
jd1923
-
Posts
1,424 -
Joined
-
Last visited
-
Days Won
54
Posts posted by jd1923
-
-
1 hour ago, Dennis and Melissa said:
I got the floor with my old sleeping bag.
Reads like a great time for all! Thanks for sharing your start-up adventure though all these pages. Love every bit of it, except maybe the line above! I'd be feeling every sport I've played, every maintenance job I worked and all related arthritis and injuries. In our family, our son is good on the floor! God bless.
-
 1
1
-
-
3 hours ago, Geronimo John said:
In addition to the much greater braking capability of the 5.2's, are the bearings larger as well?
Got to be, going from a 10" to a 12" drum. The spindle should be beefier too. There is more braking force in the larger drums & shoes, so everything must handle greater force. Sure @MAX Burner will confirm.
Big investment, new axles, leaf springs, wet bolt/sleeves kit, shocks, am I missing anything? It doesn't make sense to me to do one w/o doing it all and at the same time. I may just have to start hoarding parts as I can and wait for the right time!
GJ at least you already had a Houghton AC upgrade and I need to do that too! Hmmm, what will be first? I'm starting with plumbing fixes, rerouting furnace ducts, install the new bath fan already purchased and a half dozen other tasks, which need my labor and not a whole lot of up front $$$. It's going to be a fun Ollie summer and I have 3 weeks off starting June 15th to get started!
-
I know Wildpeak tires are a favorite brand of the 4Runner/GX offroad crowd. Would not have thought of them for LT trailer tires on the Oliver. The tread has a solid rib pattern for towing though - Nice!
-
 3
3
-
-
5 hours ago, rideandfly said:
John,
Added state, hull #, tow vehicle, and first names! 🙂
Bill
Thanks Bill, for leading by example! 😂
-
2
-
-
On 5/19/2024 at 3:27 PM, John Dorrer said:
Thanks to the Forum elite (at the Rally) for trying to figure out why the fan didn't work. It will be going into Ford when we get home.
Does it not turn at all? The blower motor has a dedicated fuse. A blower can go completely dead yet uncommon. If you have only one speed, then it's the external resistor and not the blower motor.
The fan on our TV was making squealing noises on our last outing that would change pitch with the 3-speed fan switch selection. I pulled it and it made the same sound when bench testing. The Dodge OEM is a $280 part retail, so I tried 2 Amazon aftermarket motor/fan assemblies, and both had issues. Tried Amazon since returns are easy.
Today I thought to clean the OEM fan and motor, manufactured by Denso (A+ quality). A cloud of black dust blew out of the motor housing through to cooling port (23 years in the desert and 162K miles). Cleaned the fan. It turns with so much more power than the brand-new aftermarket item. No more squeals at any speed and it's reinstalled (under dash on passenger side, rear screw is a PITA, Ford likely the same location).
Hopefully you tested the blower fuse with your buddies at the Rally. Your truck is long out of warranty, so be ready to pay $400-$600 at the dealer for a new blower installed. Car guys on the forums use the term "stealerships!" I only go there when under warranty or to pick up parts ordered online at a discount. Ford has a good system to buy online by VIN# and pickup at your choice of dealer location with no S&H costs. And always have a good local independent service shop for better price and service.
-
1
-
-
Every time I read a post, new members introducing themselves, or someone with an issue or question, my first thought is, "where are they located?" We all have interest in location, or we would not be interested in RVing! Those of you with the colored maps in your signature are certainly into this.
My semi-retirement job is online learning for PMP certification. During class introductions, I always ask, where are you located? City/state in the US, Canada or where else in the world?
Being a member of many forums, I always have Prescott AZ in our signature. For us, Chris & John, it means if you're traveling through the SW, PM me come visit for a few days and stay a while in the greatest small city in Arizona. We would love to meet you!
For example, for over 15 years we were members of the Chrysler 300 Club International (I had restored our '59 300E during that time). The club published a member book, with complete contact info. Members could opt out, but rarely did. Members cruising these old cars cross-country could contact others for a visit. We counted on each other when needing help in a breakdown situation. I once delivered a spare part I had on hand to a member in distress, stuck on the shoulder of a nearby highway. Without my help, they would have needed an expensive tow and be stranded for a week or so to acquire such an extremely rare part. We became good friends.
Location also matters in our repair topics, sometimes as much as hull #, really. Location determines climate (hot & humid to cold or dry), altitude considerations, east/west or north/south, coastal or inland all has different considerations as much as camping style. We just parked our Oliver for the summer as many of you just pulled yours out of winter storage!
All members on our Oliver Forum have a profile page and a signature. Location is a field on the profile but if I was to guess only 10% of you have entered your location. I understand we must be careful in this day, but City/State is not asking your SS# or even your street address. For example, @MAX Burner's signature states, "the Great Southwest." In communication we realized we're just 6-7 hours away, northern NM to Central AZ, a relatively short distance in the west. We now have mutual open invitations. I learn to trust the members here, who put their gut emotions into helping others on our forum.
Just a suggestion, but I for one would love to see your location posted on your profile page and signature line! And again, please PM me when traveling across our great state.
-
2
-
5
-
-
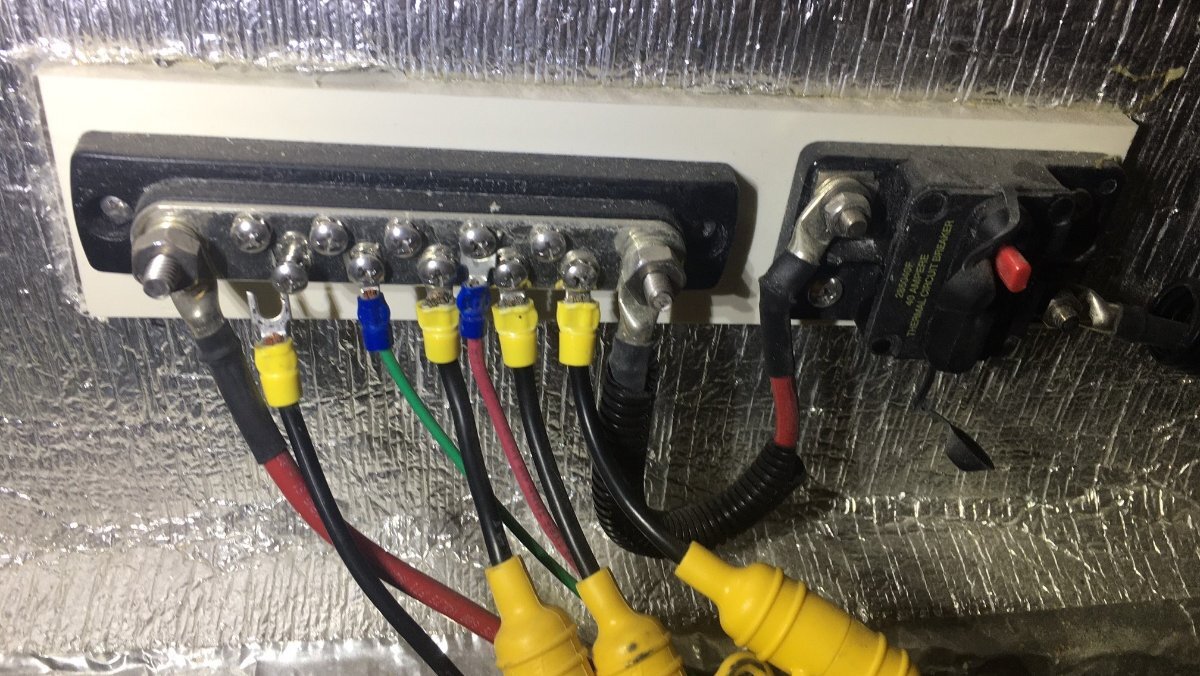
Just remembered how I tested the black 12V wire. No TV connected, just check at the plug. Use a voltmeter or 12V test light and connect the black 12V to the ground at the plug. It should show the voltage of your house batteries (light ON). Disconnect the black wire on the busbar, as shown in the picture, to produce an open circuit and it should read 0V (light OFF).
Remember whenever the 7-way plug is inserted into the TV, you always have this connection. Current will move either direction, from high potential (voltage) to low. OTT recommends removing the 7-way plug whenever parked for a period of time, certainly when camping overnight. I do not want to do that, as we often stay hitched and what if you forget? Less setup/tear-down checklist items the better!
One evening prepping dinner, our fridge somehow got switched to DC. Operating that panel is NOT straightforward! I woke at sunrise to find our 450AH LA house batteries down to 63%! Sure glad the TV starter batteries were not affected, or we would not have been able to break camp and drive off that morning! We also want to switch to DC when towing. This time we had to pull away with LP on. I have our black wire always disconnected, labeled and taped below to the insulation of another wire so not to hit ground. Our solar generally produces enough +Amps to cover the need, or when cloudy we arrive at 94% +/-.

-
1
-
-
Congrats! and please stop being shy.
Hope to meet you at a rally. We're one year in on a pre-owned and looking forward to meeting many members soon. Just an idea...
-
1
-
 1
1
-
-
6 hours ago, DavePhelps said:
So the black wire you disconnected is the charge wire from your 7pin plug?
Multimeter showed 14.51 V at the busbar. I didn't disconnect the black wire from the buss...
Since my batteries are now 9 years old, I may get them load tested...
Also, while checking the 30A in line blade fuse that protects the wiring for the refir's DC heating element, it pulled out broken...
In the meantime, I'm learning a lot about my electrical system!
I'll parse your Qs one at a time...
You should really disconnect that wire. I forgot where I connected to ground but be certain that it's on/off connecting the 7-way plug. It's hard to know in the complex Oliver wiring systems that you are not getting feedback current.
The 14.5V reading shows you have a secondary power source still connected unless you had the truck running as only the alternator could achieve this voltage. Check voltage at the truck battery and you should see closer to 12.6V (or more just after charging) on a good lead-acid starter battery.
Addition: in your next post you wrote, "That black wire tested 12.8V with my engine off and 14.5V with engine on." Now you got it, this is perfect.Wow, 9-year-old LA batteries! Load test? Maybe just replace them. First rule in any automotive electrical issue is starting with good batteries. Prior owner replaced ours 2-3 years ago with LA again. I would not want to travel far from home with your house batteries as it gets expensive to purchase batteries just anywhere. I'm assuming LA batteries on a 2015. If LiFePO4, you may have some life. If not, perhaps it's time for the LiFePO4 upgrade. Check our Epoch batteries.
Now I'll learn from you on this one. Where is your 30A inline fuse for the fridge? BTW, the 3 inline, yellow-jacketed fuses in my pic are for the 3 levelers which draw considerable current.
With each issue and upgrade, we all learn more about our Oliver electrical systems! Problem is OTT changed things at will year to year, if not hull to hull. More standardization on the newer hulls. There are no schematics and the closest electrical diagram I've seen is for a 2018.
Another BIG obstacle is having electrical components the length of the streetside basement, with the pantry and hull below blocking access and vision to make sense of the whole thing. I added the EMS that was not optioned on ours and learned a bit from that. I'm only one year into this (Chris' Birthday, June 7 will be our anniversary)! I believe when I upgrade to LiFePO4 in a year or two, I should have most of it figured out. Sure will, when I upgrade our inverter too. 😂 Glad I could help!
-
1
-
-
23 minutes ago, mgbtom said:
We are looking forward to seeing everyone at the Rally. Please add us to the list of attendees. Tom and Debbie Mohan, Hull# 071, site #70.
All the Best, Tom & Deb.
At first glance, I thought that's our campsite!? We're Hull #113, site #71. Happy to be your next-door neighbors for what should be a great rally!
-
2
-
-
Good plan on tightening the shocks. First I heard of this model Monroe still holding pressure, especially when looking like that. Mine looked much better (AZ trailer) and 3 of 4 were totally shot and the 4th barely holding on. Too bad I did not know of the Bulldogs last fall. Your leaf springs, at least what's showing in the pics look nicely arced in very good shape.
-
2
-
-
19 minutes ago, John Dorrer said:
If the cracks are bad, you could take to marine place and have them repair the fiberglass. Just an idea.
Or repair it quickly yourself! Artist not required to fill and drill 4 holes.
-
1
-
-
The other thing we do is to keep heavy pans and kitchen utensils in the lower drawers and in the back of the drawers. Again, no problem ever on ours and check out this route! From 5400 FT at home to 1960 FT at the campground, twisties for 90 miles on a narrow 2-lane hwy. Do you want a Band-Aid or to correct cause? Last trip to UT, I hit 3 bridge seams too fast on one highway and the Oliver literally bounced, I cringed each time, but nothing was amiss inside. Just sayin'.
-
9 hours ago, JRK said:
Tired of having to use duct tape to hold the drawer closed.
Duct tape? Hope you're kidding. I never want to do the tedious strap mod on ours. We had one drawer doing that and found out it needed a new slide latch. This is the part, very good backup parts to have btw considering the price: Side to Side Adjustable Locking Device for 563/569 Series Blum Tandem Drawer Slide - 2 Pair (4 Pieces) with Installation Screws - Amazon.com
Since the repair we've never had drawers opening and the roads out here can be bad, even after 25 miles of washboard dirt roads. Have you checked your suspension for any issues? Is your tire pressure set BELOW 50 PSI MAX? Run ours anywhere between 42-46 depending on temp and altitude. Common cause for any interior cabin disarray is certainly running tire pressure too high.
-
1
-
4
-
-
13 hours ago, DavePhelps said:
Thanks Galway Girl, but my system is much different from yours...
Dave, our hull may be closer to yours, #107 vs #113. I actually disconnected mine since we stay hitched on many single overnights and when boondocking on a mountain site for safety. Don't want to drain the TV! Generally, our solar covers the amp draw of our fridge on DC or at times we could use about 6% while driving a longer day.
Check the pic and look for the black wire disconnected on the left. Of course, test for voltage with and without connection to the TV or other 12V source. No 12V here and it might be hard to find along the path. First thing I would check is to open the 7-way connector on the Oliver side and see if you have continuity front to back. These connectors often get fried from corrosion. Sorry for the delayed response, just finished a busy week.
-
1
-
-
Ours is Furrion, front and streetside, and look to be original. I had to replace my streetside receptacle due to the threaded plastic portion had cracked into pieces. I used the wood screws supplied since I had no cracking and they snugged nicely. I certainly agree with machine screws and Nylock nuts, but harder to reach under the dinette and behind the EMS, etc. The front one is a no-brainer as the back is visible with doghouse removed. The part was $160 or so on e-Trailer.

-
3
-
-
6 hours ago, rideadeuce said:
The VHB metal discs are permanently applied, but the magnetic rubberized feet on the mount make it removable for land mount or cleaning/waxing.
So, if you were to land mount, for example when trees are over the Oliver, do you have an additional long cable, external terminal and a stand for it? Would be a pain to remove the rooftop cable.
Another Q: what is the model of your thin solar panel? Link? Is it connected at the junction box for the stock panels? I could envision two of these left and right angled some to better catch the winter sun.
-
1
-
-
I asked this question on a mod thread, "Does anybody know a good fill product for screw holes in fiberglass?" This is an important subject, so I started a new discussion. And thank you @aaronorange for suggesting Marine-Tex Epoxy for this purpose. MARINE-TEX® EPOXY PUTTY - ITW Performance Polymers
I have witnessed at least a dozen threads here where members have replaced shore power or solar terminals, and many other items screw-mounted where the screws have cracked the fiberglass. Many have just remounted as-is or used larger screws, into the cracked hole. If the screw hole is cracked, a proper repair would include filling and redrilling the hole.
Our hull needs so many fiberglass repairs that I will work this summer. With all of my automotive experience, "autobody" has never been a strength. Never owned or repaired a fiberglass boat either. I have two 3/8" holes in the interior hole from removing the original TV mount. There is a small hole in the front made by a stone and a blemish behind the AC which looks like somebody banged it with a tool. I will remove the Dish Satellite and OMG the amount of damage OTT created in installing the dish is crazy.
I like the Marine-Tex suggestion as I have learned that ITW also produces Permatex, a trusted product line that I have used in automotive work for 3-4 decades. I would also like to learn from your experiences and more about "how-to?" Besides suggested products, what are best practices in fiberglass repair work. Thank you for any advice you can provide!
-
1
-
-
1 hour ago, rich.dev said:
Very nice! Is the mount 3M VHB permanently mounted to the roof and the dish is removable?
VHB to the mount is pretty much permanent. @rideadeuce has used the term "semi-permanent" here and his earlier install thread. Why not permanent? To remove the dish, you have to climb up there, disconnect the cable and snap it off the stand. I'm not getting up on the roof of our Oliver except for installation, unless I really have to!
-
1 hour ago, ScubaRx said:
There a tons on the Oliver Trailer Owners FB page, posted by dozens of owners.
Never been a fan of FB, and after years Chris closed her account.
-
1
-
-
37 minutes ago, Patriot said:
I knew it was only a matter of time….
70 years later it’s another Chrysler Town & Country! 🤣
-
 4
4
-
-
@rideadeuce Mike, thanks for this. I might be going crazy. I could swear I wrote a comment on this Monday night after you posted and it's not here! Must have not clicked the Submit button.
Thank you for finding the correct part, as you stated, sourcing can be the difficult front work of the job. Made in USA and reasonable, nice! Question is, what was your reason for replacing the vent? For $16, I might replace mine just to remove the ugly of the old vent and Dicor on top of Dicor mess. I'm working this summer on removing all old Dicor and caulk so someday she will be ready to apply a decent shine. Your installation is clean, nice work as always. 😂
-
3
-
-
1 hour ago, MAX Burner said:
FYI: We observed our 2nd and 3rd Cyber Trucks yesterday headed eastbound on I-20 in LA -- again, on the back of a flat bed. Will report our first sighting of a Cyber under its own power whenever it occurs... HA!
Likely ran out of juice, just a few miles down the road. 🤣
-
1
-
2
-
-
5 hours ago, Geronimo John said:
It's the screws that cause cracking, not the drilling of holes when properly done. In this case, the holes were in play and the fixture was set up with holes. So, Mike pretty much needed to use the holes. However, use of SS bolts, nylock nuts and washers on the inside would likely reduce further cracking.
Agreed, the use of wood screws has cracked the fiberglass. It's very difficult with fiberglass to apply the right amount of torque to fasten and not overtighten.
I would want to fill these cracked holes, to redrill cleanly or to use VHB afterwards depending. Does anybody know a good fill product for screw holes in fiberglass? Some kind of epoxy that plays well with fiberglass.
@rideandfly's install is beautiful! OTT should consider this approach. However, there are times in installation work, where you do not have access to the back side to thread a nut.
-
2
-


Refueling Station Gone Bad....
in General Discussion
Posted
We owned a Class-A, then a C and now our Oliver, a progression of down-sizing. Never considered a 5th wheel. They just seem unnatural in some way. Think it's crazy every time I see the HUGE ones on the highway and more so on some narrow country road. The guy Art and D noticed @MAX Burner didn't learn from his first maneuver. Unfortunately, it will likely not be his last.
About 10-12 years ago we were on a cross-country move with a cargo trailer. Pulled in for fuel and for a moment I forgot I was towing. Went around the pumps quickly and too closely, then all of a sudden my brain said STOP! If I did not regain my wits, I would have hit the bollard hard and destroyed the trailer. After my heart moved back down out of my throat, whew! I slowly backed up to correct.
You know that thing we say about our Olivers? "You hardly know it's back there." This was the case with this trailer. Always remember it's back there. Chris and I say often, "Who is that guy? That's always on our bumper!"