sailorashore
-
Posts
50 -
Joined
-
Last visited
-
Days Won
1
Everything posted by sailorashore
-
I see there is a strong desire in some quarters to seal the exterior vents on the Ollie, and that is at least in part a motivator to shift from absorption refrigeration to compressor refrigeration. We have had great luck with Danfoss compressor refrigeration on our sailboats and are considering making the change. Of course on the boats the compressor was physically remote from the evaporator plate in the ice box, located in an aft sail locker. The key to efficiency and low amperage draw was being able to move the heat away from the compressor. The compressor had to either be in a very large compartment, be supported by forced air venting of the compartment, or as was the case in our installations, have salt water cooling. The question I want to throw out is this. Why seal off the exterior vents? The unit shown in John Davies photo looks like it is ideally suited for ducting hot air from the fan cooling the compressor directly out the upper vent. That would do a lot to keep the ambient temperature down in the compartment, promote efficiency, and reduce the amp draw. Why not take advantage and duct out that heat? Is there something I am missing? Please advise. John Shkor, SailorsAshore
-
Check your window shade clip screws
sailorashore replied to Townesw's topic in Mechanical & Technical Tips
Maniac: You can make the adjustment. Pull the window shade out of the clips. Lay shade frame face down on the bunk. Opposite the shade you want to tighten you will find a small spring in a groove in the frame with nylon strings tied at each end. Working with a small screwdriver and a needle (or something similar) undo the knot at one end of the spring and tighten (shorten) the string. 1/4 inch should be enough. Repeat for the string on the other end of the spring. You will be surprised at how much additional “hold” there will be. Don’t over tighten the strings or they will wear out prematurely. Good luck! John Shkor, SailorsAshore -
Cash: Since you mention both hot and cold water, I assume you are talking about water coming out of the sink faucet. If that is the case you may be having a problem with particulate matter clogging an aerator screen inside the faucet. I haven’t had my Oliver faucet apart, but have found this to be a problem in other sink faucets. Enjoyed talking with you at Lake Guntersville rally. Good luck! John Shkor, SailorsAshore
-
Fender problem with larger rims/tires and E-Z Flex
sailorashore replied to Foy_Mirna's topic in Mechanical & Technical Tips
Foy & Mirna: Assuming that the fiberglass hull is properly positioned on the frame, looks like the steel subframe assembly may have been misaligned (1-2 inches too far aft [or forward?]) when it was mounted to the aluminum frame. (I suspect that the suspension brackets are welded on before the steel subframe assembly is bolted on to the aluminum frame.) Sounds like a warranty issue. May be possible for the factory to pull the bolts and move the steel subframe assembly forward on the aluminum frame. Hope you get a good resolution. Sorry you have this problem. All of us are in your debt for your role at the Lake Guntersville rally. Best regards, John Shkor SailorsAshore -
Sheila & I had a great time at Lake Guntersville State Park & we enjoyed getting together with other Ollie owners. We would be interested in joining a fall mini-rally in Jacksonville. John Shkor, SailorsAshore
-
Carole: We had a similar problem when trying to heat the trailer with the furnace for the first time. The cure for us—On the thermostat change the fan setting from “auto” to a manual setting. With that change the AC stayed off and the furnace fired up. John Shkor, SailorsAshore
-
WeBoost Cell Booster Not Working
sailorashore replied to Commanche's topic in Mechanical & Technical Tips
We too had the issue of the lights showing all green on the cell phone amplifier, and then sometimes two of the lights going to red. When we made our repair trek back to Hohenwald this was one of the items on the “to do” list. The diagnosis, based on the instruction manual, was that there was feedback between the outside and inside antennas. The standard cure was applied, i.e. move the inside antennae a few inches and put some aluminum foil on the bottom of the compartment above. This seemed to help, but when I got back to home base the problem reappeared. So, I called the manufacturer, WeBoost, at the number in the manual. I got this from the technician I talked to: First, he had me describe the inside and outside antennae locations, and pronounced them plenty far apart. No need to fool around moving the inside antennae a few inches in any direction. Then he had me hang up and do a series of phone signal strength tests (different from the bars) with the amplifier on and off, and record the data. We talked the next day. Based on the numbers he said that I was in a strong signal area, and the booster was reducing the amplification gain because it wasn’t necessary, and showing two red lights to indicate it was doing so. The booster, he said, was working as designed, and there was nothing wrong with it. When the booster sensed a weaker cell signal it would increase the gain and show all green. What the tech told me seems to have been borne out by our experience while traveling. When we are in the weak signal boonies the amplifier shows all green and we get a stronger signal with the amplifier turned on. (The cell phone has to be within a few feet of the inside antennae to get the benefit.) When we are in a strong signal area we get red lights and no boost. Assuming that what I got from the technician is true and accurate, it would seem many of us have been misled & alarmed by reading an incomplete owners manual. The “strong signal-reduced gain” phenomenon should have been fully described in the manual. Electrons were never my long suit, so I can’t vouch for what I got from WeBoost. It might be worthwhile if some of you who are commenting also call WeBoost and see what you can find out. Be interesting to see if the story comes out the same, and learn for sure whether we are really having a problem with our cell phone signal amplifier or all is okay. John Shkor SailorsAshore -
Mark: We are among the very happy & satisfied Oliver owners. Ours is Elite II hull #217. Was everything perfect on delivery? Mostly. Did we have a few issues once we got home? Yes. Were they all fixed? Yes, but it did require a trip back to Hohenwald. (In fairness to Oliver, they would have paid for a local repair, but I didn’t have a lot of confidence in the local RV shop.) Our learning lesson was this. The usual delivery, if it was like mine, had an explanation of how things work, and a demonstration of some. The underlying assumption was that if it was installed it would work, but that didn’t prove to be the case for the water heater on propane. My belief is that a better delivery practice would have been if I had asked the factory rep to “prove” every operating system before writing the final check. If it is supposed to make hot water on either propane or electricity, let’s see it do each one. If TV sound is supposed to come out of either the TV or the stereo speakers, let’s hear from both. Will the furnace make heat? Will the AC blow cold air, or hot if called for. Does the cell phone amplifier boost the cell signal? The WiFi booster? Can the TV really get a broadcast channel. What has to change before it can show a cable channel? It might have been tedious, but would have caught some hidden issues. The learning lesson for us was that taking delivery of an Oliver is not like taking delivery of a new car. Most of us don’t live in Tennessee, and so the dealer isn’t just down the street for warranty repair. Everything needs to be operating correctly before you hook up and drive away. The further you live from Hohenwald, the more critical a thorough delivery process becomes. Would we do it again. Absolutely. We think the Oliver Elite II is the country’s truly outstanding small travel trailer, and we couldn’t be happier with ours. John Shkor SailorsAshore
-
Mike: The tank is mounted with stainless through-bolts in the same compartment as the water pump. I put it on the fiberglass bulkhead between the compartment and the inside of the trailer because there was a nice open flat space and easy hose runs. The tank has some rubber stand-offs to minimize any vibration transfer. Round bolt heads and fender washers on the aisle-way side, lock nuts on the water pump compartment side. We have the twin bed model so the bolt heads and washers are pretty much hidden under the extension for the mattress. I would still see where Oliver has put the tank--they may have come up with an arrangement you prefer. Best regards, John Shkor
-
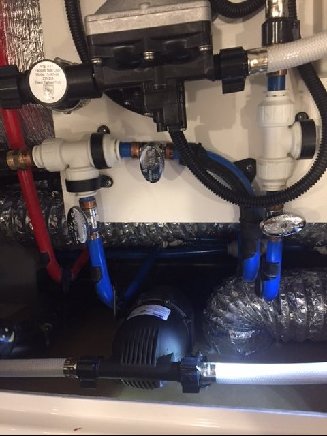
Mike and Carol: I installed an accumulator tank after taking delivery of my trailer because the pump pulsation was making a "water hammer" noise and I wanted to quiet it down. Had put accumulator tanks on boats in the past and found them a nice addition to on board water systems. Since the water pump on my Oliver was a Shurflo, I used a Shurflo accumulator tank to keep the fittings the same, Shurflo Model 182-200. When I ordered the accumulator tank I also got what Shurflo calls a "silencer kit', mainly for the extra length hoses with fittings installed to facilitate the installation. I think my installation may have been the basis for adoption of the accumulator tank in the newer models. Putting the tank in provides a pressure buffer, quiets the system, and takes the shock out of the pump cycling on and off. Pictures of my installation are set out below. If you elect to do a tank installation, you might want to get pictures of the accumulator tank installation from Oliver to see how they are doing it. As an additional thought, do you have the old style water tank connection coming off the back of the water tank, or the new style coming off the top. If it is the old style you might want to read the posts of those who had trouble drawing water from the water tank when the tank was partially empty or the trailer was nose down. In any event, good luck in finding a solution. John Shkor SailorsAshore

-
Buzzy suggested something that refers to the Oliver owner, and I like that idea. Word association put me in mind of the comedy team of Stan Laurel and Oliver Hardy. (We were certainly a happy lot at the last rally.) So the gathering could be "A stand of Ollies." The vehicle is an Oliver,...the owners are Ollies. John Shkor SailorsAshore
-
Buzzy suggested something that refers to the Oliver owner, and I like that idea. Word association put me in mind of the Laurel and Hardy comedy team. (We were certainly a happy lot at the last rally.) So the gathering could be "A stand of Ollies." The vehicle is an Oliver,...the owners are Ollies. John Shkor SailorsAshore
-
We have the macerator system and like it. The way Oliver set it up is that the black tank valve is followed by a full size slinky attachment fitting with bayonet lugs. Attached to this fitting is a 2 ft flexible slinky section that connects to the Thetford macerator. Thus if there is ever a problem with the macerator it can be worked on with the black tank valve closed and the black tank contents contained. In addition, Oliver provided a 10 ft section of slinky hose which in an emergency could be connected to the bayonet lug attachment fitting. The tank could then be dumped by gravity, without recourse to the macerator. John Shkor SailorsAshore
-
Count me as a fan of the Andersen hitch. Even though the Oliver Elite II has a good reputation for well mannered towing, I have a bit more peace of mind knowing I have the benefit of its anti-sway function. Having now towed a few thousand miles I have come to believe its greatest value to us, however, is in weight distribution. We tow with a softly sprung GMC Yukon. Getting 300 lbs or so off the hitch enables the back end of the Yukon to feel more solid, and that share of the weight shifted forward keeps the front wheels from going light when towing over the bumps. I was initially concerned about wear on the ball, but have come to accept the wear as inescapable, to be expected given the loading imposed by the tension chains, and not really a problem. I think that once the wear pattern is established the bulldog coupler and hitch ball have become somewhat "mated" and the rate of wear slows down. In any event I believe the hitch ball is covered by Andersen's lifetime warranty. (Sage--Please correct me if I am wrong on this.) Hitching and unhitching has become easy and quick with practice. In addition, having the chain brackets mounted on the center box shaft, I get the benefit of having them within easy reach for adjustment. This helps in making hitching and unhitching go quick. John Shkor SailorsAshore
-
Bulldog coupler destroys Anderson ball
sailorashore replied to John E Davies's topic in Towing an Oliver
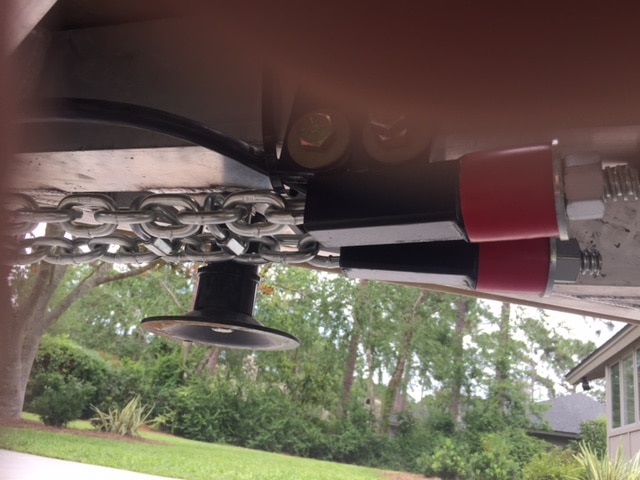
John: I have experienced a similar wear pattern as shown in your pictures, and probably have fewer miles towing than you. The wear showed up after the first 500 miles, towing with a dry ball per the Andersen recommendation. I too sent an email to Andersen, c/o Justin in customer service. His reply was in the nature of "Oh, that is normal, they all do that." Since then I have been greasing the ball, but I don't think it has helped much. The reason I can say this is that when I replaced the brake lining cone under the ball (due to excessive groaning) I rotated the ball 180 degrees to present a new wear surface. Sure enough, after the next trip there was fresh wear on the "new" back side of the ball, even though I had given it a good coating of grease. At this point I don't know which component is at fault. One could blame the bulldog coupler as destroying the Andersen hitch ball. One could also say that the Andersen hitch ball has been inadequately surface hardened. I don't know what the Brinell hardness of the coupler and the hitch ball are, but I bet some nitriding of the ball would improve its resistance to wear. I think the root cause is the use of bolt on components without a real understanding of the issues raised when they are used together. Some time ago I sent an inquiry to the folks at Bulldog and told them I would be using an Andersen hitch which by design would put an extra 4000 lb horizontal load on the coupler. It didn't appear it was something they had ever thought about, and their reply suggested that, to be on the safe side, I should use their 2 5/16" coupler rated at 12,500 lbs vice 7000 lbs. I don't know what the real solution is. Seems to me it might involve some combination of better surface hardening of their hitch ball by Andersen, and use of the 2 5/16" coupler by Oliver (which would not cost any more). In any event I have stayed calm believing that if the wear on the ball became excessive, Andersen would (I hope) replace it under their lifetime warranty on the hitch. They have been very stand up with respect to brake lining cone replacement. It might be helpful if Oliver had a conference call with Bulldog and Andersen with a goal of improving the compatability of the two components. I look forward to seeing how this turns out. John Shkor SailorsAshore -
John Davies: First, thank you for the rework of the center shaft installation method and post. The clarity of your explanation and production values of your photographs are outstanding and give the method what it deserves. It will certainly help any other owners giving this a try. Bravo Zulu. Responding to some of the comments you garnered, I did run my post on the center shaft installation in draft by Mr. Ryan Andersen to see if I had anything wrong or of concern to Andersen Mfg. He was complimentary with respect to the installation and offered only one thing in clarification. He noted that at the time they recommended (in the video I linked and quoted) compressing the bushing 1/4", they were using a bushing that was 3" long. The standard bushing is now only 2" long, so that guidance is no longer valid. I deleted reference to 1/4" compression from my final post. I believe you are correct that the anti-sway function of the Andersen hitch comes from the brake lining cone under the hitch ball. The friction it creates bleeds out sway energy and turns it into heat and in some cases some awful noise. It is not a function of the chain geometry. The belief that a "wide stance" for the chain brackets is necessary for the anti-sway function to work is something of an urban myth. As long as the triangle plate is turning along with the trailer frame, full anti-sway benefit is being achieved. Indeed, if one gets deep into the Andersen installation manual, center shaft mounting is an option they list. The Andersen installation manual encourages mounting the chain brackets so that the pull of the chains is as closely aligned with the axis of the tensioning bolts as is possible. Mounting on the center box shaft allows this to be achieved and at the same time aligning the chain tension forces with the shaft. No "sideways" component tugging on a frame element. My initial motivation in getting the Andersen hitch was to reduce the likelihood of getting into a sway situation. With a little bit of experience and a greater understanding of the Oliver reputation for good manners while being towed, I have come to believe the greater benefit is the weight distribution function. Certainly for us. Our GMC Yukon is softly sprung and the Ollie tongue weight drops the back end a bit more than 3". The Ollie tows, but the feel in the back end doesn't inspire confidence. Tensioning the chains to shift 150 lbs of tongue weight onto the front wheels gets about 300 lbs off of the hitch. (About 150 lbs simultaneously goes onto the trailer wheels.) Getting that weight off the hitch lets the rear suspension function within its design parameters without any wallow. In addition the additional weight on the front wheels helps keep them "planted" rather than unweighting when going over bumps, so there is no diminution of steering control. At least that is the theory, and in our case, I think it holds. The critical factor is getting the chains adequately tensioned, and I hope to have more on that later. I unhitch like I think everybody else does, raising the tongue with the jack to unload the chains. The center shaft mounting method doesn't change this handy method. Finally, as I said in my first post, I know the factory installation of the Andersen hitch is giving good service to a lot of Ollie owners, and this discussion isn't intended to suggest otherwise. It is intended to explore an alternative that will appeal to some. Best regards, John Shkor Sailors Ashore
-
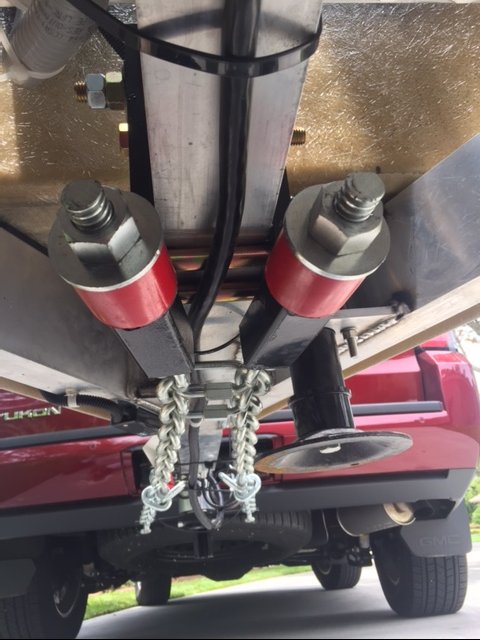
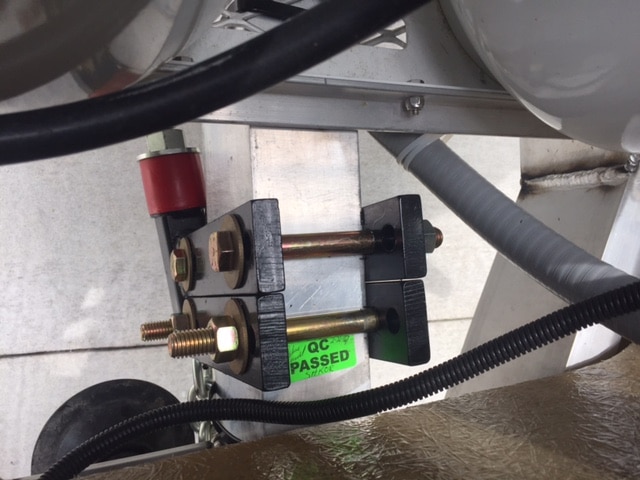
Alternative Mount for Andersen WD Hitch Attached are photos showing the Andersen WD Hitch mounted to the center box shaft of our Oliver Elite II, as described in my earlier post above. John Shkor, SailorsAshore
-
John & Sheila Shkor Sailors Ashore Alternative Mounting of the Andersen No-Sway Hitch Sheila and I have just taken delivery of our Oliver Elite II, Hull #217, and will be participating in the forum under the sobriquet "SailorsAshore." As the name implies we are lifelong sailors who reached a time when change in activity appealed to us. As trailer rookies we wanted to enjoy good handling and minimize the possibility of sway when towing with our softly sprung GMC Yukon. The Andersen no-sway weight distribution hitch looked like the right thing. I know that the Anderson hitch has been mounted onto many Oliver trailers and is giving great service. From Forum discussion and pictures, however, it appeared that there might be room for improvement. With the standard factory mounting, the axis of chain tension is not in alignment with the mounting brackets. The chains also pull somewhat sideways from the frame member on which the brackets are mounted. There are occasional reports of bracket slippage. And the force resulting from chain tension has to be carried through a number of welded joints in the frame. (The Forum contains a number of cautions about soft aluminum welds.) I wanted to see if I could come up with an alternative mounting system that might be closer to what the engineers would call an elegant solution. The chain tension required to shift tongue weight off of the hitch can be quite high. Our GMC Yukon has a 120" wheelbase and another 52" from the rear wheels to the trailer hitch ball. That is a 172" lever arm, long when compared to the 6.75" vertical distance between the center of the ball and the triangle plate on the Andersen hitch. The mechanical advantage (or disadvantage in this case) is 25 to 1. That means to transfer 150 lbs (of our estimated 600 lb loaded Oliver tongue weight) from the hitch to the front wheels, total chain tension must equal 3,750 lbs. (All numbers are approximate.) That sounds like a lot, and it is. But Andersen Manufacturing engineered the hitch to take this kind of loading. For those in doubt, please see the video at: https://www.youtube.com/watch?v=xvM7mCnqmwo. Mr. Ryan Andersen demonstrates the hitch and states "We like to compress the bushing....and that puts about 2,000 lbs pressure on the chain. With both of them they push the trailer forward with about 4,000 lbs. of force." What I wanted to find was a way to mount the chain brackets directly on to the center box shaft of the trailer frame. This location is attractive because the tension force is carried fore-and-aft solely by the center box shaft, without going through any welds. The axis of chain tension is closely aligned with both the mounting brackets and frame member. And the center box shaft is the heaviest and strongest component of the trailer frame. I first thought about mounting the brackets out in the open just behind the Bulldog coupler, but Andersen counsels against making the tension chains too short and Oliver didn't want to lengthen the trailer tongue. Instead, I found room to attach the chain brackets inside the propane locker, just forward of the propane bottles. (They could be mounted aft of the propane bottles, but that would make them harder to reach for adjustment.) A problem to be overcome was keeping the starboard chain from pressing on the tube of the tongue jack, since both would be in roughly the same plane. This was easily accomplished with two "quick links" which hold the chains closer together where they run by the tongue jack tube. This results in a slight "hour-glass" shape which does not interfere with the function of the chains or flexing of the bushings. (I have pictures showing this, but haven't figured out how to get them into the forum post. If anyone wants the pictures, send email address to (deleted) and I will by reply email.) The other thing I did was ask Andersen to fabricate the chain mounting brackets with a slight offset, which they were willing to do. This was to line up the axis of chain tension for the hour-glass shape I anticipated. Once mounted, however, it was evident that I over-estimated the angle needed for the offset. If I was doing it over I would go with a five degree offset. A potential weakness in this mounting method is that all of the tension load is carried by two brackets rather than being split between two pairs. This increases the possibility of bracket slippage, so I did two things to compensate. First, since I had to get longer bolts to span the 3" wide center box shaft, I upgraded to Grade 8 bolts. These stronger bolts enabled a bit more torque and friction. Second, I mounted the idler brackets just forward of the chain brackets to provide additional support. We experienced no slippage on the tow home and subsequent trips. Is this installation an improvement over the Oliver mounting method? Hard to say, but I like it better. At this stage it is only a prototype, and I am sure others will see possible improvements. If this catches on, however, perhaps someday Oliver will start welding aluminum cheek pieces with the right geometry onto the center box shaft. That would provide a mechanical stop to absolutely prevent slippage of the chain brackets. It would be an easy and inexpensive thing to do when the frame is in fabrication. P.S.: What a wonderful resource the forum is. Pioneers Betty & Mountainborn Harmon, video-meister Buzzy, all-things-mechanical Raspy & John Davies, and others too numerous to name, know much and have shared. Being able to draw on the accumulated wisdom of those with real world trailer experience has been priceless in enabling us to get a jump on understanding our Ollie. Many thanks from we sailors ashore to all who have contributed. # # #
-
Simon: Sheila and I have now made two trips towing our Elite II (hull 217) with our 2017 GMC Yukon. Small gas V-8 with 6 speed automatic transmission. In tow-haul mode we get 14-16 mpg in flat country, slightly less in hill country. Generally do 65 mph +/- 5 on interstates @ 2100 rpm. Plenty of power & could tow at higher speeds if desired. Tow rating 8,200 lbs. We use an Andersen WD hitch and believe it helpful with the softly sprung Yukon. Best regards, SailorsAshore
-
We stayed at the Commodore in Linden when we visited the factory last fall. Funky & fun. Where else can you take a pic beside a bigger than life bronze statue of Minnie Pearl? Just down the block is a shop that sells good organic sandwiches and, just in case you are low, ammunition. SailorsAshore
-
Losing precious fresh water out the vent on rough roads?
sailorashore replied to John E Davies's topic in Ollie Modifications
John Davies: Don't know if you have adequate access to space, but if the problem is siphoning, one possible solution is installation of a siphon break. Would need to be installed at the high point of the loop of hose and above the height of the open-to-air vent. Forespar vented loop part # 903008 (1/2") or 903003 (5/8"). Available from Defender marine supply, info@defender.com, 800-628-8225. Please let us all know how you solve the problem. SailorsAshore -
Is it possible that the mirror cracked because the closed bathroom door was subjected to unusual racking forces. You mentioned in another thread that from time to time your entrance door would stick because of frame flexing. Coincidence or possibly connected?
-
Buzzy: I wanted to answer your question as to whether you are getting full benefit from your Anderson WD hitch in the manner you are using it. I don't think you are. First, however, let me thank you for the excellent videos you have posted. As a likely prospective buyer your videos have been extremely clear and informative. The theory of a weight distribution hitch is that by creating a "turning moment," or torque, at the point of attachment to the towing vehicle, some of the weight that would normally be born by the rear axle is shifted to the front axle. Your scale numbers show that you have not yet achieved this. The loaded truck front axle weight of 3200 lbs should have gone up after attachment of the trailer and tensioning of the chains. Instead, attaching the trailer un-weighted the front axle by 120 lbs, down to 3080 lbs. The length of the lever arm generating the turning moment is the distance from the triangle plate up to the center of the hitch ball, which looks about 8" or 0.66 ft. The length of the lever arm resisting the turning moment is the distance from the hitch ball to your front axle, which I am guessing is about 15 ft. The truck lever arm is 22.7 times longer than the trailer hitch lever arm. The force applied by the tensioning chains would have to be 22.7 times greater than the force desired at the front axle. I believe you need to get the front axle weight up at least to the 3200 lbs you had when the trailer was unhitched, and I would add another 75 lbs (this is a weight shifting hitch, after all) for a desired front axle weight of 3,275 lbs. That is an additional 195 lbs of downward force on the front axle to be achieved when the trailer is attached. That would require a turning moment at the hitch ball of 2,925 ft-lbs. Given the shortness of the hitch lever arm, this would require 4,432 lbs of additional chain tension, or 2,216 lbs tension per chain. My numbers are approximate. You could work this out mathematically using accurate numbers, but you would still be guessing in that you don't know how much additional tension results from each turn of the tension nut. But there may be an easier and more accurate way. Go back to the CAT scales with a loaded truck and loaded trailer. Unhitch the trailer and weigh the front axle of the truck. Then hook the trailer back up, tighten the tension chains until they are bar tight, and re-weigh the front axle. Keep adding tension until the front axle weight is 50-75 lbs above its weight without the trailer. (Safety note-keep the front axle weight, and all other weights, under the max gross weight limits for each component.) Best regards, SailorAshore