All Activity
- Today
-
 The NOCO went up quite a bit! Mine was $86 two years ago. The new GENPRO model is now $123. The link I posted above was not working. I edited the post above and copied it here again: https://www.amazon.com/NOCO-GENPRO10X1-Waterproof-Maintainer-Desulfator/dp/B08G3M697M/ I also got a couple of these for the tow vehicle (and my Goldwing) to connect the charger without "popping the hood" or on the motorcycle, without removing side covers. https://www.amazon.com/dp/B004LWWNLC?ref=fed_asin_title&th=1 On a budget, the one Bill showed should do the trick. On Bill's suggestion, I would go that way, $45 for a 20A charger is much more reasonable.
 -
 To keep it looking new I’d just add doing a deep clean to the wheel and suspension. Wash, use the Duragloss aluminum cleaner and I recommend Griots SiO2 tire sealer. Looking for a good cleaner for the grease and dirt. Just using elbow grease for now
 -
 When I purchased my two LiTime lithium batteries I also read about charging to 100% prior to installation. It just so happened that I "needed" an additional battery charger at the time, so, I purchased one of THESE from Amazon. As JD mentions above, I needed to charge the batteries overnight in order to get to the 100% and the charger worked perfectly. For general battery charging (i.e. regular battery maintenance on the vehicles that are not driven enough) I prefer NOCO battery chargers. But, they are generally more expensive and charge at lower amps. Bill
 -
Here’s the recent settings chart. My low voltage cutoff was set incorrectly from the factory at 11.3. When I set it to 12.3 I got less simultaneous use but presumably it’s stressing the batteries less Inverter_Charger Settings.pdf
-
I don't see any reason as to why most companies continue to manufacture standard single speed compressor AC units when inverter tech is so freely available. The prices are comparable and the power requirements are 50% or less. Makes no sense to me...
-
Maintenance of D52 Nev-R Lube Axles with Alcan Springs
jd1923 replied to jd1923's topic in Mechanical & Technical Tips
Thank you, Bob! LOL, you and I both, have "done many vehicles over my years!" I've done 3 brake jobs this year alone and I want to quit having to do brake jobs around here, OMG! 🤣 Removing the drum is very easy on the Nev-R Lube axles, and no red grease mess! It's just not something to do when less than one year old with 3600 miles, as in my case. I will likely do so at 3rd inspection. Your question is a good one though, a GREAT addition to this post and soon I'll add this step to the above procedure. 😎 Remove the bearing cap, the small outer circlip and spindle nut is all it takes (more info in post linked below). One trick is retorquing the spindle nut afterwards. I got confirmation from Dexter (via Lew at Alcan), that these spindle nuts can be reused (should replace after 2-3 uses). To retorque, I would mount the wheel, lower the tire touching the ground and torque to 155 ft-lb (remove wheel again if you mount center caps). Then replace the circlip and dust cap and that's all there is to it. -

Maintenance of D52 Nev-R Lube Axles with Alcan Springs
2008RN replied to jd1923's topic in Mechanical & Technical Tips
Looks pretty good to me, Combines both the greasing wet bolts and physical inspection of operations and rough cleaning without remove the drums. I have never removed a drum with sealed bearings, I have done many vehicles over my years that have the old style tappered bearing. How easy is it to pull the drums of the Never-lube bearings (sealed bearings)? Even if everything looks good physically at some point the drum needs to be removed to check wear of drum and brake shoes. The nice thing with normal vehicles that have sealed bearing they have brake calipers, pads and rotors, being able to check everything with external inspections. -
Bob, IMHO this is unnecessary. I assume your Oliver converter (charger) is setup or will be reprogrammed for LiFePO4 batteries with Epoch charging specs. Just install them (they come at 50% SOC), plug in and charge overnight to 100%. Want a portable charger for all battery types? I got this one 2 years ago and have used it on all our vehicles when needed. Keep in mind, this is only a 10A charger. But more amps means much more money! 🤣 https://www.amazon.com/NOCO-GENPRO10X1-Waterproof-Maintainer-Desulfator/dp/B08G3M697M/ Our Victron Inverter/Charger can charge up to 120A. It can add 20% SOC to a 600 Ah battery bank in one hour! The 10A portable charger will take 12 hours to add the same 20%.
-
I am getting close to upgrading to the epoch essentials 300AH. Planning on 2 batteries. Seems like they fit the batteries slide the best. I have a question. I was reading about when installing multiple lithium batteries they said all should be charged up up completely before the installing. Meaning each battery is completely full. I do not have a Lithium stand alone battery charger. So I got to thinking should I buy a separate battery charger for lithium batteries? Do I go with the Epoch that is only designed for epoch, or is their other good lithium charger that would work? I feel like an infant when dealing with all of the different manufacture specs for chargers. Epoch charger looks like it would only fit an epoch battery and nothing else. Thanks everyone, Bob
-
Thanks for the info. FWIW I’m only interested because I went through a battery recall on my Bolt EV. Very similar situation actually, like the water heater the affected cars was small, a few percent at best (same here according to the report), and fault too was with a supplier - LG in this case. They didn’t do quality control on the cell tab alignment. A couple cars caught on fire and rather than have a PR disaster GM took it on themselves to replace all the batteries. And there too there was a parts supply issue, not surprising when suddenly there’s an order for thousands of new batteries (or water heaters). GM took a write off of a few billion for that one. The best measurement of quiet is your ears in a side by side test. The RMS noise meters (I have one) are useless for this as they just measure overall averaged dB, not things like spikes or variation (very annoying) or frequency content (high frequencies are much more annoying compared to low). The ear knows what bothers it. Listening to my Truma now, the fan is just fine, wouldn’t mind a little slower blower to drop a few dB but it sounds like white noise you’d use to go to sleep to. The main thing is the roof compressor has a mid band edge to it (sounds like “urhhhhhhhh”, its around a G below middle C so not high around 200 Hz maybe). Not loud or super annoying but that’s the worst part, if that could be reduced it would be hard to argue with.
- Yesterday
-
See page 2 of THIS thread (i.e. back 1 page) and it is the 12th post down from the top. While I'm confident that your research regarding who actually pays for recalls, it should be noted that the original design work relative to Oliver using the Truma water heater was studied and approved by Truma. As I understand it, Truma refused to order a recall when the problems with the water heater became apparent and claimed that there were no similar issues with this water heater being installed in other RV's. Therefore, Oliver took it upon themselves to take care of the problem without any monetary assistance from Truma. Then, after Oliver took this step, repair parts availability from Truma became another source of issue (i.e. repair parts were very difficult to come by even though in the interim Truma redesigned the water heater in order to "correct" the very issue that was causing the recall. Bill
-
What did you replace the blinds with? Very generous of you.
-
Scanned the recall posts, not sure of exactly the part your referring to but searching I did find that Oliver had their own NHTSA recall due to this, which means they have to pay the costs (see below) I was curious so I did a little digging. Apparently (this could be faulty information), in the event of a RV recall, the RV OEM is required to pay all costs. Looking at NHTSA rules it looks like it applies to RV’s equally with automobiles If true it’s the cost of doing business. 🤷♂️
-
I care less about the looks than the aero. Granted this truck doesn’t care so much about aerodynamics, it’s not the old days of EV’s anymore, but it’s part of the culture now. Just like the “0-60” is part of the ICE culture. Outside gubbins really kill aerodynamics. I’ve got some aero ideas for the Ollie I’d like to try someday. I like the metal plates (they are metal right?) of the water/air heaters on the side. Not fond of the plastic Truma plate. Anyhow back OT - do the new trailers still have the switch plate near the door? It would be a mistake to drop that. Jason showed in the video how you can monitor and toggle individual circuits “without having to flip a breaker”. That’s of limited use I think, who turns off circuits via breakers? But for them will probably eliminate a bunch of production steps. Now it’s just run the wires to the control box probably and no breaker panels. But it’s also single point of failure. I had both my composting fan and CO/LP detector go out. It was an easy fix dealing with the issues as it’s all physical. The Ecoflow ‘Smart Touchscreen’ was released in Summer of 2022, probably wasn’t really available until the next year. So it’s only been a couple years on the market, not a lot of track record yet.
-
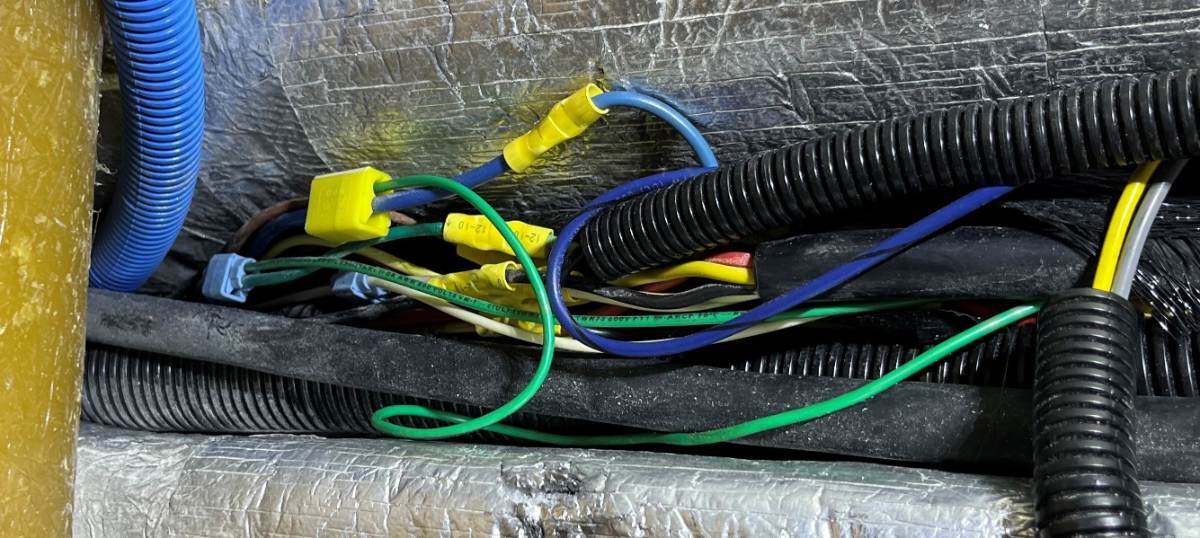
Drying it out is a temporary solution, as it will get wet again no doubt! I would be replacing the 7-blade plug on the Oliver. These plugs are not real easy to wire, as you have to cut the wire short enough to fit inside the plug. Make sure to cut the cable back a couple inches to strip and bare all new copper ends. I replaced ours as soon we purchased our Oliver used. For a waterproof installation, install a new complete cable, like this one from eTrailer: https://www.etrailer.com/Trailer-Wiring/TowSmart/TS74RR.html This would certainly be more work (so many are afraid of work these days 🤣)! But it's something that will last. Not sure on your hull, but in our hull the trailer wire is split up under the front dinette seat (picture shows trailer cable and all 7 wires connected to various Oliver circuits).

-
I recommend reading this thread. While the hard reboot wasn't the ultimate solution, you should check the end of the thread for information about changing settings on the inverter. I agree that it's more of a temporary workaround than a true fix. I experienced a similar issue when running my microwave on battery power, and it seems to affect only certain recent model years. You didn't mention your OTT's year and model, so I'm not sure if you're included in that range.
-
My wife Chris said, "The sound on this A/C is soooo quiet! I can't see it any taller from inside, so who cares?" I think it looks just fine up top (function over form) and would not want any Dometic A/C product ever, or Truma for that matter, with no aftermarket support and warranty issues with something like owner installation of a Soft-Start. BTW, Soft-Start should be inherent to the design, like it is on variable-speed or inverter A/C units (not after-the-fact with Truma service costs). I've heard the quiet Atmos/Tosot and they are quiet. The Chill cube is quieter, while using half the power. It's the height of this unit with huge evaporator fan, that creates its efficiencies and allows for an air handler flush to the Oliver ceiling. She looks just fine! We love this product. 😎
-
That was big of Oliver. In my opinion Truma clearly had an engineering problem but didn't have the capacity to correct all the units in the field. Oliver really stepped up and backed their customers; awesome!
-
Read the post here on the Forum about how Oliver footed the entire bill for the repairs to the Truma water heaters. Bill
-
I’ll guess because it’s a high profile unit? They’re coming out with a lower rated low profile one but it’s not here yet. Seems like Oliver likes low profile
-
FWIW I’m a noise freak, super sensitive to noise. The Truma Aventa is supposed to be among or the quietest on the market according to AI. At first I was disappointed hearing how noisy it is but I forgot that ACs need to break in. Used it yesterday, it’s really good! I can sleep with this. Don’t know why they’re switching from Truma, it’s a good combination
-
Gravity or compressed air or time (in a dry place)
-

Looking for Mobile Tech recommendations in Florida
Boudicca908 replied to Boudicca908's topic in Mechanical & Technical Tips
Thank you. Much appreciated! -
How did you get the water out?
-
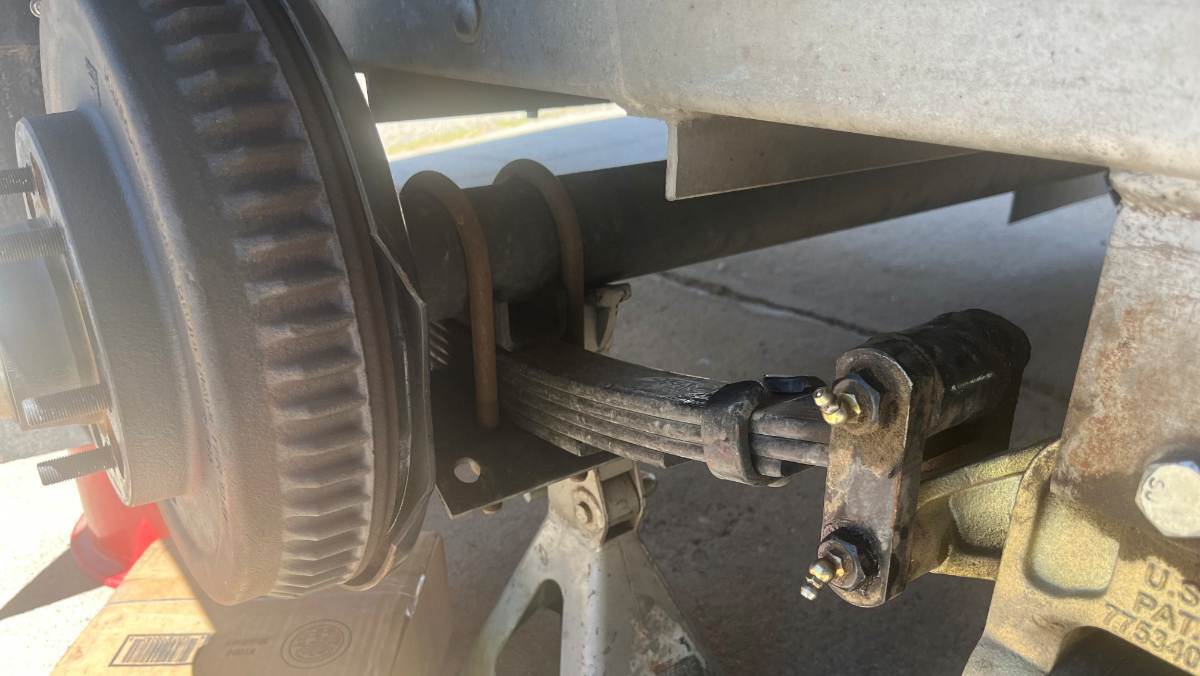
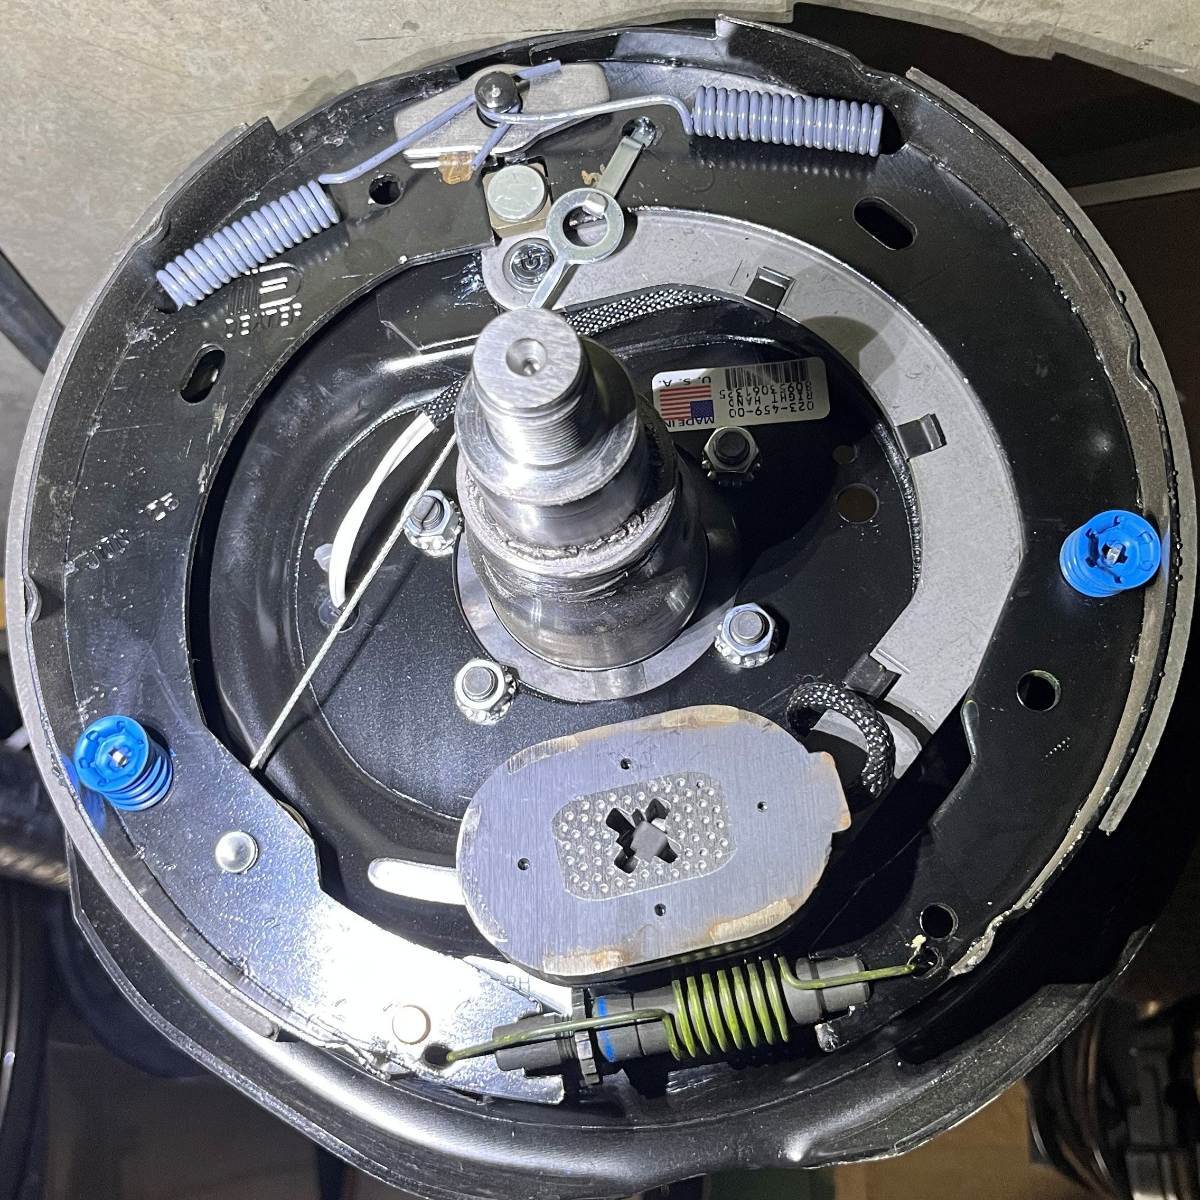
This maintenance can be completed in 2 hours (by a young experienced mechanic), or you could take most of the day, taking your time. I did the curbside yesterday and did the other side today. It's not a whole lot of work. The second side went very fast today (90 min), having the tools ready. This is just what I did and I'm sure others may do more or less. It's all the required maintenance in what makes sense to me, in my experience. IMO this maintenance should be conducted annually, or bi-annually for those who tow 10K +/- miles in a year. Following is a suggested 10-Step suspension maintenance procedure: 1) On level ground, jack up one side of the trailer, using the rear leveler jack, while the Oliver is hitched to the tow vehicle (mandatory for safety). 2) Spin each tire to see if it rolls freely. Listen carefully for any unusual sounds. Try to wobble each wheel left to right (3-9 clock positions) and top to bottom (6 - 12) to observe any free-play. There should no observable free-play with the Nev-R Lube bearings. 3) Remove the lug nuts on both wheels with impact (no impact, loosen prior to lifting). Place a jack stand under rear axle, close to wheel, for safety since your body will be under the trailer to do much of this work (see pic1). 4) Use compressed air to blow through all openings of the braking plates to remove all shoe dust from the interior of the brake drums. Wear safety glasses and stay upwind from the cloud of brake dust. Blow around until you see nothing but clean air. 5) Grease all six (6) wet bolts, plus two (2) grease fittings on the EZ Flex. Use a power grease gun if available with a LockNLube coupler attached. Add just enough grease to see it ooze from an edge. Wipe up all excess grease. A straight-blade screwdriver helps to remove old grease from recessed areas. Wipe grease fittings before and after and place caps back on (I go without caps). 6) Torque all suspension bolts to Alcan specs. 90 ft-lb for U-bolts, 80 ft-lb for the 3 end-points, 65 ft-lb on the shackle wet-bolts. Once the U-bolts set and do not need tightening, the nuts rust into place and you will not need to check again in the future (not true for the wet-bolts). I go lighter torque than Alcan specs on the wet-bolts, 70 and 58 ft-lbs which is an eighth (12%) lighter. 80 and 65 just seem high. 7) Check drag on the drums. They should contact the shoes ON and OFF when spinning (shoes installed are not perfectly round). If they do not drag at all, the self-adjuster is not tightening properly (see pic2 brake assembly, adjuster at bottom). Mine were all dragging just right on like-new axles installed Aug 2025, now at 3600 miles. There are two inspection ports on the backside. Unfortunately, there is no way to reach the gear to adjust it, due to the Oliver wide leaf/shock absorber plate. If adjusters are not working, the hub/drum must be removed, thus becoming a full brake job. 8] Pull the trailer emergency brake switch and turn the drums until they stop. Check amperage draw at each wheel, placing amp meter clamp around ANY single wire behind wheel. Amperage should be 3A +/- without much difference between wheels. My LF wheel was 3.1A (LOL, the one I hear skid when the brake controller gain is up too high)! The other three read 2.8A, the two main brake wires coming out of the streetside Oliver hull read 6.1A front and 5.8A rear. Looks good to me! 9) Remove gravel from the tread of both tires, using a thin flat-blade screwdriver, while inspecting for tread wear, tire defects and foreign objects (I do this with all our vehicles every time wheels are removed for any reason and have found many screws and other sharp metal objects in tire treads, sometimes causing slow leaks that can be fixed now vs. getting worse later on the highway). 10) Mount rims, lower hull to get rim close, making it easy to place wheel on studs. Use impact on light setting and snug up lug nuts evenly. Lower hull to sit on wheels, remove leveler blocks, and torque lugs to 90 ft-lbs. Repeat all 10 steps on the other side of the trailer. Let me know if I missed something or other suggestions! 😎
.thumb.jpg.e34bf01ef7f7d5e99ad31856d45afbeb.jpg)