Leaderboard


Popular Content
Showing content with the highest reputation on 10/30/2018 in all areas
-
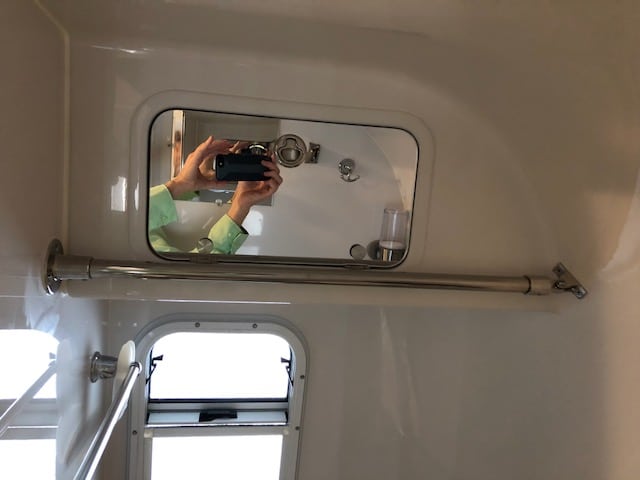
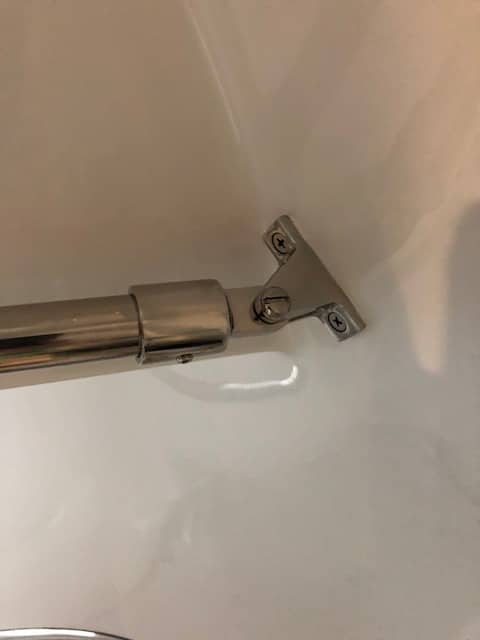
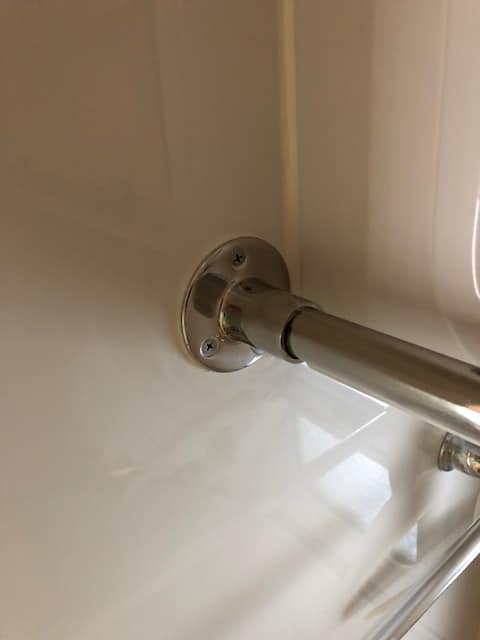
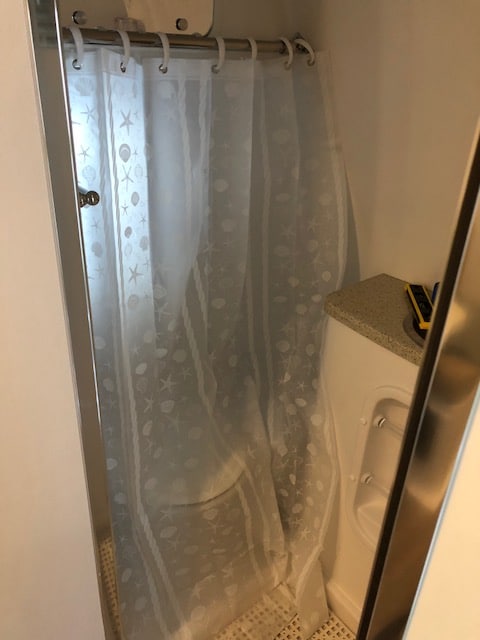
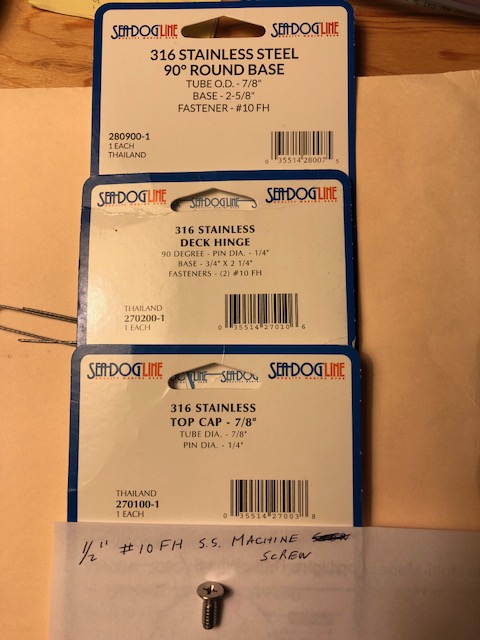
Thought I would add my completed curtain rod project. I used Overland's style so the rod would be a little higher to decrease the chance of another mark on my bald head. I drilled a 1/16 inch pilot hole, used a countersink to smooth hole to a little bigger that 5/32 inch. Then drilled a 5/32 inch hole in center of countersink. 5/32 inch is the suggested pilot hole for a # 10 machine screw. Sealed everything with 3M 4200. The machine screws worked perfect with no cracking of gel coat and everything pulled up tight.
 2 points
 -
As the cold season closes in on most of us, it is time once again to discuss proper winterization to protect all the plumbing and water systems inside the camper. First let's discuss what components are susceptible to freeze damage which would result in water leaks and potential costly service repairs. 1. Brass Check Valves – These valves are in-line valves that keep water from spilling back out of the water fill ports. These valves will be located on the Fresh Water Line, City Connection Line and the Black Tank Flush Line. 2. Plastic Check Valve – The Dometic Standard toilet has a plastic check valve located at the rear of the toilet. 3. Water Valves – These valves are used to control the flow of water. You may have 2 or 4 valves located next to the water pump, 1 located on the lower shell floor to drain the fresh tank, and 1 located on the black tank flush port line. 4. P-Traps – These are used in the sink and shower drain plumbing lines. It retains water and traps debris that has drained from the sink and prevents it from forming a clog deep within the plumbing system, and stops sewer gases from passing into the camper. 5. Water Pump & Filter – The water pump filter is used to trap debris and keep it from entering the pump and water line system that is delivered to the faucets. 6. PEX Push Fittings – These fittings are used to connect different runs of pex pipe through out the camper. Pex itself is freeze tolerant but these plastic and/or brass fittings are not. 7. Faucets – The kitchen, bathroom and external shower faucets all maintain water at the faucet when in use and thus present a potential freeze issue if not properly winterized. 8. Water Heaters – All water heaters should be fully drained of all water and the bypass valve must be set to winterization/bypass mode. This allows for RV antifreeze to be utilized in the plumbing system without filling the water heater itself. *Even when using the camper in cold weather it may be necessary to fully drain the water heater when traveling between campsites, especially the on-demand water heaters as they only hold a small amount of water that can freeze in a short period of time. *Proper winterization method to ensure that all components are protected. You can visit the following link for a walkthrough with John Oliver on how to winterize your Oliver Travel Trailer: Step by Step Methods provided below 1. Drain all water from the system (All tanks, water heaters) 2. Set bypass valve at water heater for winterization mode. 3. Change valve configuration at water pump for winterization mode. 4. Use water pump to draw RV Antifreeze (potable Safe) into the camper. 5. Turn on the kitchen faucet (Cold Line) and run until antifreeze comes out. 6. Change to the Hot line and run until antifreeze comes out. 7. Perform steps 5-6 for the bath faucet. 8. Ensure plenty of antifreeze drains into the P-Traps for the kitchen, bath and shower drains. 9. Flush the toilet until antifreeze starts to fill the bowl. Leave antifreeze in bowl to lubricate seal. 10. Turn off water pump. 11. Connect hand pump with antifreeze to the fresh tank fill connection. Pump at least 3- 4 times. Antifreeze is potable safe and will not hurt if it goes into the fresh tank. 12. Connect hand pump with antifreeze to city connection line, turn external shower cold line on and pump until antifreeze comes through shower faucet. *TIP: It will be hard to pump in the city line if the faucets are closed. 13. Turn cold line off and hot line on, pump until antifreeze comes through shower faucet. 14. Connect hand pump and antifreeze to black tank flush port. (You may have to go inside and turn the in-line valve open to allow the antifreeze to freely pump into the tank. One pump should be sufficient as we are only protecting the check valve.) For proper battery storage please visit: TIPS • The camper can be used in cold weather applications as long as the furnace is utilized to keep the components warm and above freezing temperatures. • If traveling between campsites during cold weather season it may be necessary to winterize depending on outside temperatures. • If water is left in the water heater during freezing temperatures even for short periods of time, it can cause damage. • RV Antifreeze is designed to replace water and should NEVER be mixed with water as diluting it will defeat its purpose. Oliver Travel Trailers Service: 866-205-26212 points
-
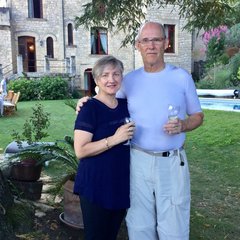
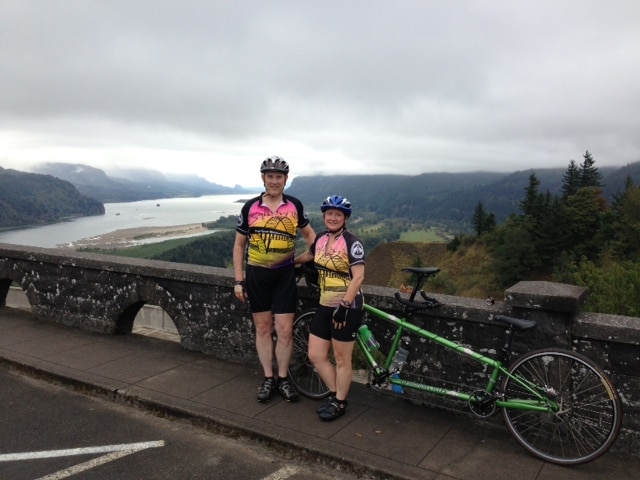
We take possession of our Oliver November 20th. To do so, we'll be driving 3 days from Portland to Tennessee, something we've never done before, and not looking forward to. We imagine 10 hours a day of driving for 6 days total will be excruciating. However, we are clear there is no other trailer on the market we would own, so here we go on this grand adventure. We are in our mid 60's, and have never owned an RV. We decided to do this because we saw it might be more convenient when traveling to ski resorts (I compete in Masters ski races throughout the Winter), National Parks and friends around the country. We imagined it might save us some time and hassle with booking accommodations, renting cars, schlepping gear, and packing and unpacking so much. We don't know this, but we love new adventures/challenges, so here we go. Donna is an exceptional artist specializing in calligraphy, water colors and creating beautiful art books, silver jewelry that includes her work with paper, and cards for any occasion. Together, we ride a tandem bicycle and enjoy attending tandem rallies in the Summer. We've taken our bike to Europe three times for 2 week tours of the Loire, Lot, Dordogne, Rhine and Moselle river valleys. We enjoy meeting and befriending new people where ever we go. We're looking forward to meeting some of you in the near future. Donna and Duane
1 point
-
Donna and Duane, I live in Portland and made the trip you are talking about when we picked up our Elite1. Let me tell you, it is a long way out there to Hohenwald TN!! Just a quick look on Google Maps will tell you that from Portland it's 2370 miles out there and another 2370 miles back. In the winter, your average speed towing, if you're lucky, will be around 50 MPH. And those are not going to be easy miles. At 50 MPH average, that is 47.4 hours of driving, and I think that is very optimistic. Potential snow/ice, rain and wind, backups, crazy drivers.... Days will also be short and you will be driving in darkness for several hours each day. I've towed in these conditions (thankfully for not very long!) and it is quite exhausting. To attempt this trip in just 3 days would be most unwise IMHO. Another option that hasn't been talked about, which is what we did, is to delay your pickup until early Spring. Our Ollie was completed about the same time yours will be, but we had them hold it for us until April, when we made the trip out to pick it up. Much better this way! And gives you time to enjoy and learn about your new trailer while taking in the wondrous early Spring throughout our beautiful country. I wish you the best of luck on your trip whenever you decide to go. Be safe! Dave1 point
-
I second what John says. I realize you are both competitive speed junkies, but honestly, towing your first travel trailer, a $65,000+ 23.5 ft rolling palace, 3670 miles in 5 days, in potential winter conditions from Hohenwald, TN to Portland, OR is not wise . . . the reasons not to do this are too numerous to mention. Google maps gave me that distance. You would need to average 734 miles a day to cover that even in 5 days. All I can say to that is AAUUgghh!! It won't be like your trip from Portland to Hohenwald, zipping down the highway on cruise control, 5 mph over the speed limit to fit in with the rest of traffic in your cool Audi Q5 3.0 TDI. No, your average mph will be significantly reduced as you (hopefully) have a lower mph and make more stops for gas and food. Even if you averaged 65 mph, which would be highly unlikely, you'd be pulling your trailer 11 hr 15 min every day. Oh, and then there is set-up and tear-down activities from the campsites to take up more time. Have you looked at the availability of RV parks along the route near the distances you must travel daily? You may find many are closed for the season do to potential freezing of their water lines. Or, are you planning to utilize the capabilities of the Ollie and boondock along the way, on this, your maiden voyage in your first ever travel trailer? Remember when you first started skiing? Did you start on the Black slopes or did you warm up your legs a few seasons on the Greens and Blues? Taking the trip you have in mind would be like starting on the Black slopes. Seeing as you both must be home by a certain time, it would be much wiser and safer to have your Ollie delivered safely to your door. I can't second John's recommendation strongly enough. Pete1 point
-
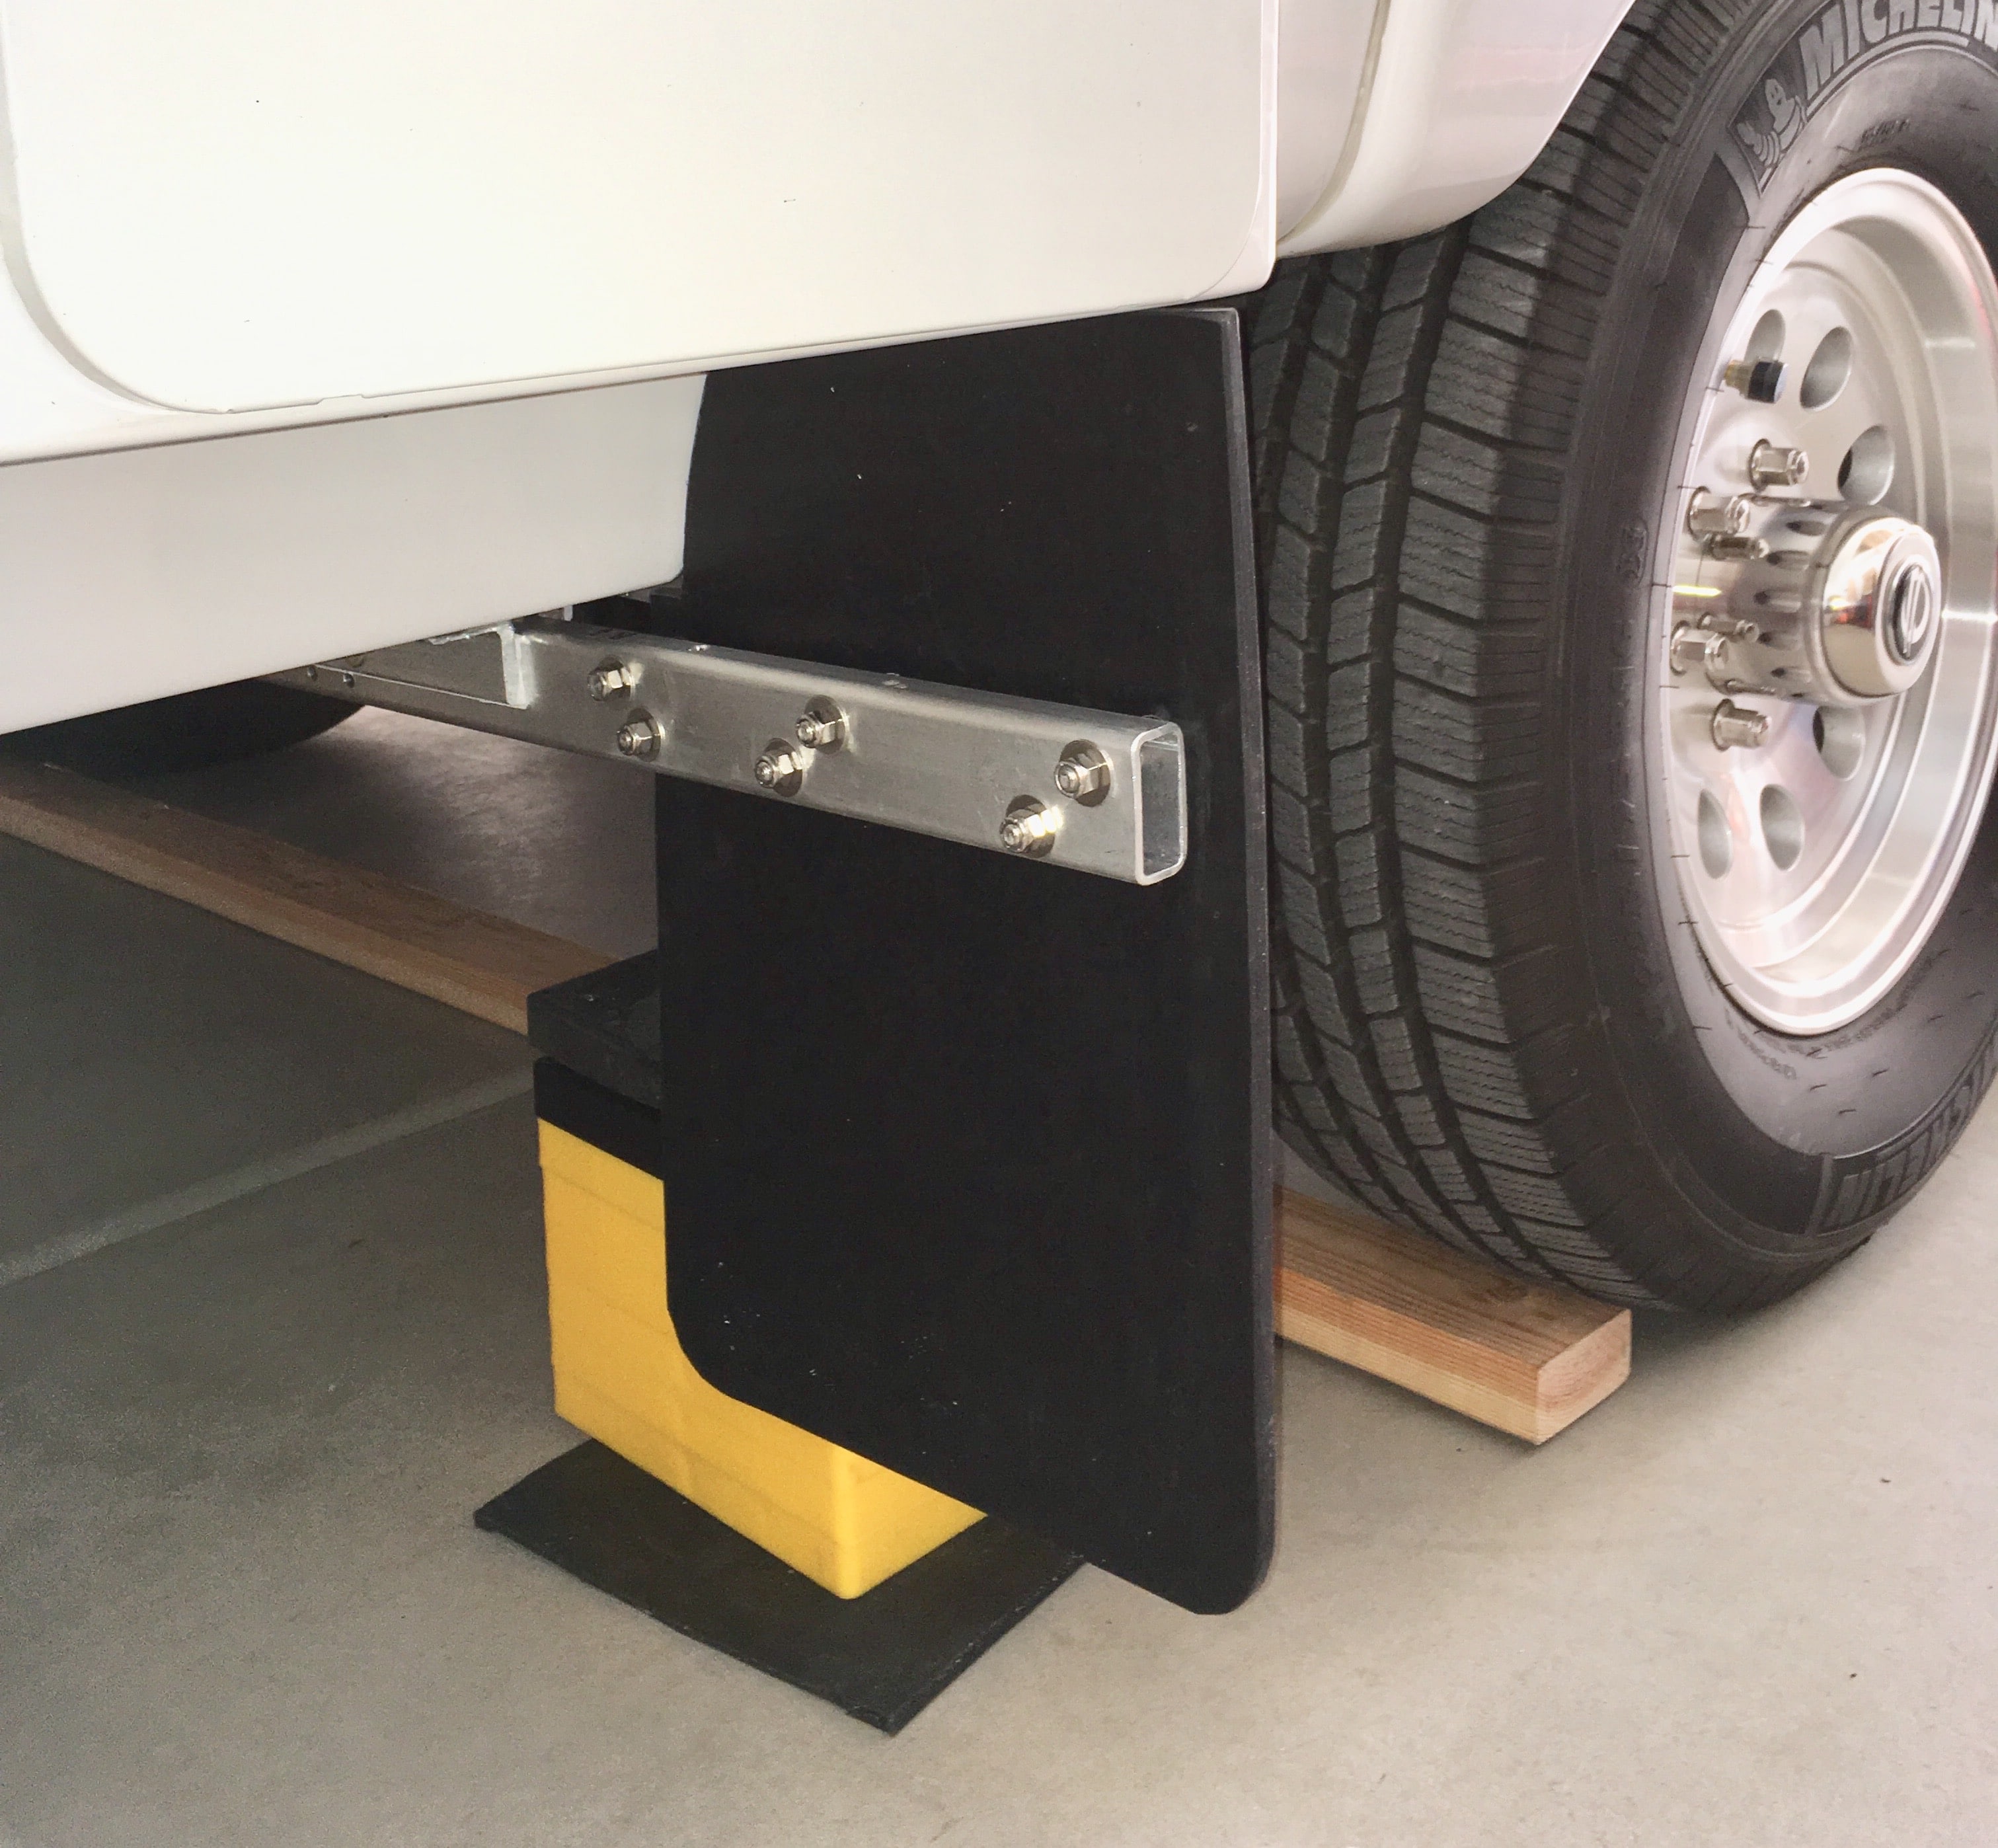
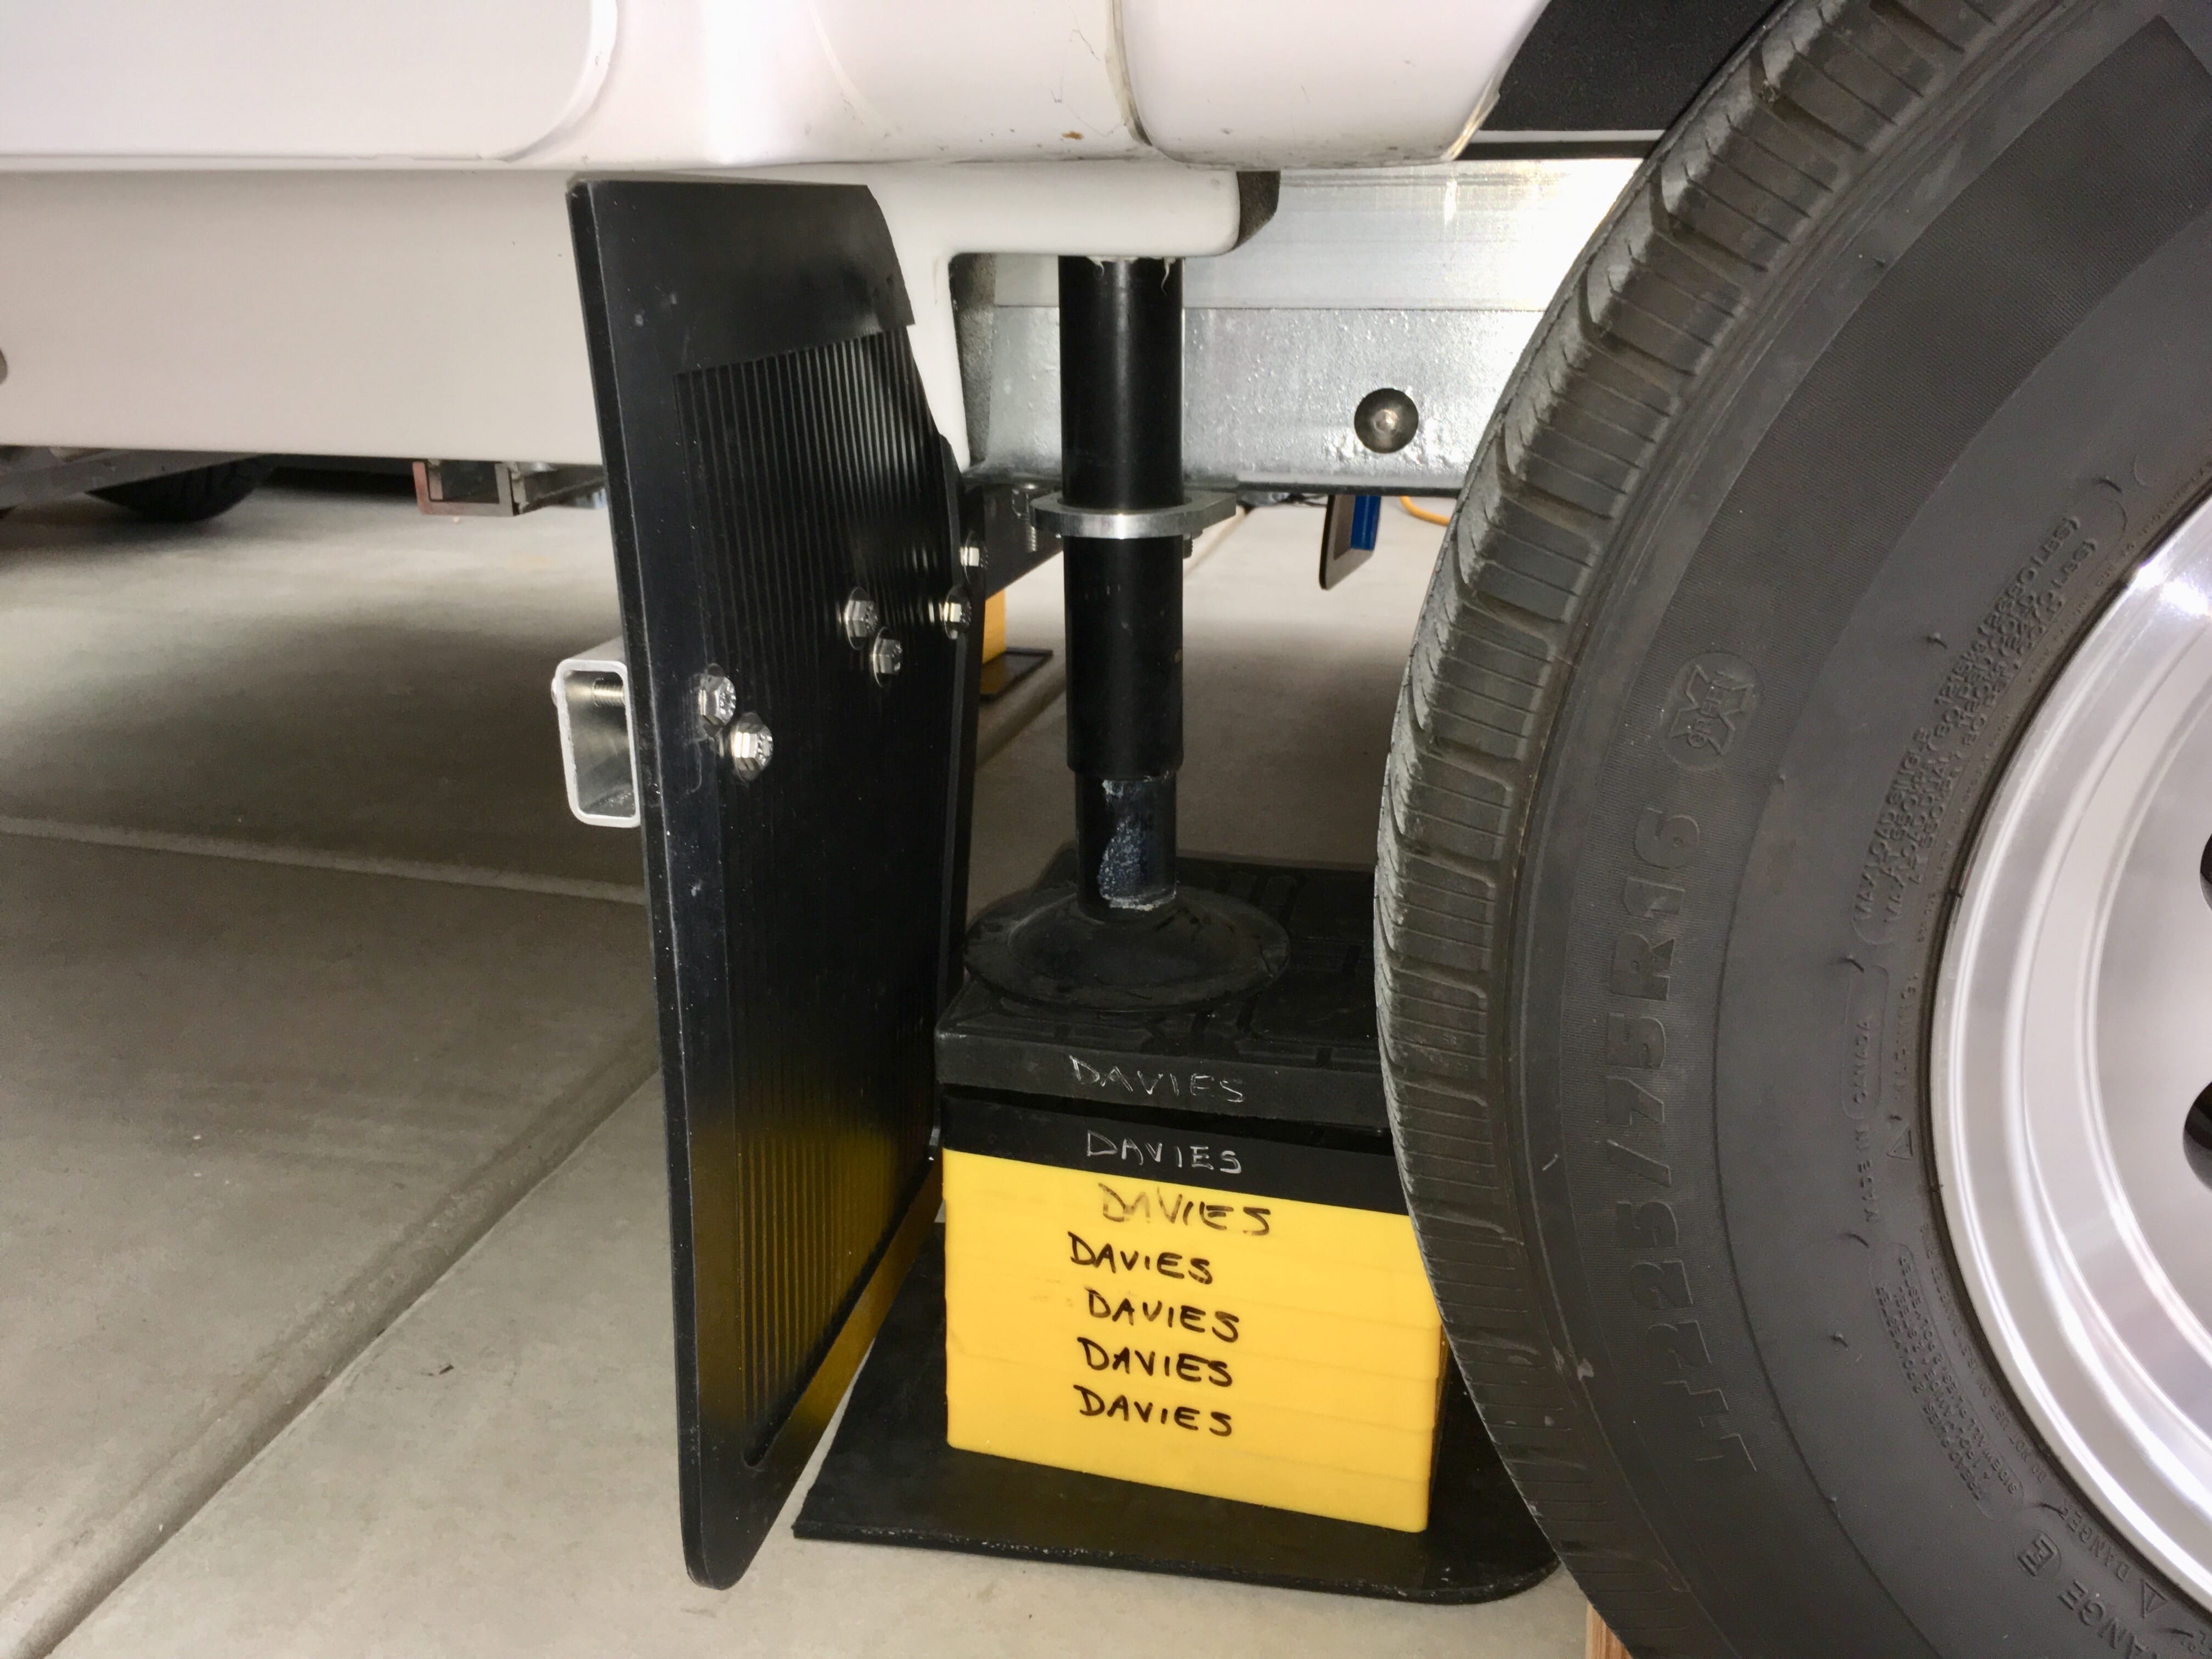
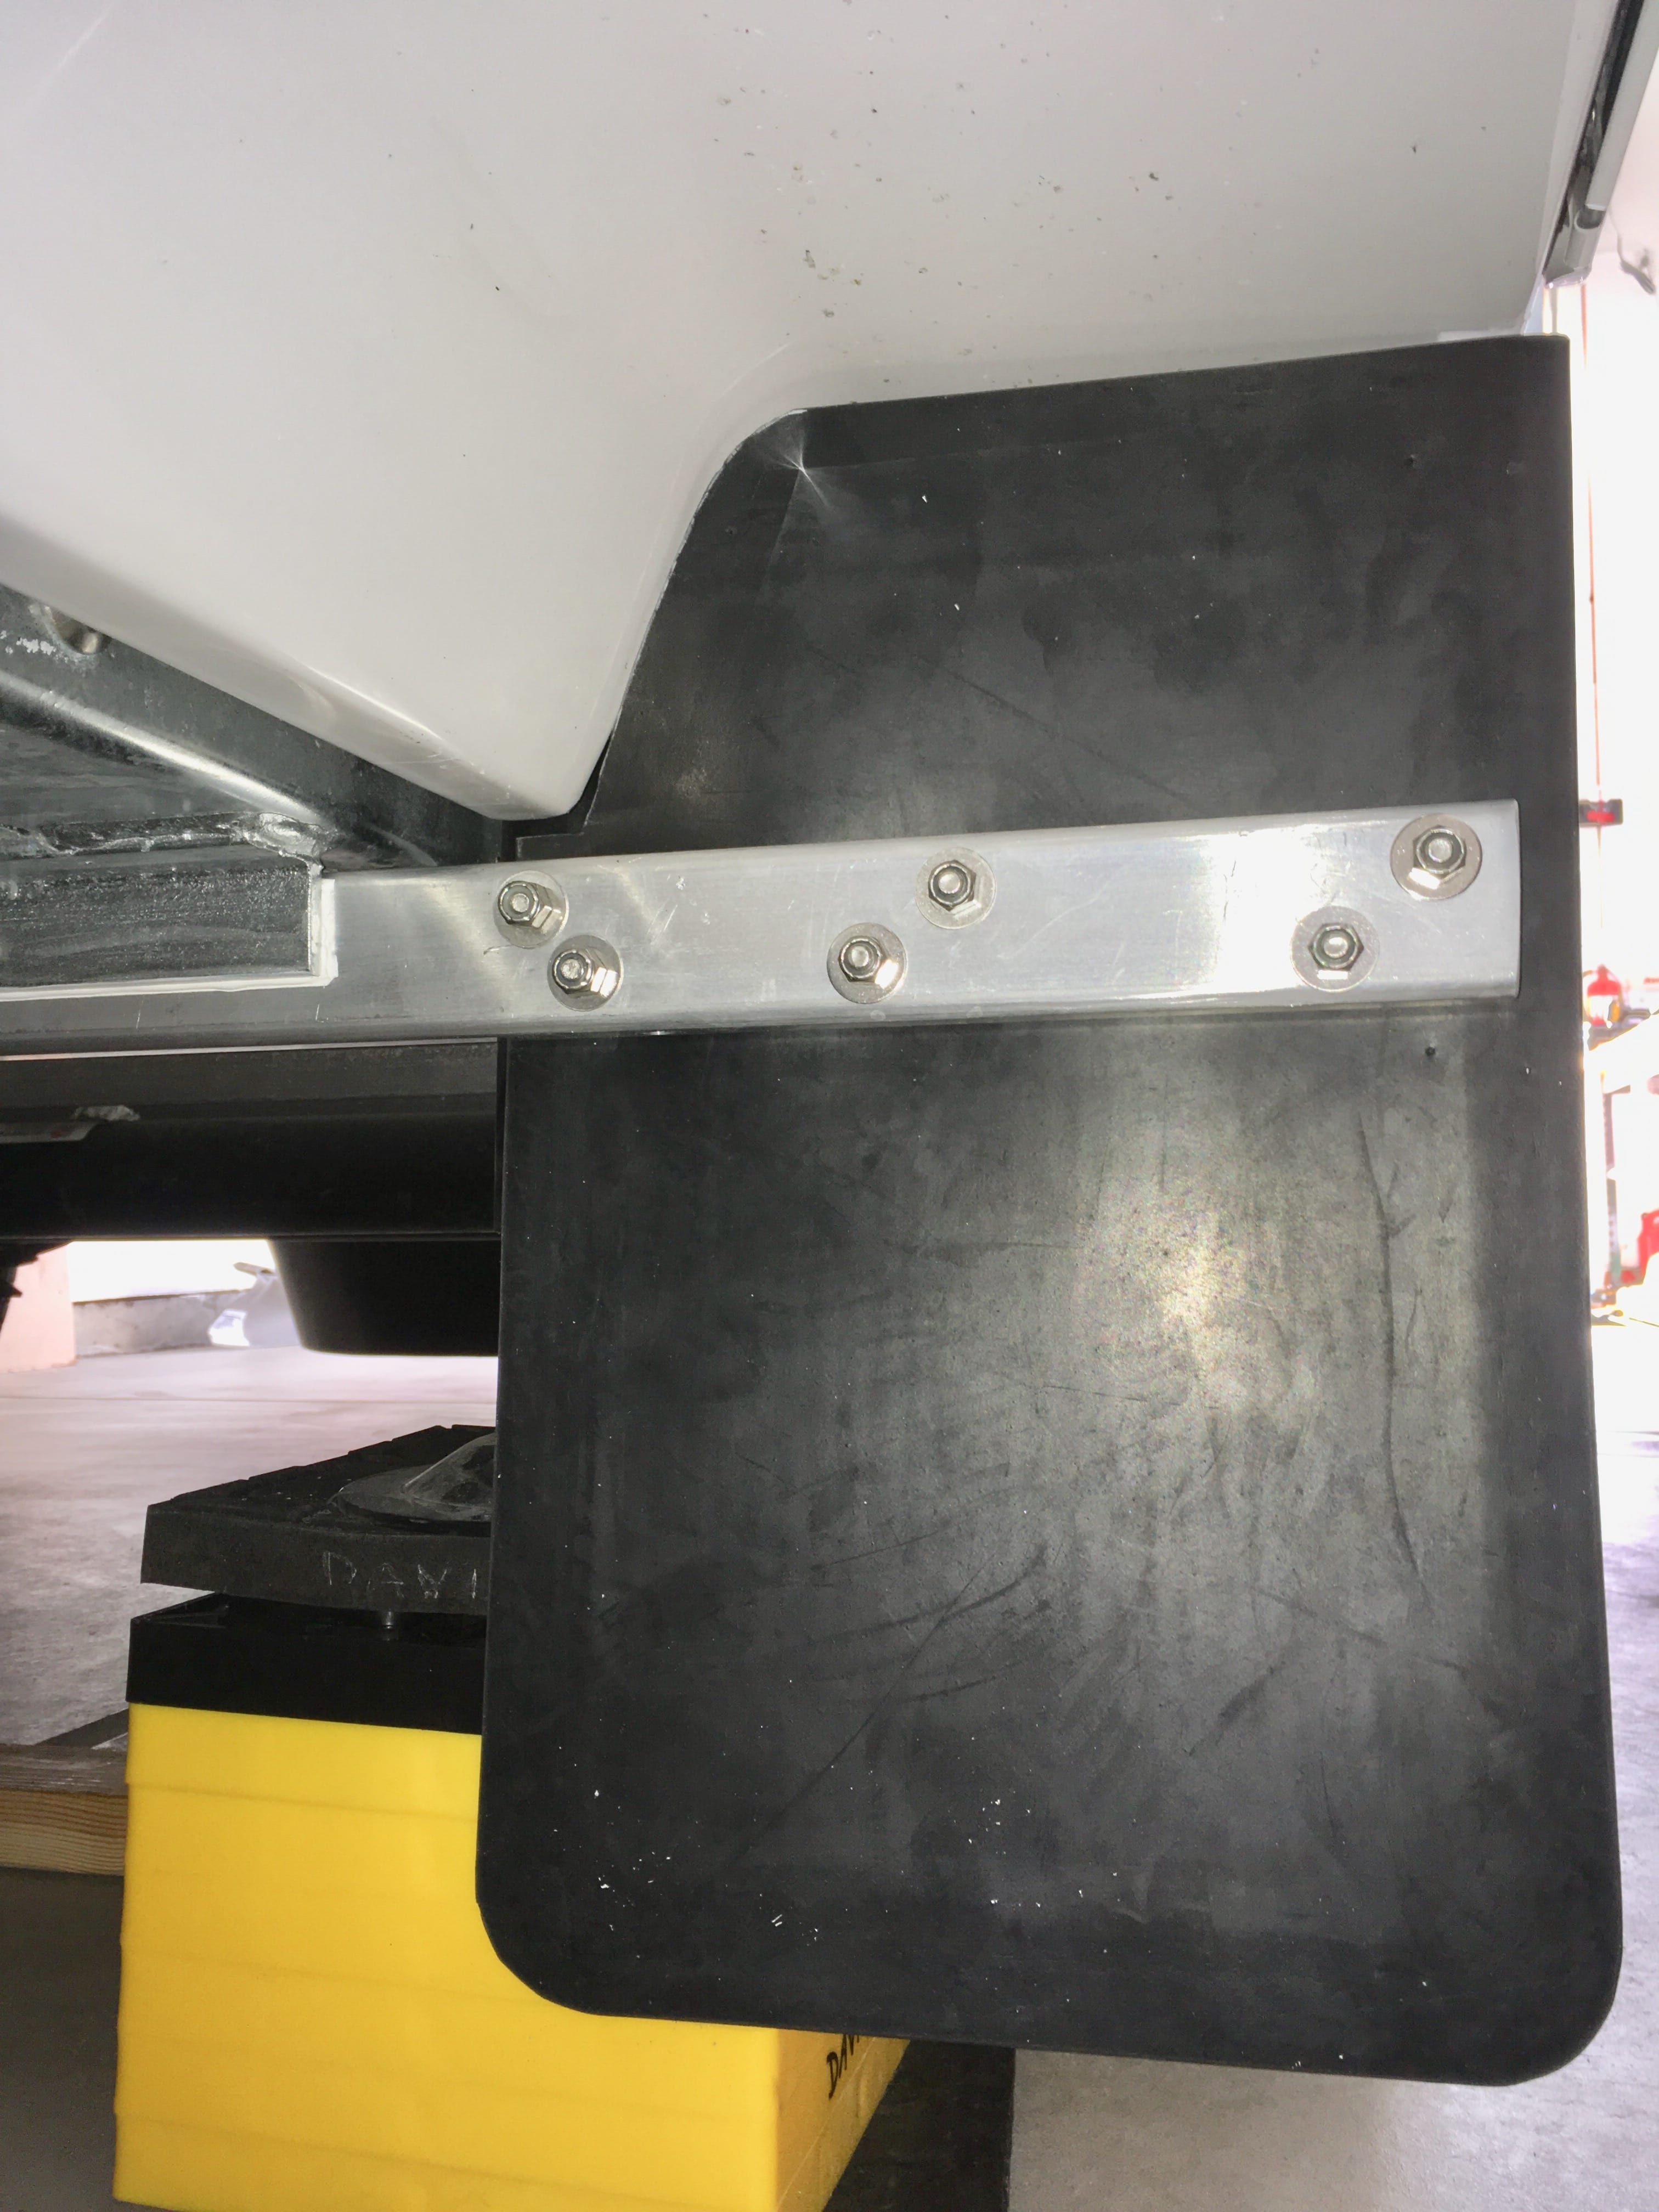
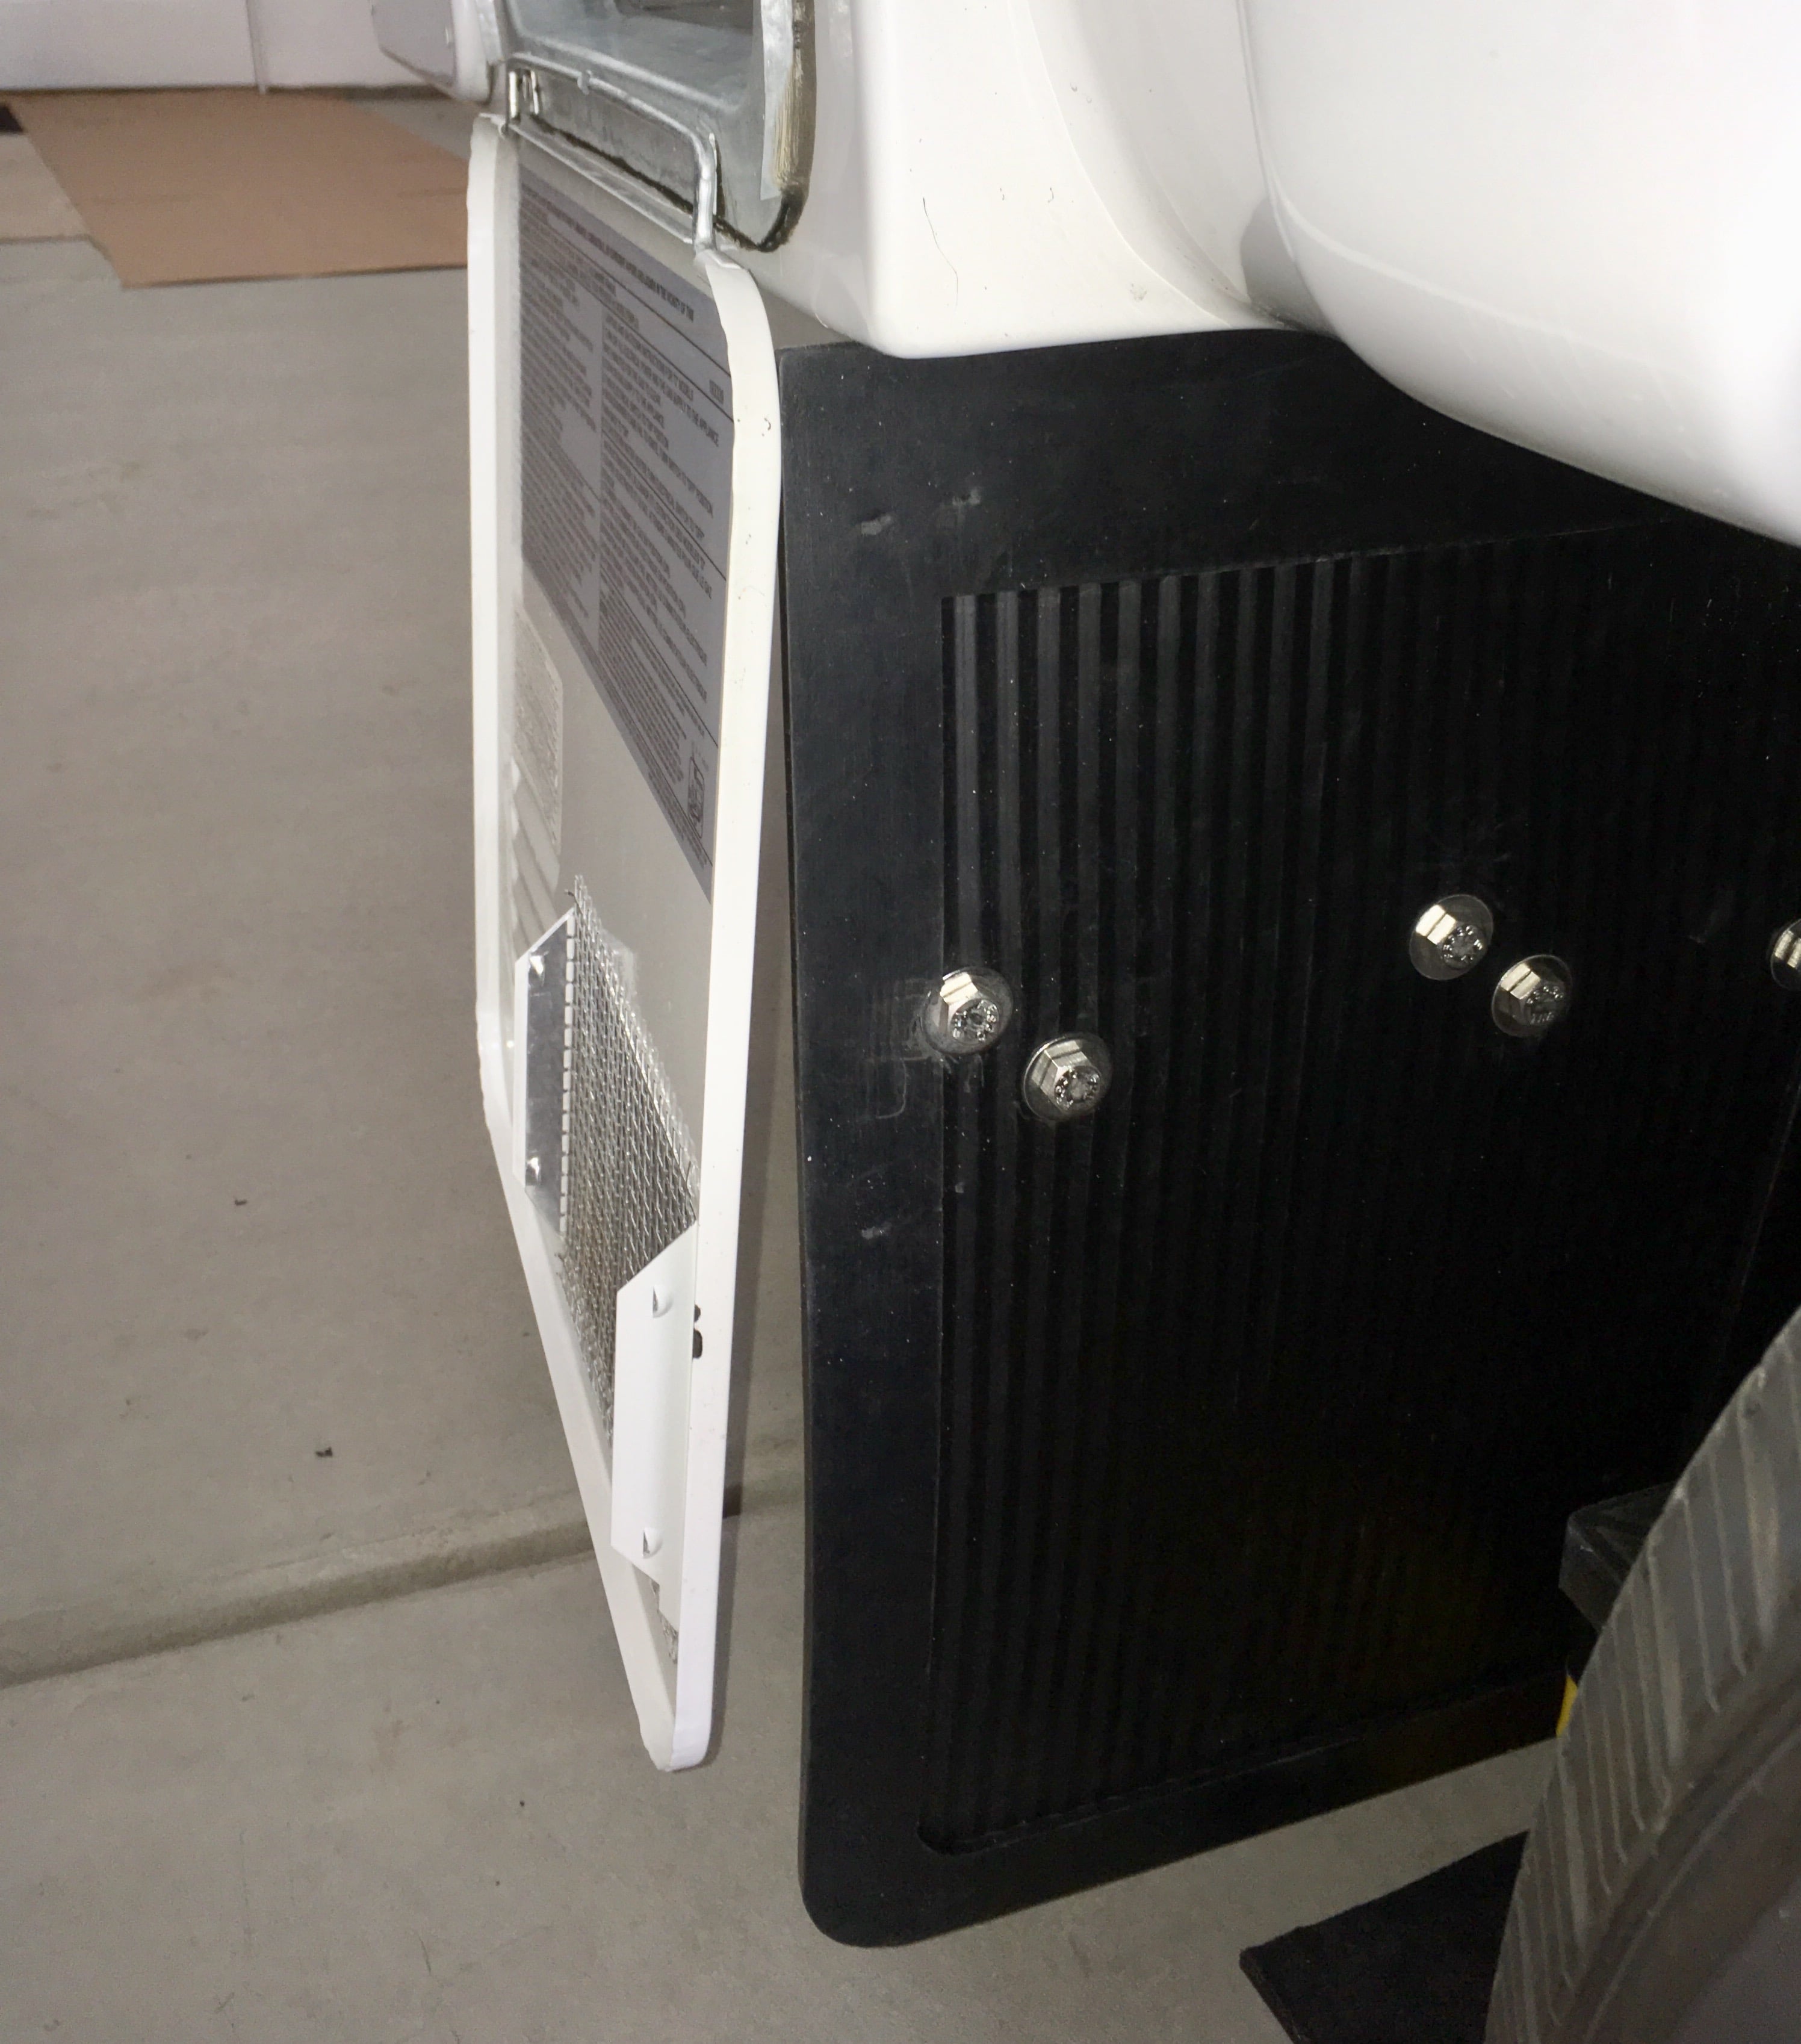
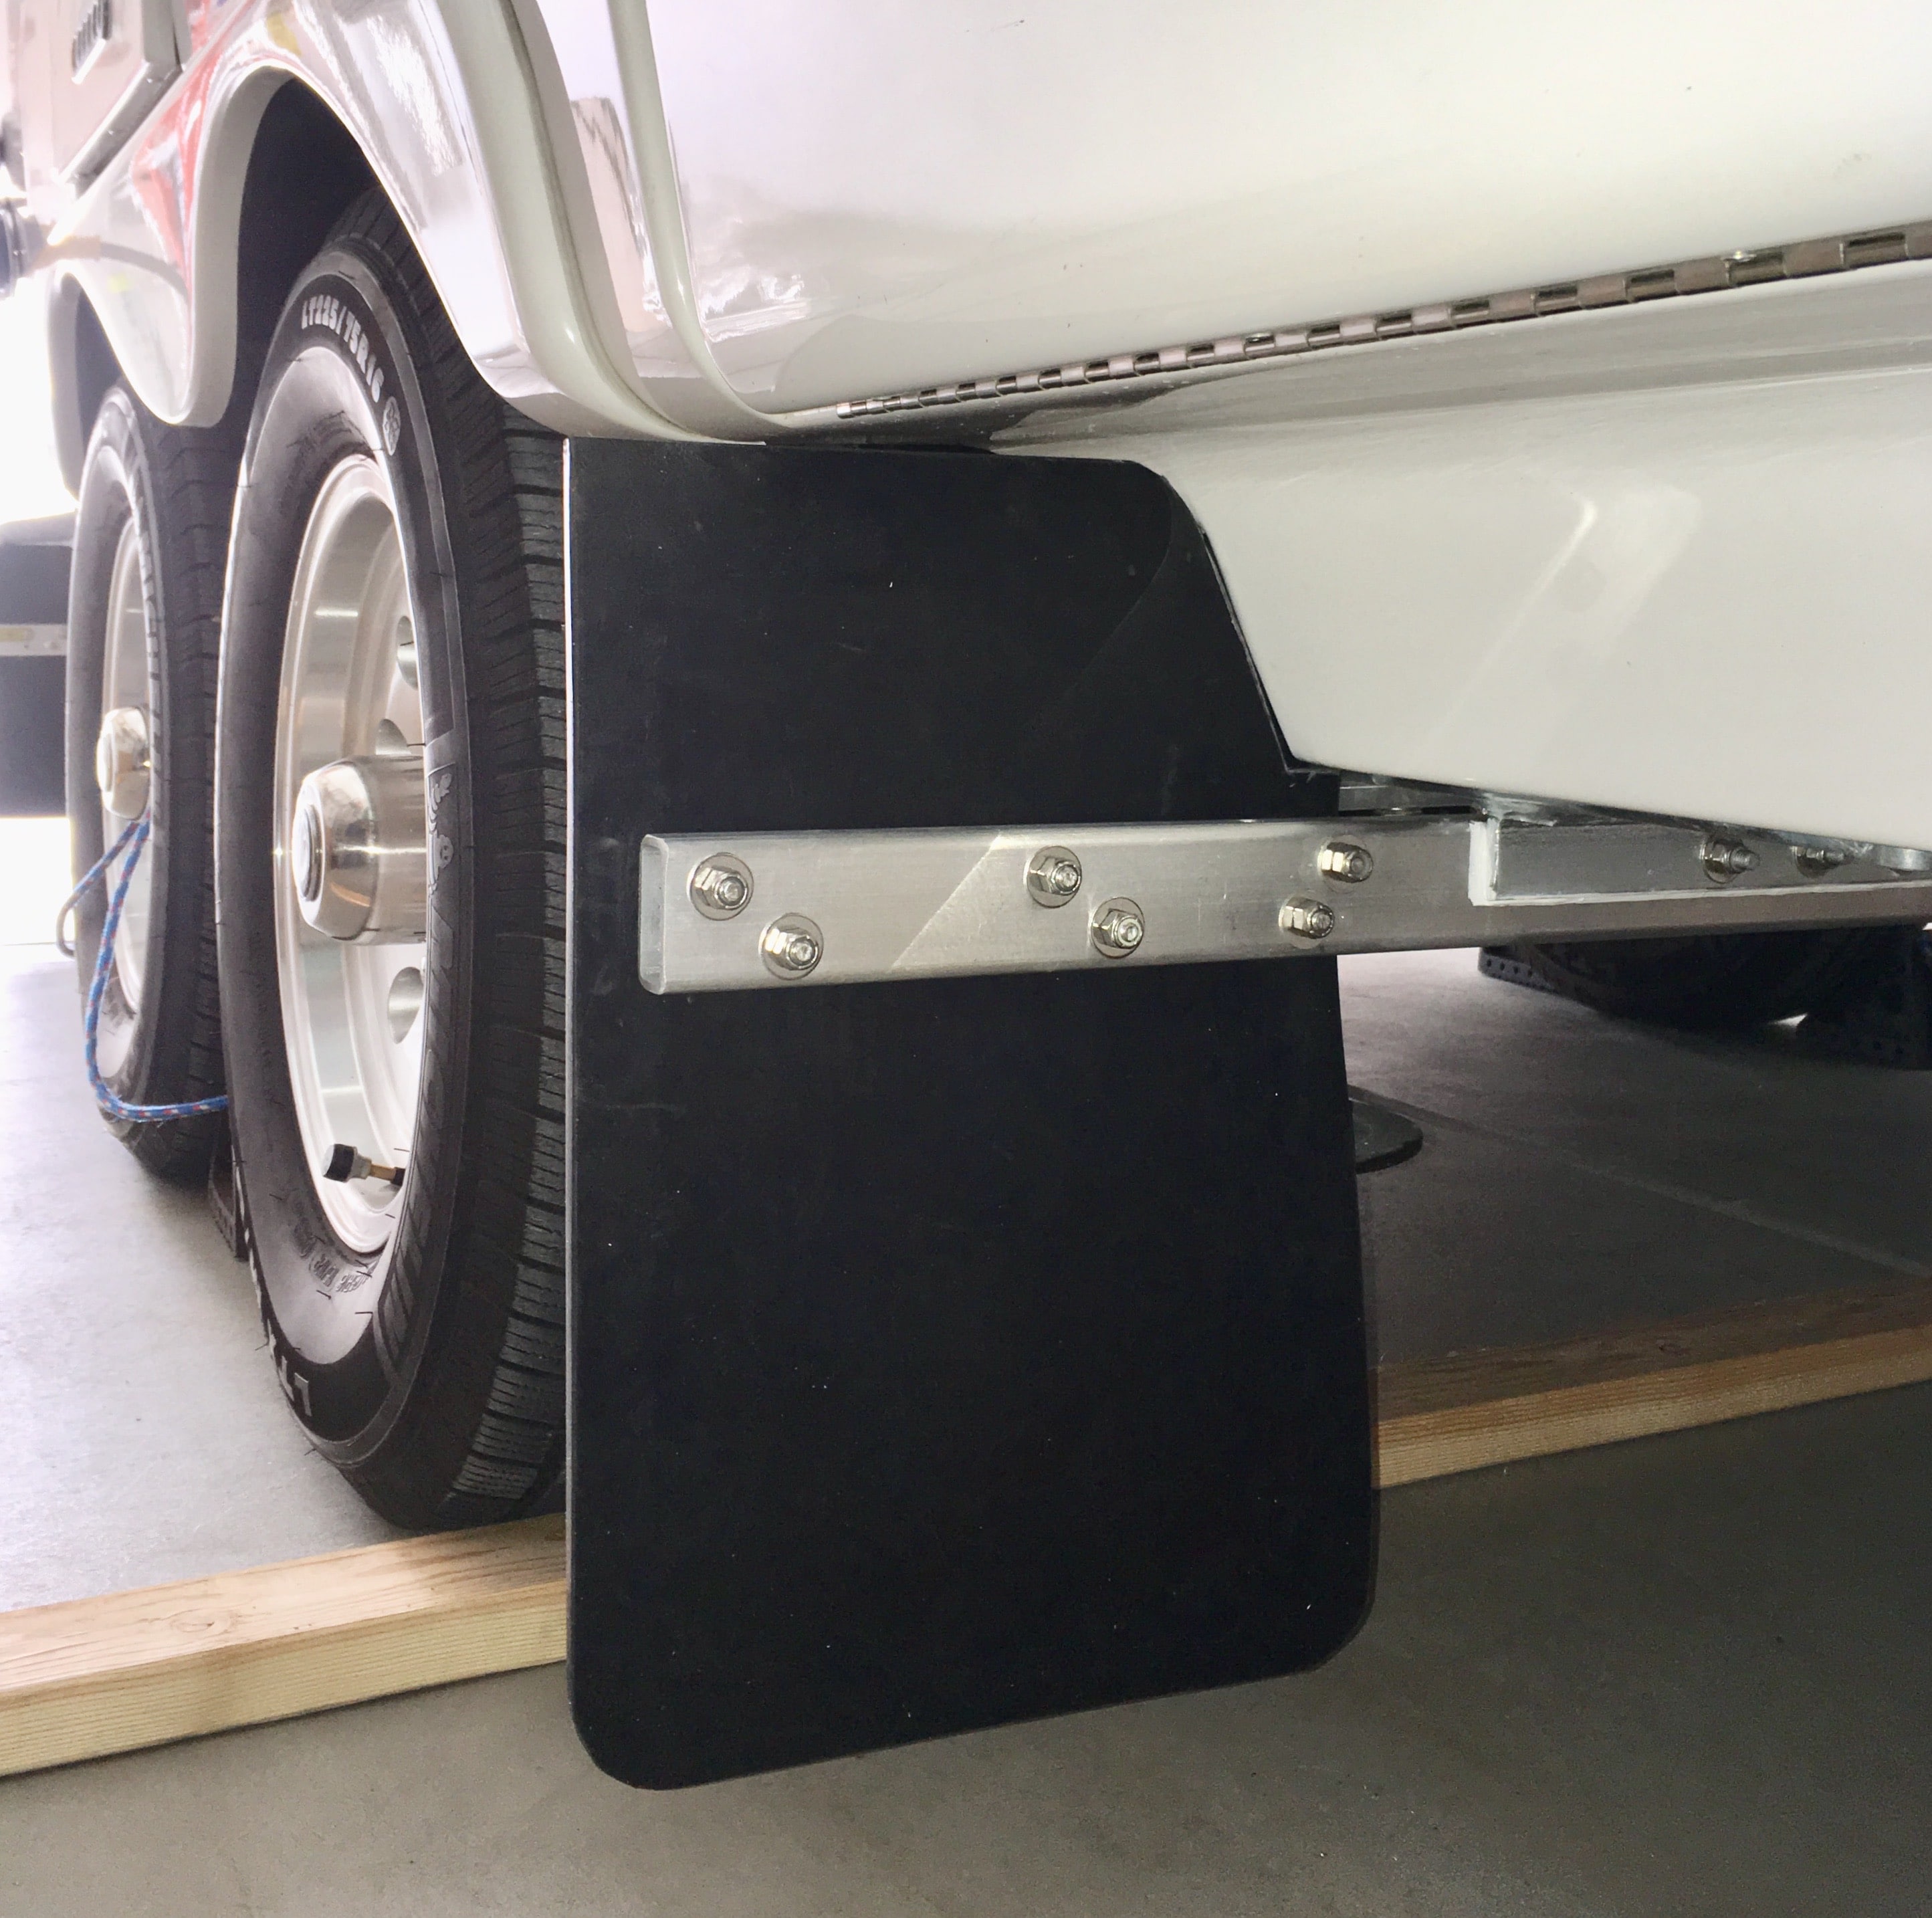
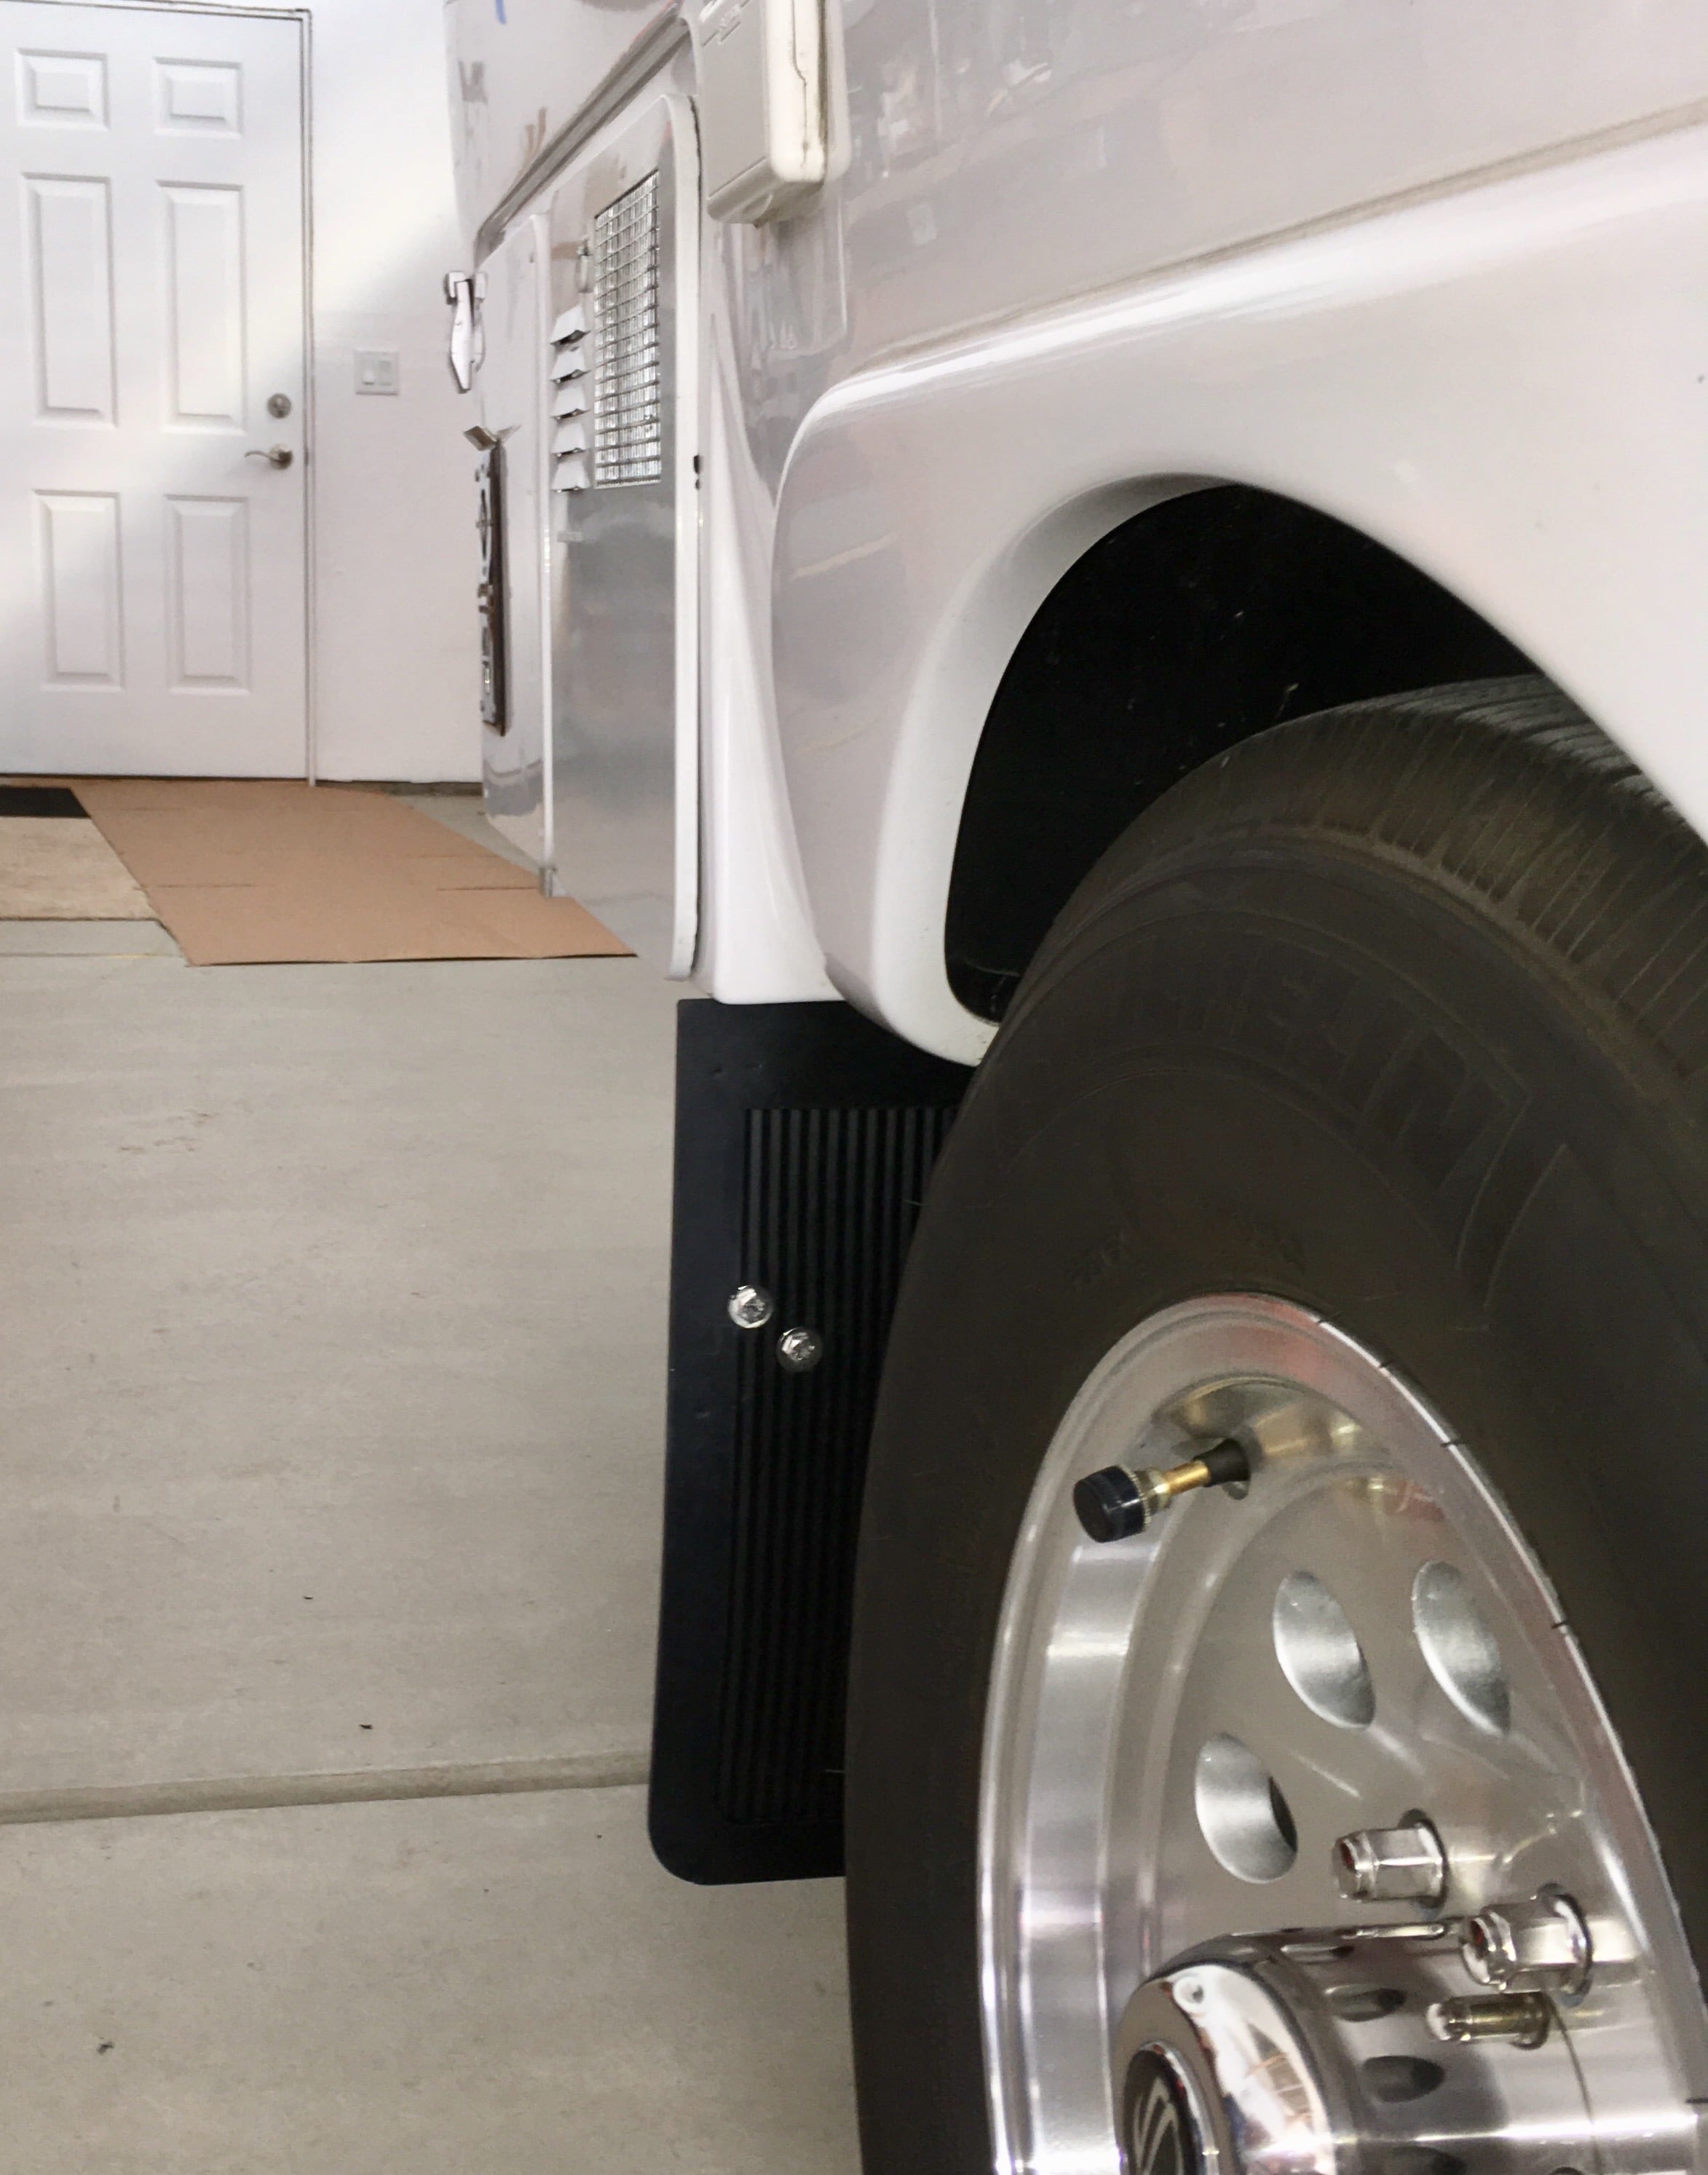
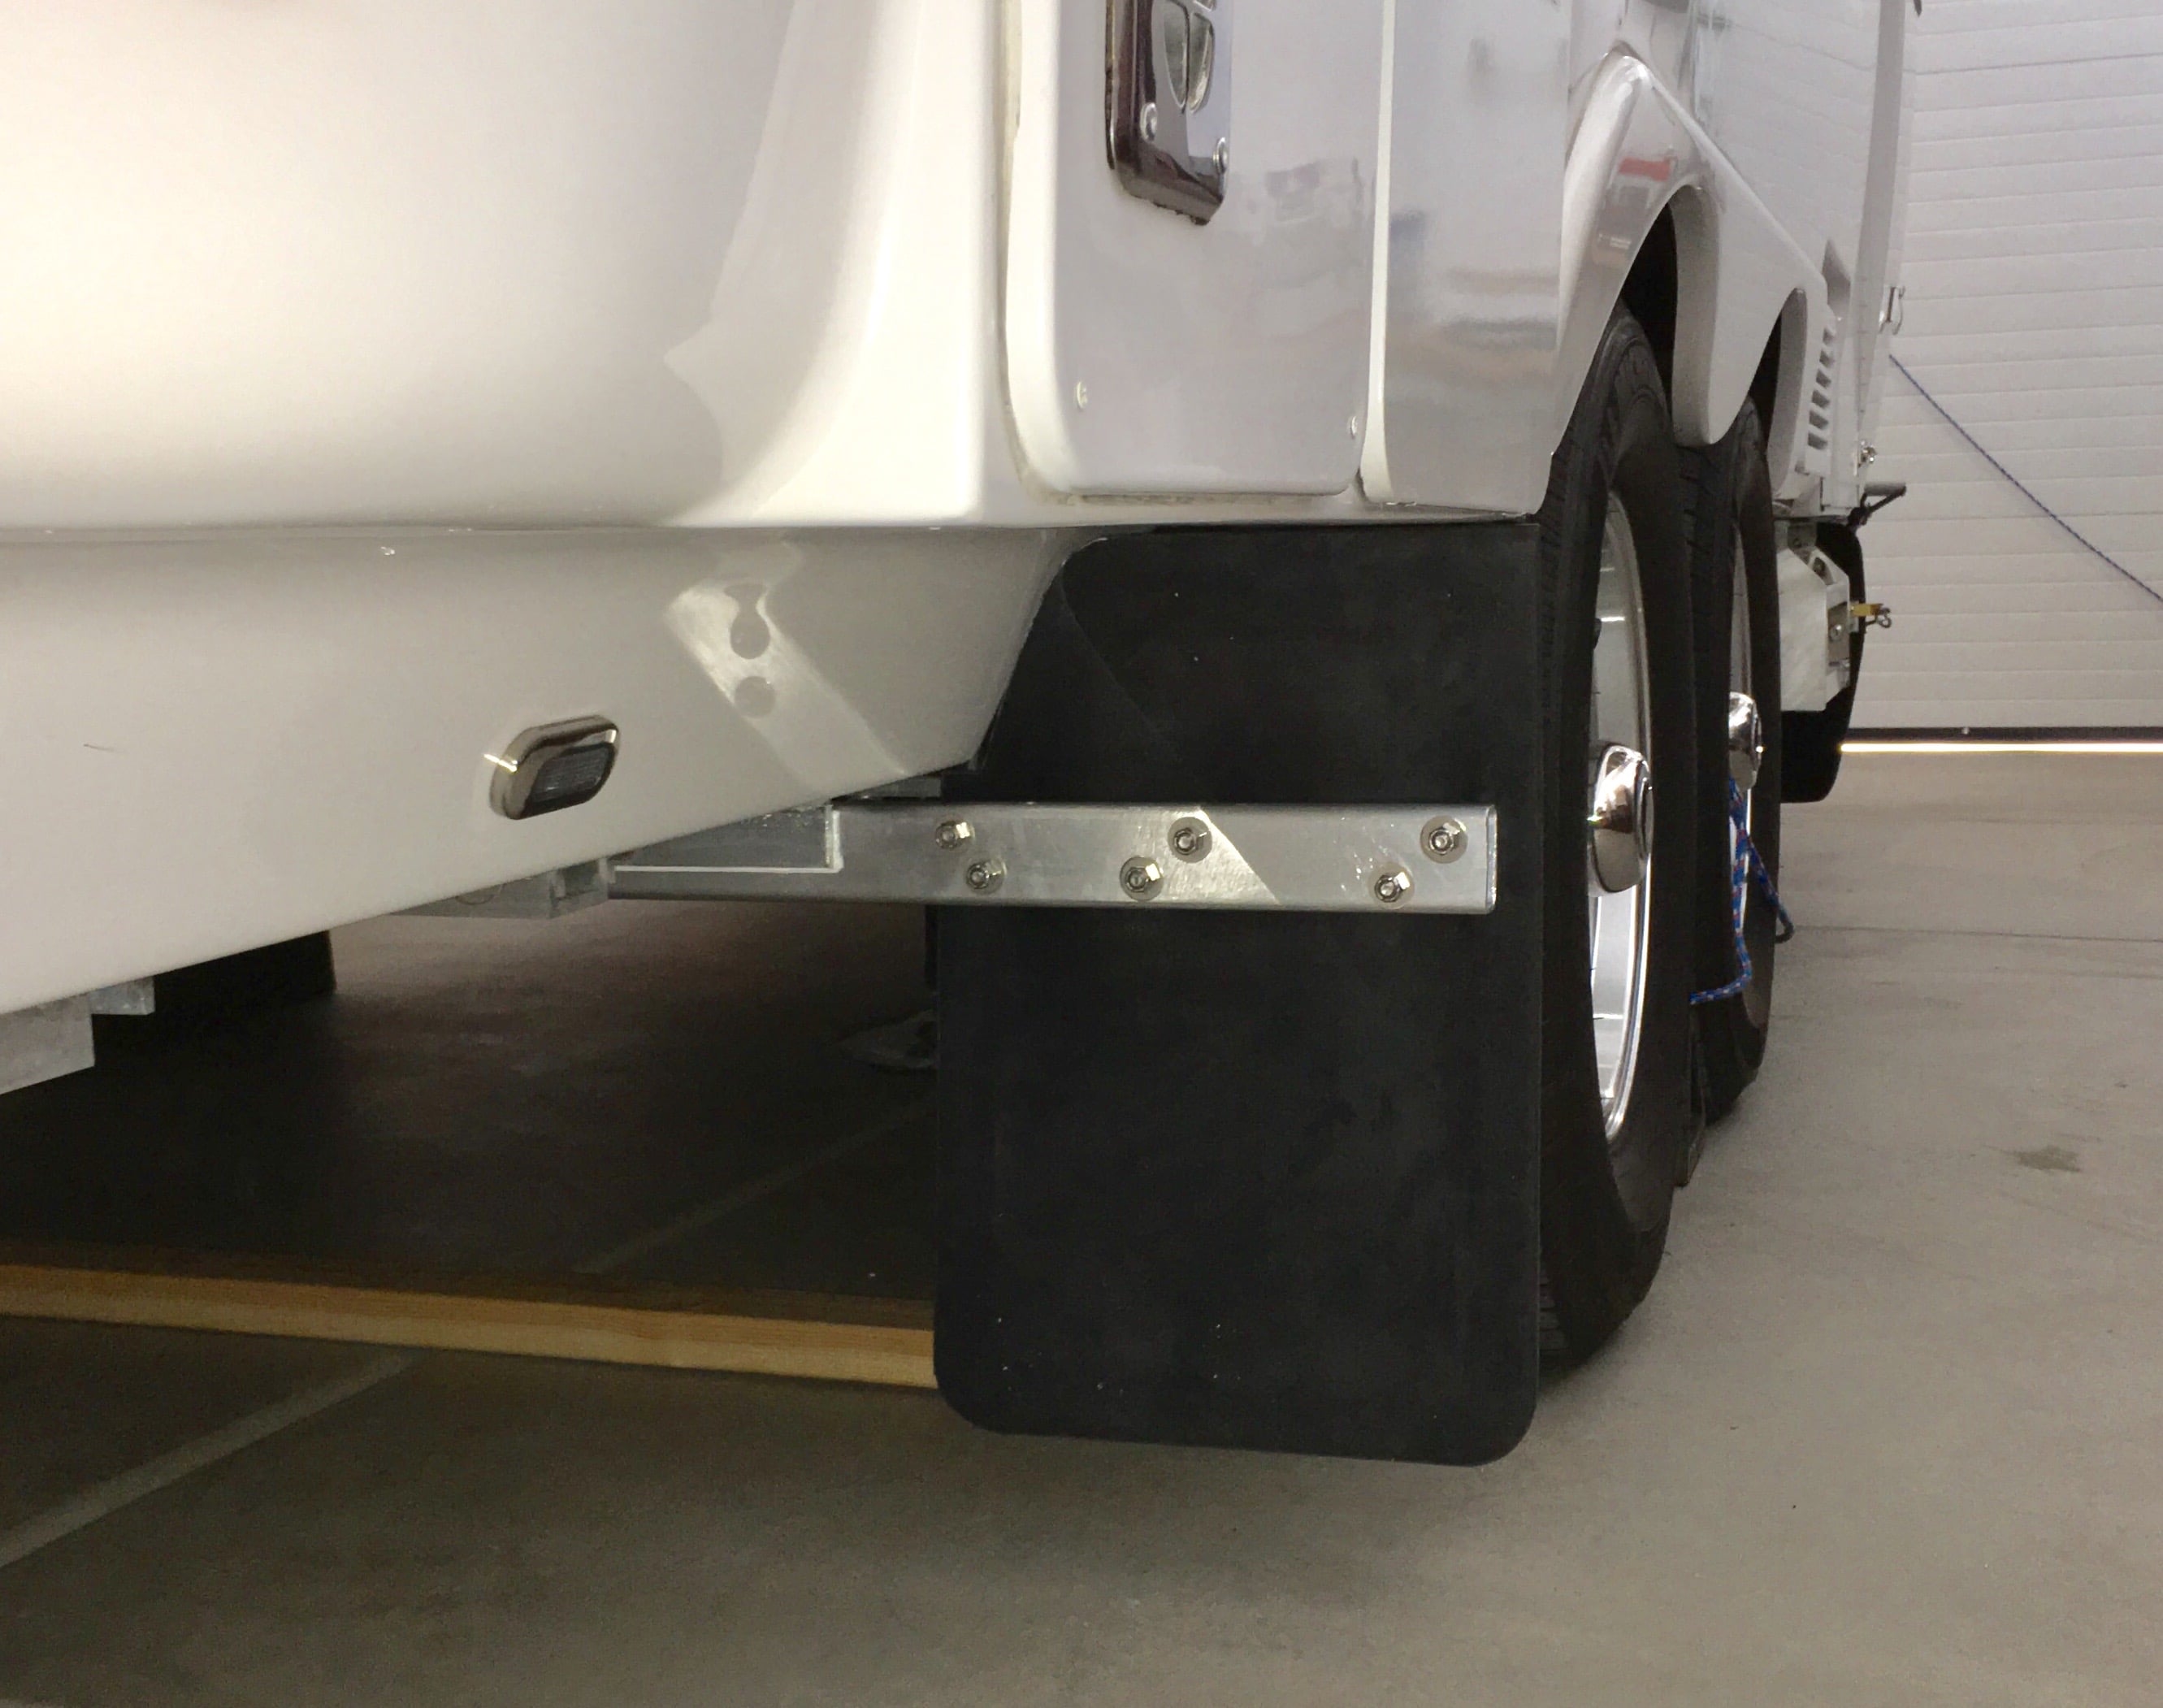
The flaps are easy to cut with a new razor knife blade. Level the trailer side to side! Once clamped into position, check that the flap is vertical along the outside edge using a bubble level, drill the holes 5/16". Remove and enlarge slightly oversize; this gives you a little wiggle room for final adjustment. Install the flaps with hardware specified in the other thread. Both flaps clear the jack, and also any blocks under it. The flap can easily be pushed back for extra room. The left flap: Clearance with the jack was tighter on this side. The jack was mounted about 1 inch further back on the frame rail. It still clears. And the flap also clears the cargo door when fully open. The bar has about 2 inches clearance with the door itself. The right flap again: The hot water heater door lies against the rubber when fully open. The bottom edge is 3.5 inches off the ground. I will see how this does, and if it seems to be dragging excessively, I can easily trim off a couple of inches. ***** I don't THINK that it would be possible to pinch a flap between a curb (or rock) and the tire when backing up! I will check to be certain, and if needed I may have to remove a little from the bottom. ***** EDIT 05/20/18: No worries about dragging, I have backed over a standard street curb and the flap folds forwards but does not get pinched. The flaps are very effective on gravel roads, but there are still rock strikes on the gelcoat above the front of the flaps, there is no way of stopping that. But behind them, the bottom of the hull stays much cleaner and relatively undamaged. I'll post a few pics outside when I next tow Mouse. This was a fun project. Fabricating the bars, drilling the subframe and installing them was time consuming and a little finicky. Actually fitting and attaching the flaps was quick and easy. I like how they look, and they should provide significant protection for the curved part of the hull, the puddle lights, water fittings, rear bumper and back of the trailer (from rocks pinging off the front face of the bumper). John Davies Spokane WA
1 point


-
Recent Achievements
-


")


")


