Leaderboard


Popular Content
Showing content with the highest reputation since 07/01/2026 in all areas
-
I just noticed that with the exception of the dealer in Canada, all of them are now gone. All sales have officially moved back to Hohenwald. I think this will come as welcome news to many potential new owners. Many were opting to actually come to Tennessee for their pickup and delivery anyway. It has been reported that many dealers were taking payment, handing over the keys and sending people on their way without any kind of walk through. That's just not acceptable. Other dealers were selling the trailer, allowing the new owners to pick up their unit in Tennessee and still charging them $1.2-1.5K for "cleanup and delivery". That's just wrong. I believe this is a wise and good move for Oliver. They gave it a good run. Sometimes things just don't work out as well as predicted. Good job, Guys...11 points
-
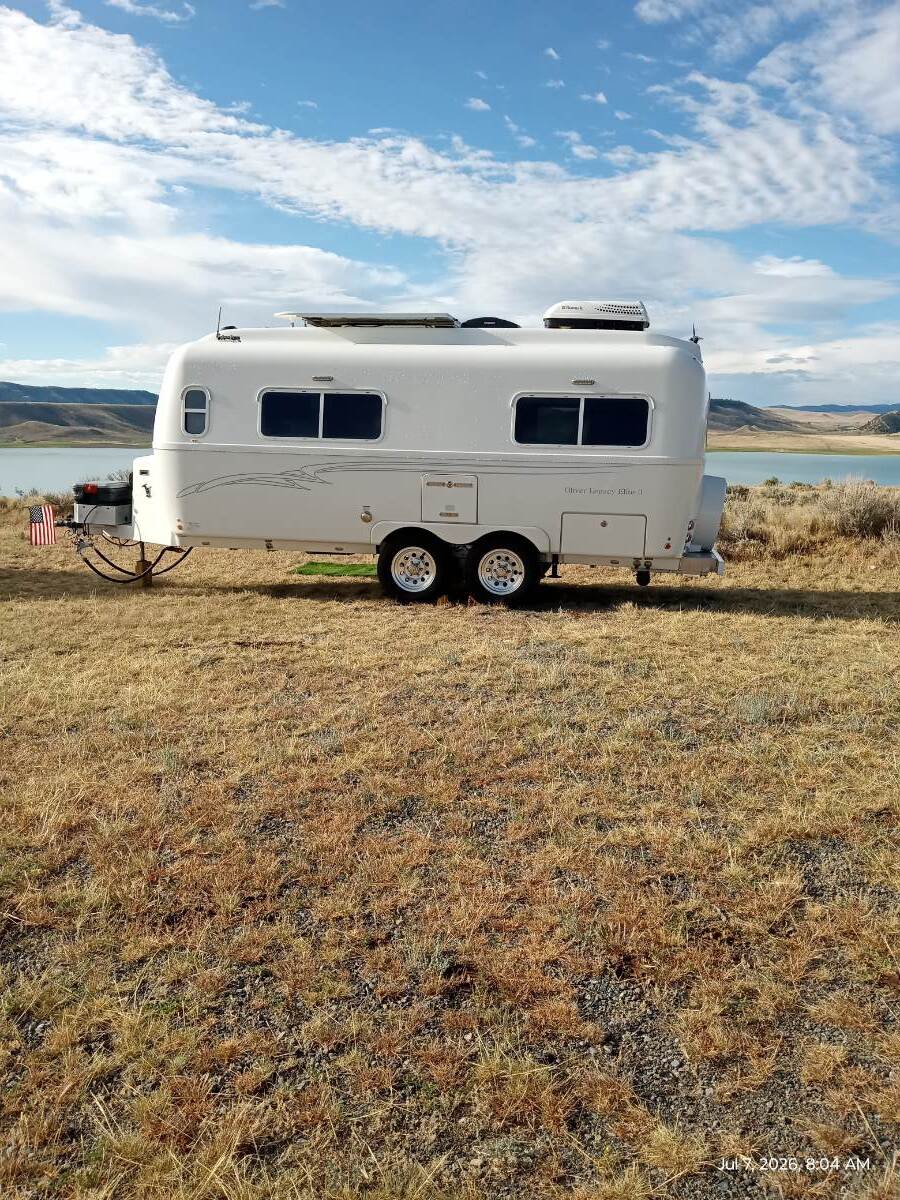
A bit of rain last night with a low temp of 51 degrees at Lower Sunshine Reservoir just outside Meteetse, WY.
 8 points
 -
7 points
-
Sometimes Mother Nature has a very kind way of saying "Good morning".
7 points
-
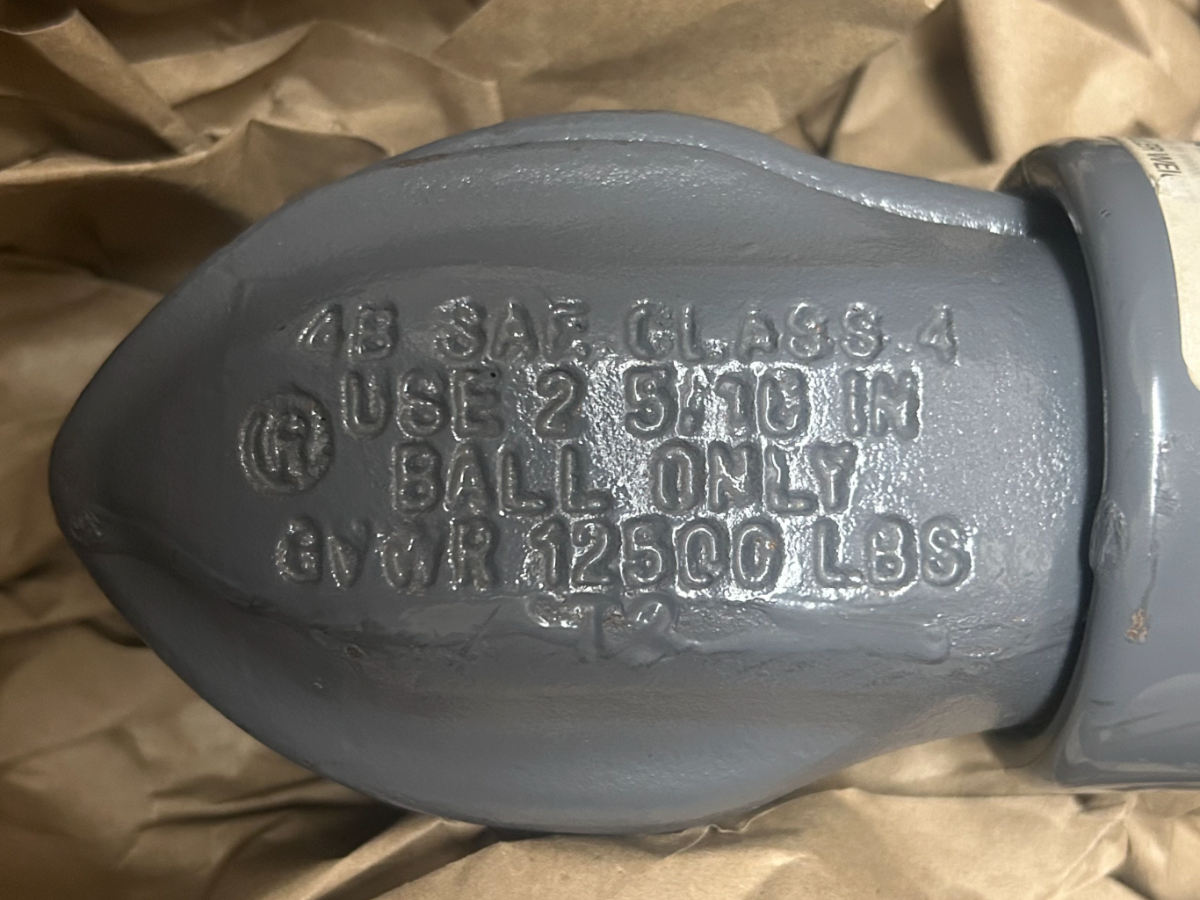
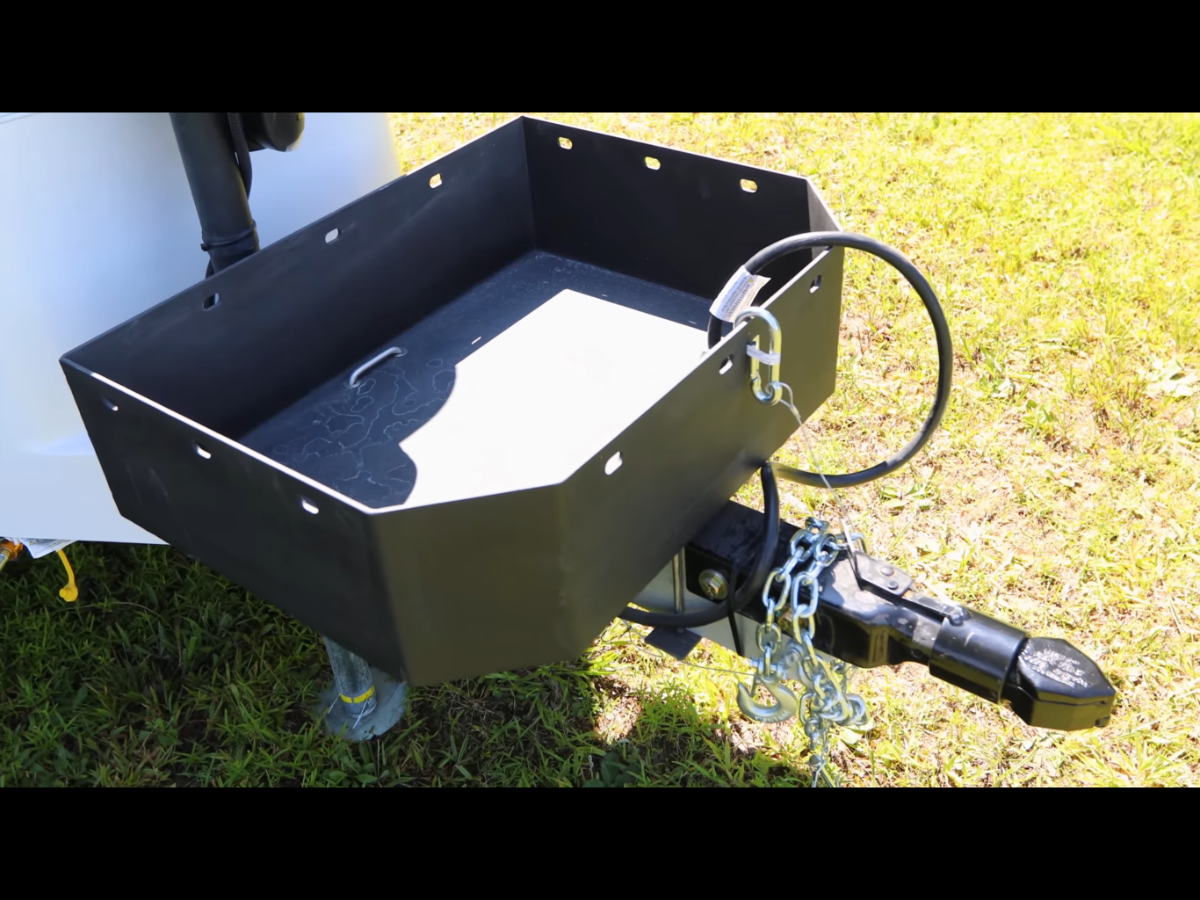
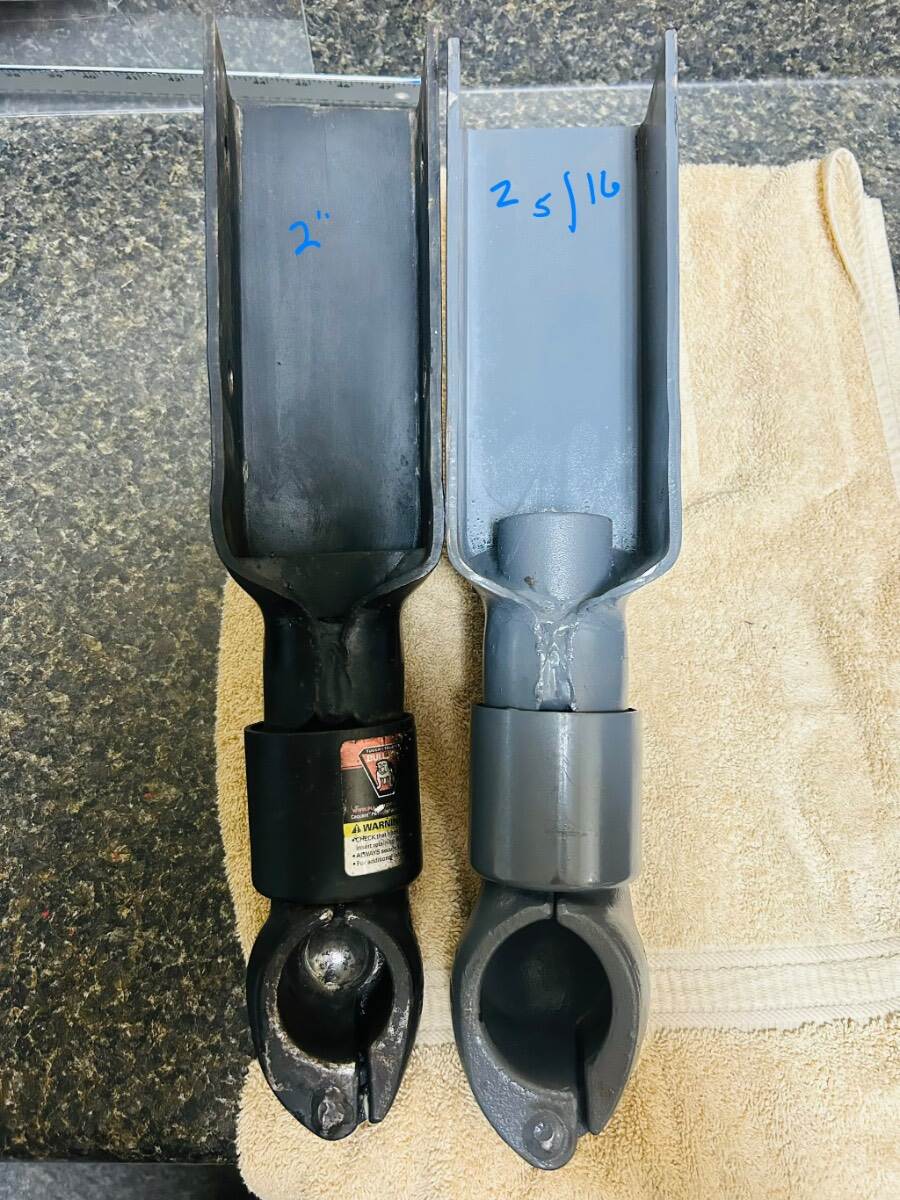
Oliver Bulldog 2 5/16 coupler upgrade. I decided to finally pull the trigger and upgrade our Oliver from a 2” 7000# Bulldog coupler to a new Bulldog 2 5/16” 12500 coupler. I also ordered a spare coupler repair kit. These 2 5/16” BD couplers are becoming difficult to locate and purchase with Bulldog filing for bankruptcy protection in Oct of last year😳. It’s my understanding, that BD is no longer manufacturing and shipping these couplers to RV manufacturers possibly due to bankruptcy proceedings. (open source) I did attempt to purchase a 2 5/16 BG coupler from Oliver and they no longer have this upgrade in stock and available to purchase and ship. Jerry at Oliver told me they have no idea if or when they will have this coupler in stock again and are seeking alternative options. Will there will be a restructuring with BD? Anyone’s guess. I will be taking the new coupler to a friend’s machine shop to have the holes precisely drilled. If you’re on the fence about upgrading to a 2 5/16 12,500 #coupler it might be a good time to search for a vendor that has one on the shelf and ready to ship. A big thank you to @rideandfly for helping source this coupler! The Vendor I ordered from was Croft Trailer Supply in Kansas City, Mo. Ended up myself, @rideandfly and @John Dorrer purchased the (3) they had in stock. If it’s an upgrade you’re considering you may not want to wait. Safe Travels! Hull#634 XPLOR
7 points
-
Hope everyone has a great holiday! 250 years is a pretty good run. Based on some of the videos from the World Cup attendees visiting the US for the first time, we seem to be the envy of the world! Mike7 points
-
I have to admit. I swallowed pretty hard when I wrote the check for my new Oliver back in 2018. However, it's been relatively trouble free in the eight years I've owned it. Can't say that for most brands. I think the low production run also adds to the desirability. If Hohenwald was stamping trailers out as fast as Casita, it would lower the exclusivity of owning an Oliver. I was happy when Oliver went back to factory only sales.6 points
-
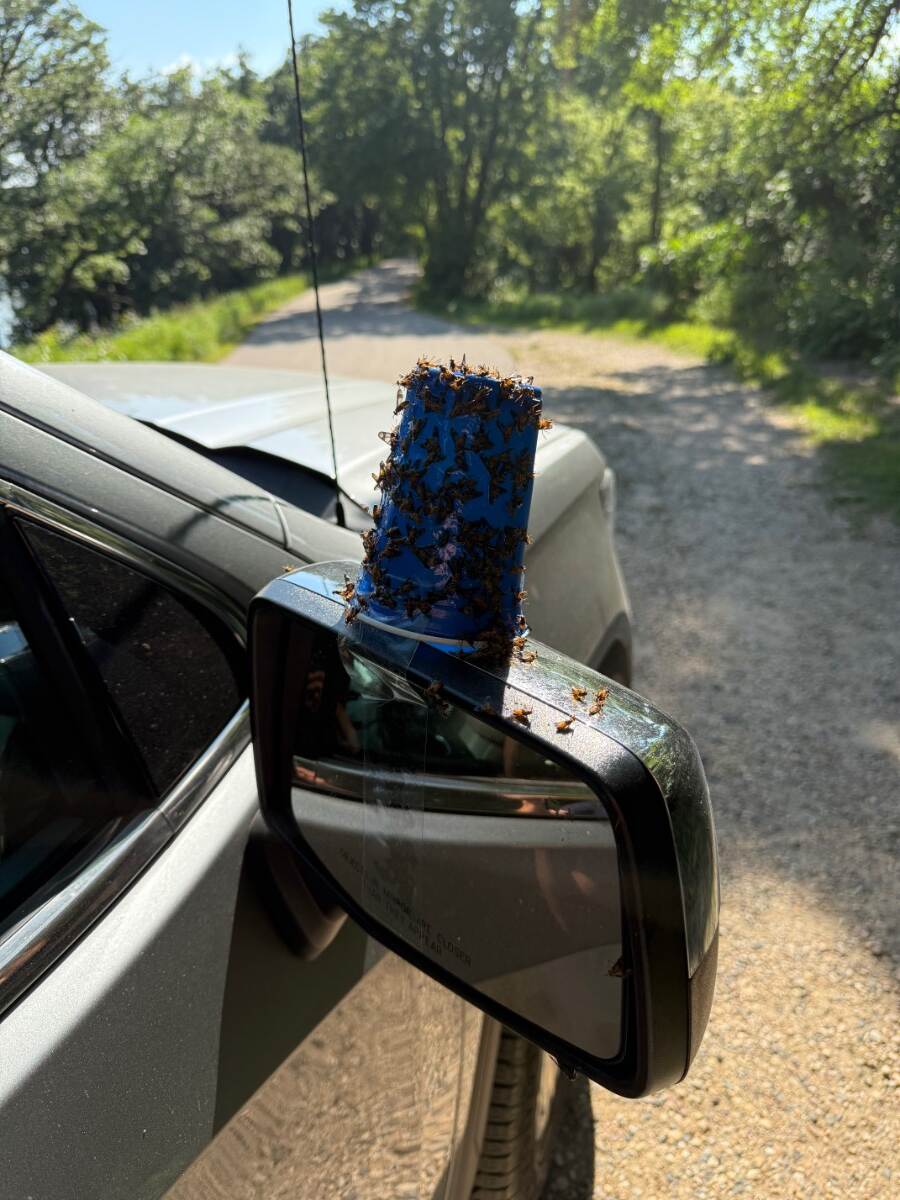
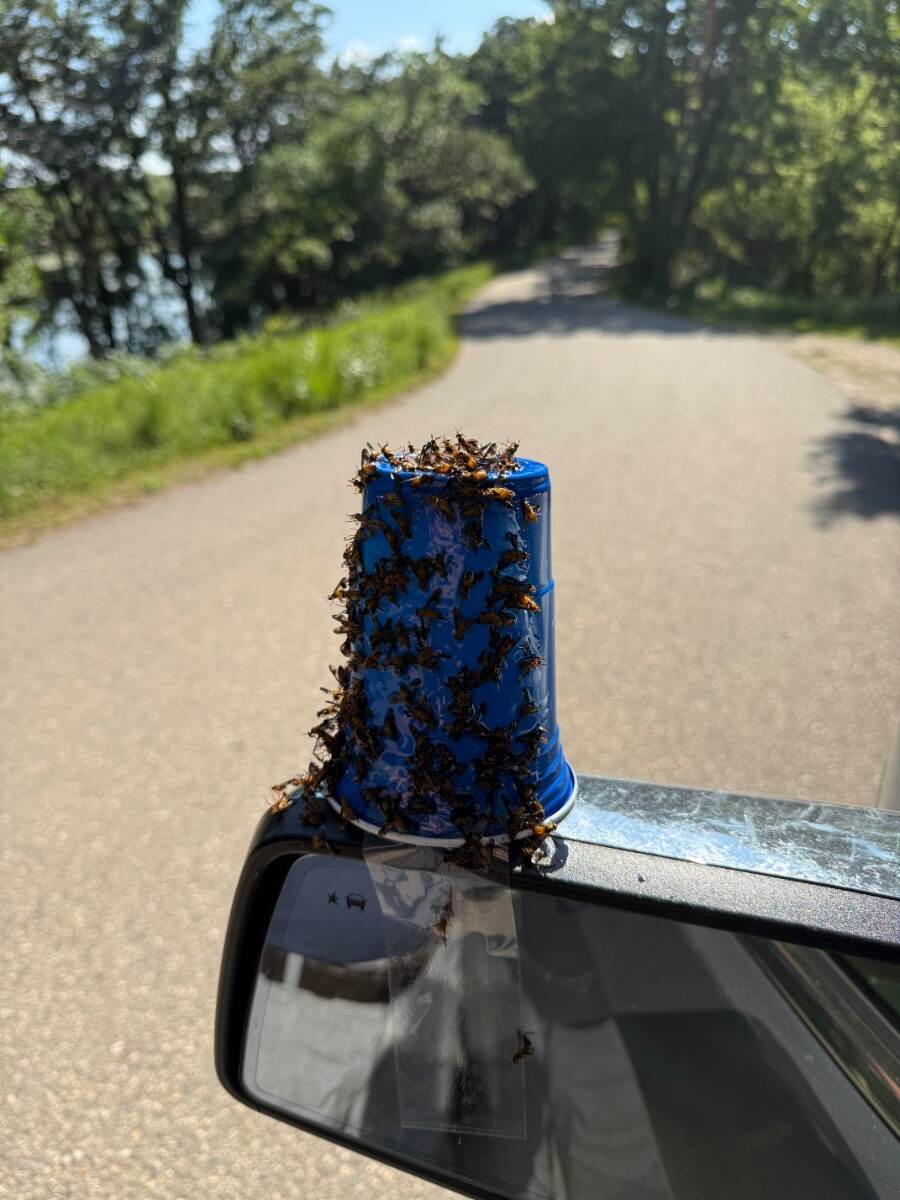
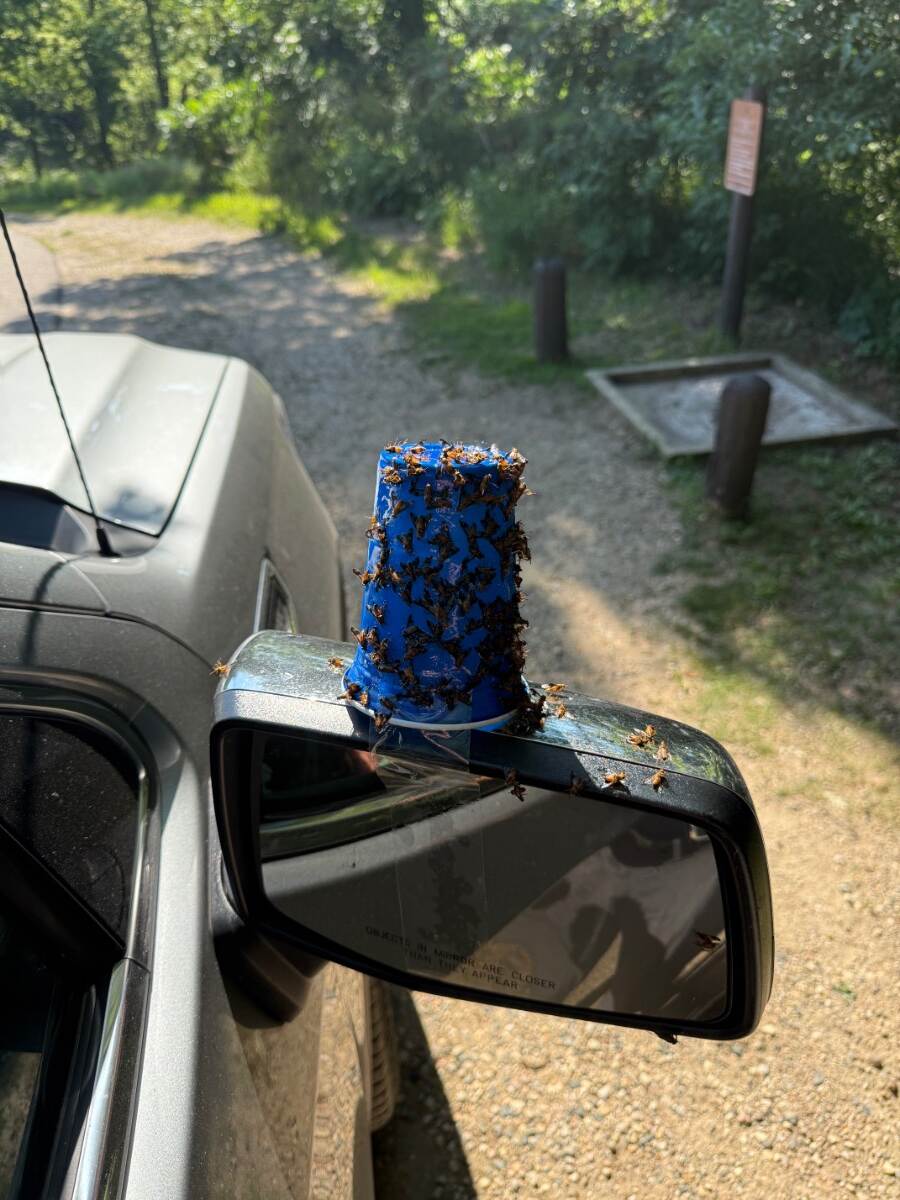
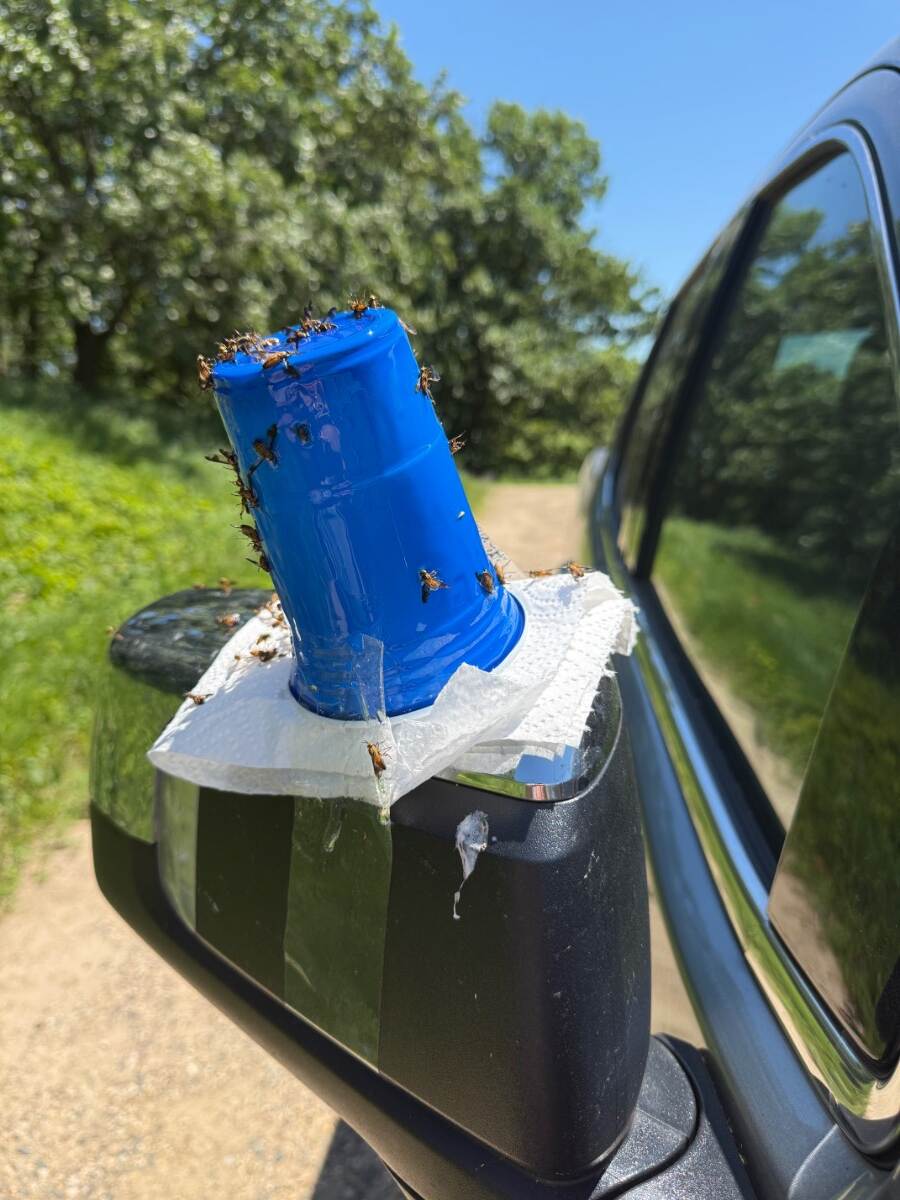
Staying here at Glacial Lakes State Park as campground hosts for the month of July has had me researching how to deal with all of the various annoying flying critters here. Minnesota is called “the land of 10,000 lakes” and humorously “and 10 million mosquitoes”. (I think that’s a low estimate between you and me…) Last year, the park manager told me that this time of year, flies are the bigger nuisance. She was right. We put if a cheapo screen house to sit in (when it’s not 95F of course) but when you’re walking, the deer flies have you at their mercy. The familiar stinky traps don’t attract deer flies, just “filth flies” (house flies). Have one up anyway and have harvested many thousands of those pests. A disposable trap fills up in about three days(!) A little research told me that deer flies go after moving targets, and go for your head or the highest point of whatever critter they’re annoying. I also read that they’re attracted to the color blue. I found a few articles - typically on equestrian sites - that told how to “troll” for deer flies using blue Solo cups and a sticky goo like “Tangle trap”. I used to use the stuff in my garden, so I was familiar with it. Amazon conveniently has a vendor selling a kit with the blue Solo cups and the sticky stuff. Since I couldn’t find any in the local hardware stores or Walmart, I bought the kit. I tried it out by painting the outside of one of the blue cups with the goo and taping the cup - upside-down - to my side view mirror. I took a slow drive through the campground and was shocked at how many deer flies I caught in just 5 or 10 minutes. I discovered that the flies attack - and stick to - the BACK surface of the cup. (Hitting their target from behind) So the next time I tried trolling, I put a cup on each mirror and only put the goo on the back side. Well, as I’ve rambled quite enough, so I’ll show you the pics of my 2-ton deer fly trap and the results. Now - if I could just find a way to ruin 10,000 mosquitoes’ day - I’ll be a very happy camper! (Here’s the kit if you want to make your own fly trap: https://a.co/d/00v6uY1Q ) ps - yes, I did get several quizzical looks as I drive through the campground with blue Solo cups taped to my mirrors….
6 points
-
Actual usage data to follow - Wow, we love our Chill Cube (and inverter/battery and DC-DC charger setup)! We left yesterday for a short trip to Walnut Canyon, just east of Flagstaff. With batteries fully charged overnight, I unplugged in the morning, packed the truck, and set the Chill Cube temp down to 73. I did so because we had pickleball from 2-4 PM, the Oliver with us ready, and our dog Charley would be in the Oliver while we played in the heat of the afternoon. We stopped for fuel and a snack (cabin nicely cool) and didn't make it to our boondocking location because of the very heavy monsoon rains in Flagstaff. We spent the night at Cracker Barrel, LOL! 🤣 (Can't drive down FS dirt roads in these rains as it's getting dark!) Checked battery SOC at 7 PM and it was 98%! We used net 20 Ah all day! Sun early in the day, cloudy later. We always have our Orion 50A DC-DC charger connected when towing. I figure it added approx 90 Ah while towing. So the Chill cube cooled all day using only 120 Ah, outside temps mid-80s. BTW, absorption fridge on DC all day too so this number could be less. The heavy rains made the cabin quite humid at 68% RH. Had our first experience with a leaky window (towing 70 MPH through monsoon rains). Thankfully only the dinette window leaked, beds dry. I switched the Chill Cube to DRY mode. Dog water bowl also spilled while towing. It rained until 10 PM while the Chill Cube dropped RH about 15% in the next couple hours, making it very comfortable to sleep. The DRY mode also made the cabin COLD overnight as it kept drying/cooling several degrees under the set temp (thermostat control issues common with many A/C models). Turned it off when I woke middle of the night. Cooked indoors powering the broiler in the Emeril. We'll be away 4 overnights and should be able to run the A/C on battery every afternoon into the evenings! 😎
6 points
-
His first time camping.
6 points
-
Yes, you are correct. Oliver has had to source another coupler supplier. Bulldog is supposedly in bankruptcy proceedings as of Oct of 2025. Hopefully they will restructure. Pic of new coupler -
6 points
-
That was us. We were heading home to Woolwich, ME from Campobello Island in New Brunswick. Just set up an account so I could reply.6 points
-
To all single axle Ollie owners, have you ever needed to have the black tank dump valve replaced? How much fun was that?! There is virtually NO room underneath to wrangle a wrench into in order to remove the bottom bolt. I’ve owned The Wonder Egg for 18 years now and it seems about every 9 years, the black tank dump valve begins to seep “water”. The first time I took it to my local, reliable, RV repair shop, Boerne RV, the technician stated that job was so difficult he almost quit being an RV tech! Well, here it is, 9 years later and I just had Beorne RV replace that *!%#! Valve again, I told them to feel free to make any modification to the trailer to simplify the process. Here’s the brilliant idea they came up with . . . A sealed, water-tight exterior access panel directly underneath the valve.
5 points
-
https://www.rvtravel.com/resale-champs-top-5-rv-brands-hold-1271/ 009/26/2026 edition5 points
-
It's been a full year for us now. Last fall cancelled some trips because we were considering selling our house and needed to finish several things before putting it on the market, then my knee finally went caput. Operation in late February for replacement, recovery is going well but can only walk or light hike for about 3-4 miles without straining things and making it worse. The good news is I can bike much better and have racked up about 240+ miles in the last few months of light to moderate mountain biking. So with this situation no solo trips or the two of us traveling to the SW and other places. Glacier is not an option currently but might head to YNP later in the summer or early autumn if things keep improving. Old age is not what it's cracked up to be. Not for sissy's.5 points
-
Great job Jason and Aaron!5 points
-
We usually take a trip every couple of months, but since moving to another home and getting the former ready for market it’s been five months and counting! Bummed as well, but occasionally run the a/c on inverter to exercise the batteries and enjoy my morning coffee in the Oliver, stress management!5 points
-
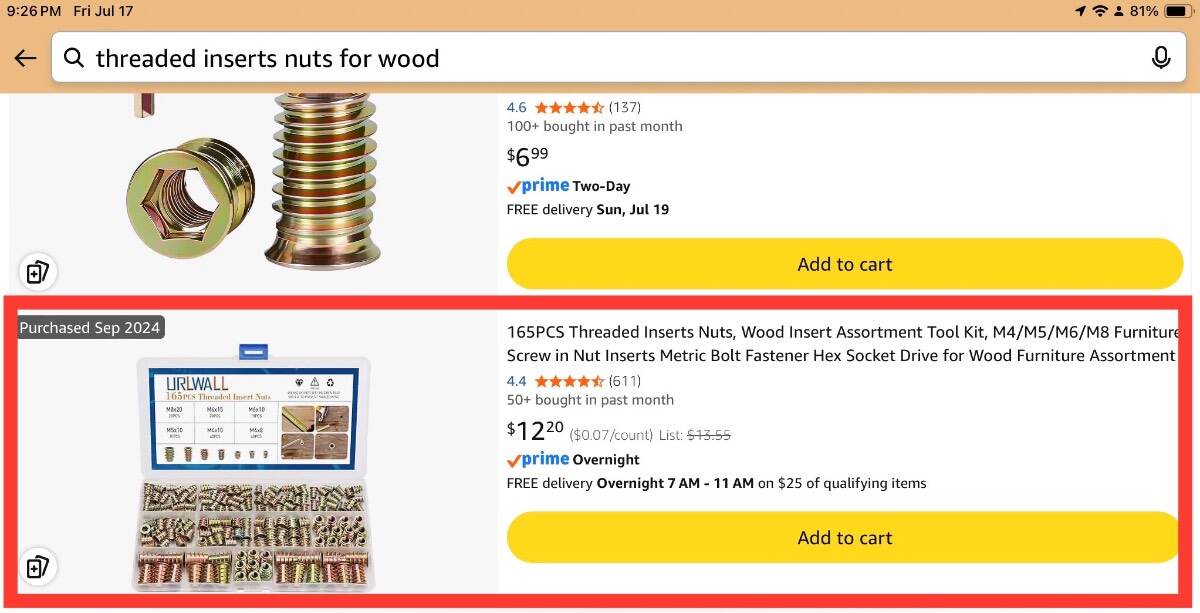
I have had some success with threaded insert nuts in the OTT installed PVC Foam Board. They are very effective on the horizontally mounted foam board, such as the water pump location. Mossey
5 points
-
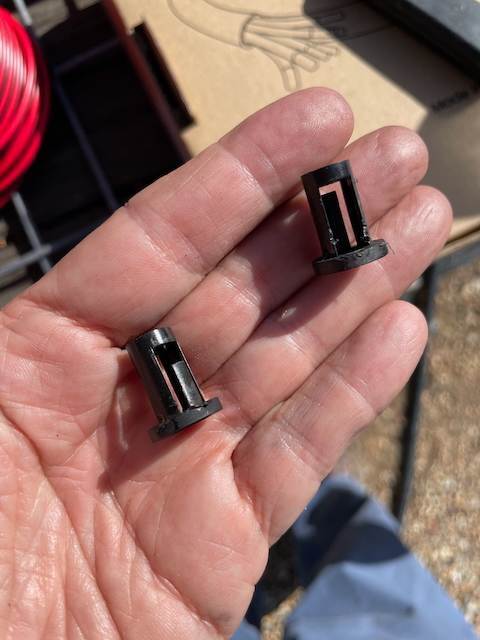
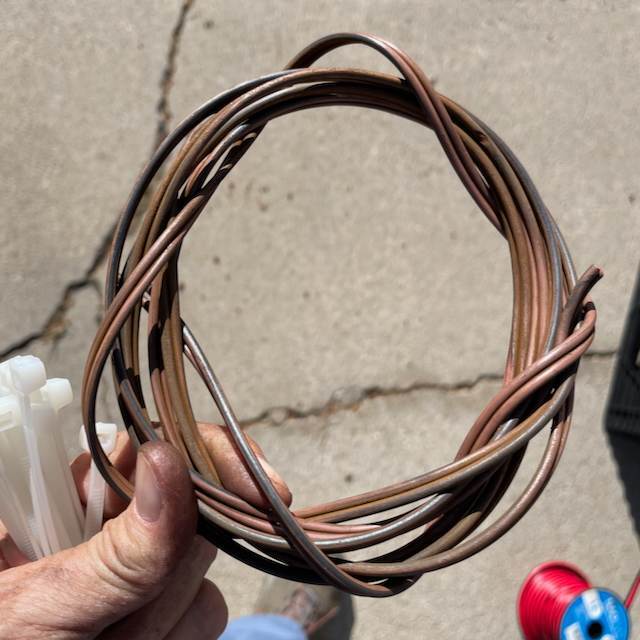
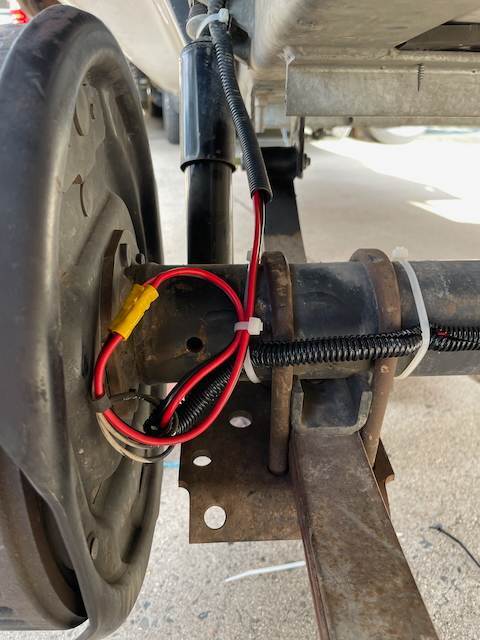
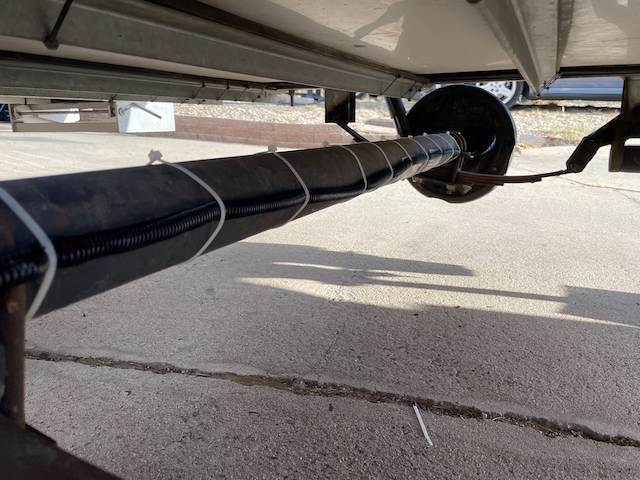
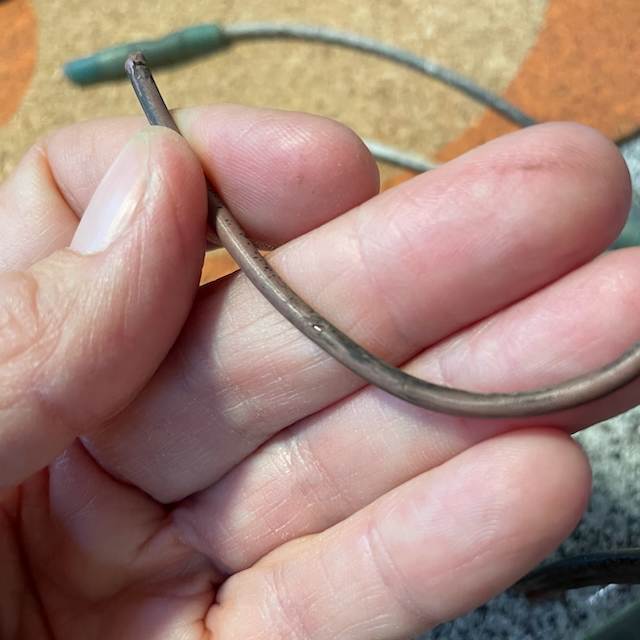
Time will tell! John and I don’t think the wire pulled from the axle looks like the culprit (though only the wire from front axle was pulled, the other is still in there, cut free)… only the small section near the hole with missing grommet was nicked. However, there were no warning messages yesterday. Today will be a longer tow, and I will keep the forum updated.5 points
-
BRIEF UPDATE July 14, 2026: I accepted the generous offer by John @jd1923 and Chris to come farther west to Prescott and tackle this 'Check Trailer Wiring' issue. While my Oliver was jacked up, I was able to take care of some other regular maintenance work, and John helped out with that as well, but I will focus here on the trailer wiring. The main job was to replace the brake wires beginning at the left side (below the battery box) where the wiring exits the hull, and connecting new wires to each of the four brakes. John suggested pulling the new wires through the axle by taping them to the end of the old wires, for various reasons, but once the taped joint reached the opposite side and I needed to pull it out through that small hole in the axle, the tape broke apart. I tried pulling the new wire through that hole with some needle-nose pliers but the wire was so soft that small pieces were breaking off. So we reverted to my initial plan (based on several others here on the forum), and ran the new wires along the rear side of the axles, using split loom and zip ties to anchor it. We found that the butt connectors I ordered from Amazon did not hold; John tested one and the wires pulled right out without any effort. He had some older style butt connectors that we used, with much thicker metal inside, and then we added tape on the connections. I will probably come back to those taped joints with some liquid tape to try to weatherproof them better. (I saw that someone had used a clear sealant -- if anyone knows what that is called, I would like to find it. The liquid tape I have is black like tar.) The finished job looks really good. Note that I haven't tested by towing yet. After the rewiring, I measured the amperage at each wheel, after disconnecting the 7-pin connector from the truck and pulling the Emergency Brake pin. Each one measured about 3.0, with the left front measuring slightly higher. This was a good result in so far as the power was flowing from the Emergency Brake battery (I believe on the Oliver, this is the trailer battery; SOB trailers have a separate little battery for this power). After the tires were back on and everything was back in place, I tested again using the power from the truck through the 7pin connector, with John's son Adam helping me by being at the controls in the truck. Measuring the two main wires exiting the hull (below the battery box) the amperage was 1.85 and 1.71 on the left front and rear wires. This measurement is obviously without being in motion, and my understanding is that the truck will not provide the full power to the brakes in this case; I'm not sure what amount should be expected here, but power is flowing to both wires from the truck. Quoting from @Geronimo John in an older forum post, "... modern brake controllers sense when a vehicle is stopped and back off the power flow to the magnetic coils when stopped..." Yesterday, John and I performed another set of tests on the 7pin Cable wires where they enter the hull and exit the cable, inside a double sized junction box behind the small panel below the vanity sink (see earlier photos in this thread.) We tested amperage for each of the wires, and the 7pin cable seems to be working fine -- even jiggling the wire at the connector and below the Oliver -- so we elected not to replace it. Of course, once again, this is not in motion driving down the highway. None of this is definitive until I actually tow the Oliver, tomorrow morning. I will report again in a few days, and try to add some photos here for clarity. I don't think this is resolved yet, but making progress on eliminating things is good. Many heartfelt thanks to John, Chris and Adam -- they have all been extremely gracious hosts and very helpful, and have cheered me up as well. Many thanks as well to all the other forum members who have been helping out with ideas and links and questions. Now we are heading out for some fun! EDIT: Added Photos with captions. Some of these might be helpful for others. These are the grommets that come with the Dexter Axles -- the wires pass through these from left to right side of axle. NOTE that they have sprung tabs on them to keep them in the axle; when you try to remove them, the tabs break off. They are not rubber grommets they are stiff plastic. I tried to replace the missing one with a rubber grommet (I cut it to place it around the existing wire) but my rubber grommets were not deep enough to cover the thickness of the axle. These two came from a new Dexter axle that John ordered. This is one of the nicks in the wire where it passed through the hole in the axle without a grommet. There was a larger section of exposed copper, but I can't find it this morning. This is the brake wire pulled from the front axle; I didn't see melted insulation nor other nicks exposing the copper here. (The original rear axle wire is still inside the rear axle --EDIT: but it is cut loose from the brakes. There's a new brake wire run outside that axle as well.) John's handiwork -- thank you John. Butt connectors splicing original to new brake wires, before being wrapped in tape. I would have preferred heat-shrink style for better weather-proofing, but this is what we had to work with. The front axle with new wire from left to right brake assembly. Butt connectors (both images after crimping); the new heat-shrink style on the left didn't hold the wire at all -- it pulled right out. The old style held, but is not weather-proof. They are taped for now. I'm seeking a good quality liquid tape or other product to address this.
5 points
-
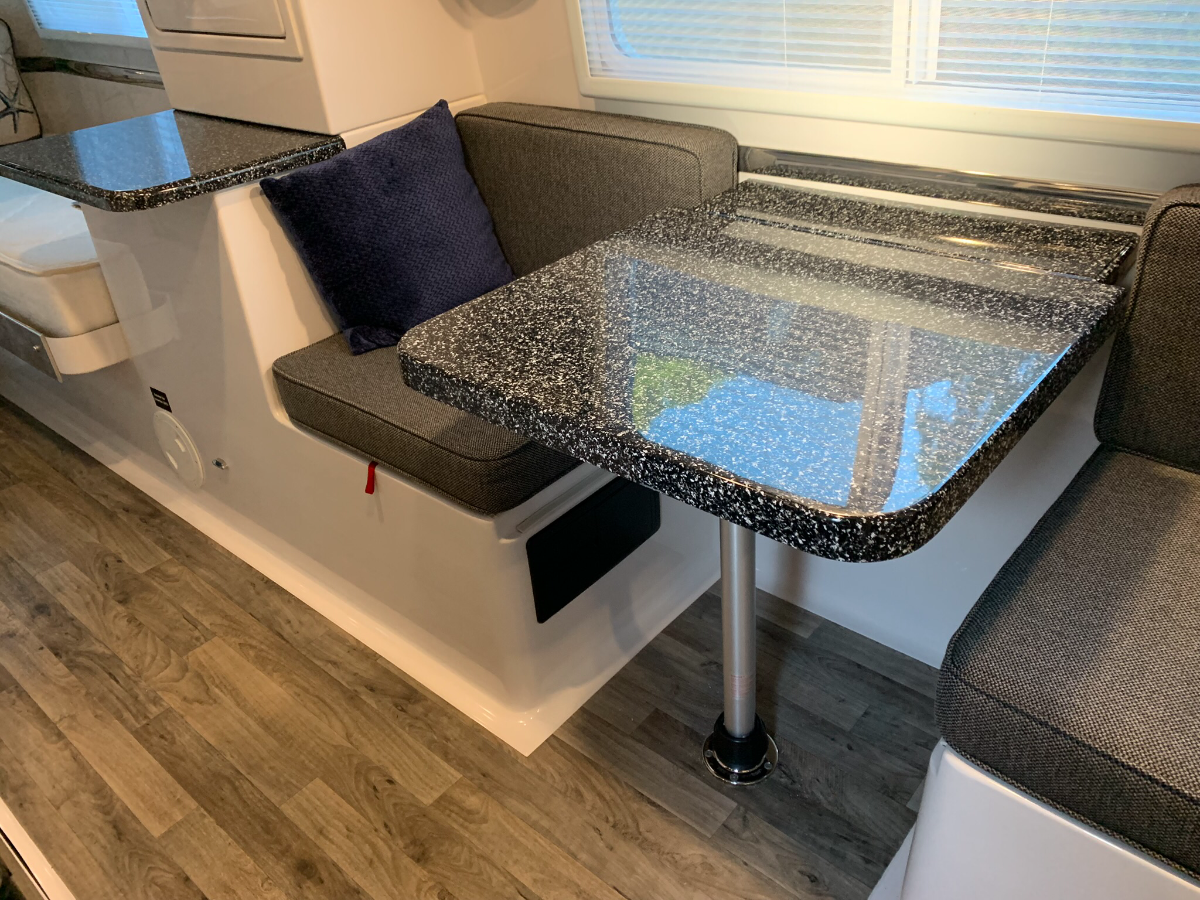
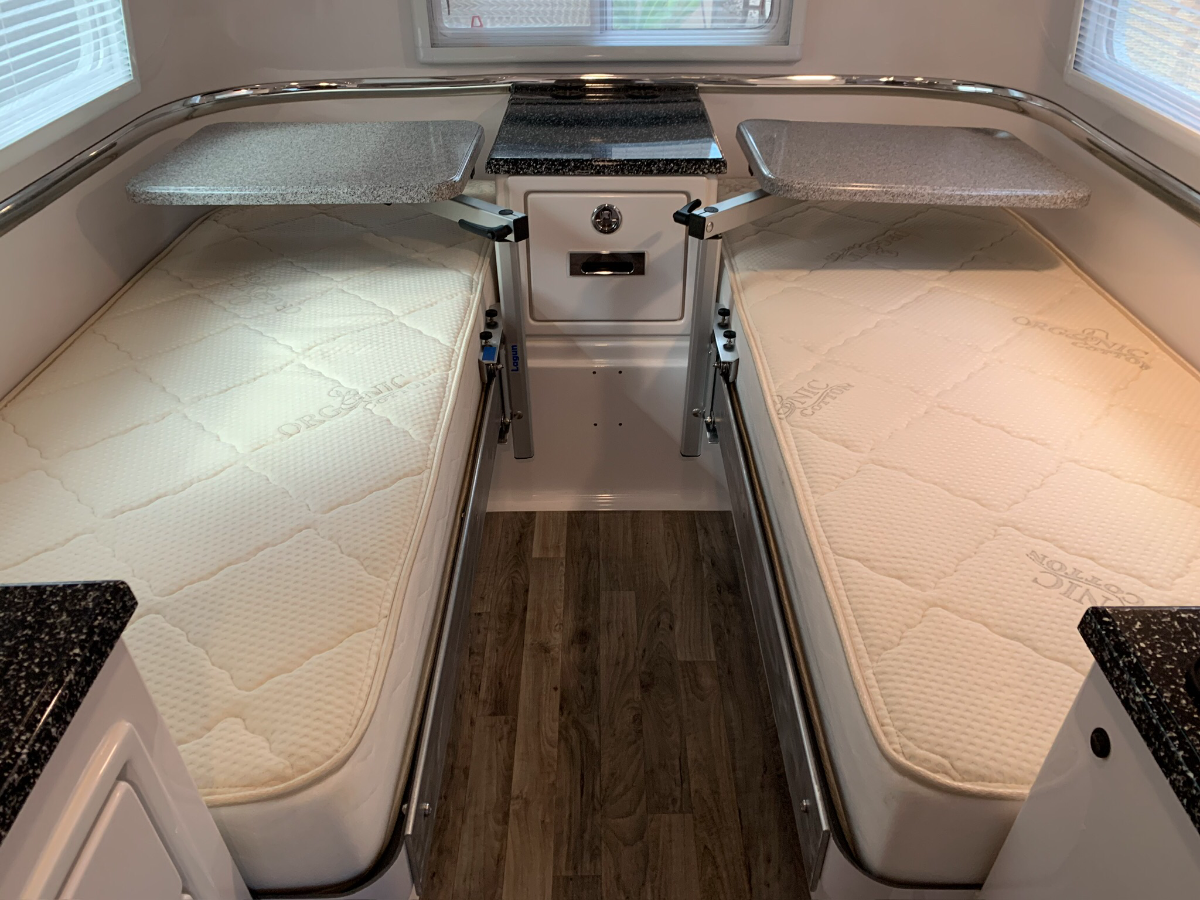
Same here! My pantry shelf mod involved extending it out to make it even with the adjacent twin bed with heavy duty Velcro for securement. The additional length provides more counter space/staging area. I also extended the dinette table an additional 7” for an equivalent bump out; making its utility for dining much better. I previously installed sliding Lagun tables for each of the twin beds and used the original Lagun tabletop for the pantry extension, likewise the original pantry shelf for the dinette table extension. We’ve been very pleased with these mods. Here’s a pic of the two Lagun tables, a much more challenging mod I must say! For those that have the Lagun option, you know the nightstand drawer is restricted when this table is in use. In my year model the nightstand tabletop can be lifted off, allowing access to the drawer content from atop; which was acceptable, since I preferred the leave the Lagun mounted for daily use and stowing it was a PITA. By design, I can now open the drawer even with both Laguns permanently mounted; and the wifey is now happy to have her own bed table, being I tended to ‘hog’ the original one for self use! There have been a few mods featured in this forum on relocating the Lagun mount to the side of the nightstand to enable front drawer access and my mod, as well.
5 points
-
Where's Ollie is my favorite thread and it's 10 years old! Thanks @Mike and Carol for getting it started!5 points
-
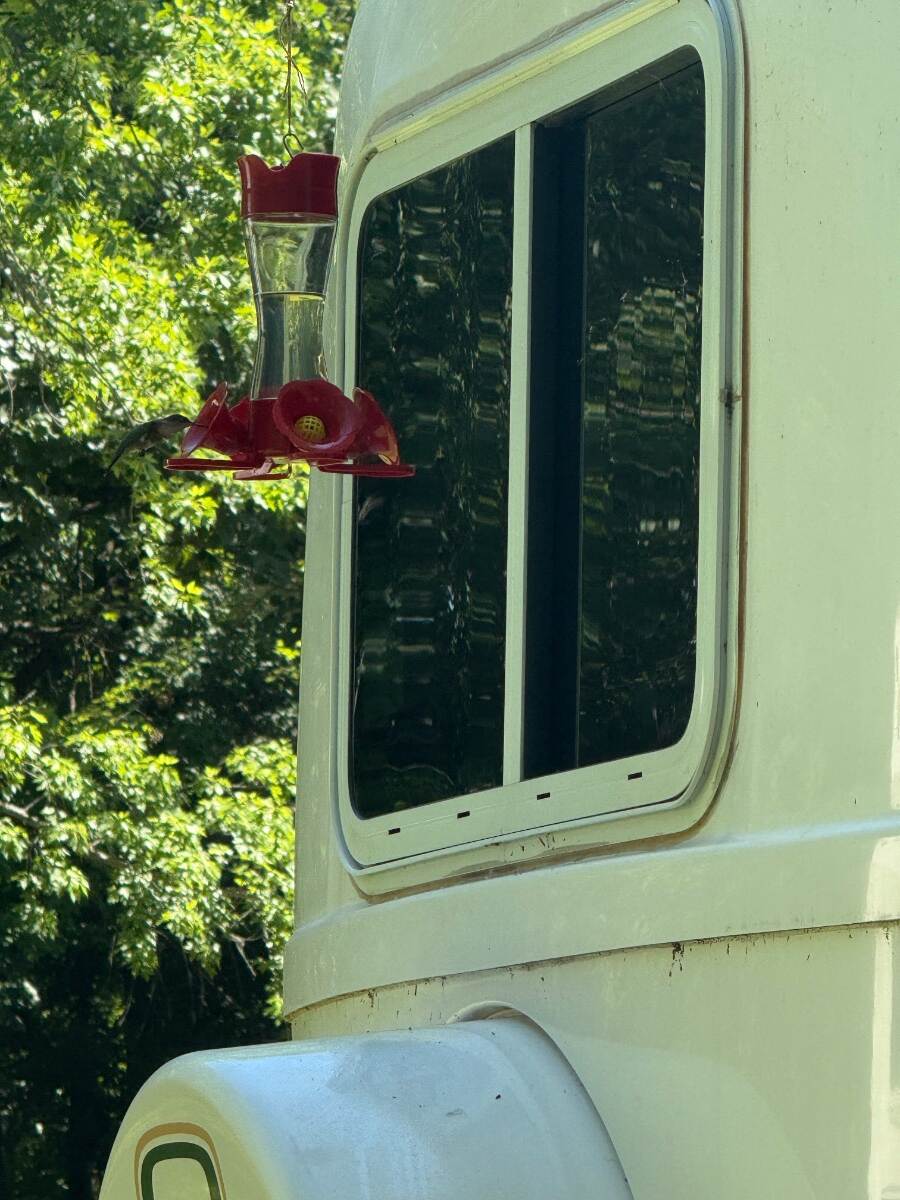
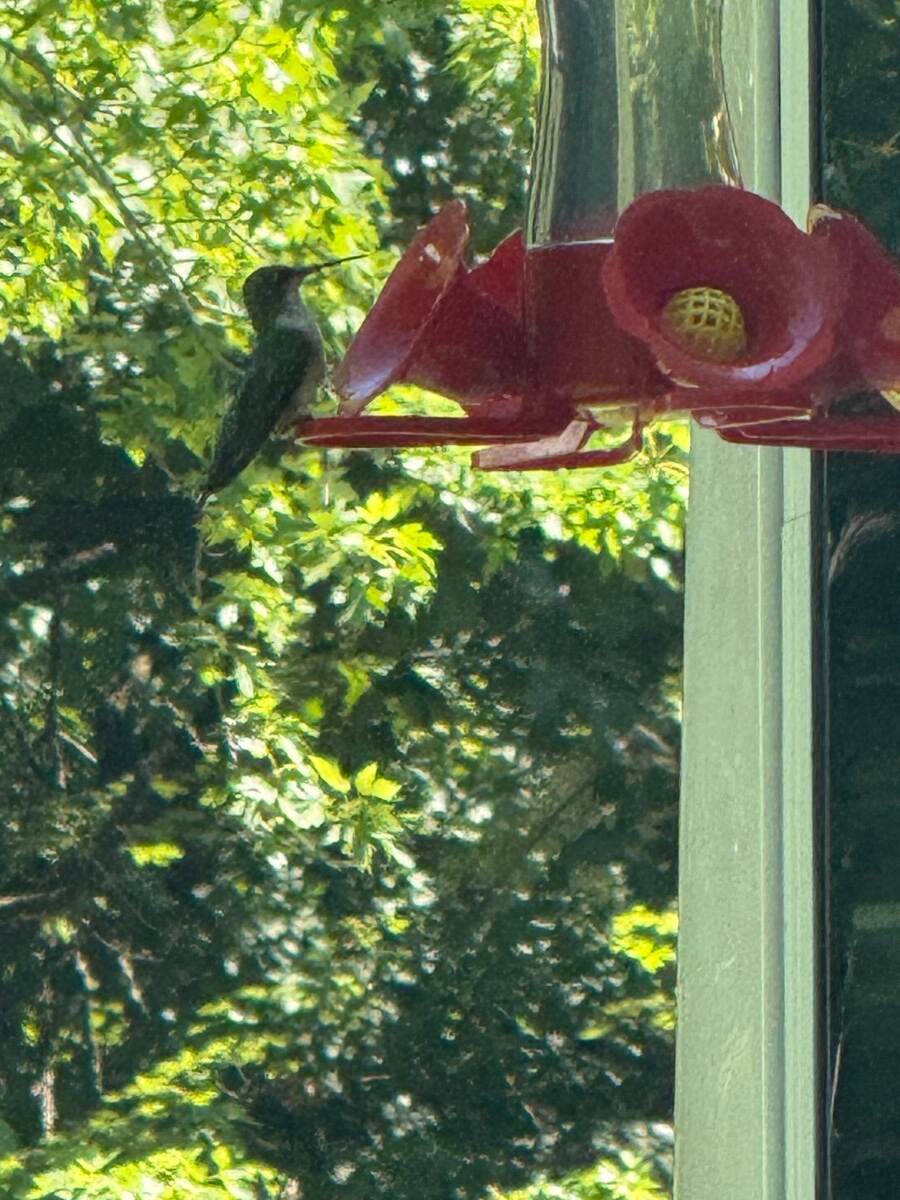
Hanging out at Glacial Lakes State Park (near) Starbuck Minnesota. Our second time here as the campground hosts. Been here since the first of July and leaving the 29th. I saw a camp host at another campground that put out hummingbird feeders, so I thought I’d give it a try. This isn’t “elegant” by any means. I grabbed an old fishing rod and secured the handle end under the edge of the A/C - twist-tied it to the TV antenna to keep it from coming loose. (Extreme vibration of our love-to-hate Dometic Penguin 2) Hummers showed up less than 24 hours later. I have it rigged just outside of the rear window so we can relax in bed and watch them come and go. IMG_9854.mov
5 points
-
These windows on the 2026 models are the ones that only open 3" at the bottom. The 90 degree windows are only on the 2027 models and should not be affected as the design is completely different from the ones on the 2026 models.5 points
-
Welcome and Congrats and enjoy the delivery day! There is something really special about taking delivery of a brand new Oliver, it was for us. Before you know it your day will be here!5 points
-
Update! I contacted Jason Essary per Topgun2's advice and we have a path forward. Oliver will be rewiring our Legacy Elite so that the induction stove top will run through our inverter. I have decided to keep our 2000w inverter as OTT indicates that is part of the build as designed. I was aware that my unit was equipped with this inverter when I made my order. They will also be adding an omni directional antenna which was on my build order but was not put on my unit. It is something that we have often used and prefer that it is installed. Finally, they will fix the lettering on the side of my unit given it is badged as a Legacy Elite II but is actually a Legacy Elite. That is an easy fix. My hat is off to Jason Essary for getting this hammered out so quickly. I called at noon, got his email, sent him an email, and had a resolution by mid afternoon. Great response. Sales will cover the costs of this service. I am now just waiting on a service date and plan to travel to the OTT facility for the service. Thank you to everyone on this forum. Your advice and support has been great! I know I will have more questions in the future and hopefully can pay back by helping others someday as well. Onward to explore this amazing country😊! Lamar5 points
-
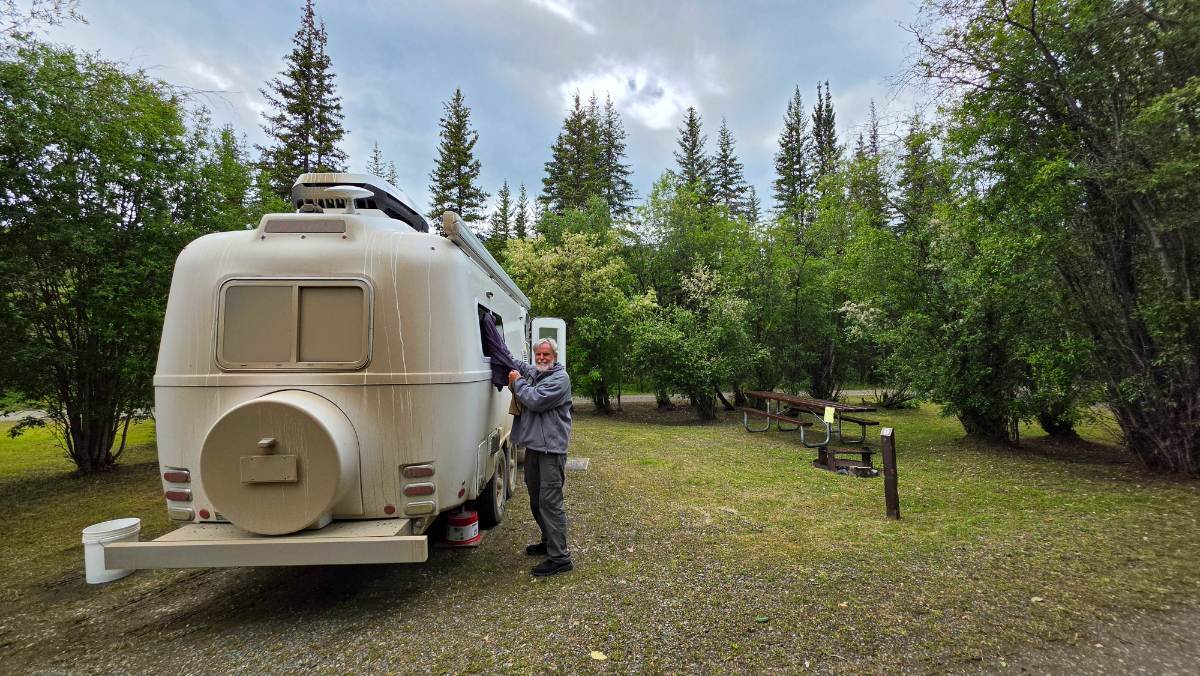
Walker Fork Campground (BLM) approx 15 miles north of Chicken, AK. 33 degrees this morning but warmed up nicely while we panned for gold...not much luck...this time. Dirt courtesy of Top of the World Highway coming from Dawson City, Yukon Territory.
5 points
-
I wasn’t a fan of the dealer program, but did have a positive experience with the dealer in Salem, Oregon. What I would like to see in the near future is an Oliver Service center somewhere west of the Continental Divide, preferably in a smaller city. Remember, any town with a stoplight is too damn big.5 points
-
Many owners with years of service of their Gray, Blalck and Vent valves find them more difficult to operate. Mine got to that point and I learned that the problem with mine and others on the internet is not with the cables, but with the slde valves themselves. I have attached a DIY for the effort that is a simple fix that can be done almost for just your time and likely tools and supplies you already have. Hope you find the below helpful. GJ DIY - Sanitary Drain Valve Cables.docx4 points
-
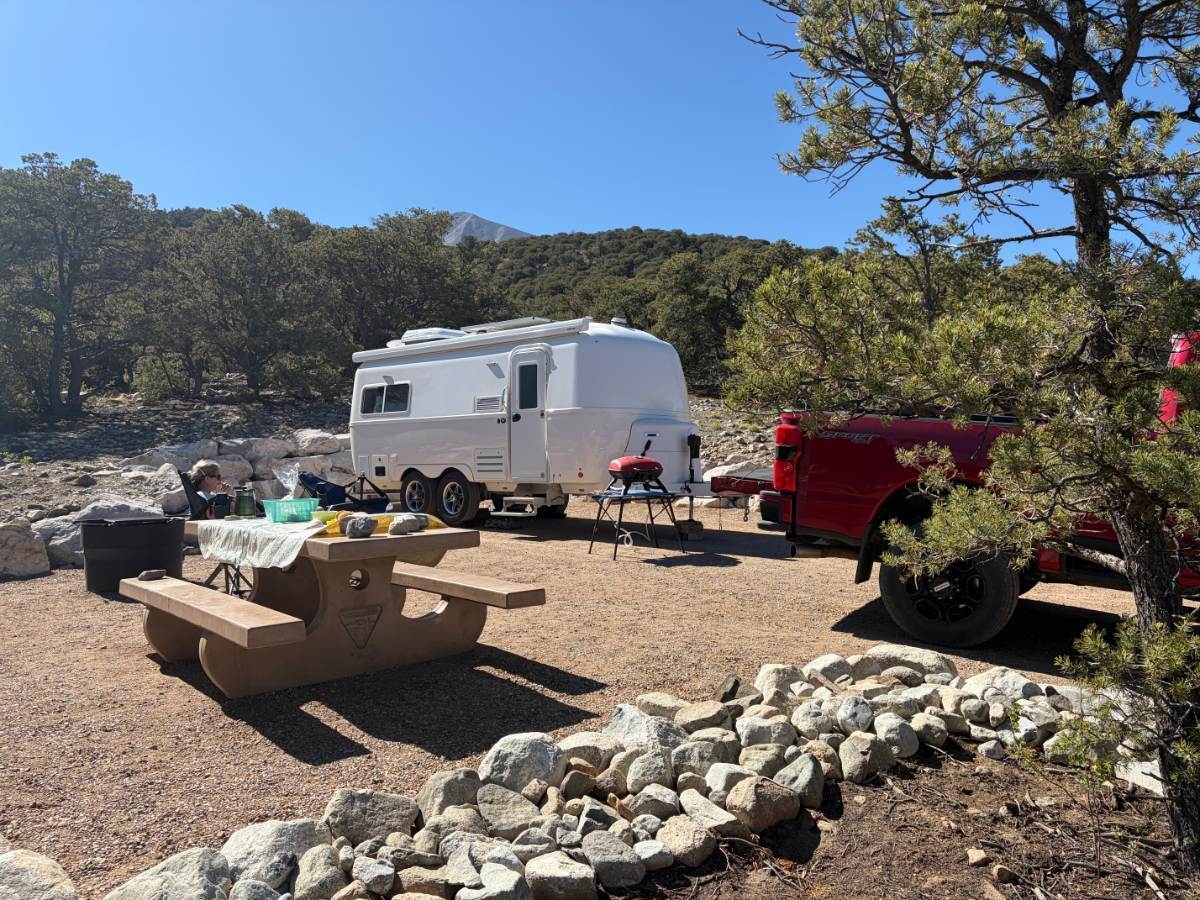
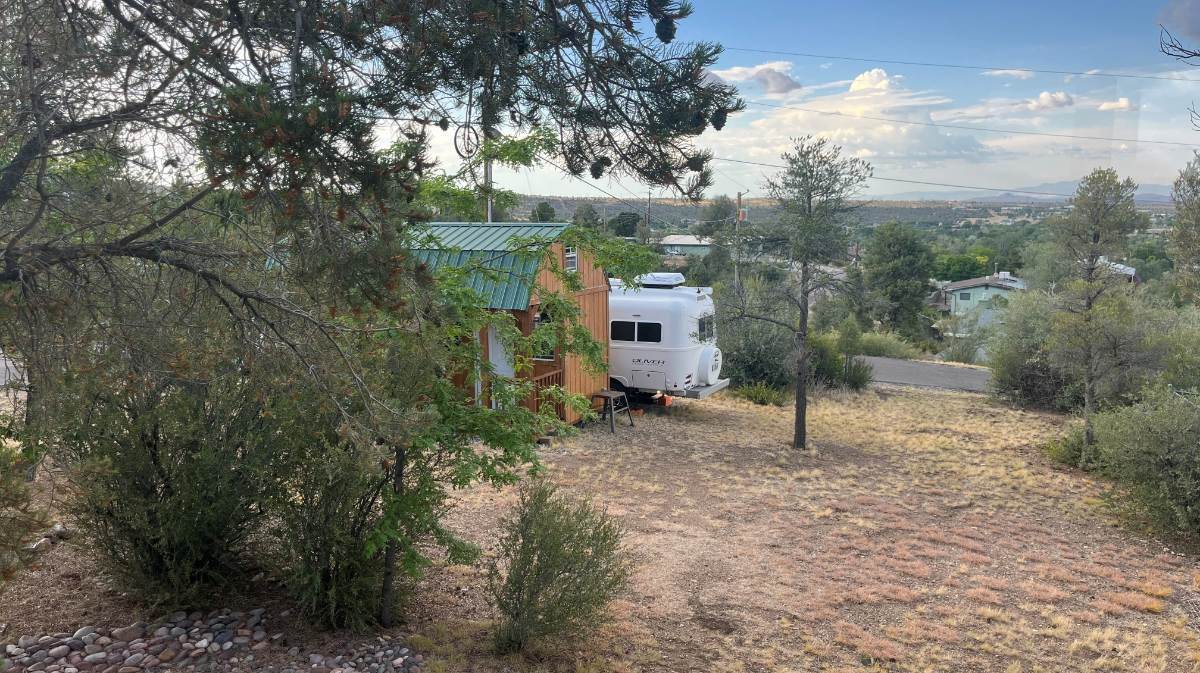
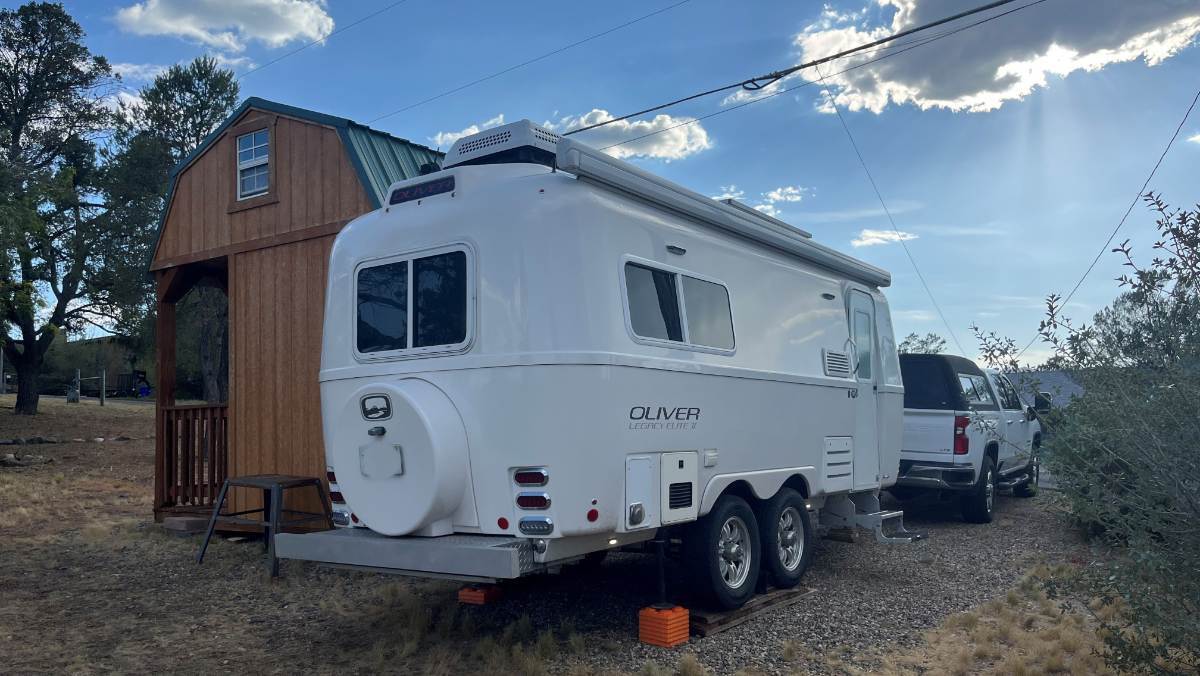
We picked up our trailer at 11:30a and were at Great Sand Dunes National Park by 7p. It was a whirlwind, and for the first time ever we saw another Oliver at the same place We head out again this weekend for more Colorado adventures. Actually spent the past month getting better acquainted with our “Oscar.” Art and Beth
4 points
-
Welp, after first talking to Anita in 2021 and putting maybe 30k miles on the microminnie we ended up with, we paid for an X23 build slot today. We live in SETX and have been scheming for an Oliver for a while now. Did the factory tour 2 years ago. We should be taking delivery during our annual trip to Tenn. to see family. Decided to skip thr solar awning -- spider sense tells me we'd break it somehow. We'll catch flack, but we'll be using our 3rd gen Tacoma as a TV for a good while. No plans for mountains, and when we do we'll get a full-size. We live in SETX, and it is _flat_ here.4 points
-
Best gift ever! Some of my greatest memories were out camping with my folks and grandparents in our “swanky” Sears and Roebuck canvas tent. Oh if they could see me now…🤣4 points
-
When I entered John's Oliver, I was interested in seeing some of the modifications he has made. First I wanted to see his electrical area under the aft dinette seat, as I am trying to learn how to find specific parts. Then I checked out the air fryer (where a microwave used to be) and his controls (mostly different due to the age of his unit, but also because he has changed out a lot of the systems.) It was probably 10 minutes later when I looked up and commented on how shallow the Chill Cub air conditioner was -- almost flush with the ceiling, making a sleek surface. What I did NOT notice was that it was turned on. I couldn't hear it at all. He lowered the setting to make it blast and I believe my impression was that the noise was less than 30% of the noise of my Dometic. I rarely run my AC, mostly because it hurts my ears. On the outside, it's boxy. But on the inside, all I can say is "Wow".4 points
-
Perhaps you could place two treated, upside down blue solo cups into the holders on one of these drinking hats for when you go hiking? Think of the conversations you would have along the way 🤣 Keep having fun and sharing.
4 points
-
Ours too, but we're hoping to go camping for a few days next week! 😎 We just had a guest Ollie here, for a few great days! 😂 But now she's gone. You might know who. Woke up yesterday, looked out our living room window and I got scared! Thought for a moment we still had a Dometic P2, oh NO! 🤣
4 points
-
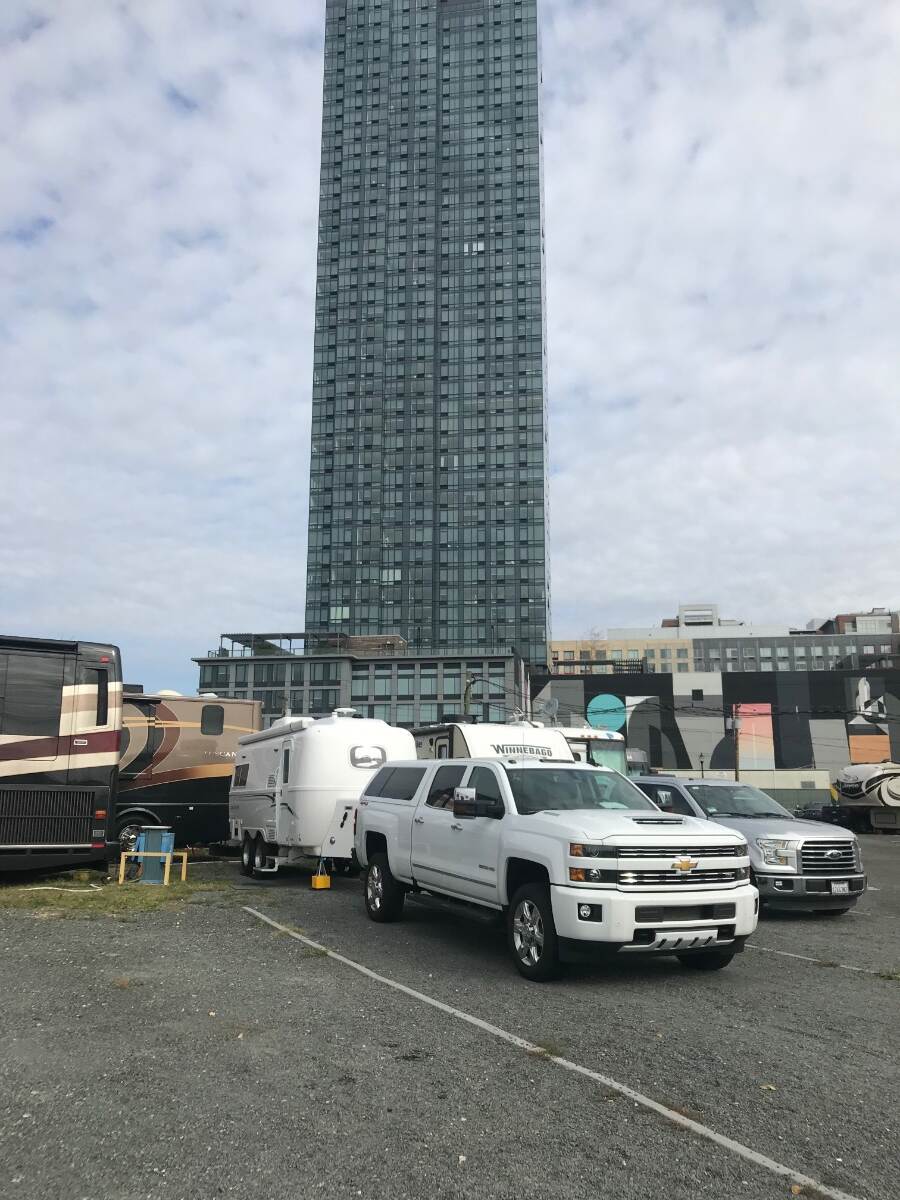
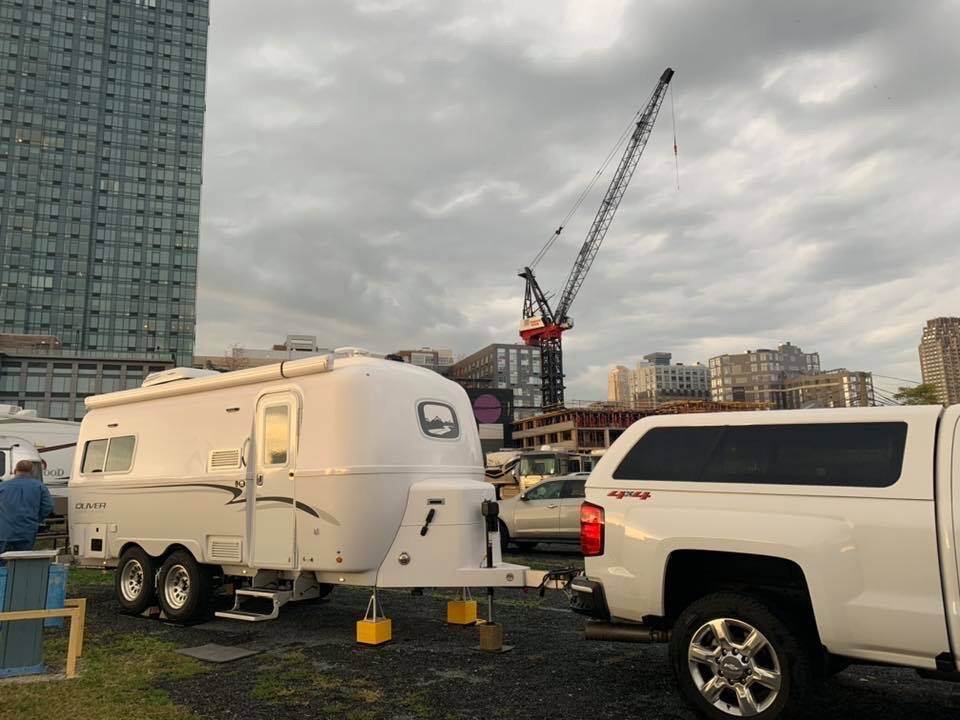
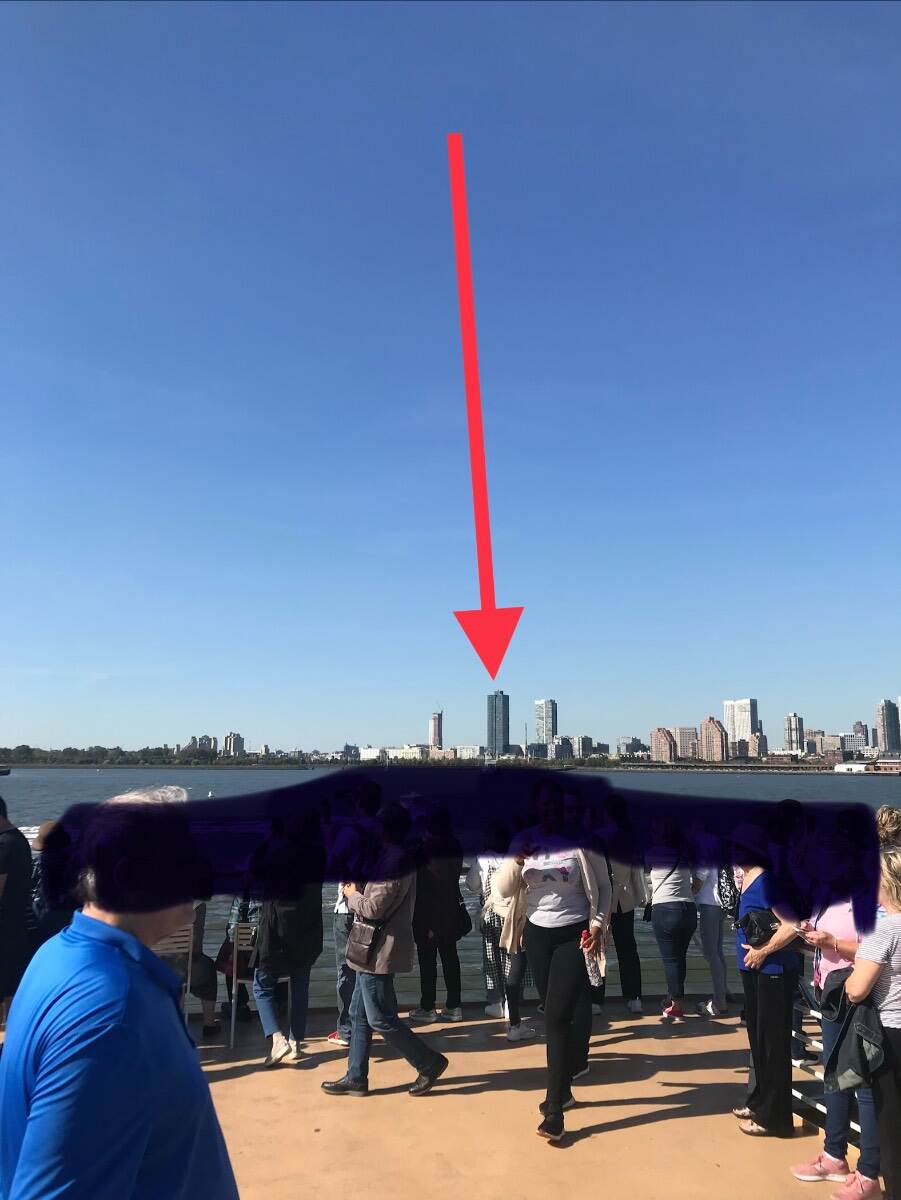
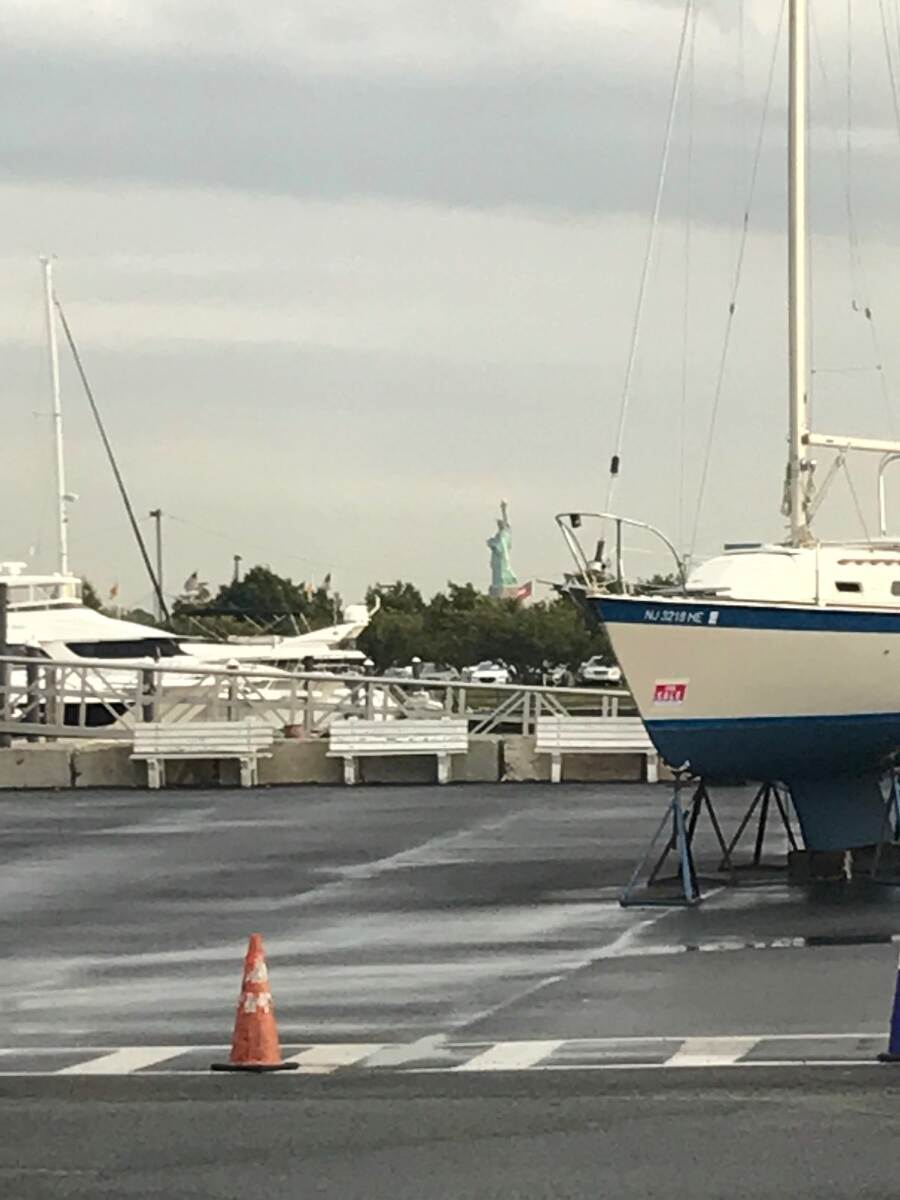
Over the past few days I’ve looked through all 39 pages of this thread. Very pretty pictures of “Where Is Ollie”. I have pictures of a not-so-pretty location. During late September, 2019 our Oliver was here for a few days We were parked near the base of this building A hint as to the location A screenshot from the campground’s website At the next campground after my one-and-only venture into NYC our Oliver was parked here. A much better looking location. September 30, 2019. And then again in June of 2026. Libby’s Oceanside Camp, York, ME. One of our favorite campgrounds. Bill
4 points
-
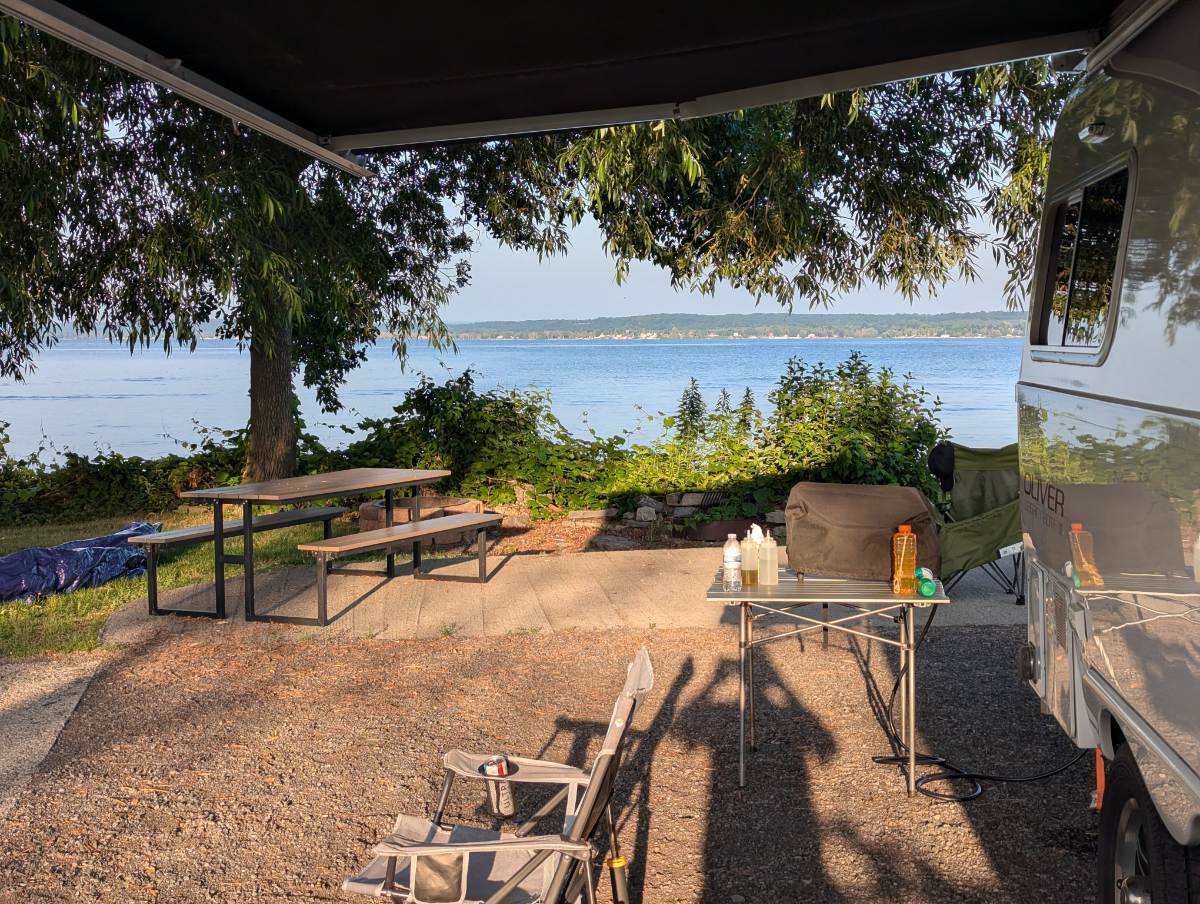
Association Island campground on the shores of Lake Ontario in upstate NY. This place has an interesting history. The island used to be the General Electric executive retreat. Thomas Edison held court there. Now it's a campground surrounded by water (there's a causeway), but some of the original buildings are still there. The largest, which was a lodge, has been refurbished into hotel rooms and there are dozens of sites and cabins, including many waterfront sites.
4 points
-
The ones on the 2027's are completely different and should not suffer this same fate.4 points
-
For those owners that want to follow this story, please do so at https://www.facebook.com/groups/OllieOwners/permalink/2252240891847686/ I don't want to see this thread turn into "War and Peace" like the Alcan one did.4 points
-
We actually tested this in Florida this past April. Outside temps were low 90s with 80%+ RH. With the Chill Cube in Dry Mode, the highest we saw inside was high 70s and 55ish% RH. So it didn’t quite get below 50% humidity, but it made a huge difference. At 77°F/55% RH it was comfortable enough to hang out in. In those conditions I’d say 55-60% RH is probably the realistic best-case without adding a separate dehumidifier. Bear in mind our Brinkley 5th wheel is not as “efficient” as an Oliver. We love the Chill Cube, the variable speed compressor is very efficient, we have seen similar numbers than @jd19234 points
-
There are times that I feel exactly the same way with regards to being out in the world! Bill4 points
-
At one point, we were traveling with 2 cats, male and female siblings. One day the screen door got left unlatched and Callie (the brave one) wandered out, followed by Max (the big coward). Steph saw them and walked toward the trailer. Callie jumped back inside but Max panicked and dove under the fifth wheel. Eventually, by securing Callie inside and leaving the door open, Max made a mad dash back into the camper and hid under the covers. The outside world looked pretty good. Until they were in it. 🙂4 points
-
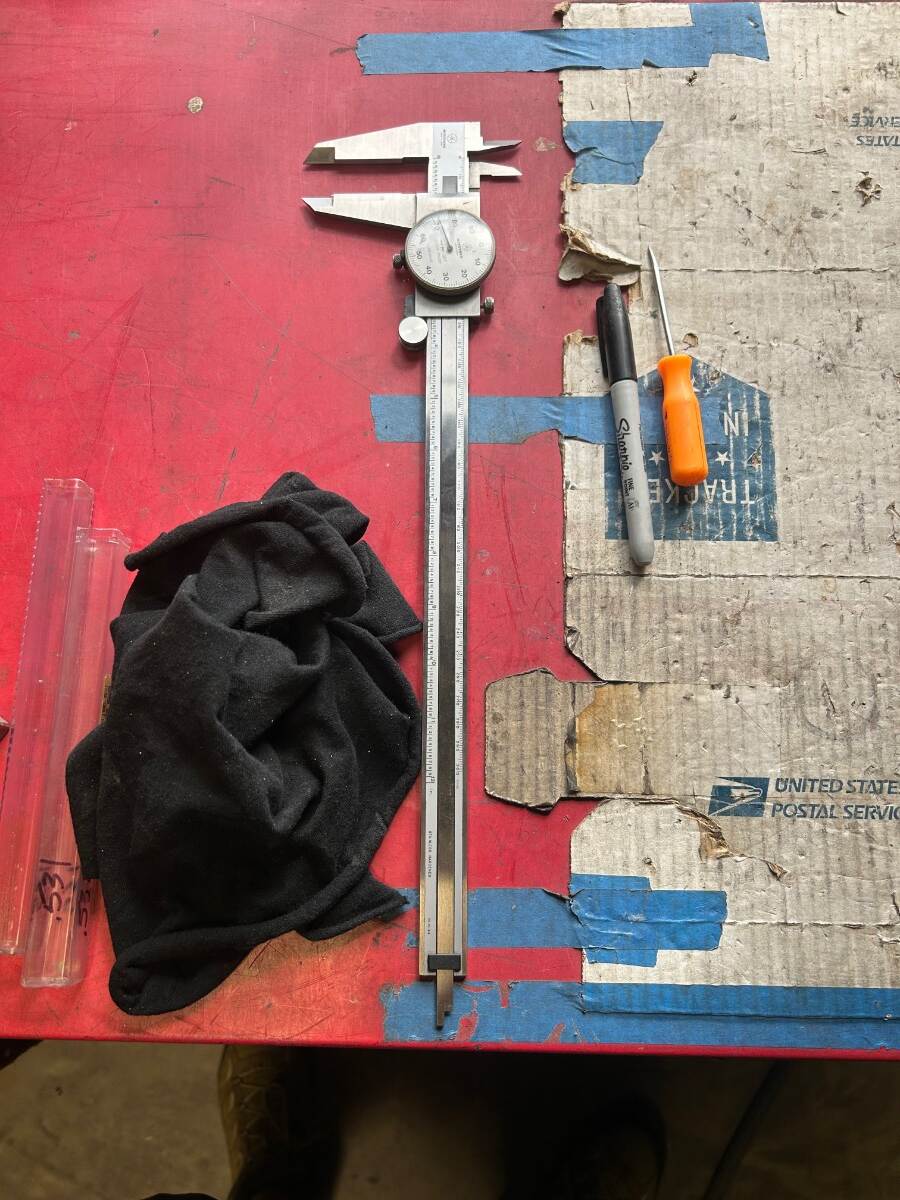
You are 💯correct on the stamping of the hitch sleeve being different on each coupler during BD’s production. This has to be accounted for and calculated when drilling new holes for a proper fit. My buddy who is a machinist measured each of the 1/2” coupler holes individually and then transferred and dialed in those exact measurements onto the new 2 5/16 coupler. He totally nailed and fit was better than factory. An inside pic of how different the couplers actually are. Pic of the bottom of the 2” coupler on the left and the new 2 5/16 coupler on the right. You cannot see the difference in the sleeve fold, but it’s not the same and thus requires exact measurement of each hole prior to drilling for proper precise alignment and fitment on the tongue. My buddies tools of the trade and his knowledge were invaluable today.
4 points
-
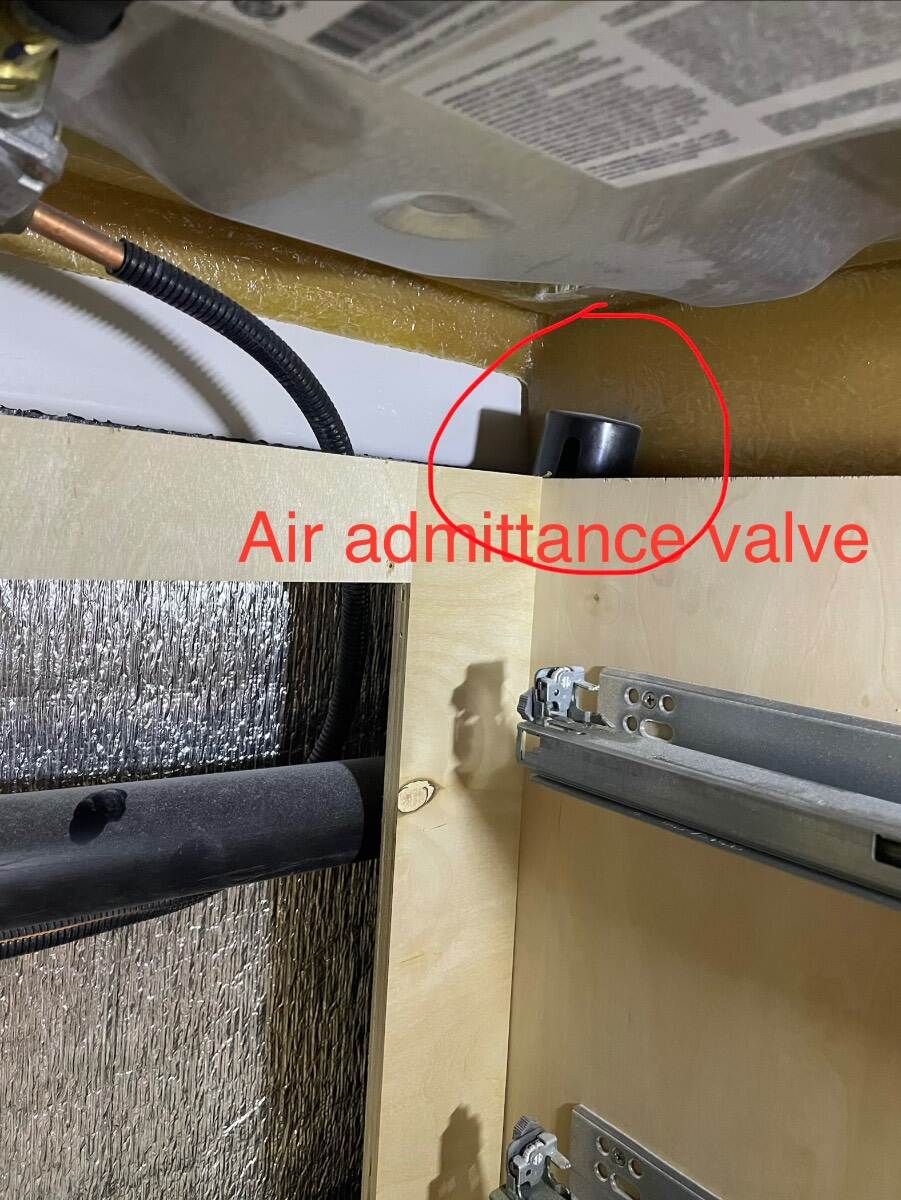
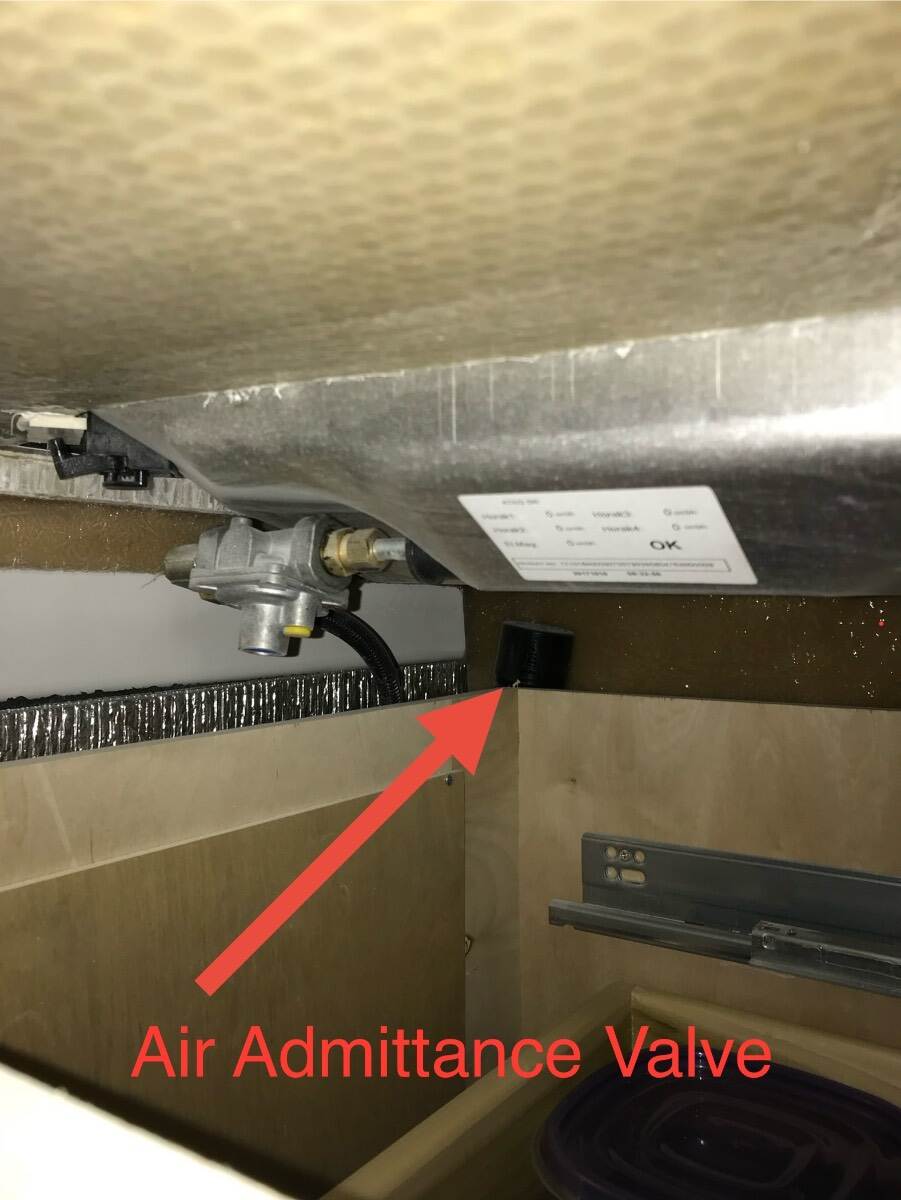
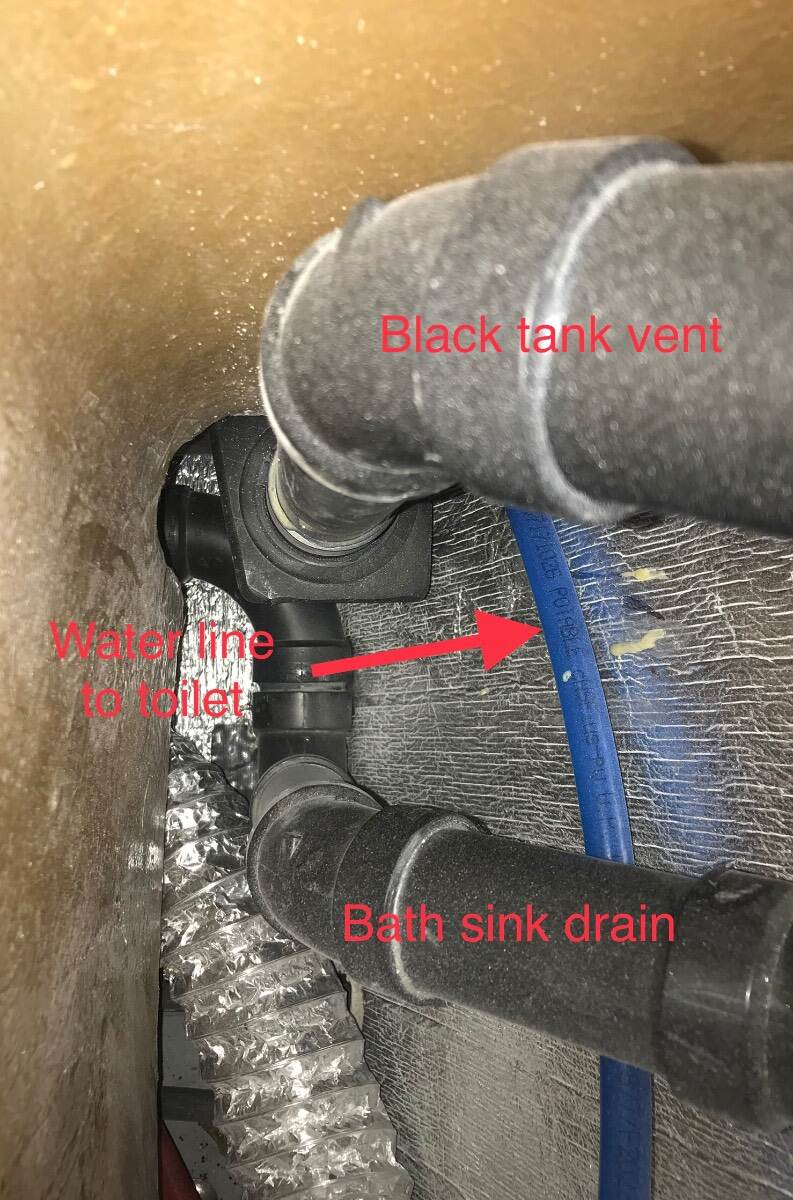
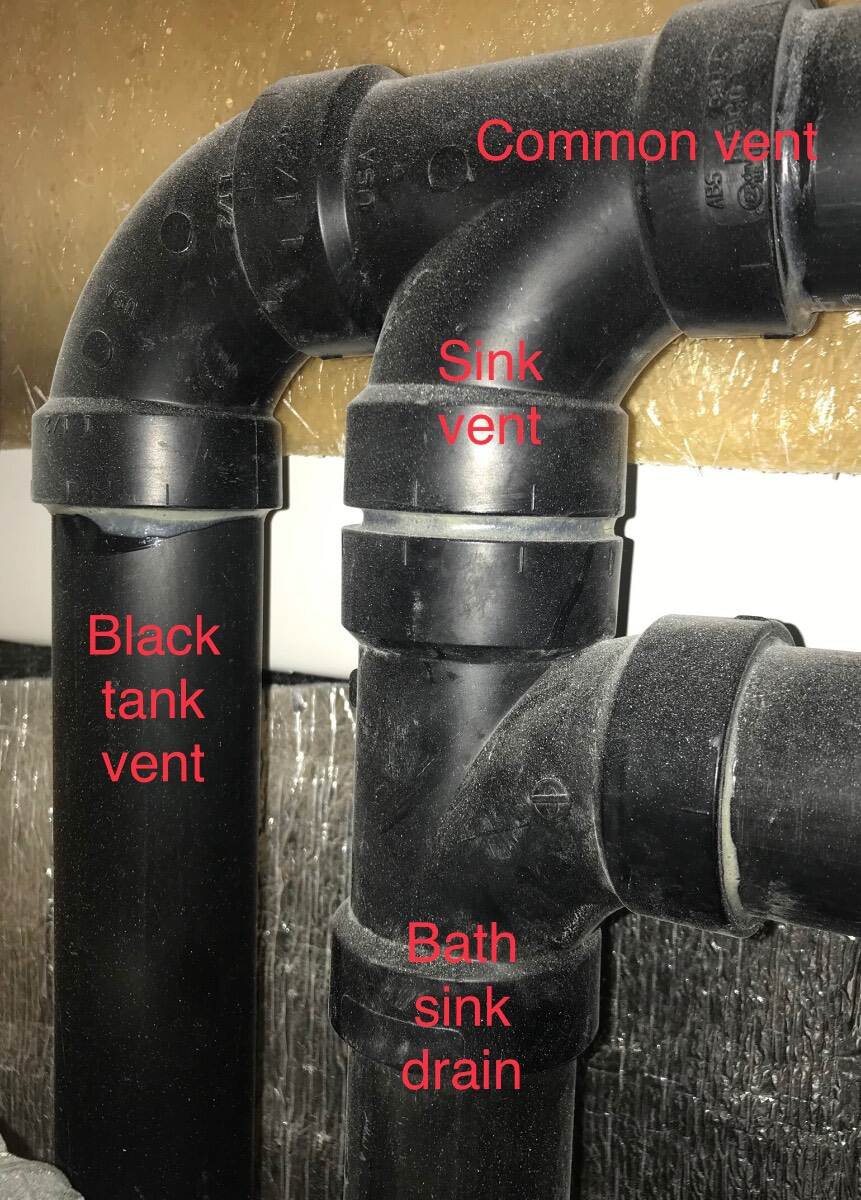
That roof vent vents the black tank all the time and the gray tank only when the shower valve is open. There is an AAV - air admittance valve - under the kitchen counter in the back right corner of the kitchen drawers that should allow air into the gray tank when draining even if the shower valve is closed once the water level drops below the place where the kitchen sink drain enters the gray tank. The bath sink drain and shower drain flow through the open shower valve to the gray tank. Bill
4 points
-
We were in the first one sold in January, at the Eggs 'n Smores rally in Florida. The layout is nice, and seems spacious. It obviously isn't Oliver quality, but the one we were in was fully loaded at $59,000 if I remember correctly. The new owner said that a twin bed version was under consideration. When we were shopping, in 2021-2022, the Oliver was beyond our financial reach, and we were looking at Casitas and Escapes. It took selling a number of vehicles and toys to finally afford the Oliver, so if this Casita 24 had been available then, it's probably the direction we would have gone instead. No regrets, and we clearly love our Oliver. It was just a stretch that we might not have made at the time.4 points
-
Never thought it would last this long! Since we’re not able to travel for a while it’s inspiring to see everyone else contribute with really interesting places to keep it going. I had our Oliver in the driveway last weekend for some maintenance and at one point I just sat at the dinette and thought we’ve got to get on the road soon! Mike3 points
-
My Tacoma was a 2012 and I had installed the TRD Supercharger, so plenty of power. The limitation was weight and range. Be careful not to overload - tongue weight, your body weight and cargo add up fast. I was stopping every 200 miles or less to fill the gas tank. Also, be aware that the overall weight of the Tacoma makes it easier for the trailer to push around in certain circumstances. I was always cautious on downhills and downhill curves. We’ve always liked the Tacoma’s we’ve owned, they just aren’t optimal for towing a 6,000 pound paperweight! After upgrading to a couple of half tons we’ve now been towing with a 2500 diesel for the past 5 years and the difference is night and day. A Tacoma will do the job, just be wary of its limitations! Mike
3 points
-
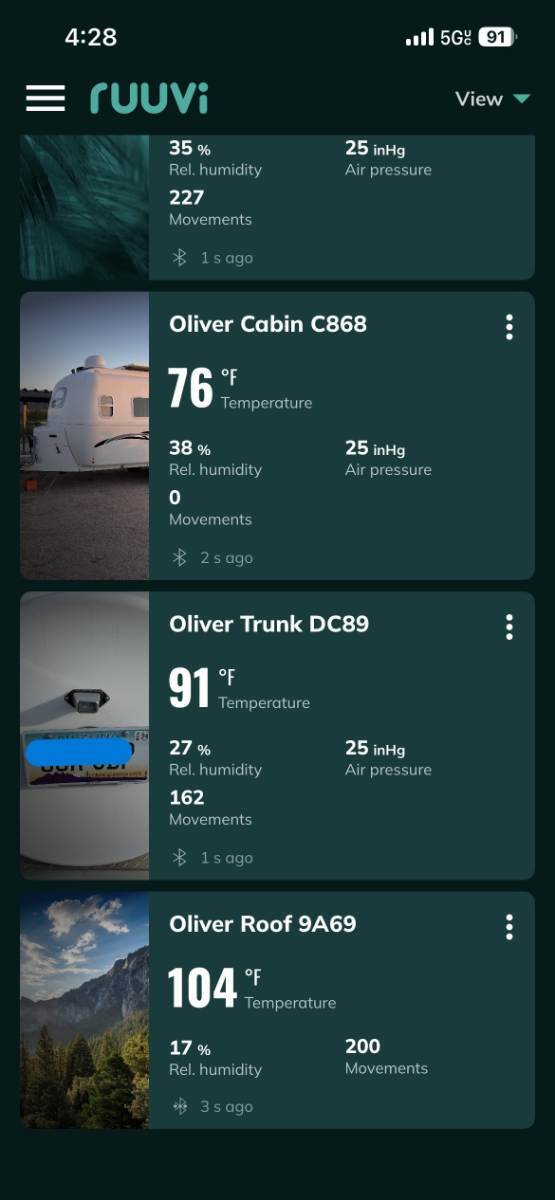
Performance update => I was able to run the Chill Cube 24x7, thermostat set at 74F, for 4 days producing this data. Data was recorded each day later afternoon 5PM +/-. The Chill cube did not quite produce the set temp in the heat of the day but did so the rest of the day. The high of 76F was still quite comfortable in the cabin. Off course our Oliver was unplugged, but in addition to battery power, our 320W rooftop solar was adding power consumed by the A/C. The table shows Ah used daily. Keep in mind this is with the A/C running 24x7 which is rarely our use case! Having 900 Ah it appears I can count on running the A/C 24x7 for 3 days, 4-5 days if it’s off during portions of the days. With 600 Ah you could truly count on two full 24 hour days. The picture below shows cabin and outdoor temps one afternoon during the test at 4:30 PM. The cabin temp is read by a Ruuvi sensor mounted above the kitchen sink. The sensor titled Oliver Trunk is positioned in the rear basement, near the incoming water lines down by the 4" drain plumbing. For "Oliver Roof" I placed a sensor rooftop under the solar panels so that it is in the shade. If I took this picture 1-2 hours earlier in the day the roof temp would certainly be above 110F! I had no idea these results would be so positive and being the avid boondocker, it's great to know we can now count on A/C cooling anytime/anywhere! When you have the old-school A/C, with the basic single-speed ON/OFF compressor (Dometic, Truma, Tosot, Houghton, etc.), you will use approx. 100 Ah per hour in the heat of the day (assuming 1400W while the compressor is ON). The inverter or variable-speed A/C will consume in 24 hours what the standard A/C will consume in just 2 hours, OMG! (BTW, the Dometic P2 will produce worse results since it uses 1800W when ON, or 150 Ah/hour). The technology capability today is amazing. Time to stop waiting on the next great product. We’re not getting any younger! 😎
3 points
-
If they can afford it. This new larger Casita is almost exactly what we paid for our Oliver at the time in 2015. In today's dollars it wouldn't be worth (to me) spending $100K ± for any sort of camper or RV including the Oliver. Like so many here we also looked at the Airstreams back in the day, lovely interiors but thats about it and way too many issues with them. Oddly I have never understood why the Oliver and Airstream are compared to one another so often other than their somewhat similar exterior shape. Aside from that they have very little in common. The Oliver being more utilitarian and Airstream more of a luxury accommodation. We also looked at quite a few Casitas in those days, cheaper for sure but just couldn't quite gravitate to love them. Also looked at a number of Escapes which were sort of ok with only one floorpan that made much sense that being their 5th Wheel. Interiors looked a bit dated and same for the Bigfoots at the time. I still have a lot of respect for the Bigfoots but they don't look as sleek as an Oliver by any means. All that said regardless of cost I wouldn't be interested in a larger Oliver. Might be nice once you arrive but lugging the thing around would not be appealing let alone getting into some of the smaller tight spaces one can do with the current Oliver. Heck I have a hard enough time getting ours into the driveway as it is.3 points
-
I had removed the Dometic Penguin A/C prior to this work. I temporarily filled the 14x14” opening with a piece of plywood to keep dust out while allowing Cameron the room above to make the entire rear roof shine! It’s always a mess under an old A/C. Good thing we did because the new Chill Cube is a foot shorter to the rear. With my son’s help, we installed the new Furrion Chill Cube A/C. One last task was to restore the rear bumper area. I removed the mounts for the bicycle rack we don’t use, drilled out more rivets and removed the deck plate and folding bumper. I cleaned the inside waste hose area, and steel brushed, sanded and ceramic coated all parts. I've been wanting to write this up for a few months now. Chris is out of town on her annual "Sisters Trip." Adam's been working overtime and it's boring being home alone. That’s it – she’s all done! 😎 When it's time for some love again, I'll drop her off with Cameron for a renewal! No more Ugly Duckling, but quite the Beautiful Swan she is now!
3 points


.jpeg.0f93612bbf4fb0d95523906b33480b7c.jpeg)
.jpeg.7457453c7ac37518691adc6a5238294f.jpeg)


-
Recent Achievements
-


")


")
