Leaderboard


Popular Content
Showing content with the highest reputation on 06/21/2026 in all areas
-
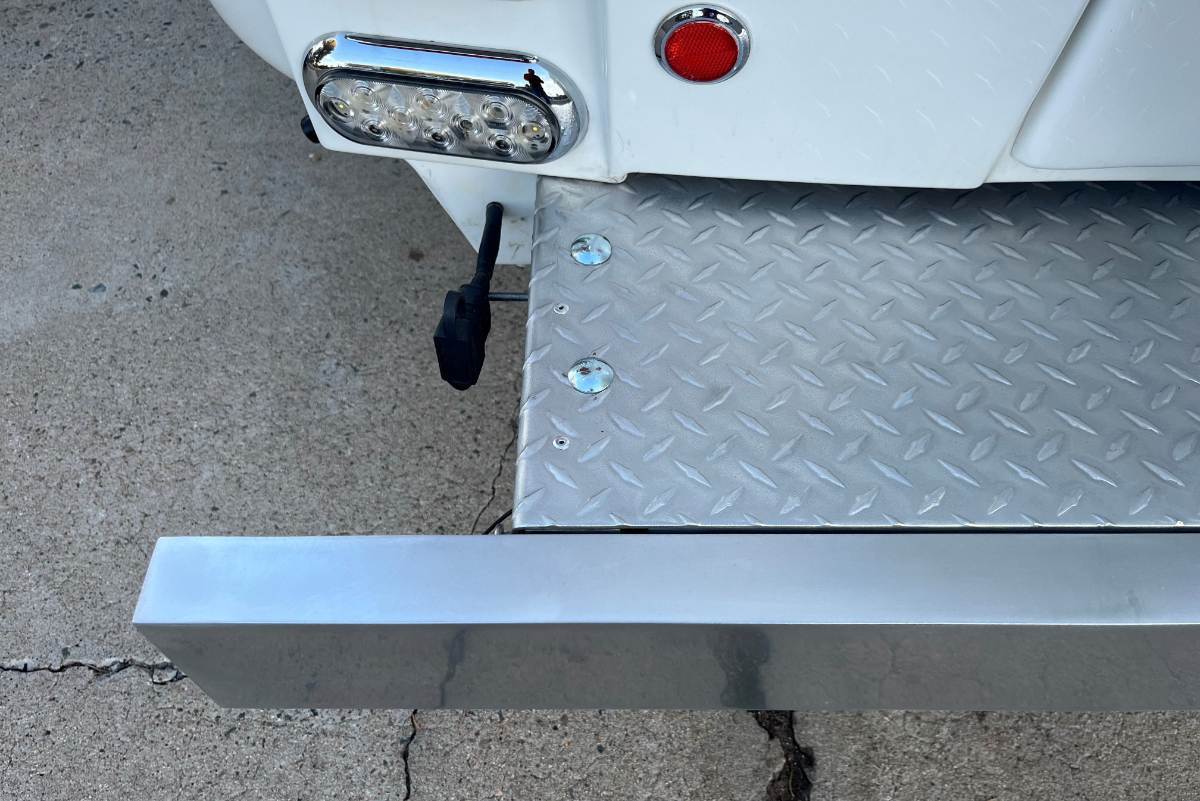
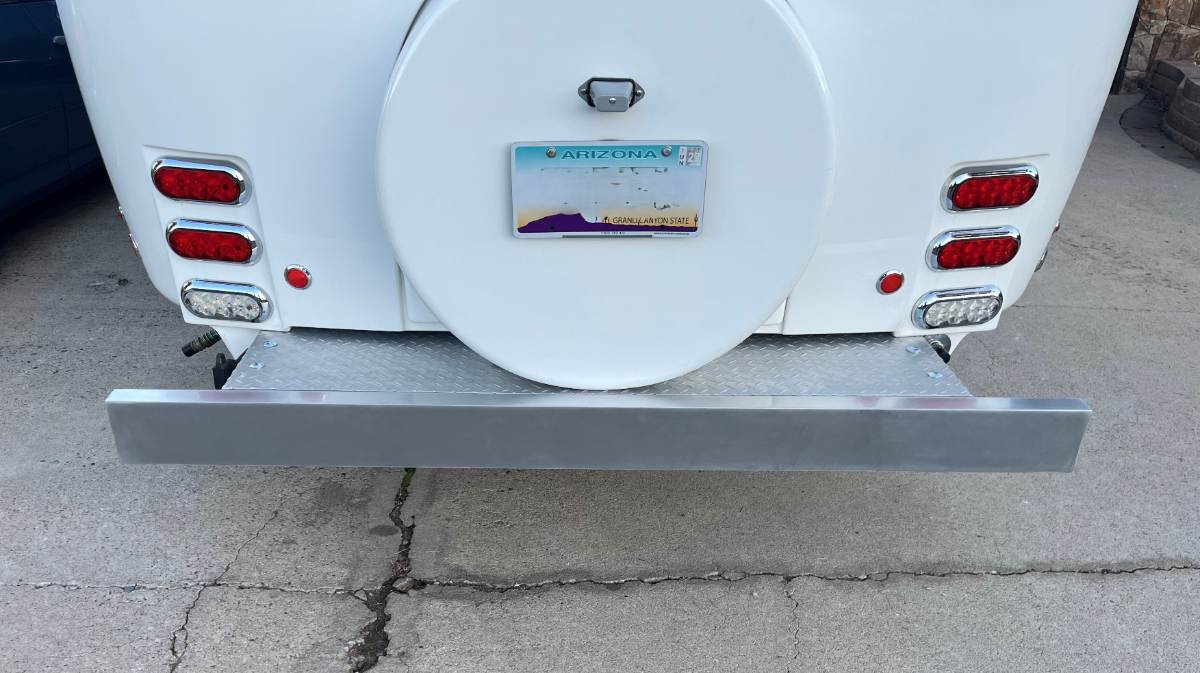
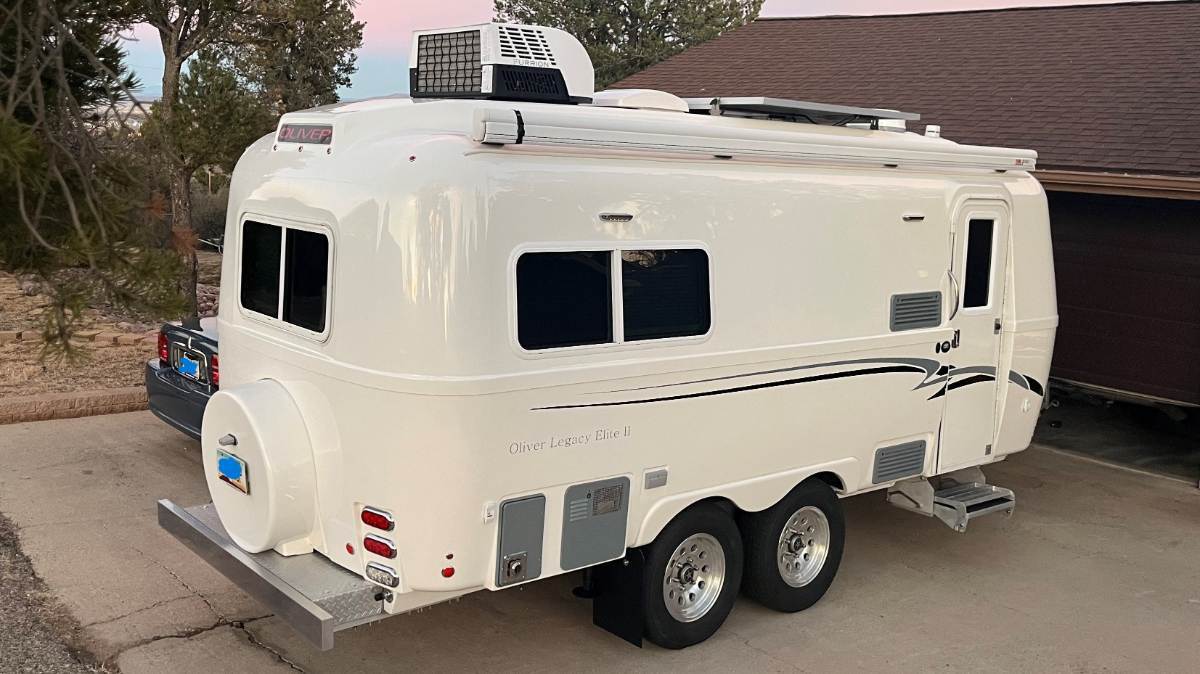
I had removed the Dometic Penguin A/C prior to this work. I temporarily filled the 14x14” opening with a piece of plywood to keep dust out while allowing Cameron the room above to make the entire rear roof shine! It’s always a mess under an old A/C. Good thing we did because the new Chill Cube is a foot shorter to the rear. With my son’s help, we installed the new Furrion Chill Cube A/C. One last task was to restore the rear bumper area. I removed the mounts for the bicycle rack we don’t use, drilled out more rivets and removed the deck plate and folding bumper. I cleaned the inside waste hose area, and steel brushed, sanded and ceramic coated all parts. I've been wanting to write this up for a few months now. Chris is out of town on her annual "Sisters Trip." Adam's been working overtime and it's boring being home alone. That’s it – she’s all done! 😎 When it's time for some love again, I'll drop her off with Cameron for a renewal! No more Ugly Duckling, but quite the Beautiful Swan she is now!
 2 points
 -
We are in Nashville, approx 1.5 hours from Hohenwald. That is the biggest reason that we went with Oliver. Bob2 points
-
Well it might indeed but given the smaller size of the Fogatti I would venture to guess it would fit. If you can fit a Suburban it should be a piece of cake for the Fogatti. The interesting and neat thing about the Fogatti is you select your temp, what ever you're comfortable with for showers or dishes and do NOT mix with cold water, using the hot only. Its very easy to go from one temp to another with the remote control. Also @Mike and Carol do make a good point regarding reliability in the boonies.2 points
-
Bob, I haven't heard of anybody going this direction, but why not? It's usually moving from the 6-gal Suburban to an on-demand/tankless model. Given your experience and reading many other posts re the Aquago model, I would not want one and I agree that I would certainly replace yours asap with something else. As you know, this model is not reliable, and my understanding is anything Truma is not serviceable! This is based on their policy of "authorized service" only. They work OEM installations only, no aftermarket sales, hence NOT serviceable except in waiting forever for OTT or Truma to service months later. Those who DIY cannot even purchase repair/replacement parts, so certainly Truma products are not for me! Rob @routlaw very recently removed a Suburban for a Fogatti tankless. He could chime in on his reasons. I would also read some blogs on tank vs. tankless to fully understand the pros and cons. Lastly, I and others with 2015-16 models, hull #s up to 150, have run the Suburban 6-gal HWH for 10+ years. This includes @topgun2, @Mike and Carol, @rideandfly, @ScottyGS, @Wayfinder and others. I would say this defines Reliability. Others can chime in on Serviceability but in 3 years of ownership, all I have done is drain it, rinse the tank annually, did the vinegar treatment once (on all plumbing). Purchased 2 anodes, installed a new one and have another for backup. I've read something about blowing the dust out of the burn chamber, but I've not experienced any real service needs which speaks again to reliability! You'll always carry 6 gallons in the tank that can't be used. I really like the option to run on propane or electric. Use electric when plugged in and it runs quieter than hearing the LP burning. I often run it on electric when towing to a campsite, powered by our inverter of course, and the +40A we get from our DC-DC charger makes it a breakeven in power, arriving at the campsite with 6-gal hot water (unless we instead run the A/C, weather depending). LP tanks always OFF when towing. There is an AC switch under the cover that is awkward to get to, so we always leave that switch ON and turn electric ON/OFF using the circuit breaker inside. There is a separate switch to fire it up by LP. For this model feature you'll have to run new 10-12 (?) AWG 120VAC wiring and add a breaker in the 120VAC power panel. You'll also need an LP ON/OFF control switch if your tankless model does not have one. That's my take. Hope it helps! 😎2 points
-
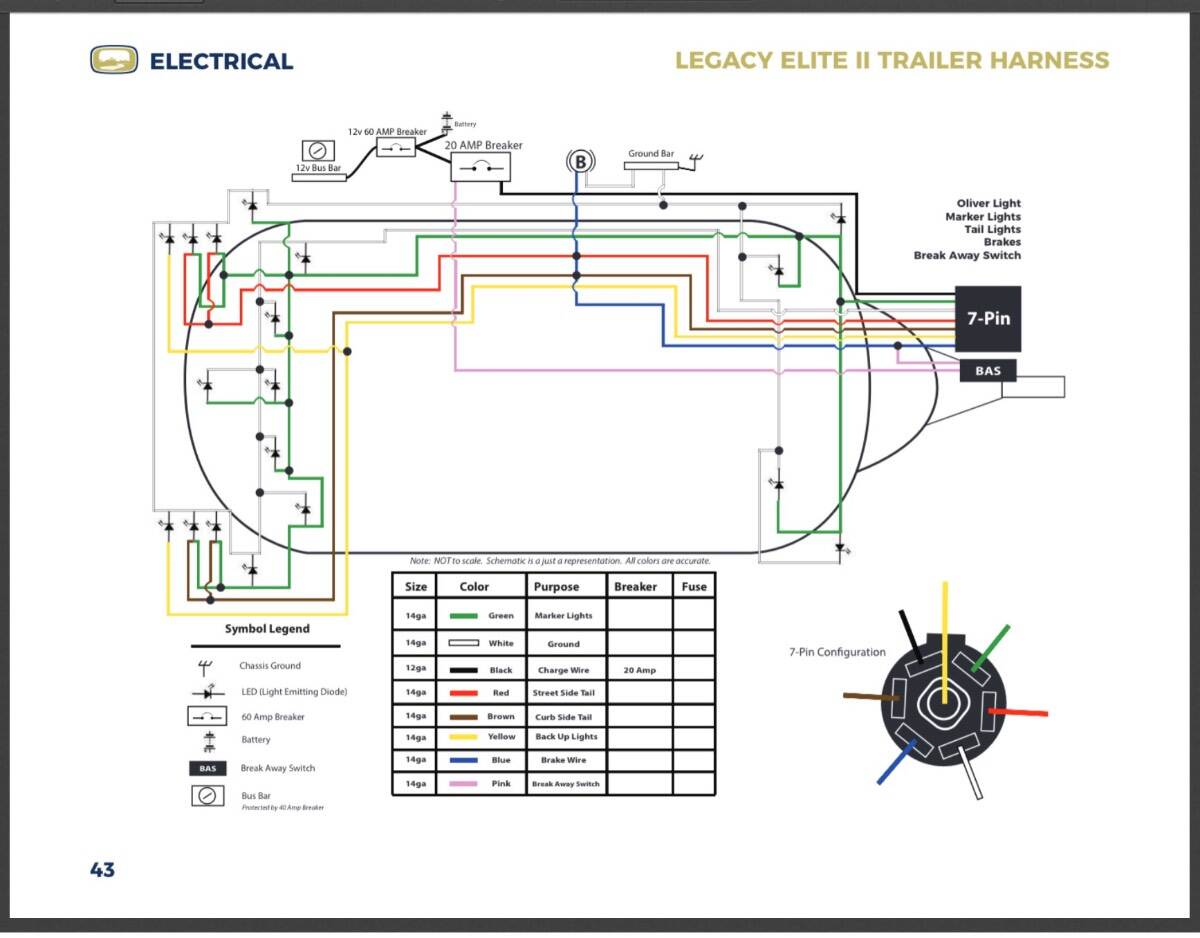
My 2021 E2 has an OptiFuse 12V 60A breaker under the street side bunk. The best wiring diagram I have found that’s close to my model is the 2019 manual (page 43) from the Oliver University. See the breaker in the upper left side. Another quick check is the CO monitor under the dinette. That usually is always on, does not go through the circuit breaker. If that has a light on, you have power coming in, so it is likely the breaker.
2 points
-
I think I have heard good things about Fogatti WHs from RV techs on YouTube. I do like my Suburban though, for all the reasons mentioned above. It’s simple to be sure. Most things from WW-II were. I'm tired of everything getting more and more technical. And I’m a soon to be retired IT guy. LOL. I need a bumper sticker which reads “Suburban water heaters or death.” That goes for my Fiamma manual awning as well. Hehe1 point
-
Not related to the original problem, just posting to show that the universe has a sense of humor… After spinning, feeling, inspecting, and pretty much giving a spa treatment to the rear curbside tire, today on our final leg home in the middle of nowhere Texas between Quanah and Chillicothe my TPMS on the dashboard alerted to a low (you guessed it) rear curbside tire. Limped to the only gas station in Chillicothe and found a screw just outside the tread area. On returning home I took the tire to Discount Tire and confirmed my suspicion that it could not be patched. At least I proved that I (1) have a working TPMS and (2) have the tools to do a tire change in the field. @jd1923 at least it gave me the opportunity to remove the hub cover on that wheel. 🤦♂️1 point
-
The Suburban is longer than the aquago and has styrofoam insulation around it. So from the outside instead of the truma cover with vents you would have a metal cover that hinges at the bottom. Under the curb side bunk is where you will notice the difference. Not really a problem but there is less room to fiddle around when you throw the bypass switch. Oliver did ours years ago so they would certainly be capable. If it's a long drive to Hohenwald I think almost any RV service shop would be able to do it. Good Luck.1 point
-
You said the jacks work. Jacks are fed from load side of the DC panel 60 amp breaker, so it's fine. The DC fuse panel then feeds a number of things such as the stereo, pump, furnace, refer, ect., and the main switch panel. You mentioned the lights don't work, but the awning and camera do. I have not verified this, but it would make sense that the master switch on the main switch panel only controls the lights including the outside, inside, and closet. That's to avoid battery drain if you left a light on. You wouldn't want the camera or awning to be turned off by the master switch, so it's the primary suspect. My master switch failed and I had to jiggle and flick it a few times to get the lights on. Turned out to be a loose spade connector on the back of the switch. Best to pop the switch out and check it now to avoid an unwanted black out. Hope that solves the problem. Geoff1 point
-
The Suburban tank is simple and reliable. There is nothing about it that can’t be serviced by the owner. Parts are available on Amazon and most RV shops. I’m not going to change ours out, I like reliability when out in the middle of nowhere. Mike1 point
-
Ok now I’m thinking that the second nut is a jam nut to hold the first nut on and both have backed off somehow. I would remove both nuts and see if the aluminum cylinder is threaded on that rod and check for something that might have loosened. Bill1 point
-
Yes I put those on there. I got a roll of stick-on UHMW from Rockler. People put it on tablesaw fences. Bill1 point
-
Could you post a photo of the breaker and its location for future refrence for us Elite 1 owners?1 point
-
Thanks for trying to help everyone. I wish Oliver would let us owners have and electrical diagram so we can tell where all the relays and circut breakers are hidden. After countless hours of testing and looking around I finally found a breaker hidden at the bottom of the trailer below the negitive ground terminal on the outside of the battery box. There are two switches on the breaker. One is on the front side and easy to see but, the other is underneath the breaker and is a swing arm thats hard to see. That was the one that popped. Everythings is honky dory now. Thanks again for trying to help....I really appreciated it.1 point
-
I've never heard of a Blueitti. However there are a similar issues with a Jackery. They have what's called a floating neutral. Also common in some generators. So yes, a floating neutral requires a neutral to ground bonding plug. Otherwise the Electrical Management System (EMS) will see it as an open ground. But there is a problem. Many (if not all) of these power packs have no reference to ground what-so-ever. So the "u-ground" pin hole of the receptacle is not connected to anything, it's just an open hole. So a neutral to ground bonding plug wouldn't connect to anything in the ground pin hole, and it won't work. Now that I've confused everyone, including myself, there is a bypass trick. Use a 1-outlet to 3-outlet adapter, or an extension cord with a "Wye" that provides 3 extra outlets to plug into. Plug the neutral to ground bonding plug into one the extra outlets to effectively bond the neutral and ground... despite there being no ground on the power pack. Cool huh. This is one of many reasons to have a $10 plug-in circuit tester, the ones with three lights that show various conditions such as open grounds. I recommend you test all circuits when rigging such power supplies. Cheers! Geoff1 point
-
Let's consider the Ollie Frame as a loaded beam running to the hitch ball. The front jack is between the hitch ball and the back jacks. Raising the back jacks then shifts load to the front jack witch is retarded somewhat by the TV suspension. The higher you raise the back of the trailer, the more load the pivit point (Front jack) receives from the back jacks. But it also compresses the springs on the TV resulting in additional load as well. Can this place over 3,000 pounds of load? Not likely in my eyes, but is something to consider. So in addition to your well stated comments: I only lightly plant the front jack. Set the parking brake of the TV. Tie a red/pink flag to the steering wheel as a reminder NO GO. Collect up all copies of the TV key sets if others are around who may not be tuned in to the situtation. GJ1 point
-
The "Master Light" switch and all the others except "Curb Awning" and "Rear Camera" would not turn. So no lights anywhere. It remained that way for 7 hours. Just now it cured itself and all is working! What the heck just happened? Will happen again? Signed, Confused.0 points


-
Recent Achievements
-

")


")


")
