Leaderboard


Popular Content
Showing content with the highest reputation on 06/06/2019 in Posts
-
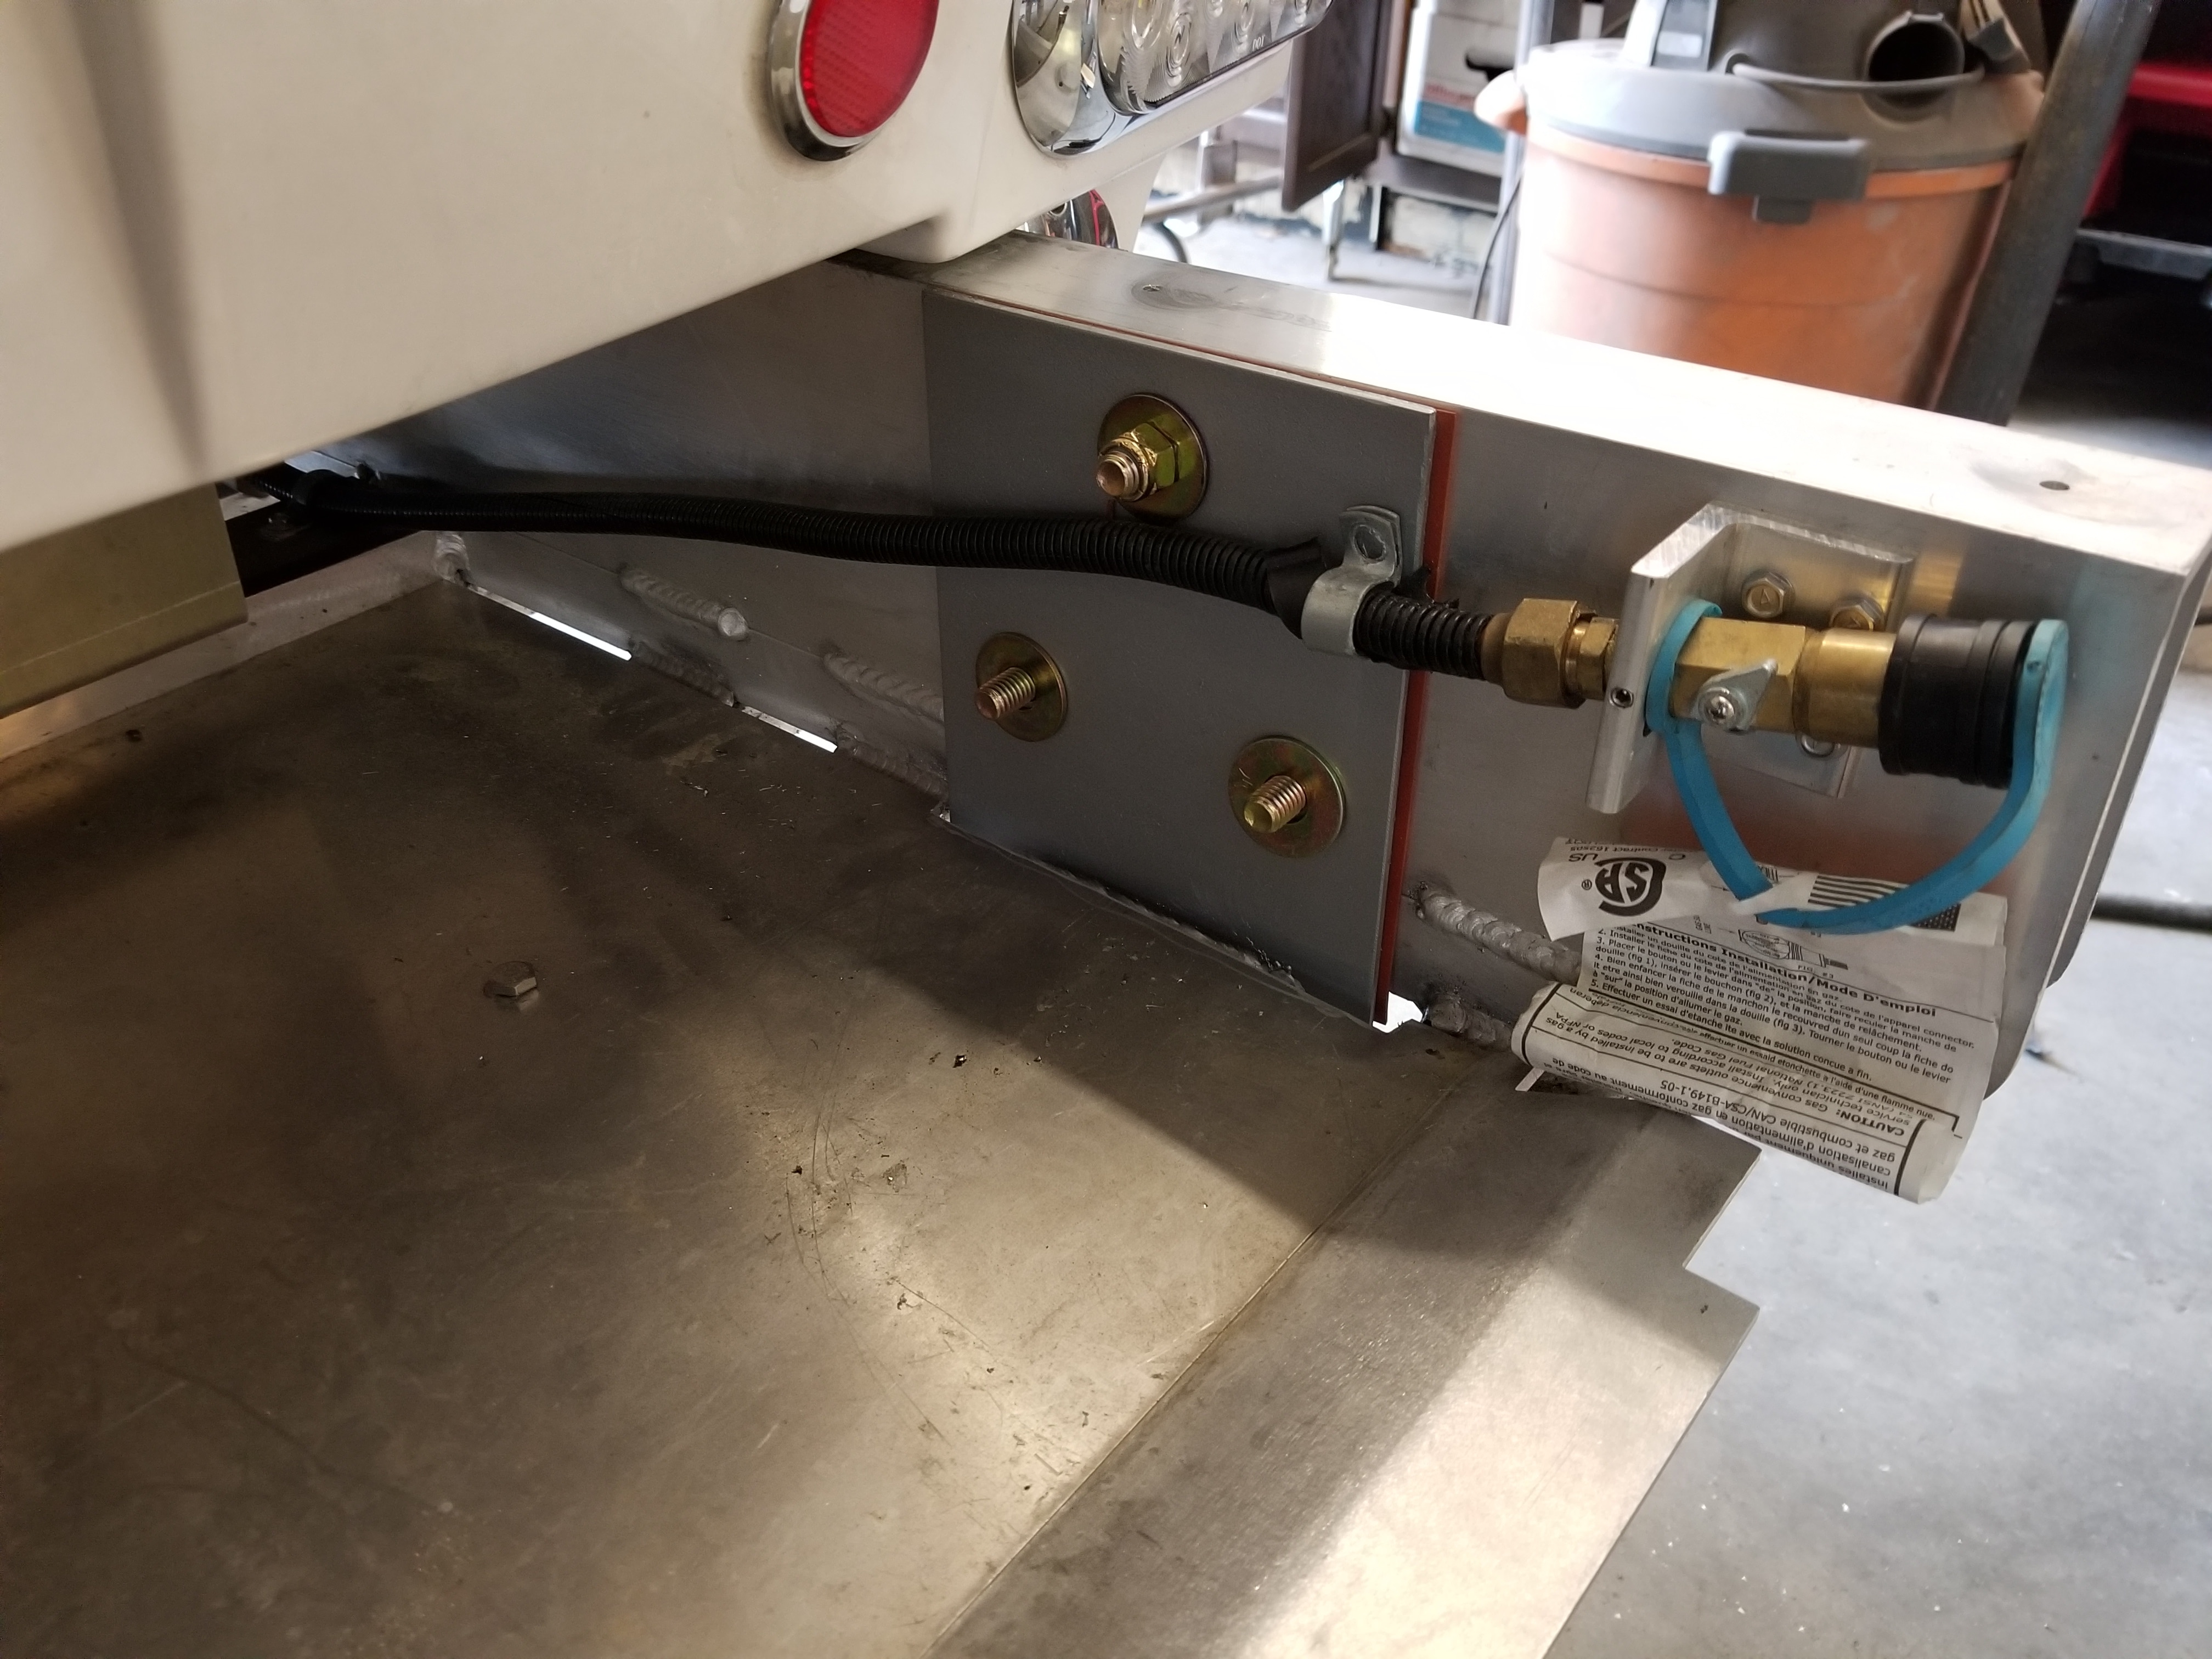
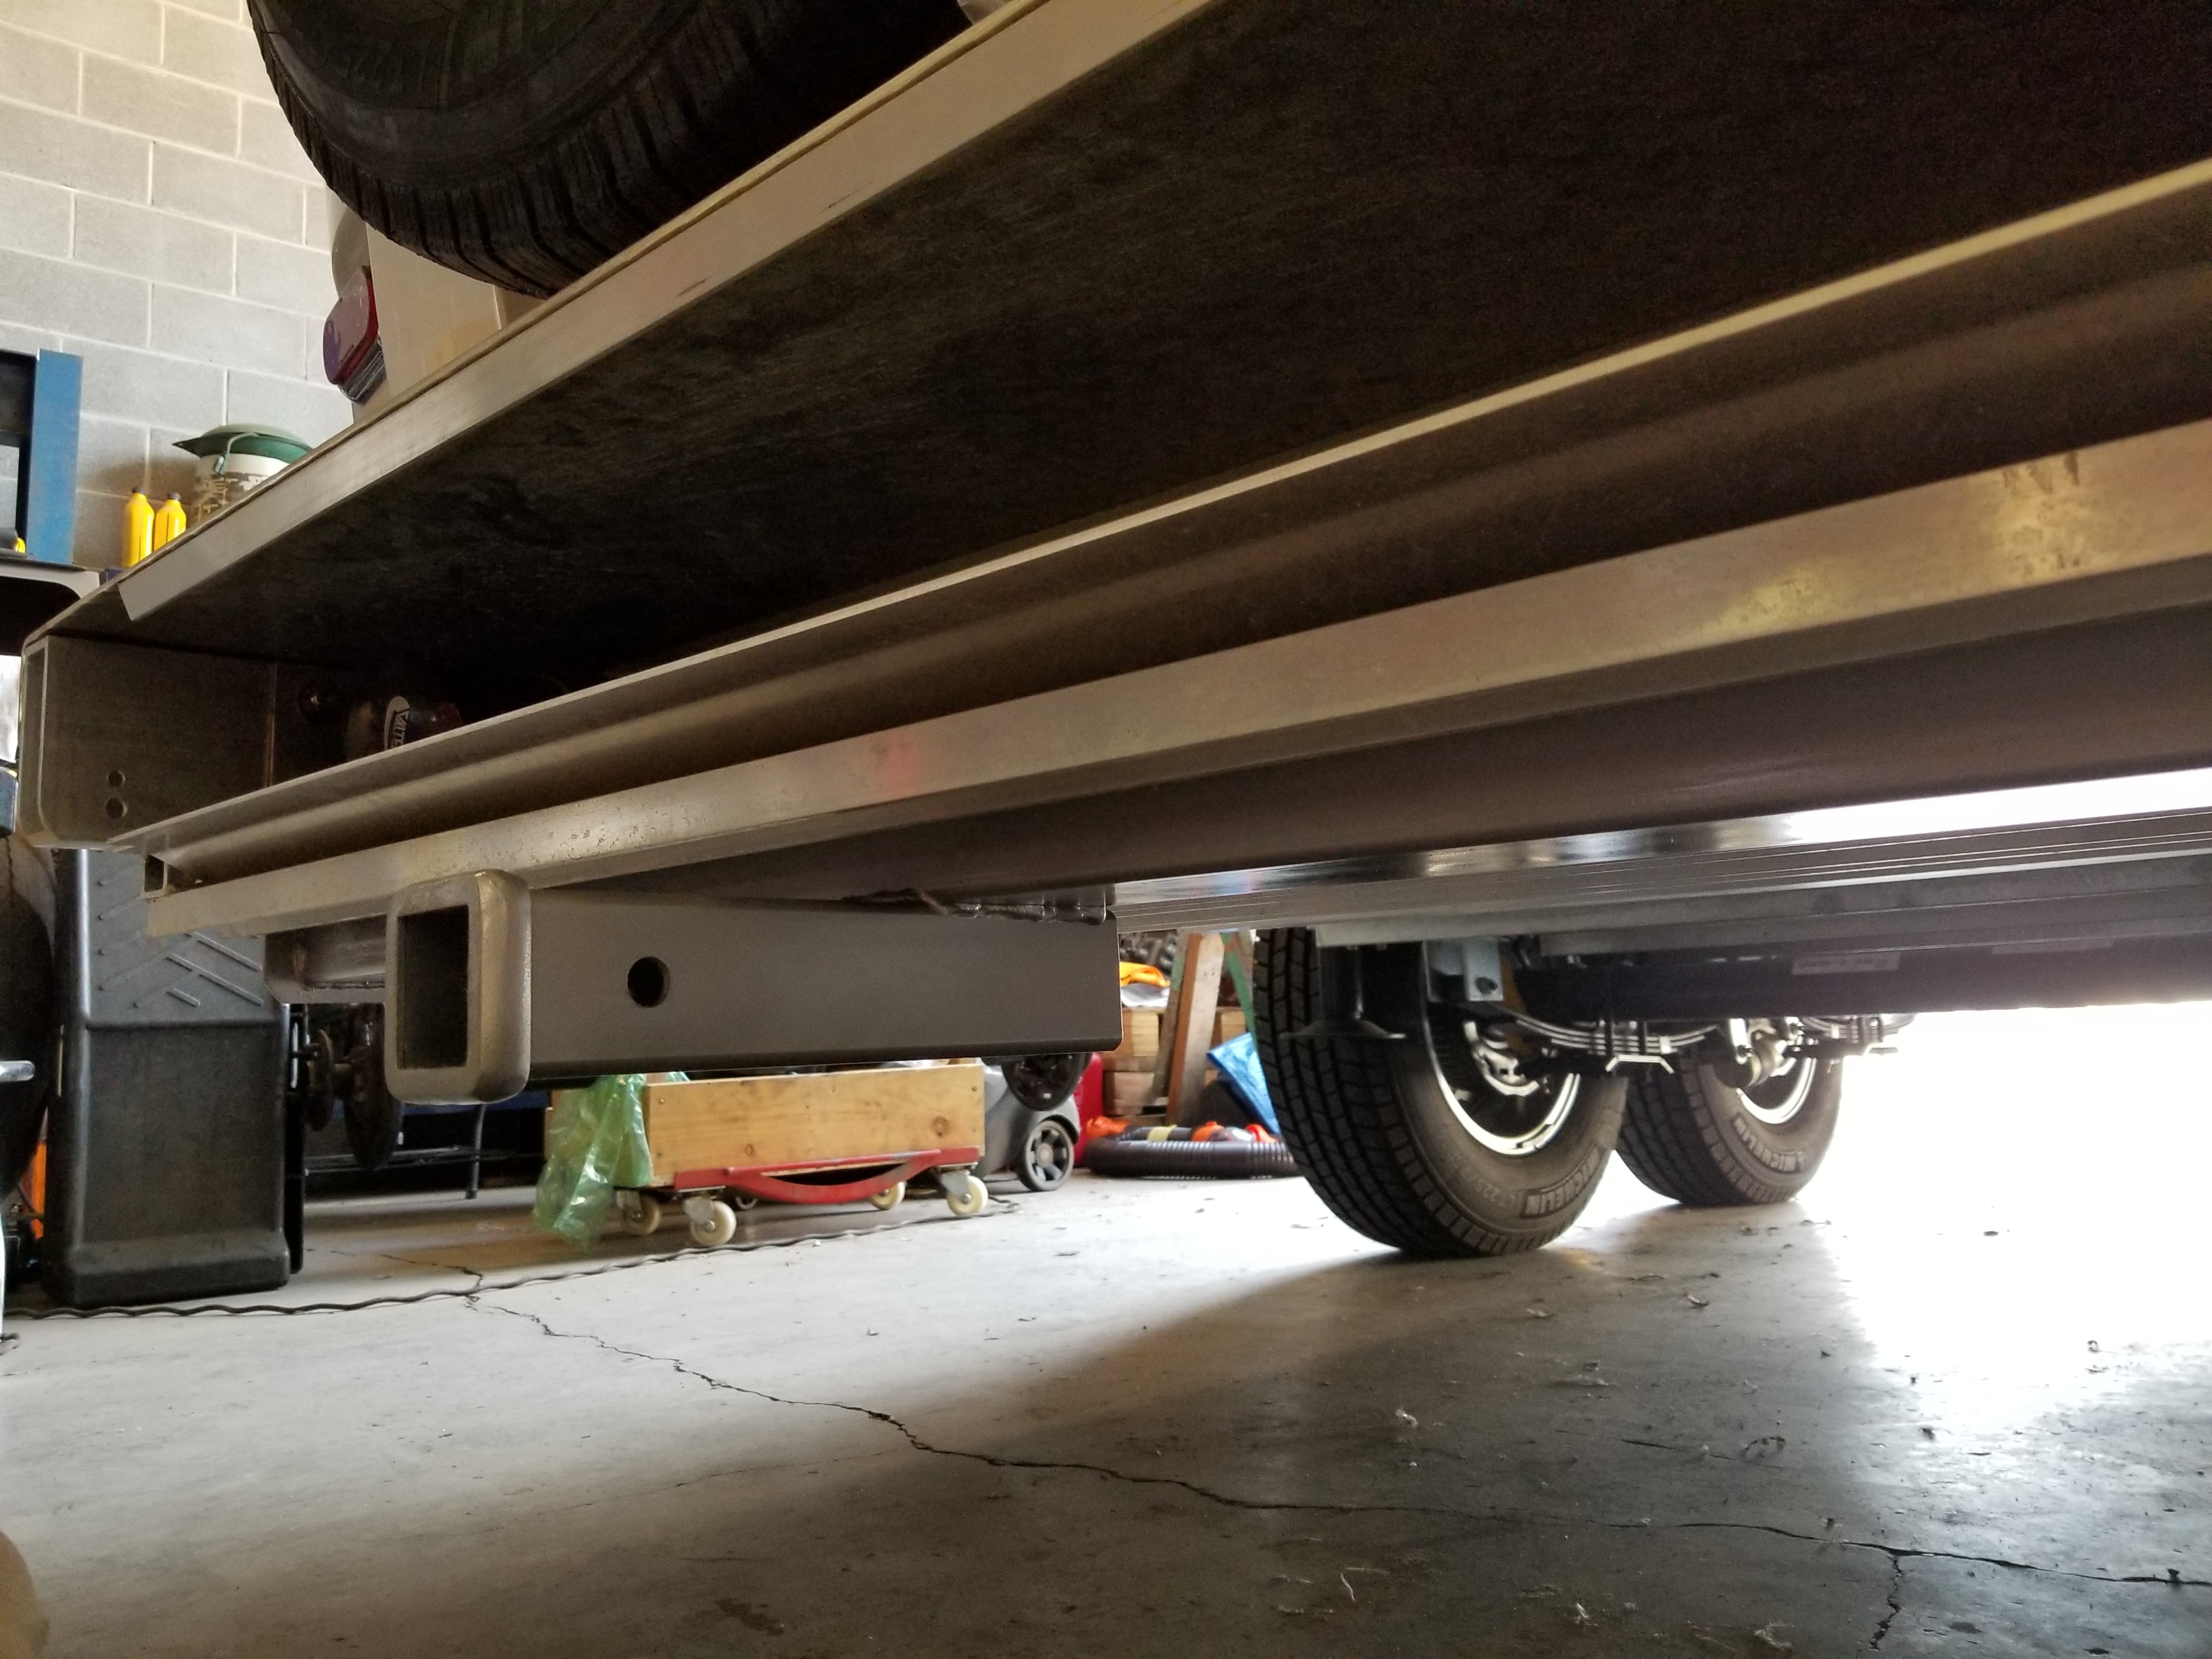
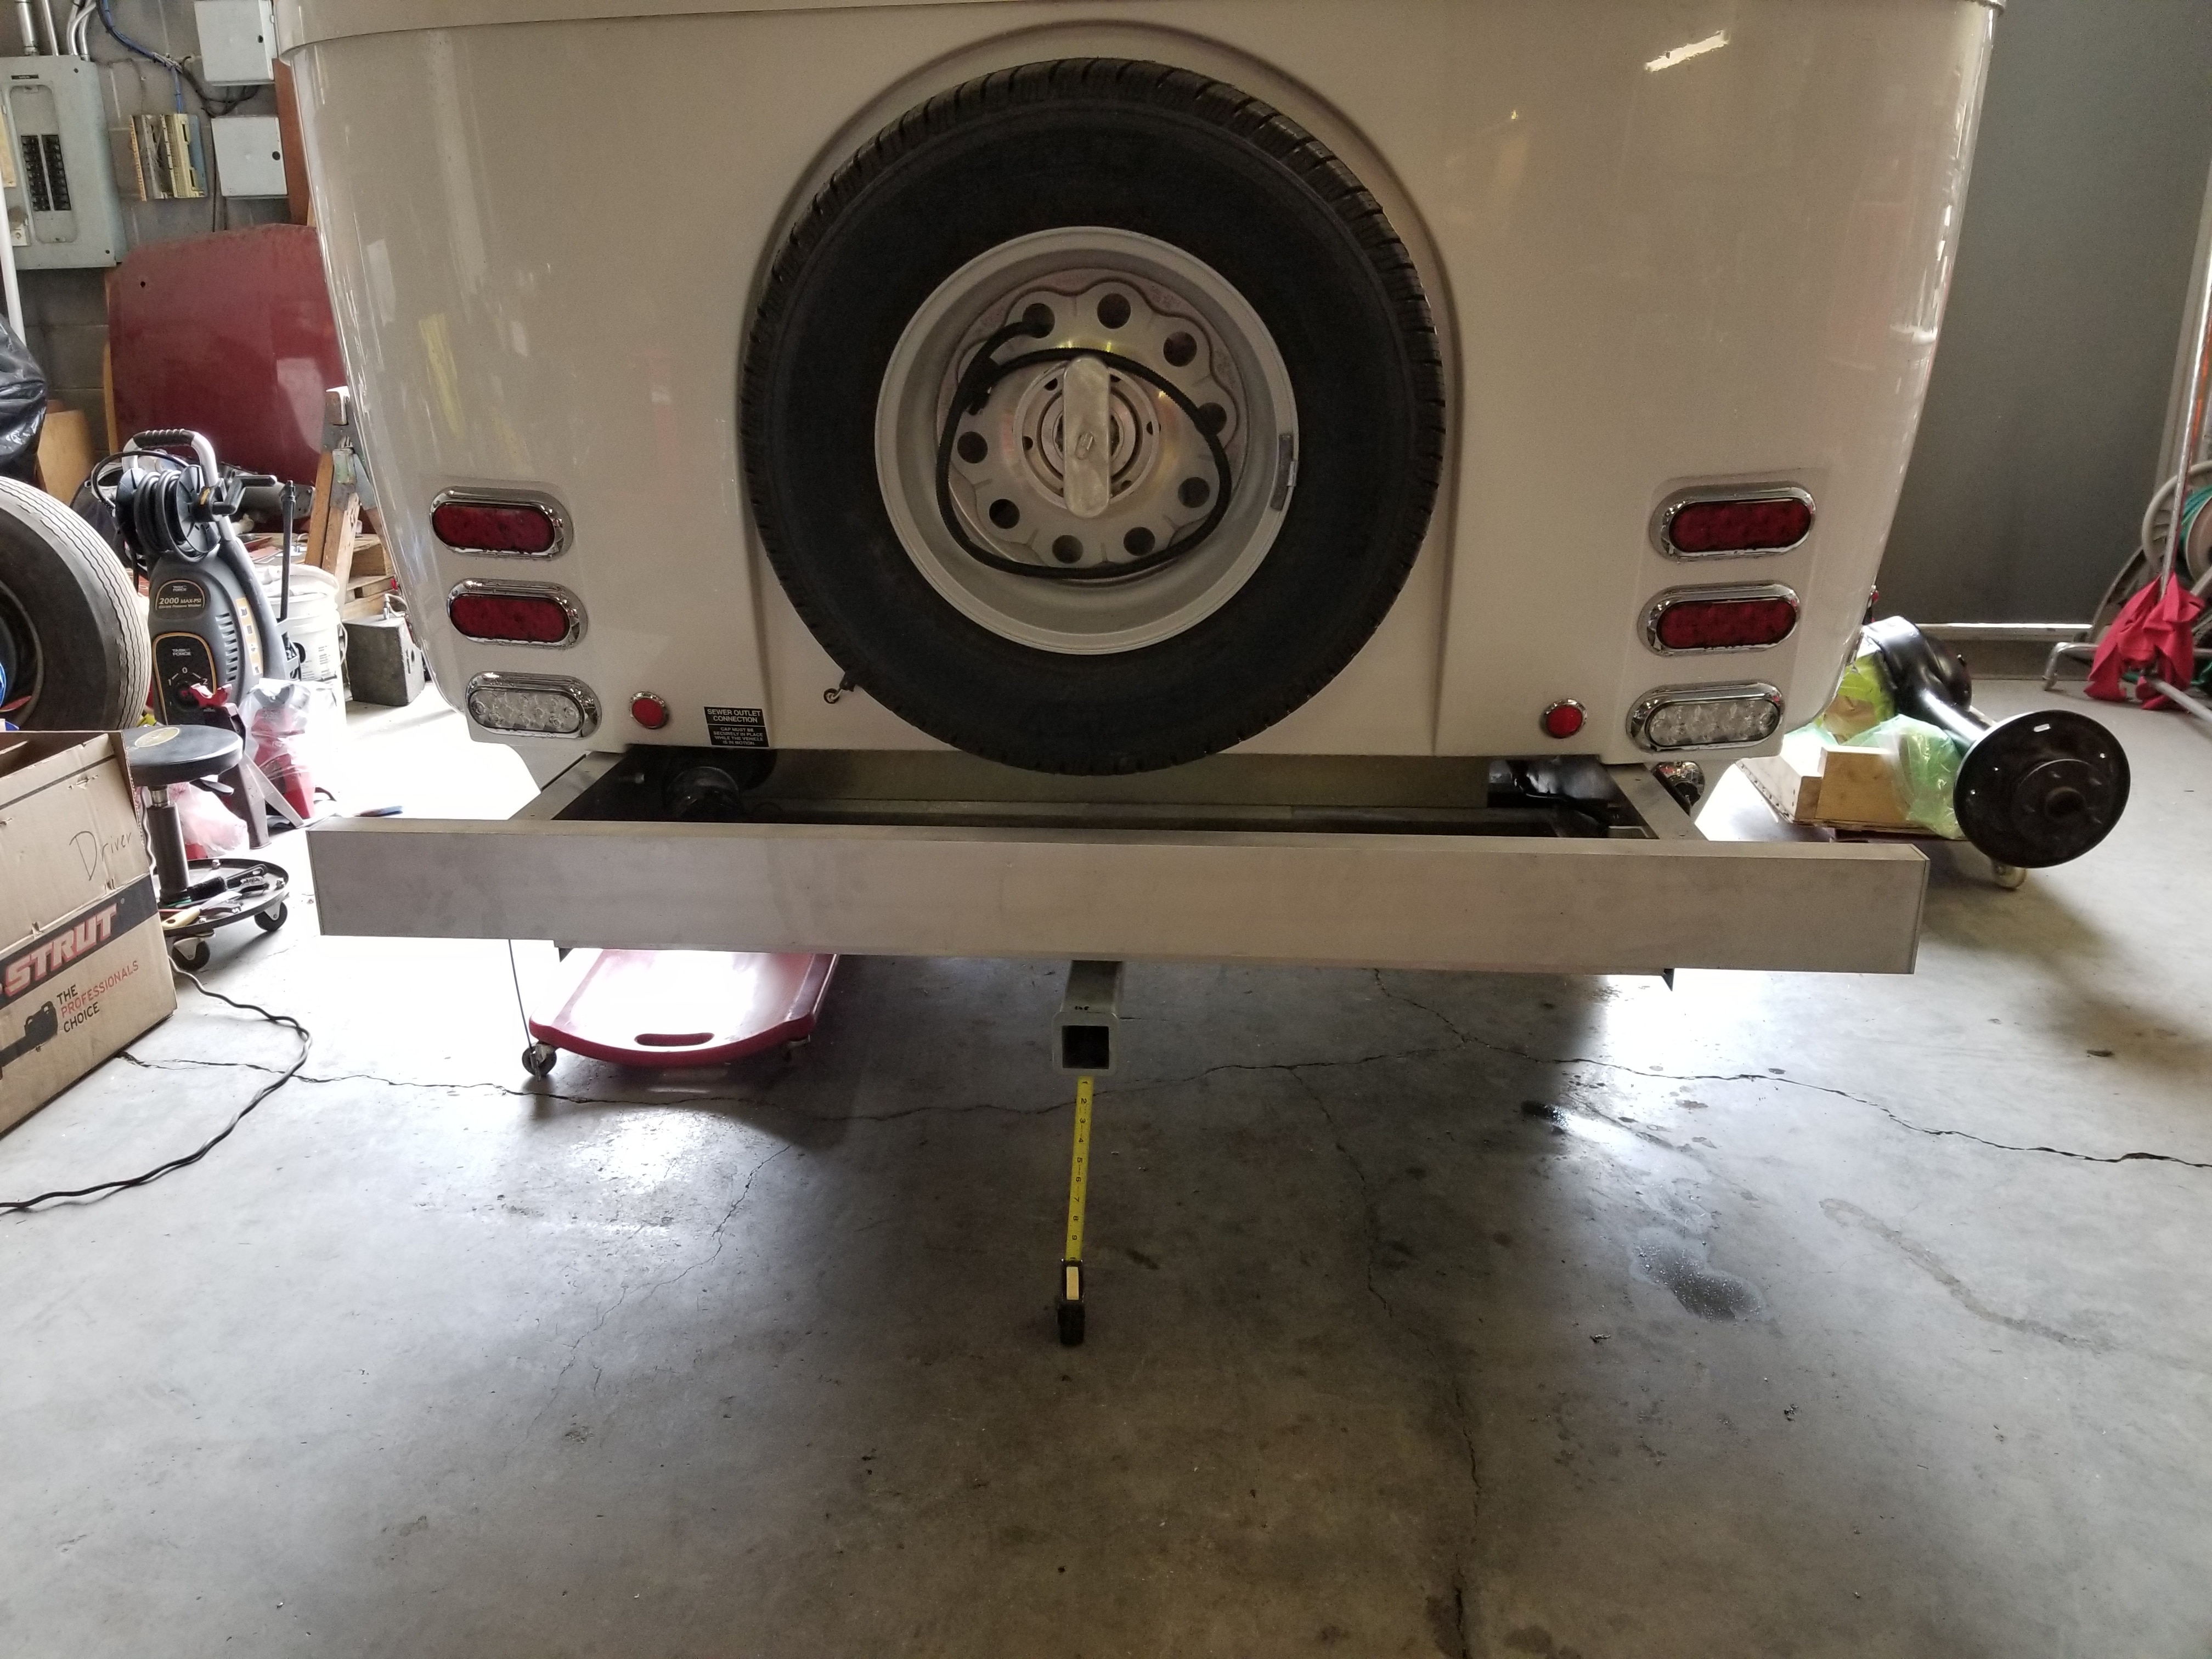
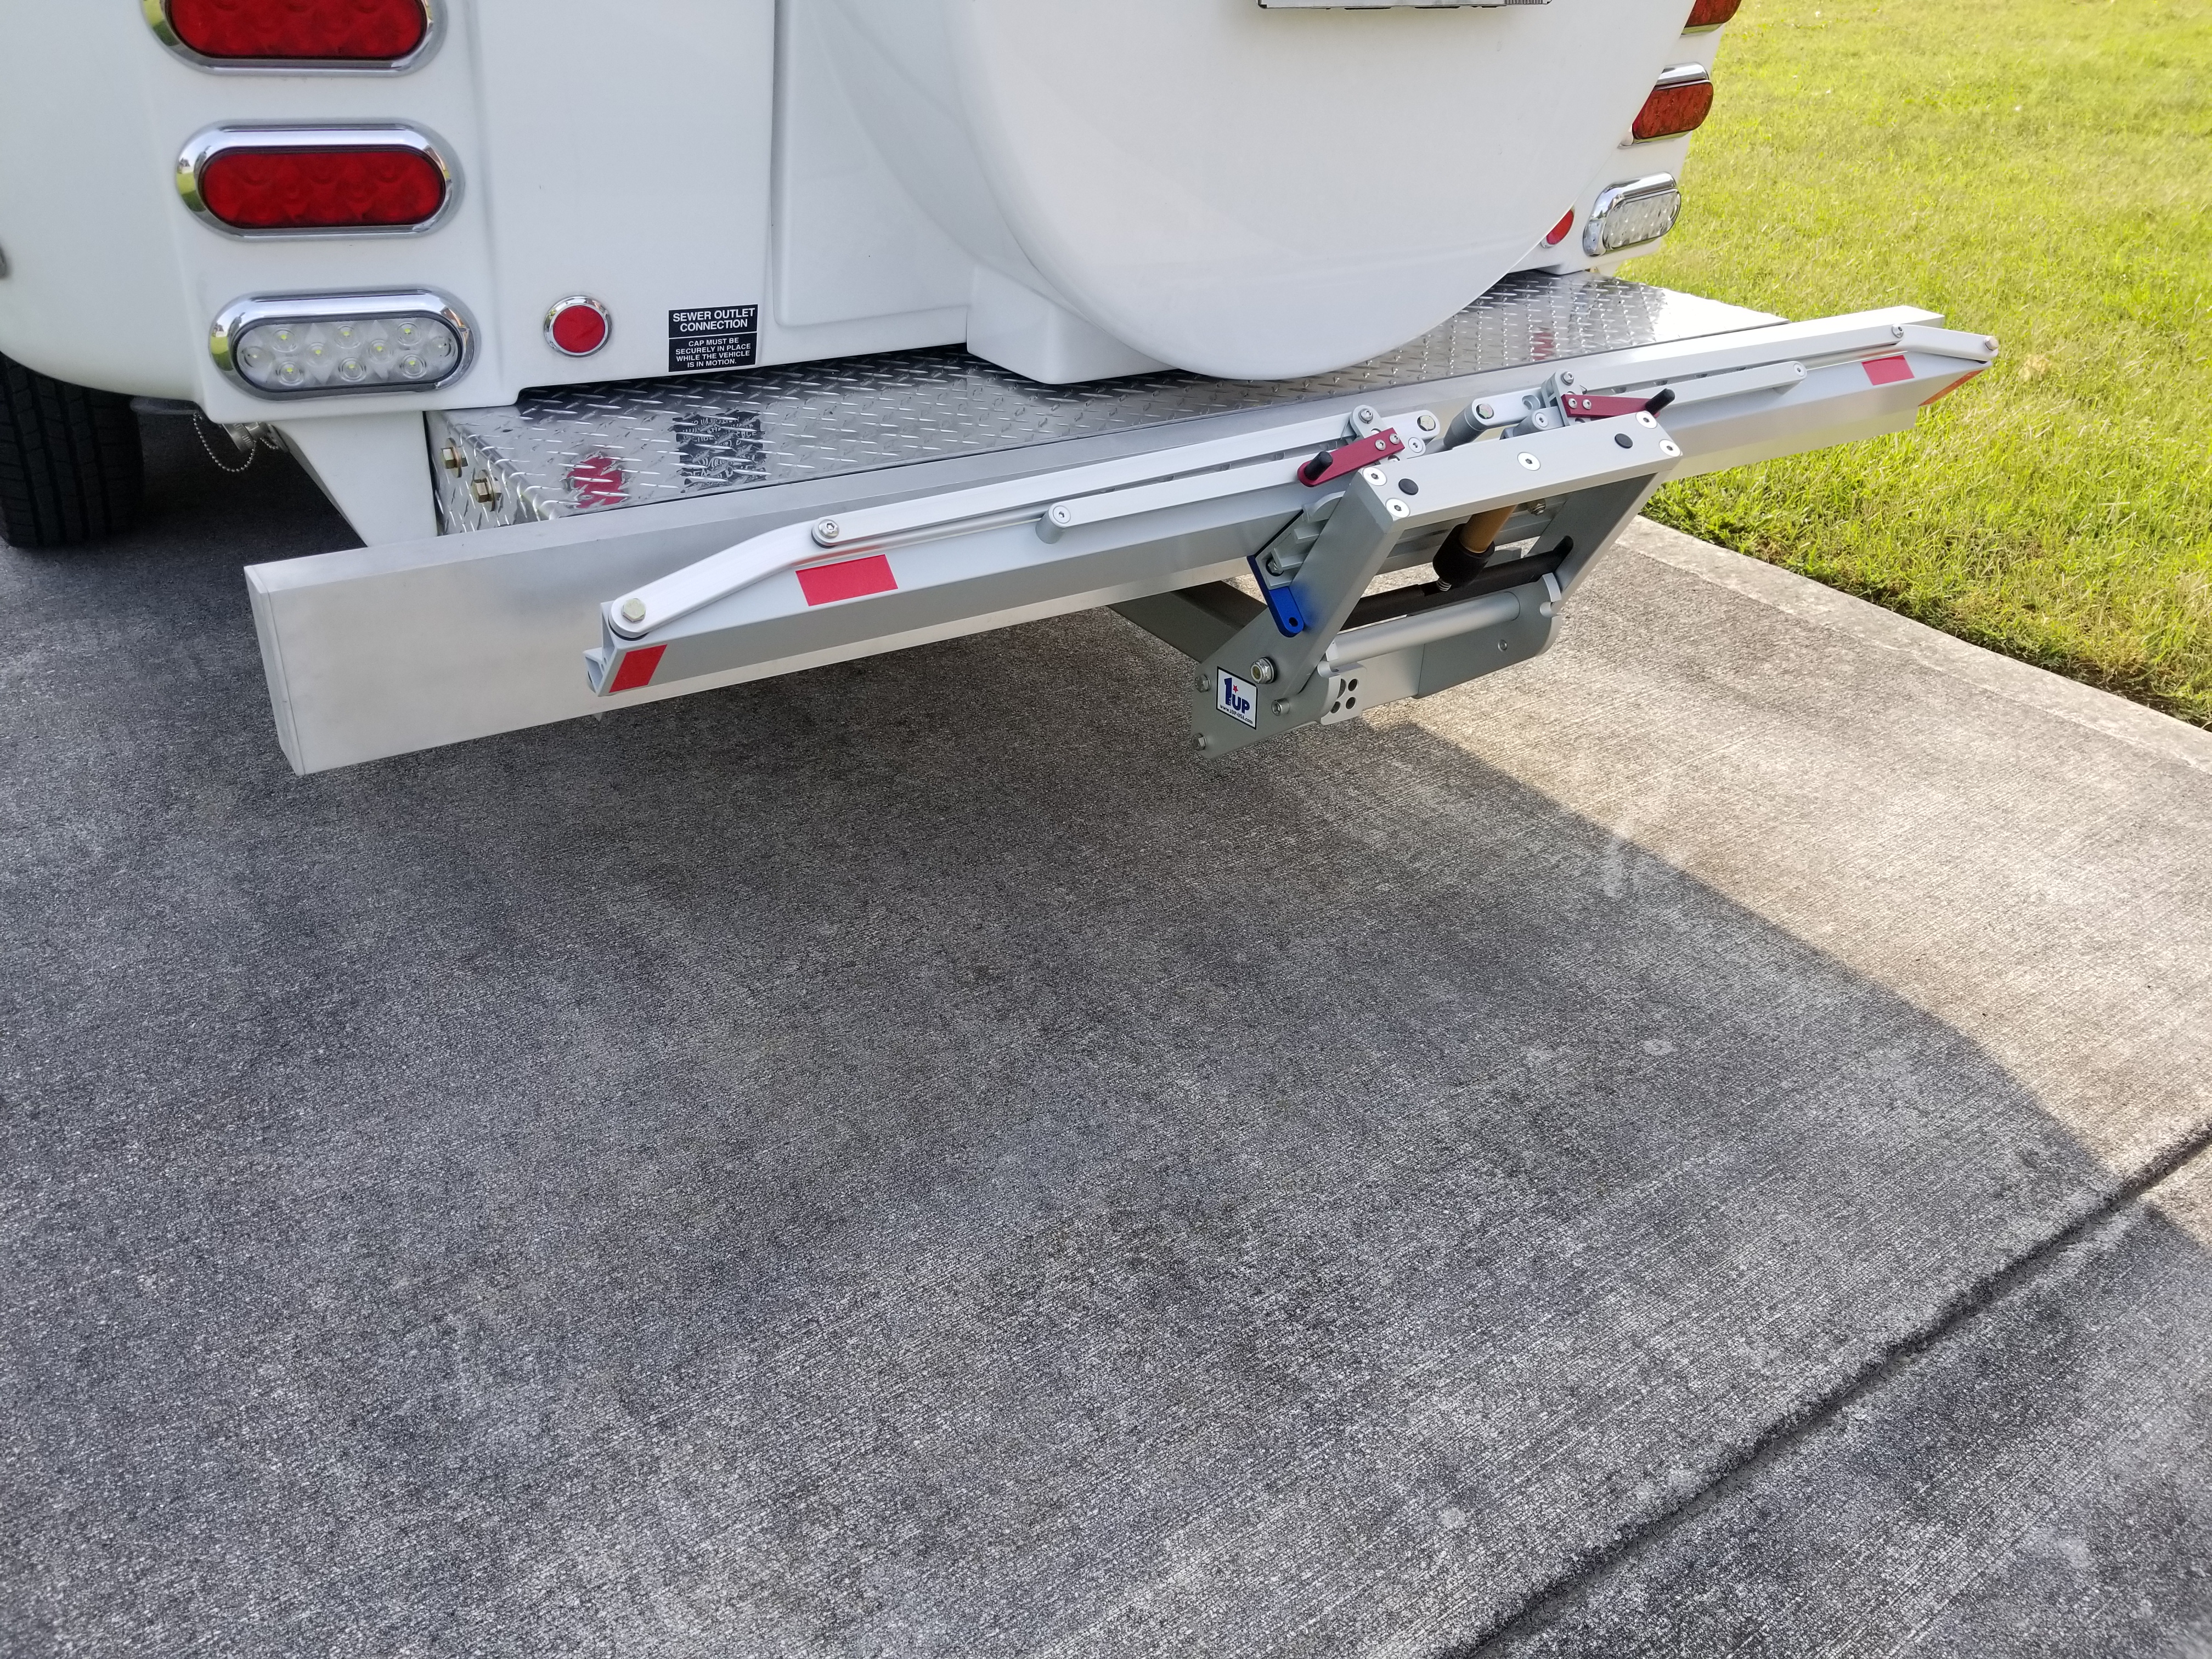
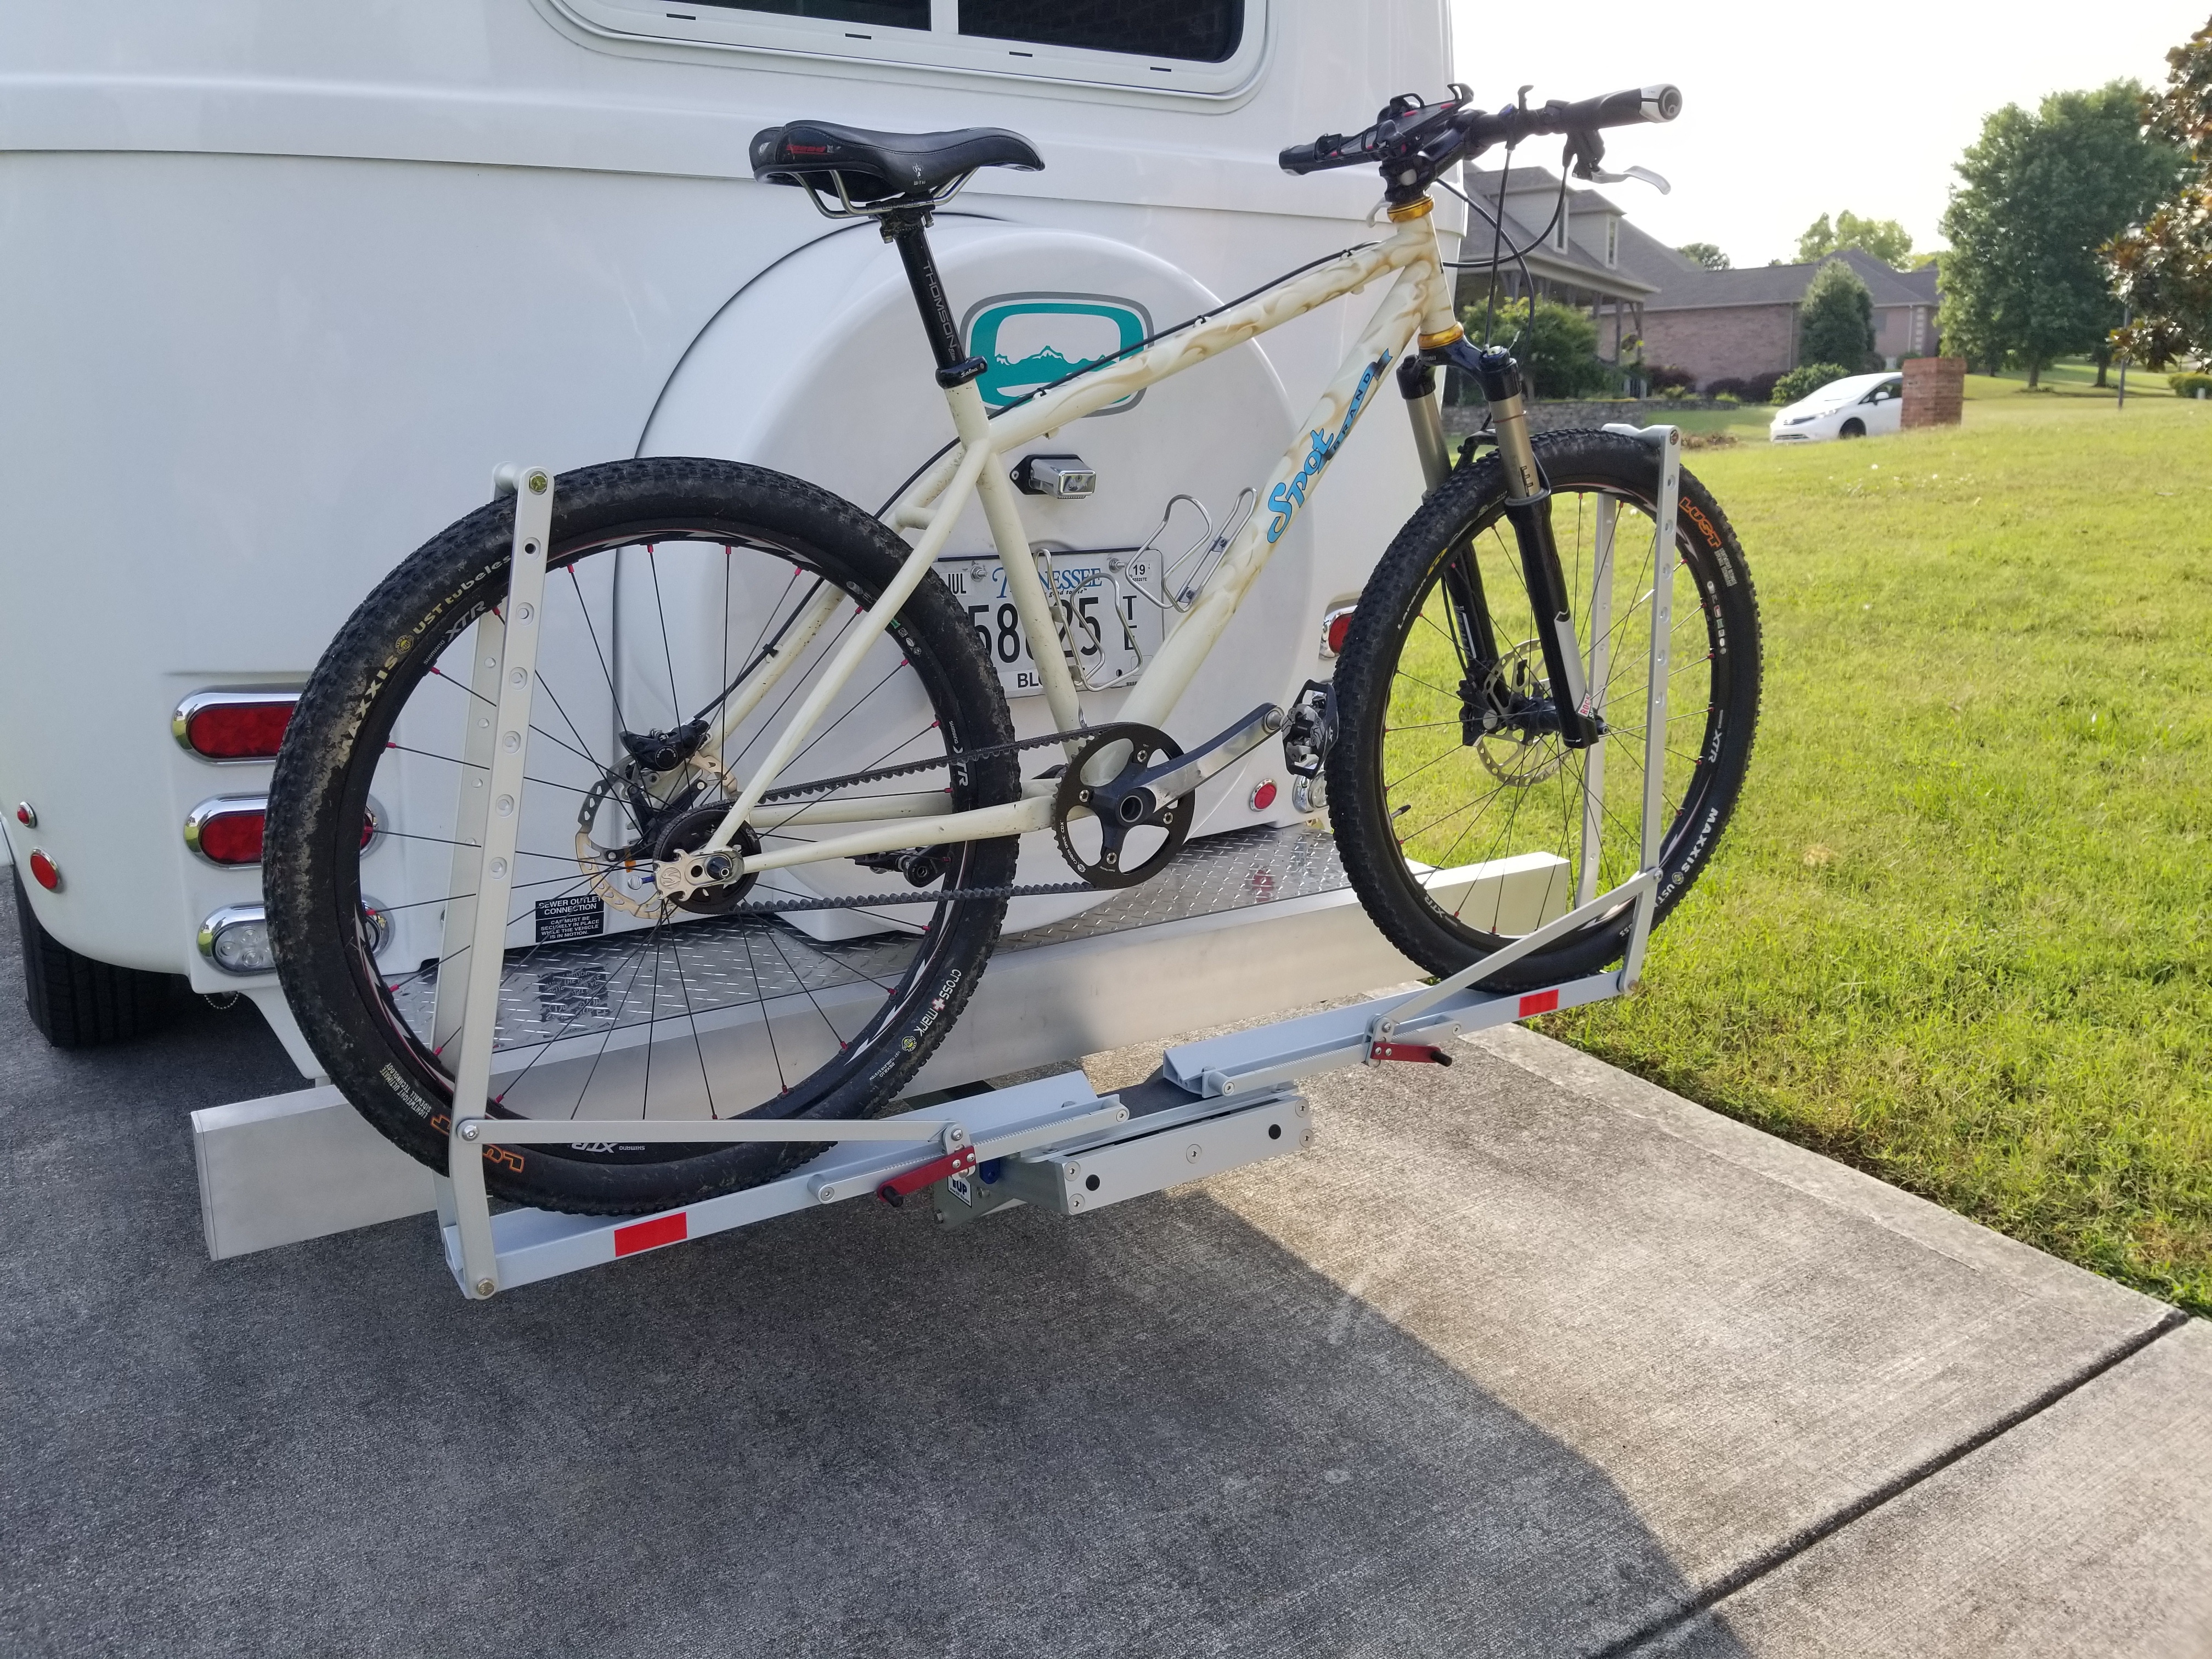
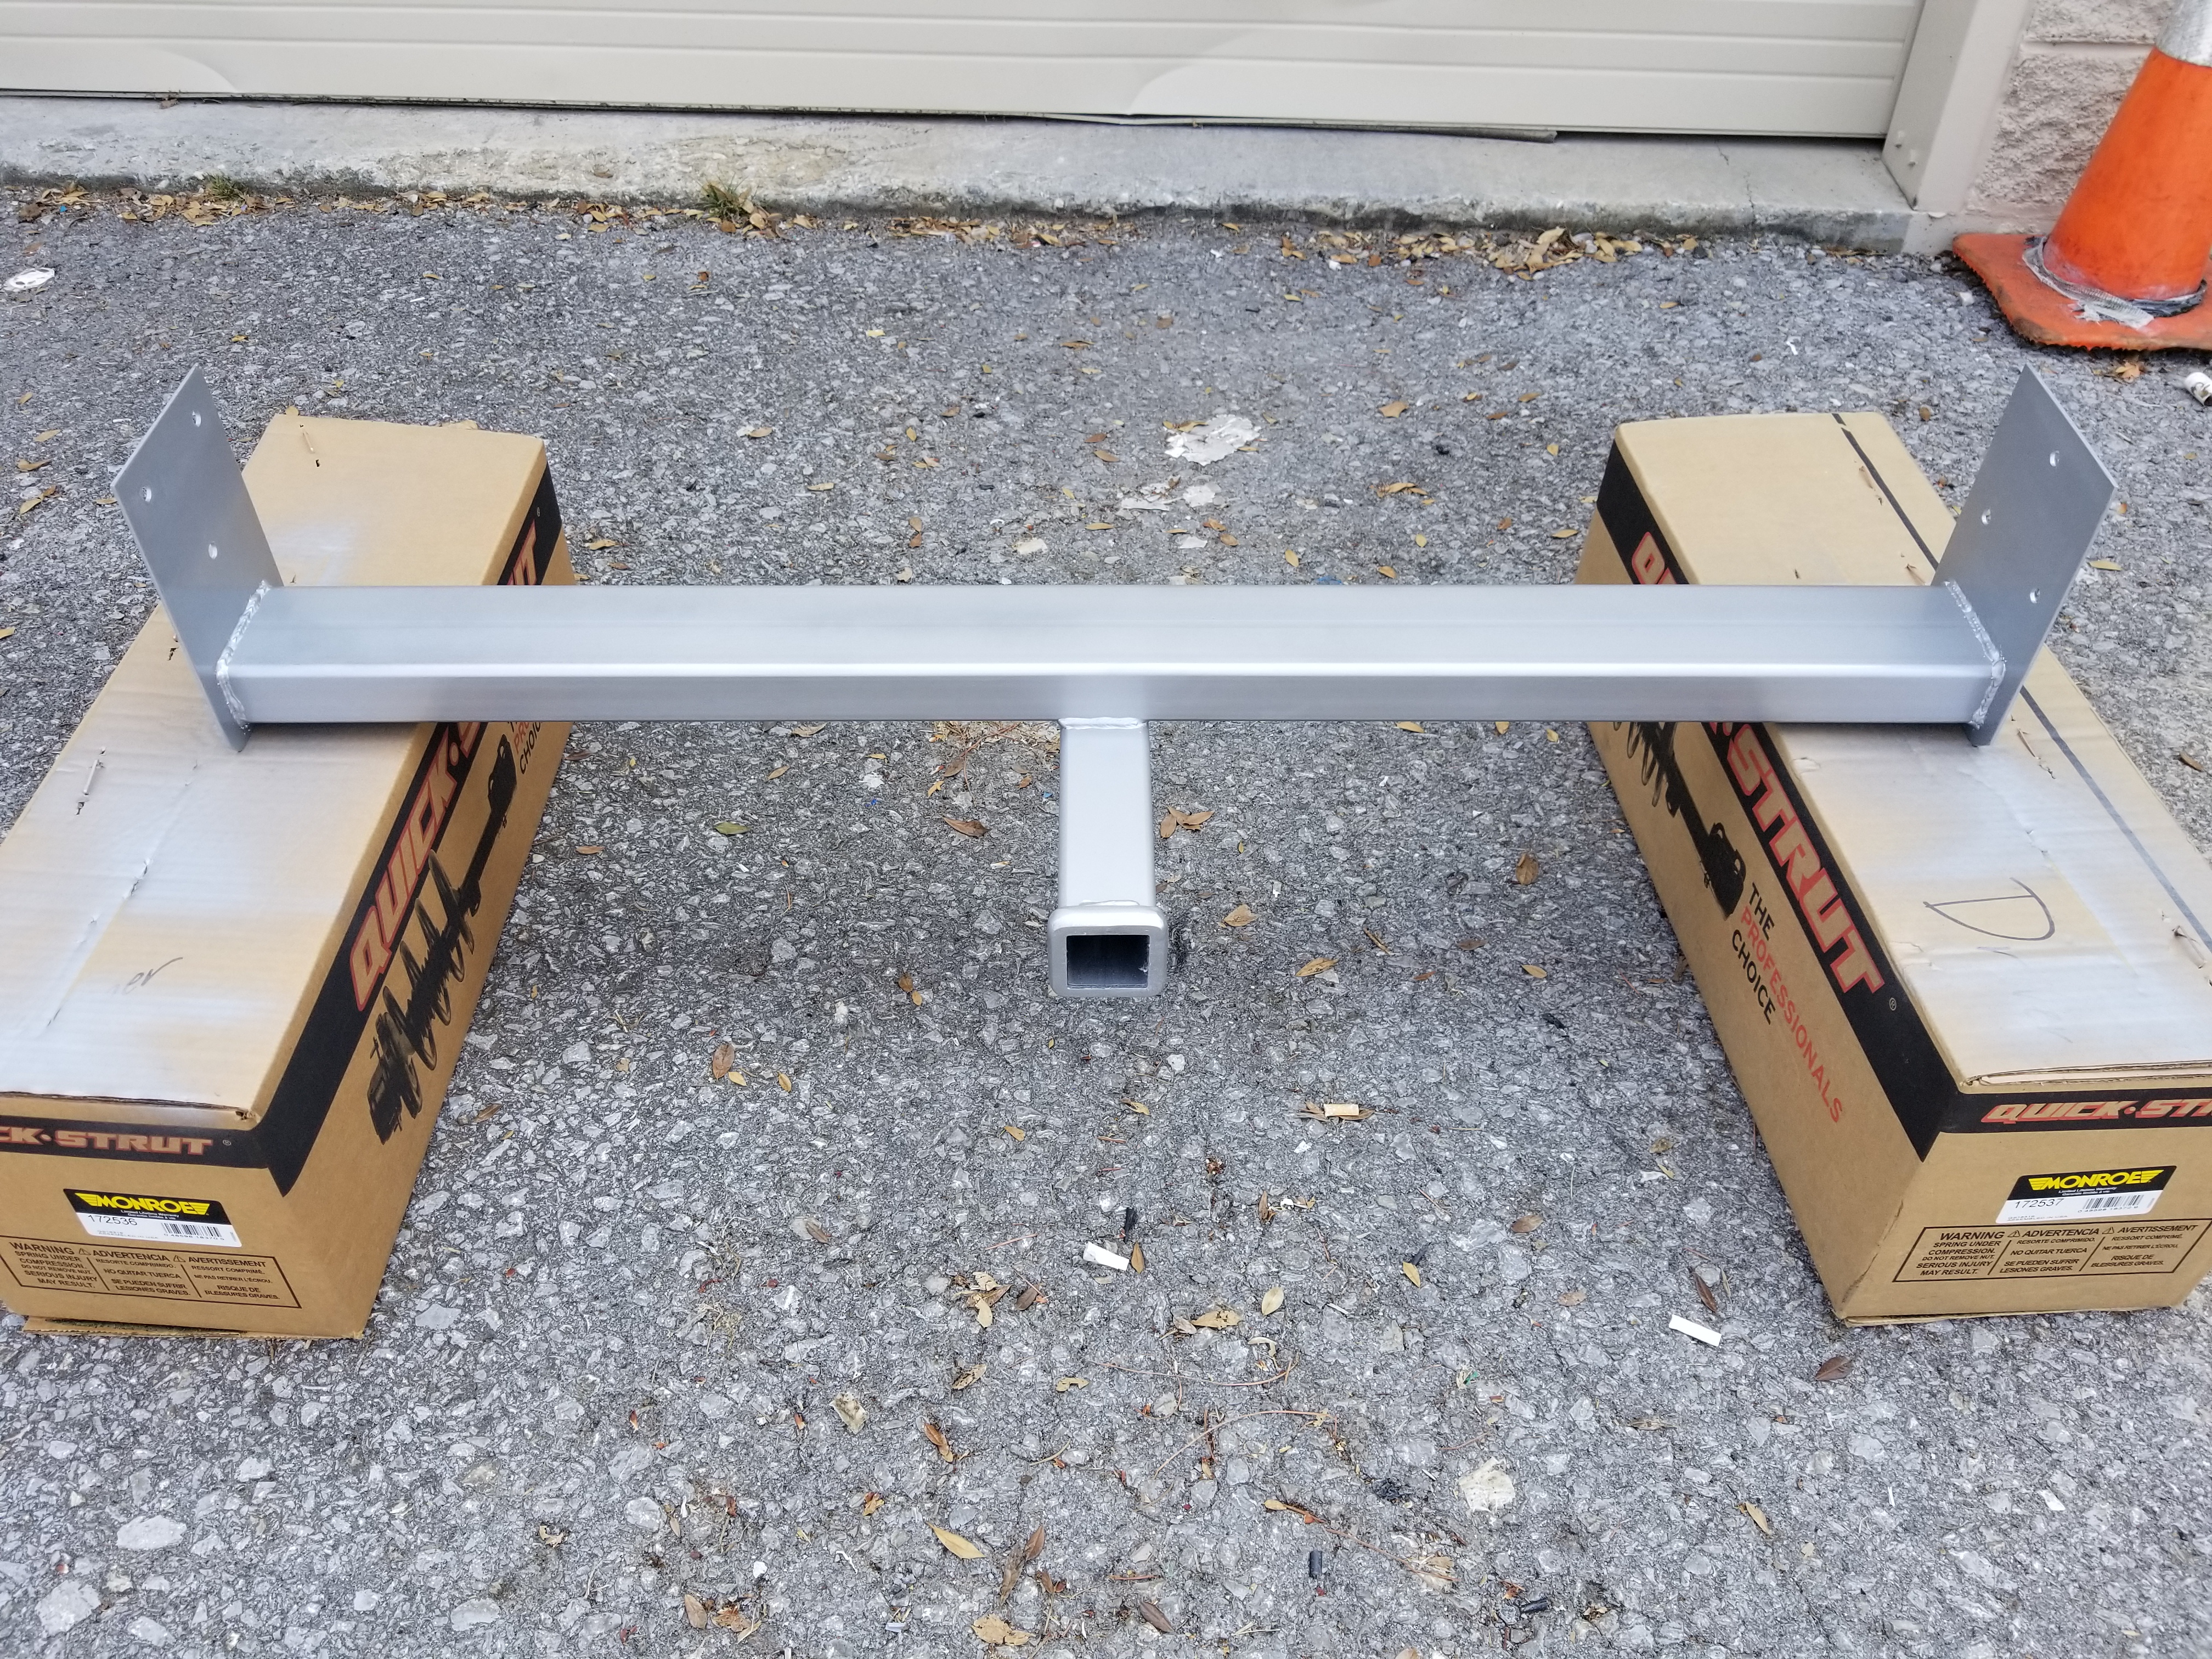
Here's another approach to bike rack carriers for Oliver Travel Trailers. Before going any further, I must say this might not be ideal for folks with a desire for maximum rear clearance ... and I've seen a post where an owner scraped one the rear cross supports. With 12-inches clearance on level ground, we haven't had that problem even with a steep driveway. Our old Airstream did drag when we attempted parking in that driveway. I'll acknowledge some folks may need more clearance, so for those folks I recommend going with an above bumper mount or tongue mount. We've been toying with ideas for a bike rack receiver for Dickens (OLEII 397) since the day of our factory tour last summer. At that time, Oliver had discontinued the model previously sold and we wanted a way to securely carry bikes outside the pick-up truck bed. After looking at ways other folks approached this and thinking about receiver hitches on various vehicles, we came up with essentially what you see in the attached photos. A big difference from the prototype ready for installation the weekend before the 2019 Rally is that the frame attachment points are inside the frame rails instead of outside. Once I had the diamond plate cover off it became evident that we could mount the support plates up between the sheet metal pan and the frame rails. That would shorten the receiver cross member (making is stronger) and much more importantly preclude cutting the diamond plate thereby improving the outward appearance. So, I reinstalled the diamond plate and prepared Dickens for the trip to Alabama ... without bikes. I should say that my original desire was to fabricate this receiver from aluminum to be consistent with the awesome Oliver frame. However, since my bike rack (1UP-USA.com) uses a 2-inch tube I needed a 2-inch receiver. Unfortunately, my metal supplier wasn't able to locate the necessary stock. We could have had it machined from bar stock but decided to just go with readily available steel. I have the design drawings in both aluminum and steel, with both analyzed to ensure adequate strength. While my intent is to remain below Oliver's limits (even with two bikes), the analysis shows the receiver can withstand far greater weights. By the way, you may note there are no safety chain attachment points on this receiver! Last point, for those possibly concerned with license plate visibility, 1UP-USA racks have an accessory for mounting the plate. We haven't gone that route because the tag is visible through the bike frames. If we decide to put a cover on the bikes, we'll get the plate holder. Okay, enough typing. Take a look at the pictures and please feel free to comment or PM me if you'd like more information. Thanks for your interest. Update: Attached is a copy of the design drawing from which the receiver was fabricated. It is offered for information only; therefore, no guarantee or warranty, either expressed or implied, applies. The receiver was drawn to measurements taken from our OLEII. Anyone using this drawing and photos for fabricating one for their Oliver travel trailer are advised to take their own measurements and use them accordingly. Dickens-Hitch.pdf
 1 point
 -
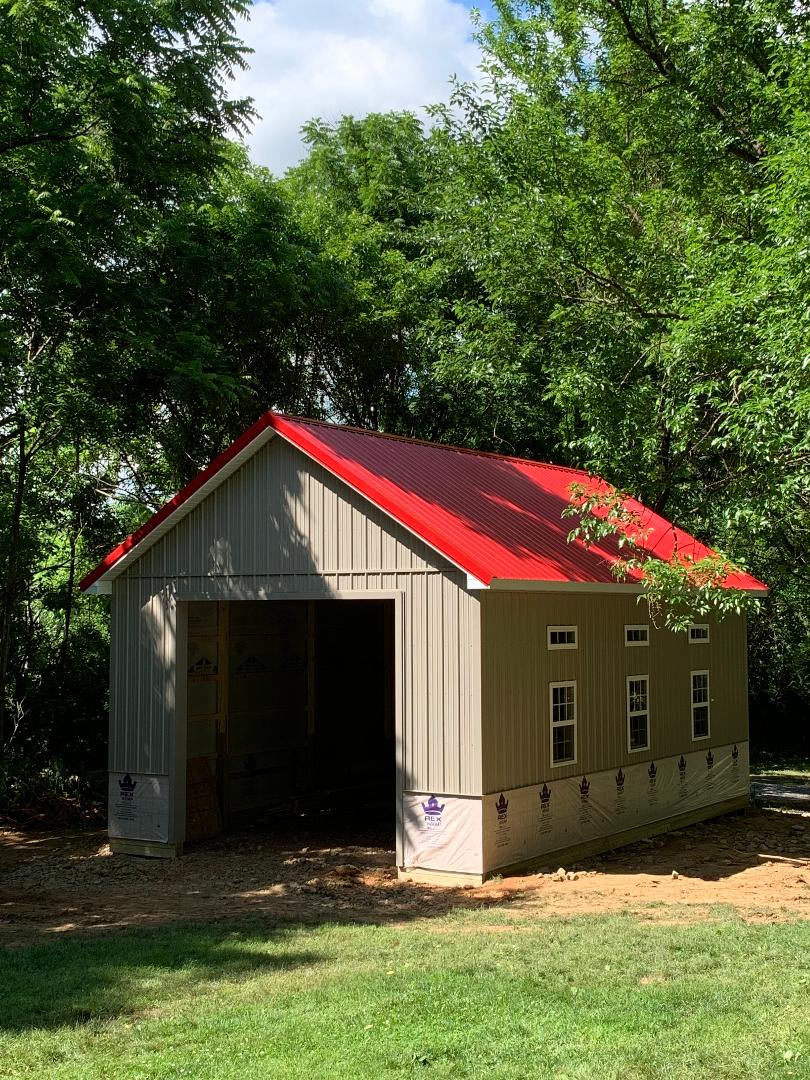
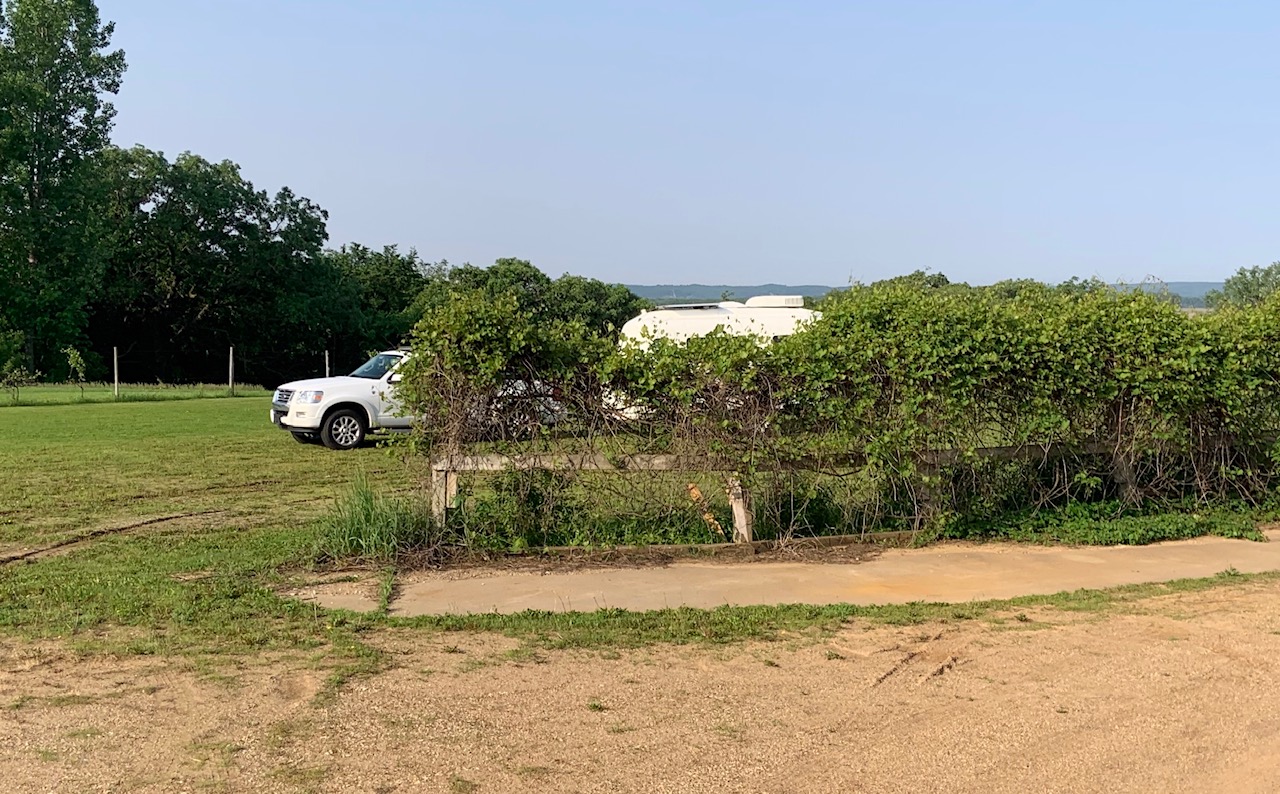
We took possession of our trailer (2 Hobos) in May and now we have a new parking place for it. Attached is a pic of a new building for HOBO just completed (sort of) today. The structure is 32' long, 20 wide, and ceiling height is 12'. Door opening is 12' wide by 11 tall. I think even a blind pig could slip HOBO into this without much trouble. Overhead door, concrete floor (with help from friends), and exterior stonework (me) next. In that order. Electric and water soon to arrive too. We're really excited to get HOBO under cover. The really amazing part of this story is that it was constructed by two young Amish men (early 20s) in just four days. That is from bare ground to final structure Four days, 2 men. These are remarkable young folks. We had a lot of fun together and really enjoyed having them around for the last few days. We formed a personal relationship with them and hope to see them again soon.
1 point
-
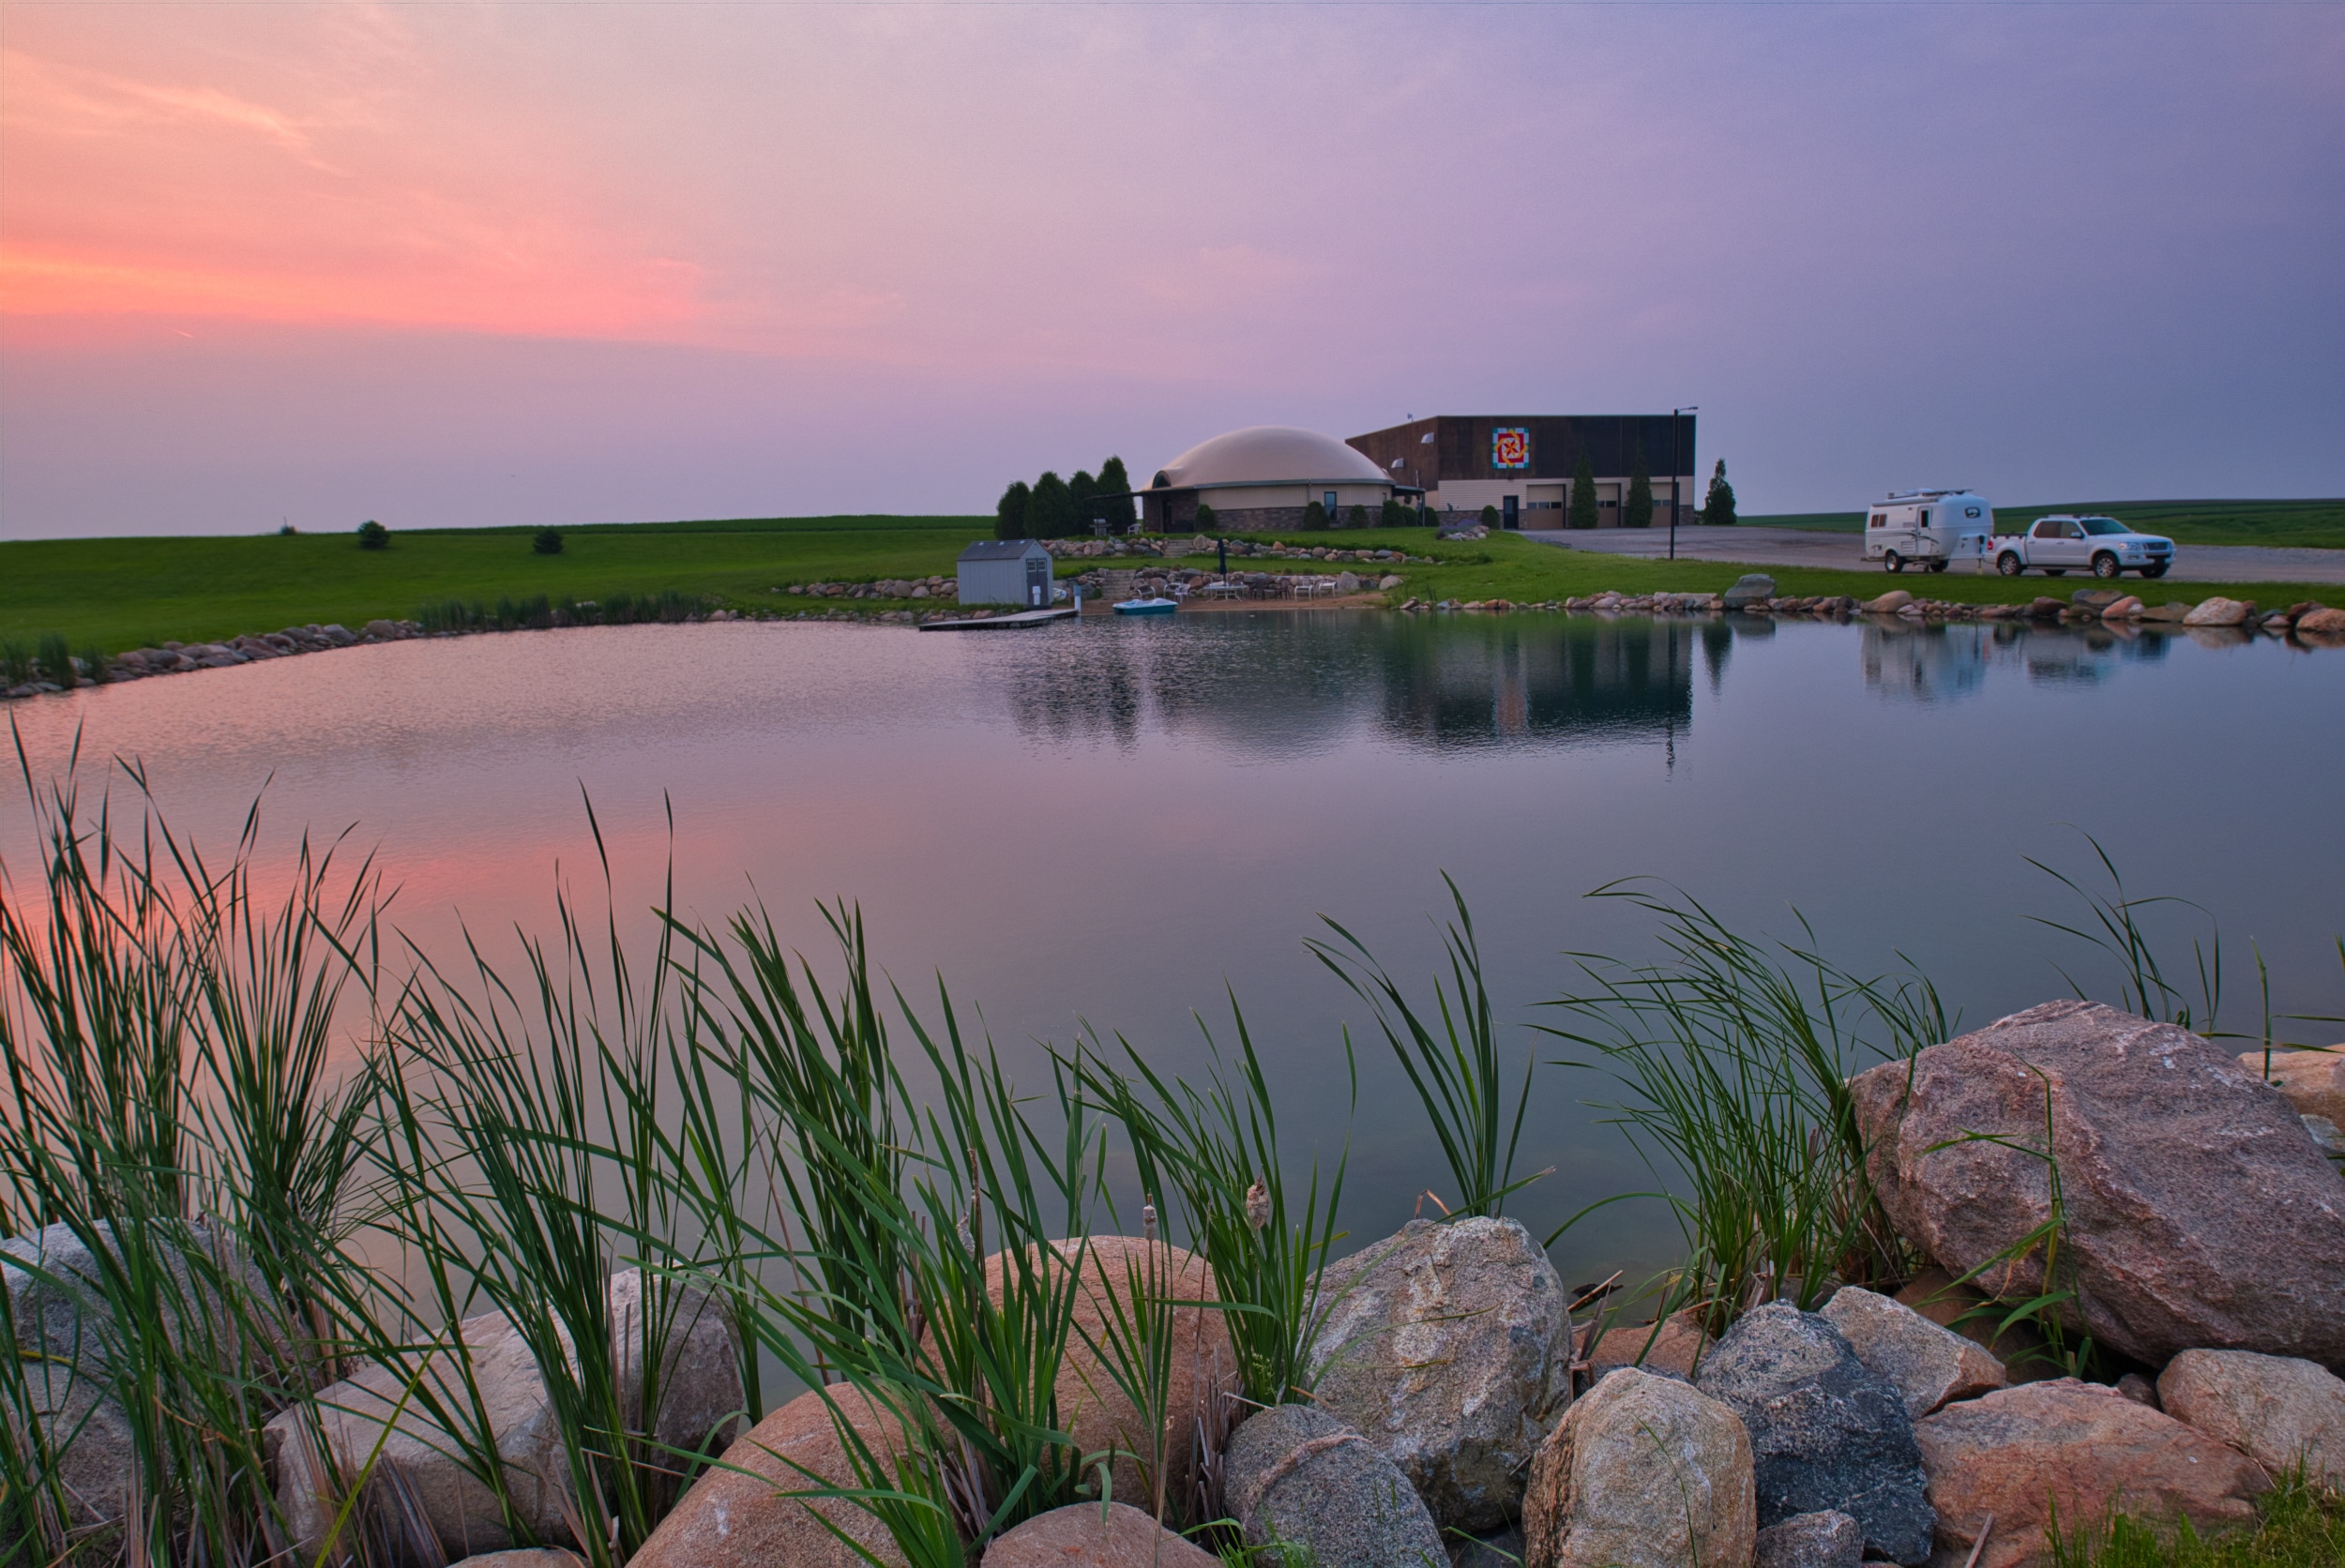
Camping Spot Night two of our Alaska Trek was in a friend’s driveway with great food, always an excellent choice when traveling. Night three was at our first Harvest Host’s stop. We were in Hudson, Iowa at the Hansen Dairy. This is a same family owned 155 year old farm starting their seventh generation of owners. Wow. Beautiful spot and even better people. We enjoyed a peaceful night next to a small pond & ate wonderful ice cream fresh from the dairy. We also bought milk and cheese curds that my wife pronounced “delicious.” The site had showers in the tour building available. Nice, hot, longer shower! In the morning we took a neat tour of the dairy. All in all an amazing stop making Harvest Hosts a great investment.
1 point
-
Camping Spot: Harvest Host at Valiant Vineyard in Vermillion, SD. Our second Harvest Host camping site was also nice. We were at the Valiant Vineyards Winery in Vermillion, SD, Had a wine tasting with Adrianne that was free and settled on a rhubarb variety. We were set up on a secondary parking area behind a line of grape vines. We were the only ones on site, so we ran our generator a bit to charge the computers and run the microwave to heat our dinner. Otherwise a very quiet spot. Left early in the AM. HH scores again.
1 point
-
Congrats! If GM only had a referral program like Oliver's... - Randy1 point
-
You won’t be disappointed1 point
-
I've successfully replaced a broken Bathroom Door Mirror. It was pretty darn easy, however I'm going to provide step-by-step instructions below for anyone who has any concerns about how to do it one's self. Note: Be very careful handling glass! It's possible to get severe lacerations, if you're not reasonably careful. You may want to wear some light work gloves with silicone grippers on the fingers. Mirror has Safety Backing which is intended to keep broken mirror from having exposed sharp edges, but it's not perfect. 1) Order a new Safety Mirror w/Safety Backing in these dimensions 18.5" X 61" X 1/8" from your local glass store. I don't recommend picking it up until you have the broken one removed and can bring the Plastic Backing Board to provide added support for the new mirror when transporting it home. 2) Remove door from Ollie by unscrewing the 4 screws on the hinge side of the door inside the bathroom. When the last screw comes loose, be ready to carefully lift the entire door and hinge assembly from the fiberglass door opening. 3) Place the door on a open, flat surface. Begin by removing the 2 screws that hold the door handles to the frame, and set those aside. Next, remove the plastic door latch by removing it's screw, and set aside. Next, there are 4 screws, one per corner, that hold the aluminum frame together. It probably doesn't matter where you begin, but I started by removing the two screws on the long side opposite the hinge. Set screws aside, and begin to gently work the aluminum frame from the mirror, the 1/8" plastic backing, and the silicone seal that holds the mirror in the frame. Once off, set aside. Move to either the top or bottom frame piece, Loosen until free, the screws that stay connected to the hinged frame piece. Carefully remove top and bottom frame pieces. Finally, remove hinged side from mirror. Note: Be sure to notice how the one piece silicone seal is placed on the mirror edges. Notice how it fits on the corners. You'll want to duplicate that exactly with the new mirror, if you want it to go back together easily. 3) Remove Silicone Seal and set aside. Carefully remove Plastic Backing Board from 1/8" mirror. It was glued to the mirror, so it may take some gentle prying. Mine came off easily because the glue was no longer holding them together. 4) Take Plastic Backing Board to glass shop to glue or tape to new mirror before transporting. Make sure your vehicle has a flat space long enough to support entire mirror. It would be a bummer if you hit a bump and it broke before you got home. New mirror cost me $130 5) Begin reassembly by removing tape if it was used to keep backing board on mirror. Place Silicone Seal on new mirror exactly the way it was on the broken mirror. I recommend starting with the hinged side first. Very gently work the mirror, backing board and silicone seal into the hinged frame piece such that the top and bottom frame pieces will fit perfectly to the 45 degree angle cuts. This allows for perfect screw and threaded holes to align perfectly. 6) Gently press top/bottom frame pieces onto mirror/backing board/silicone seal such that they match perfectly with hinged piece. Screw the top and bottom screws from the hinged side into the top and bottom pieces. 7) Now install the other long frame piece until it matches perfectly with the top/bottom pieces. Once together, install the two screws you set aside. 8) Now you can reinstall it into the trailer. Simply lift into place such that frame holes align holes in fiberglass opening. Replace screws till tight. 9) Lastly, reinstall Aluminum handles and Plastic Latch. Voile! You have a new mirror which you will never allow to break again because you learned your lesson the first time, as I did LOL.1 point
-
And just think, not an ounce of liability was incurred. That's what helping family (be it personal or extended) is all about. Never turn your back on a person in need, for it may well be you sometime down some lonely forest road...1 point
-
Great Basin NP in eastern Nevada?1 point


-
Recent Achievements
-


")


")


")


