
ScubaRx
-
Posts
3,307 -
Joined
-
Last visited
-
Days Won
173
Everything posted by ScubaRx
-
John, I have that exact product on my existing hitch and will be transferring it to my new setup. Scratches are inevitable but they won't looks as poorly as my rusty old beat up steel stinger.
-
John, looks very nice. One thing I've discovered is that Fastway produces many fine products and that Tractor Supply sells and stocks many of them. Slight hijack of thread: I recently weighed the Outlaw Oliver and found it to weigh right at 7100 lbs with a tongue weight of over 800 lbs. Since my ball mount was only rated for 6000 lbs, I set about to find one rated higher. I had recently bought a Stainless Steel ball and I wanted the new mount to compliment its clean look (OCD and Anal Retentiveness are NOT real, I read it on the Internet.) Anyway, I found exactly what I wanted in a Fastway Flash Standard ball mount. It is machined from a solid piece of aluminum, has a tow rating of 14000 lbs with a 2000 lb tongue weight and is made in the USA. It comes in 2, 4, or 6 inch drops (1, 3, or 5 inch rise) and is sized for 1″ or 1-1/4″ hitch ball shanks. Their website states a tow rating of 10000 lbs with a 1000 lb tongue weight (plenty) but the mount comes actually stamped with the above stats. I ordered it from Wal-Mart (that now has Amazon-like 2 day free shipping with NO membership fee) on a Monday and had it the next day. Cost was about $65.00 for the model I bought. We now return to our regular thread.
-

Zamp PWM controller vs Blue sky mppt controller
ScubaRx replied to STEVEnBETTY's topic in Mechanical & Technical Tips
I'll interject this in the Zamp vs Blue Sky discussion. Both brands have two components: controller and display. The controllers are merely the piece of equipment that is located under the bed and reduce the incoming voltage to a level that will not destroy your battery's. The displays are surface mounted somewhere inside the cabin and tell you what's going on behind the scenes between your panels and battery's. We have the Blue Sky setup. Our controller is the Blue Sky 2512iX-HV. Our display is the Blue Sky IPN PRO. This piece of equipment is very complex and it acts as both a programmer for the controller and a display for the system. The manual will show that it has over 40 different parameters to deal with contained in 4 ever-deepening levels of menus and for myself, I considered this to have a pretty steep learning curve. You do have the capability to see, modify and control way more things than with the Zamp display, but does (as I believe someone previously stated) the "average user" want to deal with all that. To say all that's "better" is definitely in the eye of the beholder because, in the Blue Sky system, many of these parameters have to be set up. Be it the ultimate consumer (you) or the factory personnel someone has to do it for this system to operate properly. -
Don't forget to add Mississippi, Alabama, Georgia and South Carolina to your Avatar Map.
-
geO, By far the best idea is to never sit in one place long enough to need them... Let's get out there and go CAMPING!!!! Hope you have a wonderful season.
-
John, the mounting system is still basically the same as is shown in your old photo. The panels will still tilt in either direction just as is shown (albeit, perhaps not to the same degree of angle as could be achieved with that setup.) Don't worry, if you desire to get up there and tilt them, they will have the ability to do so. Since Oliver does not include any provision for holding them up, you will have to fab up some kind of support struts. When you see the way it is all mounted you'll see how easy this will be. During our build back in late 2013, I designed the way our panels are mounted in anticipation of tilting them easily. I really believe that the reason that you've never seen a camping photo with them tilted is that they works so well in the flat position that nobody has ever found the energy to get up there and tilt them. I know I haven't and you may find it to be the same. They are still mounting them in the same manner as mine.
-
Soon-to-Be New Ollie Owners from Southeastern Arizona
ScubaRx replied to Spike's topic in Introduce Yourself
Down the center of the roof it is 2 inches thick. I have seen two men at the factory carrying an air-conditioner while walking on the roof. The greatest danger of getting on the roof is an accidental fall. There is not a whole lot of available real estate up there and it would be easy to trip. In answer to your original question, we carry a 12 foot extend and climb collapsible ladder. When I purchased that ladder back in 2013 my original idea was to store it in the basement. It will not fit in that area but I discovered that it nicely stood against the wall separating the closet from the bathroom and that's where it has been for the past three years. We do not use it often but when you need to access your roof, nothing will substitute for a sturdy ladder. After meeting you in Sierra Vista, Tali and I felt sure you and your wife would soon be joining the family of Oliver owners. It is good to know you have made the jump. We plan to come back to the west in about a month or so and spend some time up in the north west. -
Day/Night Window Shade Questions
ScubaRx replied to rideandfly's topic in Mechanical & Technical Tips
This info was available because I did the research and discovered it. I don't own an owner's manual but I'd bet a month's salary that it's not there and if you were to call Oliver they could only tell you the name of the company. As far as finding it 4-8 years from now, I'd write it down. I keep information like this in my phone. And it's backed up, multiple times. The only answer for the question of color seems to be the fact that they choose not to produce it in pure white. They used to, the shade frames in our first Outlaw Oliver were white but sometime during Oliver's travel trailer building hiatus (2009-2013) the company switched to only Black and Almond. -
Day/Night Window Shade Questions
ScubaRx replied to rideandfly's topic in Mechanical & Technical Tips
Our shades are custom made in Canada and are a specialty item made only for Oliver. The company is Auto-Motion Shade Inc. 400 Bentley Street, Markham, Ontario. The Customer Service Representative is Alex Colavecchia. You can reach him at 905-470-6198 or alexc@automotionshade.com. But the guy you really need to talk to is Vick. He is the one that actually assembles all of Oliver's shades. His cell phone is 416-989-1075. He will send you the cord and an instruction sheet for free. All that having been said, the sheet is not very clear and after disassembling the shade it's like doing Chinese arithmetic trying to see where all the strings go. I never did get ours fixed. Thanks a lot for reminding me. I think I'll go eat a bug.- 102 replies
-
- 12
-

-

-
I do try to provide a level surface to put my blocks on. Usually that only requires brushing away any rocks or debris that would not let the block sit solidly on the ground. I have never had to dig any dirt away. Again, our rear jacks are rarely extended over four inches or so. It's rare that the tires are off the ground. We even set the front jack on about 8 inches of block to keep it from being over extended. This manner of leveling our Oliver's have served us well and without problems for over 9 years of use. We have found the message in Matthew 7:24-27 to be useful when parking the Outlaw Oliver. In other words, be careful about parking your Oliver alongside a river with a sandy beach during a four day rain event.
-
Every time I hit "View Recent Topics" it opens in a new window...
-
Since the issue of frame flexing, leveling with jacks, et al. has come up in multiple threads, I spoke with Jason yesterday as to just what info was being given out at the factory during plant tours, phone inquiries, etc. In the old days (circa 2008) we were told that the purpose of the jacks was to raise, lower, level and stabilize the trailers. When we took ownership of our 2014 model nothing was said to the contrary. In full disclosure, probably since this was our second Oliver, we weren't told really much of anything. We have always used the rear jacks to lift and level both of our Oliver's and we have never experienced any cracking of the gel-coat. I would expect that flexing of the frame is "normal." That meaning, if you lift one side of the trailer significantly greater than the other you are naturally going to put a certain amount of twisting force on the frame. Is this OK? Probably for short periods of time. I would not recommend leaving it that way over the winter. I learned from Jason that the concern is about flexing the jack attachment points on the frame and the factory position is that the jacks should only be used to stabilize the trailer. It is their opinion that, with the exception of changing a tire, they should not be used to completely lift the weight of the trailer. All three jacks are made by the same manufacturer with the rear two made especially for Oliver. They all have the same rating. Steve's opinion is that the jacks are fully capable of lifting the full weight of the trailer. If this were not true the front jack should never be use for lifting (it does, however, have a completely different mounting system from the rear jacks.) As I see it, the problem is not with the jacks but with the way they are mounted to the frame. At full extension, there could be a lot of leverage and torque on the attachment point. For this reason we have always put 11 inch blocks under the rear jacks and rarely extend them past about 4 inches. Individual owners will have to make up their own minds as to their leveling needs. As for the gel-coat cracks in a Casita, their hulls average about 3/16" thick. There are areas of the Oliver hull that are over 2 inches thick! Our hulls are much more substantial than any of the others.
-
Where to carry spare gas for the generator?
ScubaRx replied to John E Davies's topic in Ollie Modifications
John, this information is simply outdated and incorrect. I did extensive research on fuel cans several years ago when I realized the primary manufacturer of the classic metal "jerry can" stopped production due to CARB compliance issues in the US. The Scepter Military Fuel Cans are in fact so superior to the traditional metal jerry cans that the Canadian military, the U.S. Armed services and NATO abandoned the metal cans years ago (in the early 1990's) and use only Scepter Fuel and Water Cans for their fuel and water transportation needs. These cans will not explode in a fire like the metal cans would. The Scepter fuel can is quite simply, the safest most reliable fuel can available on the market today. I have seven of the fuel and two of the water containers and I can tell you they absolutely do not leak. You can carry them upside down if needed. I pack them inside the enclosed bed of our Sierra and never smell gasoline. There are several drawbacks to obtaining and using them. You absolutely cannot buy them from a dealer in the US as they are intended for the military and exempt from EPA and CARB regulations. They can be found new and used on E-Bay. They are expensive, require a special spout and a special wrench to open them. The Rotopax system is a quality product and as best I can tell, the Rotopax Fuelpack’s largest size is four gallons and costs around $100.00. I would say their best claim to fame is that they are EPA and CARB compliant if that sort of thing matters to you. You don't have to take my word for it you can read about them here. -
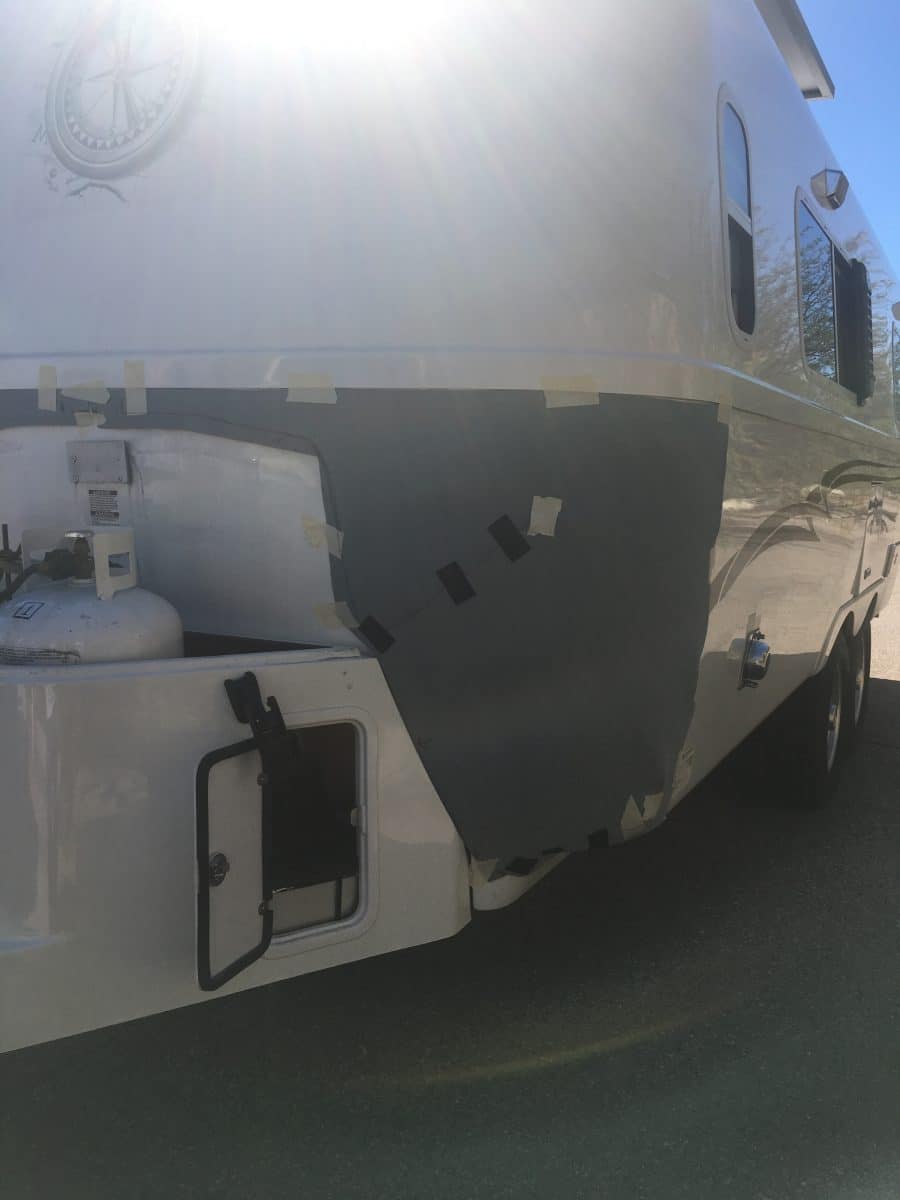
We are currently having a custom bra made for the Outlaw Oliver in anticipation of a 2018 Alaskan trip. The first prototype has been fabricated and a test fitting has been done. The second prototype is now being created, it will be sent to me for another fitting and any adjustments needed will be made. I will then return it for the working model to be produced. If anyone has any thoughts or comments about this project and/or how it should be attached to our Olivers please feel free to make suggestions. This is still very much a work in progress and there is plenty of time for adjustments or modifications before it will be used next year.
-
Reed, you and Karen should not miss the corn chowder that is served in the Old Mill Restaurant.
-
We have found that at any point beyond 90%, the black tank is full of, well you know. Probably has to do with placement of the sensor on the outside of the tank. Tali says it's too scary to look down into the toilet and no amount of straw drawing will compel her to do so. Further, she states it's a "man's job." I'm not exactly clear on how that came to be but, at any rate, that's the way it is in the Outlaw Oliver. On an additional sidenote, never (let me repeat) NEVER pressurize the black tank by filling with the flush hose and press the flush pedal while peering down into the toilet. Think Robin Williams in RV. I happen to have become an inadvertent expert on that particular set of circumstances.
-
We have finished our business in Tucson and have just filled up with gasoline. We are headed East on Interstate 10 and it will be our home for the next few days. The forum seems blessedly devoid of drama currently. We can only hope that it remains so.
-
Rubber Gaskets Around Porch Lights
ScubaRx replied to Mike and Carol's topic in Mechanical & Technical Tips
I agree with Reed. This horse has been ridden until it has fallen down and I am going to consider it dead. This was never a deal breaker and if anyone considered it so, perhaps another brand trailer would suit you better. Jason has stated they are "working on it." Accept that (or not) but move on.- 97 replies
-
- 4
-
-
- lights
- captain tolley
- (and 3 more)
-
After a particularly cold night in Tombstone, Arizona in late January 2016 that froze our water hose, we purchased this hose at camping world. I have provided a link from Walmart because it is considerably cheaper there. Admittedly it would be cheaper to just take in your hose if freezing temperatures are expected, but we were caught unawares that night. We have had the opportunity to use it when the temperatures were dropping below freezing and it does work. It also comes with a handy-dandy double male adapter that can be screwed into either female end of the hose. This effectively reverses the hose end that has the electrical plug and allows you to plug it in at the pedestal if the electric and water are close enough or at the trailer if they are not.
-
Wrenches...what do you carry in your tool box?
ScubaRx replied to Mainiac's topic in Mechanical & Technical Tips
Any and Every thing that I think that myself or someone else might possibly need. I do, however, generally leave the welder at home. If I can't fix it on the road, we probably should head home. Realistically, should take what you would normally use at home. You don't want to have to pay someone to fix something simply for lack of the correct tool. -
Thanks Matt, I did notice that the posts were showing up immediately and figured you were working your magic somewhere. Good job.
-
As yet, nothing. We bought the vinyl material to have it made but like so many other projects, I have not gotten around to it yet. Camping here in the desert where there are no insects, there's not really a need for it. The room, I discovered yesterday, stays amazingly cool sitting in the Arizona sun. Admittedly the outside temperature is only in the low 70s but if you stand outside in the direct sunlight it can feel quite fierce. On an additional sidenote, the inside of the trailer is resisting the heat to the point that it is several degrees cooler than the outside temperature. We are not running the fan, although we do have the windows open. One thing that I forgot to mention in the set up of the Privacy Room is where the left sidewall meets the trailer. You will want to make sure that it is clear of the furnace exhaust. At the very least it could possibly melt the vinyl. This is not a problem, just something to be aware of.

-
Buzzy, the most difficult task in assembly of the Privacy Room is introducing the cord sewn to the top of the side panels into the track that holds them up. This track is built into the rafters that clamp to each edge of the awning fabric. It is the same type track that is common to the front of every awning structure. This is entirely doable with just two hands, it's only more cumbersome. Although I have not tried it you might try that assembling it in this fashion. Put the awning out loosely at minimum height. Thread the sides onto the edge rafters BEFORE raising them up to their position. All othe aspects is assembly can easily be accomplished by one person.
-
Don't get me wrong, it is a very nice add on to our trailer. Yes, it does take some effort to set it up and, at about 65 pounds, it is heavy so there are weight concerns in just taking it along with you. Set up is not long nor laborious, however, it would be difficult for one person to do alone. Because of the modifications that I was doing yesterday and the photos that I took as I went along, we probably spent over two hours setting it up. If you look at the video from Fiamma it appears to take the couple only about 20 minutes, and once you get the hang of it, I think that time would be accurate. The most time consuming aspect is staking out all the hold downs along the bottom both inside and out. This is actually the first time we have ever done that but due to the unpredictable winds that we might encounter here, I felt it was a good idea. After doing so the walls are taut and I am confident it could withstand a pretty good blow. Here in the desert outside of Quartzsite, though the temperature is only going up into the low 70s, the sun is unrelenting and sitting in the room it is noticeably cooler than standing outside.