rideadeuce
-
Posts
389 -
Joined
-
Last visited
-
Days Won
19
Everything posted by rideadeuce
-
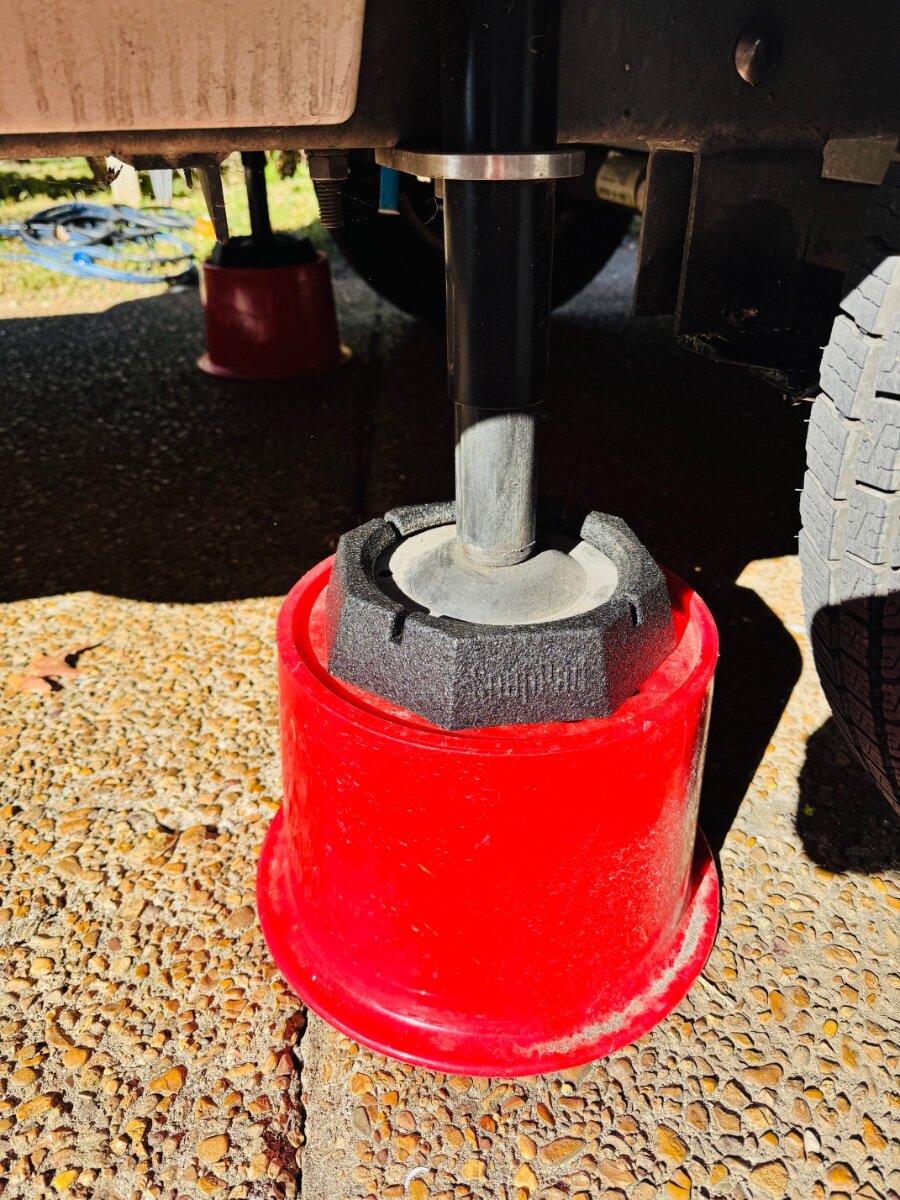
I believe I saw these on one of the forum members Oliver @Galway Girl and did a little research to find them. Pop on and never have to take them off. Quality, thick, durable rubber. Pretty cool. Not sure if there has been a previous post but thought I would share. M https://www.etrailer.com/RV_Jack_Pads/SnapPad/SN59FR.html

-
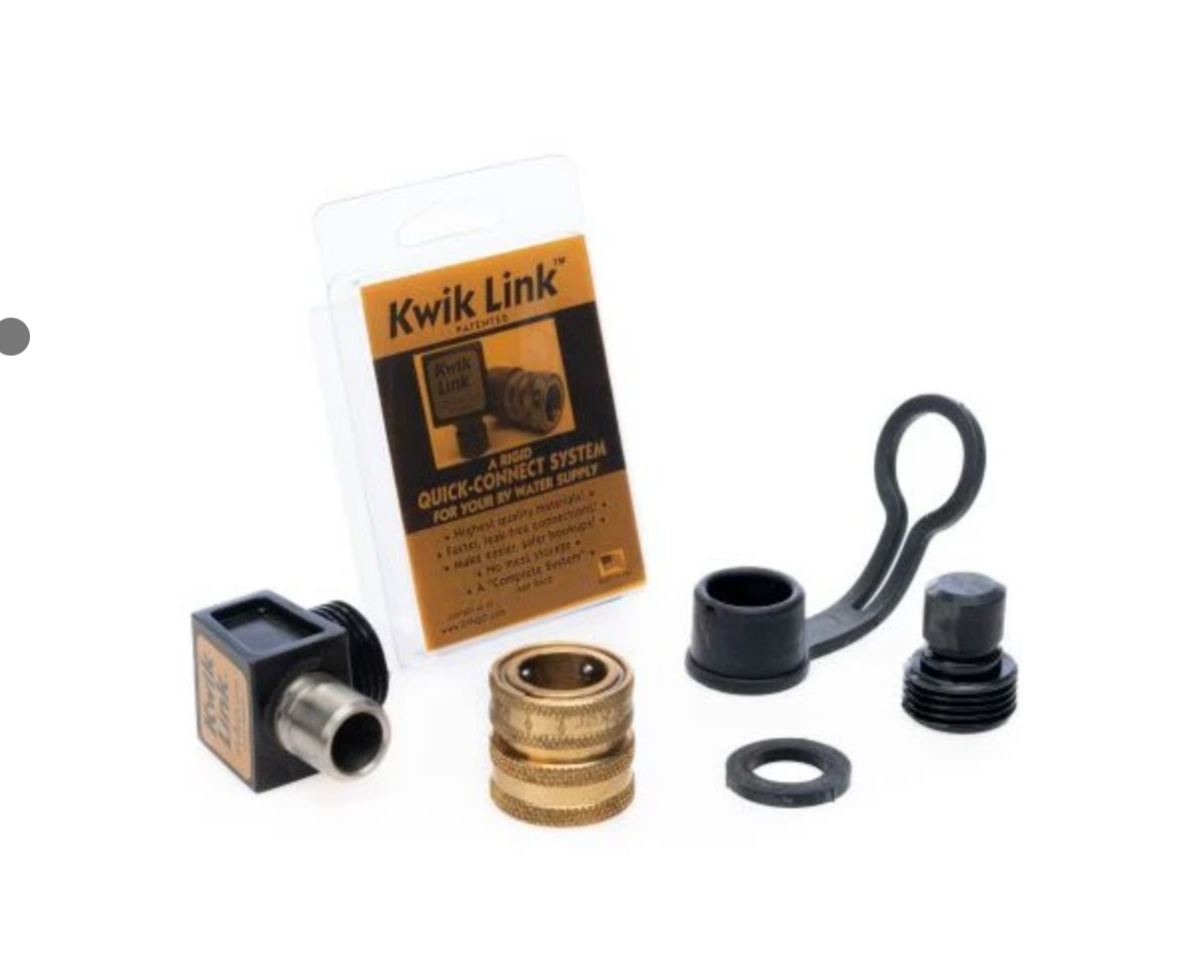
 https://www.rvwaterfilterstore.com/products/kwik-link-connect-system-90?srsltid=AfmBOoqDmJNms7camHGuO4lzVh1ExSXi1dzYkfr0DoPzl1VMP0qVfYAE Similar quality to Eley products and they come with a cover. I have had them in use on all water connections for 6 years. Work great. They use to have one that was less than 90 degrees, worked great on the city and fresh water inlets. But I don’t see it now. I zip tied the OEM threaded cover to the rubber cover to keep it safe and out of the way. Leaving the QC on semi-permanently and then attaching QC to all your hoses makes setup and takedown much easier and quicker. 120 degree? 90 degree
-
You won’t regret the investment. Makes your life easier for the rest of the year. They also give you about 50% off for annual maintenance coat. I will be a doing the annual in early spring. Can’t recommend enough. They do a terrific job. Although I could see it lasting two years if you clean it with the appropriate gel-coat friendly wash. Mine is still shiny and beading up water from the early spring. Bugs and road grime wipes off with ease.
-
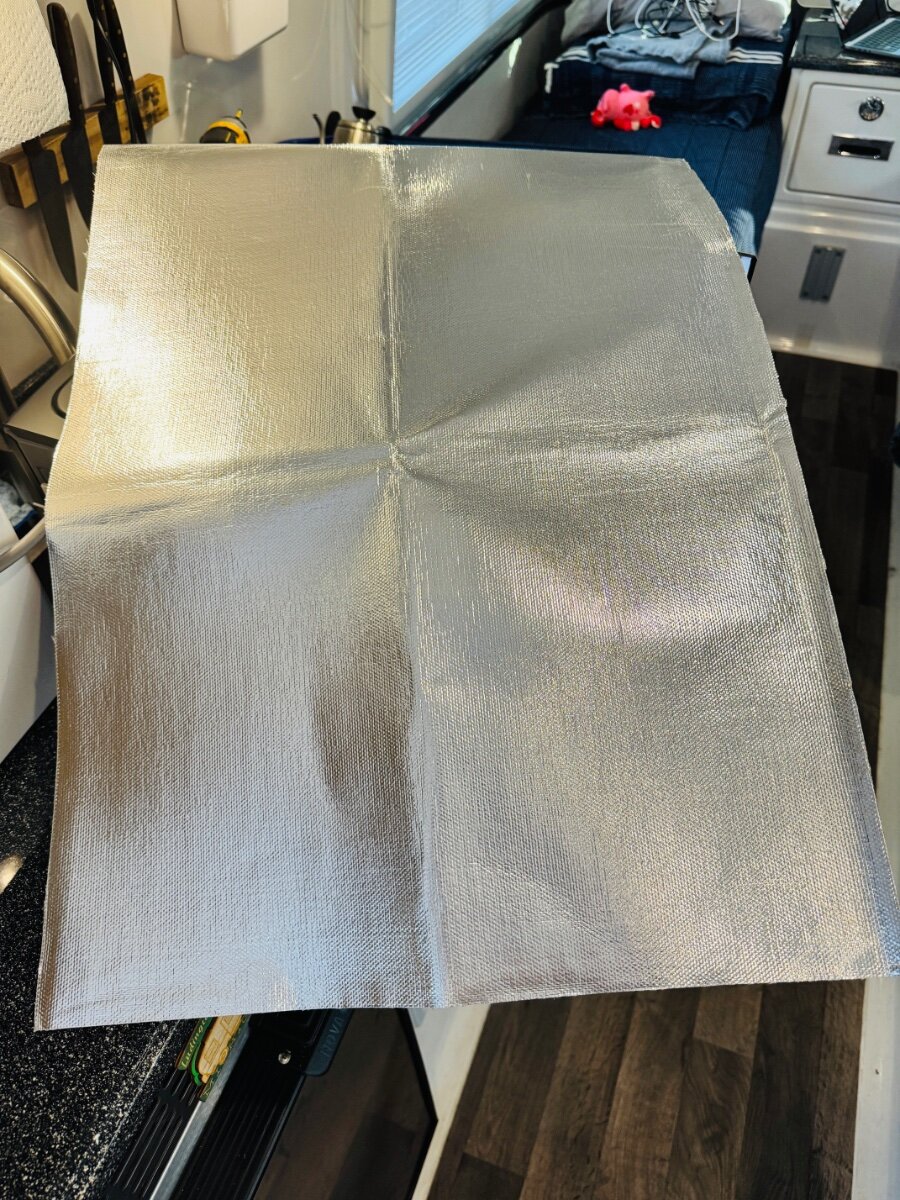
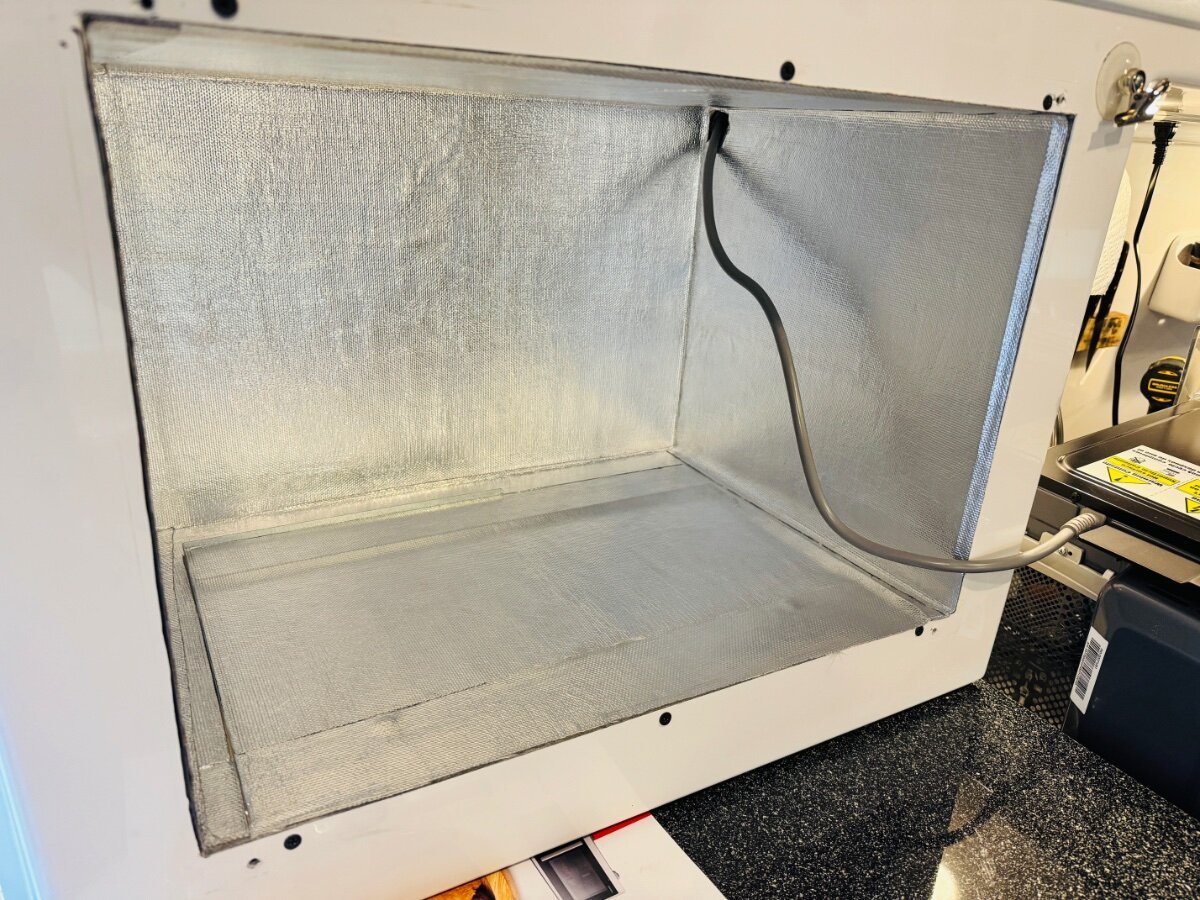
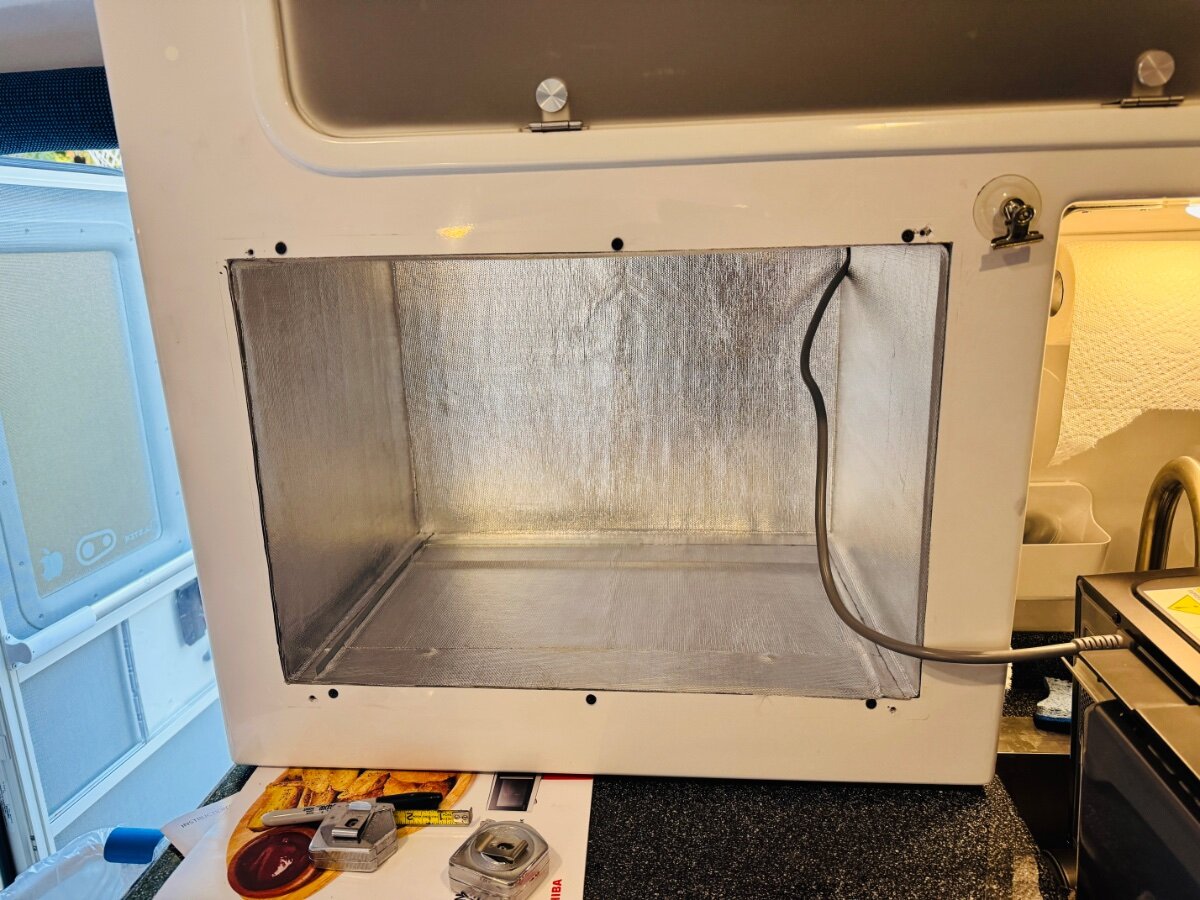
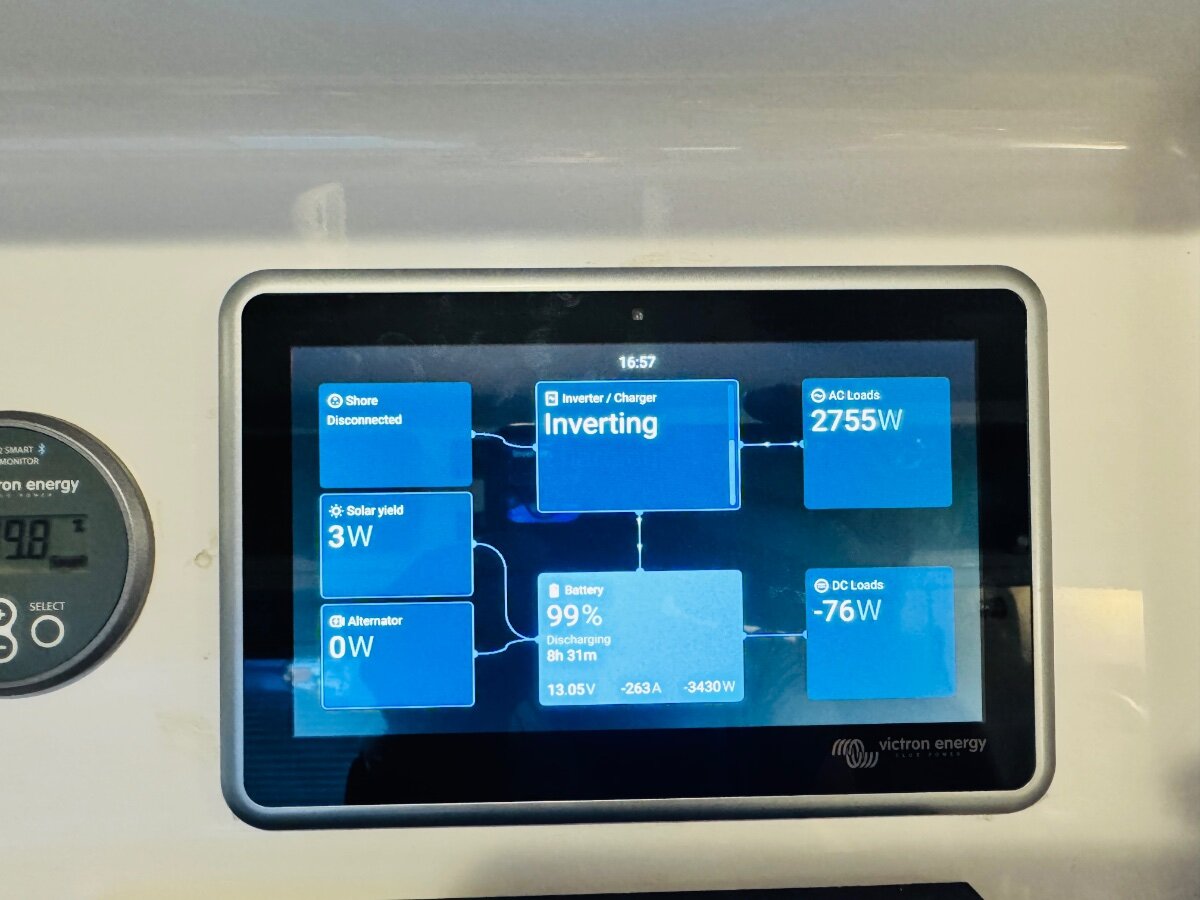
Finally, going to have an oven. I checked the hotspots of the Toshiba MW/oven and the only place it got warm was the back and on top. So I decided to take the plunge with an abundance of caution while using it because I really miss: warm cookies, birthday cake, biscuits, pizza, etc. I did line the cabinet with 1 mm adhesive backed fiberglass high heat barrier. Luckily with a little modification I was able to use the old MW SS trim kit. So plug and play essentially. Again, I will be measuring the cabinet temperatures while using. I think the most likely problem may be that the unit gets too hot or prematurely stops working. Although every looks good so far, nothing abnormal or high temps The highest wattage pulled that I saw while using the convection oven and AC on high was around 2800 watts. Will try to only use one at a time though. Links: Heat shield https://a.co/d/14NmCvX Toshiba https://a.co/d/gGyB2Gc Best, Mike
-
Broke a Leaf Spring in Maine
rideadeuce replied to Galway Girl's topic in Mechanical & Technical Tips
Lucky to be so close to a shop but this should not be happening. Glad you are back on the road. Safe travels -
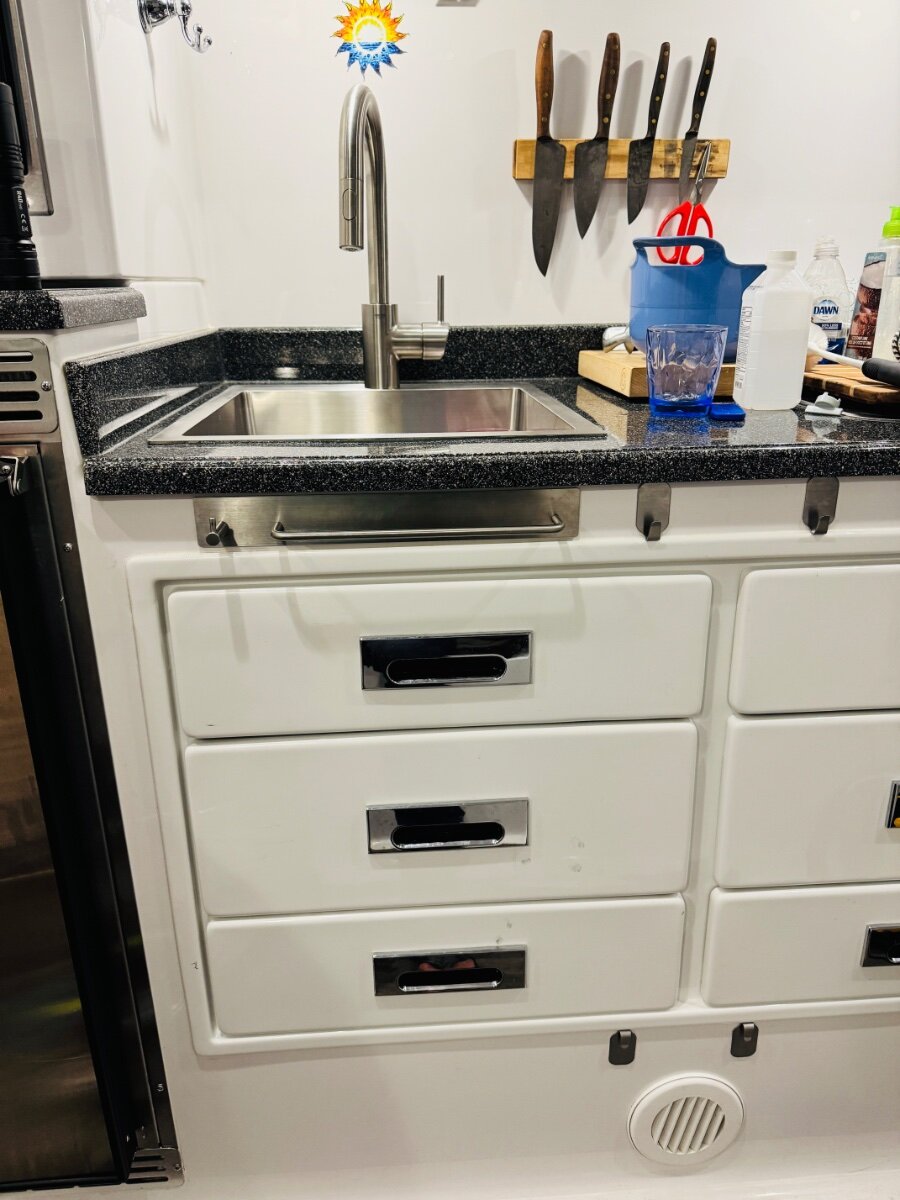
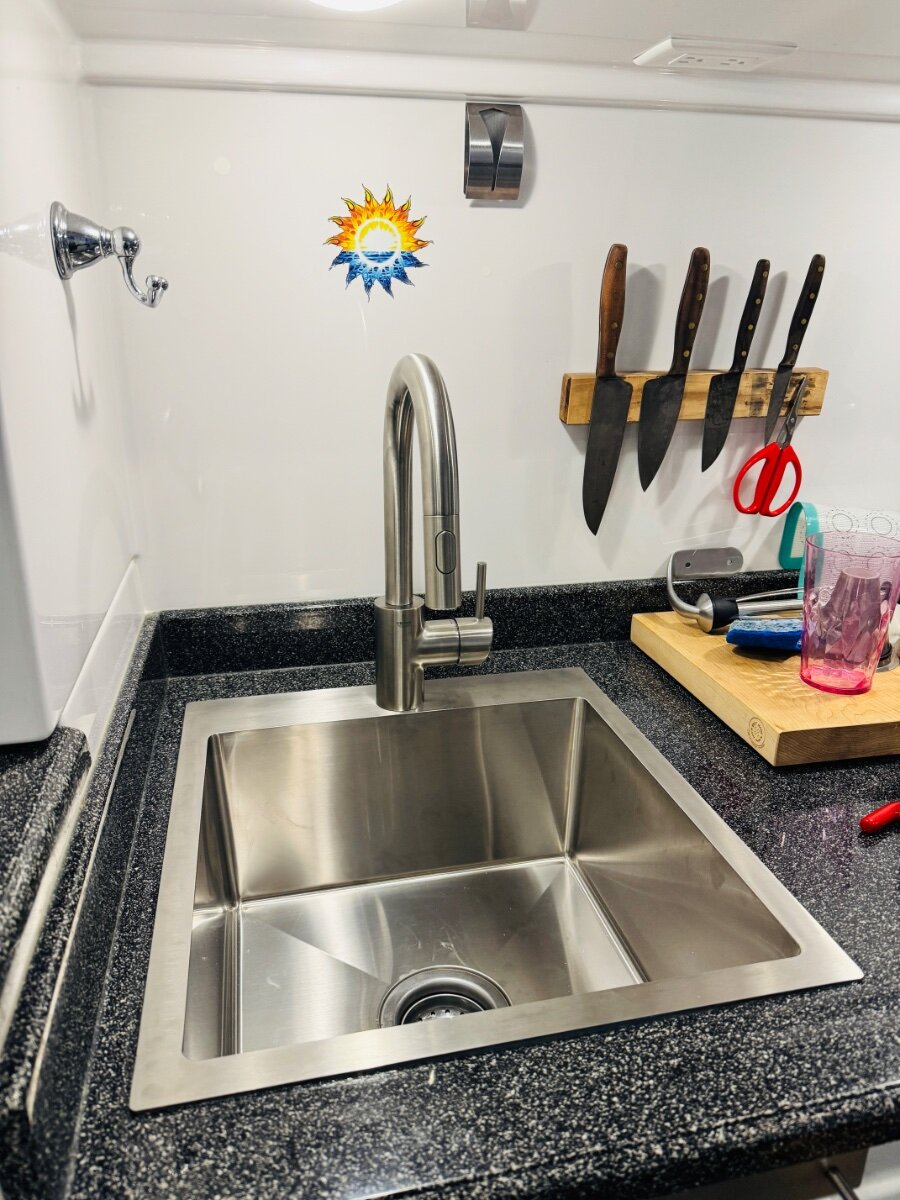
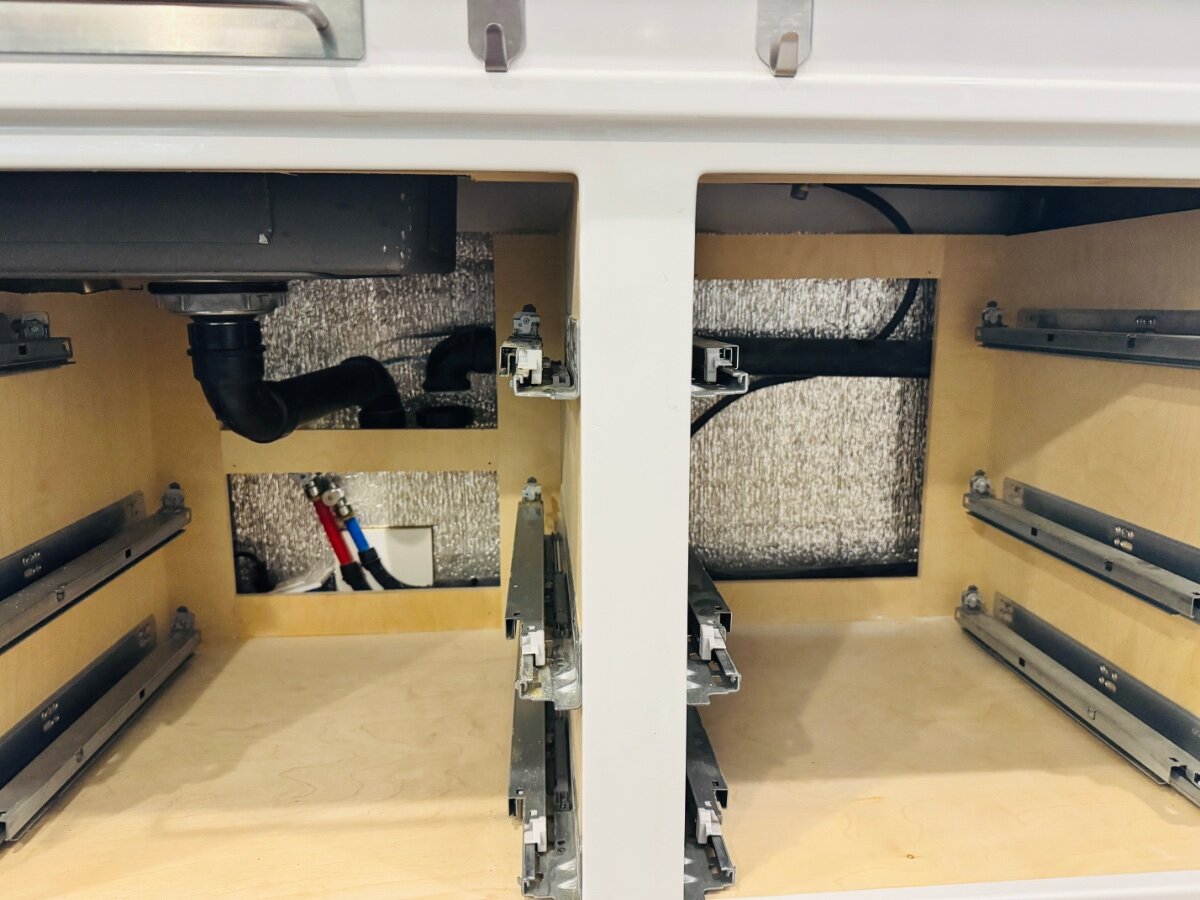
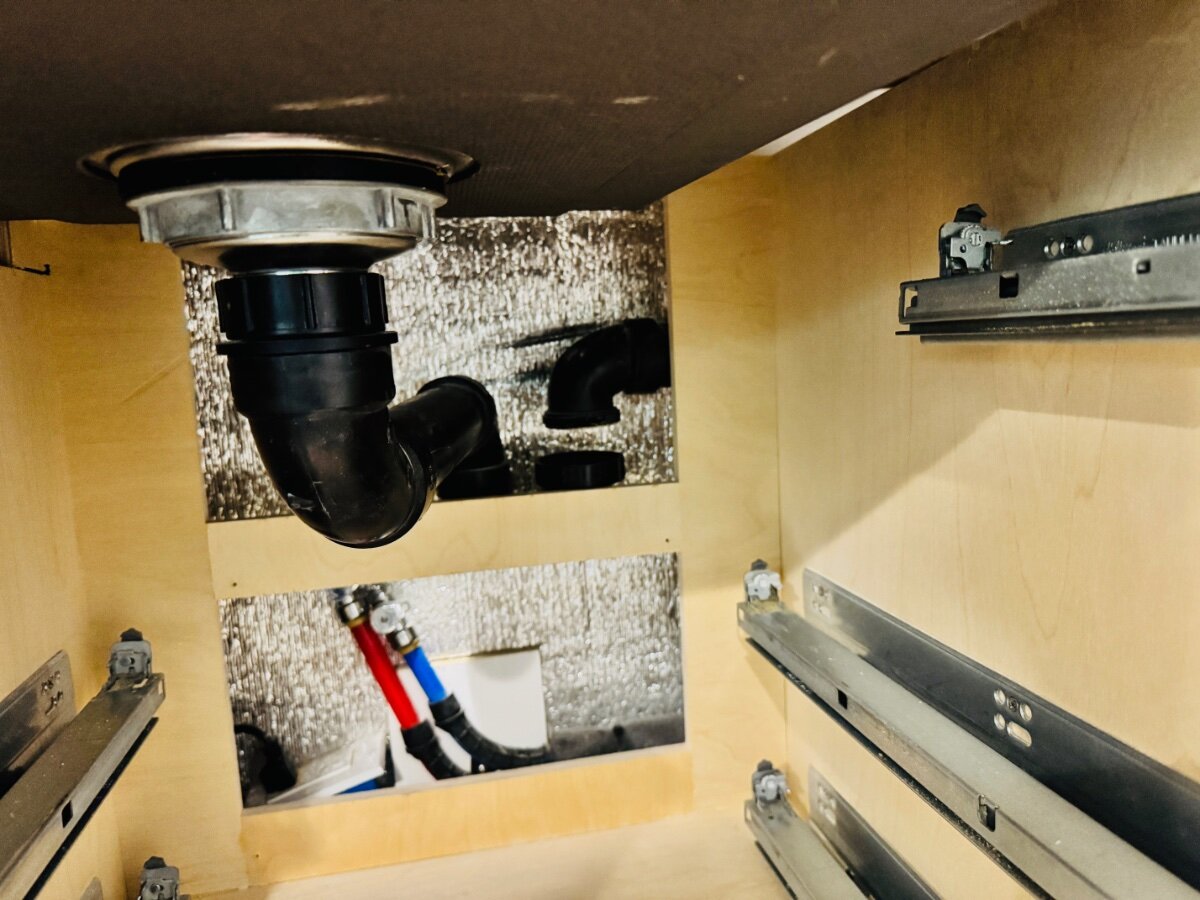
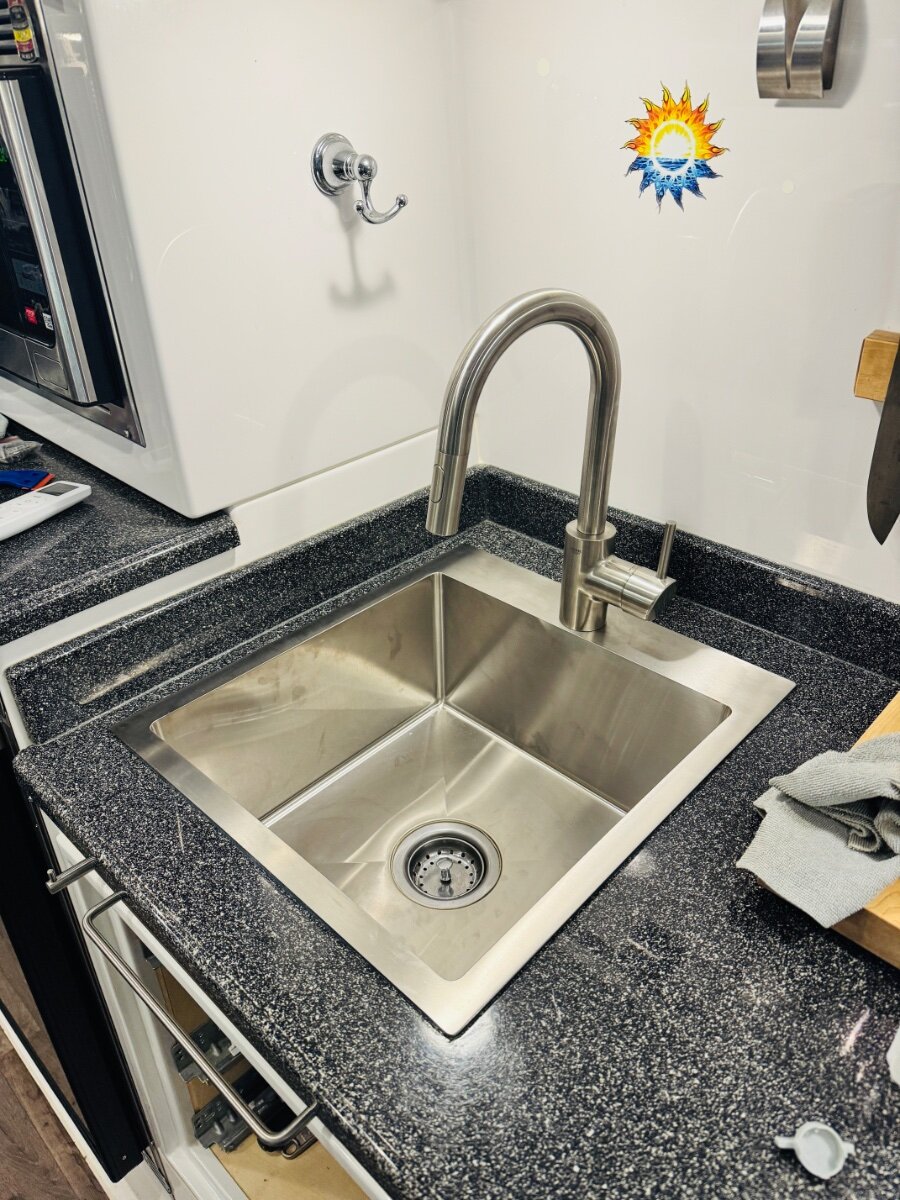
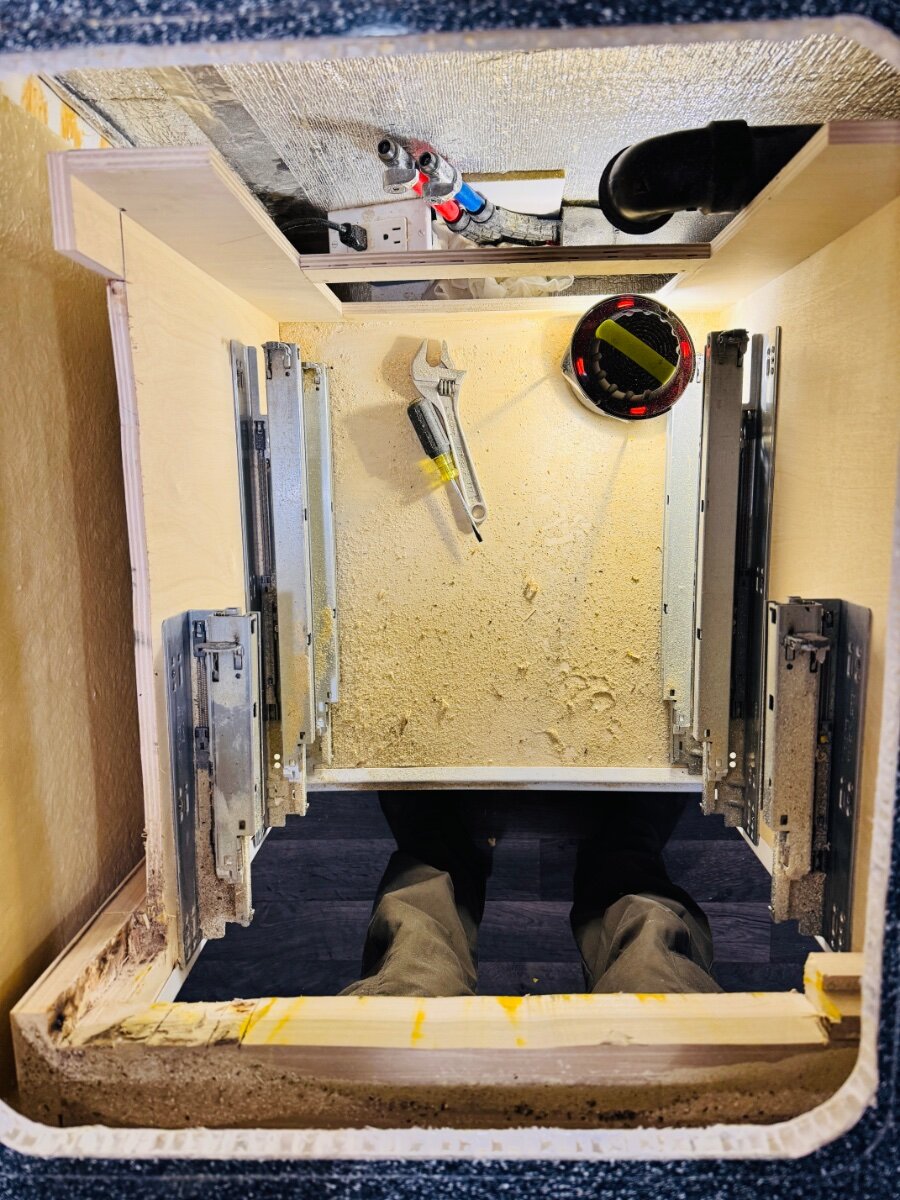
In retrospect, the kitchen sink is one of the only areas where Oliver did not do a great job of designing something that worked well. The OEM sink is too shallow and shaped more like a bowl. The OEM full size kitchen faucet had a reach of 8-9 (should have been 7-8in to spray in the middle ) which caused it to splash water everywhere unless you pulled down on the spray head and let it dangle. The upgrade solves all that and most importantly matches the faucet to the sink so they work together well. Plus, I like the more modern design. Mods are so much fun. Especially when so many members lead the way. Just curious, does anyone know what happened to @Snowball ? Oh, I forgot to mention for anyone doing this mod and it necessitates removing part of the cabinetry. Cover the soft close mechanisms, I had a hell of a time cleaning out all the saw dust. Lots of small moving parts make that work smoothly.
-
She is definitely smarter than her dad! LoL. This morning she was complaining about the healthy cereal and I told her that her mom and I were trying to teach her to eat healthy. I said that things with a lot of sugar can cause obesity and diabetes, etc. She grinned and said “Have you been eating a lot sugar while looking at my belly!?”
-
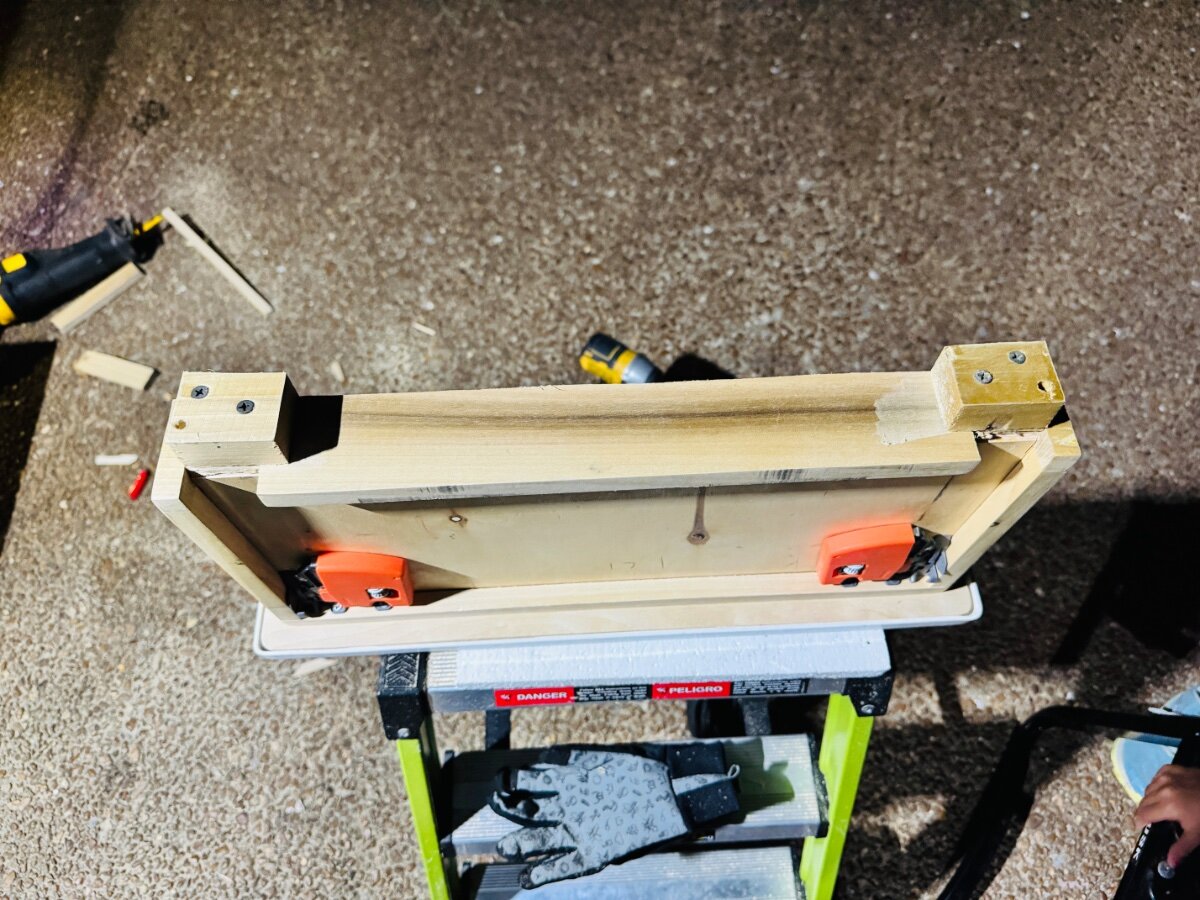
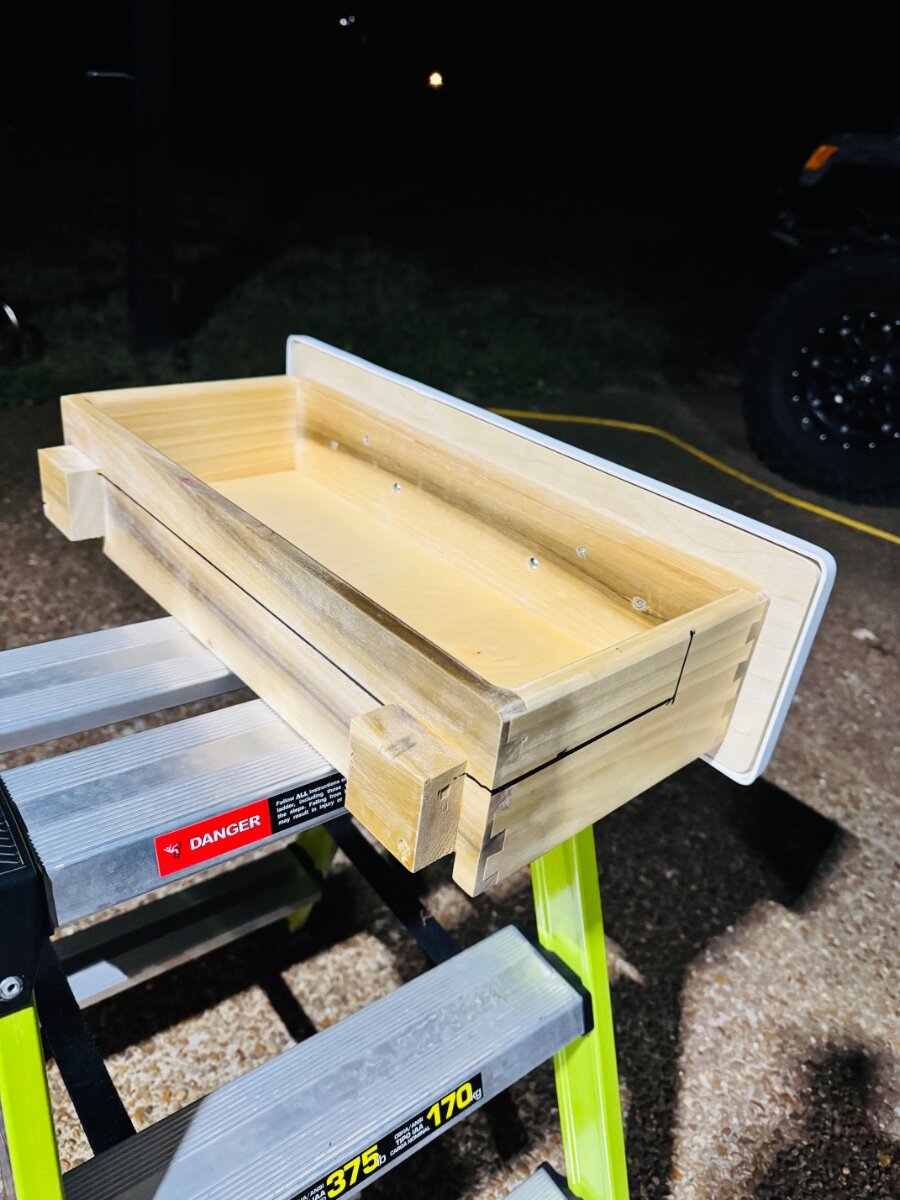
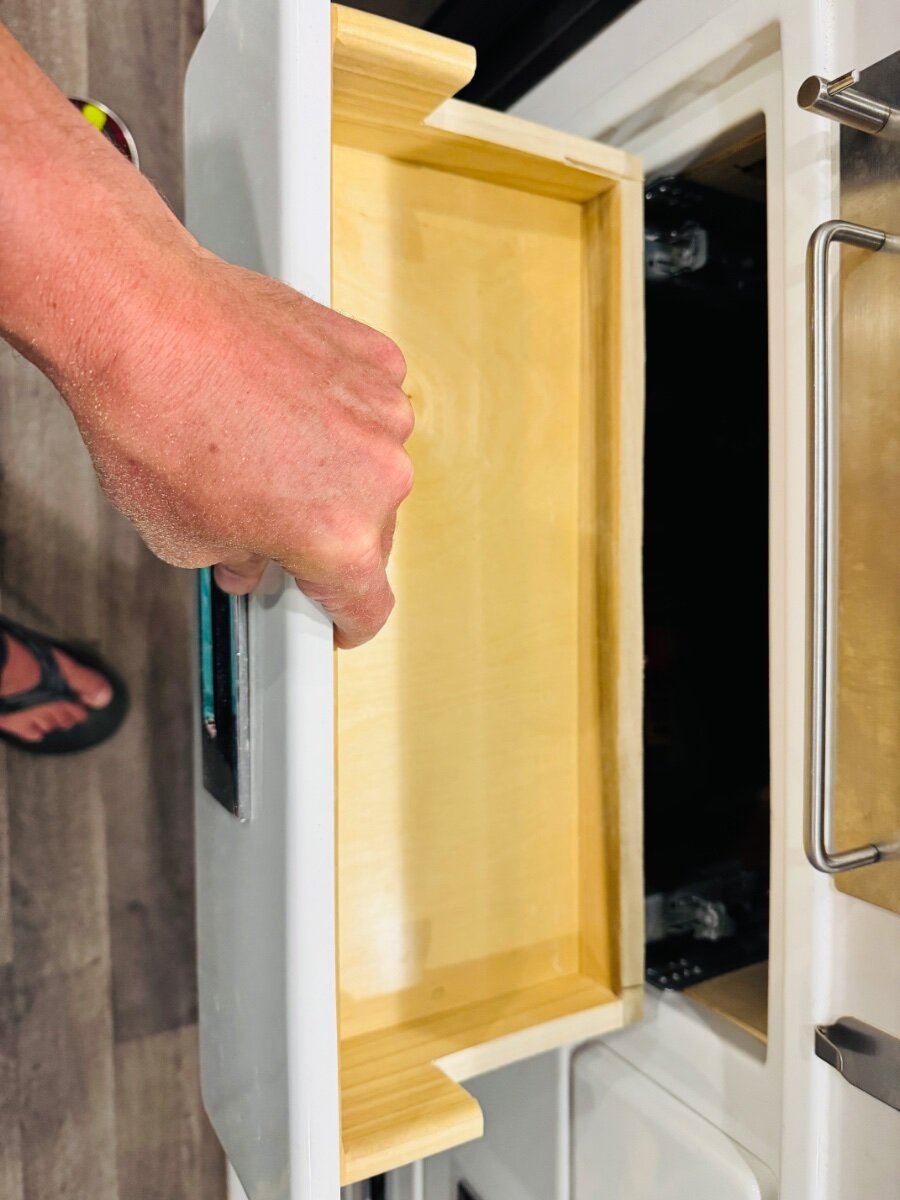
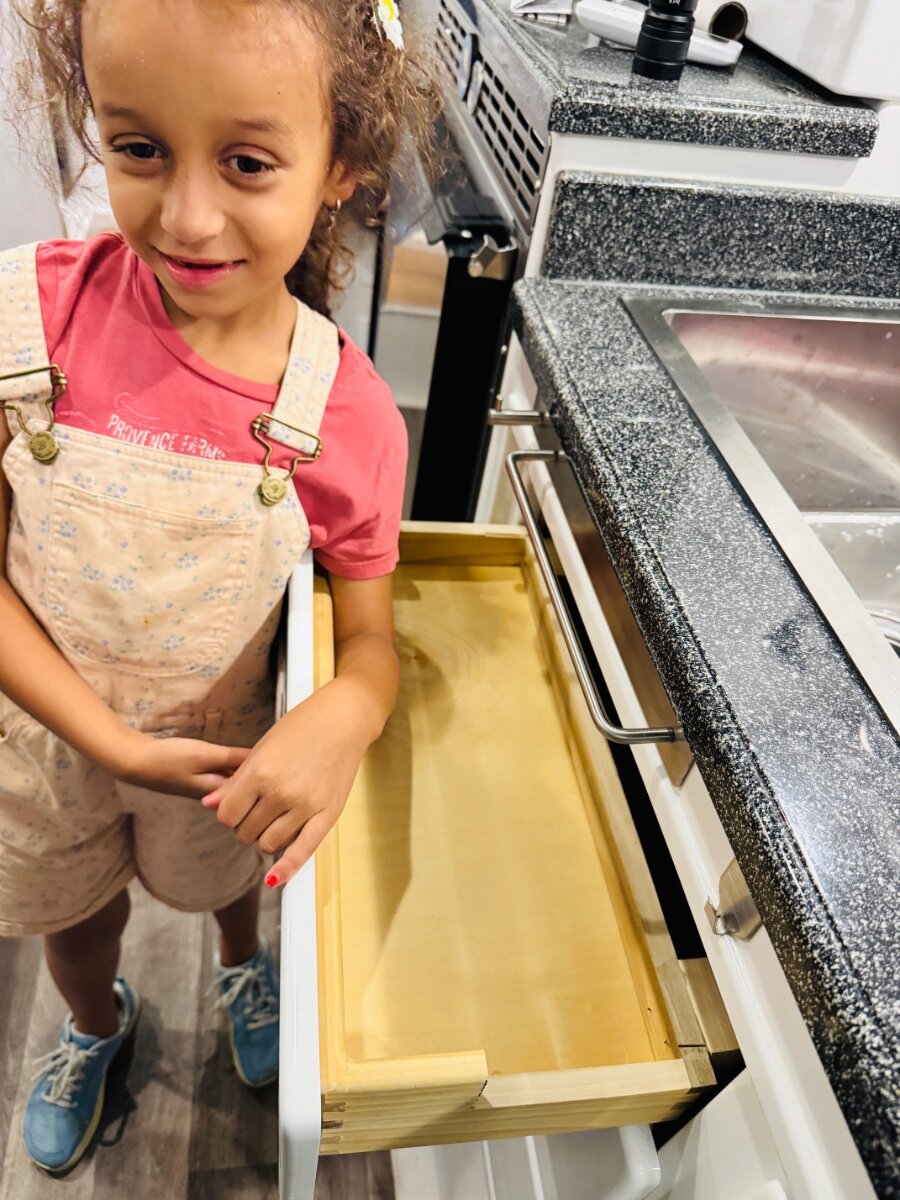
Finished the top drawer mod. Keep the wood blocks on the end, they hook into to the end connectors for soft close assembly. You do have to trim them down like the rest of the drawer to make it fit under the sink. Happy that I got to keep the drawer for small things. Turned out better than expected. Had a little helper too!
-
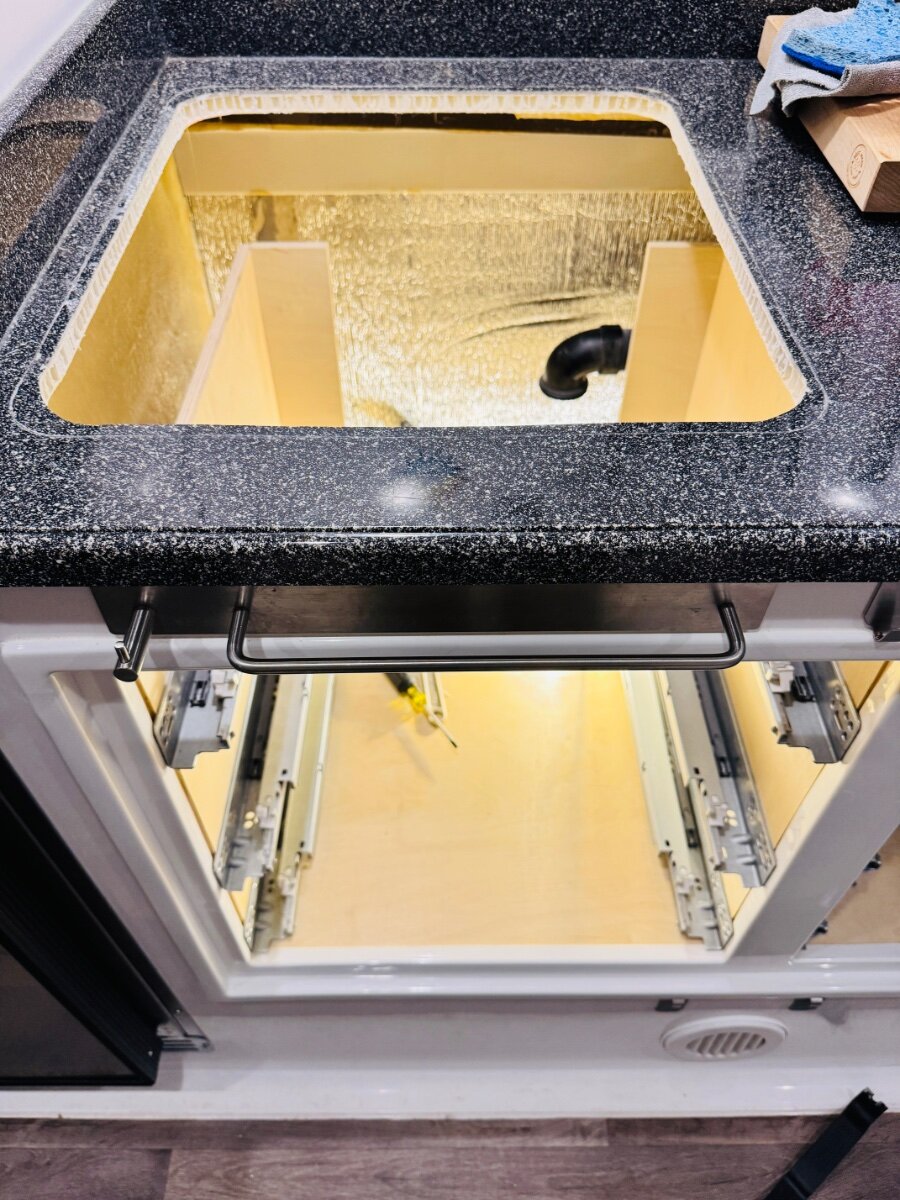
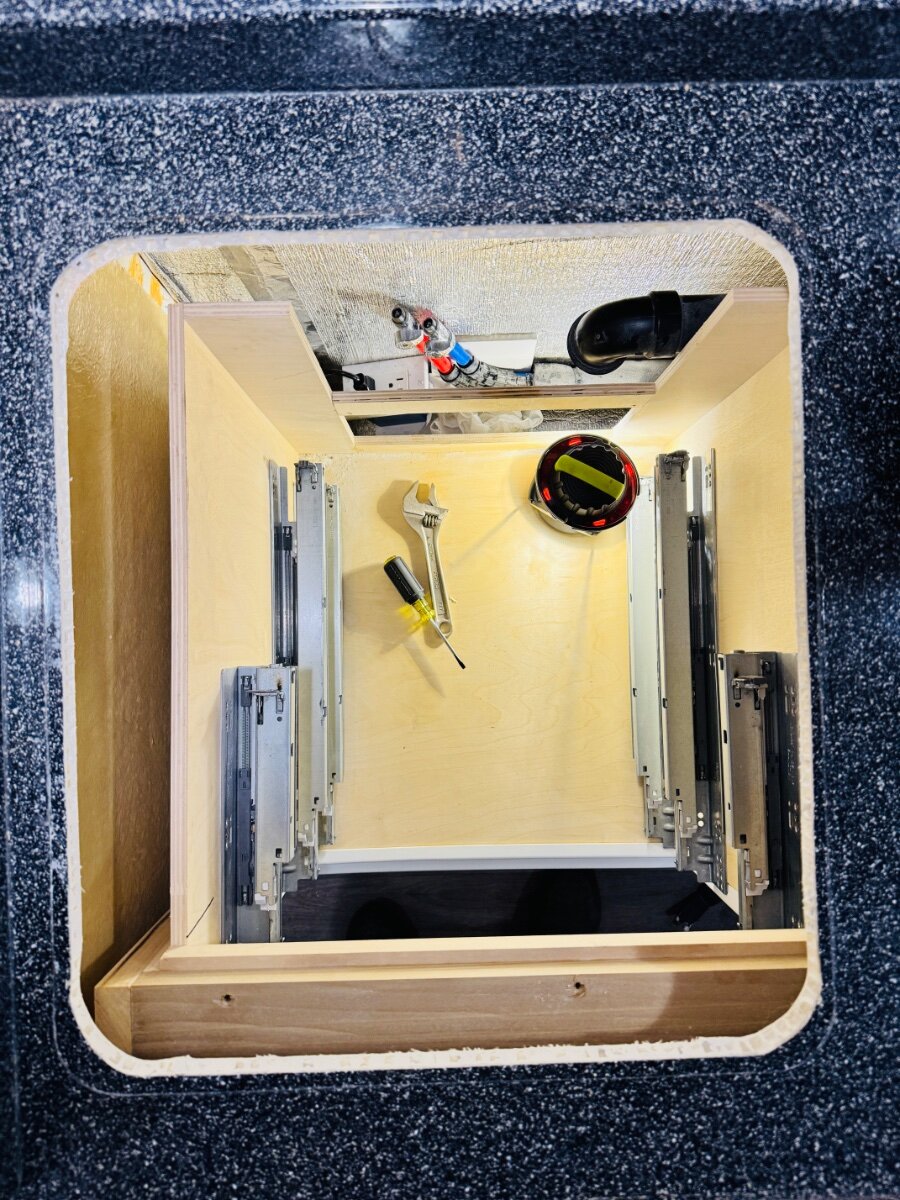
Another copy of @Snowball‘s mod just used different but almost the same components. Took a few pics. I was able to save about 2/3 of the upper front maple crossbar. Real trick since the sink is 2 in deeper was maintaining drainage grade. Had to remove metal tube securement (screwed to the back of the cabinet) and was able to reuse the 1 1/2 in ABS but may end up cutting it under road side bed to shorten a bit to get more of a grade. But seems to be draining ok… we shall see. Love the sink and faucet. SO much more useful. Just have to close up top left drawer with faceboard some how. Oh, I did shim the middle between the middle maple cabinet support and counter, the counter had small bow in it. Easily corrected, then was able to silicone the sink to the counter top. Amazon Links: Brushed SS Sink 17x19x9 18g sink, 11g sink rim https://a.co/d/ I wasn’t able to use the deep drain basket that came with it due to limited space. Grohe Bar faucet https://a.co/d/hK5IcRy Best, Mike
-
@rich.dev Yes
-
@Ronbrink SDG recommended not to use any kind of sealant between the foam and fiberglass except a small bead of Dicor around the edge of fiberglass cut-out before lowering the unit. They emphasized not to use any kind of Dicor tape and to use minimal sealant that the adhesive foam was sufficient. Good luck with install.
-
Victron Orion 50 amp DC/DC charger non-isolated Part 1 of 2
rideadeuce replied to rideadeuce's topic in Ollie Modifications
@rich.dev I bought the one you linked and drilled the holes to match what I needed. -
Finished! Shameless copy of @mountainoliver style custom vents came in today. Installed without difficulty. Very happy with the new fridge. No issue with cabin humidity since it dropped from the high 80s in August. It has been 40-60 since September. Thanks again for everyone who paved the way on this swap/install. Best, Mike
-
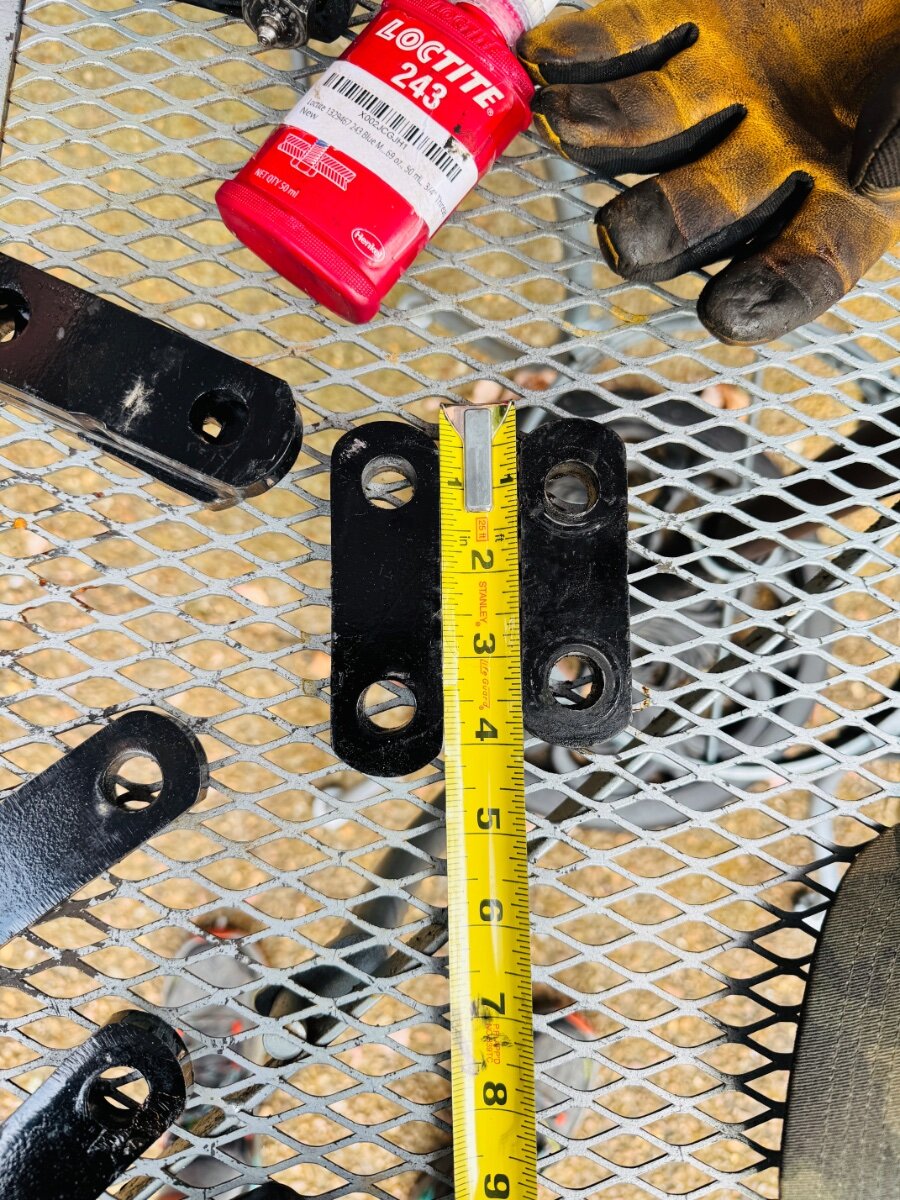
Made in USA leaf springs
rideadeuce replied to Mountainman198's topic in Mechanical & Technical Tips
Glad to see he used the 2 1/2 in shackles. Now, I am not the only one. 🙂 Great post. Enjoy the rest of your trip! -
Just thought this was interesting… https://www.teslarati.com/elon-musk-starlink-cellular/amp/
-
- 1
-

-
Love having more options but I think this comes down to use case. If you are unsure of which one will best suit you, here is a great comparison of their two newest dishes.
-
Made in USA leaf springs
rideadeuce replied to Mountainman198's topic in Mechanical & Technical Tips
Finally, leaf springs do not hit the Easy-Flex. Installed the 2 1/2 in shackles Lew sent me without difficulty. Two jacks, 13/16 socket, 11/16 socket, 13/16 wrench, 3/8 and 1/2 in torque wrench, hammer, vise, Impact wrench, wrags, and LockNLube grease gun. I know I was 2 out 1500 on the coupler issue but I can't believe that I am the only one this was happening to after upgrading to the ALCAN springs. Happy that I did not cut them to fit and theoretically the increase in 1/2 in shackle length should lower the camper by the same. So the first pull up the driveway will be the test but I did cut off about 1/2 in of bolt length on the back of the bike rack to make up difference. Again, just happy that everything is back together and working. Looking forward to fall trip and going on the ALCAN eventually! Best, Mike BEFORE AFTER
-
Made in USA leaf springs
rideadeuce replied to Mountainman198's topic in Mechanical & Technical Tips
Now y’all have given me an excuse to buy another tool - Dead-blow hammer. Although, I don’t think it would be necessary in this situation. I used a regular hammer and a 3/4 in socket to cover the zerk fitting and it seated easily over strong base like a vise. Unfortunately, I am in the process of changing out the 2 1/4 in shackles for 2 1/2 in shackles that Lew sent me. So after 3 subsequent wet bolt installs I have gotten fairly proficient at it. Hopefully, this time it will give me the necessary clearance for the easy flex to work properly. M -
@Ronbrink You are motivating me. I want to see those kind of numbers. Great job!
-
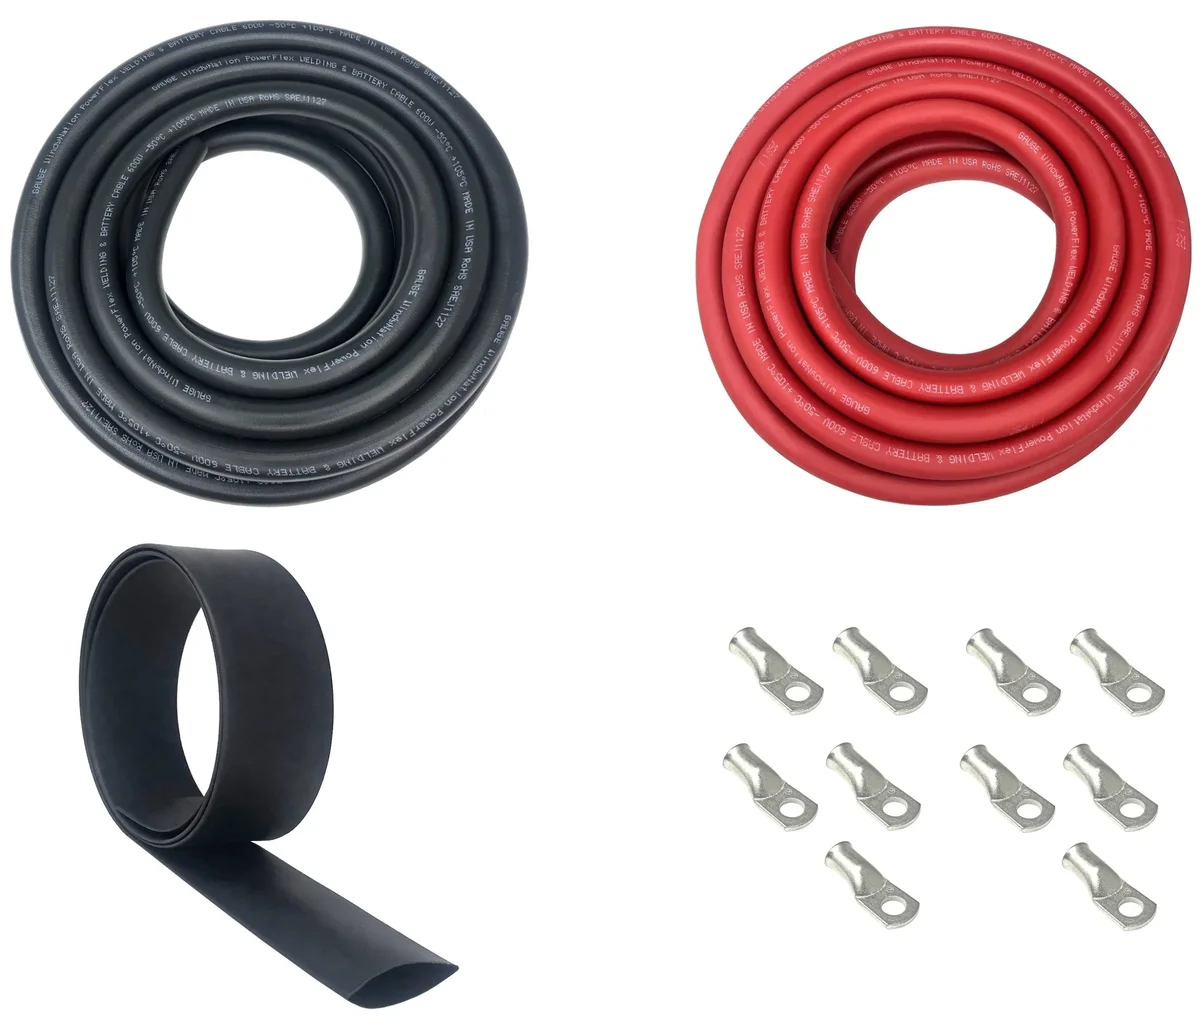
Just FYI, my Tundra install with placing the Orion in rear bay took around 60 ft of 4 awg red/black. Had some left over but I bought 50ft foot originally and had to wait on finishing the install to place a separate order. WIndynation.com also has good wire kits priced well that come with your choice of lugs and quality heat shrink tubing. https://www.windynation.com/products/4-gauge-welding-battery-cable-kit-includes-5-pieces-of-3-8-5-pieces-of-5-16-tinned-copper-cable-lugs-and-3-feet-black-heat-shrink-tubing?variant=43802376143070 Cheers, Mike
-
Duplicate
-
No question in my mind… except the non-isolated vs isolated aspect. I still have not had the time to replace my alternator to a high output because I am not getting near the capacity with current setup. I used 4 awg wire from TV battery to Orion XS via Anderson connectors.
-
I did not see any increase in humidity in the cabin until I changed out the fridge and closed exterior vents. It has gotten better since the ambient humidity decreased. Due to the fact that I have made so many changes in short order, I am still processing the observations as seasons change. The Atmos to me has an advantage in this category mainly due to how it utilizes the fan and supposedly the design reduces mixture with outside air.
-
I have mine sitting in the garage. It hopefully will be my next project. Please post your post install numbers.
-
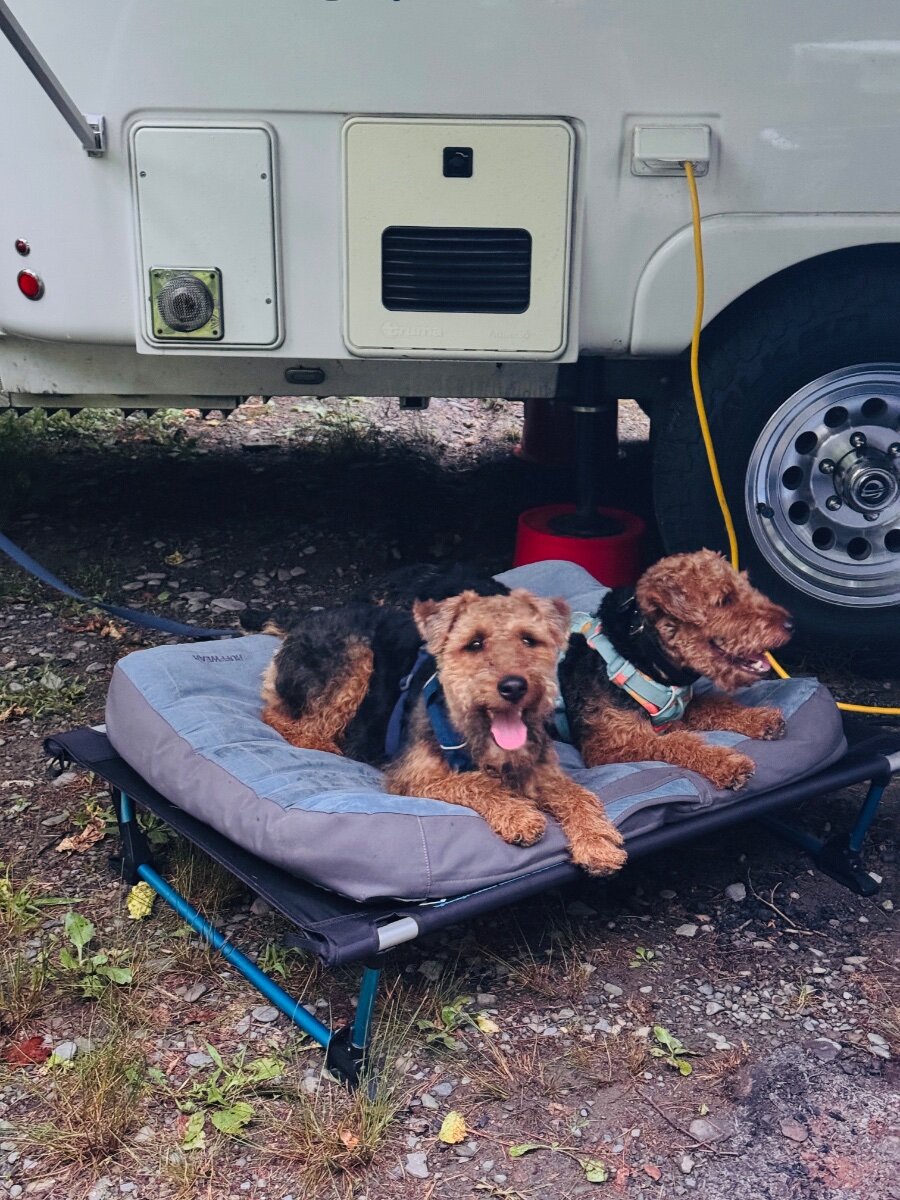
Forgot to show the parents: ROCO and MIMI. We should dedicate a page to Ollie pets! Maybe it has already been done.