-
Posts
390 -
Joined
-
Last visited
-
Days Won
20
Everything posted by DavePhelps
-
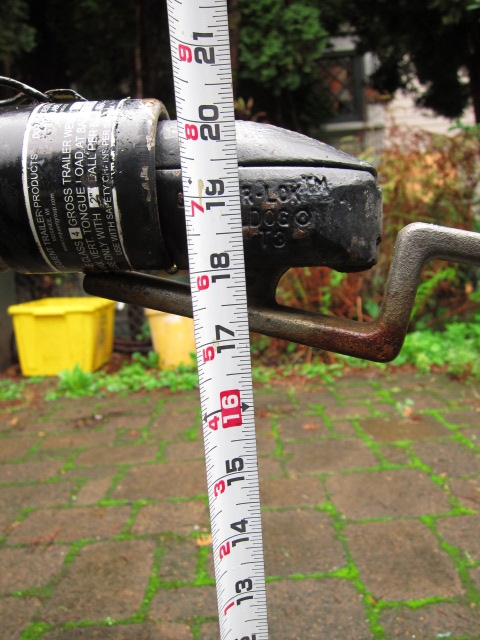
Those are the same numbers I got from Oliver. They were not correct. My trailer is on a flat and mostly level surface. Equal distance from front and rear of frame to ground. Mine is a 2015 Elite so no major difference in suspension that I know of. Here's the pic: All I can figure from what Anita said is that they are allowing for bumper drop with their ball height. This is a useless number as all TV's will have different levels of squat. Hopefully some other Elite owners will chime in to confirm but we are in the minority. Where's Bugeyedriver when we need him! Dave
-
19.5" for me. Top of ball (measured from trailer hitch). Frame of trailer equal distance from ground front to back. This is also on a level surface. Dave
-
Skalywag, I'm wondering about that 24". Did you measure from your trailer frame to the ground both front and rear to make sure they are equal before measuring your ball height? 24" sounds pretty high to me. Guess I better double check my measurements! Dave
-
I have the Elite, and with the trailer perfectly level, top of ball to ground is 19.5" (measured from the bulldog hitch) Not sure of your TV but your rear end will drop a bit from the tongue weight, which I am told is around 350 pounds. What I did was to get a few friends whose combined weight was close to that and stand on a spare ball mount I had for a different trailer (you could stand on the bumper but add a bit more weight to allow for loss of leverage, as the ball will be further out from the rear axle than the bumper). Then I measured to the top of the receiver tube. With this info, you can calculate the rise or drop of the ball mount you will need. Should get you pretty close. If you're getting a WD hitch, then that could possibly change the numbers, but the 19.5" remains the same. Strive to get the trailer as level (parallel to ground) as you can while hitched. TV and trailer should be good and straight with each other. Trailer nose down a tad is better than nose up if you have to err a bit. This is what I have learned so far. You're going to like your Elite. Tows beautifully and you can tuck it into places that will amaze you. Good luck and hope this helps. Dave
-
Just came across this article that may be of some use: http://www.hardworkingtrucks.com/get-sued-tow-trailer-with-pickups/ Don't bother with the comment section! Dave
-

2015 Oliver Elite II 12 VDC “NEGATIVE” Connection Issue
DavePhelps replied to Maverick's topic in Mechanical & Technical Tips
John and Reed, Yes I am really wondering if this has been the cause of my brake issues as well. I should have completed my old post on the issue but haven't had time to get into it. I finally did replace my brakes with some 7000 lb rated ones from Dexter. It's what they recommended. Beefier pads and stronger magnets. They still will not lock up during brake controller setup but I'm not sure anymore if this is necessary. Last trip in Hells Canyon area, they worked fine down some very steep, windy descents. But I wonder if the old brakes would have been OK if they only would have had a proper ground. As far as the water tank retrofit. I asked Jason about this in an email. He responded that they did have a fix and could I swing by the factory. Well, I live in Oregon! I asked if they have a kit put together so I could do it myself but never have heard back. That was over a week ago. Maybe I need to bring it up with Richie. Not sure if these issues are Jason's worries any more. I surely would like to get it fixed. Still not sure why a curved suction tube could not be inserted into the existing outflow fitting. Maybe the fitting is too small? Anyway, maybe we could meet in the middle sometime Reed and get the job done. There needs to be a Western rally/modification party! Thanks for all the advice and sharing of experience. Dave -

2015 Oliver Elite II 12 VDC “NEGATIVE” Connection Issue
DavePhelps replied to Maverick's topic in Mechanical & Technical Tips
As soon as I get my charge controller back from Blue Sky, I'll check that out. Had a loose connection on the mother board somewhere that they are fixing. This whole thing is really pretty hard to believe, no ground from the TV to trailer....!! I would think Oliver should know who has the affected trailers and will be contacting them about the issue. But if Reed's trailer is so affected, I guess that could be everybody. Dave -

2015 Oliver Elite II 12 VDC “NEGATIVE” Connection Issue
DavePhelps replied to Maverick's topic in Mechanical & Technical Tips
Reed, you said: "When we tested the ground up at the 7 pin we were getting less than 9vdc, so it was obvious that we didn’t have a good ground," By this do you mean that you connected the 12V out from the TV socket to the ground plug on the trailer and got 9vdc?? I did this and got 12.8vdc. Also checked continuity between the ground on the trailer plug and the trailer frame, and I had continuity. So maybe I lucked out. Hull 107, completed 11/15. Dave -
I have to agree with you John with many of your points. My biggest problems have been with email correspondence, where only one question in my email will be addressed and none of the others. My last email was about the fresh water tank retrofit. Jason asked if I was going to be around Tennessee (I live in Oregon), I said it might be a while, but do they offer a retrofit kit that I could install myself. Never heard back.... When I talk to Anita, or other office folks, it often sounds like we have a bad connection. Maybe they use headsets? Between the conversation cutting in and out and the accent (which I find lovely and have no problem understanding face to face), I have a hard time keeping up with the conversation. It's good to bring this up because the good will of Oliver's customers is worth more than most anything else. I love their trailers and all the folks there that I have met, but they do need to polish up their Customer Relations a bit. Better follow through correcting problems and clear and thorough responses to emails would be a good start. Dave
-

Porch Light reseal and silicone removal
DavePhelps replied to DavePhelps's topic in Mechanical & Technical Tips
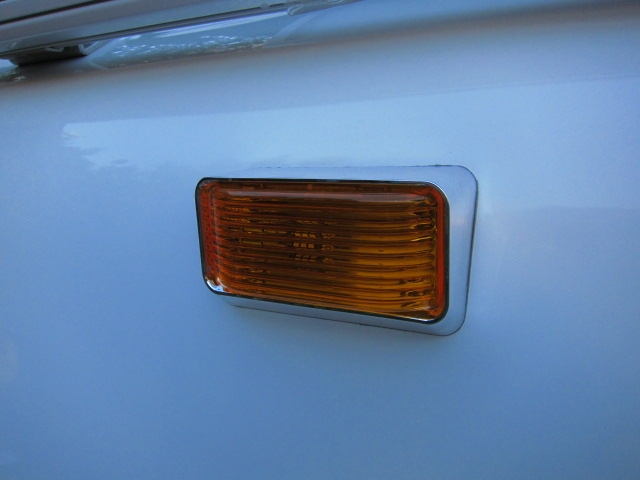
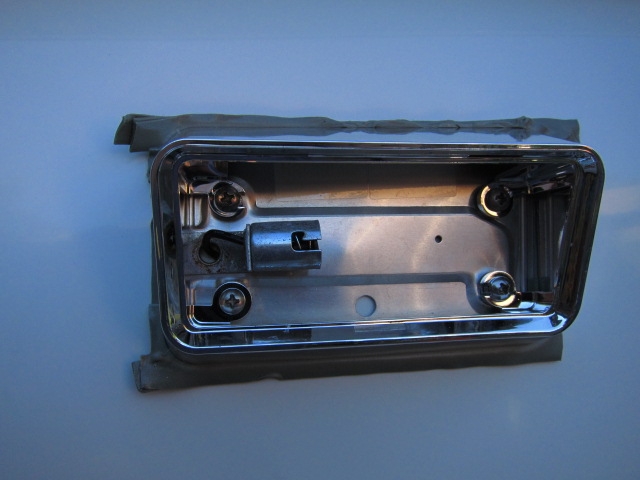
Final pic of new fixture with amber lenses Hard to duplicate this using 3M 4000 or the like. The butyl tape is tight, clean, and most importantly hasn't leaked a bit through all the downpours and sleet and snow that has followed me around this Fall! This is now an outdated fixture for Oliver. But I hope that anyone who may have silicone sealant on their rig and wants to get rid of it for real will find this post useful. Also if you want to add any accessory items like a plug for aux. solar panels, or need to reset a window, or whatever, will consider using this technique. Contrary to what some folks think of butyl tape, this brand has not oozed out in the heat or collected dirt and turned black. If you keep it tight to the fixture and use a quality product like Bed-it, you should be a happy camper! Ok, it's past happy hour..... Dave -
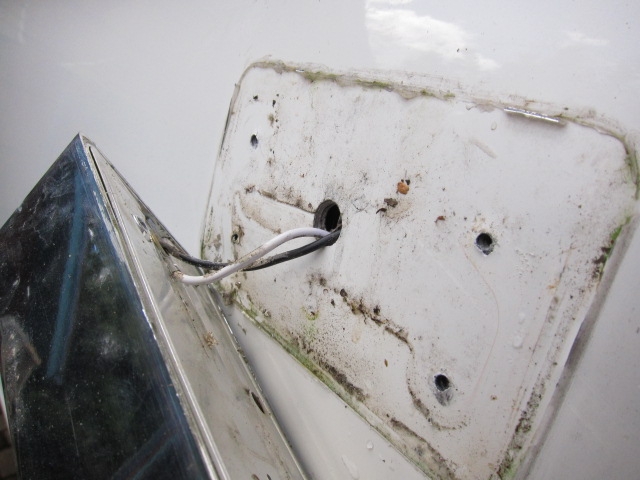
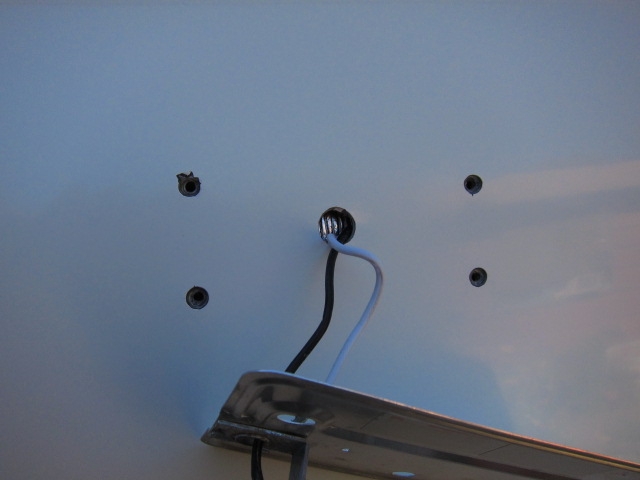
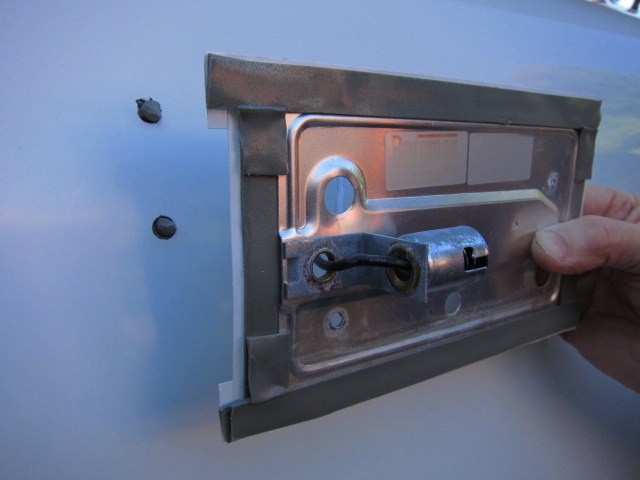
My porch lights started leaking very soon after we picked up our Oliver. Water was visible on the inside of the lenses and the bulb socket was beginning to rust a bit. I have the old style lights. Problem was in trying to fit a flat based fixture to a curved trailer. Unfortunately, silicone was used to "seal" the gaps. The job was not that well administered, with gaps in the bead and silicone residue smeared about.There is an old adage in the boating world about silicone: "Silicone sticks to nothing, and nothing sticks to silicone" Perhaps it has uses somewhere, but after 35 years of painting and construction, I still don't know where that is. It's a scourge to any finishing shop, and makes repairs much more involved. First, I removed the fixtures. They are chromed plastic (sigh) and impossible to clean without ruining the finish on them. I tossed them and bought new ones, luckily they are not too expensive. Next I used plastic razor blades and a citrus based adhesive cleaner to remove the bulk of the silicone that was on the gelcoat. It cleaned up well and looked clean but when misted with water the silicone oils which penetrated the pores of the gelcoat made the water bead up. So, more work to do. No sealant will stick to that for very long. I bought a can of Debond at West Marine here. I then bought 1000, 1500, and 2000 grit automotive sandpaper (3M). I was nervous to take sandpaper to my precious Ollie but I needed more to vanquish the silicone demon! I sprayed the Debond on the 1000 grit paper and wet sanded all around where the fixtures were mounted. I could tell instantly that it was working. Wiped the area clean and repeated with the 1500 grit, then the 2000. All silicone completely gone and just the very slightest loss of sheen to the gelcoat. I talked to Jason on the buffing products they use at the shop and he said they use Shurhold Buff Magic Compound. I bought a foam buffing pad here for my random orbit sander (Festool Rotex) and buffed/polished the area. To my relief, it blended in perfectly, and I am particular. With the area clean of contaminants and polished I reinstalled the new fixtures. I decided to use butyl tape for the sealant. I felt pretty confident that for this situation, it was the best material. But not all butyl tapes are created equal, by a wide margin. The product that kept coming up on all the boating forums was Bed-it Butyl Tape I can confirm that this is the best stuff I have ever used. Before installing the fixture. I had to re-drill the mounting holes that were way undersized, and then slightly countersink those holes. The gelcoat was badly fractured around the original holes, in a few spots, it just flaked off. Countersinking relieves the compression forces of the screw expanding the glass substrate, which would otherwise fracture the relatively brittle gelcoat. In a thru-bolt situation where there is no compression, the countersink also creates an extra space around the fastener where the butyl tape will be thicker allowing better expansion/contraction ability and a better weather seal. A very good article for those wanting to get deeper into this subject:https://forums.sailboatowners.com/index.php?threads/bedding-deck-hardware-with-bed-it-butyl-tape.117172/ I doubled up the tape top and bottom of the fixture to allow for the curve of the trailer, and added some extra bits where I thought they would be needed in the corners. I also, rolled up some small bits of tape and stuffed them in the enlarged screw holes. It was a warm summer day so no problem pressing the fixture tight to the trailer shell. Screwed down the fixture and with my plastic razor and a tiny bit of paint thinner, cleaned off the excess. A word of caution, try not to get any solvent on these chromed plastic fixtures, it messes up the finish. Next time I would tape off the fixture before installing it to make cleanup safer. As it was I did get a little discoloration to the chrome but not too bad. Finally a good coat of Collinite Fleet paste wax to the whole trailer and fixtures. What a difference! Also swapped out the clear lenses for the amber ones which I like better. Fixture with original silicone sealant above. You can see some of the fracturing of the gelcoat. The picture doesn't quite capture the flaking around the holes. Cleaned, polished, re-drilled and countersunk. Some of the chipping went beyond the countersink...but will be covered. Tape applied, holes filled with a small coil of tape. Fixture screwed down. Next time, I'll place the tape more carefully so there isn't so much to have to trim off, and carefully mask the fixture to protect it from solvent during cleanup. Final pic in next post. Guess I can only do three at a time....
-
John, I have the EezTire T515 system. You have me thinking about the sensor auto shut off. I was pretty sure it is pressure activated, but maybe it is no motion activated. The monitor itself has a sleep mode if it detects no motion. I'll have to call and find out about the sensors, it would be good to confirm. And yes, each sensor is individually marked and lives only on its own particular wheel. They also use replaceable button batteries (CR1632) rated from 3 to 4 years of life. We'll' see about that, I've had the system for one year now. Dave
-
If your hitch is up to the task, class 4 or better, then your TV is certainly stout enough to not need a WDH. But you need to assess the condition/age of your equipment. If in doubt, have everything inspected and qualified by a local shop specializing in hitches and the like. Backing is doable without all the modern cameras and gadgetry. Although I will say when I get my new truck, it will have a backup camera! As it is now, I can hitch up just fine by myself. Straight back ins are pretty easy. Angled back ins require a bit more patience and care. It takes about 4 or 5 creeps up to the hitch. Have to get out of the rig and look each time. Go slow, you will be able to visualize your approach angle with practice. With the wife helping as spotter, it's a lot easier for sure. Saw one of these for the first time last trip out, the owner liked it, but I have no personal experience with them. https://www.amazon.com/DuraSafe-Coupler-Connect-Trailer-Alignment/dp/B004VWETFU/ref=sr_1_2?s=automotive&ie=UTF8&qid=1506728306&sr=1-2&keywords=hitch+guide Dave
-
I check mine before every trip, even though the pressure has always been spot on. It is a bit of a pain, but not as much as having a flat spare! Problem with leaving a TPMS sensor on the tire is that its battery will run out faster as the sensor is always transmitting as long as it is pressurized. Mine shut off when I remove them in between trips. The extension hose you linked to could work, but I would wrap it with split loom or the like to give it extra protection from abrasion, and wear and tear. Dave
-
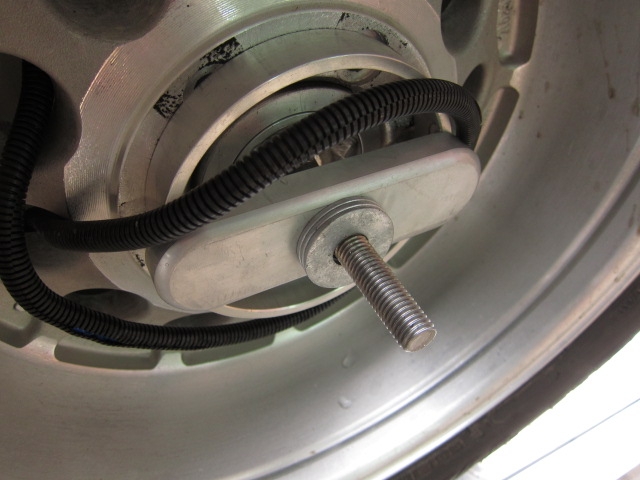
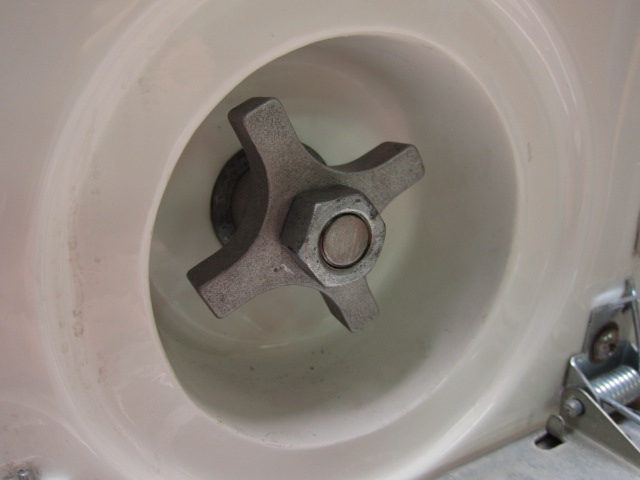
On our most recent trip, and after a long haul down a pretty rough gravel road, I noticed the spare tire cover was coming off. When I pulled down the license plate to inspect, I found the X-nut (?) used to secure the cover was hanging on by just one or two threads! Good thing I stopped to stretch when I did, as I still had some miles to go. So what I have done now is to pack out behind the cover with some 5/8" washers on the threaded rod. This fills the space between the back of the cover and the threaded aluminum bar that actually secures the tire. Then, with he cover back on, I have added a second 5/8-11 nut on top of the X-nut to secure it. If you travel rough roads often, I would recommend securing the cover in this way. Dave
- 1 reply
-
- 5
-

-

-

Anderson No Sway Hitch PROBLEMS!!! Revisited - Sorry.
DavePhelps replied to ccarole's topic in Towing an Oliver
Carole, Some good ideas being expressed here, but you still haven't specified your TV, or which Oliver you own. This is important information if you want folks to help you. If you don't need the AH, why stress yourself? Be happy you don't need the extra hassle during hitch up. These Olivers tow very well. They are narrow and are nicely rounded, especially the frontal area. They are also relatively light in the tongue. I am passed routinely by large semis and don't feel a thing. Crosswinds are also a non issue. But I have a 3/4 ton van and tow the little Elite. From all I have read, the AH still needs more R&D, but since I never needed one, I didn't give them too much thought. If your TV requires a WDH, then knowing your Trailer/TV combo will help others help you. Dave -

How To: Galley Drawer Travel Straps
DavePhelps replied to John E Davies's topic in Ollie Modifications
Bob, Not sure what you mean, but if your doors are opening when they aren't supposed to, then you have two adjustment options. The strike can be moved in or out a bit. And the hinge screws can be loosened allowing the door panel to be moved up or down (placing the strike closer to the latch if moving up). I try to get the reveals equal between the door and frame and gently tighten down the hinge screws, but overall function will supersede that. It's a good idea to go through the trailer once a season and make sure everything is snugged down. Don't over-tighten! Just good and firm. My doors have so far been behaving. Hope this is what you meant. Dave -

How To: Galley Drawer Travel Straps
DavePhelps replied to John E Davies's topic in Ollie Modifications
John Davies wrote: "Drill a pilot hole the size of the minor diameter (unthreaded part), or slightly larger, and then countersink lightly" This should be emphasized whenever drilling holes in gelcoated fiberglass. The countersinking is an especially important detail that takes no time at all. Oliver really needs to start doing this as there is fractured gelcoat around every mounting hole I have looked at. The pilot holes have been undersized and not countersunk, not good practice, and so easy to do it right to begin with. For exterior holes, the countersink also creates a thickened area of sealant around the fastener, which creates a much better weather seal. Any boat builder who knows what they're talking about would say the same. Dave -

Remove the rain seal on the awning?
DavePhelps replied to John E Davies's topic in Ollie Modifications
I also removed mine. It was just a major dirt, moss, pine needle, and mildew trap. It also came off easily with gentle pulling. I think the trailer looks so much better without it on there. Cleaning and waxing the trailer is now so much easier and thorough. No regrets. I haven't had the awning out in the pouring rain like Reed and Karen, but I can't imagine all that much water will be pouring down the trailer wall. Compared to the tarps I have hunkered down under over the years, this is still a way better (more comfortable) situation. YMMV. Dave- 107 replies
-
- 2
-

-

-

How To: Galley Drawer Travel Straps
DavePhelps replied to John E Davies's topic in Ollie Modifications
John Davies wrote: "I’m not, really, I love it, I am just increasingly frustrated that one or two sloppy/incompetent/ untrained/ hungover/ part time/ unsupervised/ rushed/ whatever technicians could have screwed up so many little and seemingly insignificant installations that care and common sense would have prevented." I feel your pain John. I too have been having to fix a lot of stuff and shake my head sometimes at the lack of attention or care by the detailers at Oliver. Sorry to say, great folks at Oliver, but they need to slow down, tool up, and start paying attention to the details. Regarding the shades falling off. Yep, we had the same issue. The clips were zip screwed into the window frame. They were neither in alignment or in plane. I shimmed them out with thin nylon washers so they were in plane (flat) with each other and also added an extra clip here and there which Oliver gave to me. No problems so far. Really I'm not a big fan of those shades, although they work OK I guess. But they are bulky and the frame color is not the nicest. There are some marine shades I've seen that are much slimmer and attractive, but for now I've got bigger fish to fry. Dave -
Reed, My p3 controller only has electric or hydraulic settings. There is no "electric over hydraulic". Did you mean that you set it on the hydraulic setting?? My mechanic called in sick today so I have another week to try and figure this out on my own.... Dave
-
I've been towing with my old and trusty Ford E-250, a remnant of my old life in construction. It tows very well, although the 5.4 liter Triton struggles in the mountains. As much as I love it, my van has inconveniences as a TV for my use and has me wanting a pickup truck instead. First, it is only 2 wheel drive. Depending on what kind of roads you travel, having 4 wheel drive can be of great help. Second, it has only 2 seats (cargo van). This is really a pain when traveling with friends. The seating arrangement you could alter with your list of vans, but I don't think any are available in 4 wheel drive. If you find yourself on pavement all the time, then that may not be an issue either. Vans are great for storage and are very versatile, but you'll have to decide what kind of camping/driving you'll be in to and go from there. Good luck! Dave
- 26 replies
-
- 1
-

-
Yes, thanks John. I hope these guys can figure this out. Really good RV mechanics are hard to find, so I hope this outfit is good. I have just over 5000 miles on this axle, so not a whole lot yet. Looking forward to putting a lot more on for sure! I also have been following the water tank saga. I haven't posted on it for a while as I have been up to my eyeballs with other projects. Oliver's (and others- thanks to all who really pushed for this upgrade....) solution seems pretty good. It won't work on the Elite however as there is no room to spin weld a fitting on top of the rear of the tank since the hot water tank hangs over it. I hope Oliver is coming up with a solution for the Elite as well, because for me, the design is a big hassle that does not enhance my camping experience at all! We'll see about that soon I hope. OK it's past happy hour, signing off! Dave
-
I really feel something is not right here. Bad magnets, bad ground, bad something. Hopefully I'll find out something on Tuesday when I take it in to the mechanic. Dave
-
I have the 5200# axle with the 12"x2" brakes. Mileage is around 5-6000 so far. I'm in the smaller Elite.


