DavePhelps
-
Posts
394 -
Joined
-
Last visited
-
Days Won
20
Everything posted by DavePhelps
-

Water pump runs continuously after tank sanitization
DavePhelps replied to Sandman's topic in Welcome to the Oliver Forums
One other possibility is that if you fully drained your FWT for winterizing, the water pump may be sucking air because the siphon tube in the tank is not in water. This was an issue with the earlier Olivers (pre siphon tube) before they changed the design. Dave -
Oops, forgot the part #: PR1022. But Check your door. My door is 11 years old! Dave
-
Just in case no one looked at Zarcor's website, the glass sold there is a Lippert product for their doors. My older Oliver Lippert door (2015) used screws to hold the window trim and the glass in place (along with some butyl weatherstrip). The newer doors use clips which complicate the switch but is still very doable. There are a few Youtube videos out there which I would advise watching if your door uses the clip system. The window I used from Zarcor was Tinted Glass, Lippert Style A, Valterra Style C Glass size: 21 7/16" × 12 7/16", Fits frame style A I would call them with your door information and they will set you up. The kit comes with the glass and butyl so nothing else to buy except maybe some spare clips if your door is that style, I've read that they can sometimes break during disassembly. Good luck! Cheers, Dave
-
I replaced my Opaque door glass with a clear tinted one from Zarcor. Really like it. Make sure to order the glass specific to the door used on your Oliver. There were changes made over the years that affect the glass specs. Their Airstream shades also have my attention.... https://www.zarcor.com/rv_products/rv-door-window-kit/spare-parts.php Dave
-
What is Towing "Level" and Does It Matter?
DavePhelps replied to Sam Heumann's topic in Towing an Oliver
Yes it does! And it is good you are taking the time to figure it all out. Traditional towing wisdom is that it is always best to have your trailer "level" (parallel to the ground) while towing. One can err a little having the front slightly low, but front higher than level is to be avoided for stability reasons. If you have a long flat surface to hitch up your TV and trailer, "level" just means that they are in plane with each other and the ground. You can measure the Oliver seam joint fore and aft to the ground (as you did) to see if they are equal (or check by measuring the frame to ground). Then check your TV to be sure it's not squatting in the rear. It should be sitting parallel to the ground as well. Trailer adjustments are made at the hitch, TV adjustments can be made by adding airbags or adjusting your WDH. Best to start getting your TV level. Just standing back and looking at the TV/trailer hooked up will tell you a lot. Just a caution that adding airbags to your TV does not increase your rated payload capacity! Make your trailer and TV so they are on parallel planes, that is the goal, with a slight nose down being acceptable if that is all you can tune into the system. It is never perfect, but getting it as close as you can goes a long ways to increasing your safety, and others around you on the road. Check out the Robert Pepper video. He has many videos on rigging and trailer setups that are extremely valuable. https://www.youtube.com/watch?v=JeEEC5eVNCk Good luck, Dave -
OK, I will give you my 2 cents on this. I have a 10 year old hull, so don't know how Oliver is currently dealing with their hull cutouts. But I can say with some certainty that square inside corners in a fiberglass layup is just poor detailing. Especially in a RV that is subject to all kinds of stresses and vibration. All corners at the very least should be drilled out with a hole saw to a diameter that is compatible with the appliance (or whatever) being installed. Then the straights can be cut out with whatever tool: angle grinder, router, jig saw etc. seems best. The hull on my rear Oliver lense had square cutouts, and I have similar spider cracks at two of the corners. I checked my HWH yesterday and the hull was also square cut under the rounded metal flange. Last year my friend had to pull his HWH and his hull was also square cut (pretty badly as we recall). No spider cracks yet on ours but.... Look up in your attic at the back side of the Oliver light. If it was square cut, then that is a good indicator that your HWH is the same. You can also look from the inside at the HWH and see what the corners are like. If it is square cut, then the only repair I know that will last is to create a radius at the corner to spread out the stresses that concentrate there. This is what I did on my rear lense in the pic. For you, that will be a real PITA as the metal trim ring has to be removed and who knows what else. Mine is set with butyl tape and pop rivets. As I mentioned, your crack is probably just in the gelcoat and not structural. But it shouldn't be there in a trailer of this caliber. Any repair that doesn't address the root cause, will be wasted effort and money IMHO. Wandering Sagebrush's idea to drill a hole at the end of the crack could work. I have used "stop drilling" to stop cracks in fiberglass layups from migrating, but then you have a hole that needs to be gel-coated and polished out. Not sure if it would work for just a gelcoat fracture. Maybe a good solution? It could be! In the end, a good fiberglass technician will know what to do. But I think it will not be a quick and easy fix. Please post up what you find out. Good luck. Dave

-
Agreed. Although there was a moment when I first posted when I thought I was in the wrong thread. Carry on. Dave
-
Seems like we have some serious thread drift going on here.... Dave
-
Inside corners are a typical area where gelcoat, which is relatively brittle, can fracture. Which is why it is never good practice to have square inside corners that concentrate flexing at a single point. Surprised you had a fracture with a nice radiused corner (Or is it? Is there a square cutout in fiberglass under the round WH flange?) Pretty sure the crack is just in the gelcoat and does not mean the fiberglass underneath is also cracked. So mostly just a cosmetic defect. Not sure how to "repair" a crack like that, and if a repair wouldn't suffer the same fate over time. Hopefully someone may know and chime in. Sorry to hear about your other woes. Our 10 year old trailer had some issues at the start, some also potentially dangerous. But since getting all that sorted, all has been great. Just had to replace my plastic toilet flange that was broken. Just the usual maintenance one would expect over time. Good luck. Dave
-
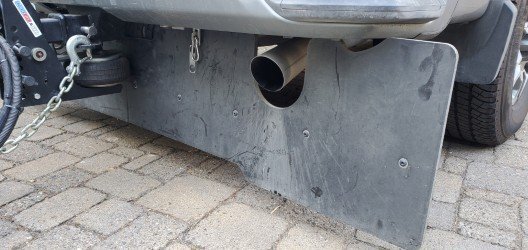
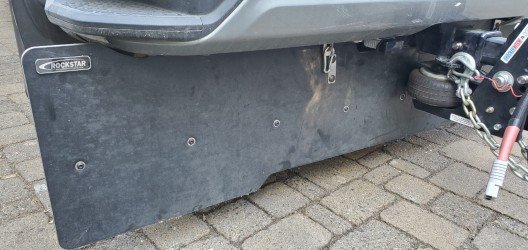
For the Commercial flaps, I read 85 inch-pounds. Even small bolts need special care in certain situations! Not that this is one of them however. I did just notice that after my recent trip before my last post, that one of my bolts had fallen out somewhere. So I emailed Rockstar about the situation of their torque spec and the rubber flaps not being able to support that kind of compression. I asked if using blue loc-tite would be a better solution. All they said was yes it would be OK. So I redid all the bolts with 5/16x1-1/2" SS fender washers and Blue loctite. With the larger washer, I was able to achieve 85 in-pounds with minimal distortion, but it's really probably not necessary with loc-tite. I just did it to see what would happen. Even with loc-tite and less torque, I think a washer is a good idea however. Dave
-
Took me a while to get to this.... I also have the Rockstar Commercial Flaps on my rig and really like it. My old flaps clamped on to my ball mount shank and were just OK. It made removing and placing the ball mount a very cumbersome and heavy affair. These are way more convenient to put on and take off since they are separate from the ball mount and do a much better job protecting the trailer from flying debris. Perhaps because they sit further forward under the bumper. My rig is gas but the cutout is similar I'm sure. Perfect fit. I added stainless steel fender washers to the bolts that attach the crossbar to the rubber flaps to spread out the load. The torque spec in the install guide was pulling the heads too deep into the rubber for my taste. Even with the washers, I didn't get as tight as was specified. But no issues with many miles on them. You'll love them! Cheers, Dave
-
OK, better pic.....
-
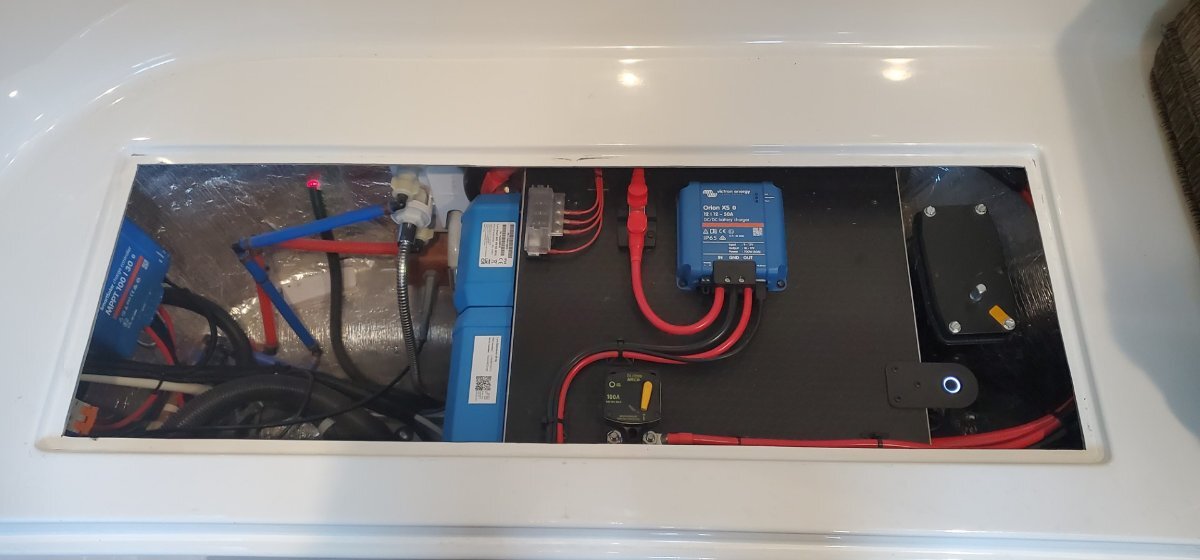
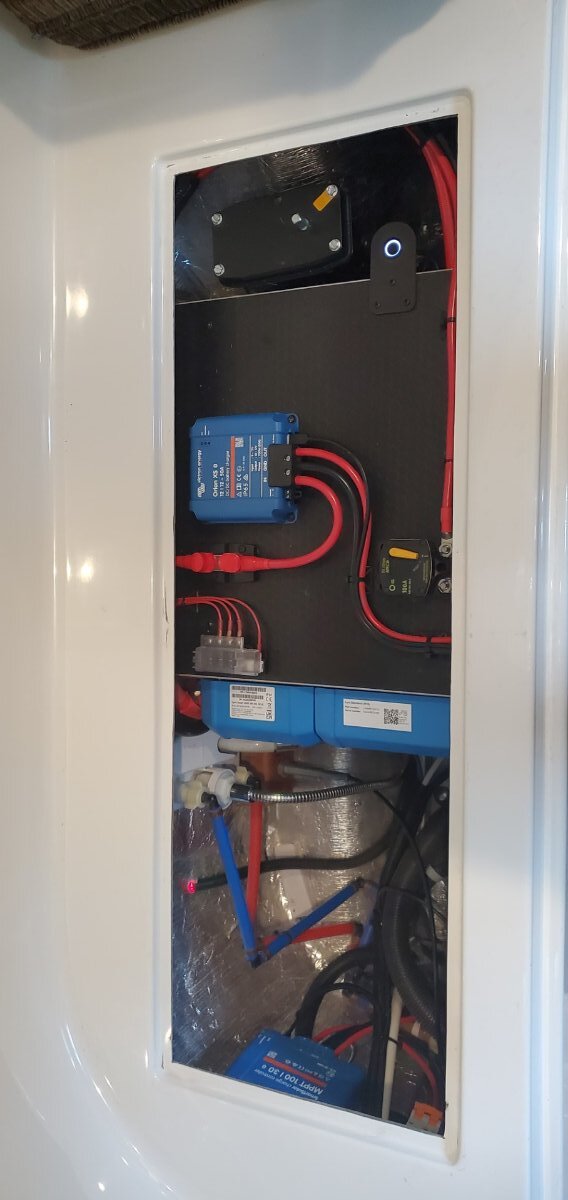
I just completed a Victron update to all the solar components in our trailer, including the Victron 50amp DC-DC charger. It has been great. I was originally thinking of doing the work myself but soon realized I was too far out of my comfort zone regarding the complexities of the install. This job I delegated! Expensive, yes. But The job as it was done went way beyond my expectations. I was very lucky to find an outfit locally that really knew what they were doing and take great pride in their work. The cost of the DC-DC charger was part of a much larger project so hard to break it out. There will be two sides to your install, the TV and your trailer. I found a way to fish 4awg cables from the streetside rear dining seat (where the battery box is) forward, under the bathroom sink, and then out the front of the trailer next to the 7-pin plug cable. The charger is mounted on top of the battery box. My truck luckily has a battery distribution fuse block with multiple fuses up for grabs including a 60 amp fuse to which the truck-side wiring was attached. The truck wiring terminated with an Anderson plug that was bolted to the underside of my bumper with a custom bracket directly under the 7 pin plug (which is next to my license plate). This location I highly recommend as it makes attaching your fairly large 7 pin and DC-DC charging cables nicely aligned and easier to manage. I'm getting similar charging profiles as JD iirc. For me, I don't like traveling with propane on, so I switch to DC mode on my fridge when under way. Always have full batteries on arrival! These new lithium batteries charge up fast if they can get the power and this little charger really delivers! Of course, it only works when your running your TV. So, as JD mentioned, this will be of no benefit if boondocking and stationary. That's where your remote solar panels come in to play if you have them. I suppose worst case, you could use your TV as a giant generator to charge your batteries but many campgrounds, especially in the National Park system, or in CG's that don't allow portable generators, this would not be allowed. Super glad I got the charger, no regrets! 👍👍 Dave
-
I don't have the Truma, but on mine, the condensate line at the AC was not hooked up at the factory. I'd pull off your interior cover and see if yours has come loose, or was overlooked at the factory. Easy fix if that is all it is. Good luck. Dave
-
As far as the more traditional RV hoses that won't collapse in a siphon scenario, the very best that I have found are the ones sold by The Water Filter Store. The fittings are excellent and the hose is also very high quality material. They will also custom make them to length as you require. https://www.rvwaterfilterstore.com/products/custom-built-hoses Dave
-
Progressive Dynamics Converter/Charger needs home
DavePhelps replied to DavePhelps's topic in General Discussion
OK just checked my PM's and looks like my charger has found a home in csevel's Ollie! 👍 Onward. Dave -
Progressive Dynamics Converter/Charger needs home
DavePhelps replied to DavePhelps's topic in General Discussion
Right you are! I was thinking of the service rating for the trailer. It is a 45 amp charger. Hope someone could use this. I was hoping to keep it "in the family"! Cheers, Dave -
Progressive Dynamics Converter/Charger needs home
DavePhelps replied to DavePhelps's topic in General Discussion
I will mail it out to anyone who could use it FREE of charge. PM me with your address if you are interested! Dave -
Progressive Dynamics Converter/Charger needs home
DavePhelps replied to DavePhelps's topic in General Discussion
Yes it does! You can see it in the bottom left of the pic. It's a small switch. Dave -
Greetings all, I bought this 30 amp charger from Etrailer a while back when I was planning to convert to Lithium batteries. My plans changed in the end and I ended up using all Victron components. I'm sure it's too late to return it now. So, if any one out there could use this brand new and never used/installed PD 30 amp converter/charger, I will mail it to you free of charge. It does have the Lithium switch. Model Number PD4045CSV Serial Number A24225FO325851 Cheers, Dave
-
Glad you discovered the problem. Regarding the water filter o-ring, I like to lube it with a small amount of silicone based plumber's grease. It helps with the seal and keeps the o-ring in good shape. Also, don't over tighten the filter screen housing. Firm hand tight is all that is needed. No tools! Cheers, Dave
-
I've read that the PB Platinum models have a payload capacity around 1250 lbs. The Lariat will be a bit more, but not sure how much. Do your calculations and be safe! Cargo weight adds up in a hurry with just the most basic things (passengers, canopy, hitch/mudflaps, tongue weight...) The 6.5" bed would be what I would pick for many reasons including the longer wheelbase, which will improve your ride. Living in the great state of Wyoming, and the inter-Mountain West, if I was towing with only a 30 gallon gas tank, I'd for sure carry an extra 5 gallons in the back. My tank is 36 gallons and I have already needed it! Good luck and hope the new truck works well for you. Dave
-
Water leaking from TV wire port in ceiling
DavePhelps replied to wolfdds's topic in General Discussion
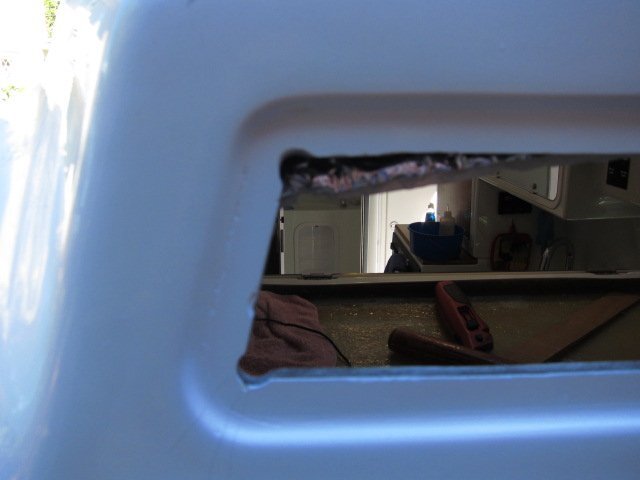
So the rear Oliver lense strikes again.... I would also check those marker lights. The one under the O of the Oliver sign especially. If it leaks, the water would run down its supply wire where it looks like it touches your TV cables. The water would then continue down that cable and into the cabin. All those wires up there with no drip loops designed in are are major pathway for water to travel to far off places. I had drips out my rear speaker from one of those marker lights.... Cheers, Dave -
That connection can be a sticky one and I've had the same issue. What works for me is to keep the leg attached at the floor, position yourself facing the window, up against the table, back straight, and give that table a good quick lift. If it comes free I would recommend paraffin over trusty WD-40 to lubricate the connection. On my leg, it's just a plastic cap over the aluminum leg with a single metal spring clip. Rub the paraffin all over that and you should be good to go. Don't be afraid to reef on that connection to get it to come off. Good luck. Dave
-
Slow Fresh Water Drain; Dewinterizing
DavePhelps replied to Gliddenwoods's topic in Mechanical & Technical Tips
The FWT drain is at best slow draining given the design constraints of the system. One issue that can make it much worse is when bits of plastic end up inside the tank from drilling the various holes and not meticulously cleaning it out before installing. I have had these bits bunch up at the tank outlet and at the drain valve. When I added my new water supply draw tube, I cleaned and vacuumed out the tank best I could, and cleaned out the drain valve while I was in there as well. Now, not really wanting to go through that all over again, if it seems plugged up, I'll take my air compressor and blow up the outflow tube (30psi is good) into the tank. This usually clears the occlusions long enough to let the tank drain more normally, which is still slower than I'd like. Hope that works for you. Dave