DavePhelps
-
Posts
394 -
Joined
-
Last visited
-
Days Won
20
Everything posted by DavePhelps
-

Locking pins for Bulldog hitch
DavePhelps replied to BlaiddDrwg's topic in Mechanical & Technical Tips
This is very true indeed. I do feel though that perception is a key element to deterrence. One can take it as far as they are comfortable doing so. Dave -
Locking pins for Bulldog hitch
DavePhelps replied to BlaiddDrwg's topic in Mechanical & Technical Tips
I use these two locks for the hitch (lever) and the receiver: https://www.etrailer.com/Hitch-Pins-and-Clips/DeadBolt/40107.html https://www.etrailer.com/Trailer-Coupler-Locks/DeadBolt/RC2SS.html You can get them keyed alike which is very convenient. The receiver lock is available in a longer length but it's not stainless steel. The coupler lock in the 1/2" length works great on the Bulldog lever. The fit is snug so there is no exposed lock pin that someone might be able to get a bolt cutter around. I like using the coupler lock when traveling so no one can mess with the coupler if I'm parked to shop or whatever. They both have worked very well with no sign of wear or corrosion. Good luck! Dave -
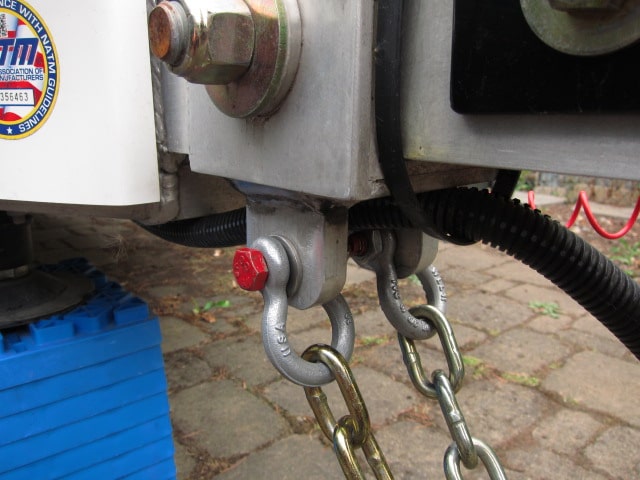
This is for Townesw, Sorry for late response, I've had some family issues keeping me busy... I attach my Grade 70 1/4" chains to my trailer frame with two bolt type anchor shackles as in this pic: Oliver has changed the design of the trailer frame since mine was built (2015), but shackles will also fit the new design as well. I used a quality, American made shackle. There are a few out there but I like the Crosby line of shackles. I also chose the bolt type pin over the screw in pin as I feel the bolt type is far more secure. https://www.westechrigging.com/shackle-bolt-type-crosby-g-2130-038.html The hole that was bored in the aluminum tabs welded on to my frame are 1/2" diameter. I really wanted the pin diameter to match the hole but that meant using a 7/16" shackle which is too large to fit through the chain link and also too big to fit side by side on the two welded on tabs. So I went with a 3/8" shackle with a 2000 pound WLL. BUT... Crosby shackles have a 6:1 safety factor, meaning the breaking strength of the shackle is 12,000 lbs., which is very close to my G70 1/4" chain (3150WLL x 4 safety factor=12,600 pounds). I also packed out the shackles with stainless washers (see pic) to tighten the gap between the shackle throat and the tabs, so there is very little to no slop. So that's where I'm at. The pin diameter of the 3/8 shackle is .44" and I'm hoping to sweet talk a friend of mine to turn out a bronze bushing (7/16 x 1/2) to make up the difference. It's not much but I believe it would add some extra strength to the system by distributing loads evenly around the tab holes. Hopefully I'll never put it to the test! This has been a good thread lots of good ideas. Knowing you've done the best that you can to be safe on the road is a great stress reliever! Regarding this, as far as I know, the WLL is the first thing you need to know, but not the last. You also need to know the "safety factor" or "design factor" of the component, as all of the laws I have read talk about "breaking strength" of the component and not its WLL. I don't understand why this is. If someone else knows different, I'd sure like to know. Dave

-
I prefer chains because they are much more easily adjusted for length, and a bunch of other reasons as well. Safety chain length is a very important part of the system and is often overlooked. The chains, or cables, need to be as short as possible without binding up in a jackknife position. I'm in the process of doing this to my Ollie as I think the supplied chains are too long. Back up your trailer in a tight turn as close as you can without TV/trailer contact. Stop there and measure the distance between the two mounting points, chains crossed. I will do this with the actual chain and connecting hardware I'm using. Leave just a little slack, maybe one link. I'm hoping that when I drop (lower gently that is) the trailer off the ball mount, the attached chains will prevent the trailer coupler, and the mounting hardware for the chains on the trailer frame, from ground contact. We'll see, there is only so much one can do if the design is off. This chain/cable length will be different for each TV/trailer setup. So supplying one length that "fits all" is not doing anyone any favors and could be hazardous in an emergency. If you have an articulating hitch, that could be very different, but I have no experience with those. Just my 2 cents. Dave
-
The first thing that came to my mind that can cause this symptom is that your brake controller is set too high. Brake controllers are not a set and forget proposition, and need to be adjusted for the terrain and road conditions you are driving in. If the voltage is set too high the trailer will not brake in sync with your TV and cause some lurching. That said, all the other ideas presented here are valid and worth looking into. The old suspension shackles had nylon bushings, were not greaseable, and generally not up to the job. New suspension kits use bronze bushings and much heavier duty components: https://www.etrailer.com/Trailer-Leaf-Spring-Suspension/Dexter-Axle/K71-359-00.html One other possibility to check, even though your trailer is a 2016 would be to make sure your trailer is properly grounded to the TV as per this Oliver TSB: https://olivertraveltrailers.com/topic/7pin-ground/ Sub- optimal grounding would affect your braking also causing a rougher ride. I feel your pain about trying to get the trailer and TV in plane with each other. There are ball mounts, however, that have drops in 1/2" increments out there. What is your current drop? Good Luck!! Dave
-
This thread could easily morph in to a whole new thread about safety chains or cables.... But to answer the OP's original question about clevis hook orientation, I would say it is always better to have the hook enter from the top of the receiver hitch if possible. This is how I was taught by the heavy equipment operators where I volunteer. In the event of a separation, the force of the drop will be directed to a thicker and stronger section of the hook. Also, if there is a malfunction of the safety latch, gravity will be more in your favor if the hook opening is facing down. Of course, if the hook won't fit in that position, then do it the other way! Or, better yet, follow Raspy's advice and get an appropriate hook with a larger throat opening, or get a suitable quick link to make hookup easier. My Oliver came with Grade 70, 1/4" chain and hooks. The laws regarding the connection and strength of the chains vary State to State, as RnA posted above. BUT, the very strange thing about all these laws is that the chain strength requirement is not based on the WLL of the chain directly, but the Minimum Breaking Strength of the chain. Grade 70 chain has a Design Factor of 4. This means its Minimum Breaking Strength (MBS) is 3150 (WLL) x 4= 12,600 lbs. When I was looking in to all of this some time ago, I'm pretty sure I read that it is best practice for each of the two chain assemblies to be sized to independently carry the load in a separation event. With a MBS of 12,600 lbs however, each of the supplied 1/4" Grade 70 chain and hooks easily accomplish this for both Olivers. Trainman, I don't like cables either, for a whole host of reasons worthy of a different thread. The main one being they are not adjustable for length. If you google safety chain length you will understand why. Dave
-
I have the Elite1 with 200 watt PV on the roof. My MPPT Blue Sky controller is rated to a max PV input of 340 watts. So my thinking is that I would be fine to wire in a remote 90 watt panel like this in to my existing system. This would keep the distance from the controller to the batteries to a minimum, reducing voltage drop. And since the voltage from the solar panels to the controller is much higher, close to 18 volts, running a 20' x 10 gauge cable would not create as much energy loss to voltage drop. I'm no electrician, but this is what I have learned so far...subject to editing! Dave
-
A question about these remote panels. If you have the factory installed solar power setup, wouldn't it be more efficient to order your remote solar panels without a charge controller and just wire them in to the onboard controller? If your remote panels do have a built in charge controller, then I assume you are wiring them straight to your batteries? With the controller on the remote panels, I would think there would be substantial voltage drop between the controller and battery, seeing as most wire used for remote panels are 10 gauge. Just trying to sort this out. Thanks Dave
-
You can also get 2" balls rated at 8000 lbs. Although you may need to replace your ball mount to accommodate the 1-1/4" shank. It's the one I use. I don't use the Anderson WD hitch, so can't comment about John's comment about decreased wear with a larger ball. Makes sense though. https://www.etrailer.com/Hitch-Ball/Equal-i-zer/EQ91-00-6080.html Dave
-
I would add to what Mike stated just so it's very clear: you also never want to leave your black tank valve open when you are at a site with full hook-ups. Let your black tank fill to 80% or more and then dump it all at once. Then, drain your gray tank. The GT is notoriously slow to get the last bit out. You don't need to raise the front to extreme heights however. Just raise it a bit and then wait if you have time. If you leave your BT valve open full time while camping, the liquid components of the tank will outrun, and separate from the solids. The solids then collect in the tank and will turn into a hard mass, often called the "brown pyramid". You don't want to go there! Waste tank management seems ominous at first, but you learn fast and it's very easy to balance the two come dump time. Enjoy! Dave
-
Spike, is that 4.5 x 4.5 inch screen you linked the same one that covers the furnace vent? That is what it seems like. Thanks a lot. Dave
-
Leveling Front to Back - Extremely Steep Csmpsite
DavePhelps replied to deniwell's topic in General Discussion
Denise, Good idea to keep your safety chains (or cables) attached to your TV! When in any doubt, keep those on!! Topgun pretty much laid out all your options. Do you carry a shovel? Very handy for these situations. It will allow you to create a flat spot to stack your blocks, and in your case, trench out a spot to drop your tongue in to. Just be sure to put it in a plastic bag to keep the dirt out of it. Personally, I'd hate to put in right on the ground, even in a bag, but maybe use one block. Question: So has it been decided that temporary (a day or two) lifting of the rear wheels off the ground with the onboard jacks is not a good practice? I know it's best to block up the wheels and use the jacks more as stabilizers, but in extreme situations..?? Dave -
So I found the Camco screens for the Water Heater and the Furnace. Thanks for the link as I've been wanting to cover these for a while. Regarding the water heater, what about the louvered vents? The Camco screen covers the main opening but not the louvered part on the left. And I assume you remove these vent screens while under way? Dave
-
You probably could not find a better Oliver than John's. I have no doubt it was meticulously and thoughtfully maintained. It is the layout you want, and the price is REALLY good. I'd be on the phone to John ASAP, it won't be around long. Dave
-
That's sweet. Oliver really does go the extra mile to make things right and help us out if there is an issue. Now you and your pets can rest peacefully! Dave
-
Overland, It depends on the width of the ledge, as noted by Newshoes. In any case, mine has no applied trim to the ledge, and the ledge is wide enough not to let the table drop. I'd put the table to the rear of the trailer with the fiberglass insert piece towards the front, and make adjustments to those trim pieces if possible. Dave
-
[postquote quote=175210][/postquote] Agreed, I'm having a hard time figuring how this could happen myself. Newshoes, are the recesses for the table parallel to each other front to back? Dave
-
Newshoes, Sorry to hear about your table. On my Elite 1, the table is 29-1/4" wide as is yours, but the space between the two molded ledges that it sits in to is 29-5/8". There is no way that my table can fall off the ledges whether slid to one side or not. If your space is indeed 30", that is too much and a call to Oliver is recommended. As you mentioned, it is a dangerous situation, especially if your pets are camping underneath. The cleanest solution would be for Oliver to build you a new table to fit the space. If the space is 30" then a 29-5/8" wide table would be the same fit as mine. Dave
-
If you are set on getting the F-150, I would take a close look at getting the Heavy Duty Payload Package (HDPP). It upgrades your frame, gives you the 3.73 rear end, LT tires (load C rated), 36 gallon gas tank, and increases payload around 800 pounds. In 2019, it was only available with the 3.5 ecoboost or the 5.0. But not available on Lariat and up trims for some unknown reason. Could be different for 2020 models. Payload (or lack of it) can be a problem with the 1/2 tons, depending on how you load up your truck with various accessories. You'll have to consider your personal use carefully. Personally, for my future truck, I'm letting go of the idea of a half ton for towing in favor of a 3/4 ton for many reasons. The 1/2 ton is still a good TV, though maybe getting close to the edge for the Elite2. The F-150 3.5/5.0 have plenty of power, just not nearly as stable a platform as a 3/4 ton truck. Just my 2 cents. Good luck! Dave
-
Greetings Mark, With a 3500 truck (or a 2500 for that matter), there is no need at all for the Anderson WDH setup. Save your money and simplify your setup. Your truck will be a very capable TV for the Ollie all by itself. Folks that do have the Anderson WDH will be able to answer your specific questions about turning radius and all if you are unswayed! Dave
-
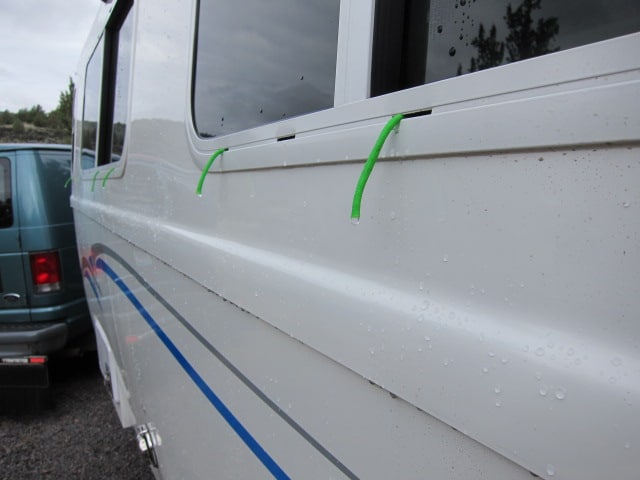
On our last trip to SE Oregon, we encountered terrific thunderstorms with incredible downpours. As I watched our window wells fill up with water, I remembered this post. But had no pipe cleaners. But I did have 1/8" paracord! I cut off a bunch of 3" pieces and worked them in the weep slot of our windows. They worked beautifully with steady drips coming off the end of the cord and dry window wells! Another good use for paracord. Thanks for the idea. Dave Edit: I see now that the original post was started by Mossemi, thanks again!
-
Exterior cleaning - Wax recommendations
DavePhelps replied to BackofBeyond's topic in General Discussion
I tend to agree about the superior protection you get with a quality marine paste wax. I store my Ollie outdoors all year. Two or three washes and two waxes a year, one in the Spring and the other in the late Fall. By the beginning of Spring, my trailer is a little green around the edges here in the NW. A month ago, after a quick wash before a future Oliver customer came by to have a look, the water still beaded up like it was just waxed after being out all Winter. Yes it's a bit more elbow grease to apply paste wax, but not that much. I have had no issue cleaning off bugs, tar, road grime, or whatever with a quality paste wax underneath. I personally really like Collinite Fleetwax, but I'm sure the others mentioned here are good as well. I also use a WHITE 3M scotch-brite pad, along with a sponge when I'm soaping down my trailer before I wax. The white pad is the equivalent of 1200 grit sandpaper. It has just enough tooth to cut through the tough stuff without affecting the natural shine of the gelcoat. It leaves the trailer smooth (no small embedded particles) and very clean, almost like it was clayed before a paint job. This has worked very well for me. https://www.collinite.com/marine-wax/fleetwax-paste-wax/ https://www.3m.com/3M/en_US/company-us/all-3m-products/~/Scotch-Brite-Light-Cleansing-Hand-Pad-7445/?N=5002385+3293194061&rt=rud Dave -
My best guess as well, and very easy to verify.... Dave
-
The first place I would look are the check valves (back flow preventer) just inside from the city water and fresh water tank inlets. On my Ollie, these are brass and when our trailer was at Oliver waiting to be picked up, they both froze and cracked (City Water & Fresh water Tank). Luckily, the damage was determined at our first night shakedown when water came pouring out of the weeps. This back corner is vulnerable to freezing, at least on our Elite 1 it is. We do not have to mess with the valves when in boondocking mode or hooked up to City water. If you can not visually see the leak, maybe when you get home, you could run some compressed air through the City water inlet (50 psi or less) and listen. A lot has changed with plumbing layout and valve type over the years so hard to give best advice to you. If you've been in freezing weather though, check the weak links first, starting with those check valves. Good luck. Dave
-
Frozen water line to Bathroom?
DavePhelps replied to DonnaDuane's topic in Mechanical & Technical Tips
That is a good idea Oliver should check out! Put the return as far from the furnace as is practical. On the Elite I, the return is on the front dinette seat, basically right next to the furnace. Where I have had some freezing trouble is on the street side rear of the trailer, where the water inlets are. That might be a good place to locate the return (on the Elite I). The Elite I bathroom is the warmest room in the house as the furnace is just on the other side of the wall and the duct run is very short. For the Elite II, using hard ducting would improve flow (reduced friction loss) and there are insulation products available for this type of ducting. Anyway, I hope DonnaDuane are working out their problem. It's been mighty cold in the Cascades. Dave