DavePhelps
-
Posts
397 -
Joined
-
Last visited
-
Days Won
20
Everything posted by DavePhelps
-

Windows? There has to be a better way, seriously.
DavePhelps replied to routlaw's topic in Mechanical & Technical Tips
I have tried but can't get that window out. That would make it so much easier! I lift the moveable sash up in to the frame but no matter how hard I try, I can't get the bottom to kick out. Any secrets?? Dave -
Windows? There has to be a better way, seriously.
DavePhelps replied to routlaw's topic in Mechanical & Technical Tips
Hey Routlaw, how about these? They look intriguing: http://www.truckcamperadventure.com/2016/01/the-dometic-seitz-window-pros-cons-and-a-few-tips/ And this: I agree with you, Oliver could do better with the windows. Dave -
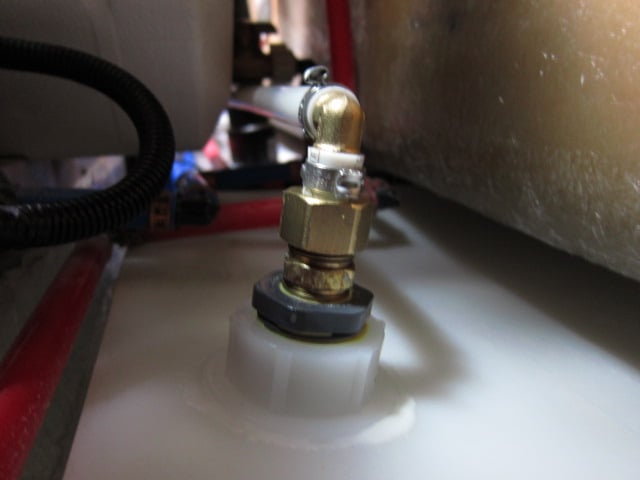
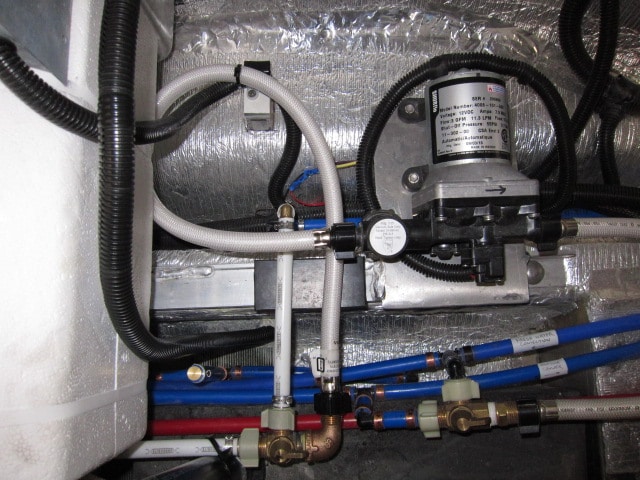
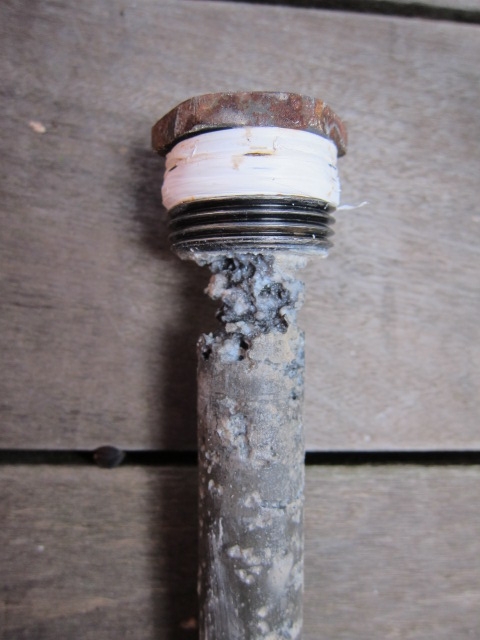
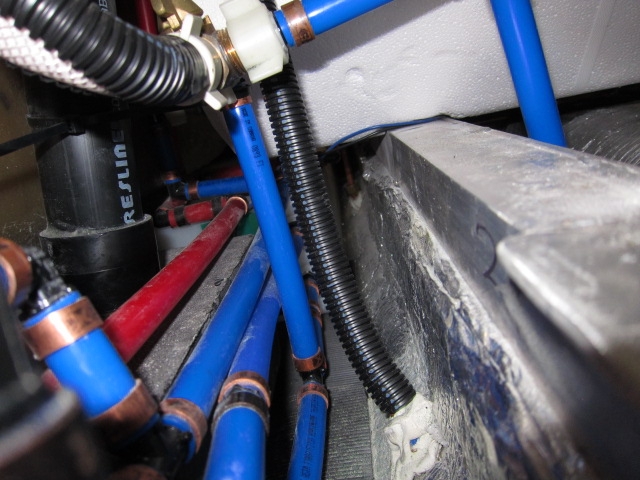
Well I may be kicking a dead horse here, but I finally got around to adding the siphon tube to my Ollie's FWT. Thanks to Raspy and Reed and all others for their input which was of great help to me. I modified Raspy's design just a bit by using a PEX suction tube instead of copper. Don't know if one is better than the other but they do have some subtle installation differences I thought I'd point out. The heart of the setup is the same, the 1/2" brass compression fitting that has been carefully drilled through with a 5/8" bit to remove the internal stop so the copper or pex tube can be pushed through the fitting. The important difference here with PEX is not to use the brass compression ring, but a nylon ring made for that purpose. Here's a pic of the siphon tube setup with all the fittings: Of course the part that gave me the greatest worry was spin welding the fitting on to the tank. I used the same HD fitting that Reed used and I bought 6 of them so I could practice on a piece of scrap plastic I got at a local tank factory (they gave me the scraps). I bought the fittings and the driver from here. They have all the fittings and drivers for that particular fitting that you need, and are very fairly priced. I oversized the fitting and also got the HD version for strength. I oversized because I wanted to screw the brass compression fitting into a bushing and not directly into the spin weld fitting as a hedge just in case! Did I need to? Maybe not, but I felt better doing it. The difficulty on my Elite is that it is crowded down there in between the hulls! I'm no stranger to routers, they are powerful, can impart tremendous torque, and things can go South in a hurry if you don't respect that. Reaching down in there with the router was dicey. My grip was tenuous at best, I needed an extra elbow! I could get a reasonable hold and turn it on, but had to change my grip for the critical turning off stage!! I did not want to change my grip with the router running and court disaster. So finally I put two short extension cords together and had my wife at the ready to pull them apart when I yelled out to her. We practiced a few times until we both felt good about it. Four seconds of terror later the job was done....perfect weld! For those used to using routers with wood and who know what can happen, I would say that spin-welding plastic fittings is pretty easy and forgiving. Timing is the most critical factor. I was glad though that I did a few test tries first, and at only .35 cents a fitting, it was cheap to do so. The rest was easy. Since using a PEX suction tube, I did not cap it but cut out 2 tabs on the bottom on my table saw to keep the tube 1/4" above the tank bottom. Everything else was just as Raspy and Reed did in their video. Here's the pic of the installed suction tube. It's actually straight, camera was tilted a bit. Here's a pic on the pump side: The pickup tube came out just next to the water heater where I strapped it to the drain pipe to the GWT. You can see the brass pulg in the old pickup tube next to the water heater. While down there, I added a brass elbow to the valve on the left for the flex line to the input side of the pump. Originally, there was none and the flex line was badly kinked having to make such a tight turn: So all is well now. Instead of loosing prime at 36% full. The pump just barely makes it to 6% full. That's a lot of water! Things are looking up! Dave

-
Windows? There has to be a better way, seriously.
DavePhelps replied to routlaw's topic in Mechanical & Technical Tips
Yep, the window wells are a pain to clean, but a very necessary part of maintenance and keeping water from overflowing the wells and into your trailer. After trying a few methods, this is what I have settled on. 1. Completely remove all the exterior gaskets. Don't get them mixed up between windows. 2. Remove interior bug screens. You may have to remove shades as well to completely remove the screens. 3. Open windows as far as you can. 4. Remove as much of the rubber slotted track as you can from the window frame. IIRC, the bottom track goes under the sliding window and is captured, so I pull up as much as I can. 5. Then with shop vac and a duster brush (3" paintbrush) I remove all the debris, brushing it into the vac. I find doing this dry is way better than trying to clean with water and washing out the debris that way. It just turns into a gunky mess with water. 6. Once all the major junk is out of there, I'll finish cleaning the frame with a damp rag and Citrisolve (or the like). 7. Last step! While all the gaskets and rubber track are out, I clean them as well with the damp rag and cleaner and finish them off all sides (once dry) with a good wipe down with 303 Protectant before re-inserting. The 303 makes the windows slide real easy and also protects the gaskets from UV degradation. Seems like a lot (and it is) but that's what I do once a year. My trailer is a 2015 so not that old, but the windows haven't leaked and the gaskets look new. YMMV depending on the roads and environments you travel. Hope I didn't forget a step. A lot of the work becomes apparent as you move along through the process. If someone knows a easier way to do this I'd sure like to hear about it! I'm with you though about finding the ultimate RV window. Maybe the frameless types I'm seeing on the new super rigs out there? Not sure how they function though, or if they don't have their own issues. Happy trails! Dave -
First thing I would do is get up on the roof, pop off the AC shroud, and have a look at the fan and condenser fins. These fins can be easily clogged, especially if you're using the AC around Cottonwood trees when they're seeding (like now). Dirt and pine needles also get in there. I blow mine out carefully with compressed air (I have a radiator blow wand), some use water. Just be careful not to flatten or damage the fins. With my Mach8 unit, I have the fan on low and that is plenty! Don't know about the Dometic units they now use. If it was working before, then that's where I would start. Good luck and keep us posted. Dave
-
A/C maintenance and Condensation tube
DavePhelps replied to DavePhelps's topic in Mechanical & Technical Tips
OK, just saw the other thread, been gone for 2 weeks so missed it. Still wondering why I can't blow air out the condensate tube though. Dave -
I am trying to figure out if my condensation tube is plugged. I pulled the cover off and you can see the condensate pump and tube in the pic. I tried blowing some mild compressed air into the clear tube and then in to the pump but no air came out the discharge tube at the driver side rear of the trailer. Anyone know which is the discharge side of the pump and shouldn't I be able to blow air through it so air comes out the drain tube at base of trailer? I have the older Coleman Mach 8 model. I also rarely ever use the AC. I have also been having a few drips come in to the trailer during heavy rain. I suspect the AC is involved. Water appears to be running down the tube to a low spot and then dripping between the hulls on to my solar monitor wiring, where it drips out right on to my face when sleeping! This water caused the monitor to fritz out. Luckily I was able to disconnect it and let it rest for a few minutes, then plugged it back in and all was good. Stuffed a washcloth up there to intercept any more water making its way to my monitor. As far as general maintenance, all I can think to do is keep the pan clean and blow out the fins clean. Anything else I may be missing? Thanks Dave
-
Nah! It's too big for my little Elite. But you have me thinking of other options. Thanks again! Dave
-
Wow that is a beautiful sink and install! I have never been all that happy with my sink/faucet combo. I was looking at getting at least a new faucet as mine does not reach far enough in to the sink. But the sink you found would be much more functional. So is your Franke Vector sink 17"wide x 22-3/8" long (flange to flange) x 9" deep? Just making sure. I'll be running out to my Elite to see if it will fit! Hope it does. Thanks for the post. Dave
-
Pete, Be sure to let us know how that 5.0 engine tows for you. I'm not yet sold on the Ecoboost for long term durability, but want to be sure the 5.0 has enough power-especially in the mountains. To the OP, my TV is a 1998 Ford E-250 Econoline with a 5.4 liter Ford Triton Engine/3.73 rear end. 10mpg towing. It has done well but it's 2nd gear and 35-40 mph over the mountain passes here out west. I really want to get a 1/2 ton crew cab with 4wd (gotten stuck once or twice with 2wd), but am having trouble making a decision. I like the Chevy/GMC trucks but they have only 26 gallon gas tanks (in the half ton)! Fords have a 36 gallon option, and depending where you travel, that is a good thing. Congrats on picking the finest Oliver trailer model! So easy to back up and you can slip it in to some tight spots. Don't go too small with your TV. The Olivers tow very well but you need to be sure you are within the payload and tow rating of your vehicle. Usually folks go over payload in smaller vehicles. Longer wheelbase is also more desirable for overall stability. Dave
-
What many don't realize (myself included until a few years back) is that tires can "age out" and still look like new or have decent tread left. There is a date of manufacture stamped right on the tire. It's a 4 digit number, the first two numbers are the week of manufacture and the second two are the year. I had a 10 year old snow tire explode in our basement while in storage. It looked almost new (until it blew up!). Where I now volunteer, all tires for the trucks are retired after 6 years no matter how "good" its tread condition. This is the rule I now follow, after 6 years, the tire is replaced. Here's a good bit of info if interested: https://www.edmunds.com/car-care/how-old-and-dangerous-are-your-tires.html Dave
-
Welcome Mmoren! Well I'm late to this party. Congratulations on your choice of an Oliver and especially the Elite!! Not many of us out there to be sure. We have two seasons experience in ours now. We seem to do most of our traveling in the shoulder seasons so we've had all kinds of weather and have been always so very comfortable and amazed at the shelter our little egg provides. After years of hunkering down under a tarp in pouring rain or blowing snow, I almost feel guilty being in there...I said almost! Options I am really glad we got: 1. Solar. OK this is a source of debate here, but our 200 watt PV/service has given us all the power we need. Yes the panels are fixed to the roof and not adjustable, but this really hasn't been too much of an issue for us. We aren't big energy users. The lights are LED, so the only other power need is the water pump (minimal) and the furnace fan (that can draw some power). Maybe a DVD now and then. We don't need extra power for medical or other needs. On my short list, however, is to add some remote panels like what Reed has done. Reason is that often we will be parked in the shade to stay cool, but there is full sun just 20' away, so a remote panel really makes sense. One thing to consider about solar is that the charge controller should be as close to the battery bank as possible for best efficiency. So if your remote panels have a built in controller, they are quite a ways away from your batteries and there will be power loss. Perhaps someone who knows more about this could chime in. If you get the solar package, with the plug in for remote panels, you will be operating at much greater efficiency. You also wont have to have to be pulling out your batteries and putting clamps on them every time you want to charge up. AM Solar sells a nice Zamp suitcase PV panel with no charge controller which is the way I will go. You'll find a ladder very helpful to brush the snow off your panels if you travel in the off seasons! https://amsolar.com/rv-solar-panels/solar-z120-f 2. Batteries. If you get the solar I would highly recommend upgrading to the AGM batteries. They have greater charge acceptance than the std batteries (charge quicker) and much greater capacity. They are a very high quality battery. The two fit like a glove in the battery box. Very glad I bought them! 3. Fabric upgrade. I found the commercial spec fabric Oliver offers a bit scratchy. So Anita told me how many yards they needed to do our Elite...16 yards IIRC. We went down to the local upholsterers shop and looked at many different materials. After we selected what we liked. They rolled it up and sent it off to Oliver's upholsterer. Couldn't have been easier! Then Oliver credited us for not using their fabric. In the end, the upgrade cost us an extra 75.00 and, really, I would have paid more. We love the feel and the look. The Oliver is pretty Zen inside, very simple, some may say stark. So don't underestimate the importance of the fabric you choose. Lots of other options we choose are now std., like the reading lights, which we use more than anything else. Porcelain toilet is now std. as well. We did spring for the Wifi and Cell booster. These have worked well. But when you are really out in the boonies the cell booster won't help you. Does work well in the fringe areas however. Did not spring for the counter tops. We were already over budget. Figured I could install something later if I felt the need. So far I haven't! If you can live without a microwave, absolutely delete it!! You will get a very useful cabinet in its place, and in the Elite, this is especially helpful as there is no real pantry like in the Elite 2. Can't imagine what a PITA it would be not to have that cabinet! Finally, get a fridge button guard for your Dometic fridge: http://www.rvwidgetworks.com/Photo-Gallery.html The Elite is narrower than the Elite 2 and sooner or later, you will bump the on/off button. Happened twice to me before I finally installed one. Luckily, I discovered the fridge was off before the ice cubes melted...God forbid...! You're going to like your Elite. Very easy to tow and back up. A pleasure to camp in, and you can put them just about anywhere where the big rigs can't fit. We sure like ours. Good luck!! Dave
-
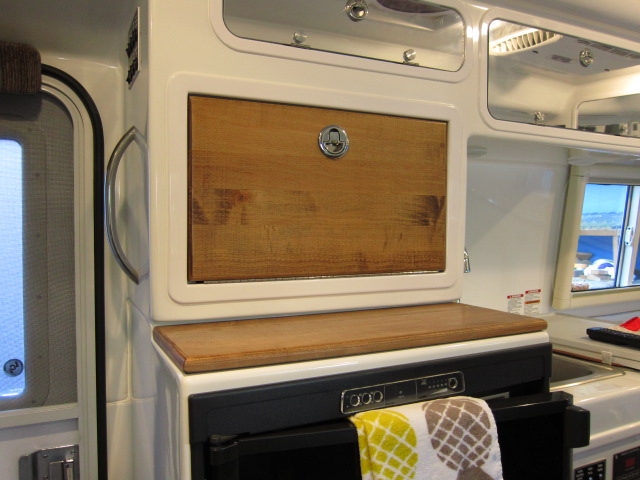
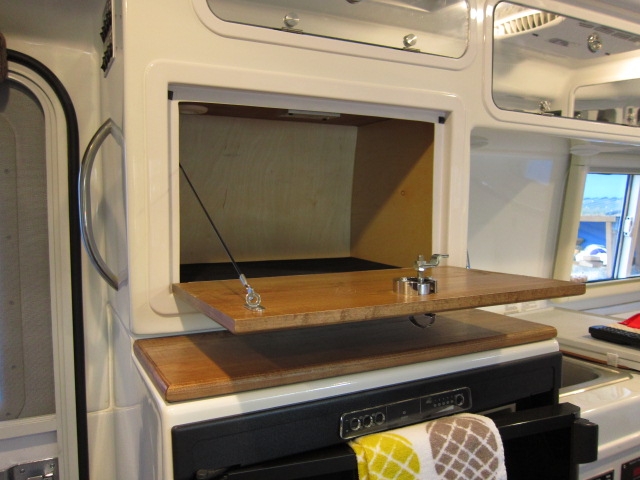
The entire interior of the cabinet is some kind of birch (or the like) plywood. That's just the lighting fooling the eye in the pic. All surfaces are the same color. There is also a rubber mat on the floor. Wine bottles fit nicely in there! Dave
-
We opted out of the microwave and am sure glad we did. The resulting cabinet has been an incredibly useful and much needed pantry for storing all kinds of stuff we use on a daily basis. In the Elite, there is just not a lot of storage, and this cabinet has really been useful. The interior dimensions are: 21-1/2"wide x 14" deep x 13" tall. The actual opening is a bit smaller because of the face frame and the door itself. That opening is 19-1/4 wide x 11" tall. Dave
-
Reed, I am also looking and researching a new TV. I really like the Chevy/GMC line of trucks. Although I was thinking more along the lines of the 6.2 liter. There are also rumors that Chevy may bring back the 4.5 Duramax for 2019 but this is purely conjecture at this point. They are working on a small diesel of some displacement for the 1500 however. The one thing about these trucks that has given me great pause is the size of the gas tank, only 26 gallons. Where we go, gas is often limited, and there have been a few times where I was sure glad I had a 35 gallon tank in my Ford van. Have you been caught short at all, or do you carry extra gas? 26 gallons at 10mpg is not so great a range. I agree with you that upping the octane in the mountains has made a noticeable improvement for me. Nice truck you have there. Can't wait to finally settle on one myself! Dave
-
It's Raining, it's pouring, all the windows....
DavePhelps replied to KarenLukens's topic in Mechanical & Technical Tips
Reed, I have the old style lights, but they leaked as well. They were "sealed" at the factory with silicone, which failed promptly. I cleaned and rebedded them with a very high quality butyl tape. This has worked beautifully. You don't need no stinkin' gaskets, just the butyl tape. The 3M 4000 would be my next choice, but it would be a far second. As for silicone....never. I posted a while back on the procedure I did. Just in case you missed it. I have not seen the new porch lights, and perhaps just squeezing some 3M 4000 in the screw holes would be enough in a pinch, but I think sealing the perimeter of the entire fixture would be best. If you do elect to just seal the holes, put a slight countersink on them, and make sure they are bone dry (hair dryer) before applying sealant. Good luck. Dave http://olivertraveltrailers.com/topic/porch-light-reseal-and-silicone-removal/ -
Yes, I just found out that there is a steel rod down the center of the Magnesium(?) anode (thanks YouTube). Saw a picture of a very spent anode but the steel rod was still fine so no worries about it falling off inside the tank. So do you folks also do the vinegar soak and rinse? I just am wondering how far I have to go with this. Is there a way to siphon vinegar through the winterization port (in back) so it just goes into the hot water tank? Or do I have to remove the T/P Valve and pour it in there (more likely)? Lots to learn here. Thanks Dave
-
Thanks Bill, I didn't want the anode to break off from the nut! Mine is two years old as well. Guess I'll give it one more year and see. I also recommend anyone doing this to flush their tank out with a wand made for the task. A lot of junk came out (the ring of granules in pic). Be sure to close the bypass valve behind the tank first so as to not accidentally blow any debris into the valve. Dave
-
Cleaning and winterizing today. Do you think it's time for a new anode? The bulk of the oxidation is at the nut. The rest of the anode is a little pitted, but in pretty good shape. Is this typical? First time dealing with this. Dave
-
So I guess Oliver needs to start including tarps with their send-off kit! Maybe white with their logo on it. Seriously....what is going on here? Dave
-
It's Raining, it's pouring, all the windows....
DavePhelps replied to KarenLukens's topic in Mechanical & Technical Tips
So for those who have reset their windows because of leaking issues. Did you set them in butyl tape and finish off around the perimeter with a bead of 3M 4000? Or...? Just curious as to the best procedure. Personally, I'm not a fan of silicone at all, in any shape or form. Really sorry to hear of these issues. Best leave it at that.... Dave -
Cold weather/ winter camping tips
DavePhelps replied to SeaDawg's topic in Mechanical & Technical Tips
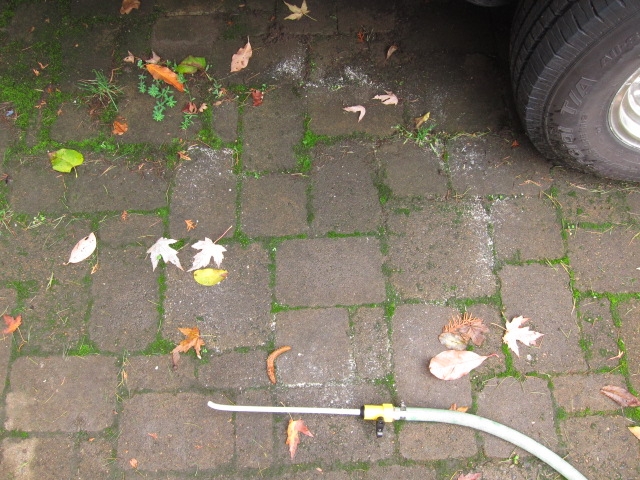
So regarding draining the outside shower hose. Since there are no inline shutoffs in the hot/cold pex lines that feed the ext. shower, I assume that "by draining the outside shower hose", one is just letting the chromed flex line drain by gravity and that's it? It would be nice if all those water lines in the back corner of the trailer could be drained when needed as this is probably the most vulnerable area in freezing weather. The brass backflow valves are at particular risk. I know because one of mine was busted open when we picked up our rig in late March. It had been out in the weather for a month or two before we could get out to pick it up. Luckily, the leak showed up right away during our shakedown at Fall Hollow, and was replaced. Dave -
One last effort! Since the system works great in our 2015 Elite, something is being missed here. Just in case that you were not aware, the volume control for the TV when setup as described above is through the Furrion, not the TV remote!! We have to get up and adjust the volume by turning the volume knob on the Furrion unit. You probably already knew this but just in case.... Sometimes the most simple things elude us. If this isn't it, definitely give Oliver a call. Dave
-
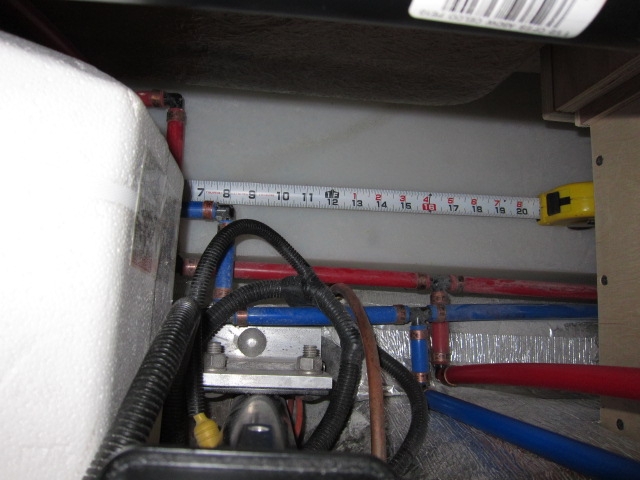
I've been learning a lot here. Lots of great ideas and techniques posted and many thanks to all who have contributed. Having looked hard at my Elite and considering all that has been presented here, I can say for certain that the only way forward for me is to spin weld a fitting on top of the tank. There is just no room at all to work with the existing fittings, even using John's technique. The water heater tank mostly centers on the back of the FWT, completely covering its fittings, there is no room. Even if I was to remove the hot water tank, which would be a huge project for me, there still would be minimal room with high chance of failure. You can just make out the back of the FWT in this pic: There is a clear area on top to spin weld a fitting but it is about 12" forward from the rear of the tank. I guess this means I would have to use a longer siphon tube that would reach to the back of the tank, which is where I believe it should be located. Tape is hooked on back of FWT above fittings. I sure wish Oliver was a little more supportive about this issue. At least identifying shops that could do this work for us folks who live very far away from Hohenwald. I told them about this issue 04/15 when we kept loosing prime on our trip home. It didn't take long to discover the problem. I still am in disbelief that, as well conceived as the Olivers are, that this PITA water system ever got off the drawing board. Sure glad we all have each other to help make our Olivers what they should be- the very best! Dave
-
Sorry that didn't fix you up. Should have looked at the video first.... I'm pretty sure that audio between the TV and the Furrion is through the HDMI cable (someone please correct me if I'm wrong). If you are still not getting sound and have a connection at the TV, then the connection at the Furrion needs to be checked. On my Elite, there is no access port in either of the overhead storage compartments next to the Furrion. Not sure about the Elite2. You may have to remove the Furrion's trim ring to access its mounting screws and remove the unit enough to inspect all the connections. Never done this so can't advise. I'd call Oliver about the best way to proceed. Good luck! Dave