DavePhelps
-
Posts
395 -
Joined
-
Last visited
-
Days Won
20
Everything posted by DavePhelps
-

The cost of a 62 Gallon Fuel Tank (hint - not all money)
DavePhelps replied to NCeagle's topic in Towing an Oliver
Topgun, Did you mean you got the OEM 36 gallon tank? Or did you get the 45 gallon tank from Transferflow? Dave -
Transferflow also makes a 46 gallon gas replacement tank for the Tundra. AFAIK, this tank and the one for the F150 are the only two gas replacement tanks available. Also, it seems for 2021 model year, Ford is still only offering the HDPP package on the F150 up to the Mid XLT trim, nothing higher. I saw a build sheet somewhere and that was the case. Kind of disappointing.... I suppose when the trucks actually are produced, things could change, but I'm not holding my breath on that. Dave
-
There seems to be a pretty good thread over on the Fiberglass RV forum you should check out. https://www.fiberglassrv.com/forums/f55/you-can-repair-fiberglass-52498.html Good luck! Dave
-
My trim in the bathroom also started coming off after a year or so. It's a difficult area due to all the moisture, etc. If you want to go the extra mile when it comes time to reattachment, I would also highly recommend using this 3M adhesive promoter: https://www.amazon.com/gp/product/B00RY8L9U6/ref=ppx_yo_dt_b_search_asin_title?ie=UTF8&psc=1 After you clean the area with isopropyl alcohol, just wipe this stuff on before applying the trim. It has worked very well for me. Dave
-
Ordered a Legacy Elite I for P/U mid September
DavePhelps replied to QuestionMark's topic in Introduce Yourself
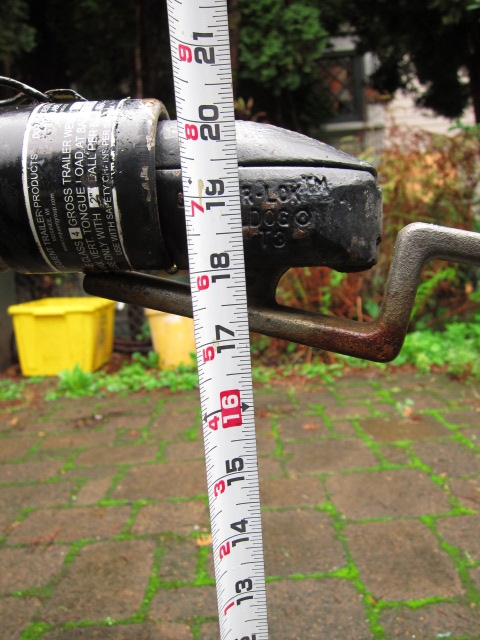
Hi Mark, Here is a pic I posted some time back of out Elite1. Oliver has since changed the hitch design (no more telescoping hitch) but I would think that would not affect the measurement. Our trailer is as level as I could make it for the pic. Don't forget to allow for the rear end of your TV to drop a bit when you do your calculating. Tongue weight on the E1 is around 450 lbs +/-. Good luck and congrats on your new Elite1, we love ours. Dave
-
One thing I would like to see improved is better between the hull heating, especially the lower hull where all of the vulnerable plumbing resides. One idea I thought may help is moving the return air vent for the furnace as far away from the furnace as I can place it. So as the furnace cycles on and off, hopefully some of the warmer cabin air would be drawn down between the hulls on its way back to the furnace. Even if the temperature wasn't raised a whole lot, just having the movement of air down there would be very helpful. On our Elite1, the return air vent is located under the front dinette seat which is also where the furnace is, so this offers no help. Think it might work? The AC really needs to be worked over. It's loud to the point that we don't use it. Plus it's just way oversized for our trailer. Hope everyone is staying well! Dave
-
Makita 16” corded electric chainsaw $182 best price ever
DavePhelps replied to John E Davies's topic in General Discussion
That's a nice saw for sure. All I could recommend is a HD contractors garbage bag to put it in. Not too glamorous I know.... For those without a generator (like me), I would highly recommend a Silky Katanaboy 500 or 650. I have the 650 and it is razor sharp and cuts very quickly, almost as fast as a traditional 2-man bucksaw. Get some pocket wedges and you're good to go. Enjoy your Makita though...know your binds and be careful! Dave -
City and Fresh Water Intake Overflow
DavePhelps replied to Stephen and Kelly's topic in Mechanical & Technical Tips
City water and FWT fill both leaking like that? My guess is that both check valves froze and busted open. That back corner of the trailer is the most vulnerable in freezing weather. Especially with all that plumbing back there. The pex lines won't rupture but the fittings sure will. From all the water coming out your weep holes it should be easy to find. Good luck. Dave -
I'm away from my trailer so can't show pics. In my 2015 Elite: Front dinette, completely filled by furnace. Rear dinette, that is where our solar charge controller is located, also lots of other electrical fuses, etc.. It's the best place for the controller as it's very close to the batteries, and the main electrical panel. Street side dining table, battery box fills half the space, the other half has a lot of plumbing. Curb side dining table, hot water heater, water pump and associated plumbing, pretty busy area. This is all from memory, so hopefully accurate. The sales folks at Oliver could give you best details on the newer models and how they are configured. Dave
-
Yes it's a real bummer that Ford limits the HDPP only up to mid XLT trimmed trucks. I would love to have LED headlights and some of the other options you mentioned. I guess Ford wants folks to buy the F250 Lariat Ultimate or above trims if they want capability and some extra safety and comfort options. That Transferflow 50 gallon replacement tank for the F150 really has me thinking though. We'll see if Ford opens up their restrictions on the 2021 HDPP. They used to offer it for the Lariat in 2018.... Dave
-
Non-liquid water treatment for RV tanks?
DavePhelps replied to John E Davies's topic in Mechanical & Technical Tips
John, Like SeaDawg mentioned, Purogene may be what will work for you. I haven't personally used it yet, but bought a quart when I bought my filters. It seems to tick all the boxes for sanitizing the water system. A little spendy compared to bleach for sure, but a little is supposed to go a long way...and it is available! Dave -
Kind of late to this party but I have enjoyed reading everyone's thought processes regarding these trucks. Yet another option to consider is the F-150 with the Heavy Duty Payload Package (HDPP). The only potential drawback for some is that it is not available above the XLT model. With the Max Trailer Tow option, it comes with the 3.5 ecoboost engine. HDPP gets the payload up to around 2400 lbs. It comes with 18" LT, C load rated tires, along with other desirable upgrades. I also learned recently that Transferflow makes a 50 gallon gas replacement tank for the F-150, so that should help with range! I wish they made one for the F250 as well.... Lots of options for diesel tank upgrades but few for gas. I never knew it could be so hard shopping for a truck! Dave
-
That vent pipe you see behind the drawer has an air admittance valve on the top. It allows air to go in to vent the system, but doesn't let air out, for obvious reasons! Kind of like a back flow preventer in a water line. These valves have been known to fail now and again so that could be a reason. If Oliver installed it right, it should screw off for easy replacement, haven't checked mine lately. For what it's worth, I also always add Happy Camper black tank treatment to the gray tank as well, especially in the summer, it works great for both tanks. Follow the pipe down to the tank, check all the connections, the problem could also be as Mike described above. Good luck! Dave
-
Yes, the older trailers had the Bargman fixtures. https://www.etrailer.com/s.aspx?qry=Bargman+Porch+Light+Lens I replaced mine and sealed them with butyl tape. Don't get any solvent on that plastic "chrome" or it will come off. The amber lenses are awesome. Dave
-
Oops, posted in wrong spot.
-
Is this what you guys are talking about? https://www.etrailer.com/s.aspx?qry=Bargman+Porch+Light+Lens The Bargman fixtures are what came on our 2015 Elite. They came with clear lenses but I swapped them out. I really like the amber lenses!! They are also available on Amazon. As far as the new fixtures go, I can't say. Dave Dave
-
26 ft trailer with a whole lot of weight in back
DavePhelps replied to John E Davies's topic in General Discussion
Yea, I saw that upper eyebolt right off. Ughh. You want to keep well away from rigs like that. Really, I think any passing Police Officer should ticket the owners of such negligent and dangerous setups. Dave -
Well it depends on how much you take with you and what accessories you have loaded on to your truck. For example, for my still unpurchased new truck, I use this personal list: Elite 1 tongue weight: 450 lbs (the Elite 2 is around 600 lbs for most I believe) 2 adult passengers: 300 lbs (generous for us wee folk) Truck topper on the back: 200 lbs Spray in bed liner and a mat: 100 lbs (guessing here) Canoe and rack on top: 50 lbs So adding all this up, before I have even put any cargo in the truck, I have accumulated 1100 lbs of payload weight! With the Elite 2, I would have 1250 lbs. This is how fast payload adds up, and each person needs to do an assessment of their particular needs and weights. Adding higher load rated tires, or airbags, or other "load enhancement" devices will not increase your payload capacity as it is written on the sticker of your door jamb. A double cab Tundra 4X4 Limited, with the 6.5 bed (my preferred setup) has a payload of 1570 lbs. The SR5 is 1630 lbs, so not much more. There is just not a lot to play payload wise with the 1/2 tons. Ford does better with their F-150 and they also offer a Heavy Duty Payload Package, but not on the Limited and above trims...go figure. As much as I don't want to drive a big HD pickup, that may be where I am heading, especially because we may someday move up to the larger Elite 2. I'd love to get the Tundra but am worried I'd overload it (based on the stickers). Maybe the Ford F-150 with the HDPP would do it. Dave
-
Someone please chime in if I am incorrect here, but payload is calculated by subtracting the vehicle's Curb Weight (which includes the extra weight of all included options), from the vehicle's GVWR. While upgrading the P-metric tires (on the 1/2 ton trucks) to LT E load rated tires has many positive benefits, and is a good idea for towing, it will do nothing to change the payload rating. The GVWR is based on the frame strength, axle weight ratings, etc. I don't see how the tires factor in to that. For example, the axles and frame will be weighted the same whichever tire you use. I've been in the market for a new TV and the Olivers are kind of right on the edge weight wise between the 1/2 and 3/4 ton trucks regarding payload. Makes for a hard choice, but either way, I don't see a truck having a payload below 1600 lbs, or more preferably, as being a suitable TV for an Oliver. That is for my particular use and ease of mind, for safety and keeping myself protected from liability in the event of an accident. YMMV. Very curious if Dodge will amend their payload sticker based on different tires. Dave
-
A section of the chrome strip between the bathroom sink and toilet started to come loose. I used This tape to reattach it. It has held up great. Be sure to clean the area well before taping (remove all old tape residue with MEK), and then use 3M 4298 adhesion promoter as a "primer" so the tape bonds even better. You can buy them both together on Amazon. Dave
-
New Ford 7.3 liter gas power numbers revealed
DavePhelps replied to John E Davies's topic in Towing an Oliver
What I have read is that 400 ft lbs of torque is available starting at only 1500 rpm. Looks to be a great engine for those not wanting/needing a diesel. Hope the mileage is respectable. It's floating to the top of my new TV want list.... Dave -
Suburban Furnace acting very erratic
DavePhelps replied to routlaw's topic in Mechanical & Technical Tips
No problem John. I was happy to stumble across it. Very well presented and informative I thought. There's a lot to learn maintaining our trailers! Dave -
Suburban Furnace acting very erratic
DavePhelps replied to routlaw's topic in Mechanical & Technical Tips
Routlaw, Check out this video, very informative. I think all you have to do for access is remove the exterior cover. The exhaust port tube slip fits into the furnace inside so just slide it out gently, then remove the large cover. But verify with Jason first!! I've not opened mine up all the way like this yet. Check out the LED flashing on the board, the codes are in the manual you should have gotten from Oliver: 1 flash w/3 second pause: limit switch, airflow problems 2 flashes w/ 3 second pause: flame sense fault 3 flashes w/ 3 second pause: Ignition lockout fault Dave -
Suburban Furnace acting very erratic
DavePhelps replied to routlaw's topic in Mechanical & Technical Tips
Hmm. On my Elite1, the furnace is under the front dinette seat. All the electrical connections are on top of the unit. Don't know about the Elite2. Definitely give Jason a call. If the fan turns on before the igniter tries to light the burner, as it should, then perhaps your Tstat is OK. Hopefully someone else will chime in with more ideas. Good luck. Dave -
Suburban Furnace acting very erratic
DavePhelps replied to routlaw's topic in Mechanical & Technical Tips
Hey Routlaw, All of my electrical issues have been with bad connections so I would start there. Oliver really should be using adhesive lined heat shrink connectors, given the nature of the environment these connectors live in, ie, moisture, dust, vibration. But alas. The 12v supply wire to my furnace had bare wire sticking out of one end of the crimp connectors.... So check to be sure all are tight, tape any bare wire with electrical tape to avoid potential shorting. Also check the frame ground, which is a female spade connector (it's attached to back of furnace, closest to exterior wall in the center). Since your furnace works intermittently, that suggests to me that there is a bad connection somewhere. The piezo igniter should also be checked, but can't tell you offhand where that is, I'll have to go and look. I'd give Jason a call and see what he says. I'm no electrician, but these have been my experiences. Dave ps: I'd also pull out the thermostat and check the connections on that end as well.