DavePhelps
-
Posts
403 -
Joined
-
Last visited
-
Days Won
21
Everything posted by DavePhelps
-
If you guys can find an adhesive that will glue pex to anything, I would like to know about it. I asked several plumbers and they knew of none. Although this mod is not a typical use of the material. I tried JB Weld for plastic, West Systems epoxy, silicone, and polyurethane sealant, none worked. And yes I did wipe all parts down with MEK before gluing them together. It will have to stand up to vibration and temp changes, no pressure concerns to speak of. Do you think the compression fitting is problematic? Dave
-
Here's another pic of the compression fitting idea I got off the web. I planned to bend the tube differently than in this pic but the idea is the same. Dave

-
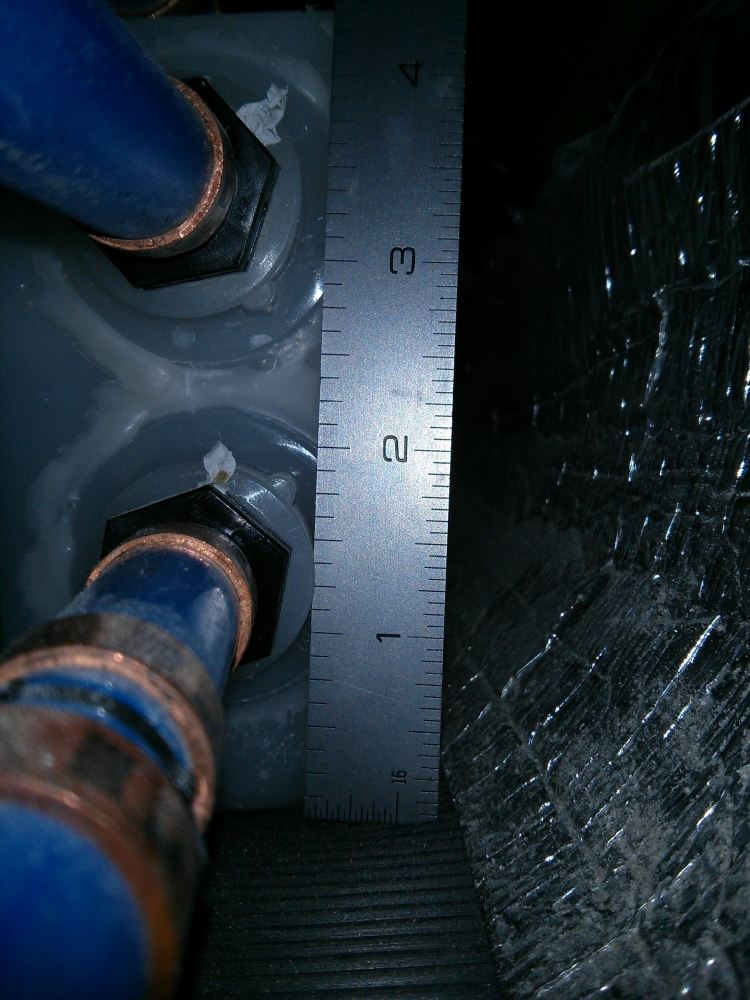
OK, it's all coming back to me. You are right Reed about not being able to screw in the soldered fitting as the pickup tube would hit the side of the tank. That is why I came up with the compression fitting idea, although there are still some unknowns about that. With the compression fitting, the pickup tube could still be rotated after the 1/2" threaded side of the fitting was screwed into the tank. Length of the pickup tube (inside of the tank) would not be as critical here as one could just rotate it until one side of the tube was just touching the tank bottom. Then the compression ring and nut could be tightened down to lock it in place. Then a transition fitting to attach the exterior portion of the copper tube to the pex in the trailer. Questions I had was whether I could even get the bent copper tube through the tank outlet fitting, and was the thread on the compression fitting the same as on the tank fitting? I didn't want to find a bad answer after I removed my hot water heater and who knows what else to get into the area. I also experimented with nylon plugs drilled through for a pex pickup tube, but could find no adhesive that would bond the two together..... Really hope we can all come up with a solution here! Thanks for bringing this issue to light again. Dave
-
Here's a pic of someone's mod I got off the web. Apparently this is not an issue unique to Oliver. It's a soldered setup, not the compression fitting I was talking about earlier. I'll post that pic as soon as I can find the patch cord for my camera..... This, or something like it might work.
-
The fresh water tank design has been a issue for me from the start. I posted something about it a long time ago but it didn't get much traction. I assumed because most folks must use hookups and are not boondocking. AFAIK, the tanks come from the factory with the inflow and outflow bungs already glued to the tank. You can see from the pic that as soon as the water level reaches the top of the lower outflow tube, the water pump will start sucking air and loose prime. I talked to Oliver about installing a suction tube at that lower connection that could be bent down to reach the bottom of the tank, but that didn't seem to interest them. To do the work now, I need to pull the hot water tank to get access (I have the smaller Elite), there is just no room to work. It would be so easy to do before hand at the factory, I guess that has been the most frustrating part for me. Now, like everyone else I have to raise the front of the trailer. Not so huge a deal, but you do need to raise it up quite a bit to get at most of your water, which makes being in the trailer not so pleasant. Like Reed, I just have to fill it more than I would like to. Also, the fact that it is hard, if even possible to completely drain the FWT, I myself would not put RV antifreeze in there. Maybe I worry too much, but I just don't want any of that in water I may be drinking. If Oliver ever does decide to change the design, I may take another trip back for the upgrade. Anxious to see what you come up with Reed. I drilled out a brass compression fitting that would screw in to the bung so a 1/2 copper tube could just slide through. I was going to bend the tube down a bit so it would rest on the bottom of the tank. But being a relative newbie at this, and not wanting to open a can of worms, and with the very difficult access problem, I abandoned the project. Dave
-
Great, thanks everyone. I'll sanitize the whole system. We don't drink out of the tanks either as a rule, but I like to think that I could if we got in a pinch. I actually have some Purogene on hand. I always thought it was mostly for treating water that you were going to drink, but I will have to look into that. I'm sure it would be great for seasonal sanitizing as well. Thanks for the reminder Sherry! Onward..... Dave
-
Well I'm just full of questions these days getting my Ollie ready for upcoming trips. When doing the Spring fresh water sanitize with bleach, should I bypass the hot water tank? Seems like it would be a good idea but I'm not sure. I plan on following Buzzy's technique as he posted here a while back but there was no mention about the hot water tank. Thanks. Dave
-
Thanks for replies everyone. Sherry, the Fiamma awning sits right on top of the gasket. It really traps a lot of debris and I think I'm going to remove it. We'll see how it works out.... Dave
-
I am getting ready for my Spring wash and wax and had a question about that full length white gasket under the Fiamma awning. First off, it's a real dirt, moss, and pine needle trap. I have to keep my Ollie out in the open, and this area is a real pain to keep clean. So I am wondering, is it really necessary to have it there? Yes, if it's raining and you are under the awning, water will run down the side of the trailer but is that really a problem? Just trying to figure out its purpose as I'm ready to pull it off for better air and debris circulation in that area. Also has anyone tried using the white 3M cleansing pads for the wash. They are the least abrasive of all the woven pads (in fact these are virtually non abrasive). They seem to cut the crud really well with no scratching of the gel coat. https://www.amazon.com/gp/product/B00EW7M5S2/ref=oh_aui_detailpage_o01_s00?ie=UTF8&psc=1 Thanks, Dave
-
I second the Gus Hill lock (The Bull). I'd also spring for the better ASSA lock. Really a great setup. https://gushill.com/product/the-bull-bulldog-hitch-lock/ Dave
-

Solar charger not working. Hull #178, Blue Sky system.
DavePhelps replied to geokeg's topic in Mechanical & Technical Tips
OK, now I don't get this. Buzzy said: "I asked the question regarding your battery choice for a reason. Please keep in mind you must never allow the controller to equalize your AGMs. That process will fry your batteries and they would need to be replaced." But Lifeline Batteries says this about their AGM's: http://lifelinebatteries.com/2015/10/can-i-equalize-agm-batteries/ So what am I missing here? I'm off to AM Solar tomorrow to have my system checked out to be sure everything is set up properly. The Blue Sky manual(s) have been very difficult for me to navigate. The truth is out there somewhere... I hope :-) !! -
I use the same grinder as GrayGhost, it is awesome and highly recommended. I also settled on drip coffee because I love the flavor plus cleanup is so easy and requires minimal water. I got the Kalita drip cone as it's stainless steel and also very beautiful to look at. They make two sizes depending on quantity of brew. I drip right into my insulated mug, ahhhh. :) https://www.amazon.com/Kalita-05033-Wave-185-Drippers/dp/B000X1AM0Y/ref=sr_1_2?s=home-garden&ie=UTF8&qid=1491590233&sr=1-2&keywords=kalita+stainless+steel I'm mostly a tea drinker at home, but while on the road traveling, a good cup of coffee is hard to beat! Dave
-
Canoe12, Yes, I agree completely with all the points you made. Dave
-
You know, I sure hope Oliver reads these forums. These kinds of issues are really unacceptable. There is great potential here with the Olivers, and they do a pretty good job, but they really need to pay more attention to the construction process. These are not complicated units compared to the aforementioned class A behemoths. The systems are simple and straightforward, which is what drew me to them in the first place. Quality is in the details, most of which are not readily visible. All the bling is just a smokescreen. Whoever does QC over there needs to up their game and get the production crew on board. As I said, Oliver makes a fine trailer, and I'm proud to own one. But there is so much more potential that could be realized without too much extra effort or expense, that it frustrates me to see them struggle in this way. Dave
-
Thanks for the reply's. I would probably place the AL on a 2x8 for support and that little extra bit of lift if necessary. I looked at the Blaylock EZ-100 leveler but they offer no mating chock (wedge) to stabilize it. So I guess you would have to find or make one. I like that it is cast Aluminum though. Dave
-
Reviving this thread with a question about the Anderson Levelers that have been mentioned. I've never had trouble with racking in my little Elite but see that the AL could be handy and save battery power and wear and tear on the "stabilizer" jacks. So if you pull in, or back in to a spot with a slope front to back, as well as side to side, would you place the AL on the uphill or downhill side of the tire? I called Anderson about this and was told that it should be placed on the uphill side with the mating chock placed on the downhill side but I'm not sure if the person I spoke with fully understood the situation I was describing. I am also concerned about the stability of this setup as the raised wheel is not really chocked and could still potentially roll? Maybe the Stabilizing jacks when snugged down would secure everything. Still figuring out the details as I'm still pretty new to this game. Thanks for any insights. Dave
-
Rubber Gaskets Around Porch Lights
DavePhelps replied to Mike and Carol's topic in Mechanical & Technical Tips
Wow, quite a thread for gaskets! Sorry this has been an issue. I have the older style lights and have had no problems. Don't know if this has already been tried, but if I had this problem, I would first clean the gaskets with denatured alcohol and then coat them completely with whichever quality paste wax you use on your Ollie. Two coats minimum. If that didn't work, then I would consider the silicones. Hopefully Oliver will find a replacement as those currently used are pretty bad. Dave -
I have to ask - What happened to Buzzy?
DavePhelps replied to Overland's topic in General Discussion
Good luck to you Buzzy. I totally get your need to back off a bit. You put a huge amount of energy into the "Oliver Project" I hope to see you around here once in a while. Maybe we'll cross paths at some awesome campground down the road a piece. Be well! Dave -
Me too. We just have a few trips with it, but the system does give a lot of piece of mind on the road and works very well. We got the EEZ system: http://eezrvproduct.com/t/tire-pressure-and-temperature-monitoring-systems-tpms-3 We got the sealed sensors and not the flow through type, for the reasons JohnD mentioned. I would also recommend replacing the rubber valve stems with rigid metal ones. I popped off both tires and took them to our local tire place where they swapped the stems out and rebalanced the tires. Maybe Oliver uses metal valve stems now, but am not sure. A bit of an extra expense but glad we did it. Dave
-
I have never heard that the Oliver jacks should not be used for leveling. They are more than up for the task. I also try to limit the jack extension with lego style blocks which work well. If battery use is a worry, then you can always manually crank them down with the supplied hand crank. But with our Elite, power usage is minimal and has never put us at a disadvantage. YMMV. Dave
-
It seems that every time I give my Ollie a wash, I get water in the interior. Since I'm not inside to see at the time, it's hard to tell where it's coming in. All vents and windows are closed! So, are there certain areas I should be careful around? Like the A/C, or Refr. vents, or....? Maybe the BT/GT vent on top, or even the fan(s)? In the past, I have had water come through the LED lights in the bathroom, and around the speaker over the dinette just next to the bathroom wall. Today, after a mid winter wash, I had a puddle on the floor under the main table (trailer was pitched front up slightly) and water was dripping out of the rear passenger side seep under the trailer. There were no signs of any drips from above.... This only happens when I wash. It has never leaked in all the heavy rains we have had here. Kind of a mystery to me. I would appreciate any tips or advice. Here in the Northwest, if I don't wash fairly regularly, my trailer will turn green! Someday, I'll have covered storage, but for now it sits outside. Next time, I'll have my wife sit in there when I wash and maybe she'll see something. Dave
-
John, Question to you or anyone about the link you posted to Suspension Specialists, great info there btw. As far as maintenance goes, is it recommended that the U-bolts be re-torqued every so often? And if so, does anyone know what that torque number is? According to that link, the torque value is based not only on the diameter of the bolt, but its grade as well. So a 1/2-20 U-bolt could have anywhere from a 36 ft.-lbs to 129 ft-lbs depending on its grade. I have no idea what grade U-bolts are used on our rigs. All I know is that I have a 1/2" bolt with (I assume) a 20 thread. Would like to keep up with any maintenance on the suspension. Thanks. Dave
-
Overland, One option you may want to consider if you need more panels would be to have a set of auxiliary panels set on the ground and plugged in to your system with an Anderson plug. http://www.4wdadventurers.com/showthread.php?568-DIY-Guide-to-Anderson-Plugs I see a lot of remote panels like this and it gives you much more versatility of where you can camp and still get good solar charging. In many of the forested camps I am in, the trailer may be in shade but there is full sun just 20' (or less) away. Out come the remote panels. If your spot is in full sun and you don't need the extra juice, they can stay in your TV. Yes, I suppose they would be more vulnerable to theft in some remote camps, but I think this is the way I will go. Probably a couple of 100 watt book-matched panels and 20' or so of heavy gauge cable. So far, with just our 200 watt rooftop array, we have never had a lack of power. But our power needs are not too great. Just a thought.... Dave
-
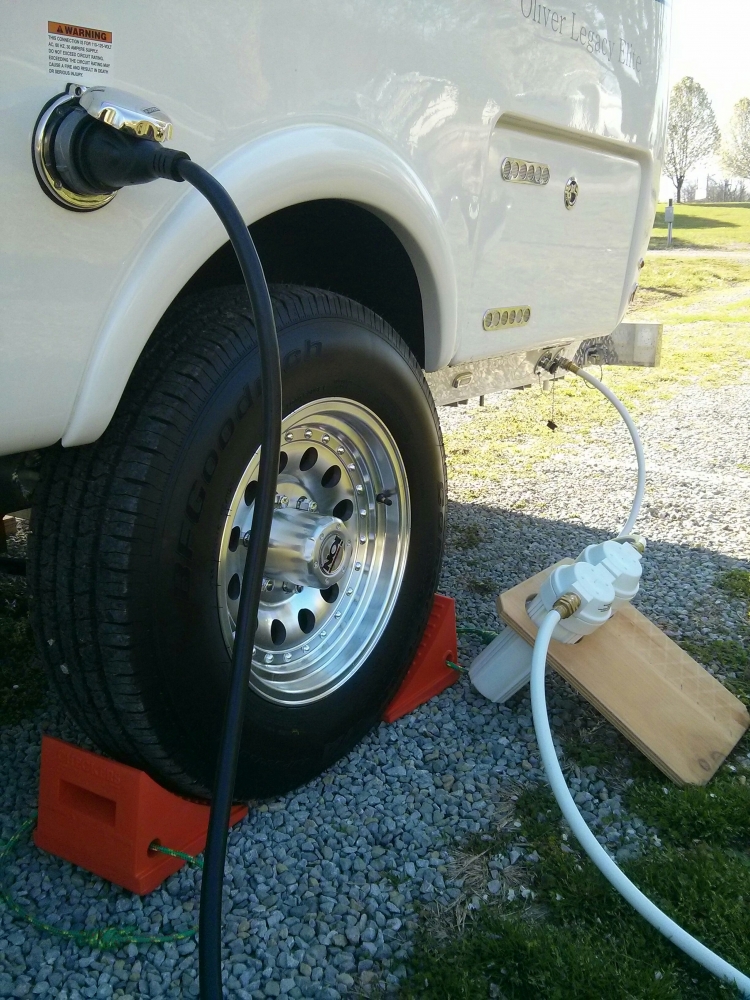
I decided to go with a two canister system and it has worked very well. I ordered it from: https://www.rvwaterfilterstore.com/index.htm This is a great website and business. You can learn a lot there, at least I did. They also sell the best hoses I've come across. Our first filter is for sediment, the second is a carbon filter that is rated to .5 microns. Plugged into the spigots at all our camp spots, the water flow has been more than adequate. Although not in the picture below, I have since added a wye to the outflow side of the system so that I can fill water jugs more easily. Currently, we don't drink from the onboard tanks but have separate water jugs for that. The tanks are probably fine and no doubt we'll do that some day, but old habits are hard to break I guess. Plugging the filters into the "City Water" and "Fresh Water" inlets has been very easy and works well. I have not yet tried siphoning through the filters using the on board water pump. I hope this will be doable. The stand is just a piece of plywood I drilled two holes in that the filter housings drop in to. Keeps connections off the ground and stores flat! A pretty simple setup and replacement filters are available everywhere. Dave
-
Buzzy, It seems like each trailer has its own set of issues. My upper doors have worked great and I'm wondering if you have an adjustment issue. Are your reveals equal between the door and frame? There is adjustment there and you can move the plexiglass door up or down by loosening the hinge screws. The latch strike itself which is attached to the upper cabinet opening is also moveable in or out. If your door is opening in transit, that would tell me that either the latch is not engaging the strike enough, or that the strike is too far from the door not allowing the latch to fully engage. I would try raising up the door. If there is still slop with the door moving in and out, I would then move the strike to get the best closure. There is the possibility that the hole in the door for the latch was mis-drilled, but I assume they use jigs over there that would make this occurrence a rarity. My smaller Elite has smaller doors, but the location of the latch should be the same. The distance from the top edge of the plexiglass to the top edge of my latch is 11/16" (on mirrored side). They are all exactly the same. I'd fuss with the adjustments before bailing on those latches. The compression latches used on the closet and pantry are much bulkier and heavier than the others and I think they would be a pain for those smaller doors. Get after those latches with a shorty screwdriver and see. I think you'll get them to work fine (I hope!) I had to reset all my kitchen cabinet drawers as they were all crooked....ughh. All the slides had to be moved. My shades also would come loose at the bottom and flop around in transit. All fixed now and still loving my Ollie! There's always a few gremlins to exorcise when you get something new! Oh yes, get some 220 wet/dry sand paper, dip it in water and ease those sharp edges!! I also eased all the sharp edges on my rear bumper and exposed frame parts outside (we're talking 1/16" radius here) That bumper was dangerous! :^) Good luck. Dave