SteveCr
Members-
Posts
114 -
Joined
-
Last visited
-
Days Won
1
SteveCr last won the day on May 6 2023
SteveCr had the most liked content!
Recent Profile Visitors
The recent visitors block is disabled and is not being shown to other users.
SteveCr's Achievements
-
How to stop AC from clicking (attempting to start?)
SteveCr replied to GlacierGirl's topic in Mechanical & Technical Tips
I had a similar clicking in the dometic control box. I eliminated it by changing the temperature differential setting on the dometic thermostat. There are instructions in the thermostat manual. I'll try to attach a picture. Steve -
Advance Auto Parts will deliver four for $115 (using online discount code). This is also the price I paid a few month ago.
-
I had the same issue on my 2021 LE2....with the trailer level the shower drains very slow and backs up. The work around is to use the front jack to raise the trailer one inch or more above level. You can experiment to find the workable amount for your trailer. When raised, my shower drains fast. So, I raise the trailer before using the shower and lower it back afterwards...wish it was not so...but part of the Oliver design experience ! Steve
-
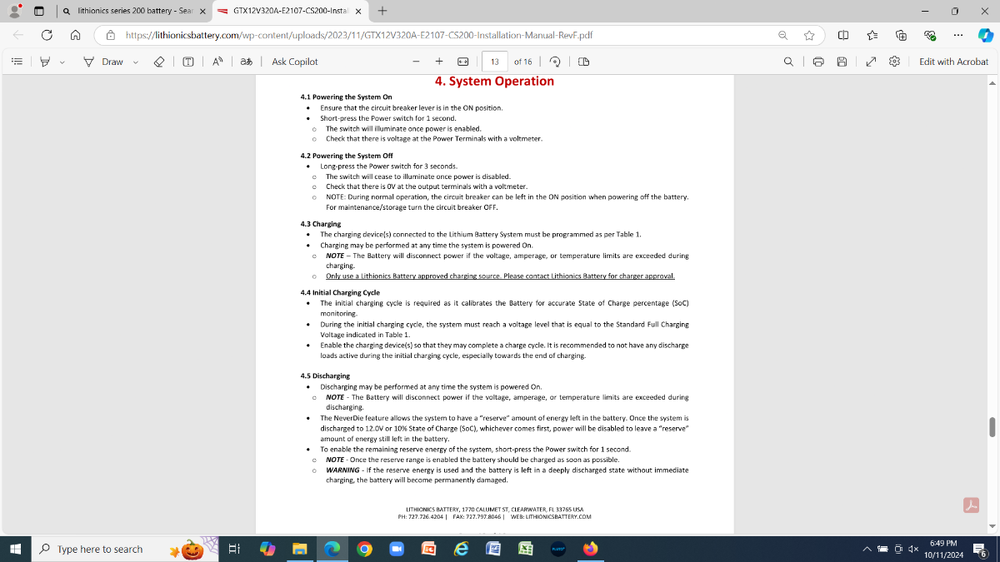
Operation page from Lithionics 200 series manual....briefly describes low power steps...circuit breaker reset...power button reset Steve
-
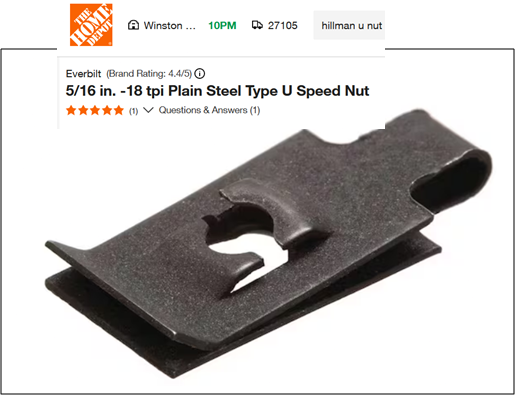
Using a u-nut can re-establish structural integrity. I found that repeated cover removal/installs by folks with power tools stripped the cover holes to the point the screws would fall out. The u-nut worked my my situation....they come in various sizes and materials. I no longer have a Dometic AC (Truma now) but if I did I would install u-nuts as a preventative measure. Steve
-
I had a similar issue with 1 of 3 lithionics batteries on my 2021 LE2. I went through the checklist...installing new app, etc...nothing worked until I simply turned off the battery (all three actually), waited a few minutes and turned them back on.....issue immediately solved with no reoccurrence. Steve
-
Xantrex Inverter Issues? Try a Hard Reboot
SteveCr replied to Rivernerd's topic in Mechanical & Technical Tips
Try adjusting a setting in the Xantrex app. Look under inverter settings and find "Low Battery Cut Off". I have mine set at 12.5 v. ....could go lower but never needed to do so. Just watch the SOC so batteries don't fully deplete. The LBCO delay timer is set for 10 s. There is no doubt that this LBCO setting will cut the inverter off. Steve -
Yeah if it is under warranty Oliver should resolve it. They are easy to work with whether you can take it to them or have them approve a mobile tech. Steve
-
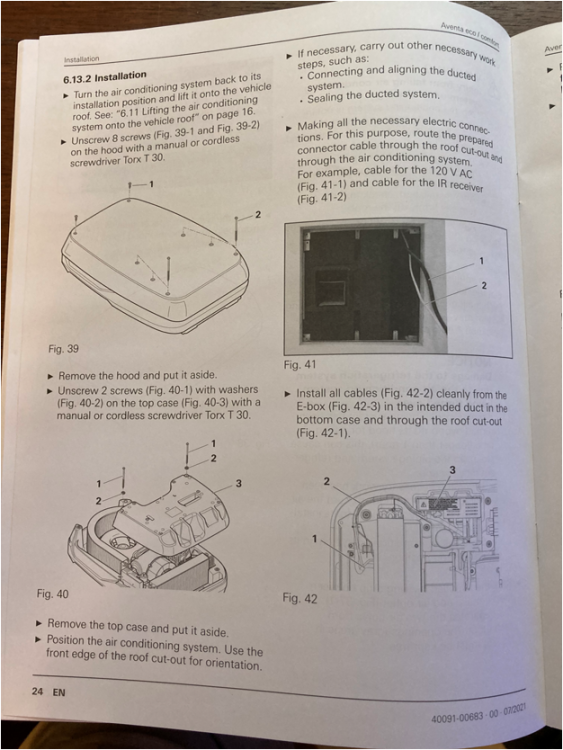
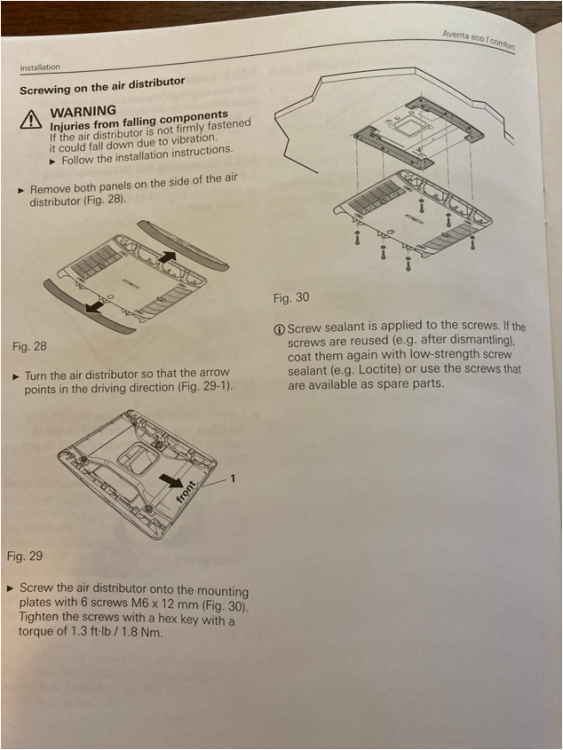
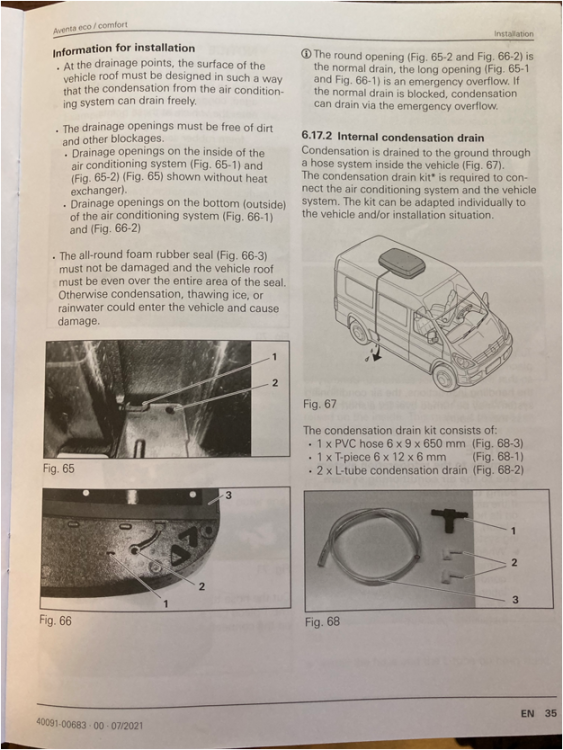
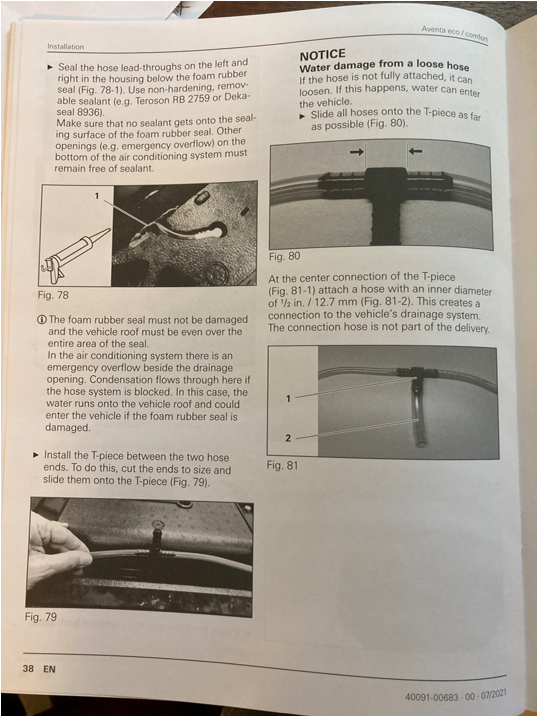
Here are pages from the Aventa installation manual. This should give you an idea of what to look for if you decide to remove the top external covers or inside air distributor. Steve
-
2021 LE2 You can remove the outer top plastic cover...about eight screws. Then remove two screws that hold down the top molded foam. Once that is removed (real tight fit) you can see the condensation drain tubes at the front of the unit. I could see condensation inside the tubes. There is a tube joint connection there also. I don't know if you can reach back into the unit to feel for the condensation collection cups. You might also take off the inside air distribution cover. From up roof top I can see the backside of that cover. When reattaching the covers the screw torque is 14in lbs. Truma tech cautioned me not to exceed and strip out the holes. Steve
-
2021 LE2 Below are pics of the thermostat in my Ollie. The second pic is with the face plate removed....it just pulls straight out. You will see that there are three male terminals (encircled with yellow pads)...these are operating like touch contacts rather than buttons. With the face plate attached you are pushing the face plate to make contact with the terminals. You can touch these terminals with your finger to verify they operate the thermostat. If so, it is working fine. The back of the face place has some material at the thee points that mates with those three male contacts. Check to insure they all appear clean and uniform...no grime build up on one that would interfere with or effect uniform applied force. When reattaching the face plate insure it is pushed flush to the thermostat body. When I reattached mine, at first it was not flush all the way around so that I had to push harder to reach the terminals. (You might want to verify "flushness" to start with....accidentally hitting the face plate could possibly cause a gap). Steve
-
Size of the bearing nut for Dexter Axle?
SteveCr replied to routlaw's topic in Mechanical & Technical Tips
Hello routlaw, 2021 LE 2 #806 definitely requires a 1 1/2" socket. Your vintage axle hub nut may be different...why you may see different answers. The good news is that to verify you just need to remove the wheel and pop off the hub dust cap....10 mins or less. -
Yes. Before installation I tried to run it on the Honda 2200i but it would not start up.....as expected. I installed the Easy Start (from the Dometic) on the Truma Aventa. I wired the ES, without any splices, into the Truma wires so that in the future I could remove the ES and easily restore the OEM wiring. You would not be able visually tell the ES had been installed. ((This was a little extra work .....when Oliver originally installed the ES into the Dometic they removed and spliced Dometic wiring. So, when I removed the ES, I had to rewire the Dometic with non-OEM wire. The Dometic works fine...just does not look OEM to the trained eye. I explained this to the person who bought the Dometic and they were fine.)) Once installed, I had to relearn the ES. On my ES model this required removal of the cover and physically moving a connection jumper, once to reset the ES and again to relearn the Truma. New ES models have a bluetooth relearn feature. This was an easy procedure. I previously installed a 30amp RV receptacle under my home's entrance panel. I used this power source to start up and relearn the ES/Truma. Once I was satisfied everything was nominal, I switched the power source to the Honda 2200i. The Truma started up and ran with no problem. A big decision was where to locate the ES. The Aventa structure is a two piece tightly fitting molded foam. There are a couple of options without modifying the structure. I chose a forward location near the thermistor. The wiring diagram was provided by Micro-Air. If you buy a new ES, they will warranty the compressor for two years. I chose not to go this route since I had the older ES on hand and would install it myself. Material used: -2.5 feet of 14 awg wire (two insulation colors...5 feet total) - two wago type connectors (ideal brand from Home Depot actually) - two 1/4" spade male connectors - one 1/4" female/double male spade "piggy back" connector - four tie wraps to strain relief the wires & cable - Three cups black coffee Steve
-
If it won't post directly, then a work around I use is to copy the image into Microsoft Power Point. I can crop or perform other edits easily in PP. Next, choose/copy the edited image in PP and paste into this forum. You don't have to save the PP file. Another product such as Word, Excel or equivalent might work also, but I can edit in PP easy (I have an old 2007 version). Renegade Steve


