routlaw
-
Posts
868 -
Joined
-
Last visited
-
Days Won
19
Everything posted by routlaw
-
The Apex X23: All hat and no cattle as the saying goes.
-
Agreed its the same old chick dressed up in a different skirt, nothing really of substance here that one couldn't implement themselves and many or most of us have already such as the Bulldog shocks, LT off road tires etc. It preposterous they are promoting this as an off grid off road travel trailer yet still using the basic old leaf spring dexter axles rather than an independent suspension. The least they could have done was adopt the Curt independent suspension as so many others have for a better off road experience. Then there is the same old (mostly) bulldog hitch rather than a full articulating hitch. The gravel road they test drove this thing on is joke. This might be off road for back east but it sure isn't out west. And what on earth is the point of going off grid just to set in your camper and run the air conditioner just because you can. People out in this neck of the woods who choose to go off grid and off road are certainly not setting around knitting, watching tv in an air-conditioned camper. What happens when that solar awning jams, or gets off center and will not retract properly. The 48 volt system seems a bit weird too. There are several dozen more ruggedly built campers than this for off road and over landing that do not use a 48 volt system and get by fine with a tried and true 12 volt system. What happens is you have issues with that system in the middle of nowhere? The interior is certainly nice and at least theoretically love the new windows and shades but thats about it. All the black isn't appealing to me, might be to others. Not sure who is in charge of marketing at Oliver but man oh man this is making much ado about nothing. By no stretch of the imagination is this an off grid/off road camper any more than my old 2015 model is with some modifications. They really need to rethink this before releasing it to the public in its current configuration. Not impressed.
-
 I did look at those Brooklyn Bedding mattresses but ended up for now doing the ones at Costco. Like I told my wife if they don't work out after a trip or they will be easy to sale on craigslist. Agreed on the existing cushions. The foam in those are pretty bad. We need to at least replace that if nothing else. Your new cushions look great.
 -
Exactly. The newer models, certainly not ours, have many of those electric controls out of the basement. Some Oliver owners have also installed remote valves for the water/plumbing side. Good idea I just hate fiddling with plumbing. It really is a far easier to deal with sheet changing with two twin mattresses and piece of cake to lift them for access below. We should've done this years ago. No regrets so far.
-
For years we used a Temperpedic 3 inch memory foam topper. It works, was heavy and also a pain to deal with while trying access the basement. So earlier in the year while doing some repairs and other mods we decided to eliminate the cushions altogether and replace with two twin mattress we bought at Costco. Since neither of us are tall sleeping in line with the trailer works just fine for us and we have never used the main dinette anyway. The smaller dinette at the kitchen works great for the two of us. This method is far easier to access the basement too with only one thing per side to lift. So far so good. I would recommend this method as a possibility.
-
Just local RV dealers service department rate charge. Has nothing to do with Oliver. No idea what Bretz in Missoula (official Oliver Service) charges but would guess it not too far off.
-
RVLock company stands behind its product
routlaw replied to Snackchaser's topic in Mechanical & Technical Tips
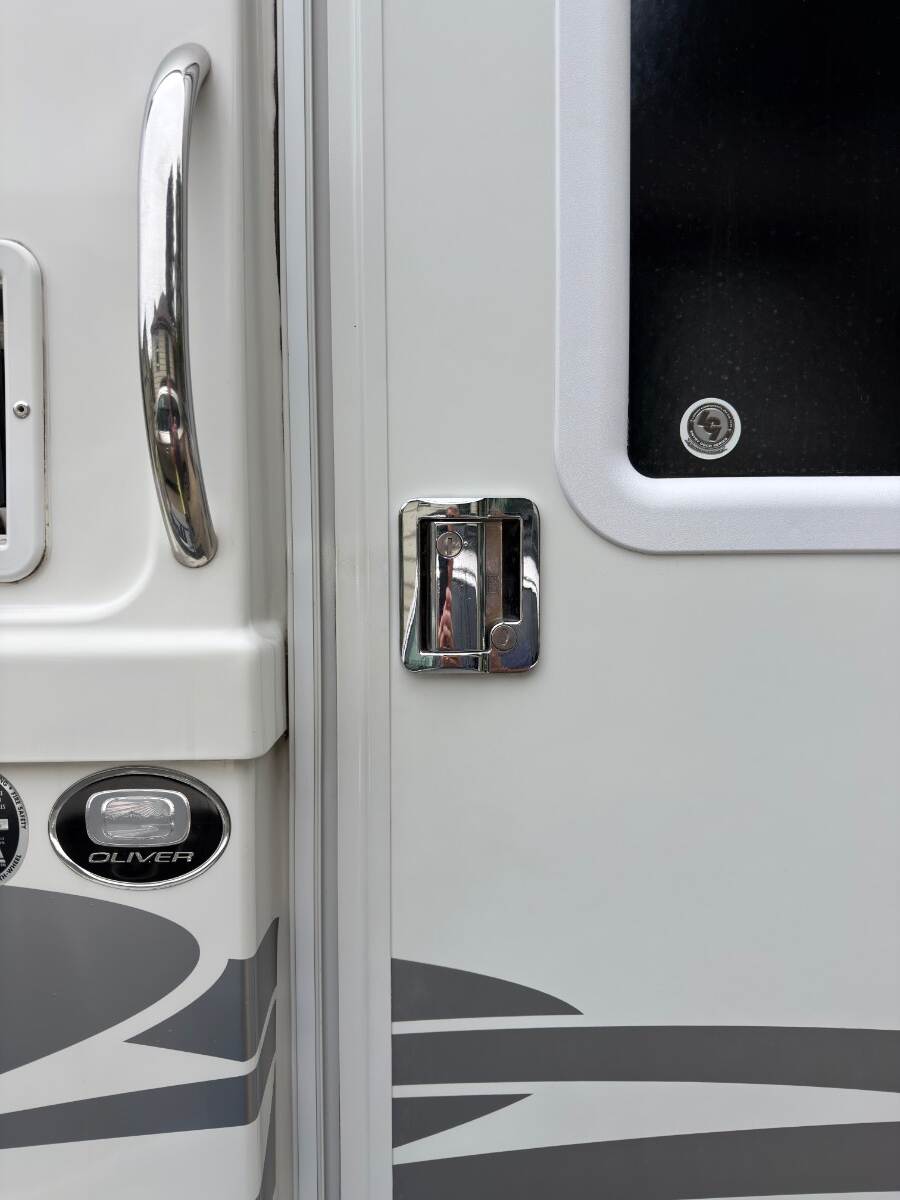
The differences from one year to the next with the Oliver travel trailers is amazing. Looking at @jd1923 door and lock compared to ours and where they decided to install the lock. Doubt I could even fit one of the RV Locks into that tight of a space. Looks like we will be content with the one we have which is fine.
-
If they can afford it. This new larger Casita is almost exactly what we paid for our Oliver at the time in 2015. In today's dollars it wouldn't be worth (to me) spending $100K ± for any sort of camper or RV including the Oliver. Like so many here we also looked at the Airstreams back in the day, lovely interiors but thats about it and way too many issues with them. Oddly I have never understood why the Oliver and Airstream are compared to one another so often other than their somewhat similar exterior shape. Aside from that they have very little in common. The Oliver being more utilitarian and Airstream more of a luxury accommodation. We also looked at quite a few Casitas in those days, cheaper for sure but just couldn't quite gravitate to love them. Also looked at a number of Escapes which were sort of ok with only one floorpan that made much sense that being their 5th Wheel. Interiors looked a bit dated and same for the Bigfoots at the time. I still have a lot of respect for the Bigfoots but they don't look as sleek as an Oliver by any means. All that said regardless of cost I wouldn't be interested in a larger Oliver. Might be nice once you arrive but lugging the thing around would not be appealing let alone getting into some of the smaller tight spaces one can do with the current Oliver. Heck I have a hard enough time getting ours into the driveway as it is.
-
I hear you on that @taylor.coyote we used to do the same backpack, then car camp in tents and so forth and so on. Those days are over for the both of us, but still love the outdoor adventures. Yes this area has become hideously expensive, land of the "starter castles" and everything else that comes with it. Still a wonderful place to live, great trails almost right out our door. Just did a 13 mile MTB ride this morning without having to load bike into truck. Class A, no way, even if I could afford one.
-
@HDRider I think you are overlooking the extra weight for a double skinned fiberglass trailer which neither the Casita or Airstream have. The Oliver as it is now is a very heavy trailer for its size, this is just a fact. Fiberglass is not a lightweight material. Add another 6 feet or 20-25% and the weight goes up substantially. The frame would also have to be built heavier to support the weight, not to mention axels and the list goes on. Most people buying a new Oliver LE2 are most likely spending around $100K, can't imagine what a much larger unit would cost in todays dollars… $145K ±. Simply not worth it, there will be some very strong competition in that price range.
-
Yep, saw that a few months ago. I imagine they will be popular. An Oliver that large would be so heavy as to not be worth it in my opinion. Even those with 3/4 ton trucks will have to use a WDH which partially defeats the purpose of using the larger trucks to begin with. And then there is the cost.
-
While I have learned to do all of the maintenance thus far that has been needed on our Oliver I would agree a western service center if they had one would best be located in SLC. I've driven and towed through there so many times I don't even think about it anymore, the CO front range is another story altogether. Avoid that like the plague unless forced into it. I doubt there are enough Oliver's out west to justify the cost of establishing an Oliver service center though. Locally in Bozeman RV shops charge $300 per hour and it takes 2-3 months to get an appointment, worse than our medical systems. The concept of towing nearly 2000 miles to have Oliver work on it doesn't make any sense either. Bretz RV in Missoula is our closest Oliver sanctioned previous dealer/service center but then it's still the same price as Bozeman and a 6 hour round trip. The point being it's better to do repairs yourself like it or not. There are days I consider going back to tent camping. 😵💫
-
Yep, they did this change a while ago. Only factory direct again.
-
Actually there is a way to easily remove and re-install those black tracks. Read my post above that describes I think well enough how to do this. Is it a PITA that any of us shouldn't have to do, yes, but once you do this a time or two it becomes fairly easy. Good that you figured out your leak. Your windows seem to be different than ours given your description of that stop bumper screw. Our windows have yet another type of rubber seal installed on the track that acts as a bumper when sliding the window open. I've said it before but it's worth repeating, imagine buying a new truck or auto and having to put up with this terrible flawed design of a window. And yet these are installed by the hundreds of thousands on US made RV's of all brands. All that out of the way the paracord is on an order of magnitude better at wicking water out of those weep holes compared to anything else I have tried other than the wet vacuum.
-
Bought skein of paracord today and confirm @DavePhelps suggestion this stuff works, way better than the pipe cleaners. Immediately it was obvious the cord was wicking water out of the weep holes. Very Effective solution. Thanks
-
@Katy McAnarney welcome to the dysfunctional Oliver window club but sorry you are having this issue like so many of us. This is how I have re-installed the sliding window with either new or cleaned and refurbished gutter track. First put the siding window into its channel without the rubber track. Coat the rubber track with silicone and wipe off excess. Position the sliding window approximately half open/closed and gently start feeding the rubber track into the bottom of the channel and below the sliding window first. You will only get so far, then start to close the window part way, hold the rubber track against the sliding window then start to push open again as far as it will go. Repeat this back and forth process for a few efforts until the rubber track appears on the far side of the sliding window at which point you should be able to grab the rubber track and pull the it through as far as it needs to go. Open the window all the way and feed the rubber track into the remaining channel along the bottom then up the vertical side and into the top leaving several inches of dangling rubber track. At this point you will need to slide the window forward into a partially closed portion so that you can repeat what was done on the bottom channel. This will also take a few passes to complete. It will be virtually impossible to do this without the use of silicone. The rubber alone just has too much friction. Once you get the hang of it the process will go much easier in the future. I don't think it is possible to do this with the rubber track already installed. The silicone allows for very easy back and forth maneuvering of the rubber track and window. It's far easier to start on the bottom rail first before the top. Hope this helps
-
Anybody having to deal with Social Security?
routlaw replied to Galileo's topic in General Discussion
Wow! And I thought being self employed had its issues. Can't imagine how you would deal with that scenario. -
Anybody having to deal with Social Security?
routlaw replied to Galileo's topic in General Discussion
I agree working with the local office has been far better for us dealing with my wife's alzheimer's sister. It was very easy to get a call through, leave a message and they return the call. Apparently, or at least in this neck of the woods SSA office no longer takes in person visits any longer and haven't for quite a few years. It's also true their workforce has been substantially reduced. I would also recommend going back to the source of your wife's work place which is where this problems originates not the SSA per se. It's ludicrous they do not have a record of her working there for 20 years. Get a lawyer then I'll bet they will come up with her work records in short order. Sorry you're having to go through this, what PITA. -
Dave I remember seeing that photo in the past. For me the pipe cleaners do next to nothing unless I go out and manually pump them back and forth which will remove quite a bit of water from the weep holes. On one window I have enlarged the weep holes, curb side rear, and that window seems to consistently have much less water in the channels and doesn't tend to leak either. I have never heard of paracord though, what the heck is that? Will have to look into this. Thanks
-
We've had rain off and on since last night and a sizable downpour mid morning, so with new weather stripping gaskets installed on the windows thought it would be a good time to see how well they have performed. Initially no leaks a good thing given the amount of rain. Brought out my portable wet/dry vac and vacuumed all the weep holes and ended up with around 6 oz of water collected from the windows. IOW's the new gaskets did little to nothing to stop infiltration. Photo posted below to illustrate the amount of water collected. Water was poured into a measuring cup to verify amount. Until this point there were no leaks inside the trailer, but it kept raining. This afternoon I checked again and sure enough a small leak had started to occur on the street side rear window. Not enough to be a major issue yet but the fitted sheet had a wet spot about 3-4 inches in diameter. Weep holes were not emitting or leaking water which was no surprise. The tracks have been cleaned twice in the last month alone. The upside down weep holes at the top of the frames have been plugged all to no avail. The new installed gutters do avert water running down the side of the trailer but offer no benefit from rain hitting the windows directly. I can't imagine living down south where torrential downpours are normal and putting up with this. I'm at a loss for how to deal with this going forward. Thanks
-
RVLock company stands behind its product
routlaw replied to Snackchaser's topic in Mechanical & Technical Tips
I had thought about buying one of these as well, now I'm not so sure. Seems like another unreliable RV headache in its current iteration. -
We have spent a good deal of time on the opposite side at Green River Lake area which is amazing to say the least. Rough ride to get the Oliver in but we have done it twice now. Lander has been on our short list too but have only driven by that part and its been quite a few years now. The Winds are fantastic.
-
Welcome @carpenter! While I do like to mountain bike and road bike as well, hike etc and live reasonably close to you in MT. We are up here in Bozeman so feel free to stop in for a visit, just understand I doubt I could keep up with you mountain bike at my ripe old age. Just did a 14 mile ride yesterday and my 4 month old new replacement knee is feeling it today. LOL. Good luck with your adventures.
-
2022 Lexus GX 460 pulling an Oliver Elite 2?
routlaw replied to Douglas-Stickler's topic in General Discussion
I wouldn't do it as others have stated. You will wear out that Lexus out in no time not to mention the safety factor or lack of it. You also might be surprised at just how luxurious and nice to drive new trucks are these days. -
The Ugly Duckling – the Restoration of our 2016 Oliver Hull #113
routlaw replied to jd1923's topic in Ollie Modifications
Nice job! Great work!