

John E Davies
-
Posts
5,759 -
Joined
-
Last visited
-
Days Won
243
Everything posted by John E Davies
-
How much do they weigh? They look a little large to me. These are the ones I use, they are quite compact and they don't need solid valve stems. In fact, I like the way they flex, it makes it easier to wake them up in the morning before departure, with a finger flick. They are only 0.5 ounces. If you add too much weight the tire will be a little out of balance. Yours ARE balanced, correct? 😉 John Davies Spokane WA

-
 Here is a pic from that other thread showing how the screws can pull out of the front part of the drawer. John Davies Spokane WA
-
Here is a new “roving” test from Outside magazine. https://www.outsideonline.com/outdoor-gear/camping/starlink-high-speed-internet-camping-test/ It sure sounds interesting but the subscription price would be hard for me to swallow. Will they offer a month by month subscription? My inReach one can be cancelled any time and started right back up again later, no worries. I still have issues with all those tens of thousands of darned satellites clogging up the sky. I think that is going to turn out badly. John Davies Spokane WA
-
It is not cavitation, the system is full of water and all the air is bled out. John Davies Spokane WA
-
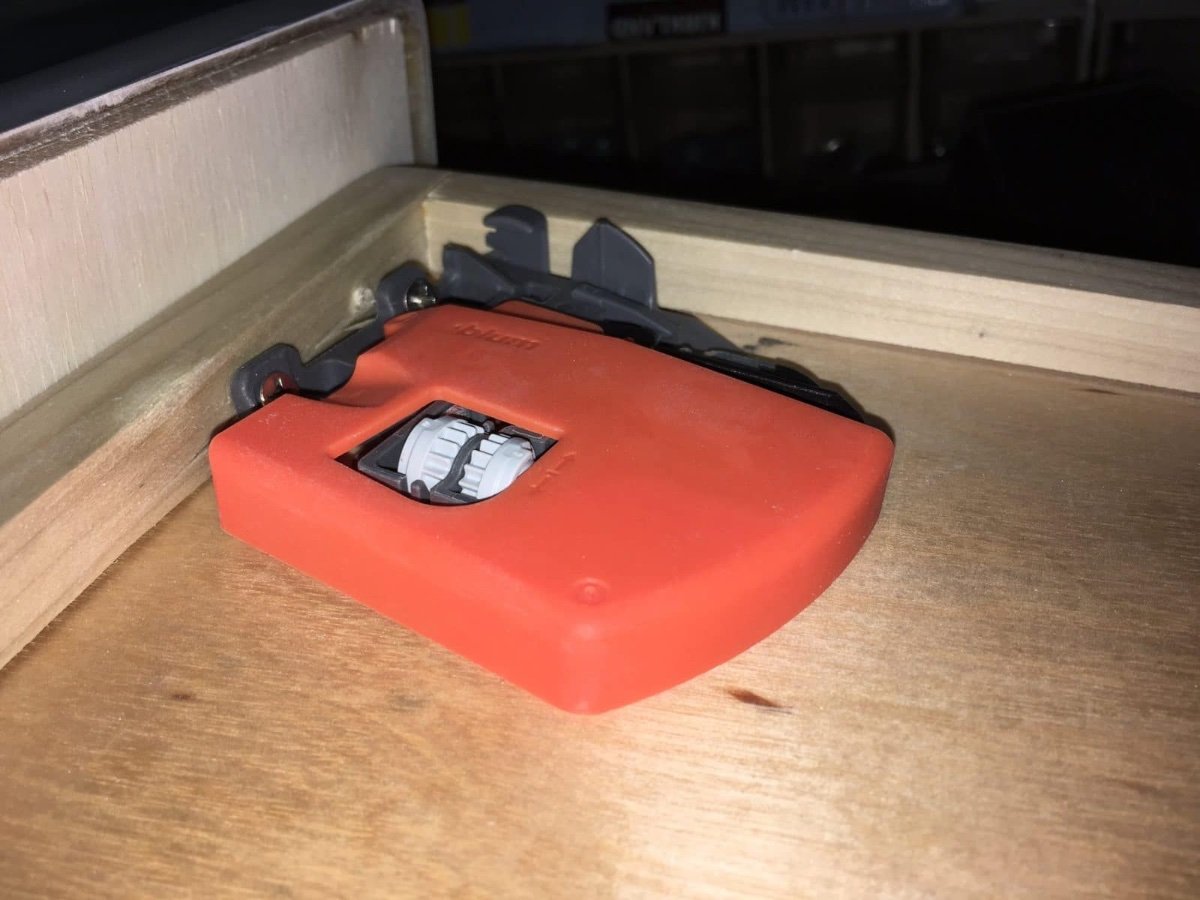
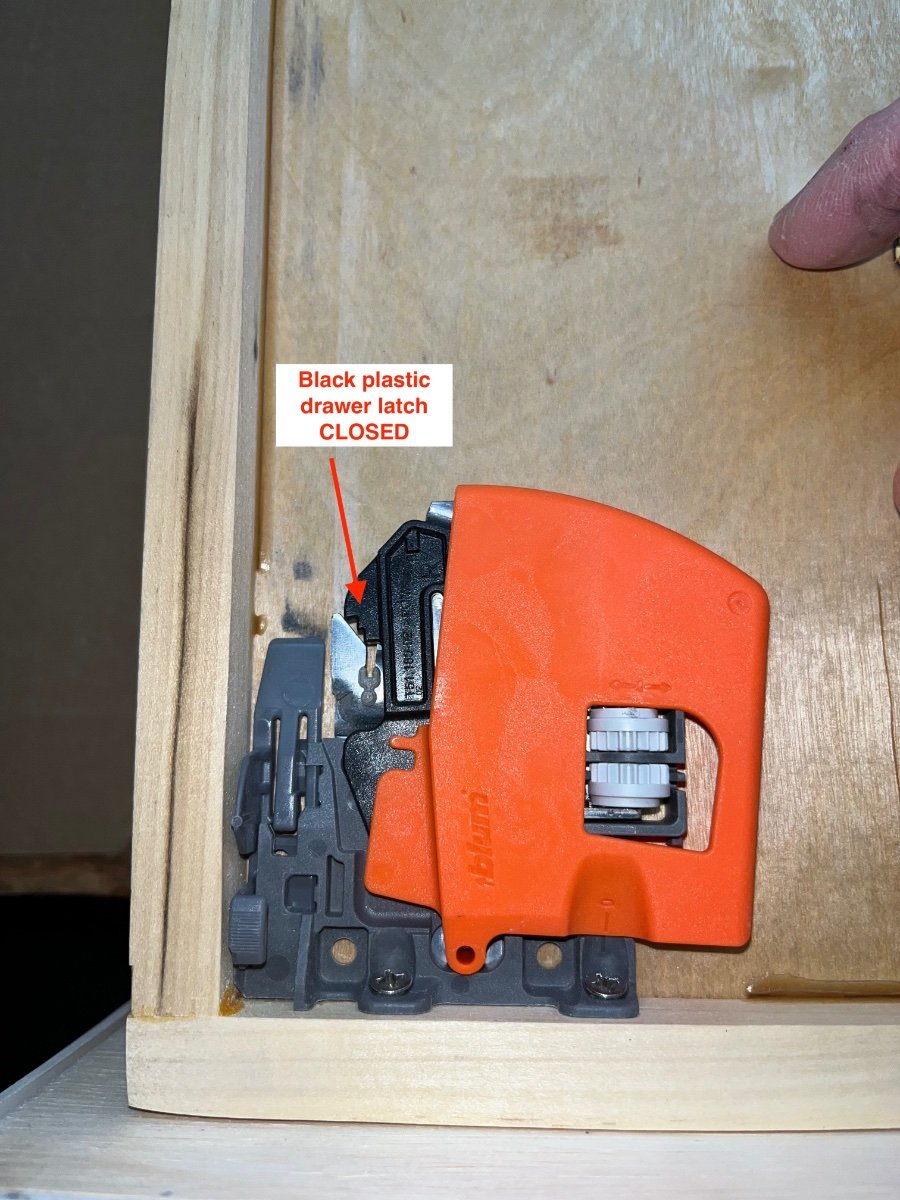
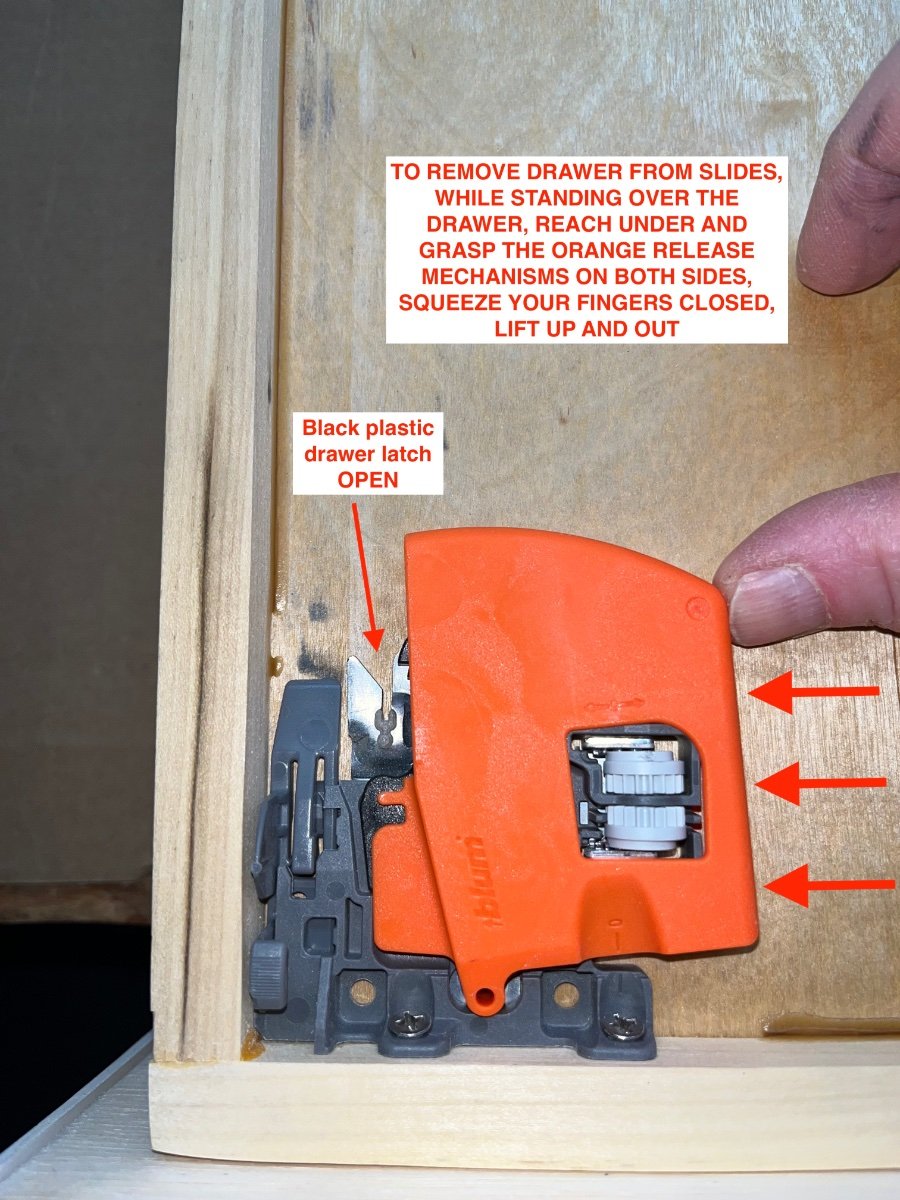
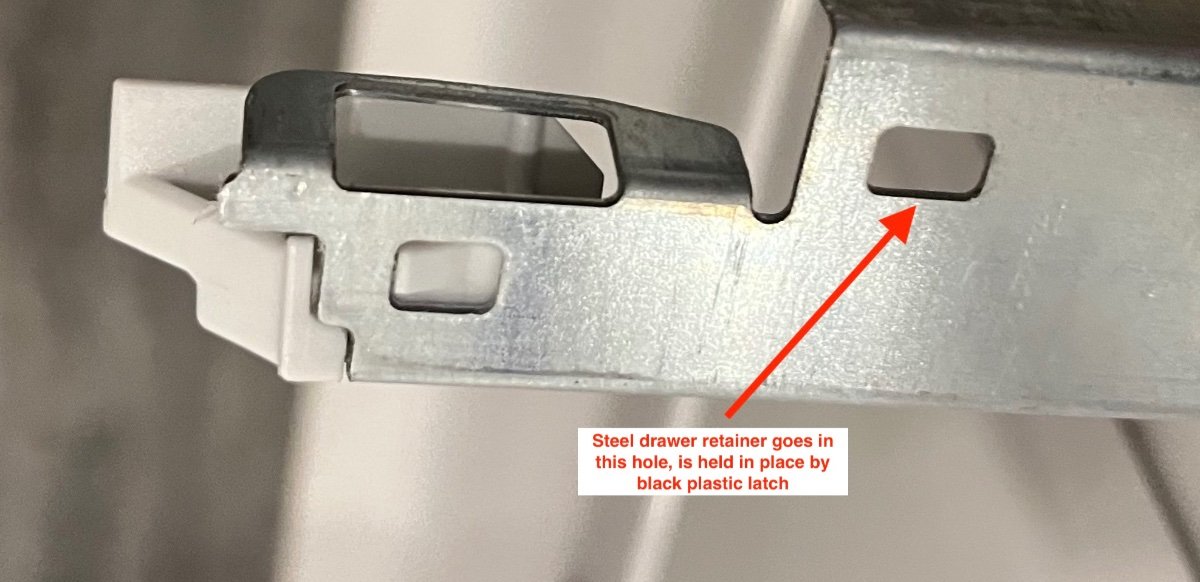
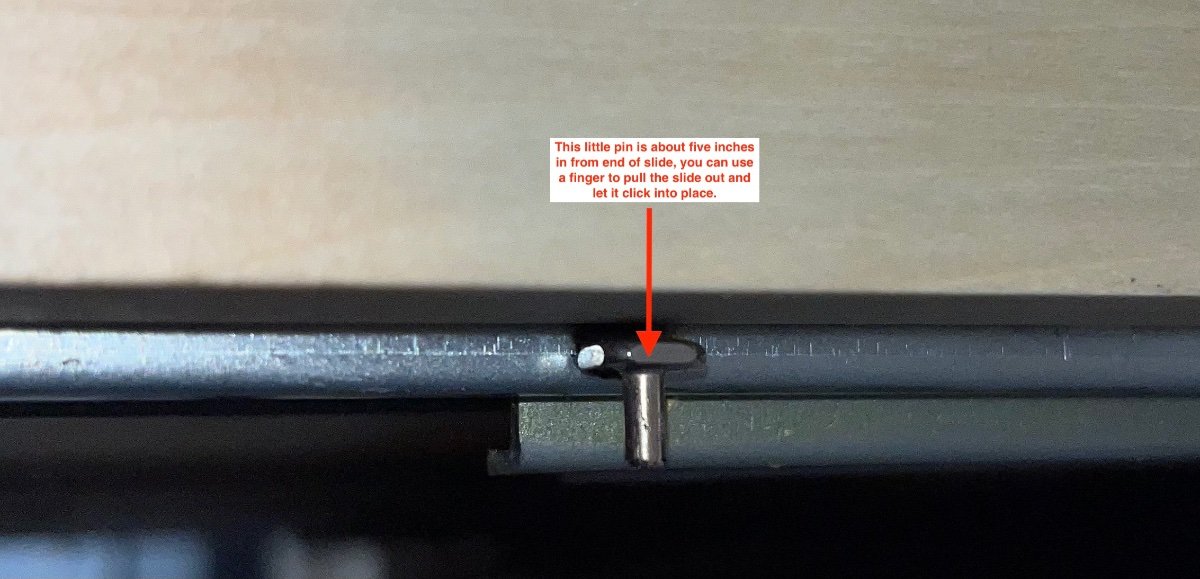
These drawers are not at all intuitive when it comes to taking them out of the galley cabinet. It is dead easy if you pretend that you are a simpleton and don't over think things... . Stand over the end of the open drawer, reach under the sides at the very front with both hands. Put your fingers underneath on the inner edge of the orange release thingies and squeeze, move your fingers toward your palms. The latches will release and you can lift the drawer up and out, away from the slides, which will probably spring back out of sight. That is the "self closing" feature at work. Here is what is going on: The drawer is held to the latch assembly by two TINY SHORT screws. They are known to strip out the soft wood. Sometimes you will find the drawer lying up by the bathroom door with spatulas and other stuff scattered everywhere. Tighten them gently, they will move! If they are stripped, install longer ones. FYI this is a six year old drawer, Oliver may have altered these parts. For example, mine don't have the inner safety latches. Note that you might want to wear disposable gloves. EDIT: one member installed 1” long screws, driven into new holes at an angle, and found that to be a very solid way to do this. Here is the end of the slide, showing the opening that catches the latch. THIS IS SO VERY COOL! I just discovered it after all these years.... On the bottom of each slide, about 5 inches in from the end, is a tiny pin that sticks down. When reinstalling the drawer, you can use it to pull the slide outwards until it clicks into the latch. It keeps your fingers away from the grease too. Finally, you can flip each drawer and lay a thin bead of wood glue around the joint between the bottom and the sides and let it sit overnight. It will dry almost clear, so don't worry about minor mistakes. Plus nobody but you will ever know. I do not recommend gluing the inside of the drawers, that will show and it also has some sort of protective clear coat, so the glue might not stick. This thread is very much related: ... https://olivertraveltrailers.com/forums/topic/2151-how-to-galley-drawer-travel-straps/ John Davies Spokane WA
- 37 replies
-
- 11
-

-

-
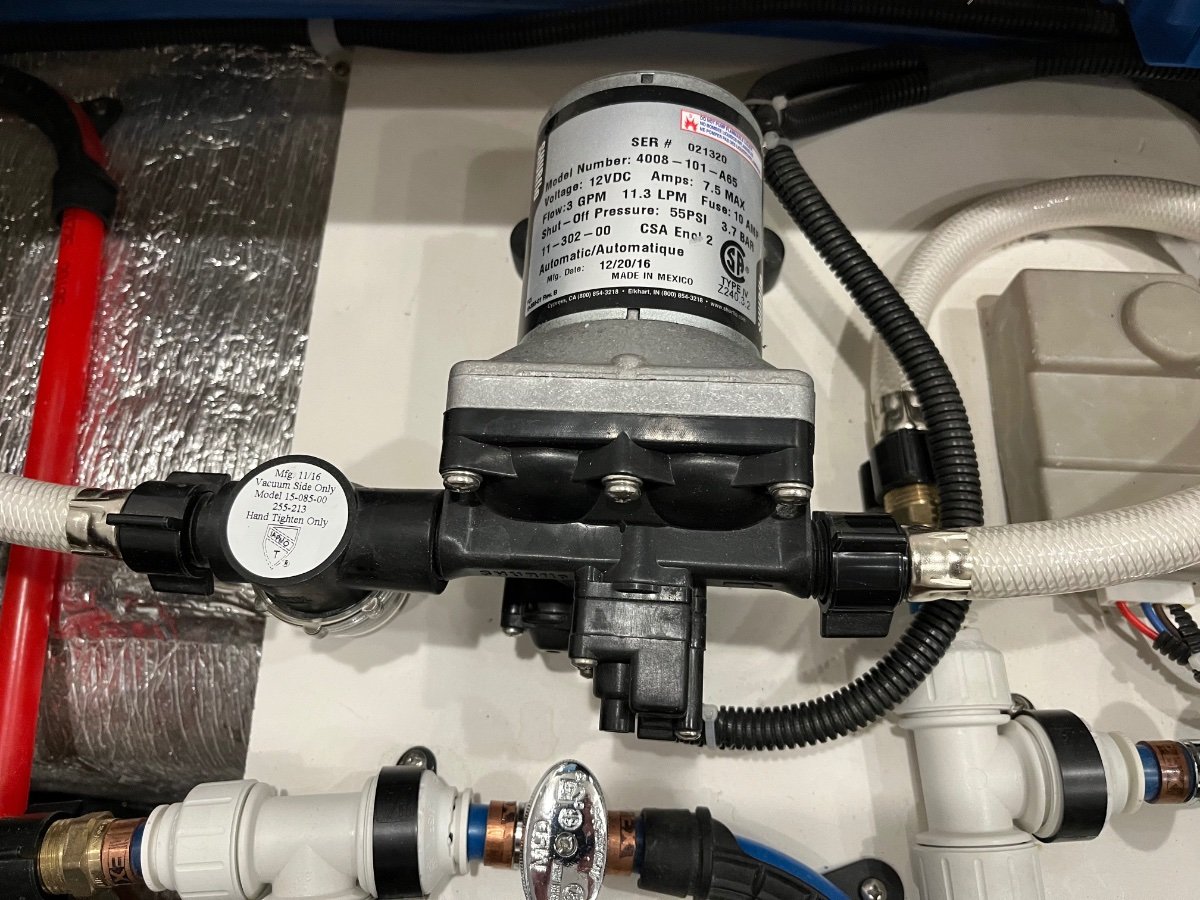
This pump has worked flawlessly for five seasons, it was good just a month ago when I serviced the water system. Now suddenly it won't make any pressure, it just sort of stutters and lurches.Could this be a pressure sensor failure? Video - SHURflo 4008-101-A65 water pump hiccups I am ready to order a new one - $59 Prime, I guess I got my use out of it. Thanks for any comments. https://www.amazon.com/SHURflo-Revolution-Water-Pump-4008-101-A65/dp/B010TKMK4O This is a really weird week for me, I am losing water pumps. The hot water recirculation pump in my house started chirping like a lost baby bird two days ago, and I ordered a new pump for that system..... John Davies Spokane WA
-
HOW TO: Propane/ CO Detector On/ Off power switch
John E Davies replied to John E Davies's topic in Ollie Modifications
???? The second one, in the back, is a combo CO/ smoke detector. I am not sure how you interpreted it differently. At least with propane, the nose works really well to detect even small leaks. John Davies Spokane WA -
Would you mind sharing the cost for the new Truma and the replacement labor? Thanks. John Davies Spokane WA
-
HOW TO: Propane/ CO Detector On/ Off power switch
John E Davies replied to John E Davies's topic in Ollie Modifications
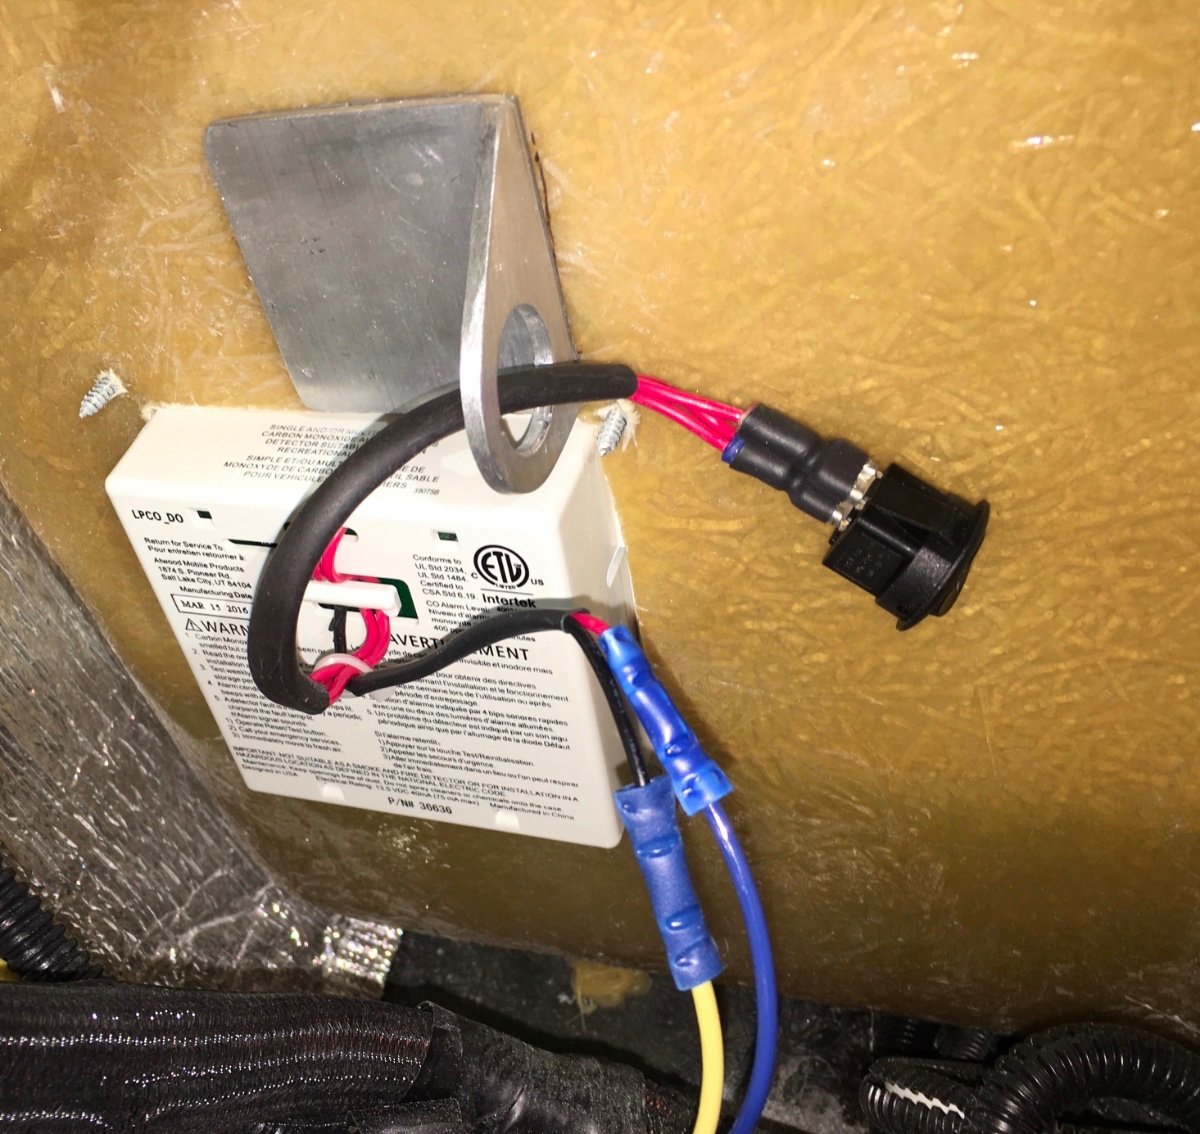
You have a SECOND CO detector, in back with the smoke alarm. Removing one isn't going to kill anybody, as long as the other one works. A malfunctioning alarm that keeps blasting for no reason is 100% useless, and must be silenced IMHO, until it can be replaced. Which should be done ASAP, not at the end of a long trip. The two red wires coming off the detector get spliced together, I don't recall wyhy the second one is there, I think it is for an alternative power source. Just connect them onto one terminal of the switch and run a new wire back from the other terminal to connect to the Oliver power wire. I used a SPST switch (Single Pole Single Throw) switch, it doesn't matter which terminals you use. If you use an illuminated switch with an LED, then polarity does matter, and you also have to run a separate ground wire for the LED. What is really confusing is how Oliver uses non standard colors for their DC wires ! I don't understand how they expect an owner or technician to do anything since they no longer publish diagrams. John Davies Spokane WA
-
Replace Flooded batteries with AGM
John E Davies replied to Kingofpauls's topic in Mechanical & Technical Tips
Kingofpauls' Ollie doesn't have that lithium jumper/ switch, it is too early, as is mine (218). OTH it is a fairy easy upgrade for around $140 in parts. John Davies Spokane WA -
Water pump won’t pressurize lines
John E Davies replied to VBistro's topic in Mechanical & Technical Tips
The filter bowl is only a few inches from the pump inlet port, it should be enough, if there is any suction being created. You can remove the inlet hose and put your finger over that open end, you should feel strong suction with the pump running. It is most likely that a defective part will fail when it is brand new, we call that teething pains. My water heater board blew a resistor in the first week. I replaced it with a used board of unknown age and it has been fine ever since. You should be able to get a pump at any RV store, swap it out yourself, and repair the original to keep for for a spare, unless you want to go through the huge time wasting hassle of trying for a warranty repair. https://olivertraveltrailers.com/forums/topic/2036-suburban-hot-water-heater-failed-a-dealer-repair-story-and-lesson/ John Davies Spokane WA -
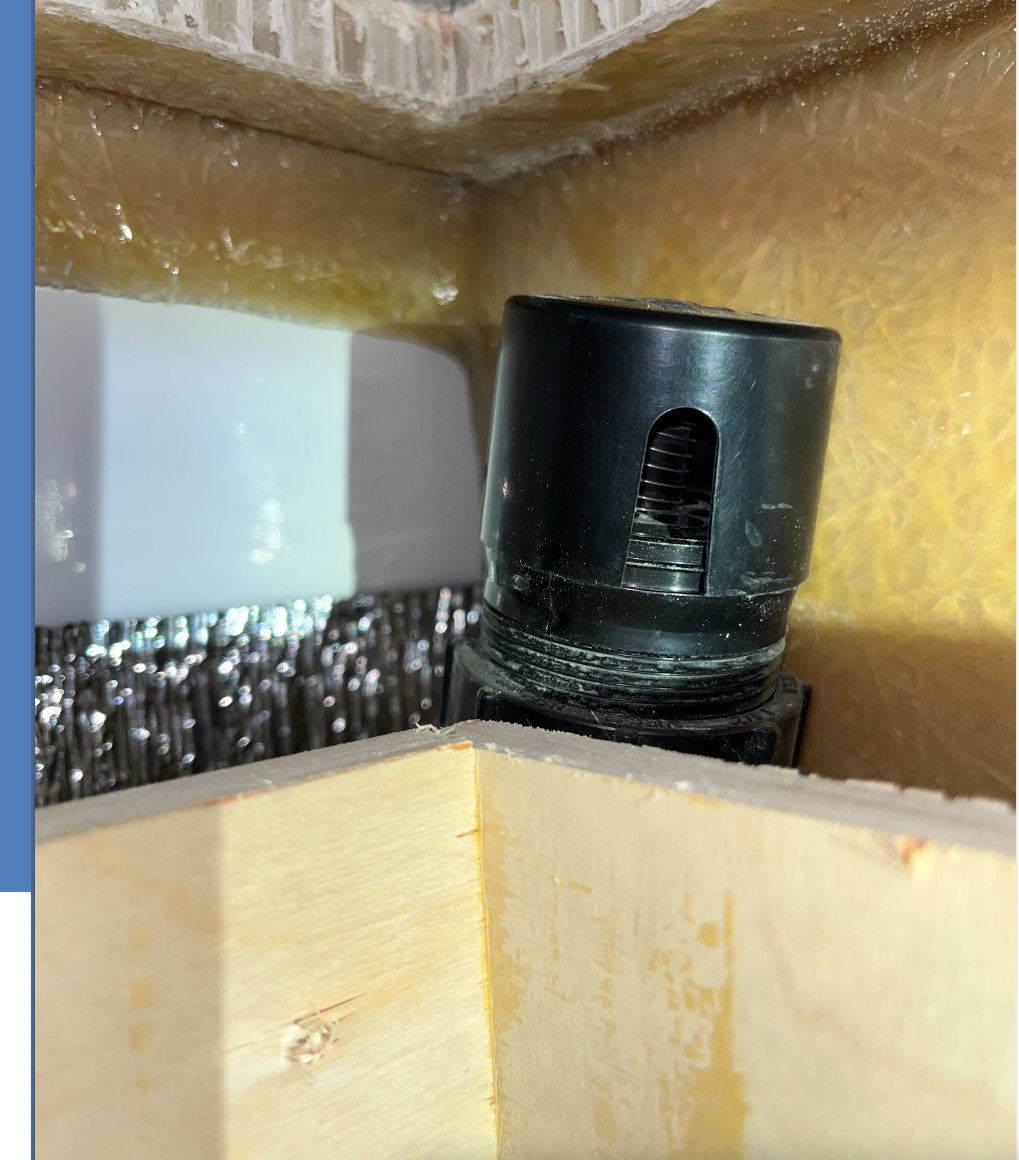
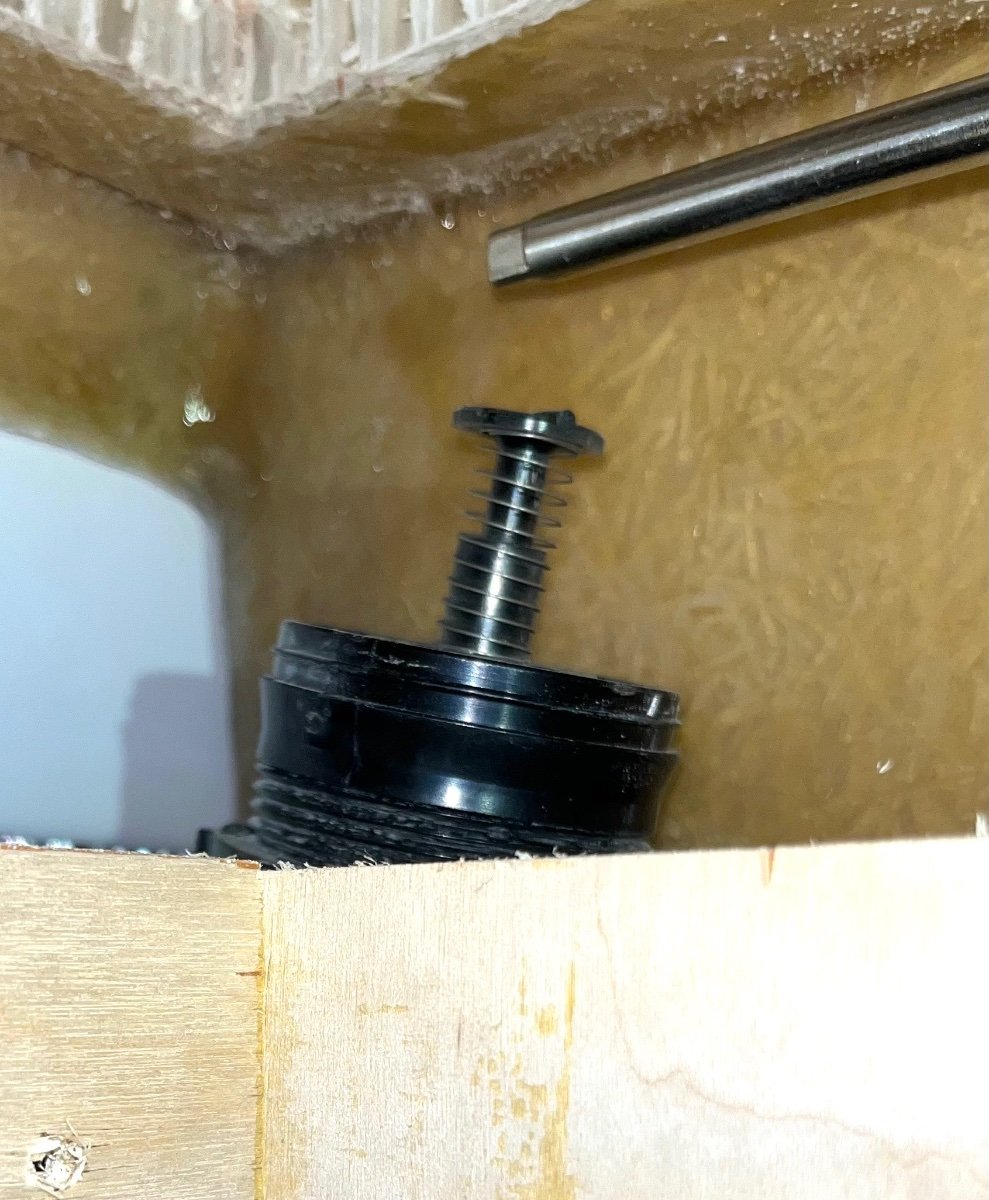
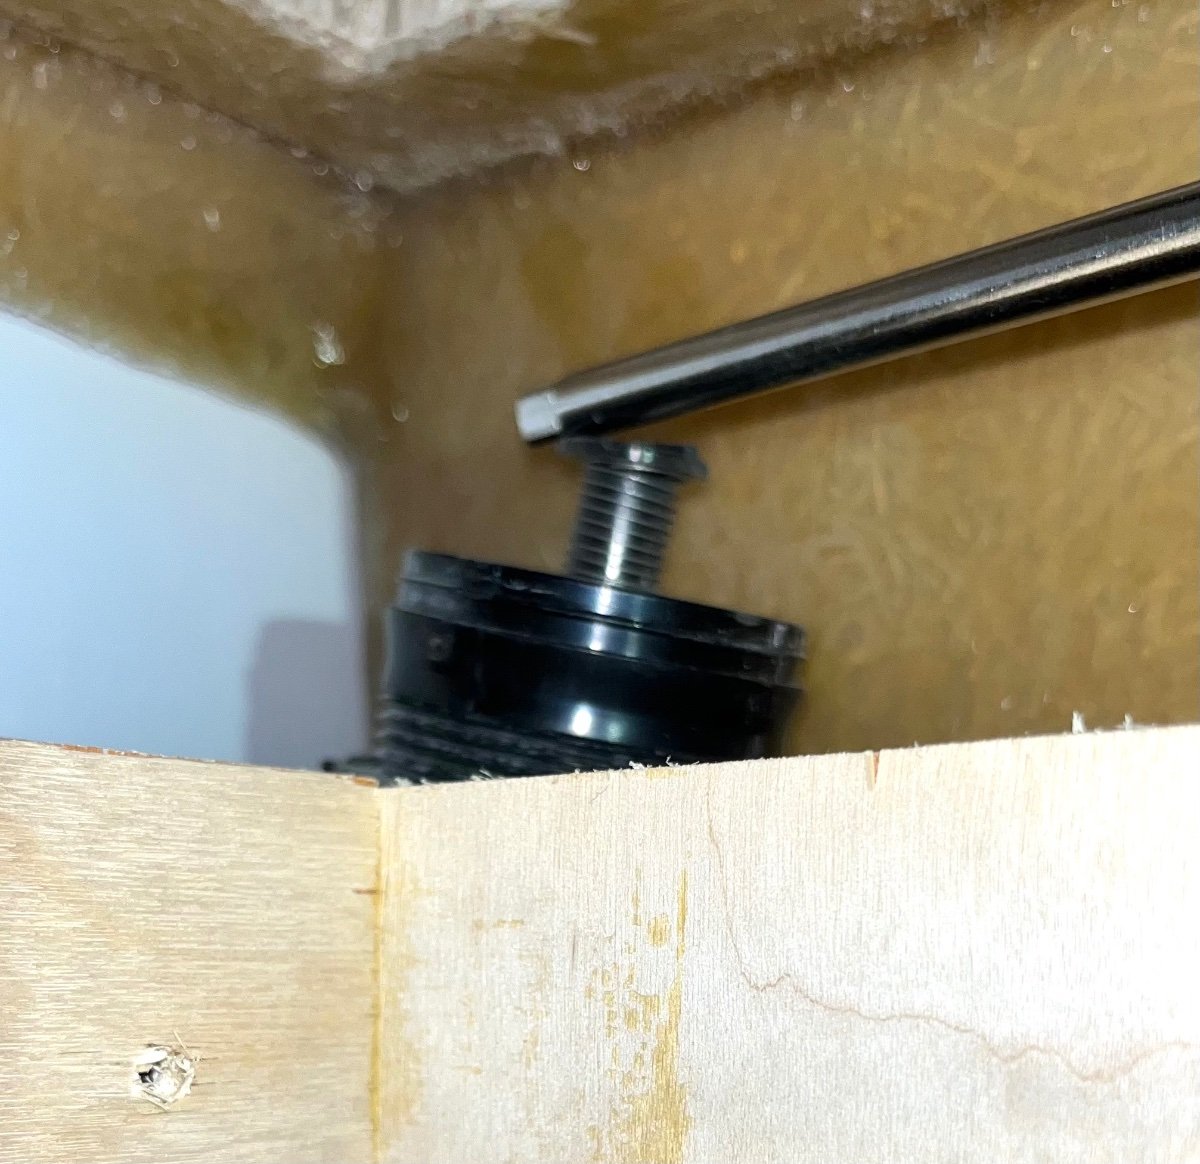
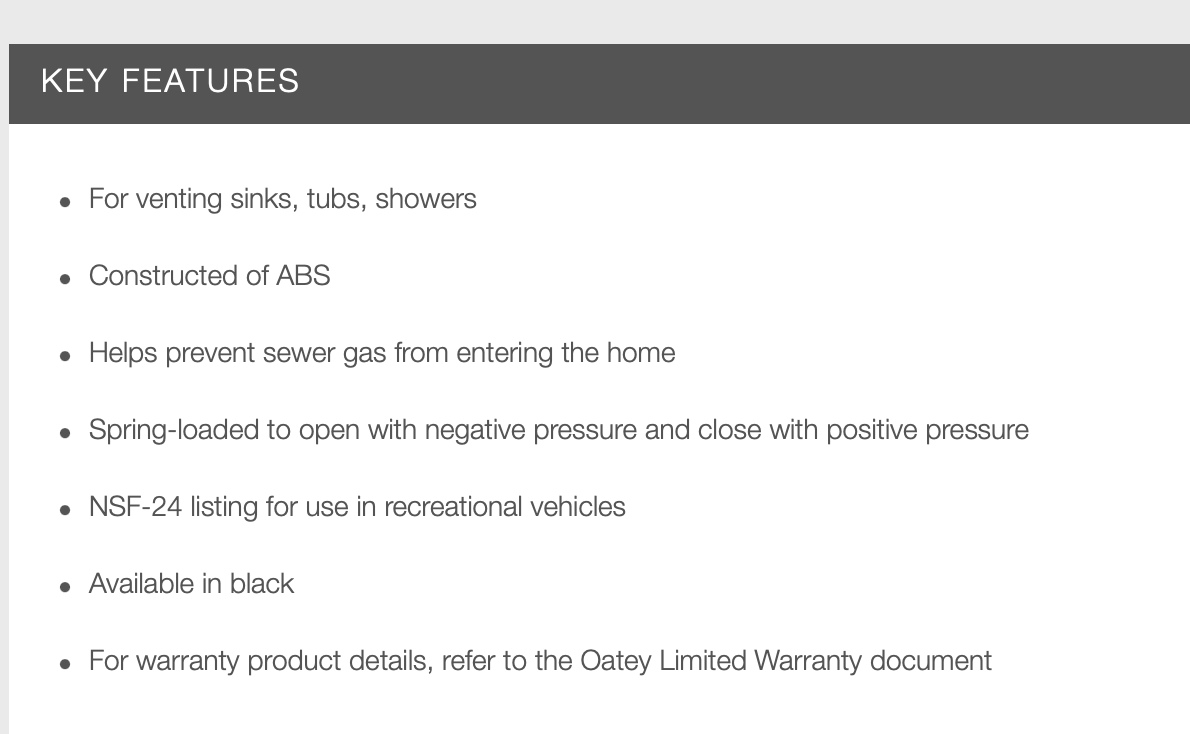
This spring loaded one-way valve controls the grey tank ventilation. It is supposed to open under suction (like draining the tank) and close at other times (to prevent stinky odors). These are used in houses, and those are known to get plugged up. So you should perhaps check your Ollie vent every year or three.... especially if you are smelling the tank contents. You must remove the rear galley drawers - grab the two orange drawer thingies with your finger tips and squeeze them toward your palms, and lift the drawer up and out of the slides. The vent is right at the back upper corner: The little cap/ cover swivels around, you can pry it loose with your fingers to look inside. Push the plunger up and down a few times to make sure it isn't sticking. Here is what it is supposed to do: Here is an interesting comment from the Oatey FAQ about RV use: Q Is the Sure-vent approved for use in a RV? A Yes, with exceptions. When the RV is stationary, the Sure-Vent will properly vent the drains for the kitchen and bathroom. If the RV is in motion and depending on how the DWV system was assembled from the factory, positive pressure could stop the Sure-Vent from opening. I have noticed a very occasional stink when towing in especially challenging terrain - very steep grades, lots of increasing elevation change and lots of hairpin turns. I am not sure if the gases are coming out of this valve or out of the sink drain...? Or if that is even related. Amazon - Oatey 39012 1.5 in. NPT ABS in-Line Vent, Black FYI, my vent was not even visible, the sewer pipe assembly was hanging down unsupported, this thread might be worth looking at: https://olivertraveltrailers.com/forums/topic/6721-how-to-secure-the-loose-grey-drain-vent-plumbing-under-the-galley/ At the very least, give the black pipe a shove to make sure it isn't flopping around, that motion can break glue joints. That is a whole lot of info about an obscure little device most people don't even know exists...:) I am not even sure if this is mentioned in the Owners documents. Can someone comment? John Davies Spokane WA
-
- 8
-
-
-
Water pump won’t pressurize lines
John E Davies replied to VBistro's topic in Mechanical & Technical Tips
It sounds like an internal failure of the pump, like a bad one-way check valve. Try removing the inlet filter bowl, filling it with water and putting it back on. If that won't prime it, you will have to remove it and either open it up out get a replacement. One good thing, the pump is super easy to work on in an Ollie.... John Davies Spokane WA -
You could have asked them to lift one wheel at a time by the axle tube, close to the brake, or under the spring perch, leaving all three other ones on the ground. That doesn’t stress anything. Lifting three tons off the ground that way does…. However, I personally would just use the factory jacks to raise the trailer completely off the ground, as long as nobody crawls under it, no worries. “Jack points? We don’t need no stinking jack points!” This is contrary to current factory recommendations. But in the Old Days it was OK. The jacks are plenty strong enough, unless there is a failure at one of their attach points. This is only for a solid level surface like concrete. John Davies Spokane WA
-
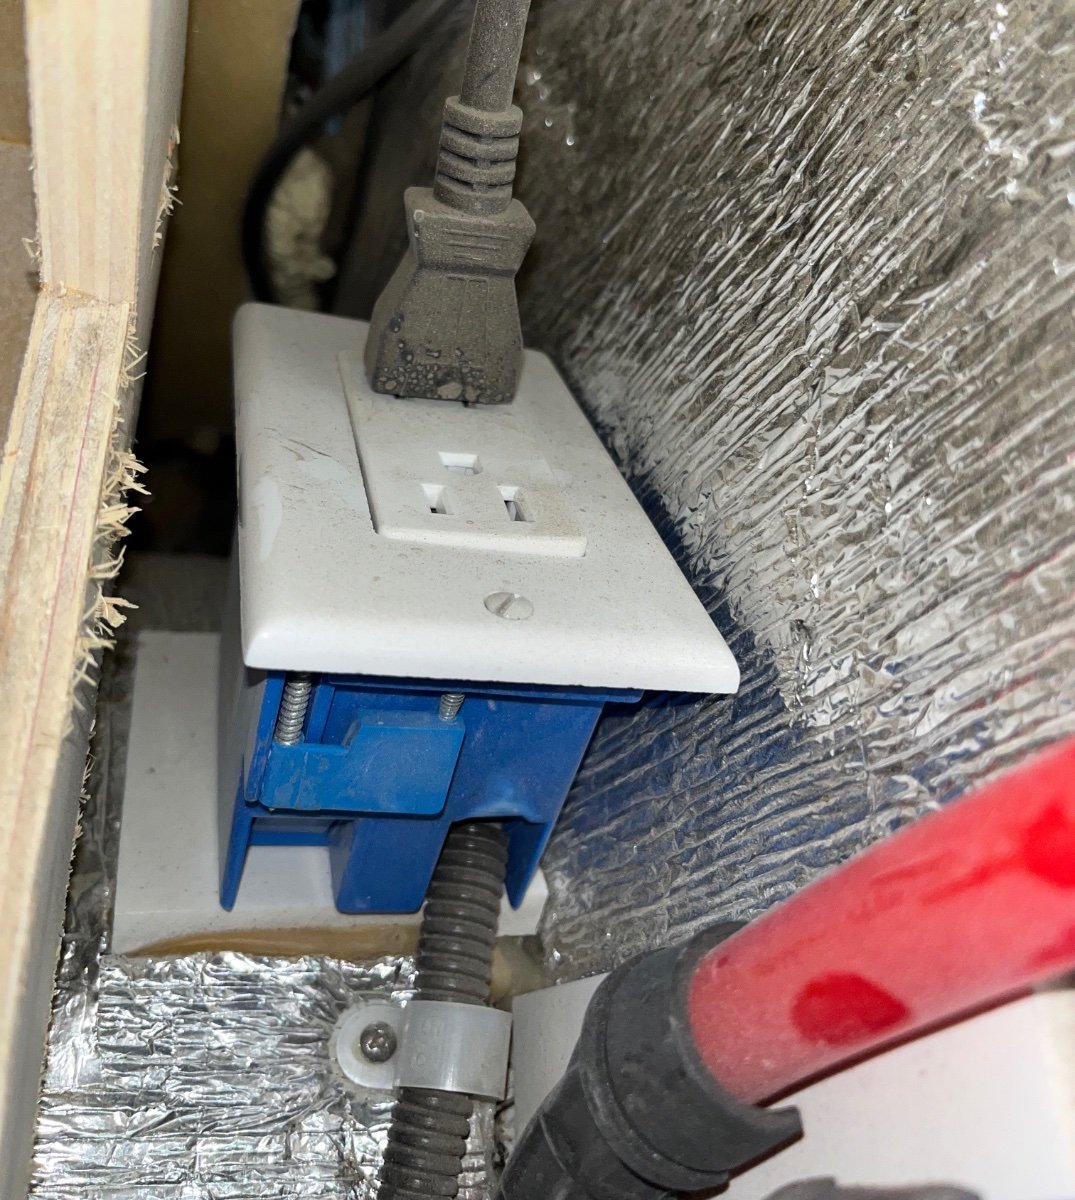
I wonder why your plug keeps coming out? It sounds as if the outlet is defective. Mine fit very tightly. There is no way it would have worked it’s way out, it was fine for five years…. Did you ever submit a service request? At the very least, it lets Oliver know that there is a problem with some hulls. Maybe enough complaints will get them to install a junction box during production instead of this stupid setup😳. Or issue a tech bulletin about it for existing trailers. Even if it technically “meets RV code”, it is absolutely dangerous, especially in your situation, where you are constantly fumbling around in a (potentially) wet area! No GFCI protection! ZAP! Please take pictures, the LE may be different from the LE2. You can post them in this thread or start a new one if you like. Thanks. John Davies Spokane WA
-
EDIT: It is possible that your fridge cord is not quite long enough to reach the new box, You can open up the bottom fridge access panel (outside the trailer) and see if there is some slack there that you can use to make it a little longer. The cable comes in at the very bottom left corner and attaches to the main circuit board under the plastic cover.If you still don't have enough length, you will have to remove that section and replace it with a longer piece of "house wire". Mine reached, barely. If you do run a new wire, be sure to re-seal the opening, That area should be "propane tight" to prevent a leak from penetrating the hull. John Davies Spokane WA
-
Yes, four big (#12 I think) sheet metal screws CUT TO LENGTH - there is only 3/8" of HDPE material to screw them into, which is why I used so many screws. Be exceptionally careful drilling the holes, so you don't punch holes into the outer hull! I have mounted blocks of this material elsewhere, I much prefer the 1" thickness since it grabs the screw threads sooooooo much better. John Davies Spokane WA
-
Yes, since there is no sink in the pictures 😉 John Davies Spokane WA
-
Bill thanks! That is the first time this has happened, do you know what caused it in the first place? John Davies Spokane WA
-
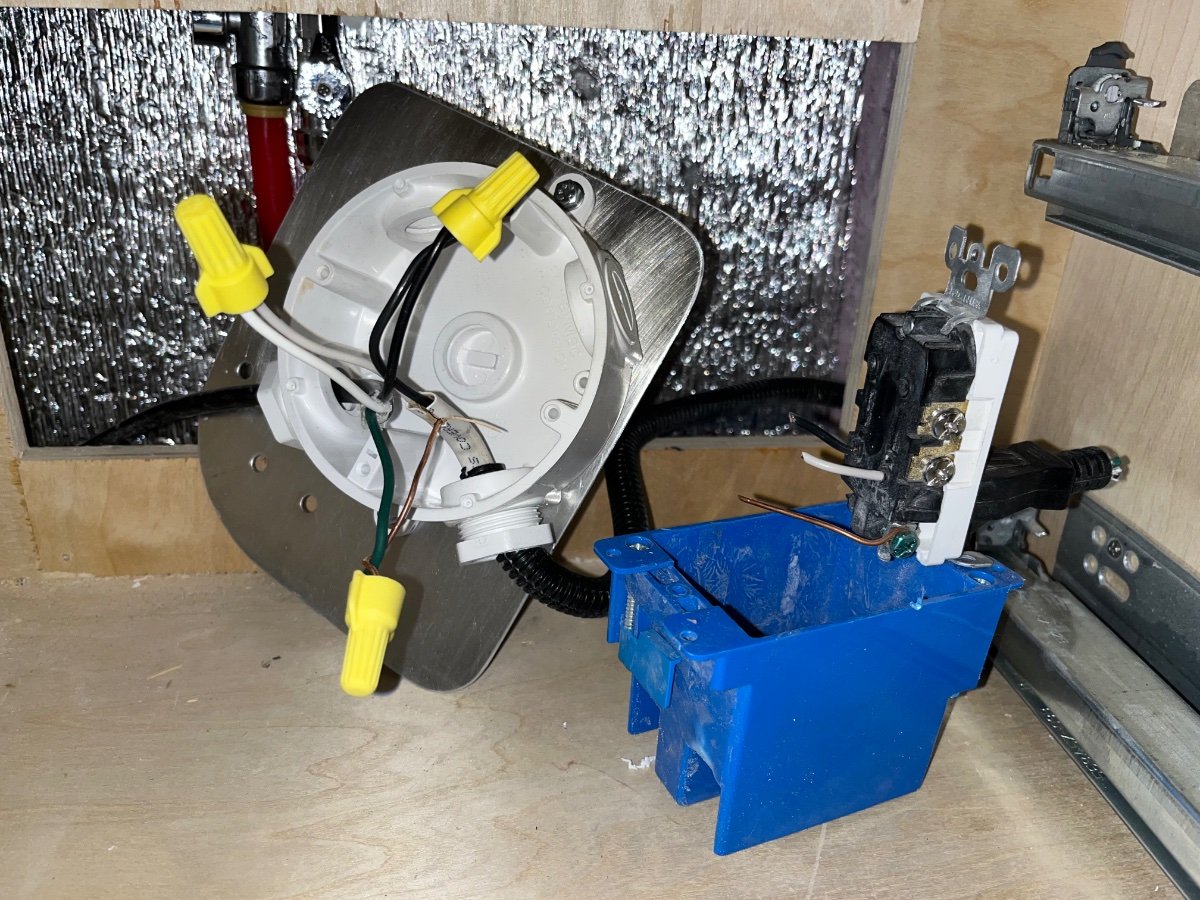
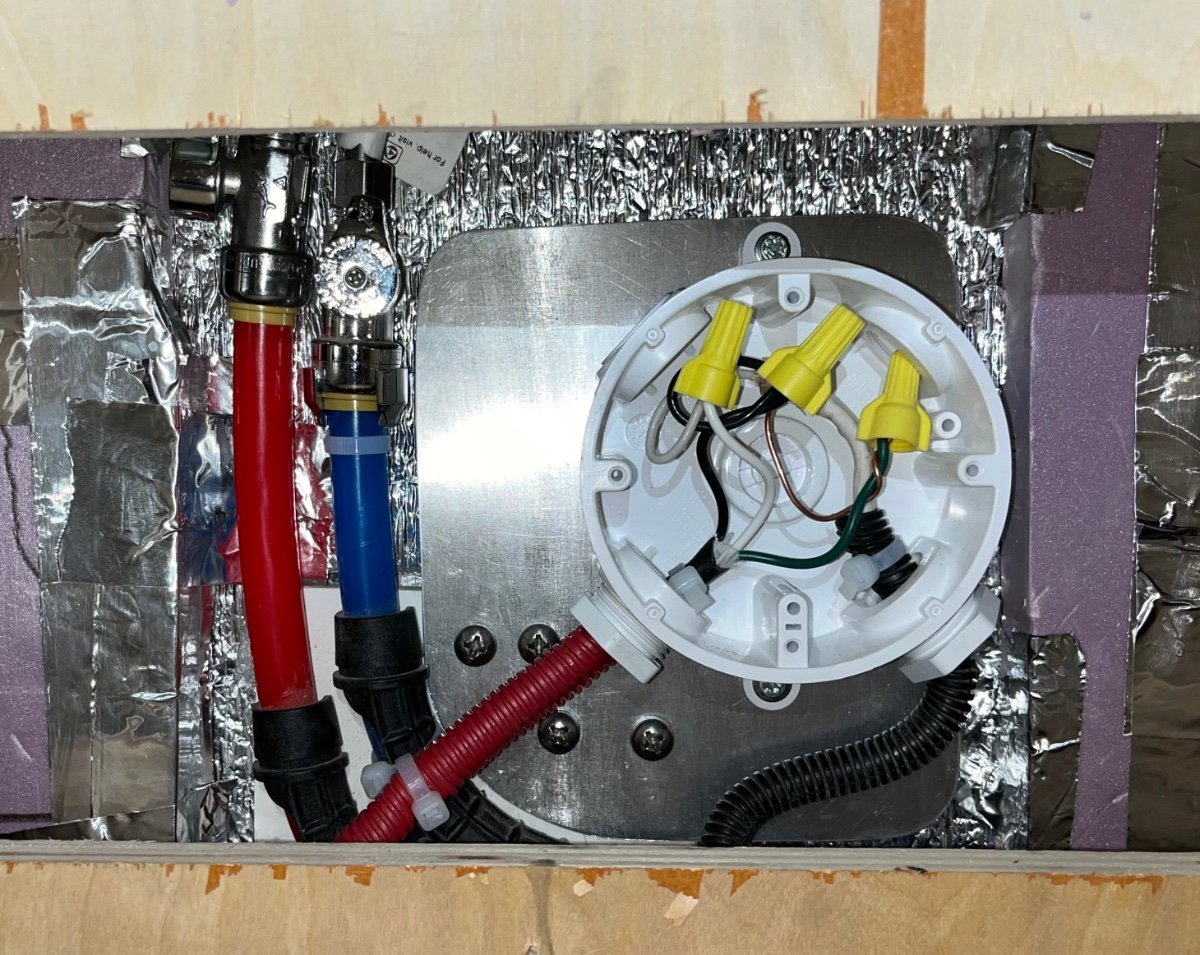
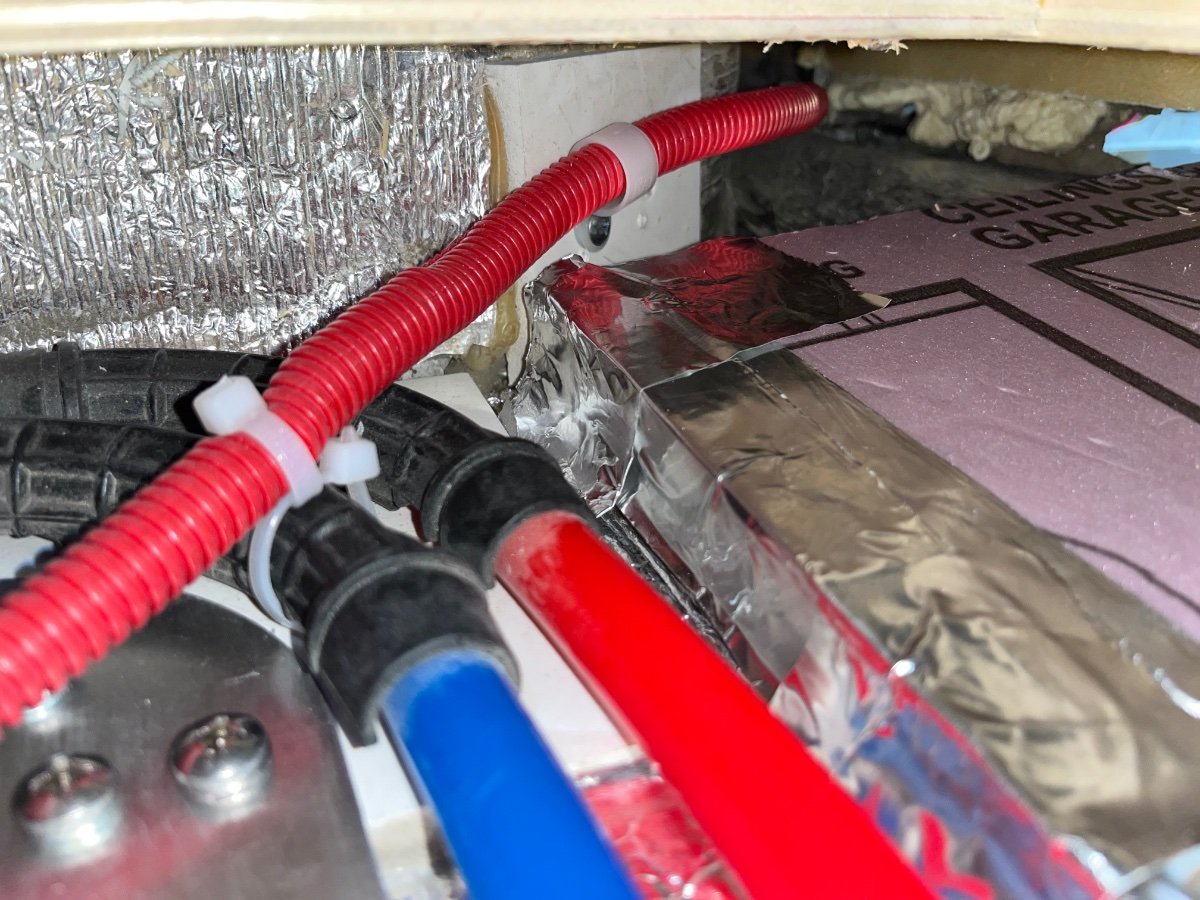
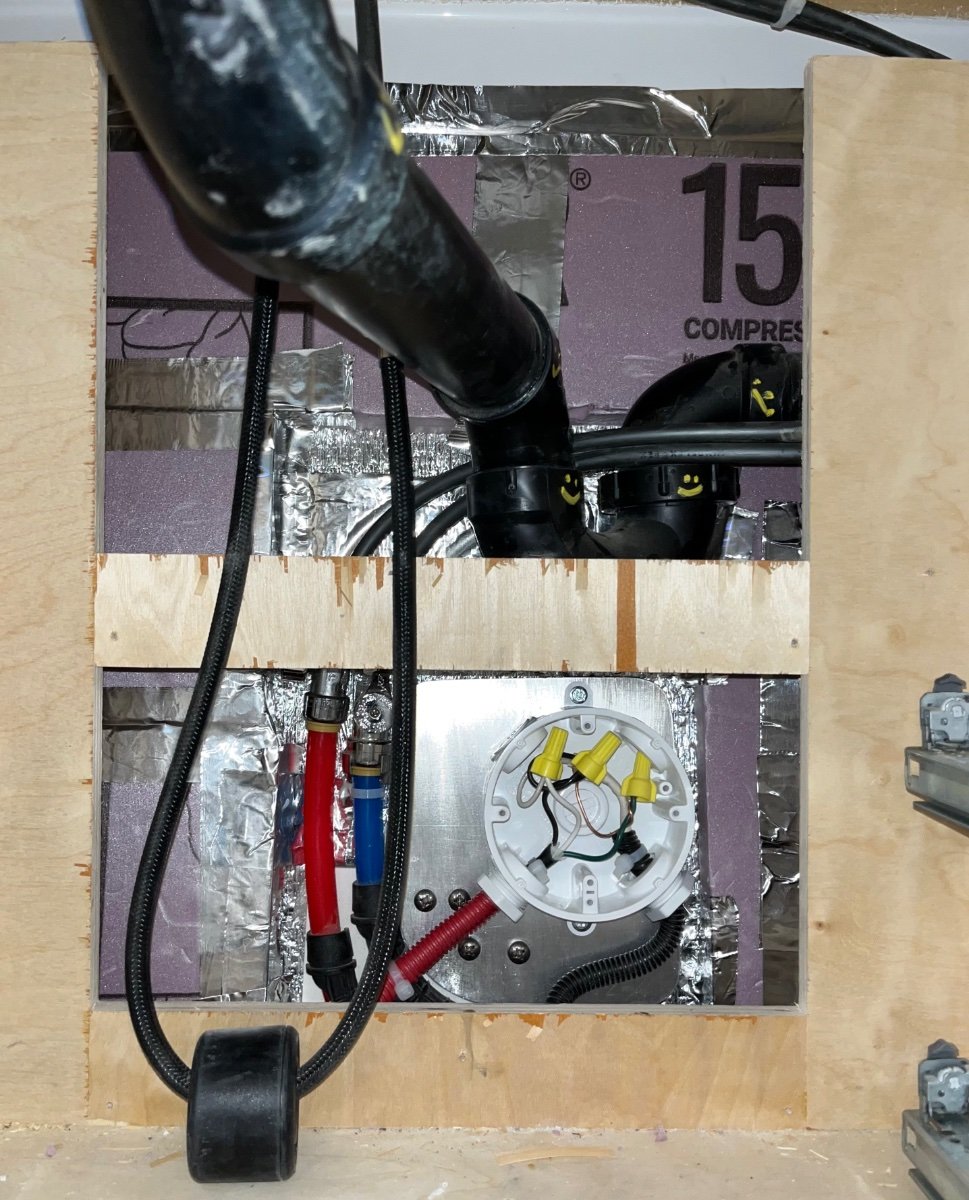
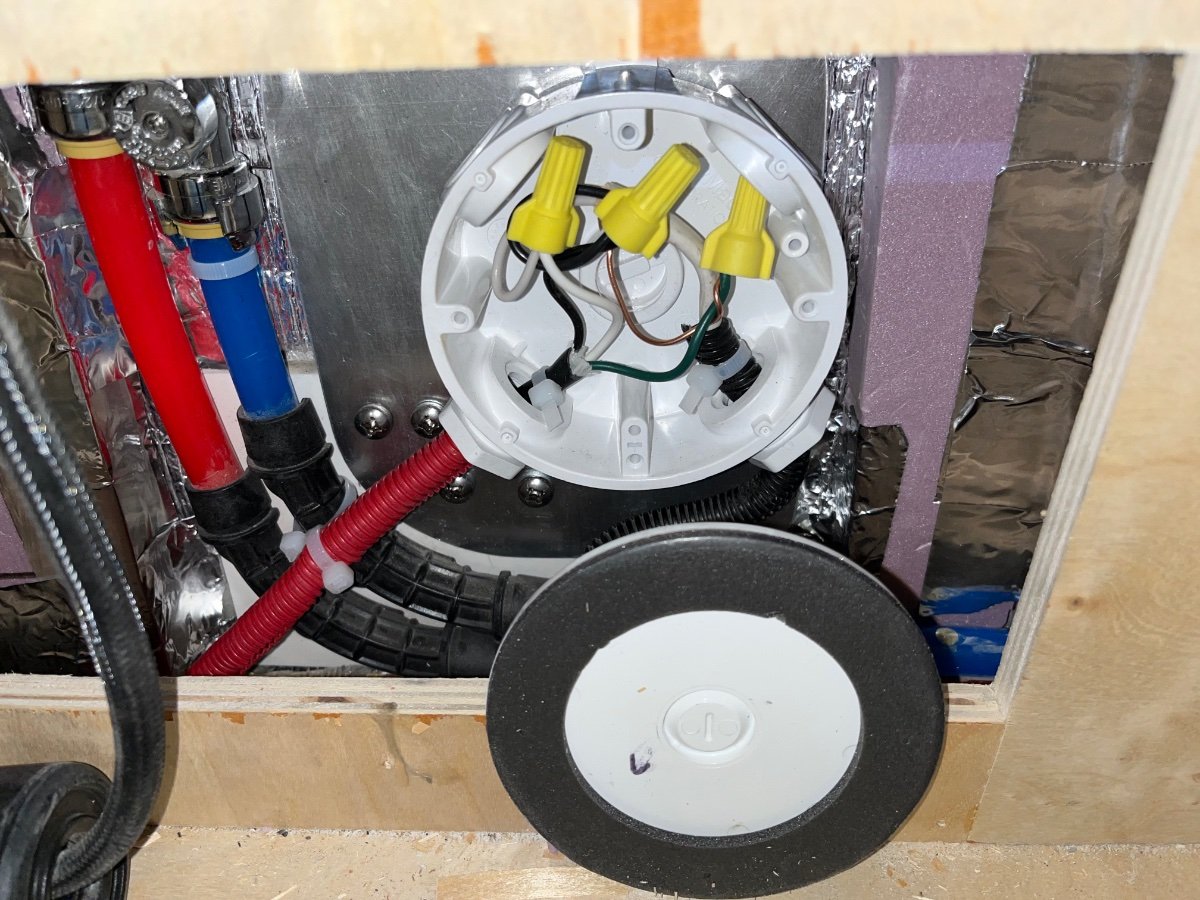
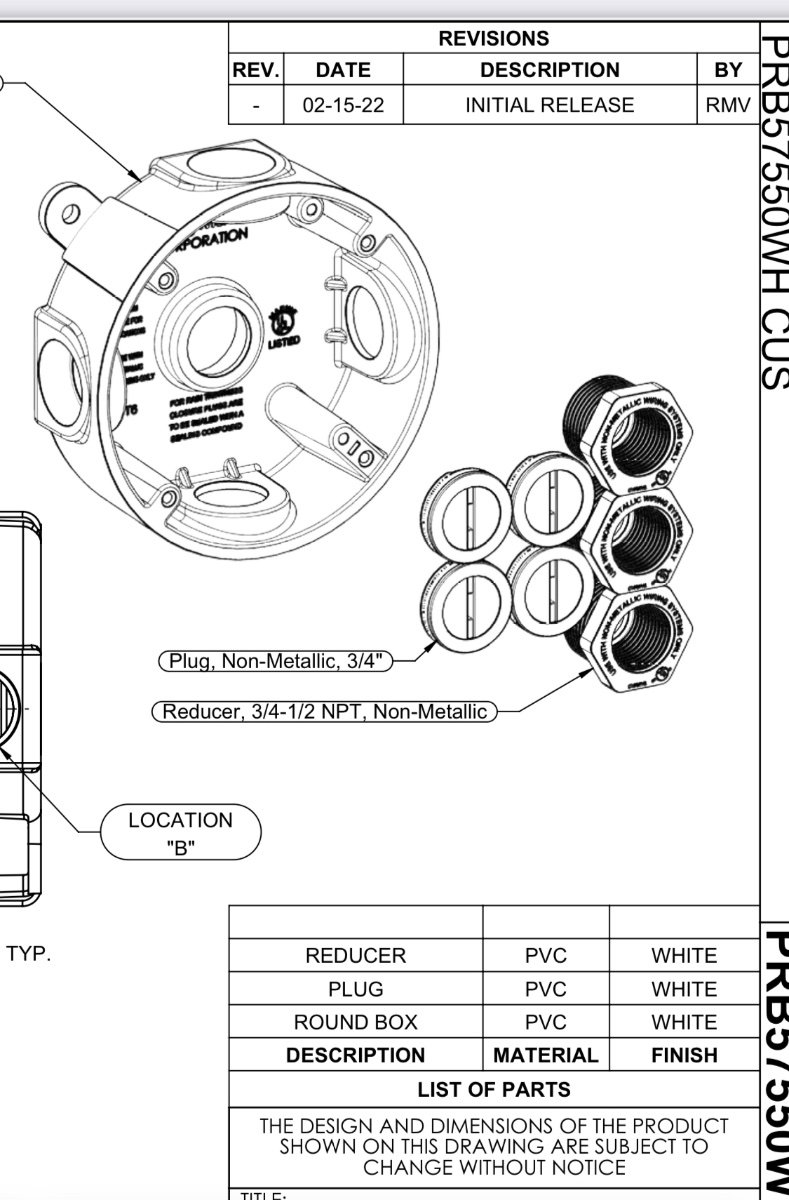
re t Fabricate a bracket from 0.050" aluminum sheet, that will allow you to attach the box to the existing hose support. After installing the blank plugs and two threaded ports, seal them from the inside with PVC cement. Remove the outlet cover, outlet and the blue box. (The lower outlet screw hole was stripped, so the screw just spun. I bent up the outlet, cut the wires and removed the two screws holding the box to its support block.) Reroute the original wires to the new box after cutting and stripping the ends. This shows the new j box next to the old parts. Afer CAREFULLY joining the wires, install the box plate onto the water hose mount. Secure the inside of the each of the two harnesses with a nylon tie. Leave the two bottom holes unsealed, water cannot get in that way. Install split loom and secure the fridge power wire to an existing hole in the original outlet mount. This pic is rotated! The finished j box. Note that this shows the additional 1 inch R5 insulation I also added to this area and under the range top. Black to black, white to white, green to bare ground. Label the cover before installing it! I think this should be done at the factory, they could simply install a larger HDPE block and attach the box directly to that. EDIT: I submitted a Service Ticket with this request. I will update this thread with any new info. John Davies Spokane WA
-
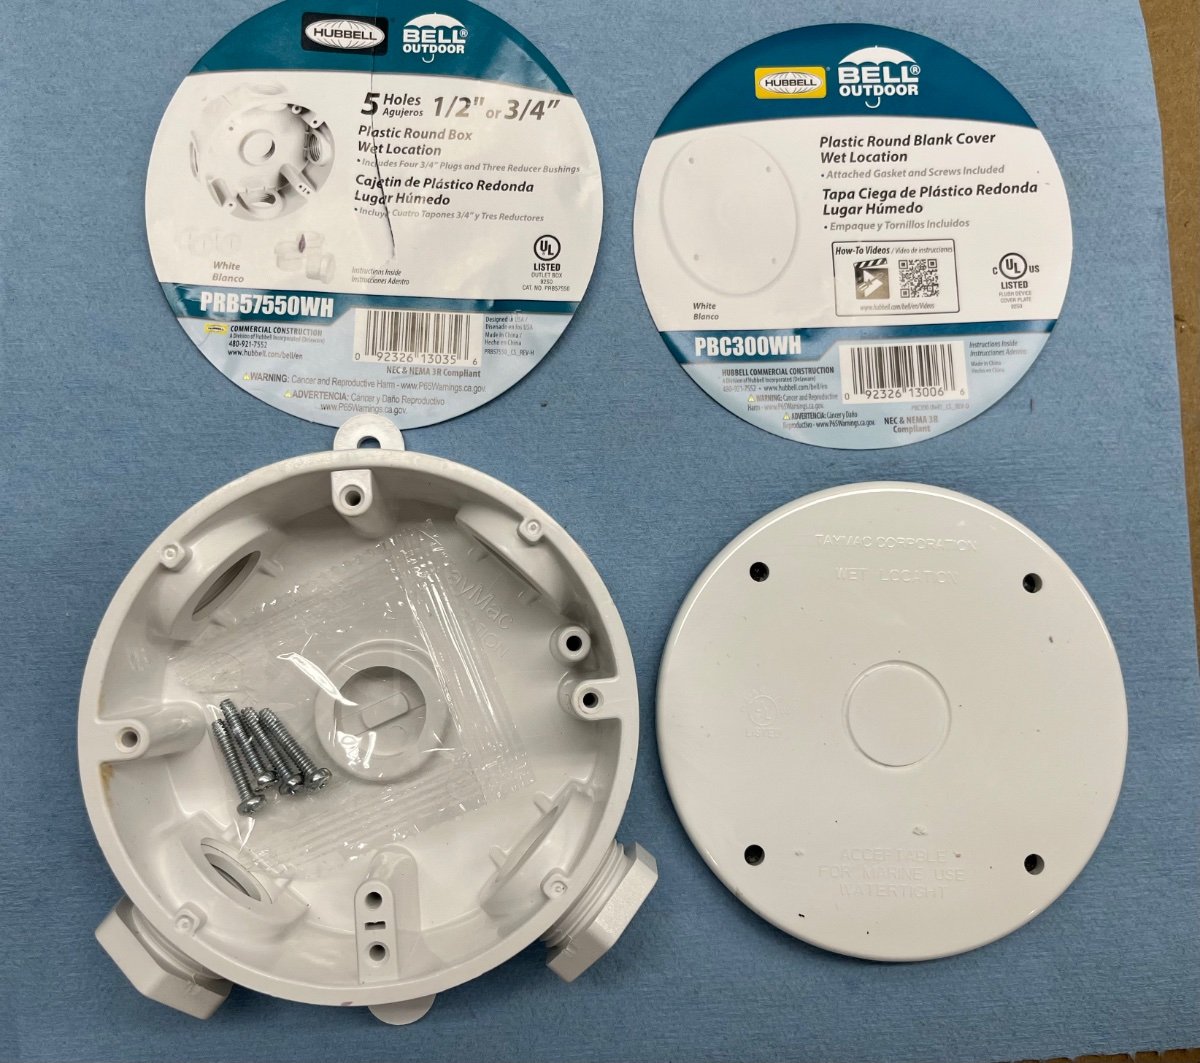
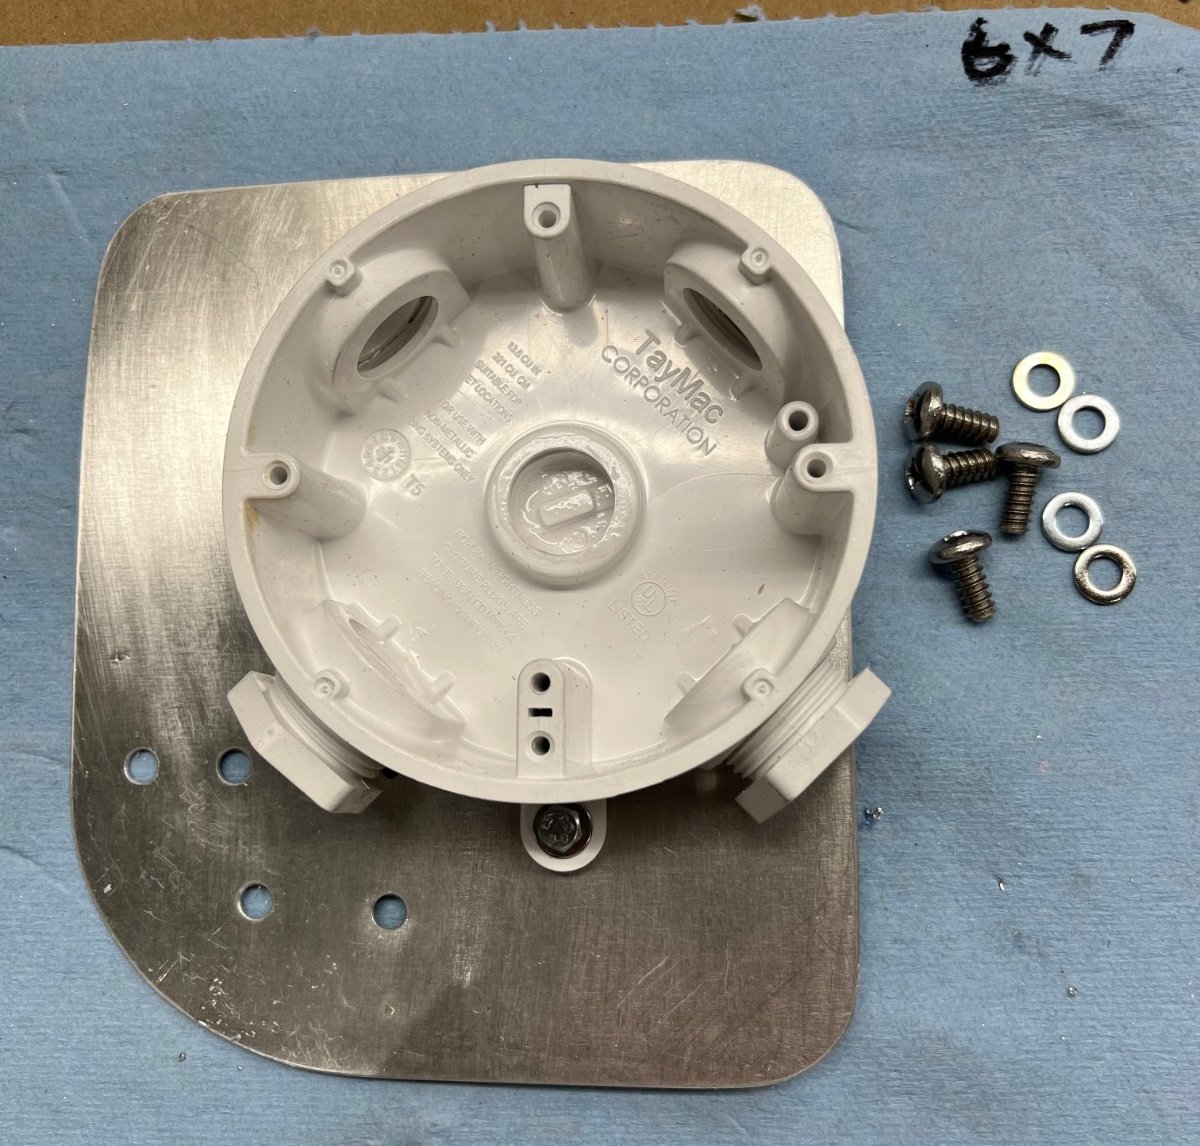
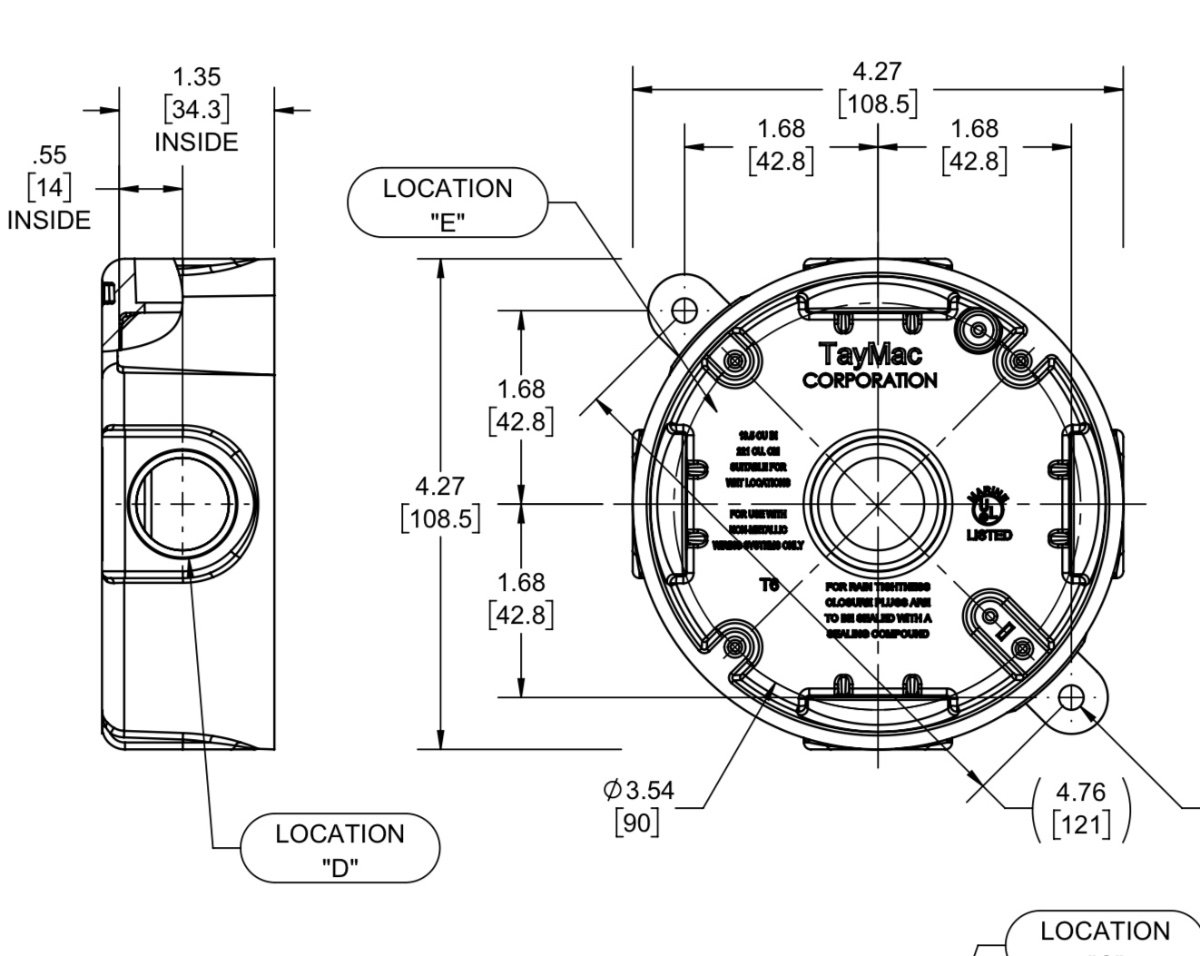
NEW JUNCTION BOX: This has literally been bugging me for five years, from the first time I saw a picture of the outlet mounted right below the faucet water supply hoses and the drain pipes. It is not even a GFCI outlet! If there is a water leak, it could be dangerous. Sorry for the rotated pics, some come through this way! Remove the two lower drawers by squeezing the orange release things, and lift up and out. Remove the flip out tray screws. Remove the tee piece (three long screws) and then the 1/8' plywood access panel. DISCONNECT SHORE POWER, double check to make sure these wires cannot be energized! Flip the main breaker to make sure! I measured the space and found that it is too tight to install a waterproof "in use" outlet cover. I even tried, I ordered one from Amazon, I can return it easily. Nope, it won't work. I decided to eliminate the outlet entirely. I am not sure why Oliver did not hard wire this in the first place...... I found this plastic junction box at Home Depot: Here is what comes in that kit: This is a true approved 100% waterproof cover; Dimensions. It is plenty thin to fit in that area. More to follow. John Davies Spokane WA
-
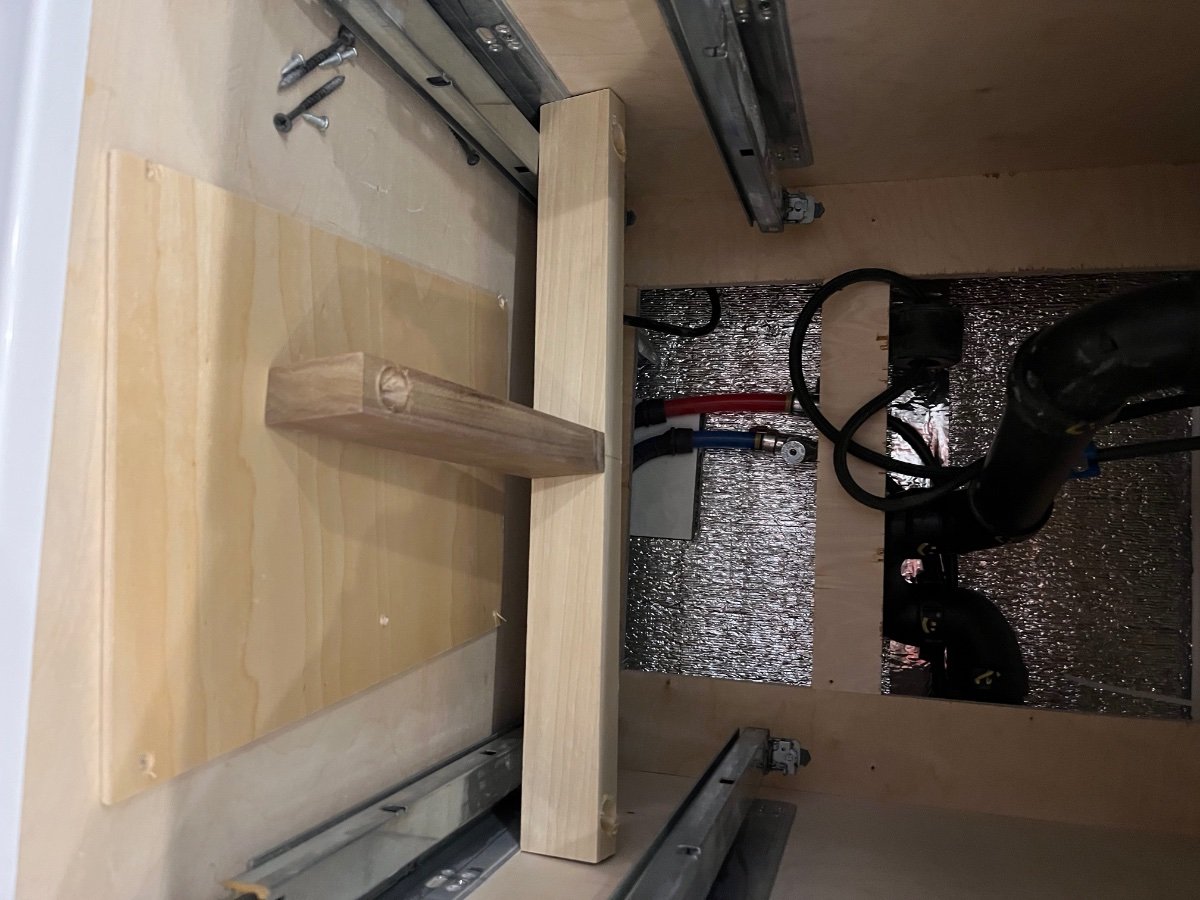
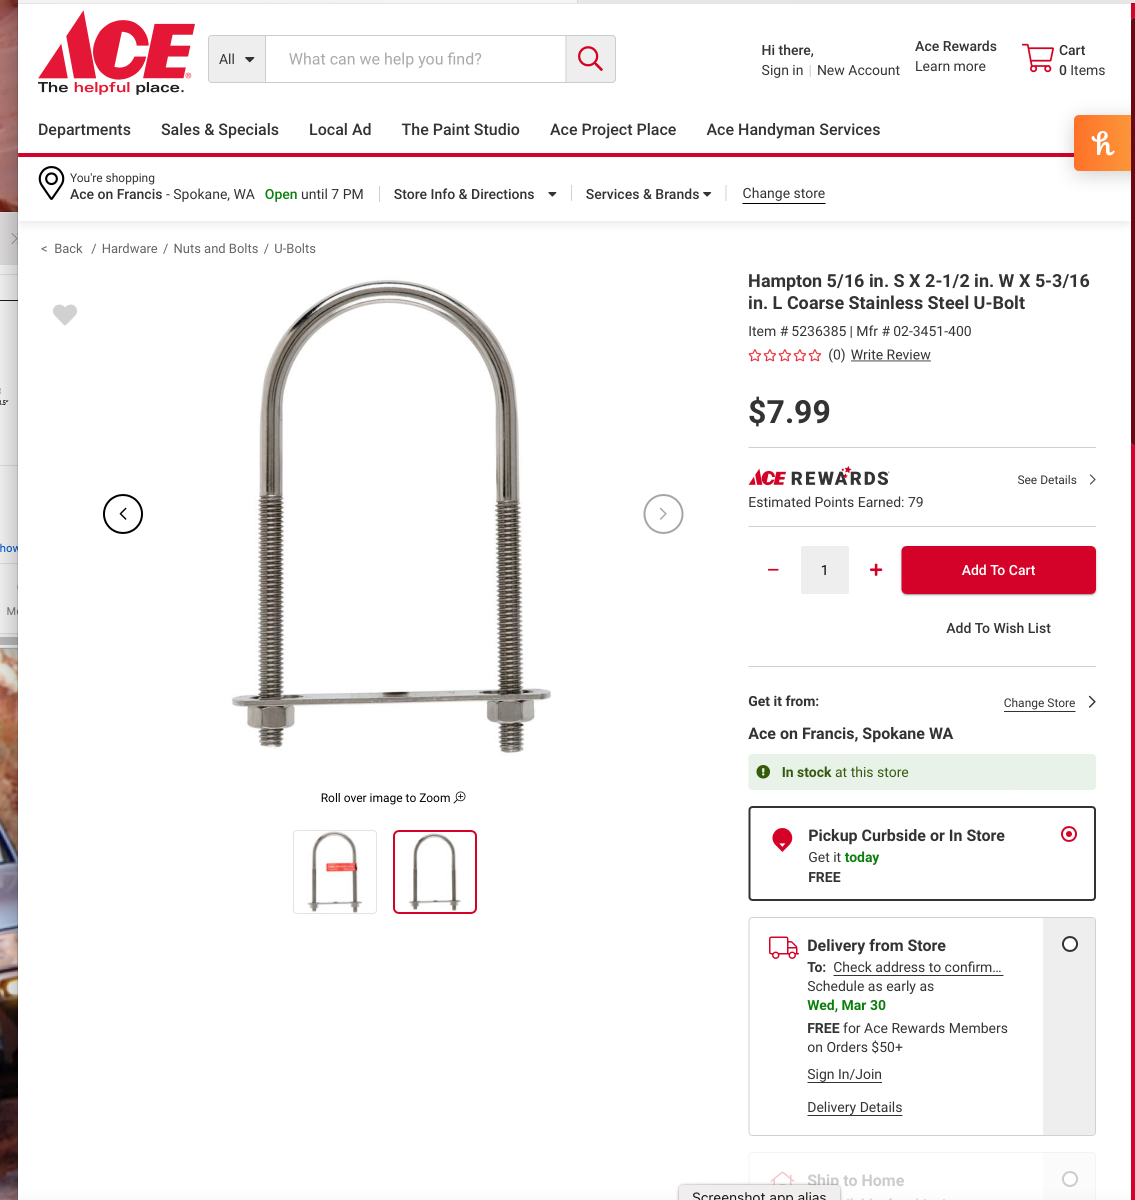
I opened up my sink access panels for the first time in five years (Yeah, I know!) and found the black pipes just flopping around, there was zero support between the sink bottom and the grey tank itself, many feet away. Video: Oliver Legacy Elite 2 Sink grey pipe With that much possible movement, it really stresses the glue joints. I decided to use a ubolt and a 1 inch spacer, to remove all motion and also to keep the down angle so water would flow properly toward the tank. (If I moved the pipe hard up against the back of the cabinet, the angle was UP..) I slid 3/8" automotive fuel line over the ubolt as padding, and a 1" thick piece of HDPE material, the same stuff Oliver uses throughout their trailers. I also replaced the plain nuts with self- locking ones. SORRY, some of these pics are coming through rotated...! This shows the tee piece and the 1/8" plywood access panel removed. This shows how it goes together, using a scrap of pipe. Use the legs to locate the holes in the wood: Use a 90 degree square to draw the center of those lines. The legs need to be cut off, anything longer than this will mean you don't have enough room to install it into the holes. Finished, the pipe is drawn up tight against the wood, no movement! This shows the slight down angle of the pipe, in reference to the wood cross piece. John Davies Spokane WA
-
This is easy, it just takes a few nylon ties. Remove the drawers by squeezing inward on both of the orange brackets and lift up. Remove the screws holding the flip out sponge tray. The following pics show the space with the wood tee and the thin plywood access panel removed, that is not needed for this mod. Sorry, the first two pics are rotated and I cannot straighten them out! Does anyone know why this happens? The faucet hose has a big weight and hangs down at random over the top drawer.,..,,\ The blue clip secures the two sections of the quick release coupling. At least one owner had their hose come open and it leaked long enough to trash the wood underneath. This tie method will prevent the clip from coming off until you want it to. There is another vertical tie hidden on the far side. This hose can leak if the oring seal fails or the two halves separate. It would be prudent to inspect this area annually! If you are hooked to city water, it can leak like crazy and you won't know until you see water coming out from the hull drains, and maybe all over the drawer contents. If you are using the 12 volt pump, it will alert you by cycling rapidly IF you do not have the accumulator (mine does not). If you have an accumulator, that will mask the leak to a degree!. This is the first time in five years that I have looked in here, it was completely dry. John Davies Spokane WA
-
dripping bathroom faucet
John E Davies replied to Danno and Donna's topic in Mechanical & Technical Tips
The early hulls like mine (218) did not come with an accumulator. Tho an owner could have installed one. John Davies Spokane WA -
dripping bathroom faucet
John E Davies replied to Danno and Donna's topic in Mechanical & Technical Tips
Have you ever flushed the system with vinegar? It dissolves the hard crusty deposits that occur in the hot lines and faucets. It might just dissolve whatever is causing the seal to leak. There have been a number of threads about how to do this. John Davies Spokane WA


.jpeg.d6e61b473ac28225d828f6918a7fb595.jpeg)
.jpeg.bca5ad26b7a62f7dee543fa252fb605a.jpeg)
.jpeg.5e41a2798b252f2cbec92c4af37418f5.jpeg)

.jpeg.5e6c53ae5e52b4e3ec06eac651715942.jpeg)
.jpeg.7950bd0eeb6d10e7cd3fe4aaedf5c66f.jpeg)