DavidS
-
Posts
407 -
Joined
-
Last visited
-
Days Won
52
Everything posted by DavidS
-
I bought my Audi new, and I purchased the Towing Package option, which includes increased engine cooling capacity, a trailer hitch receiver, the 7 pin connector, and pre-wiring for a brake controller. However from what I read on Audi forums, this pre-wiring is hidden under a dash panel, at least for pre-2017 models. Since you have to wire the brake controller in (no quick connect harness is available like in many cars), I decided to go with the Tekonsha Prodigy RF Wireless Brake Controller. It has worked really well, and if you are getting one you should read my post HERE. The Airstream AirForums have a very long thread on towing with Porsche Cayenne, VW Touareg, and Audi Q7, and you may find it useful.
-
If this is a regular trailer with regular tail lights things should go fine. Be warned that the Oliver has LED tail lights that pull very little current, so I got warnings on my Audi dashboard about something like "Trailer Tail Lights Not Working." I could see with my eyes that the lights were working, so ignored it, and drove from Tennessee to Utah. From some online research on Audi Forums I found a solution, an electrical adaptor that plugs into the seven pin connector. More info in an earlier forum thread HERE.
-
No issues with cross winds or semis passing. The Oliver is a dream to tow with the Audi Q7. Actually, I rarely pass semis. I tend to drive 65 MPH on the interstate, both for safety and for gas mileage, and the semis pass me. I usually use cruise control to keep the speed at 65. Otherwise I tend to drift up to 70 or 75 MPH. The Q7 has plenty of power when pulling a trailer.
-
While I have not stayed at either of these campgrounds, I have had very strong personal reccomendations for two campgrounds near Park City. Jordanelle State Park is the closest campground to Park City Mountain Resort. They take reservations, and the web site says they are open year round. Mountain Valley RV Resort is just outside Heber, probably 25 miles from Park City. The elevation at Weber is lower than at Park City or Jordanelle, which might be better for winter camping. There is an awesome and inexpensive Mexican restaurant in Midway, quite close to Heber.
-
I would check the Owner's Manual for your Q5. I tow with an Audi Q7, and in the section on Driving with a trailer it says "Never install a "weight distributing" or "load equalizing" trailer hitch on your vehicle. The vehicle was not designed for these kinds of trailer hitches. The hitch attachment can fail, causing the trailer to tear loose from the vehicle." From reading other forums I think this warning is true for quite a number of European and Japanese cars.
-

E-Bike Phenomenon - help with keeping on the trails . . .
DavidS replied to bugeyedriver's topic in General Discussion
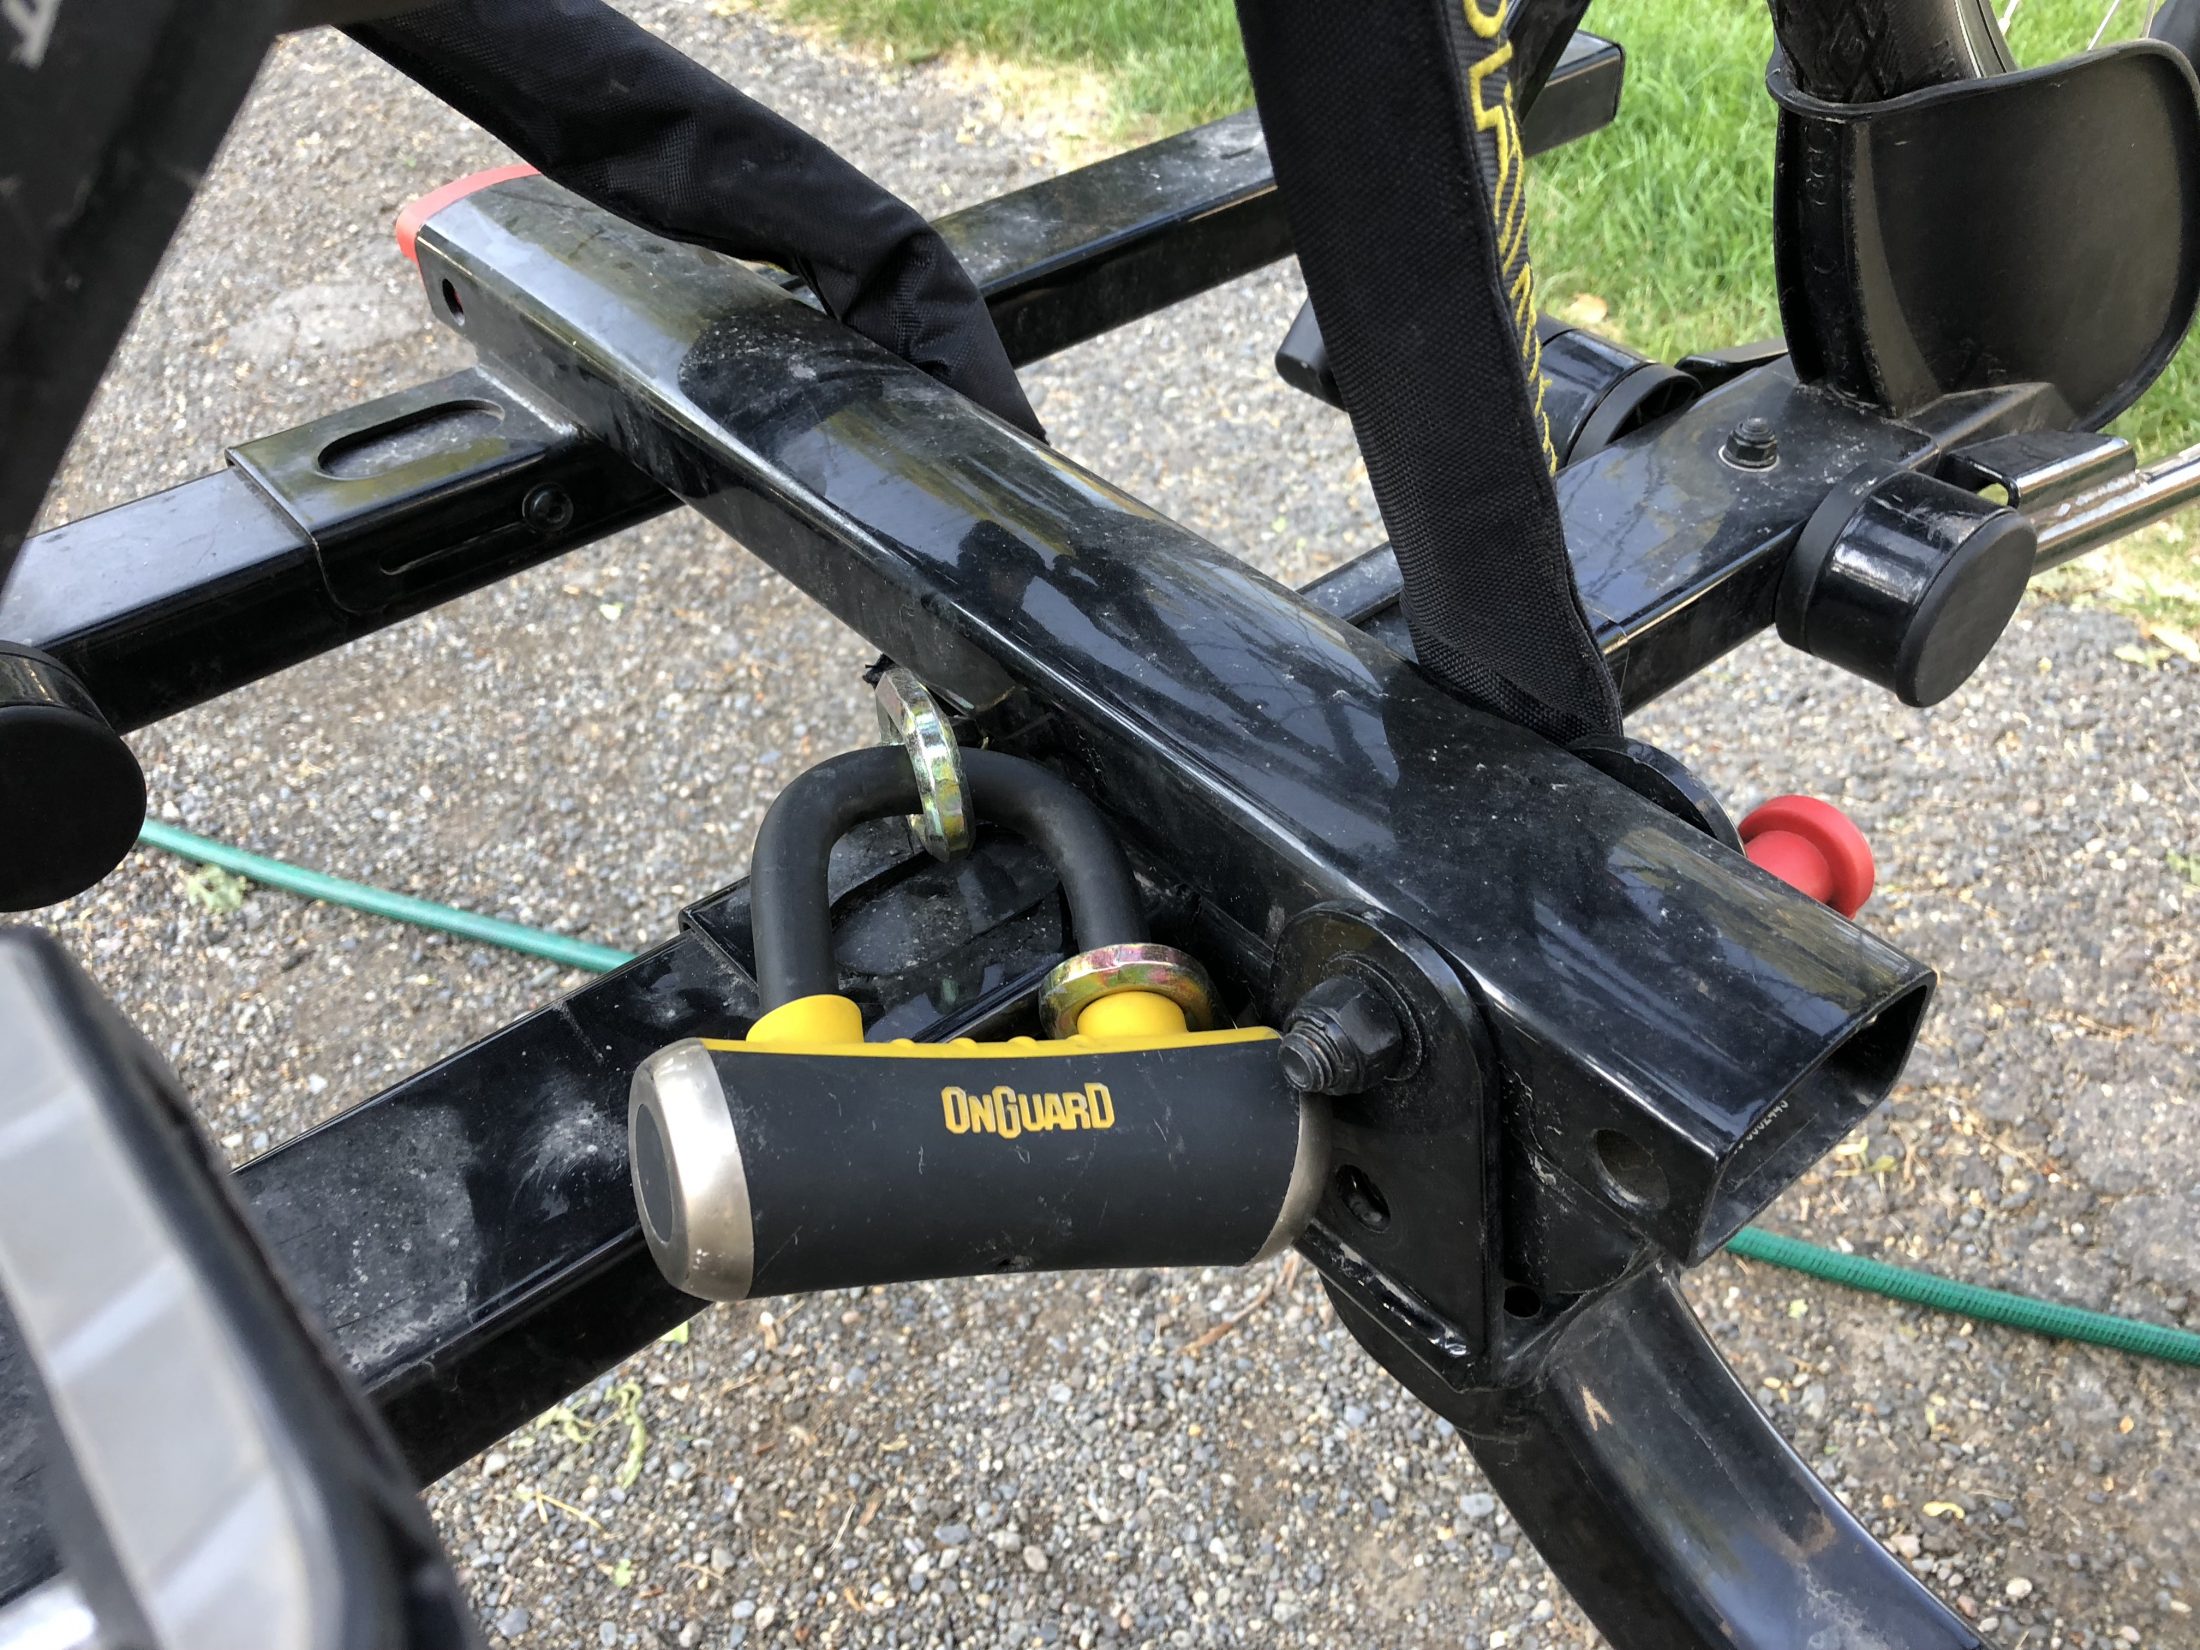
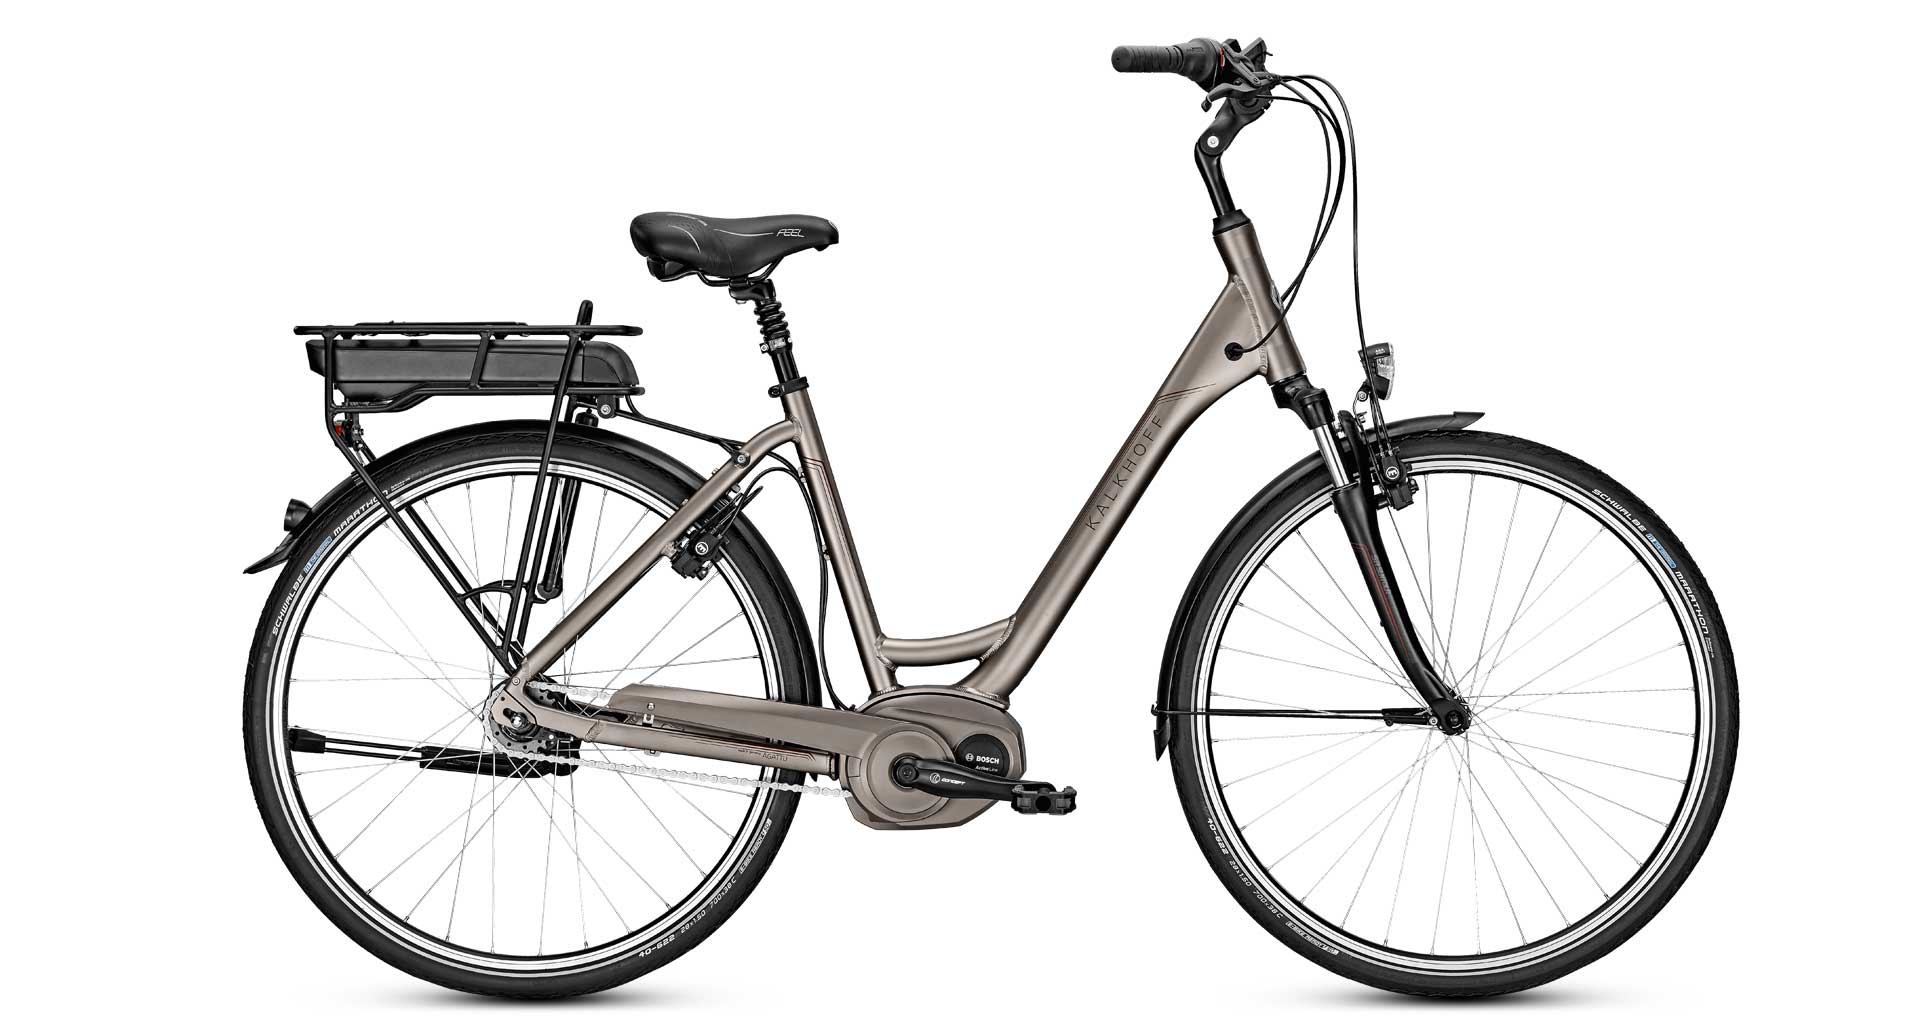
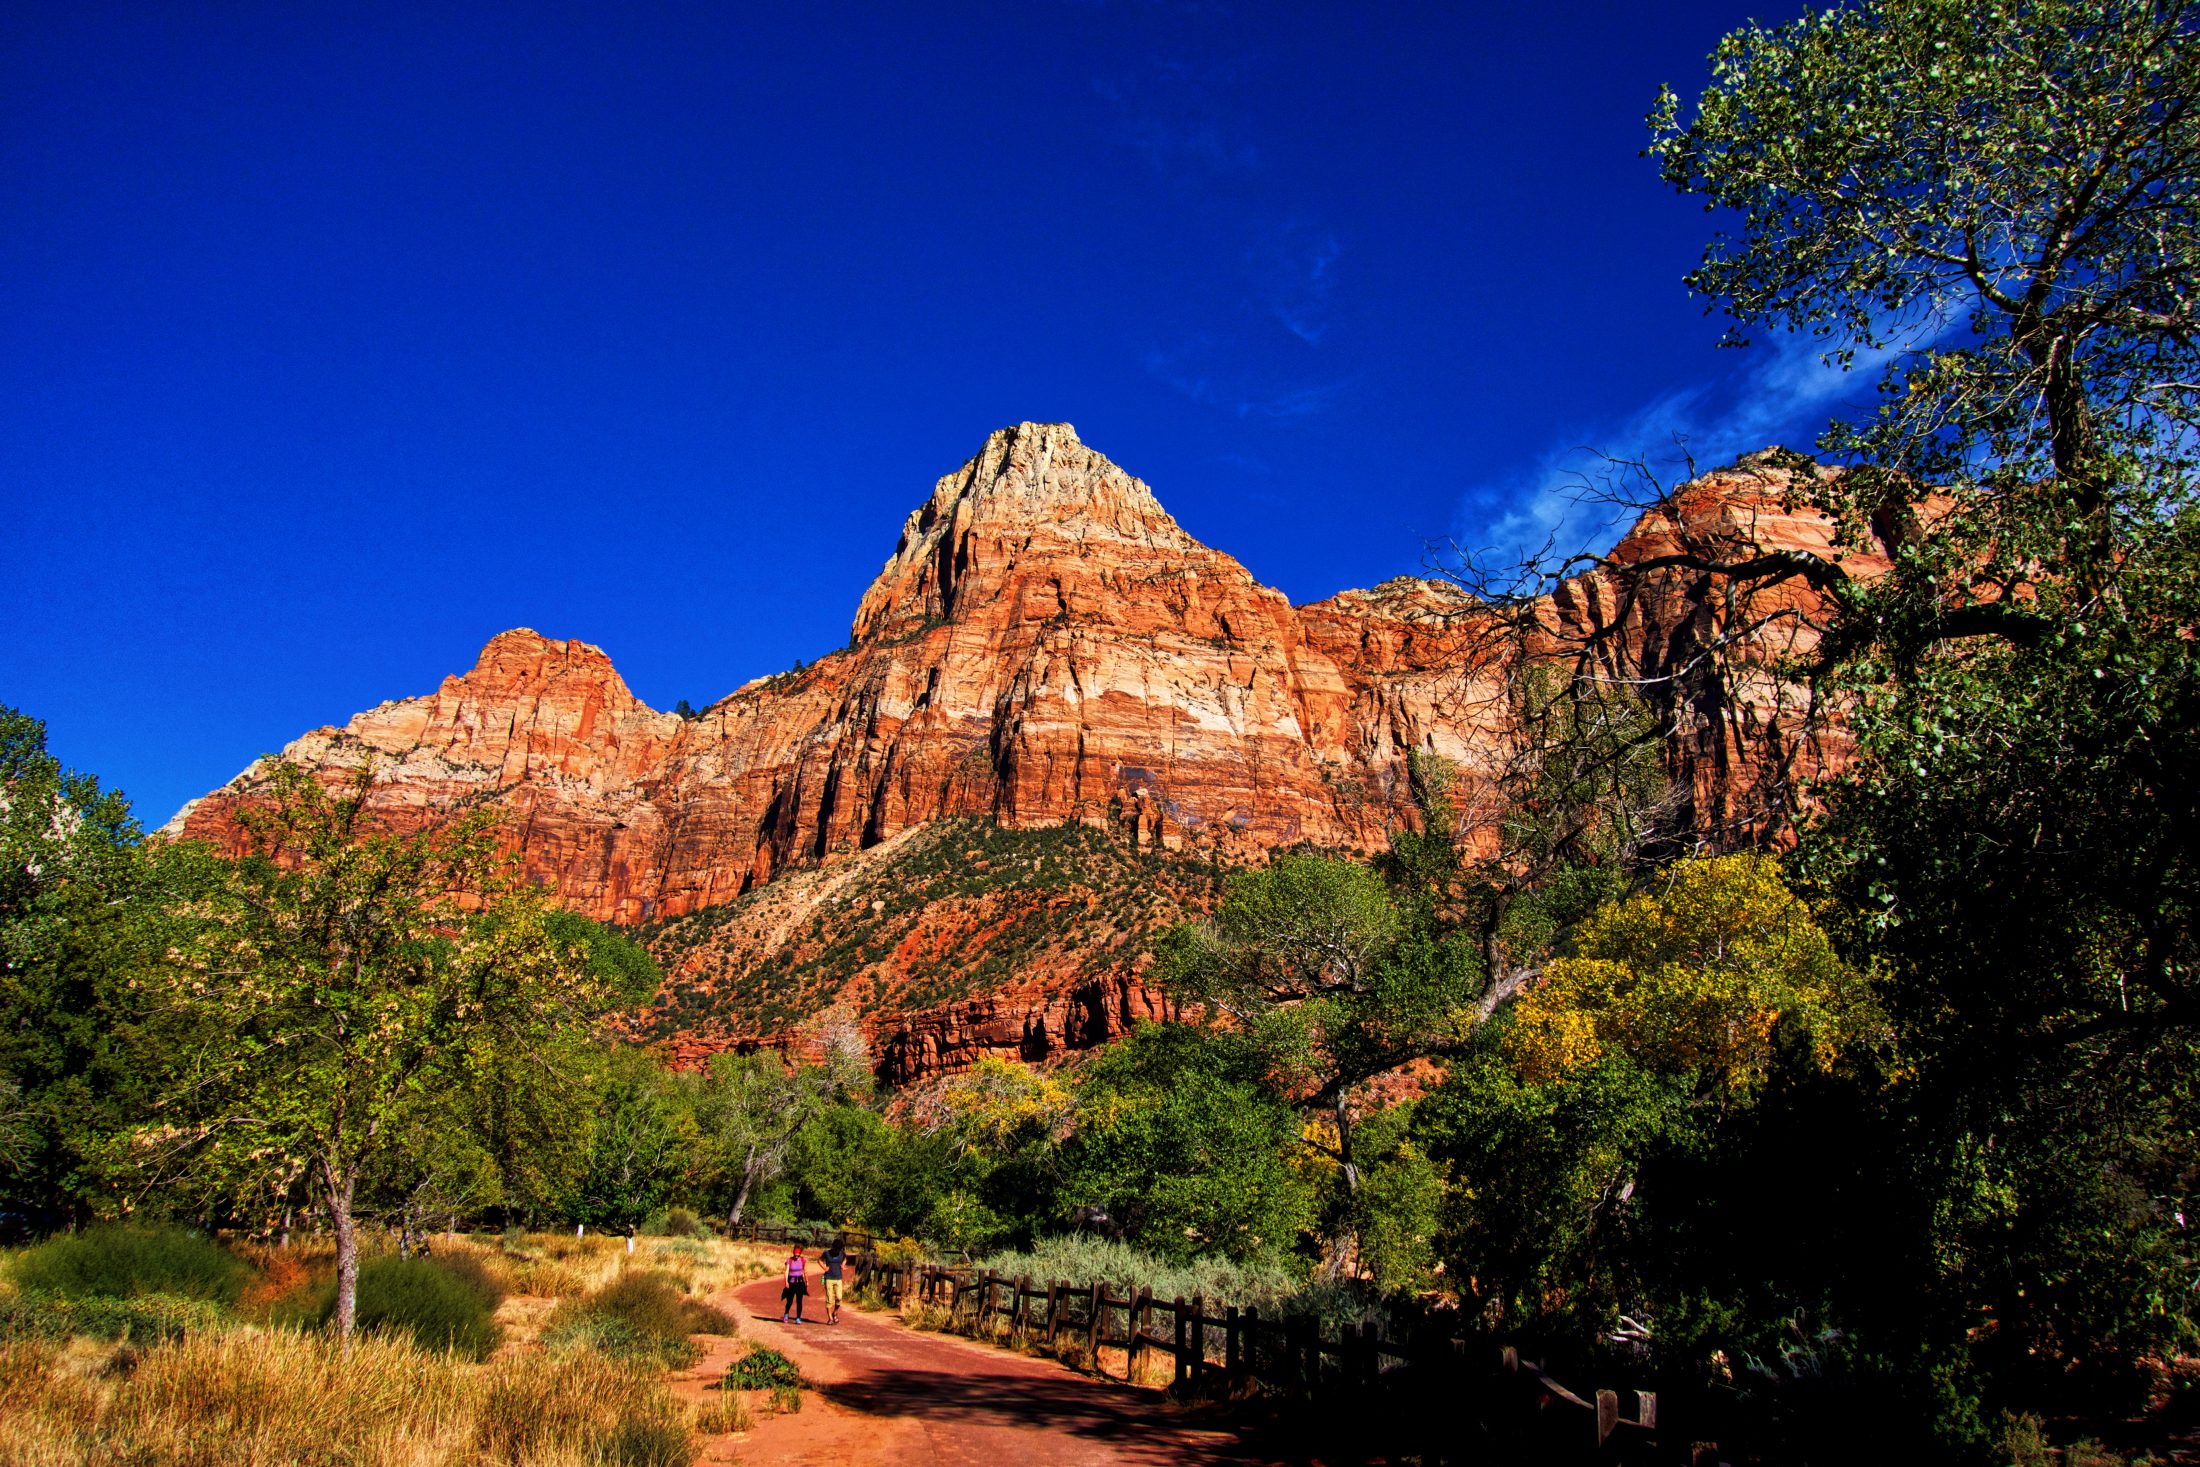
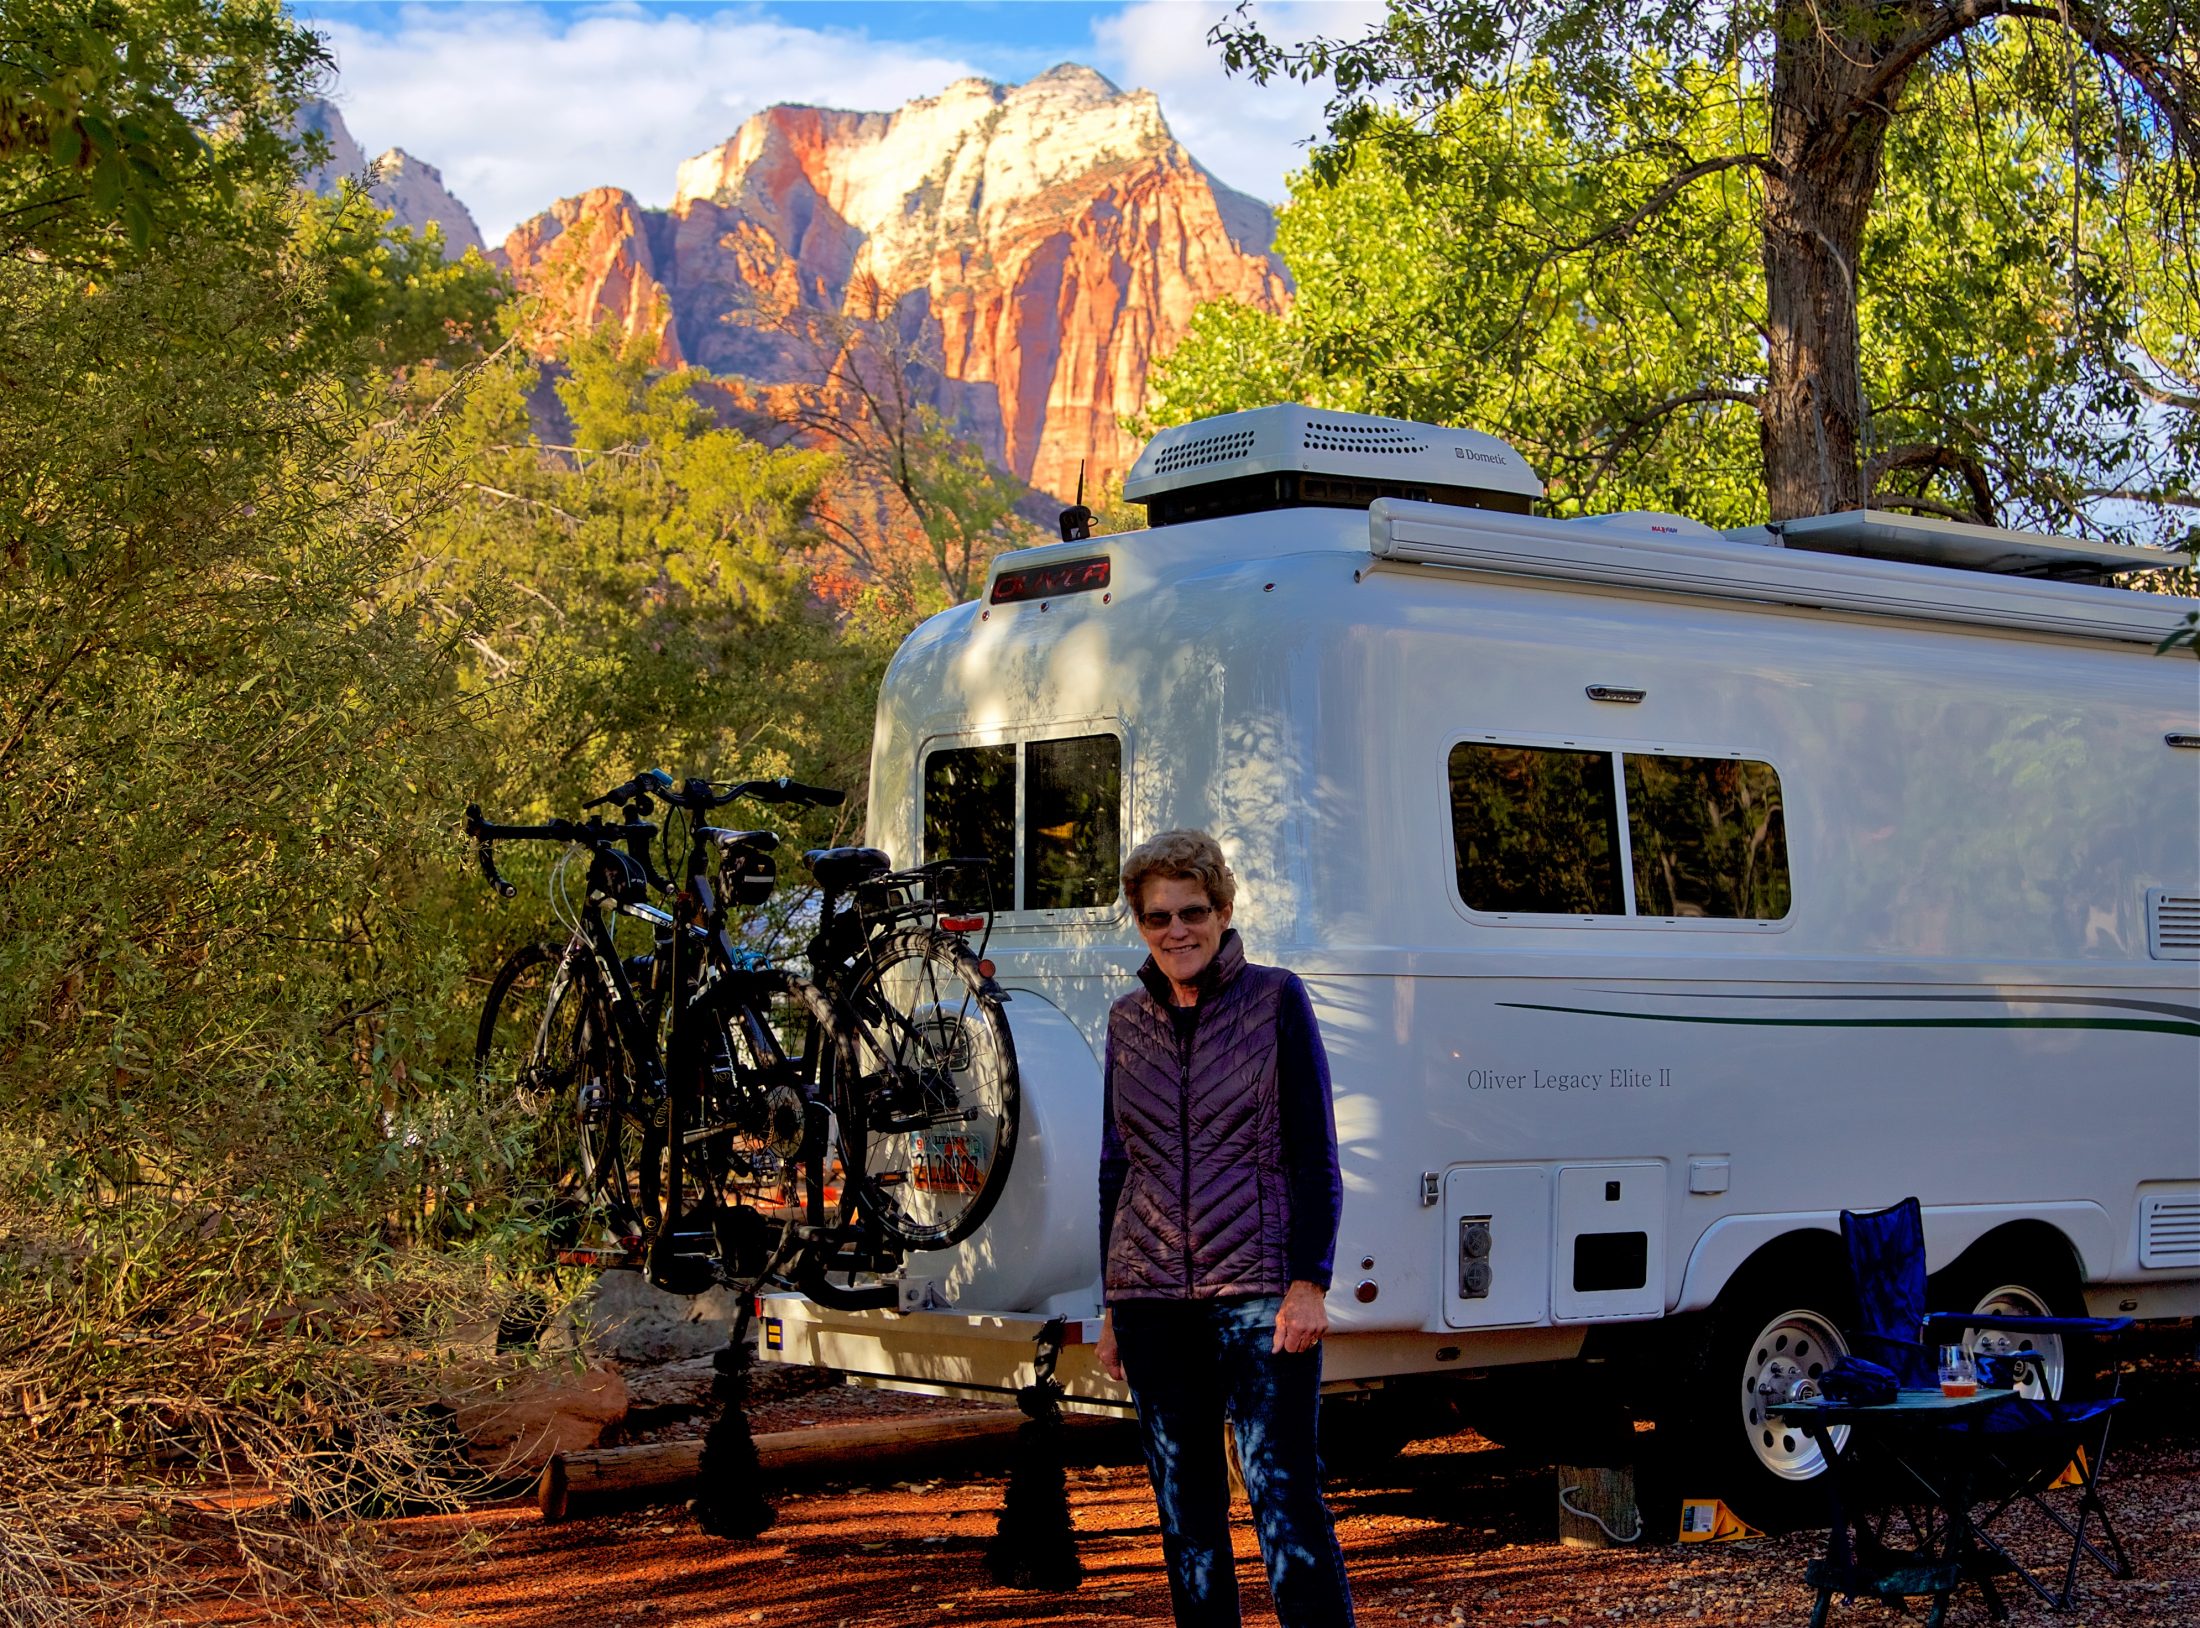
We bought an ebike for my wife Susan about a year ago, and she really likes it. I have done a lot of cycling. I commute to work by bike, and when I was younger and fitter I completed week-long 500 mile supported cycle tours, over about eight summers. We like to ride together, often on the Jordan River Parkway here in SLC, and when especially when we are camping. However, Susan struggles on even a modest hill, which limited us to fairly flat routes, such as the Jordan River Parkway. I tried to convince Susan that she should get an ebike, but she said she was not interested. Then a year and a half ago our bikes were stolen off of the bike rack on the back of our trailer. The trailer was parked in front our house, and I put the bikes on the rack the night before so that we could make an early departure. There were four cable locks on the bikes, (two from the bike rack, and two more), but a bolt cutter makes quick work of cable locks. Statistically Salt Lake City is a low crime area, but stuff happens. We were bummed. Susan’s bike was cheap, but my bike was expensive. I commute on heavy bikes that have lights, rain fenders, and a rear rack to carry panniers (saddle bags). The panniers carry my briefcase, my laptop, my lunch, and a change of clothes, and weigh 20-30 pounds, so it doesn’t make any sense to have a lightweight bike. The bike that was stolen I called my “weekend ride” bike, and it was an expensive LeMond carbon fiber bike that I bought before my second cycle tour. I was really bummed. However, our homeowner insurance covered the theft. Susan’s bike was cheap, but they valued a comparable replacement carbon fiber bike at $2900, more than double what I paid for mine (on special sale) in 2005. The insurance also covered the accessories: pump, water bottle cages, under seat tool carrier, etc. So we had some money to spend on new bikes, and we revisited the ebike question. Digression. Our insurance claim went smoothly, in part, because we had good documentation, sales receipts, and photos of the bikes. ebikes are expensive, and if you buy one keep these documents where you can find them. I have stored the scans of sales receipts and photos of the bikes on my Dropbox. So I wanted Susan to get an ebike. She said no, that she would like to get into better physical shape so that she could get up hills on a regular bike. My counter argument was “you couldn’t get up hills when you were 25 years younger,” and based on this rational argument she relented and we started doing research on ebikes. As Pete said above, there are two types of ebikes. He got the “pedal assist” type, where you must pedal. The other type is called “throttle,” and while you can provide power by pedaling, they can also go without pedaling much like a motor scooter. Susan got a pedal assist bike. Like regular bikes, most ebikes have gears. This allows you to determine how many pedal revolutions provide so much power, whether you are using electric assist or are going solely on pedal power. There are two types of gearing systems, an external derailleur (like on most current 10-speed bikes), and an internal gear hub (like those on the 3-speed Raleigh bikes of my youth). I initially wanted the external derailleur because I was used to them, and I knew how to adjust them. As I learned more, I discovered that the modern internal gear hubs are extremely reliable, and that they are completely protected from water, dirt, and grime. We ended up getting an bike with an internal gear hub. There are also two locations for the drive motor, either in the bottom bracket (between the pedals) or in the rear hub. Both types have advantages and disadvantages. The bike we selected had a mid-drive. Another variable is where the battery is located. Most ebikes have a removable battery, but some have it built into the frame. I think the non-removable batteries are a strong negative, because you have to plug directly into the bike to re-charge the batter. I think people like the non-removable batteries because they don't look like a “cheater” bike. (We camped at Fort Stevens State Park in Oregon this summer. We visited the fort and were returning to our locked bikes when someone shouted “who has the cheater bike?”) The removable battery can be located on the down tube or on a rear cargo rack. Some people prefer the battery on the down tube as it has a lower center of gravity. Single track mountain biking is very popular around here. When we were shopping for ebikes we saw a lot of full suspension mountain ebikes, designed for trail use. If we were interested in single track riding I would definitely get a down tube mounted battery. The bike we got has the battery in a rear cargo rack, and we have been happy with having the cargo rack. When we ride to the farmer’s market we attach a milk crate with bungee cords. I carry the panniers on my commuting bike which has a rack, but the panniers will fit on this ebike rack. When camping, we put a small trunk bag on the rack for our rides. This trunk bag is insulated, and a blue ice keeps our lunch cold. Finally, and most importantly, test ride any bike. You need to make sure the frame size and geometry are comfortable for your body. There is a reason that serious cyclists spend a fortune to get a frame custom fitted to their dimensions. Also, don't worry if the saddle, or seat, is not comfortable. Many people buy a bike they like and replace the saddle. We bought a Kalkhoff Agattu B8 ebike. Susan wanted a step thru model (what as kids we called a girl’s frame). This bike has the Bosch Performance Line motor, the Bosch PowerPack Li-Ion 36V / 13,4 Ah (500 Wh) battery, and a Shimano Nexus 8-speed hub. It has a predicted range of 68 miles; we have never come close to running out of power. The controls on the computer are intelligent and easy to use. The bike has a number of features, including fenders, front and rear lights, and in integrated rear wheel lock. Susan really likes the saddle (seat), which is a large gel saddle atop a suspension seat post. I thought this suspension seat post was weird, but Susan really likes it. It has been a year and half since we bought the ebike, and it is amazing how many more ebike stores there are now in SLC. We had to go 40 miles to a distant suburb to get the Kalkhoff bike. Part of me worries that we bought too soon with an advancing technology. But another part of me knows that ebikes have been used for quite a few years in European cities, and I think the technology is fairly robust. Susan mostly rides without any electric assistance, and thus gets a cardio workout, but turns on the assist when she is going uphill. Her bike has the same four levels of assist that Pete mentioned, Eco, Touring, Sport and Turbo, and she mostly uses Eco. We have really enjoyed riding up City Creek Canyon, which is a paved road through protected watershed, very close to our house and to downtown Salt Lake City. It is a 7 mile ride, all uphill, through a beautiful canyon with periodic picnic tables. They have a good system. Pedestrians are allowed every day, bikes on odd days of the week, and cars on even days of the week. Susan could never ride up City Creek Canyon before she had an ebike. While Susan got a very expensive ebike, I replaced my weekend bike with a more modest Cannondale Synapse aluminum frame bike that was on deep discount at REI. While it is not as lightweight, or as expensive, as my old LeMond carbon fiber bike, it does the job. I am no longer doing regular 80 mile rides, so I didn't think I could rationalize a really expensive bike. When we bought the new bikes we agreed that we needed to get good locks. So I spent time researching bike locks, which is probably not a surprise to anyone who reads my posts. Websites with good discussions of bike locks can be found HERE and HERE. Basically any lock can be cut by a sufficiently determined thief with appropriate tools. The better locks are 1) more expensive, 2) heavier, and 3) and have larger diameter steel that makes it more difficult to cut through. So it is a tradeoff between weight and price vs. protection. I wanted to get two types of locks. The first is a chain to lock the bikes to the trailer bike rack, and the second is two U-Locks to carry on a ride to lock up at a destination. For each type I downloaded data from the bestbikelock.com site on chain locks and on U-locks, and put the data into spreadsheets. The spreadsheets have thickness of the steel (important!), weight, dimensions, and protection score. I added prices from Amazon. For the chain lock I purchased the OnGuard 8019L Mastiff 6' x 3/8" Quad Chain Lock. It has 10 mm thick chain links, a Gold protection score, and its 6 foot length seemed perfect for my purposes. It is just long enough to go through both bike frames and around the bike rack. For the U-Locks I purchased two Kryptonite Evolution Mini-9 Bicycle U-Locks, which have Silver protection scores. I purchased them directly from the manufacturer so that I could get both locks using the same key. Keyed alike locks can be a real convenience. We camped at Zion National Park two weeks ago, and brought our bikes. After setting up our campsite, we walked through the entrance station and saw a small sign that said “No eBikes in Zion NP.” I asked several rangers about this, and they seemed to not know why. “I think the policy is under review.” “I don't know why they have that policy.” We are law-abiding types, so we were disappointed. But after we saw a number of people riding ebikes thru the campground, we decided to be scofflaws and rode our bikes on the paved Pa’rus trail down the middle of Zion canyon. It was spectacular, and here are a few photos.
-
A different strategy is to simply disconnect the batteries while the trailer is storage. This has worked well for me. I described my battery disconnect switch HERE.
-
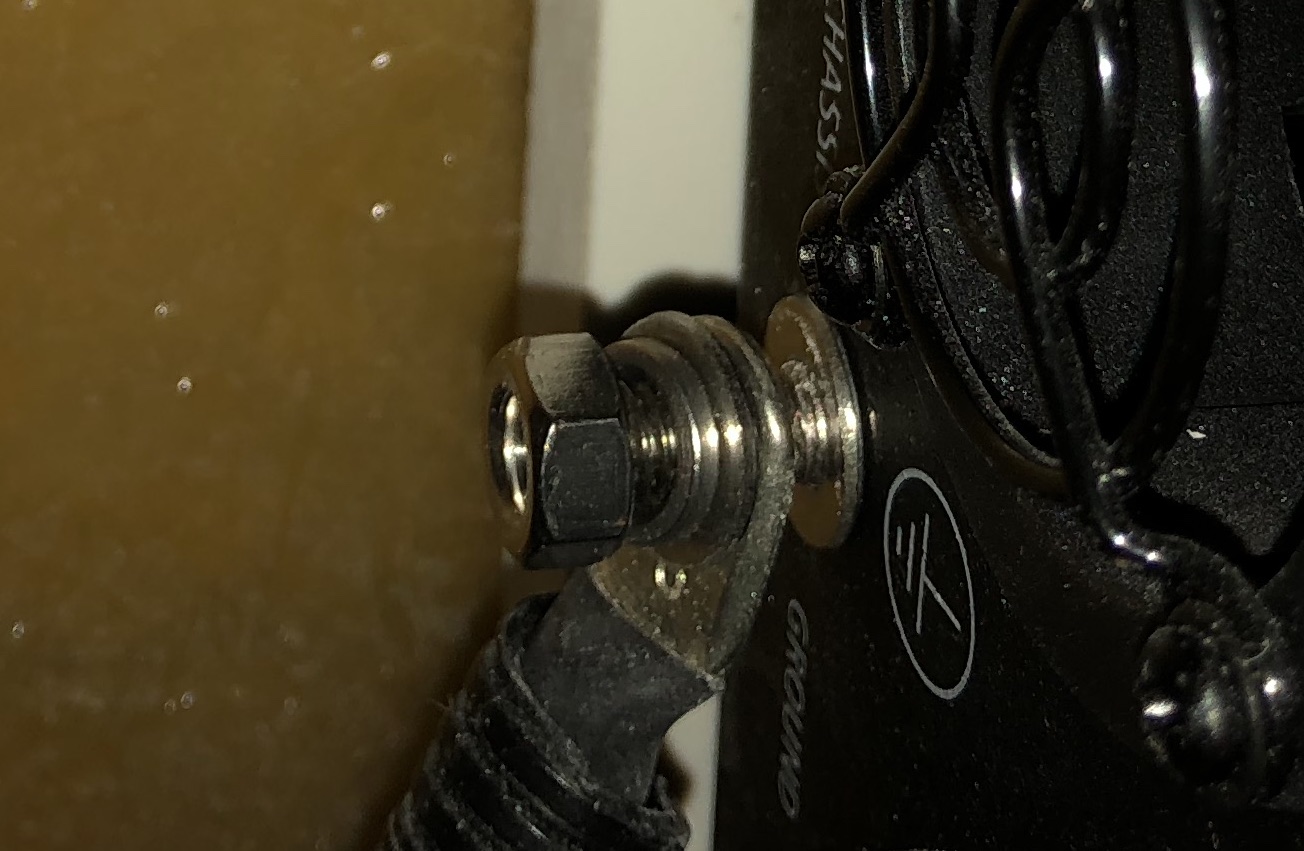
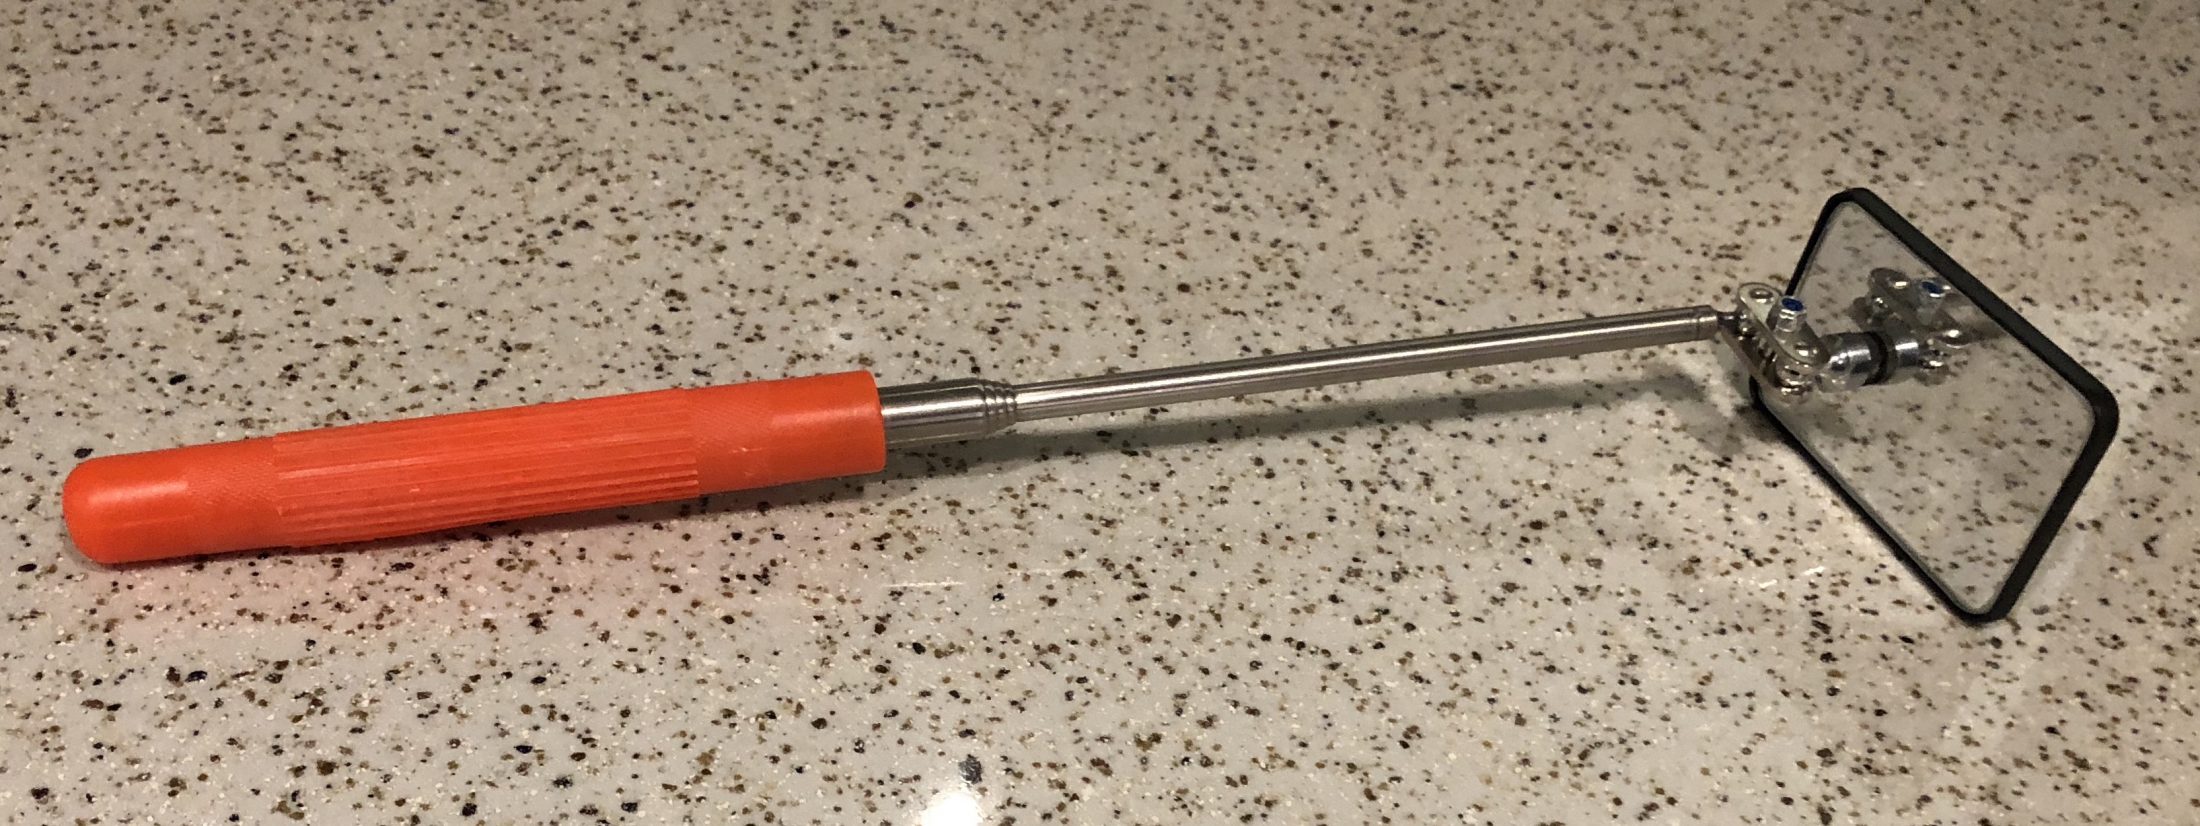
First, Kudos to John Davies for discovering this problem. Second, Kudos to Oliver for a detailed description of the problem and solutions, and their willingness to pay for an RV tech to check out and correct the problem. When John first posted about the problem I went and looked at my ollie. This end of the inverter is not visible from the compartment opening. So I used this telescoping mirror doodad I had in my home toolbox. I could see the cable connected to the terminal, and I felt okay that the unit was grounded. When Matt Duncan posted details about the problem I realized that I did not know whether my grounding cable had a flat washer installed between the ring terminal and the inverter. I could not see well enough back there. So I went back to the trailer and put my cell phone down there and took enough photos that a few were in focus. Hmm. Not clear. I see this metal ring, indicated with the red arrow. Is that a flat washer, or part of the terminal on the inverter chassis? I am going to have to unscrew the nut to answer this question. Oliver offered to pay for an RV tech to look at this, which is really good. But I figured I could handle this, saving Oliver $150 and avoiding the hassle of scheduling the RV tech. Matt Duncan’s instructions had a bunch of good safety guidelines. Pop the circuit breaker, unplug 30 amp power cord, disconnect battery cables from the inverter. I did not do any of those. My Ollie is under cover when in storage, so no solar when in storage, so I have a battery disconnect switch. With the battery disconnected, I figured there are no electrons coming into the inverter, and so I did not follow any of Matt’s procedures for electrical isolation. (If I am wrong about this safety consideration, I know a wiser forum user will speak up!) I used a 10 mm socket wrench to loosen the nut, and then hand loosened the nut further, being careful not to take it all the way off and have nuts and washers spill to the bottom of the compartment. I could not convincingly determine whether my unit contained the problematic washer, either by touch or with my mirror. However, a cell phone photo shows that the metal ring is part of the terminal on the inverter chassis. No washer. Tighten up the nut, and all is good.
-
We got a 9 x 12 rug from Amazon, this model, and we are very happy with it. It is waterproof and can be hosed off. The original fold lines remain in place in the rug, making it very easy to fold up and to fit inside the supplied carry bag. We store it in the tow vehicle. The nine foot dimension folds in thirds, and a few times where space has been limited, we have folded one third underneath and used it as a 6 x 12 rug.
-
I don't think there is a way to save user-specific bookmarks within this forum. My method is to copy the URL of the post and paste it, along with some notes, in an outlining program. I can then search for any term, in this case "composting toilet." You could do the same in any text editing program such as Word or Google Docs. Another strategy would be to save bookmarks within your web browser. I think all browsers will allow you do to this, and probably most will allow you to create folders to organize these many bookmarks. Many browsers have the capacity to sync your bookmarks between multiple devices.
-
I guess your query is addressed to me, Discus277. (Note: It is helpful to readers if you select text from the post you are referring to, and then click the Quote button.) We get 14 MPG while towing Ollie. Without the trailer we get 18-20 around the city, and 26 MPG on the highway. Our range for tank of fuel is about 275 miles when towing, and 550 miles on the highway without the trailer. Our vehicle is not a diesel. We like the Audi Q7. Comfortable vehicle, and plenty of power for towing.
-
I just discovered a new app that lists boondocking sites called iOverlander. They have apps for iPhone and for Android. They also have a website: http://ioverlander.com
-
Long before I picked up my Ollie, Buzzy had posted about painting the hitch orange to increase visibility in a car's backup camera system. I added this project to my ToDo list. My idea was to use tape to mask the area and paint a cross on the coupler, with the vertical and horizontal lines at the center of where the hitch ball should align. I then found an easier solution. I simply used tape to make the cross marks. It works great, especially when I am hitching up alone. The tape is still in decent condition after two years, but I may need to replace it next year.
-
Spike, I was the one who posted about Kodachrome State Park. After my post, Phil Andrews from OTT contacted me and I wrote a story on Kodachrome State Park that appeared in the Oliver Newsletter. Kodachrome State Park is a great park, and close to Bryce Canyon. They take reservations, so it may be hard to get a spot in a couple of weeks. I think some Utah State Parks have some campsites set aside for first come first serve use. We have stayed at a great NFS campground nearby called Red Canyon, which is about ten miles west of the cut off road to Bryce. There is also a great protected bike path in this area that follows Highway 12. A distance rurther northeast on Highway 12 near Boulder is the Calf Creek BLM Campground, and it is very nice. The campgrounds in Zion NP and Arches NP are really nice. They take reservations, so it could be difficult for you. The campground in Bryce NP is not so good, but Kodachrome SP and Red Canyon NFS are nearby. The campground in Capitol Reef NP is very nice; it used to be completely first come first serve, but I just looked at the Capitol Reef NP webpage and it says now most campsites can be reserved. but a few remain first come first serve. In Canyonlands the Willow Flat Campground in the Island in the Sky is all first come first serve. The Squaw Flat Campground at The Needles section of Canyonlands NP has part reserved and part is first come first serve. The area around Moab, near Arches and Canyonlands has a lot of BLM land with great free campsites, as well as BLM campgrounds. Mike mentioned Horsethief BLM campground, which is really nice. We like the BLM campgrounds near Moab along the Colorado River. The only amenities are pit toilets, a fire ring, and a picnic table. There are also good BLM sites near Capitol Reef NP. There is a great book on boondocking sites in Utah that I posted info about HERE. The authors also have a guide to Arizona. My sister camped last year with her Casita at Escalante Petrified Forest State Park, and raved about it, so we made reservations to camp there later this month. Other Utah State Parks that are supposed to be nice include the aforementioned Snow Canyon State Park, Sand Hollow State Park, Goblin Valley State Park, and Quail Creek State Park. Goblin Valley State Park is high on our list, but we have not been there yet. I have heard mixed reviews about Coral Pink Dunes State Park; beautiful scenery, but some people are turned off by all of the ATV activity. That is a good plan. Many of the Utah State Parks have water-electric sites, but those parks tend to reserve first. Maybe you could reserve commercial hook up campgrounds for the weekends, and use state or national parks or BLM land for mid week. There are a lot of commercial places in Moab. We stayed at Wonderland RV Park in Torrey, near Capitol Reef NP, and it was nice. There is a good thread on the Airstream Forum that maybe useful. Our last trip to Zion was two years ago while our Oliver was being built. We checked out the campground right next to the entrance, Zion Canyon Campground, and it looked AWFUL. Closely packed rigs with hardly any space for a picnic table. I have heard good things about Zion River Resort Camp, which is about 15 miles west of Zion NP. We have learned to be advance planners, and we have a campsite booked at Zion's Watchman campground during October. If you head south from Moab, the dispersed camping on BLM land in the Valley of the Gods is the prettiest campsite I have ever found. Info HERE. We then stayed at Gouldings, a nice commercial RV park near Monument Valley. Finally, since you are focused on Highway 12, among my collected bookmarks is a guide from Roadtrippers on Highway 12. I will send you a PM with the dates we are visiting Escalante Petrified Forest State Park and Zion NP, and maybe we can meet up. While we are not musicians, we appreciate music!
-
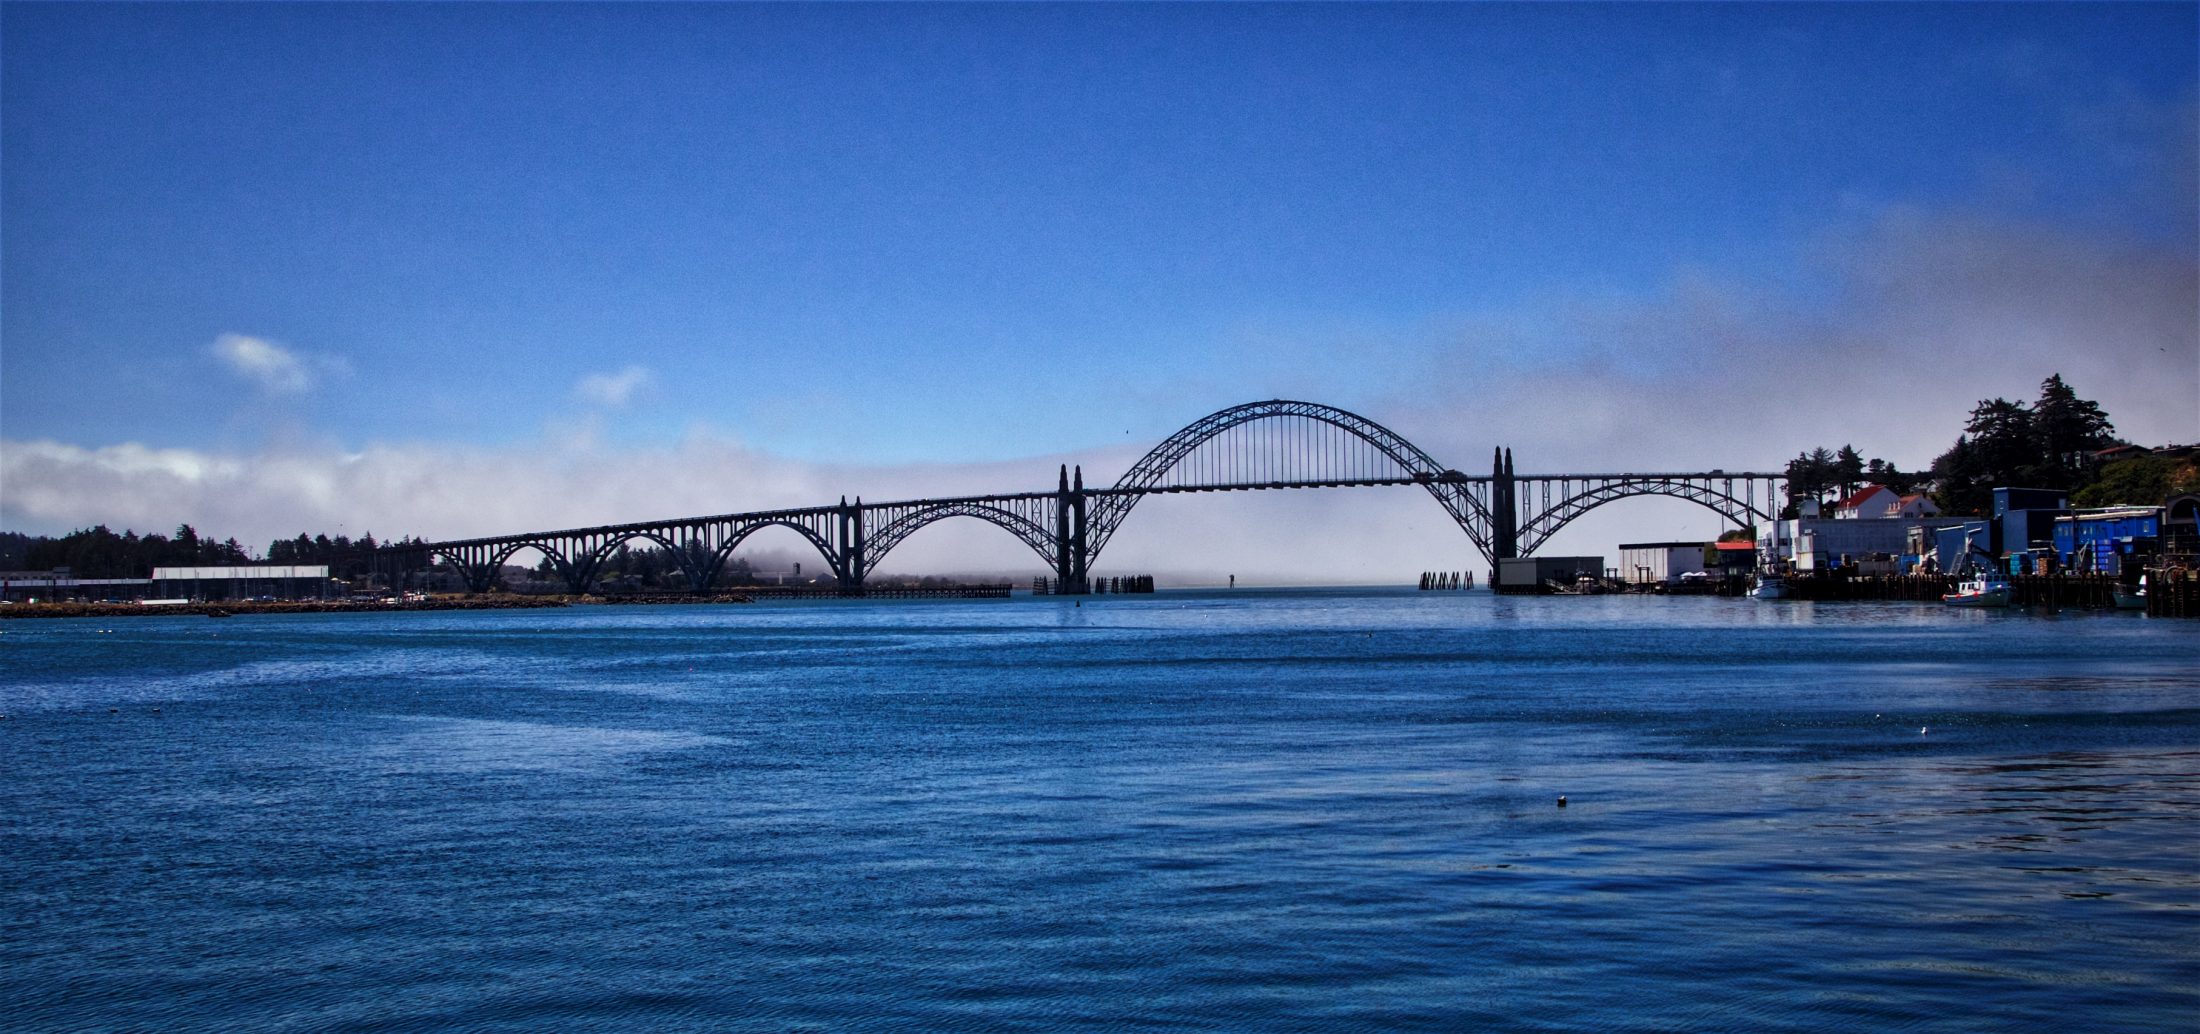
We went to the Oregon coast this past July with our Oliver, and it was fabulous. We stayed at Fort Stevens State Park, and it was great. Bring your bikes as, the park has great bike trails. One other thing. Oregon has fantastic highway bridges along Highway 101. They are treasures, aesthetically, architecturally, and from an engineering standpoint. If you like the bridges, there is is a nice free museum called the Historic Alsea Bay Bridge Interpretive Center, in Waldport, OR. It is just south of the Waldport Bridge that crosses Alsea Bay. The bridge at Newport, OR.
-
Legacy Elite II Dometic RM2454 refer
DavidS replied to raptor's topic in Mechanical & Technical Tips
I recently posted about how Berts RV Service fixed my Truma AquaGo. When Bert was finished was finished, he wanted to hook a manometer to the propane line. If there are no leaks, the pressure should remain constant. He tried hooking it up to the stove, but the connection did not fit. I suggested he remove the access panel for the fridge since there is a propane connection there. He did that, and although he did not find a fitting he could connect the manometer to, he did discover something. When he pulled off the access panel and reached in he said “The drain tube is not installed correctly.” I learned is that the fridge has a tube to drain condensation from the fridge. On the Oliver this drain comes thru the fiberglass just below the lower access panel, and protrudes about an inch. This is just to the left of the steps. He said the problem was that the drain tube did not have a P-trap. Even I know that every sink has a P-trap. A P-trap is designed to collect water, and the water prevents gases from going from the sewer to the sink. If the drain tube on an RV fridge lacks a P-trap then hot air from the outside will conduct heat into the fridge. The P-trap acts as a barrier, preventing the hot air from entering the fridge. We were able to quickly make a P-trap by anchoring the drain tube to other things in the compartment, in two places, with some cable ties. I did a google search for “rv fridge p-trap drain tube” and found that others agree with Bert. I have posted previously in this thread that our fridge struggles to maintain temperature in hot weather. Bert said that the P-trap will likely solve this problem. I asked Bert whether this P-trap needs winterizing in some way. He said no, the small amount of water will evaporate quickly, and that the tubing is flexible and could expand if needed. Bert showed me the fins at the back of the top shelf of the fridge, below the freezer. These fins are designed so that water that evaporates in the fridge will condense on the fins, and then drip into a drip tray. This drip tray leads into the drain tube. Bert suggested that before starting on a trip in hot weather I should “prime the pump” by pouring a little water into the drip tray, so that the water fills the P-trap. Sounds like a good idea. -
Truma tankless water heater option - yes or no?
DavidS replied to John E Davies's topic in General Discussion
We got the Truma AquaGo water heater, and we have been happy with it. Until it started leaking last week… We were on our way to meet up with two groups of friends at Moon Lake, which is in the eastern Uintah mountains, north of Duchesne, Utah. The NFS campground is at 8100 feet, in an area with almost no cellular reception. We stopped for lunch at a rest area west of Duchesne, and since there were no rest rooms, we turned on the water pump and used Ollie’s toilet. When we came out of the trailer we saw water on the ground, and water dripping from the Truma AquaGo access panel. I opened the access panel and turned the water pump on and saw water gushing into the interior of the Truma AquaGo. Not good. Fortunately, there was no water in the compartment under the curbside bed. I opened the Truma AquaGo instruction manual, and it provided no guidance here. The manual said the unit had a 12 month warranty, but we picked up Ollie 23 months ago. Oh well. We had good cell reception at the rest area, so I called Jason Essary, who was very helpful. Although he did not have a quick fix, he did provide me with info on the RV service shops in Utah that they had used for warranty work, and he contacted them. He also provided me with info the two RV Service Centers near Salt Lake City that Truma lists on their website. Finally Jason confirmed that that we could isolate the Truma from the water system by closing the winterizing valve. Closing the valve prevented water from spilling out when the water pump was on. So we decided to go ahead with our camping trip, but without hot water in the trailer. We heated water for washing and dishes on our outside stove, like we did as tent campers. The camping trip was great, and I am glad our hot water heater problem did not spoil the fun. I called the two RV service shops that Jason had given me, and they said they don’t work on Trumas. I called the two shops that are Authorized Truma Service Centers. Airstream of Salt Lake City said they only work on Airstreams. The other shop said they don’t work on Trumas, despite being listed on the Truma website. I next called Truma, and was connected to Stewart Neville, Truma’s Regional Mobile Service Technician based in Southern California, and he was awesome. First, he was pissed that the Authorized Service Centers were of no help, and said that he would deal with them. Second, he asked me if I had the extended 2 year warranty. Huh? It turns out that when I picked up Ollie there was a form that said if I register the Truma online I get an extended warranty. I was pretty certain I had, and lo and behold, I found the email from Truma with the subject line Extended Warranty Confirmation. Remember I said we purchased Ollie 23 months ago? Advice. If you purchase an Ollie and get the Truma AquaGo, do the online registration and get the free extended 2 year warranty. So now I had to find someone to repair the unit. Two years ago a friend recommended a local shop. They have good online reviews, and I had used them to repack my wheel bearings. I called them, and they were unfamiliar with the Truma. I then googled “RV service,” and google autocompleted with “RV service near me.” Okay. I remembered forum posts suggesting that many RV repair shops are incompetent, dishonest, or both. (I am thinking about you, John Davies.) I found an independent guy, Berts RV Service, that had five five-star reviews on google. I know that reviews can be gamed, but these looked real. Additionally there was a blog post by someone who had used Bert Warner. And Bert was mobile. He came to me in his van, rather than me schlepping the trailer to an RV shop. Bert learned his trade working at RV dealer, before he went out on his own. He talked on the phone to Stewart from Truma, and learned how to remove and open up the Truma Aquago. He found the problem, a loose water connection fitting (correct word?) that was not even finger tight. He cleaned it, put on lots of Teflon plumber’s tape, and reconnected it. No leak! I was very pleased with Bert’s work. He used fresh butyl tape and silicone when he reinstalled the unit, and verified that there were no propane leaks. He even cleaned up the broken rivets and stuff from the floor. I had never heard of butyl tape, but it helps waterproof the chamber. I learned stuff watching him, and that doesn’t happen at a regular shop. All components can break, and I am glad I got this fixed. I don't want to dissuade prospective Oliver buyers from getting the Truma Aquago. We really like it. Bert told me he had looked up Truma Aquago online, and they have great reviews, unlike the Girard tankless water heaters. Leave it to Oliver to select the highest quality components. So, I'm a happy camper! -
Video - how to reverse a double trailer.... woohoo!
DavidS replied to John E Davies's topic in Towing an Oliver
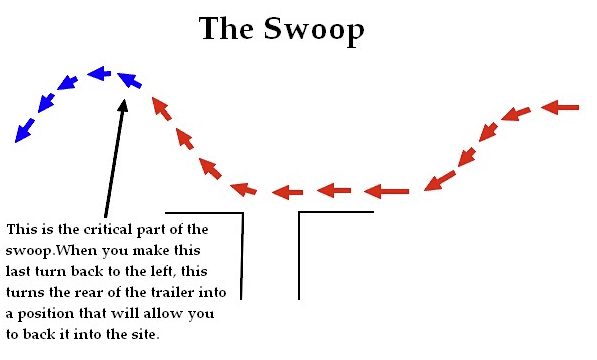
I spent a lot of time researching backing up a trailer online, perhaps because I initially lacked any skills and my first tries were such abject failures. I learned about trailer pivot points from the web, as well as strategies for using mirrors and spotters. While I am certainly not an expert at it, I am much, much better. We went camping last weekend I got Ollie straight in the center both at the campsite and at the storage facility, both on the first try. I don't think there are contradictions. This web site has a diagram with the same approach as in the video. [attachment file=Screen Shot 2018-08-22 at 5.10.54 PM.png] You are correct that the video has you approach the campsite from an angle, and then cut back away from the campsite, while the red-blue arrow diagram has you approach perpendicular to the campsite. Both of these approaches get the trailer at a good angle to back in to the campsite. I don’t know if one method gives a better approach angle than the other. But I don't think it is a contradiction. The other difference is that one method has the “critical” turn to the left. This really works, but I am not certain why. It could be that it changes the trailer angle slightly, or that it positions the tow vehicle relative to the trailer in a favorable position so that when you start backing up the trailer naturally heads into its destination. One variable is how wide the campground road is. If the road is very narrow, you may not have enough room to get the trailer angle positioned optimally when using the video swoop. In contrast the red-blue arrow version of the swoop can be done in a narrower space. Of course if the road is wide enough you have room to pull far enough forward to straighten out the trailer, as John put it. When I started using the Swoop at my storage facility, it did not work well. I finally learned when to make the turn to the right – the last red horizontal arrow. With practice I learned that for my vehicle I should make the sharp turn when the rear pillar of the driver’s door reached the far edge of the campsite driveway. Once I got that figured out this method has worked well for me at a lot of campsites. Finally, the S turn in the red-blue arrow version is much like the S maneuver that John’s Aussie trucker used.
-
Video - how to reverse a double trailer.... woohoo!
DavidS replied to John E Davies's topic in Towing an Oliver
When I picked up Ollie two years ago, I really did not know how to back up a trailer. Making things worse, putting our trailer into storage requires a 90 degree turn. This describes a backing up method called The Scoop or The Swoop, and it really helped me. The Swoop is much like John's S maneuver, “sharp left, then sharp right.” This diagram on The Swoop from this web site was also very helpful. [attachment file=Screen Shot 2018-08-21 at 12.26.16 PM.png]
-
John Davies posted a detailed description of how to attach a bubble level to the front of the trailer, without needing to drill into the fiberglass. I followed his instructions, and I am happy with the result. I can see the level in my rear view mirror, and use that with curved levelers.
-
Thinking about 30A Shore Power at Home? READ THIS FIRST!
DavidS replied to aquestell's topic in Mechanical & Technical Tips
First, I am not an experienced RVer. I have had Ollie for under two years. One time there was a problem with voltage being way too low, and we were able to move to another campsite. The other time was last May at the Oliver Rally at Lake Guntersville. I believe the problem was hot and neutral reversed, but my memory might be wrong on the details. I contacted the park people, and a guy came by on a golf cart. He seemed pissed off at me. “I just rewired all of these last month.” He checked it with a multimeter, and said “it is fine” and quickly left. I checked it again, and it still showed the same problem. The camper was very warm from our drive and we needed AC ASAP. After a quick google search I decided to hook up and hope that the Progressive Industries surge protector would protect us. The AC started up. Later that evening I found out the most of the 120V outlets did not work. None of the circuit breakers had tripped, but I finally figured out that the GFCI outlet under the bed had tripped. That solved the problem. Two days later Matteo Giovanetti came by to install our Micro Air Easy Start. Before he climbed up on the roof, I warned him about the hot - neutral reversal (if my memory is correct about the nature of the fault), and he said okay, not a problem. As part of the process, he had me flip off the circuit breaker under the dinette that controls the AC. A few minutes later there was a loud POP from the roof, and a little smoke from the AC unit. Matteo was not hurt, but I could tell he was a little shaken. He said “Of course, the hot - neutral reversal,” and asked me to shut off the 30 Amp breaker at the campground pillar, and I did so. The AC was not damaged, and I have verified that the Easy Start works. One last thing. A shout out to Matteo Giovanetti for great customer service from Micro Air. I have had excellent support from a number of companies that supply components to Oliver. -
Thinking about 30A Shore Power at Home? READ THIS FIRST!
DavidS replied to aquestell's topic in Mechanical & Technical Tips
I found my notes. I considered a combined circuit tester and voltmeter. This is currently $32. My notes include a digital model, similar to the one you found, for $9.60. The analog model I chose was $12 at that time, and my notes point out the very good price and the very good reviews. Why did I choose the analog model over the digital? Don't know. Could have been the very good reviews. The web site that suggested this setup used an analog gauge, and that could be one reason. Maybe because I am an analog type of guy. I dislike digital watches.... -
Thinking about 30A Shore Power at Home? READ THIS FIRST!
DavidS replied to aquestell's topic in Mechanical & Technical Tips
I posted about a simple and cheap setup to check both the circuit and the voltage of a 30 amp outlet HERE. Simple and easy. I use it every time, before I hook up. I found two campgrounds where there was a problem with the 30 amp outlet.
-
While I am not an aerobic-anaerobic expert concerning bacteria, I have long studied the yeast Saccharomyces cerevisiae in my lab. Saccharomyces cerevisiae is used to make bread, beer, and wine. When making bread, yeast primarily grows aerobically. However, when the oxygen is depleted the yeast switches its metabolism from respiration (using oxygen) to fermentation (anaerobic). Of course a byproduct of yeast fermentation is the production of alcohol, which many of us appreciate. The colon itself is anaerobic, and thus the microorganisms in feces must be able to tolerate the absence of oxygen. The most common colonic bacteria, Bacteroides, Bifidiobacterium, and Lactobacillus, are obligate anaerobes, meaning they do not grow in the presence of oxygen. In contrast, the Escherichia coli gut bacteria is a facultative aerobe, meaning it can grow under either aerobic or anaerobic conditions. I know yeast will grow aerobically, initially, and then transition to fermentation when the oxygen is depleted. The timing of the transition will depend on how much oxygen is available, and how many yeast were placed into the container (the inoculum size). There are a number of variables in Spike’s experiment: How much air was in the bottles, the size of the bacterial inoculum, and the relative ratio of obligate anaerobes to facultative aerobes in the dog poop. I looked at their web sites, and they did not provide any information as to what bacteria these products contain. I suppose it would be possible to analyze samples and figure out what they contain. I agree that additional more dog poop experiments are not warranted. Spike’s experiment did show that TankTechsRX sharply reduced the unpleasant odor from the bottled poop. Of course, a compound in TankTechsRX that inhibits bacterial growth could have the same effect. The best experiment would be two composting toilets, with only one using the TankTechsRX product. After a week, observers would be invited to give sniff tests to the two toilets. The observers would have to be blinded, meaning that the observers do not know which toilet was the experimental and which was the control. Probably more information than anyone wanted….
-
I thought some more about Spike's experiment. That will keep air out and thus only allow anaerobic bacteria to grow. Since air can get in to the composting toilet, a better test might be to leave the bottles uncapped and allow growth of aerobic bacteria. I have the regular toilet, not the composting version, so we use both grey and black tanks. We use a black tank treatment after every dump, but we have not been treating the grey tank. On our last trip my brother-in-law mentioned grey tank treatments, and your experiment prompted me to research this. The Camco product has good reviews. Does anyone on the forum have experience with grey tank treatments? I do not know a lot about plumbing, and maybe someone more knowledgable can chime in. I think the black and grey tanks are connected to a stack vent that goes out the roof, which would allow air into the tanks, even during storage. Is that correct?