DavidS
-
Posts
407 -
Joined
-
Last visited
-
Days Won
52
Everything posted by DavidS
-
John, I gotta disagree. We do not have a composting toilet, and we have done a lot of boondocking on BLM land in Southern Utah without any hookups or camping in state and national parks without a sewer connection. We can go 4-5 days without needing to empty our black tank. I agree that if you want an extended boondocking adventure of several weeks, then yes, the composting toilet would be needed. But you would still need to get fresh water!
-
Congratulations Ed and Nancy! I am sure you will enjoy your Ollie! I had a lot of trouble backing up our trailer, but I found a method called The Swoop that really helped me. It is described in this post. For a long time, I kept a printed copy of The Swoop diagram with the red and blue arrows on the dashboard. Like most things, it gets better with practice.
-

Any Concerns/Warnings About Buying a Used Oliver?
DavidS replied to DGLWFun's topic in General Discussion
I have a 2016 Ollie. I am not selling, but I would have no qualms about selling it to my closest friend. Ollies are built to last. I know of no RVs with a lifetime warranty. Even without a lifetime warranty, if you read through this forum you will see that Oliver provides outstanding service to owners even after the warranty period has ended. The 2014-2016 Ollies have a smaller sink than the newer ones, and also a better drawer under the sink. Other than that, not much has changed. With any used RV purchase, the buyer needs to make certain that components (furnace, fridge, etc) all work. Again, Ollies are built to last, and Oliver uses the best components. What stress fractures? I did a search and found no reports of stress fractures. -
Leveling Front to Back - Extremely Steep Csmpsite
DavidS replied to deniwell's topic in General Discussion
I followed John Davies' excellent instructions on installing a bubble level on the front of the trailer. I am really happy with it. Make sure you position it at a height where you can see the bubble level in the tow vehicle's rearview mirror. This makes it dead easy to level the trailer when you are using curved levelers. -
Leveling Front to Back - Extremely Steep Csmpsite
DavidS replied to deniwell's topic in General Discussion
Hi John, Message sent. I agree I would not use the X-chock stabilizer on a steep incline. However, I have noticed that the chocks are not really secure when up on legos, and so I will follow Mike's advice and use the X-chocks in a belts-and-suspenders approach. -
Leveling Front to Back - Extremely Steep Csmpsite
DavidS replied to deniwell's topic in General Discussion
An X-chock has been on my list for a while. I think in a previous post Mike had mentioned the X-chock as a valuable safety feature when the trailer is elevated on legos. Additionally, they are supposed to stabilize the trailer; my wife complains that the trailer sways when I walk around. Right now the highly rated BAL X-Chock Wheel Stabilizers are available for $55; camel says they are normally $70. I don't think that is a good idea to install the Stabilizer until the trailer is leveled and disconnected from the tow vehicle It was useful to read through the Amazon comments and questions on the Stabilizer. The manufacturer says that they are not chocks, they are stabilizers. One question was "Can we apply these before we unhitch our trailer to prevent any roll back when it comes off the ball?" One answer was very succinct: "BAL includes a notice in the package stating this caveat. The force applied by the wheels rotating opposite directions when you raise/lower the tongue jack will over stress the crossmembers and cause them to buckle. This is not covered under warranty. You still need actual wheel chocks until the trailer is leveled and your other stabilizers are down. " -
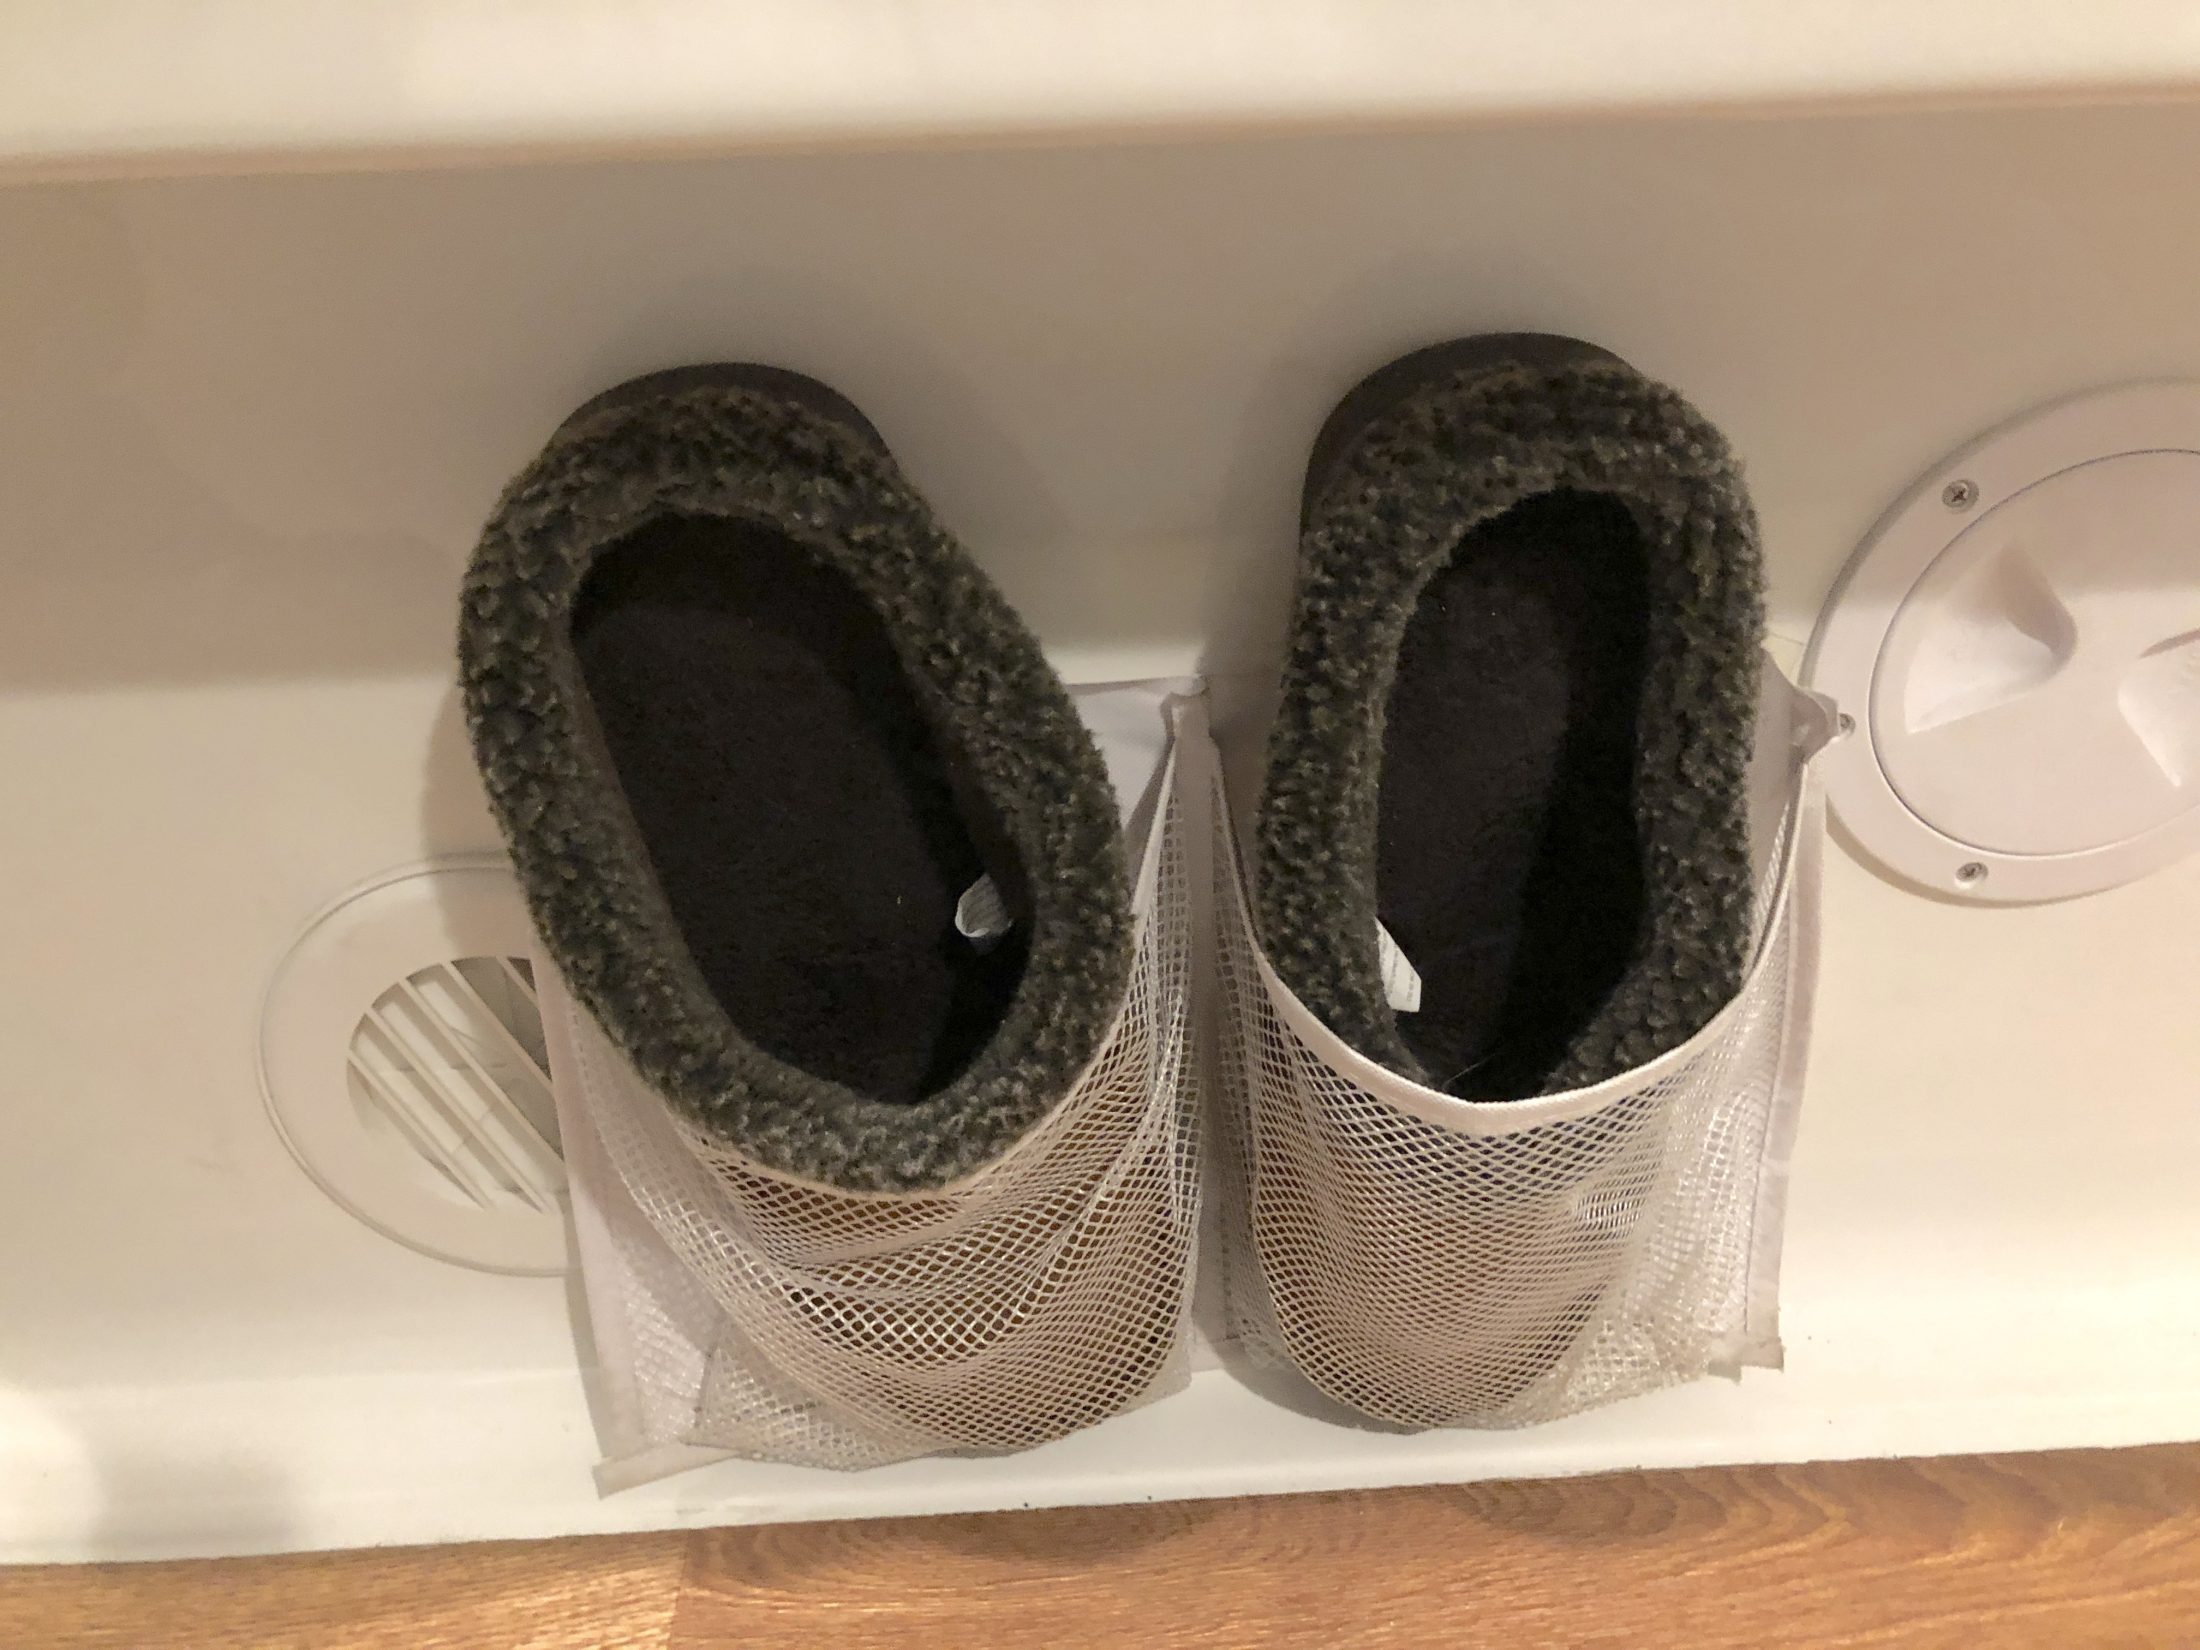
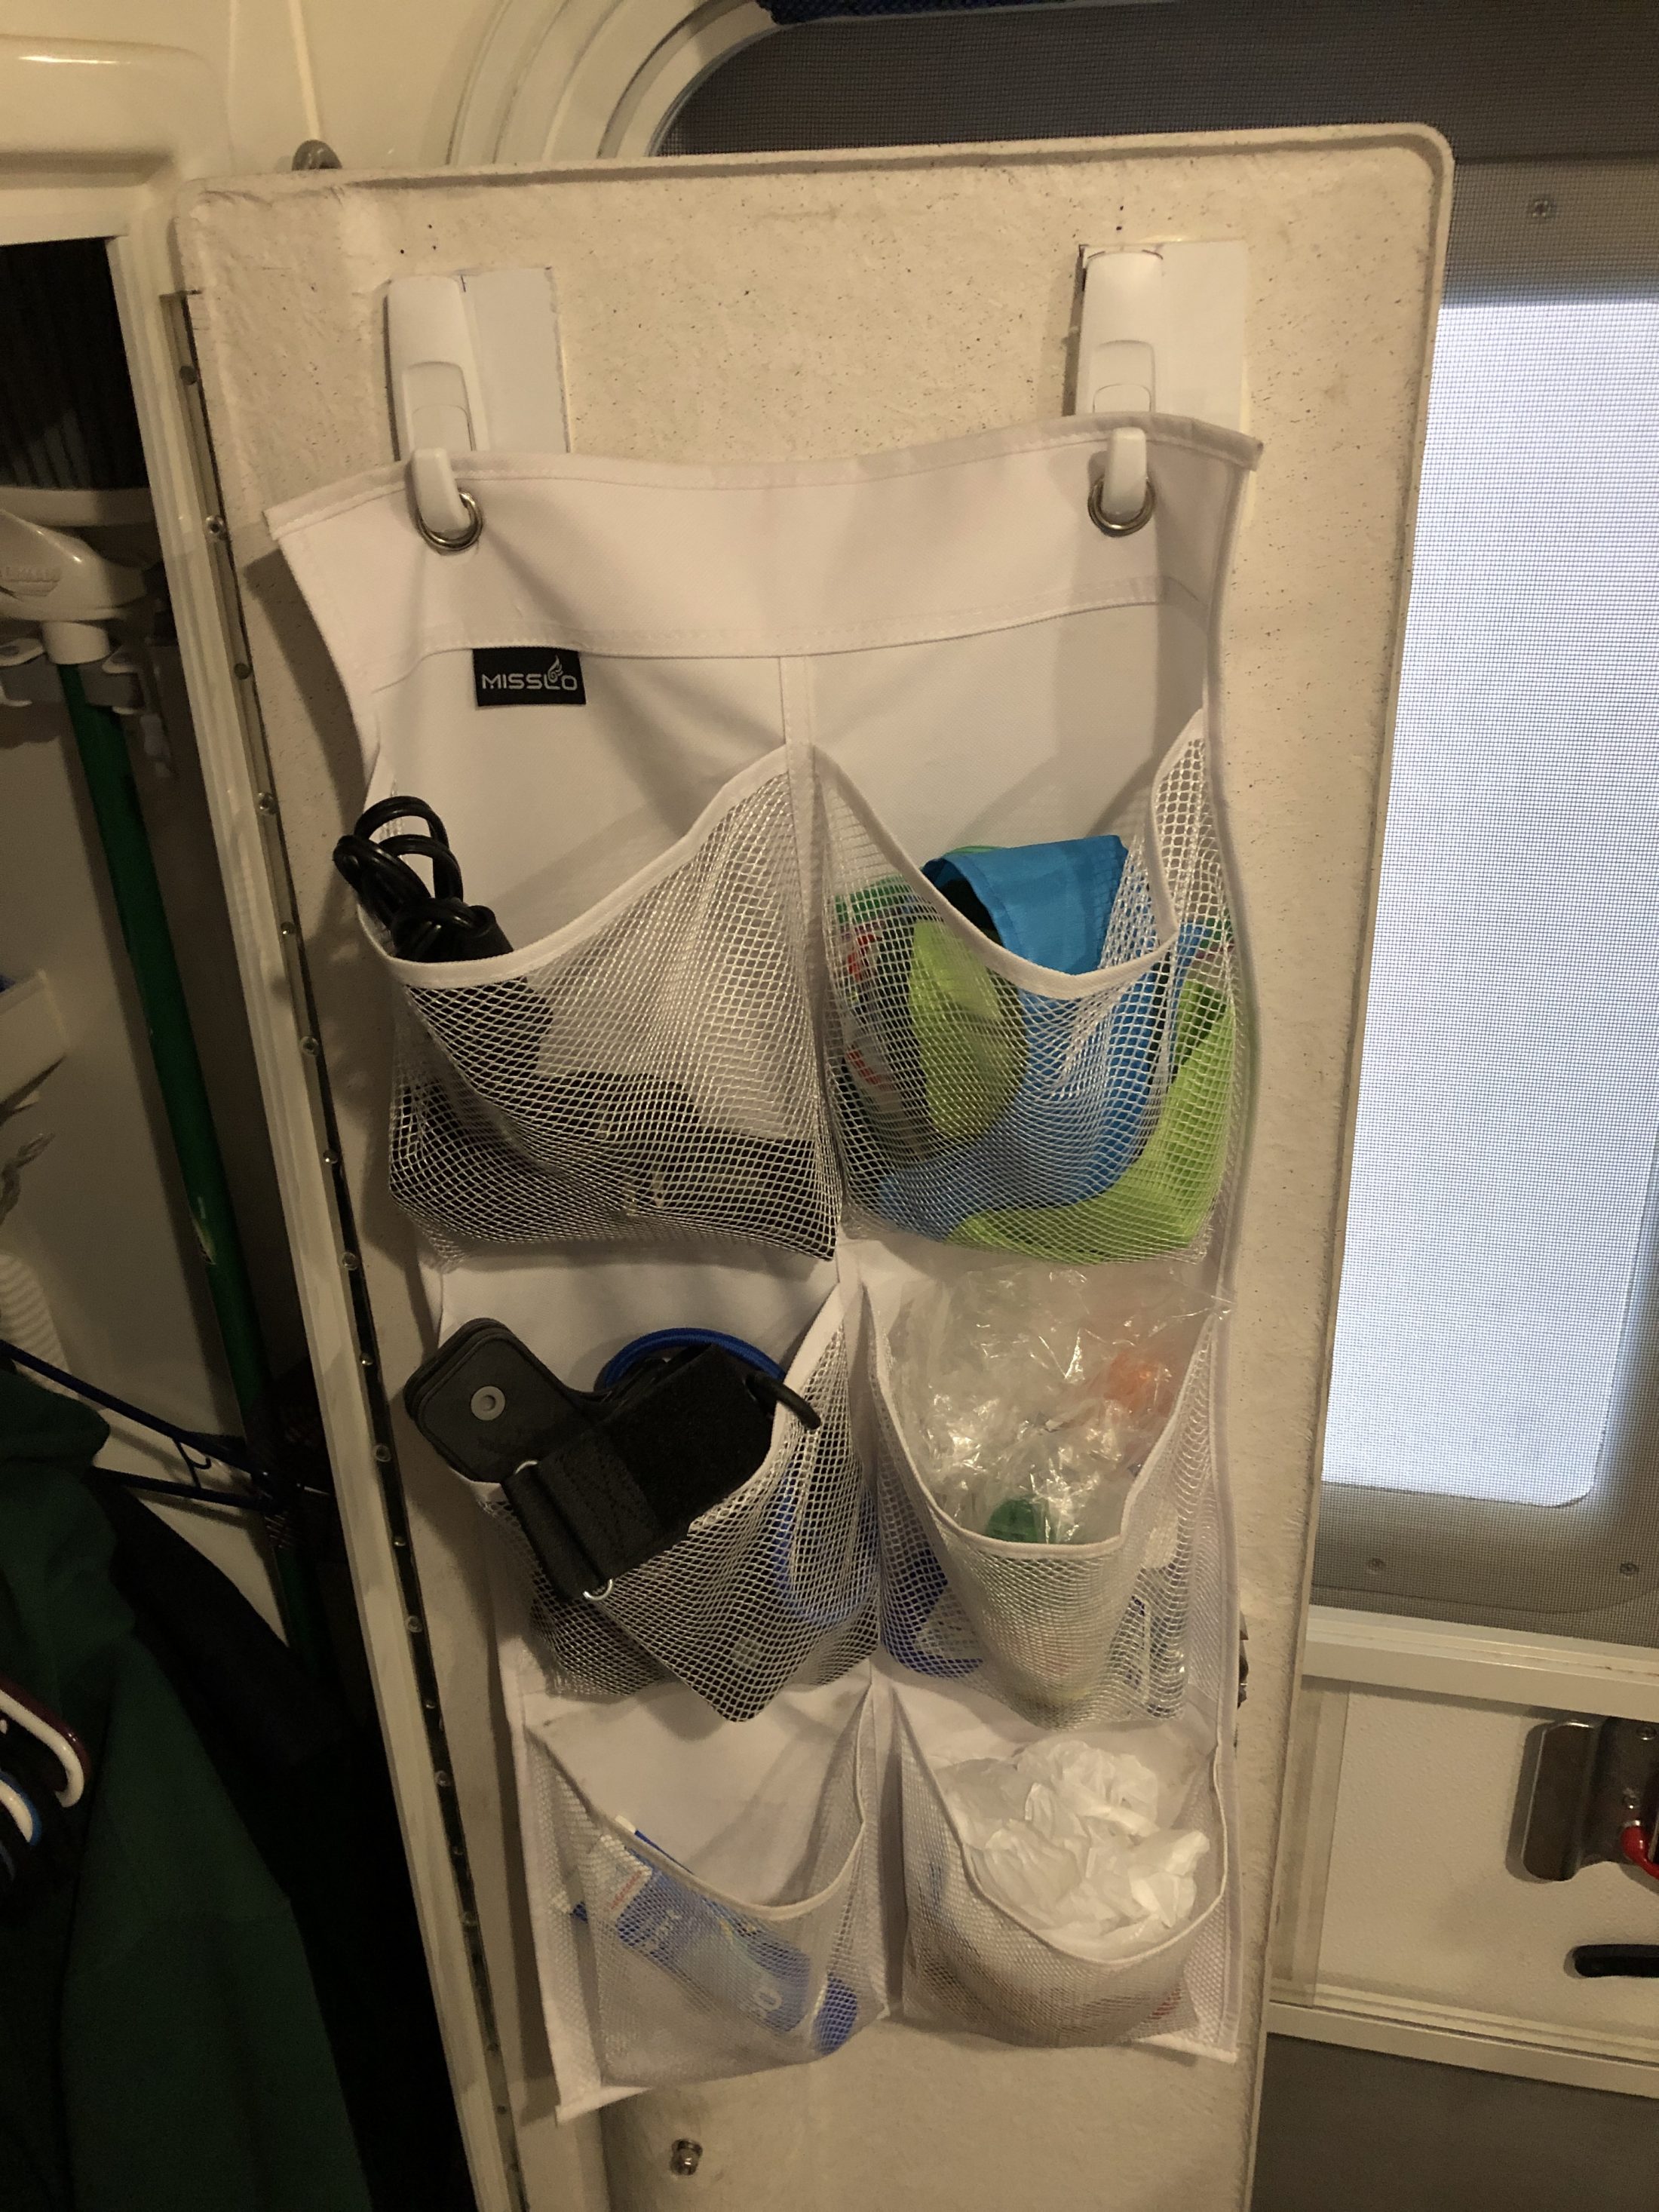
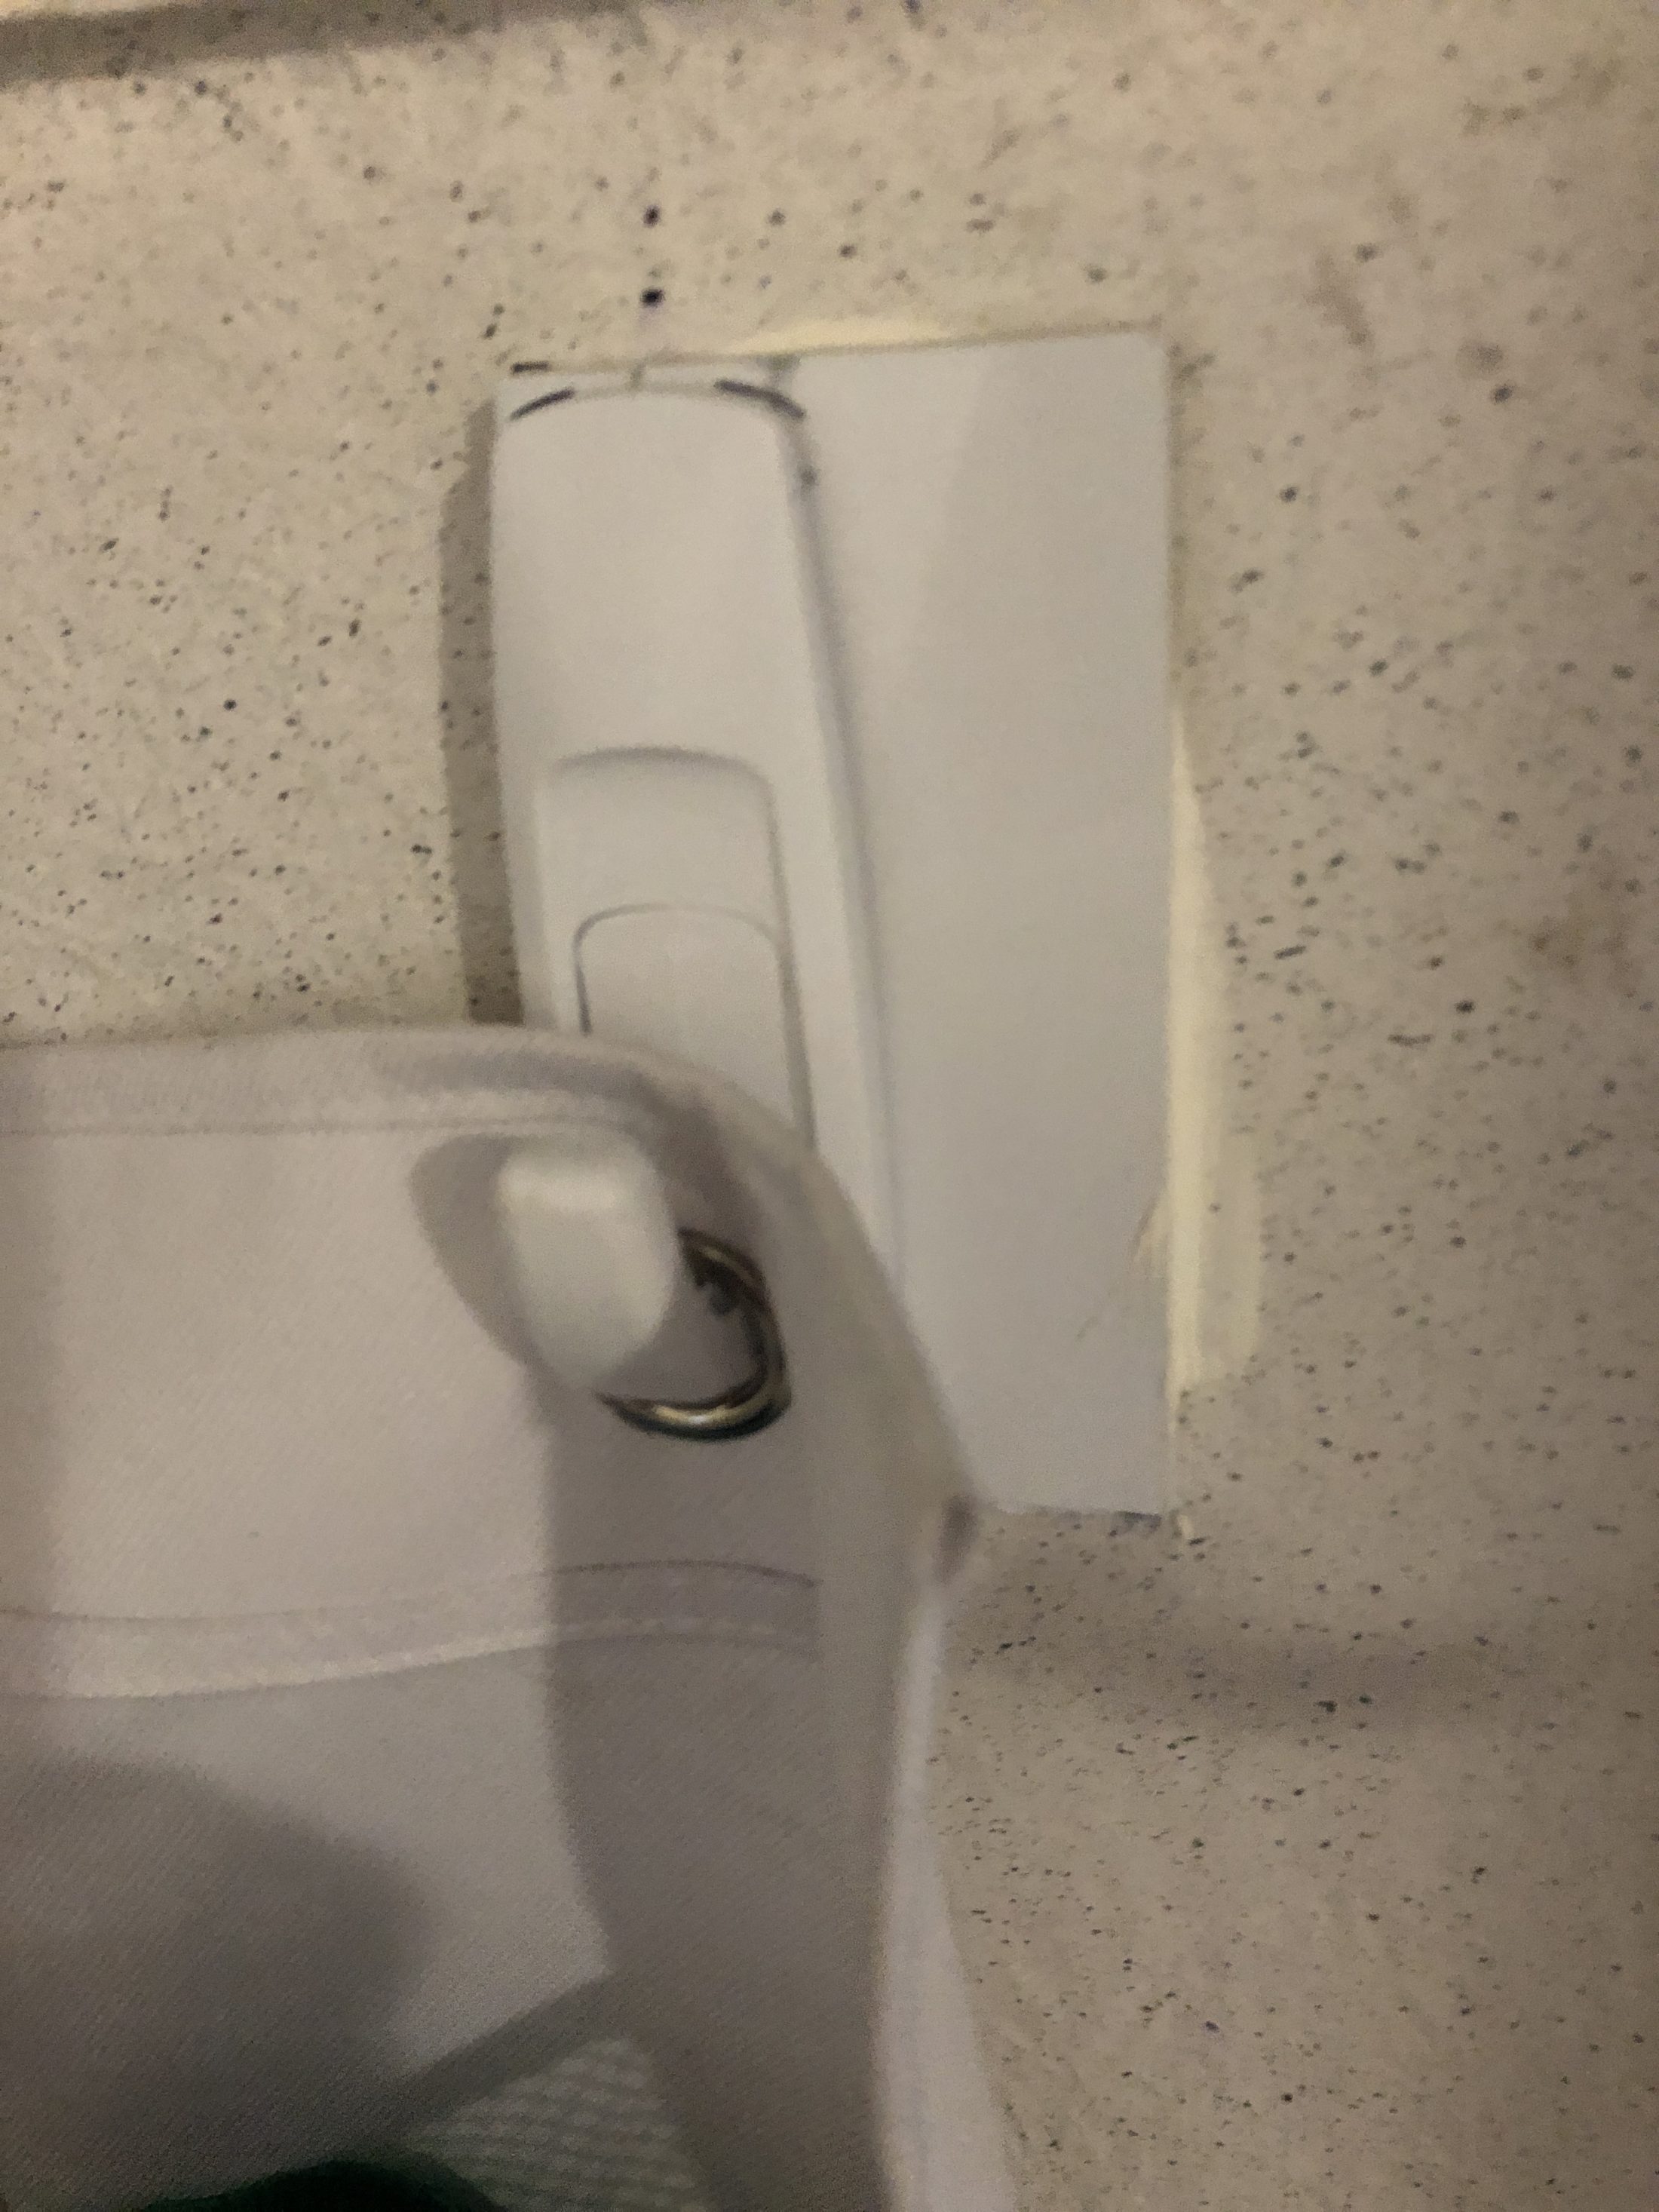
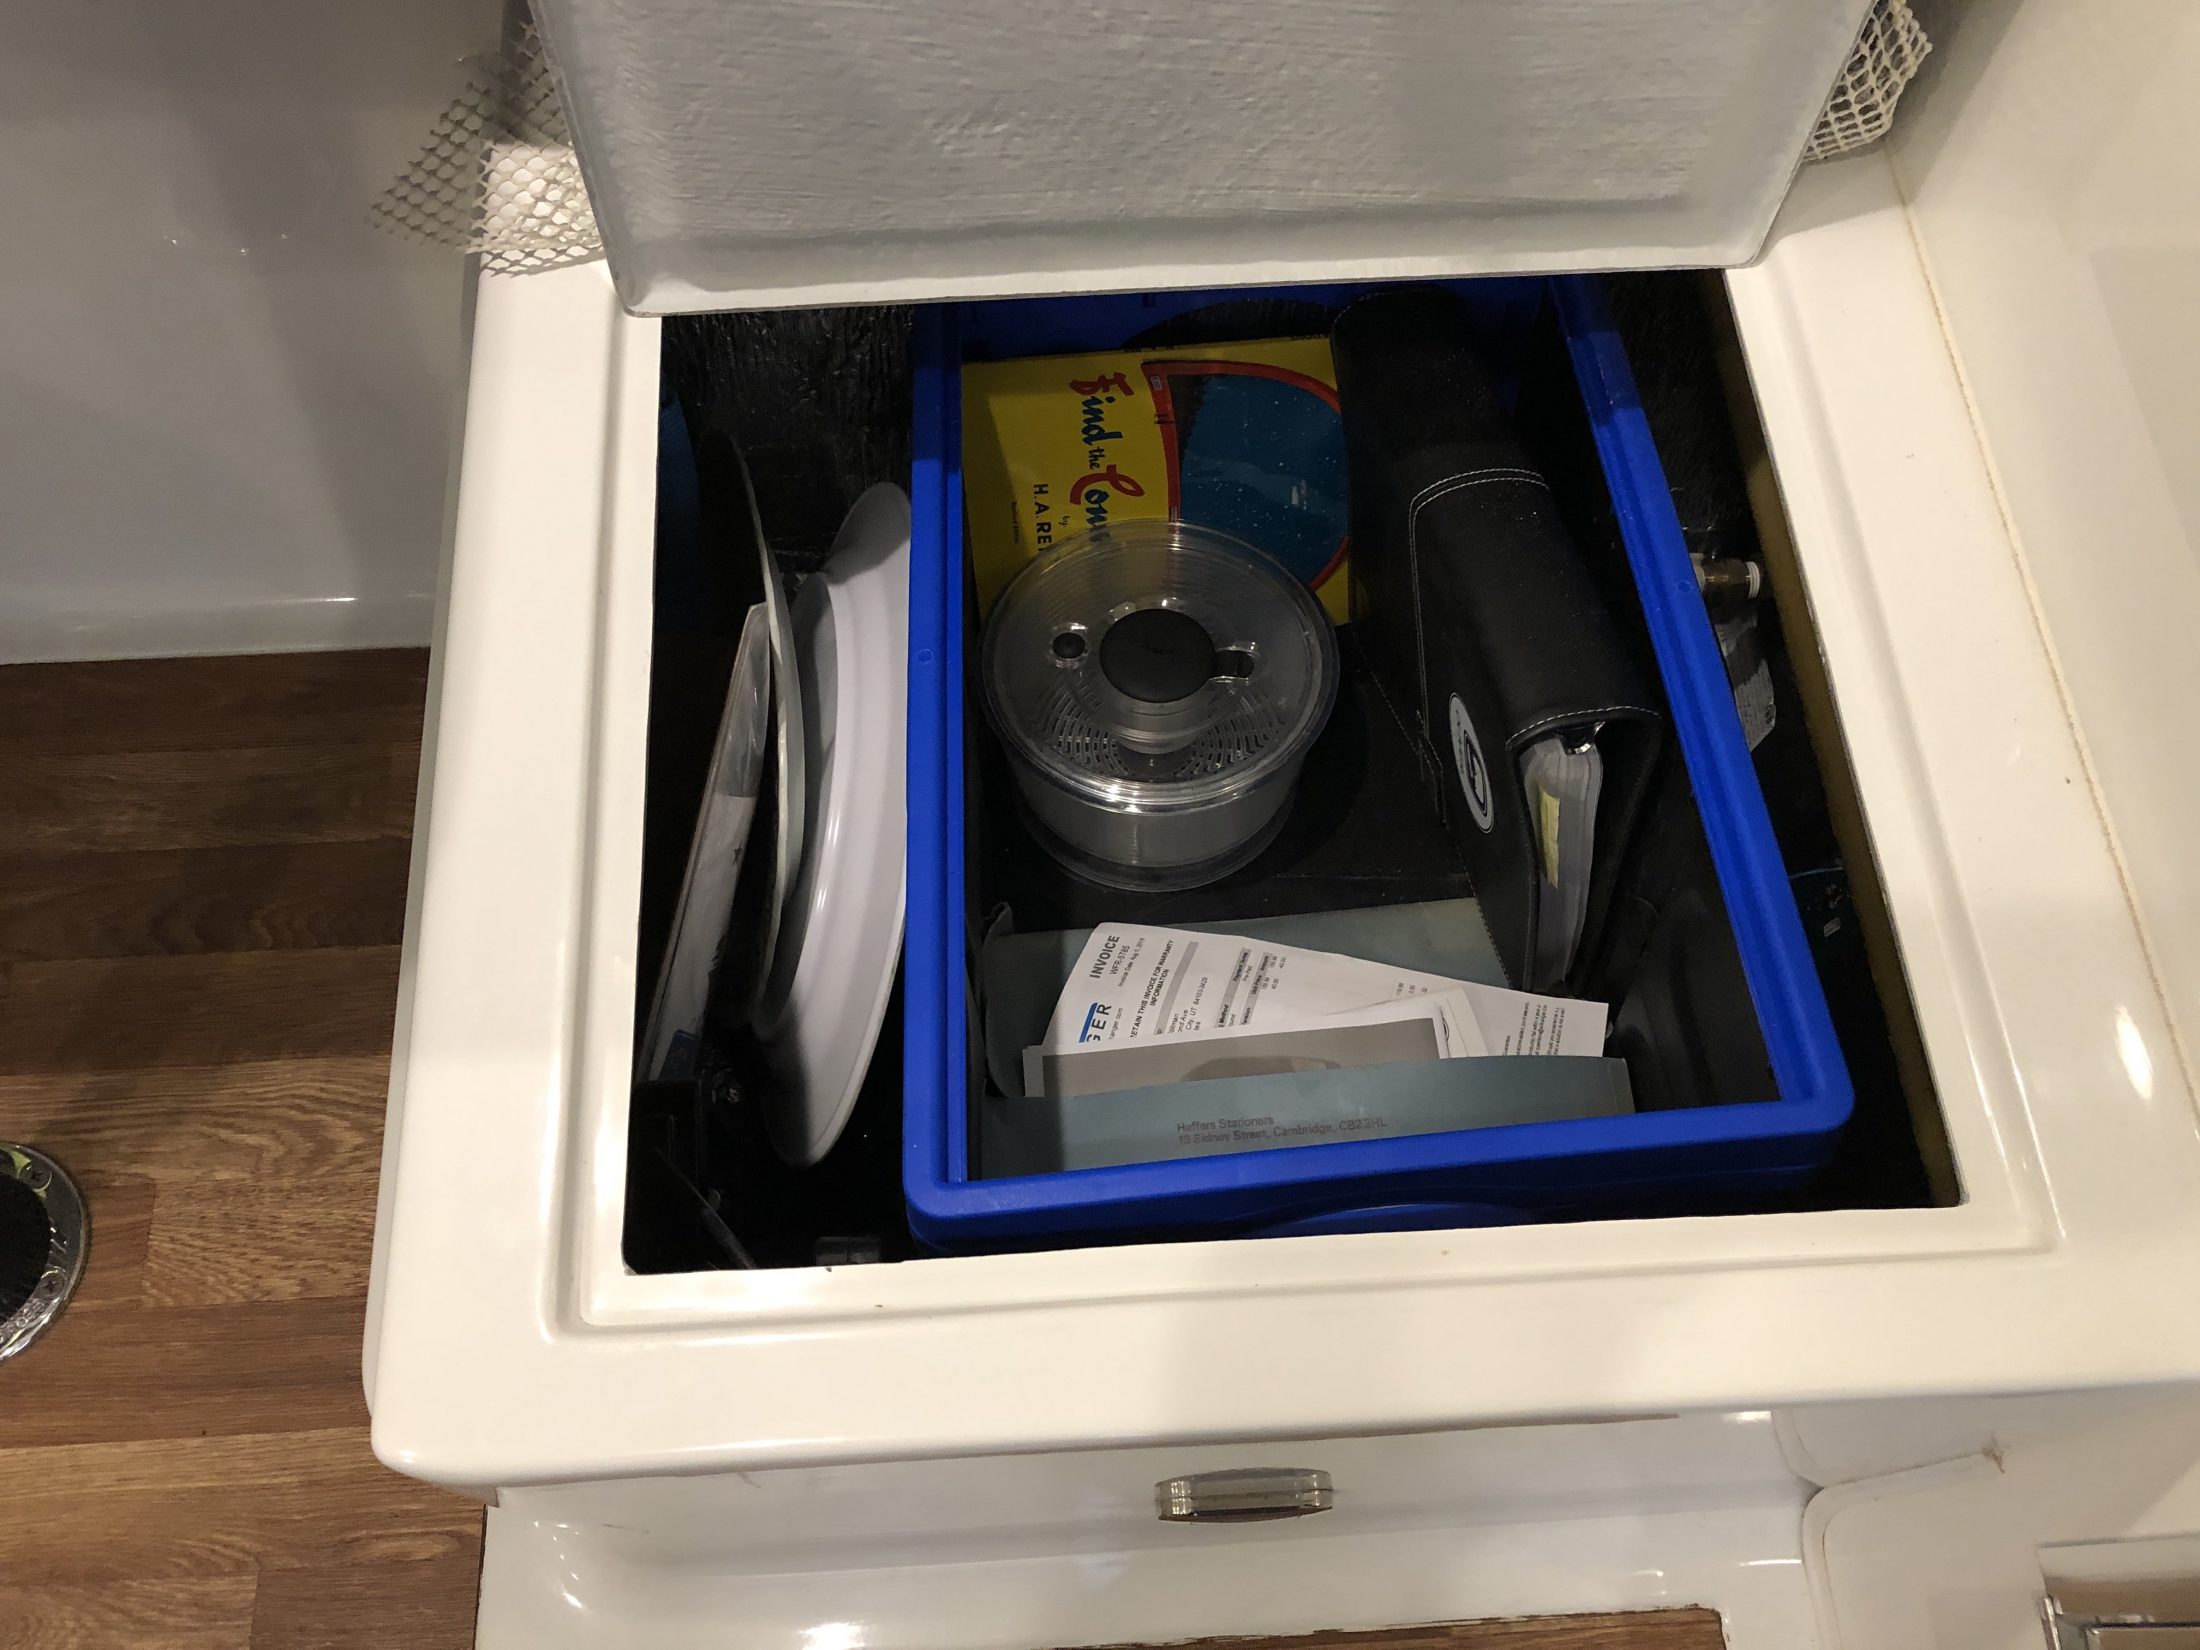
It is interesting that there are multiple solutions for mounting shoe pockets. I am a big fan of Command hooks, so I tried those to hang the shoe pockets. Total failure. They kept falling down, I think because the inside surface of the closet door is too rough for the hooks to adhere effectively. So I glued some small pieces of plastic onto the door, and then applied Command hooks; this worked. I think Bill’s idea of gluing on hooks is a better solution. I used three rows of shoe hangers. From the photo, it may appear that the shoe bag interferes with the closet latch, but it does not. I have not had the need to secure the bottom of the shoe hanger to the closet door. We do not store shoes in here, but rather other stuff. I cut off the bottom row that can hold two shoes and used double stick tape to put it up underneath my bed. I keep slippers in there. These are slippers with a suitable sole such that I can wear them outdoors. That has come in handy on more than one occasion. Shoe storage. For a long time, we stored stuff in the basement in milk crates. Most used stuff near the door, less used stuff at the back, underneath the nightstand drawer. I think it was Steve who pioneered the use of an access hatch to the basement under the nightstand, and then Oliver made it an option. I bought a hatch door from Oliver and installed it myself after I overcame my aversion to cutting through fiberglass. I moved the rarely used stuff (i.e. extra hoses, 50A to 30A adaptors) from the basement to the tow vehicle, and I found a rectangular plastic pan that I put in the back of the basement; we put shoes in there. While space is a premium in the trailer, easy access is equally important. To me, it makes sense to use this basement space for shoes, while the hoses and adaptors are further away. [Edit]. When I first posted this, the two photos in portrait mode were sideways, despite displaying the correct orientation both on my phone and my Mac computer. I figured out how to fix this. Open the photo in Preview on the Mac, rotate it 90° four times, and then save. Yes, it looks just like the original, but something in the metadata has been altered. I then deleted the photos from my post and re-uploaded them and all is good. There is something about the software running this forum that does not like photos in portrait mode ...

-
We scrape dishes clean and have a strainer. I agree with Overland that something in our plumbing is defying the laws of physics, or at least gravity. There is a long horizontal traverse in the under sink plumbing that I think is the culprit. I don't think this is a "clog" in the usual sense, but an air or vacuum bubble in the pipe, maybe where it connects to the vertical vent pipe. I hope someone with more knowledge will chime in.
-
I have had this happen several times, where the kitchen sink is clogged, but the bathroom sink and shower are both able to drain. The first time I figured something was clogged in the trap, so I pulled out the galley drawers and disassembled the under sink plumbing. I put it all back together and that solved the problem, but what a mess! So I bought a mini plunger to carry with us. I have had to use it twice since then when the kitchen sink clogged, and each time it worked quickly and easily in clearing the kitchen sink! I store the plunger in the curbside front under bed compartment, where the water pump lives. I also store my pex / sharkbite repair supplies in that compartment. An ounce of prevention.... BTW, I bought the mini plunger from a hardware store, but the photo is from Amazon.
-
Nan, Yes, GCWR means Gross Combination Weight Rating. I found this post on the Escape forum to be very helpful about the weight terms. Ken, In order to make a pdf file (or a docx or a xlsx file) able to be opened by others, you need to do two steps. First, you need to click the Select File button, identify the file, and upload it. If you do just that, then the file will not be accessible to forum users. After uploading the file, you need to click on the Insert Into Content button, to the right of the Select File button. This puts your attachment into the body of your message, and, more importantly, makes it available for other Forum users to see or to download.
-
Moved: Reply To: Towing with Audi Q5 3.0TDI
DavidS replied to DonnaDuane's topic in Towing an Oliver
I also tow an LE II with an Audi Q7, and it is a great tow vehicle. @DonnaDuane are correct about the WDH hitch. On page 98 of the Audi Q7 owners manual, it says: Never install a "weight distributing" or "load equalizing" trailer hitch on your vehicle. The vehicle was not designed for these kinds of trailer hitches. The hitch attachment can fail, causing the trailer to tear loose from the vehicle. You could have someone weld on a piece of metal that connects the receiver to the frame, and provides strength and permits a WDH. It probably voids the warranty. I have a neighbor that tows a 23 foot Airstream with an Audi Q7, and he had one installed. I did not like it because it really reduces the ground clearance. He had his installed by an RV shop in Ontario Canada called Can-Am that pioneered this solution. Having seen it, I think any good welding shop could copy the design. A bunch of discussion on forums HERE, and HERE, and HERE. The owner's manual also says: With a factory-installed or an aftermarket trailer hitch, the maximum permissible load on the ball hitch may not exceed 770 lbs (350 kg). It is recommended to use the maximum permissible load. What safety features are being disabled? On several occasions I have had an error message stating that the "ACC is not working, see the owners manual." The ACC is the adaptive cruise control, a fabulous feature. The owner's manual was no help, and the Audi service department was also no help. However, I have had this message while towing, but also without the trailer, and I conclude that the error message is not caused by the back end being lowered. Sorry, I do not know what is causing your problem, or how to fix it. I get this error message intermittently, which makes it hard to diagnose. On a couple of occasions I found road dirt and debris on the front sensors, and cleaning them off resolved the problem. Sometimes re-starting the car solved the problem, what I call the Microsoft solution. Sorry I cannot be of more help. Good luck with it. -
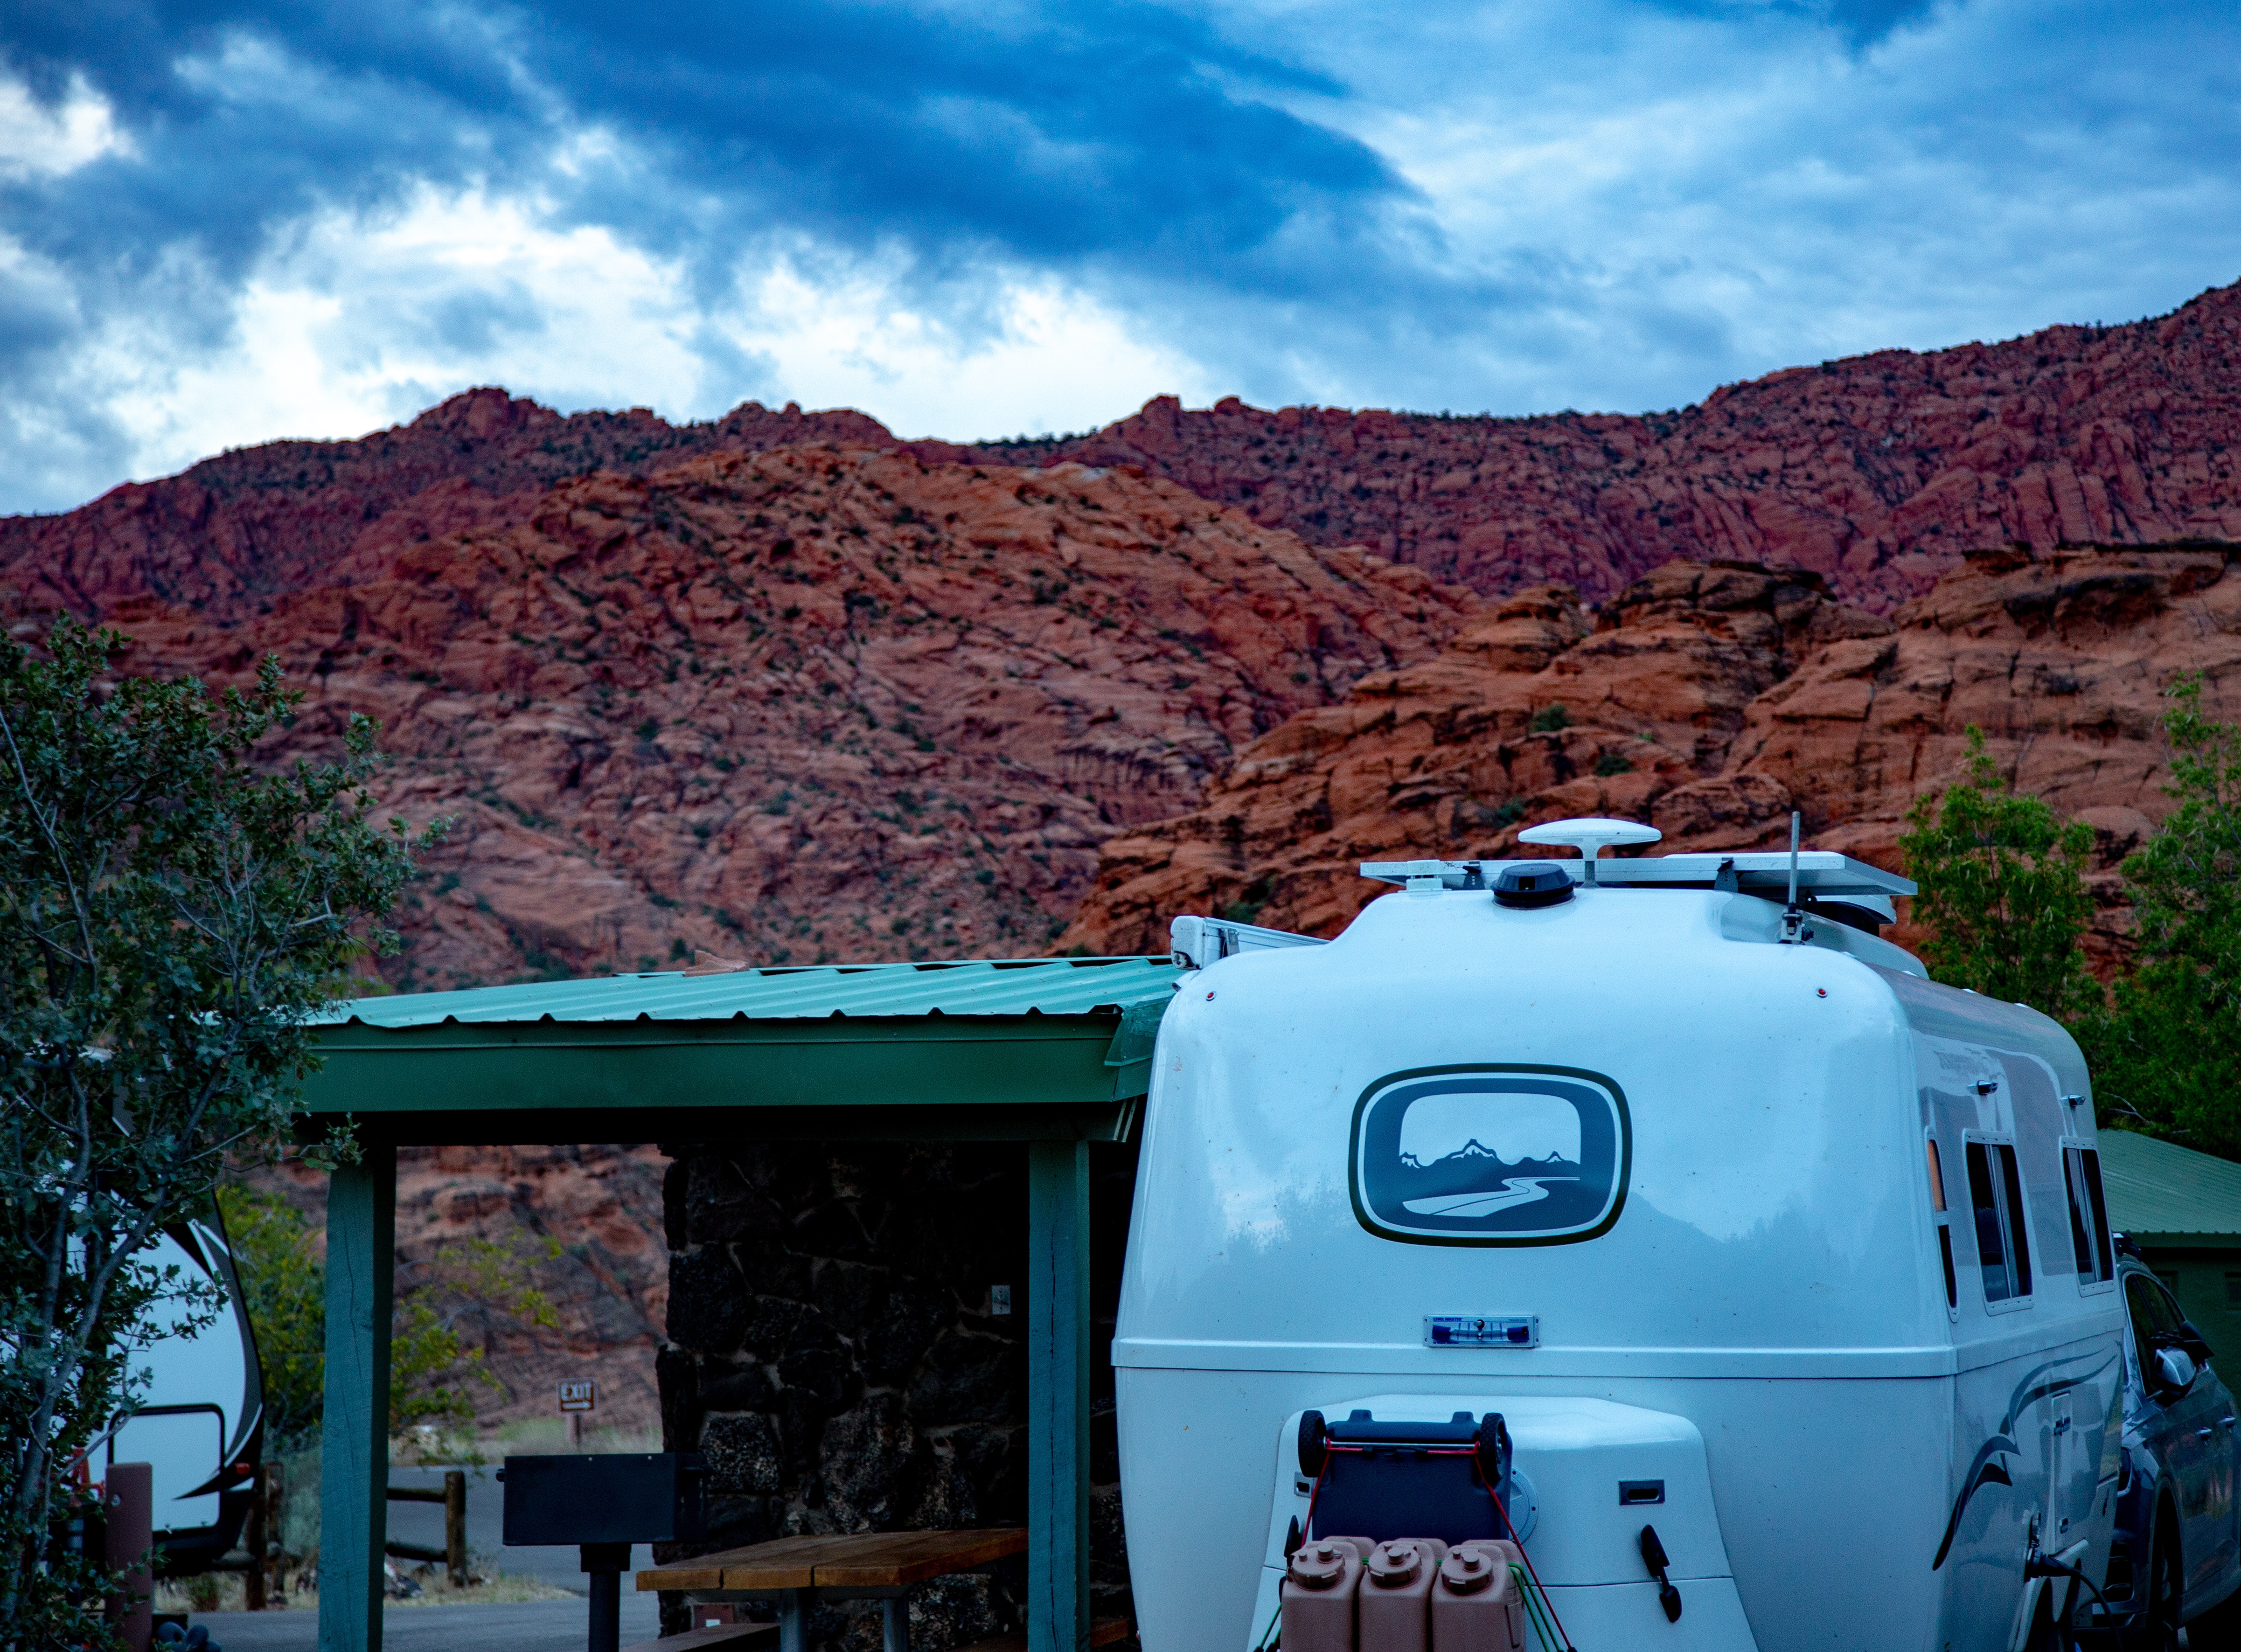
We could not go to the Lake Guntersville rally because we had a family gathering at Jalama Beach county park campground, west of Santa Barbara, CA. This is a really nice campground, right on the ocean. We had our Oliver, my sister had her Casita, and other family members rented cabins. On our way home we stayed in Snow Canyon State Park, near St. George, UT. A really fabulous park.
- 952 replies
-
- 14
-

-
Wheels, model, warranty, care
DavidS replied to John E Davies's topic in Mechanical & Technical Tips
First a disclaimer. I had never heard of a torque wrench before I started researching travel trailers. Overland recommends a Precision Instruments torque wrench, which is probably a very good one, but at $155 it seems quite expensive to me. I have not used my torque wrench for anything but the lug nuts on my car and trailer. Based on my research, before I picked up Ollie I bought a Tekton torque wrench for $38, along with the Tekton socket set for $23. They have very good reviews. I liked the fact that the Tekton torque wrench came with a hard plastic case, as I had read it is important to protect the wrench during storage (and to set it to zero before storing). The socket set comes with a 3-inch extension bar; a 6-inch extension bar, as mentioned by RnA, would probably be preferable. But this one gets the job done. -
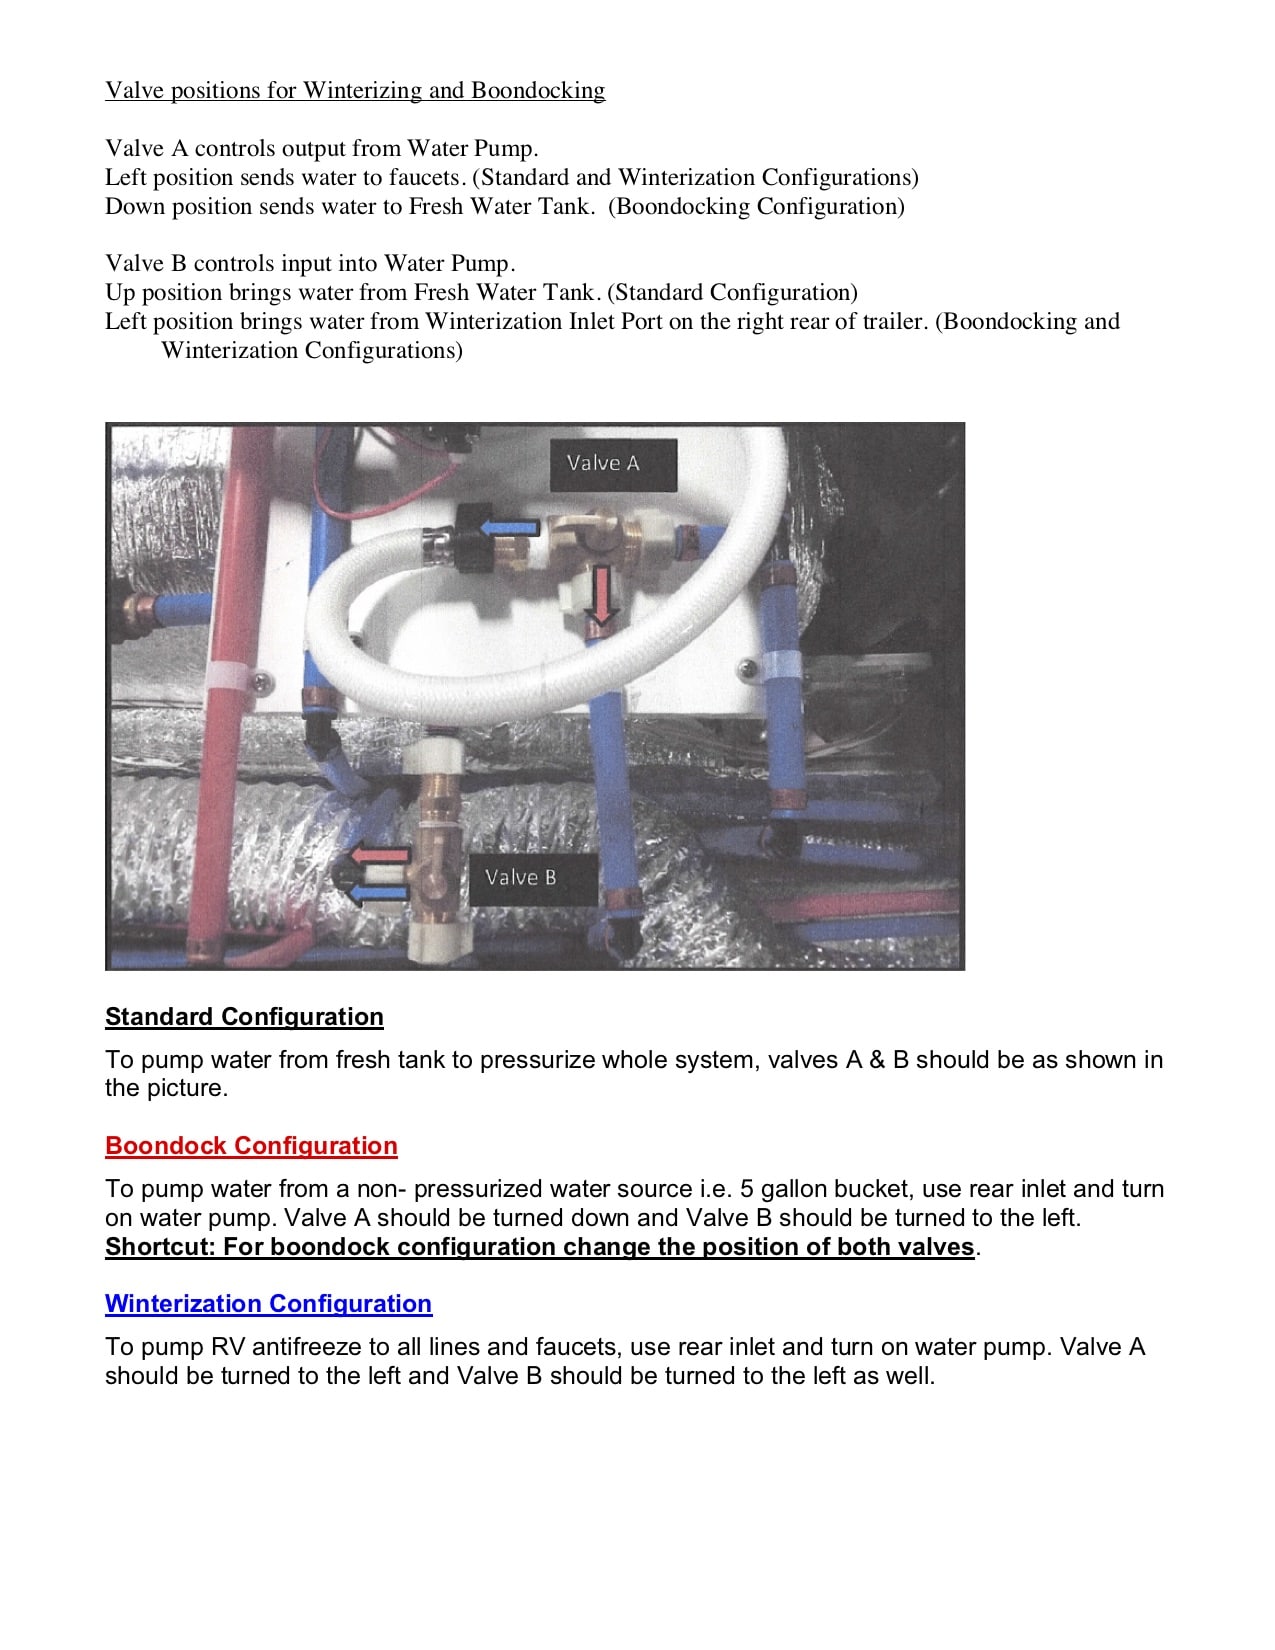
I have one of the LEII models with two sets of valves. Like CedarForks, I spent time figuring out what each valve does. I made a summary document, which if I uploaded the file correctly, others can download. I have a copy taped up on the inside of the pantry door. [attachment file=Valves JPEG version.jpg] [attachment file=Valves Winterizing Boondocking.docx] Valves-Winterizing-Boondocking.docx
-
I think the problem is that the pdf is present only as an attachment. @AndrewK, and others, when uploading a pdf file (or docx or xlsx file) you first need to click the Select File button, identify the file, and upload it. If you do just that, then the file will not be accessible to forum users. After uploading the file another step is needed. You need to click on the Insert Into Content button, to the right of the Select File button. This puts your attachment into the body of your message, and, more importantly, makes it available for other Forum users to download.
-
Outdoor propane grill and griddle recommendations
DavidS replied to hobo's topic in General Discussion
We bought the Camp Chef RV Connection Hose from Amazon. The connection hose comes straight down from the stove, or staight up during storage. I discovered that placing other things on top of the stove in the tow vehicle caused the hose to kink right at the point of connection, affecting propane flow. So I purchased a 90° elbow connector so that the connection hose now projects sideways, and that solved the problem. -
Overland, if you're headed to Arches be aware of the long lines at the entrance station. On our arrival day, we drove past at 11 AM and there was a very long line. The week before we left there had been an article in the SLC newspaper about possibly an entrance reservation system. After arriving and setting up camp, we went for a bike ride and went into the park early the next morning. The NPS web site suggests "to avoid traffic, we recommend entering the park before 8 am or after 3 pm." I think that is true seven days a week during the spring. We arrived on a Tuesday in the morning and a lot of the campground sites were taken. Fortunately, there are a lot of areas with good BLM dispersed camping sites.
-
No, we have been to Moab many times but we have never had a vehicle suitable to drive into the canyon. We decided on our next trip to Moab to either rent a jeep or to go into the canyons with a tour company. I have a colleague here who has ridden the White Rim Road on a mountain bike. He described it as an awesome experience. I think it took five days. I think it was Robert Pirsig who said in Zen and the Art of Motorcycle Maintenance that it is always better to see the countryside from a bicycle than from a vehicle. You are closer, and moving more slowly. Walking is better than a bicycle, but maybe too slow for some things.
-
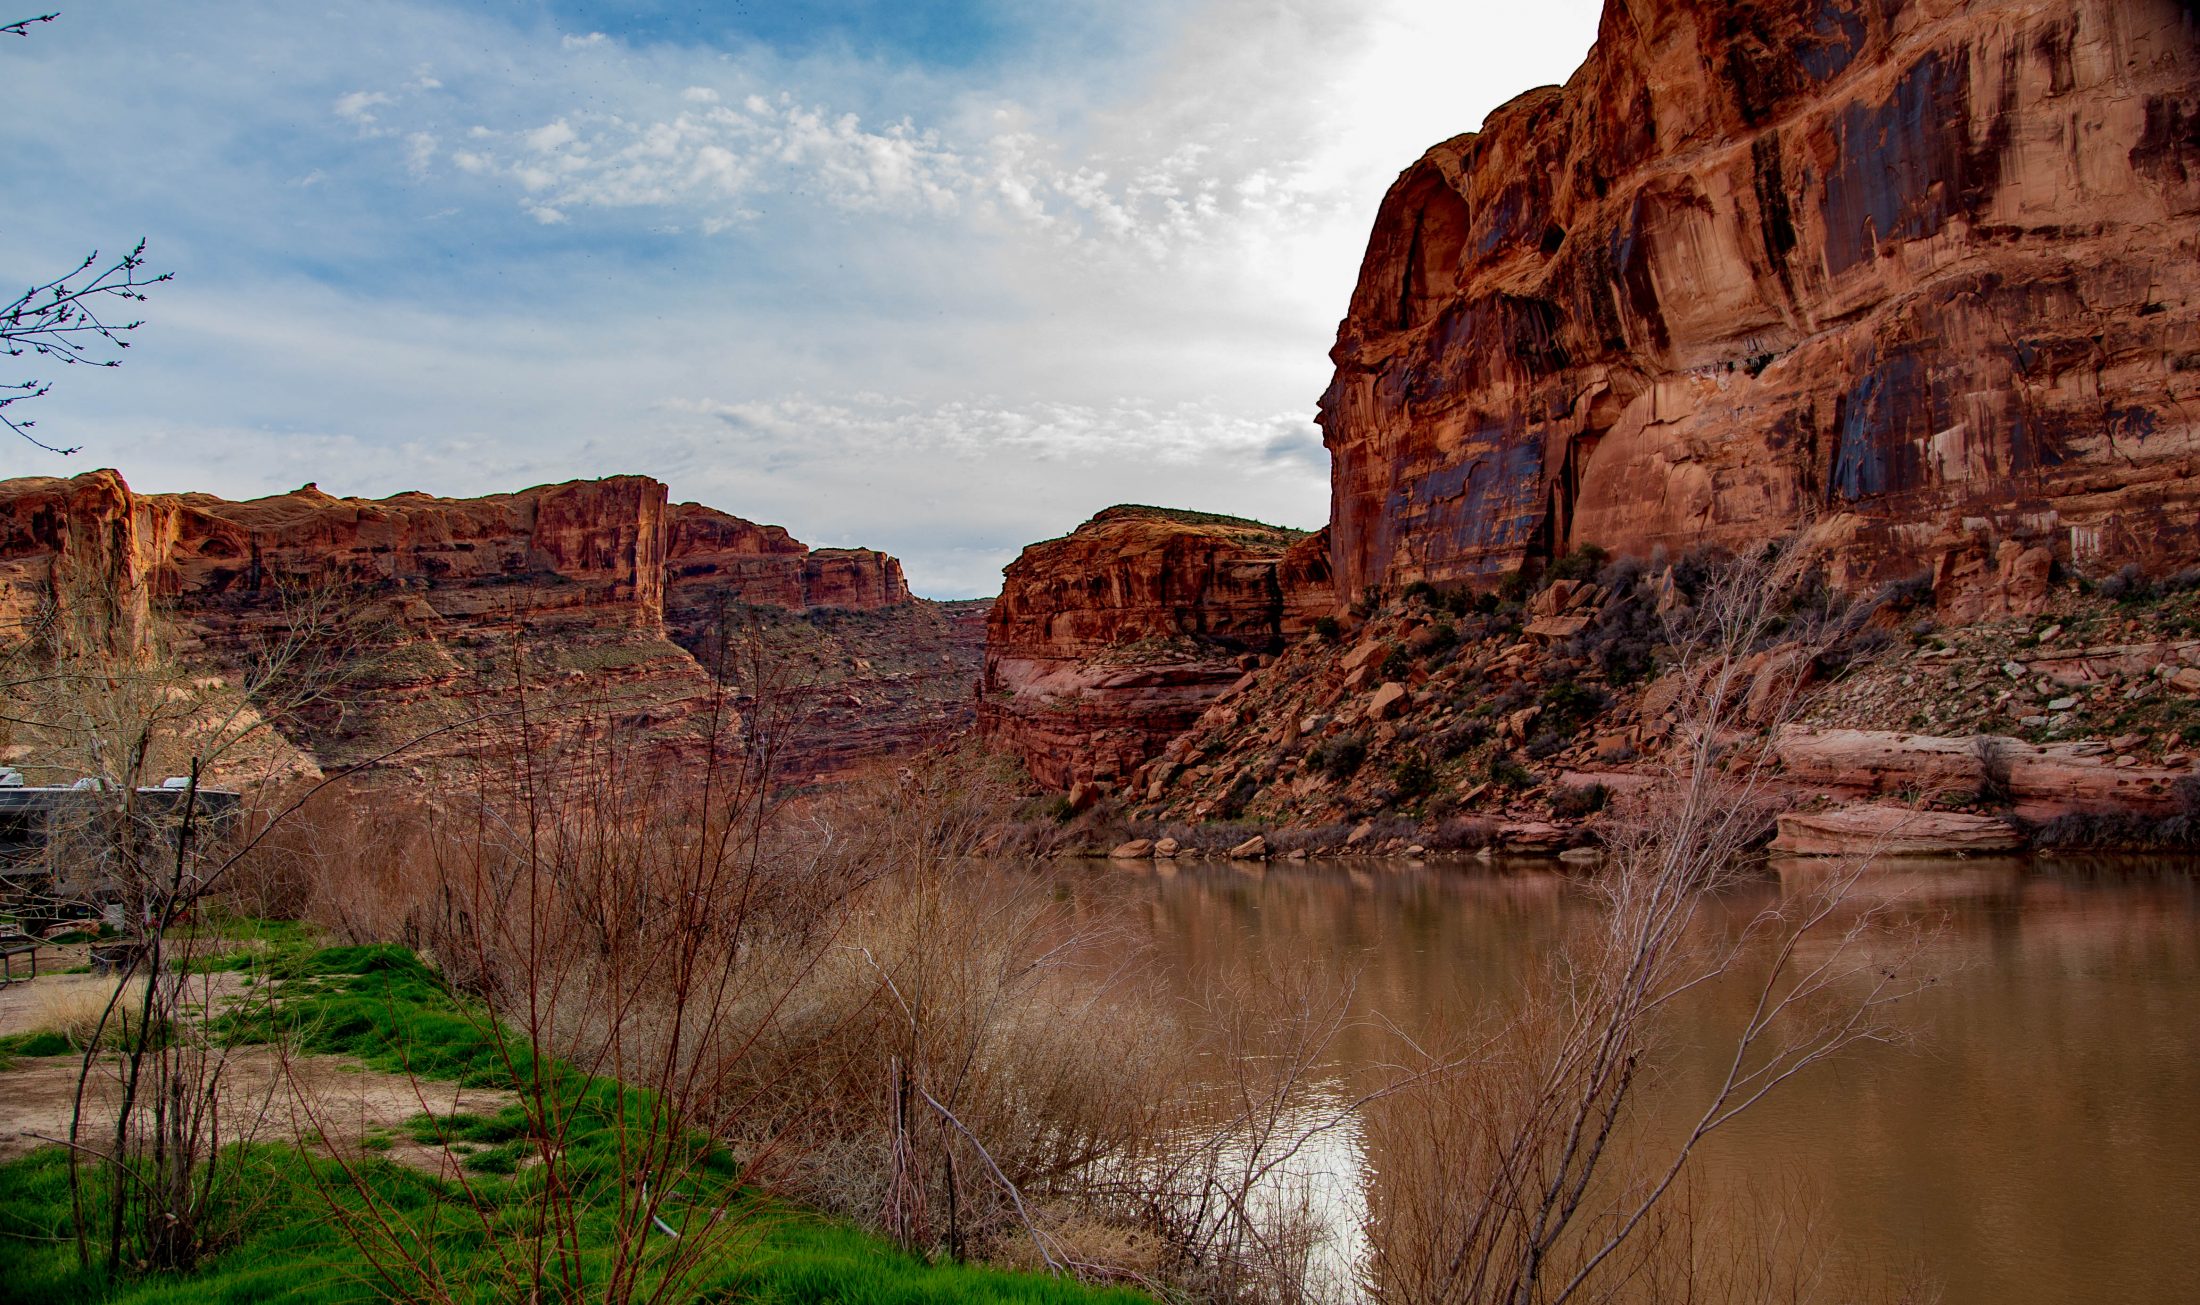
We camped in in Goose Island Campground near Moab last week, and it was fabulous. This is a BLM campground, which means no hookups and no water; they provide a firepit, a picnic table, and pit toilets. They are also first come / first served, but we were fortunate to score a beautiful campsite right on the river. One of the nice things about the Goose Island Campground that is right on the paved bike path along the river. I posted about this bike path two years ago, when we camped at another BLM campground seven miles further down the road. This is boondock camping, and I learned more about power management on this trip. Before we bought Ollie, I verified that the batteries would power the 900W microwave and our 900W toaster. These are important to my wife, and therefore important to me. There have been posts on this forum describing the microwave as a battery killer, and I was concerned. We have the Blue Sky Solar system, and on previous trips I monitored battery use via the Battery reading on the See Level Monitor or the BATTERY VOLT/AMP screen on the Blue Sky remote. On this trip I cycled the controller the screens on the Blue Sky remote until I got to the BATTERY CAPACITY screen, and left it there. Now, I touch the button and I can see the battery capacity as percent remaining, i.e. 70% or 100% if full. (It sounds like you can get similar functionality with the Zamp Solar system by installing a Victron battery monitor.) When we used the microwave the battery capacity moved from 98% to 96%, which was okay by me. On future trips I will continue to monitor the batteries when we use the microwave. The sun was out for three of the four days on this trip, so solar charging was good. I did have a generator along as my “magical insurance policy,” but we did not need it on this trip. Here are some picture of Goose Island Campground, as well as Arches and Canyonlands.
-
I had never heard of a tire plug kit. I quick search, and I saw a short how-to video. I am getting one of these! Thanks for posting this. I learn so much on this forum!
-
I have come close to that same error several times. I have now adopted a preventative solution. I put my hose wraps on the pressure regulator. When I coil the hose and grab the hose wraps and remember “Oh yeah, the pressure regulator.” The consensus from this post is that it is okay, even desirable in hot weather, to drive with the Max Air vent open.
-
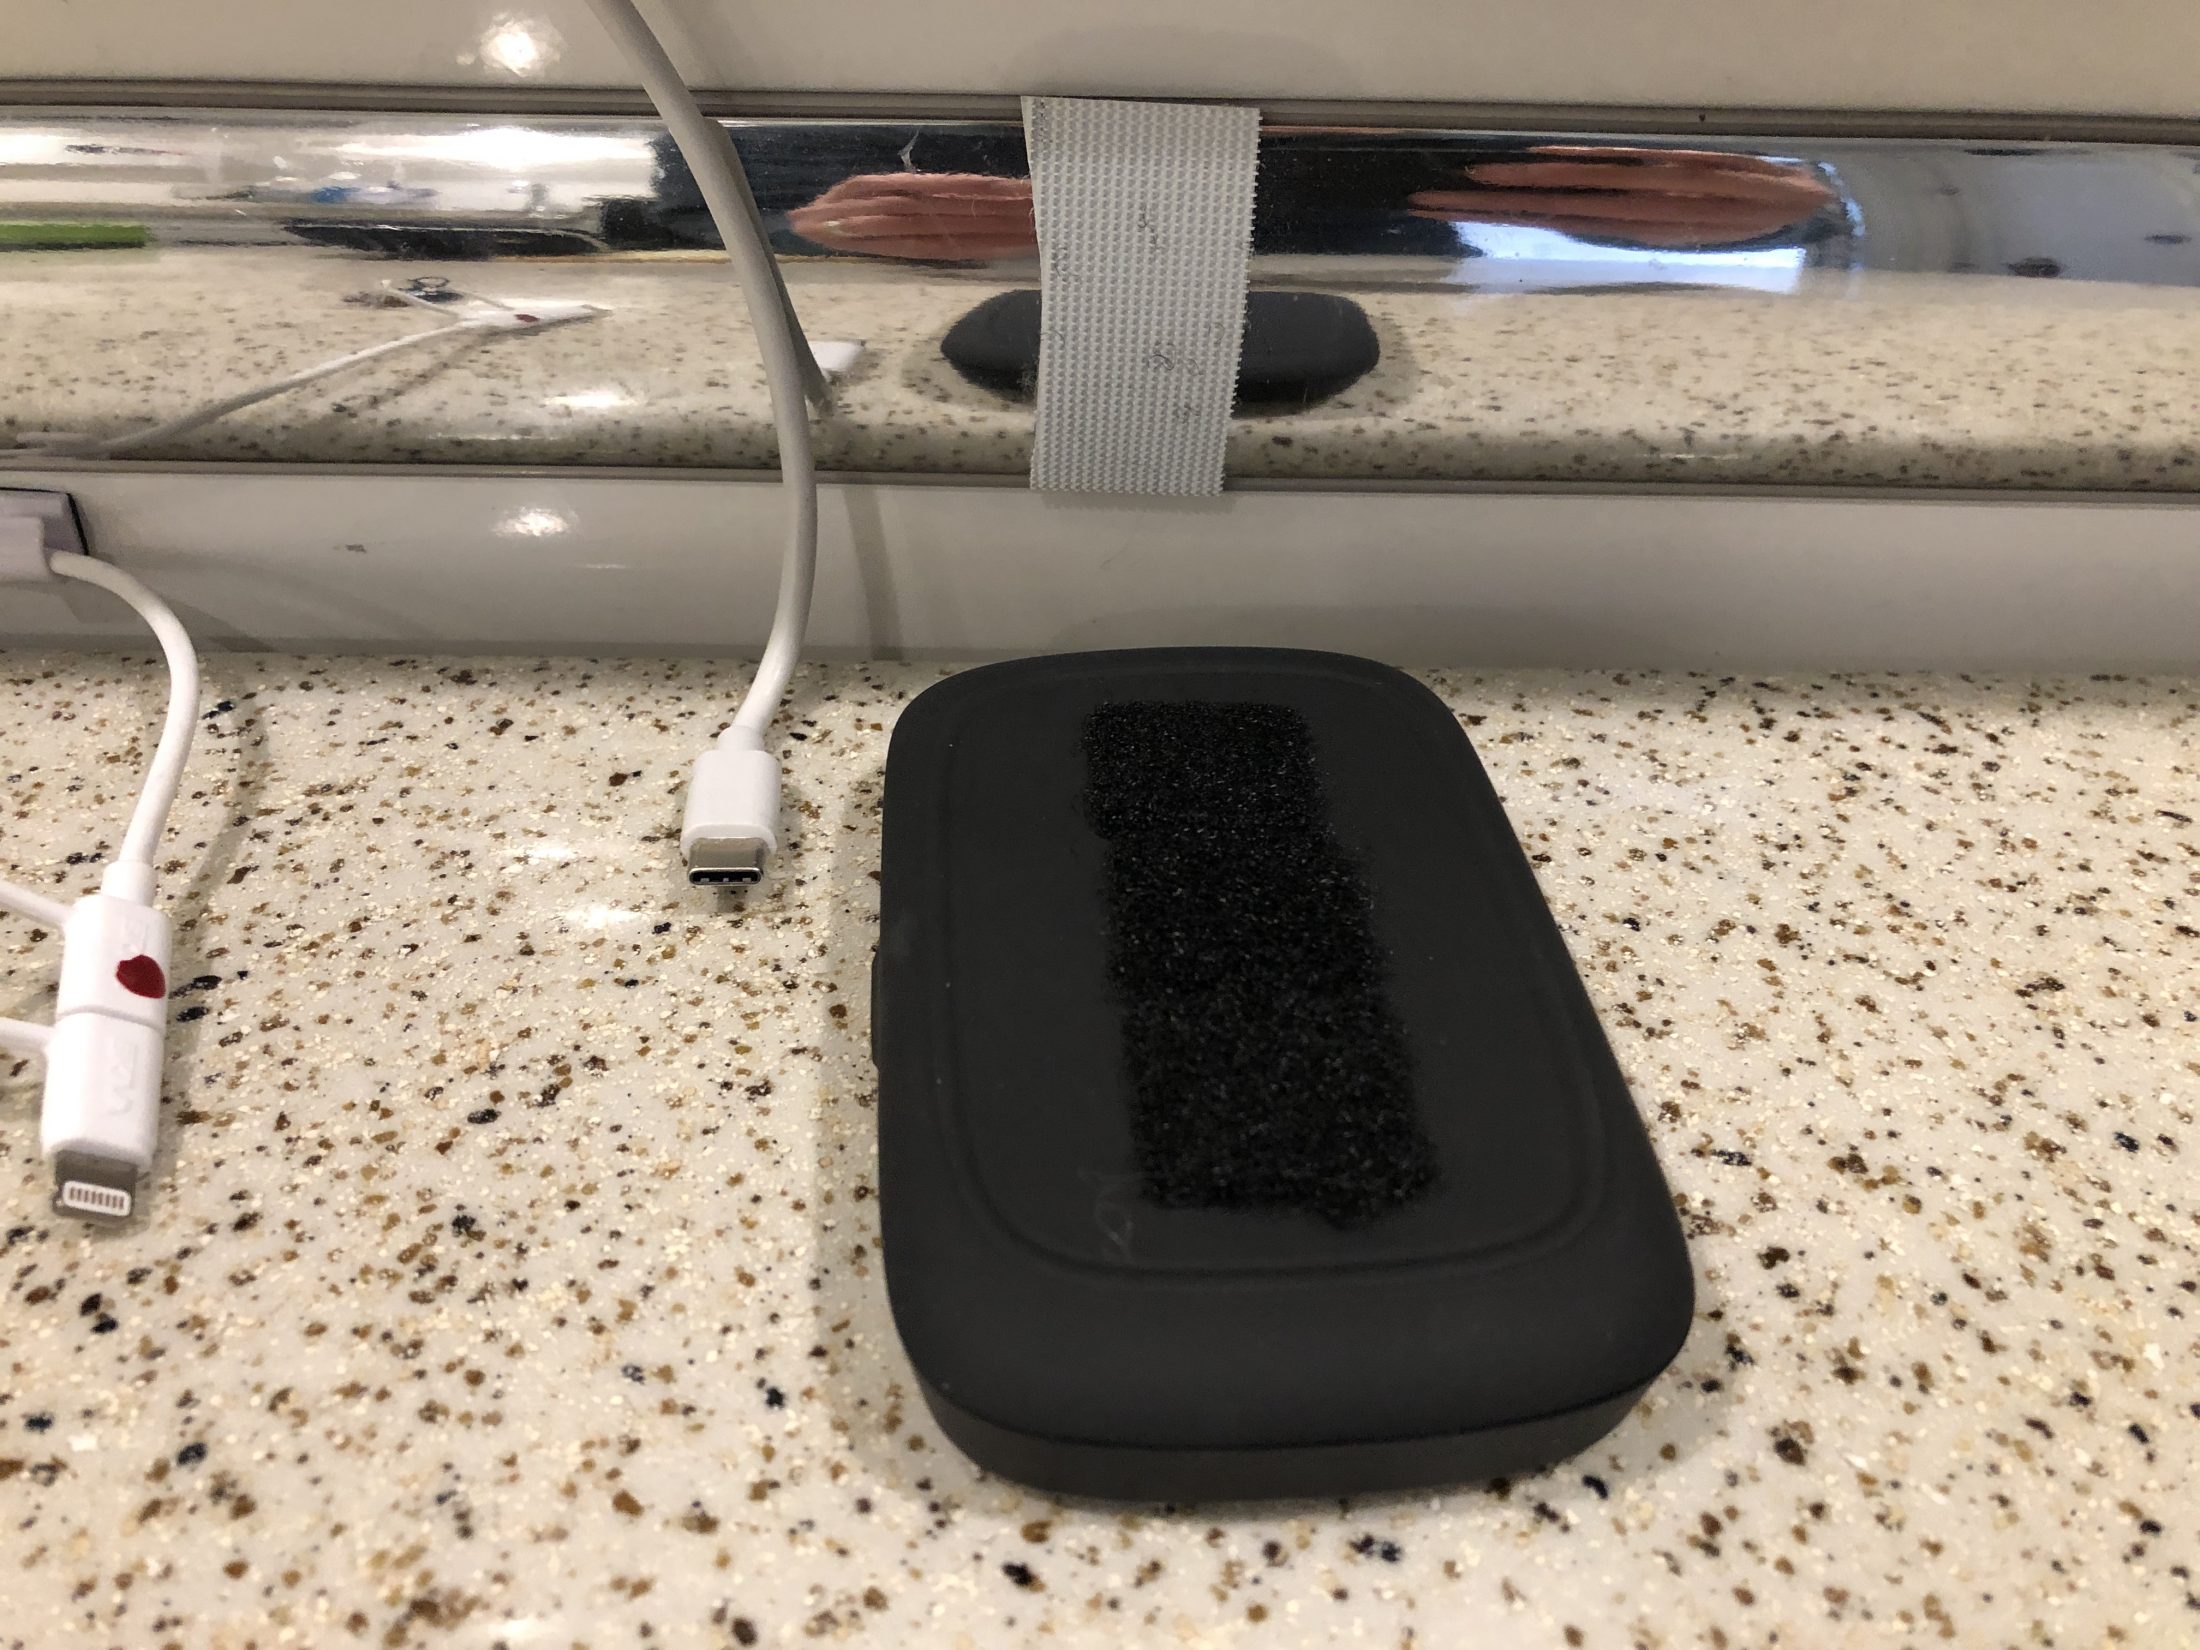
Oliver offers the WeBoost Drive 4G-M Cellular Signal Booster and the WiFi Ranger Sky Pack as options. The WeBoost Cellular Booster will improve the signal on your phones if you use it correctly (see below). The WiFi Ranger has two inter-connected routers, the Sky router on the roof and the Go2 in the cabinet above the dinette, and it provides a number of useful features. First, it creates your own local network, which is especially useful if you have multiple devices. Logging in to your network is easy, as your devices can remember the password to your local network. Second, the rooftop antenna can boost the WiFi signal from a campground, a Starbucks, or a truck stop, from as much as a mile away (see post by RVGeeks). If your device (phone, tablet or laptop) is connected to the WiFi Ranger, you would have a much stronger signal and faster speeds than if you connected your device directly to the WiFi source. Third, the Sky router on the roof allows you to access your WiFi signal outside the trailer, as much as 1000 feet away. This allows you to surf the web at the picnic table or by the river. When inside the trailer you should connect to the interior Go2 router. The interior antenna for the WeBoost Cellular Booster is mounted beneath the cabinets, above the dinette table. It is important that phones or hotspots be close to this antenna, about 18-36 inches. The signal strength decreases if you are too far away. A lot of users use the WeBoost Cellular Booster and the WiFi Ranger together, along with a mobile hotspot. Verizon seems to have the best cellular coverage in rural America, and we purchased a Verizon 7730L Jetpack as our hotspot. In the past, we placed the hotspot on the dinette table, a good distance from the WeBoost interior antenna. After setting up camp, I would turn on the WeBoost, the WiFi Ranger, and the Verizon Jetpack. Next, I would have the WiFi Ranger connect to the Jetpack. The WiFi Ranger has a USB port, and the instruction manual says that one can use a cable to directly tether the WiFi Ranger to a mobile hotspot or phone. This post describes how I did that; it was pretty easy. I wish I had done it sooner. First, why bother? There are a number of good reasons to tether the mobile hotspot with a cable. (1) The signal between the hotspot and the WiFi Ranger is much faster and stronger over a cable than through the air via Wi-Fi. (2) WiFi connections break periodically. We all see this with our devices, where they have lost connection to WiFi, and we have to re-connect. This happens in the trailer, where the WiFi connection between the hotspot and the WiFi Ranger breaks. I find this out because my devices can no longer see the internet, and I need to use the WiFi Ranger Control Panel to reconnect them. These breaks in connectivity do not occur with a wired connection. (3) The WiFi Ranger, when powered on, automatically connects to the hotspot. I no longer have to log on to the Control Panel to do this. (4) The WiFi Ranger has something called Multi-WAN Dynamic Mode (support page and YouTube video). This allows you to connect to a local WiFi network, perhaps the campground WiFi, and the WiFi Ranger can use both the local WiFi and your mobile hotspot, deciding which to use depending upon which is currently faster. Campground WiFi can be notoriously slow, but at some times of the day it might be faster than your hotspot. This can save on the amount of data you use on your hotspot. (5) The battery on my Jetpack is getting charged whenever the WiFi Ranger is powered on, albeit a minor benefit. WiFi Ranger has a support web page and YouTube videos. I have found their customer support very responsive to email inquiries. To tether my Jetpack to the WiFi Ranger, I bought a white 10-foot USB-A to USB-C cable from Amazon. USB-A is the common USB connection that has been around for years. USB-C is a newer type connector, and I need that because my Jetpack has a USB-C port for both data transfer and for charging. Your hotspot or phone could have a different connection port, and you would need a different cable. I plugged the USB-A end into the side of theWiFi Ranger Go2 router, which is in the cabinet above the dinette. I ran the cable along the back of the cupboard until the center of the cabinet, then under the rubber mat in the cabinet and out the grommet that has the cable for the WeBoost interior antenna. I then wrapped the cable around the window, behind the frame that holds the window shades. The 10-foot cable was the perfect length to reach the center of the dinette table. I decided I did not want the cable dangling from the grommet above the dinette. Although this is not necessary, I bought some white adhesive clips from Amazon to secure the cables. It gives it a neat appearance. Finally, I put white Velcro on the belly band above the dinette, and black Velcro on the back of my Jetpack. That way I can keep the Jetpack off of the table, as other things often need this space. Best practices for using the cellular booster. Some advice on properly using the cellular booster. After you turn on the WeBoost you should briefly put the phone in airplane mode, and then turn off airplane mode. This forces the phone to let go of the distant cell tower with the weak signal and to now look for the closest “cell tower,” which is the WeBoost. Similarly, if you were using the JetPack in the tow vehicle, you should power it off and then back on after starting the WeBoost. If you have been out hiking all day, your phone will remain connected to the distant cell tower, and you can get it to connect to the WeBoost by cycling into and out of airplane mode. I tend to make very few phone calls when camping, but if you are camped at a location with very poor cell signal the booster works well when seated at the dinette. To improve your ability to make and receive phone calls I suggest you set your phone to use Calling Over WiFi. I think most phones and providers can do this. At my work, the cell signal is very bad, but with calling over WiFi I can get calls. In your trailer, if you have the WiFi Ranger connected to the cellular booster you can get calls throughout the trailer as well as outside. WiFi Ranger Control Panel. You should make it easy to connect to the WiFi Ranger Control Panel via a web browser. On a laptop, you can save it as a bookmark for quick access. On a phone or tablet, you can use the Add to Home Screen method to save a Shortcut Icon to your device.
- 5 replies
-
- 12
-
-

-

-
George & Karen, Welcome! My Truma has two electrical switches, and both must be on. One is inside the cabin; mine is beneath the pantry, but the switch might be in a different location on your unit. The other switch is outside, behind the access panel. Also there is a water inlet valve on the Truma that is closed only for winterization. You should be able access this from a round access porthole under the curbside bed Hope this helps.
-
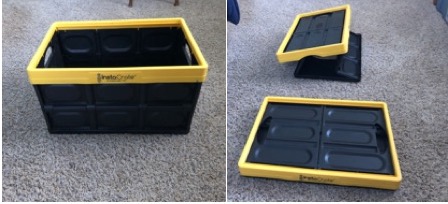
We found that we weren’t using the cupboards above the dinette very efficiently, since some of the things we were storing there were not very tall. We solved this by buying two of these wire shelves, one for each of the two cupboards above the dinette. Before we got Ollie we were advised to get refrigerator bars such as these, to prevent stuff from falling out when the fridge door was opened. We found that stuff in the pantry shifted around during transit, and so we got some spring-loaded bars double bars for the pantry. We had put heavier stuff on the bottom shelf of the pantry, but things just moved fore and aft during transit, sometimes making a mess. I found the fruit box from the Farmer’s Market fit perfectly, and I could stack canned beers or soda two high in the box to optimize space usage, and they would not shift during transit. But the pantry bars were not enough. The major problem was not being able to maximize the use of vertical space in the pantry. I measured both the available space and the size of the opening at the pantry door, and then went virtual shopping at Amazon and the Container Store, looking at dimensions posted on the web sites. I ended up getting these Wire Storage Organizer Baskets from Amazon. They fit perfectly. GrumbleandTwist put an Ikea bag under the front dinette seat. I wanted something with a solid bottom and sides, as we wanted to carry our pressure cooker in this storage area. So I measured the space and again searched at Amazon and the Container Store. The problem was that bins large enough to use the space effectively are too big to fit through the opening. And then I had an inspiration. Have you ever seen InstaCrates, these collapsible storage bins? We got them at Costco for $7 each, and they are available at Amazon and Walmart for $12-14. We use them when organizing for our trip (foods or clothes), and to carry stuff out to the trailer. At the end of the trailer trip, we bring a bunch of collapsed InstaCrates out to the trailer and use them to carry stuff into the house. We love them. Well, I discovered that the collapsed InstaCrate will fit through the opening into the storage area under the dinette seat, and then I can open it up when it is inside the storage compartment. It works well for our needs.
- 116 replies
-
- 13
-
-
-
LP propane auto switch regulator
DavidS replied to BackofBeyond's topic in Mechanical & Technical Tips
Here is the manual as a pdf. [attachment file=Fairview GR-9984P Propane LP Regulator Manual.pdf] Fairview-GR-9984P-Propane-LP-Regulator-Manual.pdf