jd1923
-
Posts
3,618 -
Joined
-
Last visited
-
Days Won
277
Everything posted by jd1923
-

More DC to DC charger installation tidbits
jd1923 replied to Snackchaser's topic in Ollie Modifications
Make sure you purchase the Orion XS 50A charger that was not yet on the market when Geoff worked his install. I detailed my installation and charging performance. We love it, no more SOC% worries. Watch video to see why to spend on the 50A model and check out other installations. See mine below and there are at least 4 on this forum (search for Orion or DC-DC). -
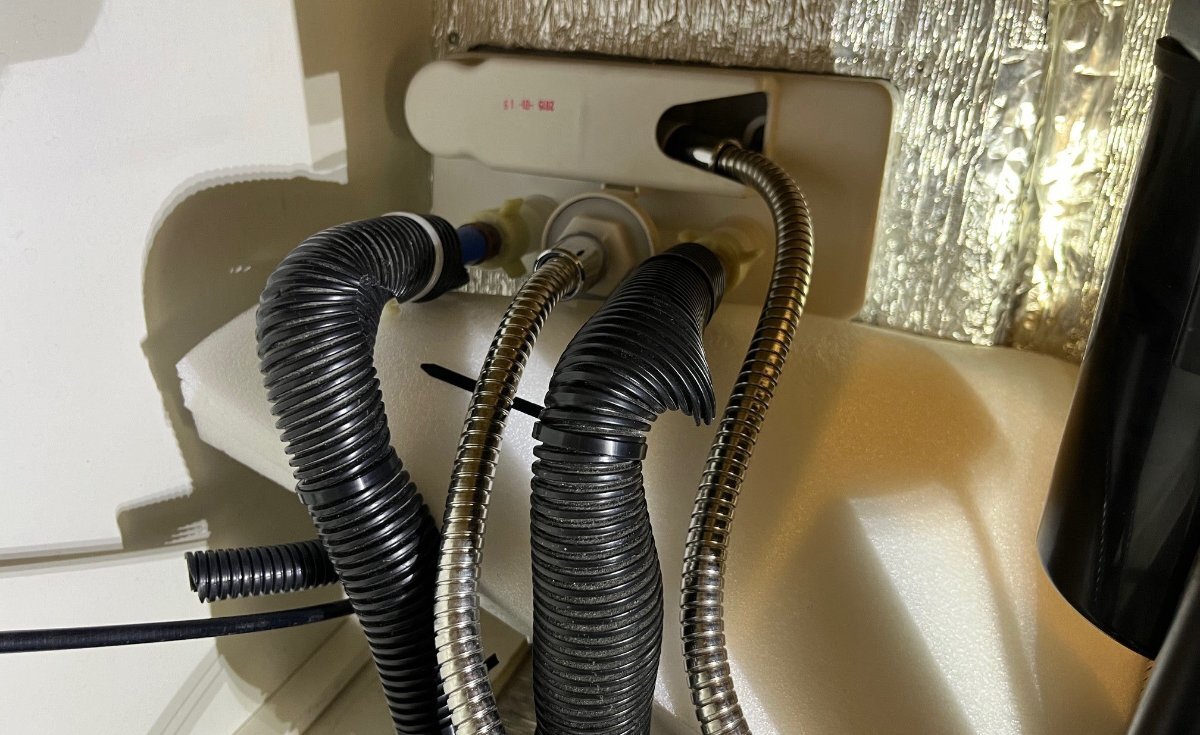
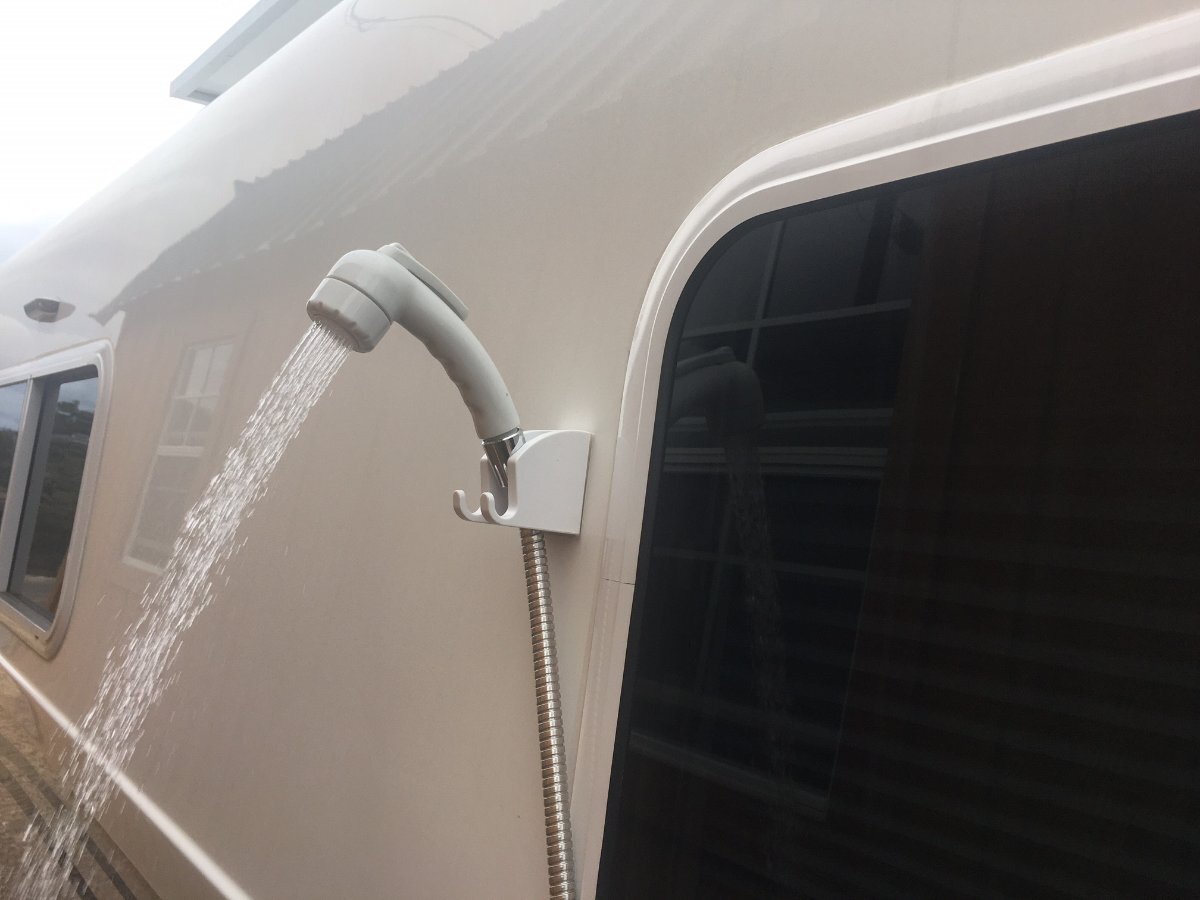
That hose must have been wrapped around the jack on purpose. The dang hose gets caught on something always. OTT should have it in a holding tube so that it can be pulled out and back in smoothly. OTT installs the shower head with hard 90 degree PEX and our gets caught on that often. I have to get under my bed AGAIN to free it before our next trip. I've wrapped the 90s with loom and it hasn't helped. I need to figure out something else this time. I need the FULL length of the hose to fit it into an exterior mount I added to get it held above my head height! Like to shower outside whenever we're boondocking in decent weather. The inside shower isn't tall enough and I prefer not getting the bathroom wet. Our wet-bath shower is mainly for Chris. I've only used it a few times.

-
Replace Colorado Carefree Awning
jd1923 replied to chuckstovall's topic in Mechanical & Technical Tips
Ours too, and like Mike’s and Steve’s still in very good cosmetic and working condition. I find it a pain to use and honestly have only used it once in our 2 years. I usually just park so that our entrance side is in the afternoon shade. We enjoy morning sun with coffee. I would likely use an electric model more often. If ours were to fail though, I would just remove it and all the brackets, patch the fiberglass, and the Oliver would look so aerodynamically cool! 😂 -
I kinda miss grass... But then I'd need the tactor back I sold when leaving Virginia 20 years ago. Out here we mow the desert weeds with a push string trimmer and weedwacker. We need our occasional rains, but hate that it makes stuff grow... and wet grasses means bugs, we truly appreciate being without... Oh humbug! Wow, what a beautiful spot, Ken and Mary Kay! Hope our paths cross again soon. We're heading to Minnesota and back leaving in 2 weeks. Maybe we might... Enjoy!
-
Dexter Self Adjusting Brake - Fail
jd1923 replied to Galway Girl's topic in Mechanical & Technical Tips
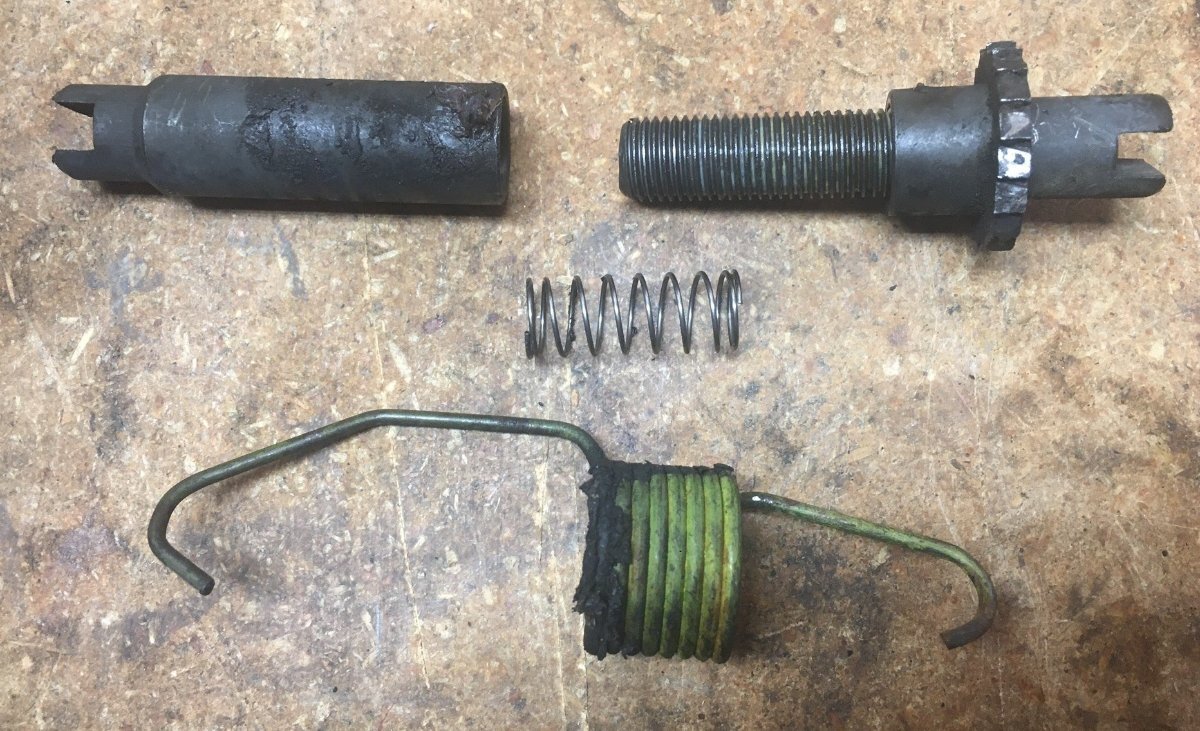
eTrailer has always been good with customer service. I try to buy from them whenever they are competitive in price. Self-adjusters on drum brakes have gotten a bad rap on this forum starting years ago with @John E Davies. I argued with him two years ago that I'd rather have self adjusters. If you go without self adjusting, you better jack your wheels off the ground and remove wheels or get under your trailer to the adjusting port on the backside of the braking plate and adjust each one manually before every long road trip. Not me. I've owned at least 10 old cars, worked full restorations of brakes systems and everything else and self-adjusting drum brakes are standard equipment on every post-war car into the 80s, and btw my 2001 Dodge Ram has rear drum brakes. I adjust them regularly by driving in reverse and applying the brakes 5-6 times and they get tight again. I learned on this forum from others that trailer brakes self adjust goin forward instead. The shoes eTrailer replaces will be no different. You will just need to replace the item pictured without the self-adjusting gear. Likely a simple replacement part, check John E's old posts. I imagine something else went wrong with Craig's brakes, but would not know unless I disassembled everything myself and was lucky to find the causal issue.
-
Dexter Self Adjusting Brake - Fail
jd1923 replied to Galway Girl's topic in Mechanical & Technical Tips
Yep, almost every time I've contracted work, gone to a service facility, I'm sorry. Occasionally I'm surprised but a rare case. And we know Craig, you do excellent work in Oliver mods and repairs. -
When you use the built-in LP furnace as designed, air is circulated through the basement (a few added vents as seen in other posts will help). Winter is generally not a humid time of year when running heat inside. When we lived in Chicago, we would add water in the pans above the radiators to make inside of the home bearable. Forced air systems, forget about it! Why cause humidity with one device and then have another to correct the self-made issue? Also a lot of extra stuff to carry! Use of space heaters are also know cause for basement plumbing freezing that has been noted in a few other posts lately. Space heater will only heat the inner-upper shell and not much more.
-
Yep seems odd at first and the you'll learn to love them. And no more banging door in the wind creating the interior stress cracks!
-
Dan, you are correct. I have not measured it but I'm 6'2" and if I stand up straight, the top of my head will fully contact the bathroom ceiling. So it's 6'2" or just a bit shorter. I was never interested in those fancy teak wood covers for the shower floor as that would lose another 2". I can almost lay flat on the bed if it wasn't for the curved corner. I'm a side-sleeper most of the time so the bed just fits but it's tight.
-
Gorilla compact 25’ hose for marine and RV use
jd1923 replied to Patriot's topic in Mechanical & Technical Tips
Anybody know of this style hose in 5/8” or 3/4” ID? On second thought, I don’t think we could use a flat hose. We have a 10’ hose and water filtration system with a 4’ hose attached. When at a campsite with water, this 15’ length is all we need. Then we have a 25’ hose when a longer reach is required. I need the 25’ plus 10’ hoses to reach from our truck 35-gal water supply to the Boondocking port. This is where a flat hose will not work since you cannot pull water through a flat hose. We fill this way more often than we connect to campground water. I've found if I wind the hose in large 3’ dia loops, squeeze it oval shaped to get it into the Oliver trunk, it unwinds nicely. If you coil tight, it’s hard to get the hose to lay flat. -
🤣... 🤣... 🤣... ...
-
The main reason to go with an Oliver! When you get yours, please show me how this is done... 🤣(looks like we failed to convince you in another thread) Just celebrated my 70th birthday and no retirement plans here! I enjoy working my parttime semi-retirement job (contract instructor for the last 10 years) and hope to continue in good health for many years to come (vocal chords keep working)! Though I haven't punch a clock, 40+ hours a week, most of my life. Most of our friends in town are retired and they do about the same thing everyday (boring)! If I'm not working for my job, I'm always working on something else and I love it! We've enjoyed 47 overnights in our Oliver over the last 6 months and leaving for a 5-week trip just after Memorial Day, back home by the 4th of July! 47 overnights in 6 months days comes to 25% time away in our Oliver! If it was any more time cooped up in an Oliver, that becomes the job. That's just me, and Chris & I love sharing this life together!
-
All the points you made are good, but don’t fool yourself that the experienced engineer in you will not come to surface in retirement. You will retire but your mind should still be active. For example… You can buy the OTT Platinum Package or save near $10K and install a Victron inverter/charger system with your own LiFePO4 battery choice! 🤣 I imagine you’ve followed the Mod section of our forum. Either way, you made the right choice in choosing Oliver. Welcome to the club!
-
What’s the SKU or part number on Advance Auto? I’ll order a set for next time. Never mind, I couldn't see the number on my phone but can now on my laptop. Part # HD1213-0656
-
Back in stock. I'm not familiar with the pricing history. Maybe they raised the price and then put it on sale! https://www.turbro.com/products/greenland-13500-btu-inverter-rv-air-conditioner-with-heat-pump
-
New Epoch 300AH Essential Battery, all going well except…
jd1923 replied to routlaw's topic in Mechanical & Technical Tips
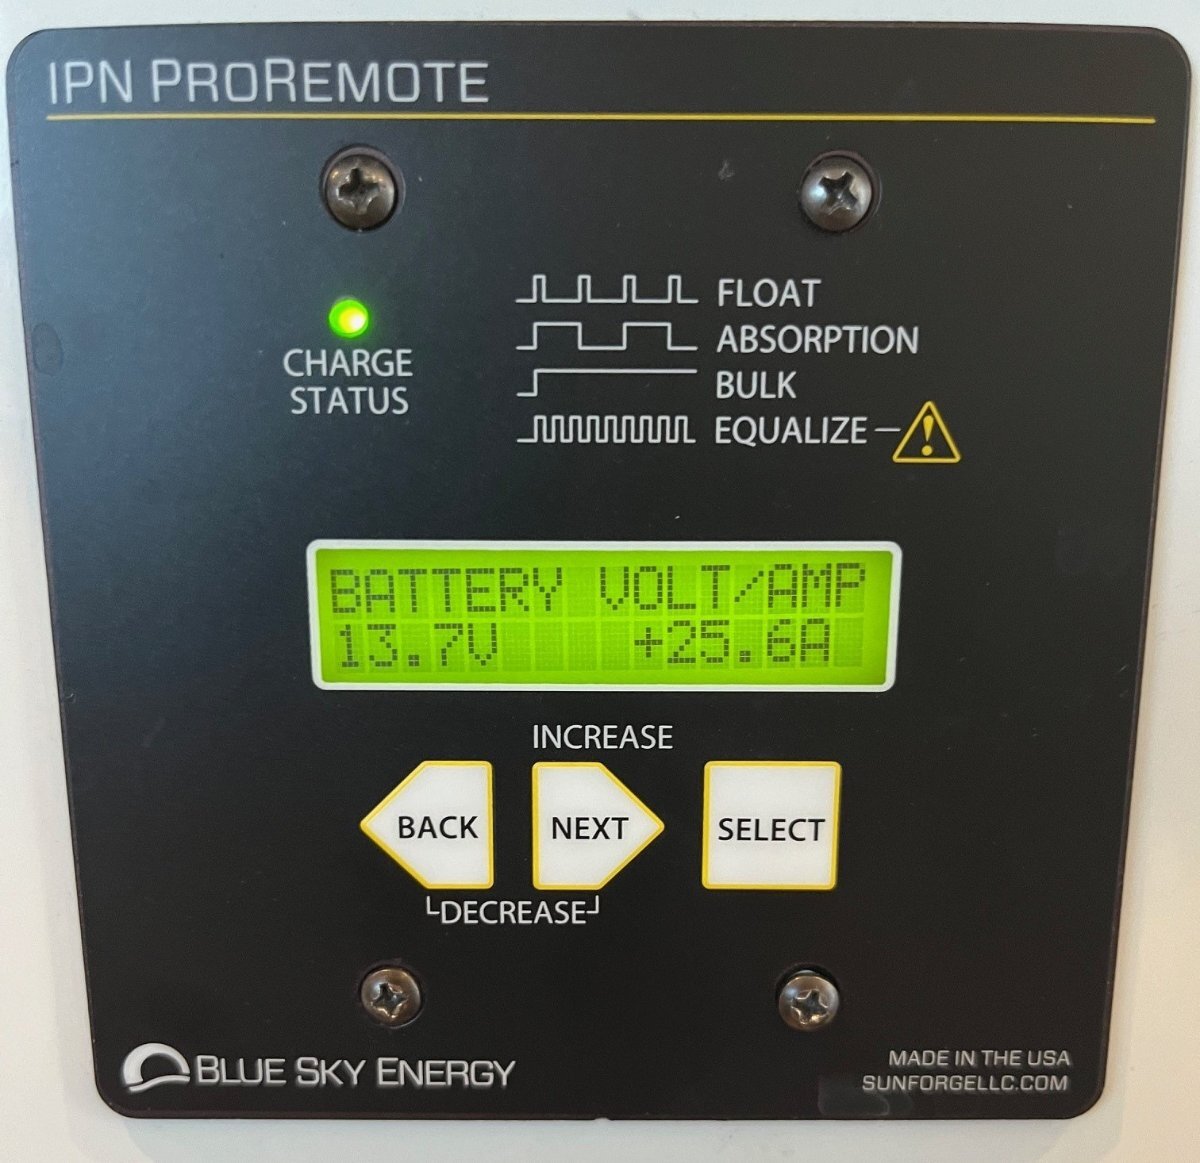
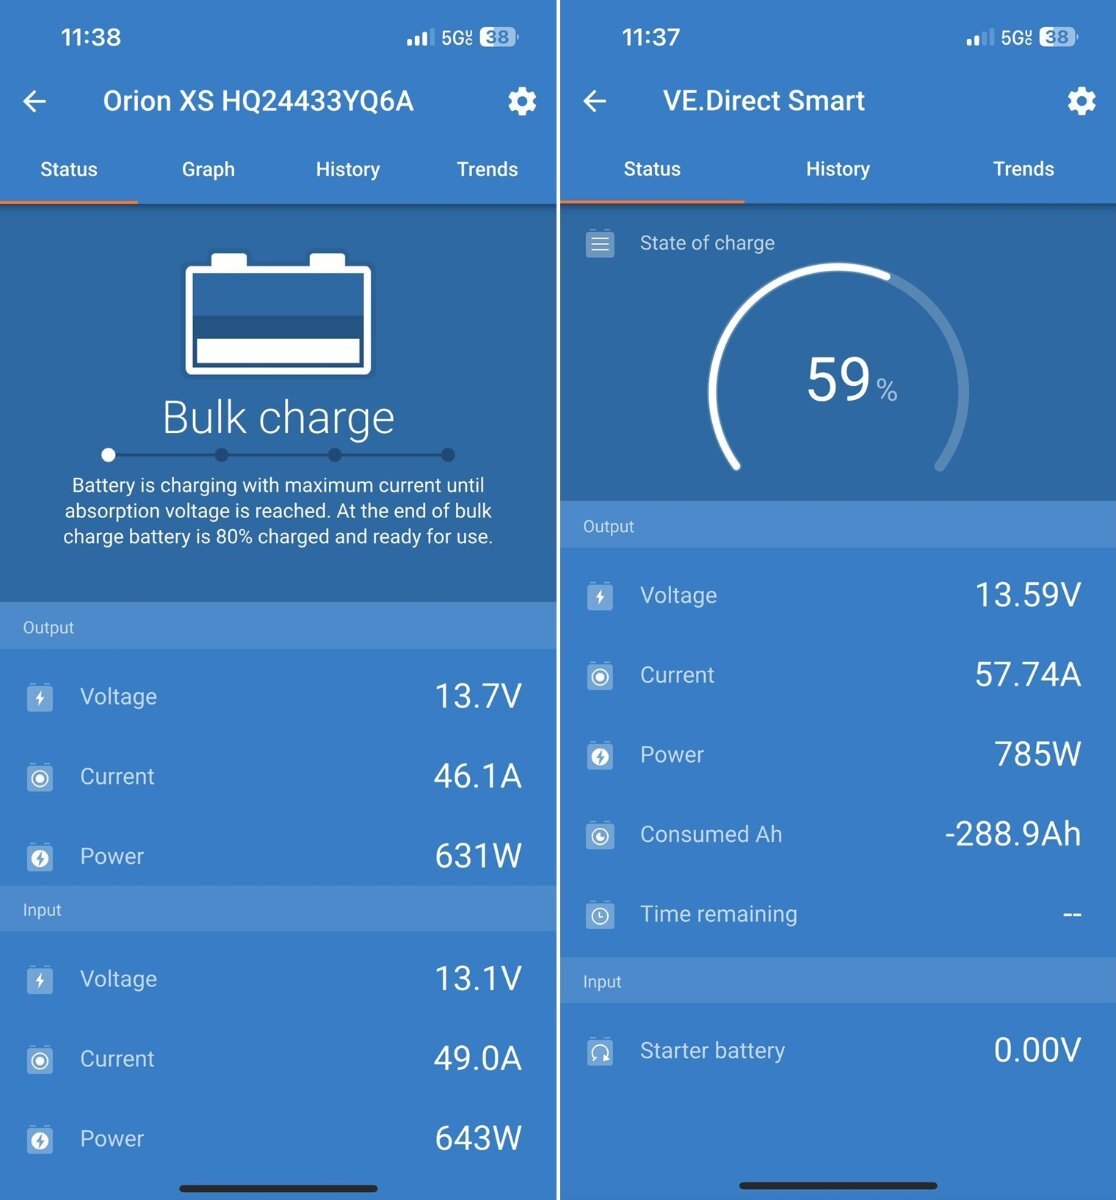
Rob, I hardly ever look at the IPN remote (pic1) since I have added a Victron SmartShunt at the main battery ground and use Victron and Epoch apps instead. The IPN remote screen shows +25.6A charging at 13.7V. I suggest, Ignore the voltage number knowing that the Blue Sky MPPT is supplying +25.6A to the batteries, hence it is charging! If a battery is at say 13.3V and the charger is trying to push 14.2, the reading cannot be 14.2 since it is connected to the battery at a lower voltage. Voltage readings are potential of the circuit, NOT what you have set Bulk charge to, the 14.2V Epoch spec. We have four (4) chargers; the Blue Sky MPPT, Victron 30A MPPT for suitcase solar, Victron 120A Multiplus II and Orion XS 50A DC-DC chargers, all set to the Epoch specs of 13.6V and 14.2V as you have on your IPN remote interface to your Blue Sky MPPT charger. I have never seen the 14.2V bulk charge rate on any of these chargers. I see 13.6V or 13.7V and never higher. Get the Epoch app loaded on your phone. The app is free and I have found you can only count on a reliable SOC% via the Epoch App measuring battery SOC internally (pic2). The screen capture on the left was taken when I started the TV, Orion DC-DC and Blue Sky chargers combined providing net +47.3A to the batteries at 59% SOC. The screen to the right shows battery SOC at 81% hours later after we parked at a campsite, engine off (hence DC-DC charger OFF) and with less sun later in the day and fridge still on DC the batteries are supplying net -5.7A. Note that voltage measured at the batteries was only 13.4V when the DC-DC charge was ON (not pictured, it was 13.7V measured at the charger) and after the charger was OFF battery voltage was 13.3V. The Bottom Line: There is nothing wrong with your system as wired as long as you are seeing +A on the IPN Remote relative to the amount of available sunshine. I get >+20A when the sun is good, closer to +10A early or late in the day or when partly cloudy. Good thing your noticing these things. Get the Epoch app to read your battery SOC%.
-
To see if the shock is good or bad, manually compress and lengthen the shock and either it will be feel firm the full distance up and back, or if not it is blown. If it is good, or to get down the road until you can replace the shocks you can get a set like this on Amazon or from ANY auto parts store. You may need to remove the shock or remove the nut from another shock to match the threads for the nut. https://www.amazon.com/dp/B0DHF93PQF/ BTW, you are better off removing the shock than to have it dangling if you need to tow your trailer. Most trailers do not have shocks and the aren't truly necessary.
-
Good work Ron and I must say, up front of the TV is the best place to add a bike rack! I removed the OEM bike rack from our Oliver (I have an OEM mount with 2" receiver if anybody would like to buy one). So we have nothing mounted rear of our Oliver. Given that, our measured tongue weight is less than 580 LBS and GTW is 6500 LBS. This is 9% and good balance should be 10-15%. This light tongue weight creates what is called "porpoising" which the Anderson WDH controls (fights). You add a bike rack rack and the weight of bikes in the rear of the trailer and this ratio just gets worse. Instead front of the TV helps to balance any cargo weight.
-
My how-to video for cleaning the weep holes and tracks
jd1923 replied to Wayfinder's topic in Mechanical & Technical Tips
Chris and I are OK with our "Dirty Ollie." After a wash it goes from dirty to pasty, but not paying the big bucks for a shine. That picture is from our very first Oliver camping trip, July 2023 to Kendricks Peak AZ, after 26 miles of dirt road. Ever since that trip, I've brought our Dewalt leaf blower which gets a lot of it off if blown as soon as we get to our campsite. Just got back from 12 days to NM and back. We hit snow then fog and rain and it's not quite as dirty this time but it is sure stuck on now. Bought gas for the pressure washer yesterday and today it's a beautiful sunny 72F day and I should be getting wet and dirty after lunch today~! -
My how-to video for cleaning the weep holes and tracks
jd1923 replied to Wayfinder's topic in Mechanical & Technical Tips
All I do is when we return from camping trips, I pressure wash all the dirt off our trailer (and there’s so much dirt out here)! I hit the windows straight on with 3000 PSI water pressure and you see the dirty water come out of the drain holes first, followed by clean water. If I do not see this out of EVERY drain hole I would address this afterwards. As I am blasting the windows, Chris is inside with a towel to collect any sprayed water to the interior and there is generally little to none. And our Ollie can get very dirty!
-
3500 pound versus 5200 pound axles on a LE2
jd1923 replied to John and Debbie's topic in General Discussion
Thanks for this info, now up $30 in just two months. I did not think labor was included, but it read that way and no reply was offered. Is that everything left-to-right? (axle, brake assemblies with drums) Must be 12" brakes with Nev-R-Lube bearings? You should be very happy with your upgrade. Just going from 10" to 12" brakes alone is a great improvement along with everything else. Best wishes and let us know re your experience afterwards. -
We just got back from our Albuquerque trip and it was our first outing with real highway miles, about 1000 miles roundtrip over the last 12 days. We are now getting BETTER performance with our Orion XS 50A DC-DC charger. I have seen charge rates often at 45-47A and once 48A was observed! Check out these pics. As soon as I read total charge of 58A (see 57.74A on right side) from the shunt reading, I switch to the Orion reading asap and it was at 46A (46.1A on left). The fridge was on DC but likely not pulling amps at the time, so the Blue Sky charger with 320W rooftop was supplying the extra 12A. We were at 59% SOC (of 600Ah) when leaving after two nights and was up to 82% when we arrived at our next camp. A 58A charge rate is likely the best case scenario, but no more worries about battery SOC%. You gotta get one of these!
-
We found a great area up in the White Mountains of Arizona with the help of a couple retired cops. They were out turkey hunting and happened by us when we were deep in the woods and came to a crossroads. In both directions the signs read, "Not Suitable for RVs or Trailers." They said the road to the right was a bit rocky and the warnings are for when it rains or snows. We liked that the signs would keep most RVers away. Then they said, "Follow us and we'll take you to our marked campsite." Check the Campendium Map and compare our blue dot to the known campsites! Miles and hours of dirt between and dozens of campsites along the way. We'll keep our high country spot a secret for now and should be meeting some Oliver friends up there in July when the weather is perfect. However, when we left on Monday it was snowing and the daytime high was to be 42F. The campsite was at 8,920 ft and on the drive home we climbed a bit more and I snapped this compass shot at exactly 9,400 on AZ Hwy 273. It's amazing you can drive down a highway at this elevation in Arizona (common in CO of course) and see mountains above and lush meadows everywhere with streams and lakes.
- 963 replies
-
- 10
-

-

-
Another Andersen WDH idea
jd1923 replied to Nick and Linda Stratigakis's topic in Ollie Modifications
@DaveAndBecky_NorthernMI notice the K-ratings on this table. You want the column for K .20 or K .17 if you are using a thread sealer. This table is better than having one torque # for all conditions.
-
Another Andersen WDH idea
jd1923 replied to Nick and Linda Stratigakis's topic in Ollie Modifications
Bolts are bolts and there are SAE (inches) and Metric (mm) bolts in multiple grades. I would assume those bolts are Grade 5 SAE (but could be metric). Measure the diameter which is likely 1/2" +/- and check this table for torque. I saved a picture of the table for convenience and the full PDF (good thing to have a printed copy in your truck or OTT Manual). The PDF also has a metric bolt torque table bottom of page. I always use torque tables from a reputable company, like this one from Fastenal, and I never take the time to check what each manufacturer states for standard bolts they merely purchase for their products (except something like a fine-thread crankshaft bolt where it really matter). It appears that the installer for your Anderson was not concerned with torque settings and will be much better when you set it back an inch and torque properly. Torque-Tension Reference Guide - Fastenal.pdf