jd1923
-
Posts
3,425 -
Joined
-
Last visited
-
Days Won
259
Everything posted by jd1923
-
@T-Oliver glad to see you got the Epoch sale! Which one(s)? #AHs? I don't remember HW dipswitches on the Blue Sky (did I miss something?), just a whole lot of menu selections on the IPN-Pro interface. I talked to and emailed with Ryan Gurin a few times. What a great, very detailed and helpful guy He even advised me on setup of the Victron MP2, that's going beyond the call of duty! He sent me this link and it's just what you need. Later part of the video bottom of page goes through the setup steps. It took me 3 tries to get through all the keystrokes without making a mistake! How to program BSE charge controllers for LiFePO4 batteries – Sunforge LLC The settings are similar to what Ken wrote. Off my head, I remember Epoch suggesting 14.2V where Battleborn states 14.4V but check your battery Epoch battery manual to be sure. It's great to have the settings list in writing in addition to the video to keep things straight.
-
Yes, this will work if all you want is the battery upgrade. Today is the LAST day for 15% OFF Epoch Batteries if you're thinking this product!
-
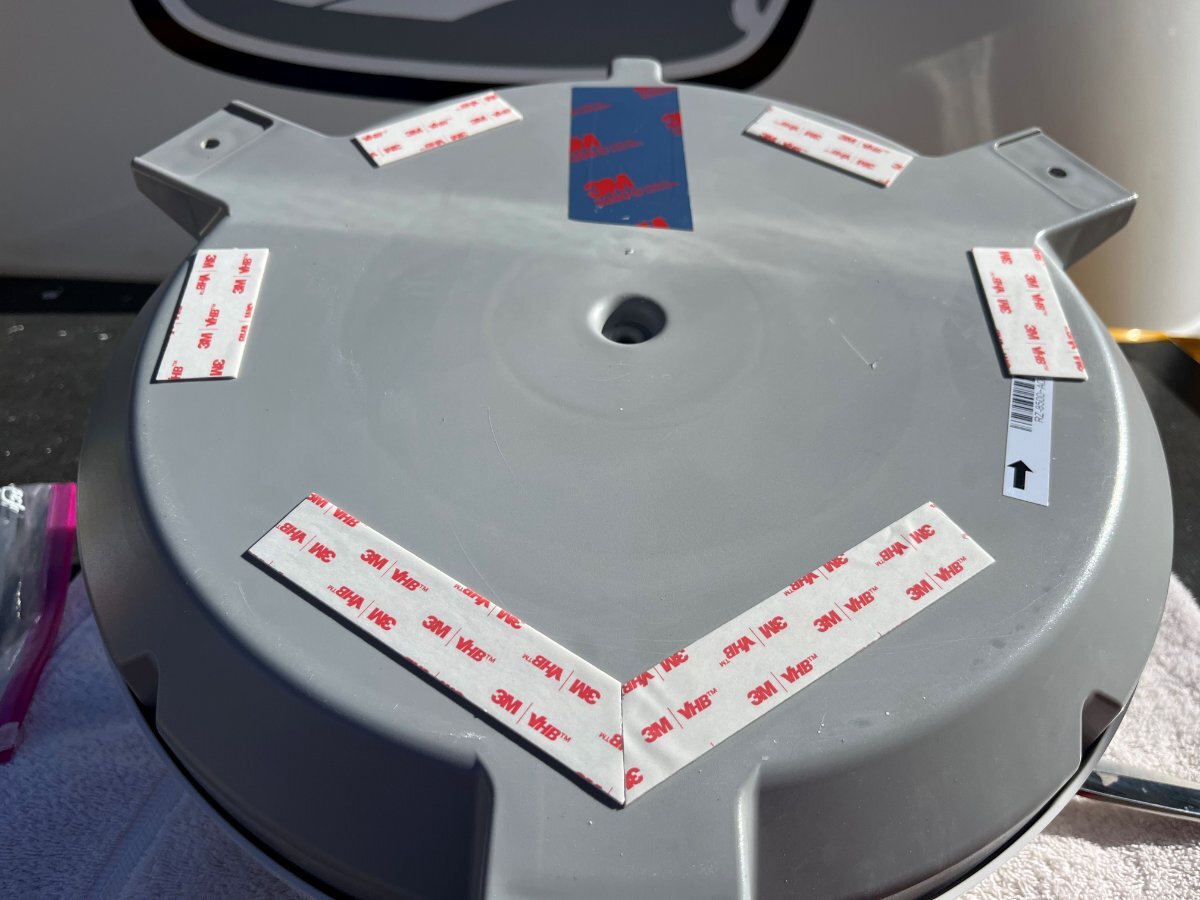
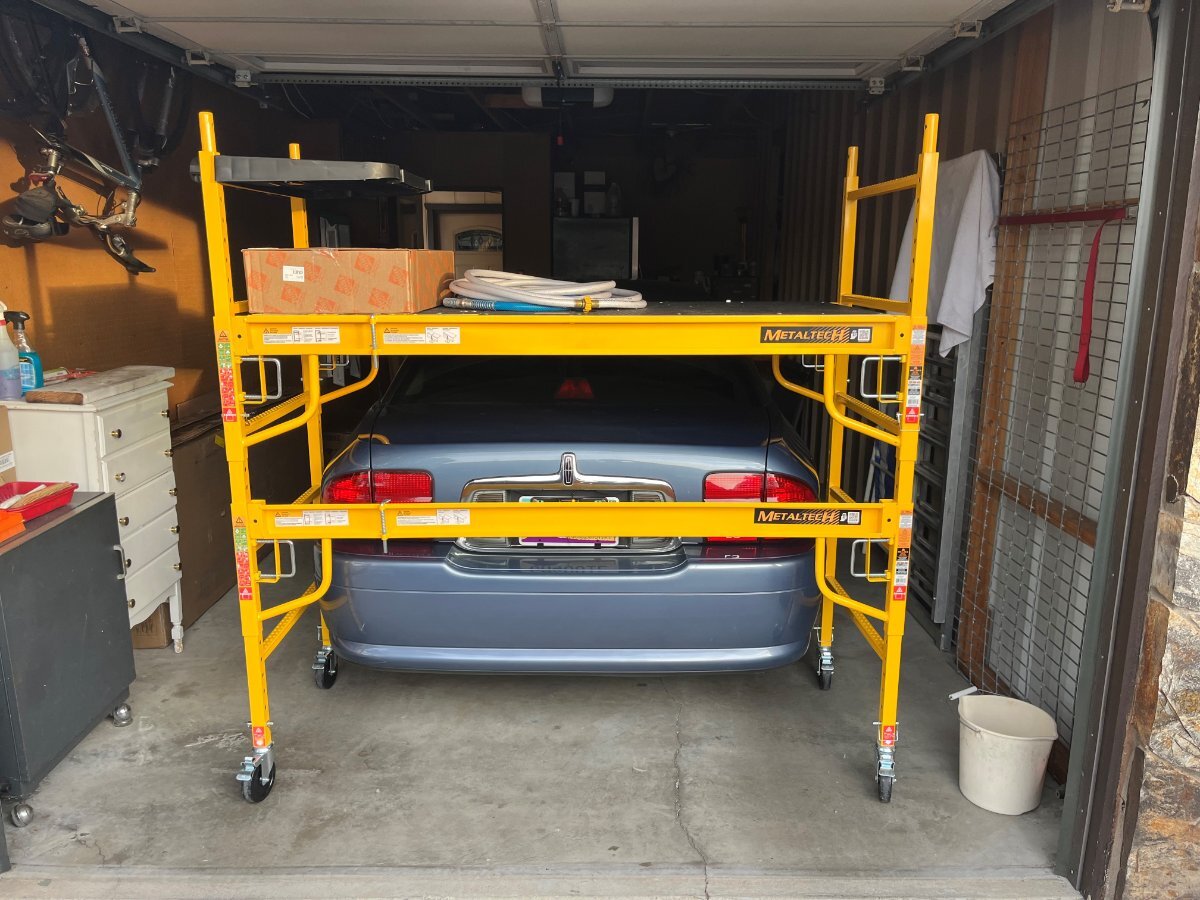
 I moved the scaffolding all around the Oliver this weekend to wash her thoroughly. It's been forever LOL, actually never in 18 months, since on prior trip returns, I have only hit the travel dirt with my pressure washer! It's great how this scaffolding can be set at different heights left-to-right. Given the slope of our driveway, I had one side mounted up two holes about 4". And BTW, notice the in the pictures above, how the original install has the 4 monstrous brackets attached to the Sat Dish (Winegard makes big extra bucks selling these). Notice how in my installation, I could have used 3 of the same brackets and drilled a bunch of holes, but NOT. Picture below shows the 3M 4950 VHB tape I used. I probably used too much but our old fiberglass is a bit porous. I used a V-shape up front to deflect wind & rain up front. Lastly, love this scaffolding! We stored the extra parts in our shed, but the main section as pictured will always sit somewhere in my 3-car garage for a variety of projects. It will store nicely in front of or behind any car and provide a storage shelf that can be rolled around. This is where I kept it while working recently. I could also use it at just a 2' height when working in the truck engine compartment, to get up and in there, instead of standing on a milk crate or something else sketchy! 🤣 Those of you who have ever serviced a HD 2500 4WD truck should understand.
-
Just turn your Delonghi heater up to 70F the night before you're leaving. It's NOT like you're leaving from the Yukon or the Twin Cities! Am I the only forum member here that is giving @ScottyGS confidence in his extremely thoughtful plan? (Yes) You guys with your pink stuff, I've never have used it and never will. Lately most of you have found your winterizing is signaling your CO Monitor! 🤣 Really? You can do better. Big Pharma, Big Food, Big Chemical, Big Gov, we don't use ANY of it, although we are stuck with the last one! Hopefully much of that is corrected soon! Scotty, God Bless you and your family and Merry Christmas. Let us know later that all was fine. Have a great trip!
-
Thank you, Tom & Doreen! It's nice when a job comes together well and even better when it's DONE! Check out our final before and after pictures --
-
Please GJ, what you wrote here is not at all related to the premise of the question! No place for fear and weather stats going back 40 years! 🤣 The premise as stated is for the next 3 weeks, while monitoring temp sensors, which have showed a low of 42F to date, is he good ? My answer is yes, YES, he’s is good! No Ice Age happening’ in the next 3 weeks and if temps get too cold, all @ScottyGS has to do is set the space heater temp up a few degrees! NP.
-
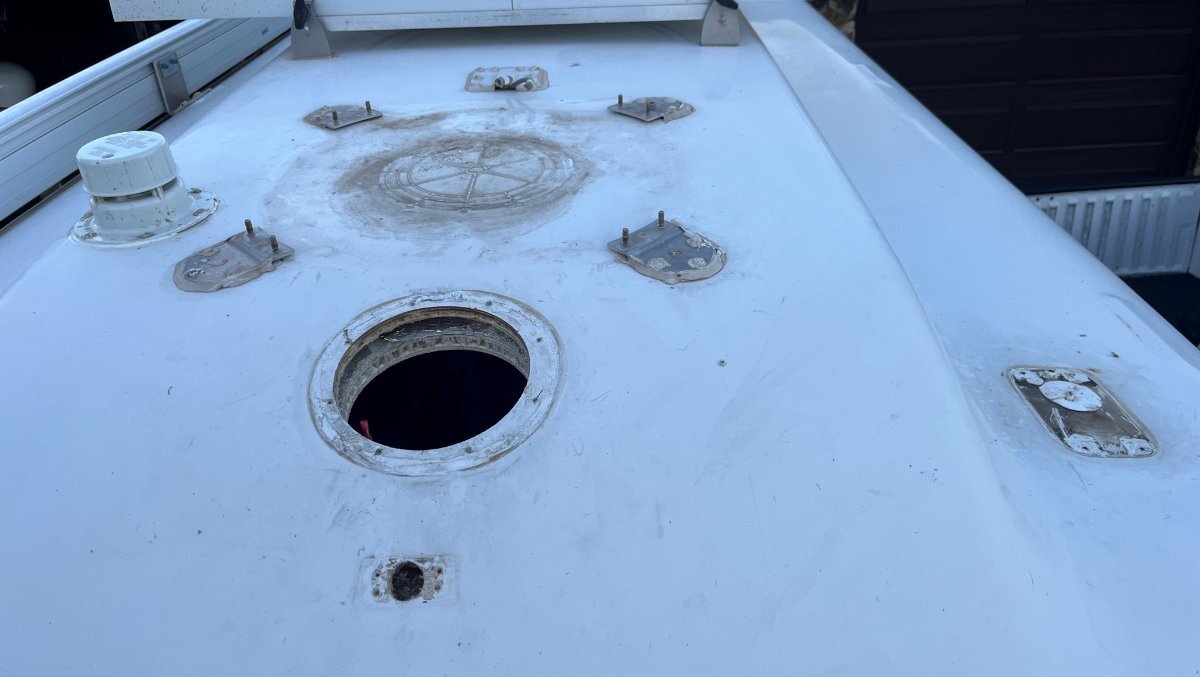
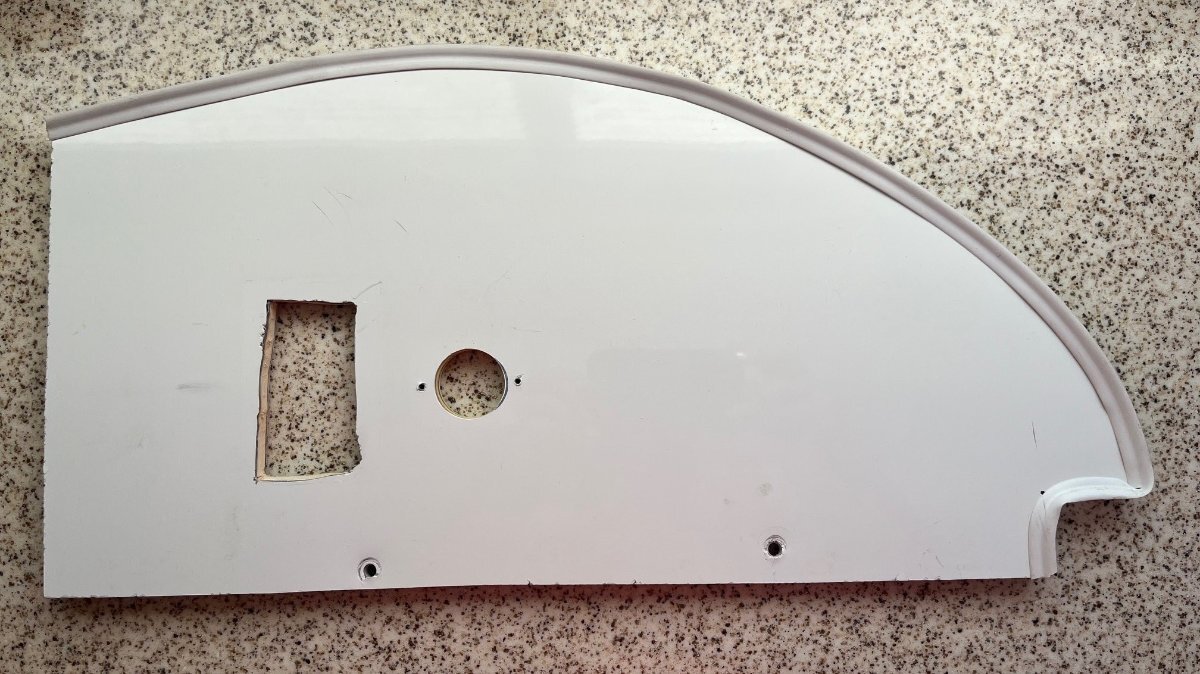
Here are a few stark pictures! The before and WIP. Somebody gotta do it! Love the posts about pretty Olivers, ceramic coating, blah-blah-blah, sorry that is not our reality... 🤣 I recently drilled a 1 1/8" hole in a fiberglass board in the attic to install an outlet. I used this plug to fill in the obscene hole left by the useless front camera. I came up with another 9/16" plug for the Wi-Fi Booster that also has little value today. The front hole in the picture has a dark spot. So I rubbed a little white paint there with my finger, so that in a later picture it will be less apparent. It's a lot of work doing this, just one day at a time. It's not perfect, but not bad. My brake jobs, and other repairs, are perfect, yet not such artistic endeavors. If/when we hire a professional to restore gelcoat it would be the time to prep a better finish. Not bad for an old-school engineer/mechanic and good enough for now!
-
Looks good to me @ScottyGS! I just used my compressed air method since we had a full 2 months, no travel plans 'til Feb 1. When it's just a few weeks, I have often set the Oliver furnace (and other RVs) to about the same 50F, leaving beds and basement doors alone. We keep our 30# LP tanks full at all times. Here we only get below zero for a few hours near dawn so very little LP is actually used. I also have a Ruuvi sensor right below the water lines in the rear basement. The Delonghi is a rather safe heater. Your plan looks very good to me. 😂
-
Me too. Maybe the slides or installation were just better on some older hulls. Talk about hijacking a thread! I started this thread. The original purpose was (read the title again). This went from a comment on needing a battery strap to all this! We do have enough posts on drawer strap mods. I read the one from John E. Davies when I first joined the forum. Personally, I would replace the slides or remount them very slightly uphill vs. all that! 🤣 Back to the subject at hand. I did weave a simple strap through the openings on the battery tray and over the batteries. Not that they need to be held in place, as they're not going anywhere, just to reduce vibration. This strap should just stay in place for years.
-
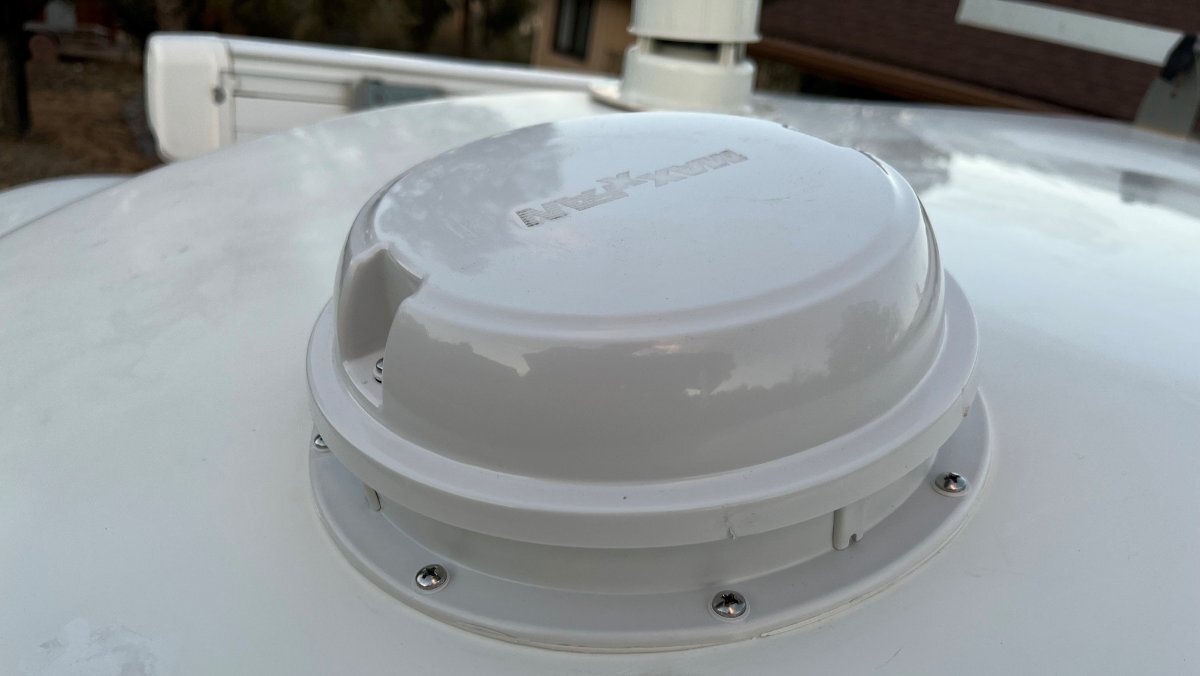
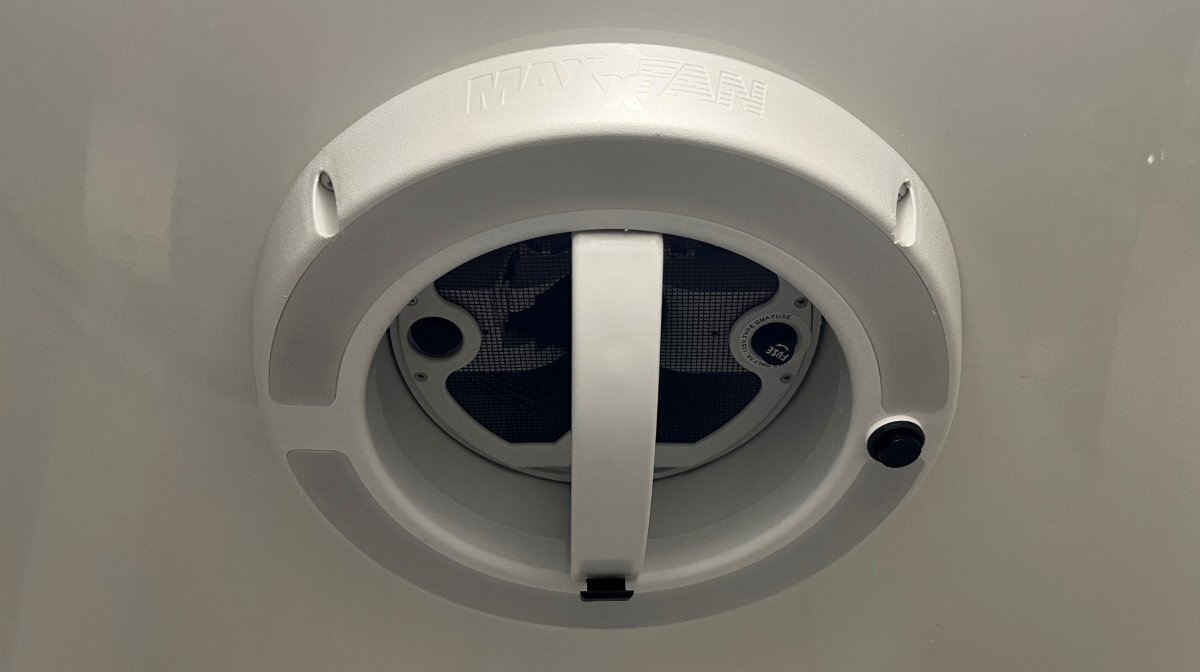
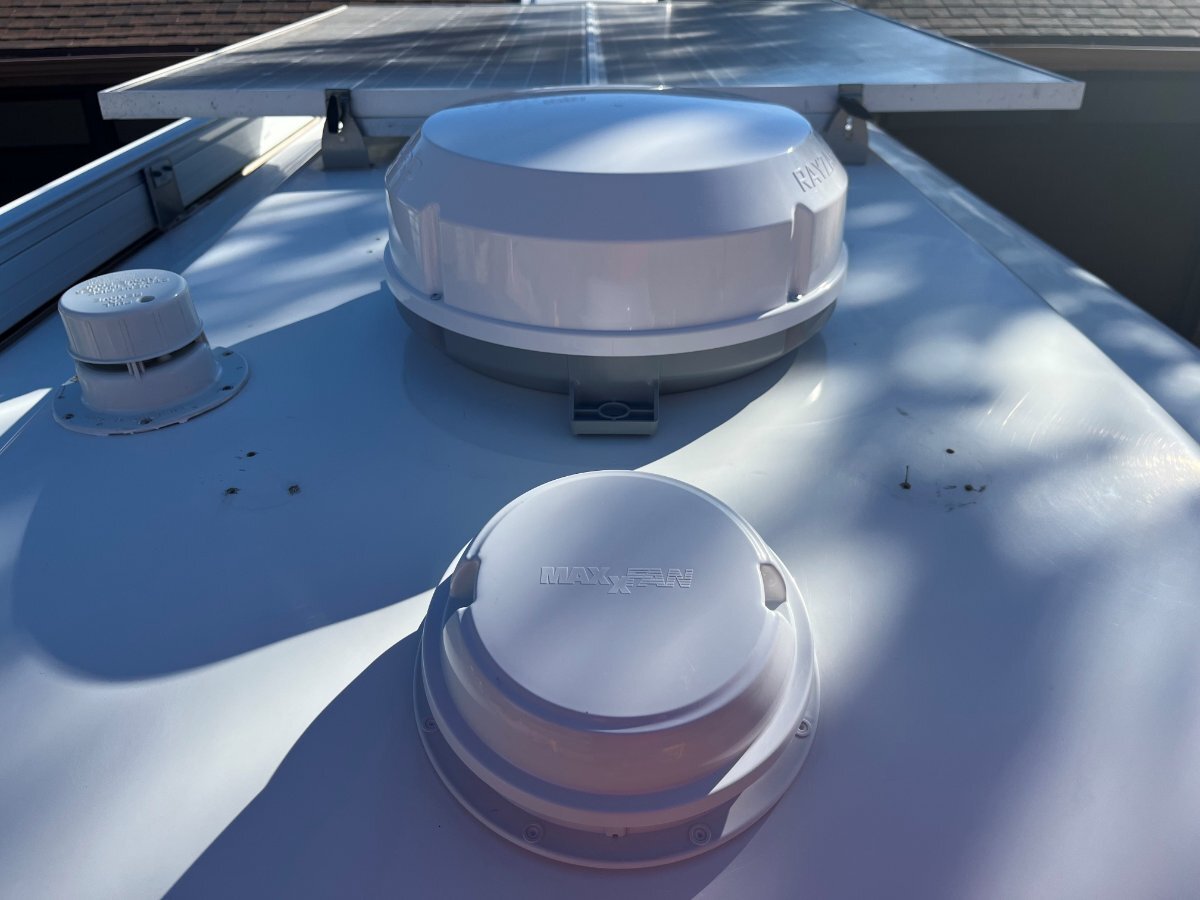
Thanks Craig. I think the fan pushes more air and that perhaps produces more sound. However, I believe the motor sound is more pleasing than the OEM Ventline model which sounded more like a harsh motor sound. I added a movie, but sound here is relative to your audio system more than the actual recording. Got'er done today. No way, NOT installing the rain guard. It has no utility except for a wall mount installation (not only per my opinion but the company literature). Yes, the stress on this plastic, both upper and lower, tightening to bend to the Oliver curves is extreme! Come on OTT, next hull redesign, please create an 8-10" DIA flat area in the upper and lower hulls. I set the 4 screws on the exterior, those left and right before drilling the other 4 front and back. I got all 8 screws started and tight to a point, waited tightened some more, let the AZ sun work it for 90 min, then tightened each to position. Do NOT work this installation up north when COLD! I will add caulk/Dicor later as the plumbing vent and other rooftop items need it, the final tasks. Inside was worse than the outside where the arc seemed more extreme. I hate to report, curve stress or not, this is not a quality build! I like the metal base and metal push mechanism of the Ventline model vs. the emotional attachment to the upper LED lighting. Our bath has great switched lighting and most of the time when using the bathroom at night the inside Courtesy Lights are all we use. The spring metal mechanism of the Ventline model is superior to this push-button switch of the MaxxFan. If it wasn't for our last trip, when our Ventline fan slipped alignment (after 9 years) this suggested replacement product could have site another some years in storage. MaxxFan Movie.MOV
-
Asking @SeaDawg, @MAX Burner, @Mike and Carol, @Galway Girl and others who have installed this, couple of questions... Re the outside installation, it seems like such a pull on the plastic to torque down the eight screws giving the fan is flat and the outer hull is so round (why doesn't OTT have a flat area here in their hull design?). With a dry fit it appears the front and back are both 1/4" off the surface. That's quite a pull on this light plastic and could interfere with the fan up-down movement when installed on such a curve. Any issues? Art mentioned this briefly on page one, but no comments from others. The instructions mention mounting the fan with the switch to the front. At first, I thought they meant the power button, but they must mean the mechanism button since it is what holds the fan down against the wind when towing. The picture Art shared shows the handle sideways vs. front to back. The instructions do not mention having the sleeve on when mounting the fan to the roof, but it appears that only with the sleeve on would you get the fan mounted in the correct position. Thanks.
-
Truly GJ has the unique way of finding the oldies-n-goodies!?! 🤣
-
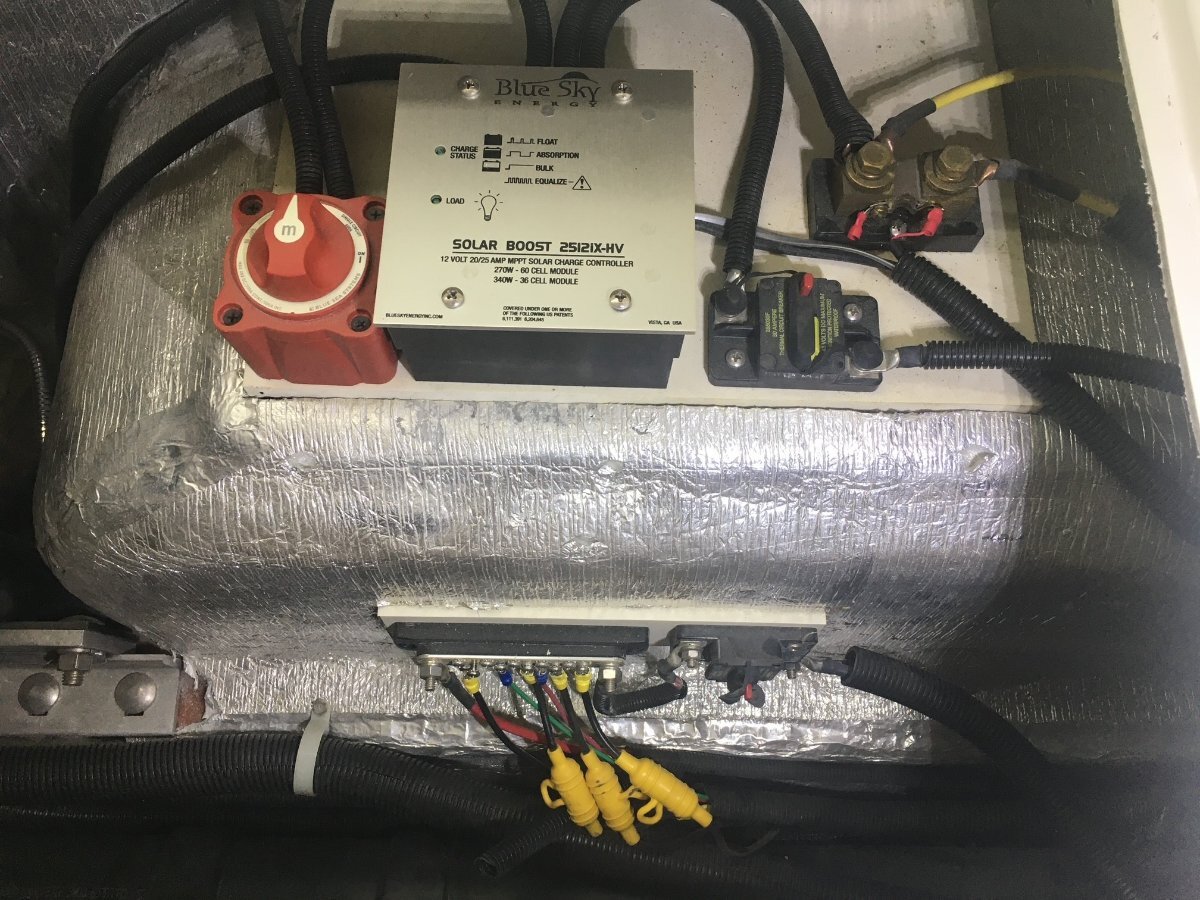
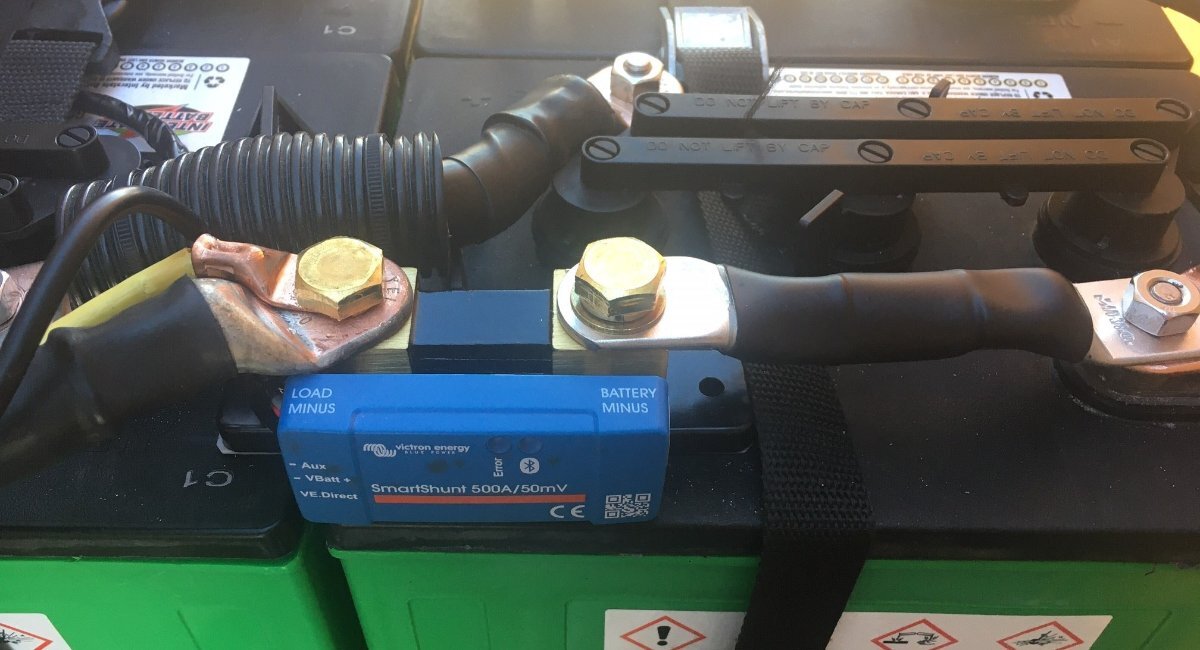
Thank you, our forum friend, no dummies here! I've respected many of your special posts as well. PM me if you want info specific to your hull. My first pic is the original Blue Sky Solar install, where you can see the OEM shunt (top-right). Our hull is dated 2016 and yours 2018. Nothing wrong with the original install but I can only read status, when sync'd, and while watching the installed screen inside the Oliver. The Victron SmartShunt has built-in Bluetooth and an app for reading on your phone. The second picture shows the Victron SmartShunt installed (at battery ground), the simplest installation possible. I have revised my installation since, after installing the Victron Multiplus II Inverter/charger, where I have it at the inverter, but still closest to the B- battery ground terminal. If I was to but a new Oliver Elite II (not happening for us, I'm a "always buy used" guy), I would have OTT install the solar array with wiring to rear dinette seat basement area (please NOT under the streetside bed) and I would install a Victron MP2 and pick from so many choices of LiFePO4 batteries on my own (Black Friday deals now 15% OFF). Battleborn batteries and Lithionics, good for the wealthy 3-6 years ago are now WAY bettered by LiTime (lowest cost), Epoch Essentials and others where 600AH cost <$2K or less! More info here (page up to first post)!
-
Additional shunts can be installed to monitor subsystems, different battery banks, multiple solar arrays, etc. not much need in an Oliver, but… Our hull has a shunt wired to the display for the original solar charger. You can only read SOC and amps */- when in our hull looking at the display under the pantry. This would be the same for the BMV712 shunt mentioned above, wherever you mount the display, though this Victron product might have a Bluetooth sender or one can be added. I left the original shunt as-is and installed this Victron SmartShunt so I could read battery status outside the Oliver, in the TV while driving, even from my living room window at home! I spent $90 to add this and it’s been worth it. Download the app for no additional charge: https://a.co/d/4hKmfCW
-
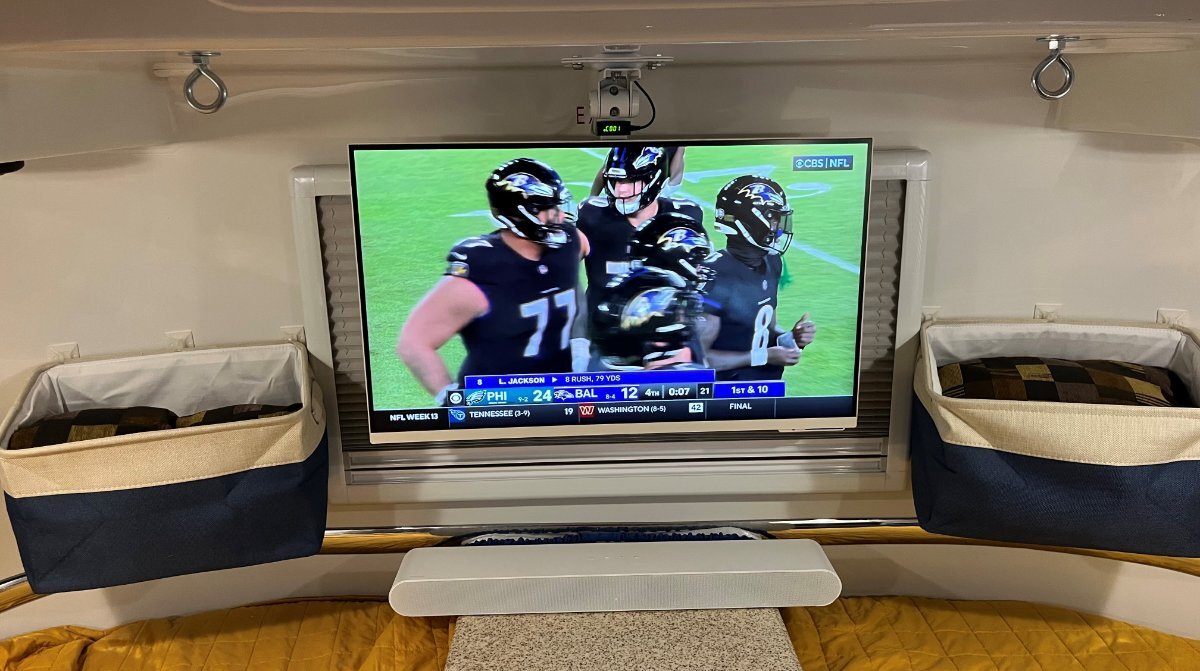
Finishes up everything today. I installed so much HW and wiring behind the panels there is so much room now inside! Blu-ray/DVD on the shelf, lower shelf empty after deleting the Wally. Room for a small box of DVDs, my extra Dewalt charger, Chris' fan, another very important tool and of course my hat! Football on everyday this weekend. Version 2 of this upgrade is done again. 😂
-
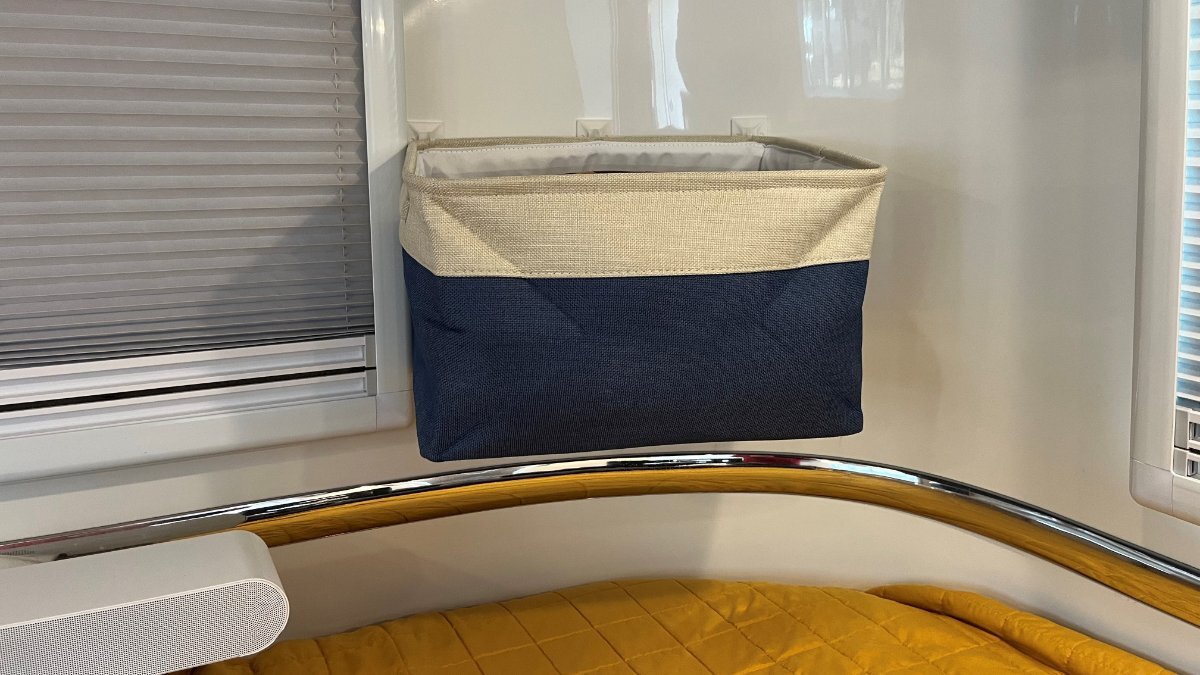
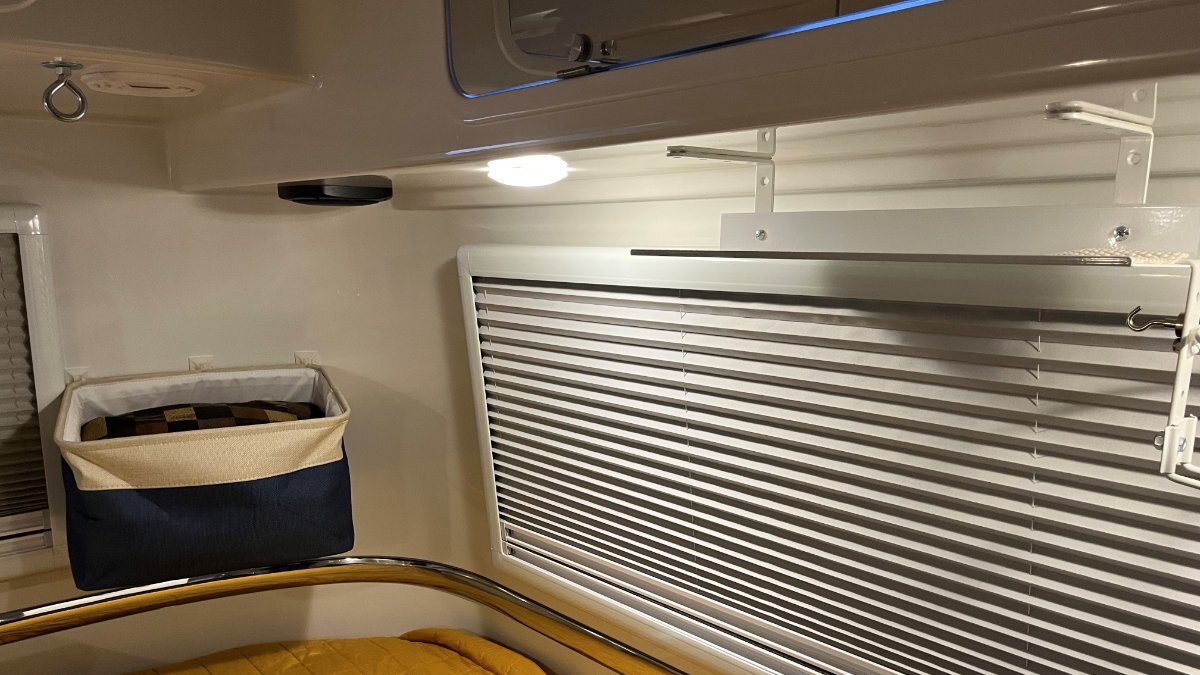
Besides the new dinette cushions we ordered carpet runners. I order the 4' length for the entrance, just to check it out, nice product. Later we ordered the 10' length. They come 26" wide (perfect) at every foot length. If you are interested in these reasonable carpet runners, just order the 10' (or 12') as they include at no charge a 3' runner! Carpets are not worth a picture so please look here: https://a.co/d/8kEcOFy Then I had another idea. After 55+ nights camping, just a drop in the bucket for most of you... The one thing that always bothered me was where do I put my PJs when I dress in the morning? And more so, where do I put my Jeans, shirts and socks that I would like to wear another day, not yet ready for laundry? We have so far piled up our day clothes on one dinette cushion at bedtime. This is our new fix: https://a.co/d/dW89TwU We love it! 🤣 Zoom in to see the simple, easily reversable, installation.
-
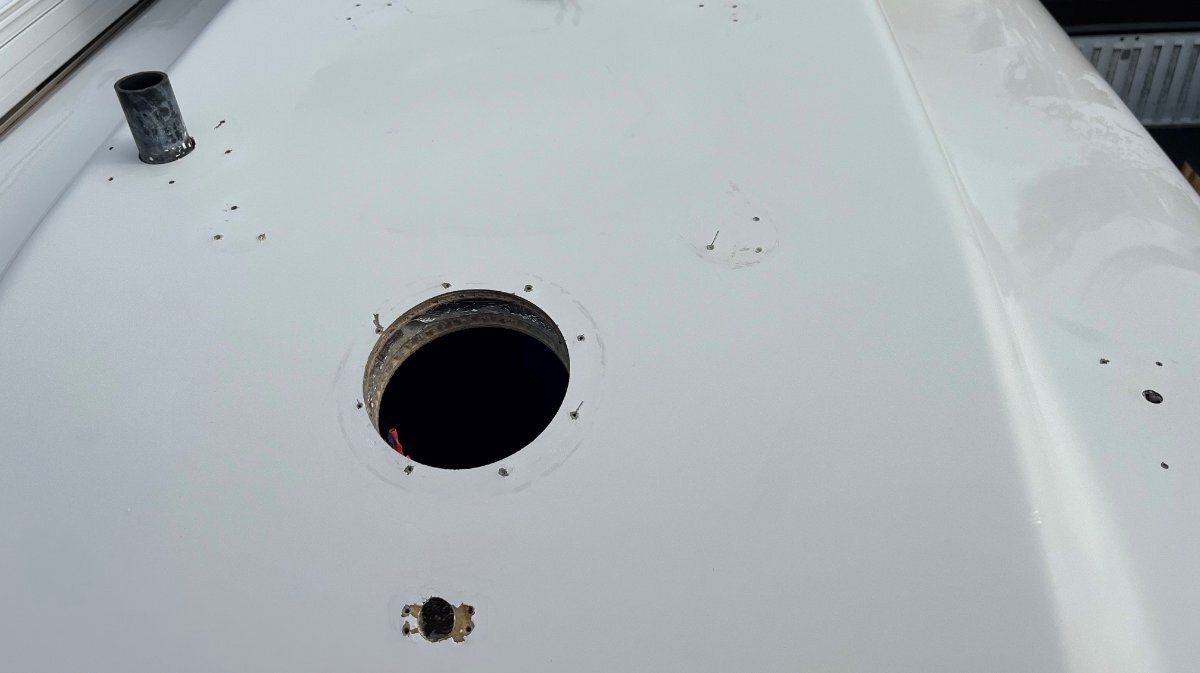
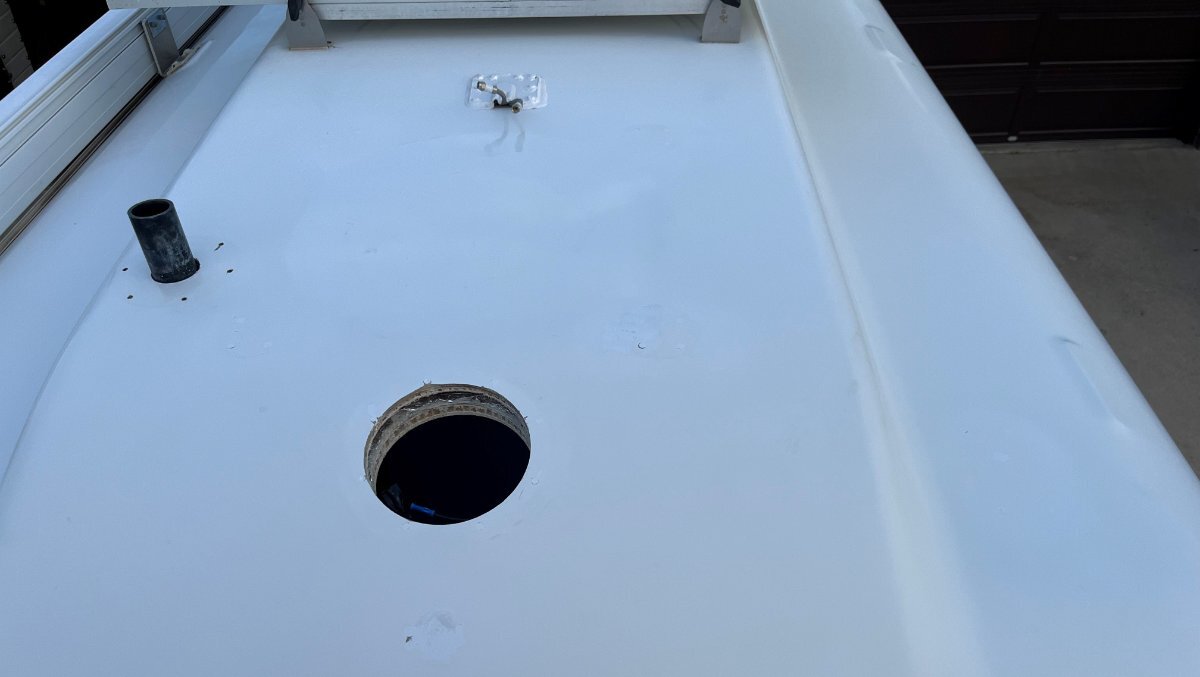
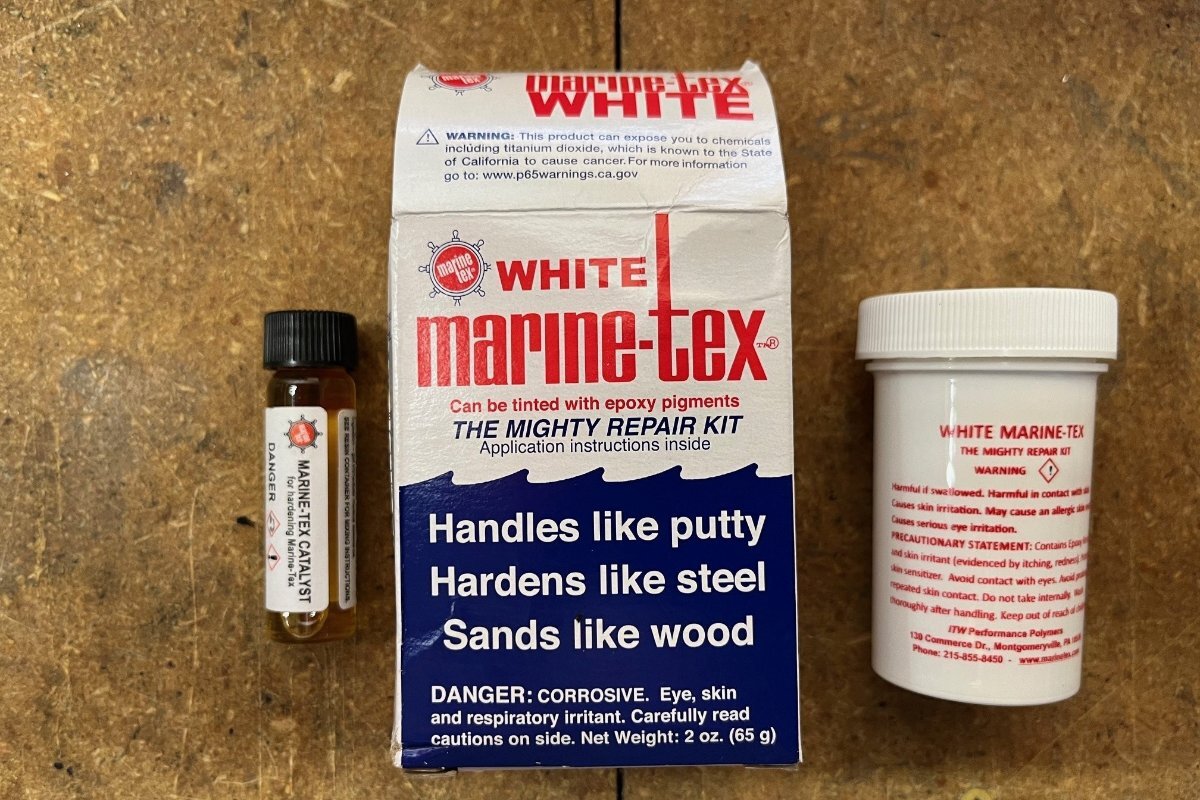
While finishing up the Attic wiring and another install today, it was hard to find the two LARGE holes I filled months ago that were the original streetside corner TV mounts. Also today, I used almost the last of my Marine-Tex to fill all the screw holes and the large openings for the front camera and the front-corner mounted Wi-Fi booster. We'll see tomorrow after some sanding, posting results in my other thread, re rooftop repair. I just ordered another Marine-Tex kit for future use, good to have on hand!
-
Had a repeat of our Thanksgiving turkey dinner last night! Chris stretched out the left-over gravy just a bit and our dinner was just as good again. It tasted really good this year, yum! 🤣 Hope everybody had a great weekend!
-
That's why I saved the dinette seat backs that measure 24x15 and 4" thick! 🤣
-
Thanks, John. I did patch these holes when I filled some screw holes on the body. Like Bill wrote, it is tedious with the sanding, and I only got it so good, trying to sand the fill without dulling the area around it. I used this product that was pretty good, color just a tad brighter than our old hull.
-
I reworked all the "Attic" wiring while adding this antenna. Check out the first picture. It's not funny! The Oliver family should not employ anybody who cannot cut a square rectangular opening! They also used a 1 1/4" hole saw for the 12V outlet that requires a 1 1/8" opening. And look at how the two screw holes at the bottom of the panel are lined up. I used the original hole for the new Winegard antenna controller and drilled a new hole to install the dual USB port. The simple power strip and an HDMI switch (choose between TV tuner or Blu-ray player) are both mounted with VHB tape. Our WHITE and amazing Samsung 32" high-rez monitor, its screen only 1/2" thick, has no internal TV tuner. I added a remote digital HDTV tuner. You cannot see this in the install since it is behind the panel. It's powered by USB and HDMI is the output. Simple, inexpensive and works well: https://a.co/d/7YBYzxw Check out all the wires in the bottom RH corner of the second picture. The TV tuner, the TV power supply and all extra cabling is behind the panel. The Winegard controller has cable inputs and output behind the panel too. The cable TV input you see in front is extra if needed. I should have taken a picture behind the panel.
-
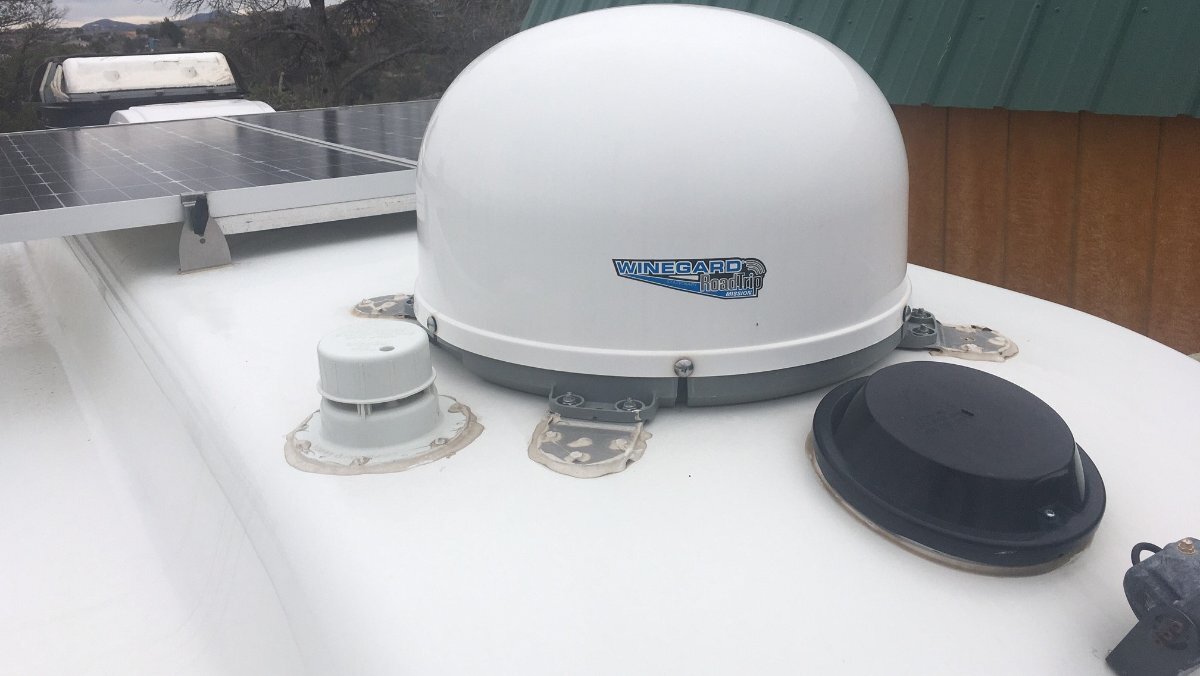
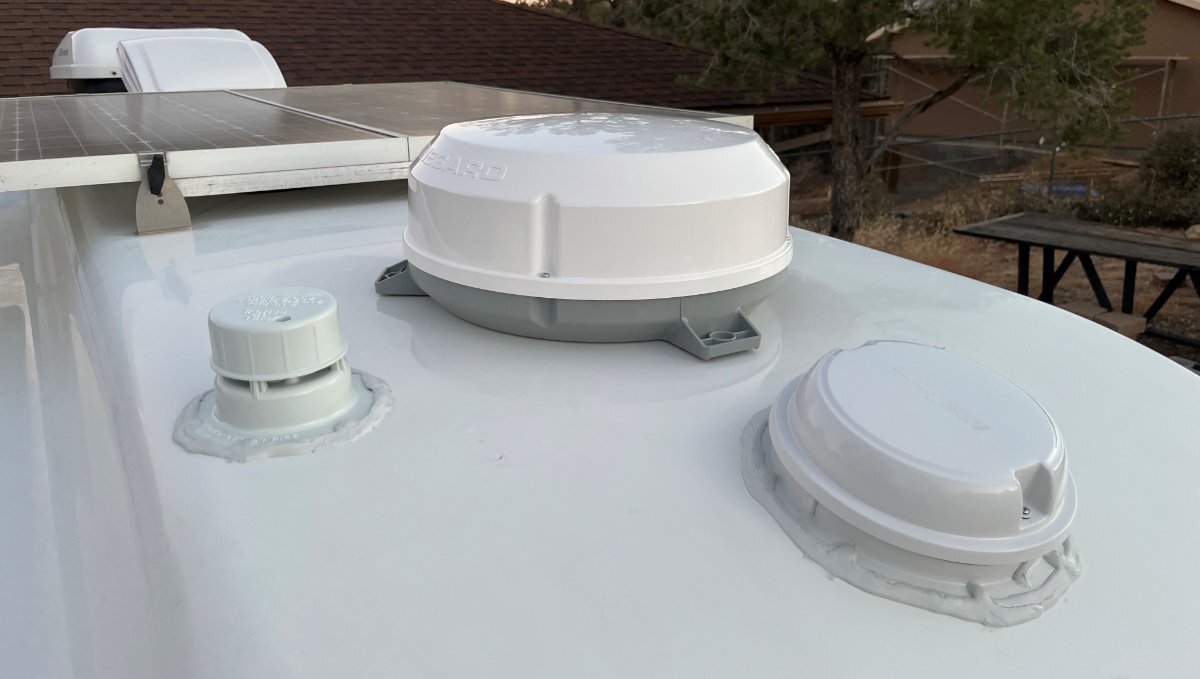
UPDATE on our A/V system installation - Back in June 2023 when we purchased our Oliver, I thought the Winegard Dish Sat setup was a nice option to have. We got a Wally receiver and used it on one spring trip to Utah. We soon realized the monthly cost of the Dish Network, even paying a month at a time, was too much money for the value. I would prefer an antenna to view occasional local broadcast TV when traveling without monthly service fees. I just removed the Winegard satellite dish. I wished OTT had never installed this system for all the related repair work, though I will reuse the same coax feed for a new antenna. After some antenna research, I went with the Winegard Rayzar Automatic Antenna RZ-8500. It has the advantage of being self-adjusting, automatically turning the antenna for the strongest signals. These are expensive at over $400. Months ago, after looking on-and-off, I found a new unit from a private eBay Seller for $250 shipped! Living in Prescott AZ, broadcast HDTV is bounced off Mingus Mountain (think Jerome AZ) to the north of us, from Phoenix 100 miles to our south. Also, our Oliver is now parked behind our garage blocking line-of-sight to the repeater. However, the Rayzar antenna still found 13 frequencies, with subchannels connecting to 30 stations. This antenna works very well. I did not want a directional antenna that would need manual adjustments. It may appear that I’m removing one eyesore for another, but the new antenna is much smaller. The Dish Sat was a monster at 13” tall with 20” diameter. The Rayzar is half the height at 6 ½” and 15” round (notice screw holes from old unit in the picture). It is far less noticeable on the Oliver roof, just 2” taller than the solar panels and hardly noticeable from ground level. In the picture nothing is mounted, until all the fiberglass work is completed. The new antenna will be held tight with 3M 4950 VHB tape, no screws!
-
Wow, less than half the price of Home Depot for what looks like the same item less the Husky house brand name.
-
New pics... I purchased some basic construction scaffolding a few years ago when we painted the exterior of our home. Remembering about $260 on Craigs for a 2x8' setup (old crusty parts). I'm the tool and setup and prep guy. Chris is an amazing painter, interior or exterior, highly detail, never bleeds a line! The rig was wobbly! I had to tie the scaffolding to the building, or to a close tree or bush, really, anything to keep it stable! I should take a picture of my neighbor's custom home next door, tomorrow where the sub is working the stucco, OMG! the rickety frame with random wood planks. You're not getting me or any family member on this this rig!!! When I sold the old scaffolding, I kept 3 of these adjustable legs (while getting our money back). Glad the see the MetalTech stuff is industry standard in the 1 3/8" inside diameter. It is so much more secure than the wheels that come with these AMAZING Home Depot deal!