
jd1923
-
Posts
3,844 -
Joined
-
Last visited
-
Days Won
312
Everything posted by jd1923
-

Update on Alcan springs and Monroe shocks...
jd1923 replied to johnwen's topic in Mechanical & Technical Tips
If the new rubber is taller you must allow for that. You want the rubber to pillow out some to hold the mount tight. Overtightening will cause them to fail quickly. Also the used rubber will have been compressed for some time and will look smaller than when new. -
Given you did not work the winterizing, did they disconnect the batteries or do you have a cut-off switch for your batteries. No interior lights either? Hard to be sure from your description but it appears you have power connected to the generator and none when disconnected.
-
Yet another Lithium upgrade on a 2018 LE2
jd1923 replied to KeysConchs's topic in Ollie Modifications
The Epoch Essentials 300 AH battery lists at $999 and several times a year it is 10% or 15% off. I got mine for $899 each, free shipping no sales tax. -
I appreciate your thoughtful reply. You understand the physics better than most. Measure tongue weight, keep more trailer weight in front of the axles. Please forgive my sarcasm. Loved my ‘75 Alfa (drove it from ‘77 to ‘97). Your Datsun 1600 must have been fun. I got stuck with a girlfriend and her Datsun 610 needing work. Still can’t stand the name Nissan! Long, long ago I had to move out of the city for property and the 3-car garage, but I get it. But here 30-40 minutes from home in most directions is a 3,000 ft drop and it worries me during each descent, the Oliver behind us. Best wishes and I really like how you ended your post! 😂
-
You could start a poll. You know my vote. Can’t wait to see your installation! Best wishes. JD
-
This truly makes sense! Our door would bang in the wind against that stop before you even got a chance to hook the door. Never since adding friction hinges. You must add these. Our door sits 90 degrees open, even in the wind, and never pushing on the stop. https://a.co/d/d1kftGz
-
The Oliver EII tongue weight is already too light. Mine measures just under 9% and 9-15% is recommend. I will get mine 10-12% with some work. Or I could remount the OEM bike rack and hang my dirt bike off the back. 🤣 Matters less for me since if the trailer sways descending on a curve road, with a rebuilt HD 3/4 ton suspension and well over 1000 LBS in available TV cargo weight. When we first purchased our Oliver, I pulled it around town behind our ‘08 GX470. Got home and started looking for a good used truck, just as a TV. Be very careful with that rig if/when driving in the mountains. I wouldn’t, but I’m old and boring, I used to drive my ‘75 Alfa Romeo Spyder fast enough to get air! 🤣
-
Yet another Lithium upgrade on a 2018 LE2
jd1923 replied to KeysConchs's topic in Ollie Modifications
I certainly understand! Good thing we found an older hull used at about half the cost of a well-equipped new one! Since June 2023 I have added $12K in maintenance and upgrades, parts cost only with my labor. I believe your price was quite fair. Not sure what OTT charges for their 390AH package, but it’s not 600A! Also, it does not include a DC-DC charger. OTT advertised one on sale recently, where they would install the lesser model, the older bulky 30A Victron charger on the Oliver side only (TV cabling and install on you). I calculated they had near $1000 for labor alone (for half the installation). Your installer spent a lot of hours installing your complete system. I know what is entailed here. Your 153A reading at 13.1V translates to 16.7A on 120VAC (153 x 13.1 / 120). Given the Atmos will cool well using 10A on 120VAC it should consume 60% as many AHs! (or last 67% longer on equal AHs). I cannot stand the NOISE of the P2! After I install our Victron Orion XS 50A system (parts paid for), I have the Atmos and a Starlink mini on my list (as we can afford them)! Best wishes and again enjoy! 😂 -
So far, you have received very good advice, but not causal reasoning, except for this pertinent blurb from @Rivernerd Amen. What you wrote above is not possible on two simple LA or AGM batteries (basically the same thing). You can watch TV all night on inverter, run coffee machines or the microwave for a few minutes, but NO-WAY the fridge and furnace All-Night-Long! The science is not there. We have LP for that and if you have a fridge w/o LP you need better batteries to dry camp, period. We have 600AH Epoch liFePO4 batteries. Just stopped to camp today, immediately turned the LP on for fridge and later tonight for furnace. Onetime we stopped at a friend’s house, left the fridge on DC (inverter) for longer than two days! We still had 30%, two LA batteries would have boiled over or went dead to ground in one day! 🤣 If you want to Boondock, you need to upgrade. Not to worry re your AGMs, they’re likely toast. It gives you the perfect reason to move into the future!
-
We still have a bit of work to do to get out later today. We'll make a boondock near Wickenburg tonight and arrive at the Q on Sunday. @ScubaRx I'll call you tomorrow. @rich.dev I just tried to send you a PM and the system stated you "cannot receive messages." Who knows why this forum does that. It's happened to me before and likely has nothing to do with you. Could you please send me a PM so I can reply with my contact info. I certainly want to meet you too and would like to stop by your camp one day next week.
-
Yet another Lithium upgrade on a 2018 LE2
jd1923 replied to KeysConchs's topic in Ollie Modifications
Very nice! We have similar tastes. 😂 Your tech did a fine job too. Wondering why the 3-pin connector? Maybe one lead is just a blank. It looks solid though, easy to connect and a clean install. The Victron suggested vertical installation is not possible in the Oliver. Yours is horizontal like the rest of ours and the fan is a necessity in the South or SW. Do you have the 13.5 or 11K BTU Penguin? You may want to get the 15K BTU Atmos A/C with heat pump, which at 10A uses about 60% AH of the 13.5K P2. I plan to install one this spring to run the air longer and not hear that loud noise anymore. The problem with consuming for example 50% SOC (300AH) running the A/C is the recharging takes much longer. Two hours towing at 30A DC-DC will only increase SOC by 10%. A long day on the road, a sunny Florida day with solar and the charge rate would increase. Did your hull have solar already? @gatorewc your name reads like you live in Florida too, where small solar companies are everywhere. The price should certainly be lower, much lower without travel, and you cannot get the preferred Victron products and less expensive, greater capacity Epoch batteries from OTT (Xantrex with Lithionics). I also purchased the Orion XS 50A DC-DC charger, 4 AWG cable with Anderson connectors. Mine is still on the workbench, to be installed this month! @KeysConchs I know you will enjoy your new Victron inverter/charger system. Bravo! https://olivertraveltrailers.com/forums/topic/10420-off-grid-upgrade-minimal-design-–-victron-multiplus-ii-and-600ah-epoch-lifepo4/#comment-112871 -
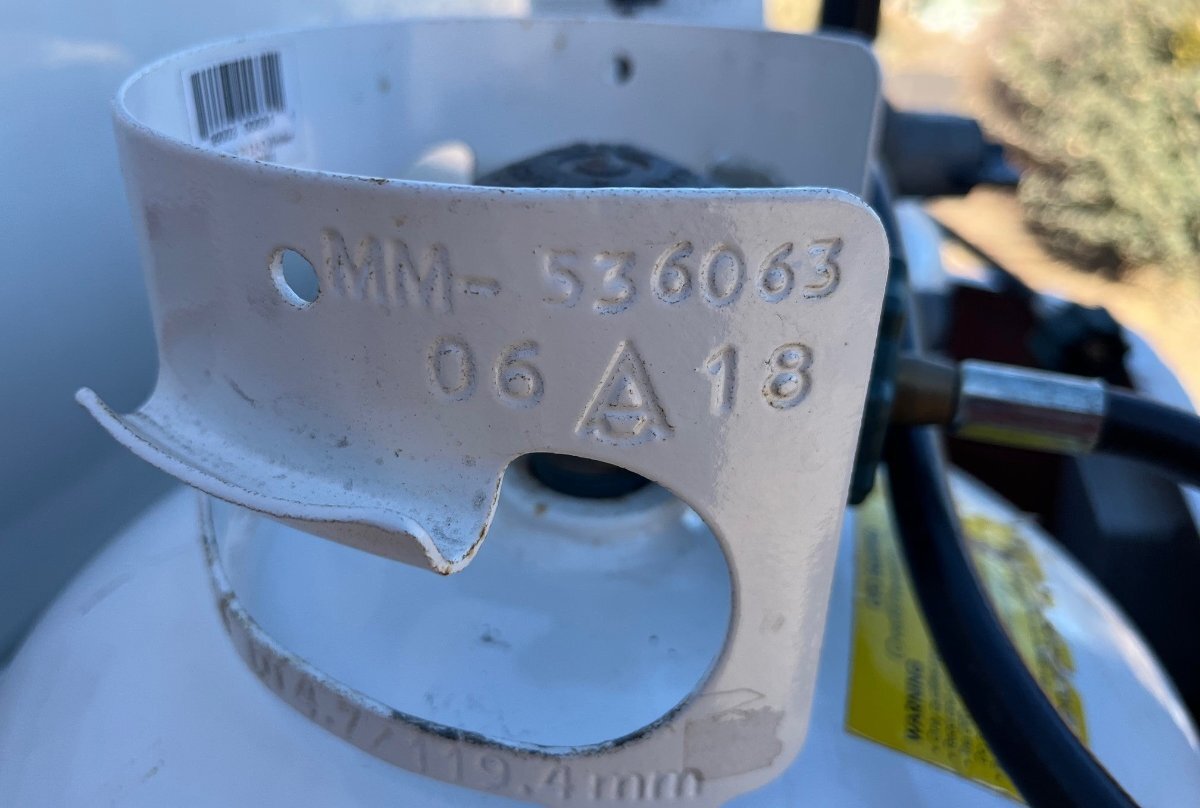
Thank you Steve, for your usual experienced sound advice! I filled our tanks today to get ready for travel. It took me forever to find the numbers since there are nothing but numeric codes all over the top handle of these tanks. Our two 30# tanks both have June 2018 dates. Wow, gotta love it! 🤣 We have 3 years and 5 months left on these tanks. I imagine the original owner received 20# tanks upon purchase and after two years realized two 20s were not enough. Our tanks have a Flame King label. Not sure if this is the brand OTT installed at the time. Love that I have over 3 years for this cost, and again thank you. 😂

-
Yeah, I was just going to spend $80 on a 20A ATS, for the original 2KW Xantrex inverter, so that I could run the A/C for an hour or two. Then as soon as the A/C was turned on, the LA batteries dropped immediately under 12V! So I needed LiFePO4 batteries and why not a 3KVA Victron Multiplus II Inverter/Charger at the same time! I certainly had to rip out all the old wiring, install heavy copper buses and ... I'll let you know when I'm done, but it works pretty good now! 🤣 Good thing about you jobbing this out. They'll get 'er done soon. Best wishes!
-
We do the same. That's what the kool kids do! 🤣 Honestly, I stopped looking at SeaLevel gauges when they did not read correctly in a Class-A we had, in a Class-C, and again in the Oliver. The Oliver is so sensitive to level that you can bring up or down the front jack an inch and the reading may change 10-20%! We stopped looking long ago, though given this thread I will study this during our trip to the Q this week. We fill the FWT when we hear the pump pulling air, we know our gray tank lasts 3-5 days and a good 10 days on the black, so we don't bother with readings that are more often inaccurate. Our hull has the suction tube defect. We pull air way sooner than 13%! (more like 44%) We have only 18 gallons usable in our FWT. Good thing we hold another 36-gal in the tank in our truck bed, having 3 x 18-gal for 54-gal total. I know it's 18 gallons. Every time the water pump pulls air we refill the tank via the boondocking port (good thing I replaced the 1/4" ID brass turn-valves for 12mm ID motorized valves). I measure the refill and after 4-5 times measuring it has always been right at 18 gallons. BTW, measuring the amount it takes to refill, 'til the tank starts to overflow is the ONLY way to determine the amount filled and the net amount remaining in the tank! Filling both tanks tomorrow to head out to the Q this weekend. Warming up soon with highs of 80F in the SW valleys next week! 😂
-
Searched this forum, far and wide, using so many keywords (rally, meet, national, lake, guntersville, 2025, etc.). Is there not a thread re the 2025 Oliver National Rally? Where is this advertised? What are the dates...
-
Yep, that would be us! Our hull #113 is titled a 2016, yet every time I tear something apart I see 2015 dates! Everything on our hull is approaching 10-years-old in 2025. I filled our tanks in November after our October trip to the Texas Rally. I asked the parts guy at our Ford dealer (best local LP price at $2.50/gal) about the date codes and neither he nor I could decipher the codes on our 30# tanks. Any advice? The date codes on brand new 20# tanks, purchased locally for our grill and fire ring on our deck, has very clearly marked date codes. I run the furnace while parked outdoors over the winter at 40F, to keep the cabin just above freezing (40F is the lowest setting on the Dometic thermostat). I used one tank in ten weeks since and just recently turned to tank #2. Friday when home I will refill the empty tank for a week in Quartzsite! I guess if the local tech can't determine the dates then I'm good for this trip! 🤣
-
Given this statement, why spend much more money than the 300AH Epoch, going to 400AH Victron batteries? Without an inverter these AHs are overkill! It's difficult to use 100AH running 12VDC only let alone 3-400AH. Your batteries will likely sit above 90% SOC most of the time. Another way of looking at it is you could stay off-grid and wait a week or longer for a sunny day!
-
Connecting 2024 trailer Vizio tv to Furion sound system
jd1923 replied to Beth H's topic in Mechanical & Technical Tips
Thank you and @Cameron too. Our older hull did not have an Optical audio cable installed, HDMI only. Good to know. -
Took me a minute, GJ! Yes, this only works for those who live nearby and check into their Olivers occasionally. 🤣 Flat spots are not that important on a trailer anyway. You can't notice them when towing and they will smooth out after some miles down the road. May slightly affect the life of tow tires when stored more often than used. The cars/trucks I have in storage get pulled out and moved around every so often (1-3 months). When I used to store for >9 months, I would store on jack stands (along with battery grounds disconnected and Ethanol Shield in the tanks). No real worries re the Oliver over annual winter storage.
-
We've had this conversation before. Yeah and watch out what you're trading for! I'd rather keep my tanks than take the chance on an exchange. Extra 20# in the TV takes up more precious cargo space. The ladder idea works but you need to get the tank into the truck bed anyway. Why not back it up within inches of the tanks? Reach down lift up and set it down, strap it into the back of the truck.
-
Every month or two, you could just use the jacks to lift the trailer, spin the tires and change where the trailer is sitting on each tire. Then put the tires back on the ground, jacks just keeping it stable.
-
Two 20s is not enough, love the 30s! I’m 6’ 2” though when standing on the tailgate I’m about 9 feet tall! 🤣
-
So really, two of you winter camp with the Oliver thermostat set at the same 58F? Day and night? Y’all must wear a lot of sweaters! Sorry, but lately I’ve read many posts on freezing issues, running space heaters instead of the furnace as designed. If we noticed a hint of pipes freezing, I would up the furnace temp asap.
-
Run the furnace at 64F or higher!
-
Rich, you caught me just in time! Leaving very soon to drive to Vegas (not towing today) to teach my PMP Prep class Mon-Thu this week. Next weekend heading to the Q with family and Oliver in tow! Hope to see you then. Turns out the Barker can be set at any height. You can ease it open which can be helpful when letting gray go in the BLM or NF lands (yes, it is legal when at a distance from others and water sources). Of course, when dropping the black tank into a sewer/septic system you would rather release all waste quickly, valve full open. Not the Valterra valve which is either all the way up or down. It must be due to the switch which could be replaced with another DPDT switch (pictured). The odd little breaker or reset button is odd. I would delete it adding a simple butt connector on the white wires in and out and wire a 5A fuse at the + bus. Without the faceplate this switch could be mounted where the pull handles are located, but I cannot determine if this switch is waterproof (unlikely). Barker has a 1 1/2" valve model and I have not been able to find one in the Valterra brand. I want to motorize all 3 valves, especially the 1 1/2" valve which gates the gray water from the bathroom. It will be great to merely push a button and remove the pull handle from the bathroom! I will do this work Feb-Mar, weather and time depending.