Snackchaser
-
Posts
267 -
Joined
-
Last visited
-
Days Won
19
Everything posted by Snackchaser
-
How many different KEY's do you have?
Snackchaser replied to Dave and Kimberly's topic in General Discussion
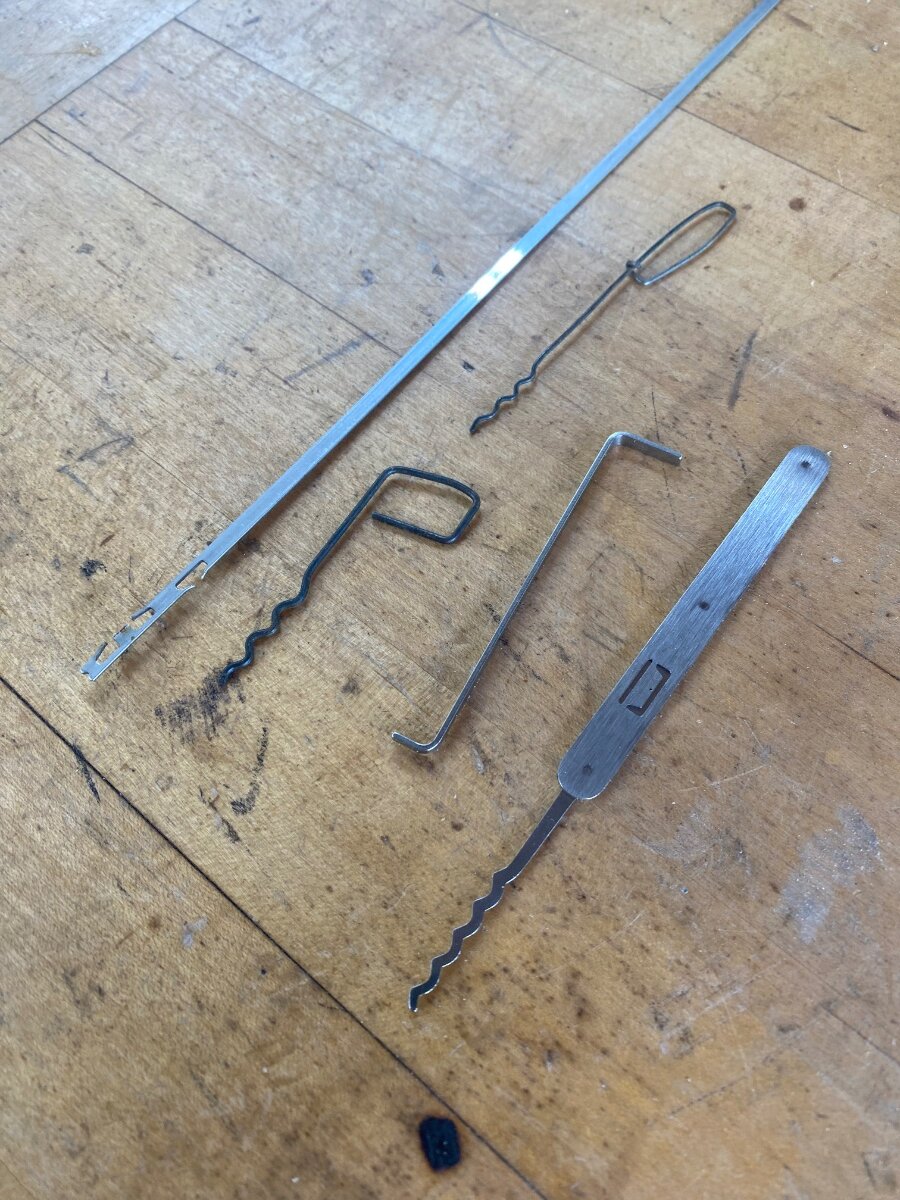
One thing that most folks probably don’t consider is lock picking. It’s actually a booming hobby and it’s simple and useful to know. I’ve saved a few folks from having a really bad day, and Iv’e even saved myself when the Oliver’s keypad failed (for the second time) and the keys were locked inside. Most auto and home locks are difficult to pick. However, the cheaper RV door locks, camper tops, tool boxes, bike racks, hitch pins, etc., are ridiculously easy to pick. The cheap cylinder locks found on millions of these products can literally be opened in seconds and it’s a real motivator to buy quality locks. I keep a professional lock pick in my tool kit. But in a pinch, you can use a paperclip and the flat wire found in most windshield wiper blades for stiffening the rubber. The paperclip, or pick, needs to be small and stiff enough to manipulate the cylinder pins while under a slight turning tension. The tension tool should be springy and light so that the pins can jump around while applying minimum turning pressure. The flat windshield wire is perfect for this. There are loads of lock picking tutorials on You Tube, and the trick is to be light handed on the turning tension as you jiggle the pins into the right combination so the cylinder will turn and open the lock. You can buy pick sets and practice locks on Amazon, and its perfectly legal. But a single quality raker pick and a home made tension tool is all you really need. The photo shows a piece of windshield wiper flat wire and picks from my tool kit. There is a tension tool, some old paper clips that I’d made in emergencies, and one professional raker pick I recently got from the Lock Picking Lawyer. You can use a small screwdriver, knife tip or hair pin, if nothing else is around. I hope you find this fun and useful. Cheers! Geoff
-
How many different KEY's do you have?
Snackchaser replied to Dave and Kimberly's topic in General Discussion
I’ve been able to narrow a similar list of keys down by using locks made by Pac Locks. They make a replacement Puc lock for the proven industries tongue lock, hitch pin locks, cam locks, and of course various pad locks for bikes and stuff. The beauty is that they can all be keyed alike so only one key is needed for all of them. I discovered Pac Locks through the “Lock Picking Lawyer’s” You Tube channel. He can pick most other locks in seconds, and Pac Lock is one of the few locks he recommends. Cheers, Geoff https://youtu.be/7eOt2mHEAOM?si=L-qhIZCfPWqQFOXa -
Battery and Solar Disconnect Install Questions
Snackchaser replied to Tony and Rhonda's topic in Ollie Modifications
@jdmmtx, I'll try to explain it better if I can. First of all, I didn't install my solar switch as was suggested, it was installed by Oliver during manufacturing. There were NEC and local codes that required solar switches, but i don't know where that stands now or why Oliver apparently stopped installing them. Regardless, it’s still a reasonable safety feature, because with no sun the system can test completely dead. Then surprise when the sun comes out! The solar wire is not as obvious, or as easy to find and disconnect as the battery, so a switch is a good idea and easy to install. Also, it’s nice to be able to switch off the solar to avoid low voltage warnings such as @Tony and Rhonda were experiencing when they started this thread. But I wouldn't worry a second if I did't have one! The battery is more straight forward. A switch wasn't required by code, and the manufacture didn’t install one. A switch isn’t needed for modifications because it’s best to disconnect the battery. There are few credible or realistic scenarios where a battery switch would prevent disaster. The most persuasive reason is to disconnect the parasite loads during storage as you stated. But you can do that without a battery switch as I’ve previously explained, and you won’t be inadvertently de-energizing the emergency breakaway brakes… which is a code violation. Yet there is nothing wrong with adding a main battery switch if you want to. Just don’t be coerced into it by safety concerns, and make sure you maintain “un-switched” constant power to the breakaway brakes. Also understand and consider what safety features already exist in your trailer. For example; my Lithionics BMS has short circuit protection, overcurrent shutoff, high voltage, etc.. The batteries also have power switches that disconnect power to the terminals, and there is a 300 amp breaker already in the battery circuit. Adding a battery switch would be totally redundant and completely un-necessary! Oliver and their liability insurance obviously knew that too! I hope this will help folks be better informed to make the right decision for themselves. Cheers, Geoff -
Battery and Solar Disconnect Install Questions
Snackchaser replied to Tony and Rhonda's topic in Ollie Modifications
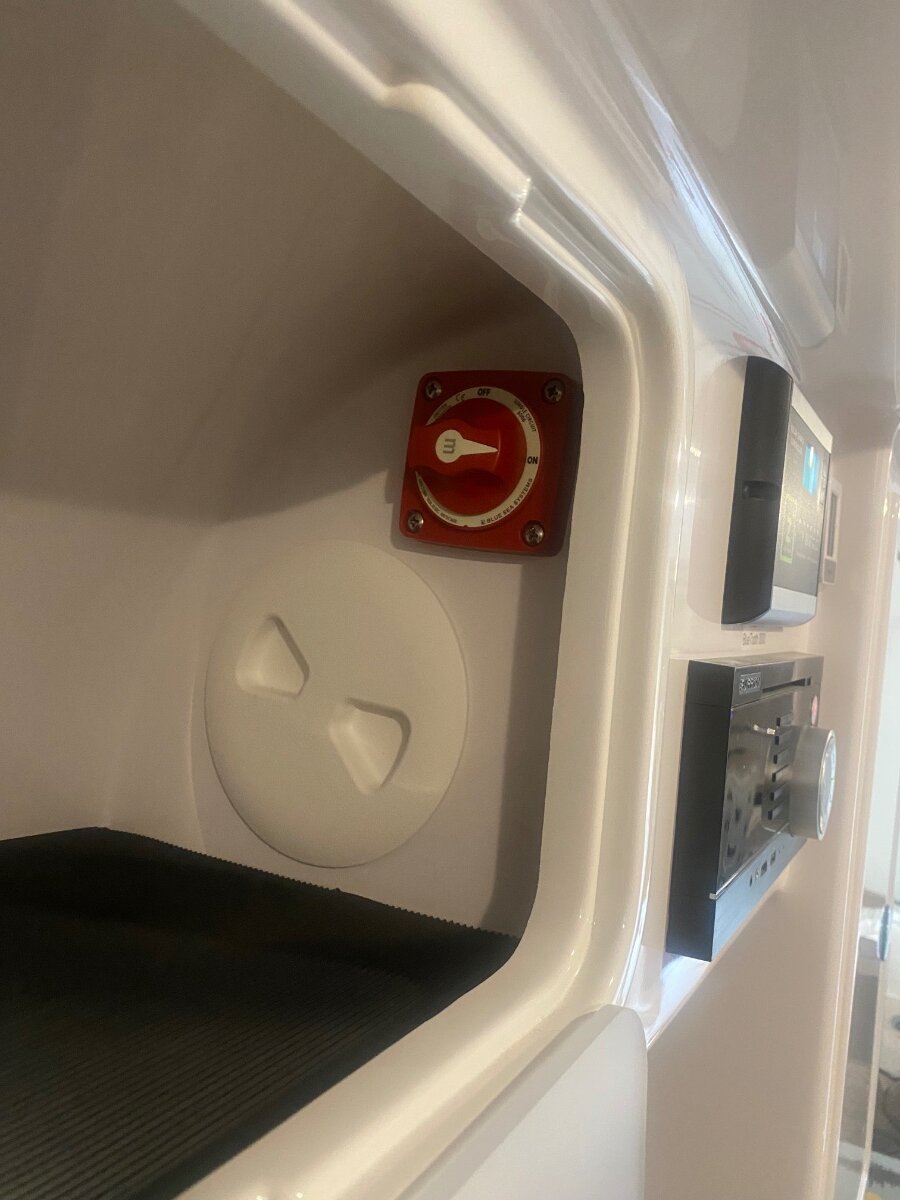
If circuit breaker access is an issue as jd points out, then just add a second power panel switch in a more accessible location. It could be a breaker or a mini battery switch mounted just about anywhere. Under the dinette seat would be ideal! You could even put it in the battery compartment if you need outdoor access. It’s a relatively low amperage circuit compared to the main battery, and the wire is already oversized, so adding a little more wire length won’t be a problem. I took a photo of the solar switch location, it’s a Blue Sea No. 6006. Amazon has them for under $25. This would be a good choice for a power panel switch too. For wiring the solar switch, just remove the positive input wire from the ZAMP charger and terminate it the input terminal on the switch. Then add a short jumper wire from the switch output to the ZAMP input. Don’t use the typical hardware store construction wire, get the more flexible automotive wire. Mine has enough extra wire stuffed in that space that I could cut a piece off for the jumper. If you want to add a new switch to shut off the power panel, then just remove the panel positive feed wire and terminate it to the input on the switch. Then add a jumper from the switch output back to the panel. Hope this is useful for you. Cheers!, Geoff
-
Battery and Solar Disconnect Install Questions
Snackchaser replied to Tony and Rhonda's topic in Ollie Modifications
Tony and Rhonda, From your photo, it looks like you removed the round marine hatch to see the back of the ZAMP charger. My solar disconnect switch is mounted right next to that hatch. From what I can see from your wiring, there isn’t one there. This would be an easy, and recommended, install. A higher priority than a master battery switch. Let me know if you need a wiring sketch. Now on the other hand, I’m of a different opinion than some of the good folks about main battery switches. I think they're unnecessary. The only reason you’d need one is to disconnect the parasite loads while the trailer is in storage. But you can do that by simply switching-off the main DC panel circuit breaker. It's probably that one there in your picture. Just flip it off and see if it kills the lights. I did some measurements of the Oliver's parasite loads that you might find interesting. Individually they were mere milli amp values, but collectively they added up to almost 1/2 an amp. That could run your 300AH battery down in about a month! So you'd definitely want to open that breaker when storing. I posted those values in a post by @Dave and Kimberly Battery depletion rate 3% or more per day... with EVERYTHING off? https://olivertraveltrailers.com/forums/topic/10258-battery-depletion-rate-3-or-more-per-day-with-everything-off/ Cheers! Geoff -
I added second switch for the street side porch lights because they were a blinding annoyance for neighbors when the curb side lights were on. I posted this modification in a post called "How to add a second switch for street side porch lights -finally." https://olivertraveltrailers.com/forums/topic/10499-how-to-add-a-second-switch-for-street-side-porch-lights-finally/ Cheers! Geoff
-
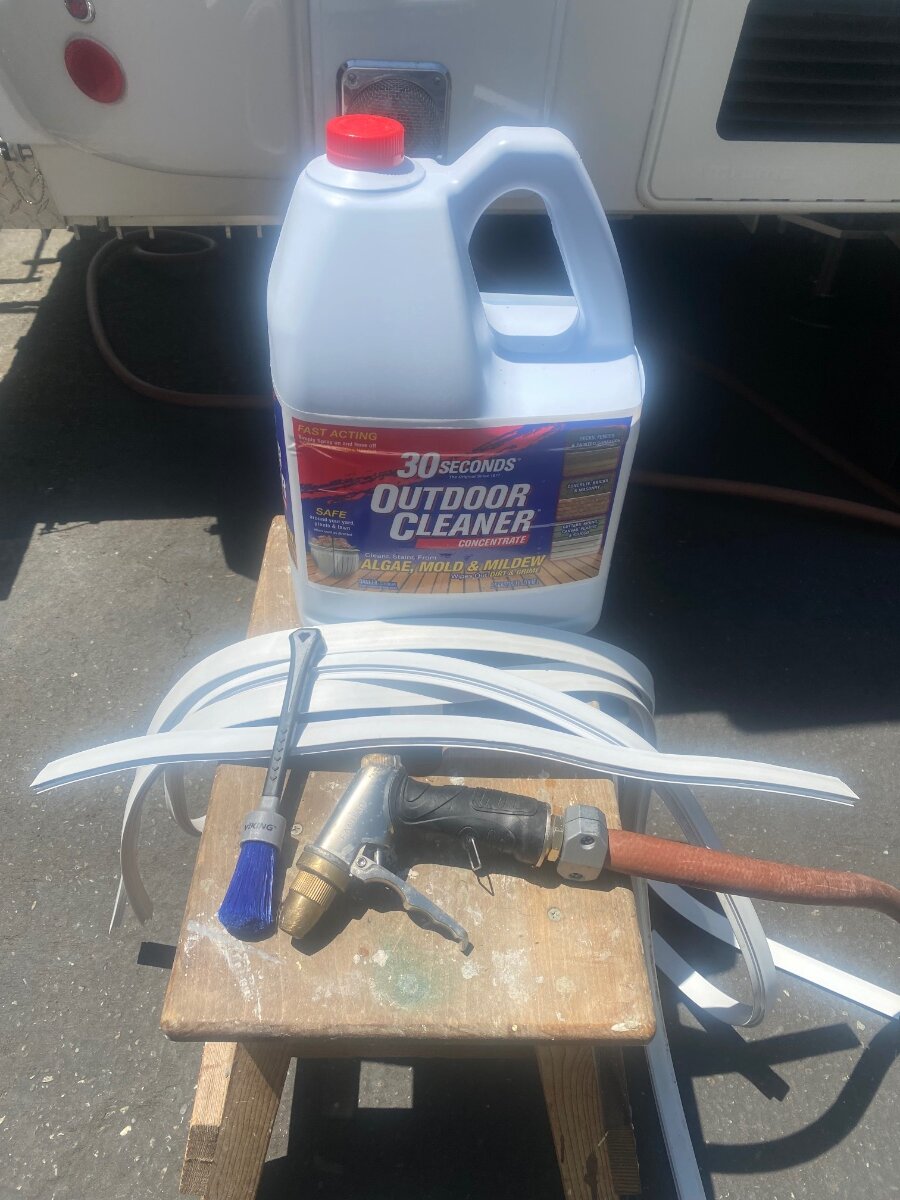
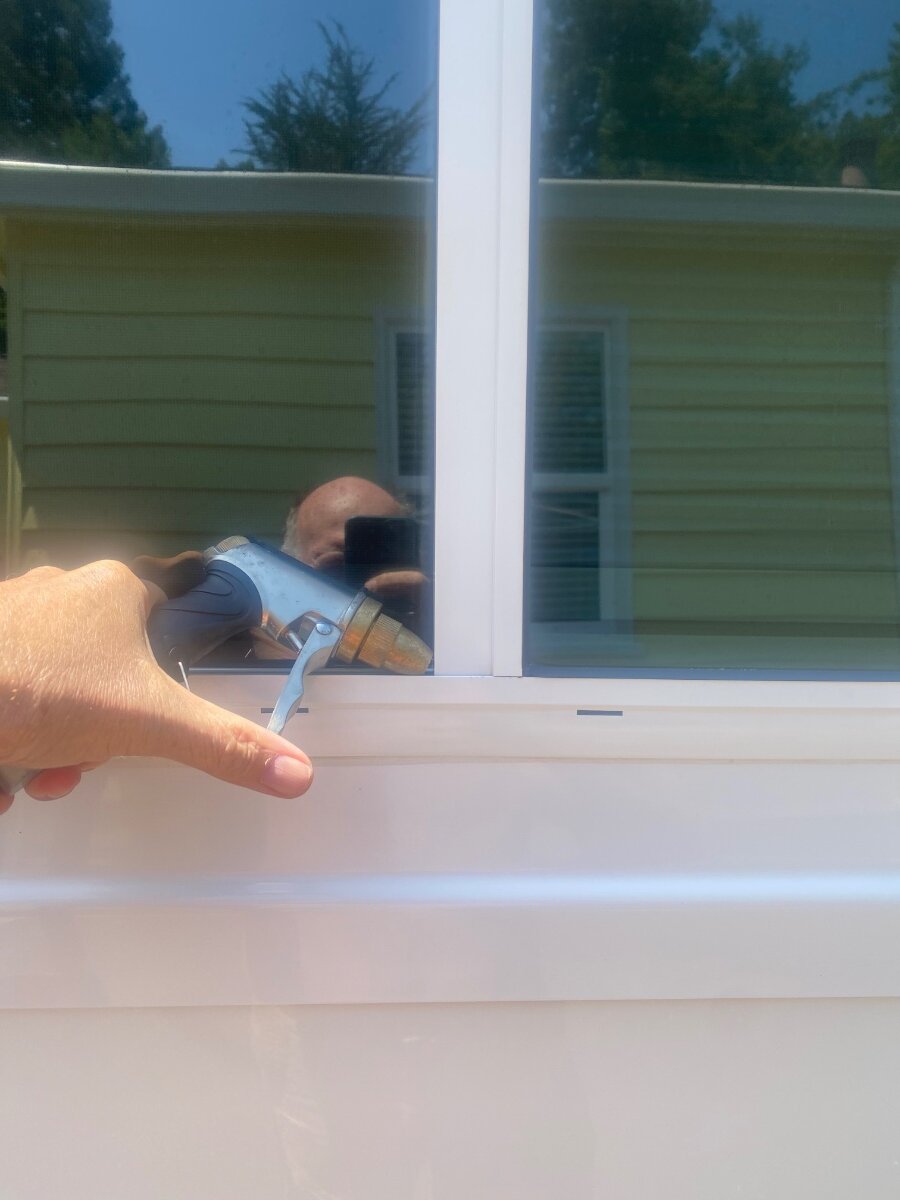
Here’s a quick and easy shortcut! After following this thread, I decided to clean our window tracks too. We live in the rain forrest and they were full of redwood needles, moss, dirt and mildew. The white rubber seals were terribly stained even after a hard scrubbing with a stiff brush. I was going to order new seals until I gave them a quick soak in “30 Second Outdoor Cleaner” from Ace Hardware. It's amazing! They looked brand new. I picked up some pipe cleaners to clean the track, but I didn’t need them. Instead I used a straight brush and a water hose nozzle. The water jet went under the fixed window section and washed all kinds of dirt out of the weep holes. I just pulsed the water jet until it ran clear. We moved the bedding and seat cushions out of the way, but there was minimal leakage inside. I'll be doing this every year now. Cheers, Geoff
-
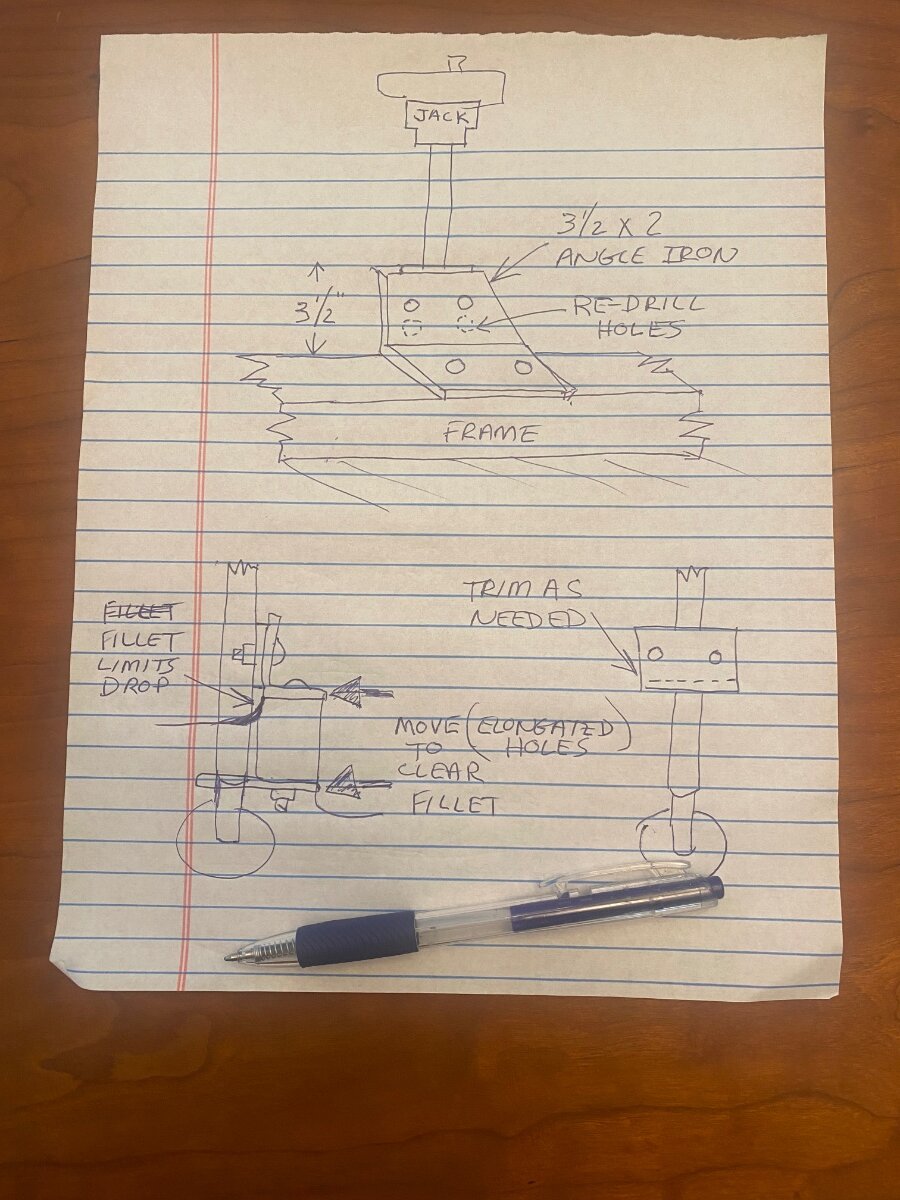
Rear Electric Stabilizer Jack adjustment - help?
Snackchaser replied to tallmandan's topic in Mechanical & Technical Tips
I totally agree that the mounting bracket was probably welded in the wrong position, and I’m sure that they will somehow make it right for you. But I also think this could be fixed with a drill and angle grinder without disturbing the weld. The jack needs to be lowered about 1” to match the other jack, and probably less than that to clear the lid. On my trailer, it looks like there is enough room to achieve that. There is plenty of space to drill new holes in the 3-1/2” x 2” angle iron to lower the jack by up to 1”. However, there is limited room to lower the jack before the welded bracket hits the floor. It looks like the jack could be immediately lowered about 1/4 to 3/8 without any interference, but then it’s hindered by a fiberglass fillet where it transitions from the frame rail to the floor. This could be enough to gain the clearance you need, but you'll need more drop than that so the proposed new holes don’t overlap with the existing holes. Or fab a new piece of angle iron, I'm sure you could source it locally. You could probably gain another 1/8” or more drop by re-positioning the angle iron and (outside) aluminum bracket to clear the obstructing fillet. The mounting holes of both brackets are elongated, and the hole though the fiberglass is oversized, to allow for truing the jack angle. These brackets are held by the long bolts that go through the frame and you can loosen them just enough to tap the brackets over to help clear the obstructing fillet. If still more drop is needed, to avoid overlap of the new holes, then you can slightly trim the bottom edge of the welded bracket with an angle grinder to make up the remaining distance. Before drilling the new holes in the angle iron, I’d experiment lowering the jack to assure you can get adequate drop and hole separation. This shouldn’t impact the structural integrity and it I personally wouldn’t hesitate doing it. I'd ask Oliver to reimburse me for fair value of a new jack. Sorry for the crappy drawing, but hopefully it helps clarify my suggestion. Cheers, Geoff
-
DC fuse for the Rear Camera Switch/Circuit
Snackchaser replied to EurekaJ's topic in Mechanical & Technical Tips
Eurekaj, To use the camera switch for your TPMS Signal Booster, you will have to tap into the "switched" camera power circuit, not the fuse. Check out the modification titled "Turning on the rear camera automatically." It has instructions and pictures for tapping into the camera circuit inside the attic, which is easier than running a wire to the camera switch. It also shows how to connect directly to the Electronics fuse if you decide against the switch and just run a hot wire. https://olivertraveltrailers.com/forums/topic/10461-turning-on-the-rear-camera-automatically/ Cheers! Geoff -
I was also looking to extend that hose, but couldn’t find a hose to fit it. Instead I lengthened the existing hose by sliding the weight down and adding a spring to prevent kinking. I got about an extra foot. This was described in a post titled something like “ Better toilet rinsing “ I also extended the shower hose by adding a second section. Those fittings are common to most showers and hoses are readily available. That post is titled something like “Washing dishes outdoors.” Sorry if those titles are not exact, but it should be close enough for the search engine. Good luck! Geoff
-
I went back to my earlier post to check what parts I listed. Oops, I listed the stem piece twice and missed the hose with adjustable regulator: https://a.co/d/dW8QaTY The gage on your Costco tank is for the tank level, the gage on the hose/regulator is for pressure adjustment. Happy cooking!
-
Yes it's the correct fitting, except that it's a low pressure fitting that has to be modified. It has "coarse" threads that will not fit into the stove's "fine" threaded high pressure propane inlet. So you need to buy the (linked) Regulator/Green Bottle Holder to scavenge the fine threaded part that threads into the stove. That fine threaded part will replace the coarse threaded part on the 90 degree fitting. The (linked) video demonstrates how to do it. Be sure to also buy the (linked) adjustable regulator (with hose) that will fit any standard size propane tank, including the 5 pound tank. You can adjust the regulator to around 10 LBs pressure, or whatever provides a nice flame, you can also dial it down for a fire pit if wanted. There's been miss-information in this thread, so for the benefit of those who don't know, the Oliver's quick disconnect propane outlets are fed by the main low pressure regulator on the propane tanks. This works for most BBQs, grills and fire pits. Some of these appliances, such as BBQs, come with their own regulator which will have to be removed to use it with the already regulated Oliver gas outlets. However, most cook stoves work on high pressure and they use different thread sizes to prevent mix-ups. The typical regulator/green bottle holder is usually stamped "10" to denote that it's 10 PSI. Cheers, Geoff
-
Hello from another HAM. I have used the existing "Furrion brand" Cable TV inlet ports, and added a third one, for an RJ45 pass through and for a 12 volt outlet. They can probably be drilled out to fit your SO239 connectors. This is detailed in my posts "Don’t cut your Starlink Cable! There’s a better way to install Starlink…" and "Starlink Mini, breaking the 12 volt barrier" There is a wide spot between the trailer walls on the street side attic next to the AC drain tube that you can fish wire into the attic. My other posts describe this too! Cheers Geoff
-
Since you have the credit card out, check out the Everest carry case too! We love it! https://a.co/d/8qTAAhv
-
I hear you brother, we also searched in vain for a decent stove that would work off the low 2-3 LB pressure trailer gas connections. No luck, so we decided to stick with our favorite Everest stove from Camp Chef that uses the more common 10 LBs pressure. It's a really popular stove that can blast BTU's or be turned way down to a slow simmer. We converted our stove to use a 5 LB propane tank instead of the annoying 1 LB green gas bottles. You can probably do the same modification to other stoves that use the common 10 LB regulator/green bottle system. To be able to use a larger propane tank, you need an adaptor to fit a long hose to the 10 lb pressure regulator/green bottle support. . . but that’s kind of janky. There is a YouTube video that shows how to easily eliminate the awkward green bottle regulator, and convert the stove to a quick connect hose that’s way more convenient and better looking. We bought a quality padded case for our 5 LB propane tank that it makes it easy to carry and stow. We also got a 5’ hose with adjustable regulator and parts for a quick disconnect. We saved the stoves original regulator/green gas bottle holder as a backup, and bought a second one that can be taken apart to get the propitiatory stove connector piece that's needed for the quick disconnect as shown in the video. In all honestly, we now prefer having a portable stove instead of being tethered to the trailers low pressure gas connections as we originally wanted. We often put the stove on a picnic table or bring it to group cookouts. Since the Oliver's awning can't be used in the rain, we carry a canopy that can go over picnic tables so we can now cook and eat outside when its raining, which is does an awful lot around these parts. If anyone wants to go this route, Iv’e linked the stove and padded tank, with all the parts needed to convert it to quick disconnect. Cheers, Geoff https://a.co/d/4wh0e5k https://a.co/d/66t3la0 https://a.co/d/0U67u5X https://a.co/d/6zcM88m https://a.co/d/7VNUJ9d https://a.co/d/7VNUJ9d https://a.co/d/fSQMj0G https://youtu.be/QI3TZYfKDEU?si=pH_B9Z9l3SnksOdR
-
JT, I'm not sure which connector you have, or how you're installing it, so forgive me if I state the obvious. I think you might be trying to put the nut on the inside wall of the trailer, that would probably be too thick. The nut goes on the back of the Furrion cable TV port after it's drilled out to fit the Rj45 panel mount. It's assembled on the bench, then installed on the trailer with the 4 mounting screws. The hole through the Oliver might need to be enlarged a little, this is best done with a step drill bit. I sure hope this helps you out!
-
Dc to Dc charger Victron Orion 12 I 12 - 30
Snackchaser replied to johnwen's topic in General Discussion
No. My 30 amp Orion only powers up, and shows in the App, when it's connected to the truck. That’s the proper operation per the manual and it's a good thing otherwise it would be another tiny parasite draw when not in use. I don’t know about the 50 amp. Its ability to be used as a power supply, or that it's non-isolated could have something to do with it. Or if you have it connected through VE Direct it would probably show up on the App. -
Inexpensive Helpful Modifications
Snackchaser replied to Wandering Sagebrush's topic in Ollie Modifications
John, I'm fairly sure that I found the following Moen part number in an old forum post. I bought them on Amazon, but they were a bit larger and the mounting holes were different (vertical verses horizontal.) My wife actually liked them better, so I relocated one of the original hooks so that the size difference is not noticeable. I looks factory🤙 https://a.co/d/fdl5a9h -
I guess technically speaking, it’s correct that Gree does not have a built-in SoftStart, but that might not be the whole story. The Gree website says: “Proprietary compressor technology eliminates the need for an add on "Soft Start.” This seems to be a new industry direction. Good discussion! I’ve been slowly building an AC spread sheet over the last few months and trying to capture information. Sound levels are not usually specified so Its good to hear actual comparisons in an Oliver. I think your probably right about 45dB being too low, some vendor claims are dubious:
-
I received a reply from Greenland this morning and I'm still on the fence with its viability, despite its other excellent attributes. Customer service has been very responsive though: "Turbo Customer Service Thank you for your patience and continued interest in our products. The ambient temperature needs to be lower than 109 degrees is designed to protect the compressor's longevity. Regarding the low-temperature threshold, the design of this product does not include electric auxiliary heating so it does not heat when the ambient temperature is below 20°F."
-
Hi Derek, Good question, I'm also curious what folks think about the Greenland Turbo Inverter. It could be my top choice except that it’s only rated to operate in temperature ranges from 19.4℉ to 109.4℉. I asked the manufacture if that related to the inside or outside temperature, and they said both. I reached out to them again for more perspective because temperatures over 109℉ are common, and that’s when the AC is most needed. I’m hoping to hear some better explanations next week because that could be a non-starter. Another potentially controversial issue is that the Greenland is designed to slowly ramp the compressor up-and-down - continuously. The starting/running current looks like a smooth sine-wave, unlike conventional compressors that turn on with a large inrush starting current and then a steady run current. The Greenland runs continuously when in use, cycling the compressor from high-to-low to maintain temperature. The conventional AC compressor constantly turns on-off when in use. Our Penguin sometimes does that every 30 seconds. I was skeptical of the Greenland at first, but after more thought I think it’s a good design because it doesn't have frequent starts and stops, and there is less temperature fluctuation. They supposedly have lower energy consumption, and are very quiet at 45db. They come with a remote control thermostat where I’d prefer a wired one to replace the existing one. Another interesting AC is the Eco Cool by Gree. It’s also a heat pump with a built-in SoftStart. The manufacture claims its the quietest. I like that it has “intelligent” dehumidification, a 3-speed fan, and both remote and wired thermostat. The Houghton and Dreiha Atmos are on the table too, they are getting good reviews! From what I understand, the Truma is unavailable for DIY. Cheers! Geoff
-
Yea after miles of dirt road the dust gets everywhere. We missed cleaning under the caps but I'm not concerned about it. To get the ethernet cable from the attic to the outdoor garage, you will need to remove the attic's street side wall panel, it's held in by two hex head screws. Also remove two screws to partially pull back the garage side panel. From both locations, you will see the clear poly drain tube for the air conditioner. The gap is wider here, and I was able to snake a fish rod along the side of the tube straight down to the garage without restriction or obstruction from the insulation. A cheap Amazon sectional fish-rod works well here. Always pull an extra string with the cable because it gets harder to get the rod through with each wire added, and you may want to add wires later for my "Turning On The Rear Camera Automatically" modification😁 https://a.co/d/fl9XvxS
-
Yea this stuff could drive anyone nuts! Forgive me that Iv’e showed this before, but it still might help you save $$. I looked at the SmartPort way back when, and was appalled at the price. Also it would stick out like a sore thumb on the Oliver. You can buy another matching Furrion outlet for $9 and a RJ45 panel mount (two) for $16. Just have to drill the Furrion hole bigger and the RJ45 panel mount will fit right in. It’s a double female, so any Cat 6 RJ45 patch cord will work on the inside, just fish it up the wall into the attic. There is a clear path next to the AC drain tube. Gosh, that photo looks like it's mounted crooked🫢 A female 5.5 mm barrel connector will screw into the Furrion without any drilling if you want to go that route. You can even make your own Starlink Mini power cord from cable, at least #16, and run the Mini without boosting the voltage. https://a.co/d/6ZfCA1Q https://a.co/d/5YNGSrP https://a.co/d/9p1RQpP https://a.co/d/hszApCd
-
There are battery isolators for charging, but I've never seen one that would work for your purpose of using both sources at the same time to power your Mini. You would be essentially wiring the batteries in parallel, and it's also a no-no to mix lithium and lead acid. I'm sure you could rig up a diode affair, but that's not very realistic. I'd keep them separate with a "On - Off - On" toggle switch to feed the Mini from one source or the other . . . or off! The common terminal goes to the Mini, the others to the starter battery and tow harness trailer battery respectively. Ground to the chassis. You can get toggle switches up to 30 amps. A relay will work too, but overkill in this case. Just fuse it properly. 🤙
-
My typical problem with the Mini is "partial" obstructed view, where the connection continuity is impacted when the satellites pass over the blind spots. It depends how big the obstruction is, whether it can be buffered-out without disruption or too much speed loss. I have a Dishy pole mount on the front and rear of the trailer for that reason, and sometimes only that much movement can make a big difference in an obstructed area (See my "Tacky Starlink Dishy Mast" post). Often the obstruction is on the low horizon and a long mast is the ticket. That's another advantage with the lightweight Mini because my heavy Gen-3 Dishy is too wobbly on a long pole. The Starlink App has an interesting feature that maps the sky and shows obstructions. I think it works even without having a Starlink connection if you want to play around with it. It might help you answer the question how well the Mini would work laying flat. Correct, I think mobil cords are around 15-20 feet long compared to the standard 50" cord, so there is no need to boost the voltage. Cheers, Geoff