Snackchaser
-
Posts
267 -
Joined
-
Last visited
-
Days Won
19
Everything posted by Snackchaser
-
I looked at the Suburban manual, it shows a wall switch with Fault/Reset light on the blue wire. That would cause voltage drop! Use the green/yellow wire for negative ground, and you should be good to go. Let us know if that’s what you have. Cheers, Geoff
-
That is different. I'm on jury duty lunch break, this will be quick. The WH switch I assume is a remote switch. It likely is a specialty switch with some resistors or such causing a voltage drop, some LEDs will do that. Unfortunately I'm not familiar with that suburban unit. You will probably need to replace the switch for the new WH. Check the old switch for internal resistance with an ohm meter. Good luck and let us know what you find
-
You are measuring volts with WH switch on, which means your measuring the voltage drop of the internal WH electronics. Disconnect the red, and volts should be 13.7. The yellow/green wire is a non-current carrying ground due to the AC aspect of the WH, so it does not see the electronics voltage drop. All seems normal. Cheers, Geoff
-
Your stated battery voltage of 13.2 is on the low side, which suggests that the battery charge is low. You also mentioned that the inverter cutout on low voltage at 12.1, try setting it to 12.0. Also look to see if there is a low voltage cutout delay setting. This accounts for larger current spikes and it should be around 15 seconds. If the battery was full, and voltage is still that low, then defiantly look for a high resistance connection, such as the 300 amp dc breaker. It's easier to check the breaker by taking a voltage reading across the input and output terminals, first with microwave on, then with it off. The microwave's current load should result in less than 0.5 volts difference. When hooked to shore power and charging the battery, or running a convection oven, the load is higher and voltage drop would be higher too. Good luck and let us know what you find. Geoff
-
That’s exactly what I used to think!. However, equalization requires a constant outdoor temperature, but that never occurs in a natural day/night cycle. The 57% swing shows that the insulation is effective enough that the interior can't track outdoor changes fast enough to equalize. You're right, it could be better, but it's way better than some drafty old trailers that I used to own.
-
Automatic Leveling for the Oliver Trailer — DIY style!
Snackchaser replied to Snackchaser's topic in Ollie Modifications
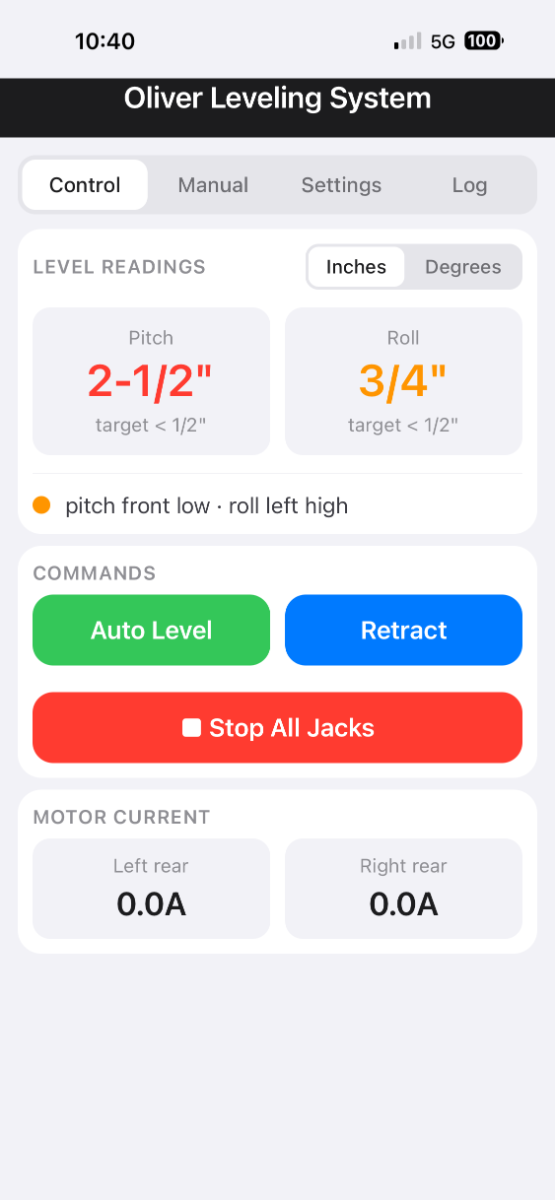
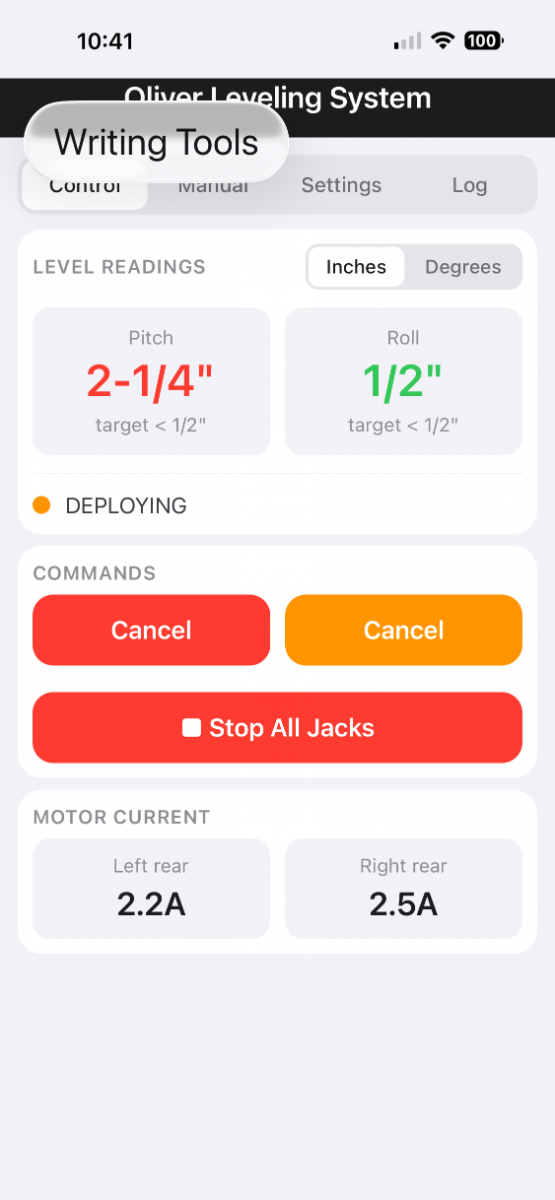
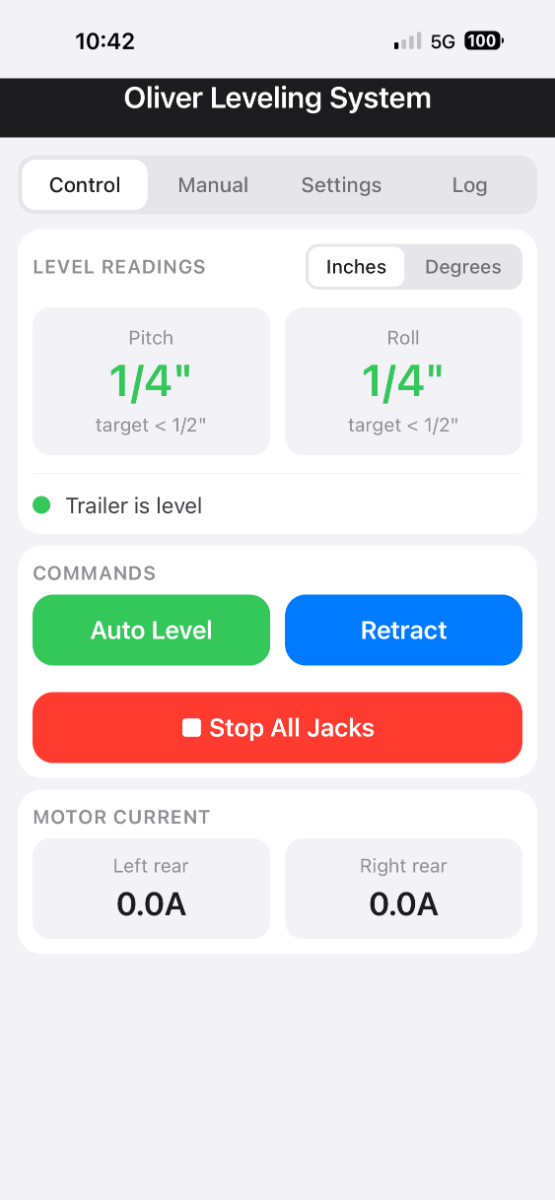
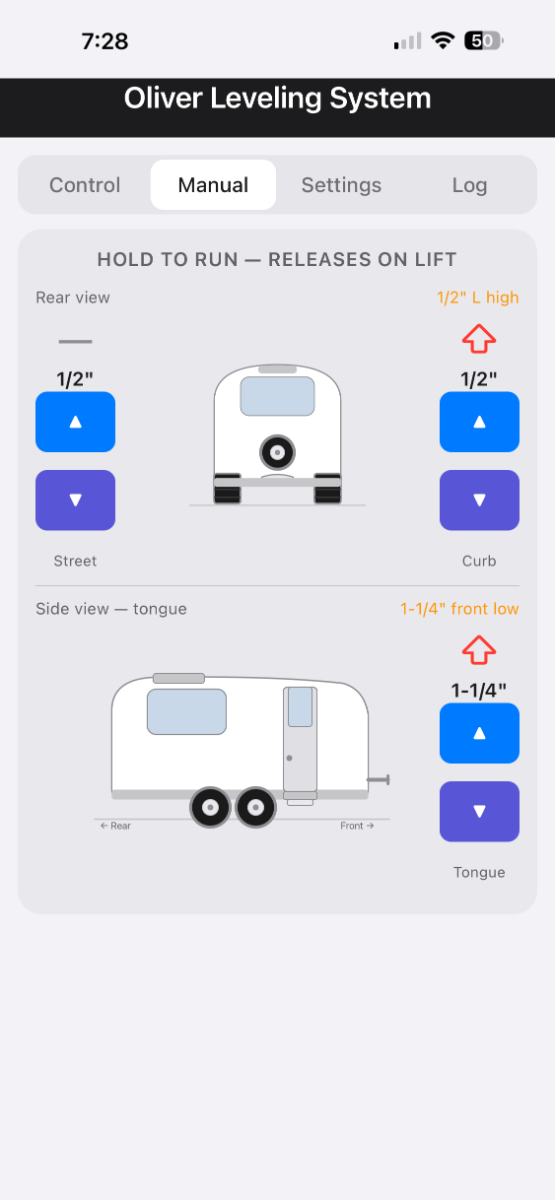
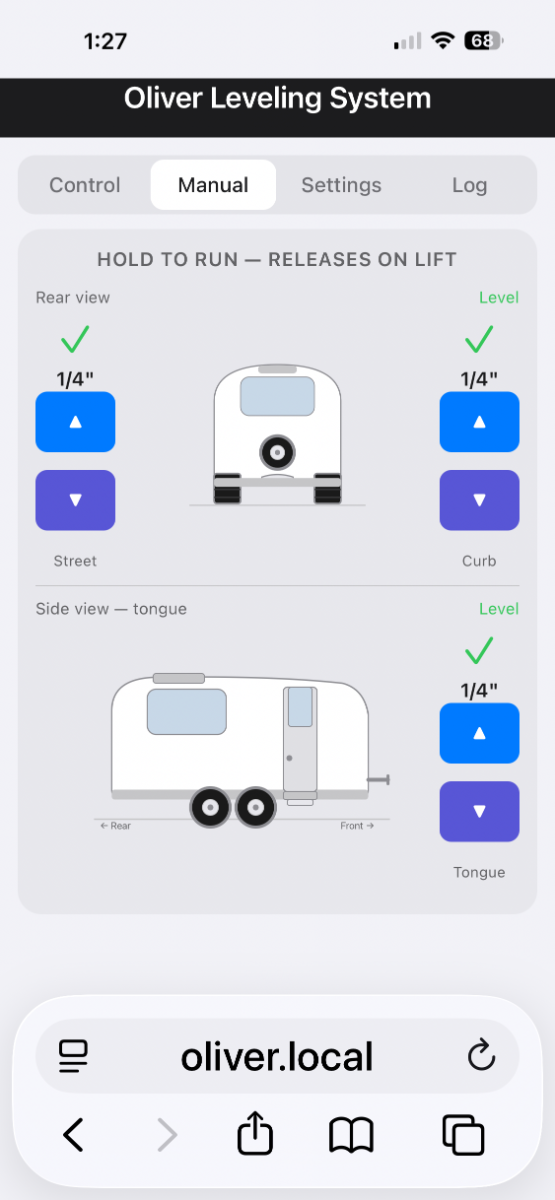
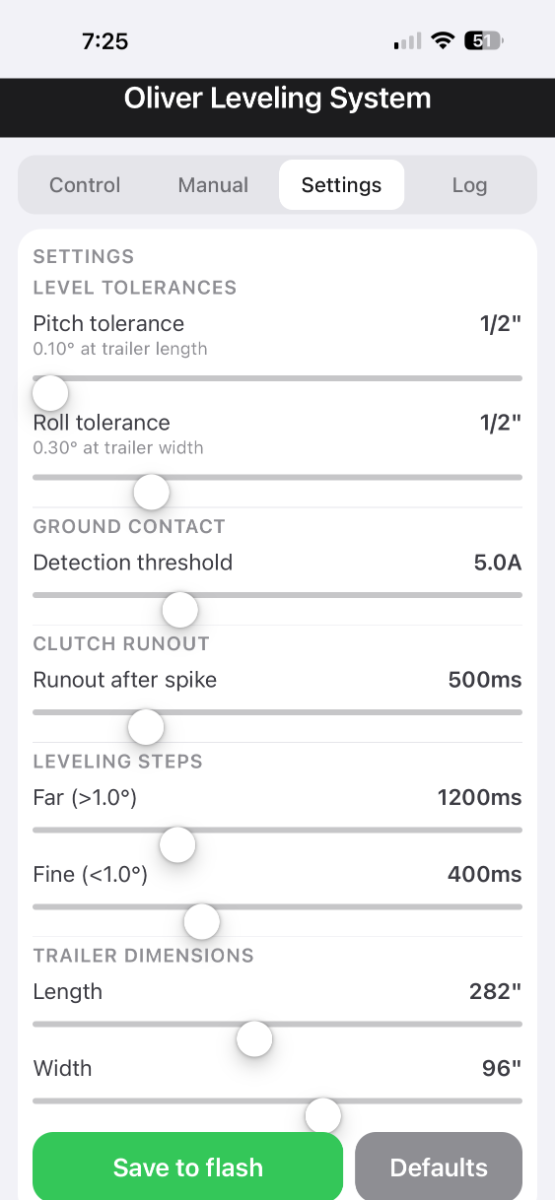
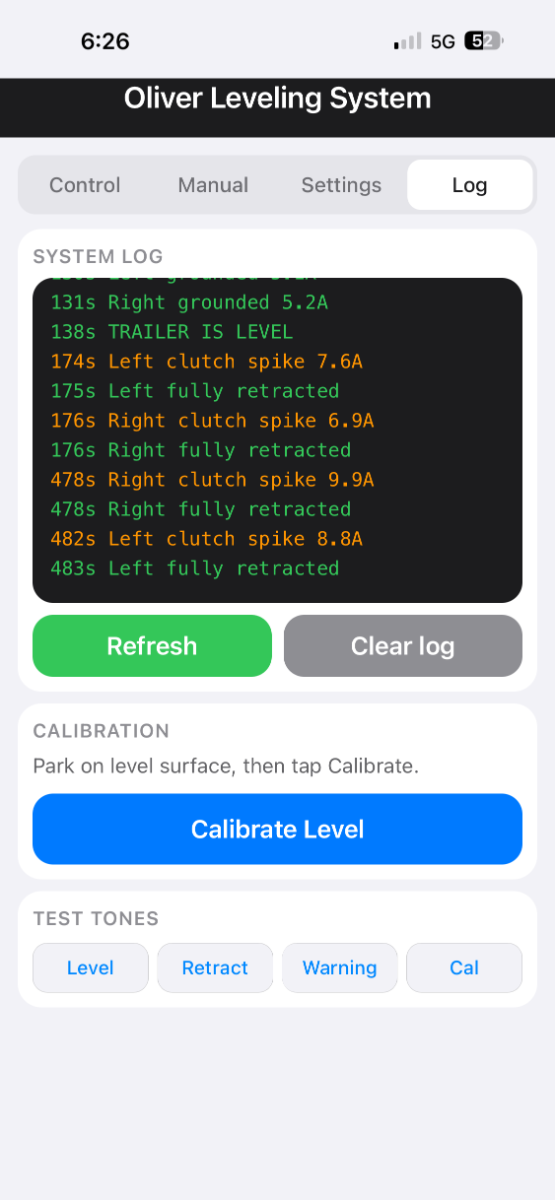
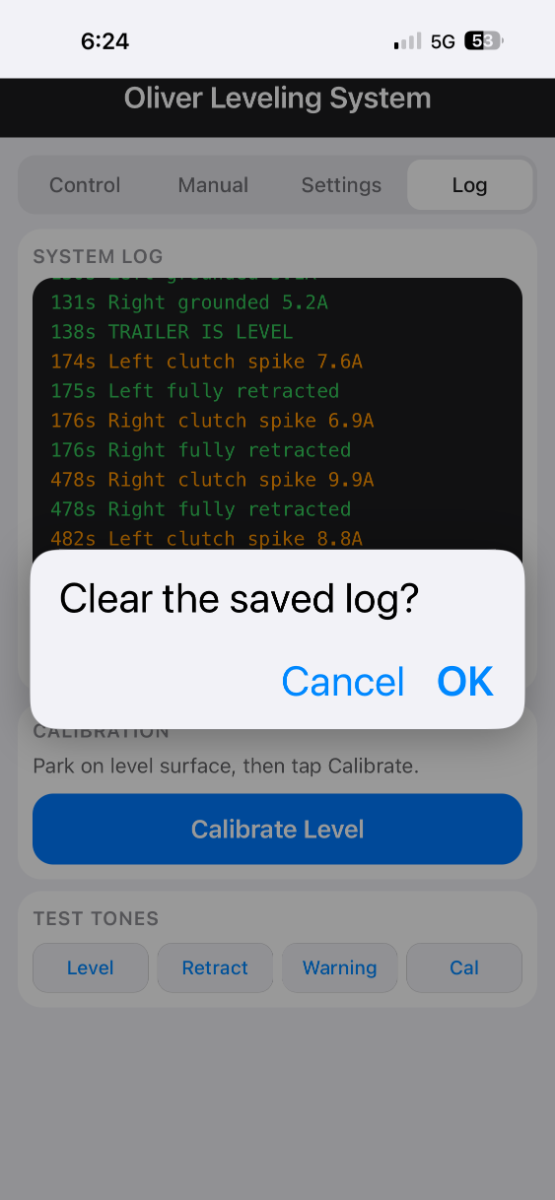
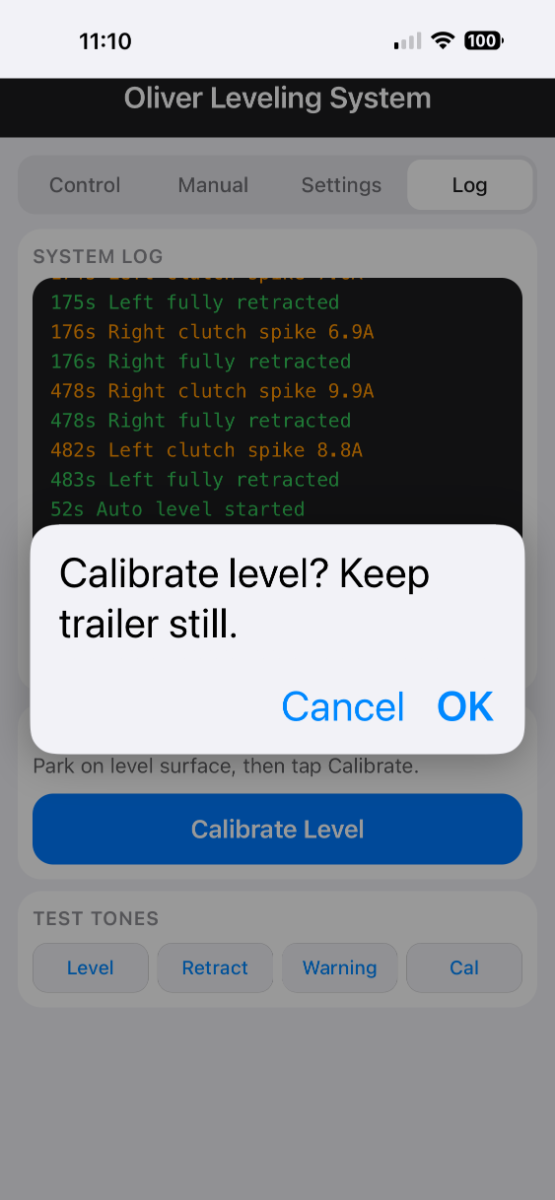
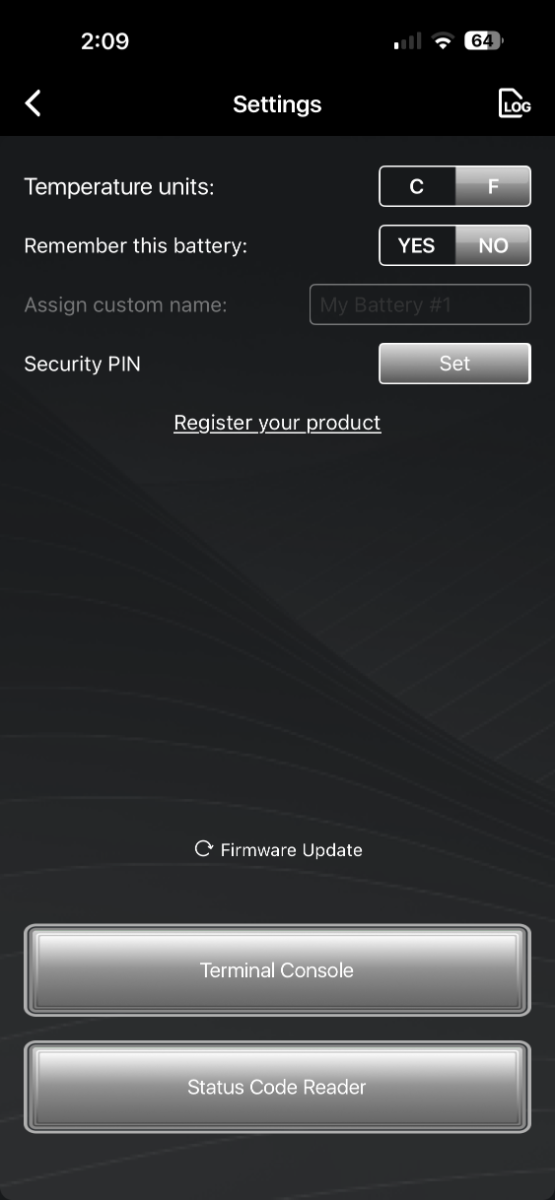
Part 4, Custom Automatic Leveling — now with a phone app! The automatic leveling system is finally done, and it works fantastic! Although it was convenient and satisfying with just the control board switches, I made it even better with a phone app. The app works with the ESP32 microprocessor’s built-in WiFi, rather than Bluetooth, and the range is excellent. Besides better range, there were advantages of using WiFi over Bluetooth. Primarily for ease of development. An iPhone Bluetooth app must be developed with 3rd party software and managed through the app store. It’s tough for a hobbyist, especially with custom graphics and controls. With a WiFi app, it lives in the ESP32 firmware and it’s fully customizable with AI help, and easily revised. The app consists of 4 tabs, or pages, with the primary controls on the main page. Extra controls and features are in the other 3 pages. The pages are laid out as follows: Control — This page has the main Auto Leveling, Retract, and All Stop buttons. To prevent accidental activation, the buttons must be touched and held for 3/4 of a second (except the All Stop which is instant). The as-left readings (variance from target level) can be viewed in either inches or degrees, and the tolerance can be adjusted on page 3. The jacks motor current is also displayed with the idea that it could indicate jack degradation, but that feature is going away in the next revision because it’s too hard to correlate. Manual — This is an awesome feature on its own! The screen is similar to a LevelMate with graphics of the Olivers back and side, only it has manual jack controls too! The touch and hold buttons will raise and lower the jacks while showing the distance from level. I’ll probably use this feature a lot, especially for uneven terrain or if messing around with leveling blocks. Settings — This page contains settings for fine tuning. Any changes are temporary for the current session, but they can be flashed to the memory. There is also a reset to defaults button with a protective confirmation step: Pitch and Roll Tolerance — when set to 1/2” tolerance, the level usually gets to within 1/4” Ground Contact Detection Threshold — this determines how firmly the jacks are footed on the ground for stabilization. Default is 5 amps which closely matches where I used to set it by ear Retract - Clutch Runout — this shut-off delay determines how many clack-clacks are heard when jacks are parked. It’s set at 1/2 second, which is two clacks Leveling Step Durations — sets the jack’s incremental run time during leveling. It has 2 adjustable steps that decrease as the trailer nears level. This is important for accurate level sampling and coasting. Too little time increases timeout risk, while too much impacts accuracy. Finally there is the trailer width and length setting that’s used in the conversion formula for level degrees to inches. The longer pitch default distance from bumper to ball requires a wider tolerance than the width. Log — A summarized log of the Serial Monitor shows which jacks were activated and the different steps of automation. A Test Tone legend plays examples of tones for successful leveling, retraction, unsuccessful leveling, and calibration, although the tones are obvious and don’t really require a legend. This information has limited value and may get cut in next revision. The most important feature of this page is the calibration button. It has a secondary confirmation to prevent unintentional calibrations. This is used to reset the target level after maintenance, or if the front needs to be higher for tank drainage, etc. This concludes this project and I hope you found it interesting! Cheers! Geoff
-
Interesting data! I ran the numbers through AI trying to get an R value, but there's not enough information. However, it determined the swing insulating value was 57%, which is about right for Olivers claimed R-18 value. Most RV's are lower than R-10, 20 to 30%. Good stuff!
-
I had the same problem after lengthening my hose to reach the toilet for better rinsing. This was done by sliding the hose return weight further down, but it also caused kinks. I used a spring from ACE hardware to prevent the kinks and haven't had a problem since. The spring was 1/2" x 10", not a perfect fit but just narrower that the width of the kink, That modification is described here: Cheers, Geoff
-
Lithionics Battery Firmware Update
Snackchaser replied to Snackchaser's topic in Mechanical & Technical Tips
Well said! The battery drops below 12 volts at about 0-5% SOC, and the never die is 10% SOC (greater than 12 volts) as calculated by individual cell voltage. The inverter dropout is around 10 volts. However as @Tom and Doreen stated, it would see less voltage, particularly with a load. The inverter will always have some load from voltage drop and just being on. So it seems like all is working well! -
Lithionics Battery Firmware Update
Snackchaser replied to Snackchaser's topic in Mechanical & Technical Tips
Here are the release notes for the current version, didn't see anything about earlier versions. Probably only meaningful to techies: https://lithionics.freshdesk.com/support/solutions/articles/154000170433-firmware-release-v1-1-11-and-v1-0-11-for-the-internal-bms-batteries#:~:text=This firmware is-,specific,-to smaller batteries -
If you have Lithionics batteries, you should check their Firmware. Mine was three versions outdated! The latest version of Firmware includes upgrades and corrections to the Battery Management System (BMS) and State Of Charge (SOC) accuracy. The Firmware can be checked and updated with the Lithionics Application. Go to settings and pick “Firmware Update.” Then press the “Flash Firmware” button if you don't have the latest version. Be sure to up-date each battery.
-
Automatic Leveling for the Oliver Trailer — DIY style!
Snackchaser replied to Snackchaser's topic in Ollie Modifications
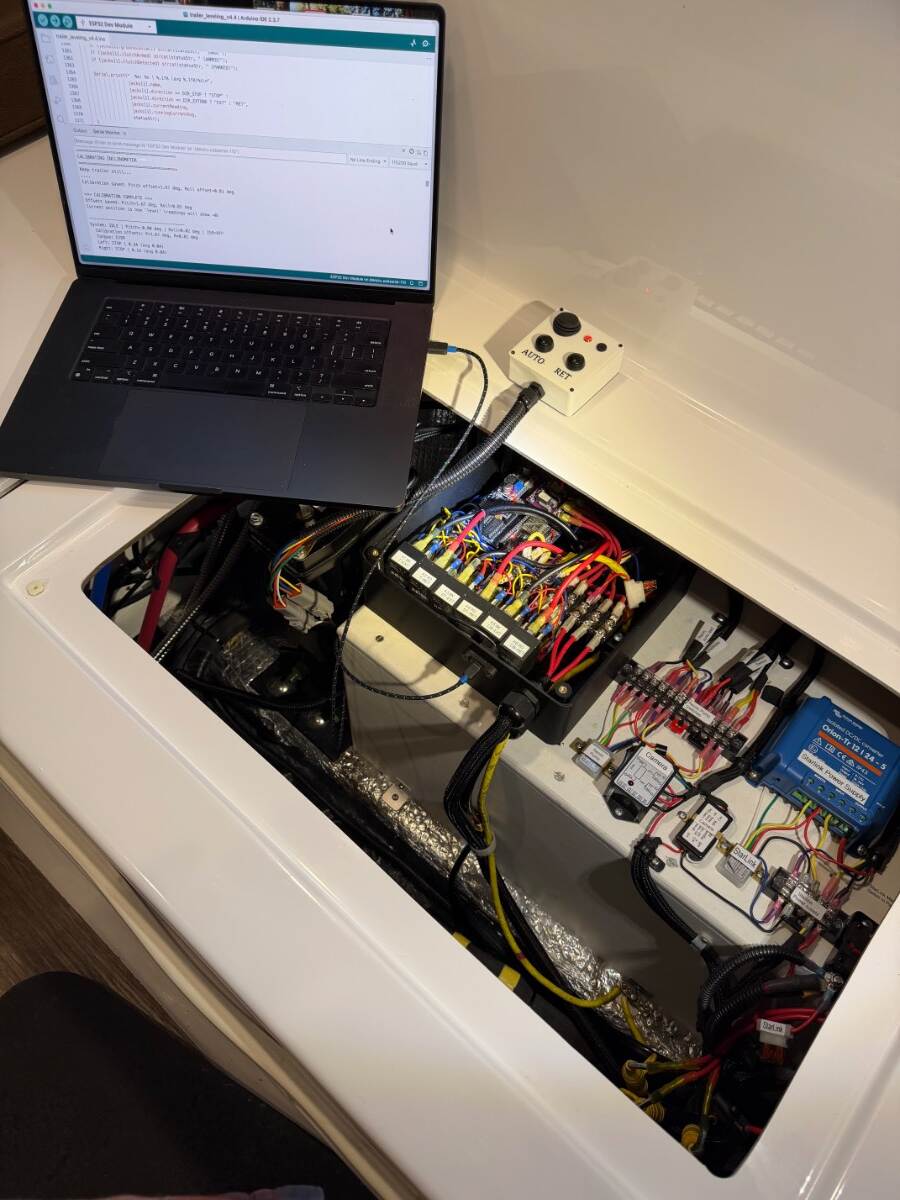
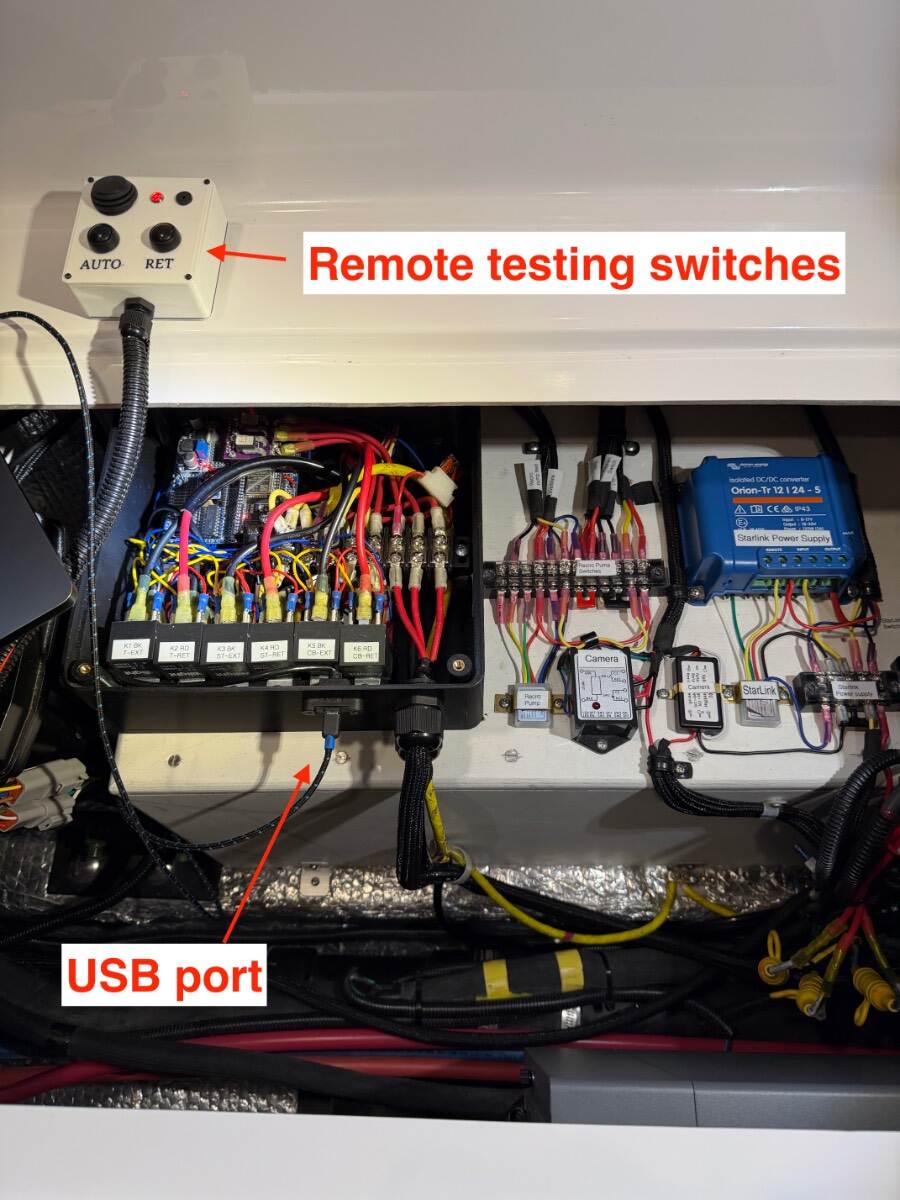
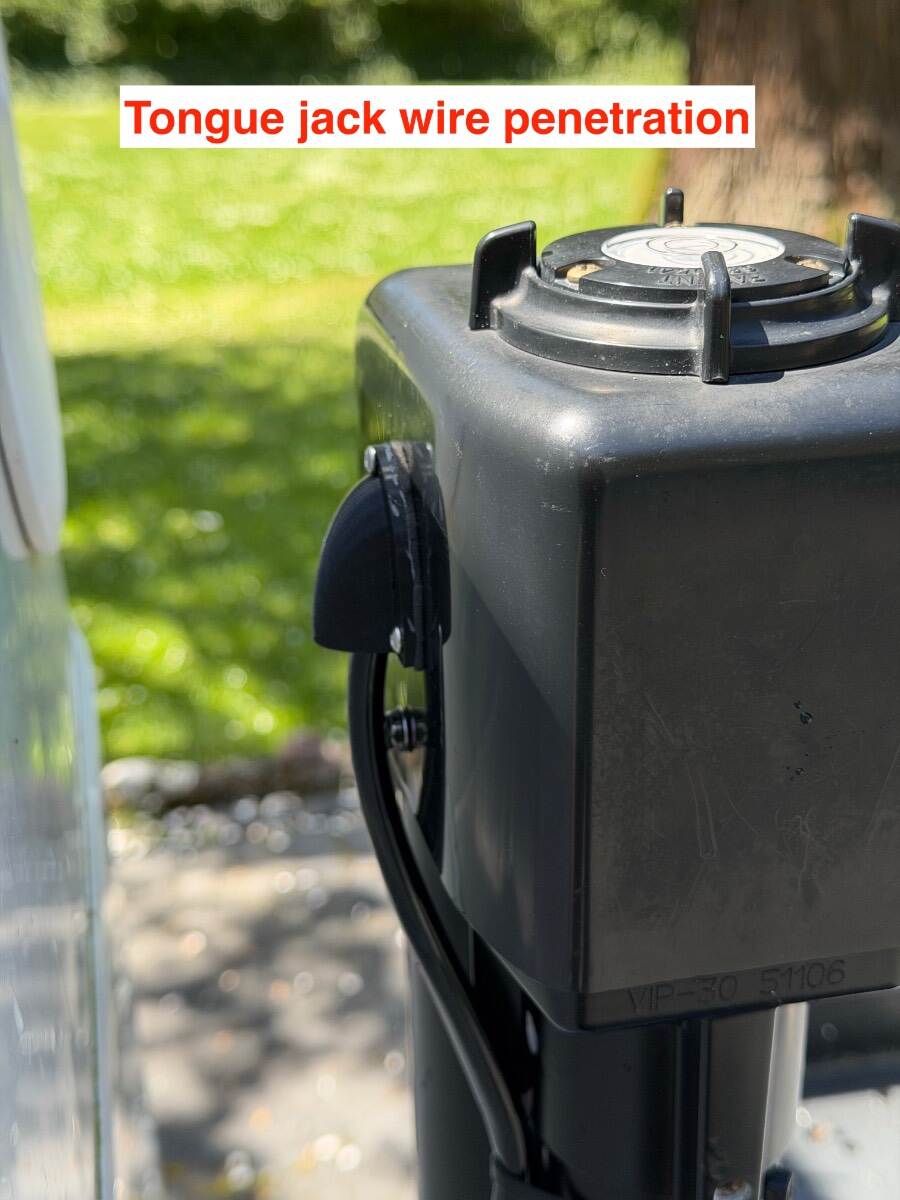
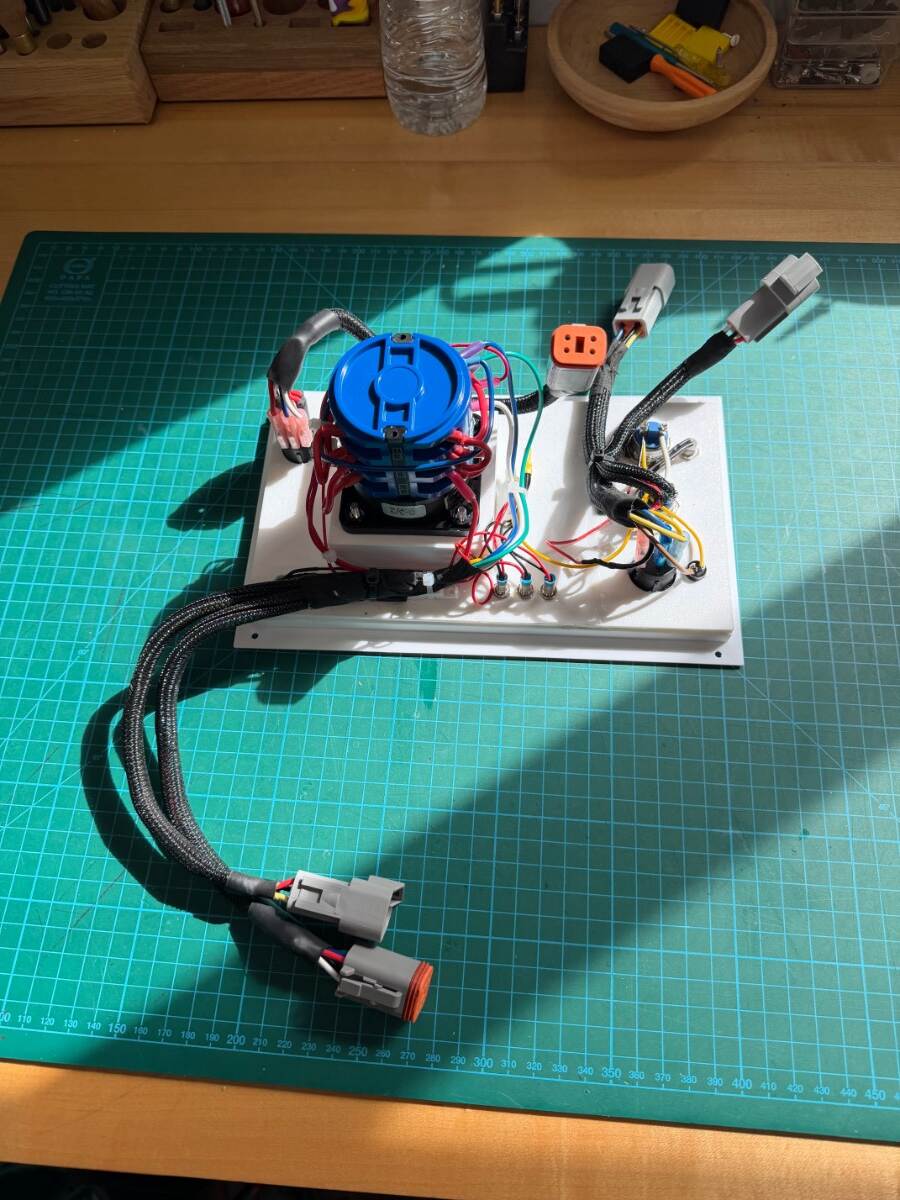
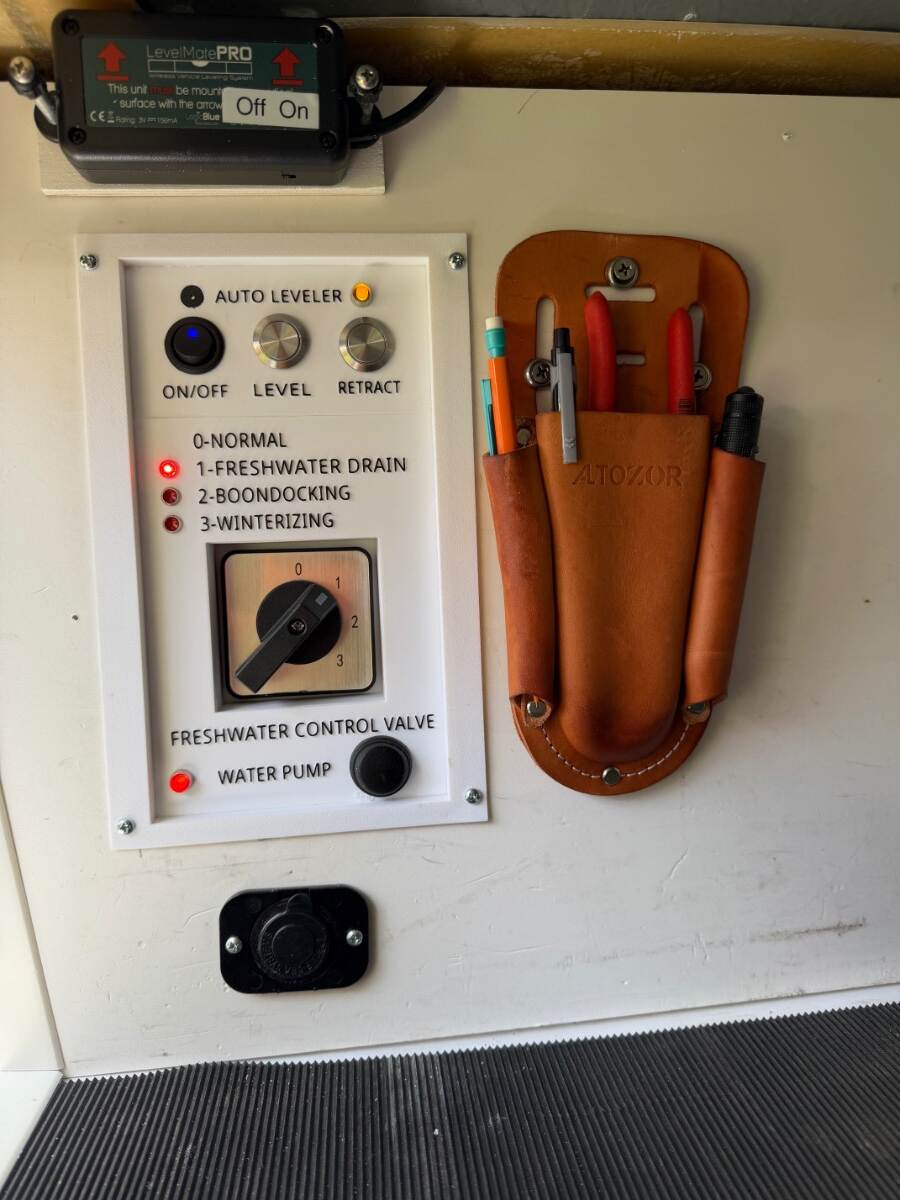
Custom Automatic Leveling for the Oliver's Barker Jacks Part 3: I skipped over a lot of detail to keep this project interesting, and it’s probably still too much information. But some might be interested to hear about some of the background work that was involved. After the test board phase was complete, and everything was working well on the bench, the system was installed in the trailer for real-life testing. This was an anxious time because it had only been tested with simulated current, and I had no idea how it would react under real current conditions. Things went south immediately! I started testing with rear jacks because they were easier to wire and much more complex than the tongue jack. I didn’t want to run the tongue jack wires if the whole project could end up in the trash bin! I came up with a test procedure to verify each function in different scenarios of operation, and that required manual jack operation. That’s when the problems started! I was blowing the 30 amp jack fuses and couldn’t figure out why. I first focused on the H-bridge relay wiring as the problem. Then I suspected that the ESP-32 or driver outputs were miss-wired during transition from the test board. They had been soldered together one wire at a time under magnification, and back tracing the bundled wires was a nightmare. I couldn’t find the problem and came close to scrapping the whole project. I was so confident in the design, and overly focused on wiring, that I completely overlooked the obvious. There was a major flaw in the way the auto-leveling system was isolated from the manual jack switches. I had used a high-amperage relay that closed to a common ground only when the H-bridge relays triggered, which broke the short circuit path when the manual switches were used. However, I hadn't considered that the pole-reversing function of the switches created a different ground path through the hot side of the leveling system. The solution required major re-work, replacing the single ground isolation relay with six 30/40 amp relays that isolate the manual switches from both the ground and hot side. Although there were two spare Darlington driver channels capable of handling two relays each, there weren't enough channels for six new relays and a second driver was added. The system now runs 12 relays from 9 driver channels — six H-bridge relays and six isolation relays, two per jack. All the components were installed in a 12” project box that was limited in size by the 3-D printer capacity. So the relays were stacked 2 high on a stepped base to save space, and a elevated terminal block helped with wire congestion. I was able to mount the current sensors directly on the PCB with the ESP-32 and other modules. It’s tight, but nicely compact too! The switches for the leveling system are mounted on a 3-D printed control panel inside the outside storage garage. The panel includes flush to the surface push-buttons to safeguard against accidental activation, one for “Auto Leveling” and the other for “Retraction.” There is a master On/Off switch, status LED, and a Piezo Electric buzzer for the status tones. The entire panel is also recessed to protect it from cargo. The system can be shut down with the On/Off switch, or by re-pressing either momentary switch. The systems parasite draw is near zero when on, but it’s normally off when not in use. The existing freshwater control system was incorporated into the lower part of the control panel due to space constraints. It has a 4-way water pump switch for the outdoor shower, with indicator LED. There is also a 4-position, 6-contact, rotary switch that controls motorized valves for the four freshwater configurations; Normal, Freshwater Tank Drain, Boondocking, and Winterizing. The LED indicators show configurations other than normal. A printed weather proof hood was used for wire penetration into the tongue jack head, and a terminal board was used to splice into the rear jack wiring. This was a useful addition for quick disconnecting and troubleshooting. Those were the only modifications made to the trailer, other than enlargement of the existing switch panel cutout on the garage wall. All the custom components used in this project were designed with a free on-line CAD program called TinkerCad. Some items were 3-D printed from PLA filament, a plant based plastic. Other pieces were printed from ABS plastic for better durability, or TPU — a rubbery filament. Automotive Deutsch style plug-in connectors were used to connect the switch panel and control box, and they allowed me to connect a remote switch box that was used to operate the system from inside the trailer during testing. There is also a panel mount USB cable port for a laptop connection to view the serial monitor or update the software. The system needs a one time calibration that is done with the trailer perfectly level. Both momentary switches are held for 5 seconds until the Status LED quickly flashes three times and the audible calibration tone indicates satisfactory level. The software determines the pitch and roll off-sets from absolute level, and sets them as the new target level +/- 0.2 degrees pitch and 0.3 degrees roll. This equates to about 1/4 to 1/2 inch tolerance. The end result works great! There will probably be more software fine tuning in actual camping conditions, but it will be easier to do that in the future. I’m just finishing up a Bluetooth App for the automatic leveling controls, and it will include setting adjustments for tolerance, ground contact pressure, clutch runout, leveling step durations, and more! If you made it this far, I hope you enjoyed the project! Cheers! Geoff
-
Automatic Leveling for the Oliver Trailer — DIY style!
Snackchaser replied to Snackchaser's topic in Ollie Modifications
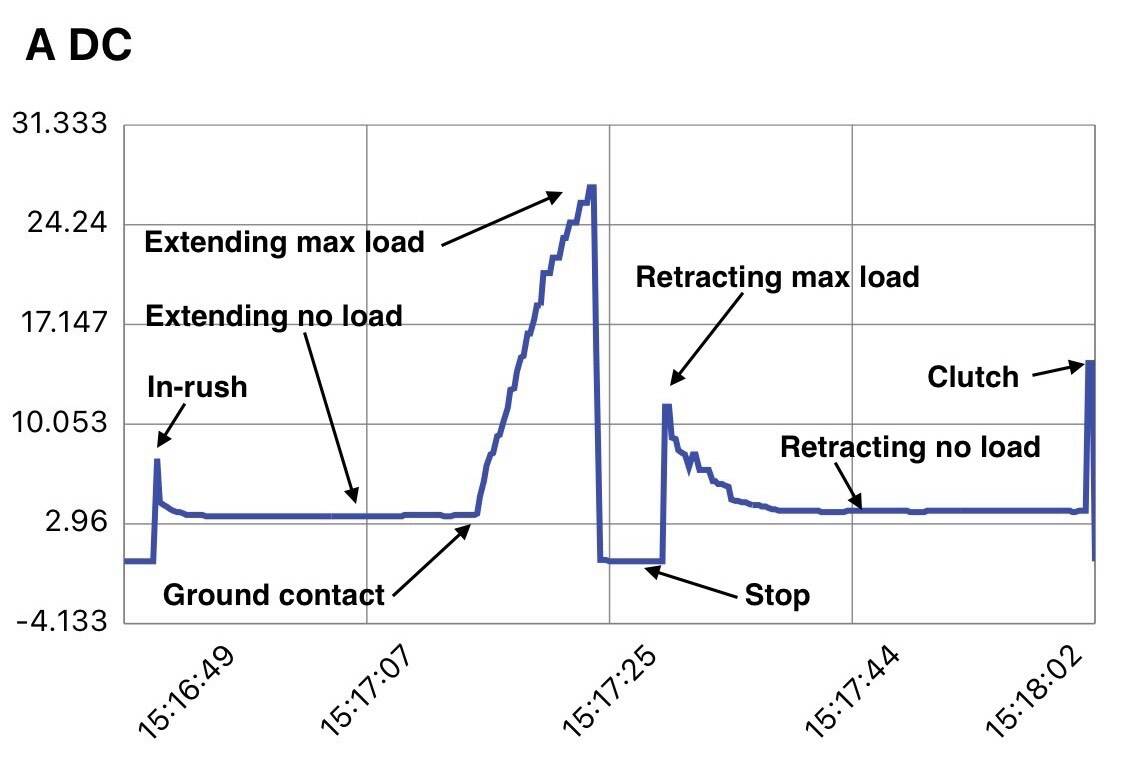
Custom Automatic Leveling for the Oliver's Barker Jacks — Part 2 Here is some more detail of the automatic leveling project as it transitioned from an idea to a working prototype. The project evolved from concept with safety and trailer protection as core design priorities. Limitations were built into the software including current-based motor cutoffs and maximum leveling offsets to prevent over-stressing jack capacity and minimized frame stress. On the mechanical side, the design incorporates fail-safe circuits, redundant shutdown methods, and four levels of overcurrent protection. A side benefit is the electronic monitoring of jack condition where abnormal current can reveal lubrication issues, mechanical wear, or circuit degradation before they become catastrophic failures. First step was writing a program script with open source Arduino software, and then uploading it to an ESP-32 microprocessor. The ESP-32 is basically a $10 miniature computer with programmable memory and integrated WiFi module (I might develop a Leveling App later). It receives inputs from a Inclinometer and two 50 amp current sensors, and it sends outputs to a status LED, a piezo buzzer for audible tones, and a 8 channel Darlington driver that converts digital inputs to 12 volts for relay coils. Six 30/40 amp Bosch style automotive relays are wired in an H-Bridge configuration to run the jack motors in forward and reverse. With a basic design plan and software, a test board was needed for proof of concept before anything could be installed in the trailer. The test board included potentiometers to simulate jack current, and LEDs to indicate the jack's up and down movement. It had a status LED, an isolation relay LED, a piezo electric buzzer, and a circuit board mounted with the microprocessor, inclinometer, drivers, and power supply. These standalone plug-in modules are wired together with soldered jumpers on a generic printed circuit board. Testing resulted in many design and software changes as the bugs were worked out. During this time it became evident that the tongue only needed the inclinometer for leveling, no current sensor required. I also realized that the jacks should be run in decreasing intervals with a limited number of leveling attempts before timing out. Another improvement was to run the jacks uninterrupted in free air until they were firmly seated on the ground for stabilization — before starting incremental leveling movements as needed. Current values are easily adjusted if more or less stabilizing pressure is desired. Testing found a flaw with the inclinometer. Thankfully they came in three-packs and I replaced them because they wouldn’t stay calibrated. The inclinometers have accelerometer and gyroscope functions, and it turned out that the accelerometer has known drifting issues. After turning off the accelerometer in the software, it worked great! In the end, the Arduino script grew to over 1,000 lines of code. With a lot of trial and error, a sequence of operation was developed: When the Level button is pressed, the rear jacks lower without interruption until they are seated on the ground in a firmly stabilized position (phase 1). If the trailer is level at this point, then there is no further action and an audible “happy tune” indicates successful level was achieved. If the trailer is not level after phase 1, then the left or right jack is cycled in intervals starting at 1.5 seconds (~1/2” travel) depending on how close to level it is. As the trailer gets closer to level, the interval shortens to account for coasting and fine adjustment to within 0.2 degrees of level. During the roll leveling sequence, a pitch limit of 5 degrees prevents the rear jacks from inducing too much pitch. It's a safeguard that temporarily interrupts roll leveling while it moves the tongue jack to bring pitch back within limits. Phase 2 pitch leveling begins, if needed, after roll level is achieved. When roll and pitch are level, the “happy tune” is played. The system allows up to 20 level correction attempts per axis before declaring unsuccessful leveling with a “sad tune.” The operator can stop the leveling at anytime with the On/Off switch or by re-pressing either momentary button. The “Retract” function proved difficult to program because of the mechanical clutch. Originally it was programed to shut off when the mechanical clutch actuated in the parked position, which is 13 amps. This didn’t work because the jacks had a current spike when coming off load, and there were oscillating current spikes during the clack-clack of the clutch that caused shutdown before before a clack was heard. These spikes hadn’t shown up in the time compressed current chart, but they were picked up by the current sensors. This was resolved in the software with a current delay when coming off load, and a longer delay when the clutch actuated so a few reassuring clack-clacks could be heard for audible confirmation that the jacks were fully parked. The leveling system was designed so that the jacks manual switches could remain fully functional. However, the H-Bridge relay configuration reverses the motor polarity for the up or down direction, and that could cause a direct path to ground when using the manual switches. To prevent this, I used a normally open relay to isolate the ground when the leveling system is not being used. I used a single 250 amp generic lawnmower starter relay on a common ground bus for all 3 jacks. It seemed reasonable. .. what could possibly go wrong? Hope this is still interesting…Cheers! Geoff Please excuse poor photos, I just didn't take very many!
-
I'm late to the party, but just reading this real quick it sounds like the GFIC outlet is tripping. This has nothing to do with over current, it's completely different than a overcurrent device such as a circuit breaker or fuse. Rather it detects an imbalance in the circuit. So if either the hot side or neutral side of the circuit has a path to ground, it sees an imbalance and trips the GFIC. This imbalance can be as low as 4 milli amps, so even a little moisture is enough to trip it. You should be looking for any dampness on your main power cord and where it plugs into the outlet or trailer. Look for cuts in the cord, not ones that are a direct short, but ones that can use current leakage to ground. Someone suggested that you turn off each breaker in the trailer, I assume you did that and eliminated any trailer issues. I seem to recall writing something about GFIC's in the past, perhaps JD could find it. Good luck, Geoff
-
12 volt heat trace is about 3 watts per foot, and I'm not sure how you would calculate the length needed to protect the hot and cold loops. We picked up our trailer during a terrible ice storm with icicles hanging off the trailer while going down the road. There was real concern of freezing pipes. We said: Damn the warnings, we're running the gas furnace while going down the road!
-
As far as I can tell, I’ve made the first automatic leveling system for the Oliver’s Barker stabilizing jacks! Maybe even the first 3-jack leveling system on a travel trailer! It’s simple to operate, safe, and works great! I built the leveling system as a novelty for my own entertainment, so I’m only posting it as a interest item not a recommended project. In reality, manually leveling with the electric jacks is already easy, particularly with a LevelMate, so automatic leveling isn’t really needed. There are even warnings that the jacks are stabilizers, not to be used for leveling. However, I believe the warnings are more about liability than capability, as long as the jacks are used within reasonable limits. I'd been thinking about an auto-leveling project for a long time, but was deterred by the thought of modifying the jacks with fiddly proximity sensors or revolution counters as used in conventional leveling systems. I didn't want to alter the jacks for a DIY project that might not even work. But then it dawned on me. The only time I really needed to know the position of the jacks, is when retracting them to their parked position. I wasn’t interested in returning the tongue jack to the truck hitch hight like some systems offer. So this led to a revelation that automatic leveling could be done with nothing more than current sensors mounted in a control box rather than on the jacks themselves. This was only possible because of the Barker jack’s mechanical clutch. When the jack reaches the end of its travel, the clutch activates with a distinct clack-clack sound. It was likely that clutch engagement would produce a unique current signature that could be used to detect when the jack is fully retracted. A plan was developing, but I needed actual amperage values for proof of concept. Fortunately I had a data logging ammeter, and the chart below illustrates the results for one of rear jacks starting from its fully retracted parked position. The jack was extended through free air until it touched ground and began picking up load, maxing out when the wheel lifted off the ground. Then it was retracted to the parked position until the clutch actuated: I didn’t include the tongue jack chart because it's far less dynamic — it's always under load, and the clutch doesn't normally actuate during leveling. The clutch only comes into play after trailer is hooked up to the TV and the tongue is manually retracted. The amperage results confirmed that current sensors could work, and beyond detecting the parked position, they could also be used to distinguish the different leveling phases: rear jack extension until firm ground contact for stabilizing, and then transition to "roll" leveling if needed. Completion of the rear jack phase could then trigger the tongue jack phase to handle "pitch" leveling. The amperage chart became the basis for the circuit and software design. No proximity sensors. No revolution counting. No permanent modifications — just two wires to each jack, a component box, and a control board. Sounds easy, but this was only just the start of a long process to perfect the system. I hope someone finds this interesting! Cheers! Geoff
- 11 replies
-
- 10
-

-

-
Water pump runs continuously after tank sanitization
Snackchaser replied to Sandman's topic in Welcome to the Oliver Forums
The pump stops running when the pressure set-point is reached. So it’s pumping, but not reaching full pressure. This happens when there is a leak on either the suction or output side of the pump. If the leak is on the output side, it’s easy to find because it will be leaking water. However, if it’s on the suction side, it will suck air but it will not be leaking water. The most common cause is the suction side filter right next to the pump. You won’t see any signs of leakage, but make sure the cap is on straight and tight with o-ring. I assume you have re-checked proper valve line-up and full closure, and any open faucets. Other than that, it’s unlikely a leak developed by just sanitizing. Good luck, Geoff -
Maximizing amp hours for boondocking
Snackchaser replied to Olive2Roam's topic in General Discussion
As JD said, the inverter should run the microwave. Three things you should try first: 1) Using the Xantrex App or control panel, check/lower the low voltage drop out. It's usually set between 12 and 12.2 volts. Try lowering it to 11.5. The battery voltage will drop under load, and there could be voltage calibration errors in the inverter so that if it's set to 12.2, it could actually be higher. 2) Also check/increase the low voltage cut-off delay. The delay prevents nuisance trips from inrush currents, and the microwave might have a delayed power surge. 3) Try a hard reboot. This has worked for some folks, but it's more difficult because you have to disconnect the battery leads for a few minutes. Hope that solves the problem! Geoff -
Lithionics large phantom draw
Snackchaser replied to DaveAndBecky_NorthernMI's topic in Mechanical & Technical Tips
Check to make sure that your brake "breakaway switch" wasn't accidentally pulled out. If so, the electric brakes have been on the whole time. Four brakes would draw 3-4 amps each. If you were reading 2-3 amps draw on your Lithionics battery App, then that's only one of the 3 batteries. So it's actually 9-12 amps. Add in the solar input and it's about right for what the brakes would draw. Good luck, Geoff- 9 replies
-
- 10
-
-
-

-
Amazon carries it, but theirs is sometimes low quality and thin. I got some from an HVAC contractor/supplier for free. It is used for duct insulation and was much better quality.
-
Yea sorry, those Amazon links were questionable, so I updated that reply with a better link. 3-pin dc power connectors are typically switched, to disconnect a battery when an outside power supply is plugged in. Those Amazon knock-offs have a sketchy description, so without actually testing one there is no telling what they are. I buy parts from DigiKey. Look up Digikey part PJ-005B and view the datasheet. There is a schematic showing the Pin-2 to Pin-3 switch. They are under $3 at DigiKey plus shipping, Amazon sells them 5 for $18 with free shipping: https://a.co/d/04TQyt2M
-
Edited to correct link. Here is an updated Amazon link: https://a.co/d/04TQyt2M
-
Ruuvi sensors with Victron - Awesome!
Snackchaser replied to rideadeuce's topic in Ollie Modifications
Just as an FYI, new tech is out there! Although probably impracticable for most, others might love the Safiery LP tank sensors! Check out today's new post "AI is here for your trailer!" Cheers, Geoff -
There are plenty of posts about new products and technologies for our trailers in this forum, and it seems there are endless choices. But for those willing to pay for cutting edge and high quality, take a look at products from Safiery. Safiery, based in Australia, began as a Victron supplier and is now marketing their own RV and Marine products to integrate with Victron equipment. It’s a somewhat confusing array of technology that is mostly overkill for our little trailers. But I’ve been eying a few items that look very attractive: Since I titled this post with “AI tech,” then I should mention Safiery’s Smart AI DC-DC charger. Cutting edge for sure, but not cost effective for small systems IMHO. If I was looking to upgrade or replace my lithium batteries, the Safiery SOLID STATE batteries are worthy of consideration. They are expensive, but cheaper than the Oliver’s Lithionics, and they have many advancements such as 10,000 cycles, improved BMS, better cold performance, smaller size, more robust, and much safer than liquid lithium. For those with Victron Cerbo, Safiery has compatible tank level sensors for liquids and LP gas. I had been waiting for something like this before upgrading to a Cerbo. These sensors are easily adapted and competitively priced with some of the lessor alternatives. Liquid tank sensors are top mounted and use Radar for very accurate measurement, LP gas level sensors are similar to Mopeco, but with built in signal processing. How about an Electric Stovetop? A safiery induction countertop stove looks very cool and affordable for those with 2k inverters (can be drawer mounted too!). Then there is a whole array of digital wireless switching options with Multi-channel receivers, bus management, and other options I haven’t even gotten around to looking at yet. It’s an exiting new world for the tech minded DIYer! Cheers! Geoff
-
- 3
-
-
I'm not sure what vintage the old unit was? However, I recall that there was some question whether it was an AGM only battery charger. So if your new replacement has charge profiles for both AGM and Lithium and you want to retain the lithium option - then it's not worth keeping as a spare. Besides, no telling if the resistor is the only issue. Glad you're whole again! Geoff