Leaderboard


Popular Content
Showing content with the highest reputation on 06/13/2017 in Posts
-
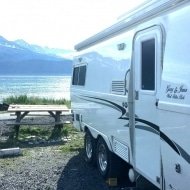
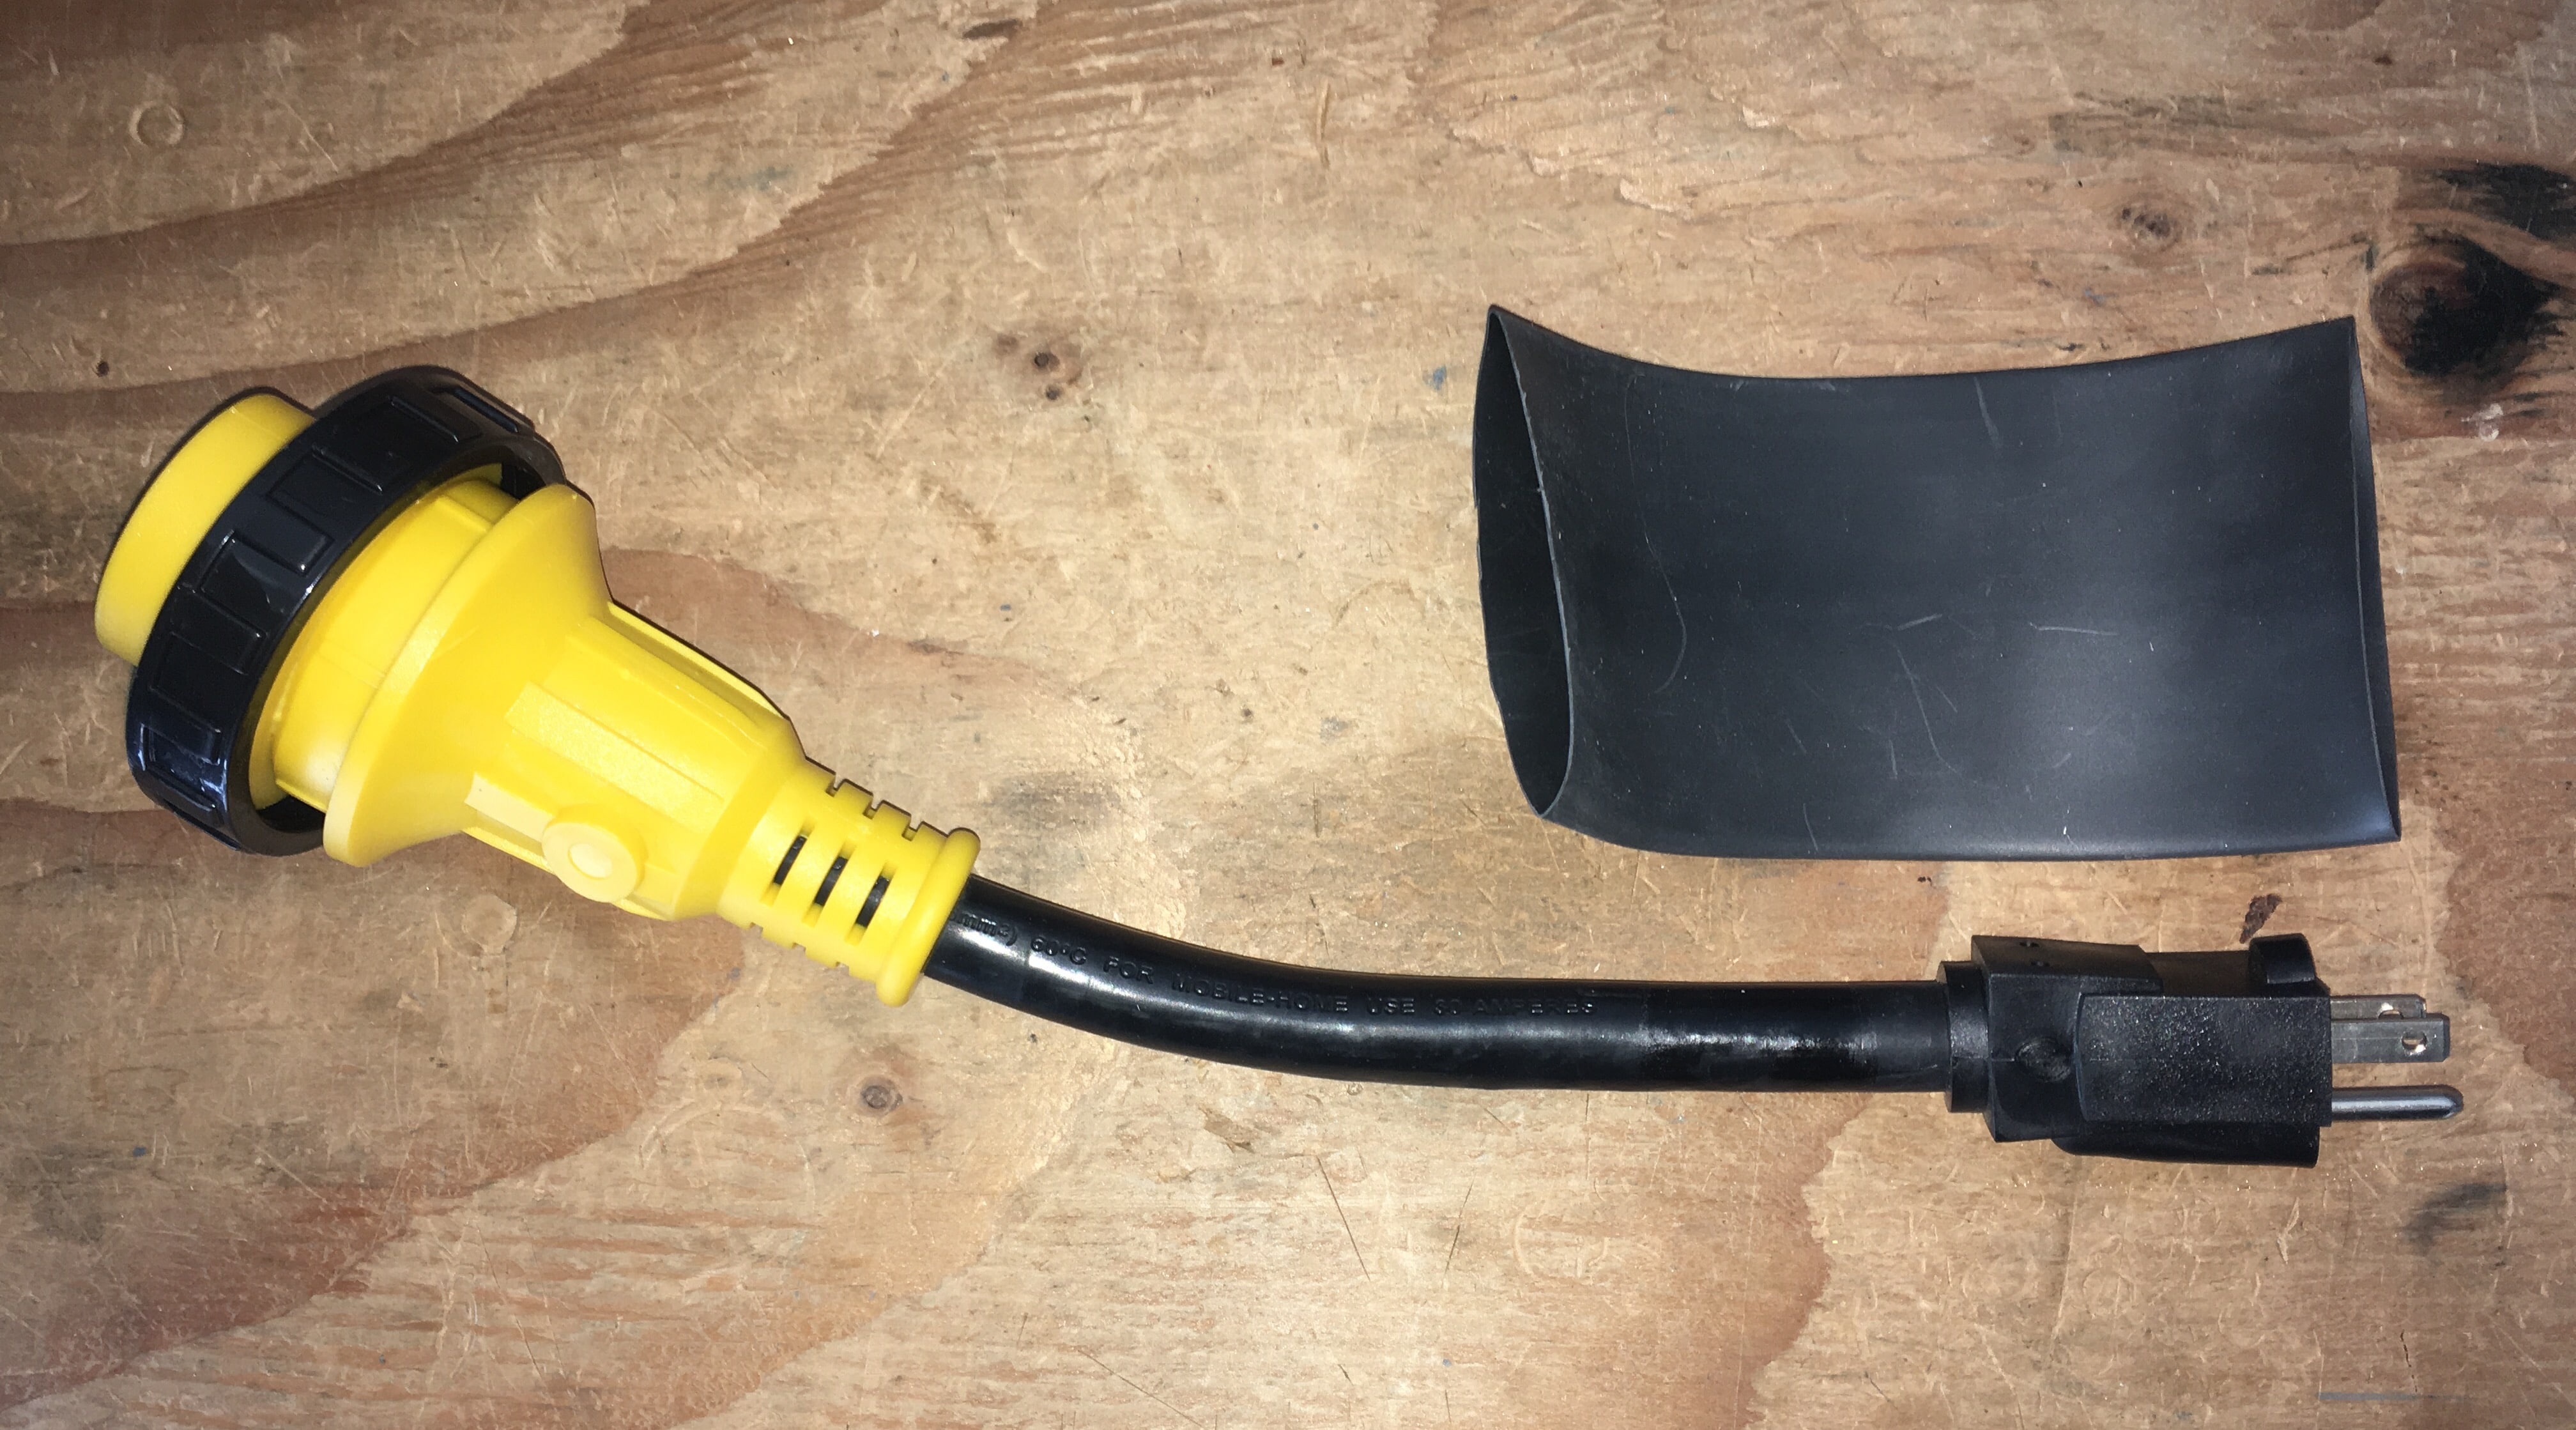
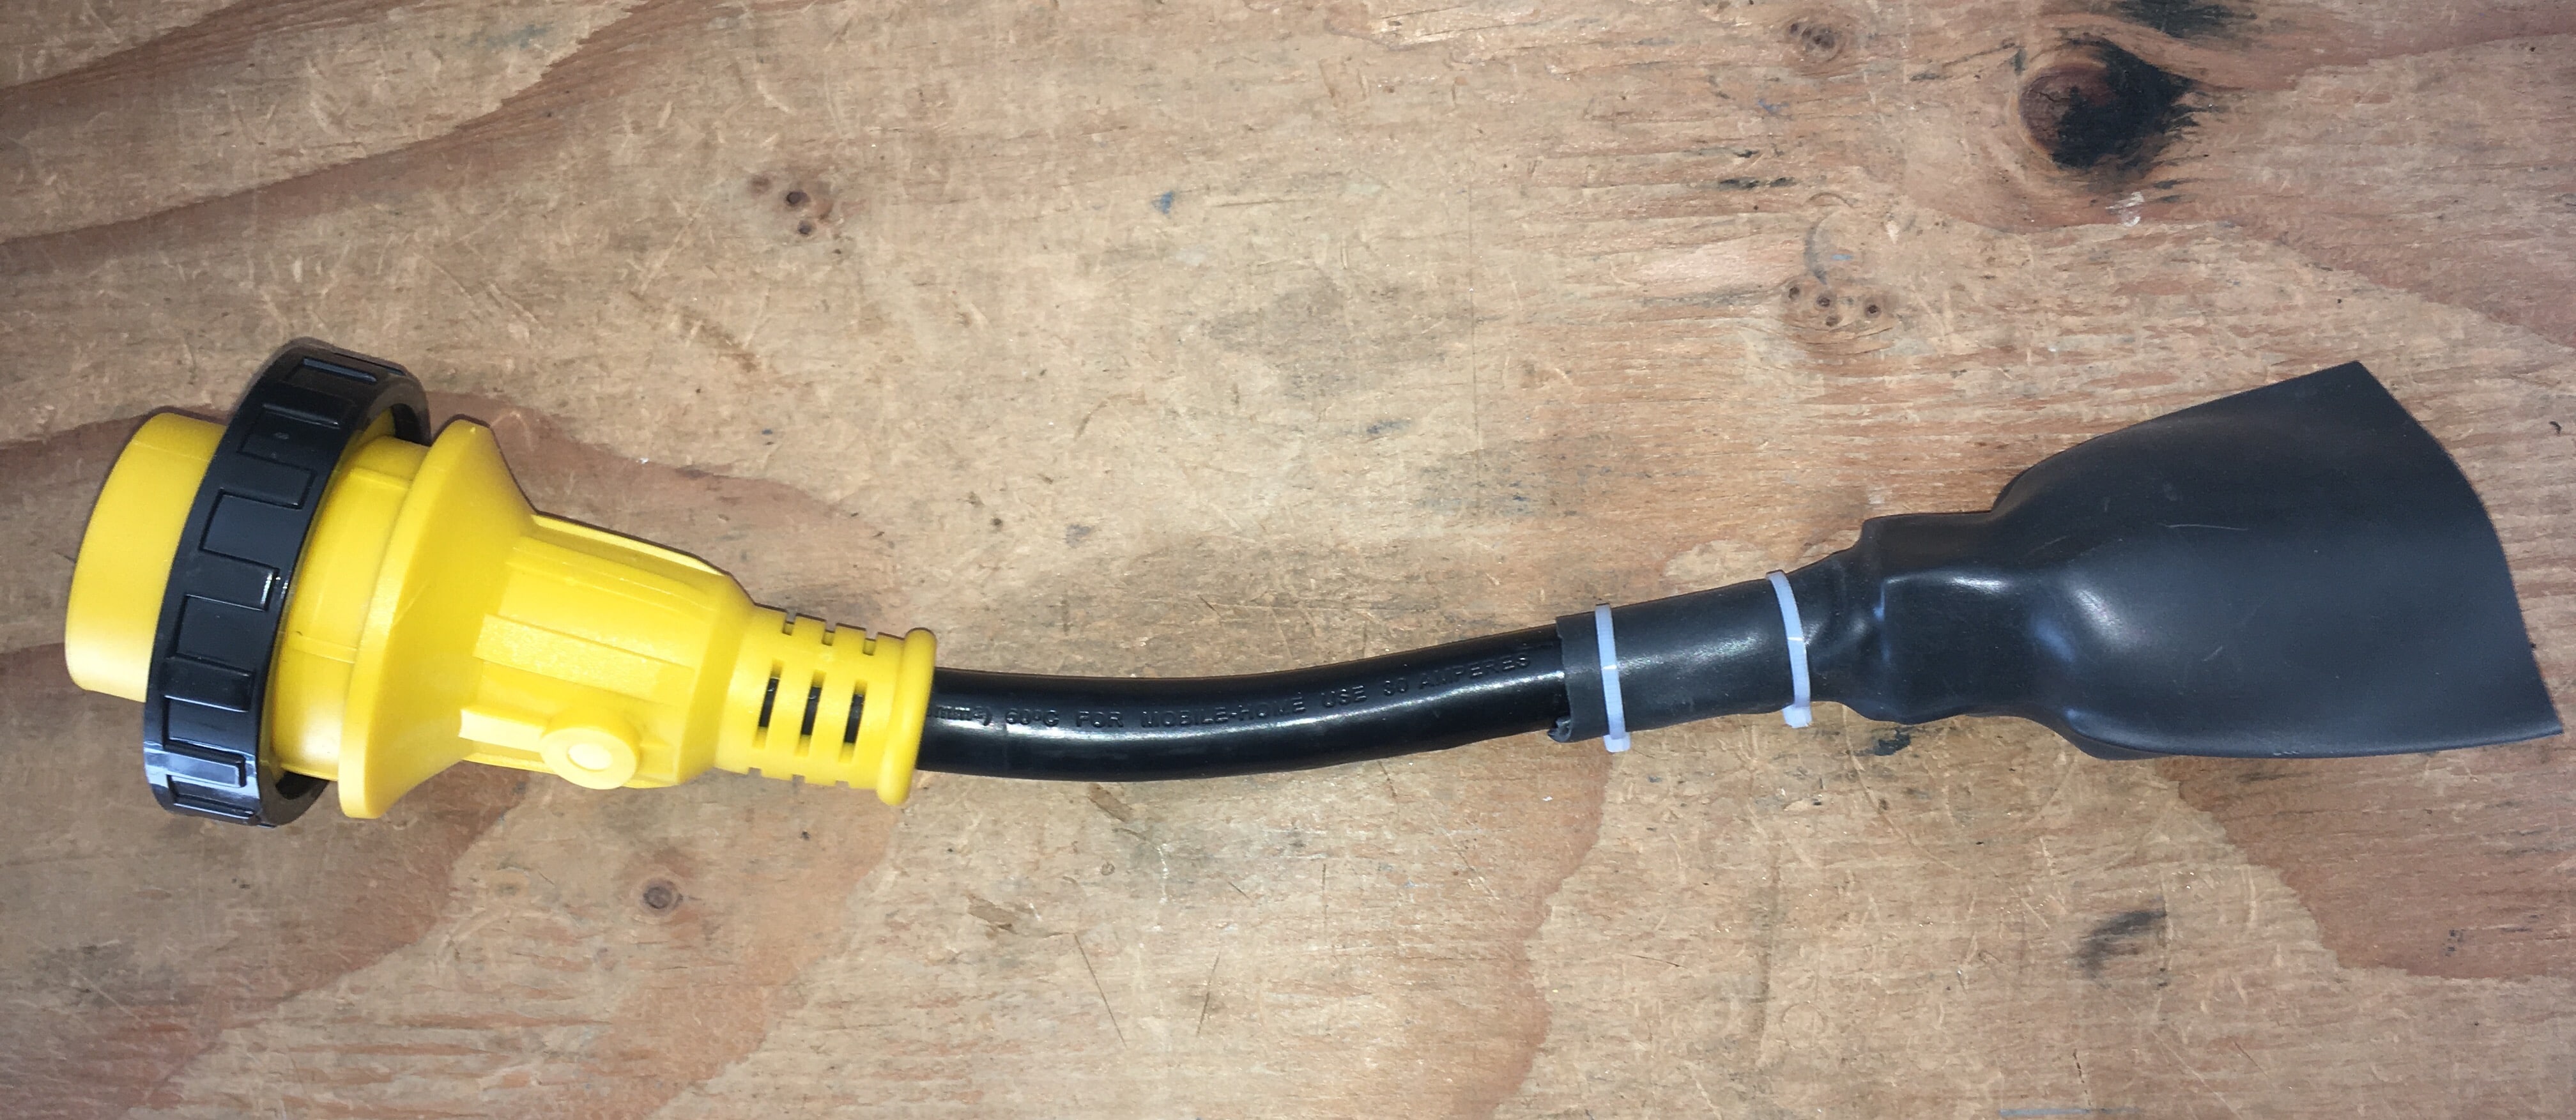
I made a rain boot for my 15 to 30 amp pigtail adapter, using 3 inch heat shrink tubing. John Davies Spokane WA
 3 points
 -
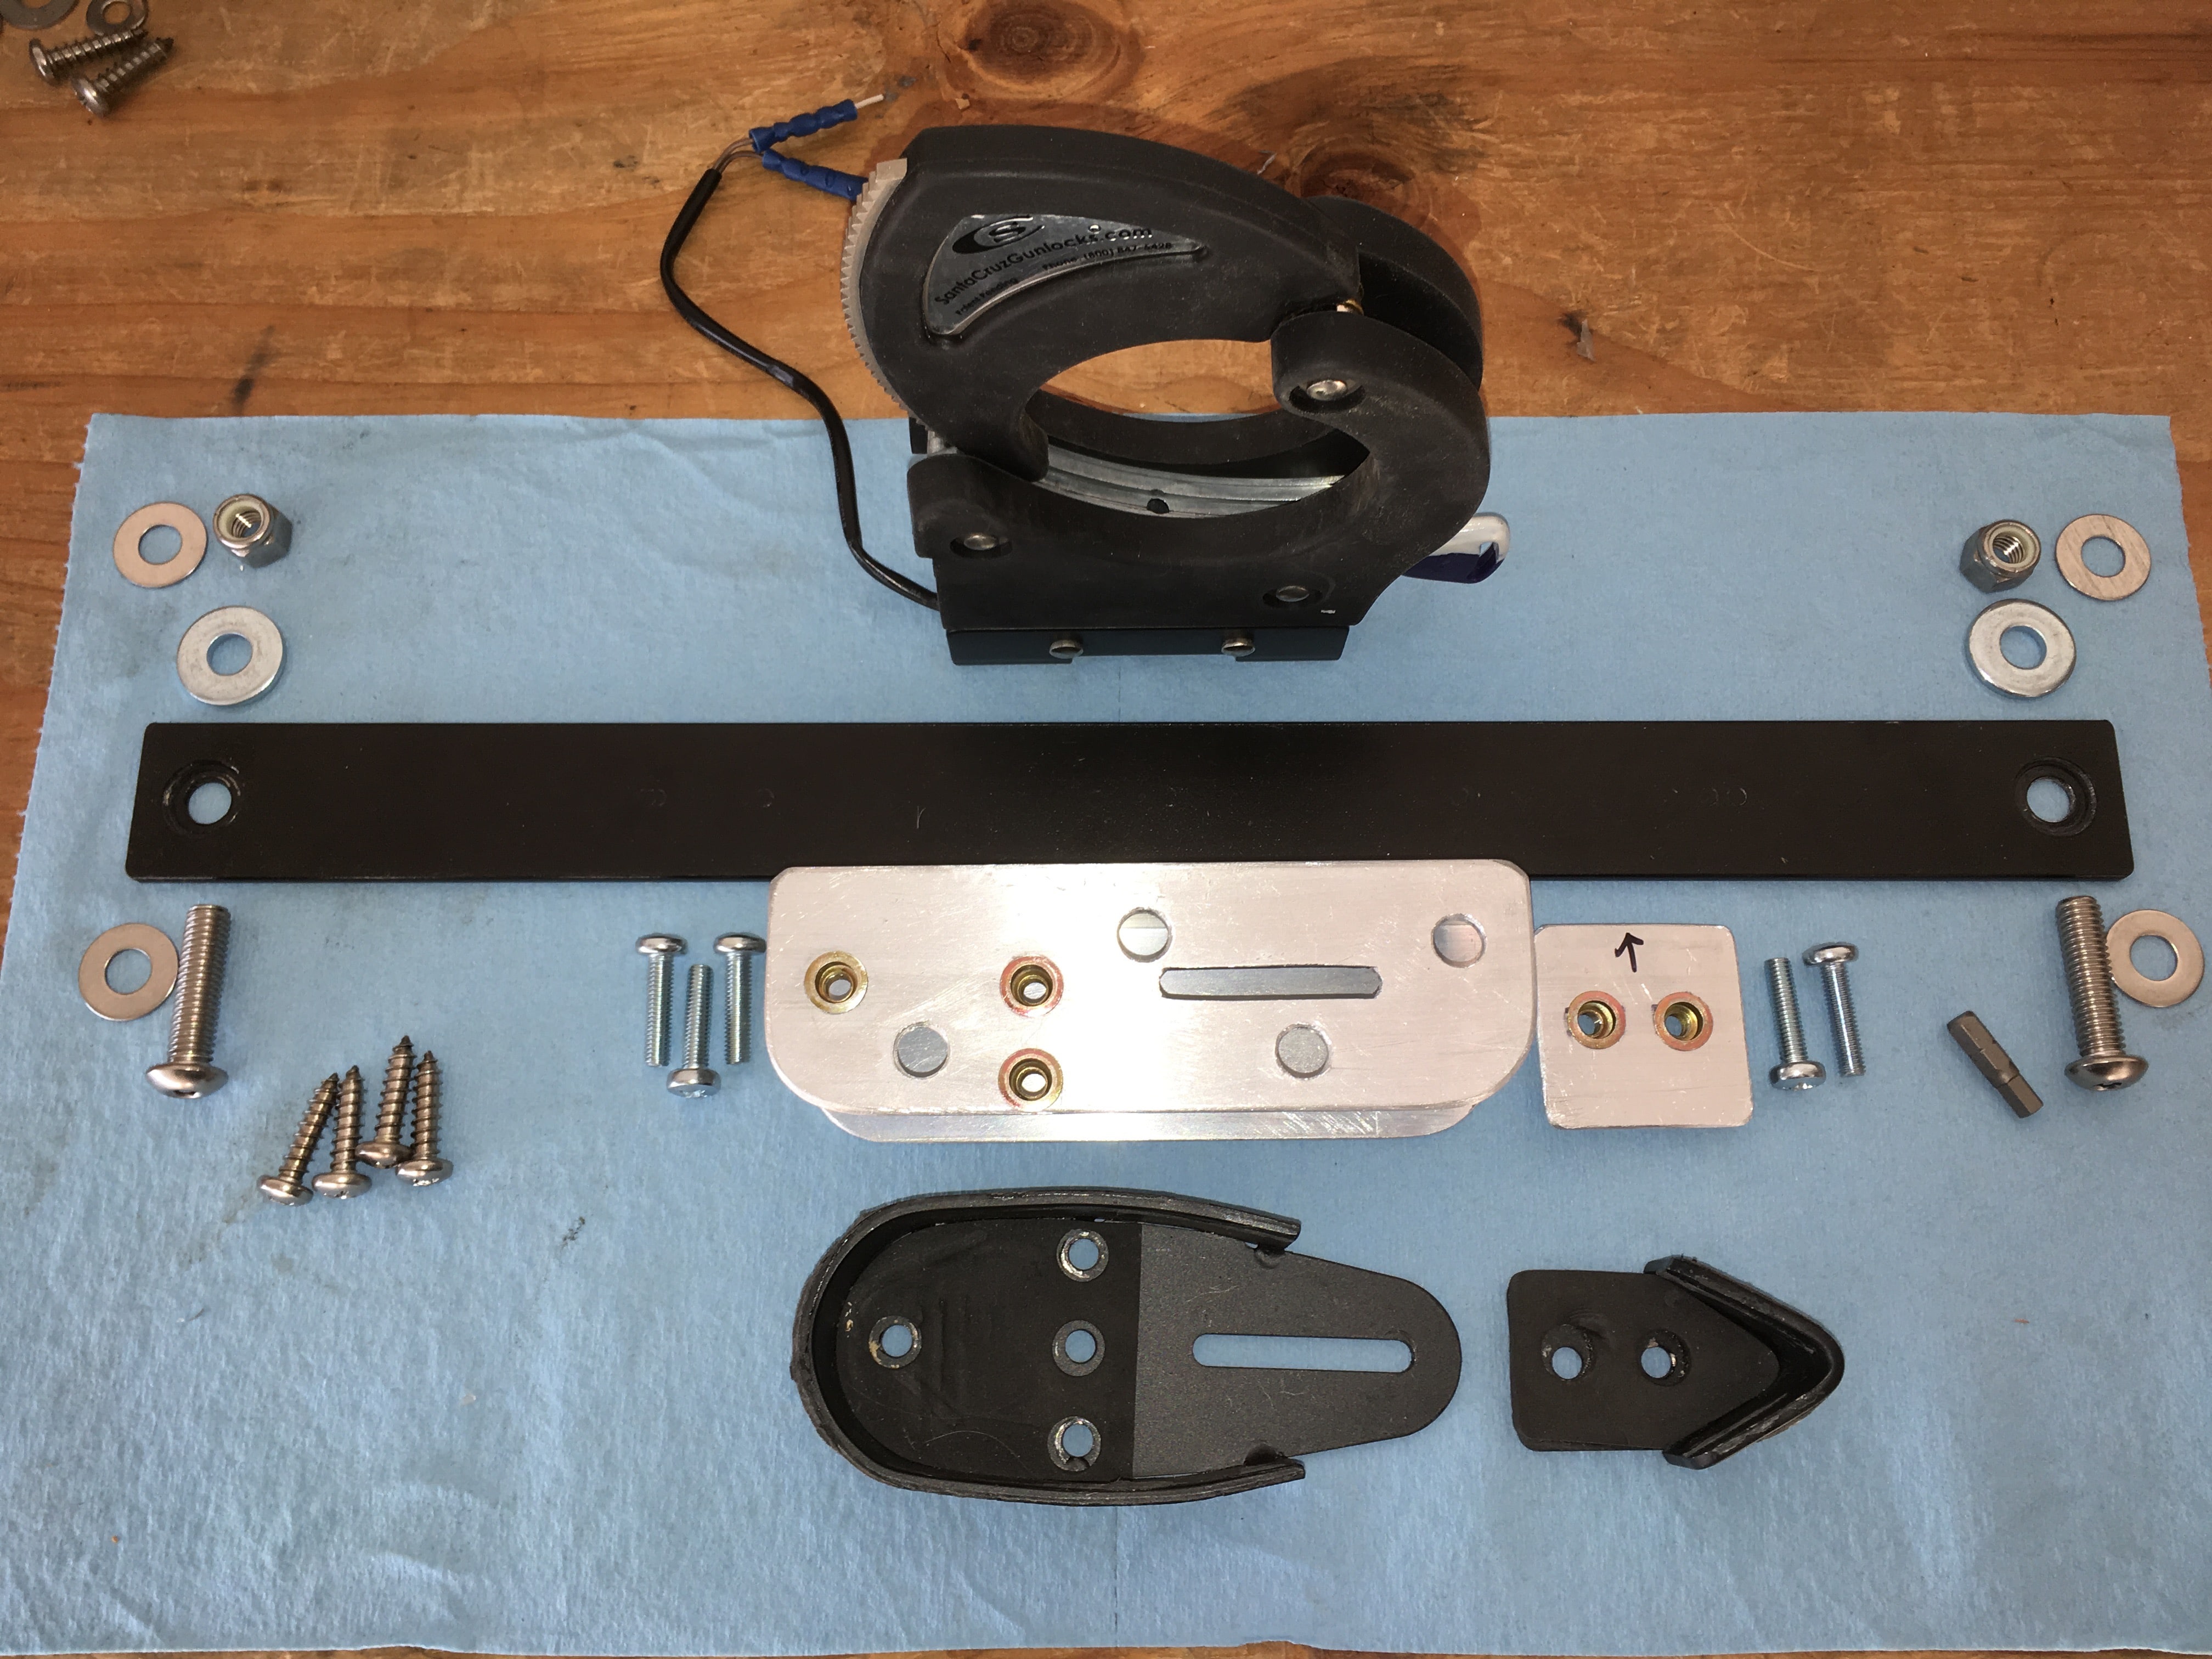
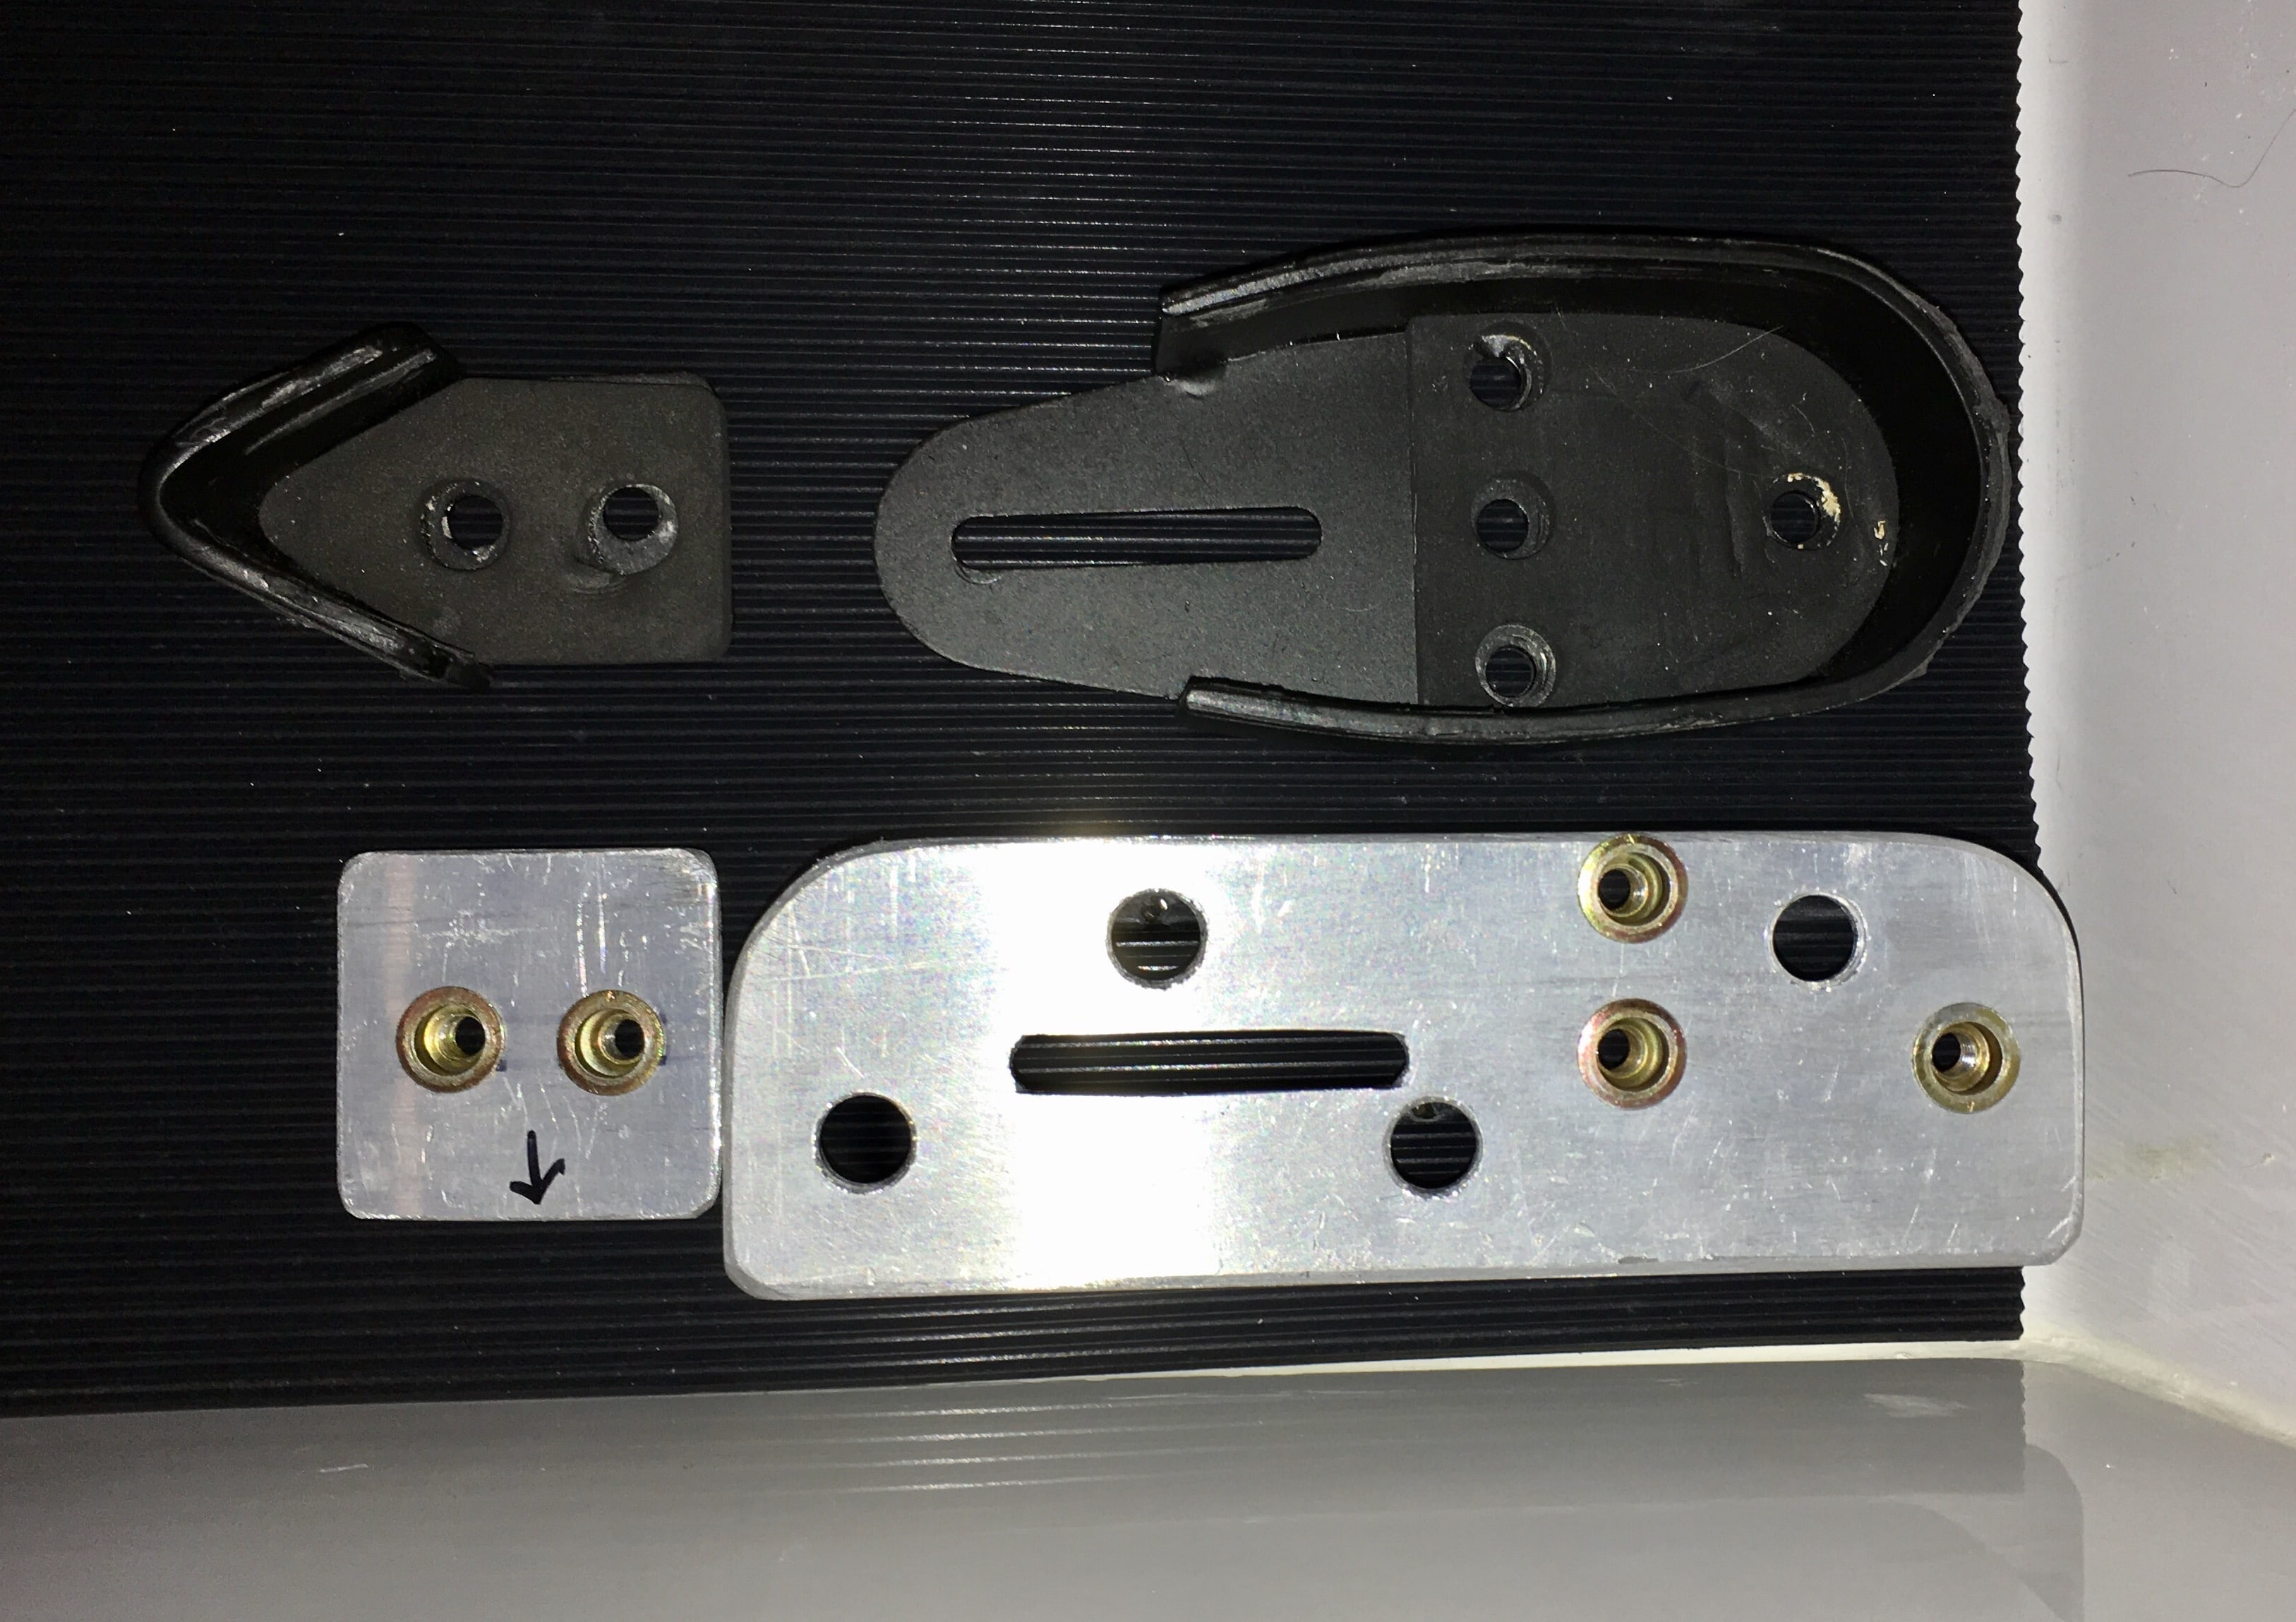
The forum is being really weird today and there were a couple of duplicate posts. Those of you that don't have any interest in firearms can read for enjoyment or skip the thread entirely. I want a 12 gauge shotgun stored securely yet close at hand for primitive camping and bears, and it is a weapon that is 100% legal to take into Canada. I had a Santa Cruz vertical locking mount installed in my master bedroom closet for 13 years. We moved and I decided to put it in Mouse. The mount is typical of what you see in police cars - the shotgun rides vertically with the butt resting in a floor saddle, and the barrel is clamped into a padded and ratcheting steel ring, that is released electrically by way of a 12 volt dc solenoid. In my house I had to install a power supply, but the Ollie has no need for that. http://santacruzgunlocks.com/products/ Here are all the bits, laid out and pretty: The hardened steel bar slides into the lock assembly, which gets positioned properly and is secured by an internal Allen screw, which is hidden when the lock arm is closed. [attachment file=IMG_1981.jpg] [attachment file=IMG_1982.jpg] Lower saddle: Because I wanted the bulky lock to clear the coat hangers, I raised the entire setup 2 inches off the floor. I fabricated a stand-off using a piece of 2 x 2 aircraft aluminum channel. Because the installation needs to be as secure as possible, I used steel nutserts where I could (regular nuts could be loosened). The bottom part attaches with #12 Philips sheet metal screws into the floor, but access to them is difficult due to the shape of the channel and the overlying rubber pad. For installation, I drilled 1/2 inch holes in the top of the channel: these are covered by the actual Santa Cruz saddle assembly. I sealed the screws and bedded the saddle with clear RTV sealant, to prevent water ingress. [attachment file=IMG_1977.jpg] [attachment file=IMG_1989.jpg] [attachment file=IMG_1994.jpg] [attachment file=IMG_1997.jpg] Main gun lock assembly: The bar is held on by two 3/8-16x 1.5 stainless "security bolts" and self locking nuts. The bolts have a tamper proof head design that you often see in public restrooms. It is an Allen head with a center post. You must have the special drilled bit to install or remove. Since the nuts are accessible, it is critical that the bolt heads be impervious to attempts to turn them. [attachment file=IMG_1979.jpg] The mount bar and lock fit neatly just outboard of the closet door frame. I had to move the clips for the awning center brace. (I put them on beside the entry door, rear side.) The wall is half an inch thick with fiberglass surfaces and apparently a wood core (???). I used sealer on the hardware, just in case. [attachment file=IMG_1993.jpg] [attachment file=IMG_1999.jpg] [attachment file=IMG_2001.jpg] [attachment file=IMG_2002.jpg] [attachment file=IMG_2016.jpg] Here are the security screws, viewed from the cabin side: [attachment file=IMG_2006.jpg] [attachment file=IMG_2007.jpg] I'll get this stuff posted and work on the last part. John Davies Spokane WA
2 points
-
Hi Everybody, Tom and Karen here, checking in from the back slope of Chimney Rock State Park just outside of Hendersonville, NC. We're retired and almost retired, and have decided to take the plunge and buy our first travel trailer. The original plan was a truck camper, but we've kind of backed off of that in favor of either a new or used Oliver. Towards that end we traded our (older) Tacoma in on a new F-250 4x4, which I realize is probably serious overkill, but hey, nothing exceeds like excess! TopGun2 (callsign: Bill) was kind enough to give up most of one Thursday morning to give us the nickel tour of his Elite II, and we came away hugely impressed. While we wait for a couple of small details to iron themselves out we're debating the merits of new v. used, twin v. king, color schemes and power outlets. We also followed some advice we saw here and subscribed to the classifieds in order to try and catch that most elusive of wild creatures, the used Oliver Elite II. If anyone in our neck of the woods is considering a sale please let us know! The plan is to summer and winter in the mountains, and head out spring and fall to see America, hopefully boondocking for the most part. Hope to see y'all on the road. T&K2 points
-
We're working on performance/functionality and will have something to show shortly. There is still some work left to do before we're comfortable with the release. This will include a new forums. Better user experience and moderation tools for moderators.2 points
-
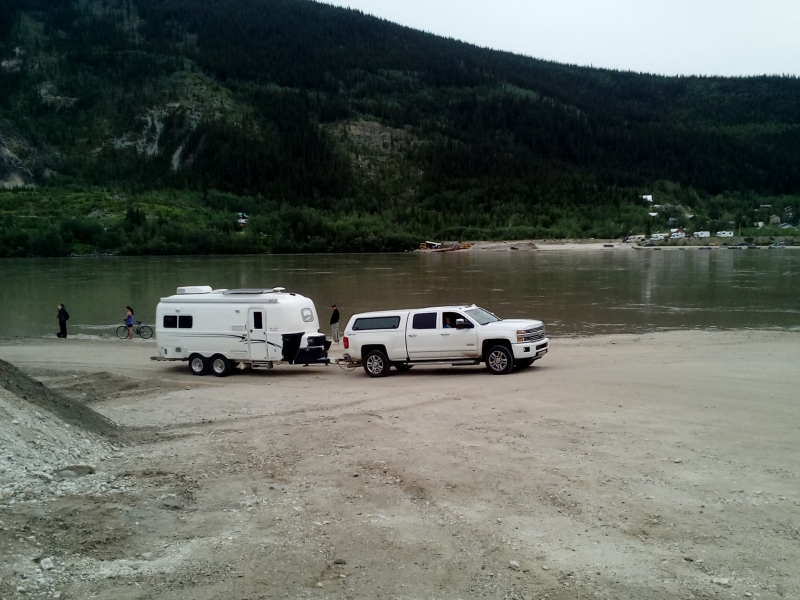
Hello I was asked to post a picture what we had covered the front of our Oliver with on the trip to Alaska last year. We used closed cel foam maybe 1/8 0r so thick we bought at a flea market u can probably buy it on line it is the same thing that you use as a sleeping bag cushion, being closed cell you do not get any water or dirt that can get through and rub under the foam as you travel and the wind, rain and dust will not penetrate. I cut the pattern and applied it from the belly band down and the running light around the front. I taped it on with Non-Residue duct tape and stayed on over a month through the Alaska, Yukon Territory portion of the trip just over a month long and it held up great and came off easy and cheap.This is the best picture we have taken from the Yukon River after staying in a Provincial Park across from Dawson City. Thanks Gary
2 points
-
I have been told that if you don’t have any trailer brakes you WILL KNOW IT. But not sure I will be able to sense reduced vs. full. In the "electric brakes" mode I can get them to lock up using the manual brake 'slider', although I get the dreaded "Trailer Disconnected" message. In "electric over hydraulic" mode I can't get them to lock up even at max brake setting (10.0). If you have an area where stopping distance is not a concern then you can try using the same approximate brake pedal pressure without the 7-pin connector installed (secure the cable to the tongue so it doesn't drag the ground) versus trying it connected as normal. Do it with the transmission's 'Tow/Haul' mode off so you don't confuse the tow mode's enhanced downshifting with actual braking action. After a few tries you'll have a good feel for when the brakes are working, if they are indeed working at all. I've got the 18.5 Elite so I'm guessing it'll be an even more pronounced difference with the heavier Elite II. I have an appointment with the Ford dealer on Monday to have the latest SSM (#45803, I think) applied. I'll post a followup after that. Brake-controller.pdf1 point
-
The whole head of the jack moves around on mine only being held on by 2 screws on opposite sides, making it undependable. The fridge needs to be level, I just used the Outter hulls seam to level with, then put RV levels inside and out. The seam worked really well as my main leveling point but it will differ from front to back and side to side if you're using the jacks to level with. For the one time base leveling, you need to use blocks under the tires first, not the stabilizers and do it on as level of ground as you can find :)1 point
-
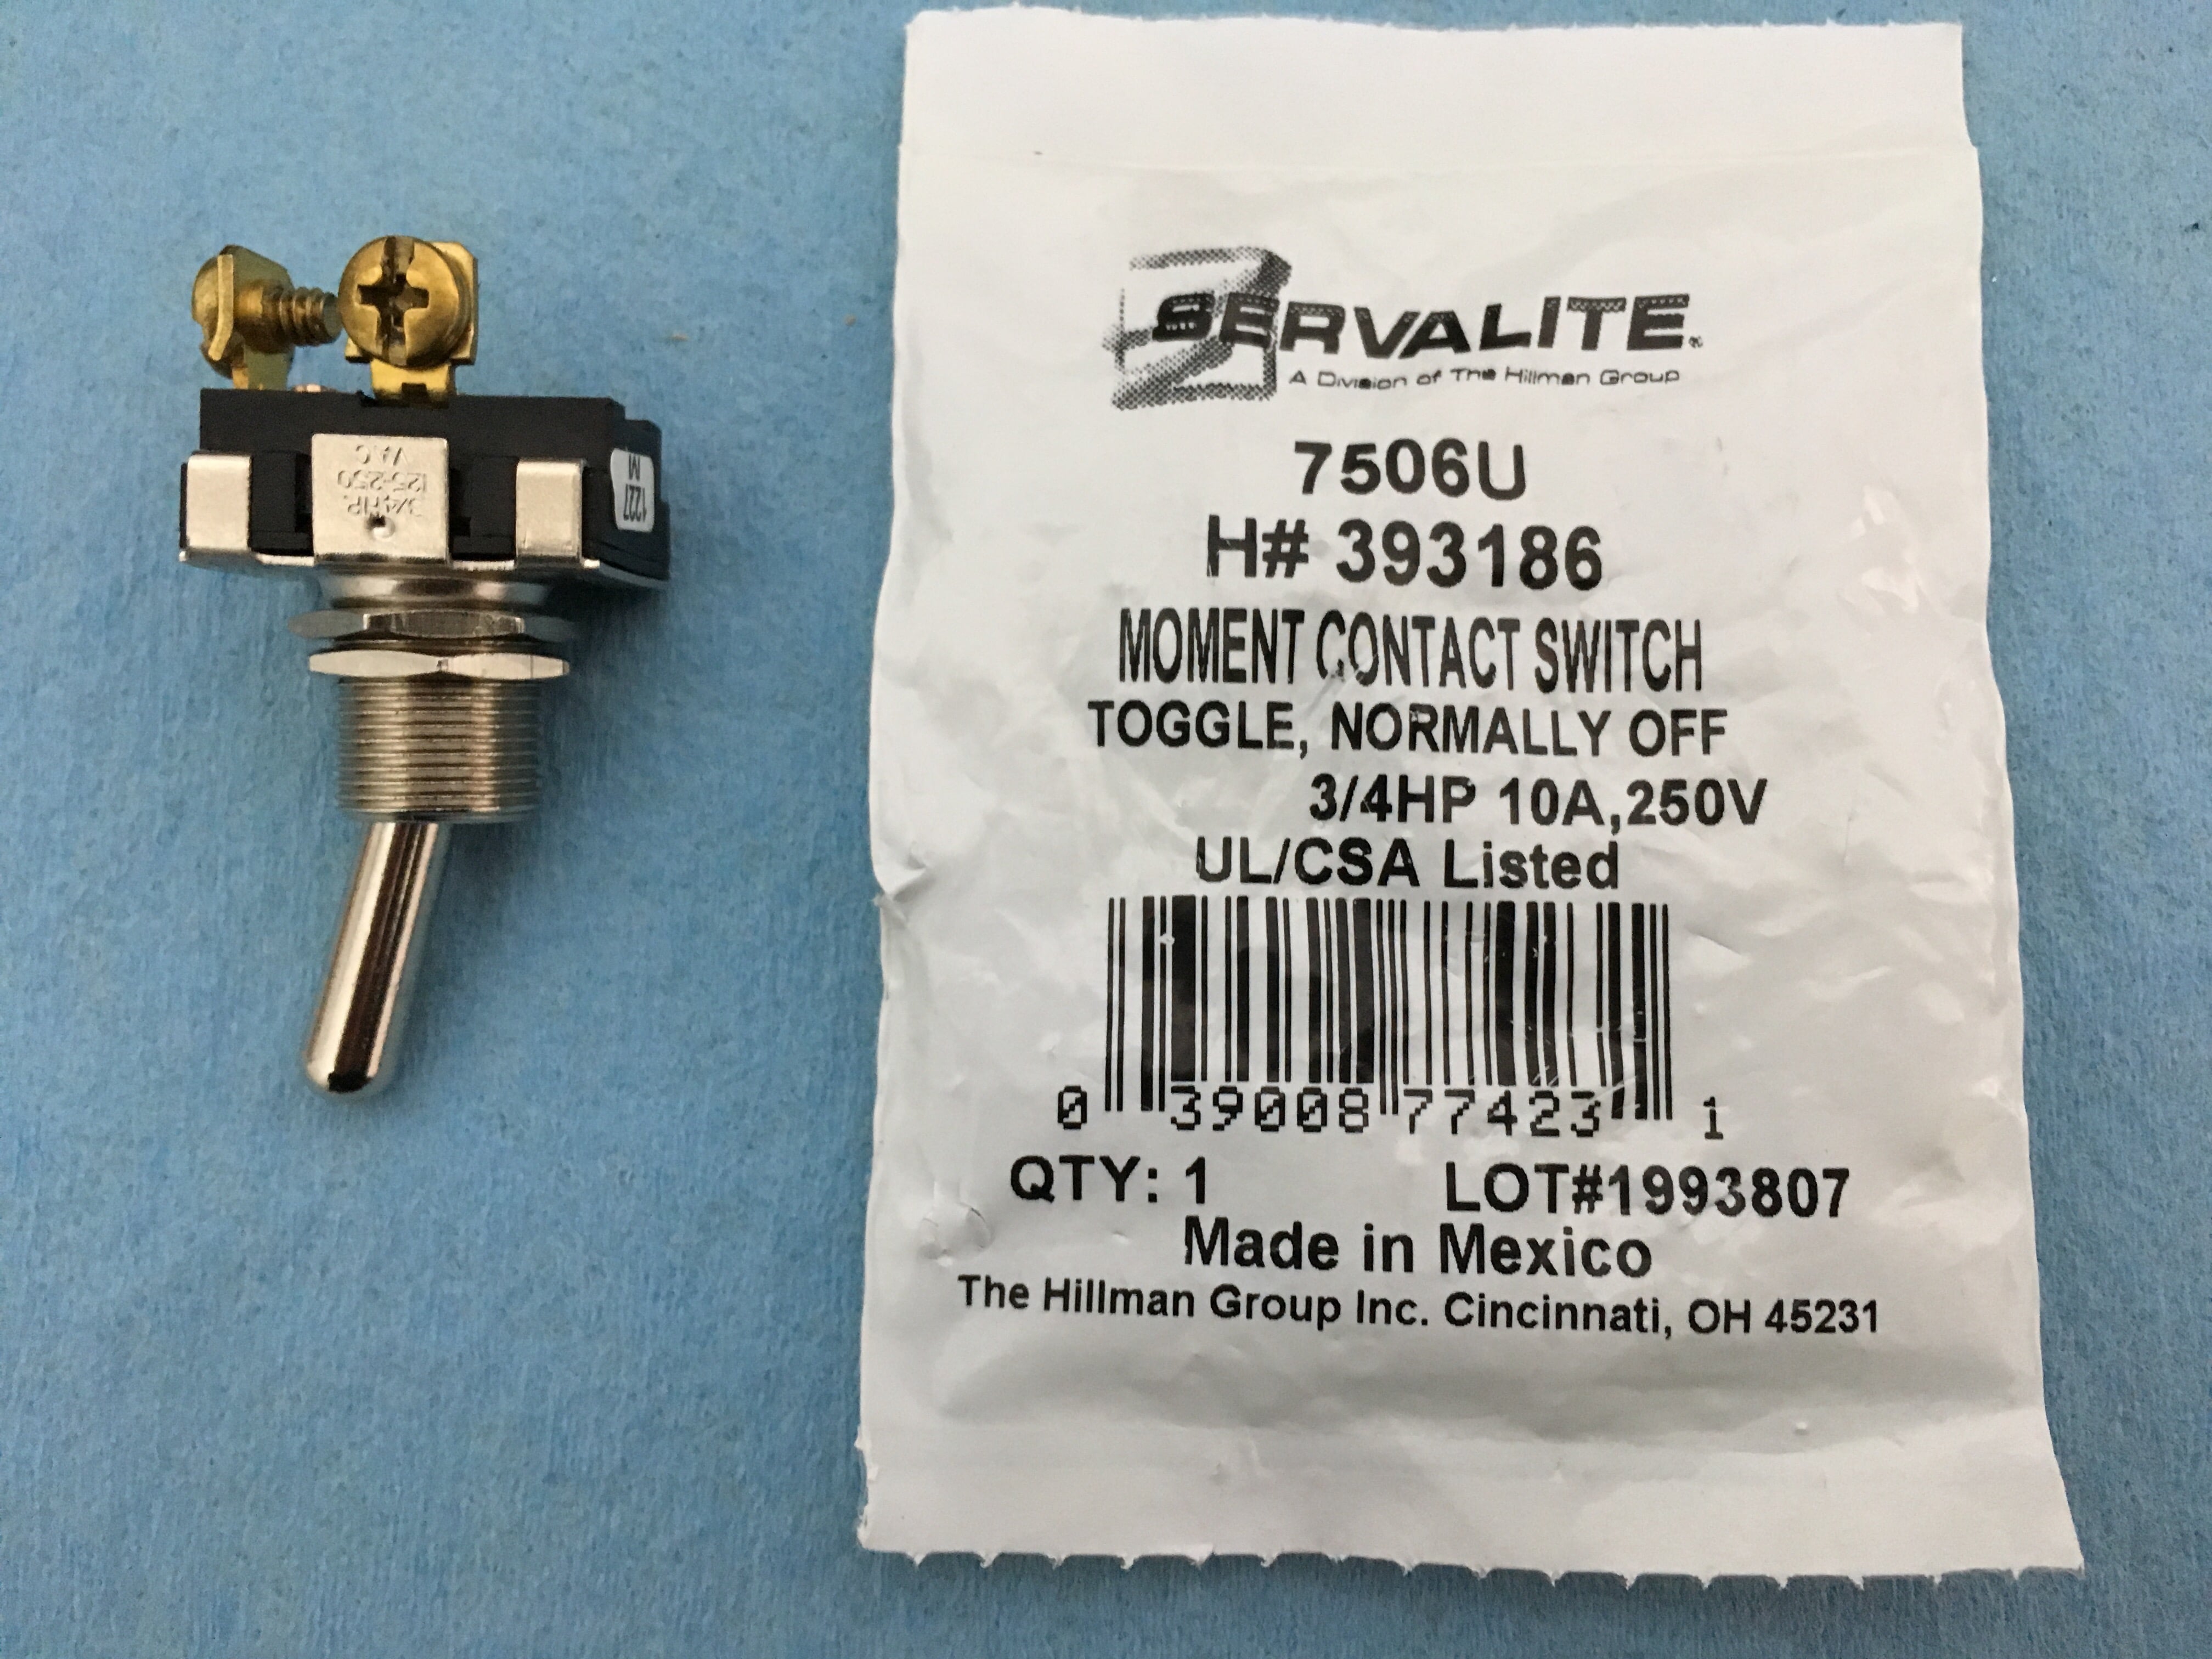
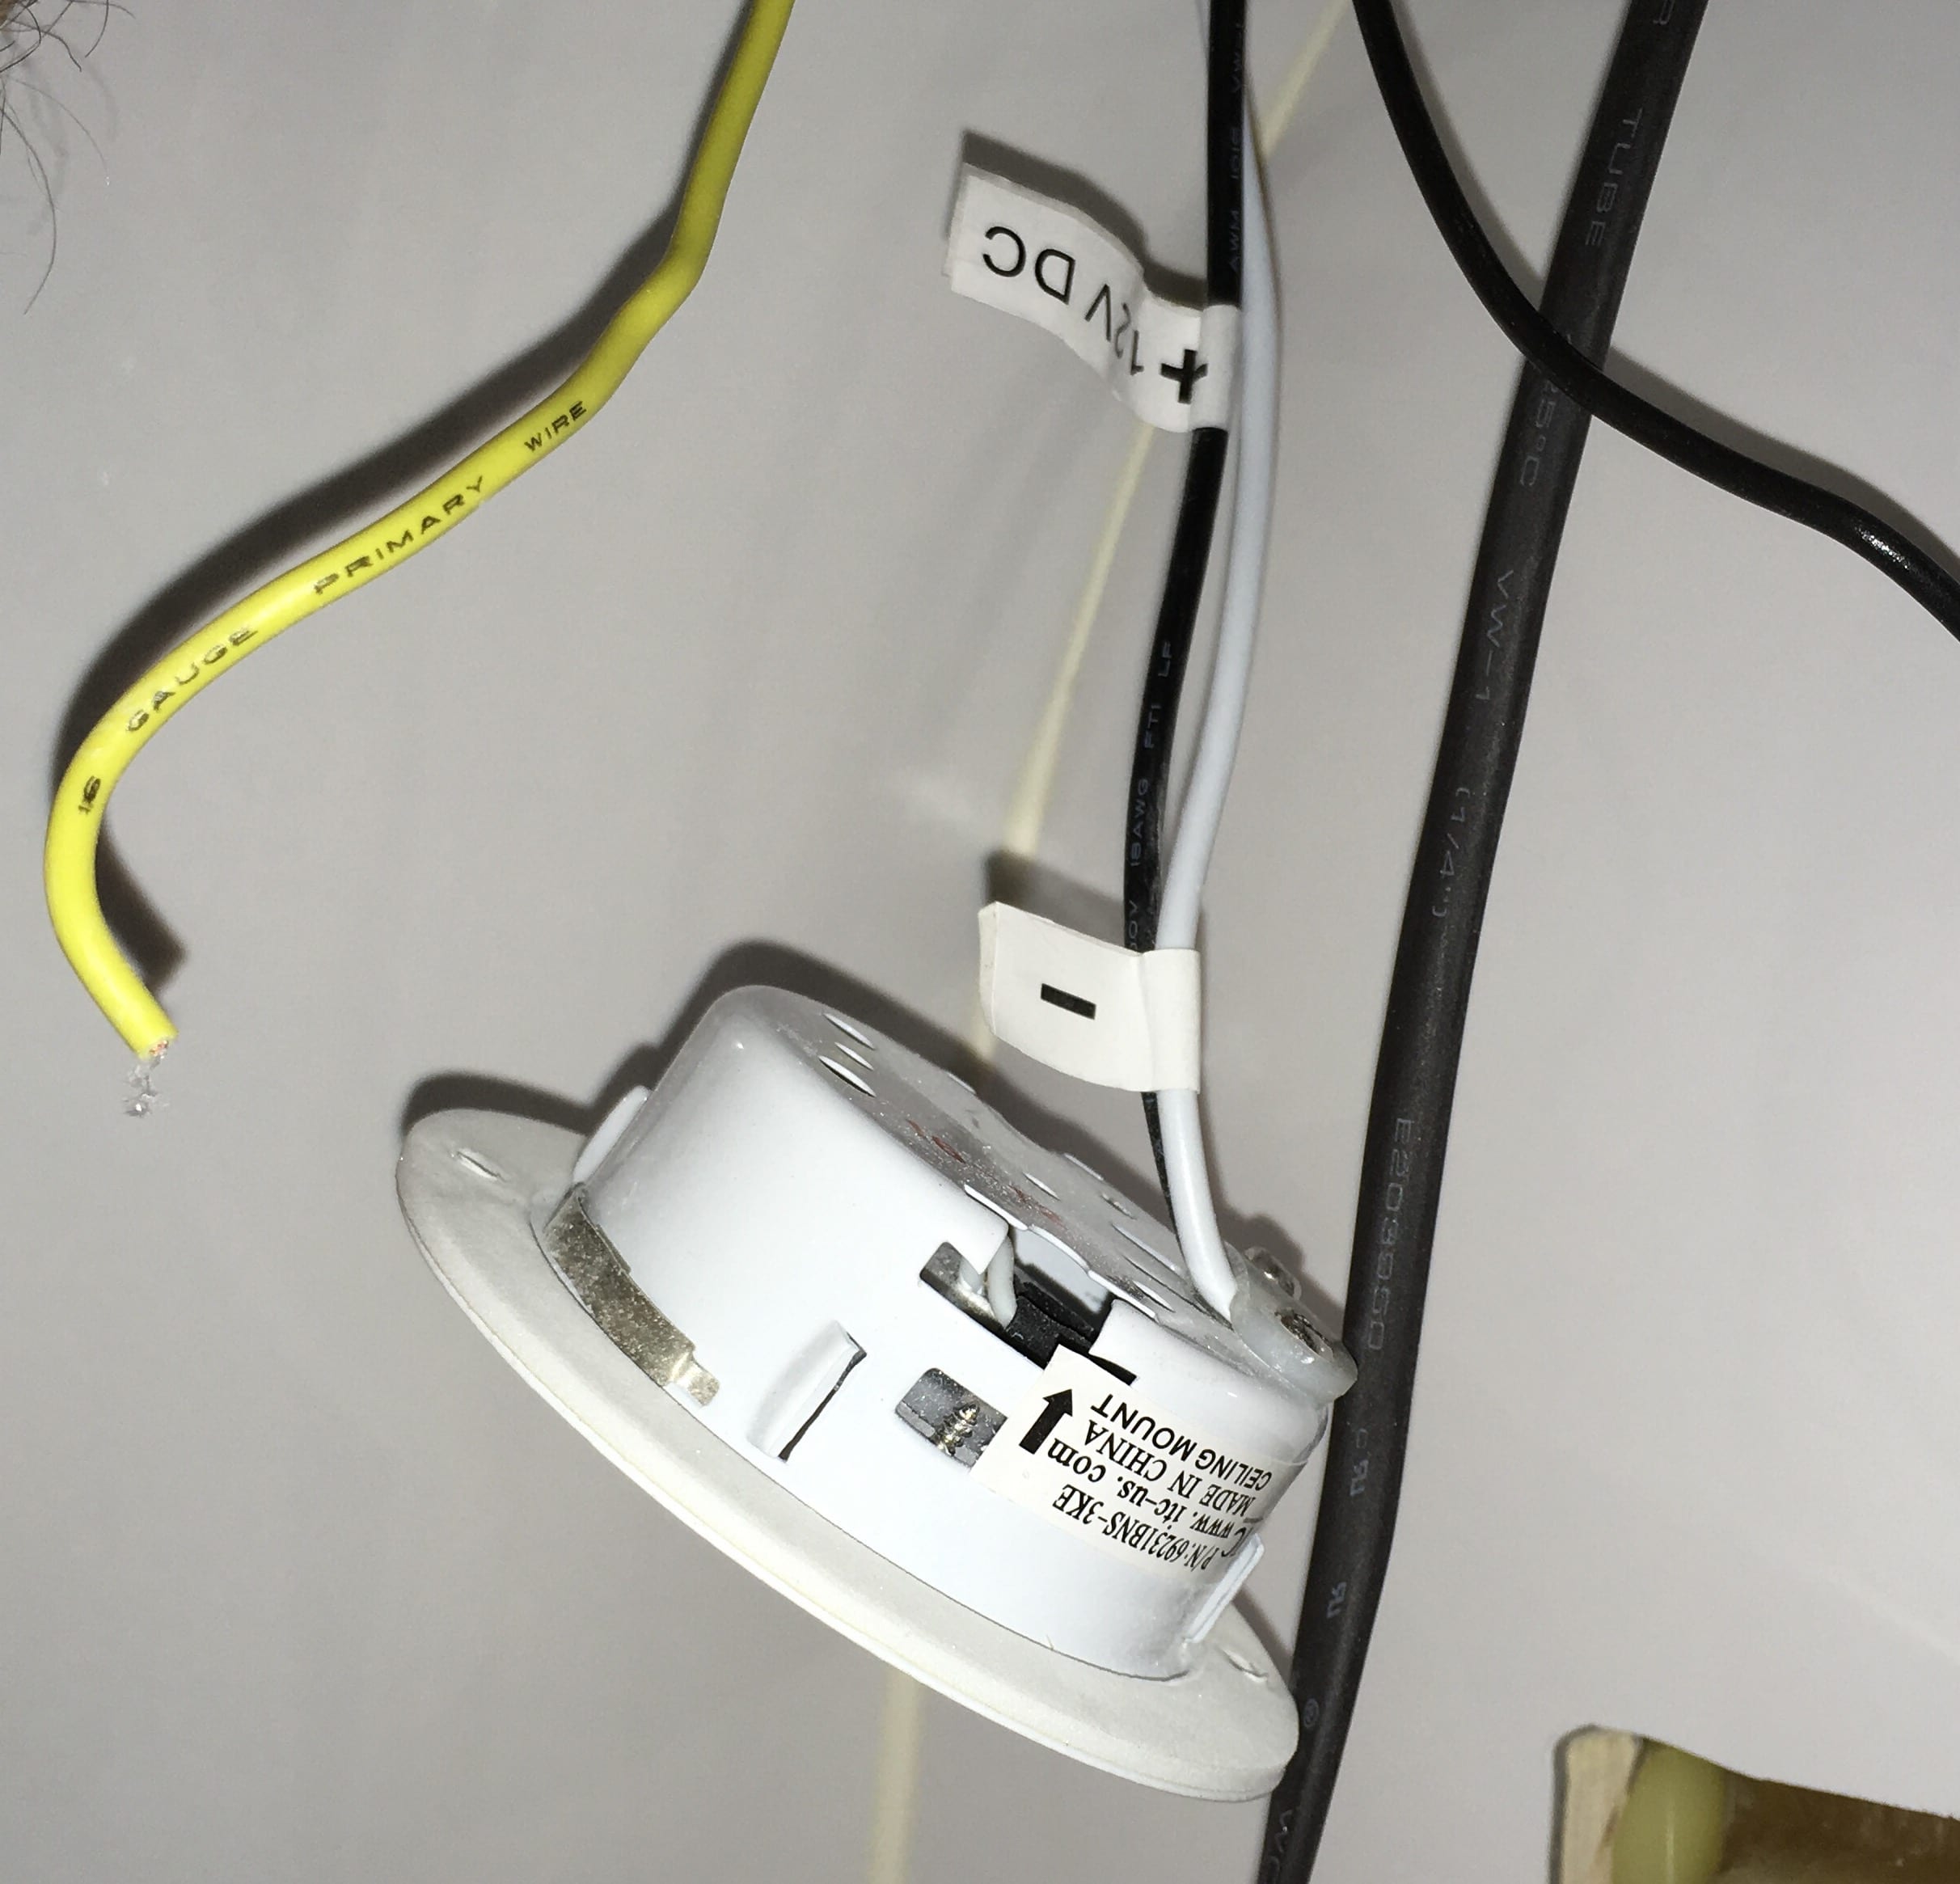
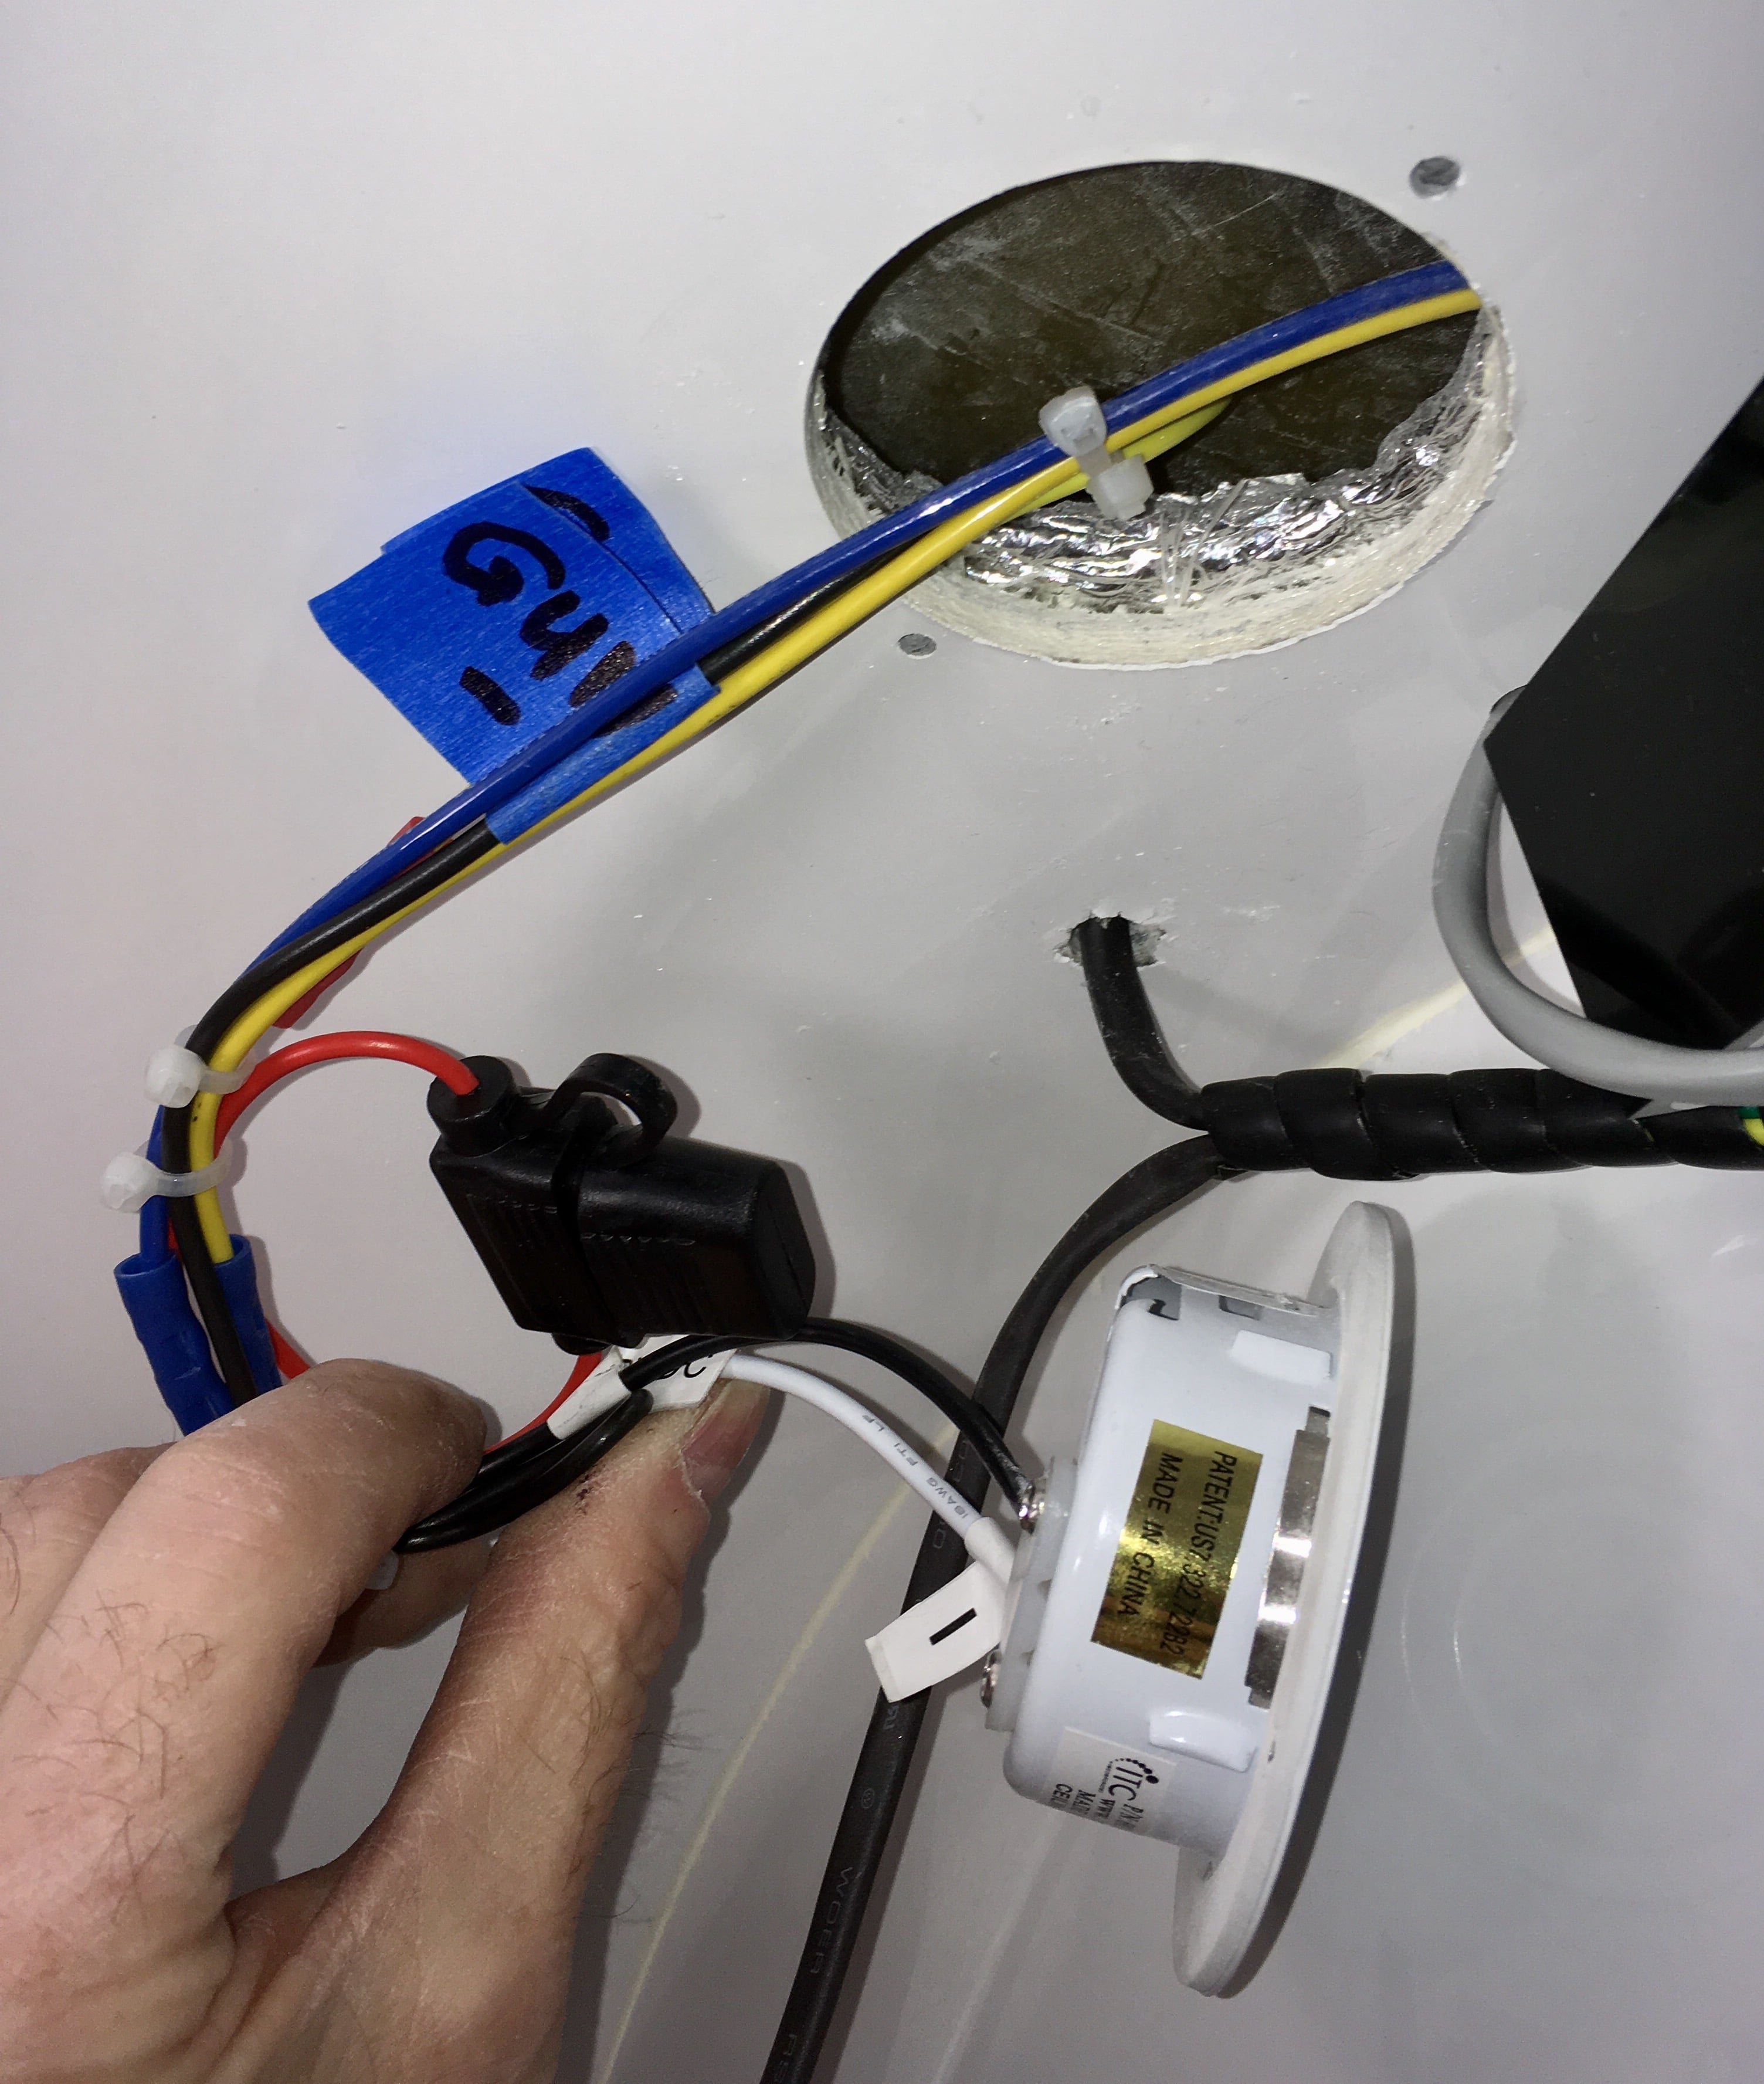
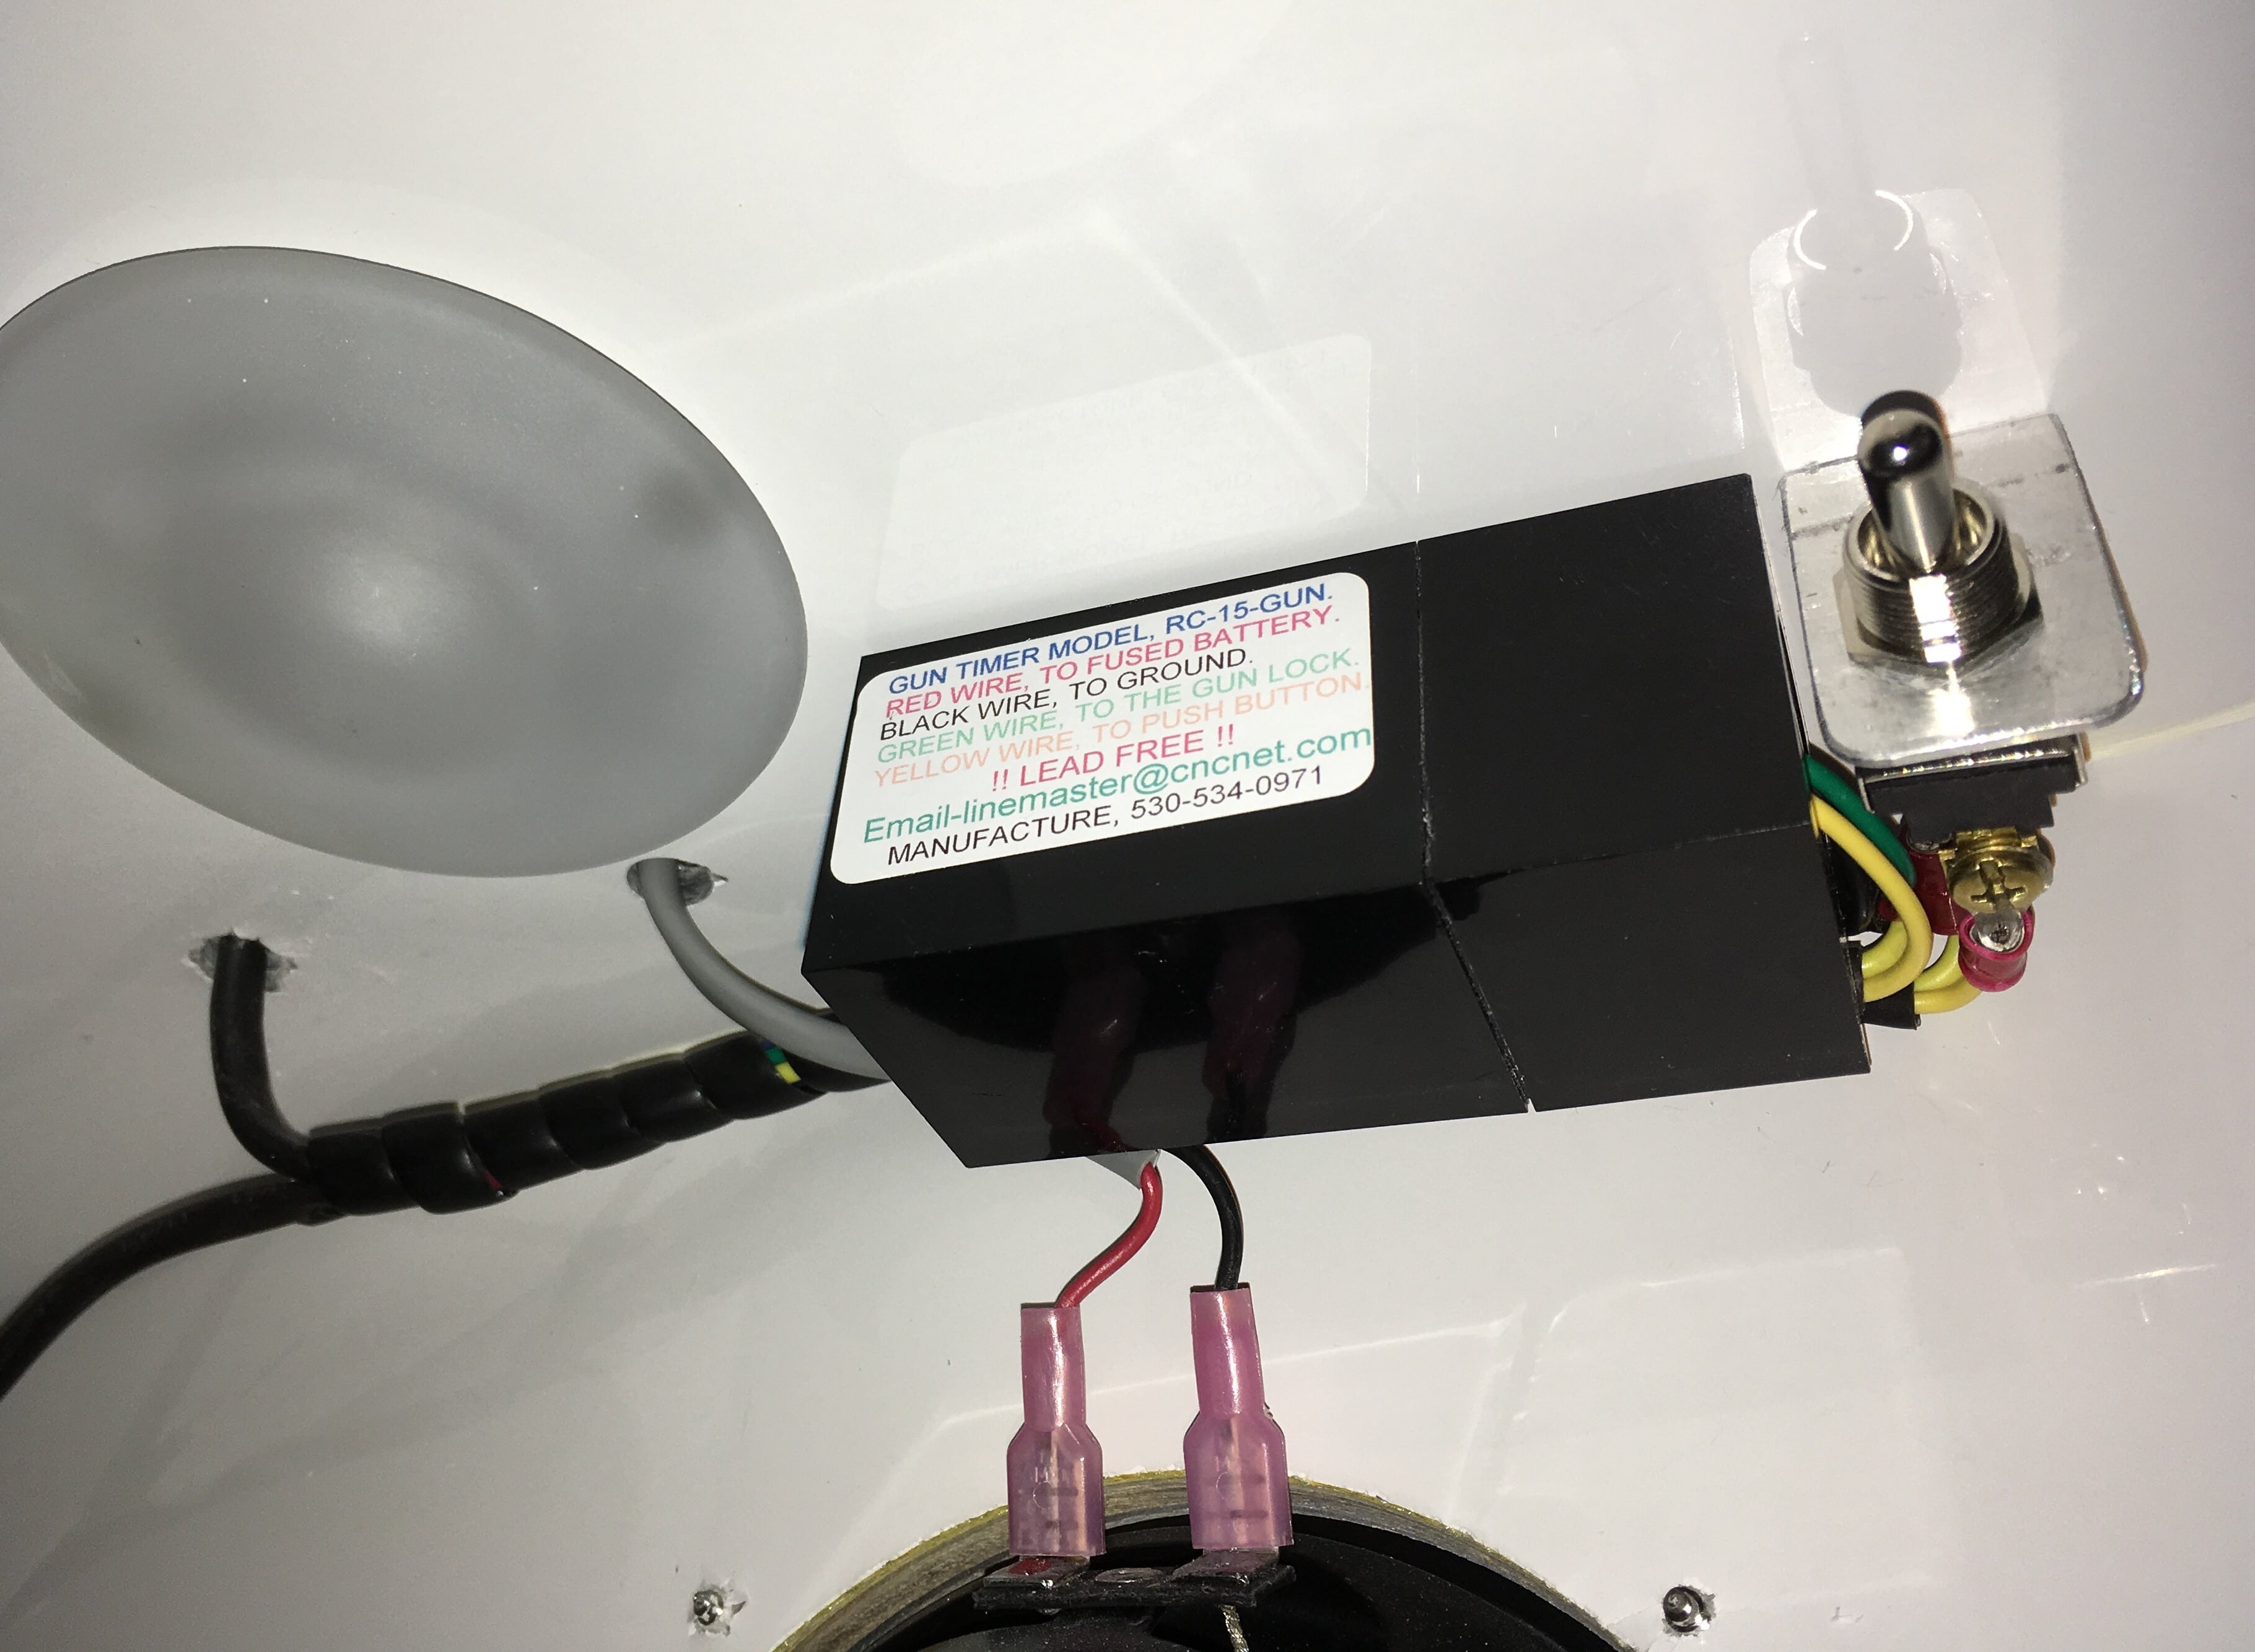
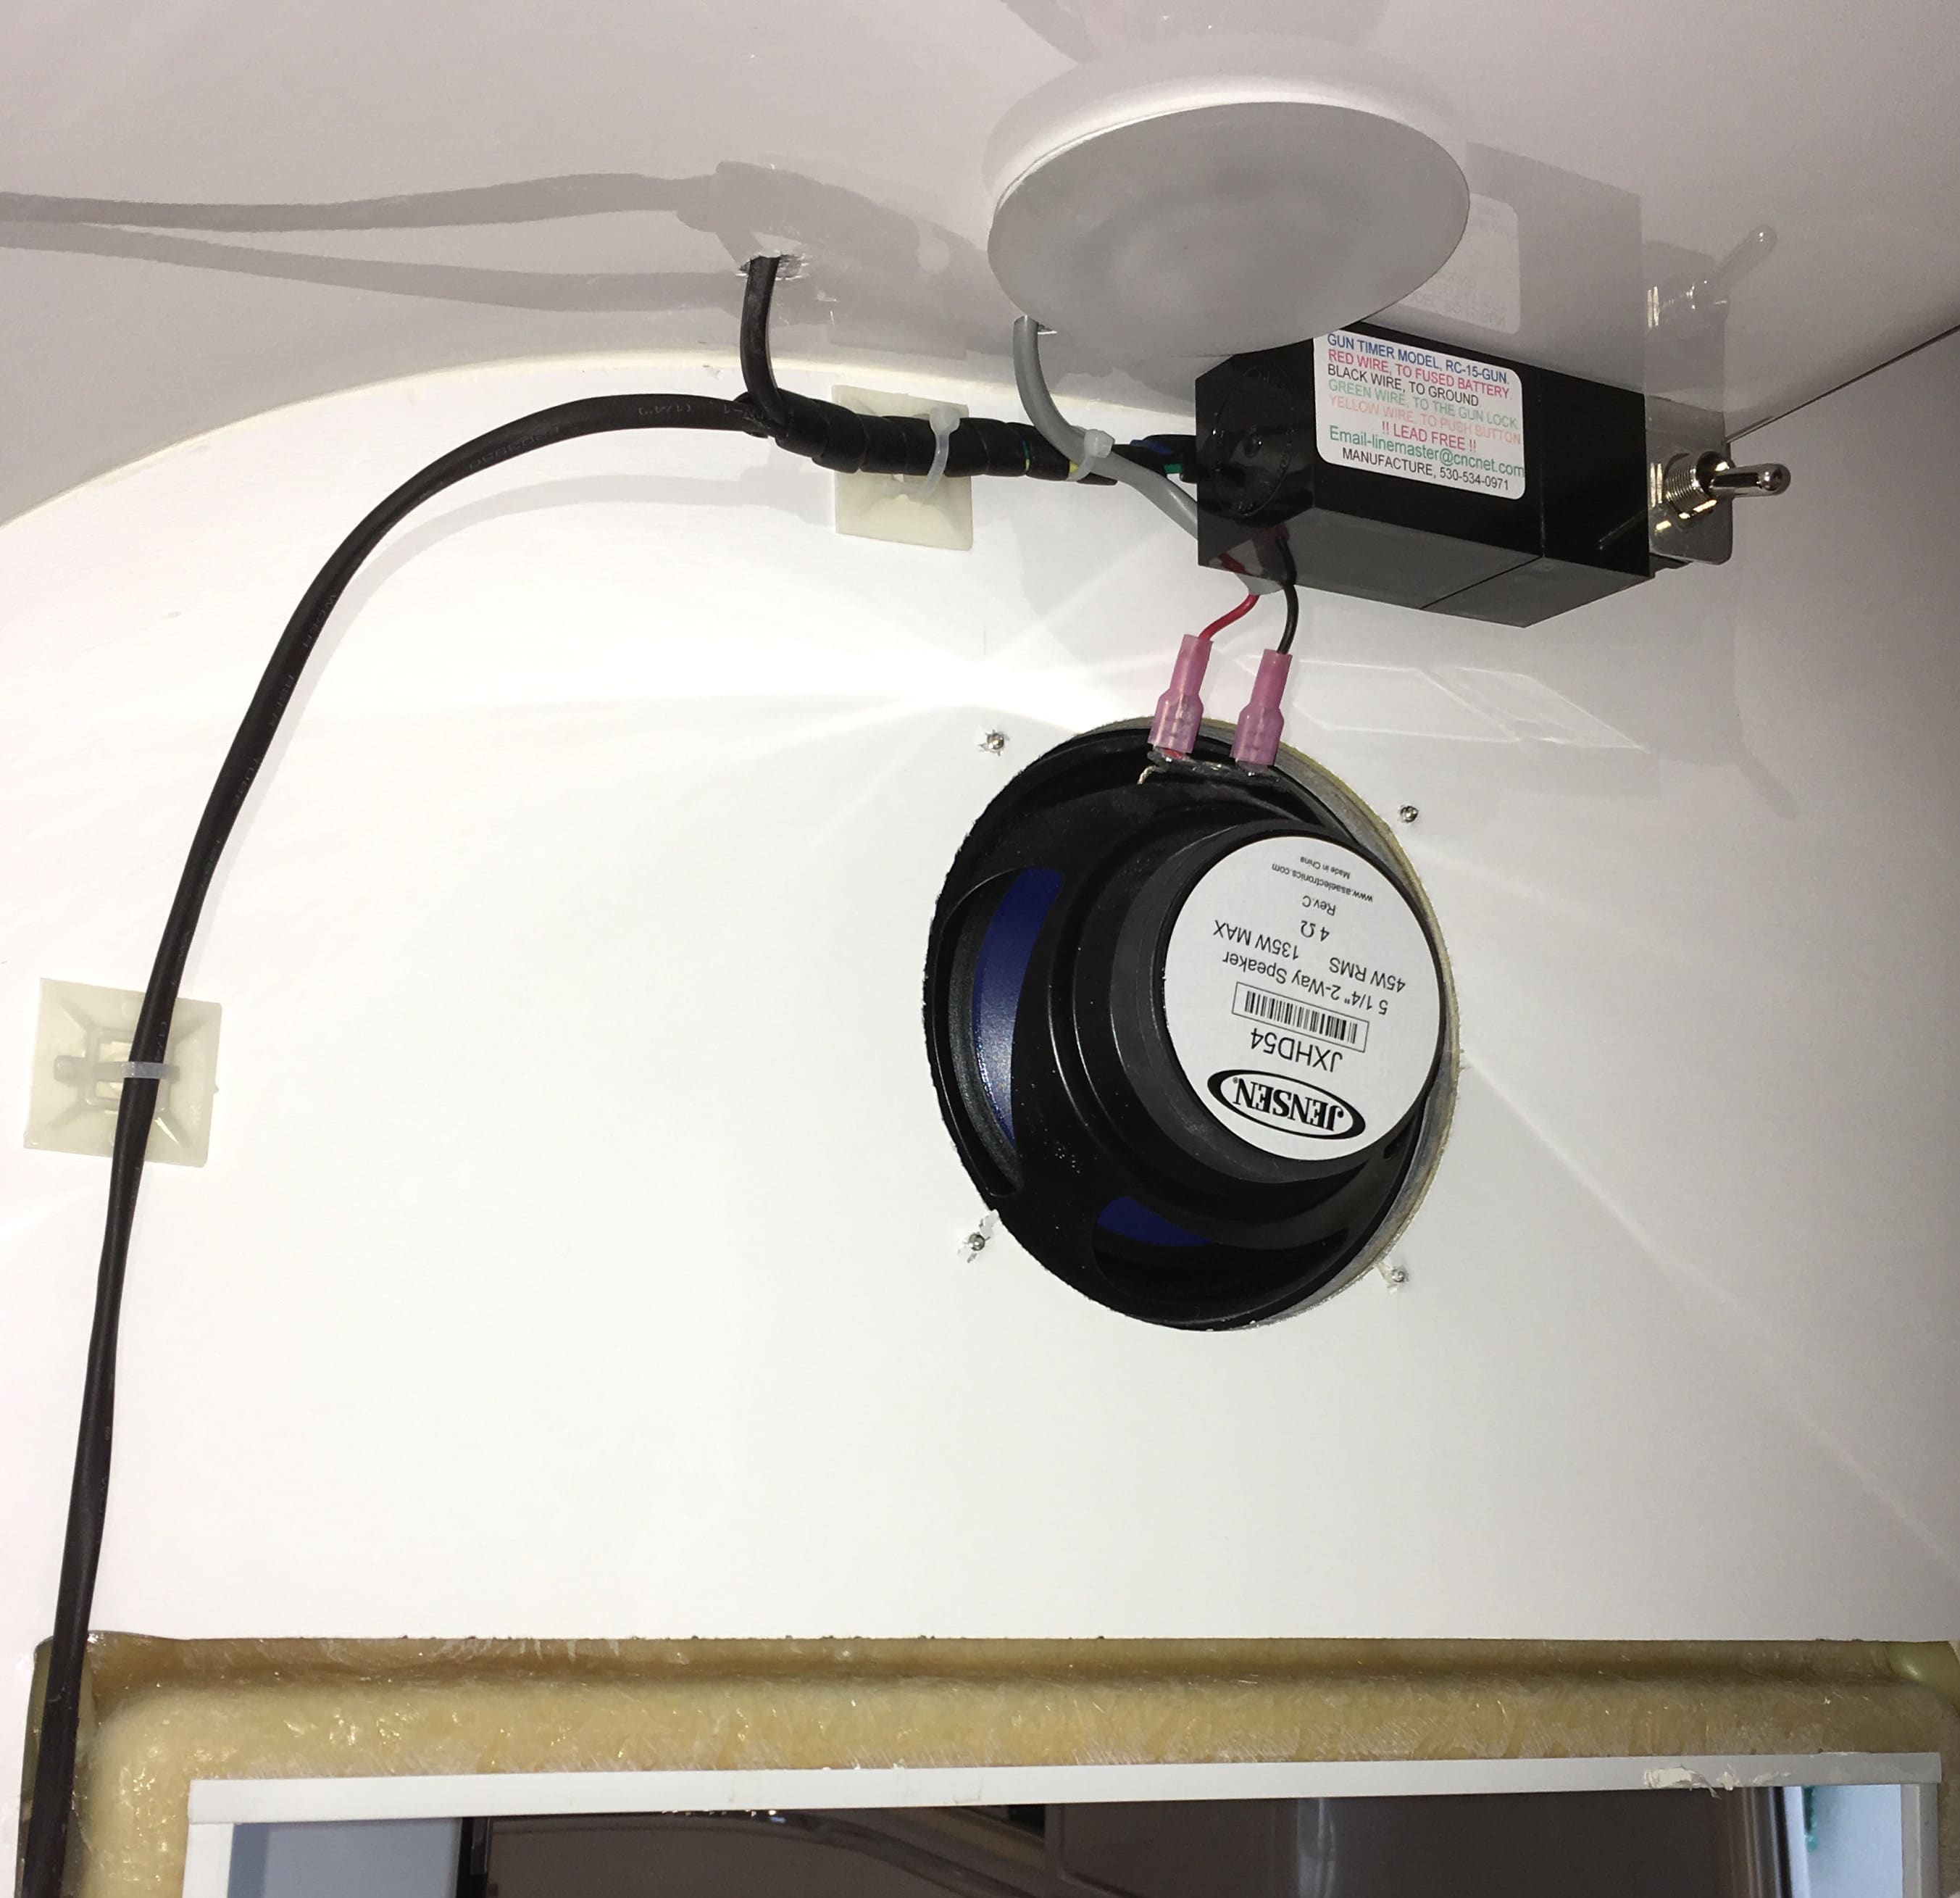
Electrical Installation: I needed 12 volts to run the circuit. I decided to use the closet LED light circuit since it was directly overhead. By switching on the closet light, using the switch near the microwave oven, the lock is "enabled" or armed. The lock is controlled by a momentary (spring loaded OFF) toggle switch. I found a sturdy and high quality switch at Ace Hardware - it is intended for cabinet door actuation (internal lighting). Cost was $10: Added to the circuit is a 10 second solid state timer. When the switch is toggled up, the timer powers the solenoid, releasing the arm. After ten seconds it automatically resets. It also has a failsafe design: if the switch fails (shorts) the timer will deactivate itself until the switch is replaced, protecting the solenoid. The timer also came from Santa Cruz. It was originally installed in my home closet. Here are all the bits hanging down from the closet light opening: The LED light, a very nice little unit! It was held on with two 1/8 inch aluminum pop rivets which I drilled out. I used small stainless screws for reassembly.: I used a 20 AWG inline fuse holder, which goes above the ceiling panel. I used a 3 amp fuse. Because the color coding was every which way, I labelled the gun wires + and - : All splices were done using regular crimp connectors, and the wires were covered either with heat shrink tubing or spiral wrap. I used 3M mounting tape to secure the timer to the ceiling. The finished installation: Closeup of the timer unit: Wiring schematic: ... http://ledguy.net/santa-cruz/pdf/Timer.pdf I ran the two shrink wrapped wires for the gun lock solenoid down inside the exposed channel of the door frame. I secured them there with dabs of silicone sealer every few inches. I added self stick nylon wire tie anchors at top, to finish it off professionally: Operation: The shotgun is a Mossberg 930 SPX (Special Purpose), with a 20 inch Cylinder bore barrel (no choke). It's very well built and reasonably affordable, and a great choice for a home or trailer defense weapon, agains humans, moose, bears or rabid coyotes. The semi-auto action reduces the brutal kick of a 12 gauge, a little ;) My bear load is Brenneke Black Magic 3 inch magnum slugs. They are hardened so that they will penetrate deeply without slowing down. There is even a picture of an angry brown bear on the box;) They are Big Medicine, but they hurt your shoulder, a lot. To secure the gun, place the butt into the saddle, maneuver the barrel and mag tube into the open arm of the lock. Squeeze the arm closed while wiggling the barrel to eliminate any play. It click click clicks and locks into place. To retrieve the gun, the closet light must be switched ON. Reach up past the stereo speaker and flip the toggle switch straight up. The timer activates the solenoid, the lock arm is freed and you can remove the gun. If you do nothing within 10 seconds, it will re-lock itself. Cool! The shotgun clears all the coat hangers by a good margin. There is enough clearance, toward the outside of the trailer, to mount a scoped rifle. There is about 8 inches of vertical adjustment in the lock, in both directions, to allow for different stock and barrel lengths. When locked, it is possible for someone to lift the butt up and out of the saddle, but it is impossible to get the barrel out of the lock assembly: the front sight prevents that. A shotgun with no front sight would require a different setup. The mount is not fully burglar proof, nor is it intended to be. It is intended to be handy and quick to access, and secure in terms of an unsupervised child or thief with minimal time to hammer and pry on the parts. With a towel or shirt draped over the muzzle and lock, it looks completely innocuous. Transport laws vary widely: some states allow you to transport a loaded, but secured, long gun, others require you to unload it and place the ammo in a separate container. Sometimes, it has to be a locked container, in a separate area. Always check local and state laws before transporting any firearm! This setup is fully legal to bring across the border into Canada, if declared ahead of time and the fee is paid, eh! This thread was a LOT of work, thanks very much for reading. John Davies Spokane WA
1 point
-
The lower step traps water when in the stowed position. When extended, that is not an issue. Both sections need a way for trapped water to drain away. Standing water is bad - it and dirt combine to form a crud that promotes corrosion, plus it just looks bad. And you don't want to dump that water onto your sneakers, correct? Drill a hole at each lower corner of each section (lower corner, when stowed!). That way water will drain regardless of the angle the Ollie is sitting. Clean up any burrs on the part that shows when the steps are down, using a countersink or larger bit. That was easy..... this is a very simple mod that anybody can do in a few minutes, and feel better afterwards. John Davies Spokane WA
1 point
-
I think it's much easier to find a slot without full hook-up. Remember your Ollie is made to boondock, dry camp, wild camp. Are you going to stay two weeks somewhere? Two months? You are young never mind about hooking up and dumping once every 10 days. I'm twenty years older than you and I don't mind it. Use the shower room and toilet at the campsite and you can go for weeks without dumping. You will have thousands of more places to camp if you can do this! Otherwise, you need 30' camper like my brother and stay six months. You might have to plan a year ahead to get a nice place in Texas to stay for six months and usually the fee is quite a bit cheaper. Just my opinion, not to upset or belittle anyone. I had to come to terms with this as everyone who chooses an Ollie does. The first thing I learned is there are more campers all the time and a limited number of spaces. Go figure!1 point
-
You won't want to hear this, but unless you can camp midweek, this is standard for highly populated states without much public land. When your only choice is developed campgrounds, you have too much competition. One reason we moved from Seattle across the state to Spokane is to get away from the weekend hoards, and to get closer to National Forests and other federal and state lands. The availability of free dispersed or low cost camping in DNR, NFS, and COE campgrounds GREATLY reduces the demand for full hookup state parks and the like. Plus the population density is orders of magnitude lower. This problem was highlighted for us when we picked up our trailer on a Monday in TN and didn't have any trouble until the weekends. You must have long term reservations for those days. There just aren't enough available spots to meet demand in a booming RV economy. Sorry. Move west, but not to the coast, problem solved. Or at least greatly reduced. John Davies Spokane WA1 point
-
Forum speed and access seems a little painful this morning... Android - Firefox browser1 point
-
When I started researching bike racks for the back of the Oliver, like Don Thompson who started this thread, I found that for many bike racks, mounting them on a towed vehicle voids the warranty. I wondered why, and I searched the internet with terms like “catastrophic bike rack failure trailer.” There are lots of examples and discussions on trailer forums. Most (all?) of these failures are on stickbuilt trailers, where they have bolted a receiver hitch onto a possibly flimsy bumper. And catastrophic failure can occur. After seeing this, I figured that the lawyers for Thule and Yakima were simply doing their jobs and voiding the warranties when the racks are on trailers. I felt that the Oliver bike rack was much stronger, and I would take my chances. After my research I decided on the Yakima Holdup bike rack that fits into a receiver hitch, and I am quite happy with it. I have the rear view camera, and I can see the rack as the car travels, and the rack and the bikes are remarkably stable. The new Oliver design for a rear bike rack that Yvonne & Doug posted pictures of looks very good; it was not available when we ordered our unit. However my reason for posting here is that for some people there is a good rationale for a standard bike rack. I am an experienced bike rider. I commute to work by bike and I did cycle touring multiple summers. I am comfortable riding on many kinds of roads. My wife, in contrast, is happiest riding on an empty road with wide shoulders; even better is a protected bike path. So for us, the campground may be on a poor road by my wife’s preferences. However, if we transfer the bike rack from the trailer to the tow vehicle, we can transport the bikes to a more desirable bike path. We camped at a BLM campground last month near Moab. The road was narrow with no shoulders. However, eight miles away there was a great bike path along the Colorado River. Some photos enclosed. There is a bridge across the Colorado River for bikes and pedestrians, and at each of the bridge piers there are wonderful sculptures of rock and steel. David
1 point
-
Yvonne & Doug, Congratulations to Crew #223 on the beautiful Ollie!!!!! Agree, the folks at Oliver go above and beyond correcting problems to making the Ollie experience very positive. Like the water falls and Ollie shots, too. We enjoy camping in western NC & eastern TN, hopefully meet y'all sometime camping. Best Regards from Crew #75! Bill and Debbie,1 point
-
John, Took some photos while working on the Ollie today: Cord plug: 15A Cord Adapter used while connected at home:1 point


-
Recent Achievements
-


")


")


")
