Leaderboard


Popular Content
Showing content with the highest reputation on 11/06/2019 in Posts
-
Not much going on at the rally today so I thought I’d unplug the trailer and do a little experiment running the AC just to see how long the batteries would last. We don’t travel much in AC weather so this is really the first time I’ve had a good chance to test the limits of our system. I started at 10am with 100% charge. AC set at 72 and we’re in full sun with no clouds. 640 watts of solar and 400 amp hours of battery storage. I’ll plug back in when the batteries hit 20%. Any guesses as to when that will be?1 point
-
Excited owners in July 2020. Been camping off and on all our lives but next summer as retirement is around the corner we hope to be camping much more often. Have thoroughly enjoyed all the forums and great information in learning about our Oliver Elite II. Not sure of our Hull # but am sure we can't wait.1 point
-
Welcome to the group! A long camping trip in a new Ollie is a wonderful way to kick off your retirement! Sherry1 point
-
SharkBite fittings are very cool but they are a VERY costly method of repair. There are times when one can be a life saver, and the ability to release the grip and pull out the pipe can be useful. But I would not trust a fitting that has been reused to not leak. I much prefer using regular crimp rings and Pex fittings. The old school copper crimp rings are a royal PITA, but the SharkBite stainless ones are wonderful, but OTH you need their ratcheting crimper to install them. To remove one, you just grab the crimped part with vise grips and twist it. The copper ones have to be cut off! You can buy the tool for the cost of a handful of push SB fittings; the regular brass PEX couplers, elbows etc are cheap. The stainless clamps are only 50 cents each. This tool will do everything from 3/8” all the way up to 1”, so it works nicely for home repairs too, like your irrigation system.. https://www.lowes.com/pd/SharkBite-3-Handle-3-8-in-to-1-in-PEX-Clamp-Tool/1000224581 As an older gentleman I have a hard time crimping the 1” rings due to hand and arm strength. Slipping a couple of pieces of hollow pipe over the handles gets the job done easily. John Davies Spokane WA
 1 point
 -
One or two of our solar panel mounting knobs were loose last November when we put our Ollie away for the winter... just 3 nights camping from factory pickup. Checked them all and put it away with sufficiently tight nobs for the winter. We've maybe put a couple of thousand miles on it so far this season, and there were 2 knobs loose again. Not sure if it was the same 2 knobs as before or not. All knobs had a lock washer installed, but they were compressed between the metal bracket and the plastic knob so not sure if they were able to fully achieve the intended effect. I added a stainless flat washer to each knob, and implemented John Davies' locking solution described above (thanks, John!). Easy, cheap and effective. On a side note pertaining to tilting the solar panels to facilitate water runoff, that does not appear to be possible on our 2018 Elite I as the box holding the connectors is located right underneath the panel and is so tall that there is insufficient clearance to drop down either side of the panel a notch in the bracket. However, when the trailer is level (as determined by the bubble on the tongue jack/stabilizer) there is a slight forward tilt to the solar panels due to a slight slope in the top ridge of the roofline. When level and at rest, water flows forward and off of the panel's top surface.1 point
-
Mingy, Now let's not get too snarky here. Those of us with Ollies are fortunate not to have a unit with all the problems inherent in many stick-built units. (or hail magnets) "Stickies" do come in at a price point some can just afford to help them get their family out making smores around a campfire, or dipping a fishing pole into the water. It's about getting out there, after all. While they will not have the stamina of an Ollie. They do serve a purpose during their comparatively brief lives. Pete1 point
-
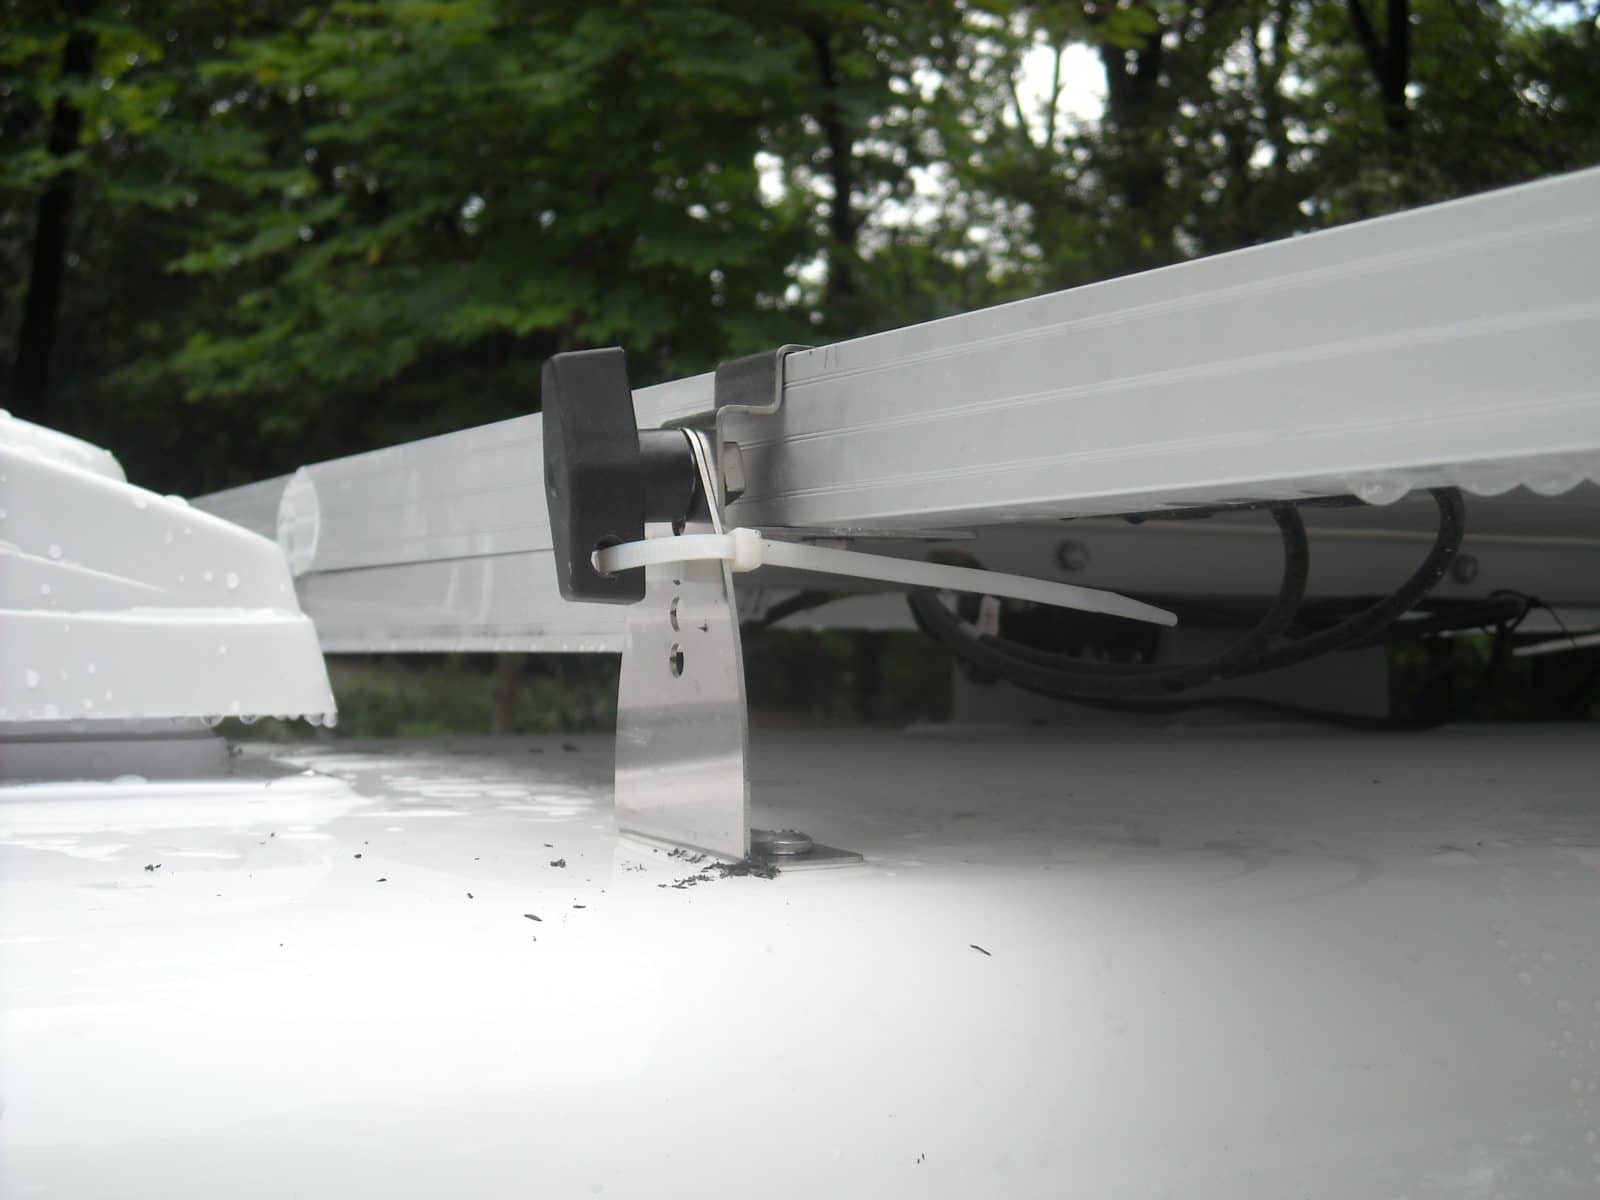
Good Catch John, Most of ours were slightly loose to loose. I thought about using a lock nut behind the attachment flange but there is no room for a wrench in that space. So I used the nylon safeties after drilling the handles. I drilled one 1/4" hole thru the flat end and fed the safeties thru the bracket , then thru the handle hole and secured it. I was able to tighten each of the 4 knobs to the vertical orientation a seen. It should keep it from rotating, but I will continue to check them. While I was up there, I noticed that, at the junction box, there is a spare input receiver with a cap on it. Can this be used for an "add on"? Cheers, Terry
1 point
-
Since they can't tilt I wonder why Oliver doesn't just use a regular bolt and lock nuts.1 point


-
Recent Achievements
-


")


")


