choied
-
Posts
27 -
Joined
-
Last visited
Everything posted by choied
-
Welcome. I would like to bring out my shine again, too!!
-
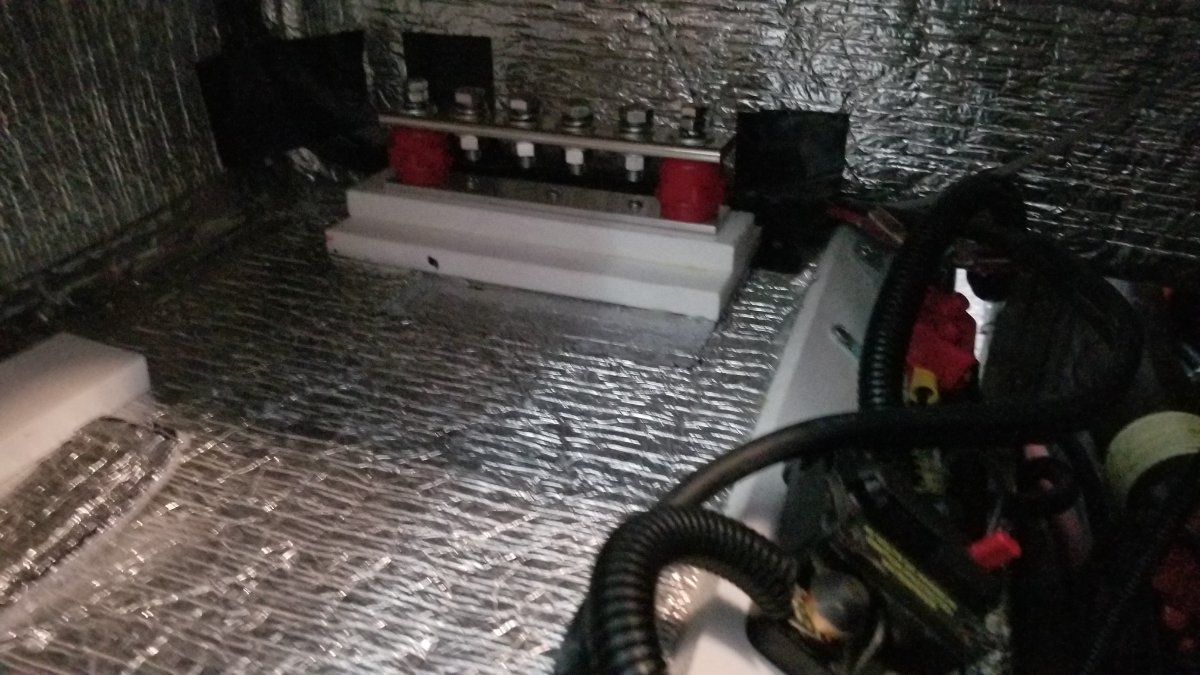
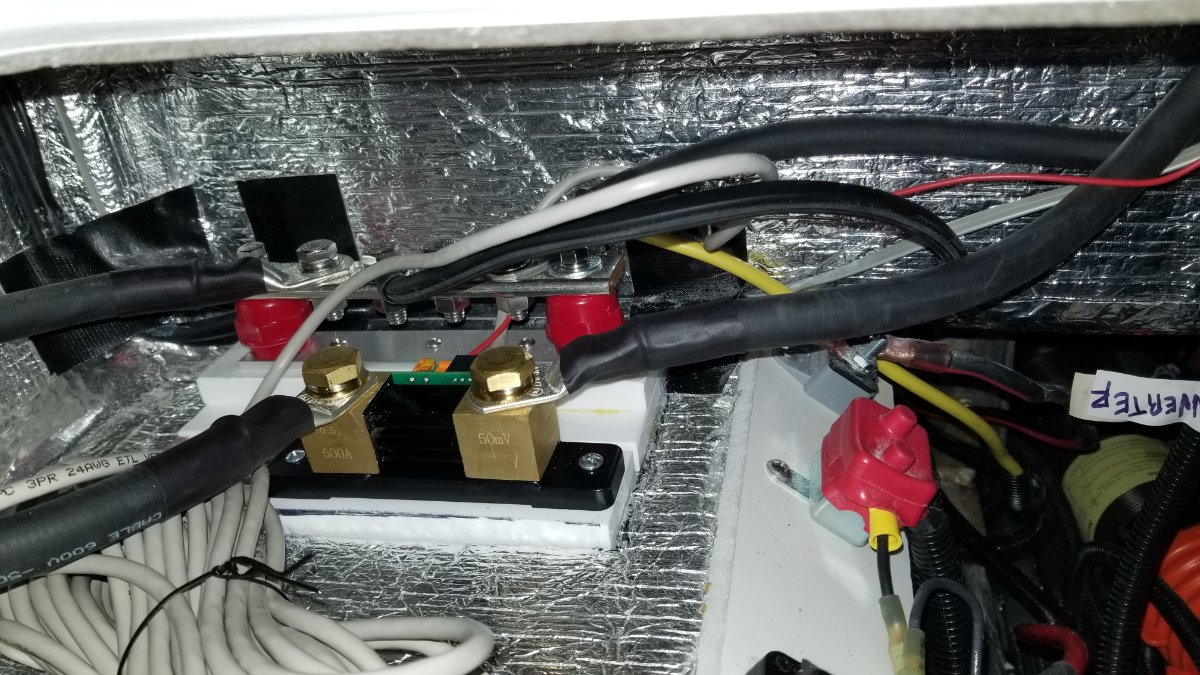
Finally finished this project. Currently, I have two batteries and I have space for four total, two main battery cables & one small gauge wire for the shunt between the battery storage area and the inside areas. On the inside, I decided on two separate busbars (one for the red and another for the black). The red-side busbar ended up left of the pantry and the black-side busbar on the right of the pantry. Had to redo some cables to custom lengths. The only thing that remains "unfinished" so to speak is the battery monitoring system. While the unit is connected, I failed to find and snake the cable from the bottom to the top as I was unable to find the hole and do this. A job for another day I guess...

-
omg!!!
-
Wiring Quality New Models - Feedback Please
choied replied to connor77's topic in Ollie Modifications
Just got a chance to look at this post. The 400s are definitely cleaner and neater than the 200s...oof. -
In addition to the items above, I am figuring out what I believe others have already figured out 🤪- which is I need to change/upgrade my Progressive Dynamics Converter. At this time, Progressive Dynamics is recommending that I go with their newest version, the PD4045CSV, which has a switch to allow users to charge Lithium or LeadAcid batteries. Also, the PD representative pointed out that I would need to upgrade any fuses related to charging the batteries to 60AMP.
-
sweet geezus...nice!
-
Thanks for the picture - Mike & Carol. Very nice and clean! Was wondering if you used a distributor to consolidate the other cables/wiring, i.e., how did you handle the other connections? I cannot see any other lines. And to confirm, the battery connections to and from each other are with 1/0 wiring? Looks to be less than 4/0 gauge on the connections to the cutoff switch as well, correct? Then 4/0 wiring for the mains?
-
Upgrade to lithium batteries blows circuit boards....?
choied replied to John E Davies's topic in Ollie Modifications
I am currently beginning the process of switching over to LI batteries from the AGMs and actually ended up asking the BattleBorn rep about this issue. He told me that changing out batteries and reprogramming the Solar and Converter to the LI setting should not impact any of the appliances if the RV was wired properly. I guess I will find out in the not so distant future..lol.. -
Hey folks, I am new to all things solar/battery-related. So please forgive me for any mistakes/errors. I welcome and would very much appreciate any comments/suggestions. I am about to replace my AGM batteries with Lithium Ion (LI) equivalents, specifically Battleborn (100 Ah 12V GC2 LiFePO4 Deep Cycle Battery). These LI batteries have the same/similar footprint as the 6V AGMs I currently have, so the battery layout on the tray will be much the same. In my limited research, there are at least two possible routes to go on the number of batteries and their respective layouts. One is to go with two or three 12V batteries lined up in a single row (using three batteries would take up the entire depth of the battery tray, leaving unused space along the sides of the tray). A second option is to go with four 12V batteries that have the same/similar dimensions as the 6V AGMs. [Note: The battery tray measured approximately 15" wide by 21-1/2".] deep. The second option uses up the entire battery tray. I am curious as to what choices others have made with regards to the number of batteries and their respective layouts. How have others decided to connect the batteries and with what size/gauge wiring. I had a chance to take a survey read of Minnesota Oli's LI project (wow!!), but currently I am not considering using a bar to interconnect the batteries. I am considering connecting the batteries together using 4/0 cables - although I wonder if I using 1/0 cables to interconnect the batteries would be sufficient. Using a smaller diameter cable/wire would certainly make it cheaper to replace in the future and easier to work with as well. Is 4/0 cable really necessary? I figured I could add a true battery cut-off switch at this point to simply enable myself to easily cutoff the batteries from all downstream loads, but I am still considering whether this is truly necessary. Seems to me that any parasitic draws may not be material enough to warrant the extra work. I will take a look at mounting options and make a call on that. Should I add-on a Victron battery monitor? I guess it could be fun. Some more buttons to push and a display to look at. Again not sure on this one as constant monitoring may not be necessary. Has anyone used a distributor? I am considering using a distributor to centralize cables/wires. The distributor would handle all cables/wires, e.g., the mains connecting to the 12V system, the solar panels and the inverter. I was told that the cables related to the battery temperature sensor would no longer be necessary. The only cables that would be present in the battery closet would be the cables interconnecting the batteries themselves along with the one entry and one exit cables.
-
After getting the materials to do this job more than a year ago, I finally finished it this past month. Thanks John.
-
Seems like many of you have gone the Lithium route. My 1st two AGMs petered out this past month, so I am glad to read here that many of you successfully retrofitted. I will likely follow the trail blazed here and do the same.
-
Upgrade to lithium batteries blows circuit boards....?
choied replied to John E Davies's topic in Ollie Modifications
Oh boy, I am about to upgrade my AGMs to lithium batteries. Do I need to get regulators for all the appliances and splice them in? For some reason I thought leaving the Converter and Solar Charger at the AGM setting would be okay as well vs. changing them to Lithium settings. -
Nice recommendation, will gather my stuff and do the same...I have lots of PEX tubing and fittings, etc. collecting dust. I wonder why/how your elbow failed though? Was it a cracked elbow, or a failed crimp, i.e., leaking at the connection point? Not sure, if Oliver used "crimps" or "clamps" back in the day, but my trailer used the plastic-like PEX ring. Your photos in the other post made me believe that "crimps" were used. Using "crimps" requires a check after the crimping to ensure a proper install has been done. To me the PEX ring is the way to go, so much simpler to use/install.
-
Ken_Judy, My experience with PEX tubing is that the tube and white tubing PEX ring are simply installed over the fitting by expanding them both and then sliding them over the fitting. The only practical reasons for failure would relate to a bad install (i.e., insufficient overlap of the tubing/ring over the fitting) and/or too much pressure in the line. The tube is designed to be able to turn/spin on the fitting without losing its seal. Now, if the movement is more akin to a wobble or slide, then I would be worried. The only way to remove the fitting is to carefully slice into the PEX ring and get it off of the tubing. You can get a new ring and expander tool to reinstall the same tubing over the fitting if you see either of the two issues above. However, in a repair scenario I would use a new section of tubing, a coupling and a few new PEX rings so that your new connections are rock solid. PEX is very easy to work with. I am not sure what you are referring to when you write "o ring", I've never seen an o-ring or used one on any of the PEX work I have done. There are barbs on the fitting though, so maybe you are seeing one of those through the translucent piping??
-
Ken_Judy, Are they leaking? The lines are allowed to spin after installation; the white connectors and tubing are simply heated and expanded then allowed to tighten over and onto the fitting itself.
-
preventing water lines / tanks from freezing while in transit
choied replied to taylor.coyote's topic in General Discussion
I wonder if you could simply get a thermostat plug, e.g., HEATIT ET-21 Freeze Thermostatically Controlled Outlet On at 38F /Off at 50F, plug it into your inverter, and then plug in a heat cable and wrap it around your pipes with some pipe insulation (used often to insulate hot water pipes)...e.g., a 30 ft. Automatic Electric Heat Cable Kit. It should conserve on the use of power, and you could check on it periodically. The cable only takes 7 watts per foot; so not a huge power requirement to run it. -
I have carried mine in the truck bed for years. It takes up a fair amount of space as I have a 42 gallon tote, so I have recently considered purchasing a rooftop system so I can strap it on a roof top carrier going forward. The tote is not light though and its size makes it fairly unwieldy....I may need to improvise adding a handle or two to it to decrease the chance of dropping it and cracking the tote.
-
Sherry, I have a 2017 - so the new lights on my trailer. But bugs are clearly an issue when they are around, so transparent orange tape will be the way I go for now. Readily available on amazon and cost effective.
-
I am thinking about transparent orange/yellow tape might be a good option here as well, if a color change is all that is important. Seems like a quick solution. See photo below.
-
On my 2017 LE2, I had serious condensation and some window seals leaking apparently on my last trip to the Northwest. When I got home I got to investigating by removing the window shades and the inner clamp ring. The window shades can be removed by taking a flat-head screwdriver and getting between the shade and the window next to clamp and giving the screwdriver a turn. This will pop-off the shade which is held on my tension at six spots (3 on top and 3 on bottom). Removing the clamp ring can be done by unscrewing some screws from around the window on the inside of the trailer. After removing these two items - you should be able to see some of if not all of the insides of the window frame .... depending on how they cut and/or shimmed the window into the fiberglass. I had my daughter inside with a flashlight and I was outside hosing the window under the light fixture. After a few starts and stops after a few "hey dad, there is water coming in" ... we discovered a small imperfection in the sealant applied to the window frame on the top of the unit......otherwise known as the "leak"....lol. You could see the water on perfectly sealed spots simply traveling down the body of the trailer, but in this one spot... the water appeared to be entering the trailer. The window is mainly sealed using the sealant that you can see from the outside .... looks like white silicone. On the inside of the window frame (once you have taken it off) you will see foam tape. This is not a sealant and will not prevent water from entering the unit. So I will now be removing my windows and sealing them up with butyl tape. If you have never seen or used butyl ... you should know that using it is a "no brainer". Stuff should last a very very very very long time and provide users with peace of mind. I like my mind at peace. On the light fixtures, I simply removed the screws and used plumber's putty. Stuffed into the screw holes and spread some around the top of the rubber gasket .... like an umbrella. This was a quick fix, but I think it will hold until I have to replace the lights down the road.
-
So sad to read this just now. Rest in peace. All our best to his family and friends.
-
I jacked up and down, every which way, but there was one fitting that simply wouldn't accept any grease. In a closer look at the fitting it looked like the opening was stuck. Need to replace or repair this fitting. What a waste of good grease. LOL.
-
Hi, did you replace the fitting and if so, what was the size of the zerk fitting on the Dexter suspension? Have one bad one myself so I was looking to replace it, so I could get some grease in it...
-
Outdoor propane grill and griddle recommendations
choied replied to hobo's topic in General Discussion
I purchased the following on Amazon: Camco Propane Brass 4 Port Tee- Comes with 5ft and 12ft Hoses, Allows for Connection Between Auxiliary Propane Cylinder and Propane Appliances (59123) -
Outdoor propane grill and griddle recommendations
choied replied to hobo's topic in General Discussion
Thanks for that. I ended up purchasing a 4-way valve, and hooked it up as you said...upstream on one side of the regulator. The 4-way comes with one 1-lb male connection, which I can hook up a hose to and simply attach it to the regulator on my Camp Chef Everest stove. Should work fine, and I will update this comment if it does not. Definitely saves some space on not having to bring so many green or larger propane bottles/tanks. Anyhow, thanks again!!