

mossemi
-
Posts
1,615 -
Joined
-
Last visited
-
Days Won
39
Posts posted by mossemi
-
-
Looks like the guard dog has the best seat in the house!
Mossey
-
 1
1
-
 2
2
-
-
The solar panel mounting points would be more important to me than the pre-wiring. I wonder if that is still being installed during a non solar build.
Mossey
-
3
-
-
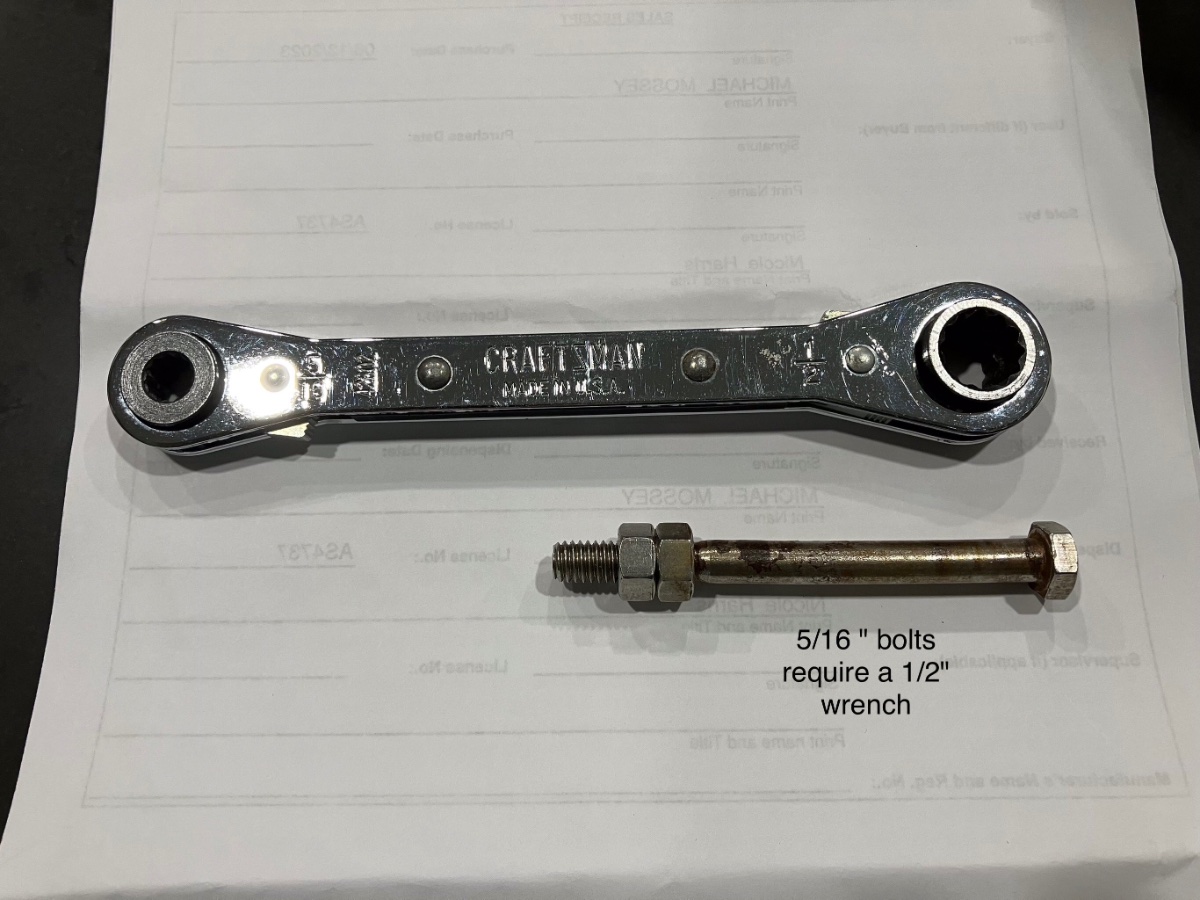
15 minutes ago, topgun2 said:
Do you have a !/2 inch Allen wrench handy
This is what I use, since I don’t own a 1/2" Allen wrench!
Mossey

-
4
-
-
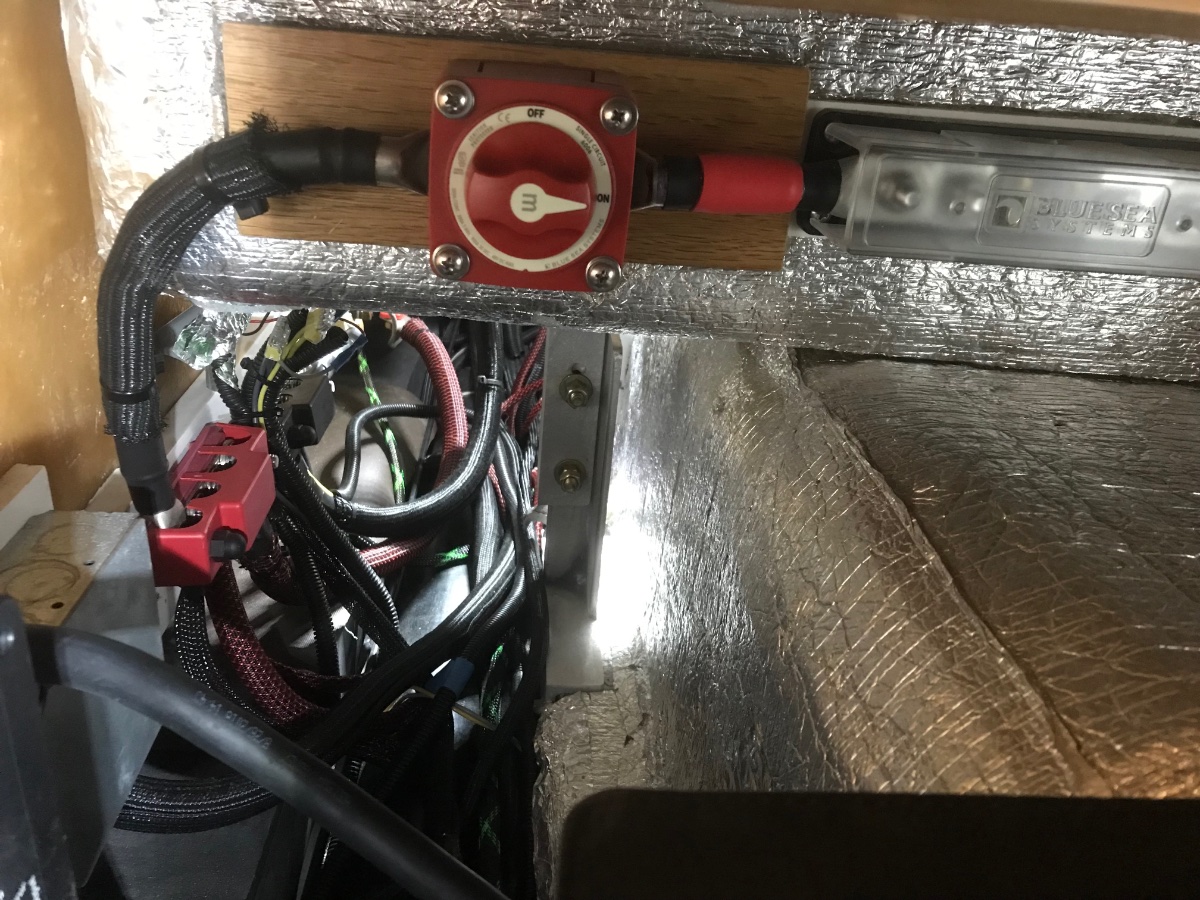
Mine was powered by a positive and negative wire from the Ollie and connected to the positive and negative wire leads from the CO/Propane detector with crimped butt connectors. The wires and butt connectors are probably covered by wire loom and should be visible under the aft dinette seat, near the detector mounting location. After disconnecting the batteries via a cutoff switch or manually removing the negative cable, while working on 1 wire at a time, cut the wire on the Ollie side, the strip the wire insulation and crimp on a new butt connector. Then repeat for the second wire. Now you can remove the bad CO/Propane detector and install the new one. Then crimp the new detector wires to the Ollie wires.
I’m not sure, but I think the positive wire has a fuse under the street side bed, near the stabilizer jack fuses. And don’t forget your solar system is also supplying power and if you can, cover the panels with a moving blanket.
If you have any further questions, let us know,
Mossey
-
1
-
-
Very nice and creative! And your documentation of the project should be very helpful to others. But I’m more interested in what may be a bike rack mounted on top of the sewer hose storage area. Can you elaborate on that project if it is indeed a bike rack mount.
Mossey
-
2
-
-
The giveaways for me were the printing on the glass in the bath window and the metal window gutter that is built into the rear window frame. And Kansa mentioned working on the rear window sealant.
But, you made me look at the rear window picture again and it appears to be the right side of the window frame. The caulk that seals the frame to the fiberglass is on the right or outside of the frame. And the deteriorating caulk is on the inside or glass side of the frame and there shouldn’t be any caulk in that area because that window is the fire escape and opens to the outside.
Now I find myself in my usual state of confusion. So maybe Kansa can provide some additional pictures that show the complete window and we can also see the cockeyed view.
Mossemi
-
 1
1
-
-
Your first picture is of the bathroom window and the black seal or gasket is installed by Lippert, the window manufacturer. The picture of the rear window shows a sealant that Oliver uses to seal the window frame to the Oliver fiberglass exterior. Both of these pictures indicate failures in different components used in the manufacturing of an Oliver Travel Trailer. I think your trip to Hohenwald is going to solve both of these issues to your satisfaction and may prevent future failures for you and other owners.
I don’t think the bath window is a major concern, but if it does leak, adding some butyl tape would stick to the existing gasket, frame and glass. It will be easier to remove than a silicone product. The rear window does need attention to prevent water intrusion into the basement area and the interior of you Ollie.Document any and all work you do while cleaning up the the caulking around the rear window with notes and pictures and provide that information to the Oliver service department during your upcoming appointment.
When I look around our house, I see the same or similar products used in the construction and installation of our windows and sometimes they need maintenance, in our case, it’s to keep the air conditioning in as well as water out.
Good luck and reach out if you need additional information,
Mossey
-
1
-
-
8 hours ago, Geronimo John said:
OWNERS WITH HONDA EU 2000i generators: Will your pull the Dometic Penguin A/C?
My EU2000i which was purchased new 2004 runs my 2017 Dometic A/C with a Micro-Air EasyStart.
Mossey
-
2
-
-
Under the aft dinette seat.
Mossey
-
4
-
-
5 hours ago, ScubaRx said:
Why not use a SPDT-center off switch?
You are correct! And I have corrected my typo. The final solution will depend on the existing wiring.
Mossey
-
2
-
-
I am researching the OTT bike carrier / 1UP SD, double tray combination. There has been a lot of discussion concerning the weight limit of the OTT option and you provided a picture of your rack / receiver weight limit sticker which states that the limit is 150 lbs. But I haven’t read anything about the other limiting factor on that sticker concerning the length of accessories attached to the receiver which is 24” in length. Would you provide a front to back measurement of your 1UP rack mounted in position to carry 2 bikes, verifying it also meets the 24" limitation?
Thanks in advance,
Mossey
-
1
-
-
16 hours ago, rideandfly said:
Our 2015 LE2 has two conductors per switch per porch light. Don’t believe Oliver had a standard LE2 wiring harness until later, after a discussion with the service department a few years ago.
That’s exactly the way our 2017 LE2 was originally wired, except both female spade connectors on both switches were insulated.
Mossey
-
2
-
-
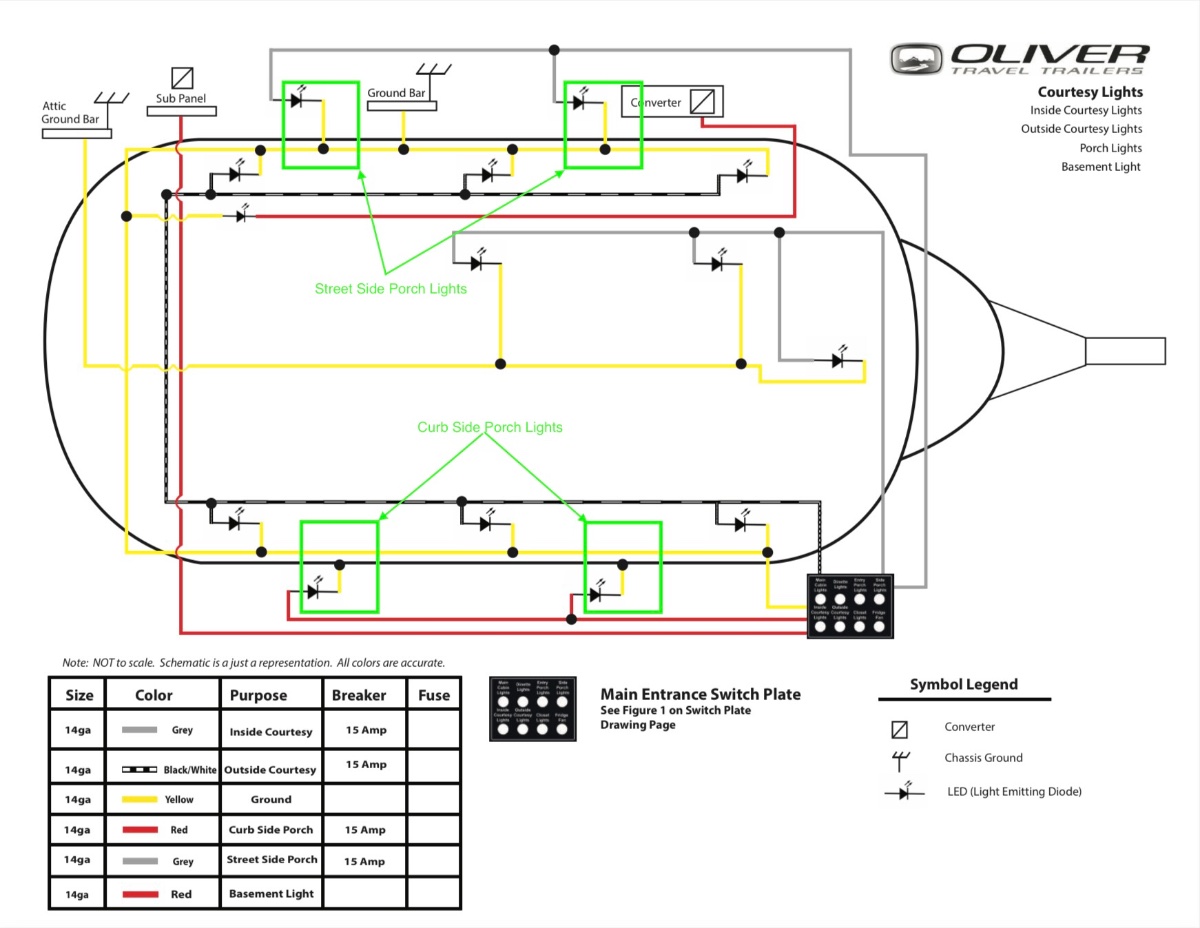
I will try to explain my thinking on this porch light issue while using my 2017 LE2 wiring diagram as an example.
Both the curb and street side porch lights are powered by a positive 12V power or B+ wire beginning at the attic Sub Panel. The red B+ wire crosses from the SS to the CS of the of the Ollie in the attic, then it is routed through the upper cabinets to the main switch panel in the entryway where it splits and powers several different circuits. One of those circuits is routed to and powers the CS porch light switch and another is routed to and powers the SS porch light switch. This results in a separate red B+ wire connecting to the input side of each porch light switch. The output side of the CS porch light switch is also red and connects to the CS porch light fixtures. The output side of the SS porch light switch is grey and connects to the SS porch light fixtures. There is also a yellow B- or ground wire connected to each porch light fixture.I am still looking for porch light switch information from someone that has a single rocker switch turning on the porch lights on both sides of the Ollie.Mossey-
3
-
-
A point of clarification for my picture above that shows the side porch light switch pushed out of the main panel name plate. That picture does not show the factory switch or wiring because I had previously changed my porch light switches from SPST TO SPDT and the light fixtures to fixtures containing both Amber and White colored lights in one fixture. I can turn on Amber lights by pushing the top of the switch in or turn on white lights by pushing in on the bottom of the switch. The lights are off when the switch is in the neutral position. This modification required running a a second B+ wire from both new SPDT switches to the 2 new light fixtures on both sides of the OLLIE.
Mossey
-
2
-
-
On 6/7/2023 at 9:54 PM, Steph and Dud B said:
Which gives me an idea: maybe you could swap some wires around so one of those switches is the left porch and left belly and the other switch is the right porch and right belly?
That seems like a reasonable and simple solution if both sides are wired in parallel.
Mossey
-
2
-
-
I haven’t found a wiring diagram for 2020 and newer LE2's. Are there any volunteers that would be willing to do some exploratory sleuthing. I would like to see a picture or diagram of the porch light switch wiring so we can determine if the lights are wired in series or parallel. You can gain access to the switch wiring by removing the round inspection hatch cover located is in the upper storage cabinet above the microwave. There are a lot of wires behind that cover and it’s hard to determine what’s what visually. The switches are a friction fit in the switch panel, so if I am going to work on a specific switch I usually just push that switch out so the switch is hanging by the wires in the entryway. The switch wiring is usually 12V positive and are of varying colors. The 12V negative wires are typically yellow. The pictures below or for reference only and are some what specific to my Ollie only.
Mossey
-
5
-
-
24 minutes ago, Bill and Nancy said:
We are at the Oliver rally in ME and we found out that the older Oliver’s had two switches for the porch lights. On for the street side and one for the curbside lights. The newer Oliver’s not sure on the 2023s have only one switch for both sides. It is annoying not only to us but it’s a common complaint of most people that you can’t shut off the street side porch lights. When in a camp ground most of the time all they are good for is to blind your neighbor.
So you can turn the porch lights on or off on both the curb and street side, but you can’t turn on one side or the other individually. Now we have to figure out how turn the lights on either side or both sides together. I’ll see if I can find a wiring diagram for a 2022 LE2 and work on a plan. Off the top of my head I would say that a SPDT switch would be a simple solution if you would be satisfied with the ability to operate one side at a time.
Mossey
-
 1
1
-
2
-
-
On 6/3/2023 at 10:38 AM, Bill and Nancy said:
We have a 2022 and it has a pump switch under the sink and use it all the time. Now if we could only turn off the curb side out door lighting it would be great.
Can you explain the problem with the outdoor lights and provide some details about you switches? By your statement, I take it the street side lights function differently or correctly. I’m sure someone on the forum has some ideas that might help.
Mossey
-
2
-
-
5 minutes ago, Galway Girl said:
Just fyi.. @Galway Girl *Craig & Rose Short* weren't at the rally.
Maybe you meant Duke and Chris who referred you maybe with a different screen name.
Craig & Rose
Hull 505 - Galway GirlDuke & Chris's forum name is ShallowGal! They are huge fans of the 3qt. Instant Pot.
Mossey
-
1
-
-
This is the rear view camera on hull 193:
Mossey
-
1
-
-
We got home from our 2023 OTTO rally trip yesterday and have a couple of days of Ollie cleanup scheduled. It was a little rainy at the rally, but we had very good time meeting some new owners and reconnecting with old ones. Now on to the business at hand!
ScubaRx and I would like to apologize to all of you that responded to the dump valve maintenance discussion we had planned for the rally. As some of you know, Steve was under the weather and cut his rally stay a couple of days short. He is on the mend and getting better. This discussion is something we will try to complete at a future rally.
Thank you all,
Mossey
-
4
-
 1
1
-
-
-
Well, it would have been a good time to talk about Ollie’s especially since you would be picking up soon after.Mossey
-
1
-
-
11 minutes ago, rich.dev said:
Noooo please let us all know how you would fix it! 😜
I assume you will be at the OTTO Rally with a pickup date a couple days after the rally ends, so I’ll show you then. 😎
Whoops! SteveCr just let the cat out of the bag.
Mossey


Need to replace the slider in the curbside window
in Mechanical & Technical Tips
Posted
I certainly agree with your assessment! It is cock eyed. Hopefully the service department will get it sorted out for you.
Mossey