Frank C
-
Posts
783 -
Joined
-
Last visited
-
Days Won
20
Everything posted by Frank C
-
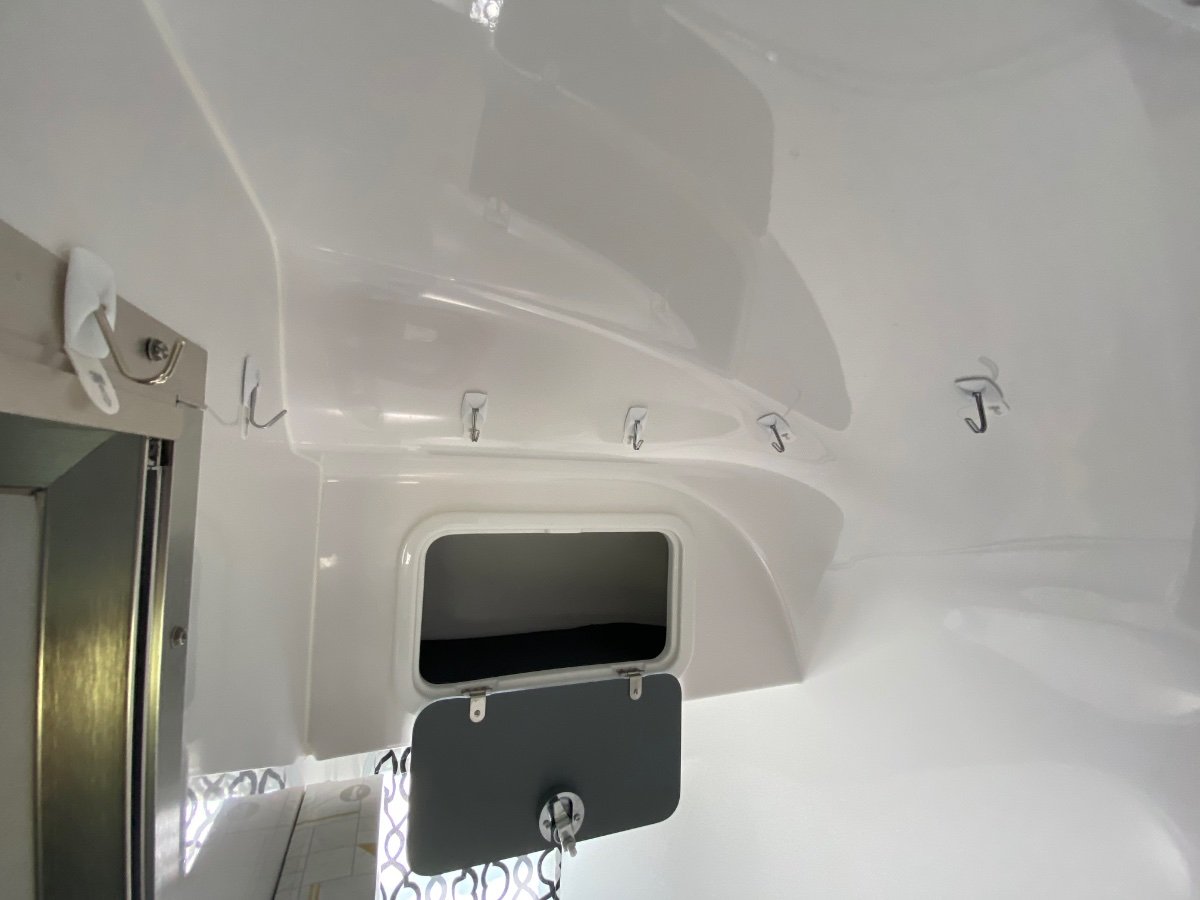
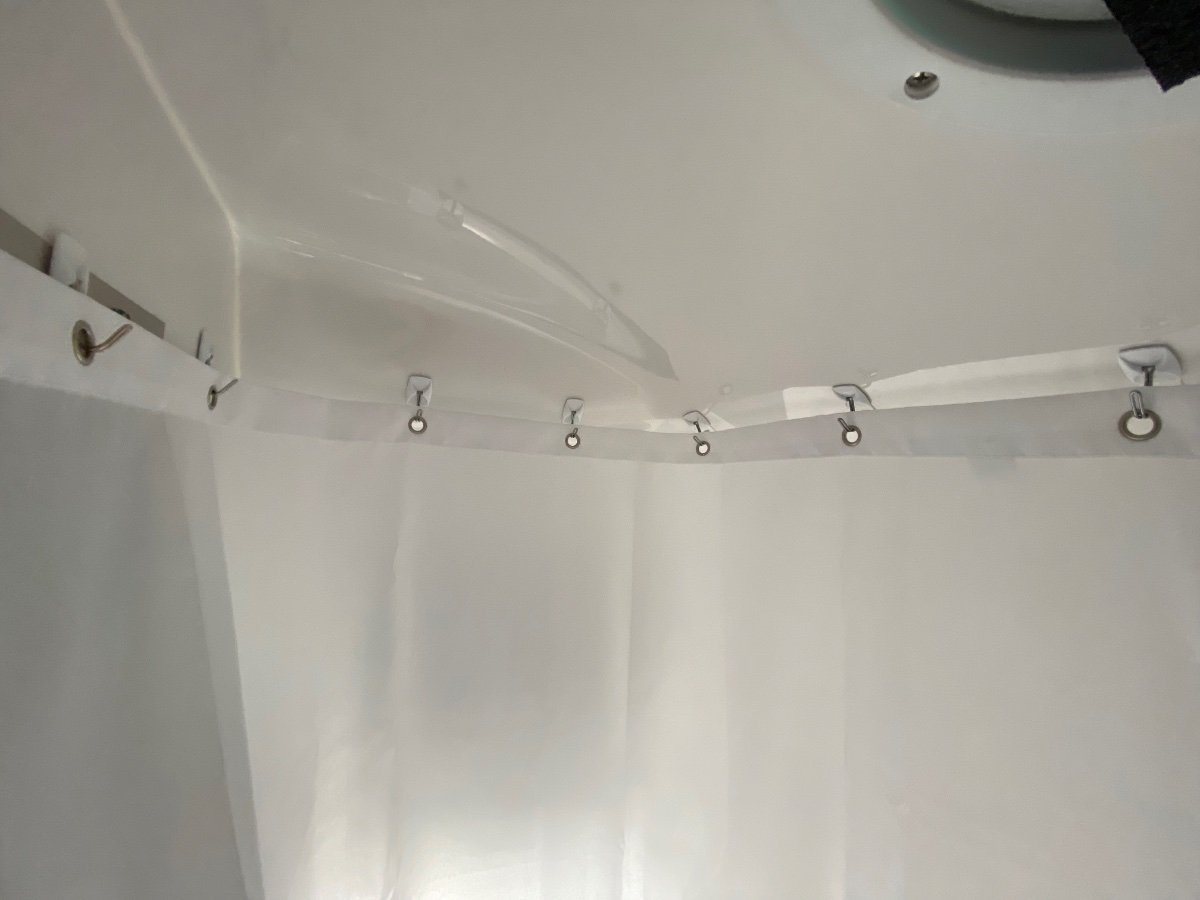
We didn’t get the Oliver shower curtain track. It’s an odd design, seems a bit expensive, and some owners have had issues with the track detaching from the inner hull ceiling because of a poor riveting job. But we wanted a shower curtain though, so I attached the small Command hooks all around on the ceiling directly above the perimeter of the shower pan in the floor, and then hang a standard shower curtain on those hooks when we take our showers, and can quickly remove the curtain to let it dry outside the trailer when done. It was a cheap and effective solution. And if I ever come up with a different idea this one is easily removed completely. Command strips/hooks are a great accessory for attaching lot of things on the Ollie interior.

-
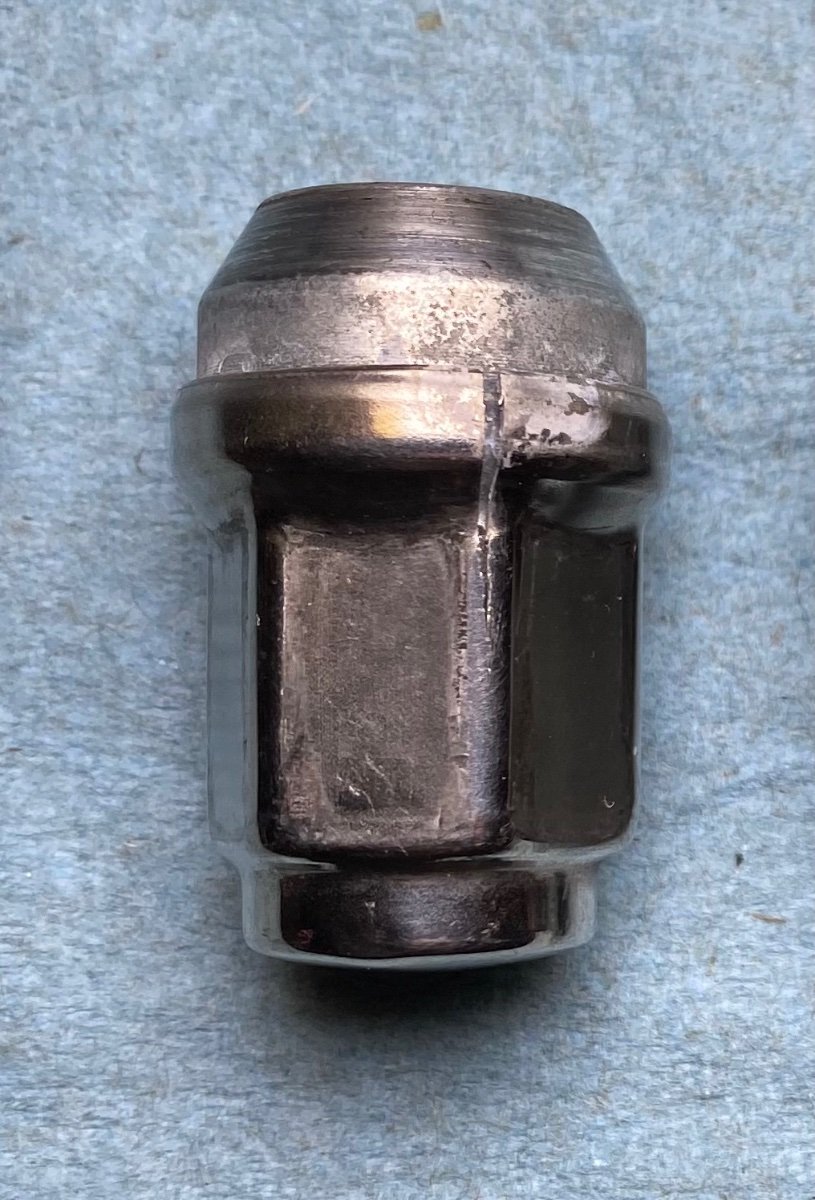
I found several lug nuts with the cracked stainless clad cover (see pic) when I did my wheel bearing service recently. So I replaced all of my lug nuts with Gorilla lug nuts from Summit Racing. So far they’ve worked great. https://www.summitracing.com/parts/gor-41187htb
-
 If you’re reading only 4.6 volts at the battery as no load voltage when not connected to shore power, then at least one of the the batteries is probably shot. You didn’t mention if you have 12volt lead acid or the 6volt AGM, but either way a voltage reading of only 4.6 volts is essentially a dead battery, way less than 10% charge level. And frequently letting the batteries drop to less than 50% charge level will shorten their useful life.
-
Updated (Again). It’s fixed. If the toilet’s a-rockin’…..🎶
Frank C replied to Frank C's topic in Mechanical & Technical Tips
You are correct John. “Flanges? We don’t need no stinking flanges!” 😂 Definitely not applicable to the composting toilet. That has its own unique issues to deal with. -
Updated (Again). It’s fixed. If the toilet’s a-rockin’…..🎶
Frank C replied to Frank C's topic in Mechanical & Technical Tips
I used a file and chamfered the leading outer edge of the 3” pipe and then put some dishwashing liquid soap on the pipe and grommet and it went in with a little effort. The seal rests on the flat plastic ring that’s to the inside of the stainless ring and it seems to seal well. Unfortunately we won’t be at the rally this year though. -
Updated (Again). It’s fixed. If the toilet’s a-rockin’…..🎶
Frank C replied to Frank C's topic in Mechanical & Technical Tips
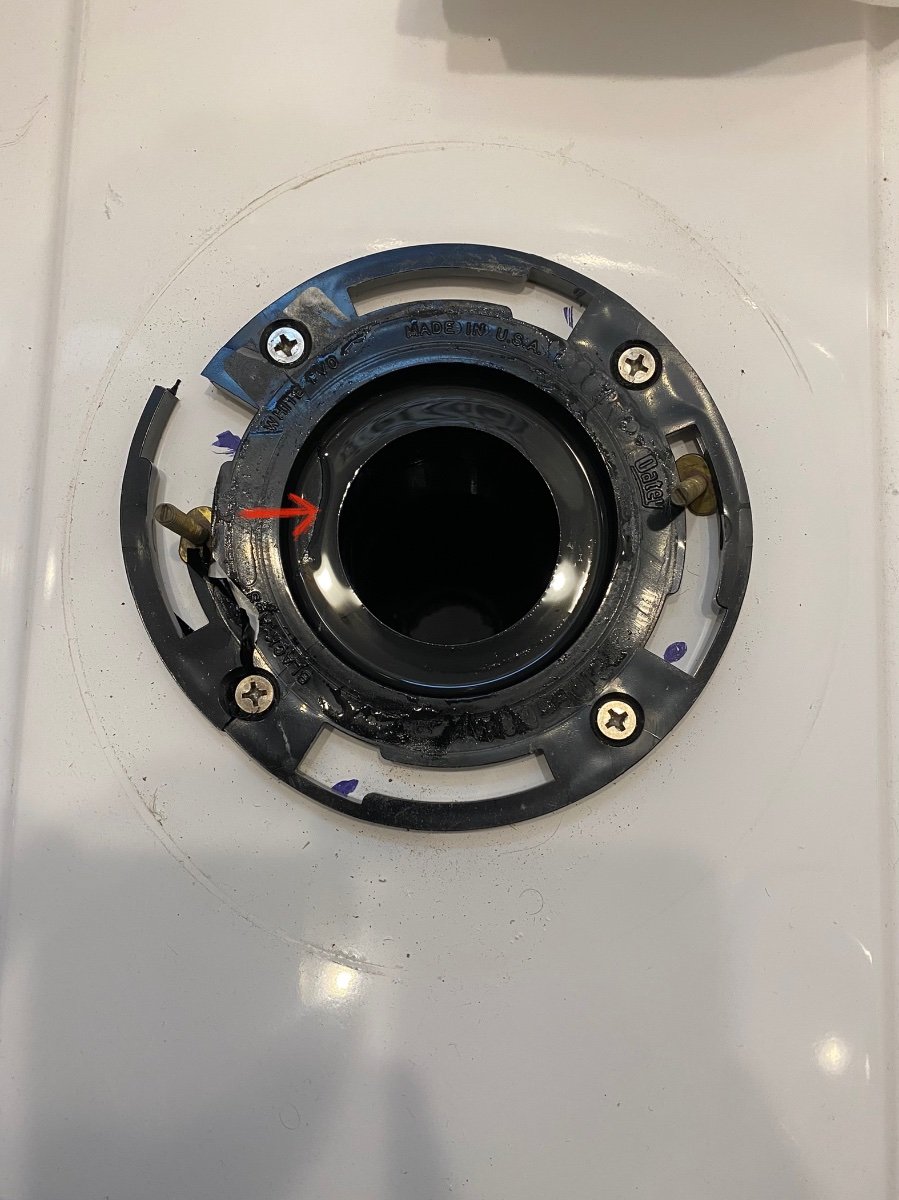
The size/type of black ABS plastic flange used originally by Oliver is not readily available at hardware stores, and I wanted the stronger metal mounting ring to hold the toilet bolts to keep this from happening again. Flanges with the metal ring that I found at most hardware stores tend to be a larger collar size underneath that is dual purpose to fit either INSIDE a 4” pipe or OUTSIDE a 3” pipe. And I corrected the photo orientation just now. And the flanges and pipe come in either white PVC or black ABS, either is fine for drain/sewer connections like this, just don’t mix them because different solvents are used to weld each type. And you mentioned that your toilet isn’t aligned correctly now. The bolts that hold the toilet can be moved in the flange to allow the toilet to be aligned correctly, unless Oliver mounted the flange itself way out of alignment when they repaired yours. -
Updated (Again). It’s fixed. If the toilet’s a-rockin’…..🎶
Frank C replied to Frank C's topic in Mechanical & Technical Tips
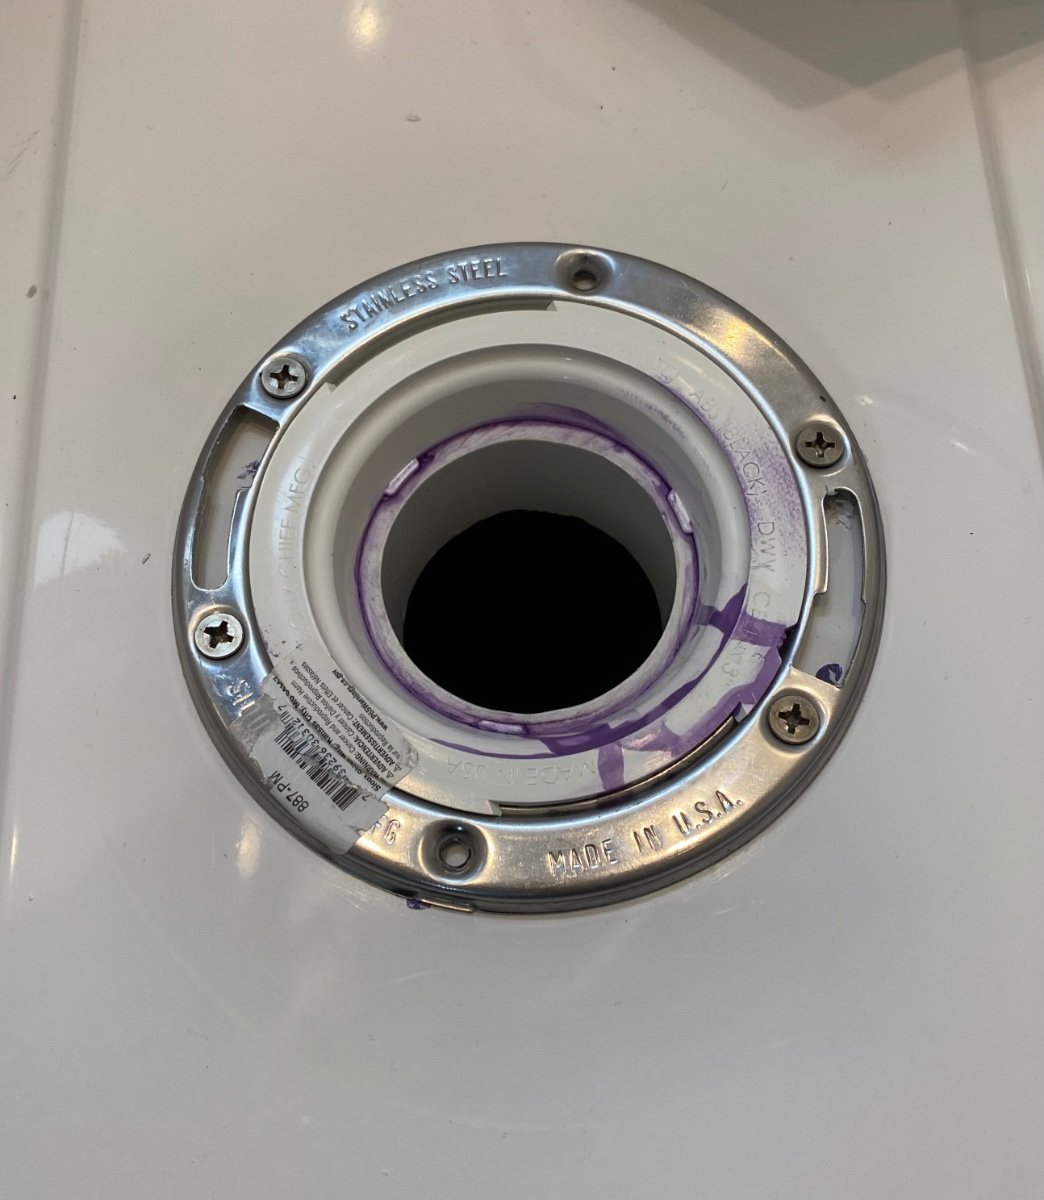
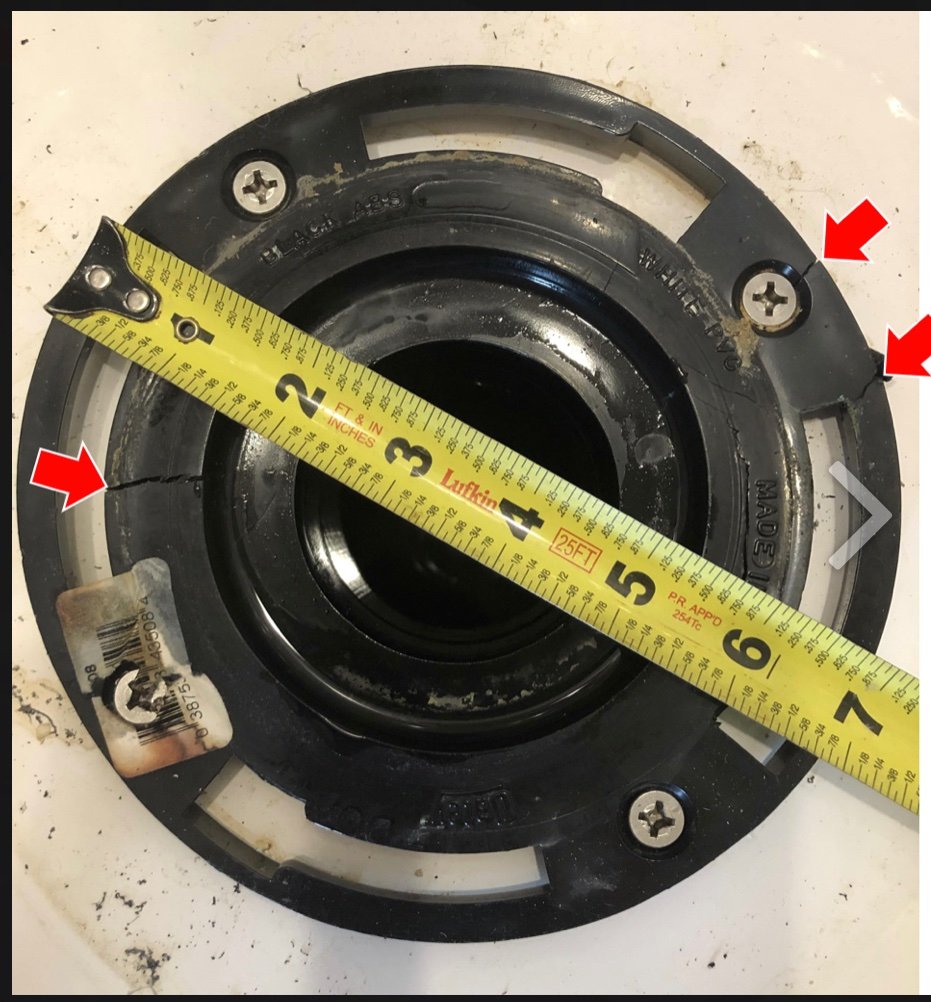
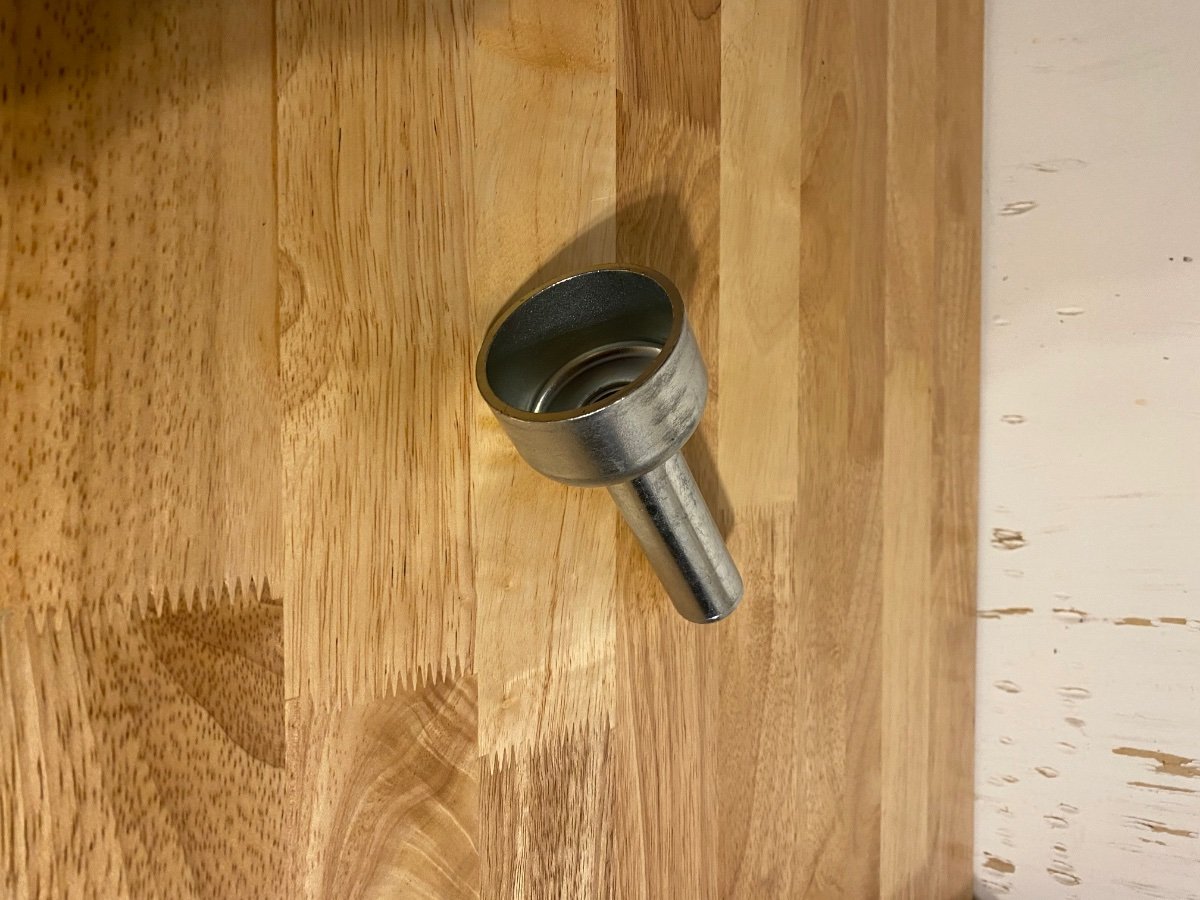
Removed the toilet and the first photo shows what the original all plastic flange looked like, cracked and broken in multiple places, including the countersunk screw holes in the plastic flange. Might have been over-stressed when initially built. I removed the old flange and replaced it completely with an upgraded flange with a metal mounting ring, shown in the second photo. Had to drill new mounting holes in the floor, and because of the limited distance between the floor level and the grommet on the top of the black tank, it took some cutting of the flange collar on the underside of the flange to shorten it up a bit, and then solvent welding to adapt to a short piece of 3” PVC pipe that gets forced into the rubber grommet on the top of the black tank. The purple streaks are a bit of dried residue from the primer used on the PVC for solvent welding. Hidden by the toilet once it’s back in place. This fix took care of the rocking toilet and also the small leak that would happen only when the toilet was flushed. Water was seeping between the toilet/seal/flange/floor because of the broken/cracked flange. The red arrow in the first photo shows the crack in the flange collar itself. That crack was letting water leak onto the top of the black tank and then down between the hulls, and then dripping out the forward street side weep hole scupper under the hull. The drip only happened when the toilet was flushed. It was good to see that the floor itself under the toilet is a very thick built up panel with fiberglass over a thick core material, so the flange screws thread directly into that very well. This is a pain in the butt project that I’ll bet eventually all Ollie owners will have to do. Your toilet flange is either already broken and you don’t know it yet, or it’s about to break.
-
Thanks to all for the investigative work on this! I’ll be adjusting my lug nut torque check accordingly.
-
Updated (Again). It’s fixed. If the toilet’s a-rockin’…..🎶
Frank C replied to Frank C's topic in Mechanical & Technical Tips
Wow! Thank you so much for the details of your ordeal! Based on your experience I’ll try the repair ring option first instead of removing the old flange. And does Oliver use a wax ring between the toilet and flange as is standard practice? -
Streetside Fresh Water connection/supply line occluded.
Frank C replied to Rleog's topic in Mechanical & Technical Tips
Are you sure all the valves under the curbside bed are in the “Normal” positions? (Not winterizing or boondocking positions). -
Updated (Again). It’s fixed. If the toilet’s a-rockin’…..🎶
Frank C replied to Frank C's topic in Mechanical & Technical Tips
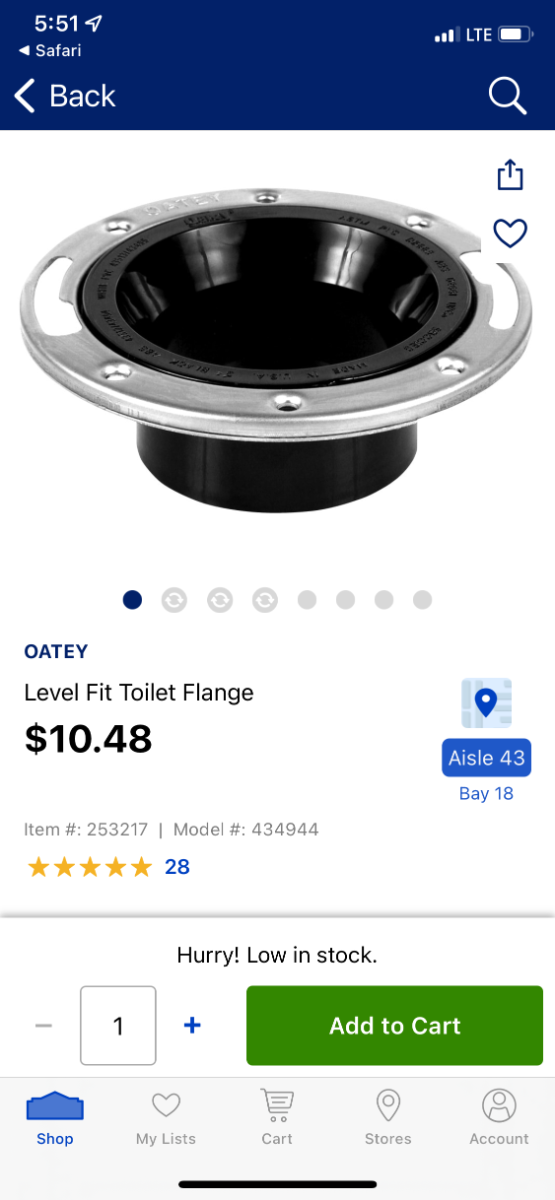
Thanks for the info John. I’ll see how it goes. Should be starting on this project in the next few days. I do want to replace the flange with the type with the metal ring to hold to toilet bolts. Like this type.
-
Updated (Again). It’s fixed. If the toilet’s a-rockin’…..🎶
Frank C replied to Frank C's topic in Mechanical & Technical Tips
Thanks! I’ll send him a PM -
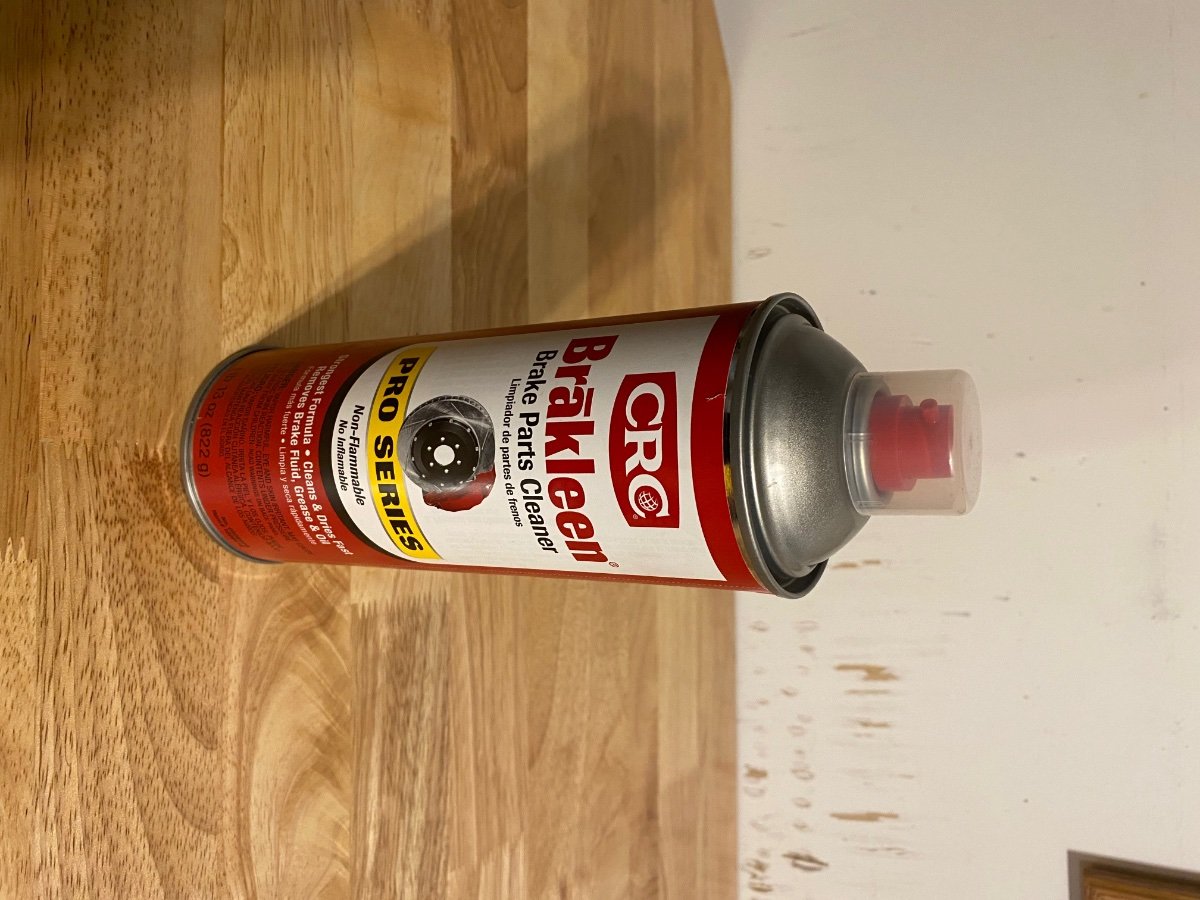
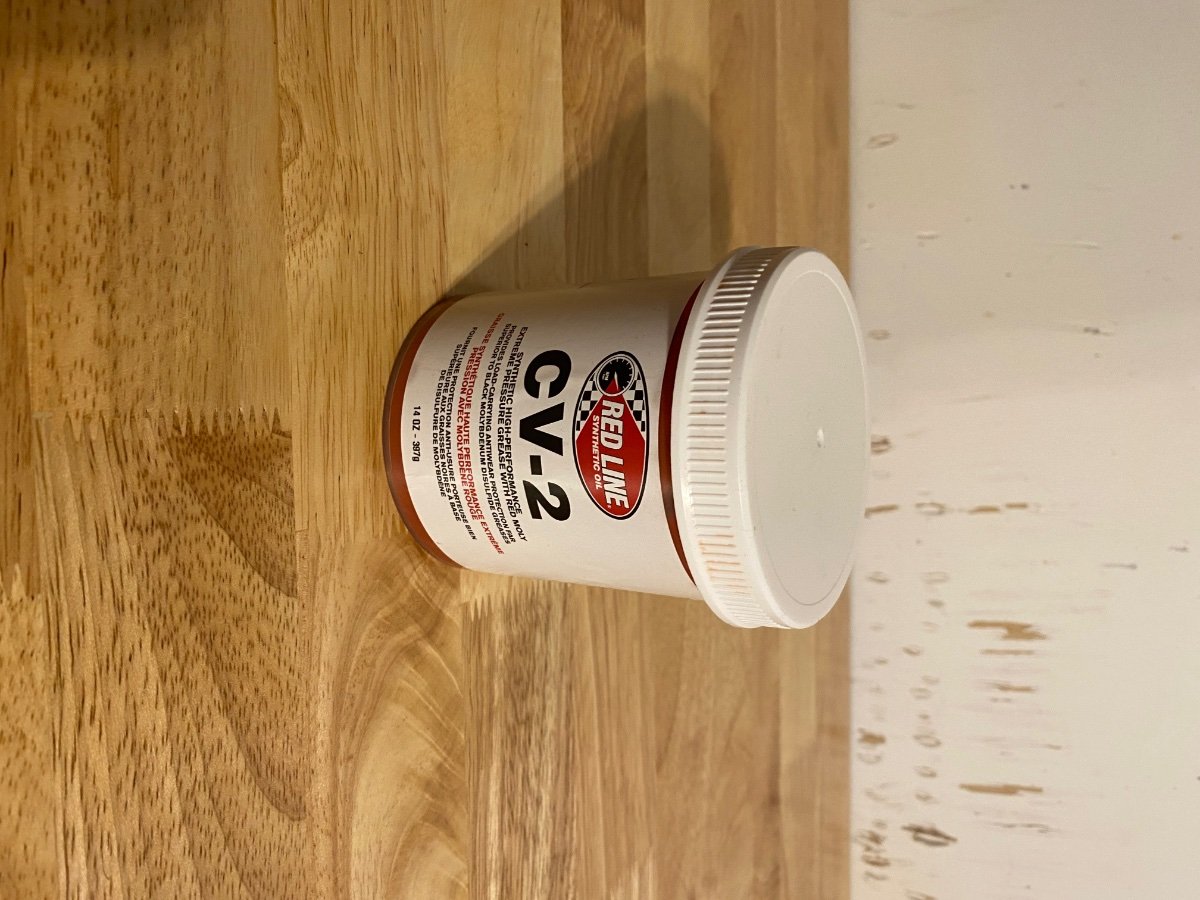
Flat tires and wheel bearing failures are the things that can leave you stranded. Waiting many hours or even days for Good Sam or some other roadside assistance isn’t something I care to do. Actually met a couple who were stranded and lived in their 5th wheel trailer for 3 days on the side of I-70 waiting for a replacement wheel bearing. I believe in being prepared Probably not the norm for all Ollie owners but I don’t want to be stranded waiting for help for some issue that I can fix myself. So I carry quite a bit of tools, parts and supplies. A Dewalt portable tool set in a carrying case with full ratchet/socket sets in 1/4”, 3/8” and 1/2” drive sizes, open end wrenches, US and metric Allen bit and torx bit drivers, screw drivers, etc. Misc pliers, wire cutters/strippers, large crescent wrench, hammer. An electrical multi-meter for diagnosing electrical issues. Spare fuses, crimp connectors, etc. Torque wrenches for the lug nuts and axle nuts (different torque ranges needed, one wrench won’t cover both). All the special tools needed as described in earlier posts in this thread for a complete bearing replacement and grease repack if needed, such as a seal puller, drift punches, dead blow mallet, bearing driver set, 1-1/2” socket for the axle nut, grease cap driver tool. Brakeleen for cleaning old grease out. Redline CV-2 Bearing grease to repack the bearings. 4 complete sets of bearings (Timken Set4 and Set17), seals and grease caps, enough to service all 4 wheels if needed. A grease gun with Lucas red-n-tacky grease for the suspension zerk fittings. A large military surplus HUMVEE scissor jack that’s perfect for the Ollie. A few 12” & 18” long pieces of 4”x4” lumber to use for cribbing with the jack to make lifting the Ollie much quicker. A small DC air compressor. And a few other things that I’ve probably forgotten to mention. All kept in toolboxes in the bed of the pickup truck. I just did my annual wheel bearing service (which included replacing the original bearings) took about 4 hours total to do all 4 axles plus grease the suspension Zerk fittings. But I was in no rush. Maybe an extreme for what to carry on the road, but I’m much more comfortable traveling/towing the Ollie knowing I am prepared.
-
Updated. See later comment below. Toilet rocking, so I’m about the undertake the repair of the broken toilet flange as discussed in a previous thread (below link). Before I get started on the project and remove the toilet to get to the flange, a quick question for those who have done this. For the screws that attach the flange to the Ollie bathroom floor as shown in the photo, what do those screws engage into? Just threaded into the fiberglass? Or are there wooden blocks or metal nuts bonded on the underside of the fiberglass floor that the screws engage into? Just want to see if there’s an opportunity to improve the mounting and use a higher quality flange. This is one area Oliver could do a bit better on. A plastic flange on an RV application is not the greatest. I’ve used the Danco Hydroseat flange on my home toilets with great success and might try it on the Ollie if it will fit under the toilet properly. Thanks in advance.
-
Ditto to John’s solution. If you try to just repair it as original it’ll still be a weak spot, and probably won’t look quite perfect. Adding a larger aluminum backing plate is less complicated than trying to do a perfect fiberglass repair job. A slightly larger aluminum plate will hide the original damaged edges/area and also give a larger area to support the rubber bumper in case it ever happens again in the future.
-
You mentioned that you already replaced the battery in your tow vehicle, was the alternator checked out as well? It may not be charging your tow vehicle battery properly.
-
The EZ gutter above the windows was added by the previous owner of your trailer. If I recall correctly from your previous posts, you bought your trailer from the Rimer family after Ron Rimer passed away. Ron was a great guy who helped us in our decision to buy our Elite II. Ron had added that EZ gutter and during our visit with him to see his trailer he commented that fixing the lifted corners on the EZ gutter was on his to-do list. Based on Ron’s experience, when I added my EZ gutter I ran it around the top and all the way down the sides of the windows.
-
That’s really odd. The term “deleted weapon” is usually used in reference to online gaming when players lose a virtual weapon in a game like Call of Duty or Halo.
-
Found these on Amazon https://www.amazon.com/dp/B00J9TJ1ZI/ref=cm_sw_r_cp_api_i_QWQ738ECJXPCGREKEK4W?_encoding=UTF8&psc=1
-
That’s a great idea! Nice work!
-
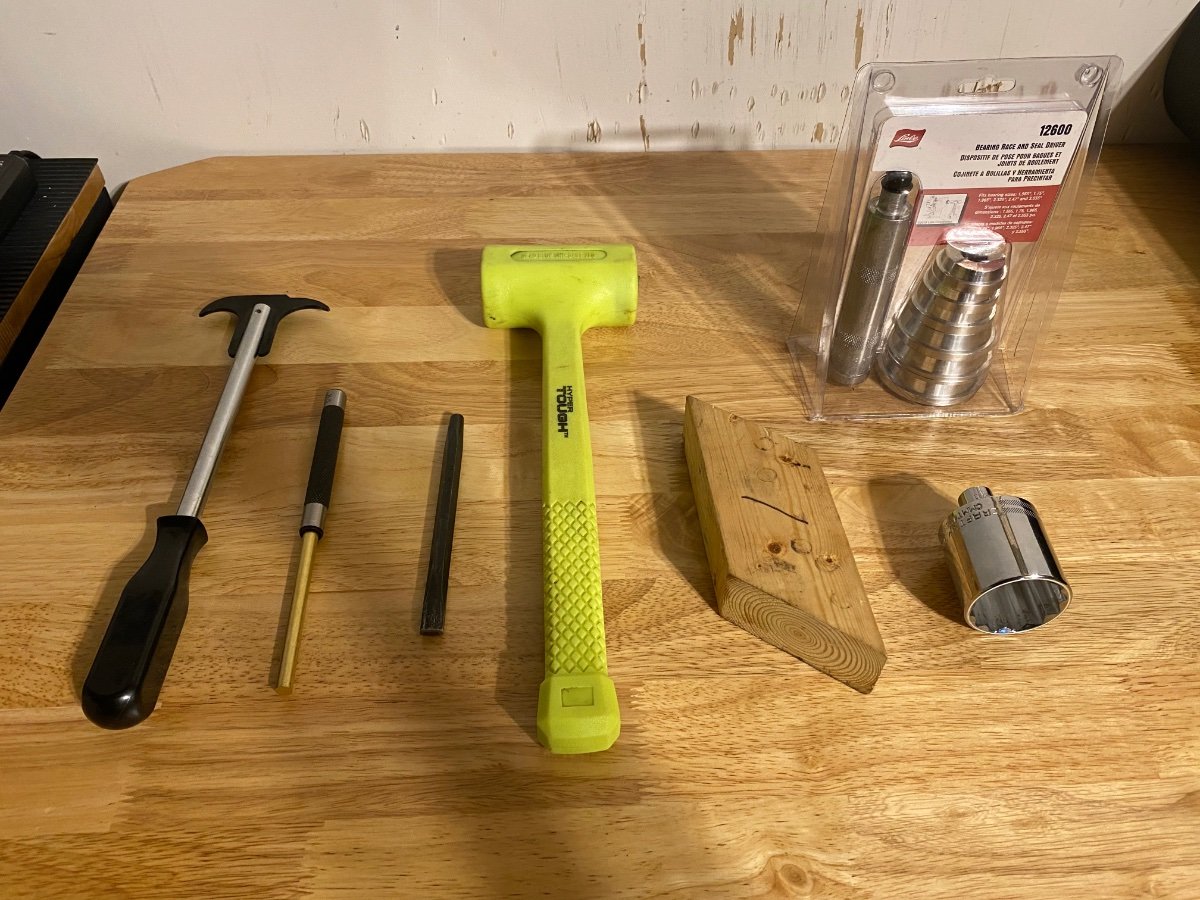
Agreed that Dexter doesn’t say to use a new grease cap, but the caps are soft plated steel and the steel deforms a bit for a press fit into the hub when pounded into place, so the next time it’s reused it’ll have slightly less interference for the press fit and is more likely to fall out. I prefer to install new ones each time now as cheap insurance. I think a lot of the Oliver complaints about grease caps falling off are due to multiple reuses of the same grease caps over and over during service. I had one grease cap fall off within a few hundred miles after our wheel bearing repack service done at Oliver last year, and it knocked off the little logo decorative center cap as well and that was lost.
-
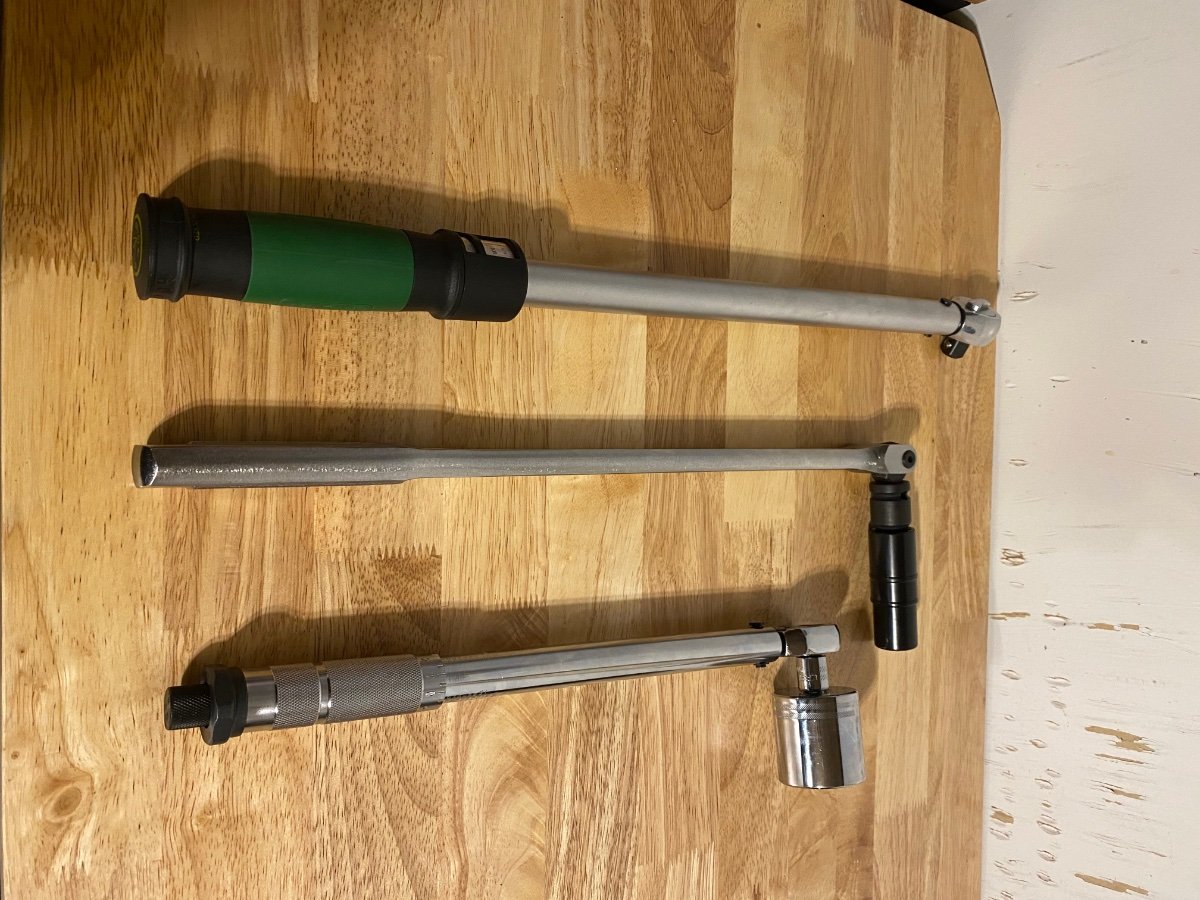
The Dexter video is very helpful. https://youtu.be/GnH-h3W9XvI As mentioned before the complete bearing sets must be replaced, you can’t leave the old races in the hub. And the seal and grease cap must also be replaced. So new bearings, seal and grease cap on each axle. Here’s the tools/etc. that I used for my recent replacement of the bearings on all 4 wheels: Breaker bar & 3/4” lug nut socket for loosening the lug nuts to remove wheel. Screwdriver to pry off old grease cap. You may have either a spring clip or cotter pin as the axle nut retainer. Mine have the spring clip that can be reused. Cotter pins should be replaced. The axle nut should come off by hand since it’s only supposed to be finger tight at final assembly. Seal puller from Harbor Freight to remove old seal. Brass and steel punches to drive out old outer races. Brakleen to remove all old grease from hub and axle spindle, and clean the inside of the brake drum while you’re at it. Also check your brake pad thickness while you have the brake drum off, Dexter says 1/16” minimum thickness for the pads. A bearing driver set to install the new outer races. A good high quality grease to pack the new bearings. A dead blow mallet. A wooden block to install the new seals. A 1-1/2” socket for the axle nut. Torque wrenches for the axle nut and lug nuts. I use two different ones because of the difference in torque settings. The axle nut is to be torqued to 50 ft-lbs. to seat the bearings, then backed off and finger tightened, then install the retainer clip or cotter pin. The lug nuts are 120 ft-lbs. I don’t have one single torque wrench that can cover that range for the axle nuts and the lug nuts, so two torque wrenches in my tool box. Grease cap driver tool to install new grease caps properly. Follow the Dexter video. And I carry all of this with me, including spare bearings, seals and dust caps, in my road tool kit, along with a heavy duty scissor jack, a full ratchet/socket set, small air compressor, and other common hand tools. Flat tires and wheel bearing failures have been common points of failure that leave people stranded. I like to be prepared. Mad Max was the Road Warrior, call me “The Road Worrier” 🙂.
-
If you do buy replacement bearings, make sure you get genuine Timken parts. There are a lot of counterfeit “Timken” bearings out there, especially on Amazon. Here’s the link to the Timken site to find an authorized distributor. And the complete bearing assembly needs to be replaced, which means pulling out the old seal and knocking out the old outer races that are pressed into the hub. So a few special tools are needed. I just replaced mine. I’ll do another post with the tools that I used to make the job easier. https://www.timken.com/contact-distributors/
-
Has anyone had experience with Cilajet aviation-grade paint sealant?
Frank C replied to Spike's topic in General Discussion
The Cilajet page says it’s for painted and metal surfaces, but does mention boats. The Ollie isn’t painted or metal. Is there a different Cilajet product for fiberglass? Seems that folks have had the best success with products intended specifically for fiberglass/gel coat, like those used in the marine industry for fiberglass boats.
-
HOW TO : Service your rear electric jacks
Frank C replied to John E Davies's topic in Mechanical & Technical Tips
Thanks for the tutorial John. Very helpful. The jacks are one of my next maintenance projects this summer.