DavePhelps
-
Posts
403 -
Joined
-
Last visited
-
Days Won
21
Everything posted by DavePhelps
-
If your hitch is up to the task, class 4 or better, then your TV is certainly stout enough to not need a WDH. But you need to assess the condition/age of your equipment. If in doubt, have everything inspected and qualified by a local shop specializing in hitches and the like. Backing is doable without all the modern cameras and gadgetry. Although I will say when I get my new truck, it will have a backup camera! As it is now, I can hitch up just fine by myself. Straight back ins are pretty easy. Angled back ins require a bit more patience and care. It takes about 4 or 5 creeps up to the hitch. Have to get out of the rig and look each time. Go slow, you will be able to visualize your approach angle with practice. With the wife helping as spotter, it's a lot easier for sure. Saw one of these for the first time last trip out, the owner liked it, but I have no personal experience with them. https://www.amazon.com/DuraSafe-Coupler-Connect-Trailer-Alignment/dp/B004VWETFU/ref=sr_1_2?s=automotive&ie=UTF8&qid=1506728306&sr=1-2&keywords=hitch+guide Dave
-
 I check mine before every trip, even though the pressure has always been spot on. It is a bit of a pain, but not as much as having a flat spare! Problem with leaving a TPMS sensor on the tire is that its battery will run out faster as the sensor is always transmitting as long as it is pressurized. Mine shut off when I remove them in between trips. The extension hose you linked to could work, but I would wrap it with split loom or the like to give it extra protection from abrasion, and wear and tear. Dave
 -
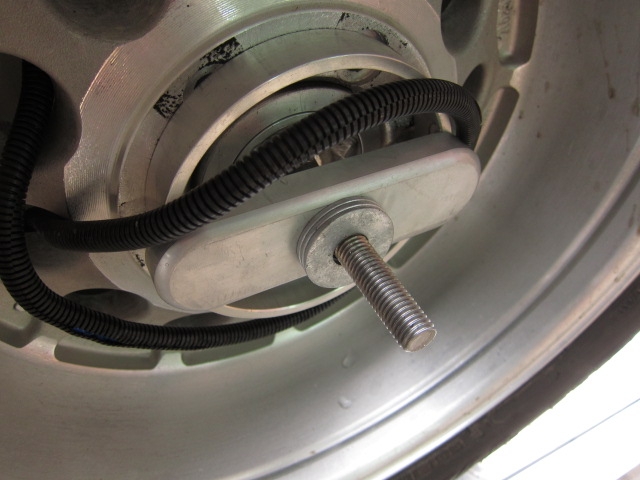
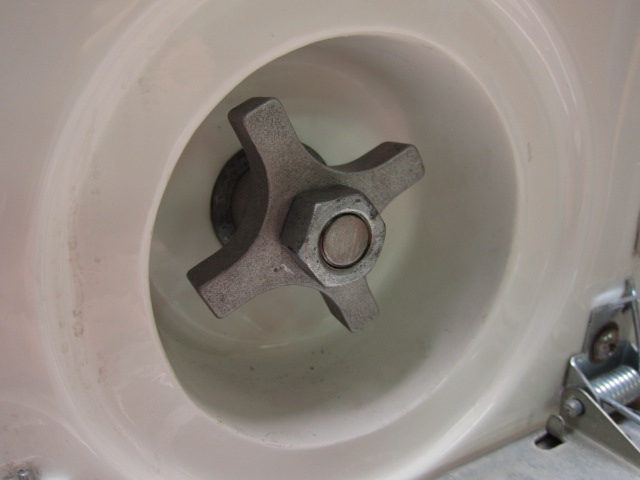
On our most recent trip, and after a long haul down a pretty rough gravel road, I noticed the spare tire cover was coming off. When I pulled down the license plate to inspect, I found the X-nut (?) used to secure the cover was hanging on by just one or two threads! Good thing I stopped to stretch when I did, as I still had some miles to go. So what I have done now is to pack out behind the cover with some 5/8" washers on the threaded rod. This fills the space between the back of the cover and the threaded aluminum bar that actually secures the tire. Then, with he cover back on, I have added a second 5/8-11 nut on top of the X-nut to secure it. If you travel rough roads often, I would recommend securing the cover in this way. Dave

- 1 reply
-
- 5
-

-

-
Anderson No Sway Hitch PROBLEMS!!! Revisited - Sorry.
DavePhelps replied to ccarole's topic in Towing an Oliver
Carole, Some good ideas being expressed here, but you still haven't specified your TV, or which Oliver you own. This is important information if you want folks to help you. If you don't need the AH, why stress yourself? Be happy you don't need the extra hassle during hitch up. These Olivers tow very well. They are narrow and are nicely rounded, especially the frontal area. They are also relatively light in the tongue. I am passed routinely by large semis and don't feel a thing. Crosswinds are also a non issue. But I have a 3/4 ton van and tow the little Elite. From all I have read, the AH still needs more R&D, but since I never needed one, I didn't give them too much thought. If your TV requires a WDH, then knowing your Trailer/TV combo will help others help you. Dave -
How To: Galley Drawer Travel Straps
DavePhelps replied to John E Davies's topic in Ollie Modifications
Bob, Not sure what you mean, but if your doors are opening when they aren't supposed to, then you have two adjustment options. The strike can be moved in or out a bit. And the hinge screws can be loosened allowing the door panel to be moved up or down (placing the strike closer to the latch if moving up). I try to get the reveals equal between the door and frame and gently tighten down the hinge screws, but overall function will supersede that. It's a good idea to go through the trailer once a season and make sure everything is snugged down. Don't over-tighten! Just good and firm. My doors have so far been behaving. Hope this is what you meant. Dave -
How To: Galley Drawer Travel Straps
DavePhelps replied to John E Davies's topic in Ollie Modifications
John Davies wrote: "Drill a pilot hole the size of the minor diameter (unthreaded part), or slightly larger, and then countersink lightly" This should be emphasized whenever drilling holes in gelcoated fiberglass. The countersinking is an especially important detail that takes no time at all. Oliver really needs to start doing this as there is fractured gelcoat around every mounting hole I have looked at. The pilot holes have been undersized and not countersunk, not good practice, and so easy to do it right to begin with. For exterior holes, the countersink also creates a thickened area of sealant around the fastener, which creates a much better weather seal. Any boat builder who knows what they're talking about would say the same. Dave -
Remove the rain seal on the awning?
DavePhelps replied to John E Davies's topic in Ollie Modifications
I also removed mine. It was just a major dirt, moss, pine needle, and mildew trap. It also came off easily with gentle pulling. I think the trailer looks so much better without it on there. Cleaning and waxing the trailer is now so much easier and thorough. No regrets. I haven't had the awning out in the pouring rain like Reed and Karen, but I can't imagine all that much water will be pouring down the trailer wall. Compared to the tarps I have hunkered down under over the years, this is still a way better (more comfortable) situation. YMMV. Dave -
How To: Galley Drawer Travel Straps
DavePhelps replied to John E Davies's topic in Ollie Modifications
John Davies wrote: "I’m not, really, I love it, I am just increasingly frustrated that one or two sloppy/incompetent/ untrained/ hungover/ part time/ unsupervised/ rushed/ whatever technicians could have screwed up so many little and seemingly insignificant installations that care and common sense would have prevented." I feel your pain John. I too have been having to fix a lot of stuff and shake my head sometimes at the lack of attention or care by the detailers at Oliver. Sorry to say, great folks at Oliver, but they need to slow down, tool up, and start paying attention to the details. Regarding the shades falling off. Yep, we had the same issue. The clips were zip screwed into the window frame. They were neither in alignment or in plane. I shimmed them out with thin nylon washers so they were in plane (flat) with each other and also added an extra clip here and there which Oliver gave to me. No problems so far. Really I'm not a big fan of those shades, although they work OK I guess. But they are bulky and the frame color is not the nicest. There are some marine shades I've seen that are much slimmer and attractive, but for now I've got bigger fish to fry. Dave -
Reed, My p3 controller only has electric or hydraulic settings. There is no "electric over hydraulic". Did you mean that you set it on the hydraulic setting?? My mechanic called in sick today so I have another week to try and figure this out on my own.... Dave
-
I've been towing with my old and trusty Ford E-250, a remnant of my old life in construction. It tows very well, although the 5.4 liter Triton struggles in the mountains. As much as I love it, my van has inconveniences as a TV for my use and has me wanting a pickup truck instead. First, it is only 2 wheel drive. Depending on what kind of roads you travel, having 4 wheel drive can be of great help. Second, it has only 2 seats (cargo van). This is really a pain when traveling with friends. The seating arrangement you could alter with your list of vans, but I don't think any are available in 4 wheel drive. If you find yourself on pavement all the time, then that may not be an issue either. Vans are great for storage and are very versatile, but you'll have to decide what kind of camping/driving you'll be in to and go from there. Good luck! Dave
-
Yes, thanks John. I hope these guys can figure this out. Really good RV mechanics are hard to find, so I hope this outfit is good. I have just over 5000 miles on this axle, so not a whole lot yet. Looking forward to putting a lot more on for sure! I also have been following the water tank saga. I haven't posted on it for a while as I have been up to my eyeballs with other projects. Oliver's (and others- thanks to all who really pushed for this upgrade....) solution seems pretty good. It won't work on the Elite however as there is no room to spin weld a fitting on top of the rear of the tank since the hot water tank hangs over it. I hope Oliver is coming up with a solution for the Elite as well, because for me, the design is a big hassle that does not enhance my camping experience at all! We'll see about that soon I hope. OK it's past happy hour, signing off! Dave
-
I really feel something is not right here. Bad magnets, bad ground, bad something. Hopefully I'll find out something on Tuesday when I take it in to the mechanic. Dave
-
I have the 5200# axle with the 12"x2" brakes. Mileage is around 5-6000 so far. I'm in the smaller Elite.
-
Raspy, Yes! Your brakes are set up just as I would like mine to be. But this is not the case for me. Just came back from a test drive and still the brakes are anemic. Reading an article at E-Trailer, they mentioned a current check (amperage) to test the magnets. My P3 controller has this test function. It came out at 6.7 amps which is below the range they gave for 12" drums, which is between 7.5 and 8.2 Amps. So maybe I have bad magnets.... I think I'm heading to the mechanics shop as this is getting beyond my knowledge. We'll see where this goes. Dave
-
Well here I am again asking the same question, trying to establish some kind of consensus. This is regarding the set-up of the brake controller and whether or not I should be able to lock up my brakes during this set-up. Dexter Axle says that the brakes should never be able to lock up by design. Jason said something similar. Others say that yes, the brakes do need to lock up during set up, including the tech support at Tekonsha, who makes my p3 controller. I have not ever been able to lock up my brakes even at the highest voltage setting. I have tested voltages with my multi meter at the TV plug and at the magnets. TV plug registers exactly the same as my controller. The magnets just a hair less, which I would expect due to voltage drop. The problem I have is that I do feel like I'm being pushed around a bit on steep descents. If there is no lock up voltage to create a baseline during the setup phase, where to set the voltage? My trailer brakes respond the same at all voltages as far as I can tell. There is some braking, but I feel it is not quite what it should be. I readjusted my brakes again the other day and will take the trailer out again today to check and see if there is any difference. My trailer was built in 2015 and the brakes are not self adjusting. Thanks for any advise on this matter. Dave
-
Rubbing a little paraffin wax on those tabs will make them rotate out a lot easier. Plus I don't think the tabs need to be fully twisted on to do their job if you also lock down the black collar. We like to eat outside as well but when it's blowing and snowing we like our dinette! Dave
-
Shureflo water pump not working!
DavePhelps replied to routlaw's topic in Mechanical & Technical Tips
!!All right then!! Good idea to get access through the tank gauge opening. Note to Oliver: As far as I know, the National Electric Code requires access to all connections. It also requires that a switch or receptacle needs enough extra wire to be pulled out of its box at least 6" for maintenance or repair/replacement. There should be an access port inside the hidden compartment and don't skimp on your wire! Glad you're up and running again! Dave -
That's great Reed. I'm really glad this whole idea of the pick-up tube has worked. Really nice work, and I truly hope Oliver carries this forward, because it really is an important design issue. I have access "obstacles" in my Elite that you don't have in your Elite 2. My hot water tank pretty much covers the back end of my fresh water tank. So in order to spin weld a fitting on the top of the FWT, I need to first remove the HWT! ughh. I am still hoping that somehow I can insert a bent tube inside the original outflow fitting, and letting it rest on the tank bottom. I'm waiting to hear what Oliver comes up with. What was the pipe dope you used? Not seen that before but I'll get some when I dive into this. Thanks again for bringing this all to light again. Dave
-
Shureflo water pump not working!
DavePhelps replied to routlaw's topic in Mechanical & Technical Tips
It is pretty plain to see if your fuse has blown. If they look to be in good shape, then I would really recommend looking at the switch connections. Those spade connectors can easily slide off if not crimped correctly and/or if you travel rough roads. In my Elite, one of the two switches is in the kitchen sink cabinet. I pulled out a drawer to get access to the back side. For you, with the switch under the pantry, I don't know. There has to be an access hatch somewhere. The cover plate for these switches will not come off as far as I can tell, however, the switch itself can be popped out of the cover plate (use a plastic putty knife so no scratches). Less room to work, but you can at least check all the connections. The bathroom switch may not pop off the same way, haven't tried it, I'd ask Jason about that. If any one of the connections to those two switches has come loose, the pump will not work! Just my two cents. Please let us know what the issue ends up being. Good luck! Dave -
Shureflo water pump not working!
DavePhelps replied to routlaw's topic in Mechanical & Technical Tips
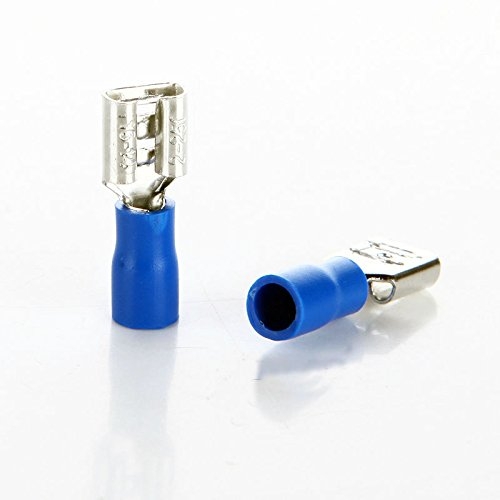
You may want to check the switch itself. This happened to me as well. The wire connection to the switch is a simple female spade wire connector. Ours slid off one of the two tabs on the back of the switch. I took the loose connector and pinched it closer together with some pliers and then slid it back on the switch tab. Back in business. Hope it's as simple for you. Here's a pic of the connector that was used on our rig: Dave
-
I'm glad some of you found this useful, and hope the trim works for your cover. I'm hoping that Oliver makes them all about the same thickness. The thickness of my cover fell within the specs of the trim. Filing really helped to smooth out that edge and even thing out. To me, it has made a huge visual difference for the better. My wife didn't notice..! LOL. Oh well, we all see things differently, that's for sure. Happy camping! Dave
-
Thought I would put this up here in case anyone else is having the same issue I had. Soon after leaving the factory, the plastic strip that lines the bottom edge of the tank cover started to come off. It was a very cheap piece of 'L' plastic kind of glued on here and there. Really, it was pretty ugly even when new. So I finally found this very nice 'U' channel on Amazon that fits perfectly. These trims come in a vast variety of sizes and colors. It appears to be a very high quality vinyl compound and has internal fins that grab the cover on both sides, so no gluing is involved. I just set it in the sun to warm up and gently tapped it on with a rubber mallet. Before doing this, I carefully scraped off all the old glue residue with MEK and a plastic razor blade, followed by a light scrub with a 3M WHITE scotch brite pad (love these for tough cleanup jobs on the trailer, no scratching) Then I filed all the edges to make sure there were no sharp edges or bumps in the fiberglass. Then a good wash. Here's the product: https://www.amazon.com/gp/product/B01F9FXQLU/ref=oh_aui_detailpage_o01_s00?ie=UTF8&psc=1 This looks so much better to me, and the fit is great, better than with the stock plastic trim. It's supposed to be marine grade, so hopefully it will last. My Elite took 5 feet to do. Those with the Elite 2 will need to measure, but the stuff is available in different lengths. It's all in the details! Dave
- 22 replies
-
- 23
-
-
-
For the record, my water pump starts sucking air at about 35% full. I have to tip up the trailer after that, or refill. The hardest part of this project will be getting access to the area for wrenches and other tools. With the tank out at the factory, it would take no time at all. Really, as there is no option for an outlet on the bottom of the tank, it has to be on the side, which requires some kind of draw tube entering the tank. I'll be curious to hear what Oliver comes up with. For the rest of us, anyone taking this project on please post pics if you are able. Thanks. Dave
-
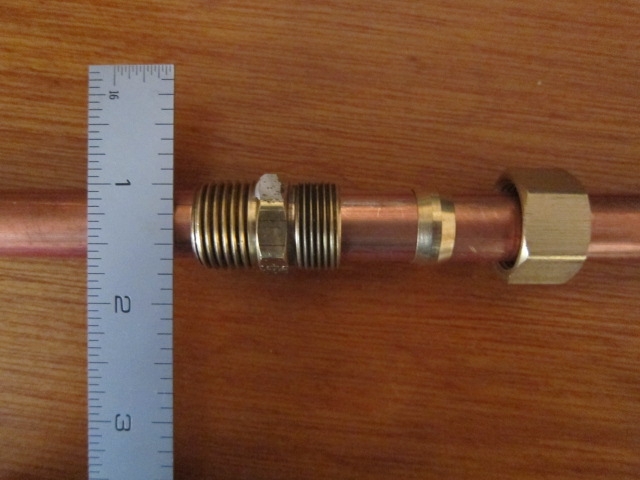
Here's a pic of my test setup with 1/2" copper tube. Will the comp fitting screw into my tank fitting? That I could not figure for sure until I took it all apart.... Left side hopefully screws into tank, rt. to trailer plumbing. Dave
-
I must not be visualizing this correctly, plumbing is not a strength for me.... But, it seems like if the comp fitting screws to the tank outlet, the pickup tube needs to run completely through it, half bent down in the tank, and half sticking out to reconnect to trailer plumbing. This is not how comp fittings are designed to be used and requires modification. I must be missing something big here. If you put something together, please send pics! Dave