routlaw
-
Posts
843 -
Joined
-
Last visited
-
Days Won
17
Everything posted by routlaw
-
FWIW in the conversation I have the highest gear ratio in my 2013 F150 with 3.5 Eco Boost engine. Our Oliver has been throughout much of the intermountain west with many a steep grade but the duo does just fine and not once has it seemed limited by either power or lack of lower towing gear ratio. In other words I wouldn't worry too much about it, you should be fine.
-

Suburban Furnace Maintenance and Repair for the Elite II
routlaw replied to routlaw's topic in Mechanical & Technical Tips
Sherry thanks for the comment. I can't disagree with your point of view either other than to say this would not in any shape form or fashion be an inexpensive standard annual maintenance project. This project is very labor intensive, especially the first time around and more importantly due to some of the shoddy and odd installation procedures some one took. Primarily the security bolt to the casing on the curb side which was completely not needed and unnecessary. And at least in my case its over a half days drive to the nearest Camping World store and the other local RV store is normally months out for scheduling repairs. Neither of those choices made much sense either. By no stretch of the imagination was I encouraging anyone to embark on this repair if they don't feel comfortable working on such things, thus the precautionary comments I made in terms of dealing with gas connections. Regardless some other members and owners had requested this information and I was glad to oblige. Hope this makes sense. Rob -
Suburban Furnace Maintenance and Repair for the Elite II
routlaw replied to routlaw's topic in Mechanical & Technical Tips
Correct Steve, due to the Atwood furnace which does require this larger cut out on the outside of the trailer. What I did only applies to the older installed Suburbans, thus my recommendation early on for making this conversion change from Suburban to Atwood. -
Suburban Furnace Maintenance and Repair for the Elite II
routlaw replied to routlaw's topic in Mechanical & Technical Tips
I have just finished captioning all photos. The system doesn't apparently allow one to add those captions later so I just created additional text above each picture. I hope this helps others to have a better understanding. Let me know if there are questions or if its all clear as mud. Thanks Rob -
Suburban Furnace Maintenance and Repair for the Elite II
routlaw replied to routlaw's topic in Mechanical & Technical Tips
John you make good points regarding captions for the photos. I was hoping that a picture, even mediocre phone photos in dark places might be self explanatory. Apparently not. Hopefully I can edit those and add captions. The exhaust duct at least on my Oliver is riveted in place, not screwed. Not the end of the world but when you are working in the "blind" not knowing exactly what you're getting into taking destruction up another notch makes the entire process just that much more daunting. But even if removed, it still would not have provided the access needed to remove the one self taping bolt in the front casing area. In my case I really had to do it the hard way, and believe this was a difficult pill to swallow. In a phone call to Jason Essary at Oliver he told me several owners have retro fitted their Elite II's with the Atwood. Its my understanding a new fuel line needs to be run, and some spacers mounted to the framework Oliver built to house the furnace. A large cavity also has to be cut into the side of the Oliver where those exhaust ports are to accommodate the Atwood furnace. Personally I don't mind propane appliances but I do see your point. We had a compressor type fridge in our T@b for 8 years before purchasing the Oliver. Absolutely hated that thing. It was very loud, as in you could not sleep with it running. And they do take a drain on the batteries too. I totally agree regarding your comments about shoddy work in Olivers. And as much as I hate to say it, this episode has really put a damper on my love affair with Olivers at this point. I spent 3 days in 90 ± degree heat working on this thing. A guy can get pretty irritated under those circumstances, putting it mildly. I'll try and get those captions done. -
Suburban Furnace Maintenance and Repair for the Elite II
routlaw replied to routlaw's topic in Mechanical & Technical Tips
Bill that is correct regarding the igniter, easily removable without removing the entire enchilada out of the compartment. At the time though for what ever reason I was convinced the issue was most likely with the sail switch, rather than igniter. At least in my case, there were other extraneous and very good reasons for removing and repairing some issues due to some very poor installation methods. It is worth noting the entire casing due to the wobbly mounting frame below did not provide for a stable installation which might have created more shock and rattle to the internal parts than was necessary or desired. Also worth pointing out, with two calls to the Suburban tech support for clarification on certain issues I found them to be extremely helpful. The people went to great lengths to explain the wiring, installation and other things regarding the furnace. Also if you notice in the photos I have applied some heavy duty red tape, (not to be confused with the tape inside the furnace) to the cutout hatches. Those openings have some raw exposed fiberglass rough edges and after cutting my arms and hands a few times I finally resorted to taping the edges each of those access hatches. Made a huge difference and would encourage anyone else to do the same. Thanks -
John, no PM, yet anyway but I just did post the Suburban furnace repair and maintenance situation you had requested. I hope its at least a bit more clear than mud and helpful for anyone who decides to undertake this.
-
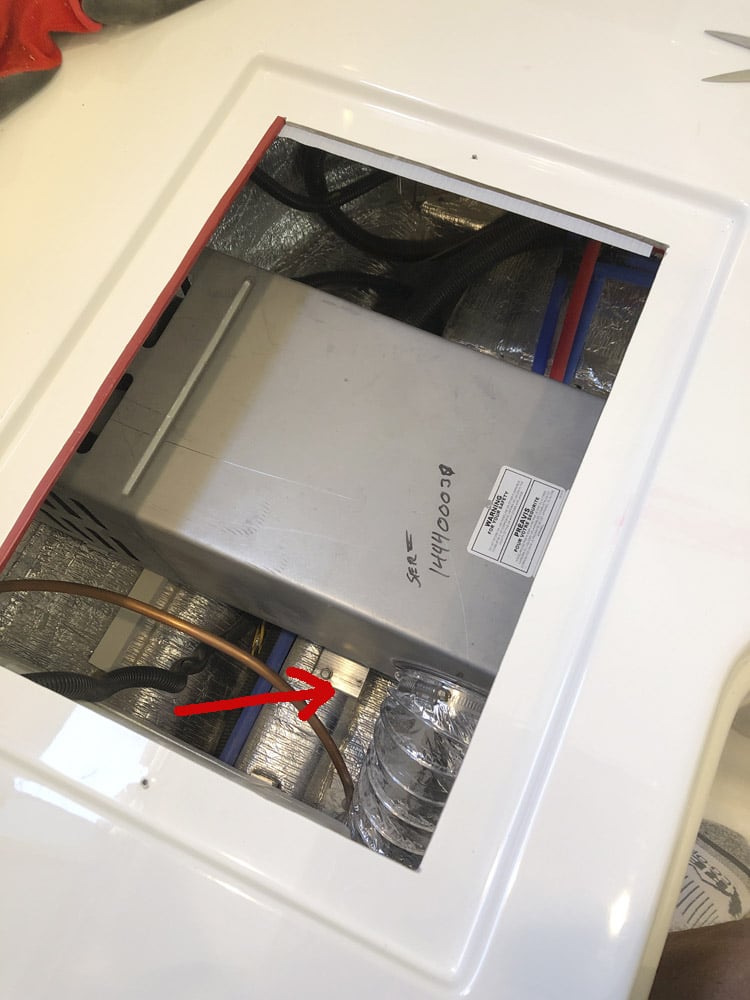
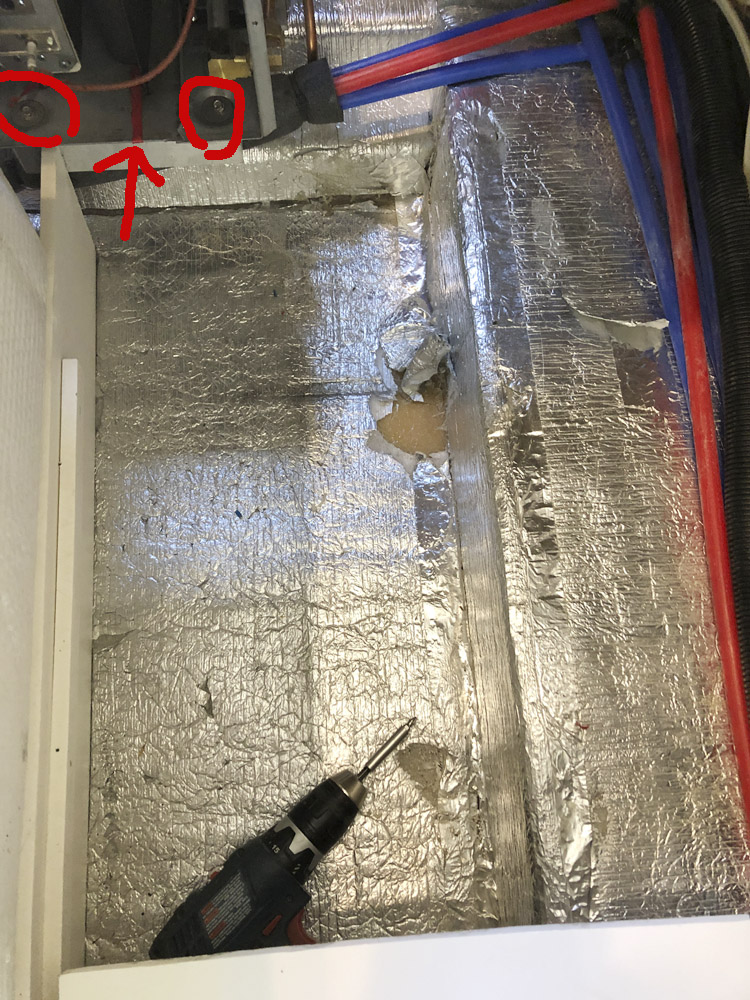
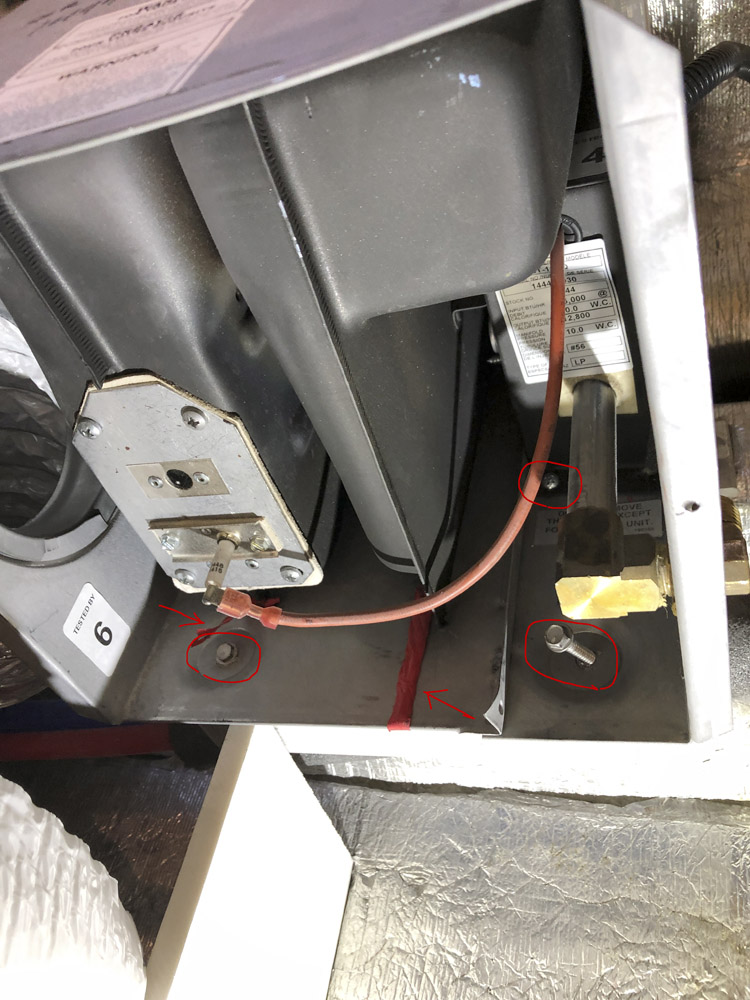
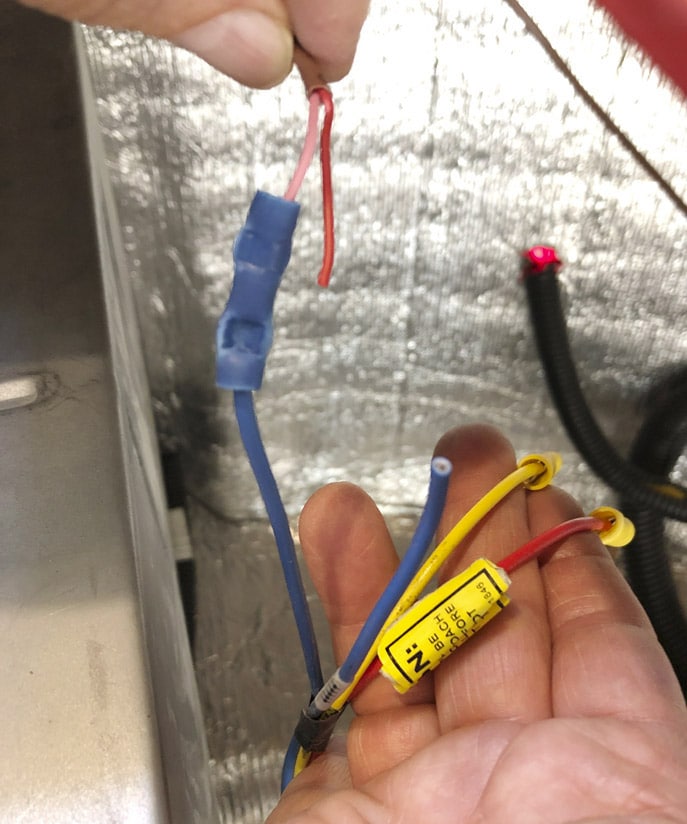
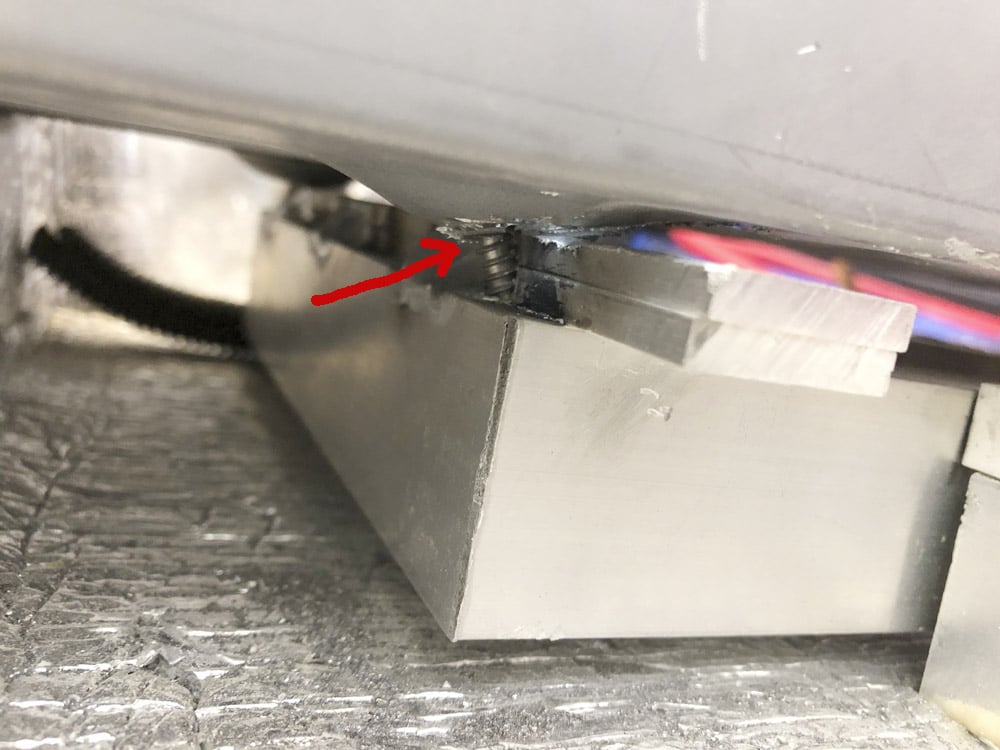
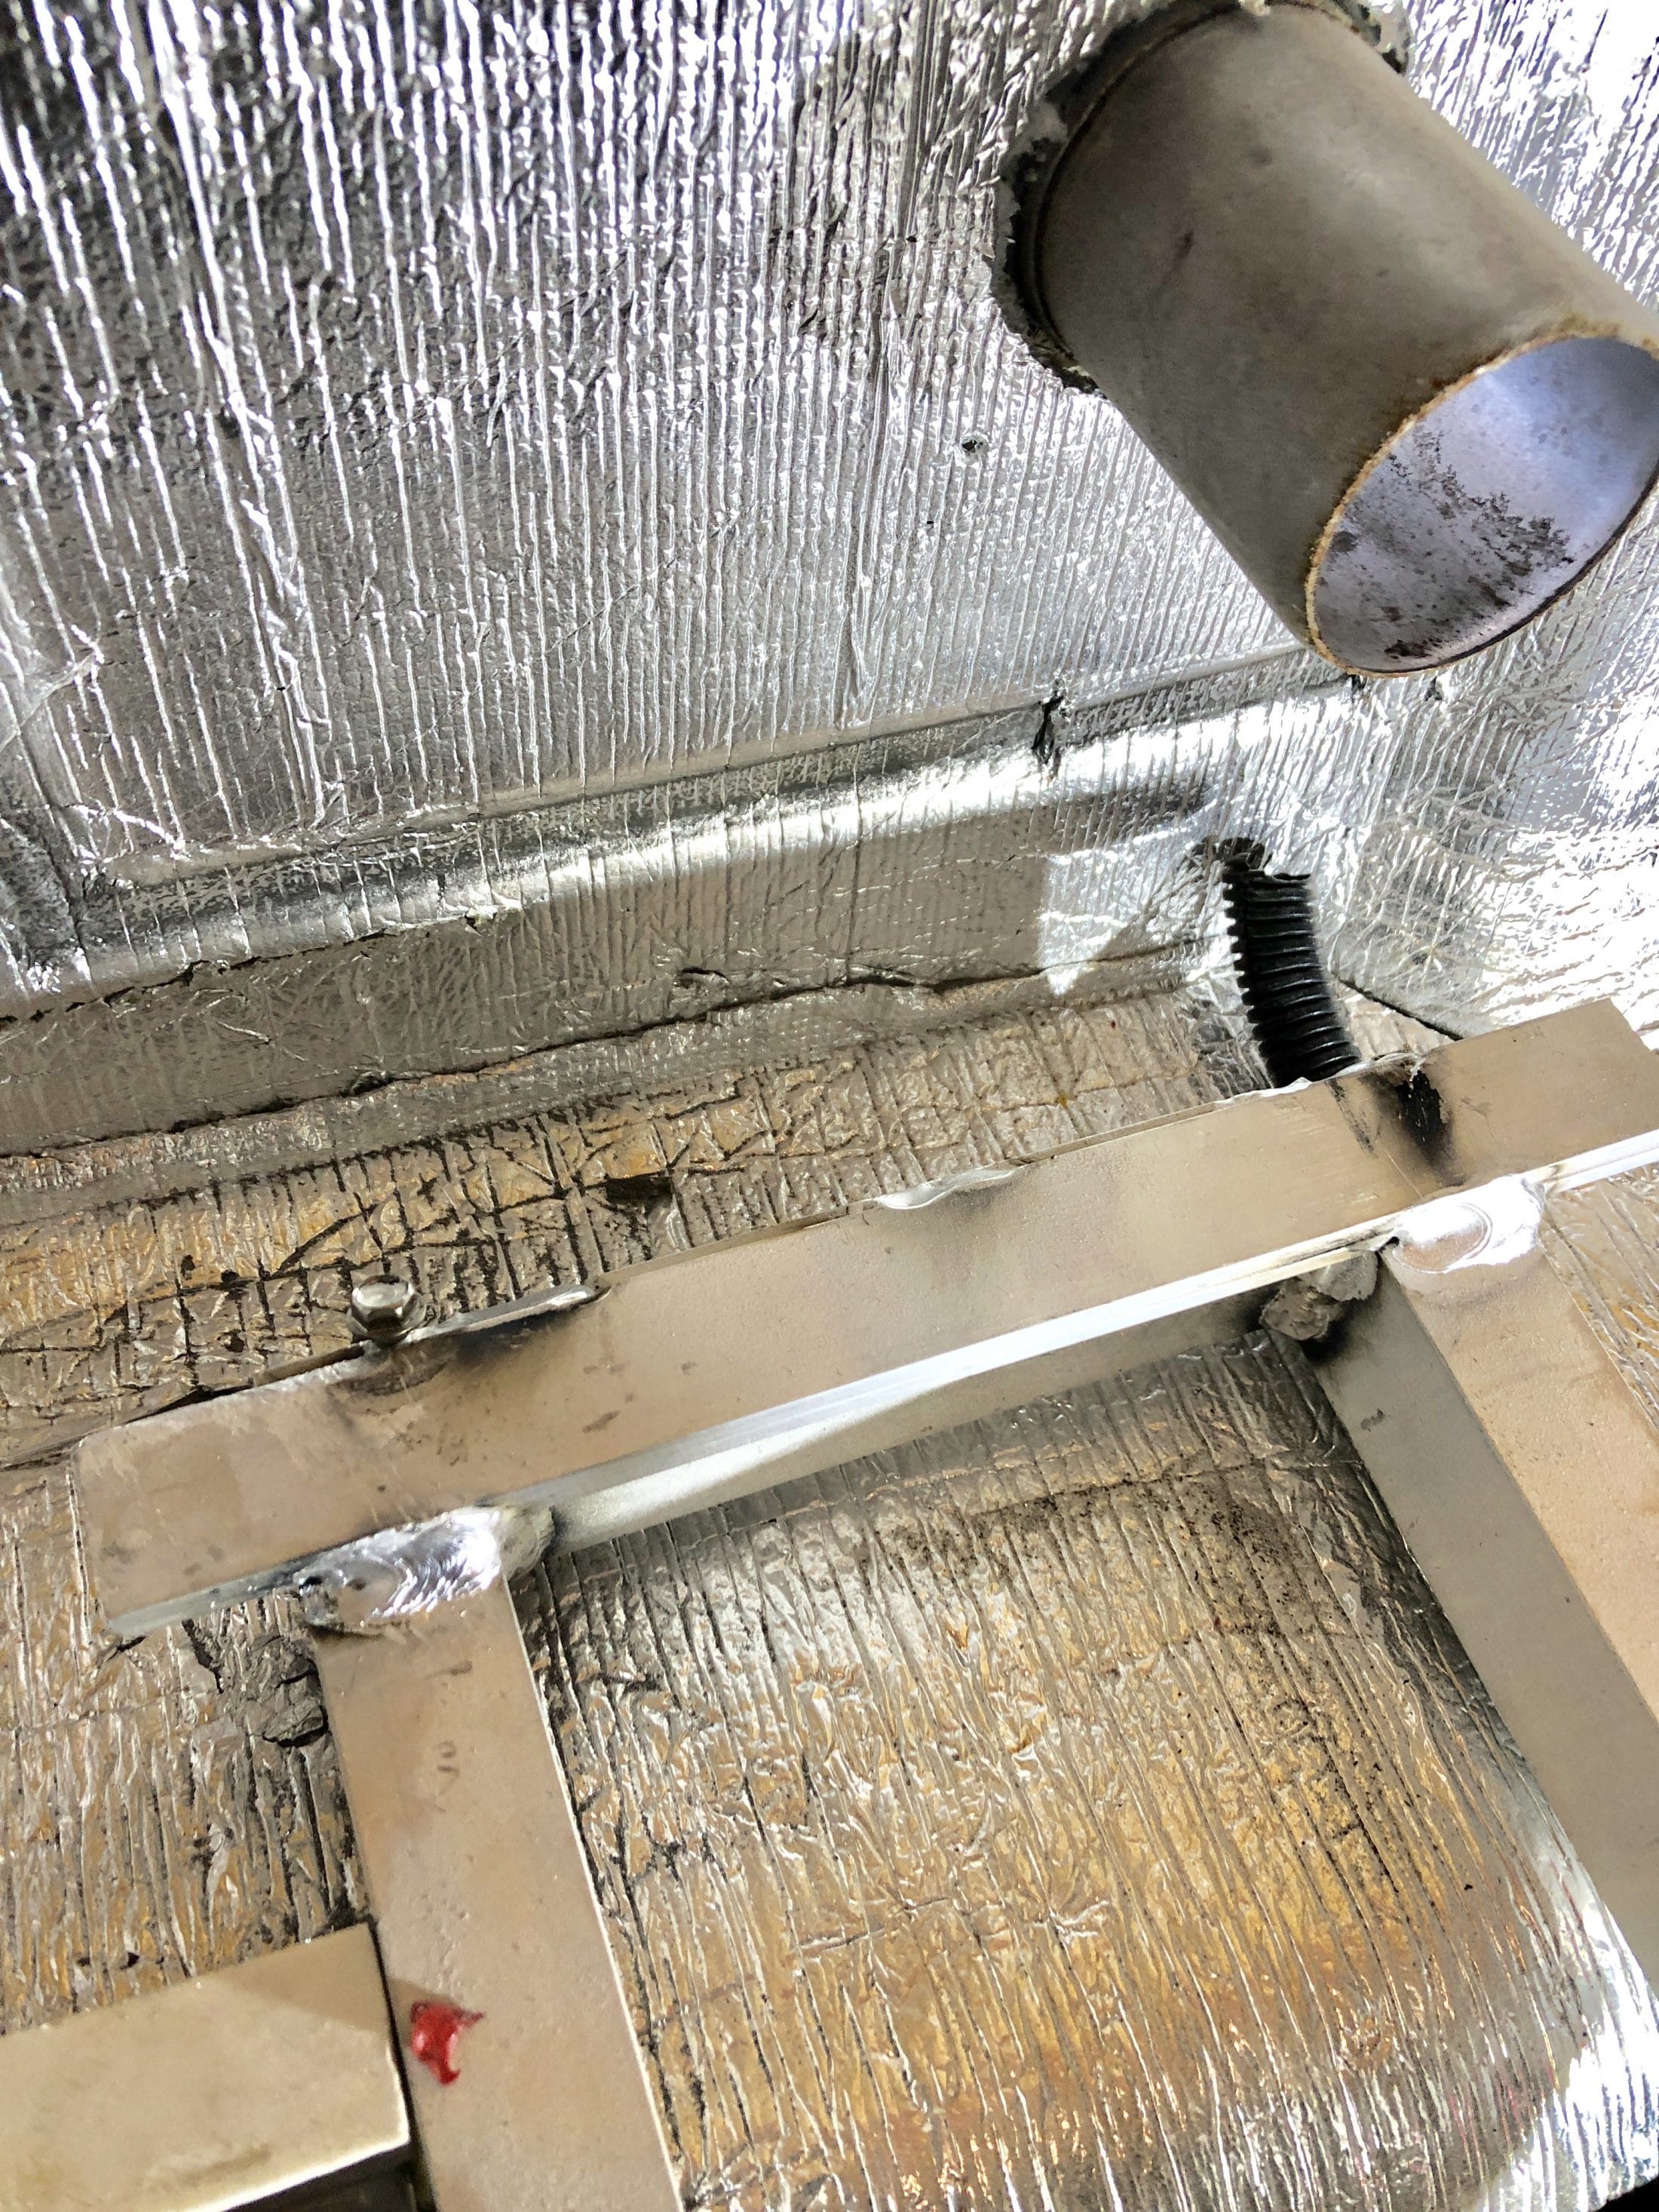
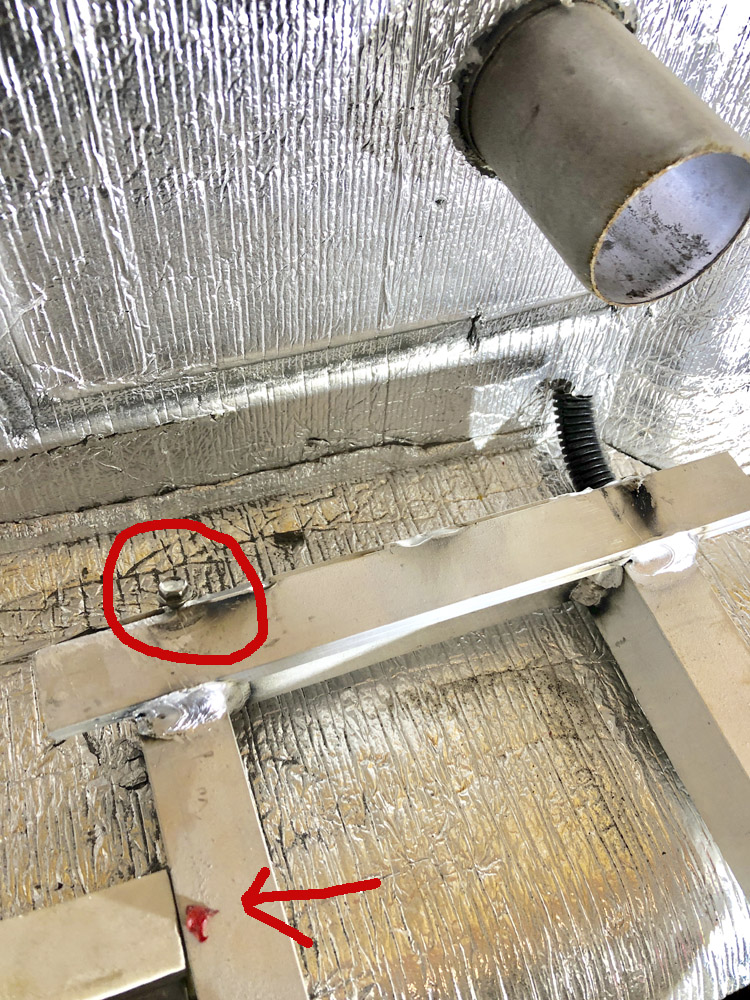
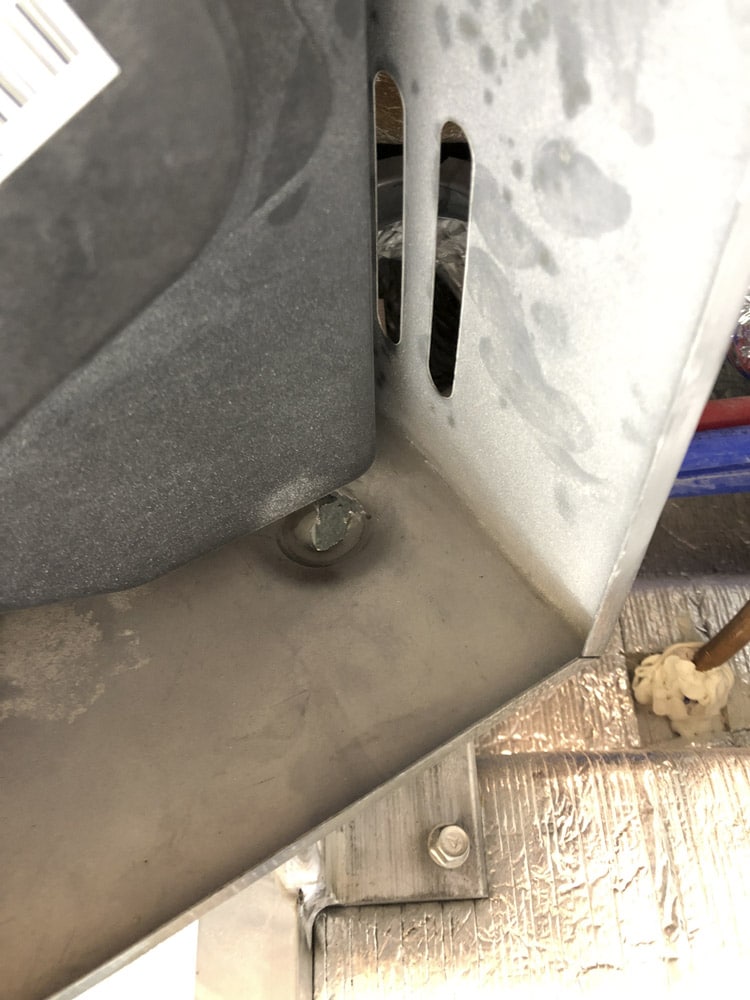
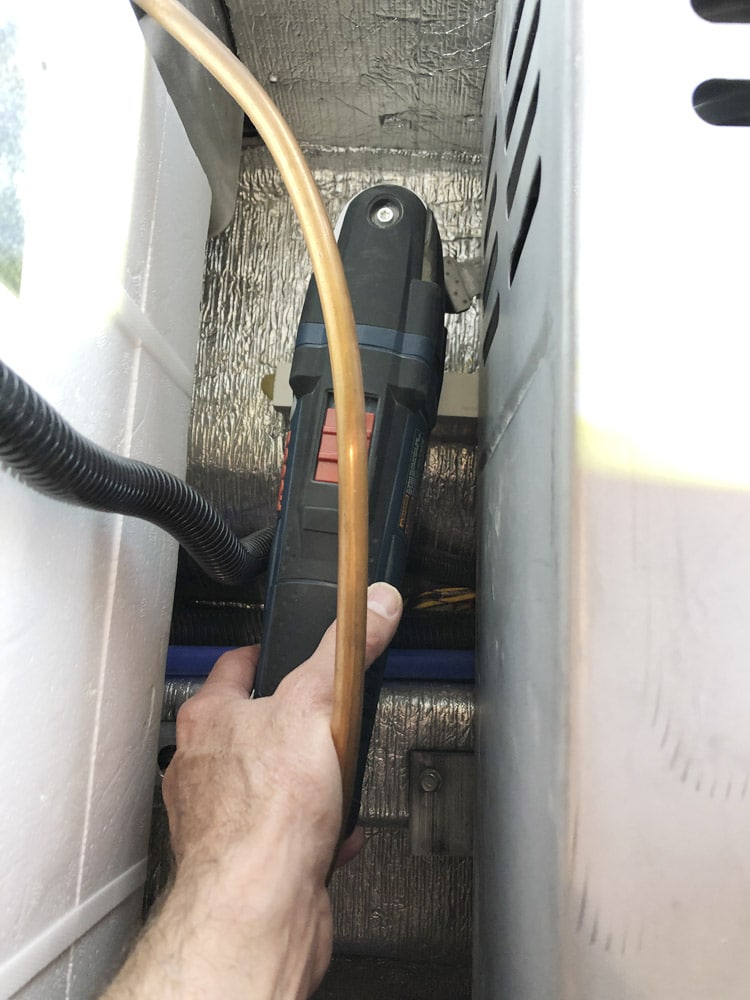
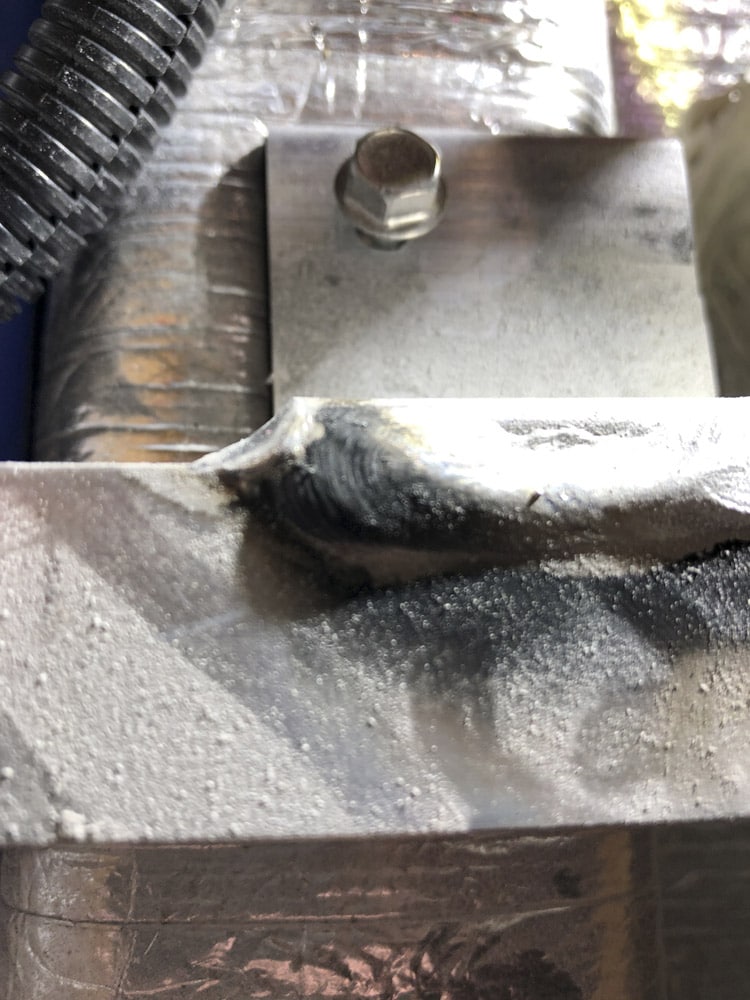
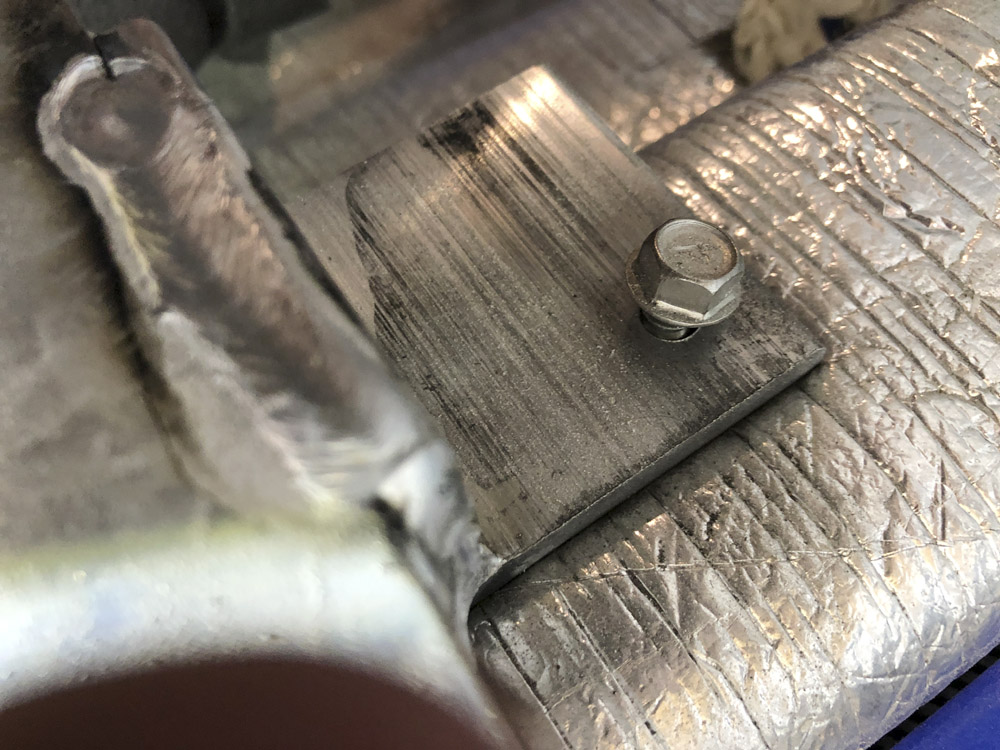
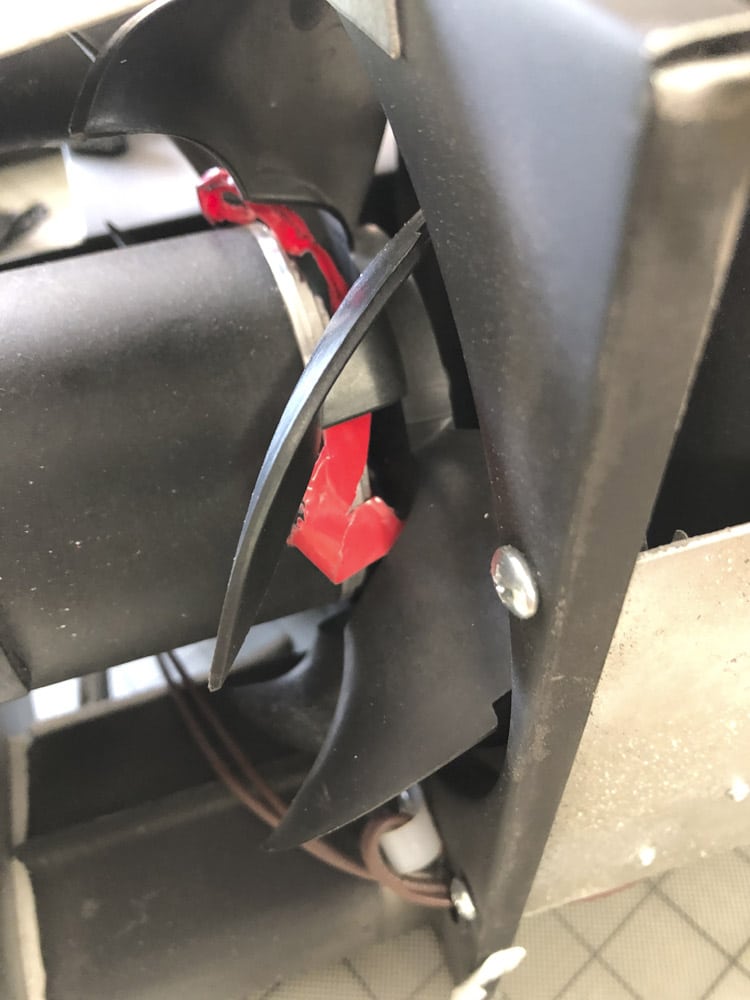
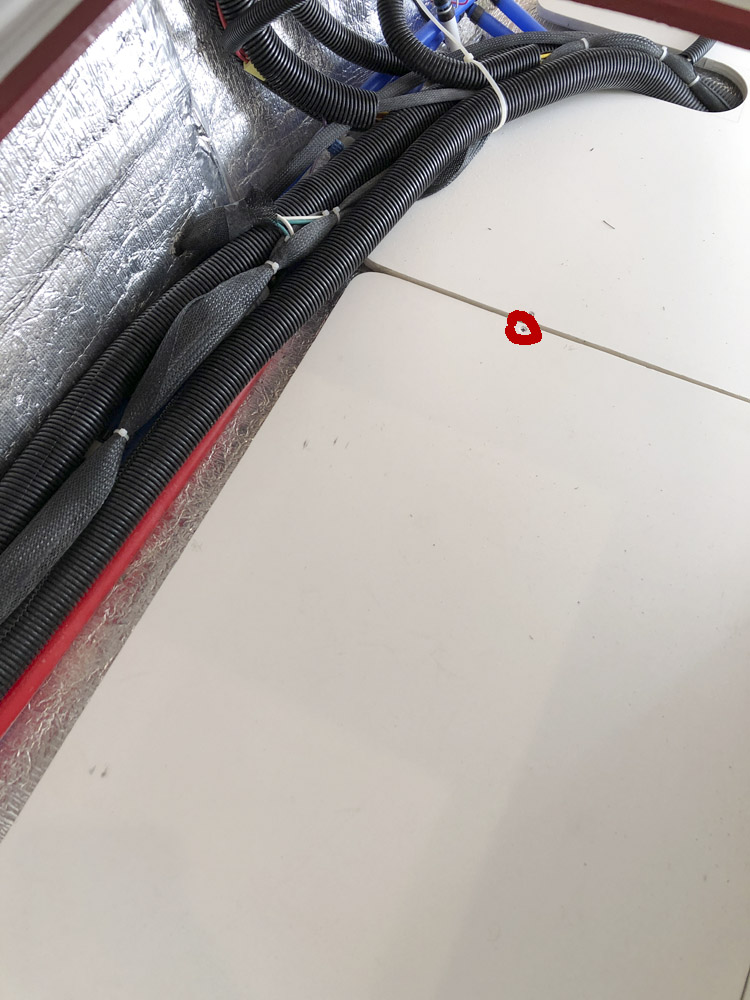
A week or so ago I posted issues I was having with our Suburban furnace and its erratic behavior, and had many helpful suggestions. John Davies requested I post a followup to benefit others who have this furnace should I take it upon myself to repair the thing which I did. It appears to be working fine now. Hopefully other members who still have this furnace will benefit from my experience. Be forewarned though removing and repairing this furnace is nothing short of a major PITA, so much so its hard not to recommend changing over to the Atwood which is now being used in both the Elite II and Elite. Even so you have to get the darn thing out of its compartment, no easy task in itself. So let the fun begin. 1. The basics: remove cover hatch under the curb side bed, remove everything stored in the basement rear, then the black rubber mats. At this point you will see several white plastic panels that make up a sub floor and partition to the heater compartment. The floor panel closest to the vertical partition will need to be removed, then the vertical portion will need to be moved out of the way. Its size prevents it from being completely removed from the basement area. There are several, 10 or so, phillip's head screws holding these two panels in place. Tape applied to the edges of all hatches due to abrasive fiberglass. This access looks down onto the furnace casing This second photo shows the compartment after the plastic boards are removed at the rear of the trailer in the basement. The two circled marks represent the two casing mounting bolts that have to be removed. The red arrow represents yet more melted red tape. 2. Once those panels are removed, you will have much better access to the furnace itself. Turn the gas valve off at the front of the trailer, then burn out the remainder of gas in the line at the stove top. At this point it should be safe to disconnect the gas line as you can see in photos provided. Remove the sheathing on the wiring harness that goes into the side of the casing to the furnace. This will enter from the right side of the casing, facing the rear of the camper. Take a phone picture of the harness making special note of the connections. The two blue wires are for the thermostat, but notice the ++++ will be unconnected, while the neutral is connected to a pink 18 AWG thermo wire. The other red thermo wire is also not connected. Do NOT connect the red to the ++++ blue wire during reassembly. The other two of the 4 wire harness will be red and yellow to the furnace and yellow striped and brown for the Oliver wiring. Yellow to yellow, red to brown when reassembling. At this point after photos are taken cut all wires, but you should shut off all power to the camper before doing so. I was careless and blew a 10 amp fuse to the furnace when stripping the wires again for re-connection a couple of days later. I would encourage anyone who has gotten this far to reassemble the wiring using insulated fast tab connectors so that you don't have to continue cutting these wires in the future, thereby shortening them during another service visit, which hopefully you'll never have to do. From the factory mine came connected with crimped connectors. Clear view of gas line disconnected from brass nipple, note red arrow pointing to wiring harness Removing one of the casing mounting bolts, red arrow points to the 90 degree brass nipple that will need to be removed Mounting bolt on right side unscrewed, circle around left mounting bolt, also notice yet more red tape, circle in the upper right is the one to dislodge the heat exchanger system from the casing. Wiring harness as attached to the Oliver. 3. Remove the two set screws at the rear of the furnace casing. John Davies pointed this out in a previous thread. At this point you will have a decision to make. Try to remove the furnace from the casing while allowing the casing to stay in place, or remove the entire enchilada at once. Neither choice has a happy outcome. Should you try to remove the furnace from the casing, the brass 90 degree nipple will also have to be removed first to clear the casing. Red arrow points to this in photos. There is one set screw that holds the heat exchanger within the casing and can be found at the bottom of a small sheet metal panel that holds the circuit board in place. The gas line runs through this panel which has some info regarding the specs of the furnace. If this doesn't work, then the entire casing assembly has to come out which is what I had to do. This presented another almost overwhelming conundrum as you will see in the photos. At the rear base of the casing there are two medium size set screws or self taping bolts. Remove those, and if you are lucky the whole thing should just slide out. I wasn't because who ever assembled and installed this furnace on our Oliver also installed one of those self taping bolts to the front of the casing bottom completely out of sight and completely inaccessible. I'm not making this up. Suburban only requires two bolts to be mounted at the back, where the access panel is located. Close up of bolt attaching casing to the outside edge. This is the one which was totally inaccessible and had to cut. Furnace mounting frame made by Oliver that attaches to the carriage frame of trailer. Its obvious I was not able to cut the bolt but rather the sheet metal casing and then pried the casing away from the bolt. Arrow points to yet more tape debris. Looking down into the torn mounting bolt hole of the casing. Another view of the cut casing from below 4. Assuming you have a front mounted casing bolt, it gets ugly here. You will either have to cut the bolt from underneath or cut into the casing and pry the thing off which is what I did. So with rear bolts and front bolt removed, gas lines disconnected and wiring harness cut it should be fairly easy to slide the assembly out of the compartment, but it is a tight fit and will need to be shifted sideways while pulling backwards to clear the Oliver compartment area. Using my multi tool saw to cut bolt/casing. This was extremely difficult access with very little room to move let alone apply force. 5. After removal there were a few disturbing factors I had to deal with. One the frame work the furnace is mounted to was extremely loose and wobbled back and forth like a seesaw because the installer was too lazy to finishing driving the bolts completely down snug to the Oliver carriage frame. No they did not vibrate loose, the bolts were way too tight to ratchet down. As you can see in the photos those bolts were 1/4 inch to 3/8 of an inch above the mounting frame. But thats not all. Once I had the assembly out of the camper, and pulled the heat exchanger from the casing I found significant amounts of some sort of red tape all over the inside of the casing. The tape was similar to electrical tape only red but most of it had been completely burned onto the heat exchanger and other parts or was wrapped up around the fan assembly and the shaft going into the motor. Again I'm to making this up. At this point I started noticing shreds of this red tape debris laying around parts of the furnace compartment area as well. Thankfully there was no damage to the sail switch to the best of my knowledge. The next two shots are the loose mounting bolts that attach the furnace frame to the actual Oliver frame. This illustrates the extent of unfinished work. The next two shots show red tape bound up on the fan and shaft to the motor. 6. At this point I figured I better inspect the ignitor and unscrewed it from the rear of the heat exchanger it looked ok other than some carbon deposits but I started noticing the center pin rotated about 15 or so degrees which would change the tolerance. Called the local RV dealer and luckily they had replacements, but didn't realize until back home and reinstalling the gasket was disintegrating. Back to the RV dealer to buy a gasket kit for the ignitor and furnace door. At this point reassembly was pretty much academic. But before installing the casing assembly I ratcheted down those bolts that hold the furnace frame onto the Oliver carriage frame so the entire assembly was rock solid once complete. 7. The brass 90 nipple should be reinstalled with gas pipe dope, but the fitting to the gas line does not require this as its a compression fitting. Make sure all fast tabs connectors for the wiring harness are crimped like a cold weld. Note: not all crimpers have the ability. Once everything is properly hooked up, turn the gas valve back on. Wait awhile and look or smell for leaks, better yet use a propane sniffer if you have one. I don't. My gas line connections appeared to be good so at this point it was time to fire things up, but it was 90 degrees outside. I would have to wait until the next morning for cooler weather. Thus far its been working fine since reassembly. View of the sail switch from above, which is mounted in the upper left corner of the casing assembly so that the fan blows on it. Igniter removed Attaching screws to the basement subfloor made of plastic sheeting, red circles represent the screws. Let me know if you have questions, be glad to answer what I can.

-
Over half of my clicked links end up with 404 errors but I also find this forum to be excruciatingly slow given that my internet speed is very fast. I don't have slow issues on other websites or forums.
-
Mike and Carol, I live in Bozeman and know these areas well. Fires: we have had an extremely mild summer this year with virtually no fires at all, lots of rain and what few have existed thus far have not made for bad air quality in fact its been quite good on all but a couple of days. Its my understanding a small fire has broken out in YNP lately though. IOW's this would be an excellent year to travel to this part of the country. Hope you have a great trip. Bowman Lake: Regardless of what Overland has done, do not do this! He is extremely lucky he succeeded. Ask any ranger in this park and they will tell you the same. Normally you only see tent campers, vans, and truck campers up there and there is a good reason for it. I have been to this lake dozens of times and my wife and I have paddled the entire length of it a couple of times. Its gorgeous and one of the nicest parts of this park. Don't go on the weekend it gets very busy with folks who come up from the Flathead Valley and other surrounding areas. Camping: I find it interesting others like St Mary, to me its just too busy cramped with tight spaces et al. A bit further on the same road is a small campground with a couple of spaces just large enough for an Oliver. Most are too small and tight to fit an Oliver but Rising Sun is a sweet little campground. As others have suggested Two Medicine and Many Glacier are also very nice. Most but not all of the hikes from Two Medicine can be quite long so be prepared. At the time of year you will be there most likely Apgar crowds will be long gone and camping should be fine. Mid summer its a zoo. One of our favorite campgrounds is Avalanche and while the area gets lots of crowds due to the hike up to Avalanche Lake the campground itself is quiet and peaceful, but it does close early in the year. BTW the dump station at Apgar is awful for Olivers, not worth going into for now but there are better choices out of the park. You might also consider some of the excellent State Park campgrounds in and around Flathead Lake, Wayfarers is awesome which is in Bigfork, but all are quite nice. I would not advise Whitefish Lake St Park though, well unless you like to be jolted awake in the middle of the night with freight trains that run directly next to the park. Nice park otherwise. YNP: As suggested the crowds should be thinning out quite a bit. Pebble Creek on the far end of Lamar Valley is also nice, as is Slough Creek on the way there. As you head out the park to the east don't miss the chance to travel over the Beartooth Highway. It will be a trip you're not likely to ever forget. This road will take your over two summits that are 11,000 feet in elevation. Views are out of this world and there is some great hikes to be had as well. There are some excellent campgrounds along the way, Beartooth Lake, Island Lake are two. For your first trip I would suggest NOT towing the Oliver over the road. Suffice it to say its steep and winding and gets a fair amount of traffic, yes even at these altitudes. It closes at the first snowfall so pay attention to that. The road drops down into Red Lodge on the far side and if you decide to go up from that direction there are also some great campgrounds up Rock Creek Canyon. They allow for lots of dispersed boon docking (free) as well as pay sites. I was there last weekend and due to reservations most were all booked. If you travel down Paradise Valley on the way to YNP, Pine Creek is an excellent campground with at least one very steep hike but well worth going up to the falls a short way. The Madison River Valley further to the west is well worth the effort with several BLM and Fish and Wildlife campgrounds along the way. The Madison is heavily fished. GTNP: Also not to be missed, Gros Ventre is a huge campground but still nice. I agree with the assessments regarding the other campgrounds here. I could go on, but good luck and have a safe trip. Rob
-
Not sure what brand ours is, doesn't say on the front face but it has never gone off (knock on wood) to the best of my recollection and we are hull #70 March 2015 delivery. As others have suggested sounds like you might have a faulty unit to replace.
-
Suburban Furnace acting very erratic
routlaw replied to routlaw's topic in Mechanical & Technical Tips
But surely even with this odd configuration there would still be at least both Tstat wires for the furnace connected to two wires from the Oliver? -
I have done a fair amount of camping in some cold weather but have never run into any frozen lines so far. Thus far we have seen some teens, to 20's or so for a few days running but knock on wood no issues yet. Hope this helps. Rob
-
Suburban Furnace acting very erratic
routlaw replied to routlaw's topic in Mechanical & Technical Tips
Agreed Overland. I was on the phone for quite awhile this afternoon with the Suburban tech support people which were very helpful. Understand this is not a Dometic, it states RV Comfort HP on the Tstat, but what is odd is there is no pink wire at the Tstat, however there is a reddish brown which as you can see on this photo is NOT connected. This episode just gets weirder by the hour. We can't remove the furnace from the camper either as there seems to be a hidden screw in the casing toward the bottom front near exterior wall that has been attached to the forward support bridge. I'm not making this up. How on earth any installer was able to do this is behind me. Next option is to try and extricate the heat exchanger assembly from the casing. That ought to be fun. Thanks -
Suburban Furnace acting very erratic
routlaw replied to routlaw's topic in Mechanical & Technical Tips
This doesn't look right to me, only one wire hooked up to the thermostat. Normally as prescribed by Suburban there should be two wires running from the thermostat to the two blue wires supplied by Suburban. Oddly enough though there are no pink wires at the Tstat, but one red wire. So how could this furnace have ever worked in the first place? Photo below:
-
Suburban Furnace acting very erratic
routlaw replied to routlaw's topic in Mechanical & Technical Tips
I've heard back from Jason and thought I would share what he has had to say thus far about working on the Suburban furnaces, should anyone else run across a similar problem with same furnace. "The exterior exhaust should be riveted in place. The furnace has some mounting screws to hold it to the aluminum bracket inside the camper. The furnace itself once loose has to be removed either through the basement or through the above access panel if you can maneuver it." So effectively those ports are not coming out without some serious destruction, and getting this beast out is not going to be easy which we all knew anyway. In the meantime this furnace has now started up every time I've tried this morning and appears to have blue flames although access to the peep hole is minimal at best and getting a good iPhone photo just about as easy. I've not been able to identify the sail switch with multiple attempts at iPhone photos from inside the furnace. @ Ken, by now I have to assume you have the Atwood furnace and not the Suburban as there is no cover to remove on the Suburban which is a complete total encasement. Thanks Rob -
Suburban Furnace acting very erratic
routlaw replied to routlaw's topic in Mechanical & Technical Tips
Just heard back from Jason this morning, he felt it was most likely the sail switch too. FWIW, the furnace fired up this morning with no problem, but I just don't trust it until I can get in there and see whats going on. Thanks Dave for this video I will take a look at it shortly. I do have those manual papers but their instructions are not very explicit for removal IMO. Need to check the codes too. @ Ken, congratulations on pulling this off while in a campground. Well done! -
Suburban Furnace acting very erratic
routlaw replied to routlaw's topic in Mechanical & Technical Tips
John this is great information, thanks for posting all this, very helpful. The way you accessed this was exactly what I had perceived what one had to do. What I don't understand is why Oliver did not create a situation that made servicing these things easier. My guess is, the furnace was installed in the bottom exterior tub before the interior tub was mounted making it nearly impossible to extricate the thing out of its original installation. The least they could have done was provide a larger access to those two screws at the back plate. Not trying to rag on Oliver but this really is a poor design situation for future service. Regardless I agree in order to work on this thing they have to be taken completely out, no small task. There is an on off switch where the wires enter the chamber which I turned on and off a several clicks hoping that might just clean up a contact an make for an easy fix. In the meantime I have a service request into the folks at Oliver on what I should be doing next. I will run the furnace tonight to see how things go, but suspect an exorcism is on my agenda. -
Suburban Furnace acting very erratic
routlaw replied to routlaw's topic in Mechanical & Technical Tips
@ Dave, yeah the Elite II's are located behind the hot water heater on the curb side, in what can only be described as an extremely difficult access. I agree I don't think my Tstat is toast, pretty sure its something at the actual heater unit. Thanks -
Suburban Furnace acting very erratic
routlaw replied to routlaw's topic in Mechanical & Technical Tips
Thanks Dave for the input. How on earth did you expose any connections without taking the entire enchilada out of the camper. On mine I have no access whatsoever that I can see. There is a group of wires going into the back side but no exposed connectors at all that I can see. I will add though at all times the fan motor will turn, but the erratic part is the ignitor not lighting. After posting this initial call for help a quick internet search shows that these furnaces are notorious for this issue of erratic behavior. Often the problem is a "sail switch", sometimes an incorrect setting for the solenoid valve, then a heat overload switch and last but not least is debris, insects and other creatures building next and obstructing the ports. If I'm not mistaken Oliver has gone to a different furnace, perhaps because many have had issues with these as well. The thought of taking the darn thing out is a bit daunting. -
Dave why not just use a long necked brass Master lock rather than the pin. When we picked up our Oliver it did not come with a locking cotter pin, probably someone forgot to install. So I just bought a lock instead, key stays on my tow vehicle key chain. Works great.
-
Hoping someone can shed some light on a Suburban Furnace that is not working most of the time, or at best being very erratic. I have been so busy these last couple of years I've had very little time to get out in our Oliver, but this happened earlier while up in Glacier NP with terrible weather, then again in the Beartooths this past weekend, also very cold at night with the need of heat. Briefly this is what happens, turn furnace on the fan runs for approximately 15 or 20 seconds but the furnace does not seem to ignite the whole thing quits. Turn the switch off, than back on again same thing over and over. Last night I did this exercise some 15 or so times all to no avail. The previous night it worked. Now here is where it gets really odd. Broke camp drove down the road a ways into Red Lodge pulled over to the curb, went back to the camper furnace works. The trailer was way out of level, went down the road another mile or so, did the same thing and furnace works again. In frustration drove home unhitched, turned on furnace and it works again. However I just don't trust the thing anymore at this point. At all times the camper was level, fuel bottles full and all other gas appliances, fridge, cooktop and hot water heater all worked perfectly, and checked fuses all good. Does anyone have any clues what so ever that might be causing this.
-
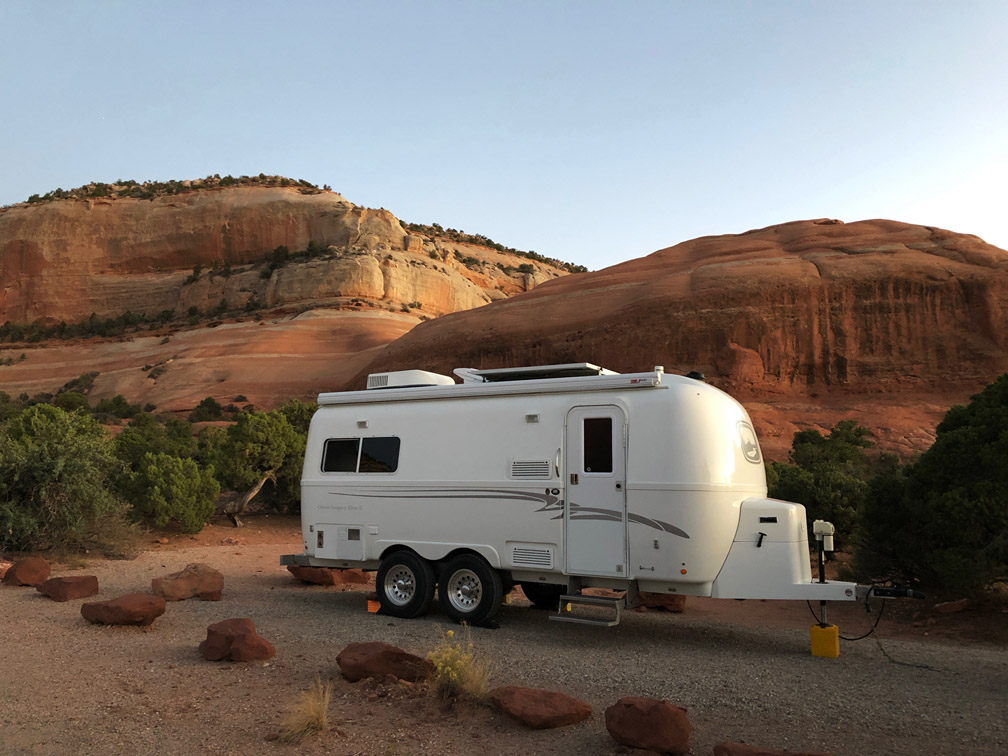
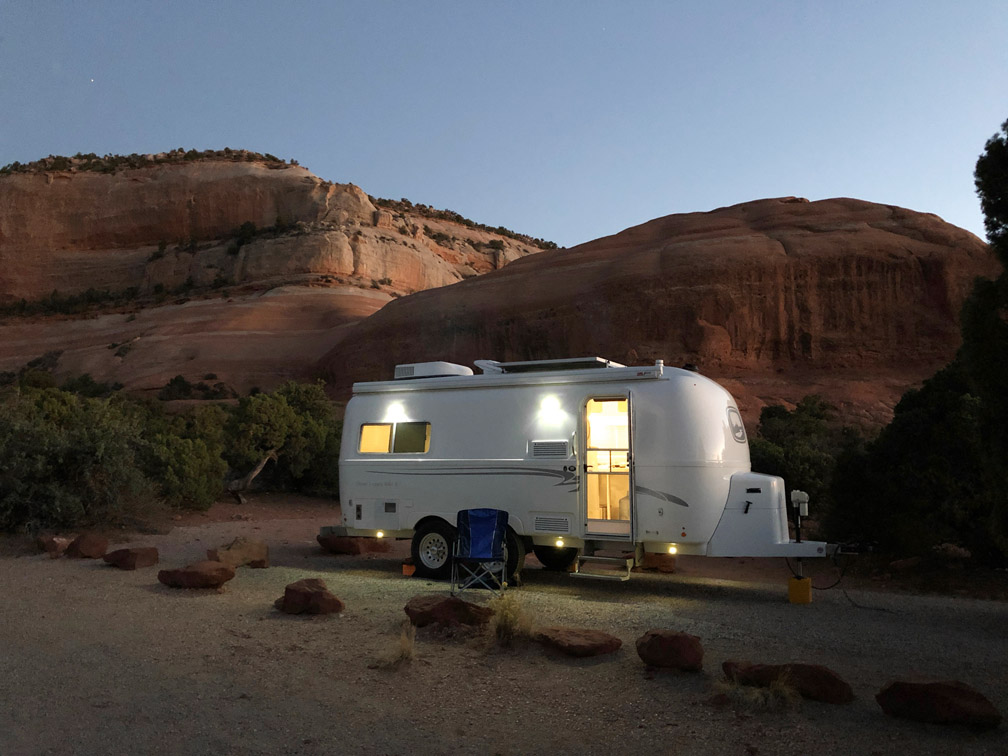
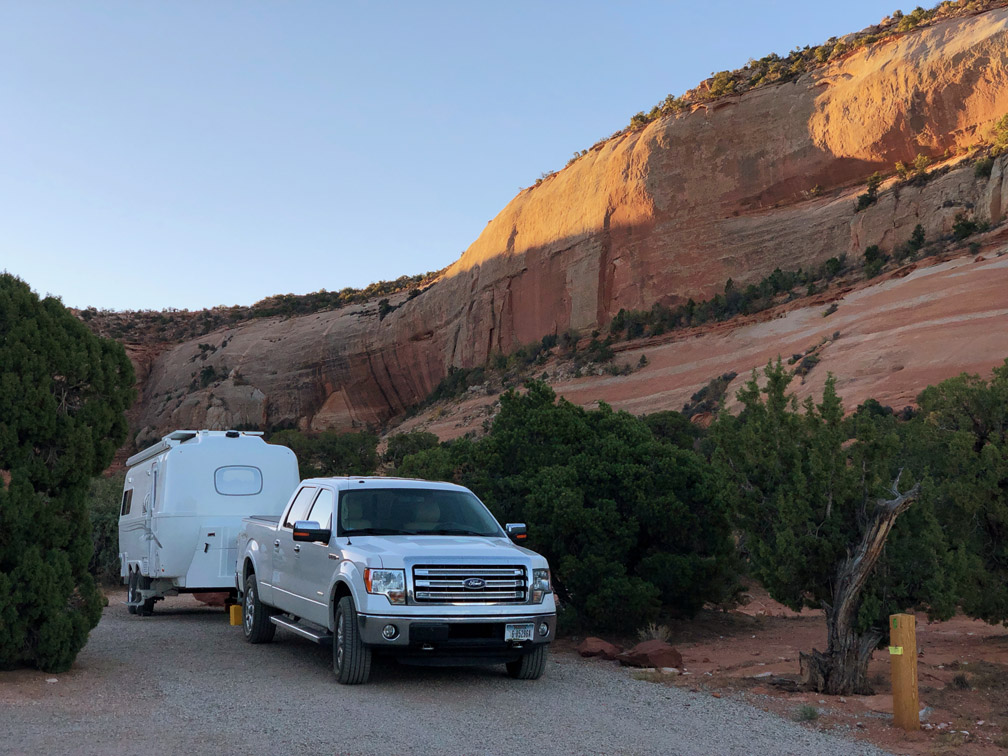
@wolfdds Sorry I've had some busy weeks lately and have not spent any time on any forums including this one. But to answer your question this campground is south of Moab on BLM land, called Windwhistle. It is small allowing for only about 15 sites ± and not all will fit RV's. This has to be one of the best well kept secrets in the area. Its just an awesome campground with host that have always been exceptional. Its reasonably close to many points of adventure, well as much as anything is in the deserts of Utah. Happy Camping!
-
John, this campground is about 45 minute drive south of Moab fairly close to the Needles Overlook area and just before the turn off to the Needles on highway 191/89. Very nice area to camp and excellent campground host. We have stayed there many times though my wife could not make this trip, thus the solo chair. Thanks
-
Just returned from a two week trip down in the southwest, thought I might show a couple of campground pics. Thanks for looking.