John E Davies
-
Posts
5,759 -
Joined
-
Last visited
-
Days Won
243
Everything posted by John E Davies
-
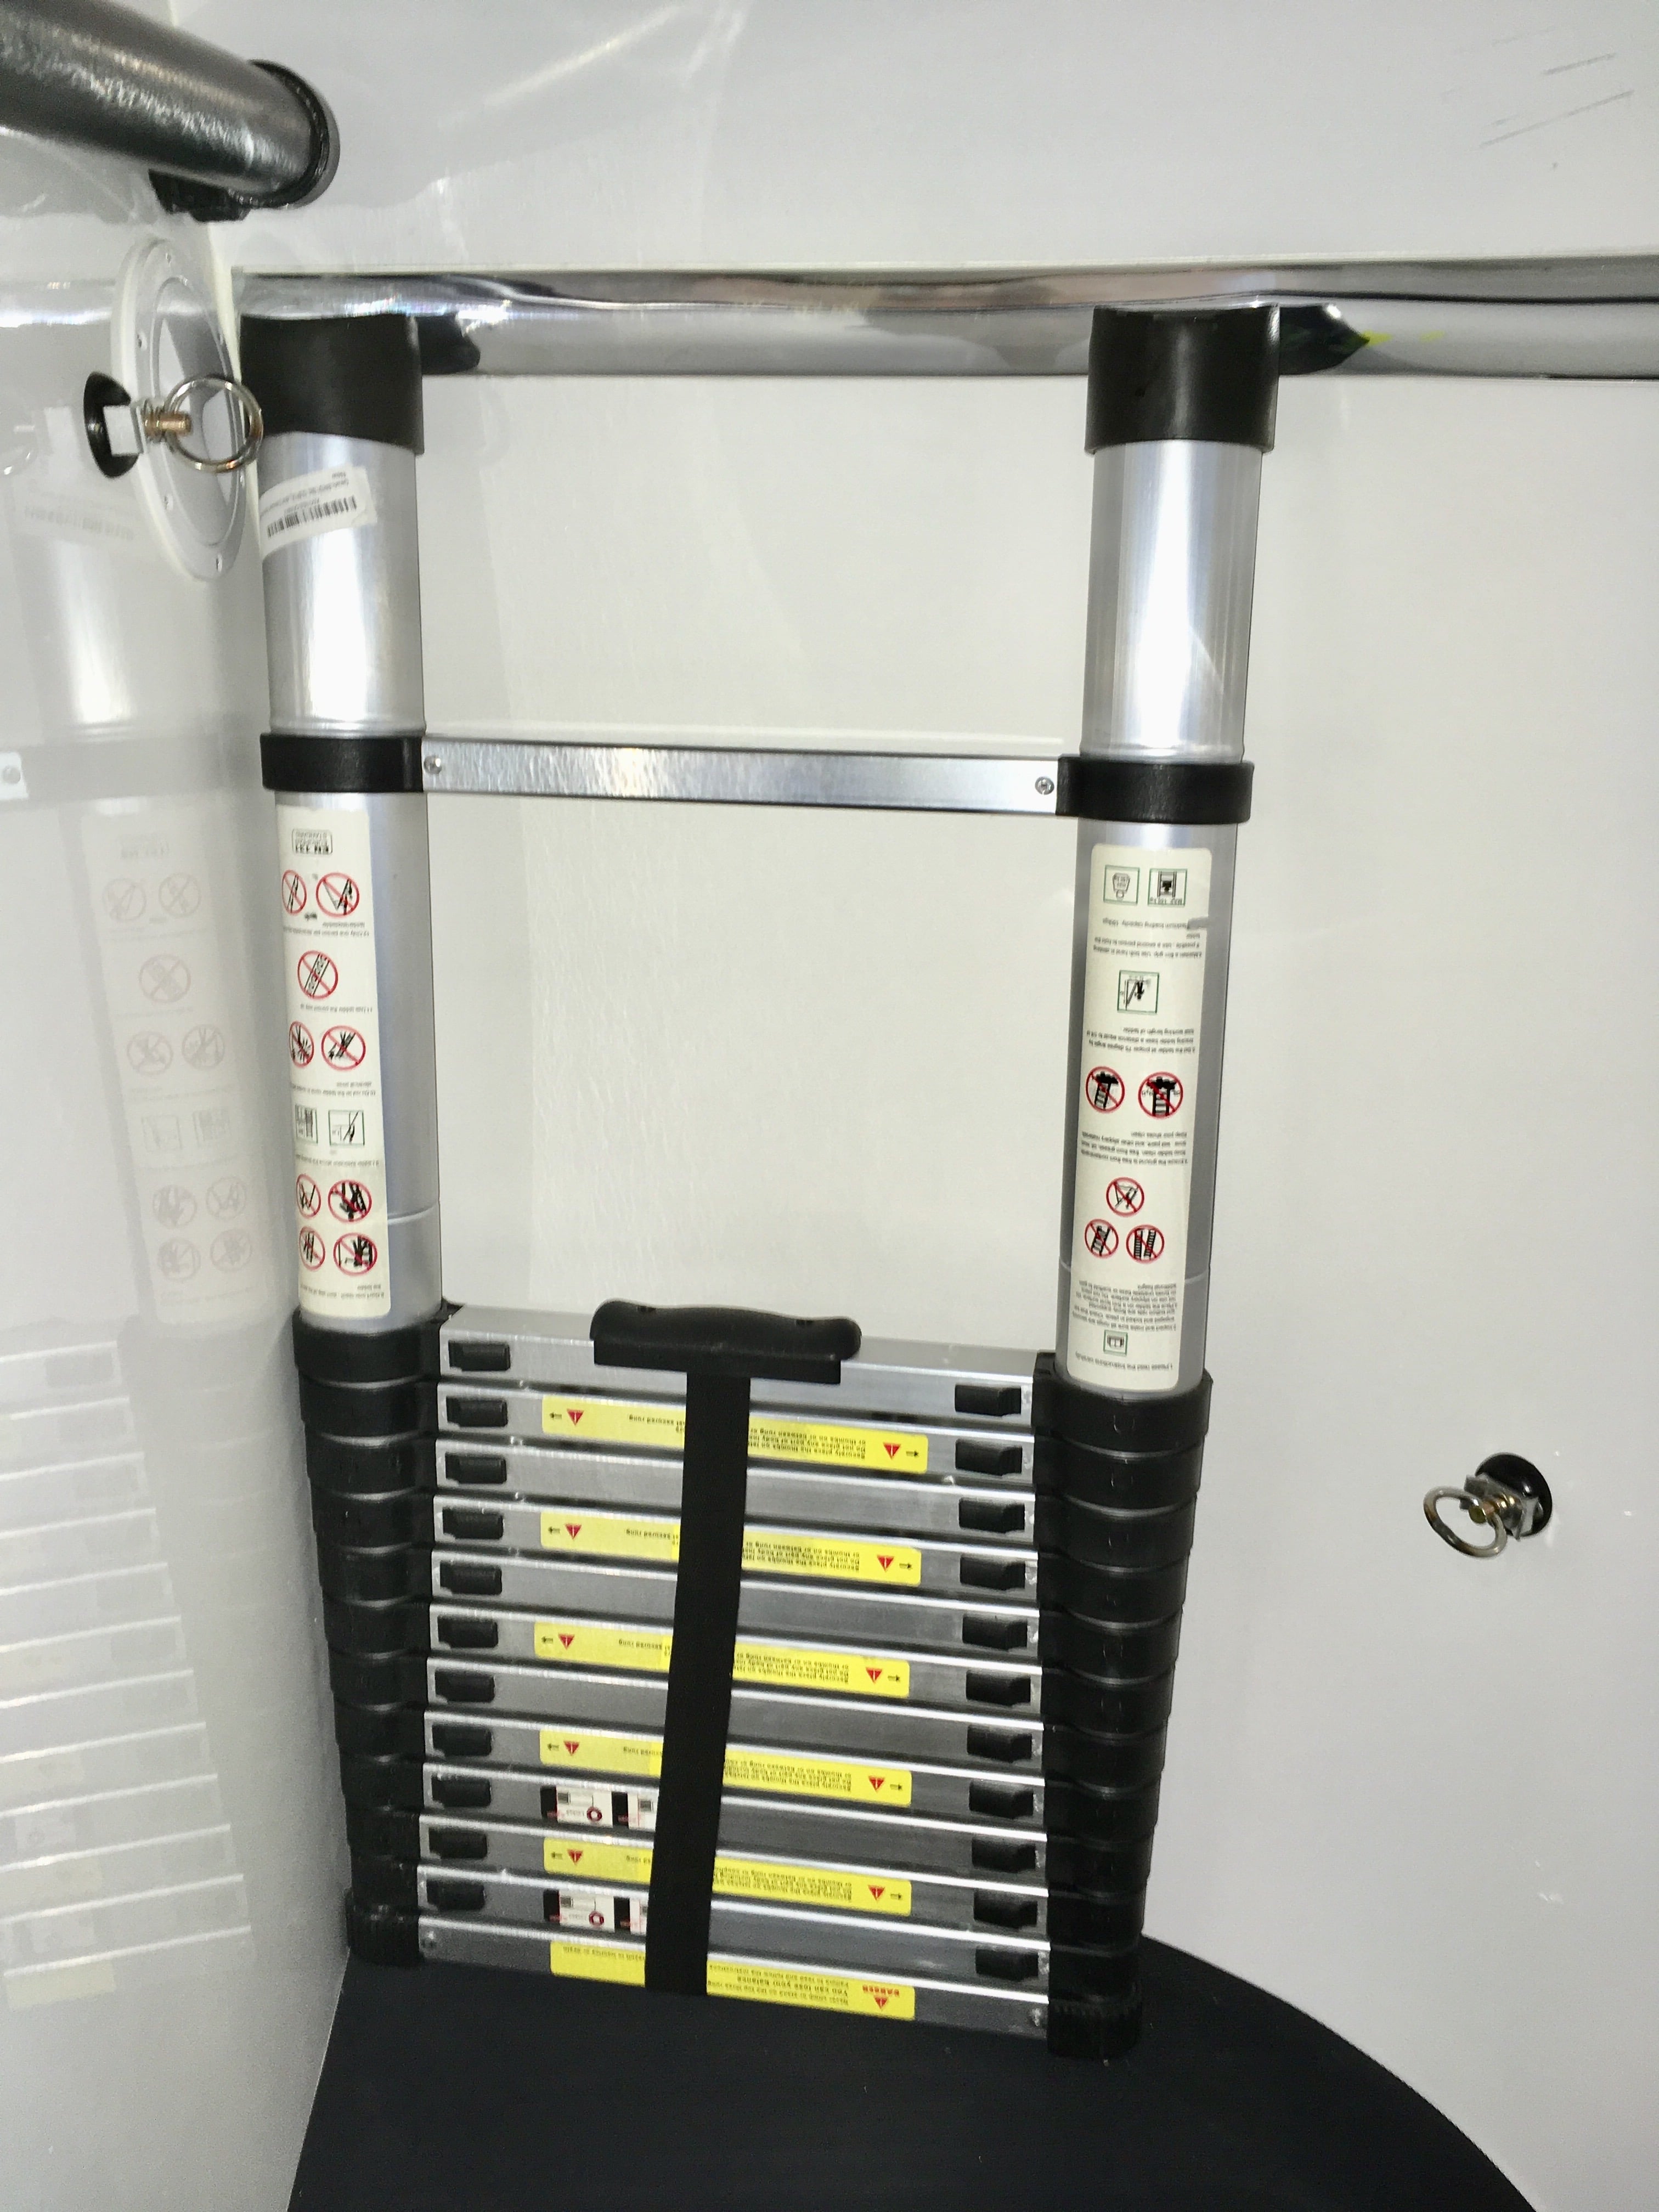
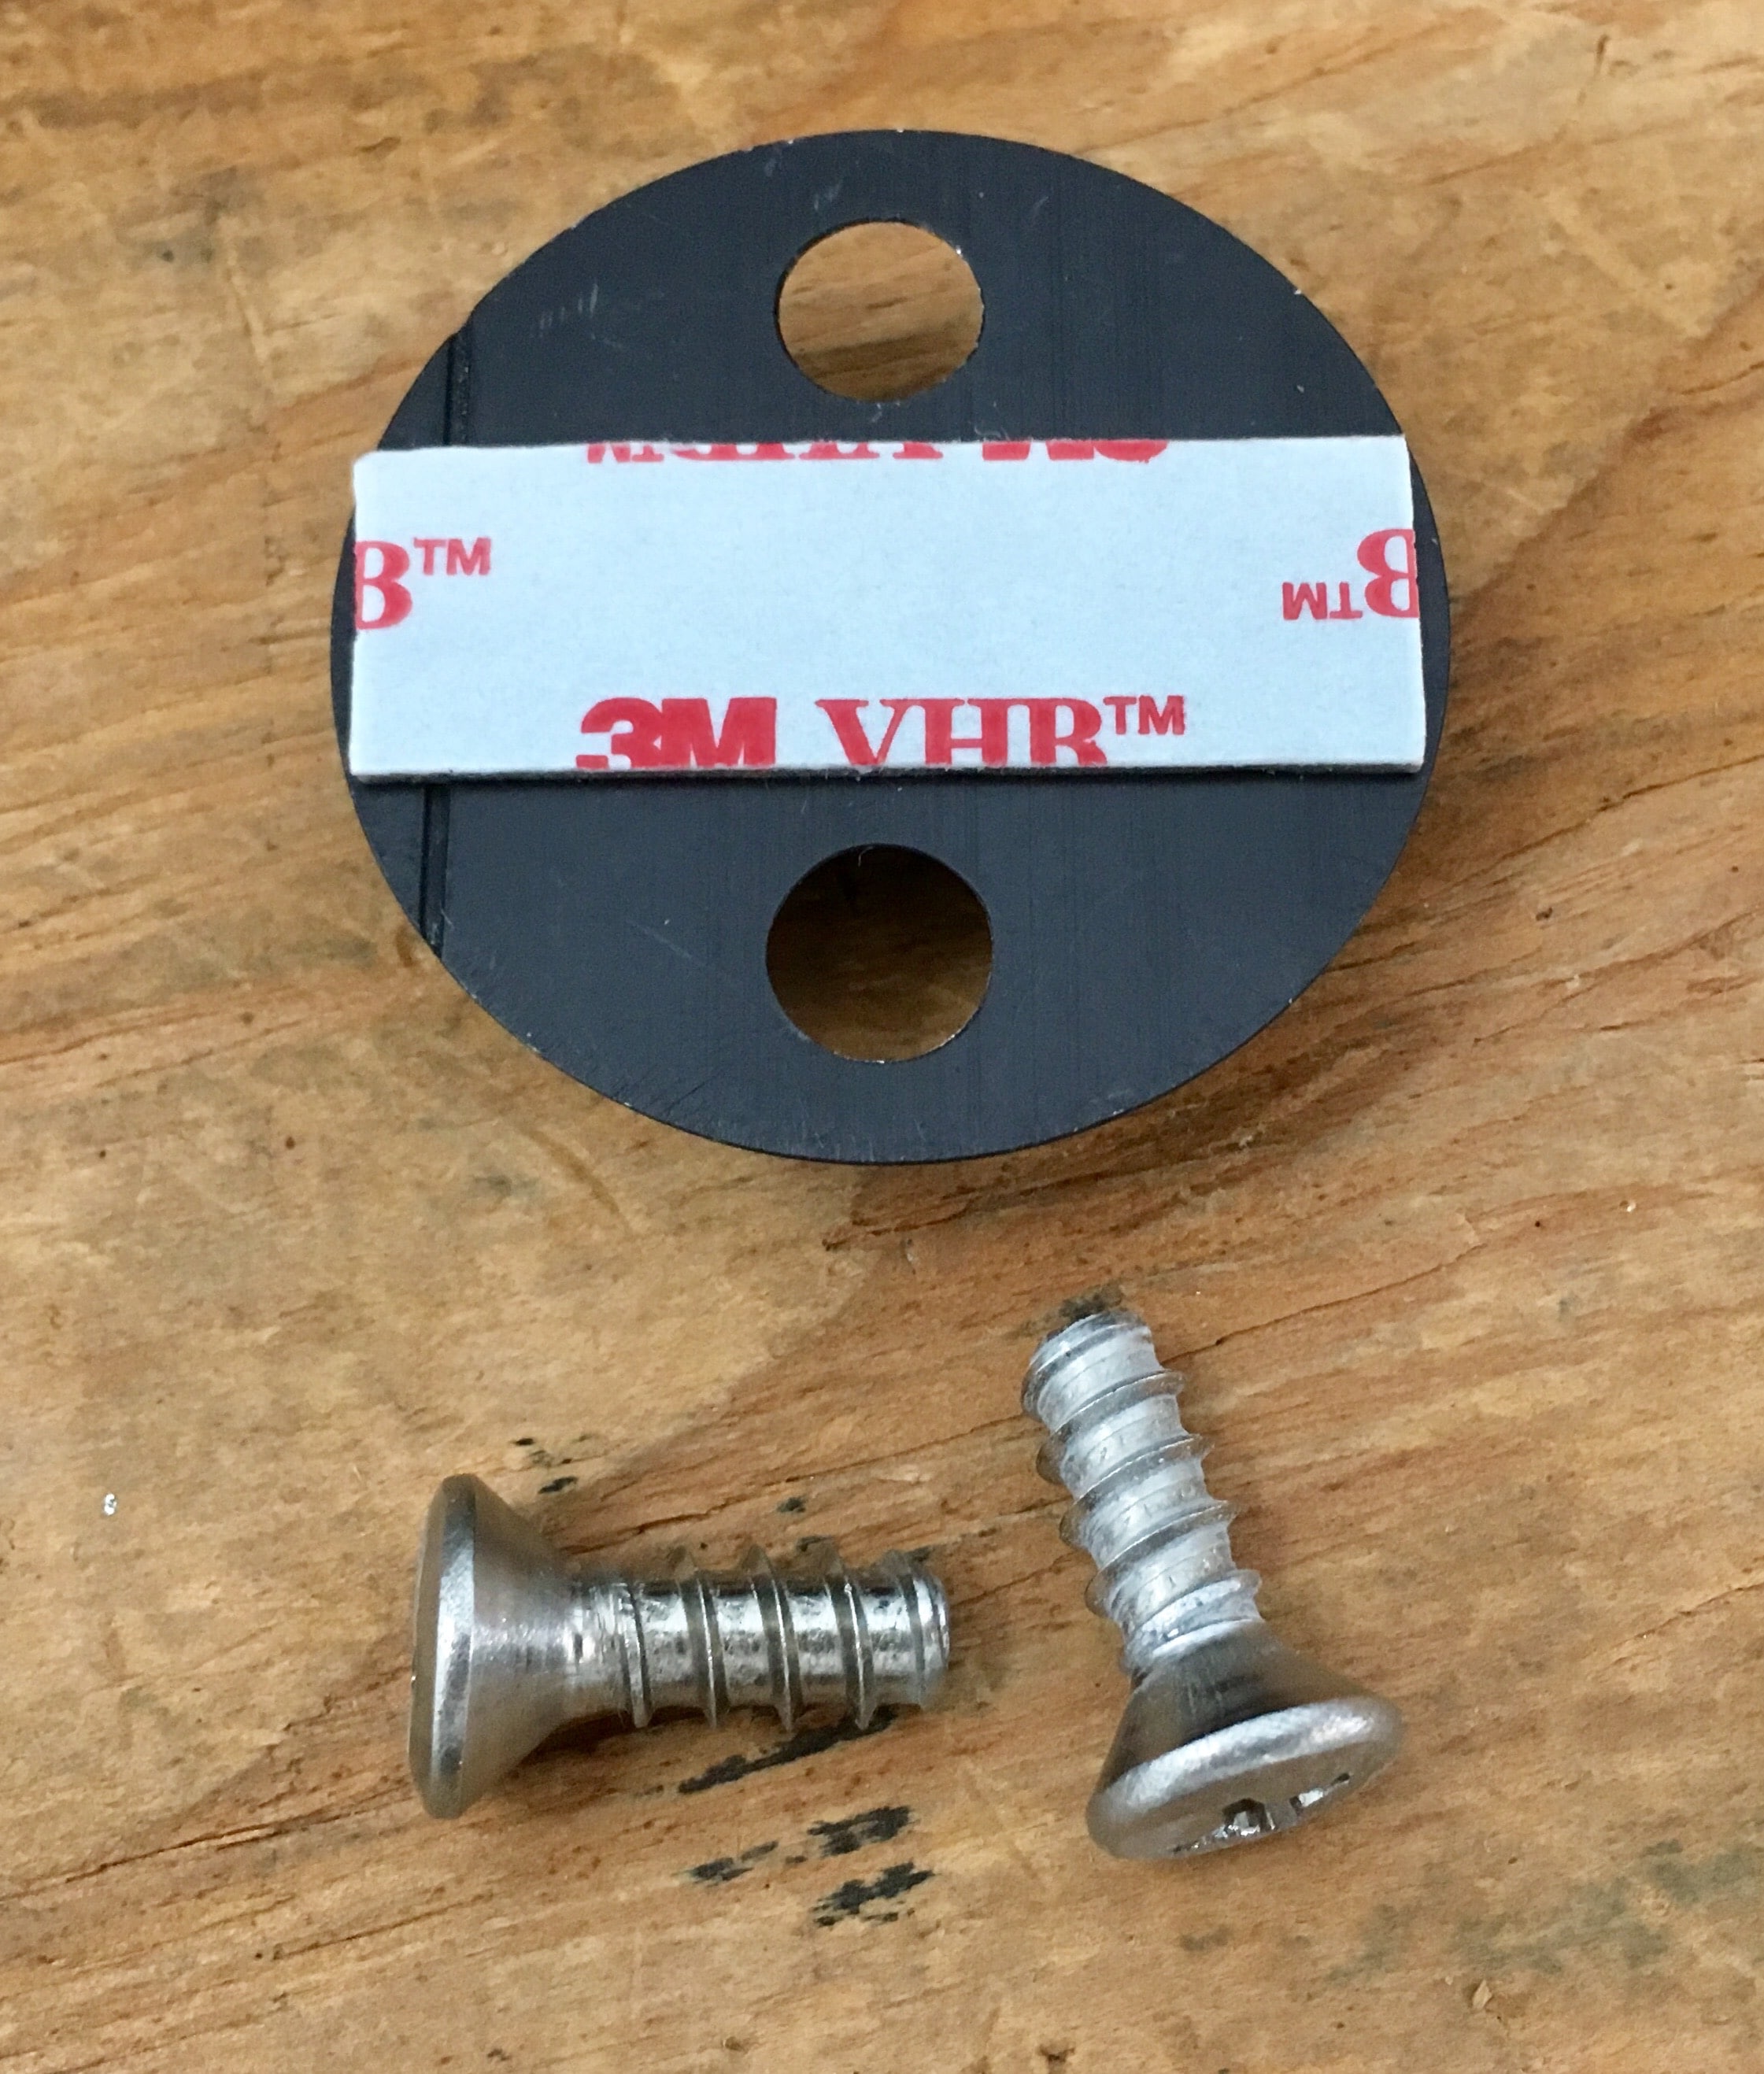
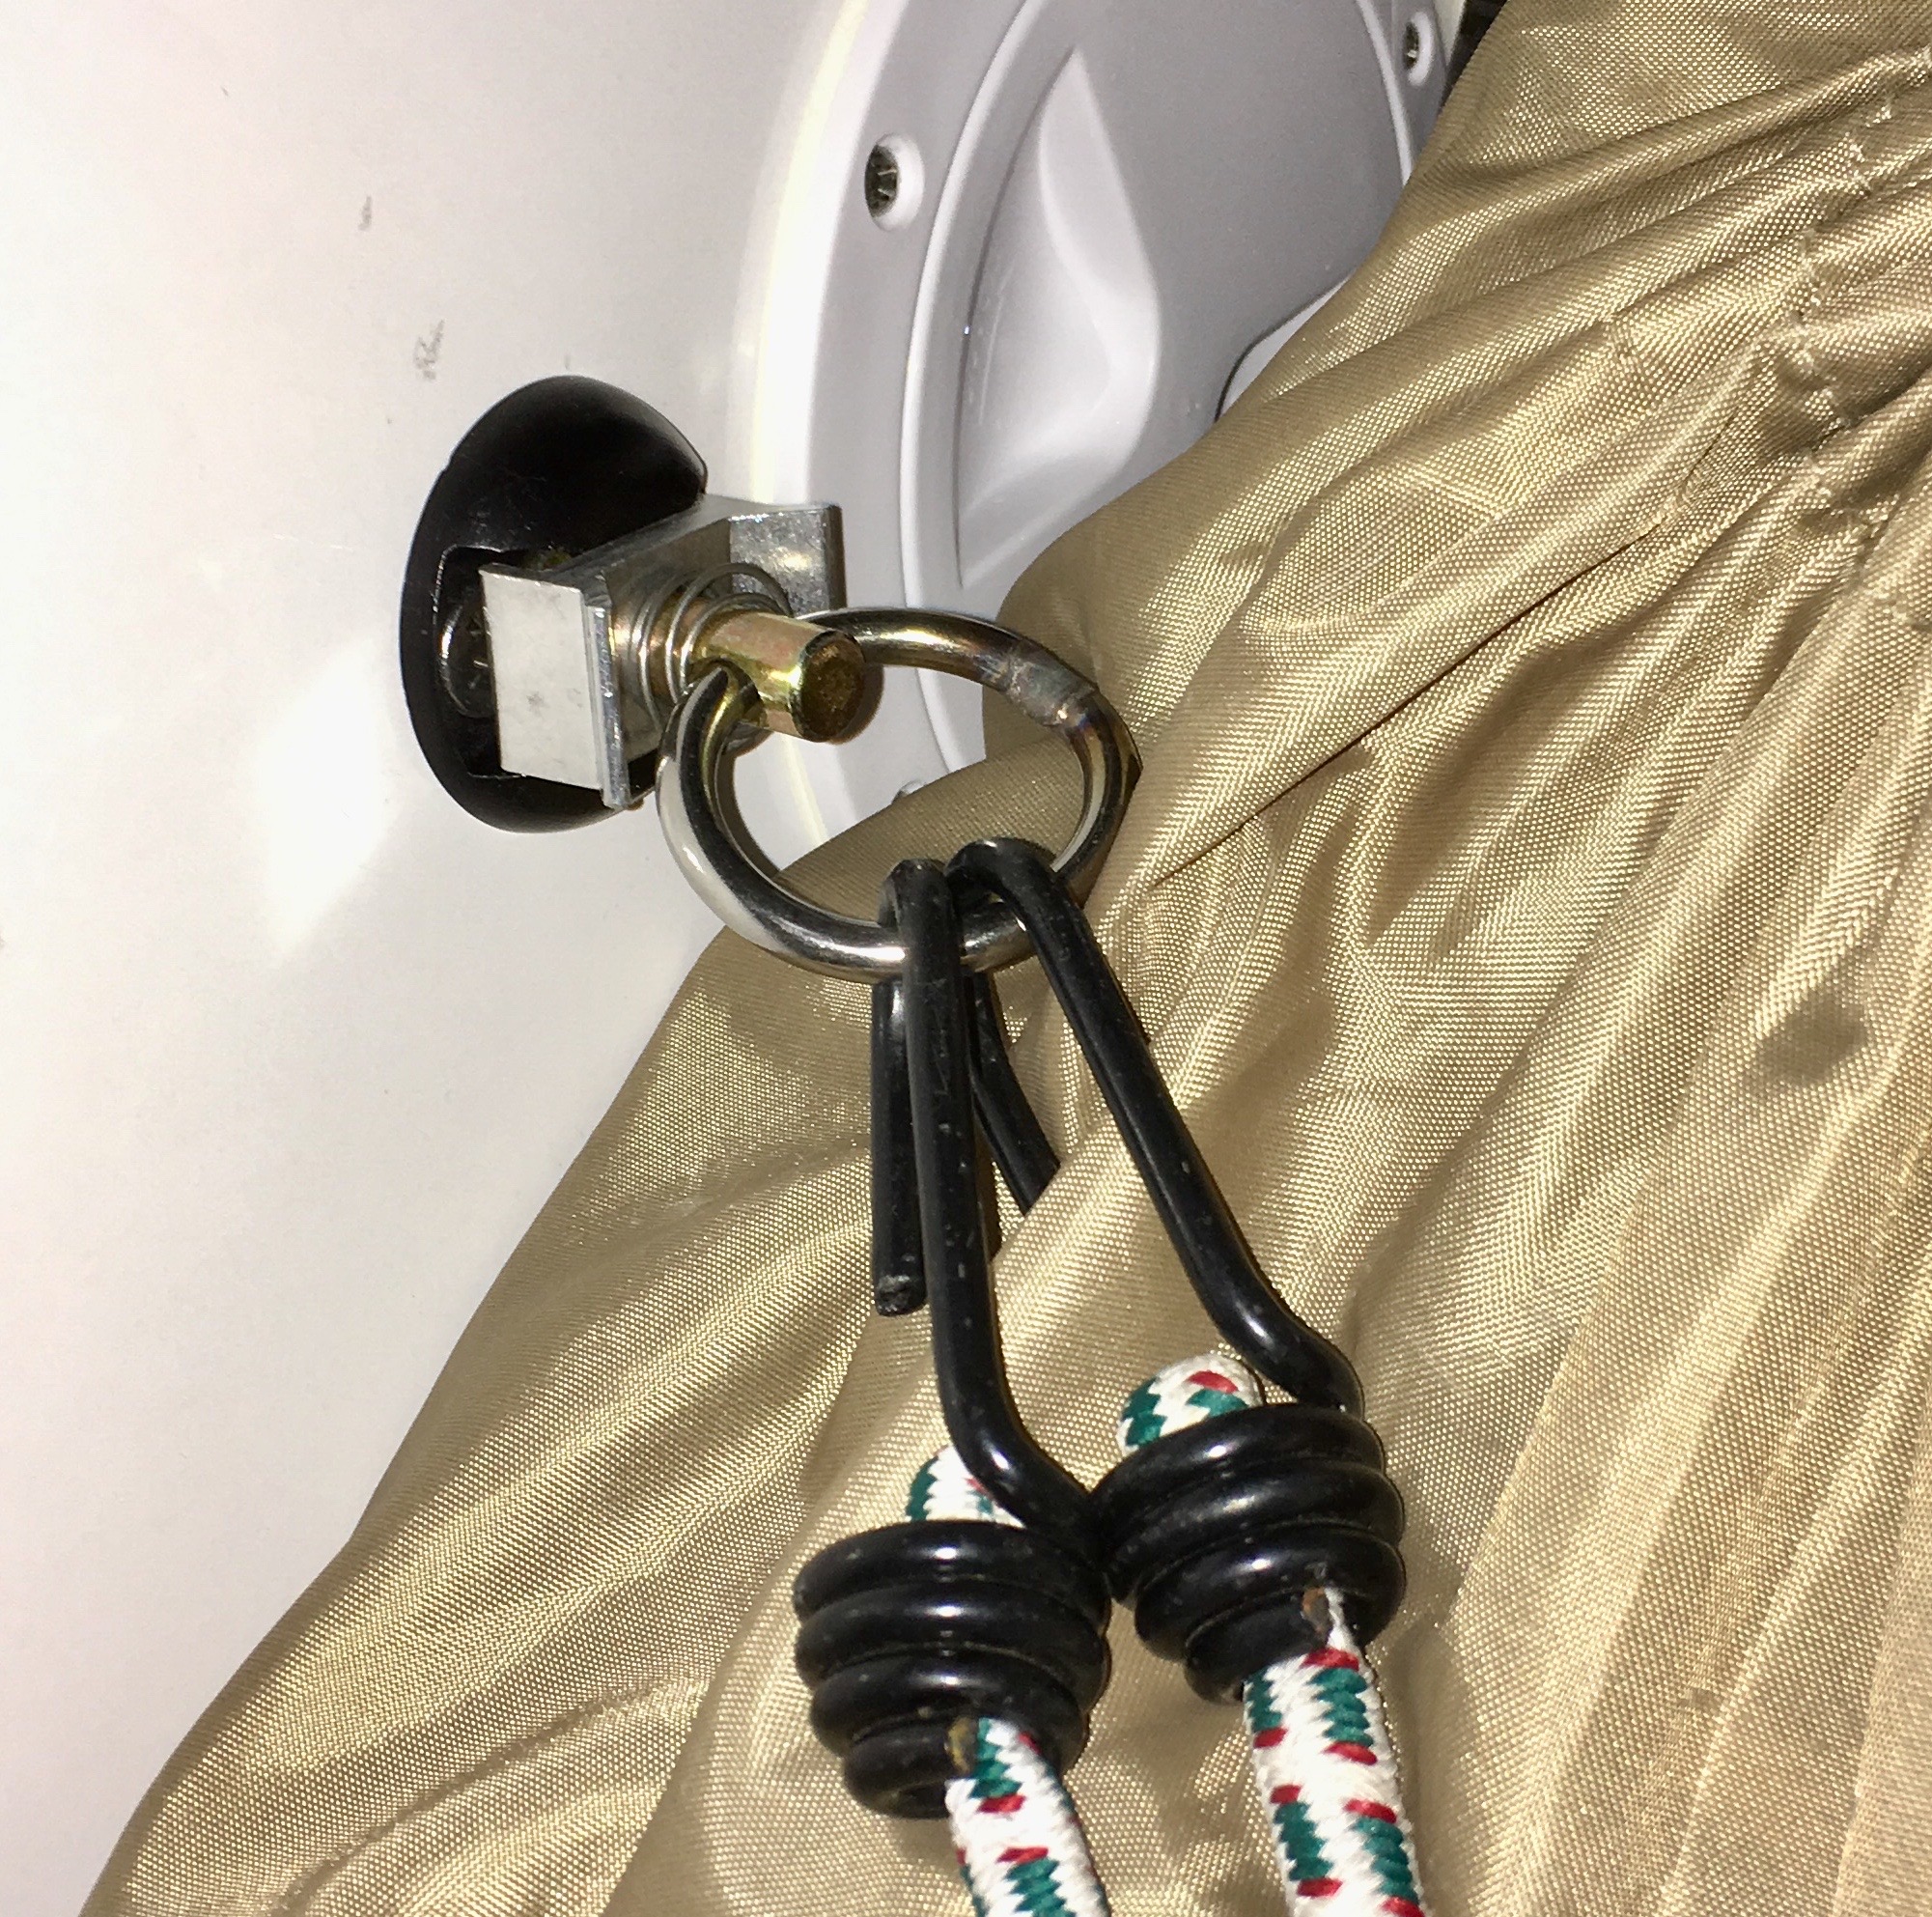
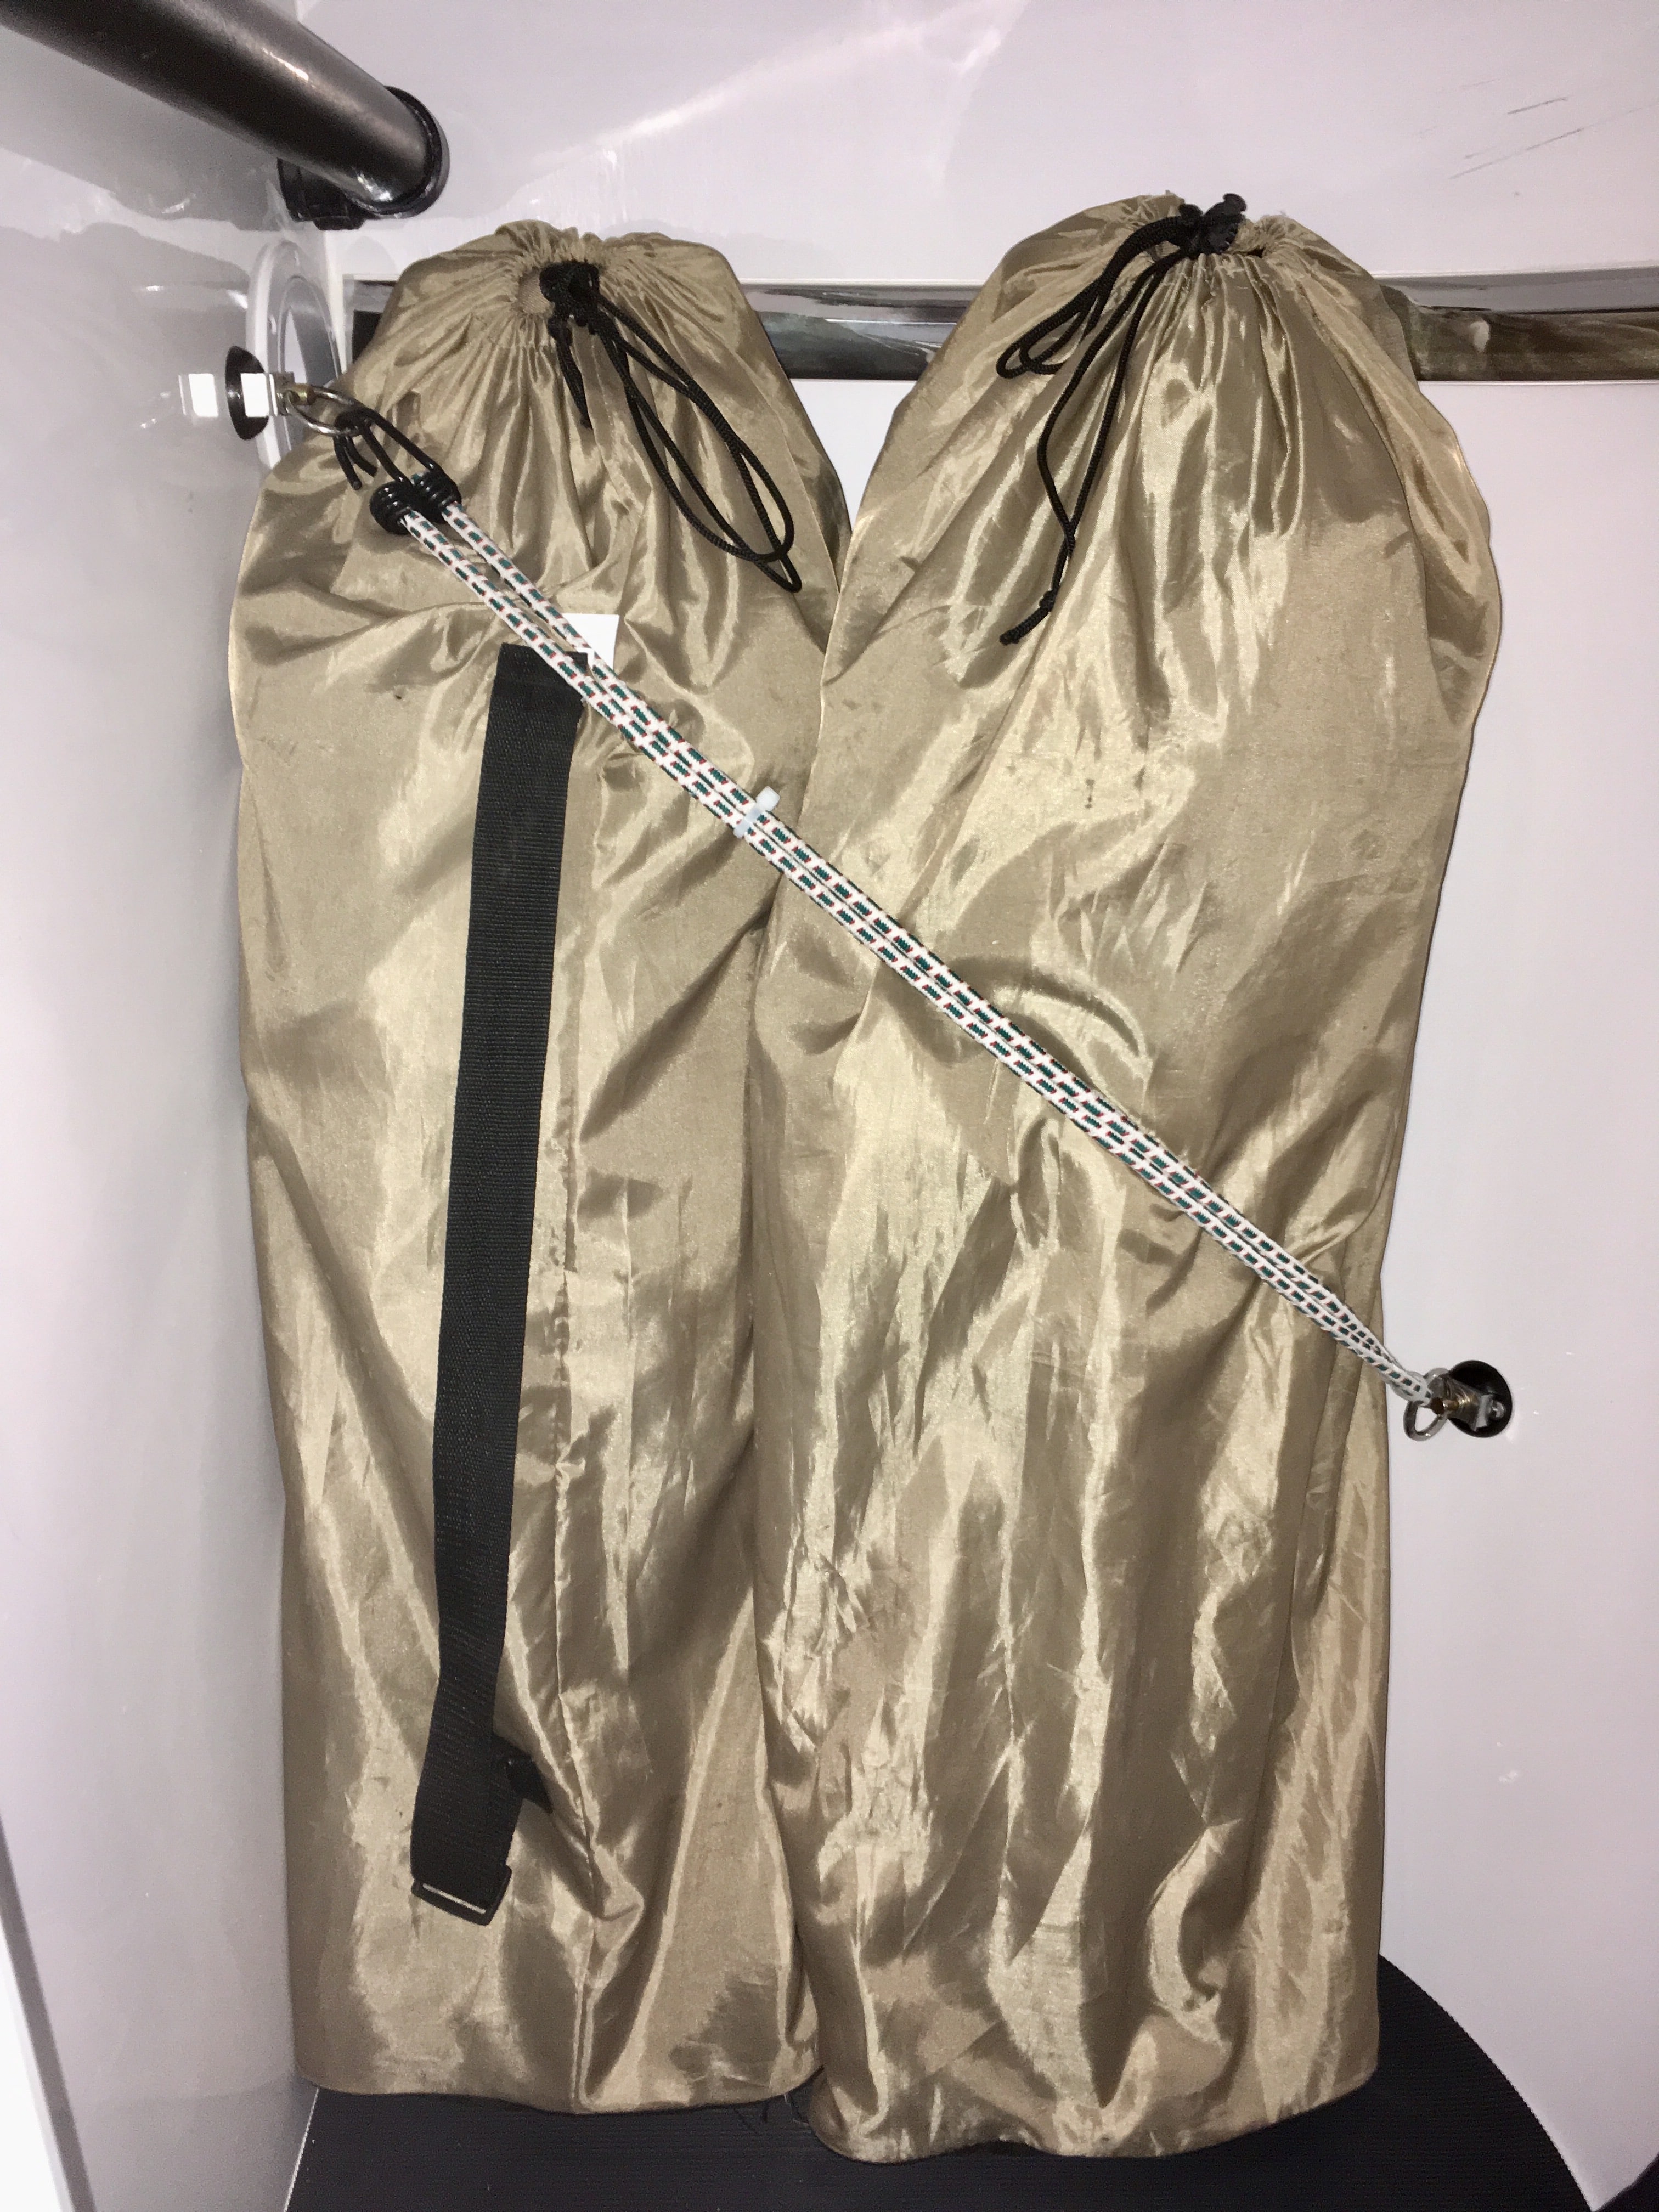
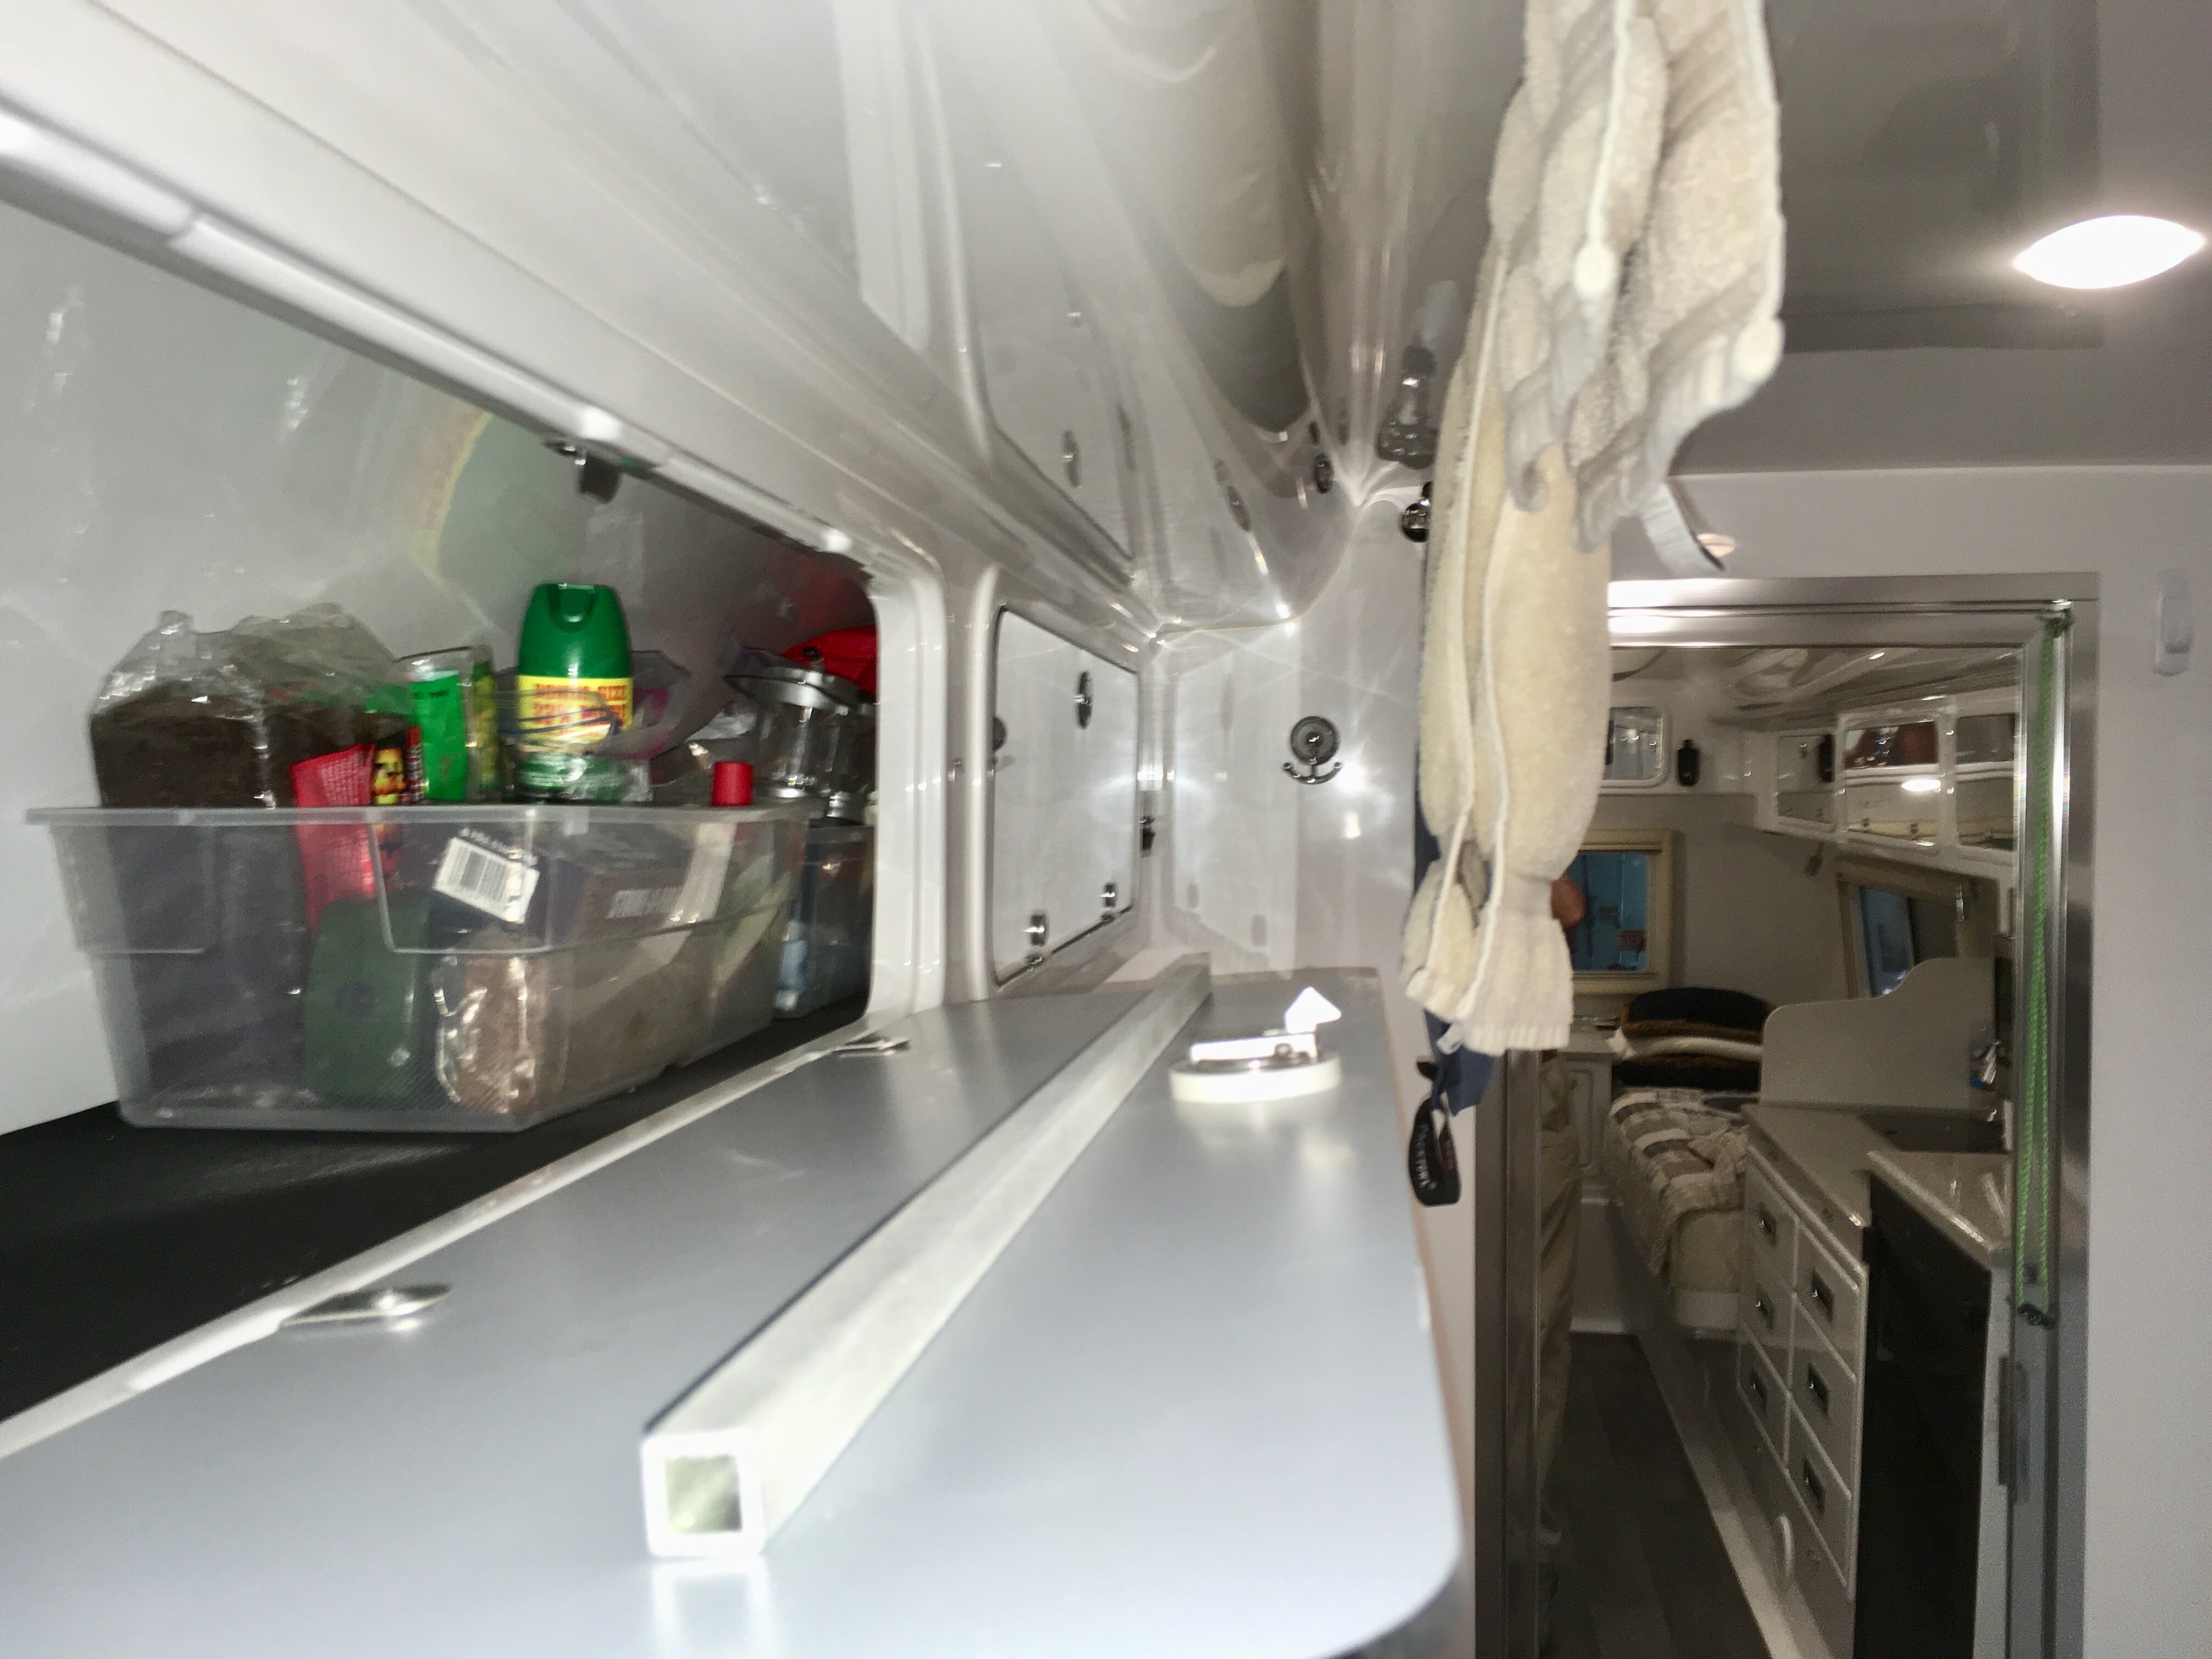
Please refer to this thread for info about the Macs tie downs used here. I ordered extras when I did that mod. http://olivertraveltrailers.com/topic/how-to-wire-cable-clothes-line-full-cabin-length/ I carry a telescoping ladder and two folding camp chairs in the closet, and they flop around on rough roads and make it harder to access stuff on the floor. The outer one sits on a curved surface, and there is not much space between the inner and outer walls. I cut off some #12 screws and used 3M VHB tape in the center to help fill the gap and to add some strength. The upper base sits on the inside closet wall, and I had a small inspection port there, so I mounted the base where I could reach in and feed the threaded backing plate into the correct position. There are water hoses RIGHT THERE, so you need to be careful if you use sheet metal screws. Don't drill through a hose! I used a 3 ft bungee cord doubled back on itself and secured the bottom part with a nylon tie wrap to keep it in place when disconnected at the top. It is a very secure restraint, but it doesn't put too much strain on the attach points. With my two large bins in place, there is a little more usable floor space since the chairs and ladder are now held tight against the front wall: John Davies Spokane WA

-

HOW TO: Wire cable clothes line - full cabin length
John E Davies replied to John E Davies's topic in Ollie Modifications
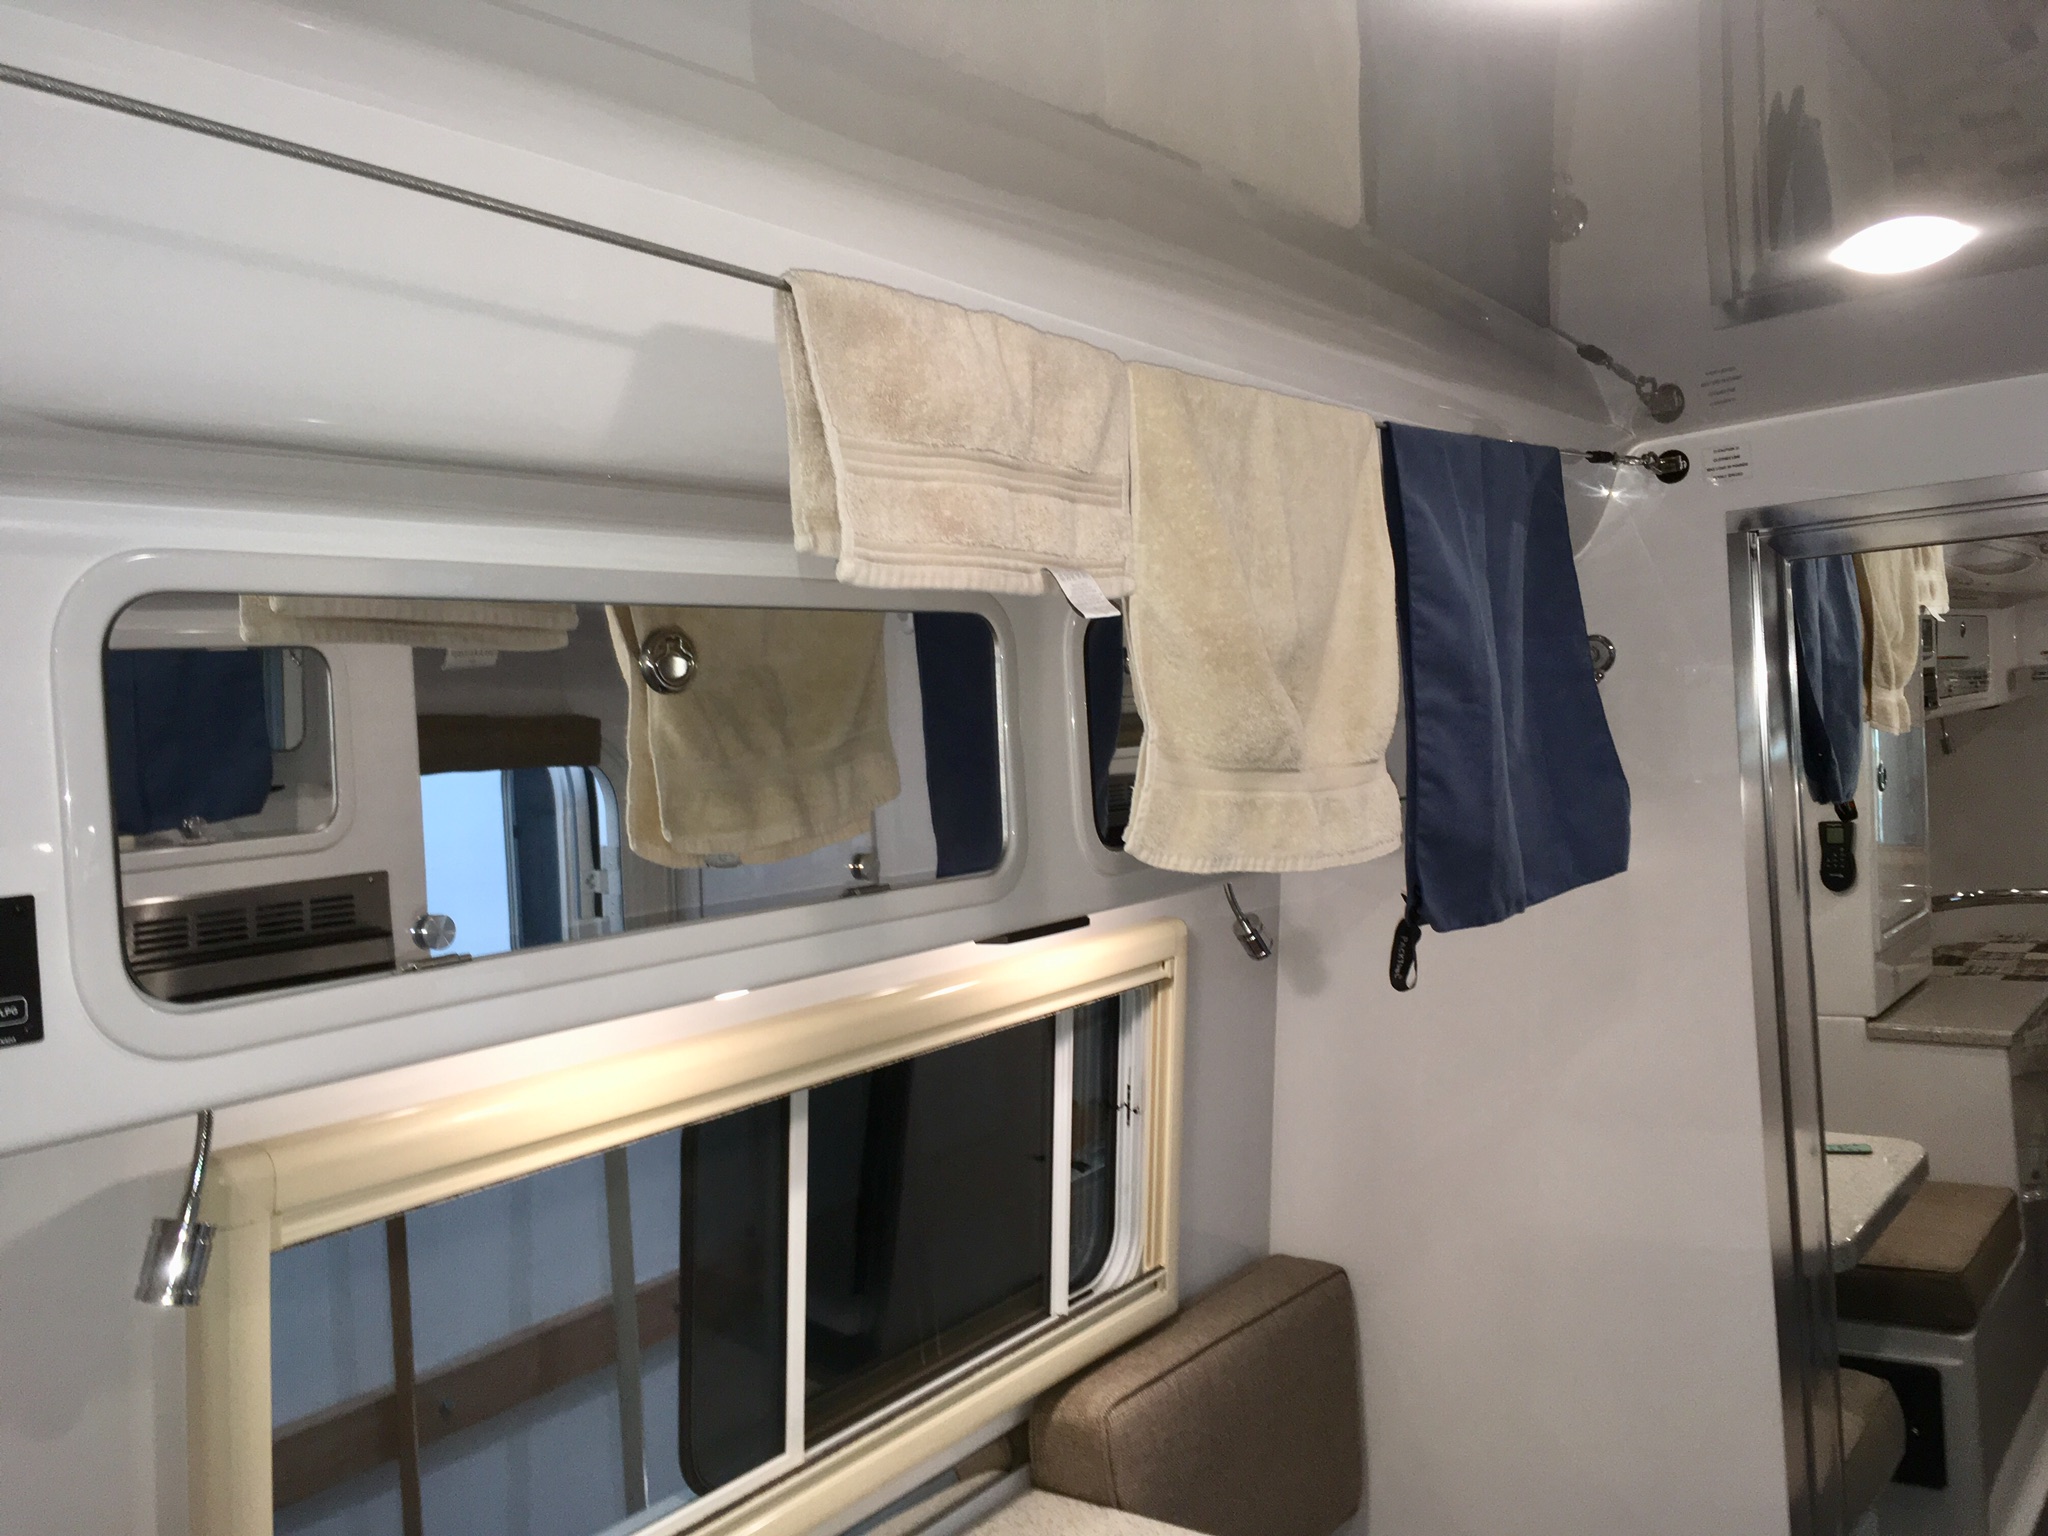
With towels hanging from the line, you can still open the overhead doors.... The new cable system sure beats the old setup, where I strung a rope between the front clothes hook and an eyebolt in back... Cool mod, a little time consuming, but I think it will be a very useful setup. Most of my time was spent scratching my head and doing R&D. With the measurements provided it should go quickly if you want to try this. John Davies Spokane WA
-
HOW TO: Wire cable clothes line - full cabin length
John E Davies replied to John E Davies's topic in Ollie Modifications
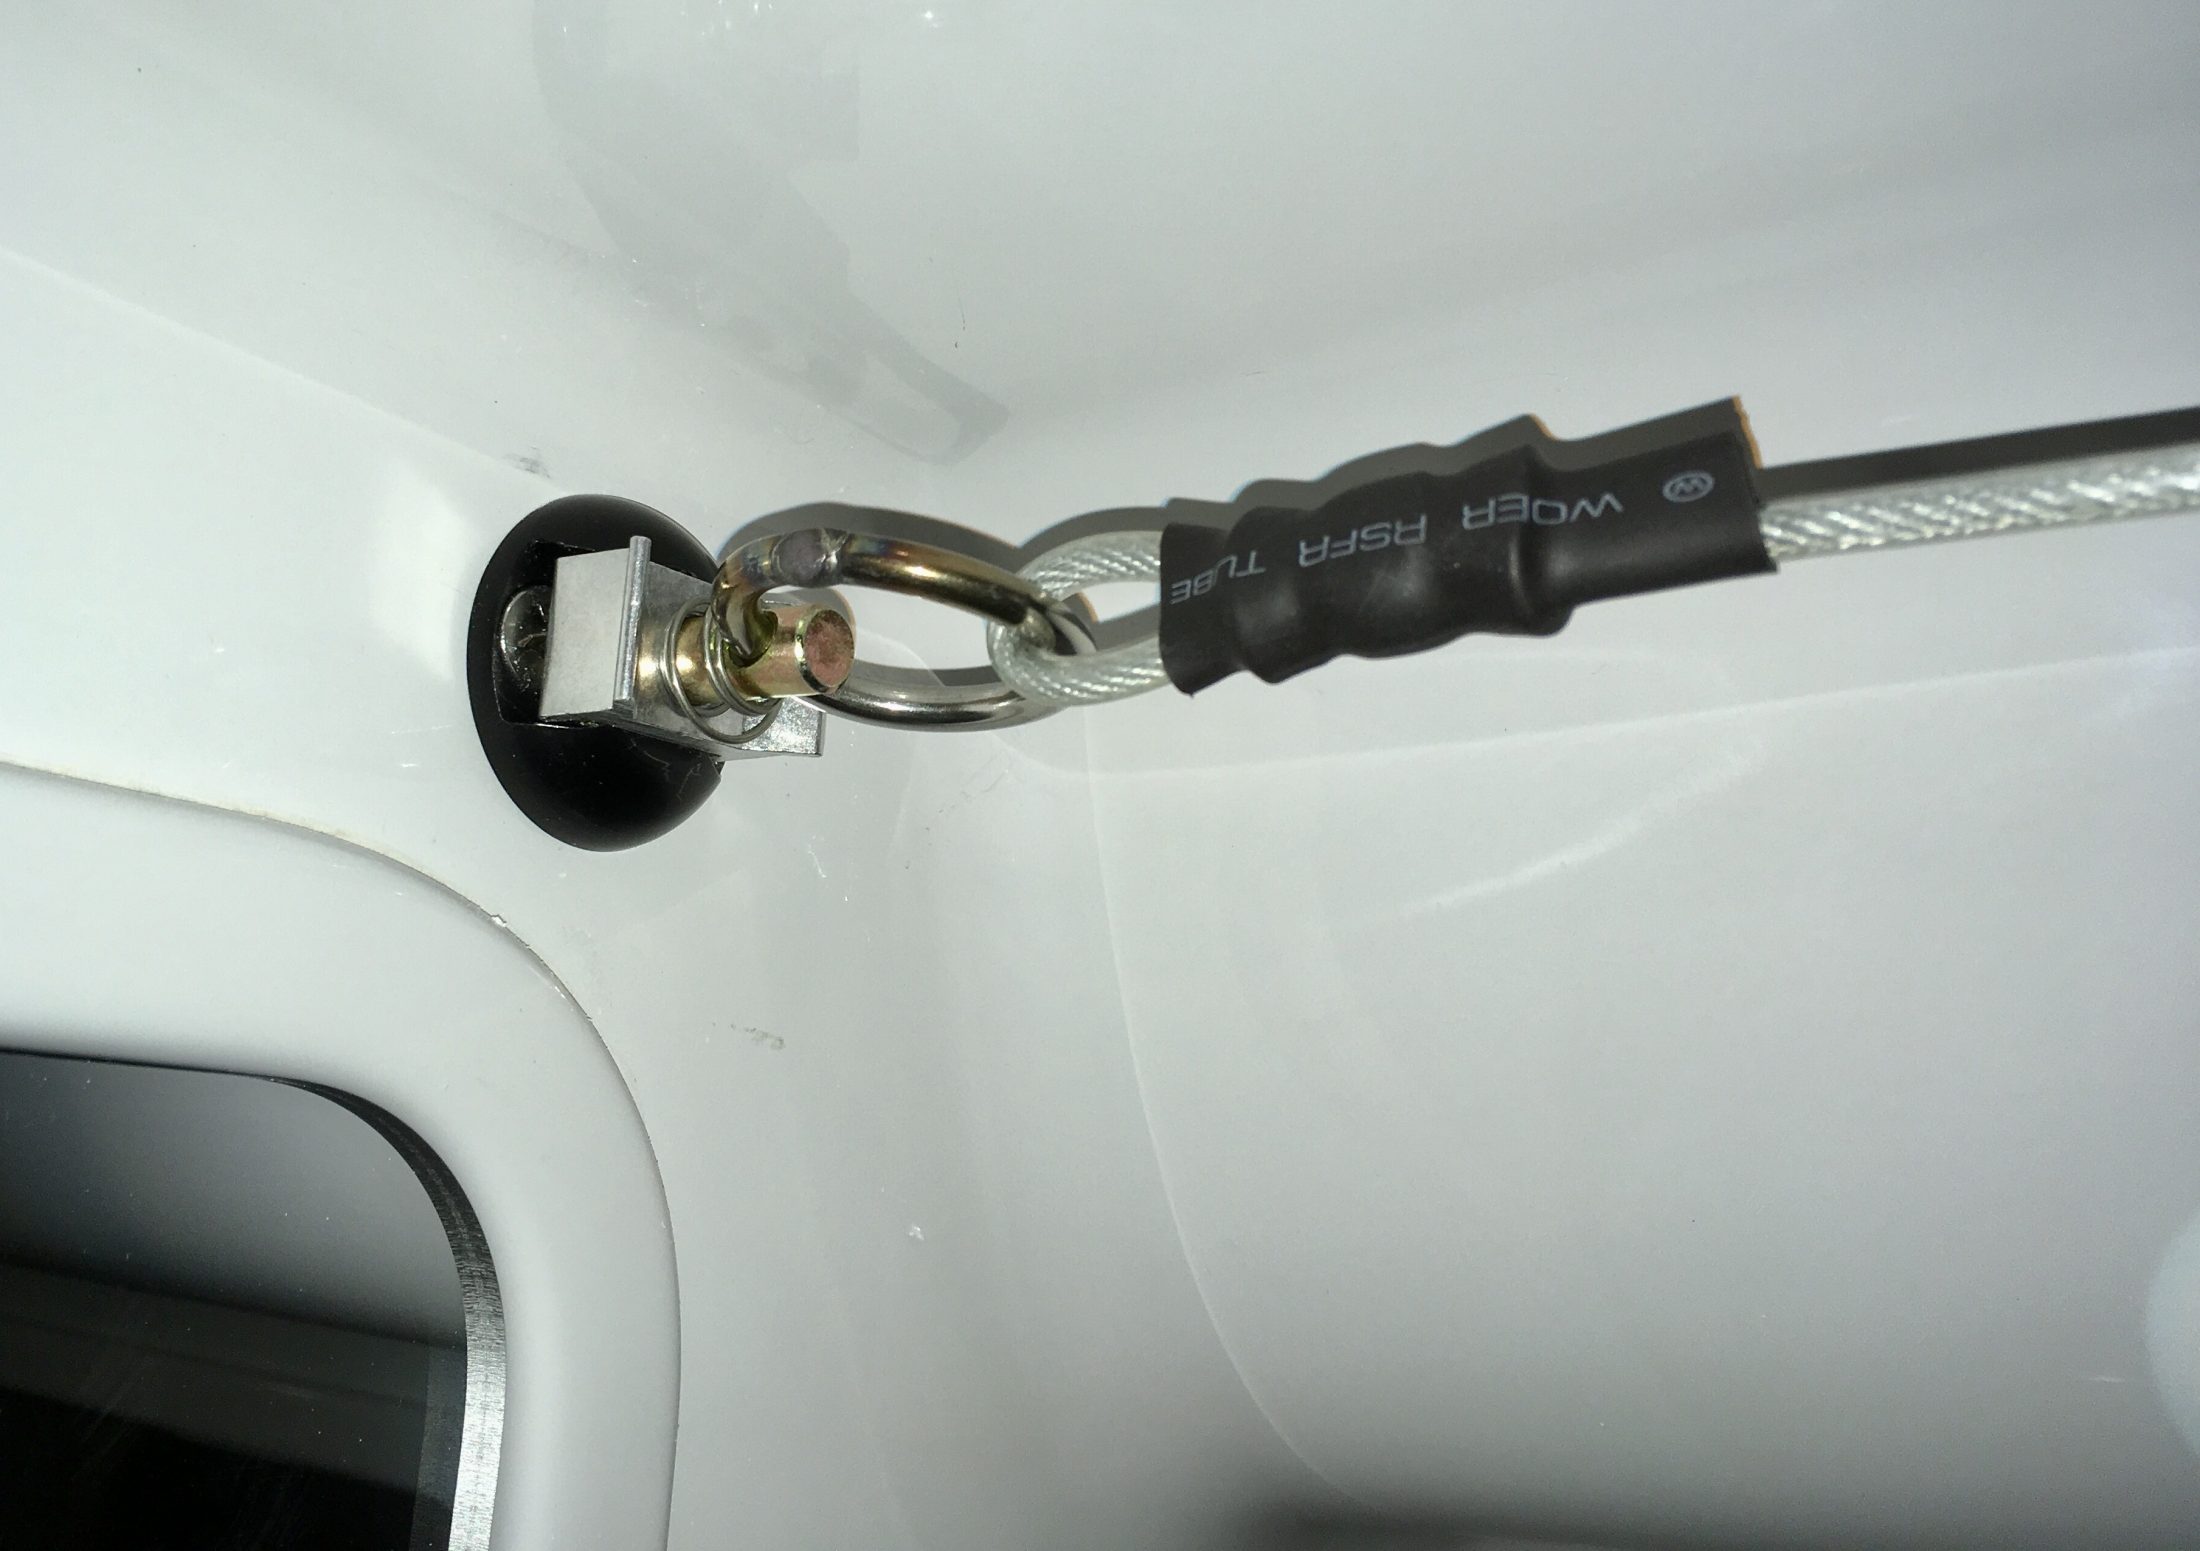
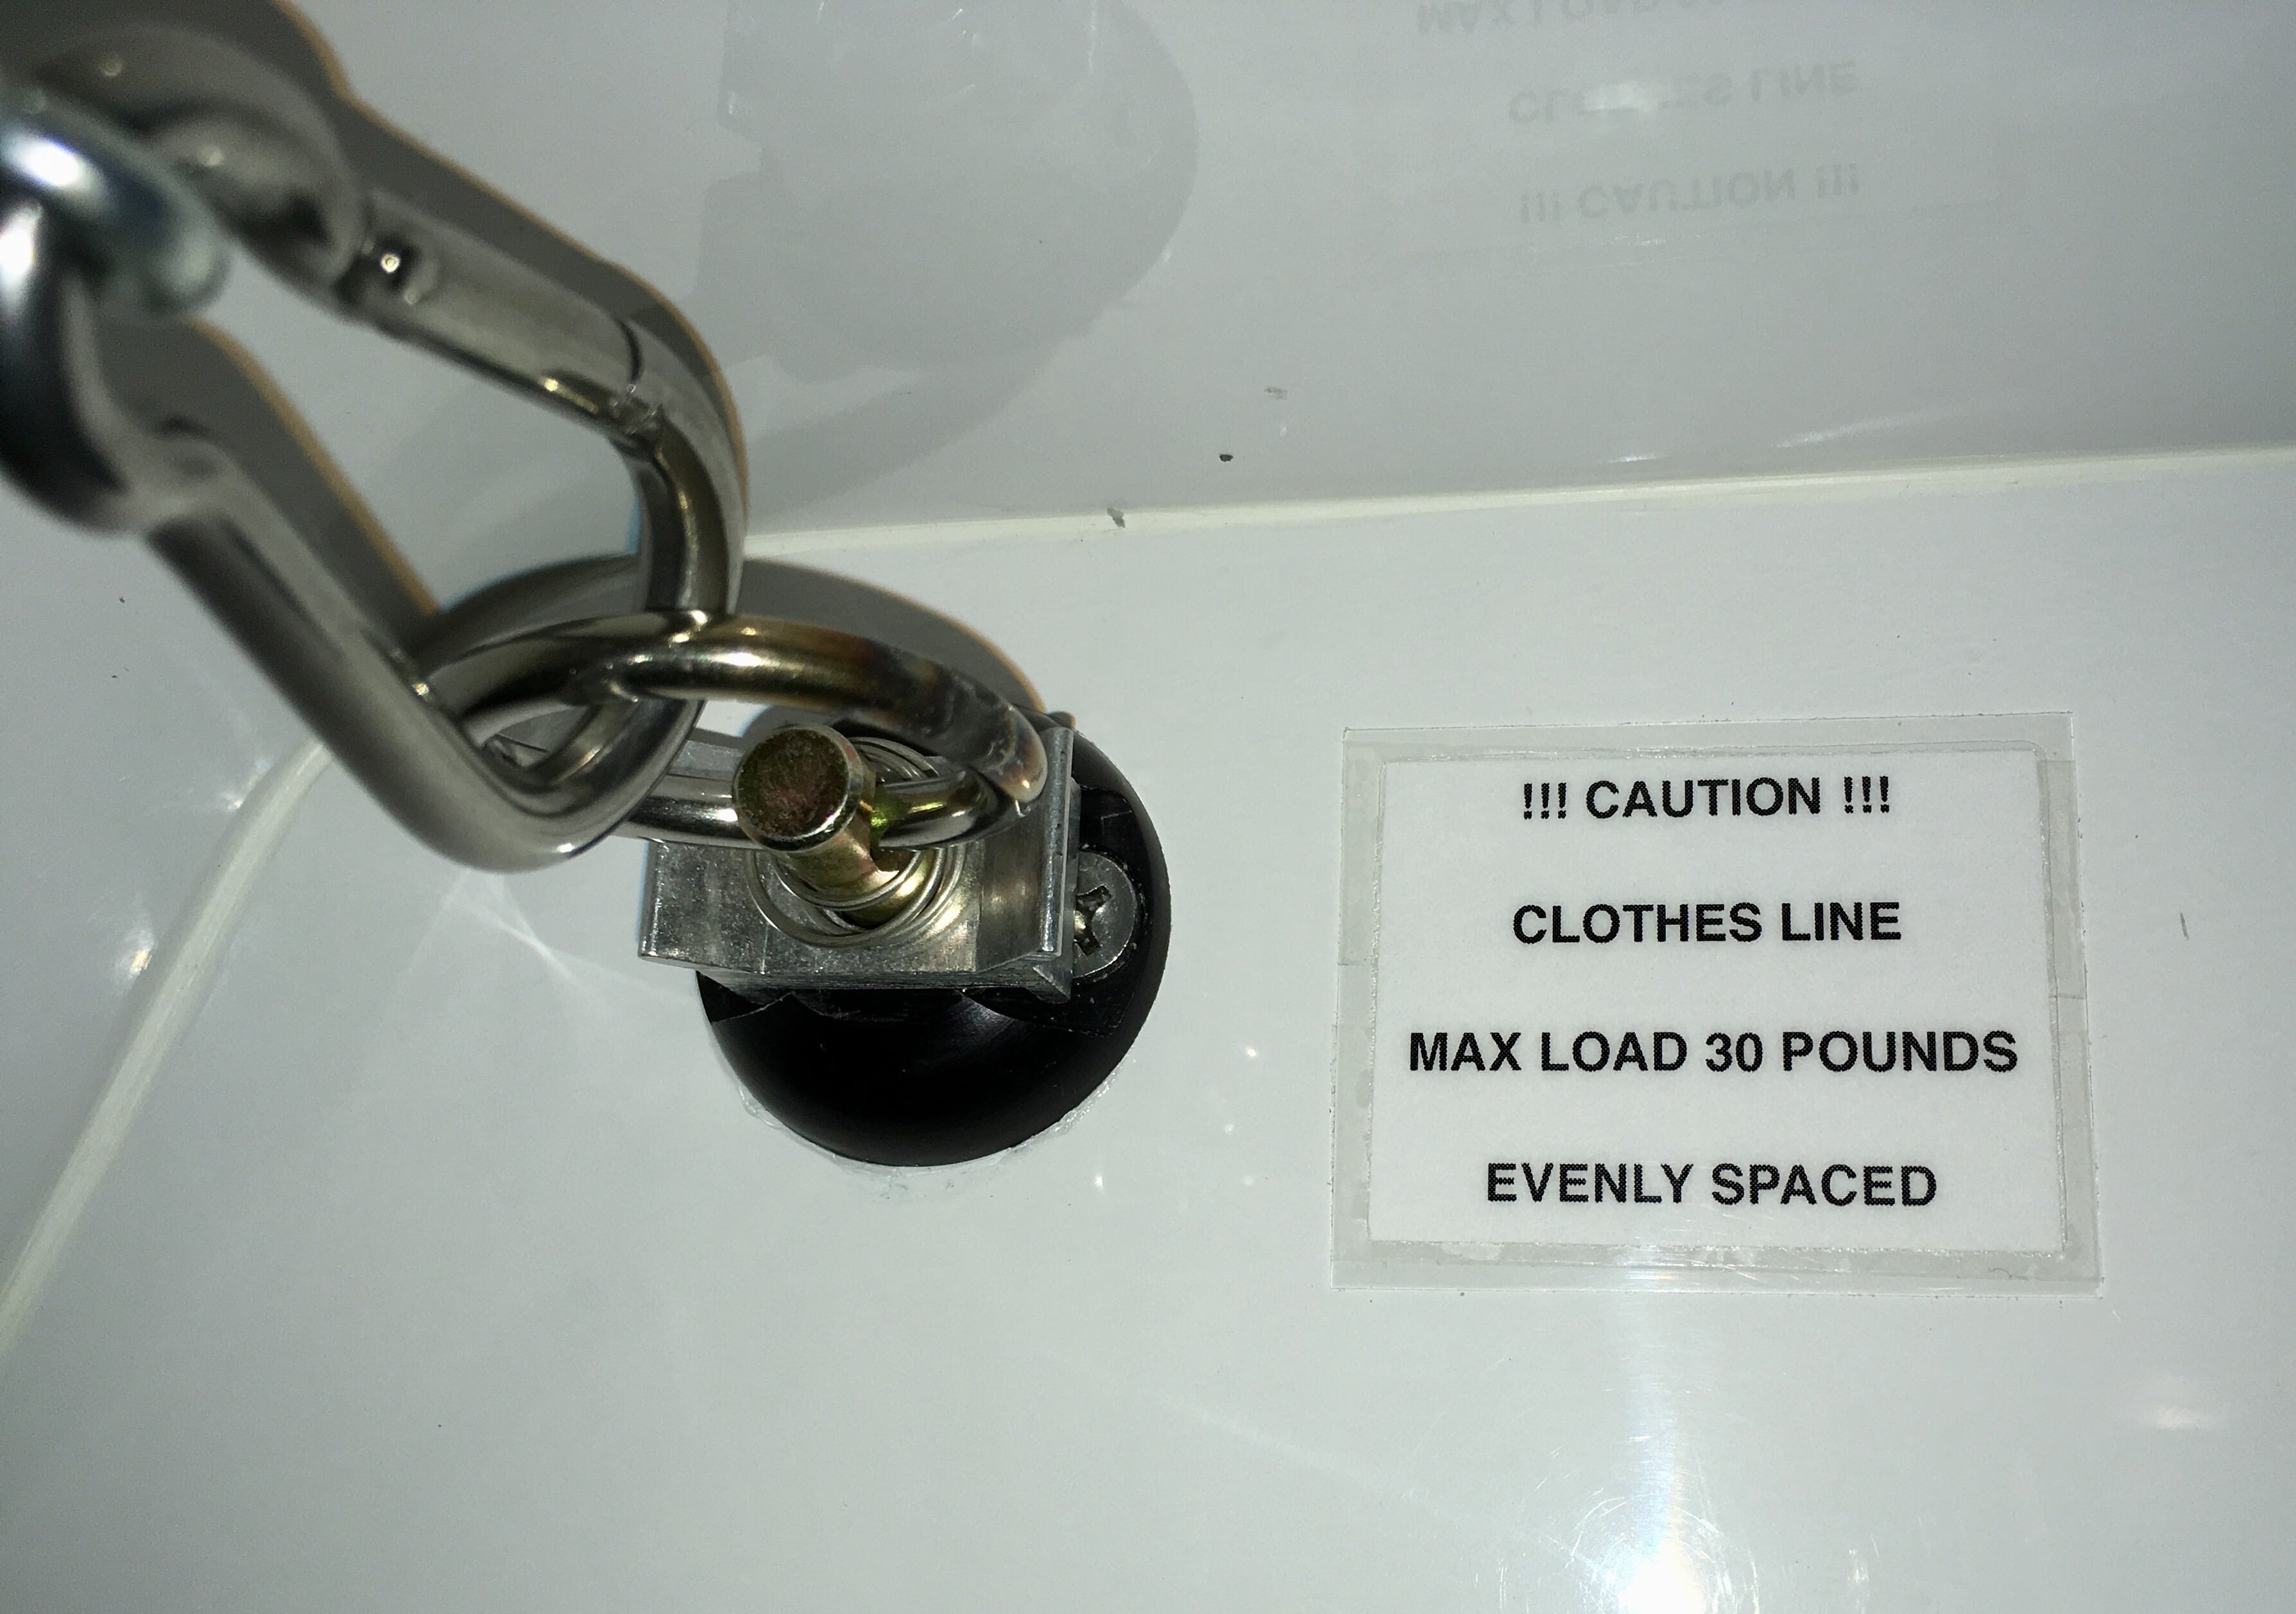
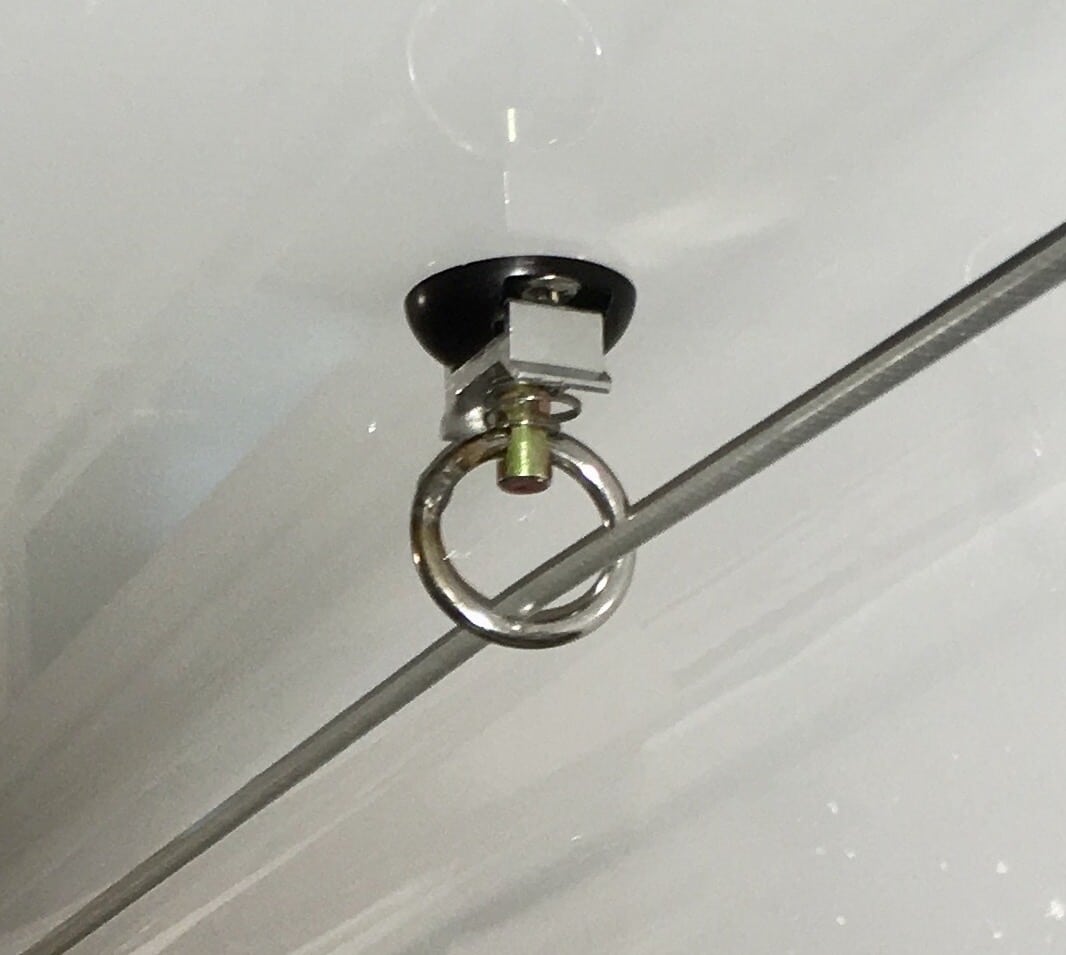
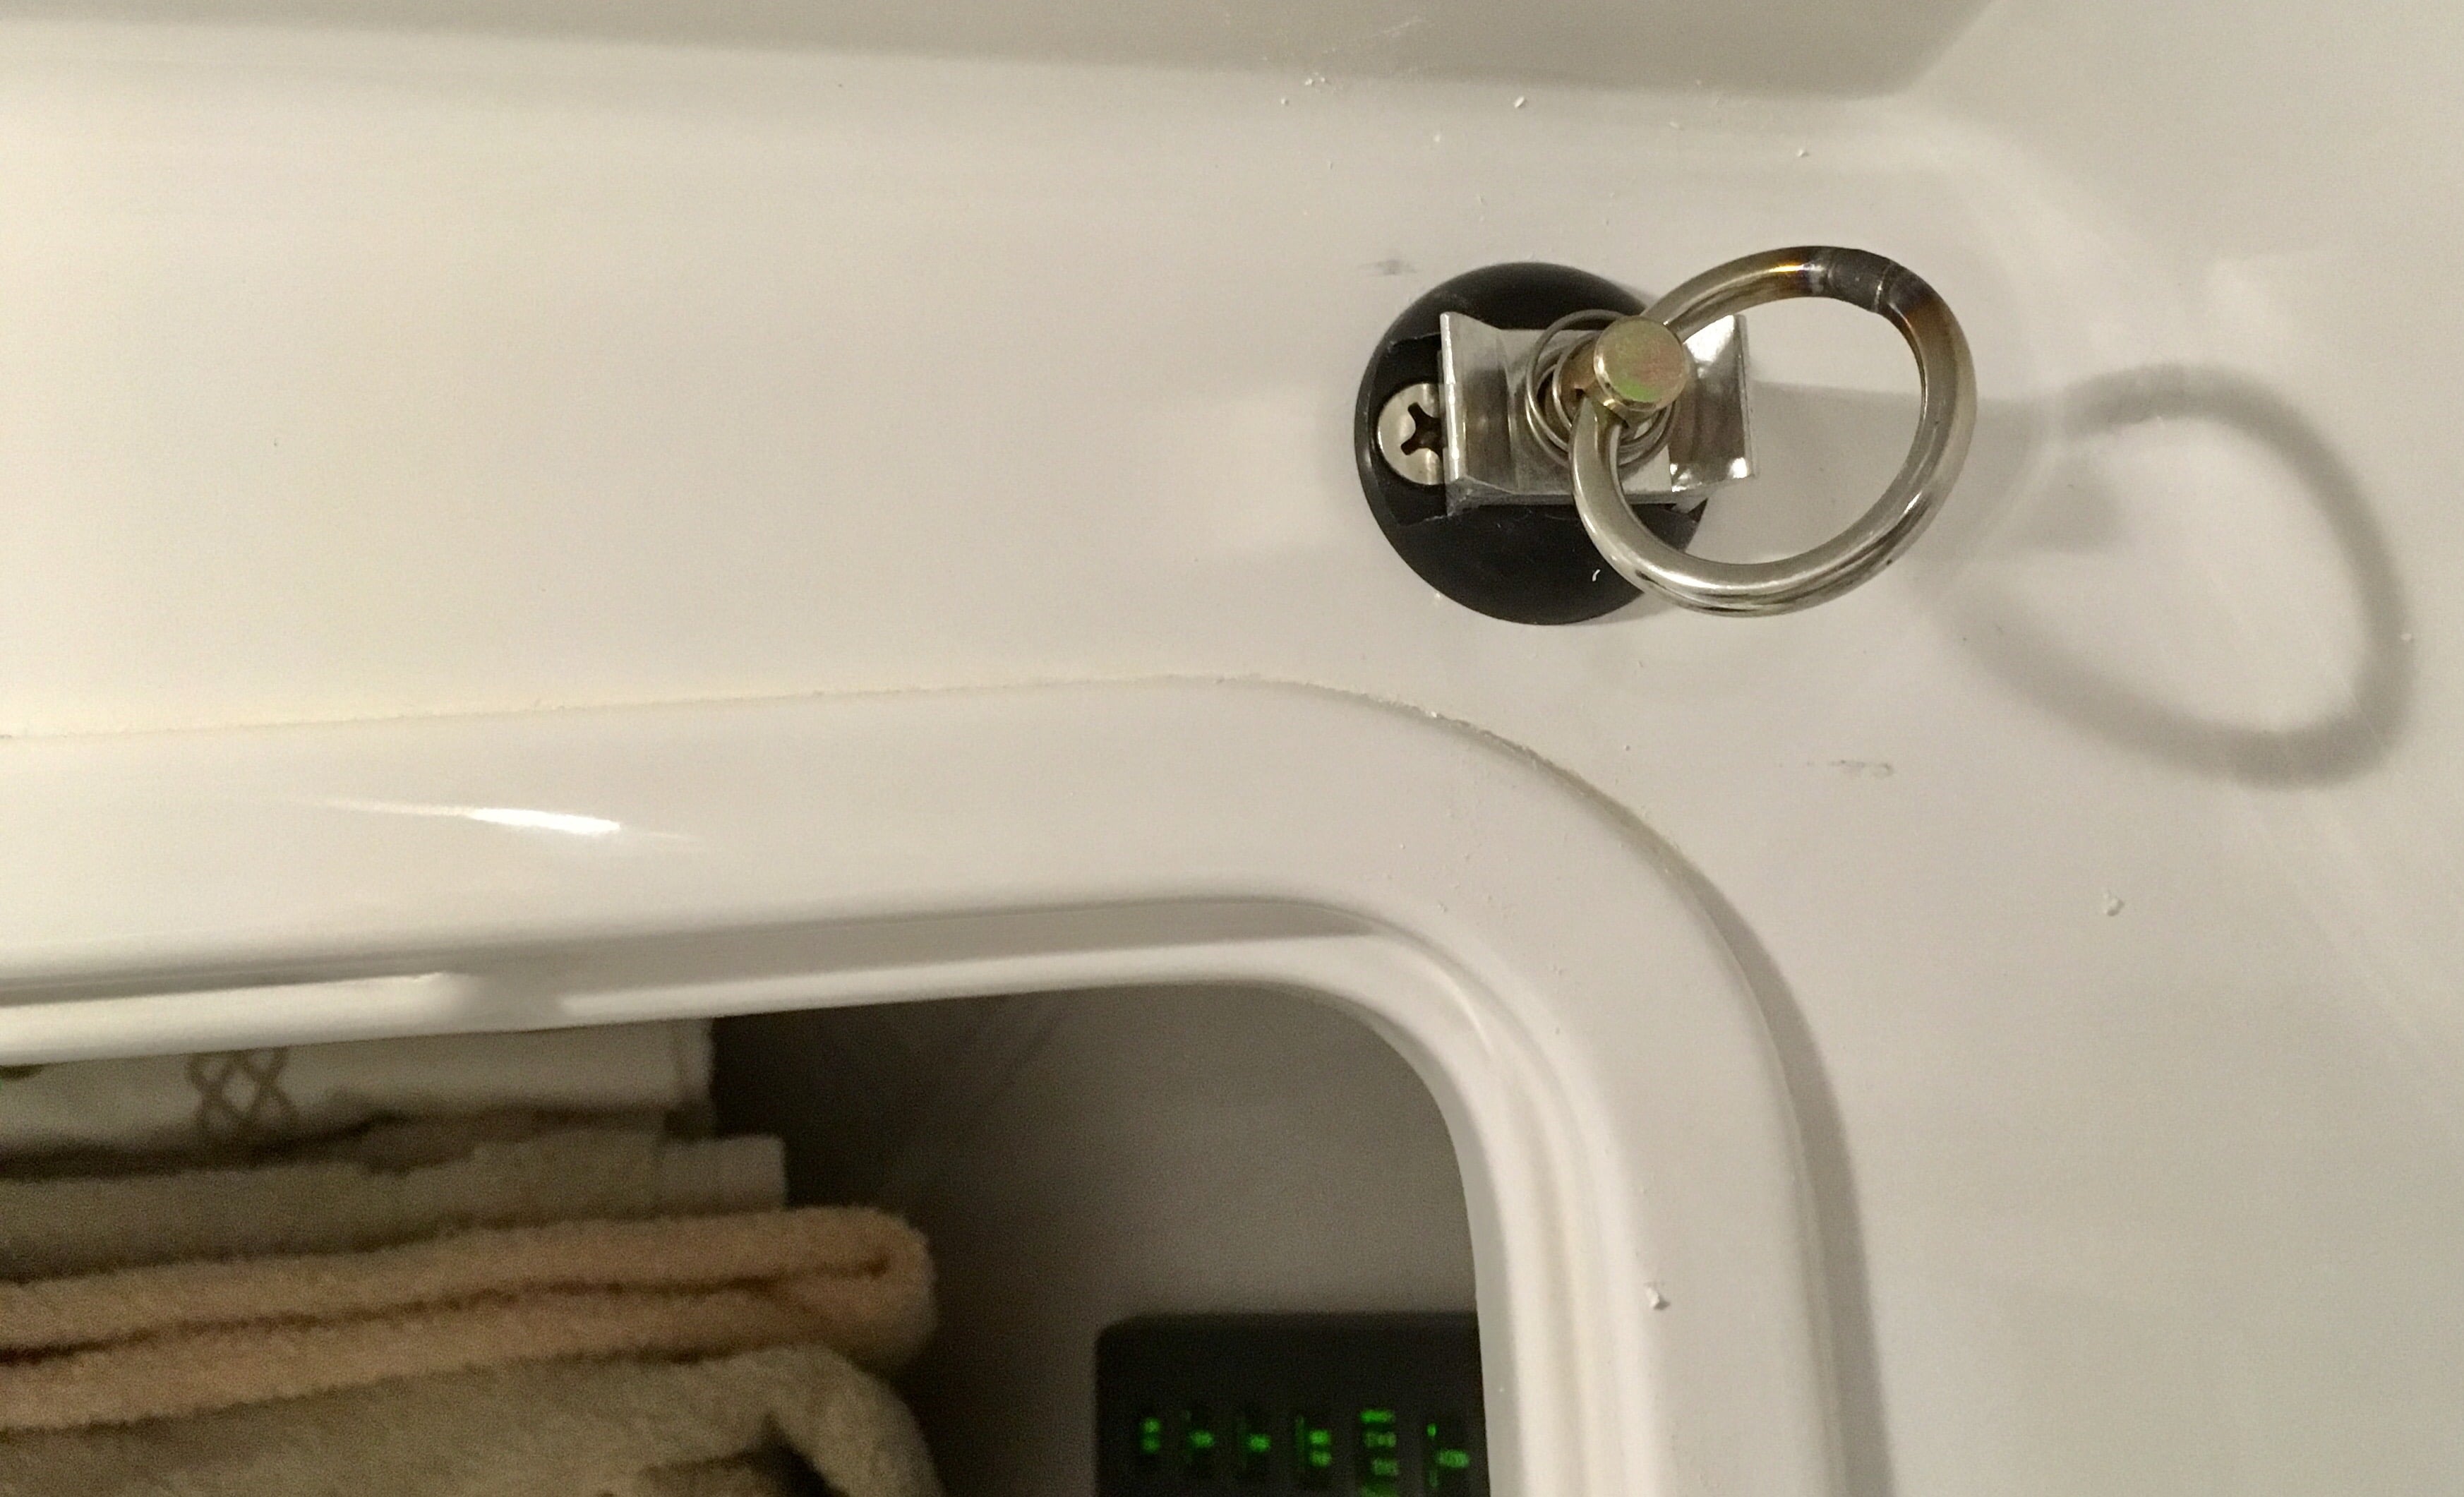
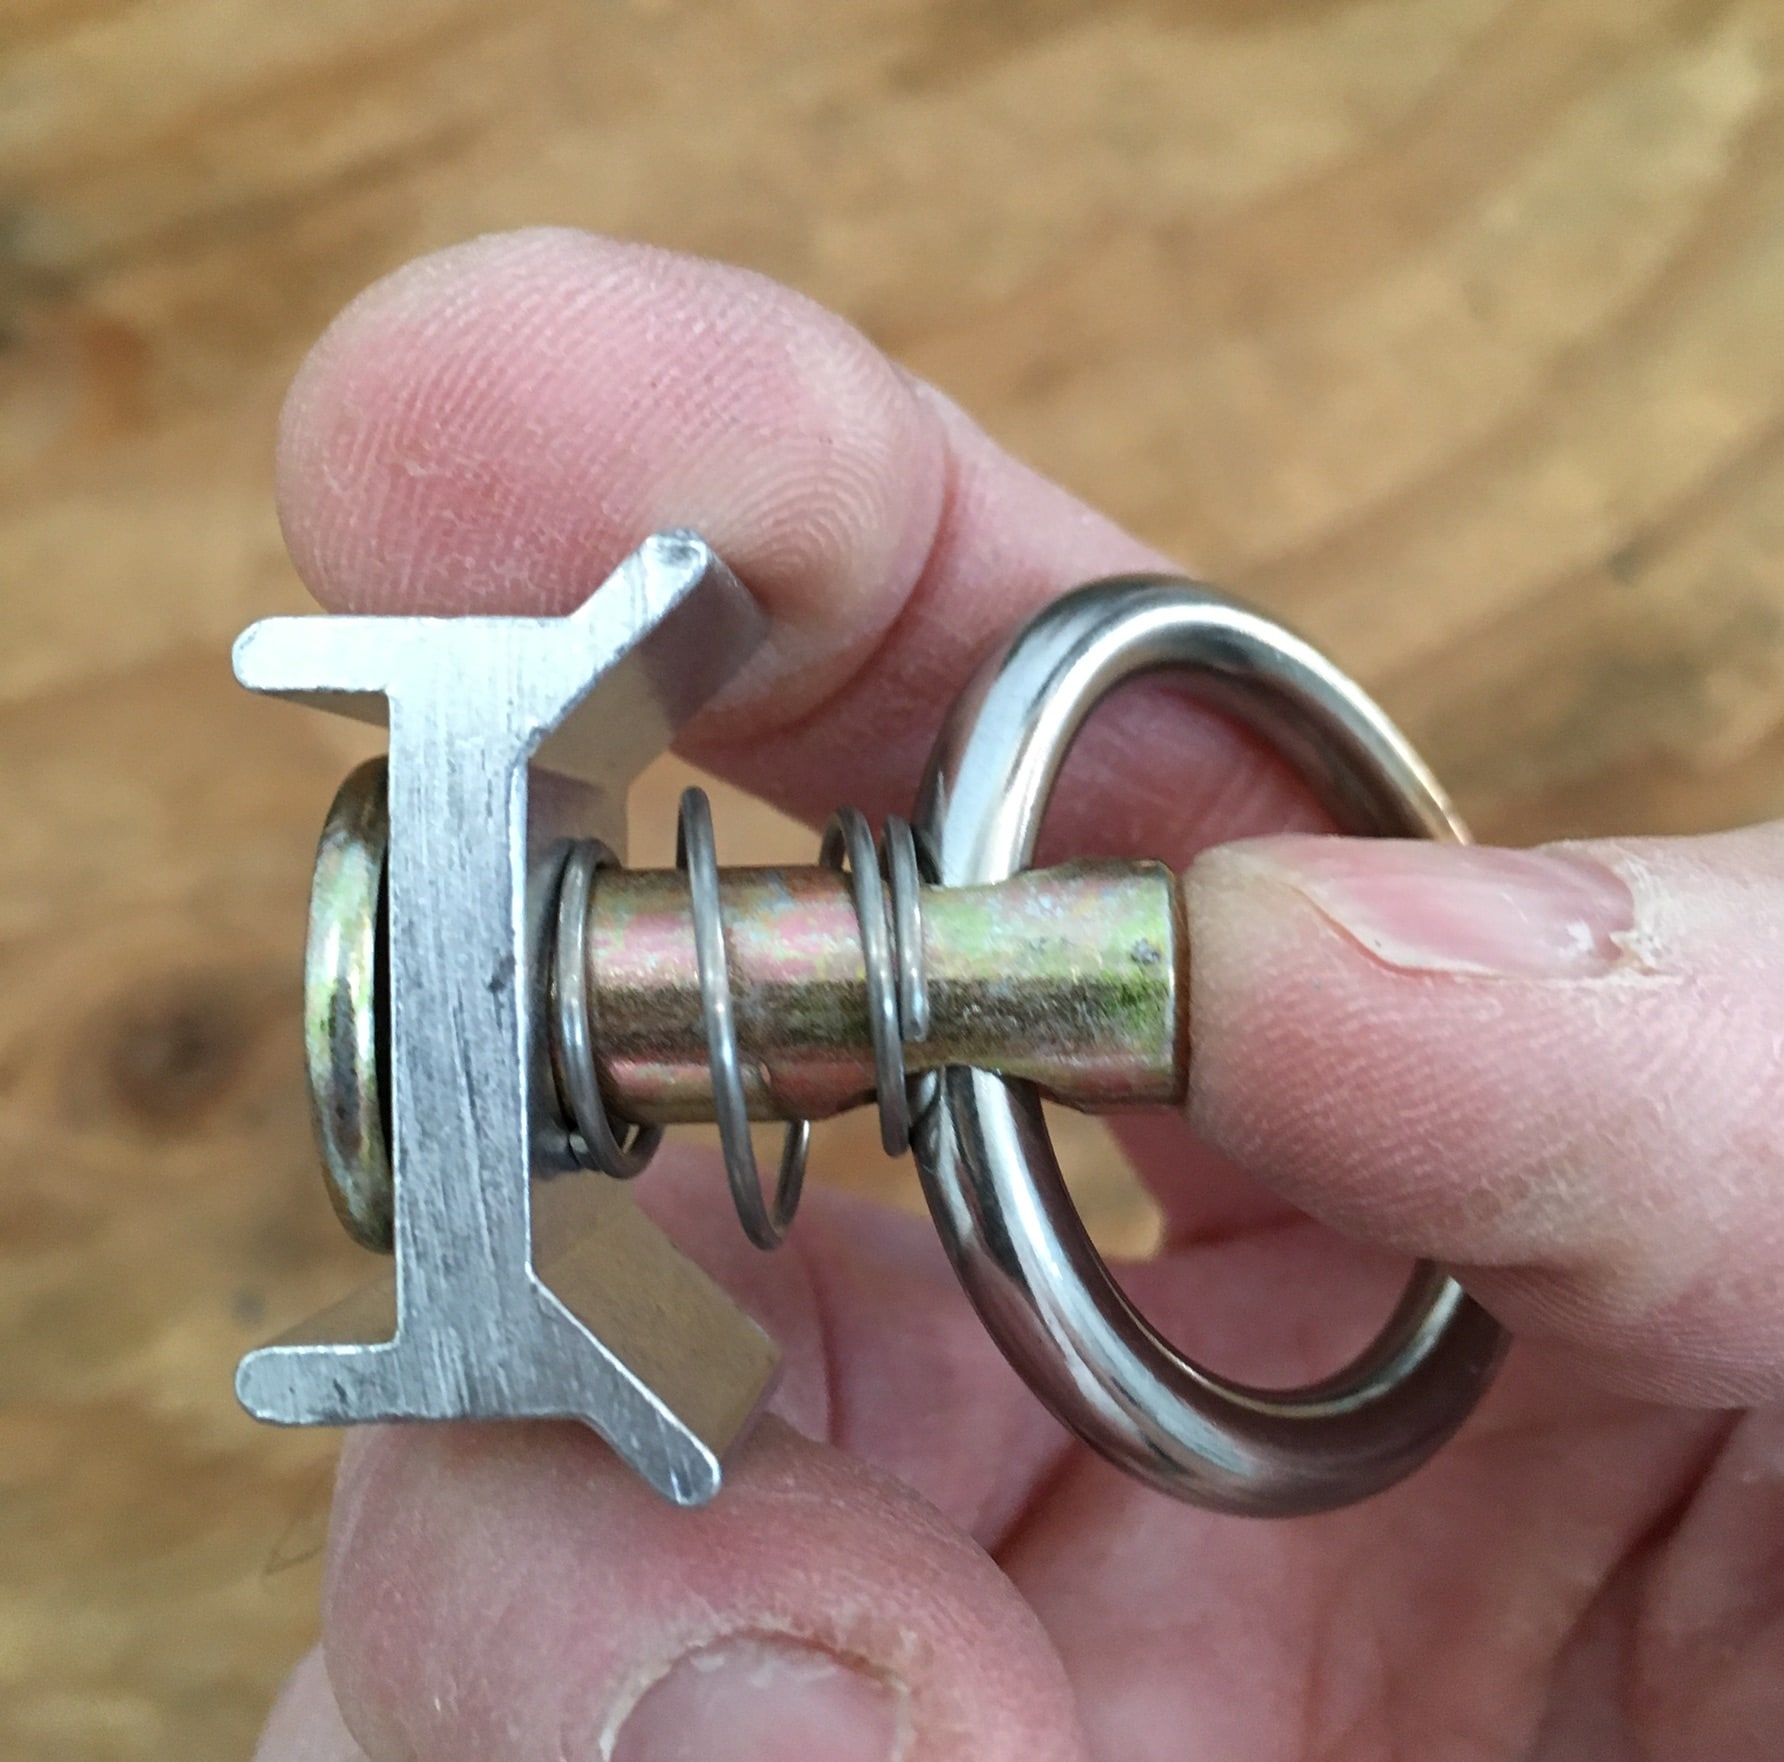
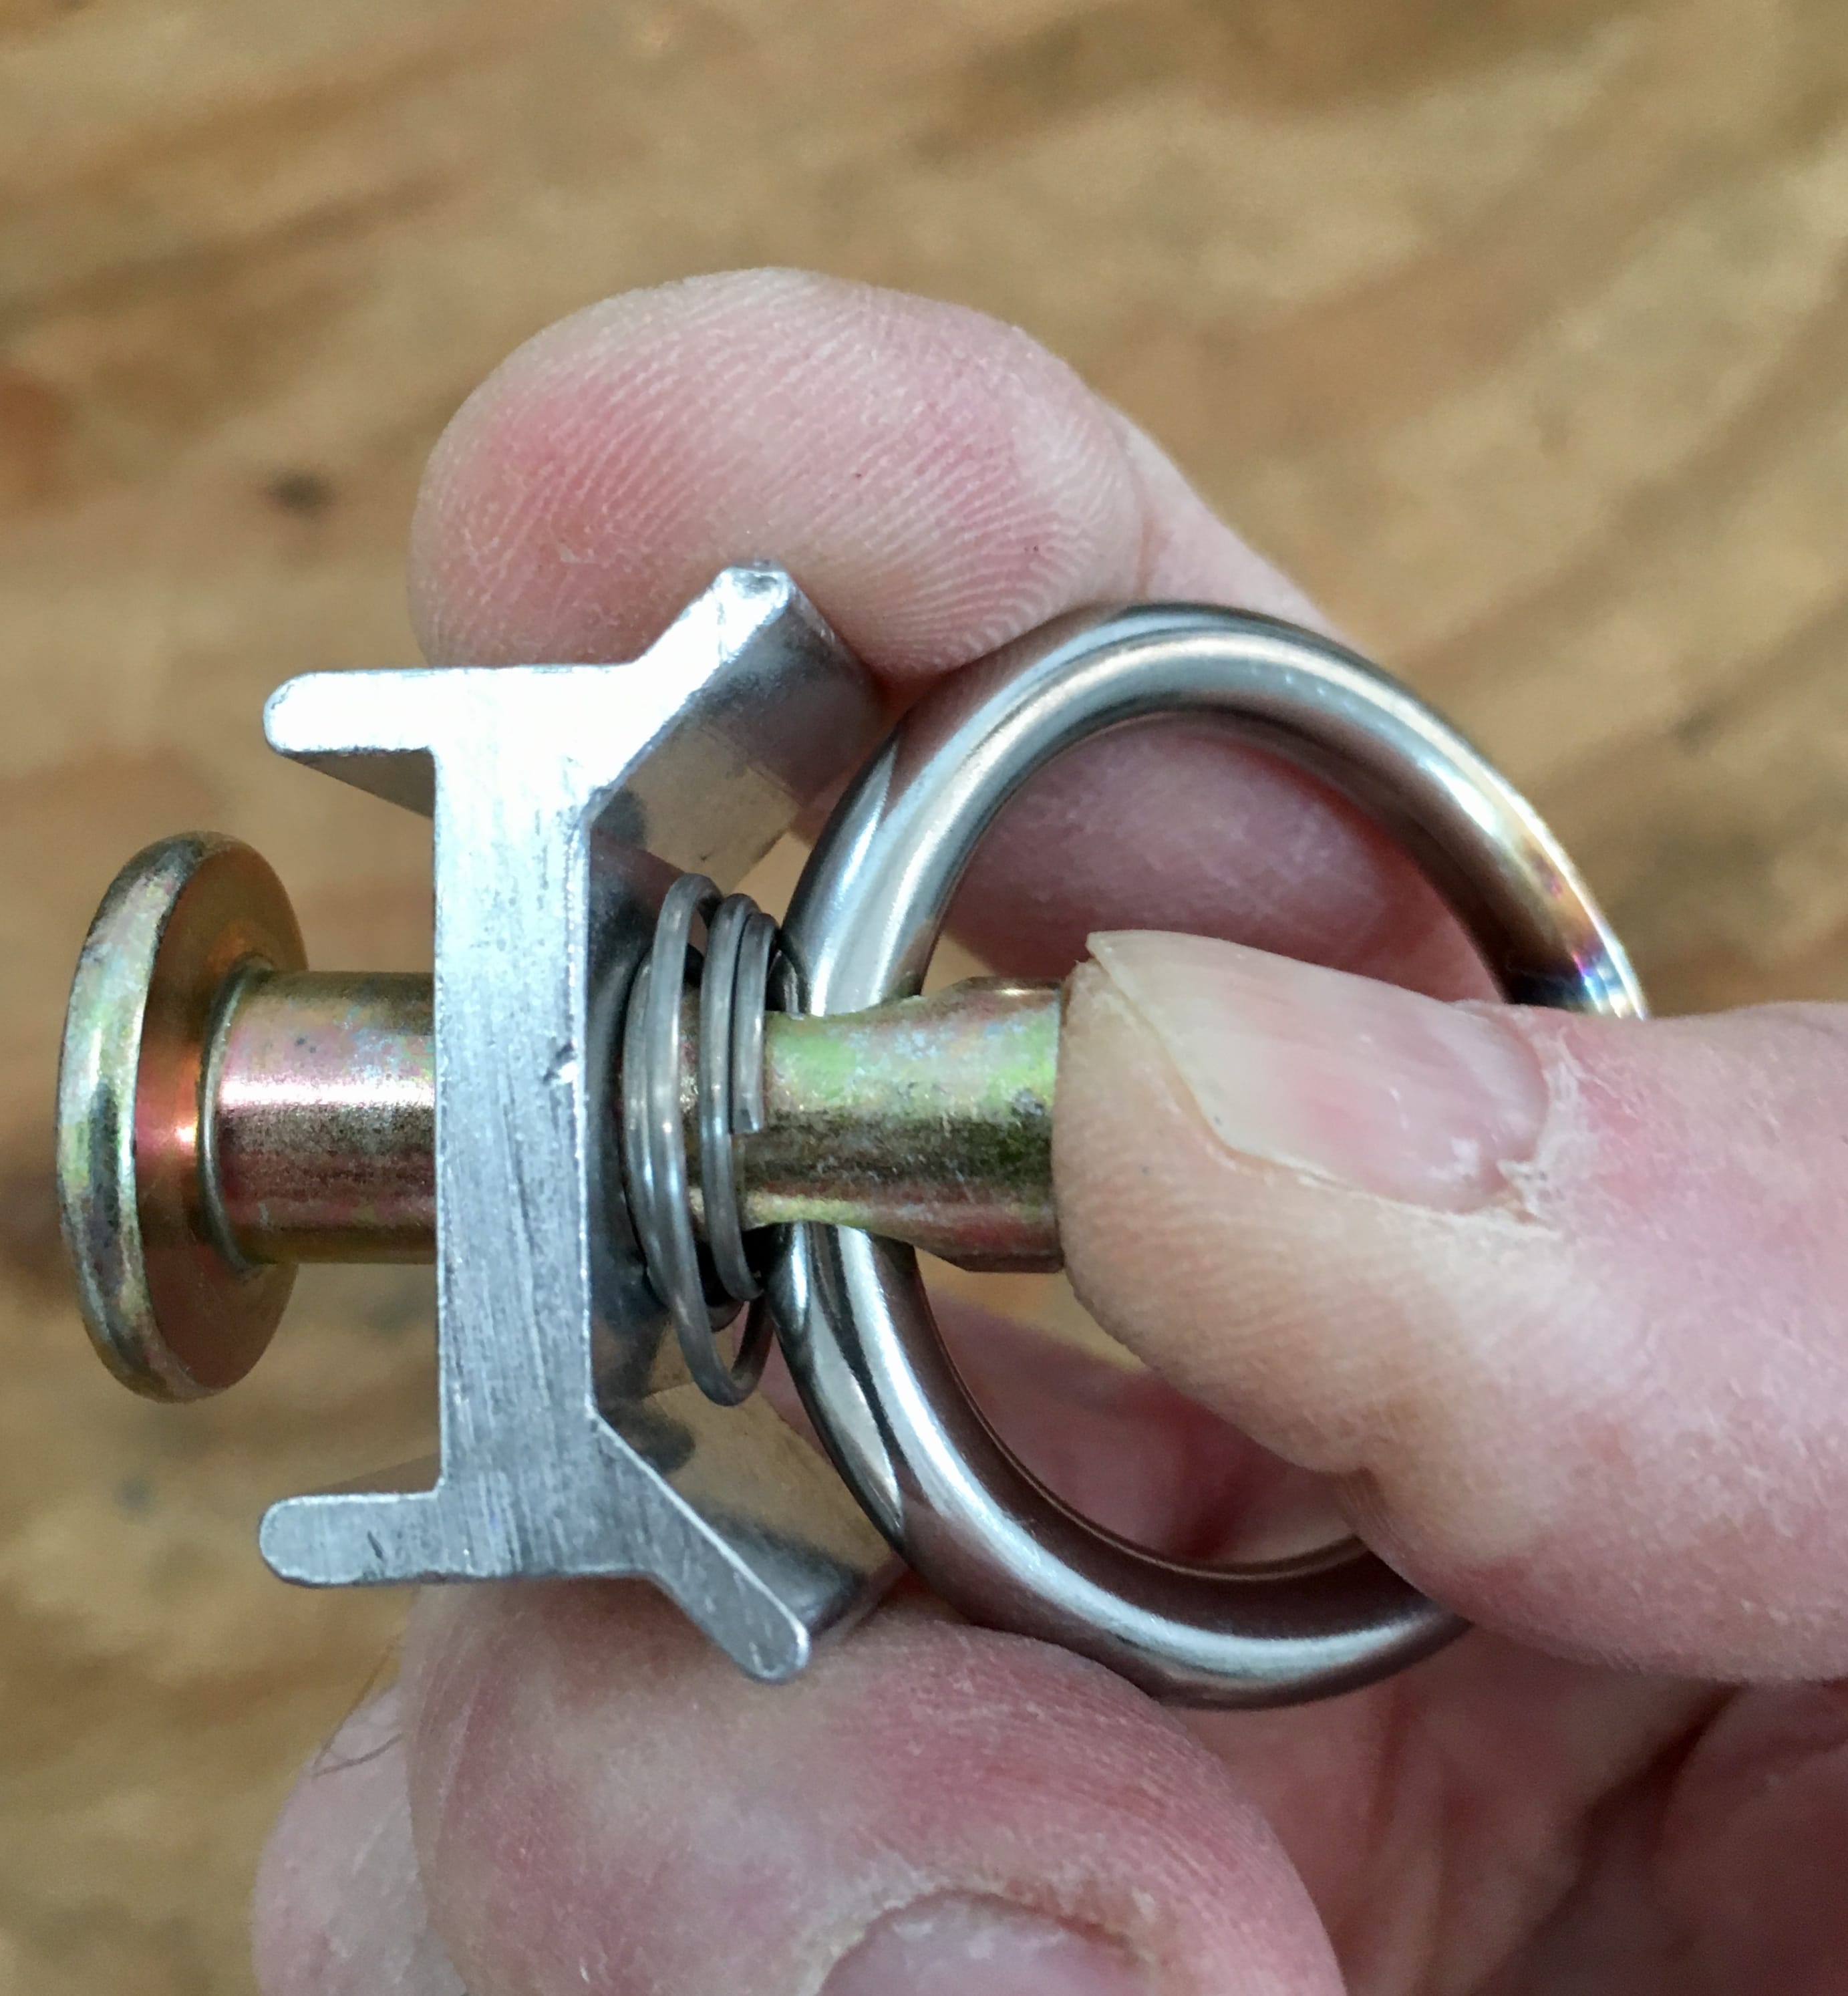
The cable: easy if you have the crimping tool. I used a large cold chisel and hammer to cut the cable, with it resting on my old vise. BANG and it was cut. No worries, except it buggers up the vise. The rear of the cable is a simple tight loop, with a double crimp, covered with heat shrink tubing for looks. The front is a tight loop through a small aluminum turnbuckle, which is anchored to the ring with a small stainless snap shackle. Closeup of the front ring and the placard. I decided 30 pounds was a good safe load that would not stress anything. That is a lot of wet towels. The cable is run through the ring of the center mount by feeding the turnbuckle through it. [attachment file=IMG_6914 crop.jpg] To mount the cable you clip the rear and center rings in place, then the front one and tension the turnbuckle to just take out the slack, and no more. With no weight on the cable it lies straight with no curves. To dismount, loosen the turnbuckle several turns and unclip three places. The cable rolls up and stores neatly in a cabinet. John Davies Spokane WA
-
HOW TO: Wire cable clothes line - full cabin length
John E Davies replied to John E Davies's topic in Ollie Modifications
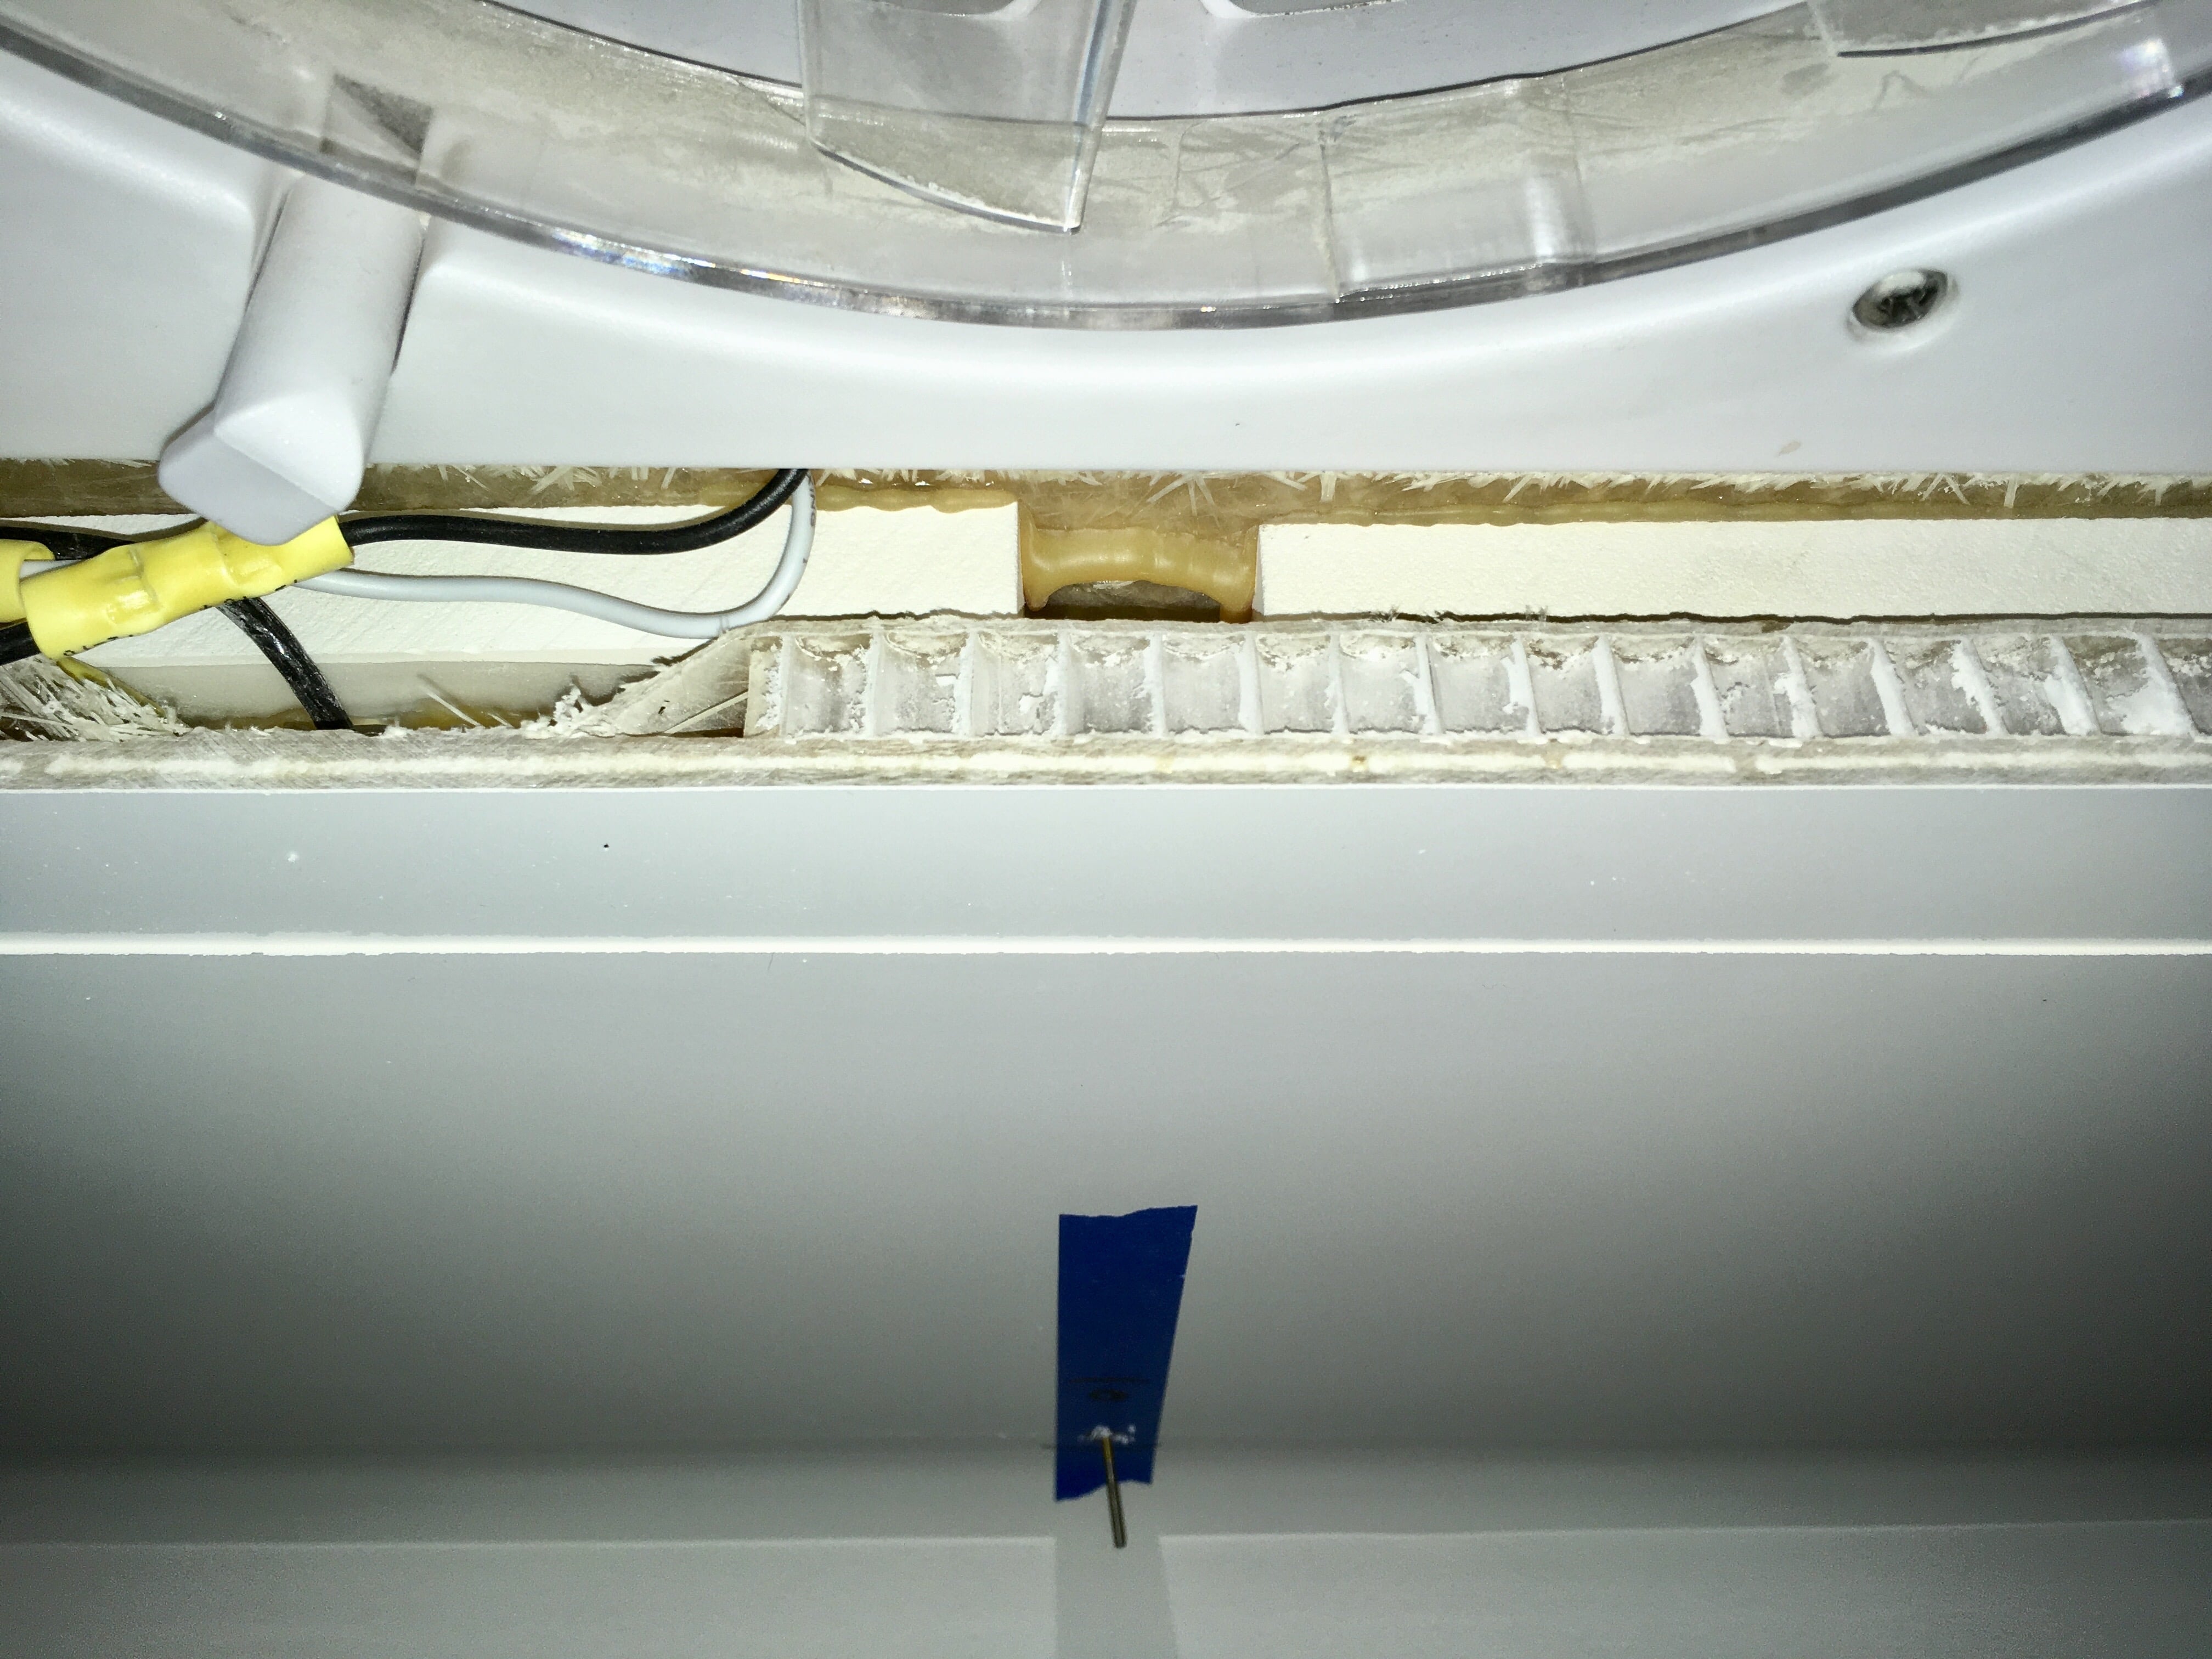
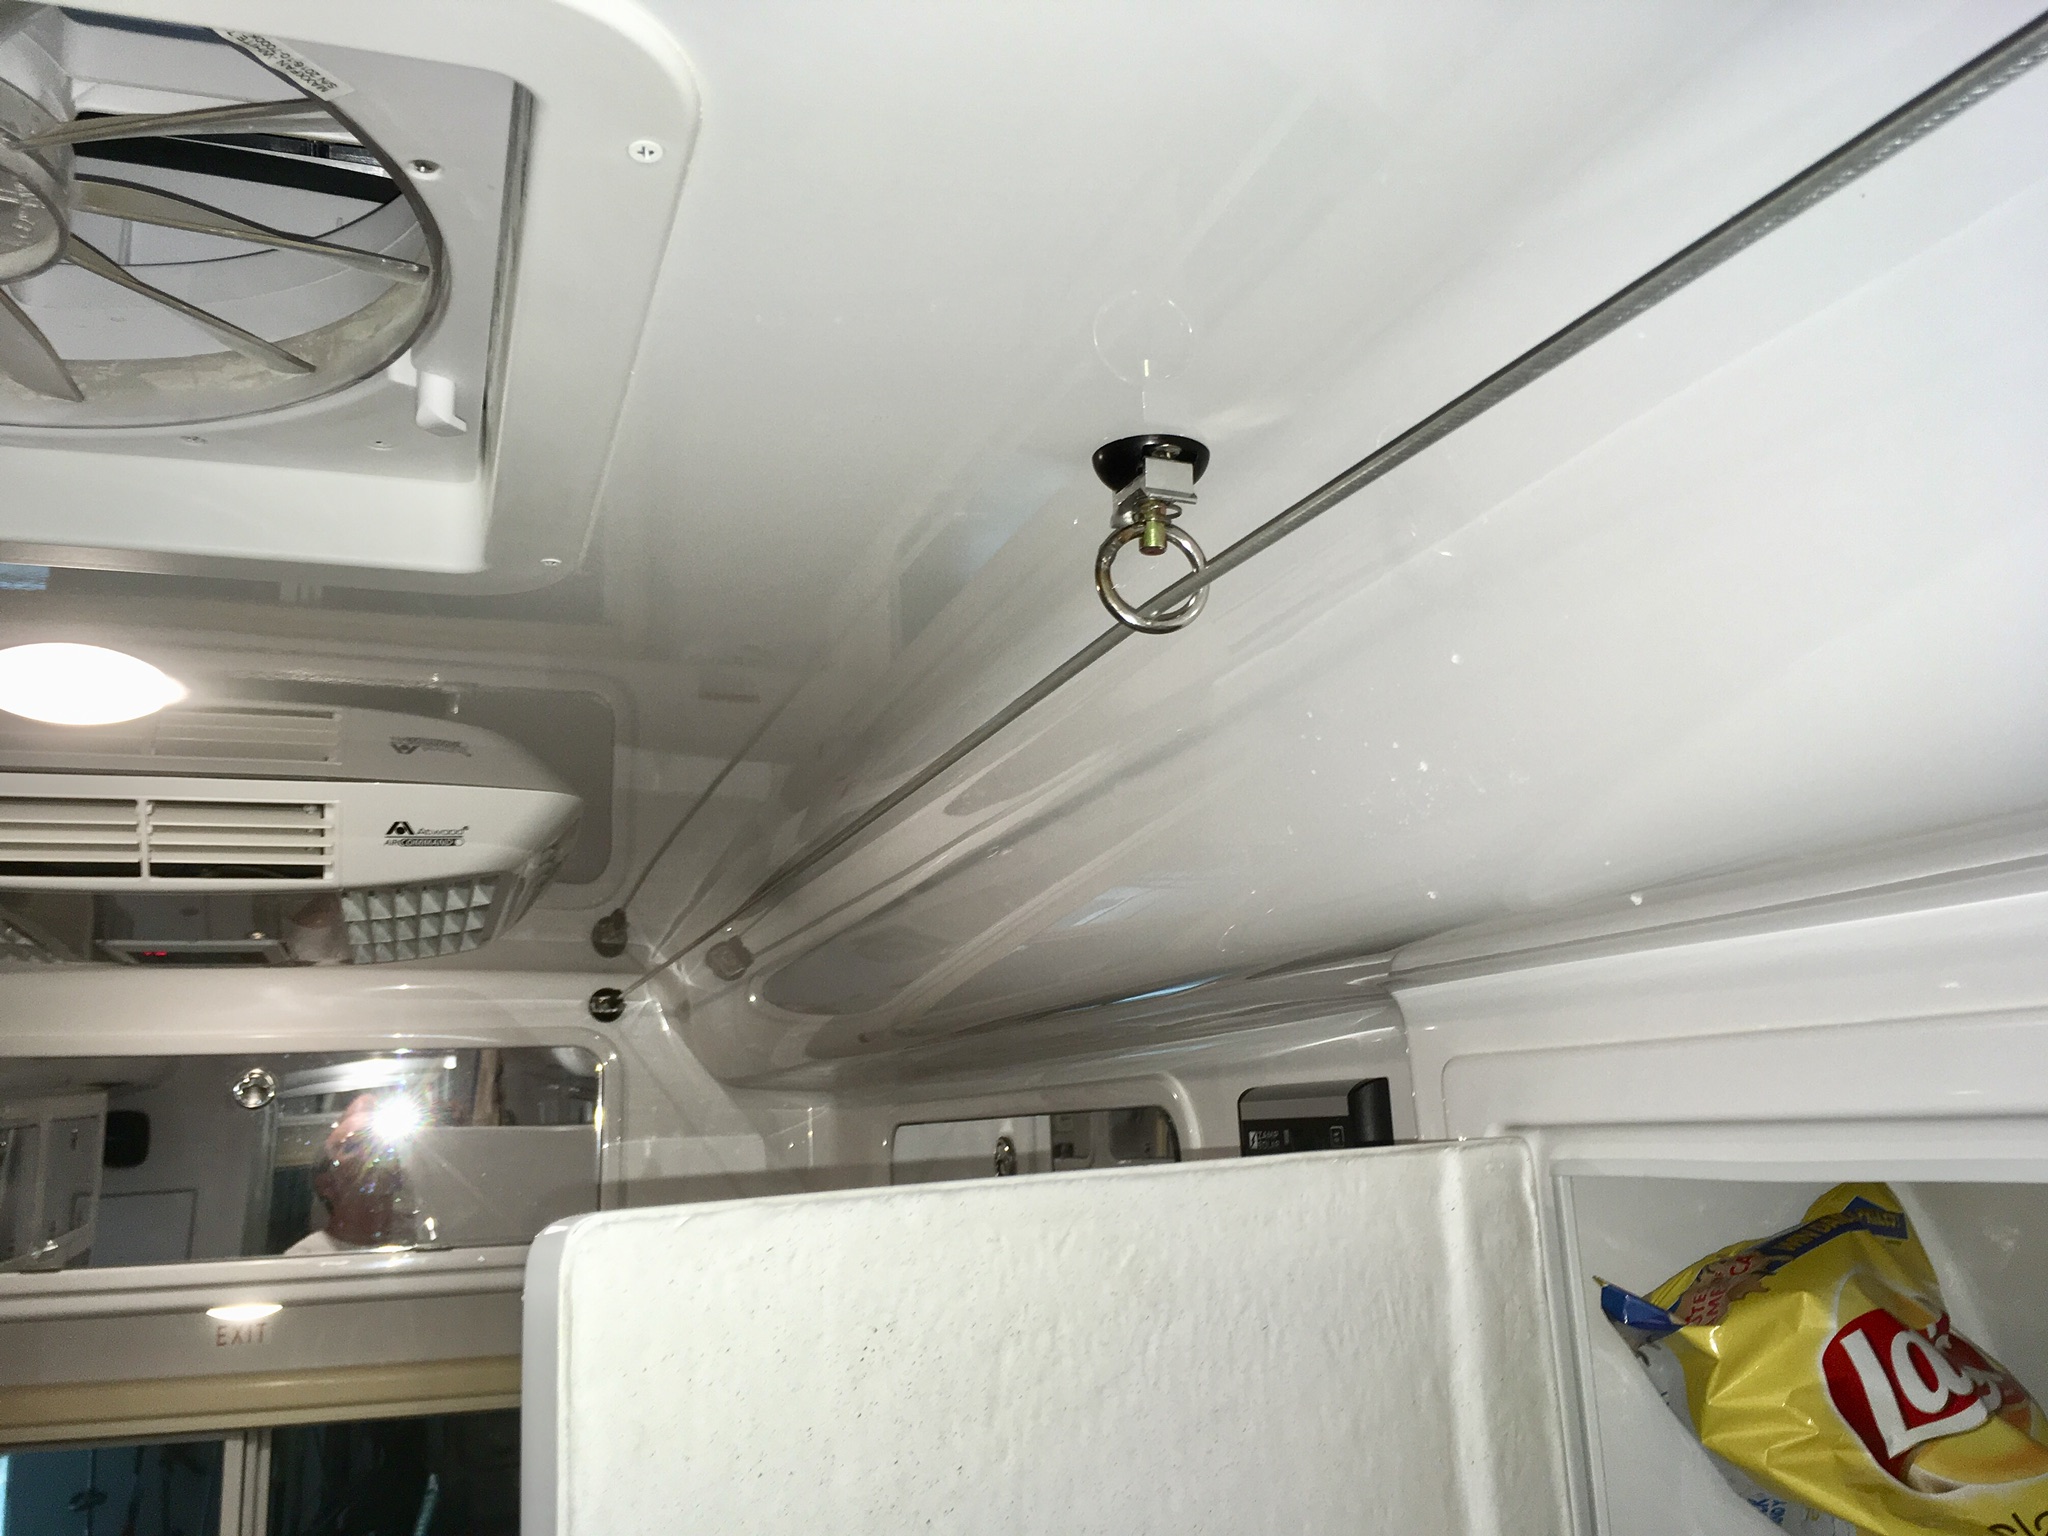
The ceiling base,: the maybe hard one. I originally planned to use one of the heavy stainless backing plates, and fish it through the gap between the inner and outer roof panels. I did check to see if there was room. I removed the trim panel from the Fantastic fan, and there was a 1 inch gap in the wood supports that would have let me get a trimmed plate in there. Unfortunately, the spot where I wanted the base to go was right at the edge of the bonded honeycomb material, one hole would be in the 1/2" honeycomb and one would be in the thinner material. There was no way the plate would sit properly in that spot. So, I used #12 Philips screws and just went straight into the fiberglass, and did not use backing plate. So the center base is strong, but not Uber Strong. I think it will be fine. You could add 3M VHB tape here if you wanted some extra grip. I used a rope stretched tightly between front and rear bases to locate the center base. I wanted the final line to be straight and also parallel with the side walls. I taped it in the correct spot and drilled the holes. The cable lies almost perfectly straight between all three rings, and aligned with the ceiling and the wall. Cool. John Davies Spokane WA
-
HOW TO: Wire cable clothes line - full cabin length
John E Davies replied to John E Davies's topic in Ollie Modifications
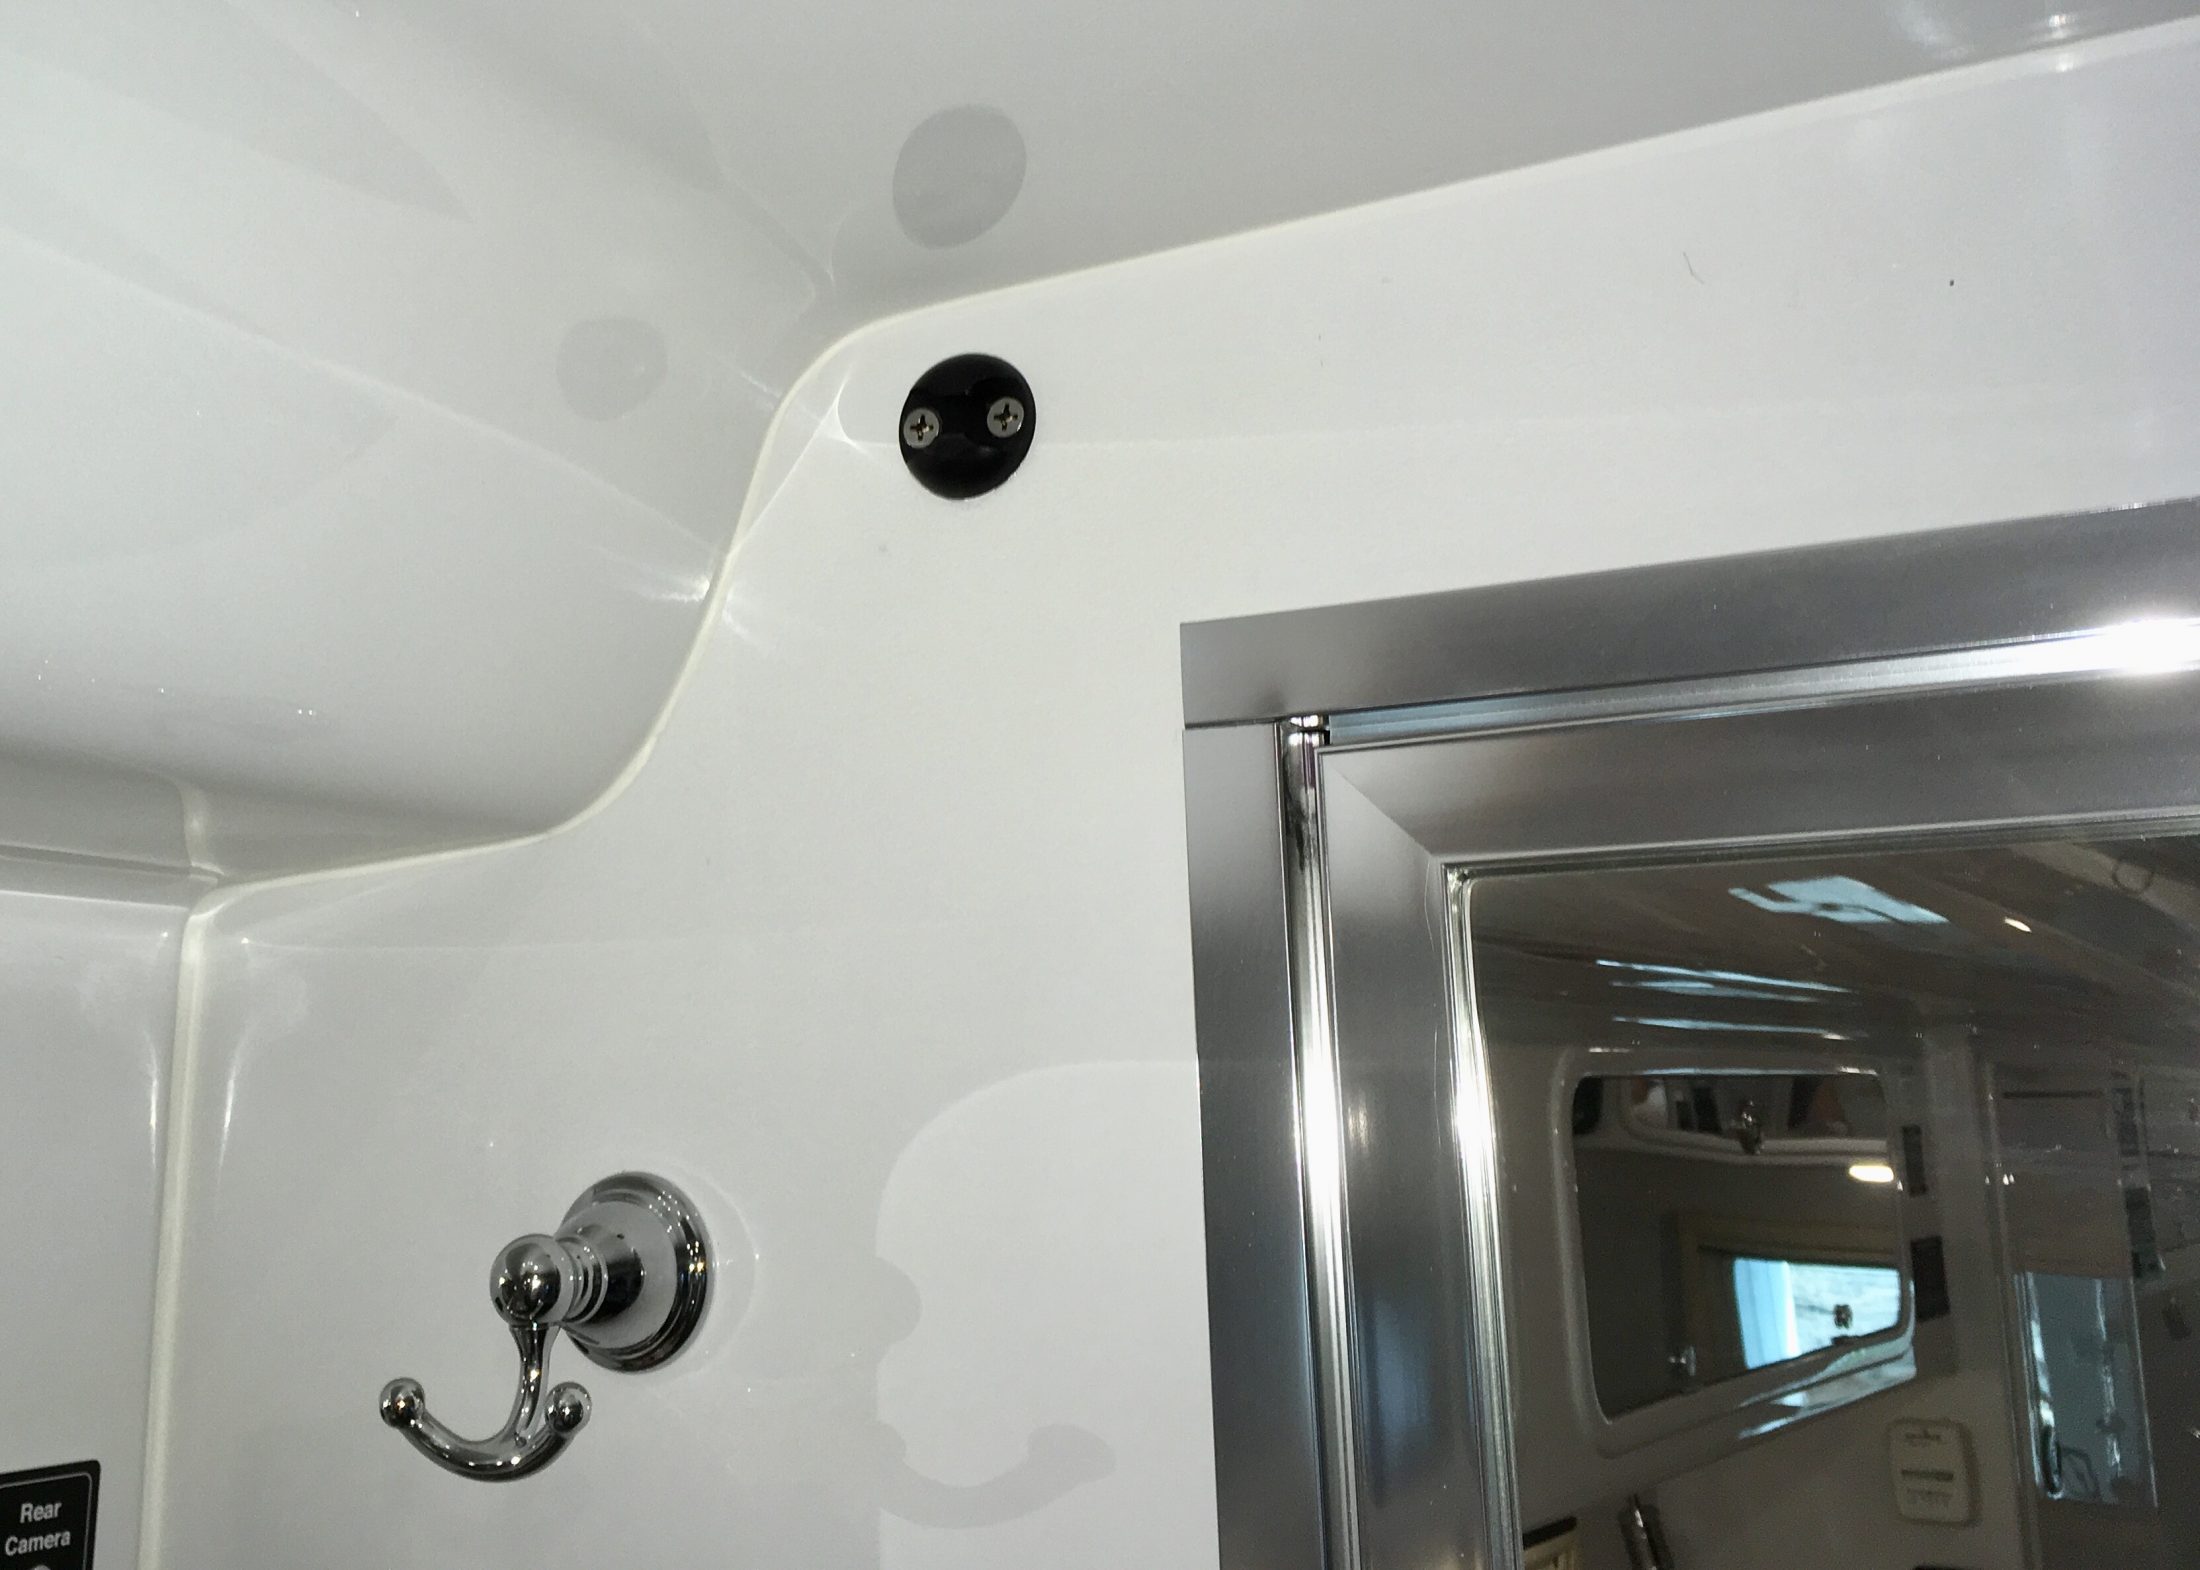
The FRONT base: the hard one! Same measurements as the rear base, use tape and level the holes. (Notice the wood core in this wall!): I was dismayed to discover that the main wall/ bulkhead is held to the ceiling with a strong adhesive, and apparently no real hardware. I am very surprised since the mirror door and closet door hang off this wall, you would think there would be mechanical fasteners along the top. When I first installed this base, in a similar manner as the rear one, and hooked up my fabricated cable, the wall would visibly flex rearward with just a small amount of weight on the cable, no more than ten pounds. That was NOT good. I did not want to rip the wall loose with a few wet bath towels... I took the base apart and fabricated a beefy reinforcing plate out of 2" x 2" x 1/8" 6061T6 aluminum angle, the good stuff. It is very strong and is a similar alloy as to what the trailer frame is made from. I screwed the upper part to the ceiling with #10 stainless screws and silicone sealant, and mounted the base through the angle with more sealant. It won't move now, it is very solid. The reason I used sealer here is that it is a wet area and I did not want moisture penetrating the core of the wall. The other bases do not require sealer. John Davies Spokane WA
-
HOW TO: Wire cable clothes line - full cabin length
John E Davies replied to John E Davies's topic in Ollie Modifications
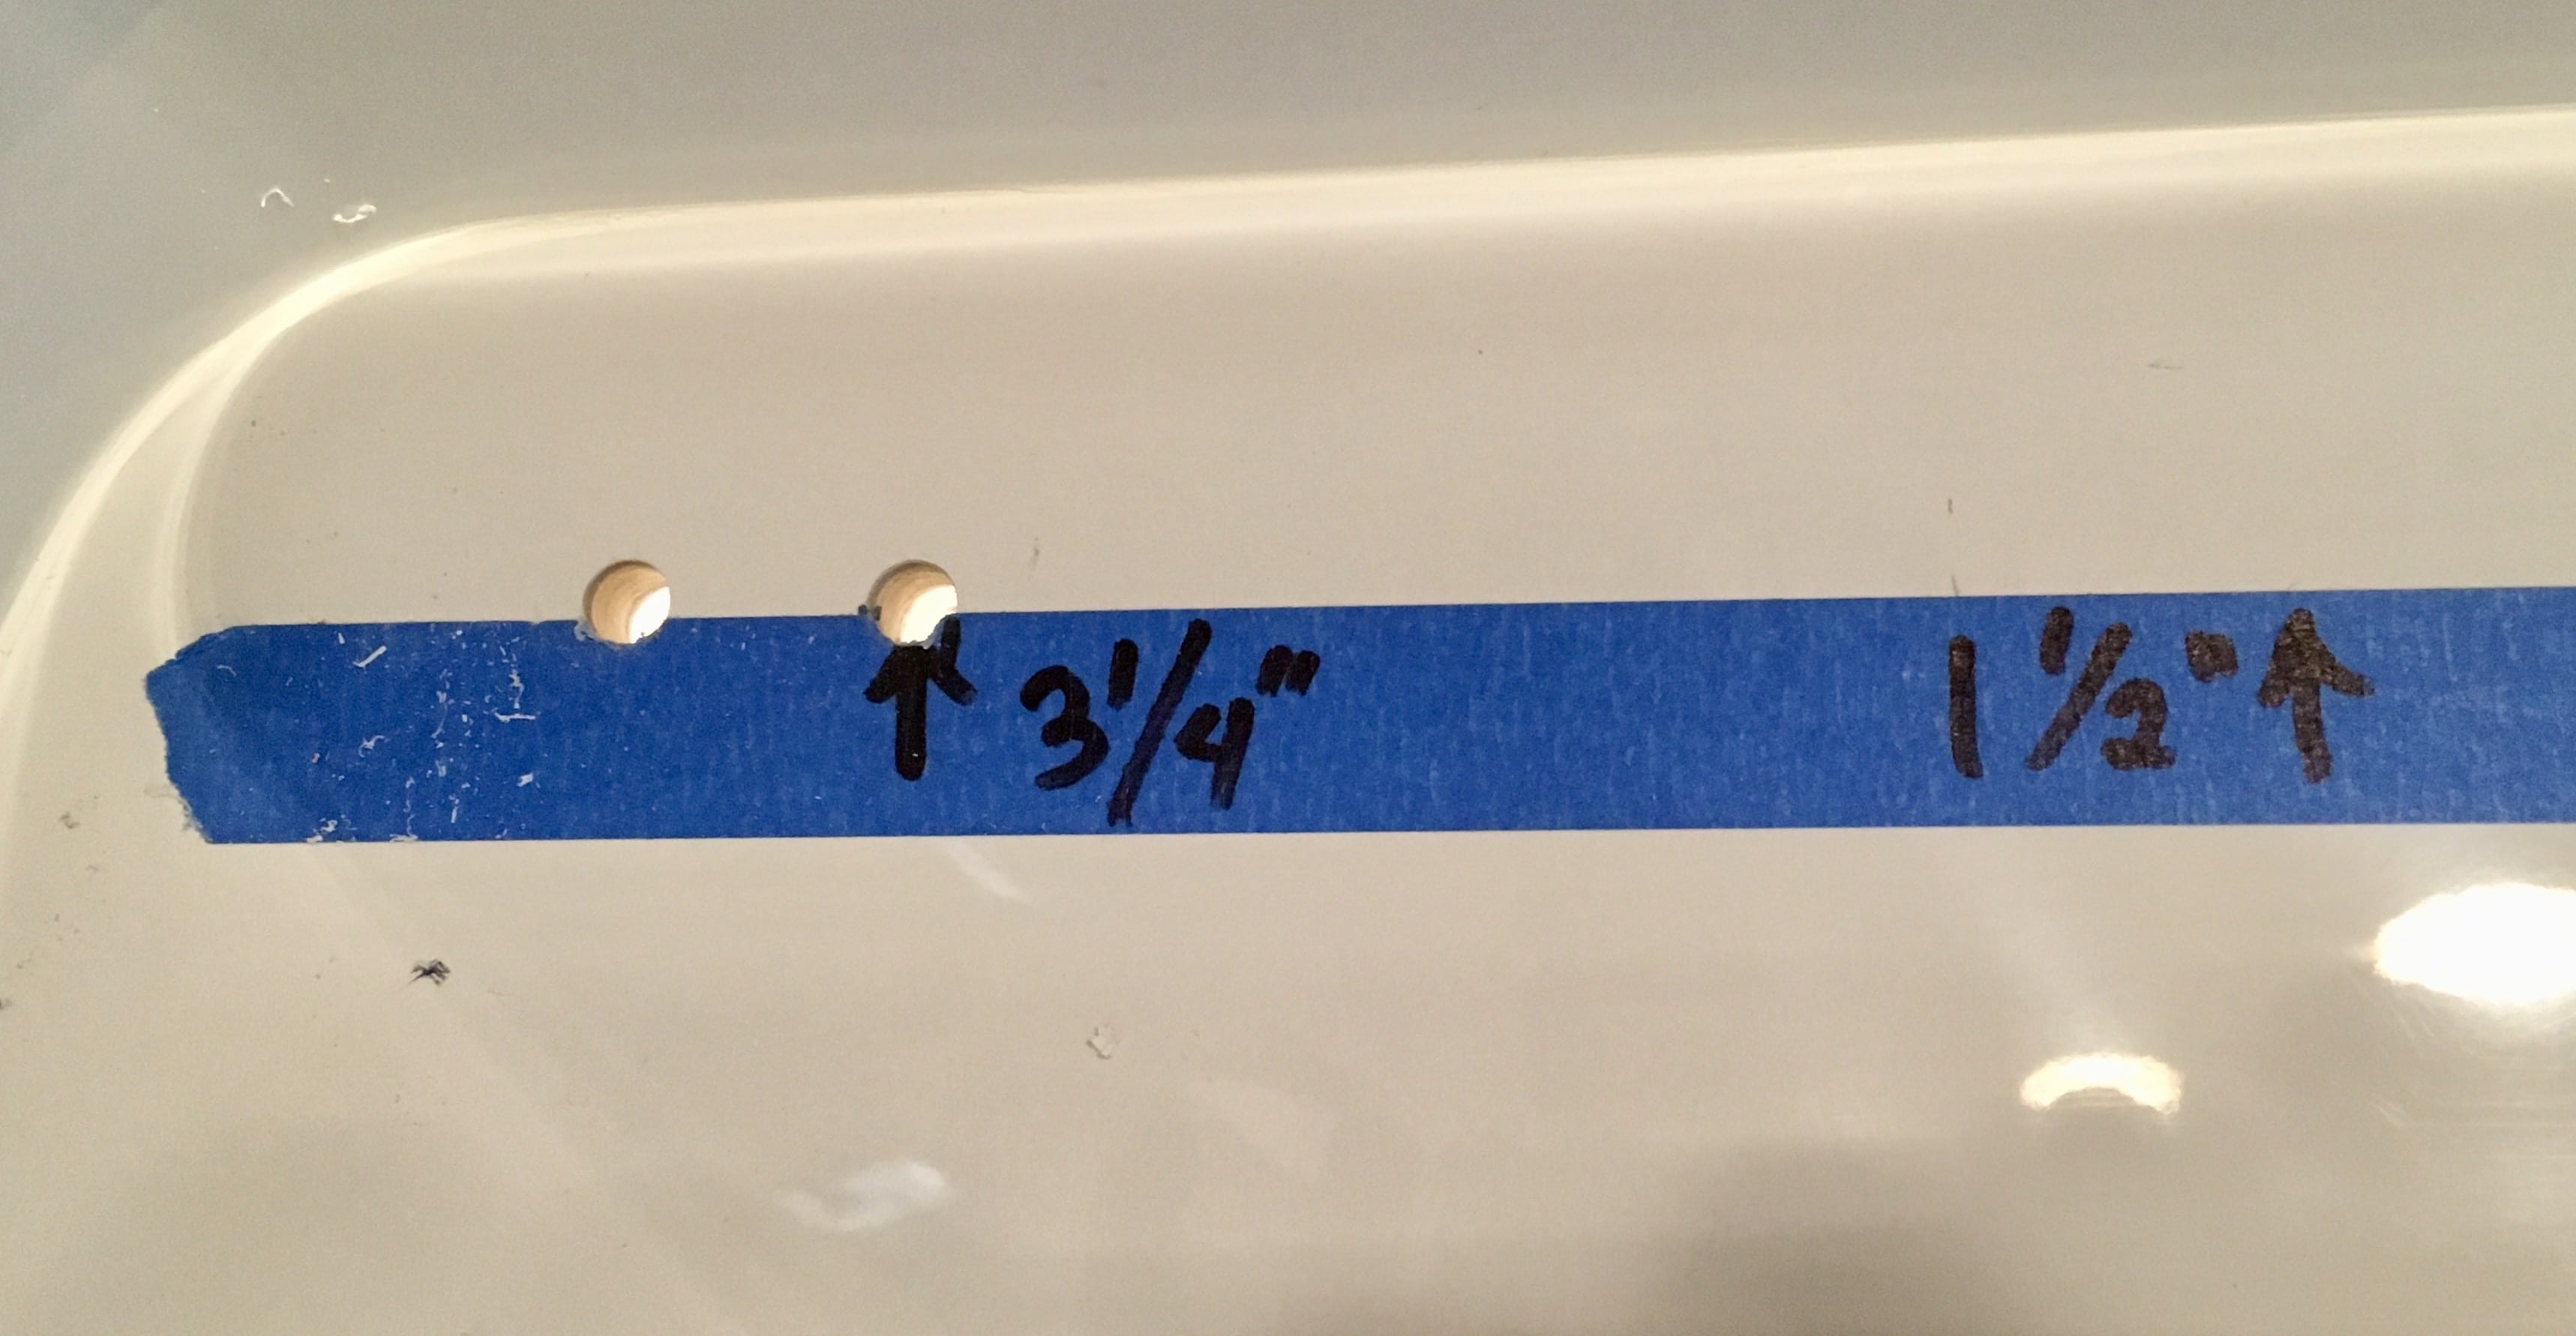
The REAR base: the easy one. The INBOARD (curb side) hole is 3.25 inches from the wall, and 1.5 inches from the ceiling. Make sure the holes are horizontal. I used a strip of tape and measured down to the bottom of the cabinet for reference. This panel is about 1/2 inch thick, so the 1 inch screws work fine here. That was easy.... John Davies Spokane WA
-
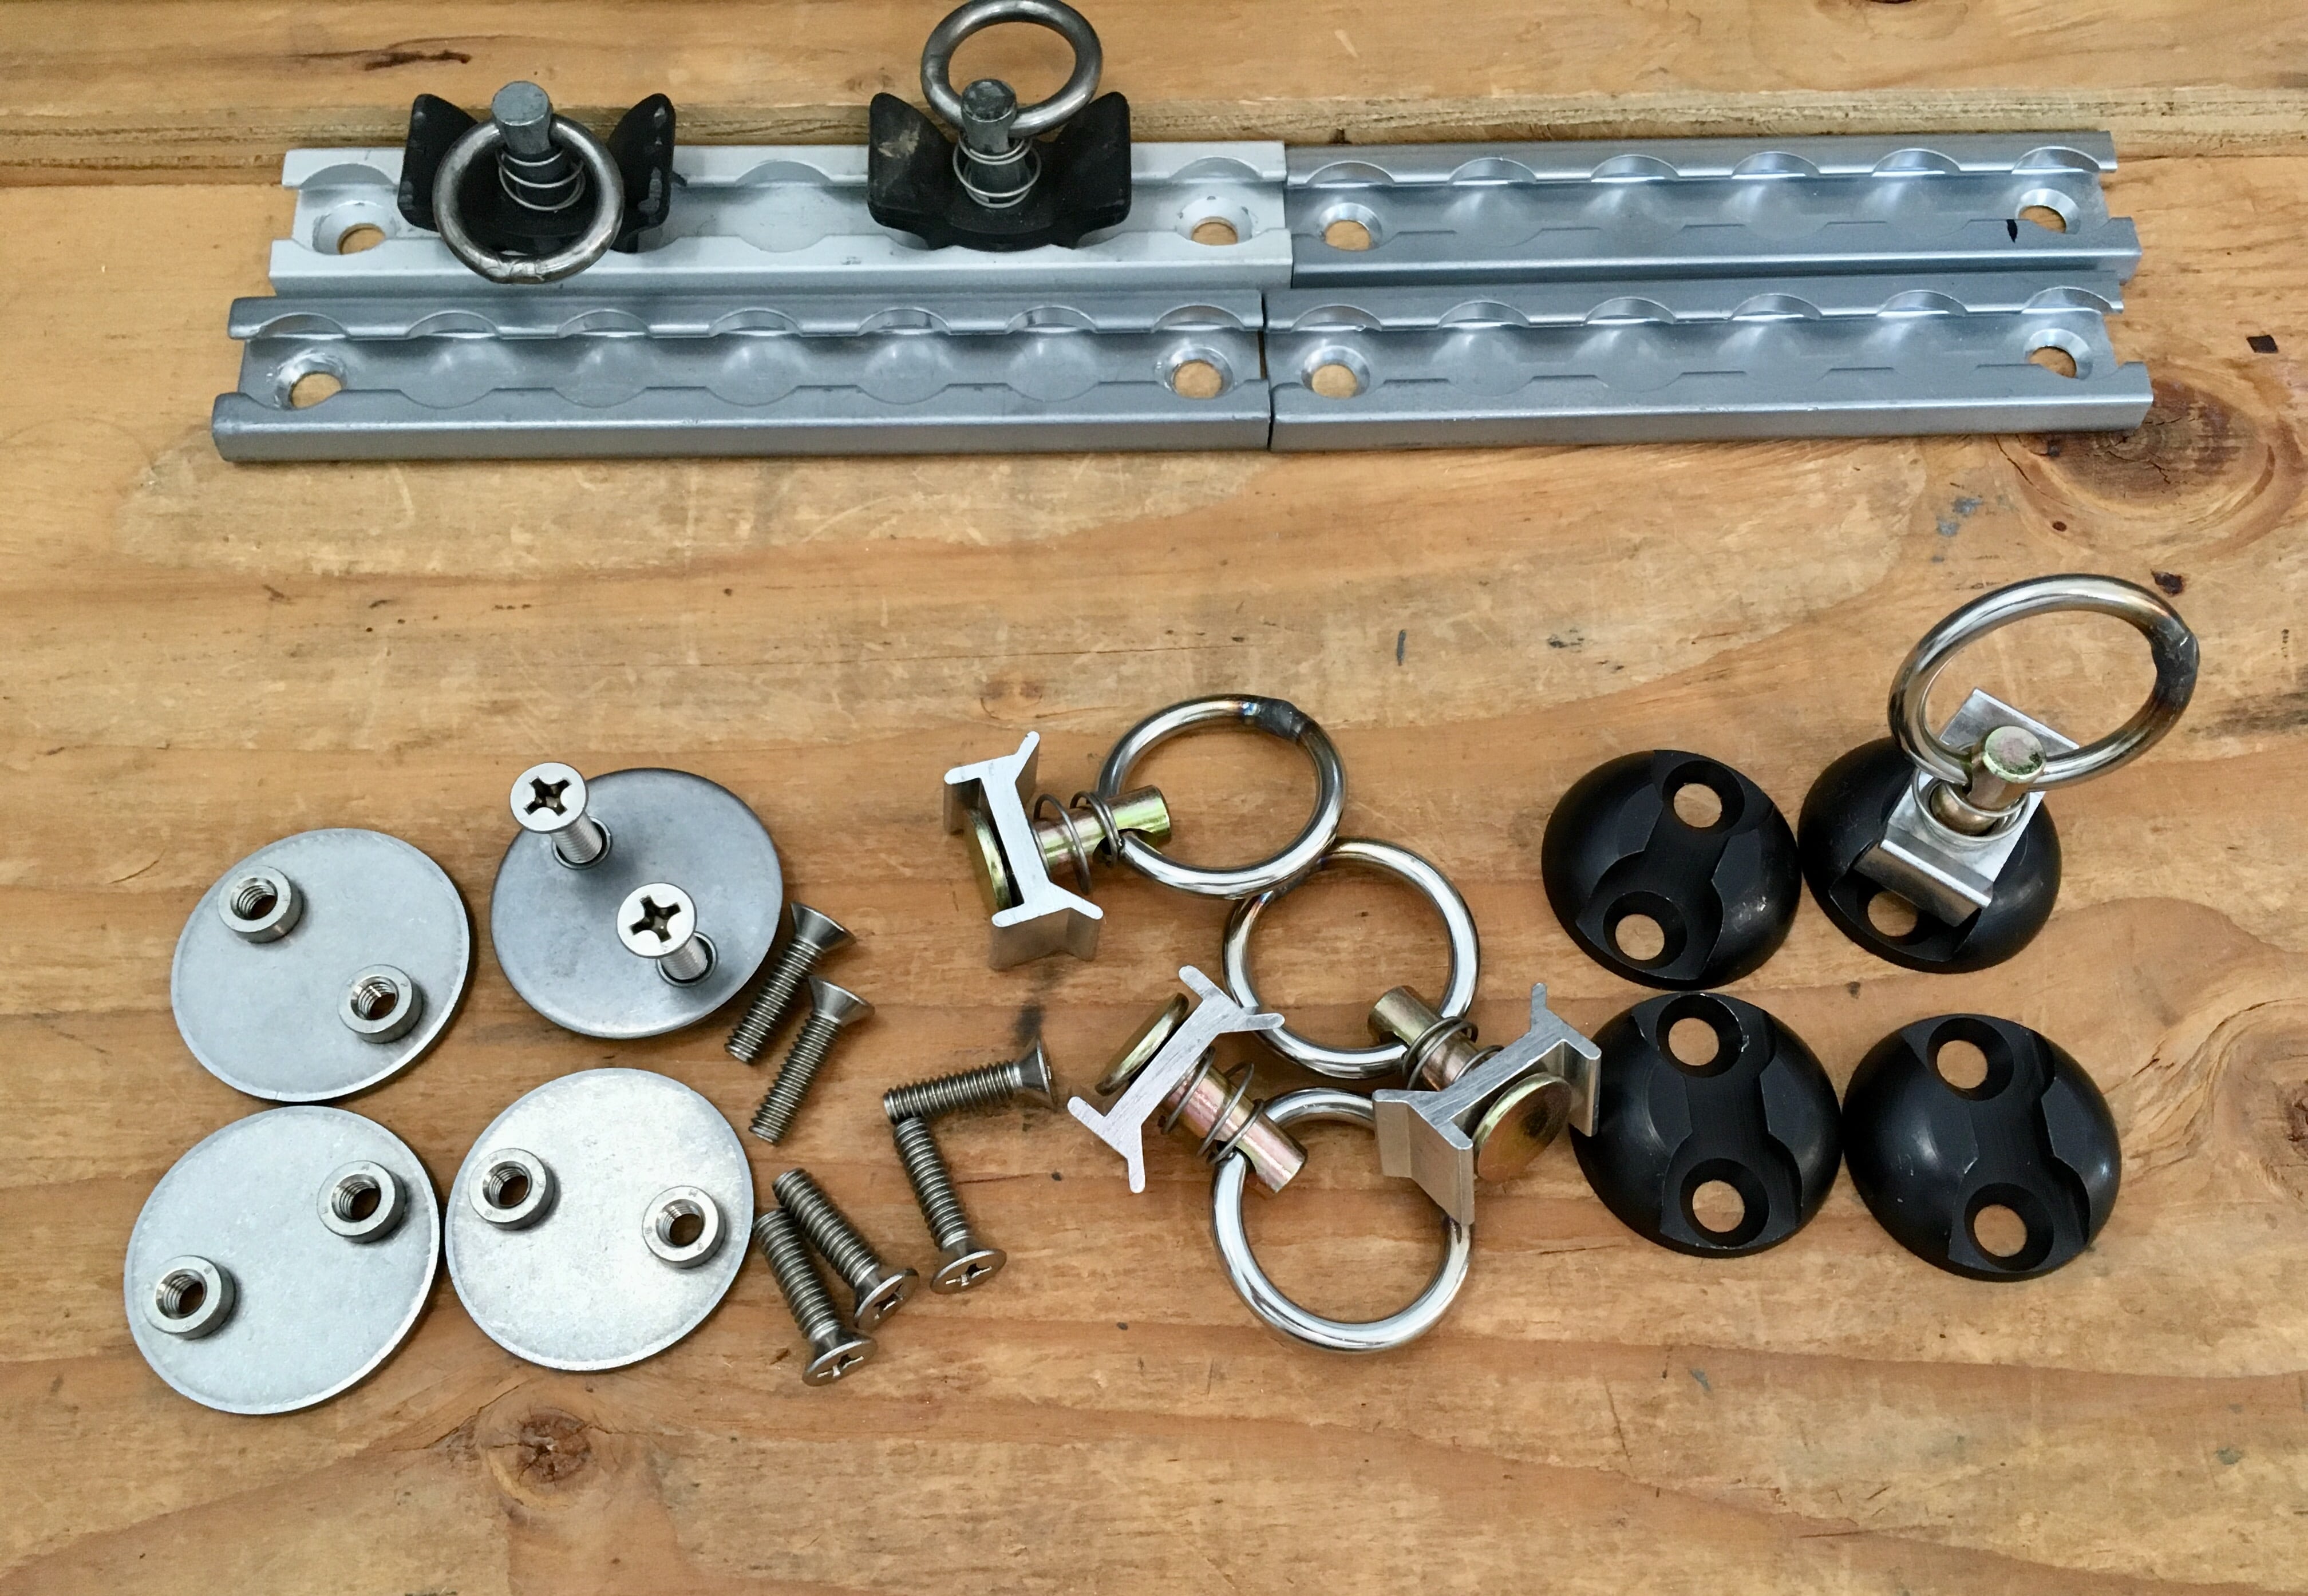
I had been planning to fabricate a stout clothes line ever since we picked up “Mouse” 16 months ago. I wanted something good looking and strong enough to hold three wet bath towels plus underwear and light clothes, for drying when it is not possible to string a rope outside. Those dinky retractable ones are not good enough for anything but small stuff. Here is the heart of the project: ... http://www.macscustomtiedowns.com/product/versatie-anchor-plate-assembly-4-pack/Anchor-Plates Pictured below are the four rings and bases from that set, plus some extra materials I had laying around from earlier projects. I have use these tie downs for many years, on all sorts of trucks and trailers. The extra stuff is going to go on my front cargo tray. The bases stay attached to the two walls and also one to the ceiling. They are anodized black. If they were white they would blend in, but I don’t mind. The tiedown rings are quick release, simply squeeze and slide out of the base. I used 1/8 inch plastic coated wire, crimp splices, and a crimper tool, all of which I already had in my shop. The crimper is the big dollar item, but for a neat and strong installation it works way better than the screw type clamps. This is a 5 out of 10 project; you need to be comfortable drilling holes in your trailer, fabicating metal, and with cutting and splicing cable. More to follow, I have to go to dinner. John Davies Spokane WA
-
Fresh Water Tank Overflow Problem
John E Davies replied to roguebooks's topic in Mechanical & Technical Tips
In regards to the name “Legacy”, that is a touching story. Thank you. However, the trailers are really a MEMORIAL to John Oliver. They could have picked the name Tribute - “a gift or service showing respect, gratitude, or affection”. “Legacy” usually means that the object (or money) is to be passed on to a later generation in a person’s will. It is the first and primary definition, and combined with their heavily promoted lifetime hull warranty, Legacy strongly implies that these trailers are built for decades of use. I have read in several places about this interpretation, I did not invent it. I don’t have any links or references.... It is really a moot point, but a confusing one for me. When I bought my trailer, that is what I believed the name meant. I am sure I am not in the minority. John Davies Spokane WA -
Woohoo! That is a great idea. It never occurred to me. I could leave a small amount of fresh water in all the time with some oil, except for winter. For those who don’t know what this is.... http://olivertraveltrailers.com/topic/how-to-bleach-service-tee-to-sterilize-water-during-tank-fill/ Thanks. John Davies Spokane WA
-
It’s very important to file a service request online, under the CONTACT/ SERVICE tab at the top of every page. This alerts Jason Essary and also keeps a complete paper trail of the issue and whether it has been solved, or not. I just send a request asking Jason to read this entire page, and issue two Service Bulletins: Natures Head bulletin, describing the fan failure problem and the procedure for installing either the recommended 2.5 amp fuse, or the acceptable 3 amp one. Fuse Box bulletin, describing how the fuse socket “ears” are weak and may loosen their grip if the fuse is inserted at a slight angle or wiggled, causing intermittent or no connection. Plus the method to retension them by squeezing with insulated mini needle nosed pliers. If you have been affected by the NH fuse problem, or for issues with other fused circuits, please alert the factory in writing. Phone calls can go astray. Thanks, John Davies Spokane WA
-
The blade type fuse is locateed in the fuse box under the dinette table. Mine was the only one there that was NOT labelled, all the other ones were labelled. It was originally 1 amp and was blown after the first day. I changed it to a 2.5 amp one, as specified by Natures Head, and it has been fine ever since. Make sure the metal ears are grabbing the fuse prongs hard, or there may be an intermittent connection. This is a VERY common problem with this cheap, poorly designed fuse box. You can check your fan by removing it, there are two philips screws at the hose outlet, and make sure it is spinning and clear of debris. If the fan is not operating, the toilet will never operate better than a five gallon bucket. It has to ventilate to convert the bacteria from anaerobic (stinky) to aerobic (not stinky). Good luck, this is not rocket science. Ask a friend to help if you can’t figure it out. Get that fan running! Even with mild tinnutus I can hear mine running if there are no other noises. I put my hand over the inlet opening once daily as I enter the bathroom, to feel the airflow. It is very small, but you can feel it. If your fuse is the wrong size, please file a service request so the factory will be alerted and hopefully change their ways.... there really is no excuse for installing the wrong one. John Davies Spokane WA
-
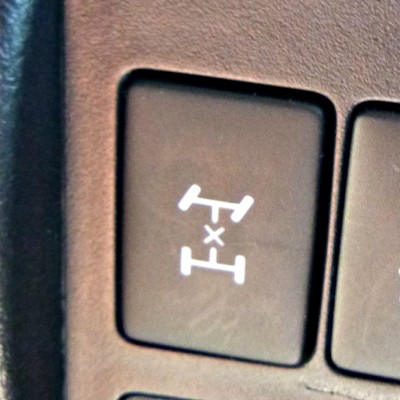
Have you used 4wd Low on public roads and highways?
John E Davies replied to John E Davies's topic in Towing an Oliver
Yes, it has a Center Differential Lock switch on the dashboard, so it can operate in either High or Low Range. It is completely controlled by the driver. I sometimes lock the center diff in High Range when ascending steep gravel forest roads that have a lot of washboard switchbacks, it is helpful and reduces wheel-spin. It does turn off ABS when engaged. There might be a way to fool your Jeep’s transmission computer, check on the Jeep forums for a “center difflock disable” electrical mod. If you can turn that off, there would be no reason to avoid using Low on hard surfaces. It might be as easy as installing an on-off switch in the wire coming from the transfer case sensor, I dunno.... or there may be a computer hack or dealer setting that can be altered. If it is possible, somebody has already done it, and documented it. Good luck. John Davies Spokane WA
-
Simplicity of plumbing layout. Cheaper. You can flush the black water out of the big hose with the grey water. Install a composting toilet and you will have no more black water, much longer fresh water reserve, and much fewer worries in general. John Davies Spokane WA
-
Fresh Water Tank Overflow Problem
John E Davies replied to roguebooks's topic in Mechanical & Technical Tips
Remove the streetside vertical bulkhead in the overhead rear media bay, look behind the breaker panel. There is a ground bus there and the main harness for the rear equipment enters there. Lots of splices. Remove the round inspection port to access the area behind the stereo head unit and solar control. Take pics, post them in a brand new thread and I will post mine. I had rat’s nests pretty much everywhere there are switches, cables and coaxes. I secured most of them with lots of nylon ties, but that is a band aid fix. I complained to and talked with the factory and they assured me that they would do better. After a year and a half, this would be a good reality check. (BTW, check the solar cable terminal screws while you are in there. They are “supposed to be” checked every 30 days as per the Zamp solar manual. LOL. Mine were tight.) Thanks. John Davies Spokane WA -
Fresh Water Tank Overflow Problem
John E Davies replied to roguebooks's topic in Mechanical & Technical Tips
I am 100% unhappy about the poor quality of my electrical system, which hopefully is no longer a problem in current production. I would like to see pictures of the electrical bays in the latest trailers to compare to my tangled rat’s nests. Otherwise I love the trailer and believe it offers the best bult RV in its price range. OTH I think naming and advertising the trailer a “legacy”, that can get passed on to grandkids, is more than a little deceptive. The superior quality frame and hull will stand the test of decades of use - the cheap systems inside and underneath, no way. Which I think is a shame. Surely you are joking about buying an Earthroamer. Maybe when I win the Lottery. John Davies Spokane WA -
In my head I really like the idea of replacing the ugly and water catching flat glass “dining room table” that sits on Mouse’s roof, with snug fitting, lightweight plastic ones. It would look SO much better, self drain, and be more clear of wind, bugs and tree branches. Reality sets in. They trap heat against the roof, so they run hot; are prone to scratching and cracking; have a much shorter life expectancy; and they cost more. Plus there are a lot of panels being made with poor quality “second” cells. Intersting article here.... https://cargovanconversion.com/10280/the-current-state-of-flexible-solar-panels Maybe I will swap mine out in ten years when the technology is better. John Davies Spokane WA
-
An exended “rack” for your Anderson would be much more cost effective. Would an extra 3 inches get it to clear? It did on my 200. It also gives you more maneuvering clearance when backing. https://andersenhitches.com/Products/33734-custom-4-wdez-hd-rack-with-3-extra-shank-length--2-shank.aspx It says there that made to order custom racks are available, this is no longer true, as per a phone call with them. If you need more than 3 inches a good welding shop could modify yours for less than $100. Don’t let your handyman brother in law mess with it, it needs to be very high quality work. Airbags would work but you must inflate them, then rig the correct tension on the chains. If you use the old thread count with the bumper sittiing higher than before, the weight distribution geometry and tension will be off. It is wrong to rig your system, then lift it up afterwards. That slackens the chains. A big plus for the airbags is for levelling when your bed is fully loaded, for when you need a ton of bark for the yard. It does NOT increase your payload at all. You must keep a minimum of 5 psi in the bags to prevent damage to the material, so expect a slightly stiffer ride and a taller bumper height when not towing. http://www.trucktrend.com/how-to/chassis-suspension/1607-air-suspension-basics-for-towing/ I use airbags on my 200, in addition to the Anderson, and really like them. In addition to leveling they firm up the ride enough in back to make the entire rig feel a little more stable and planted on choppy roads. I only use 12 psi towing (max is 30). I use a bike pump to adjust pressure, it takes a couple of minutes to add air, and much less to remove air. An onboard compressor would be very handy, but a $15 pump and $7 20-psi stick air gauge work fine. John Davies Spokane WA
-
Fresh Water Tank Overflow Problem
John E Davies replied to roguebooks's topic in Mechanical & Technical Tips
Be aware that there ARE much better quality parts that can be used in an RV, but they are typically used in the very high end overland rigs that may venture into Third World countries. I think OTT is missing the boat by not offering an upgraded marine appliance package, for example diesel fired cooktop, diesel combined hot water/ cabin heating system, and a DC compressor fridge. Eliminating the propane with its huge safety hazards would make a great trailer way better. Standard RV appliances are crap, pardon my language., being built in the cheapest manner possible with a built-in short life span. A few owners are upgrading to a compressor fridge either from frustration or when their propane unit dies. I have not heard of anyone ditching the propane systems entirely. The downside to installing higher quality parts is that folks like you who think $60K is expensive would have a heart attack when seeing the new MSRP. A few folks might buy, but most would shake their heads in wonder and go with the cheap stuff. It would not be a viable sales strategy in this current market. https://earthroamer.com/heating-ventilation-air-conditioning/ https://earthroamer.com/water-systems/ https://earthroamer.com/electrical-systems/ CRAFTSMANSHIP: It’s a common cliché that the “devil is in the details,” but nowhere is this more true than with electrical systems. An intelligently designed electrical system is useless if poorly routed wires chafe and short out or improperly terminated electrical connections come apart. Electrical failures can be much more than just an annoyance, an improperly installed electrical system can result in an electrical fire and potentially be life threatening. Good electrical systems require installation by a skilled craftsman who cares. Our electrical technicians have many years of experience and training, and are true craftsman who take great pride in their work. For them, electrical system installations are a work of art and a source of pride. Unfortunately, Oliver really needs to address their electrical build quality. It is disappointingly sad as delivered..... but better than the RV industry average, I suspect. John Davies Spokane WA -
VERY cool analysis, thank you! A minor correction, MY 2013 6 speed 200 does indeed have 3.90 axles, the Tundra with tow package is 4.30. The later 8 speed 200 has the taller gears you quoted, for some weird reason that completely baffles Land Cruiser fanatics. (They missed the chance to build a really capable tow rig.) I have been debating about spending the $2500 needed to install either Tundra ring and pinions or a set of 4.88s. The latter would really move my trailer. I could tow on the flats in fifth and I would have a better spread of climbing gears. Mileage would probably remain the same unladen, or improve while towing. Sixth is a really tall gear (0.5:1 and the truck does not stay in it on any sort of grade. Poor Ridgeline owners. Stay in Florida please. Another BTW, the high output Raptor motor will be an option in the newest high spec F-150s. They would make great towing weapons. ... https://media.ford.com/content/fordmedia/fna/us/en/news/2018/07/26/2019-f-150-limited-gains-high-output-ecoboost-v6.html Thanks again, you really made my day. John Davies Spokane WA
-
MaxxAir Fan - Outside Cover
John E Davies replied to Maverick's topic in Mechanical & Technical Tips
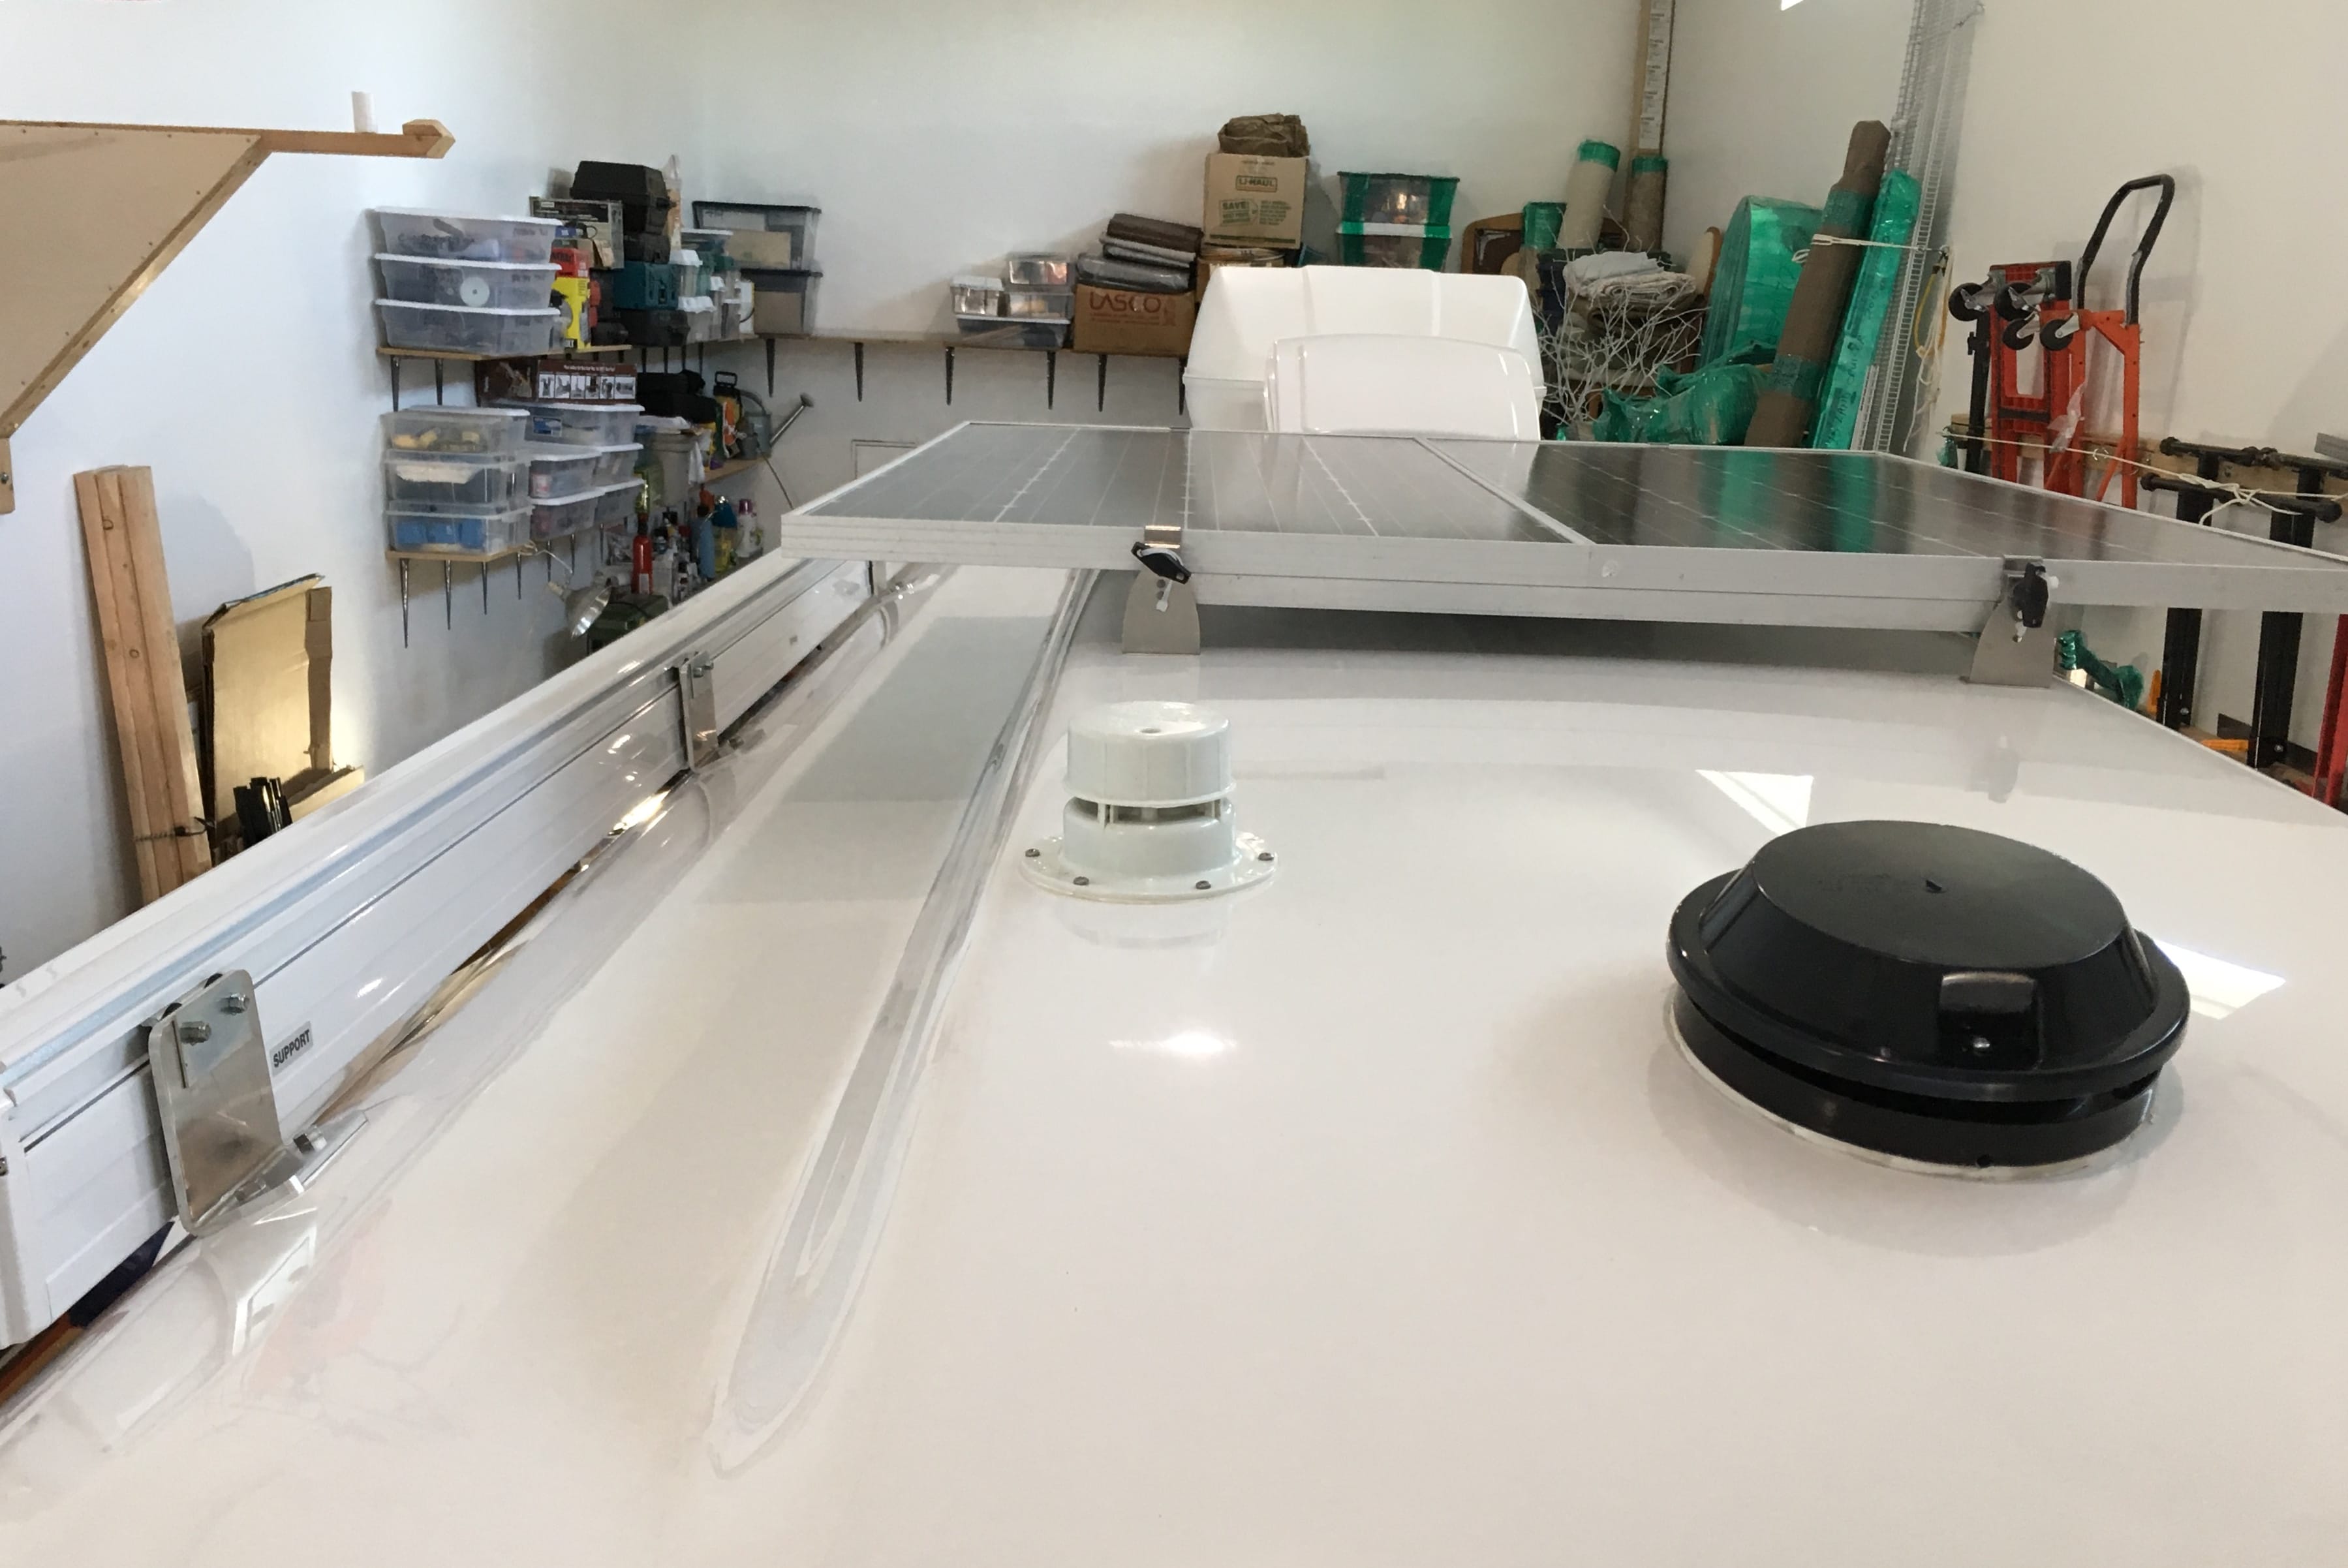
I think it is much easier to do extended work on top if you climb up. Reaching 3 feet inward is awkward and hard on the knees. You are at greater risk of falling. You need two ladders for accessing the far side of the AC, for example, or you must keep moving the one ladder from side to side. I suggest you board from the awning side, NOT from over the spare tire as shown in the picture. It is much much safer! That tech is foolhardy. Pad the awning cover with a soft material like a thick towel and, if you have removed the silly white rain seal, tie your ladder tightly to the awning to prevent the ladder from shifting and leaving you stranded on the roof. Otherwise use a very secure ladder or have a helper hold the bottom. Disconnect the nearest solar knobs, if you have solar, and prop the panel up at a steep angle away from you using pieces of drilled 1x1” aluminum angle. This gives terrific room for you to climb up and scoot around. A blue egg-crate sleeping pad like in the pic works great for under your legs. A clean carpet remnant would work, just be sure it canmot scratch the gelcoat. You can stay between the awning and the center hump and it is a secure place to be for an older gentleman. I spent half a day up there detailing the roof with RejeX and 304, and securing the loose solar wiring. I had no worries about slipping off, but it did kill my knees. Be safe. The roof is an order of magnitude stronger than your typical stickbuilt rig, it does not flex noticeably and you won’t hurt it if you are careful, stay off the center part and are of normal size. Clean it while you are up there, it will look amazing. John Davies Spokane WA
-
Re mileage. If you plan to tow many thousands of miles annually, as in 10k or more, a diesel may be a great choice. The extra range and economy will pay for the significantly higher fuel and routine maintenance costs. I am satisfied with my Toyata 5.7 gas truck and its 10-12 mpgs towing because I will not put more than 5000 towing miles on it annually, and I do not use it for commuting. I have owned a Cummis 5.9 and loved the bottomless power and 900 mile range, but not the $3500 it cost me mid-vacation to replace the ENTIRE hydraulic system - pump, hydraboost brake booster and steering rack - due to a failed pump sending metal throughout the system (gas engined trucks have a much simpler system.) The newer engines with DEF and exhaust particle filters are an order of magnitude more trouble prone than my pre-emission truck, and if you own one out of warranty you had better have very deep pockets. Labor costs on the V8s are very steep, the tech has to pull the cab off the frame for certain repairs. IF I were to buy a new one, it would be an inline Cummins, for the ease of servicing. The diesel engines in the heavy duty trucks are super heavy and negatively impact your payload numbers and wear out the front suspension. My Ram’s ball joints were completely shot at 80,000 miles. Anyway, I love Land Cruisers and if it got 8 mpgs I would still own one. John Davies Spokane WA
-
My 06 Ram 3500 had acres of clearance. My 200 hit hard and I had to install an extended ball mount (+3 inches). Most trucks have the receiver located well below the height of the bed. John Davies Spokane WA
-
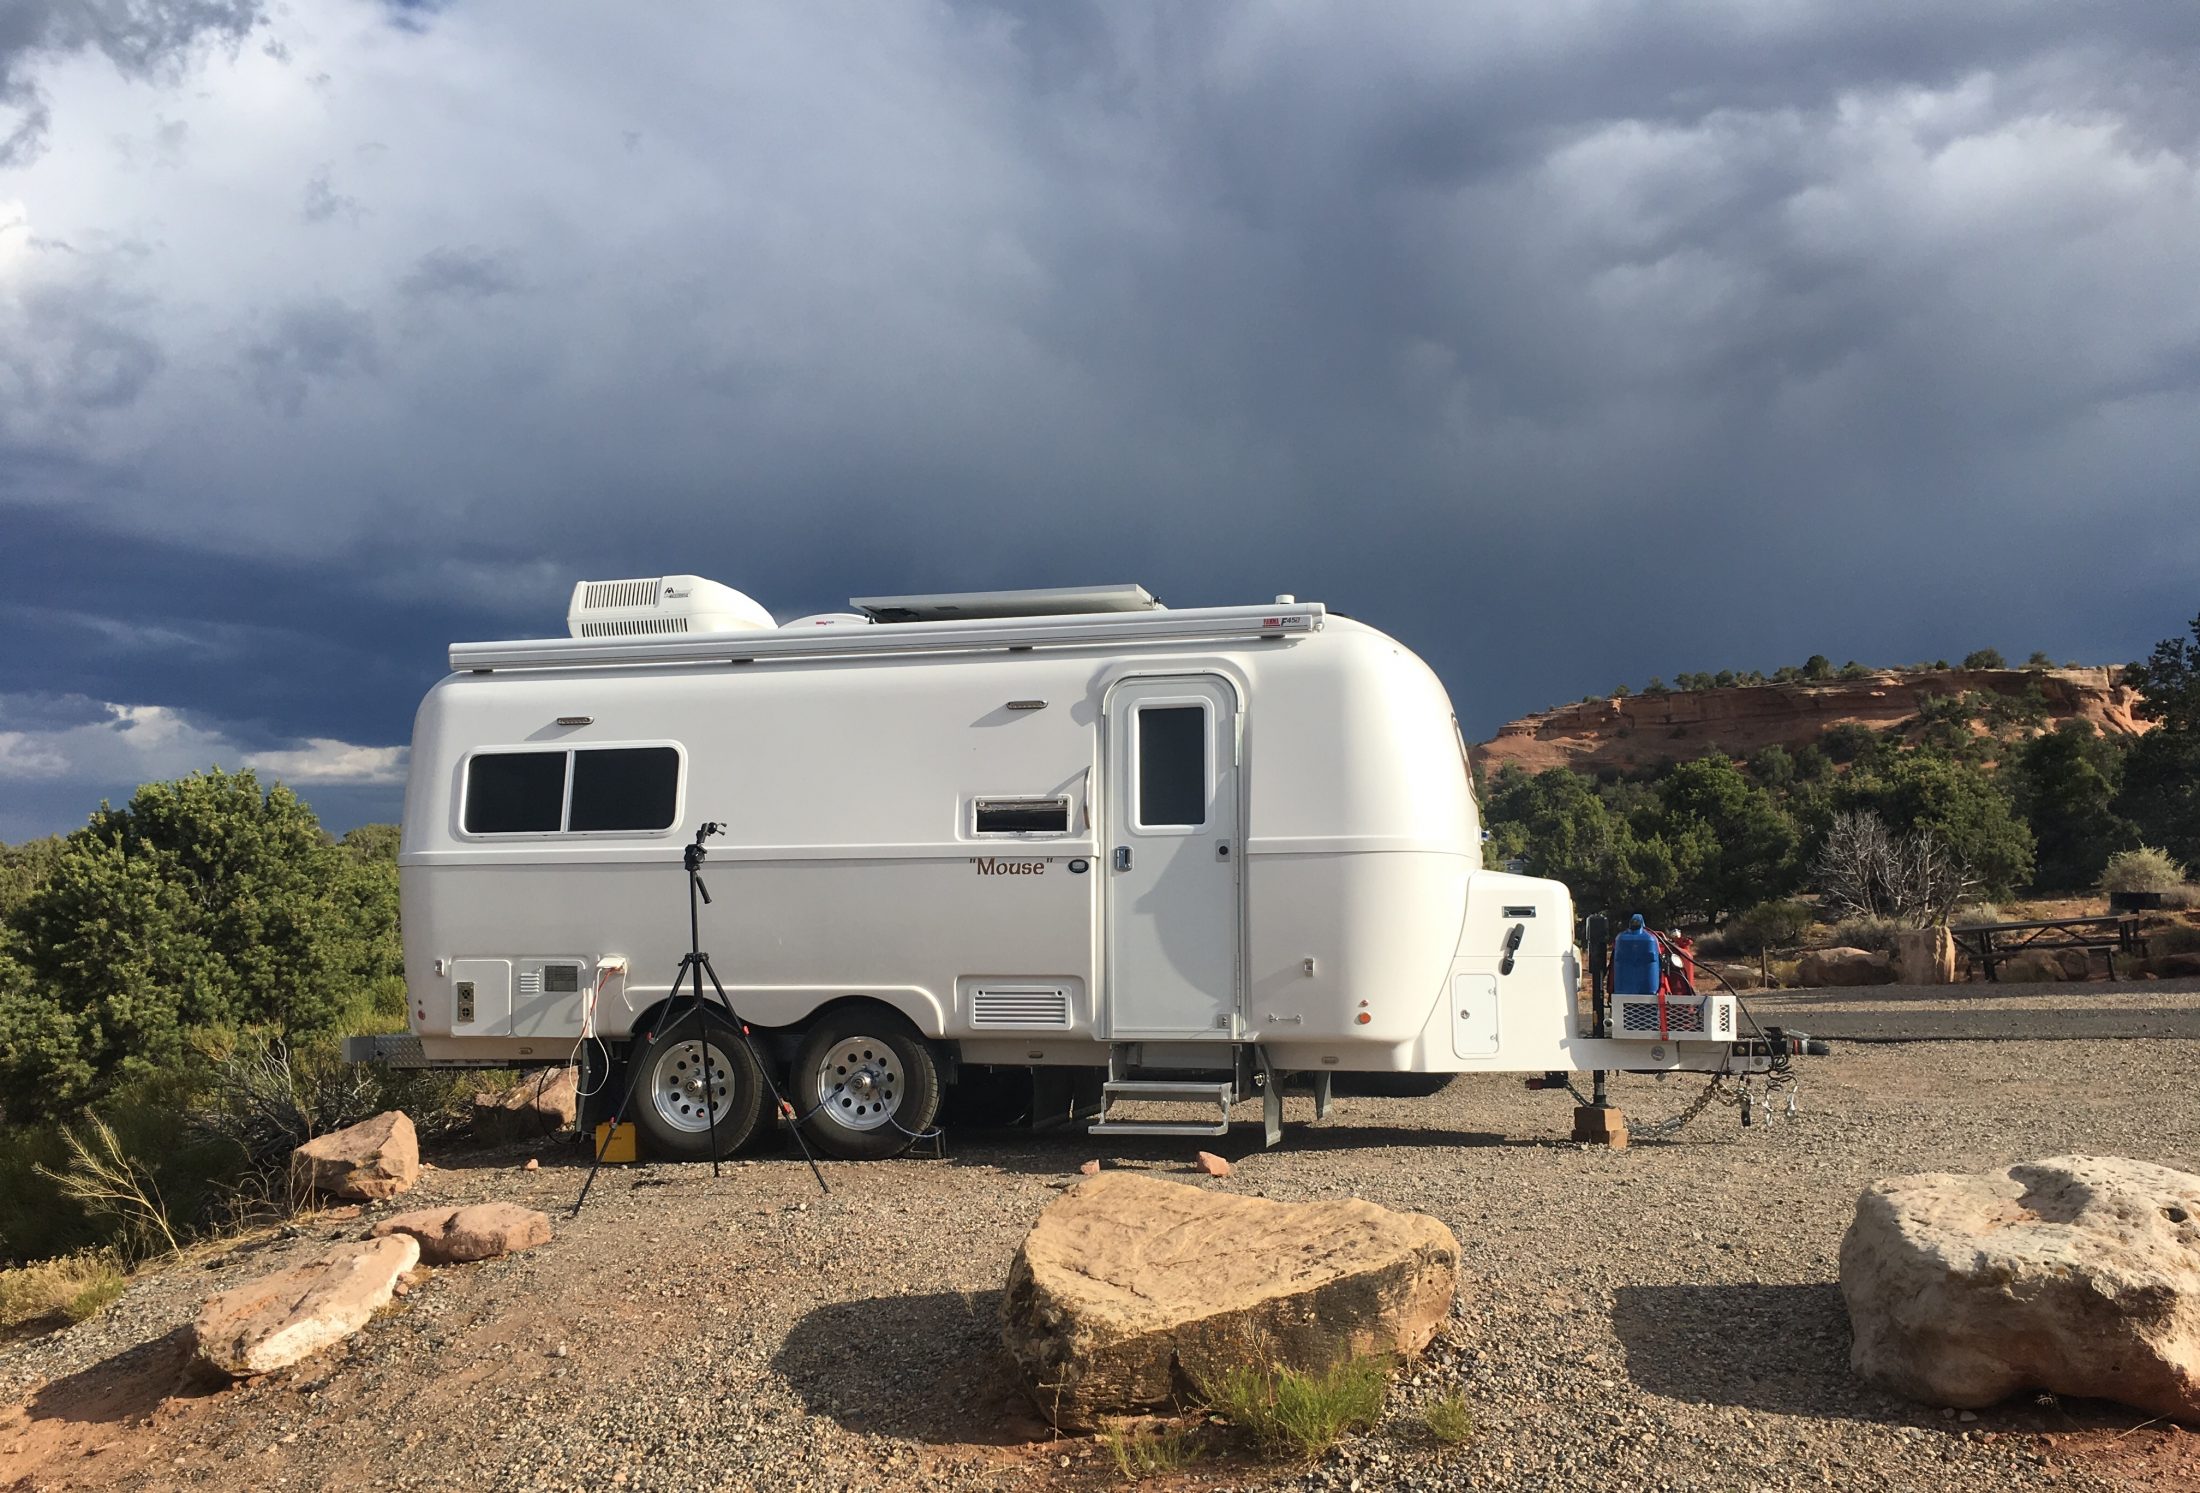
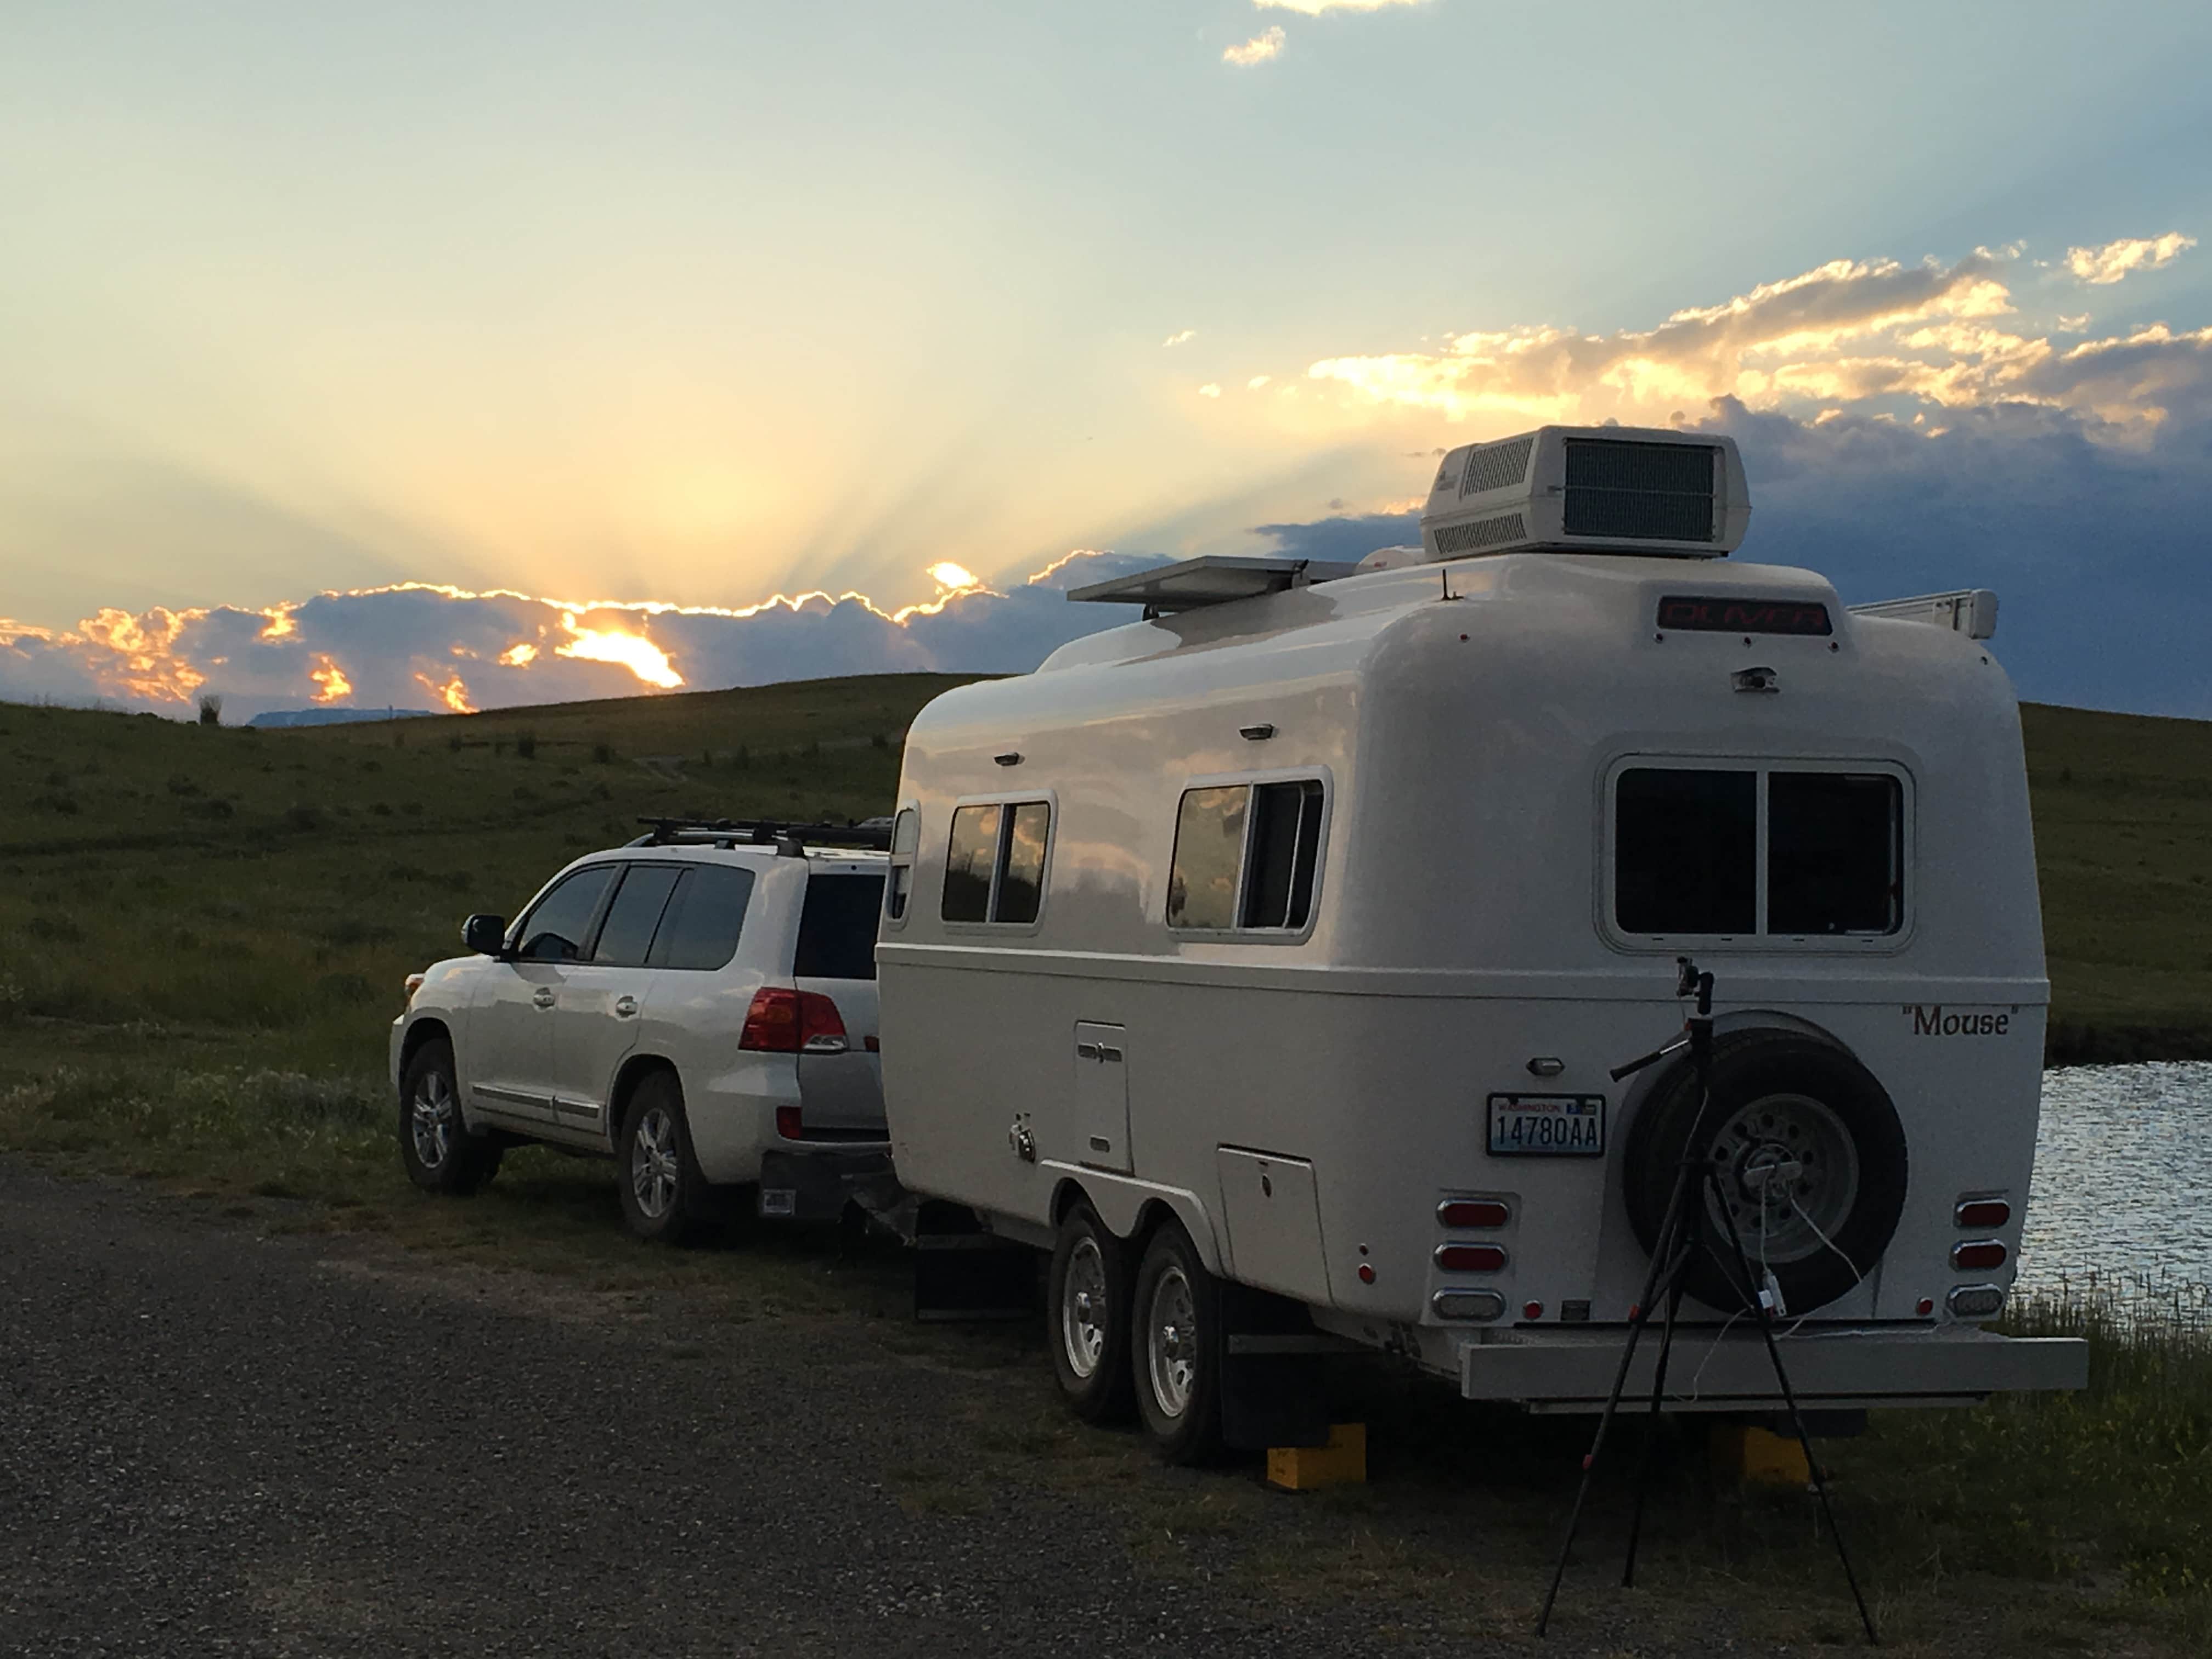
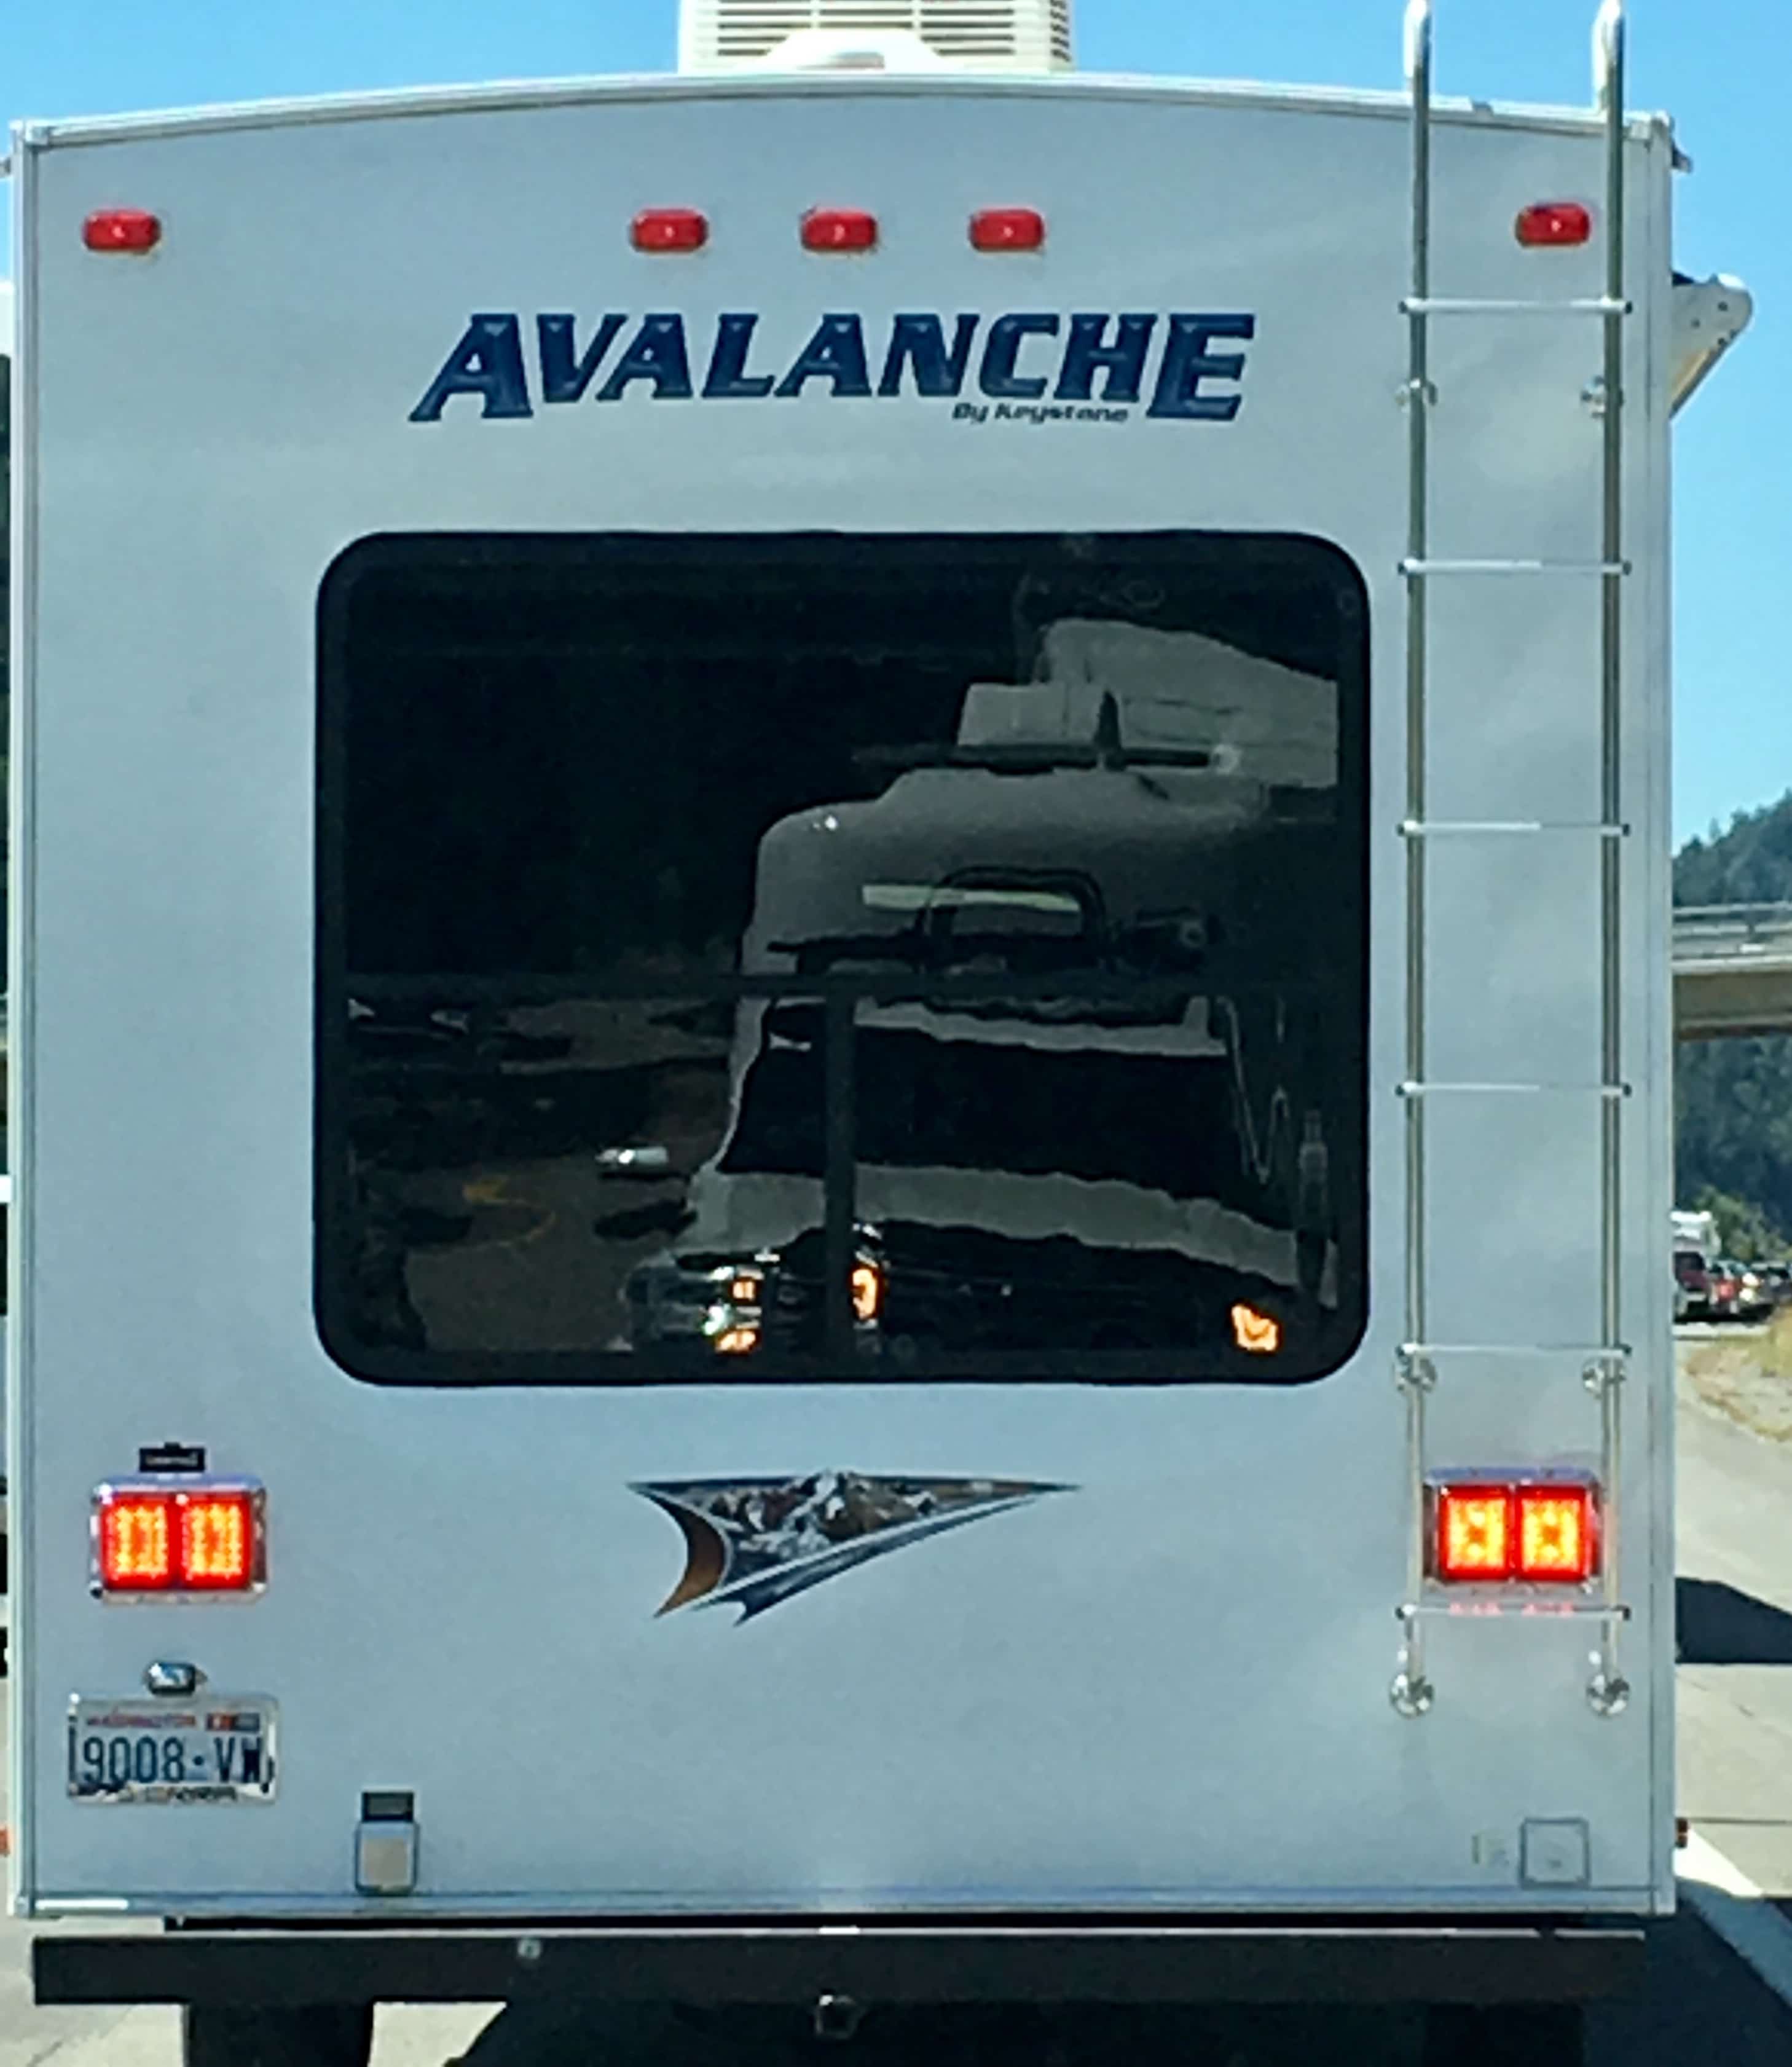
Colorado National Monument, near Fruita CO, summer thunderstorm brewing: Upper Sunshine Reservoir, near Meeteetse WY, boondocking sunset: Reflection in a Stick and Staple RV’s back window while stuck in a traffic jam: All these were done with our iPhones. Pretty amazing quality IMHO. I no longer bother to bring our DSLR. John Davies Spokane WA
-
Both Yellerstone and Tetons, plus the nearby highways and towns are absolutely swarming with visitors, like a kicked anthill. My advice is to wait until September, when all the little people are back in school and hopefully the air quality has improved. For a boondocking spot good for several nights or longer, try this.... http://olivertraveltrailers.com/topic/super-boondocking-spot-near-cody-wy/ On the ID/WY border south of Tetons, Palisades Reservoir is simply lovely with many possible camping locations. https://www.fs.usda.gov/recarea/ctnf/recarea/?recid=54449 You don’t have to actually go into the parks for great scenery, and the crowds are gone. John Davies Spokane WA
-
Is it 4wd? Since you tend to keep vehicles a VERY long time, getting 4wd would be prudent since you never know where you might be living in a decade, and there are definitely going to be times when the xtra traction will save your vacation... plus the feature makes it easier to sell in the future. Otherwise, the specs are great and it should provide a reasonably effortless tow, except in the very steep high passes of the west, where you will have to work it hard. John Davies Spokane WA