John E Davies
-
Posts
5,759 -
Joined
-
Last visited
-
Days Won
243
Everything posted by John E Davies
-

HOW TO: Rear mud flaps for the Ollie
John E Davies replied to John E Davies's topic in Towing an Oliver
1 x 2 x 1/8" wall, I do not know the radius diameter, I think it is 0.25" but not positive. See the 4th post on that Stone Stomper thread. ...Here is the metal source (local to me, great prices): https://alcobrametals.com/product/AQ1.00ER This is one of the front flap bars, it is drilled differently from the rear mudflaps: http://olivertraveltrailers.com/topic/how-to-stone-stomper-gravel-guard/ There is no need to use the radius corners, but I do think that they look classy compared to square ones, and they save your knuckles from scrapes when you are washing the trailer. The 1x2" rectangular shape is way more rigid than a 1x1" square tube, be sure to drill some "failure holes" as shown in that thread, so the bar will fold rearward gracefully if hit hard, instead of transmitting all the impact energy to the subframe. You do not want the subframe to get damaged if you run over a truck tire retread or a scrap of lumber at freeway speeds. John Davies Spokane WA
-
Exterior cleaning - Wax recommendations
John E Davies replied to BackofBeyond's topic in General Discussion
You cannot find a more satisfying product than Rejex. Read the reviews. It is amazing stuff, and a single coating will make your Ollie glow. Two coats will make your jaw drop. (Great for dark colored cars with paint in good condition.) https://www.amazon.com/Rejex-High-Gloss-Protective-Finish/dp/B00GM6NF0I You must remove all existing wax from the surfaces before applying. Dawn dish detergent will strip off wax, and a followup with a paint prep solvent like this ... https://www.amazon.com/3M-General-Purpose-Adhesive-Cleaner/dp/B00Y957GWC/ref=sr_1_2?s=industrial&ie=UTF8&qid=1534521368&sr=1-2&keywords=3M+adhesive+cleaner .... will remove tar, tree sap, etc etc. You can get it locally from an auto paint supply store for as little as $15 per quart (and no shipping). At NAPA it is close to $30. You need about half a quart to do an Elite II, including the roof, if it isn't too dirty/ spotty. I suggest that you buy two quarts to be safe, and for future use. Good stuff... use with gloves and adequate ventilation. It smells a little but it does not knock your head off like MEK or acetone. I use square cotton rags folded twice to apply, flipping when they start to turn black. That gives you eight clean sides to work with. I only need half a bottle of Rejex to do "Mouse". Dried three week old bug carcasses on the front wall do not "rinse off" but they do come off completely with absolutely minimal pressure. It is very satisfying compared to the old routine of multiple hard scrubbings, which is hard on you and also hard on the gelcoat. John Davies Spokane WA
-
Progressive Surge protector shutting down 30 amp service
John E Davies replied to Yukon's topic in General Discussion
Disconnect the remote display cable and see if it works now. I am not 100% positive, but I think it will work without a remote. John Davies Spokane WA -
Fires in Western U.S. and Canada
John E Davies replied to donthompson's topic in Campgrounds & Parks
Agreed, my last two summers have been pretty much ruined by the beginning of August. Visibility has been horrible. I have smoke and dust allergies too, so I cannot stay outdoors very long when the particle count is above 75. Thank goodness for room HEPA filters. Another thing to be VERY conscious of when rough camping is to never stay in a dead end campground. Pick one with at least two ways out, preferaby in different directions. They need to be routes that you can tow your Ollie over. It would really ruin your vacation to be incinerated, or to be helicoptered out and leave your truck and trailer behind to burn up..... I am not kidding, this is important around the West when you are in dry and brushy timberlands and desert. A SPOT or preferably an inReach should be part of your emergency gear, and keep it turned on and in a handy location, not buried in some storage compartment. Within easy grasp of the driver is best, in case you are trapped in the front seat. I keep a small hydropack with my inReach hanging behind the driver seat, it seems to keep a good satellite lock in that location, and I keep the inReach running when I grab the pack for a short hike. Speaking of packs, you should have a sizeable, well equipped bugout bag with water pouches, purifier, food bars, bear spray and/ or big-bore firearm, first aid kit, firestarter, space blanket and the minimum gear you need to survive outdoors for at least a couple of nights. My big “carry” BO pack is in the back of the truck, along with extra emergency stuff in a bright red duffle, and an extensive med kit.... Stay aware, prepared and safe. John Davies Spokane WA -
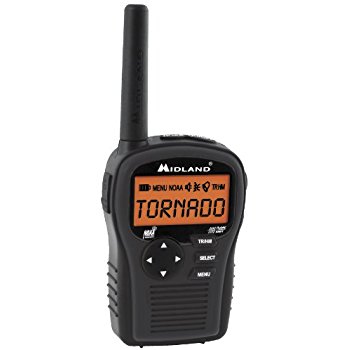
OK, i am just going to ignore the jokes. This is a serious thread, or was intended to be. I was thinking maybe a handheld weather alert radio, so I could run it off batteries if necessary, and leave it connected to inverter power the rest of the time we are inside. I like this one, and I already have a Midland CB and GMRS handhelds that have been working well: https://smile.amazon.com/dp/B003DMIGQC/?coliid=II0LJLZ5NEURZ&colid=1X5H11EH41351&psc=0&ref_=lv_ov_lig_dp_it But I learned it is discontinued, and in an email Midland told me that they will not be replacing it or coming out with a new model. So I am reluctant to buy a radio with no future support. This is similar, but I suspect it is poorly built. https://smile.amazon.com/dp/B005I1B1RM/?coliid=I16I3U5Z369PPA&colid=1X5H11EH41351&psc=0&ref_=lv_ov_lig_dp_it I do actually like that Rust color. Any comments about these, or any other radios that will run off batteries for more than a few hours, and/or can preferably be plugged into the RV 12 volt system instead of 110 v AC? I really don’t like the ones with crank handles, solar panels, lights, sirens, SOS, AM FM, knobs, analog tuners, 1950’s styling, TVs, etc etc. I just want reliable weather alerts in a handy package. NOPE: Thanks, John Davies Spokane WA
-
I used to use the Weather Channel’s wonderful Storm app and loved it. They recently replaced it with Storm Radar, which is pretty much useless, slow to load data, buggy and very frustrating to use. It no longer shows highs, lows and fronts. I found an “old school” interactive map with those features which looks interesting. https://www.wpc.ncep.noaa.gov/exper/nationalforecastchart/map.php Here is an article “The Demise of the Surface Weather/ Frontal Map”. ... informative and also quite sad for me, who grew up with these maps. https://www.accuweather.com/en/weather-blogs/weathermatrix/the-demise-of-the-surface-weather-frontal-map/70000589 Here is an air quality (smoke) map I refer to often. Current level for my home area is 162, hazardous ;( The AQI Loop video is cool. https://cfpub.epa.gov/airnow/index.cfm?action=airnow.local_city&cityid=260 Anyone have a recommendation for a better IOS weather app? How do you monitor the weather, especially when far away from radio or tv news? Do you use an emergency weather radio, and what features do you like and utilize? Do you need an external antenna? I am planning a week long west coast trip (Ocean Shores, WA and then north) for late September and would like to be able to receive tsunami, earthquake and storm warnings independntly from my phone. But not have to leave it turned on constantly. Please educate me. Thanks. John Davies Spokane WA
-
4000 is a great choice - it is very resistant to UV and will not yellow - but all of the high tech 3M sealants are a pain because they must be used within about a day or two. Once exposed to air the entire tube will “kick off” and you won’t be able to use it the next time. I really wish they would offer these products in a 2 ounce size for say $4. It is very expensive to use the bigger tubes for a small repair. ... https://www.3m.com/3M/en_US/company-us/all-3m-products/~/3M-Marine-Adhesive-Sealant-4000-UV/?N=5002385+3293242579&rt=rud Be aware that regular cheap silicone sealers are generally a poor choice, the ones that do not include the word “adhesive” in their name. The better grades of Marine ADHESIVE sealer work fine for small stuff. But none of the silicones stick very well to stainless steel. If you have a job that penetrates the roof, use 4000. 5200 is for super permanent jobs. Do not mess with 5200 if you ever plan to remove it wthout a lot of swearing! I think I told this story before, but I will repeat it. I bought a 27 ft SeaRay cruiser new in 1988. They built it with cheap clear silicone and within six months every joint on all the stressed parts on the deck (such as cleats and life rail stanchions) opened up and let water into the balsa core. We are talking about several dozen holes. The upper and lower surfaces delaminated, when the core swelled and became mushy. When you walked on it, water would squirt out of fittings. They had to ship it to Arizona where it had been built. I insisted that they use 5200 for the big hull to deck joint, and 4000 for all the small parts when they installed a completely new deck. That blew three months of a short Seattle boating season.... It taught me a big lesson about balsa core construction, stainless parts, silicone sealer and idiotically poor build quality in general. Maybe that is why I expect a little too much from Oliver in terms of quality control.... As far as prep work, NEVER use alcohol for cleaning parts that you will glue with 4000 or its brother products. It will prevent the sealer from bonding. Use MEK, lacquer thinner or a similar commercial solvent. It says this in the instructions on the tube. It pays to use a good product, even if it costs a lot more. Weigh the extra cost against getting a leak, having to deal with the mess and possible damage, and having to do the repair all over again ..... John Davies Spokane WA
-
Hey David, thanks. Is there a reason you picked a dial type gauge over a digital one like this? https://www.amazon.com/dp/B017AVBIVG/?coliid=ID1HJKRPE2S5B&colid=1X5H11EH41351&psc=0&ref_=lv_ov_lig_dp_it They are the same dimensions, I suspect the analog one would not survive a fall, the digital one “might” survive. John Davies Spokane WA
-
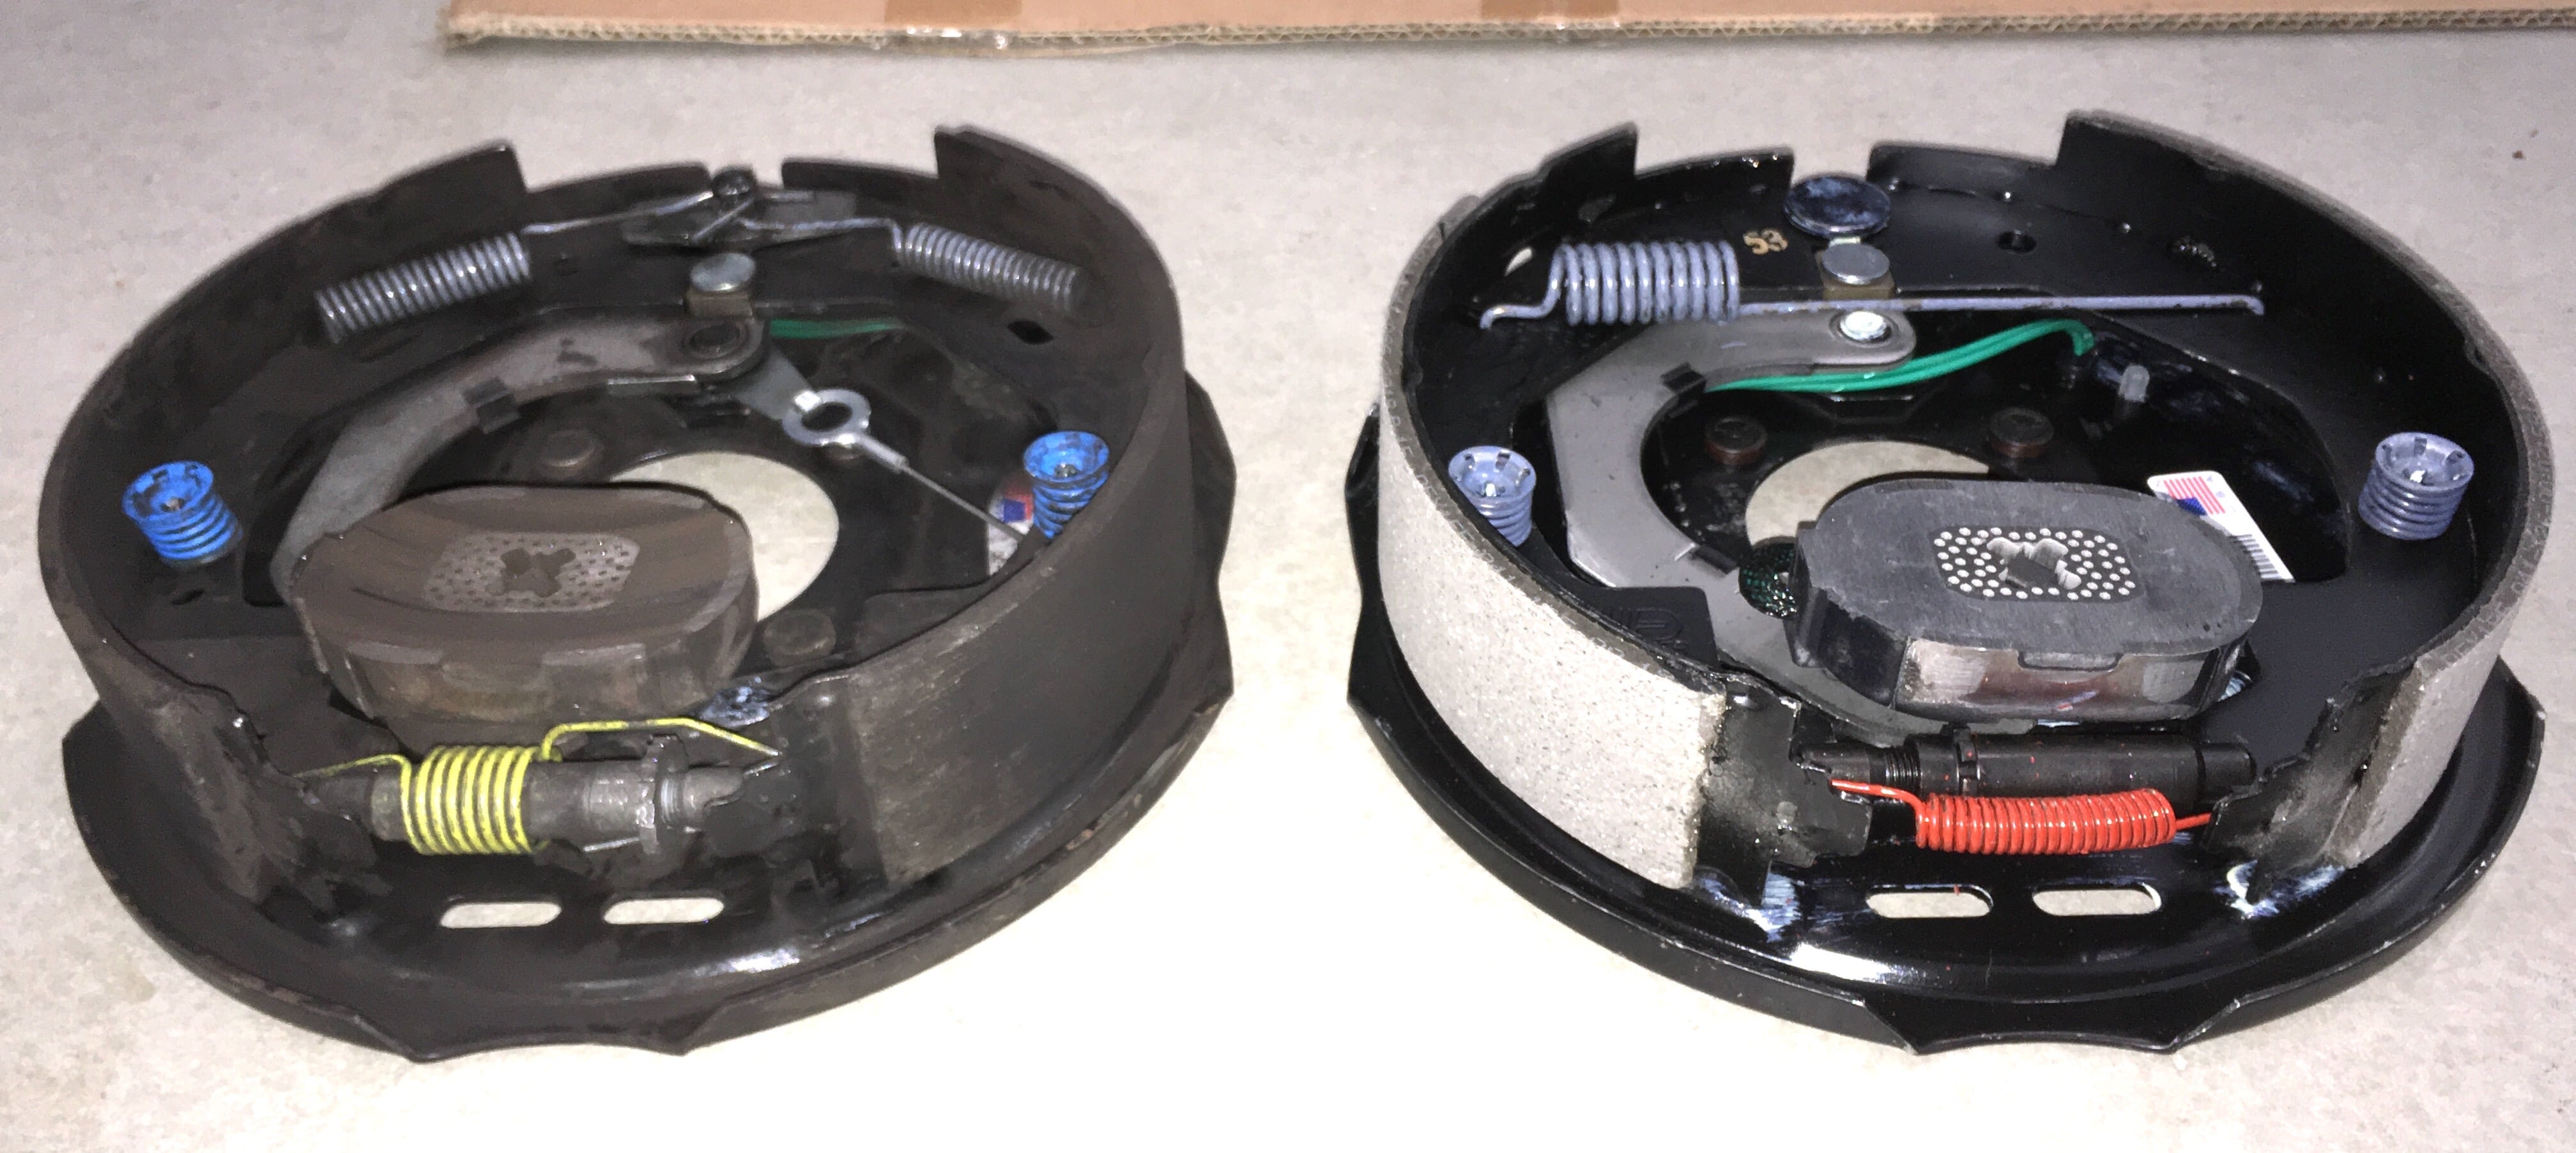
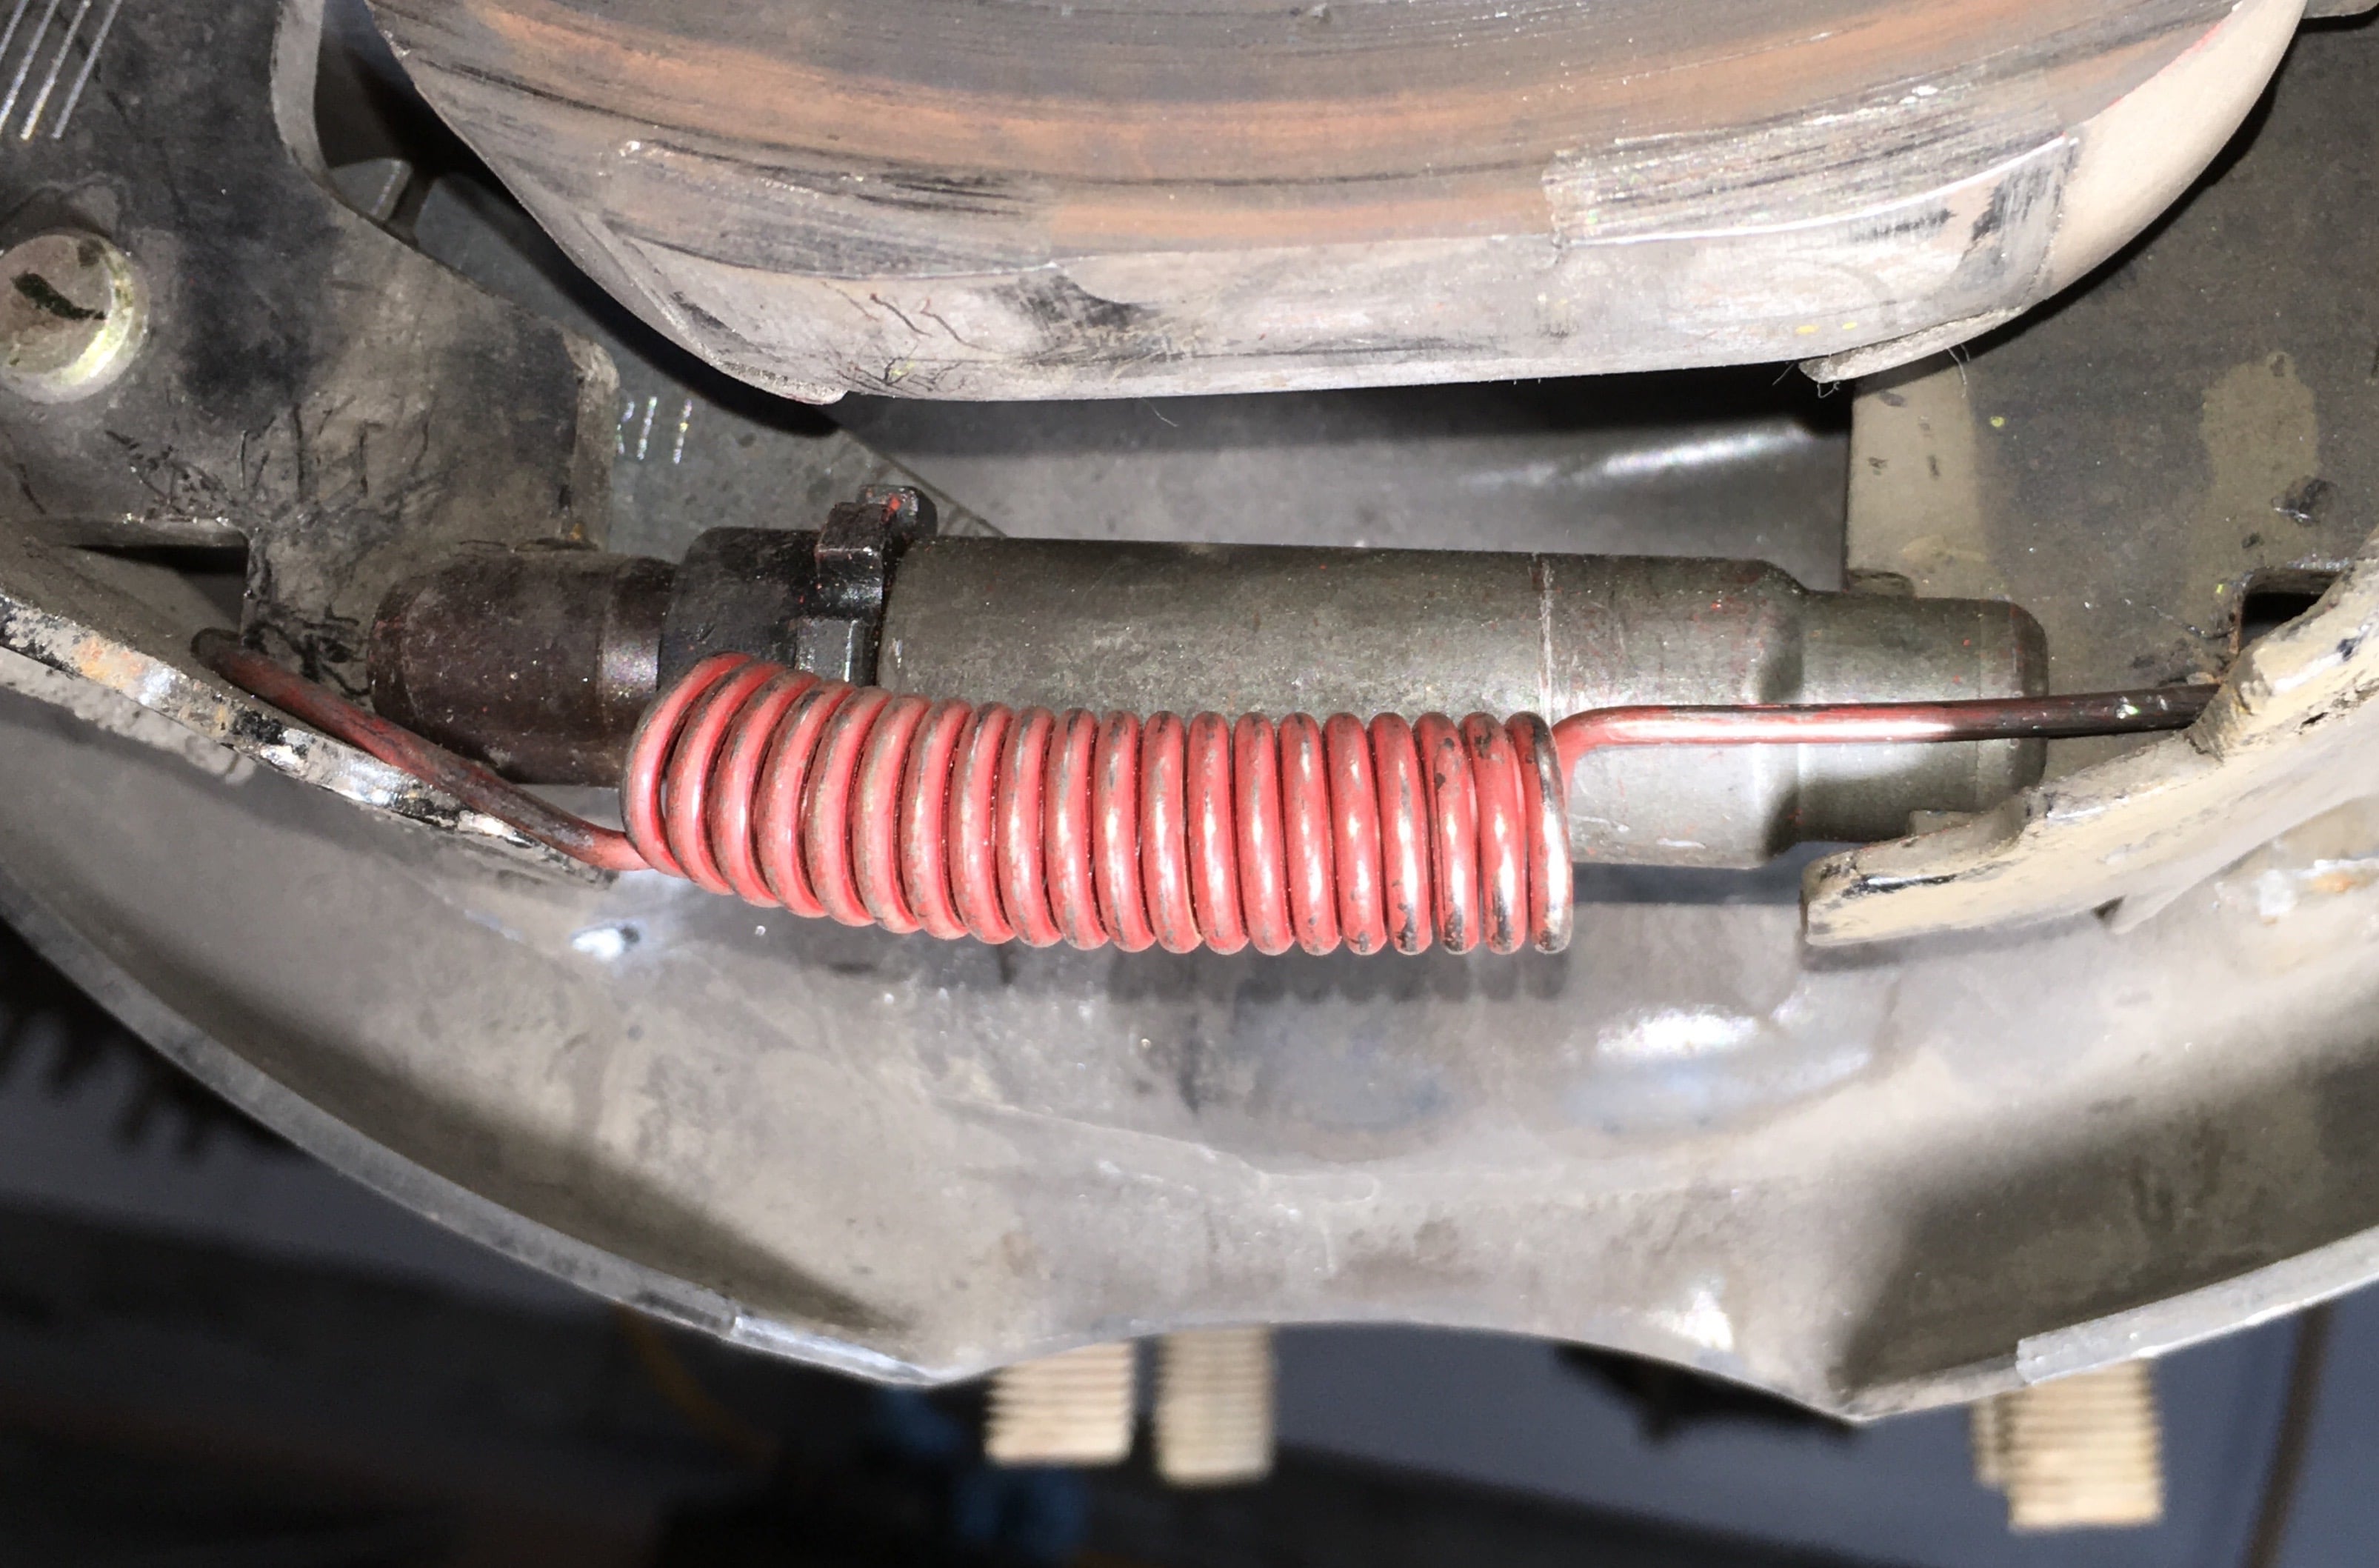
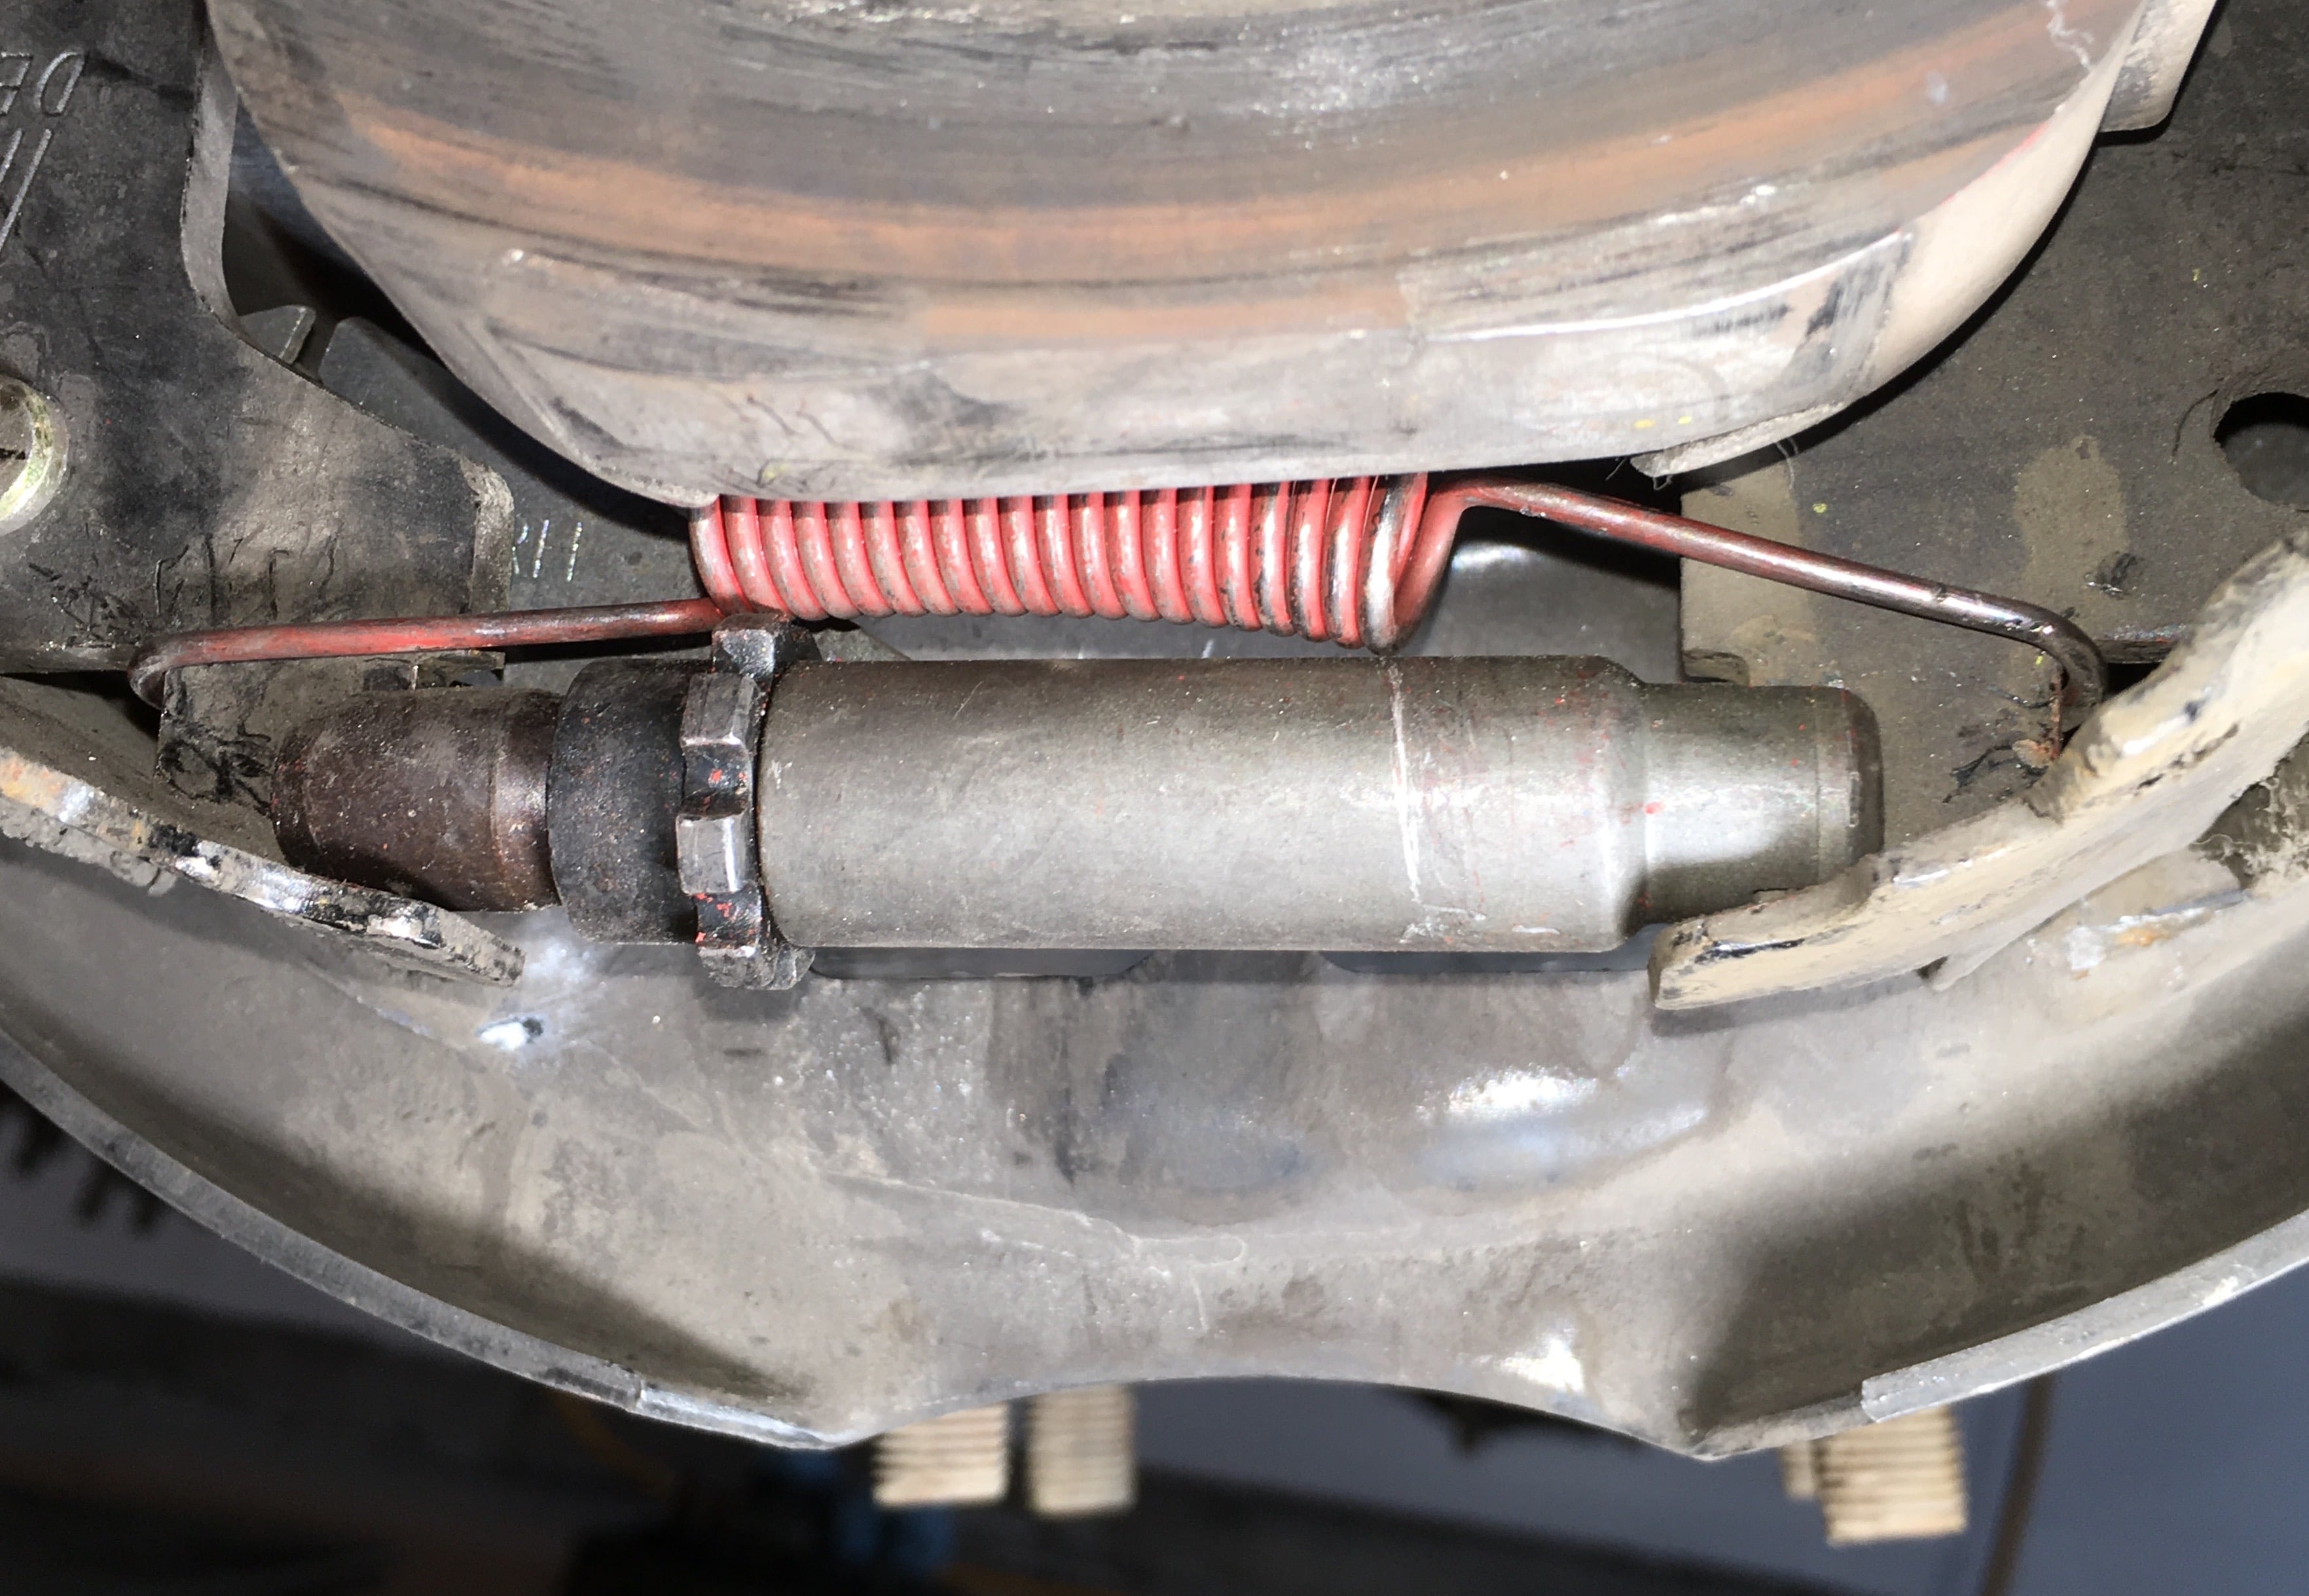
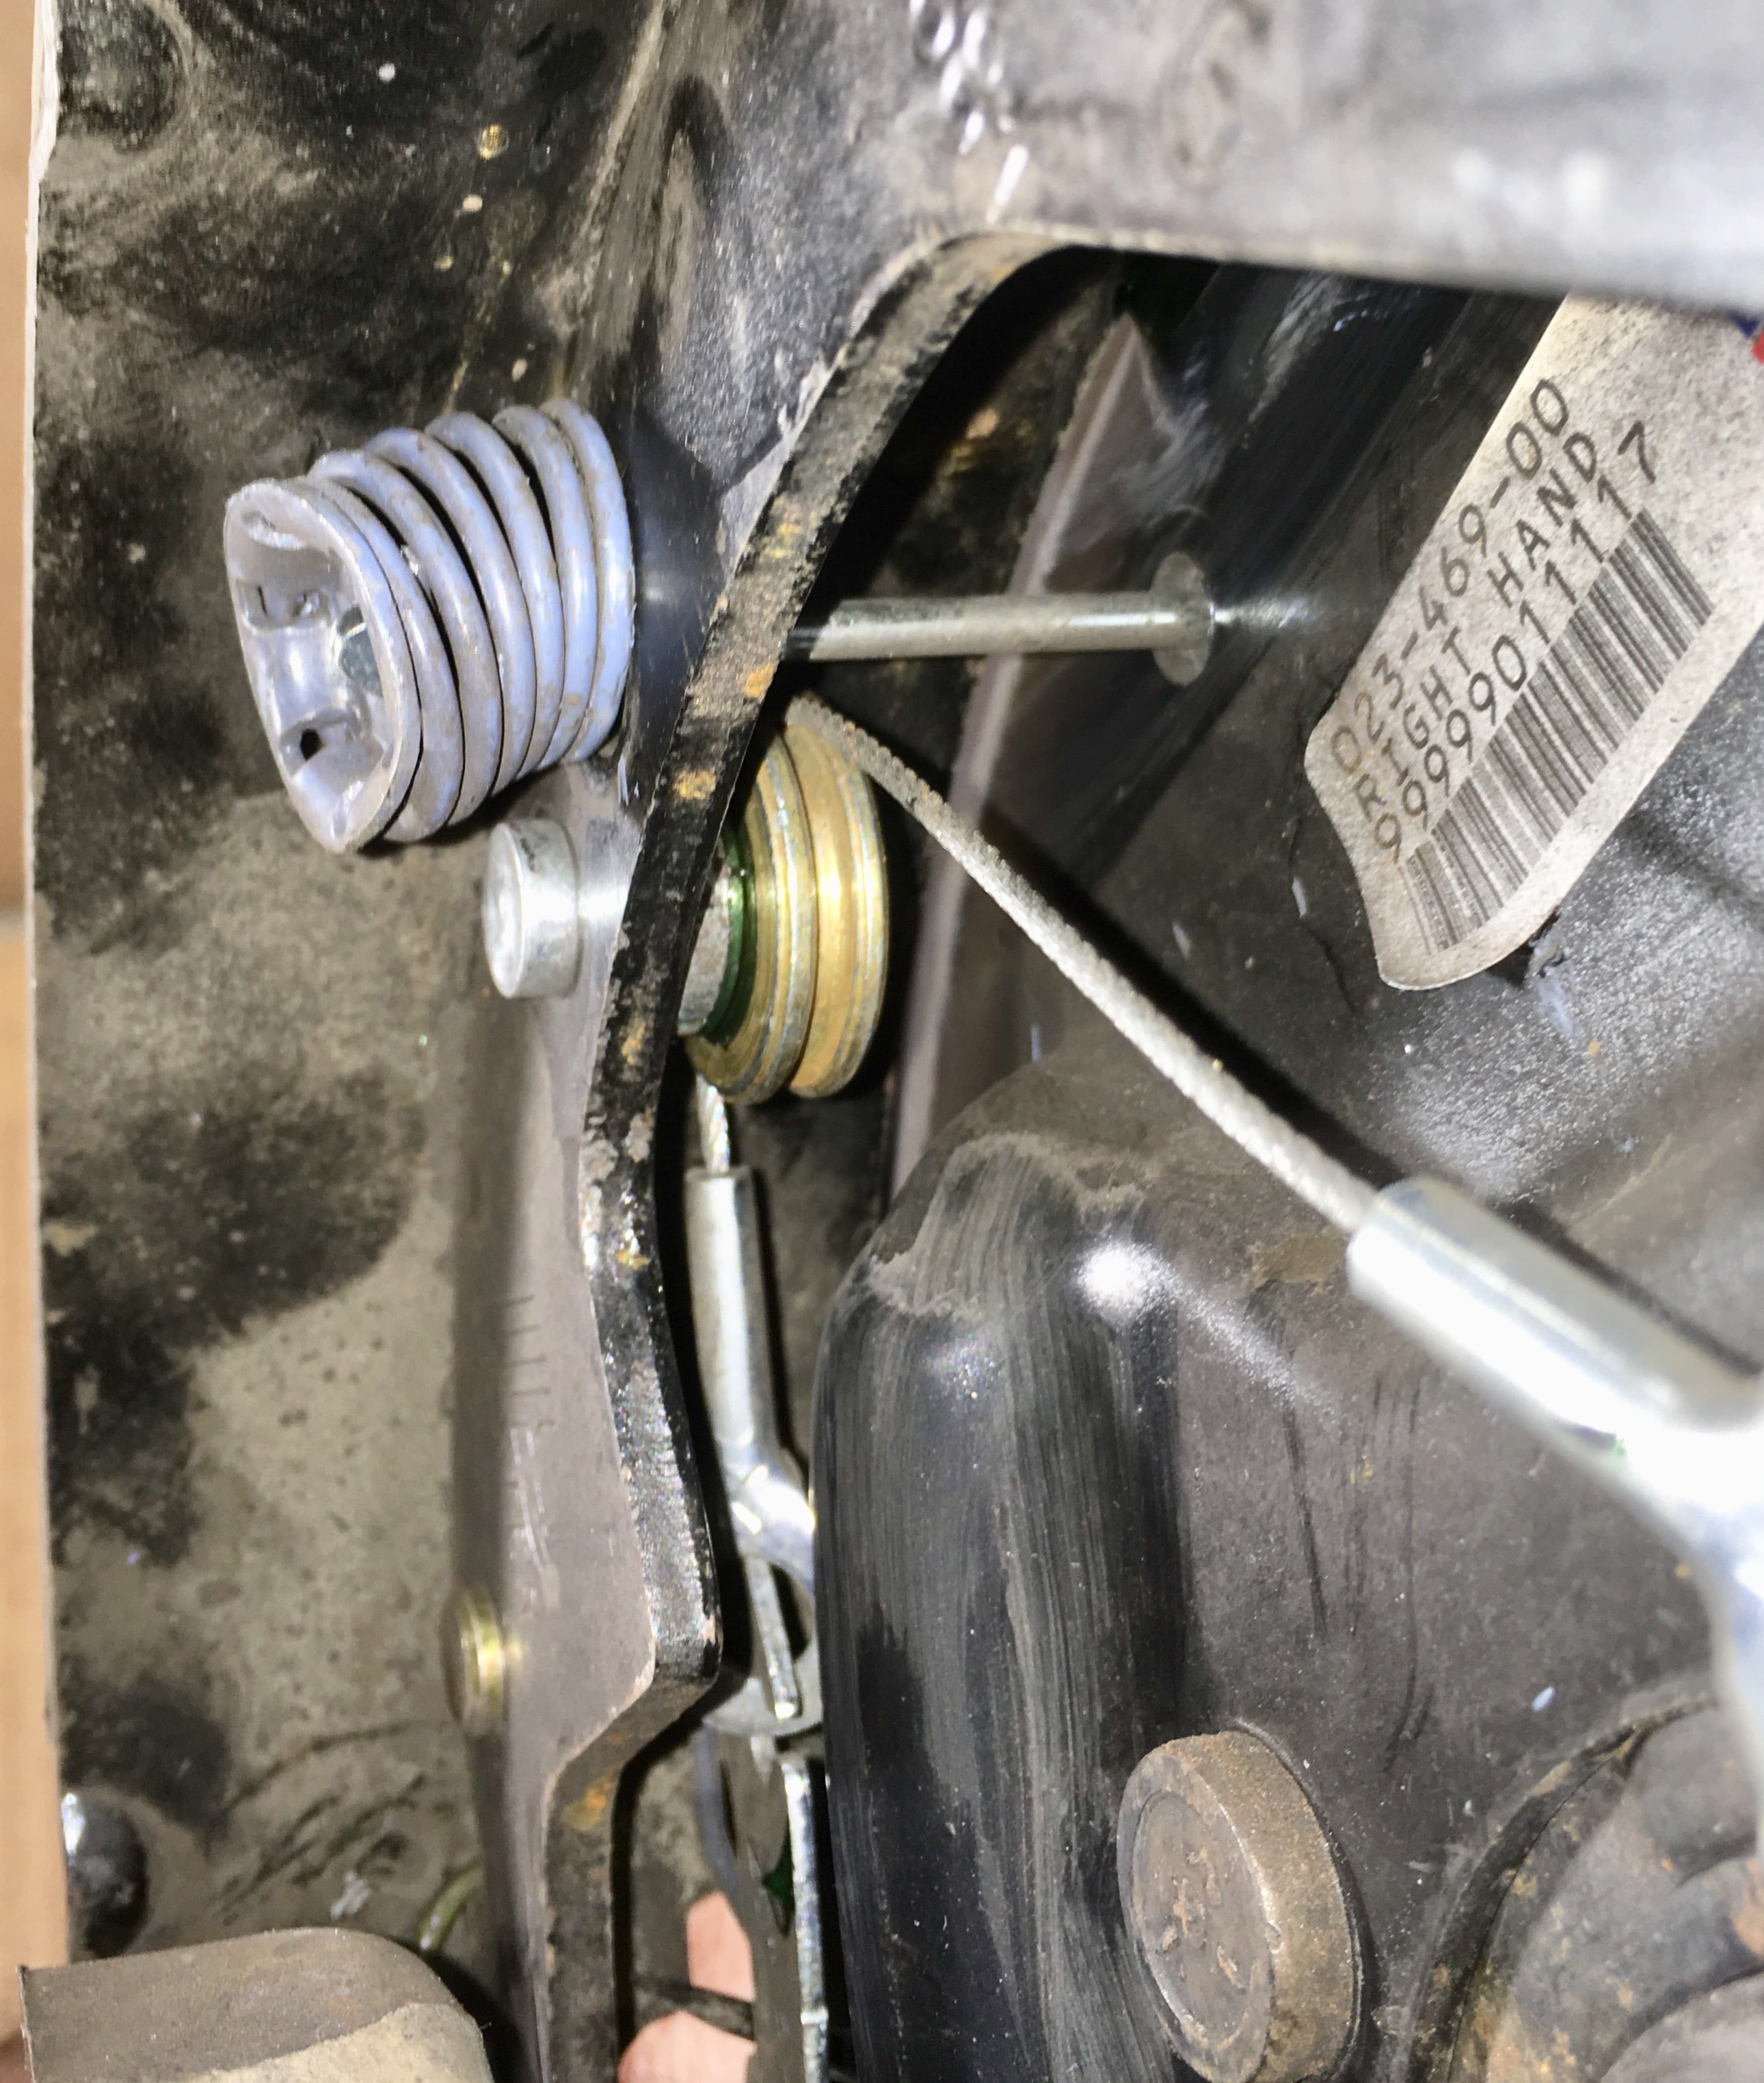
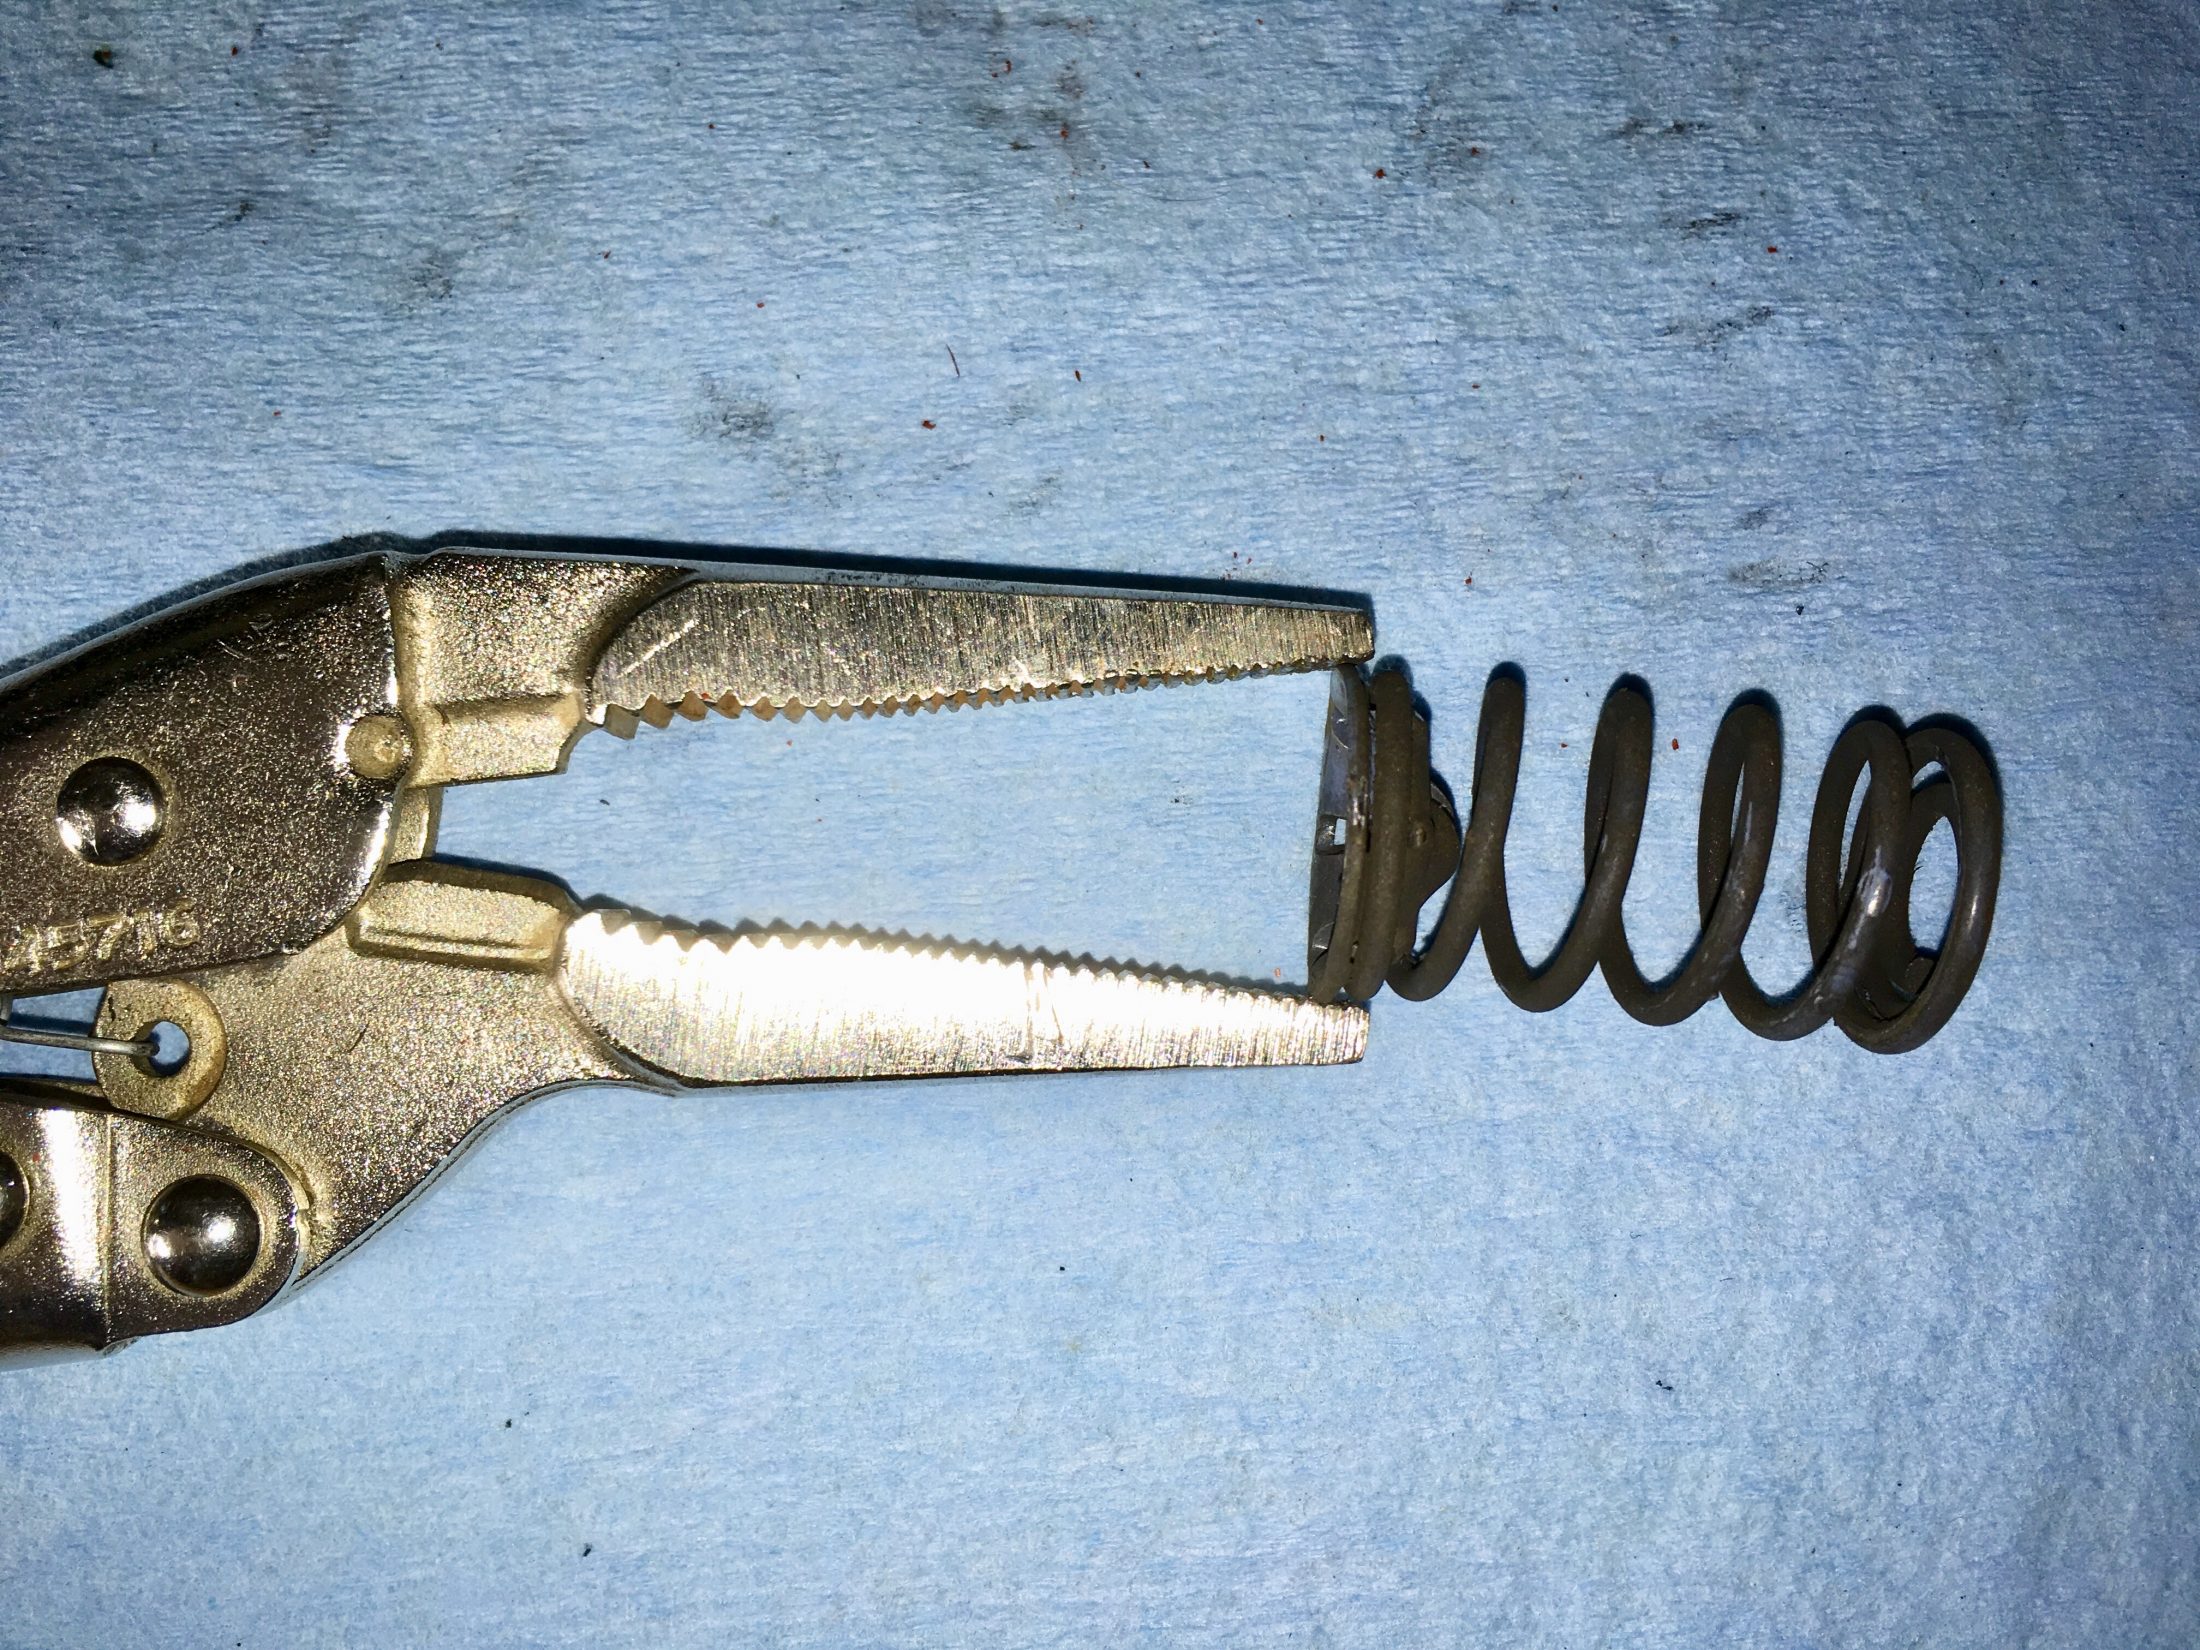
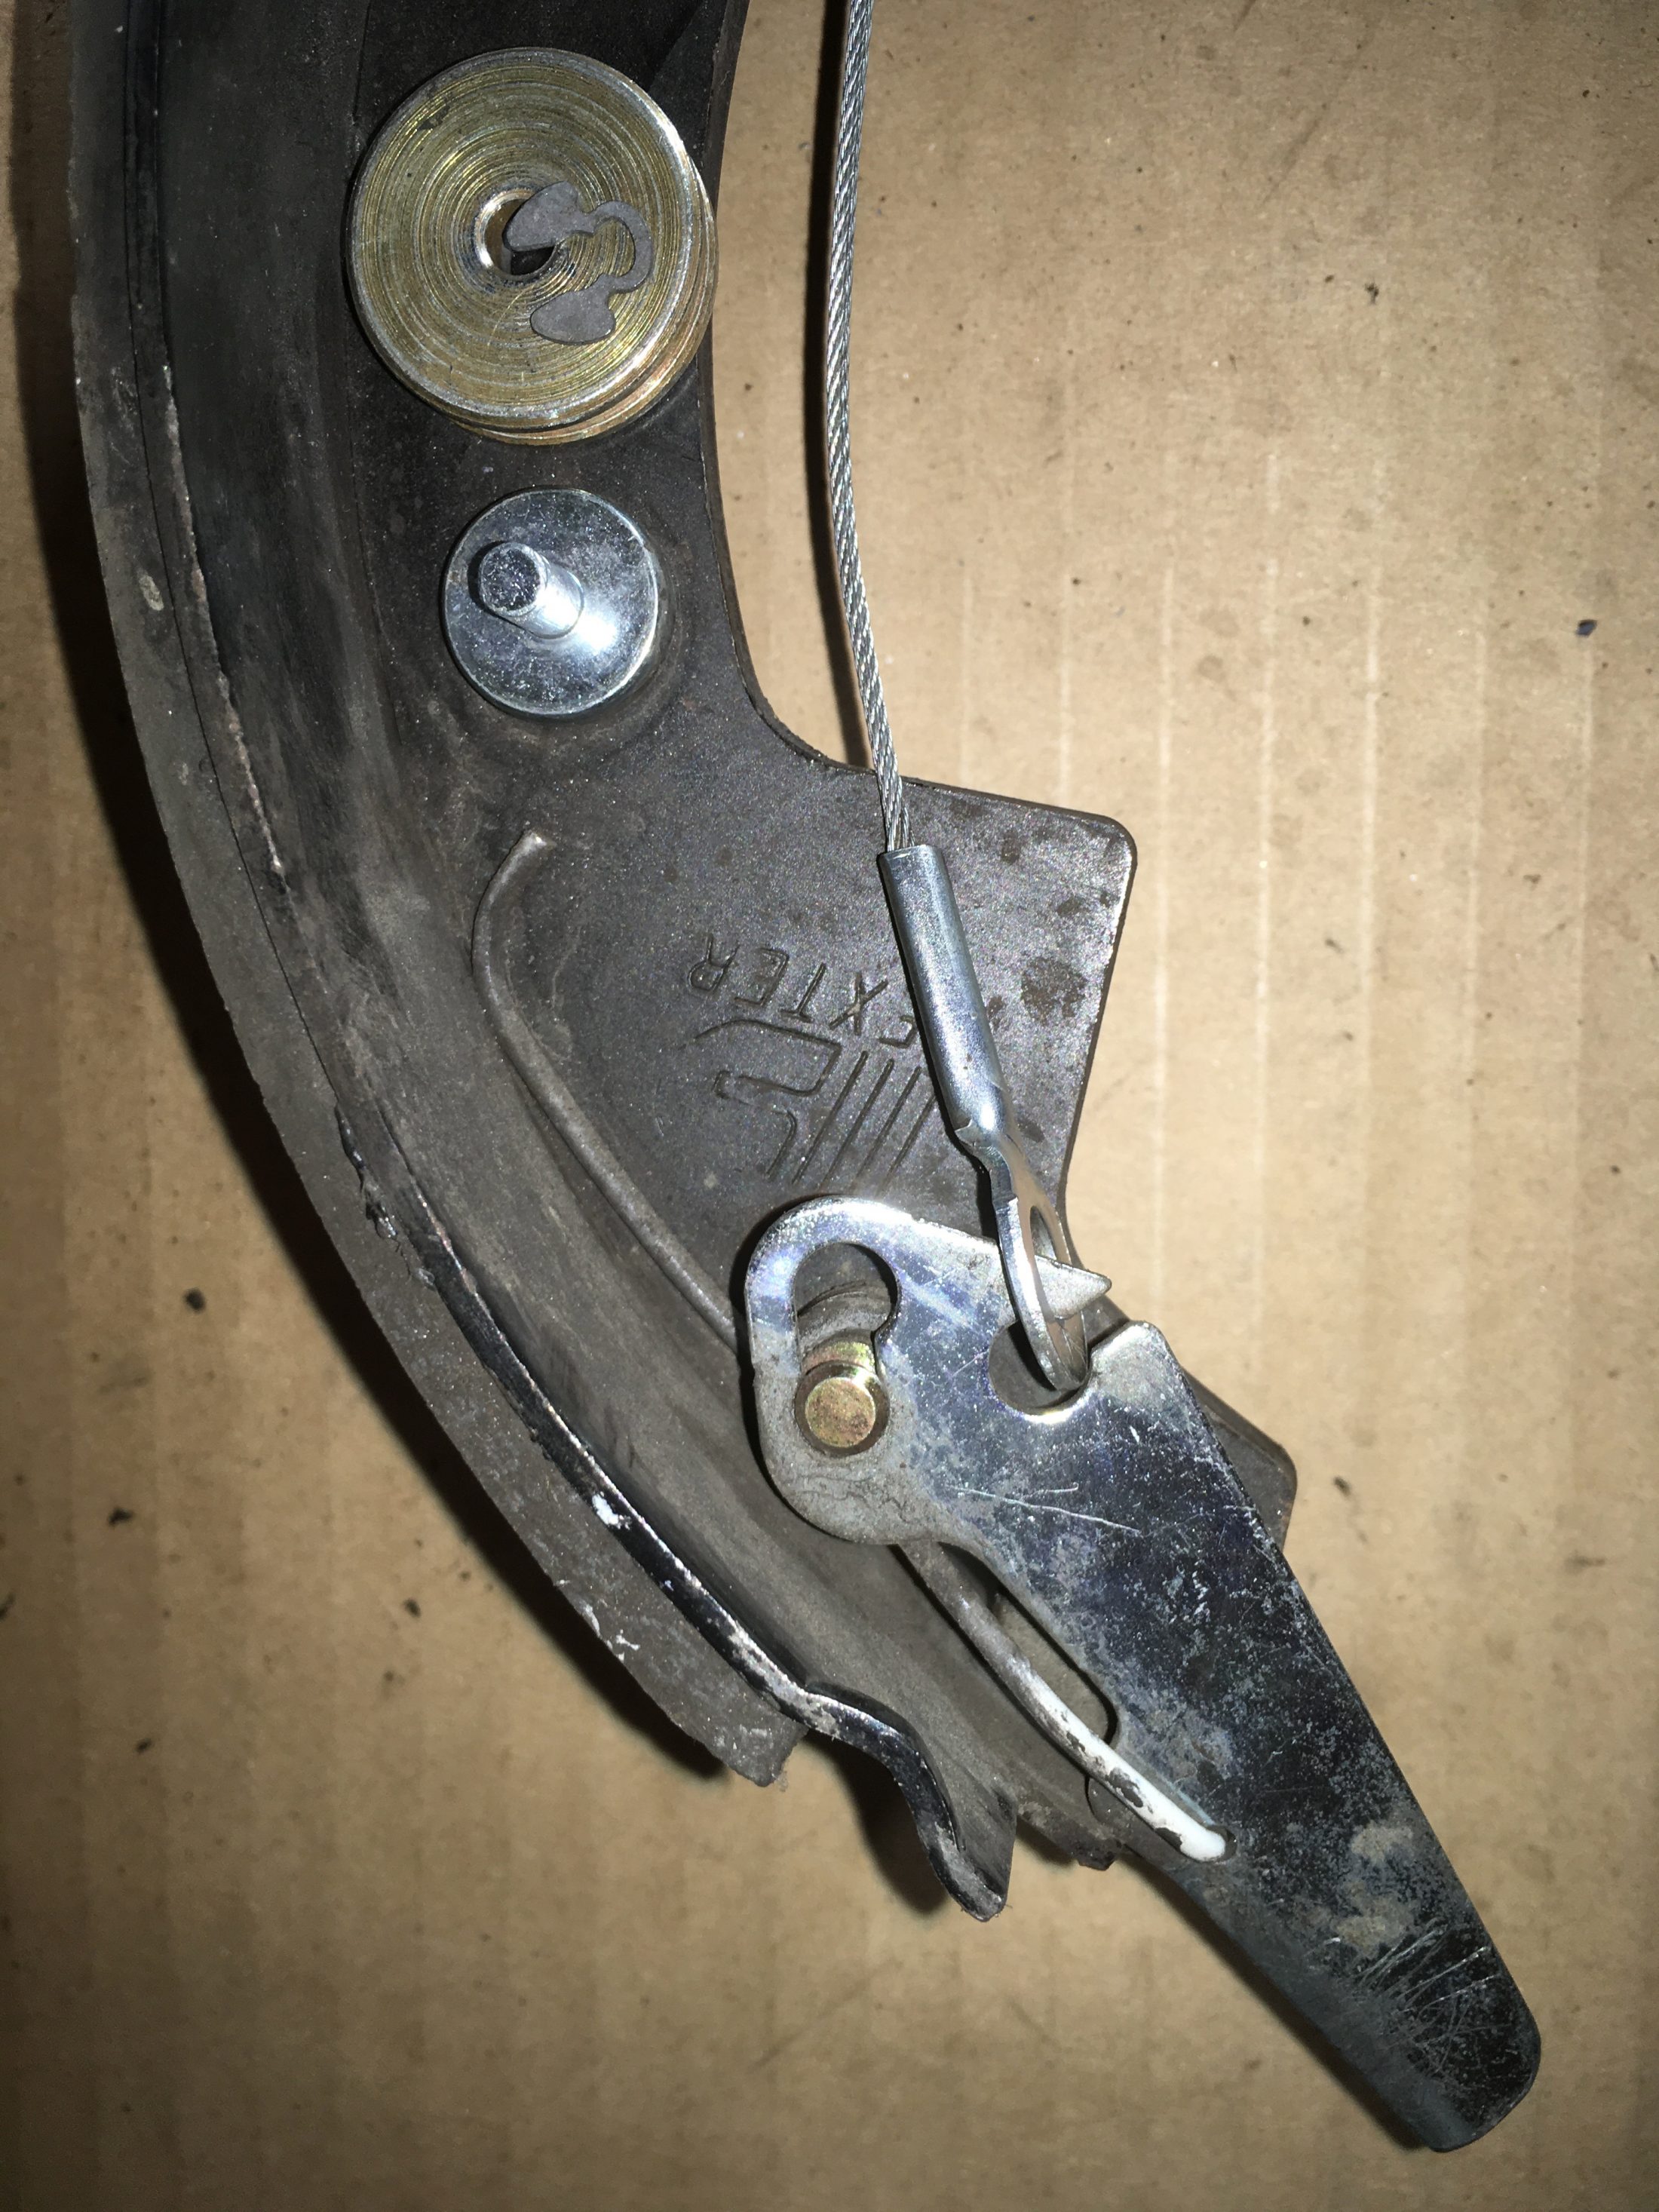
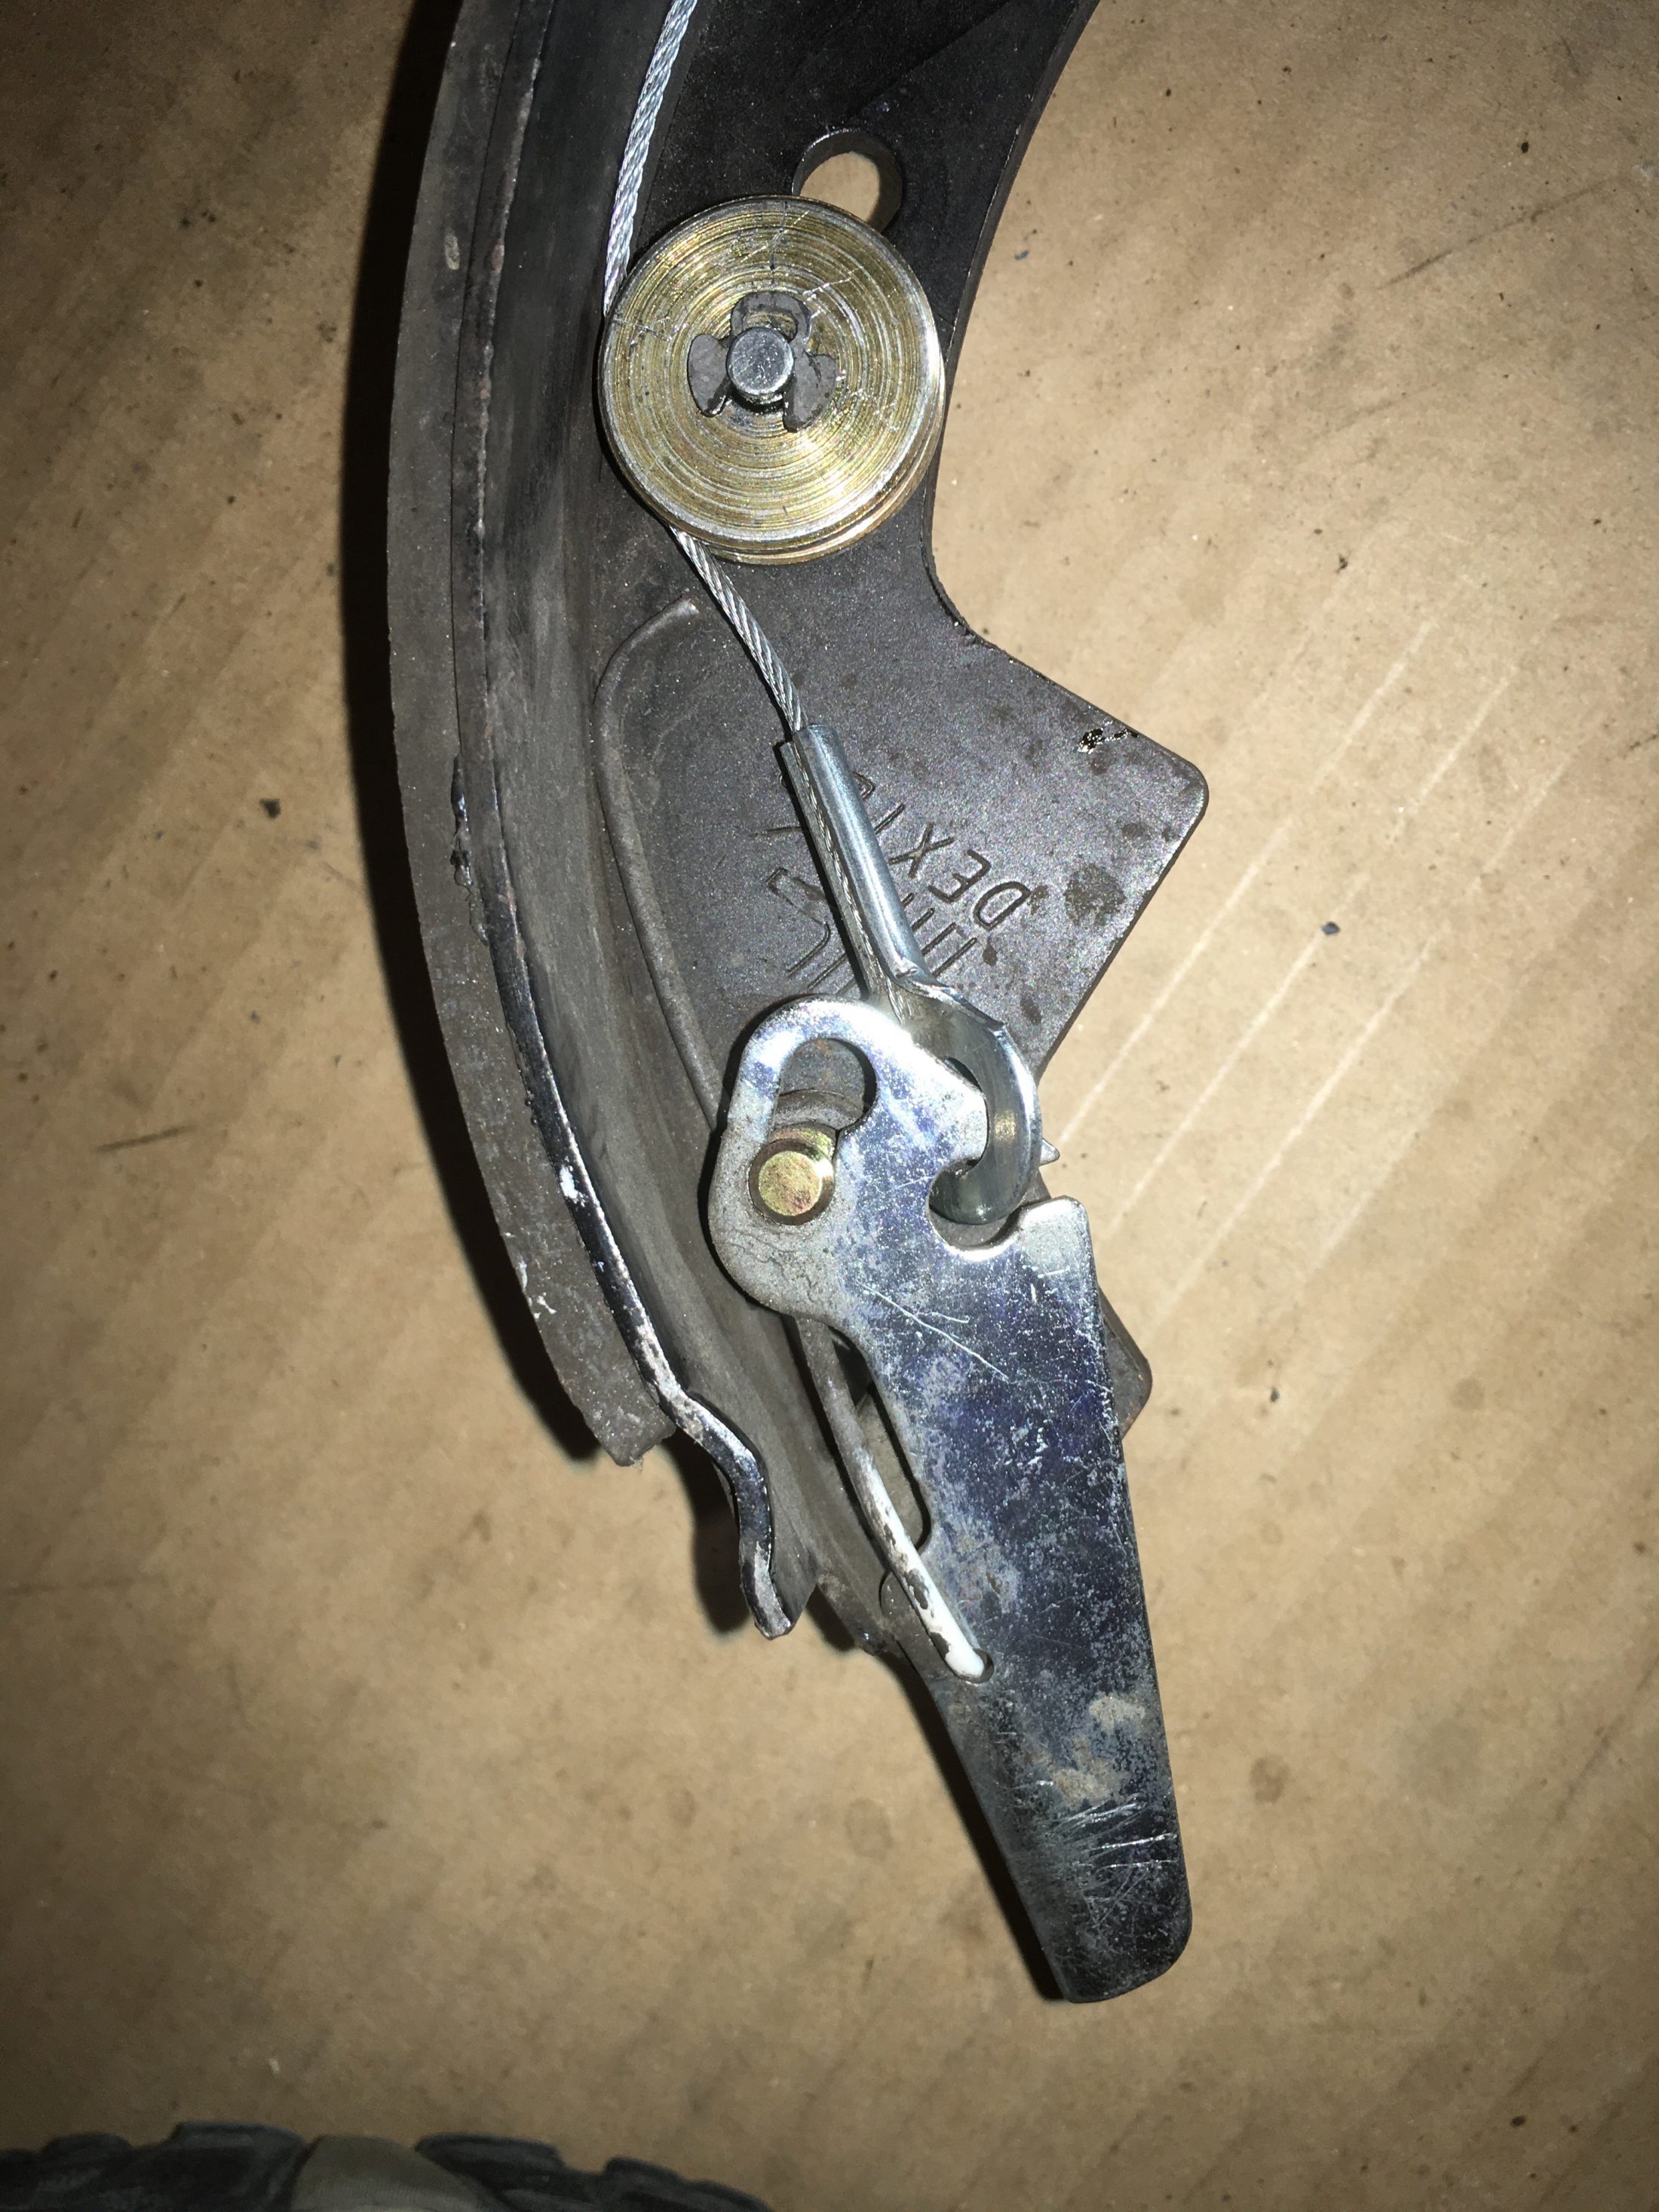
I have been chasing a grabby brake problem, and my Auto-adjust brakes never did self adjust correctly, regardless of how many brake applications there were... I learned about some important differences. I thought that I could remove the self-adjusting hardware and install an adjuster and spring from a manual adjust brake, and then all would be well. It is not so simple. Auto vs Manual: The shoes are shaped and drilled differently, and the spring for the adjuster rides outside the screw, not around it. This is critical since you can't just swap them. I tried... here is the manual spring and its adjuster attached to the Auto shoes: When the adjuster is turned, the teeth drag the spring up and bang it hard into the magnet. Ooops. So.... if you are having issues with the Auto adjusters not, uhmmm, auto adjusting, as I was having, can you just manually adjust these brakes? Yes, you can. MAYBE. You can simply reach in through the oval hole with a small screwdriver and lift the adjuster arm up and let it drop repeatedly until it no longer turns the screw. It's easy and quick. But there is a problem. Here is the adjuster cable, looped over the pulley, under spring pressure: Here it is with the arm lifted up: The cable raises up out of the pulley groove (there is no retainer). I was not able to get it to fall out, but the possibility is high if your cable and pulley is not well lubricated and moving freely. Which is a common problem. Mine were dry and dragging before I serviced them. If the cable falls out of the groove, you will have problems and have to disassemble the brake. Here is a look at the entire Auto-adjust mechanism: [attachment file=IMG_5121 copy.jpg] The top of the cable hooks to a sheet metal arm that sits under the magnet bearing. This area must be well lubricated or it will bind. These brakes are a real pain to keep operating correctly. Here is a tip to make removing the hold down springs simple, for either version: Make sure the slot in the spring cap is aligned with the jaws, so it will be easier to “stab” it over the matching tab of the hold down pin... you can’t easily see how things are aligned. The Auto adjusting mechanism is problematic, adds a lot of extra drag to the system (three additional pivot points), requiring heavier and more springs for the shoes to function. The Auto brakes are much MUCH more difficult to reassemble after they are taken apart for a repair or service. I swapped out my goofy front brakes for a pair of Dexter Manual Adjust ones, cost was $110 from eTrailer. Generic ones are a little cheaper. In this particular case, simpler is way better. Disc brakes are still in my future. John Davies Spokane WA
-
Updated with some corrections to the look of the Numbers file (Freeze Headers, some very minor appearance alterations), and also exported it as an Excel file, so you MicroSofters can open the spreadsheet directly into Excel. Please test these out, make sure the links and the files are working OK. LINKS ARE IN THE FIRST POST, I wanted to keep everything together. Thanks, John Davies Spokane WA
-
Chris, have you looked at the actual file? Please see if there are any formatting or functional issues, and tell me what program you use. Any suggestions/ improvements/ or even donuts are always welcome. Thanks. John Davies Spokane WA
-
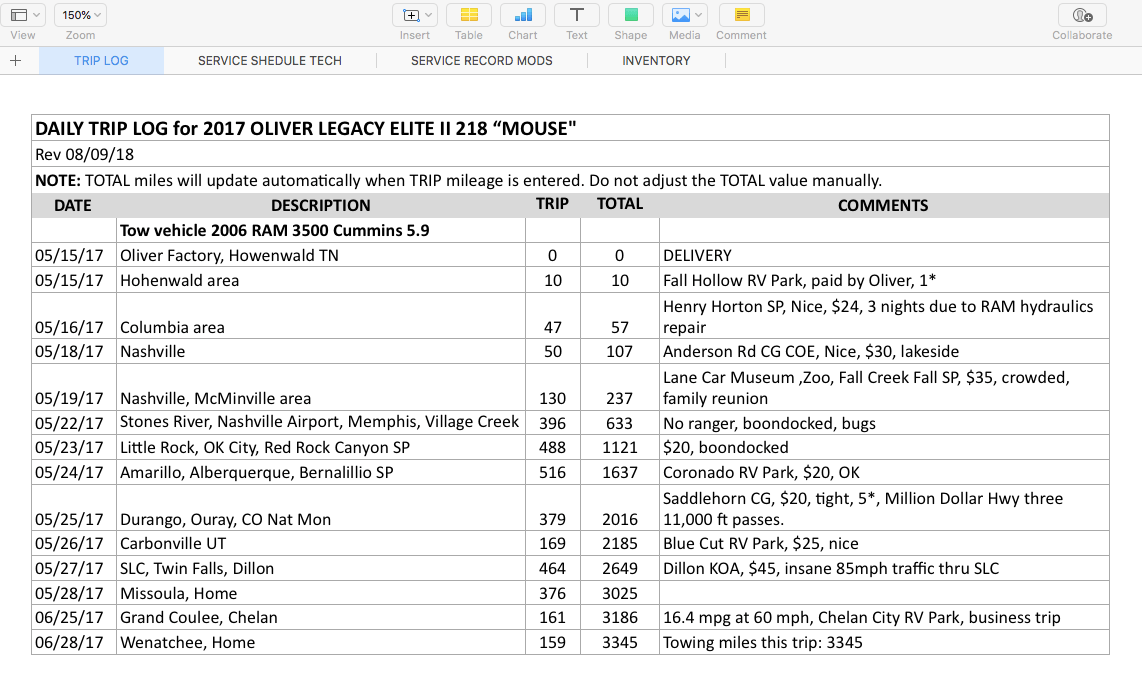
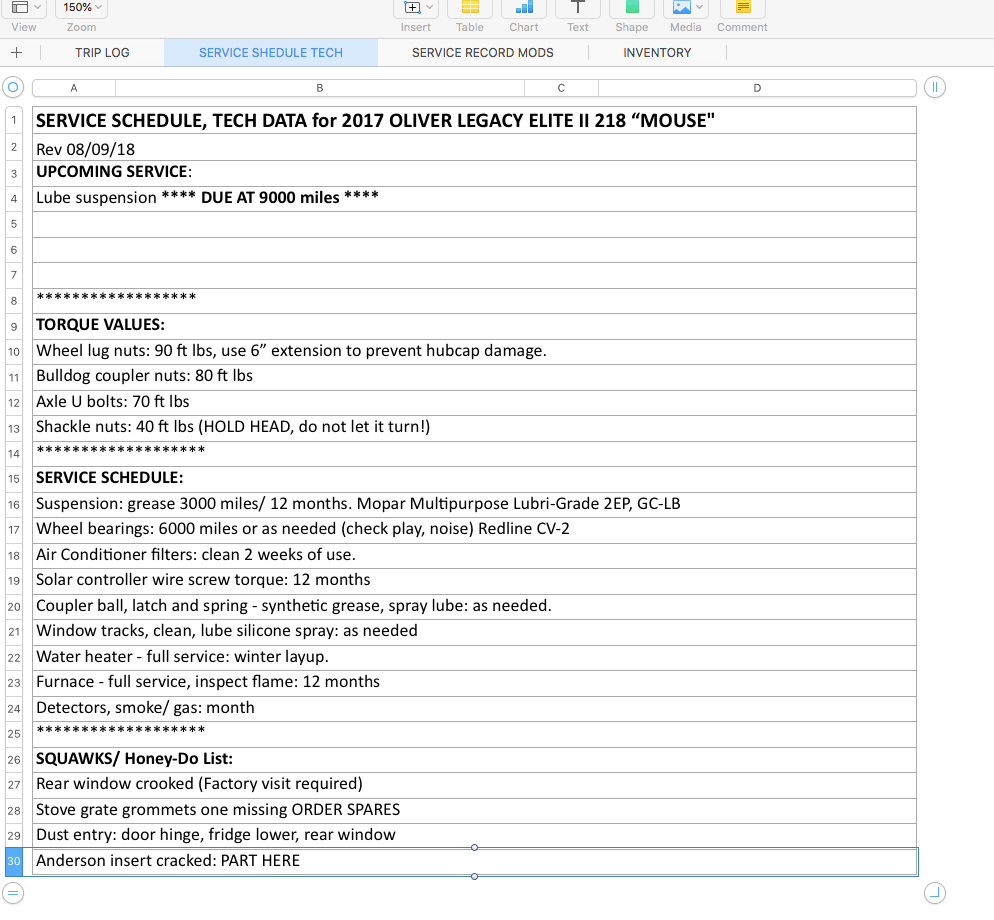
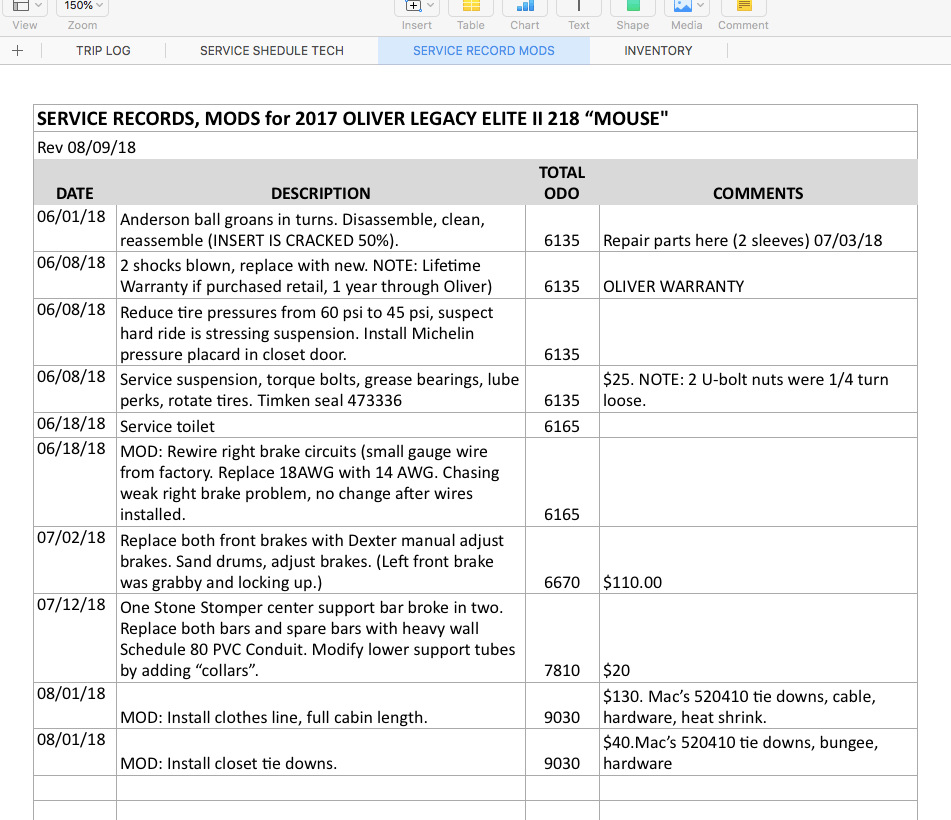
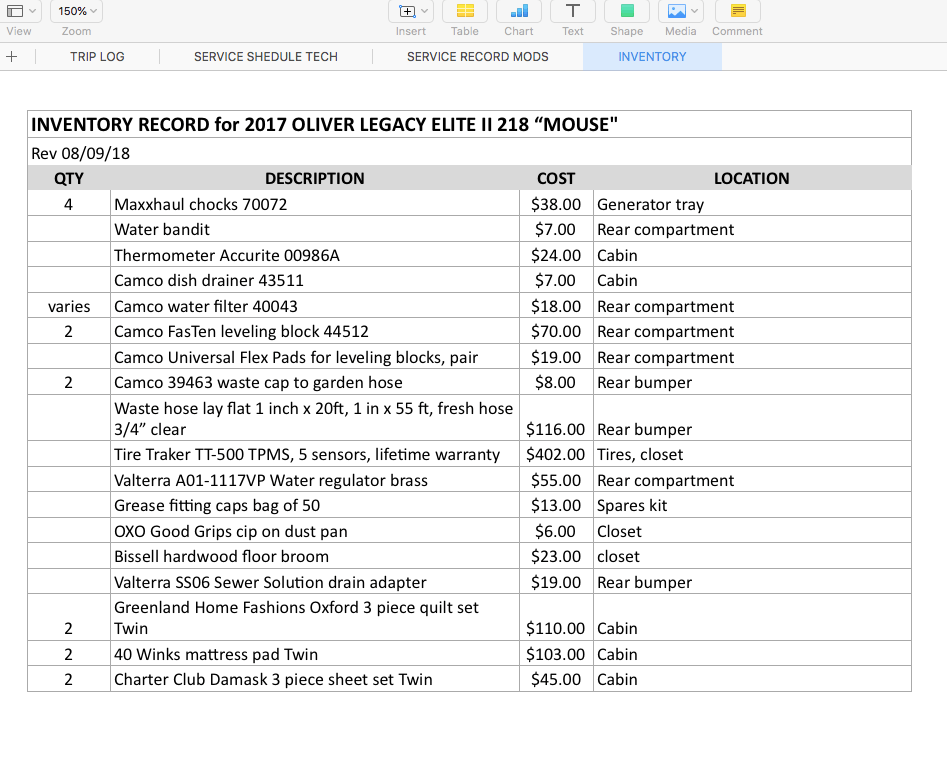
EDIT 08/11/18 Uploaded a (corrected) Numbers Revision 01 file and a (new) Excel Revision 01 file. Note: I will keep any future major updates or important comments in this first post. I do not want for them get lost in subsequent replies. If you are at all familiar with Excel or Numbers, this may be helpful. I was keeping my records in a variety of forms, and the data was getting increasingly messy and hard to interpret, so with the help of my wife I now have an all-in-one spreadsheet that I can update on-the-fly, as long as I have an internet connection. I back it up in the Cloud, so I can do data entry from my iPad at a campsite as easily as I can from my iMac at home. It has four tabs or sections. The first is the Trip log. The Date column "self-formats" so all the dates look alike. The Total column automatically updates when you enter the Trip (daily) number of miles. Don't mess with the figures in the TOTAL column. [attachment file=Trip log capture.png] The second tab is the Service Schedule/ Tech page. I have service reminders (stuff I need to do soon), torque values, service info and my Squawk List (aka the "Honey-Do List") - stuff I either want to or need to address, eventually. [attachment file=Service Tech Capture.png] The third tab is the actual Service Record, which includes all routine work, repairs, and mods. I did not include extra columns for cost and detailed lists - I summarized since a future owner would only need that rough data. The paper records are there if I need to get down to small part costs. [attachment file=Service Record capture.png] The last tab is an Inventory section, for me to keep track of loose stuff that is carried in the trailer, in case of loss. [attachment file=Inventory Capture.png] The sample file, which includes the data shown in the screen captures above, but not all my history, can be found at my Dropbox page. Follow this link for the NUMBERS file: https://www.dropbox.com/s/u4fmo7ko7oxde6y/DAVIES%20SAMPLE%20RV%20LOG%20Serv%20Rec%20Inv%20REV01%20%20NUMBERS.numbers?dl=0 Follow this link for the EXCEL file: https://www.dropbox.com/s/07kvpx7u1d9l7bc/DAVIES%20SAMPLE%20RV%20LOG%20Serv%20Rec%20Inv%20REV01%20%20EXCEL.xlsx?dl=0 I strongly suggest that you save your file as a Master, duplicate it and work with the copy in case you mess up some how. Change all the entries and headers as you see fit. I hope it is useful to some of you. The first and third tabs print very nicely in Landscape, the other two work in Portrait. Use the "Fit to Page" option, print one tab at a time, and they will all stay on one printed page, so they are easy to read. Please let me know if there are any problems downloading or opening the file. I know very little about spreadsheets, but way more than I used to ;) John Davies Spokane WA
- 12 replies
-
- 11
-

-

-
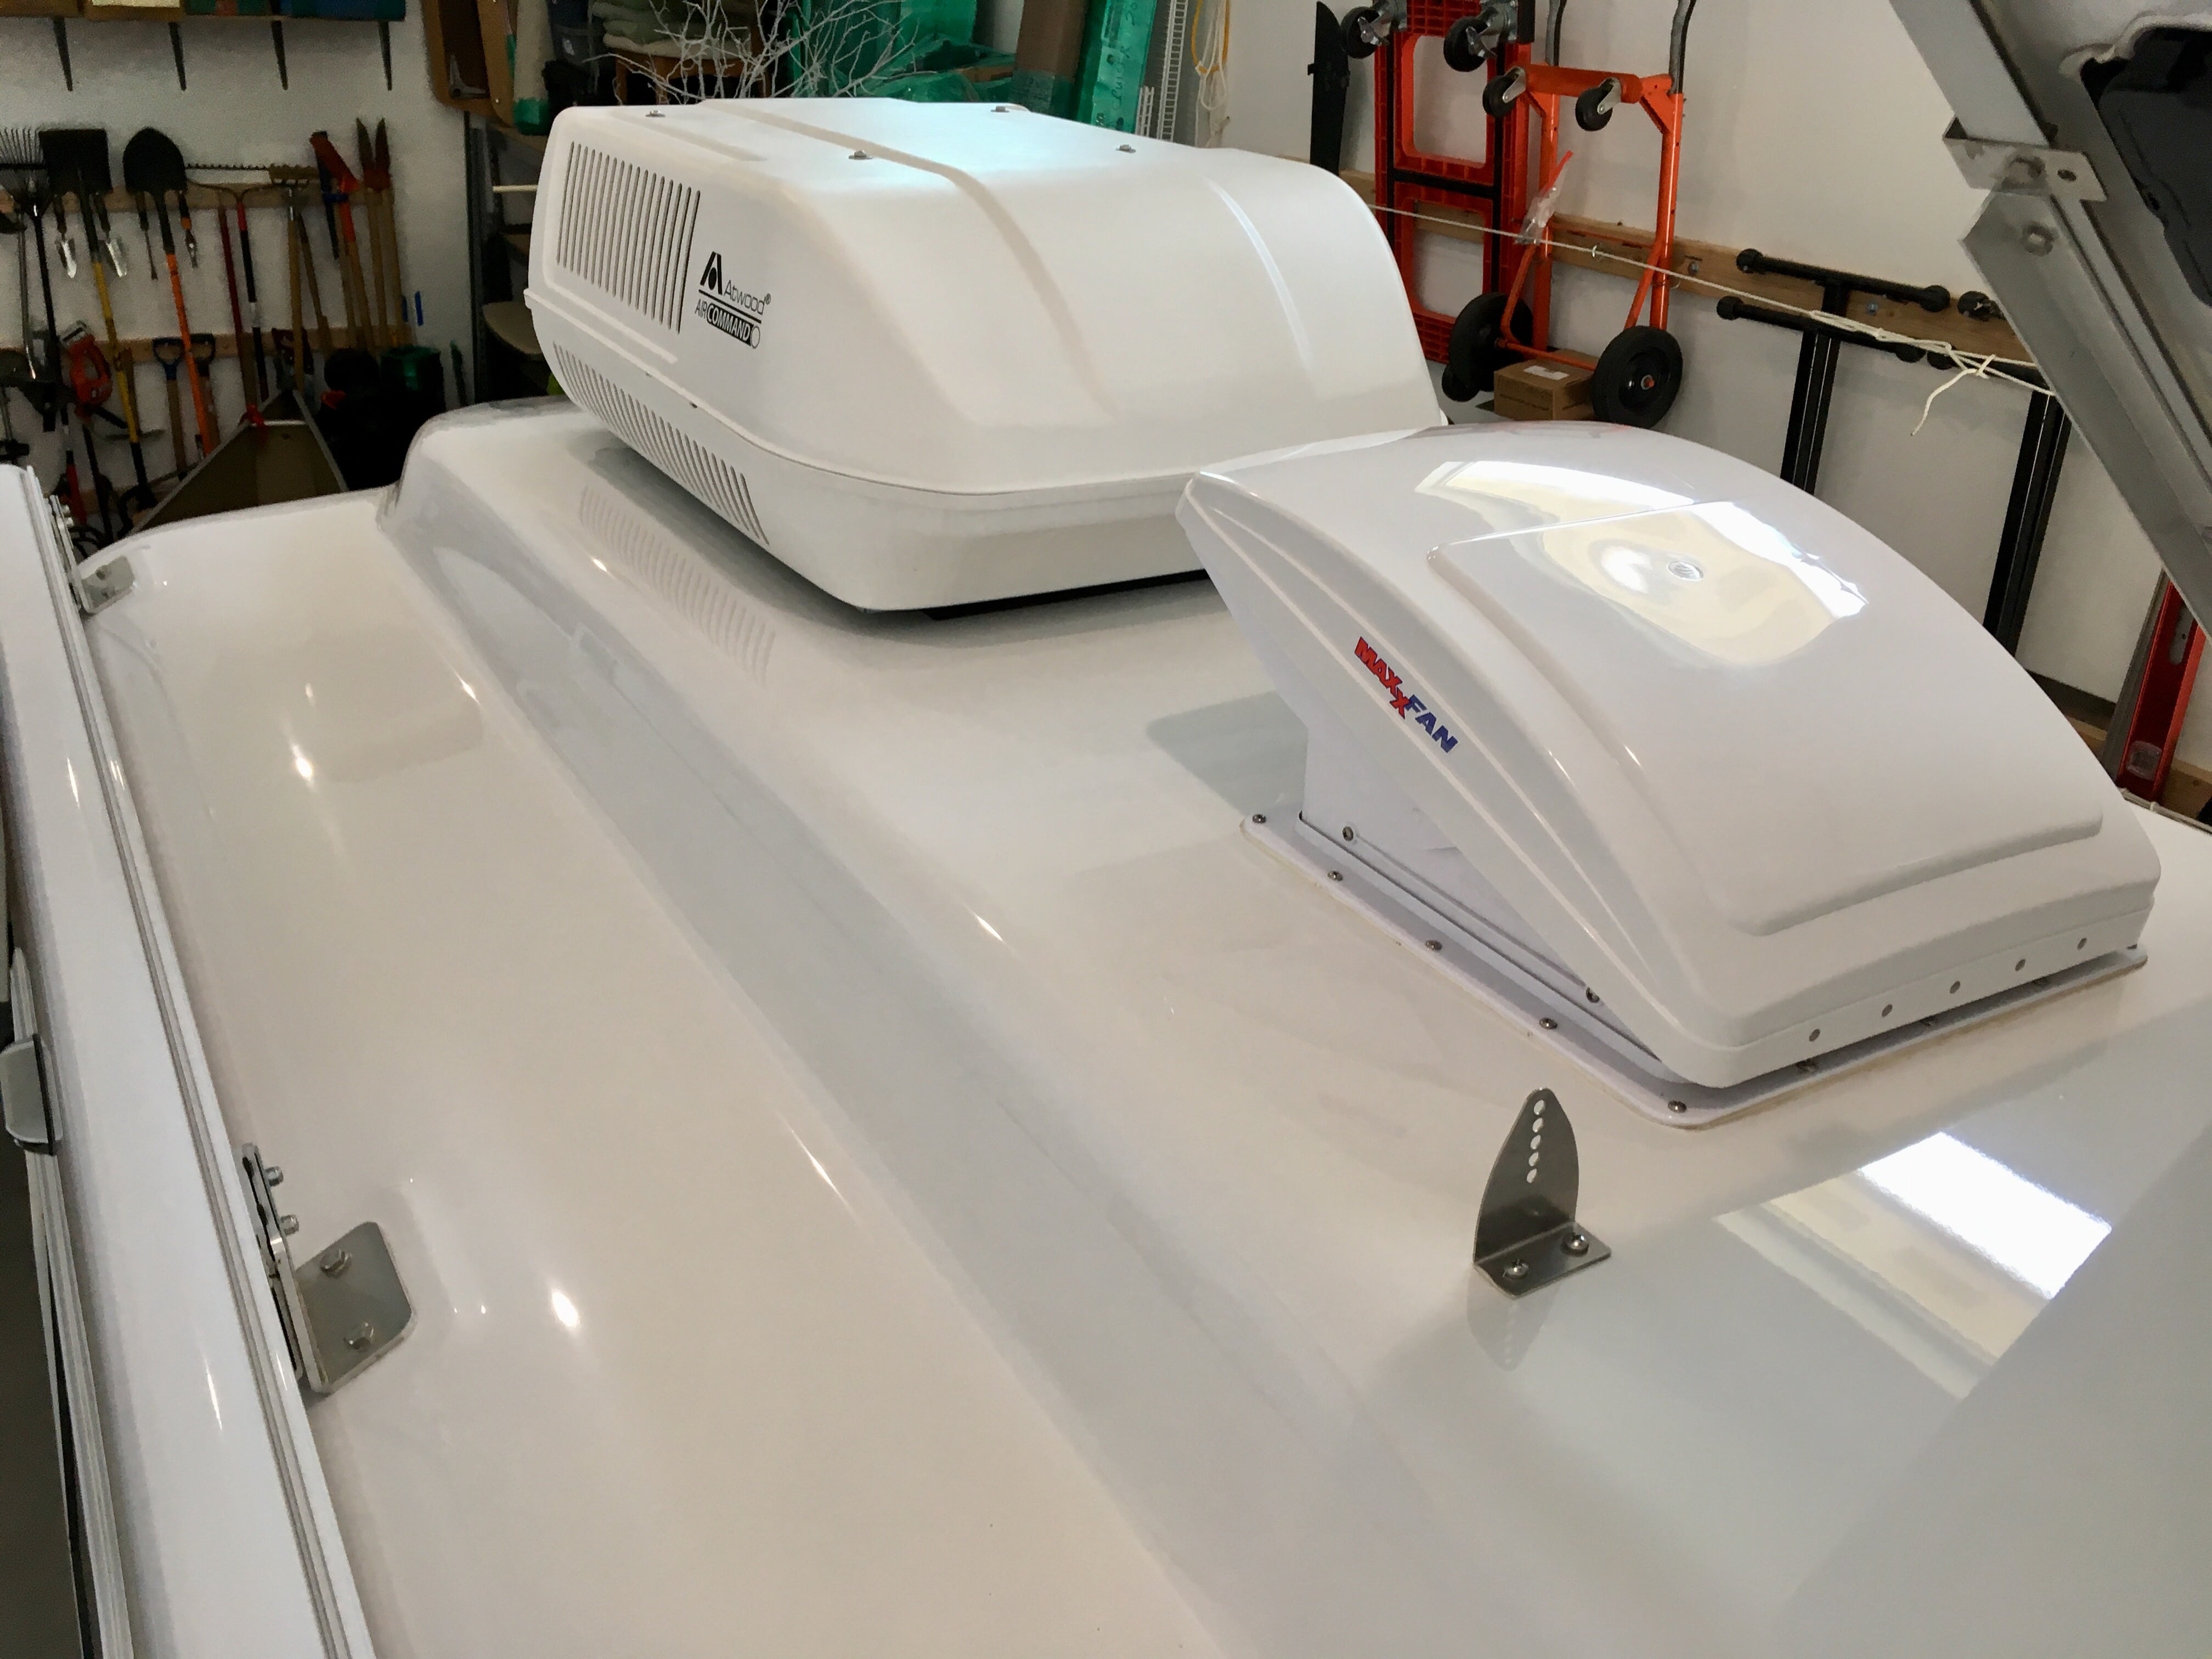
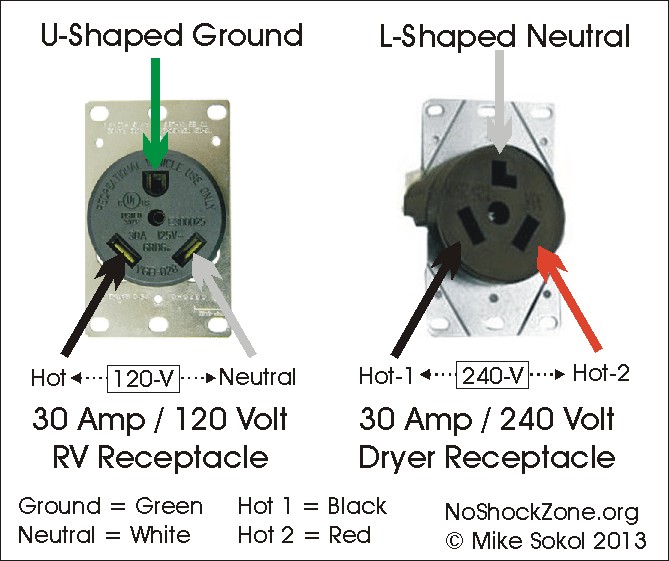
Thanks for the story, you are lucky. You cannot assume a professional electrician will do it right, always check! Your problem is not unusual! BTW: White is NEVER hot in residential AC wiring, I am not sure where you came up with that idea. I ordered a 30A 120V RV outlet for my RV bay, aka "The Hanger Deck" and I provided the electrician and builder each a printout of the wiring, a PHOTO, and also a link to the RV receptacle. I knew he might get it wrong.... especially if he did the job late in the day when he was tired and unfocussed. Everything was fine but I did check it with a voltmeter and VISUALLY before plugging in for the first time. I also made sure it had a dedicated 30A breaker. Since I have an Air Command air conditioner (low amp draw), I rarely use it, I normally have a 10 AWG extension cord plugged into a regular 20A socket, and that is fine unless I need to run other heavy loads on that circuit. http://noshockzone.org/accidentally-plugging-into-240-volt-outlet/ John Davies Spokane WA
-
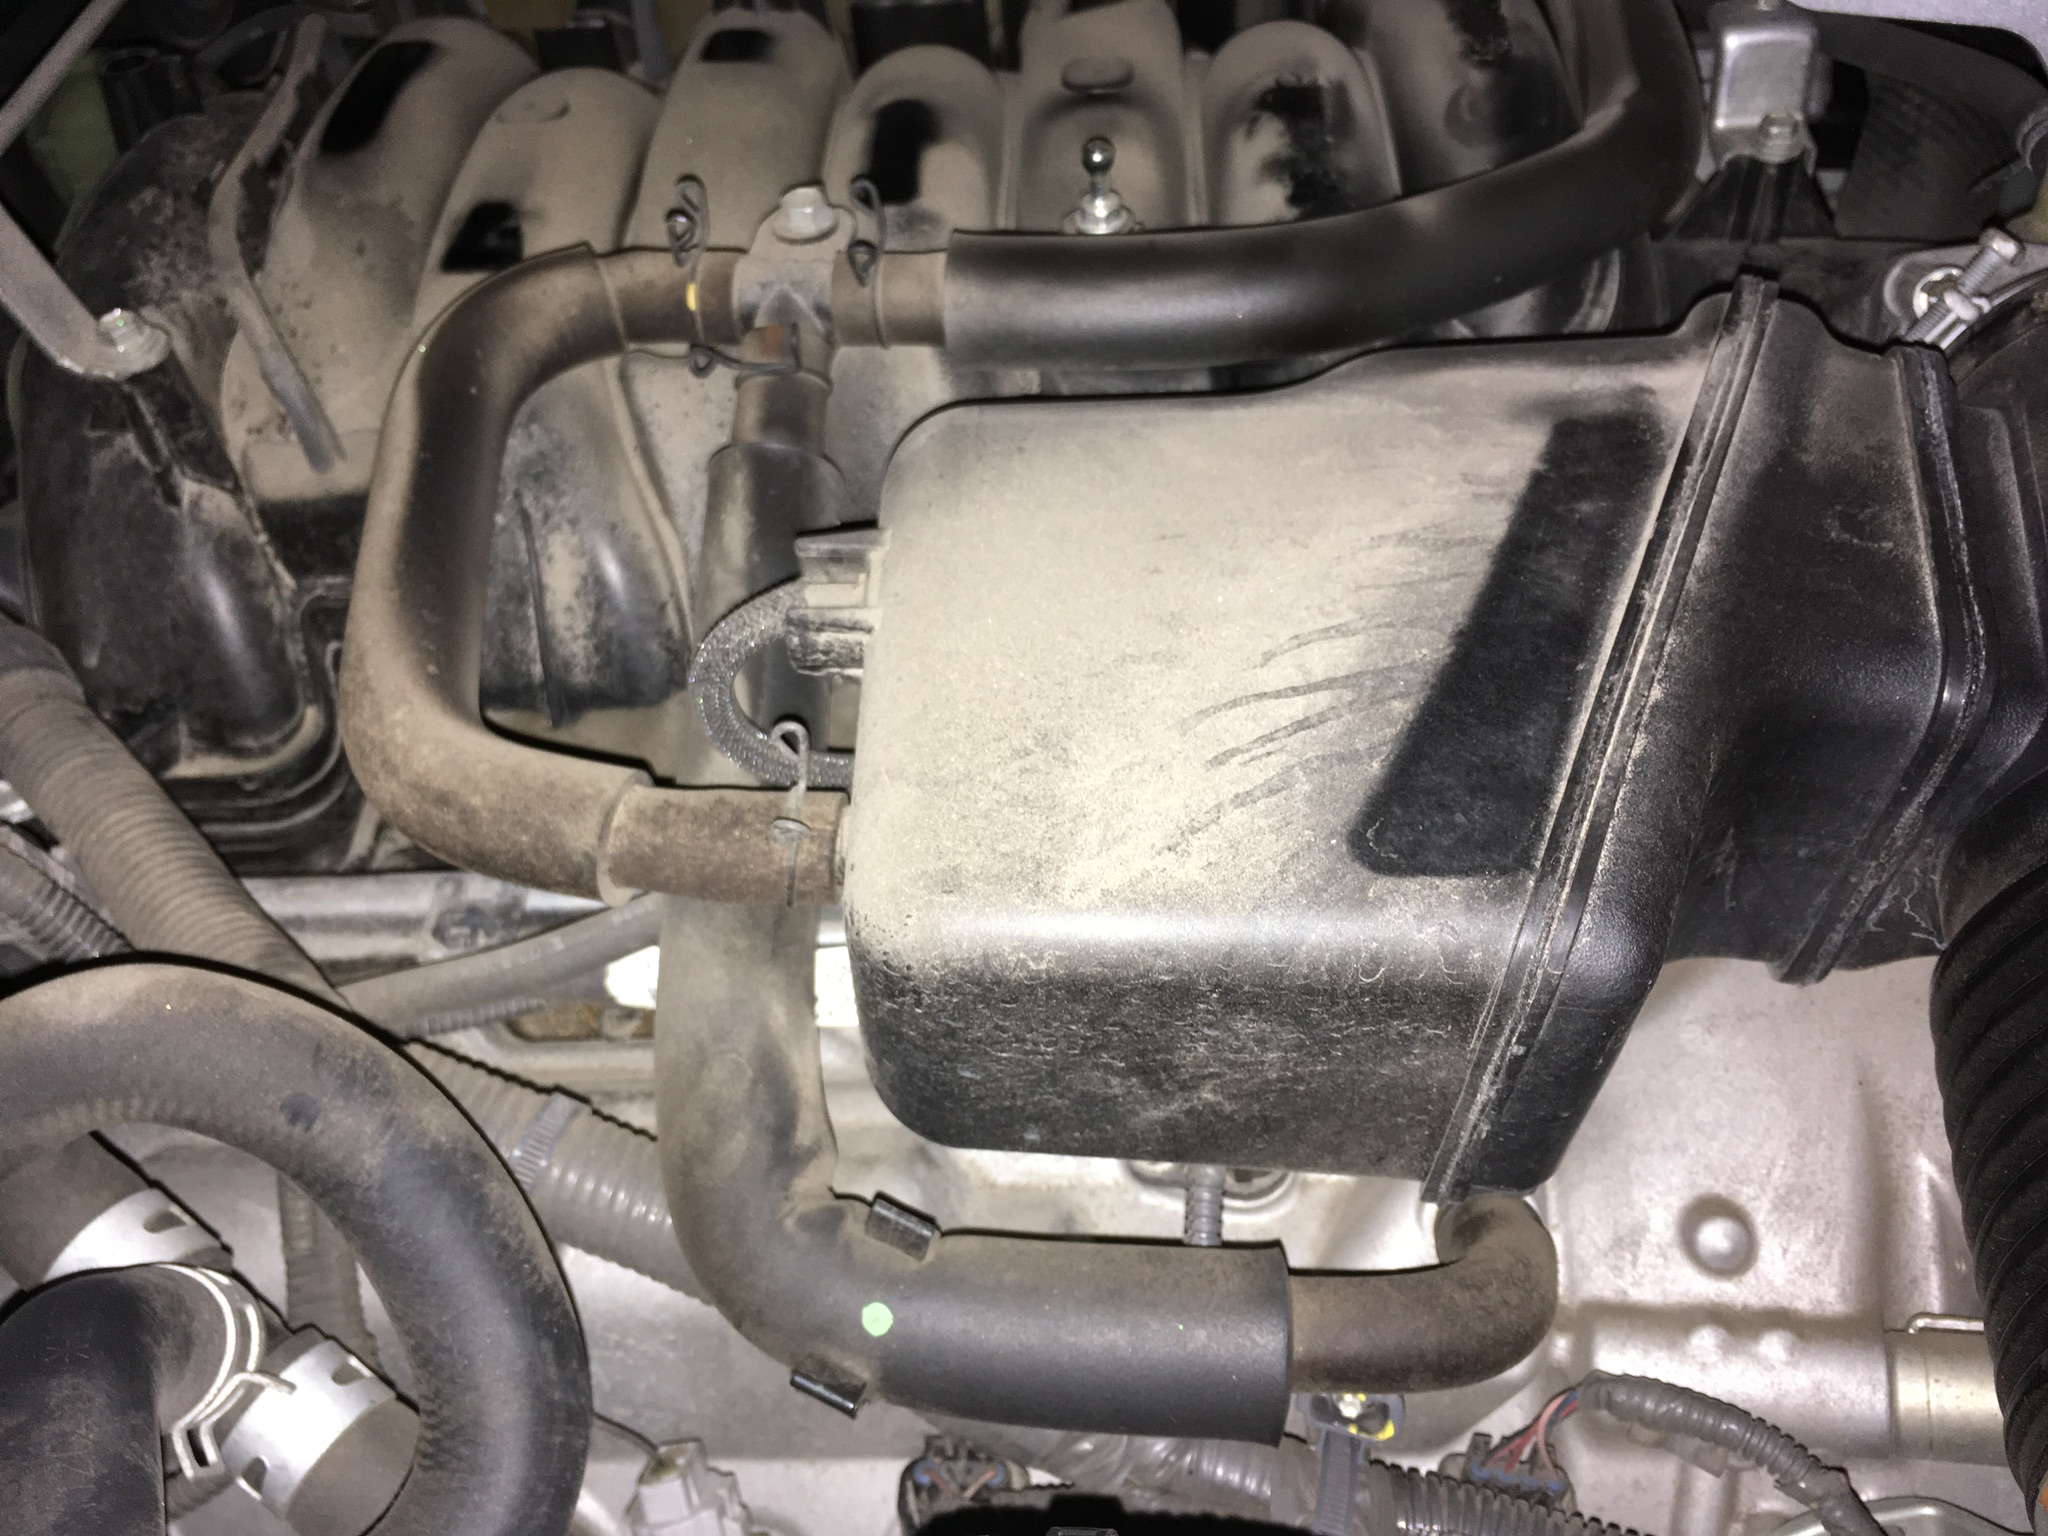
OUCH. That is where a crankcase breather hose should go. Please do not drive it any longer this way. I wonder why it is not leaking oil? Are you sure it was not removed very recently? Pull the plastic cover off and see what the rest of that system looks like. That is more than a little unreal, I wonder what the story is behind it’s being gone? You need to talk to the shop that worked on it last, they should have noted its absence, if not caused it! RE your cabin air filter: you MUST turn on the ignition and switch to Recirculate. This swings the blend door up and forward so you can reach the filter element. If forced open, the door will break where the actuator shaft enters, making it inoperative. This is fairly common, and not an easy or cheap fix. Mine is busted, and I need to pull the fan box out to see if I can repair it, or if I will have to change the entire $450 housing assembly. I have been moving the door manually from Recir to Normal by reaching in though the filter access opening. There are several threads about it at Ih8mud.com. There are a number of pissed off owners, it is a very stupid design. Read this.... there is a 20% “reported rate” of door breakage. ...https://forum.ih8mud.com/threads/important-check-your-hvac-recirculate-door-and-answer-poll.1021239/ You have to wonder how many 200 busted doors out there are as yet undiscovered. I hope yours is OK. Good luck, John Davies Spokane WA
-
Just a heads up - that is a poor adapter because it has just two "ears" and the plastic is brittle. it will eventually break and leak. The Camco version with four ears is way better. I speak from experience. https://www.amazon.com/Camco-Durable-Connection-Connection-39463/dp/B000BQKBP2 They are cheap, buy an extra for a spare. John Davies Spokane WA
-
The bugs normally will come down the exhaust vent. I have never had any problems with insects. Would you really be OK with a trash bag over your toilet? Talk about hideous! John Davies Spokane WA
-
The box slides off the mounting "sliding rack" to lighten it significantly. OTH it is still a two man operation, and both must be pretty fit. It is not necessarily a good match for your average "mature" Oliver owner. No offense intended to anyone here - I include myself in that category. I want to see video of one hopping down a corrugated freeway at 75 mph. I do like the idea of enclosed hard-sided storage for bikes tho. But not for $3000. John Davies 'Spokane WA
-
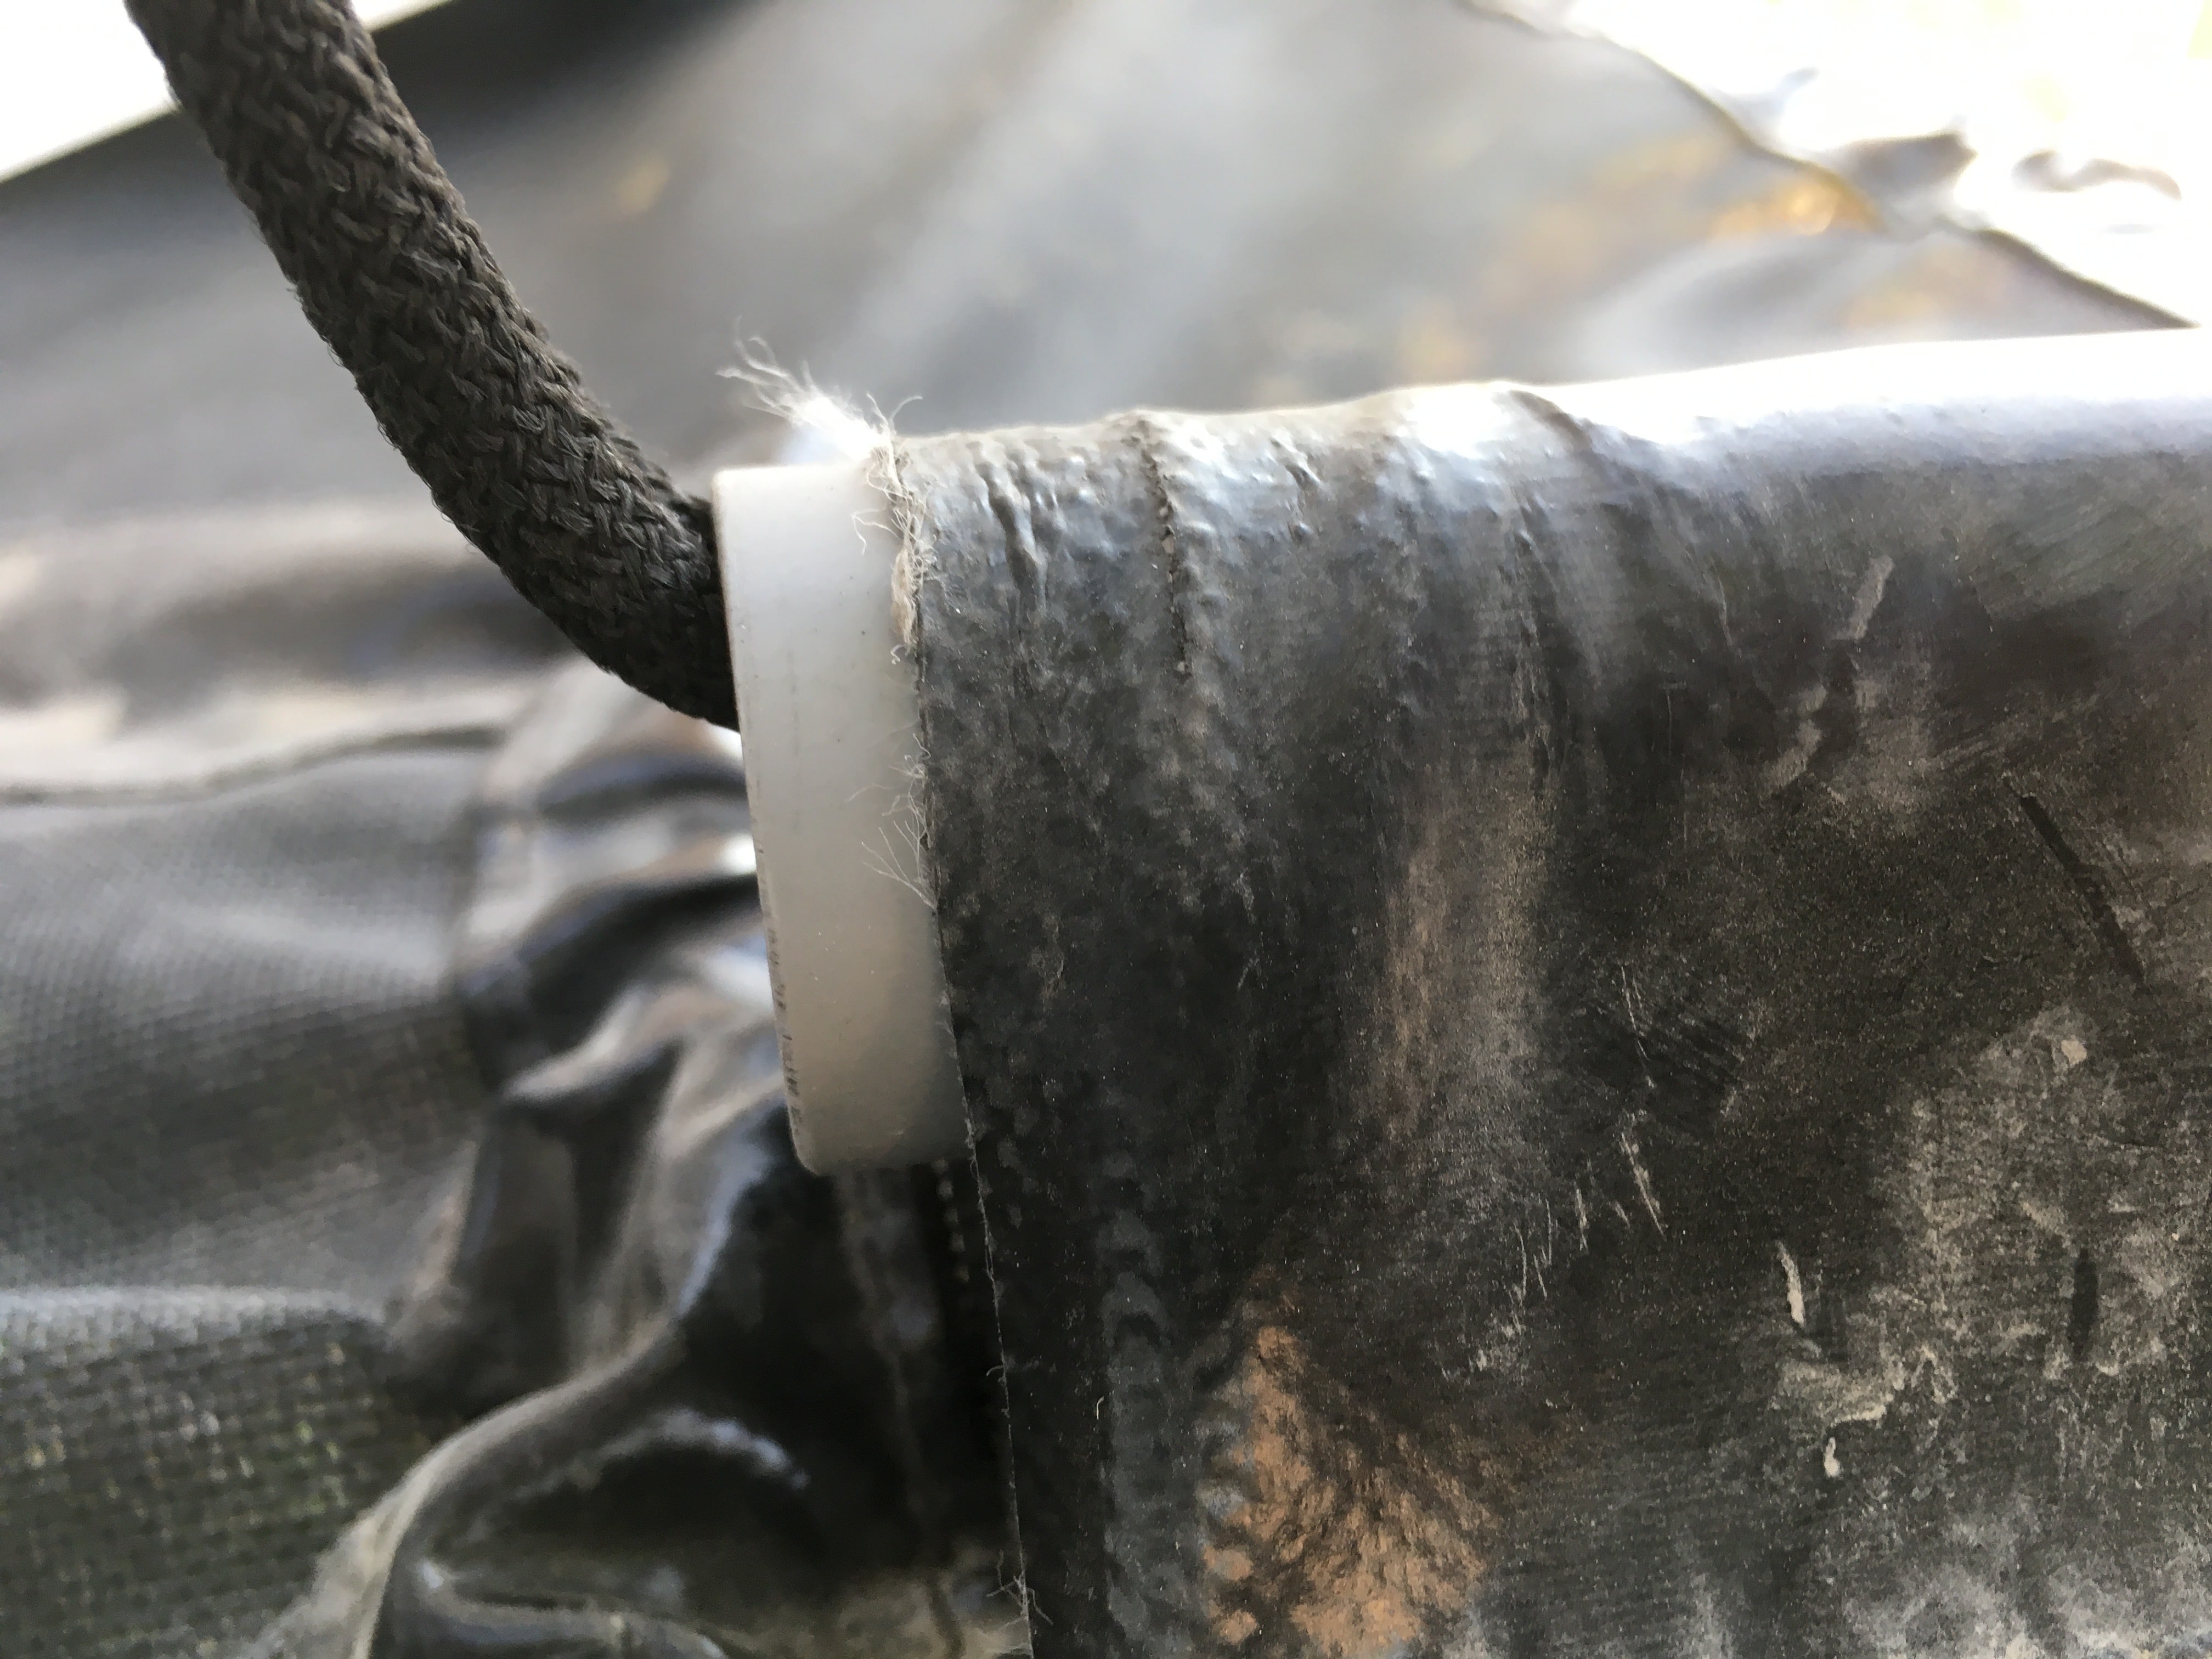
Nice mod. Very neatly done! BUT, if you camp in below freezing temperatures the screen may ice over due to the moist air coming up through the pipe and condensing on the mesh. Maybe, maybe not, but keep it in mind if you start to get some stinks in the bathroom in cold weather. I think some screen inserted into the vent pipe where it attaches to the toilet would be better. John Davies' Spokane WA
-
I normally don't bother treating the gray tank. However, after towing on very steep and twisty roads in Colorado, we opened up "Mouse" and it was very stinky inside. I suspect the motion emptied the water out of the galley sink trap and allowed smells to come up through the drain. I started adding the Camco treatment just in case,and the odor went away quickly with some fresh air. I think you could keep the drain screen hard down on the opening to seal it off, but I do not like that. John Davies Spokane WA
-
HOW TO: Stone Stomper Gravel Guard.
John E Davies replied to John E Davies's topic in Towing an Oliver
Update..... We towed Mouse for 3000 miles over two weeks and for the most part the system works great. We encountered a few stretches of road maintenance - chip-sealing - in Colorado. It was nice to know that the trailer was fully protected for those 40 miles, even at reduced speeds. The underside and rear bumper stayed free of tarry rocks. I saw a few nice RVs and sports cars on those stretches and I bet their owners were a little bothered. There was a complete failure of one of the center support bars. I found it when we pulled off at a rest stop. The bar had parted cleanly where it exits the support tube, and was lying on top of the fabric. There was no other damage.I don't know how long it was like that, but it was no more than 50 miles. I make a habit of looking things over every time I exit the Land Cruiser. I removed the entire Stone Stomper until I could get a fix made. That took a couple of minutes. The trailer looked naked and vulnerable without it. I had time at Colorado National Monument, so I found some heavier walled Schedule 80 PVC conduit at Home Depot. The walls are twice as thick and should be more resistant to fracturing, while still flexing... I had to visit the local Harbor Freight for a saw and vice, so I could cut the pipe and also trim a flat section longitudinally for it to fit into the tube. I made two new ones and kept the remaining old one as a spare. For less than $20 this little 2 axis swivel vice is a great tool, that attaches very firmly to the cargo basket. It is heavy though... https://www.harborfreight.com/2-1-2-half-inch-table-swivel-vise-97160.html Later I found that the short tubes that go through the fabric in two places were wearing the fabric. They were sliding into the fabric and needed a way to keep them located. I made new tubes by gluing them together with a straight coupling, then cut them apart through the center of the coupling, to provide a lip on the problem end: I also made extra spare long support tubes to carry on trips, so I do not have to kneel in the dirt in 100 degree weather. I cut the flat sections using a table saw and it was very fast and neat. I don't think I will add further comments to the previous sections I left empty. If somebody has a question, fire away. The installation pics are pretty self explanatory. John Davies Spokane WA
-
Thank you, I have been using the Camco stuff in the grey tank, it works but is pretty expensive per treatment. Nice bottle though! Is this the best price? https://www.amazon.com/TankTechsRx-Holding-Tank-Treatment-Cleaner/dp/B00JFUJBTW John Davies Spokne WA
-
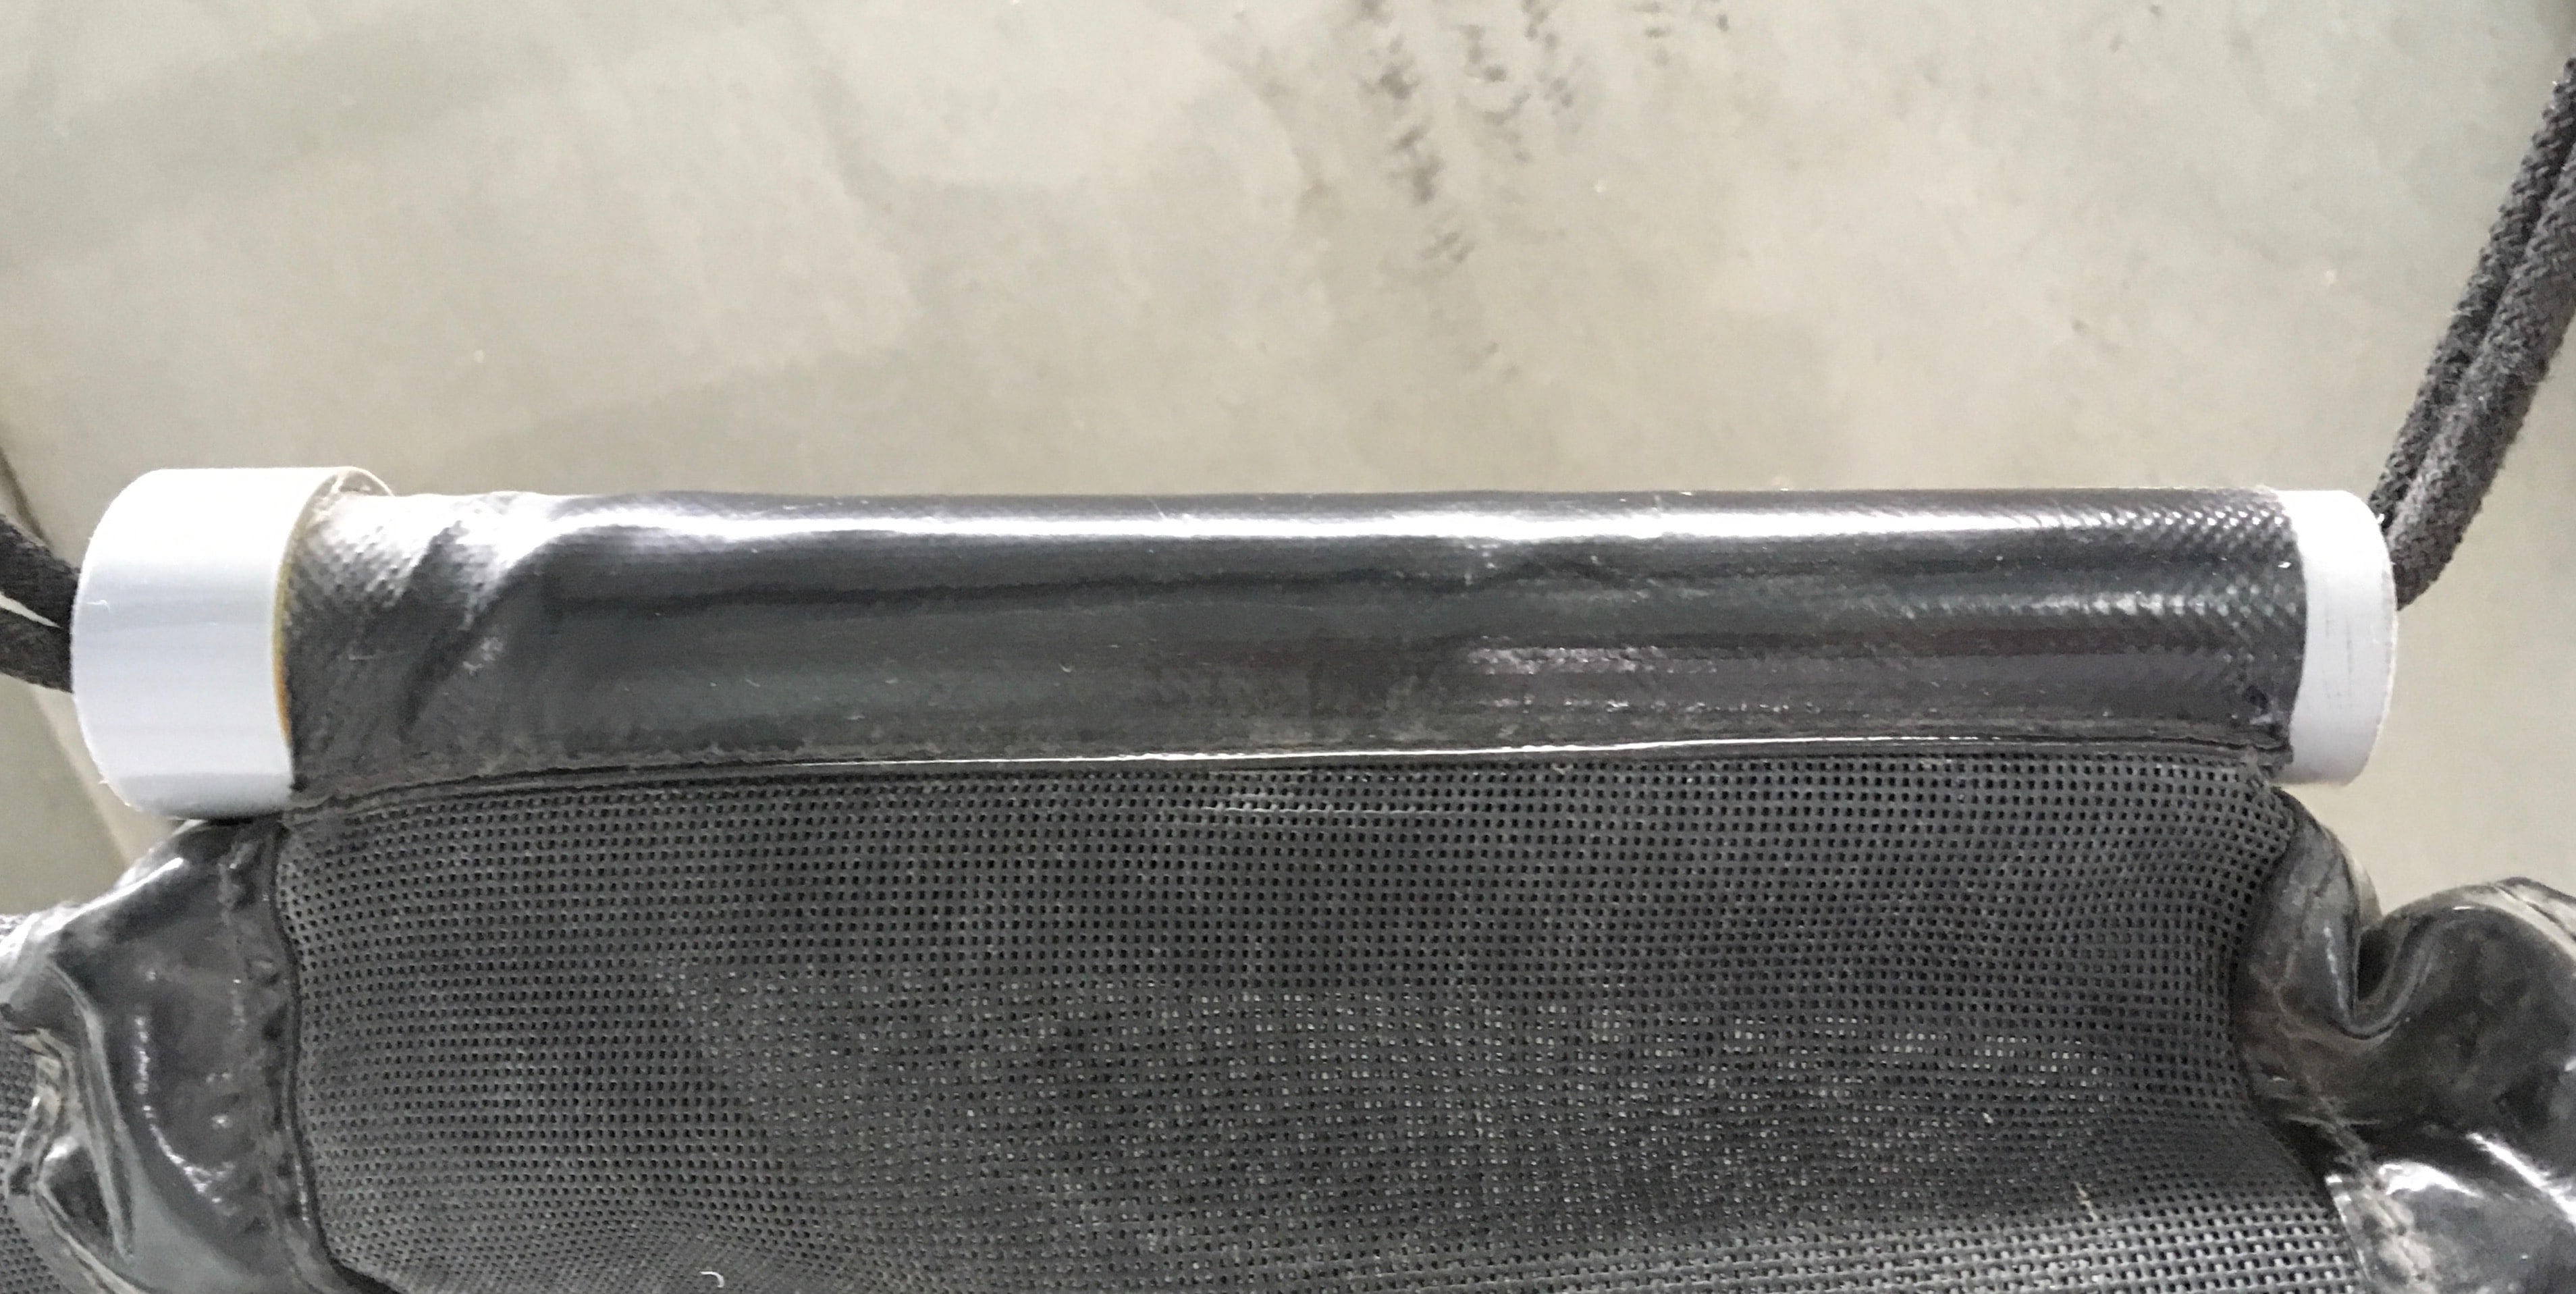
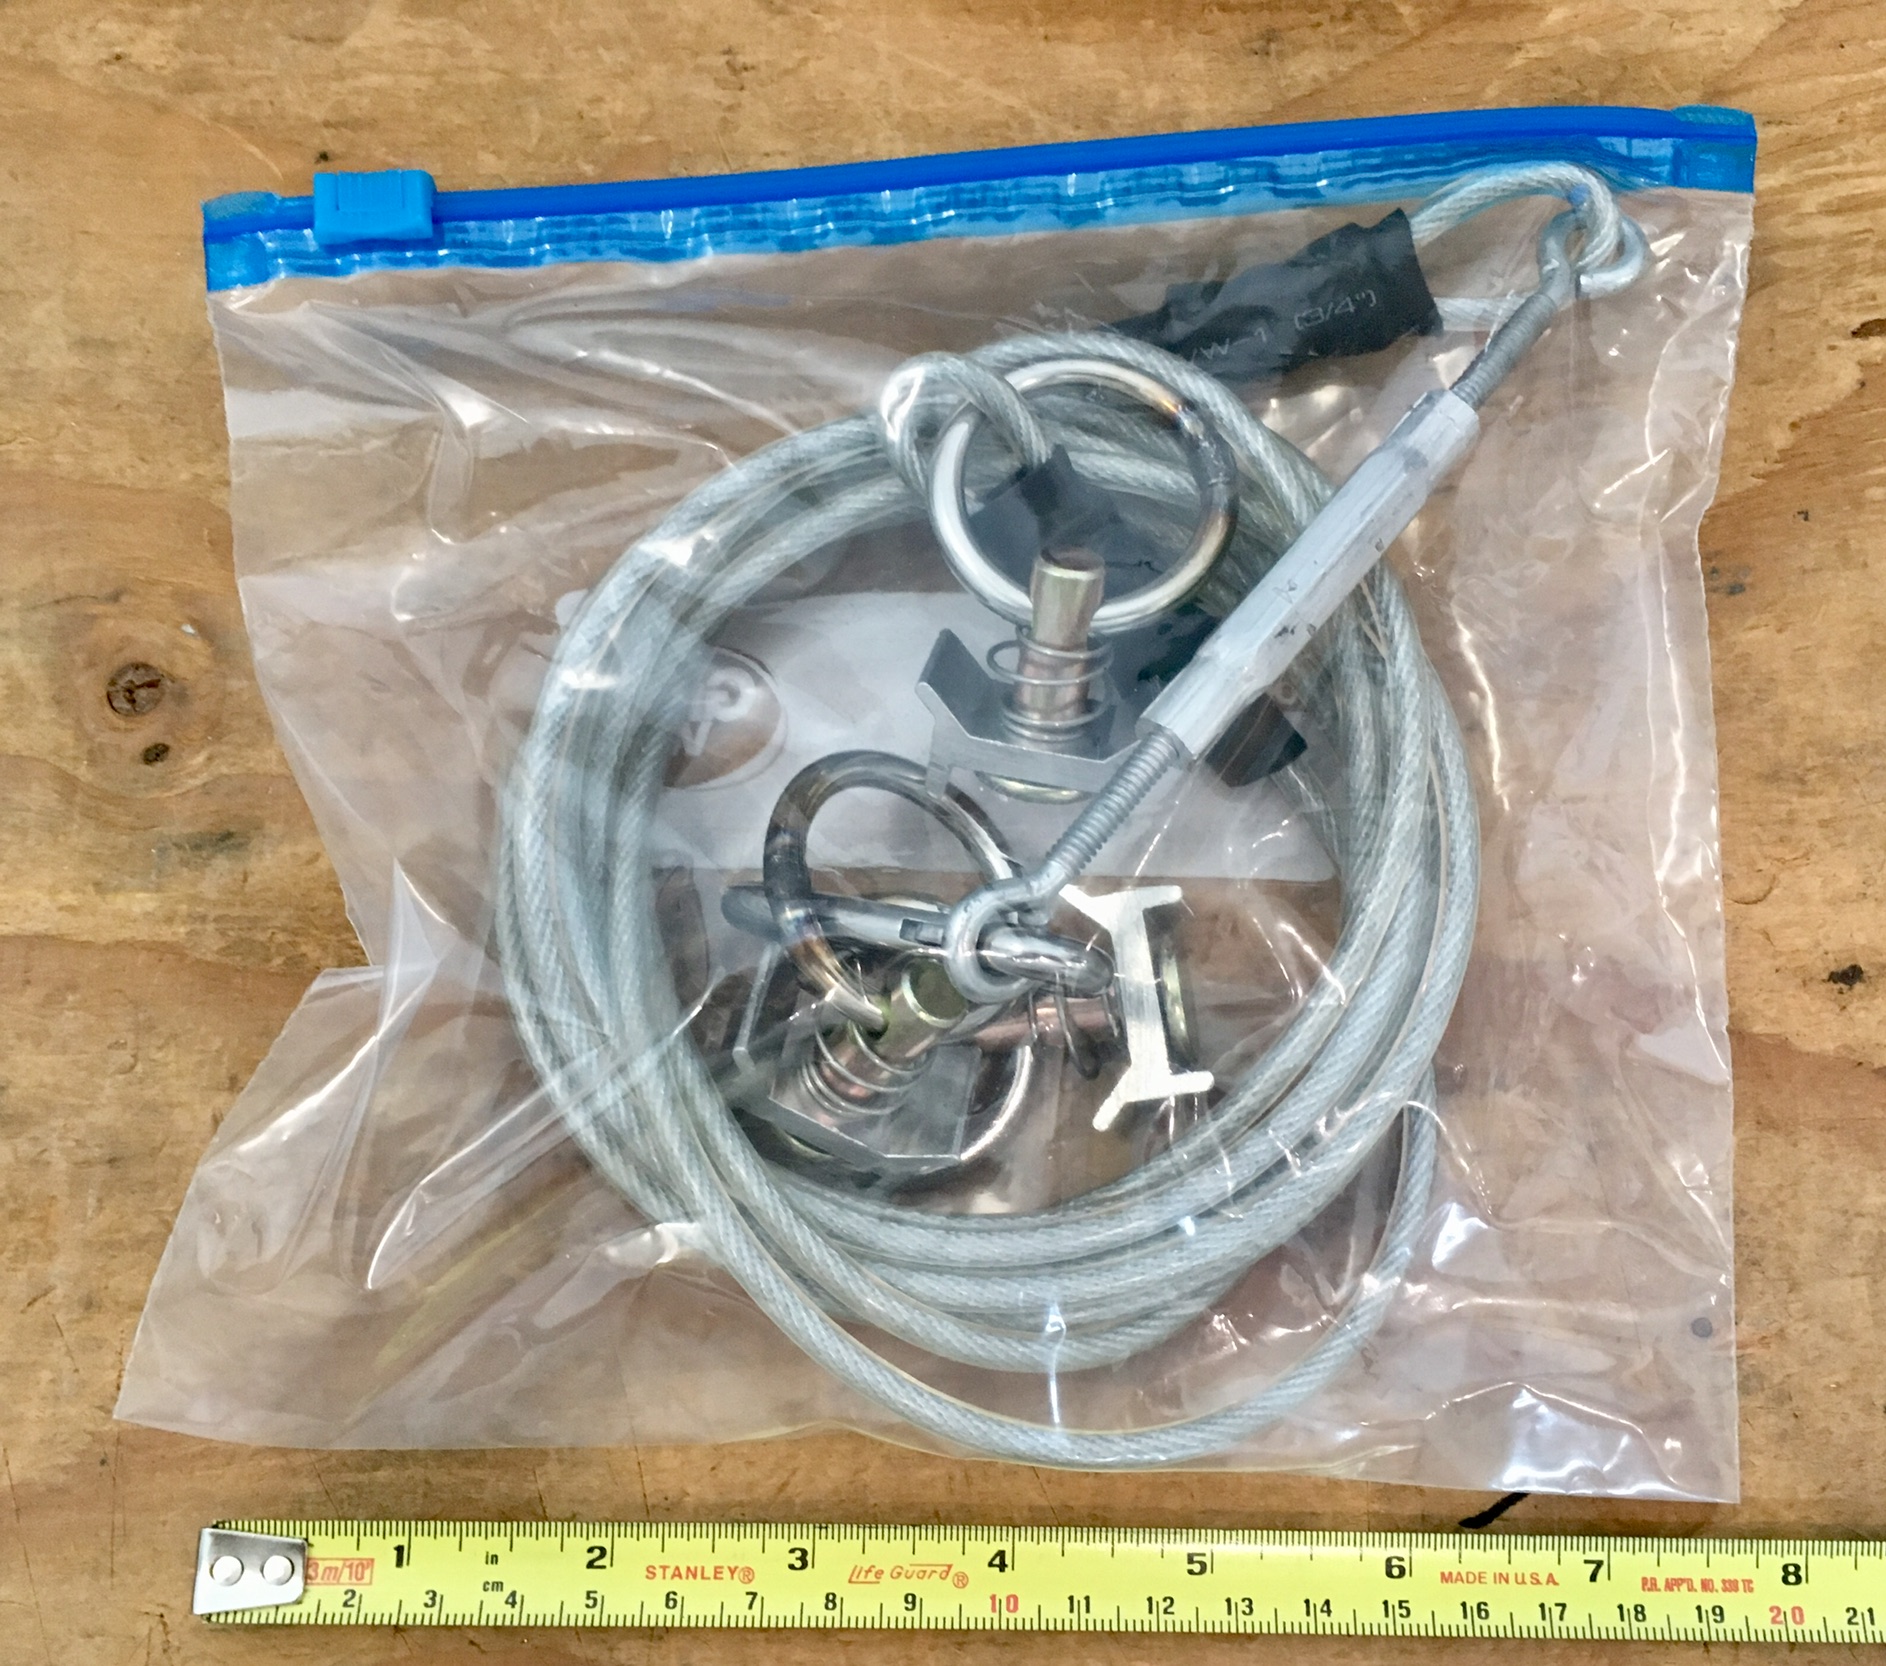
HOW TO: Wire cable clothes line - full cabin length
John E Davies replied to John E Davies's topic in Ollie Modifications
How big is the rolled up cable, ready for storage? 1 quart zip bag..... The bases are noticeable, but they look OK. You could get them powder coated white, but the finish would probably not last very long. Chrome plating would make them match the rest of the trim and would be very durable. John Davies Spokane WA
-
It happens countless times on roads across America: a vehicle gets a flat tire, usually just a temporary inconvenience. But on one road near Redding, California, when a tire failed last month on a trailer and its rim scraped the asphalt, the result was catastrophic for an entire region. The sparks that shot out July 23 from that minor incident, California fire officials said, ignited what is now the sixth-most destructive wildfire in state history. The Carr Fire blazed a fiery path along Highway 299, lighting up mile after mile of dry brush as it crept up on residential areas. The blaze turned everything it touched into ash, mangled metal and black embers, and is still burning nearly two weeks later. It's killed seven people, scorched more than 145,000 acres and is the deadliest of 17 blazes racing through the state. https://www.cnn.com/2018/08/04/us/carr-fire-week-wrap/ This will not happen with aluminum wheels - they will not spark - but it demonstrates why a TPMS system is so valuable. Can you imagine how the clueless owner of that trailer feels, knowing he caused all that death and destruction? I think TPMS should be mandatory equipment on every new trailer sold. John Davies Spokane WA
-
It might be prudent to put a tall jackstand under the coupler. I do that routinely, even if just for a week.... mostly as a visual reminder to not whack my shin on the end of it! If it will be outside, stored half a year, you should probably also support the subframe to take the load off the suspension and tires. For a shorter time this is unnecessary. Stands are a good visual theft deterrent. You can remove the three jack fuses in the left rear electronics bay too, to make them inoperative. John Davies Spokane WA
-
The port was done by the factory. I wish they had used a full sized opening instead of this smaller one, and had positioned it further back. It is too hard to reach through to do any maintence, I check inside every now and then for a quick look at the faucet connections. Thanks for the kind comment. John Davies Spokane WA