John E Davies
-
Posts
5,759 -
Joined
-
Last visited
-
Days Won
243
Everything posted by John E Davies
-

Inside Closet Door Material?
John E Davies replied to Steve-Gwenne's topic in Mechanical & Technical Tips
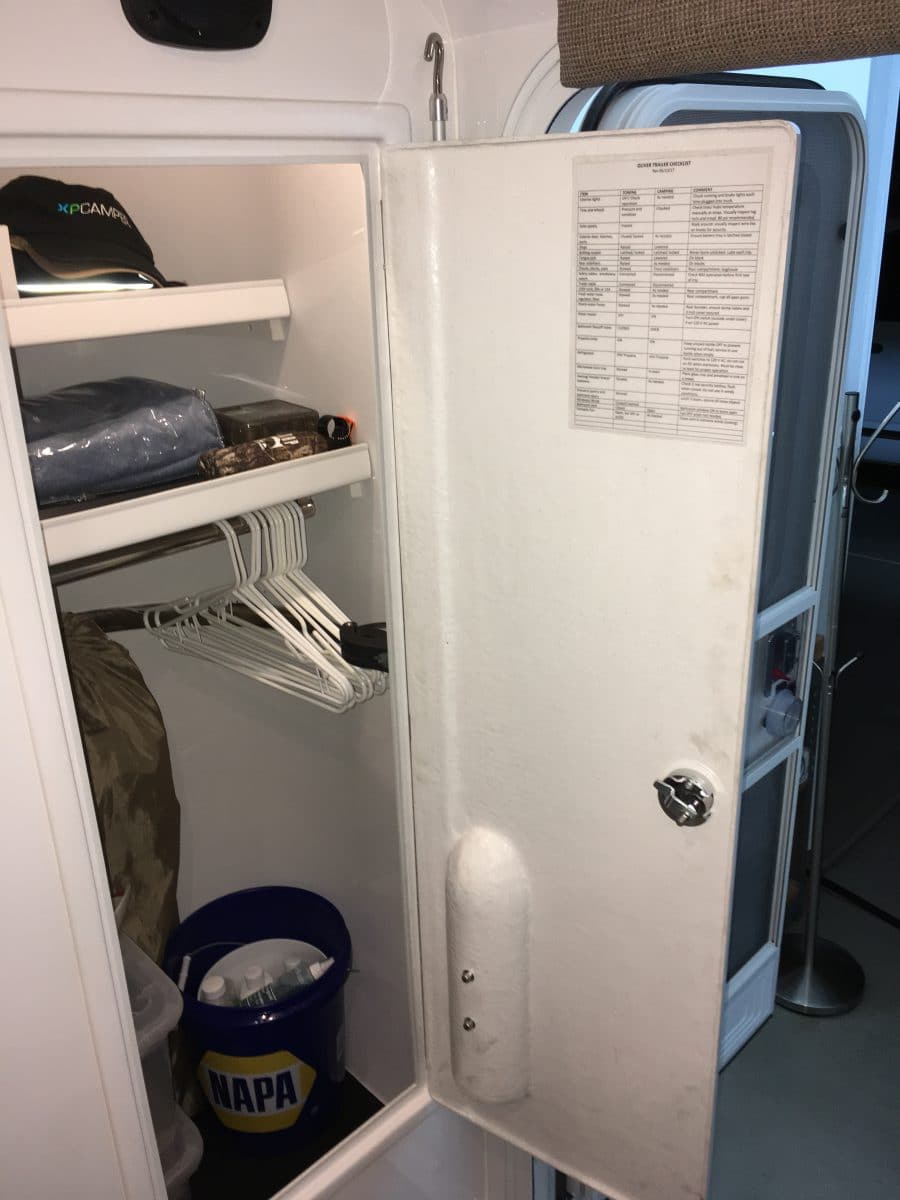
I personally would be very reluctant to hang much inside the door. Anything heavy stresses the hinge and latch in ways for which they were not designed, and anything bulky like a coat will seriously be in the way when you are accessing the inside. Plus you could bonk your face on the hook when leaning down.... The only thing I hung inside mine was my personal checklist. Not shown in the pic, I do have three 1 inch Command clips inside for my CaneMasters cane, the broom and the dust pan, stuck to the side walls.... plus there's my shotgun rack, which is currently and temporarily holding the leaf rake and the fly swatter. JohnDavies Spokane WA
-
Battery Charging Via Tow Vehicle
John E Davies replied to Maverick's topic in Mechanical & Technical Tips
I'm not sure of the location, but the Oliver diagram shows a 20A breaker in that circuit. The cable runs from there directly to the battery bank. But if the breaker were tripped you would not see any voltage at the seven pin connector with it unplugged. I suggest that you first disconnect the smaller positive cables and use a multimeter to figure out which one is going to the seven pin. Make sure the resistance is near zero. I suspect that there is a connection failure between plug and receptacle. For some reason that charge pin isn't making contact when you plug in.... You need to disassemble the trailer plug and perhaps the truck socket to see if there is an internal problem. It is really common for the truck parts to get corroded and fail, but that usually takes a few years and I would not expect it on your recent tuck. The ground especially is problematic, but usually you will see weird behavior in the trailer lighting. One quick test would be to borrow somebody's trailer. Ask if you could back up to and connect to a nearby rig, and see if your truck charges their batteries. They would have to turn off their converter or solar. That will tell you if the problem lies in your truck or in the Oliver. I am not sure how easy it would be to find a "guinea pig" trailer, but it wouldn't hurt to ask over a beer and some doughnuts.... I hope you understand that you will not get a bunch of amps from your truck through a teeny 12AWG wire, but if you drive for many hours it should be sufficient. Good luck. John Davies Spokane WA -
Closet retainers/ tie downs: suggestions needed
John E Davies replied to John E Davies's topic in Ollie Modifications
Those are cool but not suitable. I need to be able to secure various odd shaped stuff, not tubular shapes. I want to be able to stretch a bungee or two across to act as a barrier. John Davies Spokane WA -
How to: Install a big bubble level, no drilling
John E Davies replied to John E Davies's topic in Ollie Modifications
For those worried about future removal: https://solutions.3m.com/3MContentRetrievalAPI/BlobServlet?lmd=1257835586000&locale=en_IN&assetType=MMM_Image&assetId=1180621639953&blobAttribute=ImageFile Typically folks use dental floss or fishing monofilament, and use a sawing motion to shear through the foam. That's how you de-badge a car. There are countless videos showing how to do it. Or, if you live in ND you can wait for a chilly -40 degree F morning and shock it with a hammer and punch.... I prefer the first technique. John Davies Spokane WA -
I keep a couple of folding camp chairs in front of the closet, propped vertically against the wall, and I will soon be adding a cheap telescoping ladder for emergency roof use. The chairs always fall over and I am sure it will be more of a clutter with the ladder added. Any suggestions on ways to secure them upright against the front wall? I need something stronger than the stick-on plastic hooks. I am OK with drilling and putting screws into the inner wall, as long as I know the part is there forever. I do hate to make a mistake and then have leftover holes to deal with. Do any of you have tie downs? What's in your closet? It sure would be cool to have something adjustable..... I could use these but I am not sure of the load capacity: https://www.boundarywaterscatalog.com/whitewater-designs/dring-tie-down-kit-24943 A set of 2ft tracks mounted vertically could work, screwed directly into the glass....: http://www.macscustomtiedowns.com/product/versatie-track-kit-2-foot/VersaTie-Track-Kits Thanks, John Davies Spokane WA
-
It's back for me now, IOS. It was gone last night..... John Davies Spokane WA
-
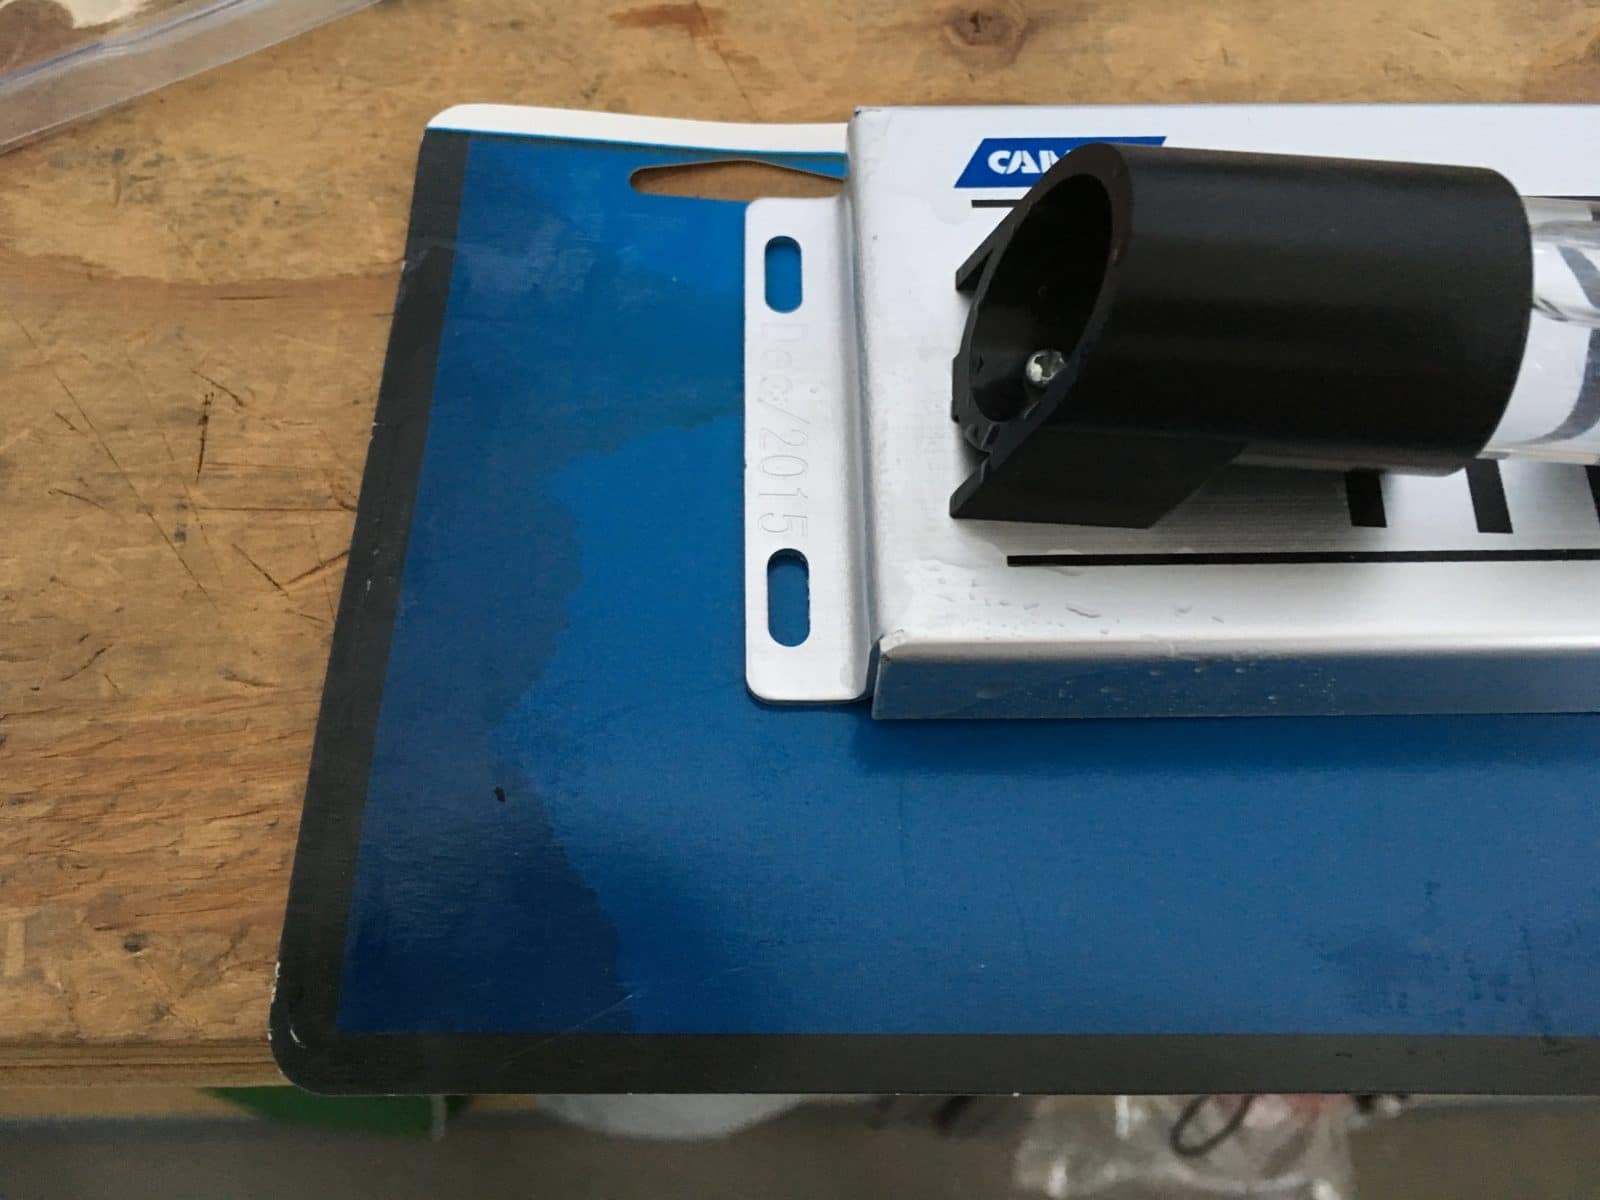
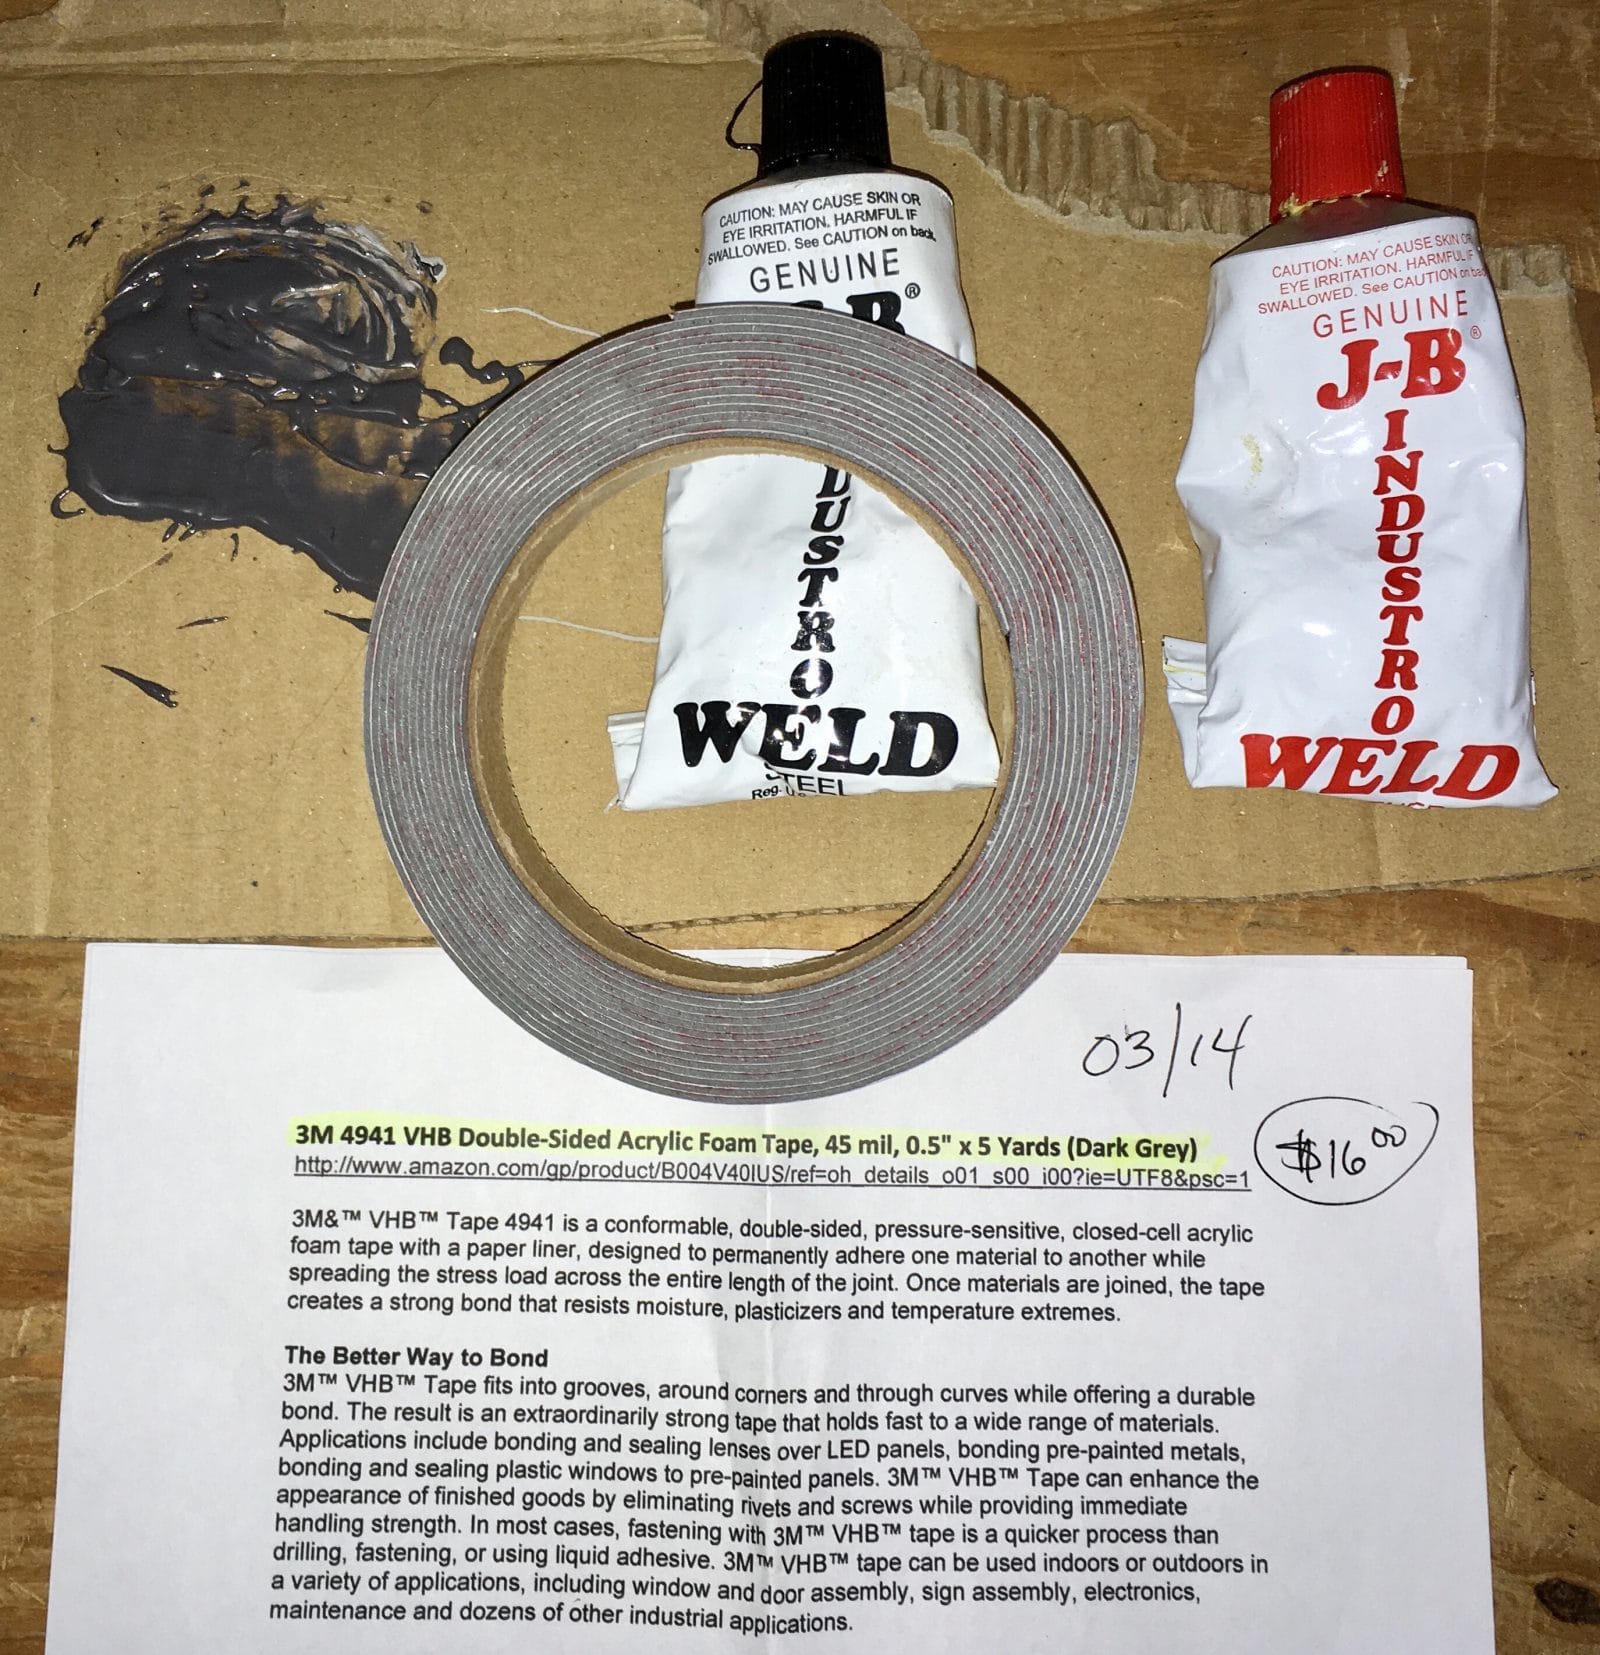
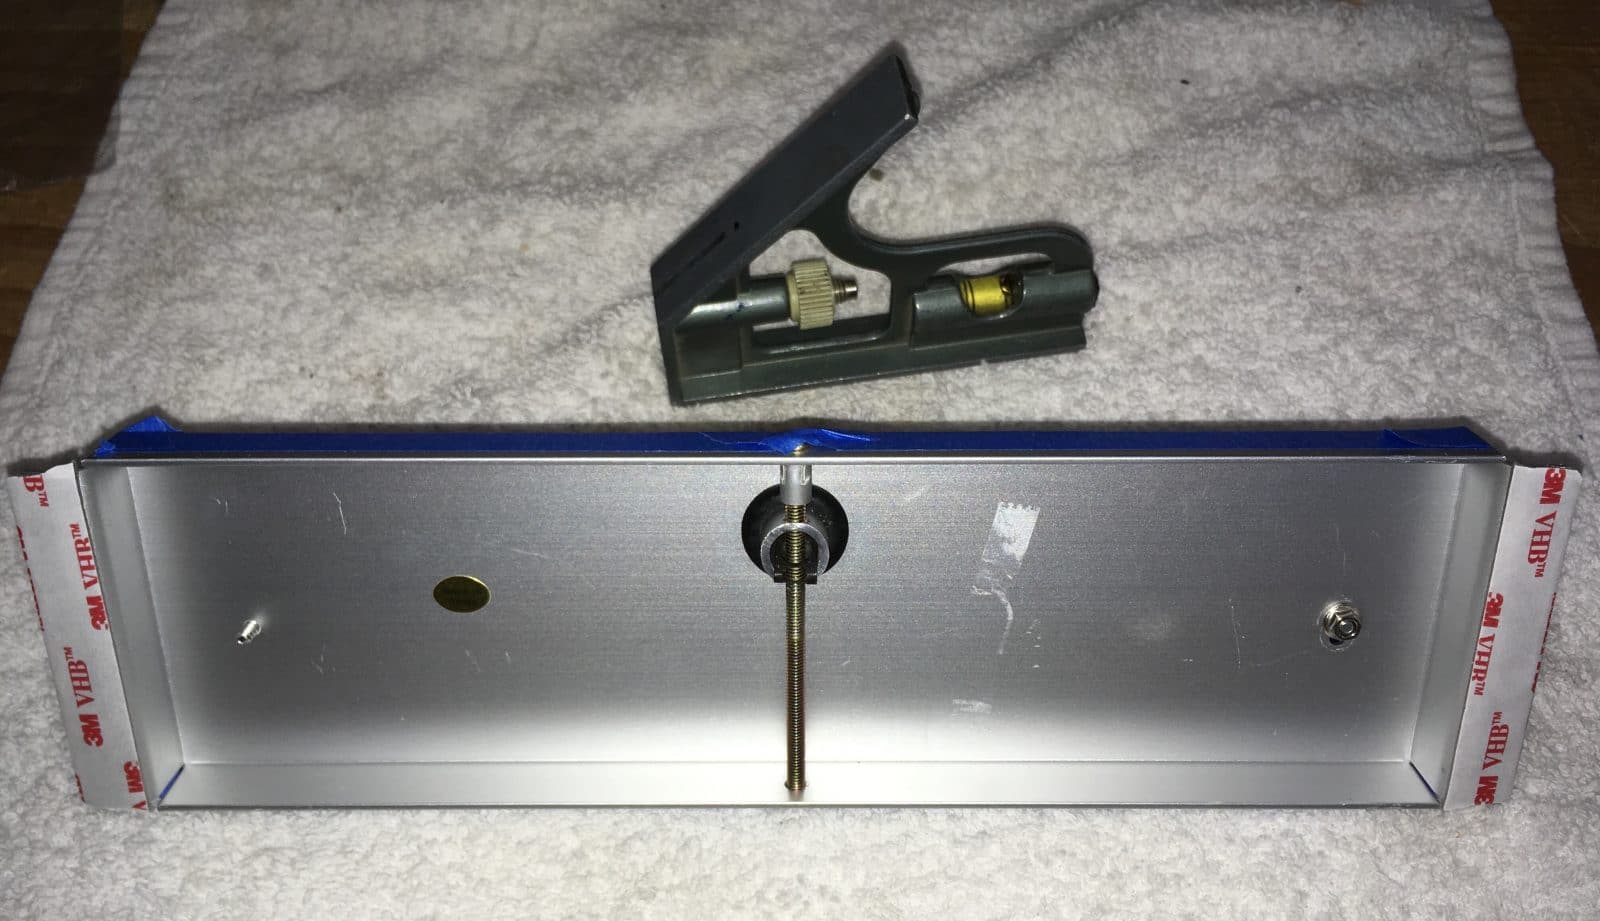
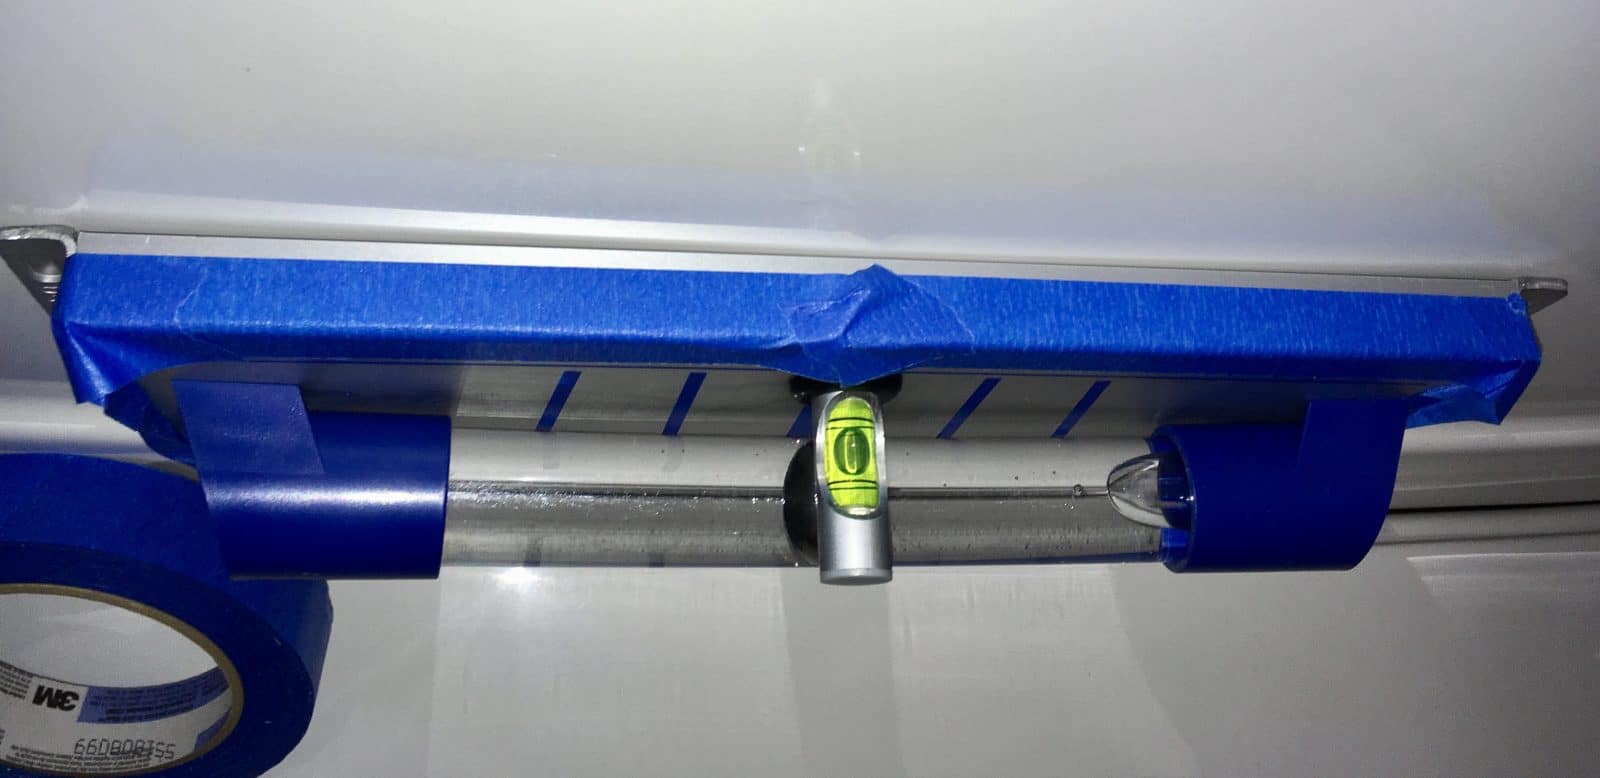
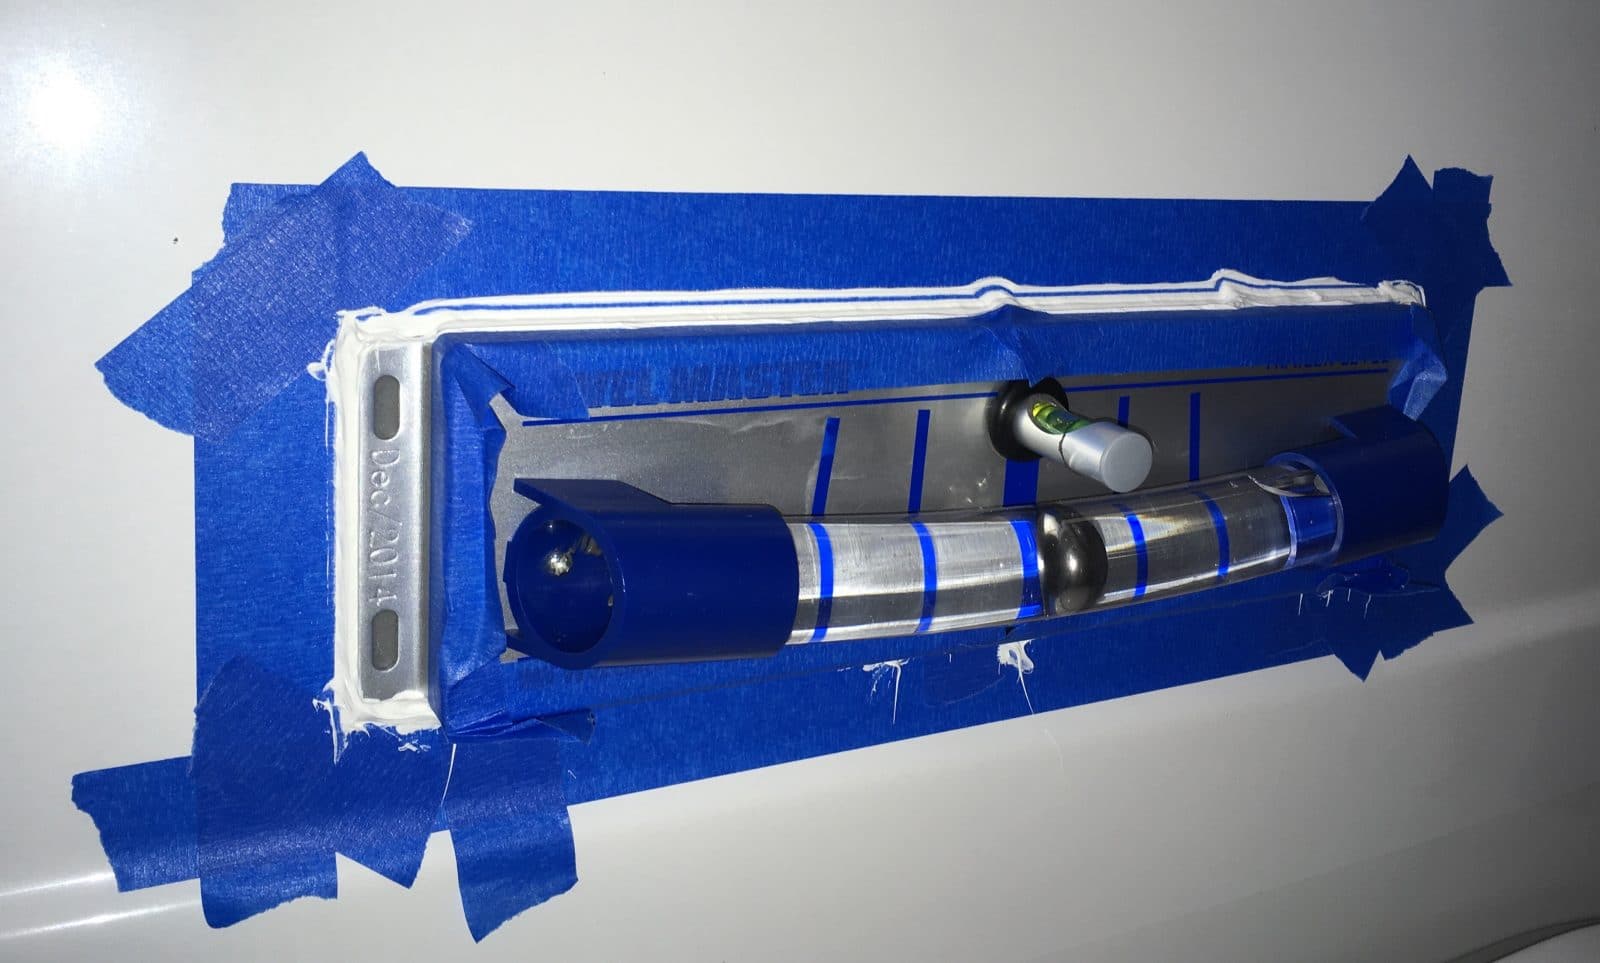
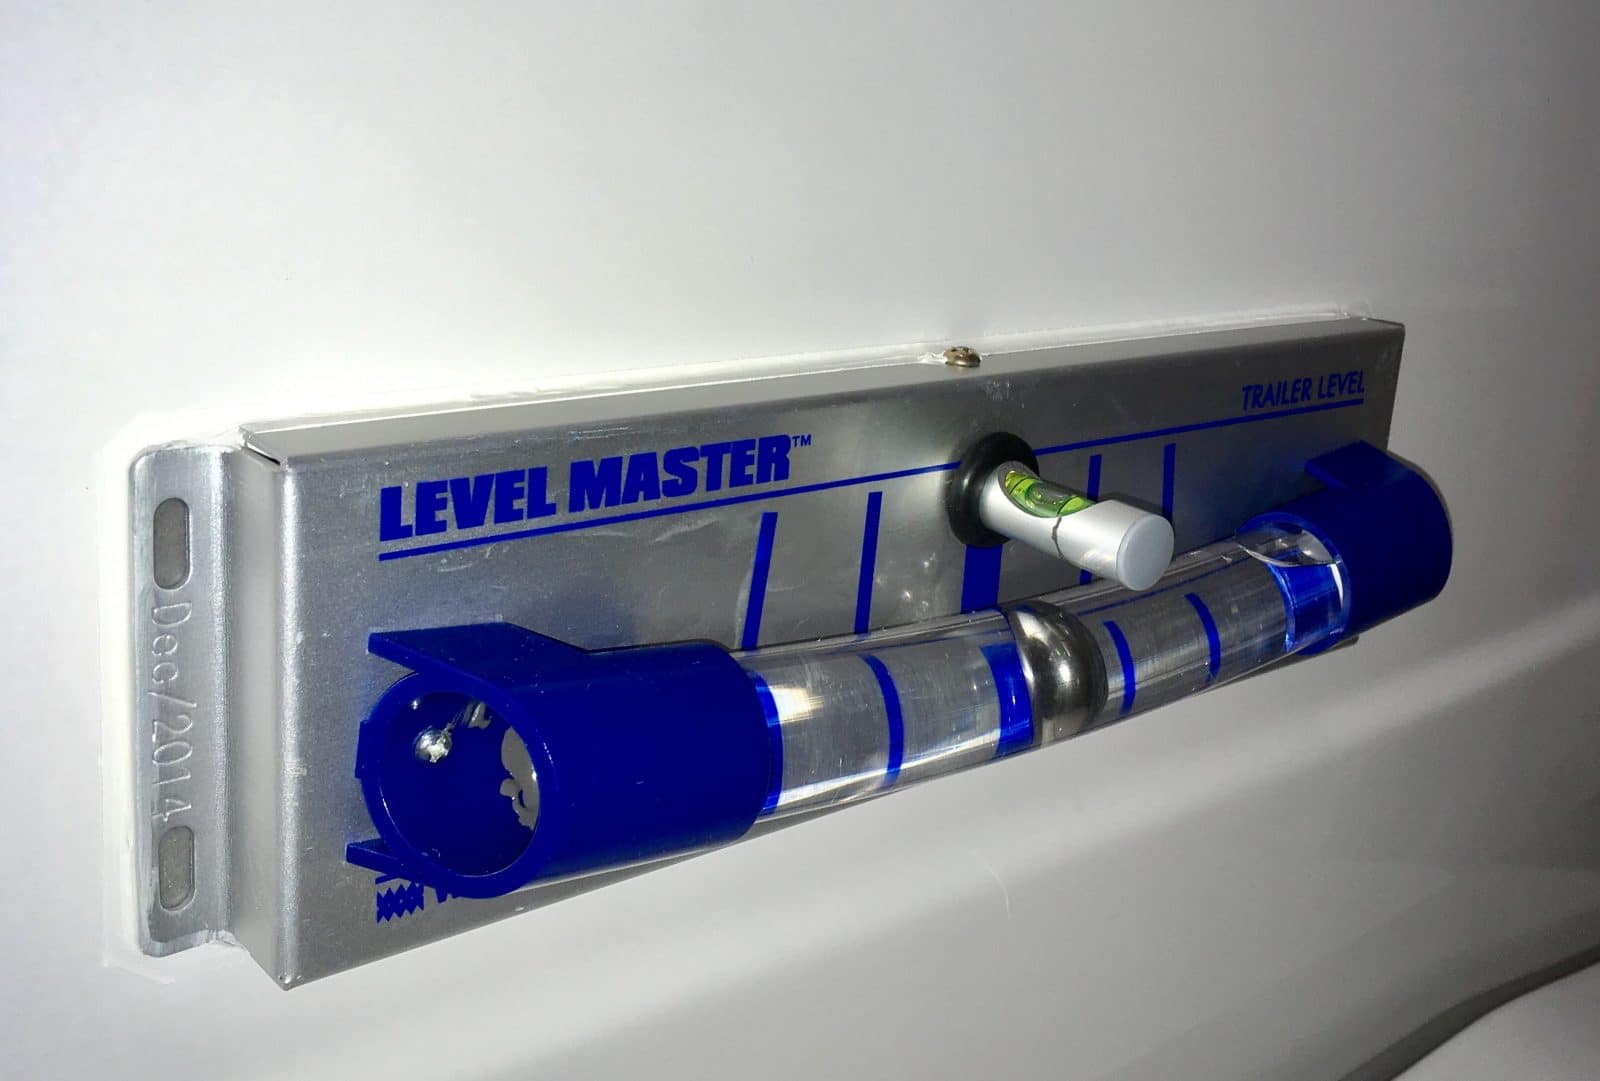
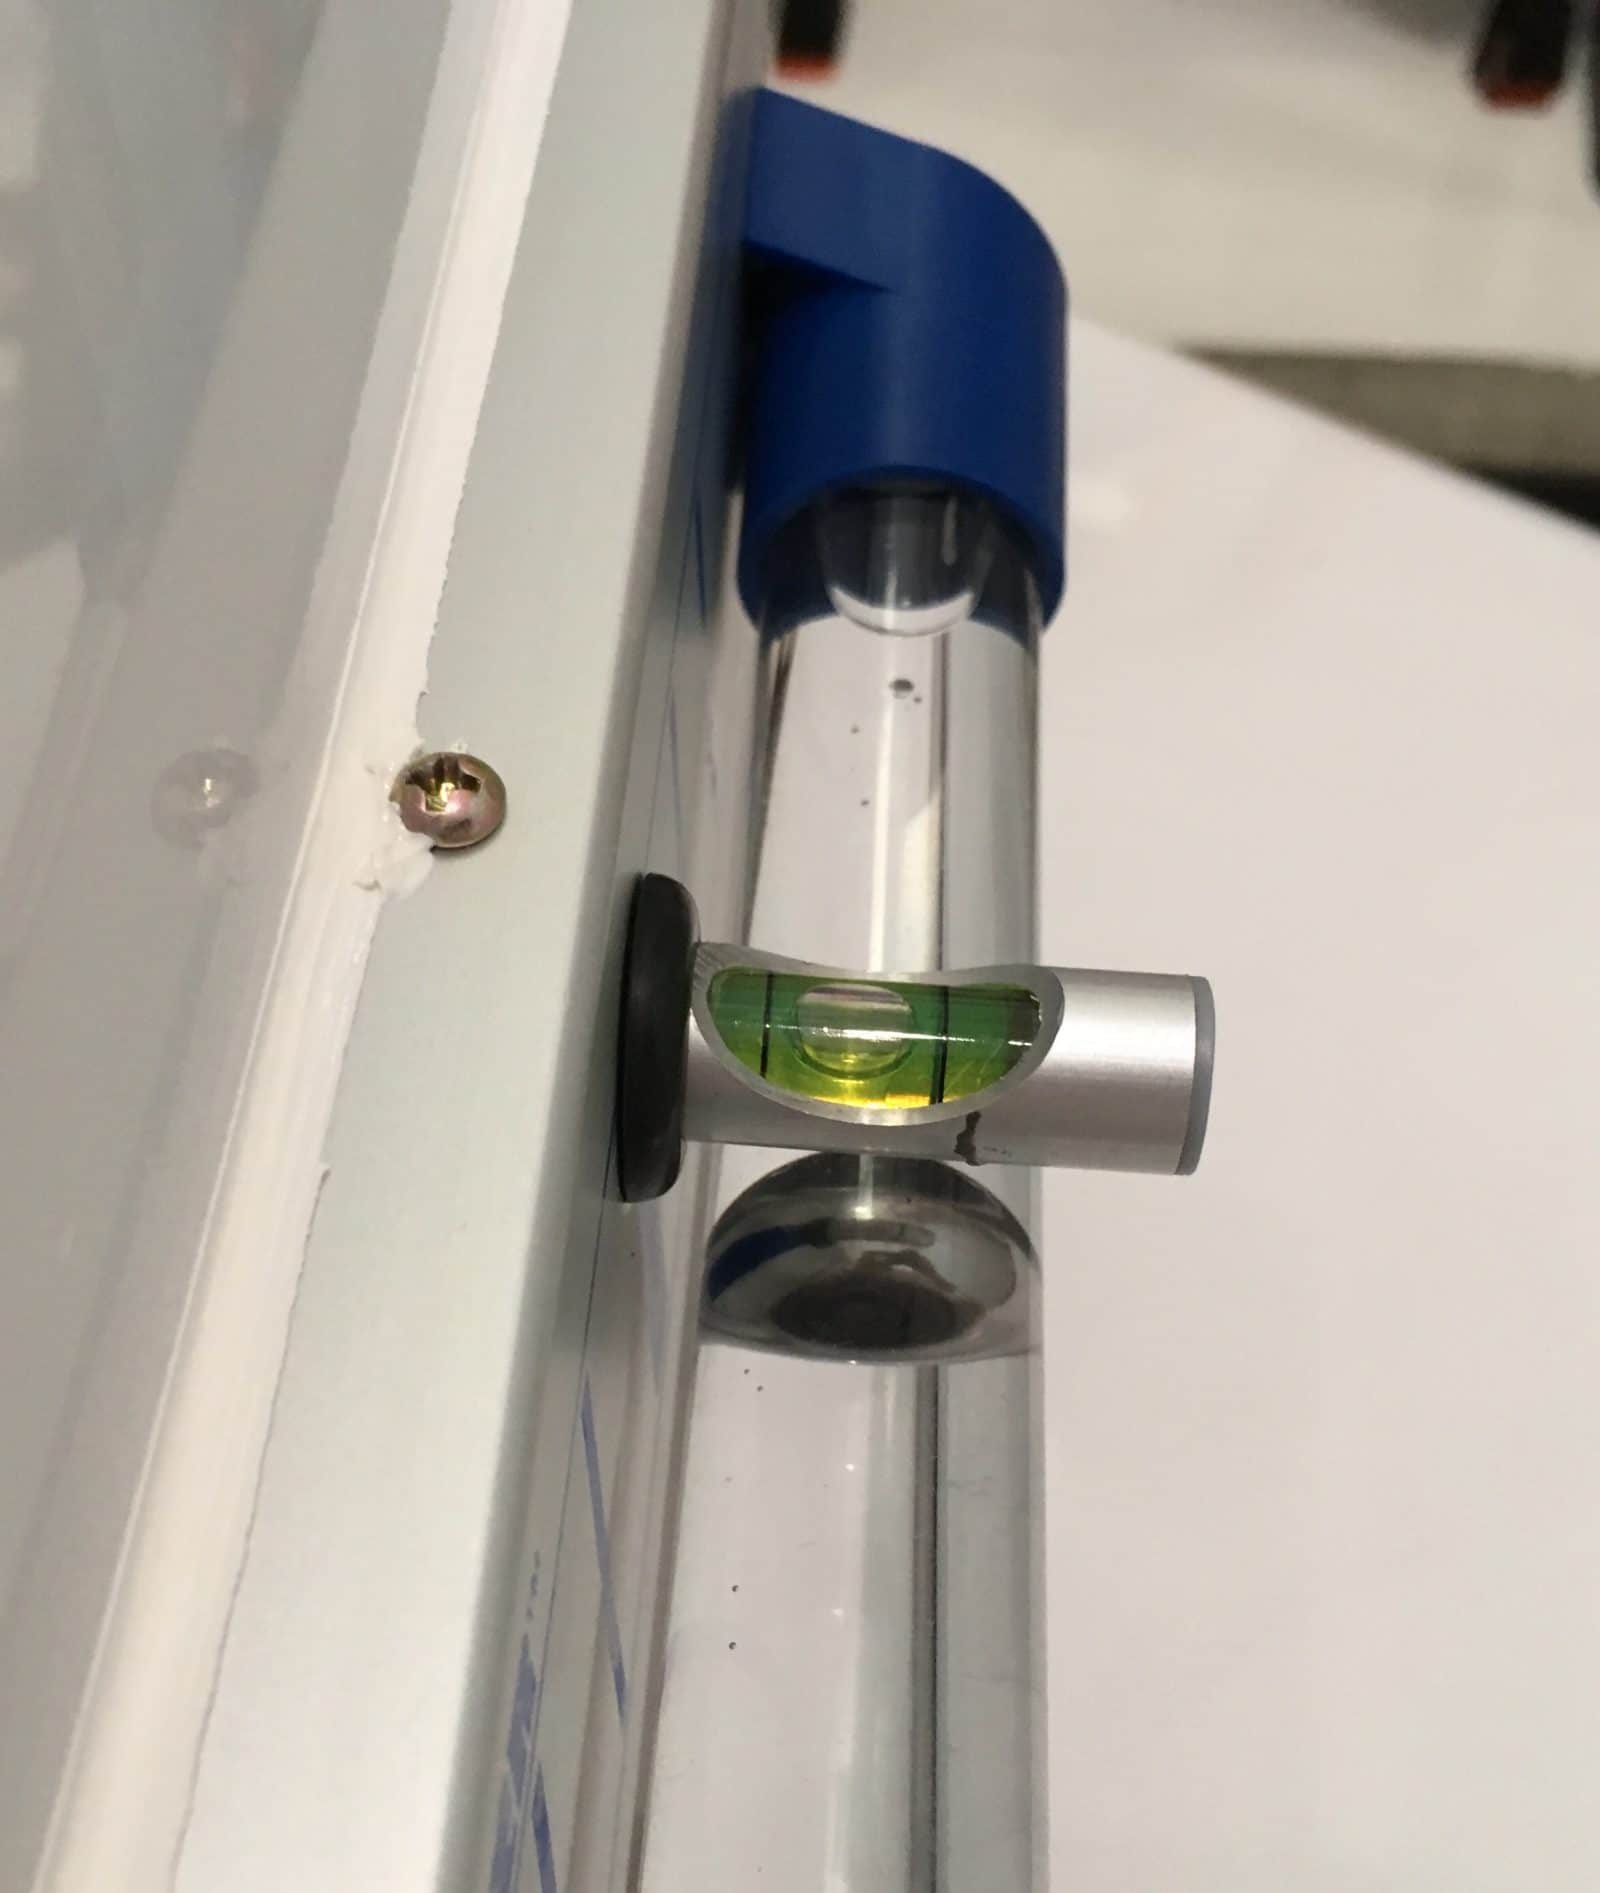
I originally wanted the Camco 25563 level because Amazon had it on sale for less than $15.... The one I received had leaked badly and there was oil all over the inside of the packaging, and the cardboard was soaked through: I arranged for a refund and another level through Amazon's painless return system. The next one I received had ALSO leaked, though not quite as badly. I returned that one and decided that maybe Camco was not a very good choice for this particular device. I went by the local RV Stealer parts department and found a similar model made by Level Master. It was $34, but it was not leaking, so I brought it home. After test fitting it where I wanted it to go, I pro-actively sealed the two ends where the factory plugs go, to prevent any future loss of fluid. Parts used: https://smile.amazon.com/Wheel-Masters-6700-Level-Master/dp/B000V55NB0/ref=sr_1_1?s=automotive&ie=UTF8&qid=1501042191&sr=1-1&keywords=level+master+trailer+level JB Weld (or any good two part epoxy) 3M 4941 VHB Very High Bond Acrylic Foam Tape 0.5" wide (used for securing automotive trim, very tenacious!) White Marine Silicone RTV Adhesive Sealant, UV stabilized. Not regular silicone sealer. The "Adhesive" part of the description is important! Masking tape and assorted measuring stuff Carpenters level I carefully secured the level vertically in a bench vise and added a thick layer of epoxy to cover the factory "plug" in the hollow tube. I let it kick off (two hours) and then did the other end: [attachment file="IMG_2792.jpg" There is no way that is going to leak, unless it gets hit with a bird or large rock..... Here is the back, showing the small bubble leveling screw. It has a hole at the bottom where it turns, this must not be covered with sealant on the final step. Also shown is the two strips of VHB tape. Alone they are probably not quite enough, but with the adhesive/ sealant added afterwards it will be plenty strong:: I cleaned the front of Mouse with isopropyl alcohol, and also the surfaces of the level. I used masking tape to find the center of the front wall. My choice for height is based on being able to see the level over stuff piled in the rear cargo area of my Land Cruiser, so it is an inch above the belt line. [attachment file=IMG_2794.jpg] I leveled the trailer left to right using the rear bumper, double checking the inside floor ... and carefully stuck on the level. Once pushed down firmly there is no removing the VHB, but if you lightly position it, you can readjust it. Once in the correct location, push and hold each side hard for 30 seconds. Now it is stuck hard! Detail showing that there is a gap all the way along, in spite of the curvature of the wall, thanks to the thickness of the VHB tape: Mask off the perimeter, leaving gaps on the bottom at each end and at the hole for the small level adjuster screw. The gaps are for moisture drainage: Inject the adhesive/ sealant into the cracks all around: Work it in smoothly by dragging your finger along it. Do not lick your finger! I am sure it tastes really bad: Carefully peel off the tape, do not let the sealant dry first. Mistakes can be wiped up with a dry paper towel: Make sure the trailer is level fore and aft and adjust the little level: Done: If the big ball is a little off center, you can adjust the entire tube a _small_ amount by loosening the left screw (looking at the front of the unit) and then gently tapping that end down or up with a screwdriver handle. The mount is slotted for that screw and the nut is serrated, so you can retighten the screw after and the nut will not turn. DO NOT LOOSEN THE SCREW MORE THAN A TINY AMOUNT, just enough to move the tube, or the nut back there may spin around and you won't be able to tighten the screw. Then you will say very bad words, indeed.... I will post more pics when I next tow Mouse. This should make it a lot quicker to get the side to side leveling done, from the driver's seat, by simply driving along until the ball is closest to dead center. John Davies Spokane WA
-
Not for me. Is there a way to let the viewer choose whether or not to have the bar there? John Davies Spokane WA
-
I can't say I miss it much - it really is too obtrusive when I use my phone - but it might be an indicator of other problems. John Davies Spokane WA
-
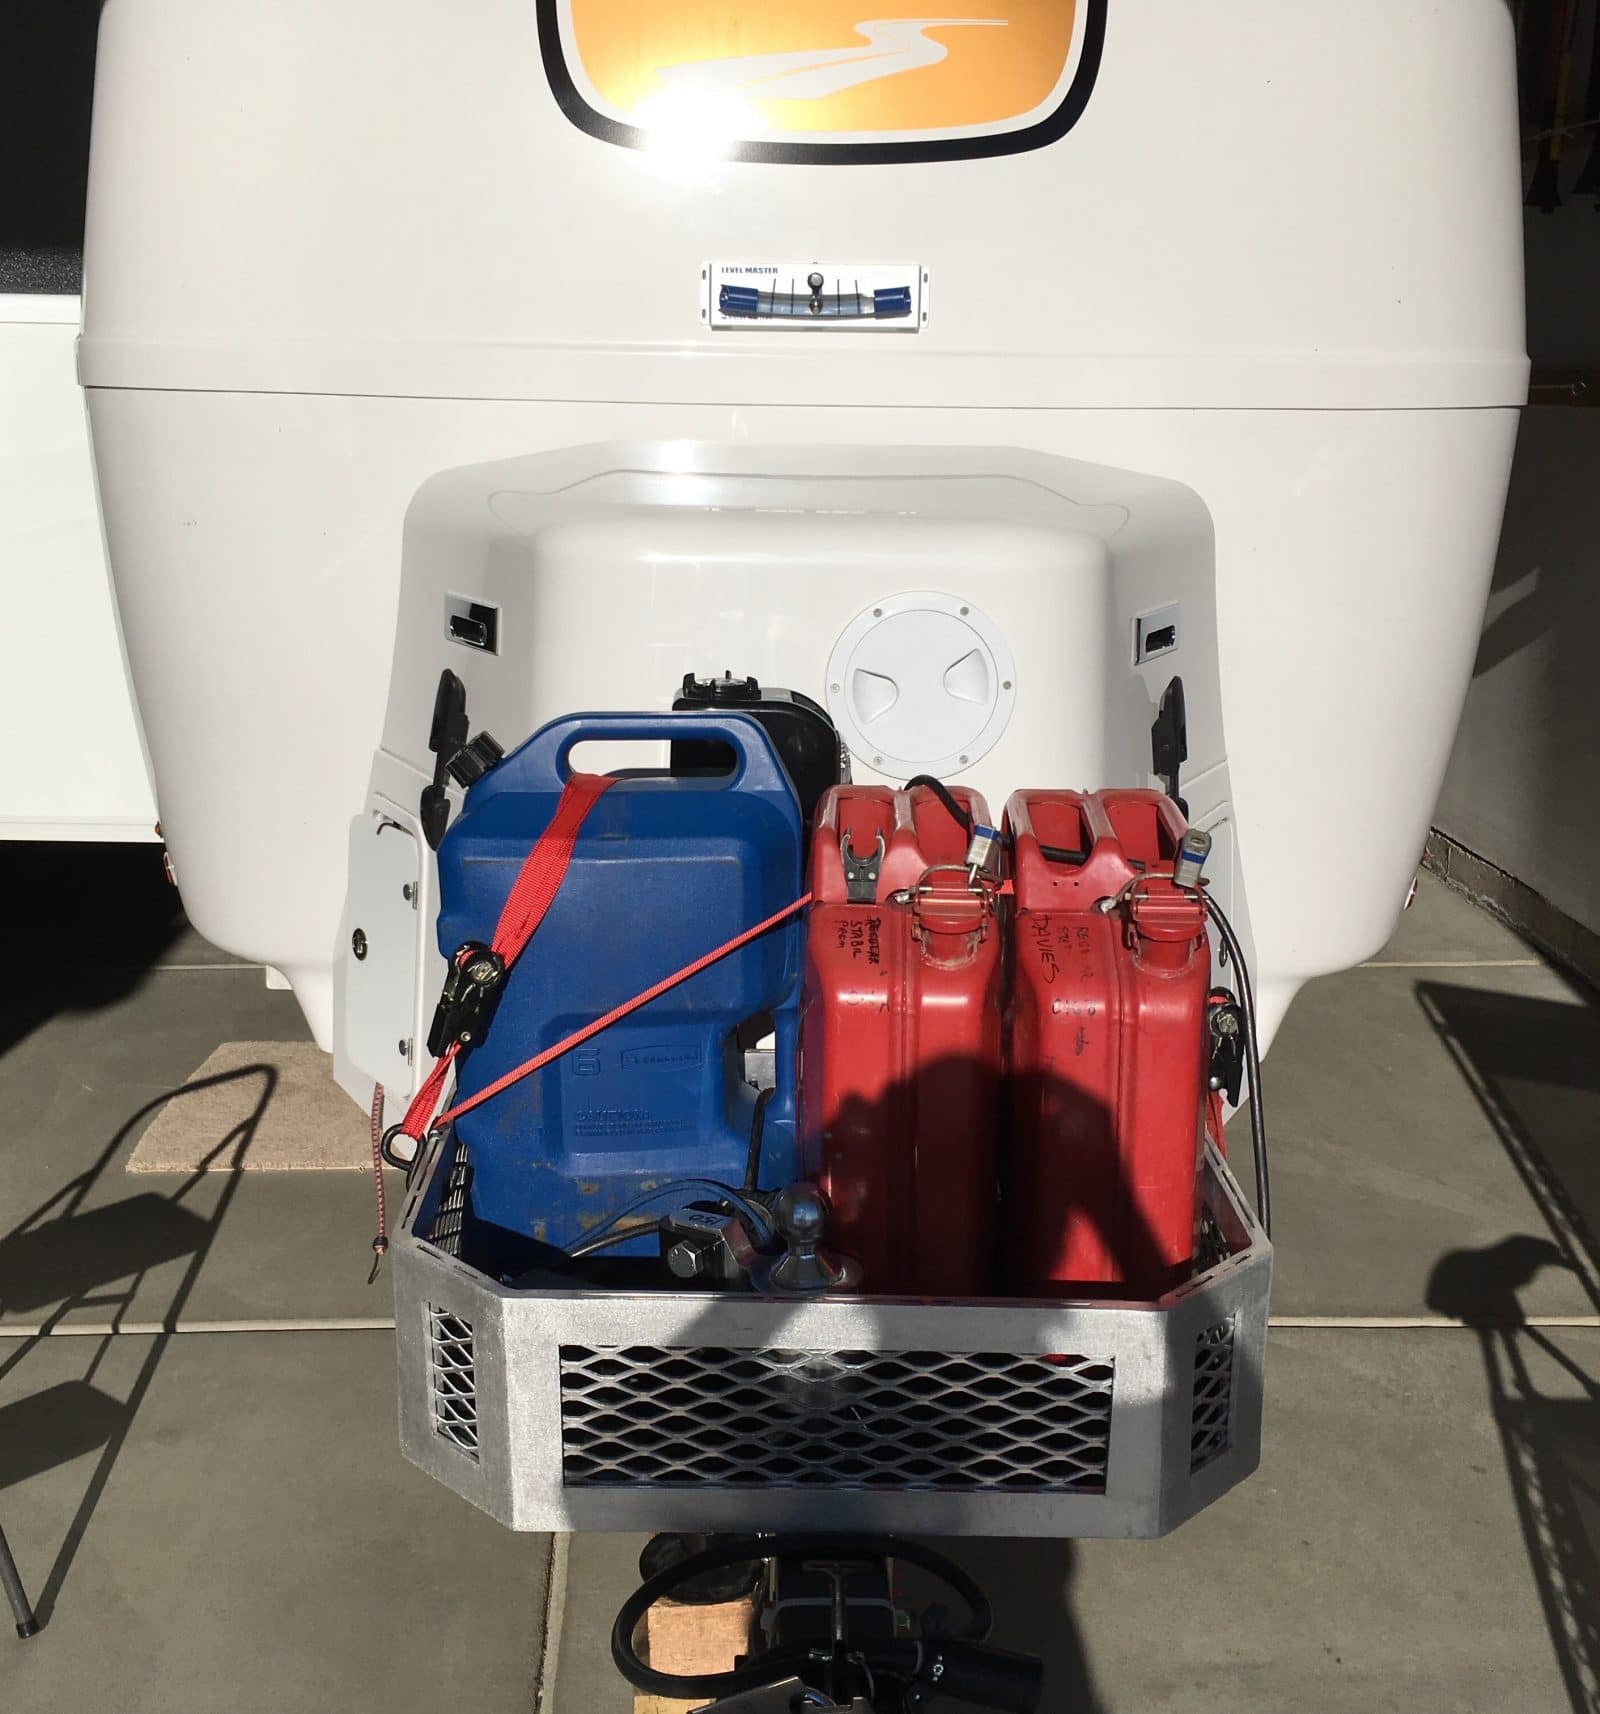
Yes, with three jerry cans (2 6-gal water, 1 5-gal gas) full, 720 lbs, with one gas can full 620. I don't know the weight of the Accessory Tray, perhaps 20 pounds? John Davies Spokane WA
-
Mine is not. I am wondering if they are supposed to be. It seems as if it would be a huge heat loss area. I'm wondering if I need to get mine swapped or not. Or just add insulation. I have AGMs so venting is not needed. Does anyone have a link for the type of outside panel insulation Oliver uses, in bulk quantity? Thanks for any comments. John Davies Spokane WA
-
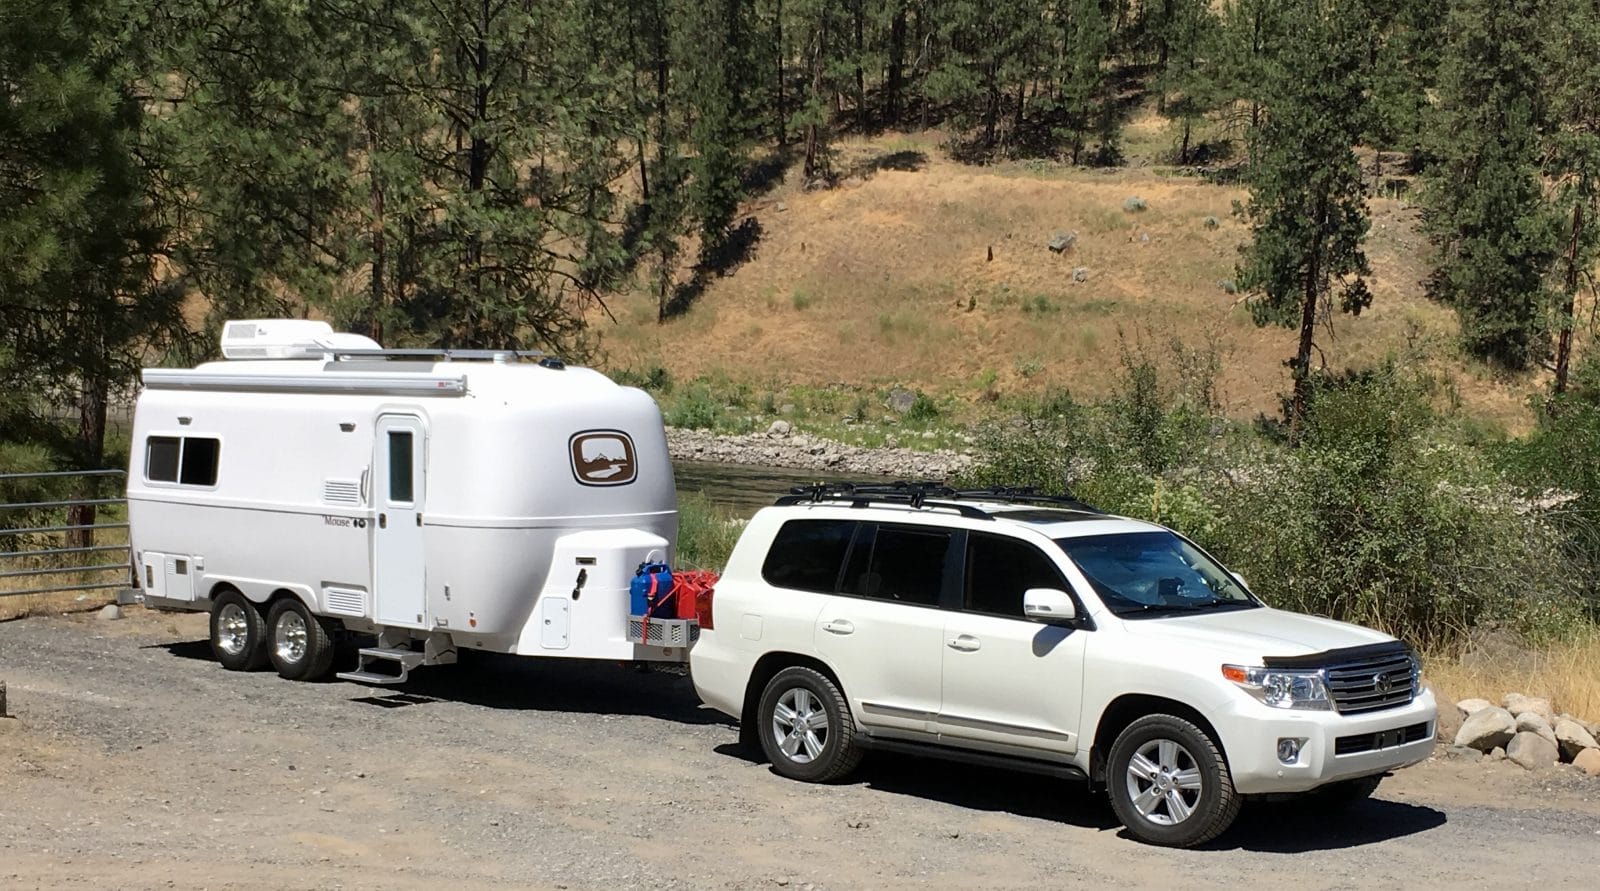
Things are looking good, we went on a short day trip and stopped at one of our favorite local Spokane River access/ picnic area, Long Lake Dam, 24 miles NW of downtown Spokane. I would have loved to stay overnight, but it is a Day Use only spot. The dogs got to swim, and we had a nice lunch and a short lie down. https://www.google.com/maps/place/Long+Lake+Dam,+Tumtum,+WA+99034/@47.8399277,-117.8387515,14z/data=!3m1!1e3!4m2!3m1!1s0x549e0a30cee417f1:0x5c02aea672151f6f?hl=en-us The Anderson hitch is working out well. The ride is a little stiffer than when not towing, but it is not objectionable, even on rough surfaces. The steering is much lighter than the Ram, and I need to pay closer attention, but it is not at all unsettled or darty. No signs of sway, whatsoever, and any up and down bouncing is dampened after just one oscillation. Cool. I am getting used to using the gears for steep climbs and descents. This has a high compression engine and axle ratios close to 4:1, but there isn't nearly as much engine braking as I had hoped for. It is not much better than my Cummins 5.9, and diesels are not known for their engine braking. Second gear is fine for steep descents below 50 mph. I had to drop to second for a couple of climbs. This was a "coulee" area with numerous rapid elevation changes. My wife hated the Ram, it left us both battered and weary in spite of the Corbeau Baja XRS suspension seats. This truck is so VERY much more satisfactory in terms of comfort. The fit and finish and interior refinement is stellar. I got 9.7 mpg towing at speeds up to 55 mph, mostly 35-45, not so good..... She's no diesel. But we both love her. Land Cruisers are luscious. That last pic clearly shows the fuel cans. Only one is normally full, and that is intended for the Yamaha generator, but if needed I can fill both jerry cans, and transfer up to ten gallons of gas to the Thirsty Cruiser using a cool syphon pump I bought for that purpose. Because I can easily raise the tray pretty high with the power jack (coupler disconnected), I can get enough height to maintain a natural syphon clear to the bottom of the cans, either into the Cruiser, or into the generator if it is on the ground. The plan is to be able to top off the truck at a campground, and then go exploring. The alternative is either a VERY expensive aux tank installation, or an aftermarket rear bumper with fuel can racks. But I would rather use this method, if it works as planned. I hate carrying fuel in or on a truck, and I am hoping to keep it as close to stock as possible. Modding is such a money pit, and you never get a return on your investment. I do plan to mod the Olliver's tray, though, by adding aircraft tie down rails and adjustable rings, from Mac's Custom Tie Downs. Hooking my ratchet straps through the wire mesh sides is unsatisfactory, and temporary. Pics will follow when I get to try it out. John Davies Spokane WA
-
This is all very cool Reed, I cannot wait to do this, but there is still the issue of the special tool for installing the fitting. Any comments about that? I suppose I could just buy one and rent it to Ollie owners for a few bucks.... shipping charges should be minimal since it probably would fit in a small USPS flat rate box. Though I think the factory should step in here. John Davies Spokane WA
-
Shureflo water pump not working!
John E Davies replied to routlaw's topic in Mechanical & Technical Tips
You won't see a spark unless current is actually flowing. Even in a functioning circuit, if the pump switch was turned off, there would be no spark. It's best just to check voltage at the water pump connector, and if there is none, go to the switch and figure out where the open circuit is. If you have voltage and a good ground at the pump, check the resistance through the motor. If that is open, the pump is bad. If everything checks, whack the pump with a mallet.... Good luck, and please post a followup about the fix. John Davies Spojane WA -
Shureflo water pump not working!
John E Davies replied to routlaw's topic in Mechanical & Technical Tips
Swap a known good fuse to see if that fixes it. Check to make sure the fuse is straight into the clips, and not loose or canted. I found the fridge fuse not making a connection because the two socket arms or prongs, that the fuse plugs into, were spread apart, probably from an amateur installation, not mine. It killed power to the fridge control panel so it would not function at all. If the arms are loose you can carefully squeeze them together with small needle nose pliers. Leave room for the fuse to go in. Be careful to not short anything out! You could wrap the ends with electrical tape, pray, or even disconnect your batteries. Your choice. I used bare pliers and did not create sparks. Check all the other fuses to see if they wiggle or if they are simply loose. Tighten all as needed. This is not what you would call a high quality fuse box, not like in a well built car. Now add fuses to your shopping list, and keep them handy in a spares kit. Be sure to buy ones for the jacks. John adavies Spokane WA -
Hi Reed, I am glad you like the Blayloch ramp, it was just too massive and awkward to store for me. I considered drilling lightening holes in the center but if you are using it long term in inclement or salty weather you should probably leave the chrome plating intact. I am waiting for my fresh water tank parts from Oliver. I do not mind doing this myself, since my contempt and distrust for RV shops goes beyond intense. I do have an appropriate router. But the spin weld tool worries me. Can I rent or borrow one? They are expensive and not worth buying for one use IMHO. Does anyone know where I could obtain one, for one use? Maybe the factory should provide them as loaners, with a deposit against damage or failure to return..... I do have a question. If you spin weld a fitting and mess it up, could you cut it off flush with its base, redrill the big hole and spin weld a replacement directly on top? Would the heat re-weld the old flange as well as the new? I am thinking about screw-ups and alternatives to replacing the entire tank! Keep up your great posts, I usually find them very interesting and informative. Thanks, John Davies Spokane WA
-
Thanks for the comments; I think you have me confused with someone else. I never post at Airstream and I never served, though I came _really_ close to being drafted to Viet Nam. I only have about 45 miles towing with the new Anderson setup. .... http://olivertraveltrailers.com/topic/how-to-anderson-weight-distributing-hitch-center-frame-location/ I hope to do some more towing this weekend and I have a couple of local trips coming up soon, and I will post comments and pics here. I think the 200 will do great but it is going to suck gas;( I need to learn to keep my foot out of it. I am used to my Cummins which had 50% more torque, at 1800 rpm. I also suspect that I will add Timbren bump stops to help with the slow speed pogoing when the chains are off, for example, negotiating a steep incline or rough forest road. Load limits: LOL Land Cruisers are so overbuilt due to their intended use (and abuse) that published load figures are "negotiable". The frame is fully boxed, unlike a Tundra, and 20% stronger. The steel in body and frame is high tensile and the build quality is the best in the world. If you have added heavy bumpers, winch, sliders, skid plates, bigger tires and a drawer system, plus you are towing, then you are definitely going to be way WAY over the load limit, for sure. This just means you need to install LT tires and stiffer suspension. Problem solved. Except for the resulting single digit fuel economy. I plan to keep my truck stock with the exception of the tires and sliders. The aftermarket has fully embraced the 200 series and you can spend $20K in parts and mods with a few mouse clicks. I have been down that road before with my 1996 LX450 and do not care to do so again.... https://oppositelock.kinja.com/why-the-toyota-land-cruiser-is-so-expensive-1715003811 John Davies Spokane WA
-
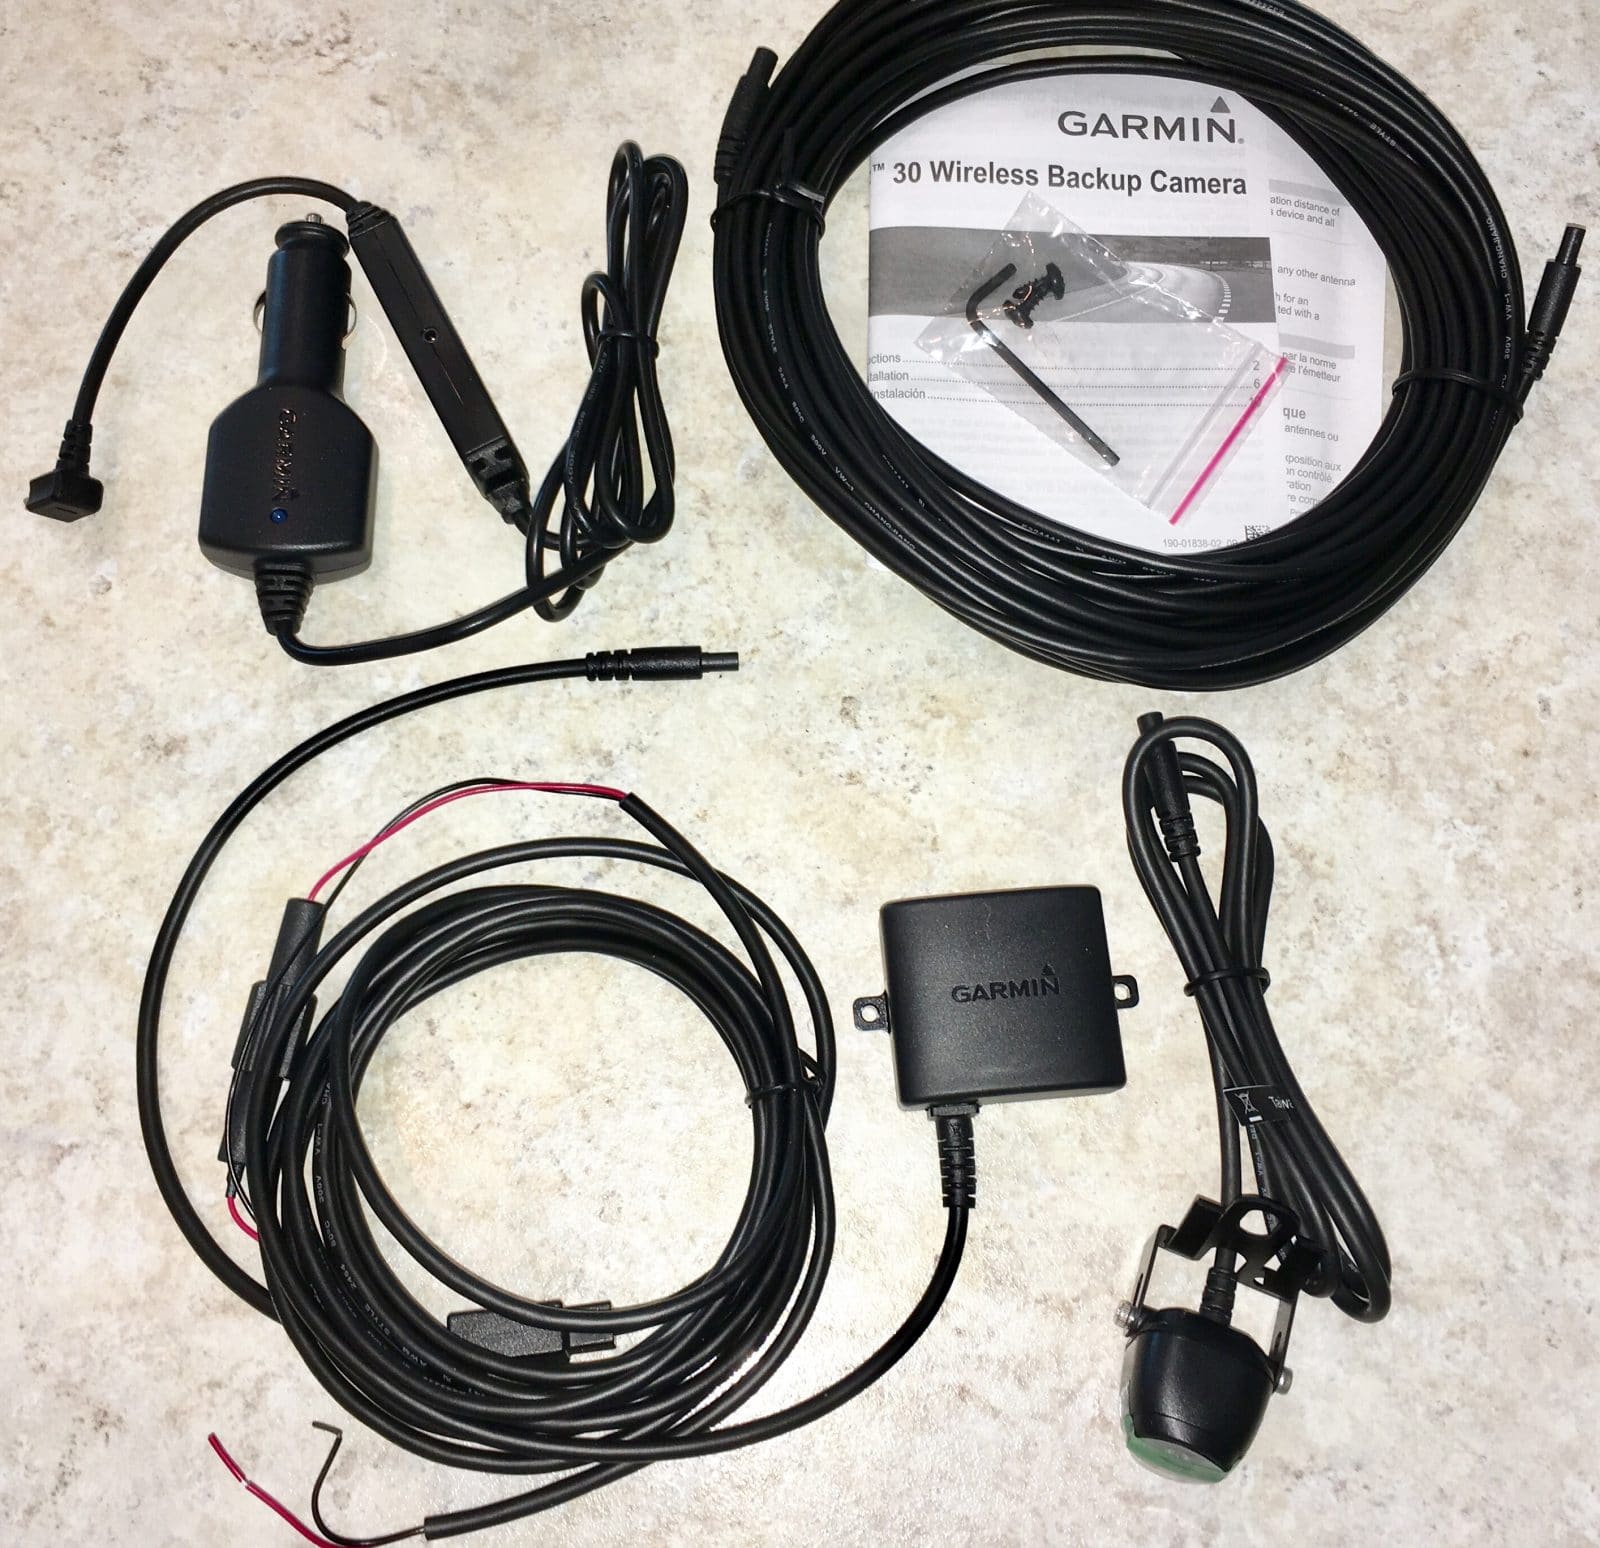
How to: Install a Garmin BC-30 backup camera
John E Davies replied to John E Davies's topic in Ollie Modifications
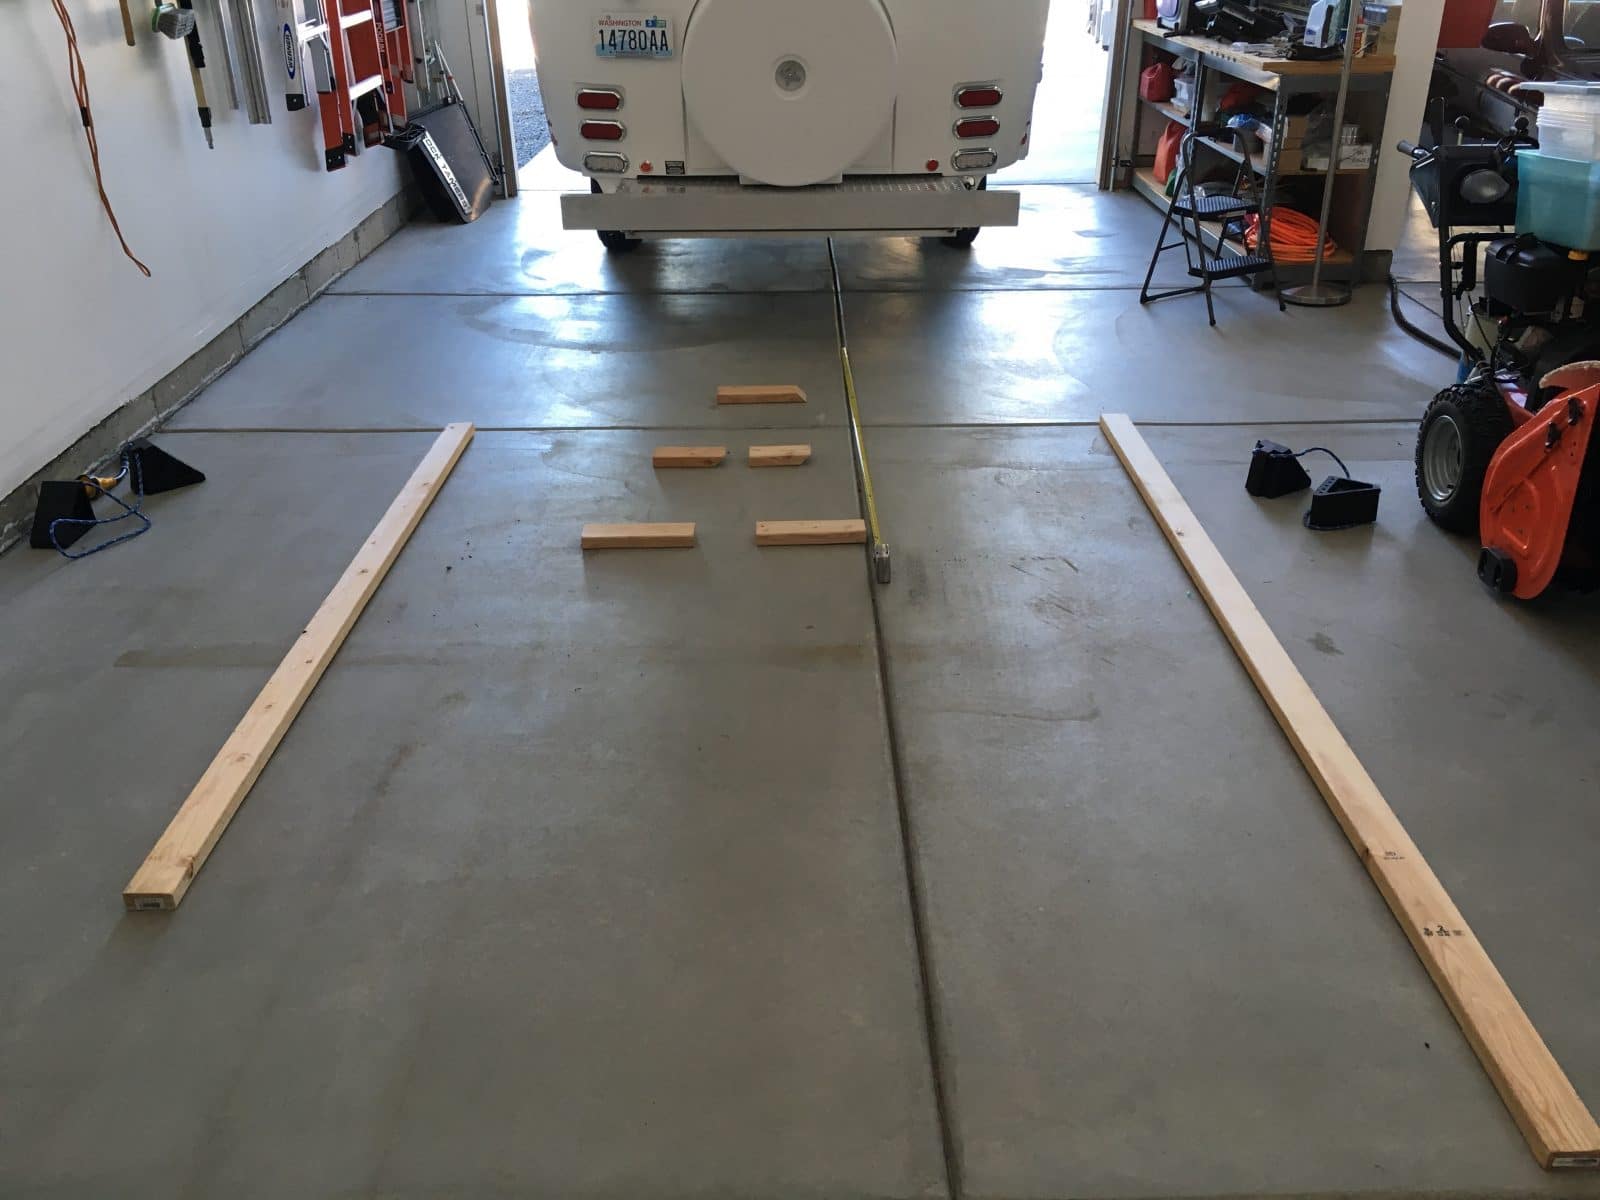
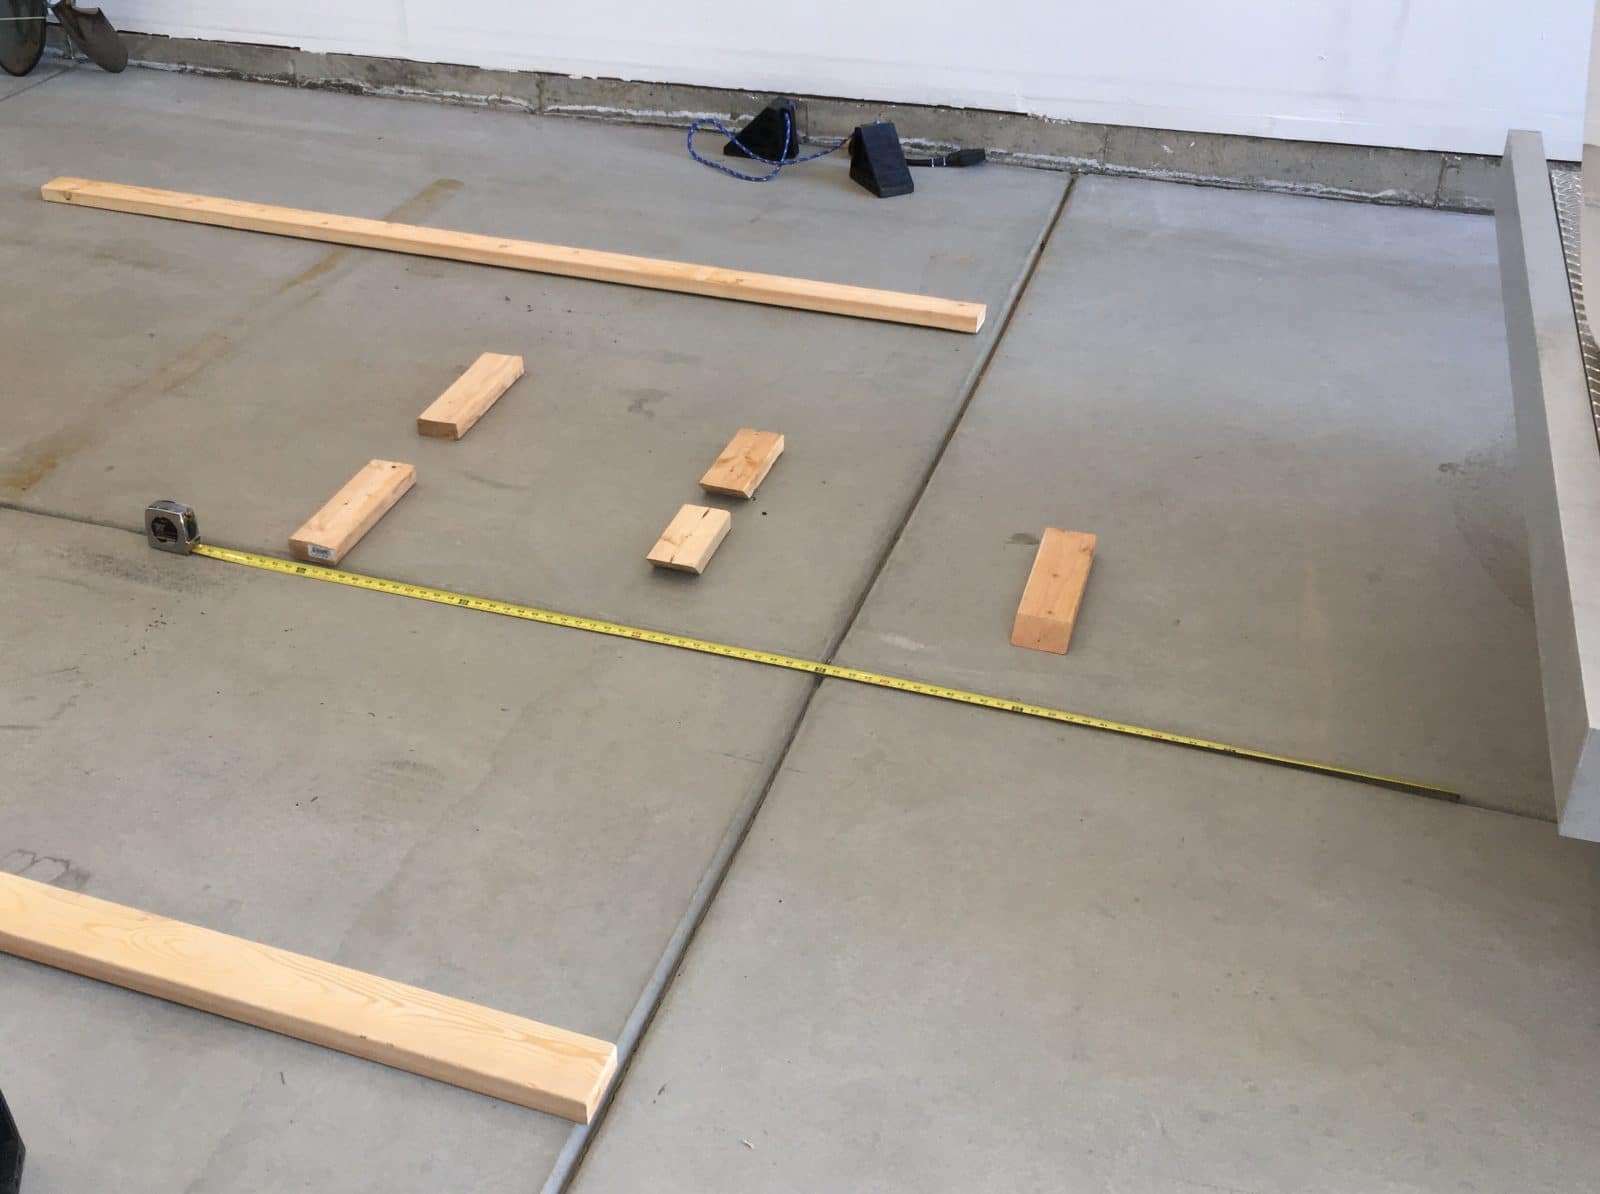
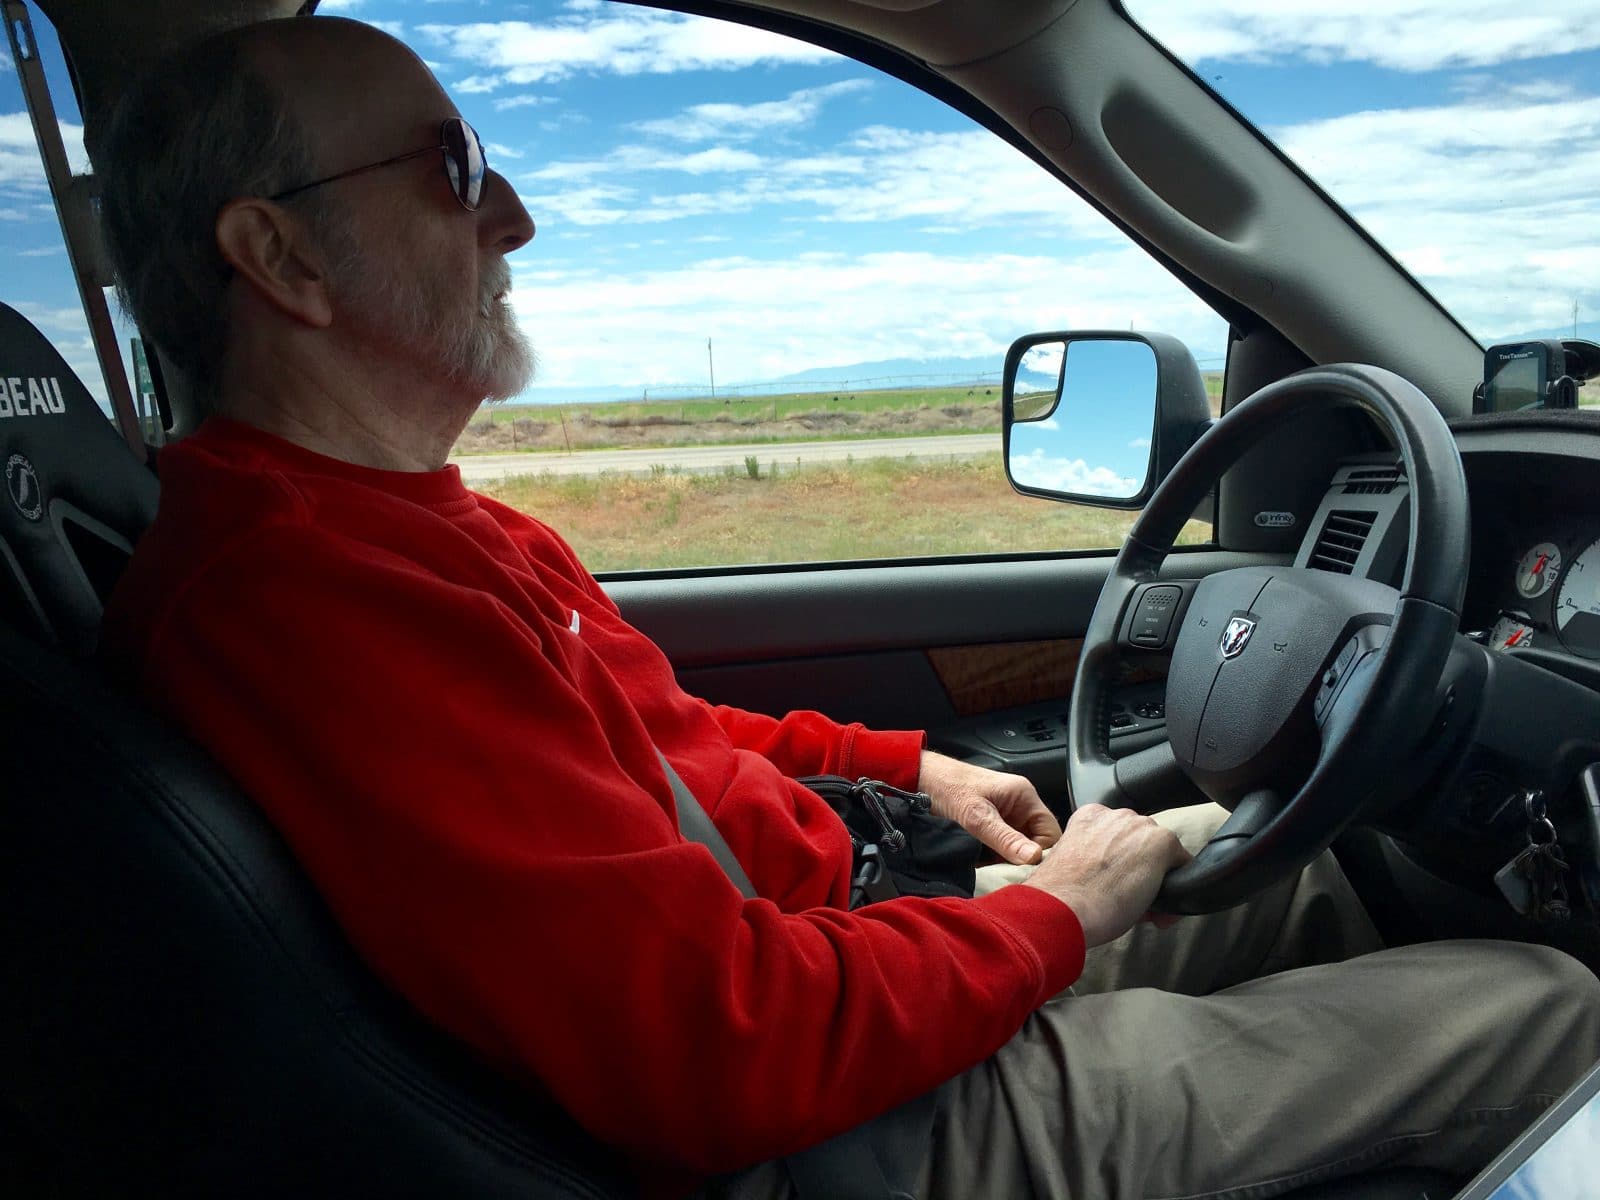
Adjusting the Garmin guide lines. The GPS is a RV660LMT. The onboard settings allow you to adjust the side guide lines, where the tires will go if backing straight, and also to adjust the three horizontal distance markers. Garmin tells you to go to a parking lot and maneuver, using the painted lines for guides, but I decided it was easier to bring the lines to the trailer than vice versa. I laid out lines using 2x4s, in line with the outside edge of the tire sidewalls. I just laid them down and moved them around after squinting along the trailer. I used a tape to ensure they were parallel: I then laid out horizontal reference boards at 2 ft, 4 ft and 6 ft from the rear bumper. Using the arrows on the Garmin Camera Setup screen, I aligned the side lines, and then the distance lines. There is no adjustment for the center line, but you can accurately align the top and bottom ones with the 6 ft and the 2 ft markers. It is quick and easy. Reposting an earlier pic: Last, I renamed the camera in the Garmin menu, to reference the distance markers. (This gps will accept up to four camera inputs.) Done. As mentioned before, the resolution is pretty bad but it is entirely usable. I do wish it were sharper. In traffic I keep the camera selected so I can see what cars are doing behind and to the sides. It really helps when planning lane changes. The picture quality is not good enough to check out the driver of the car.... but you can tell it's a car ;) Other than remembering to switch on the camera, the rest is pain free and automatic. When the gps sees a signal from the camera, it will open automatically the video screen. It takes a few seconds after switching on the camera. If you are navigating (the map is in view) a camera symbol will appear in the corner. To see the video, you have to exit the map screen. I guess this is a safety/ liability thing. I found it handy when installing the wiring to have the gps inside the trailer, on the dinette table and plugged into the 12 v outlet below it. John Davies Spokane WA
-
How to: Install a Garmin BC-30 backup camera
John E Davies replied to John E Davies's topic in Ollie Modifications
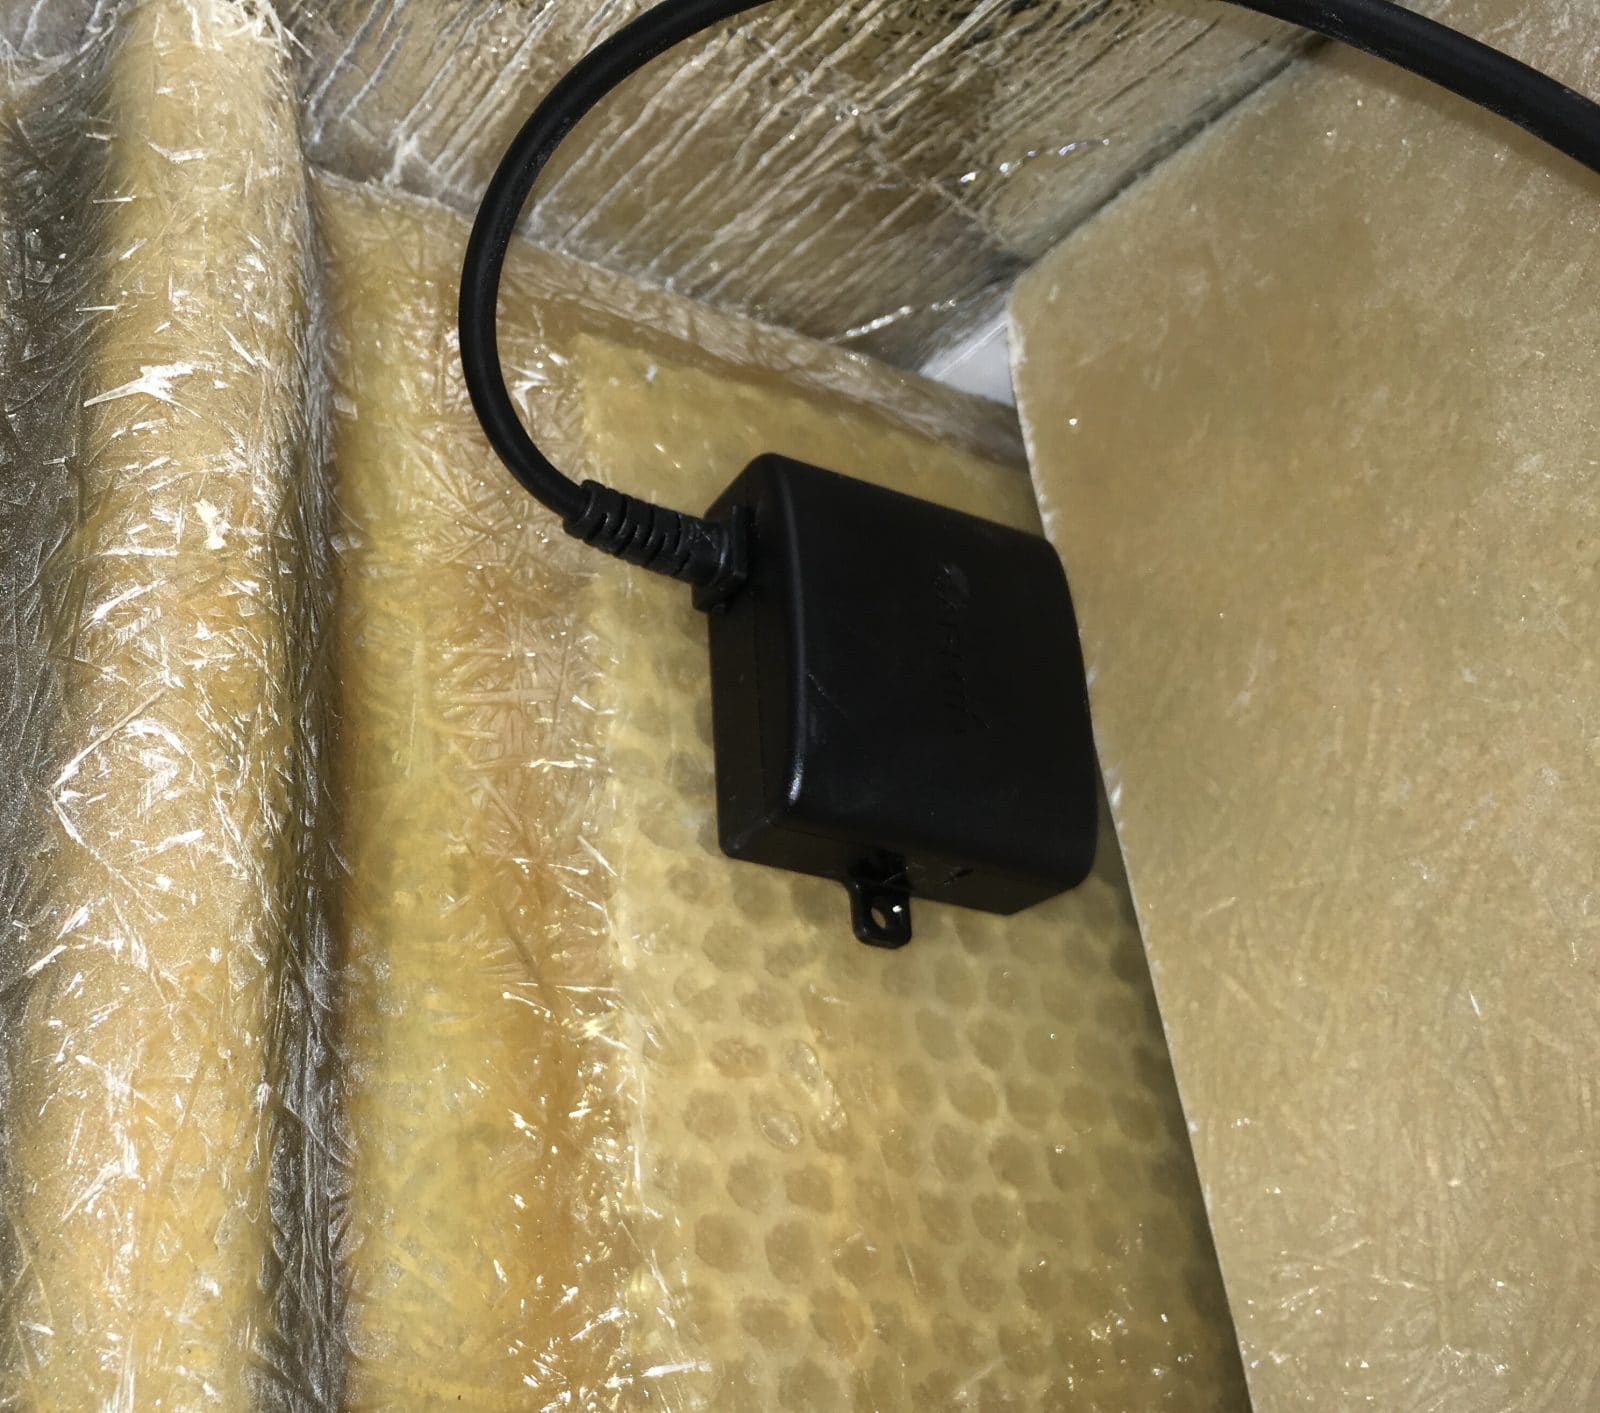
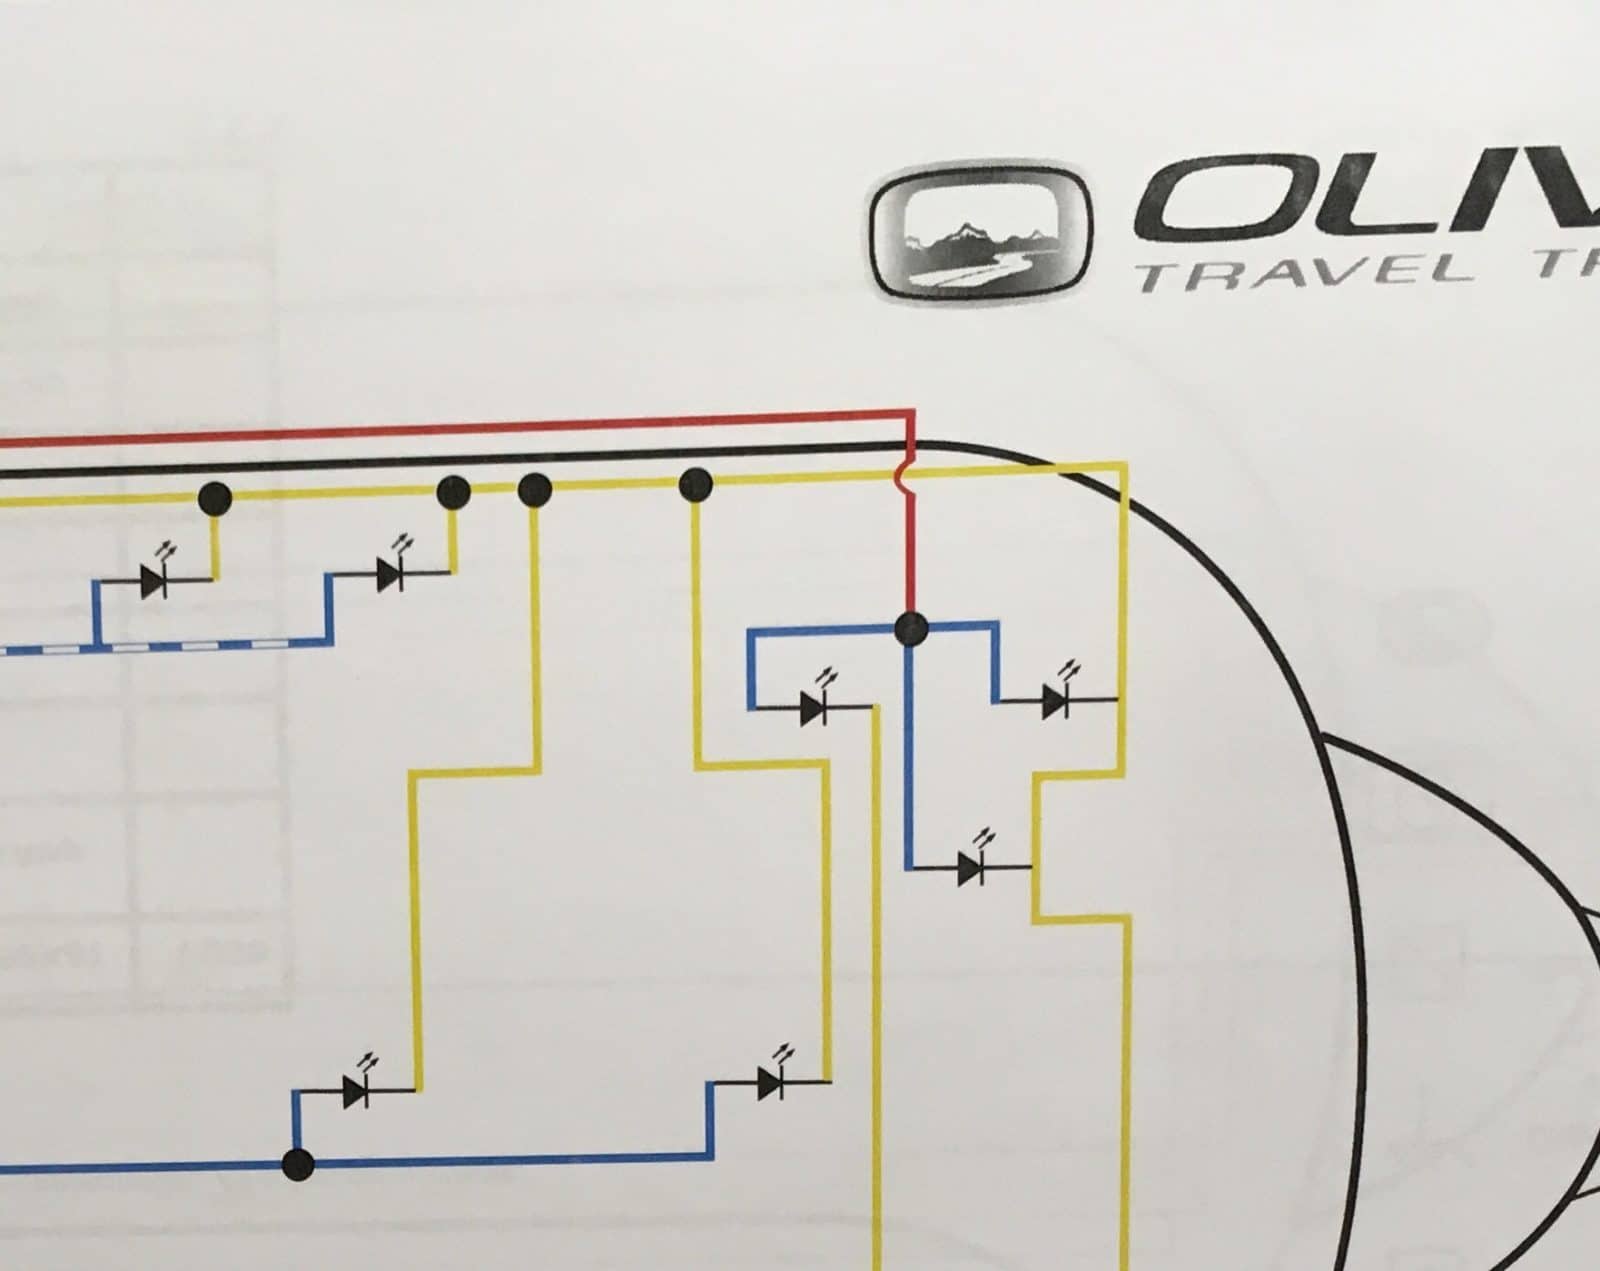
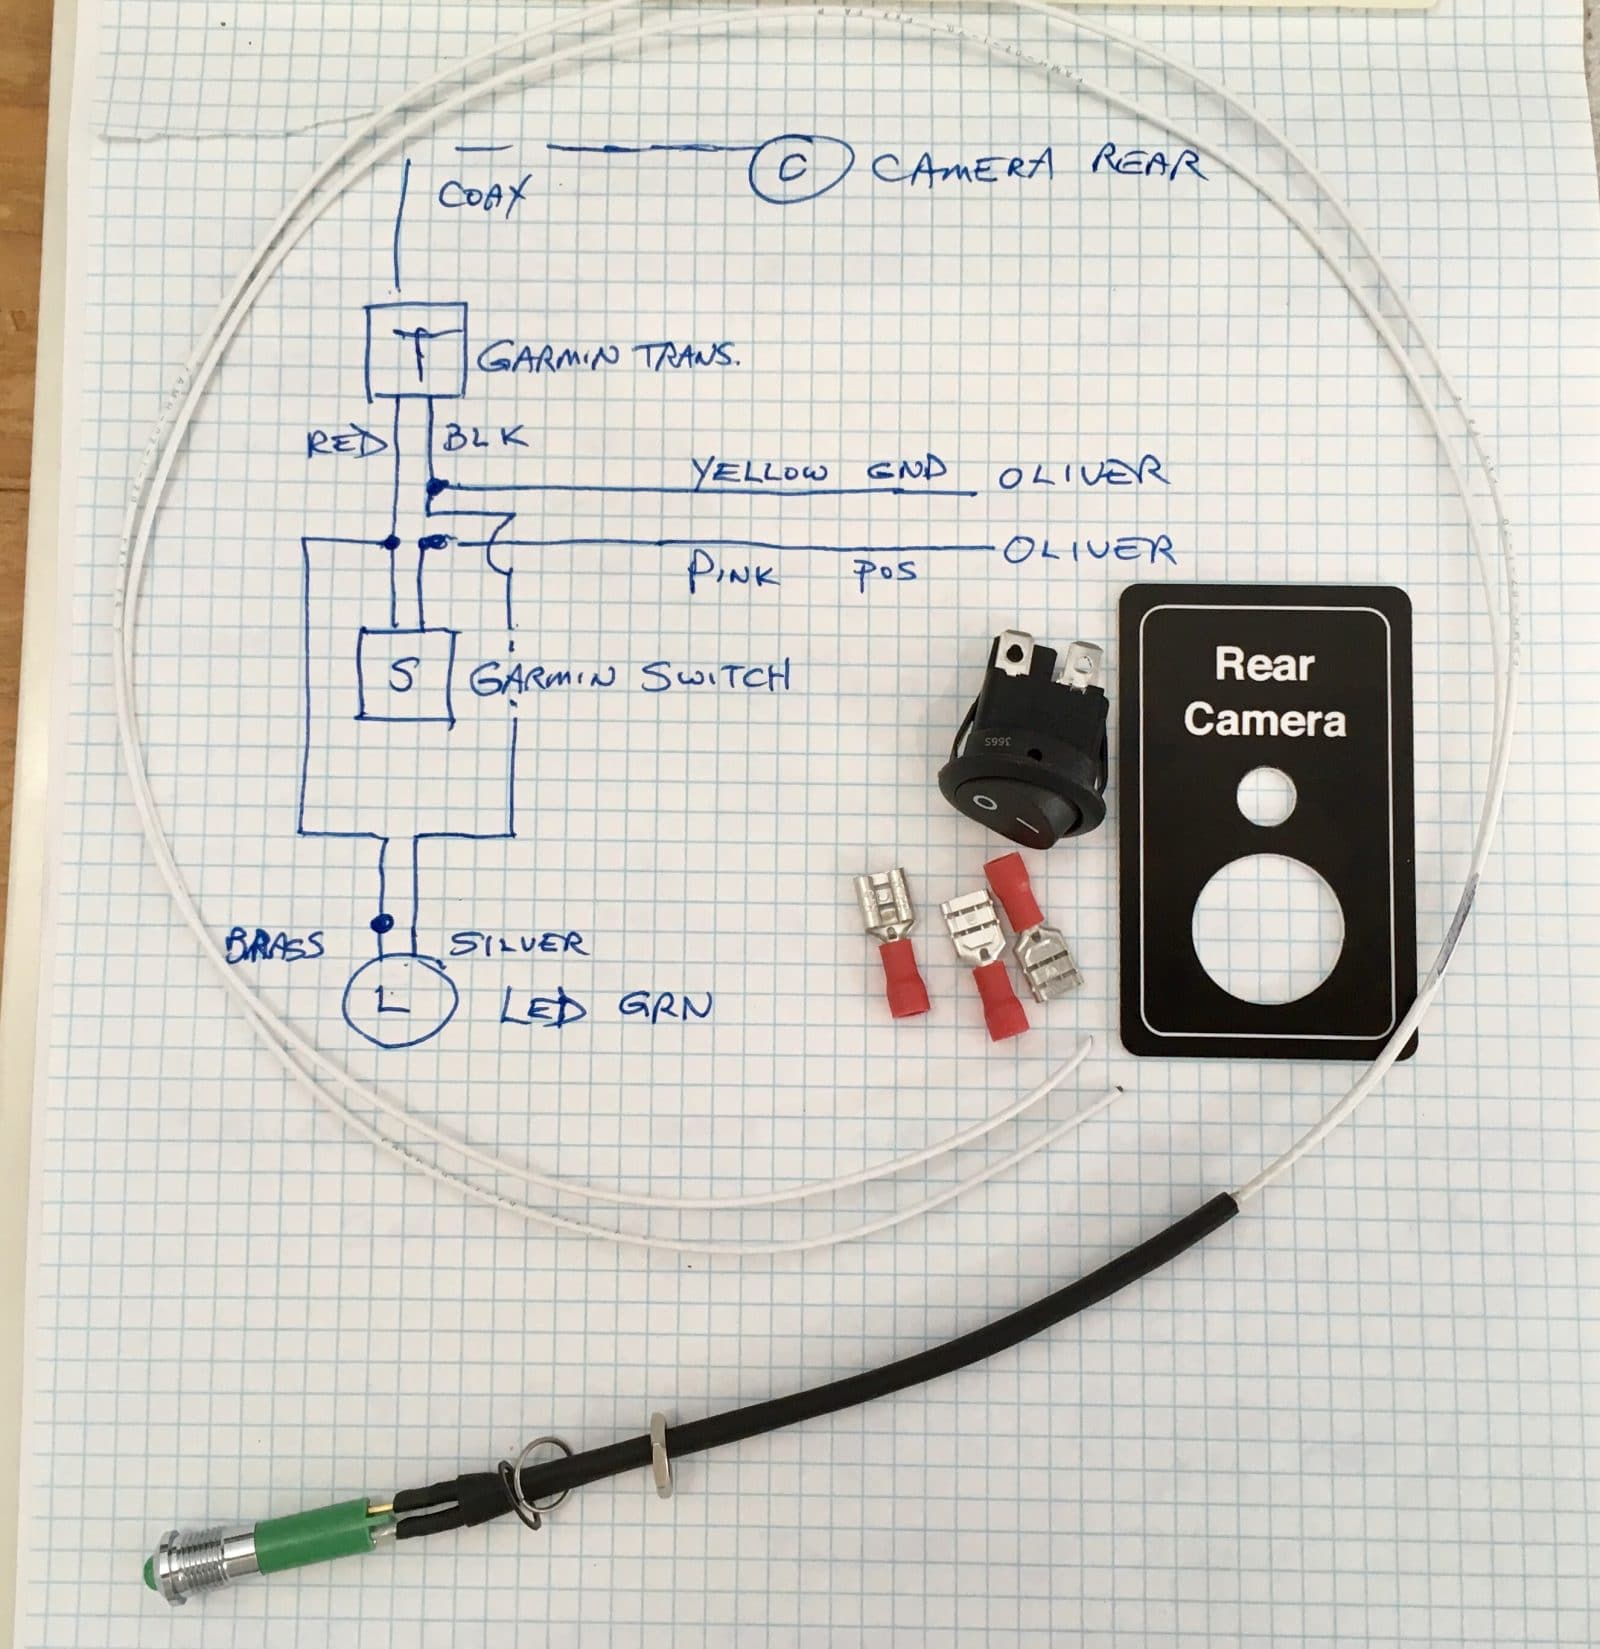
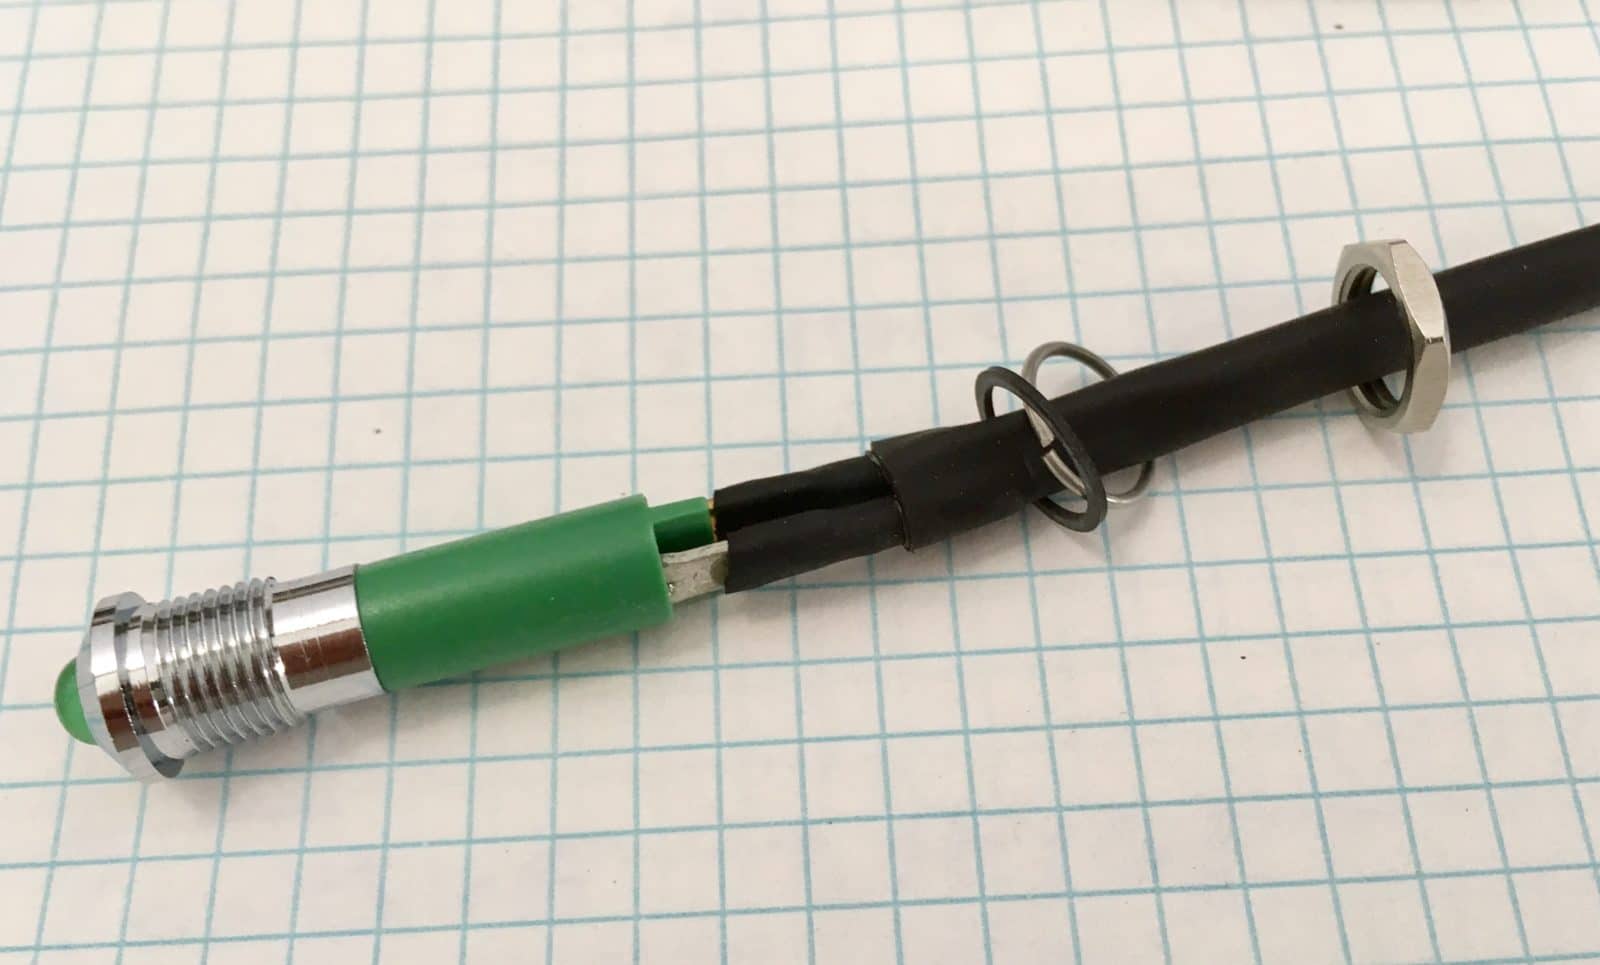
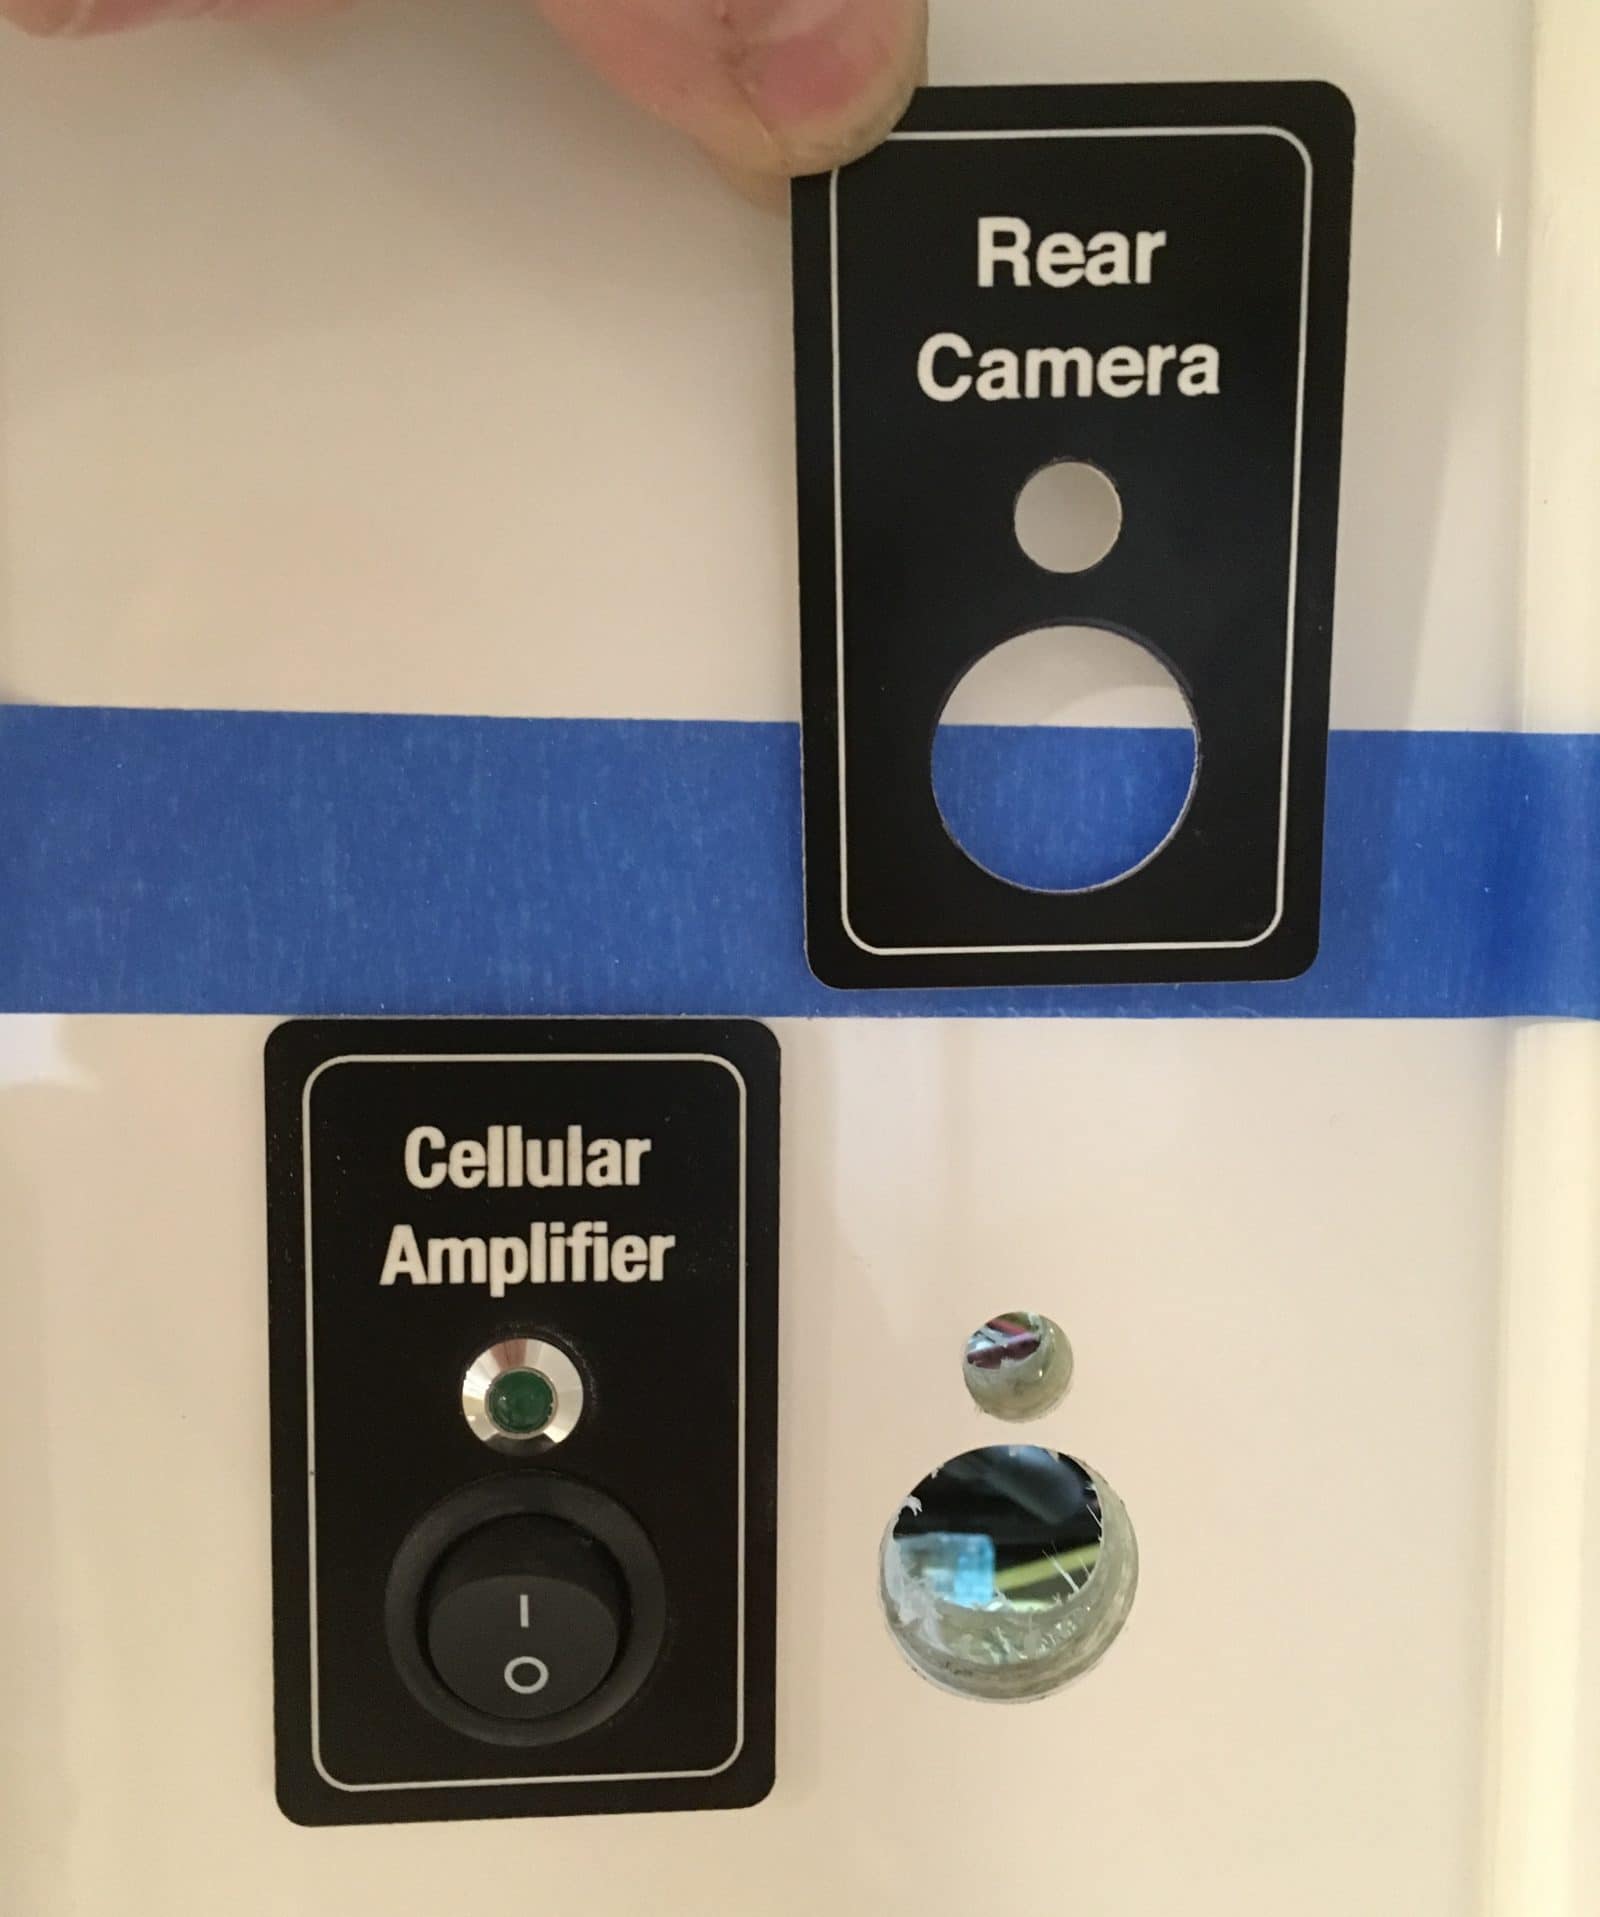
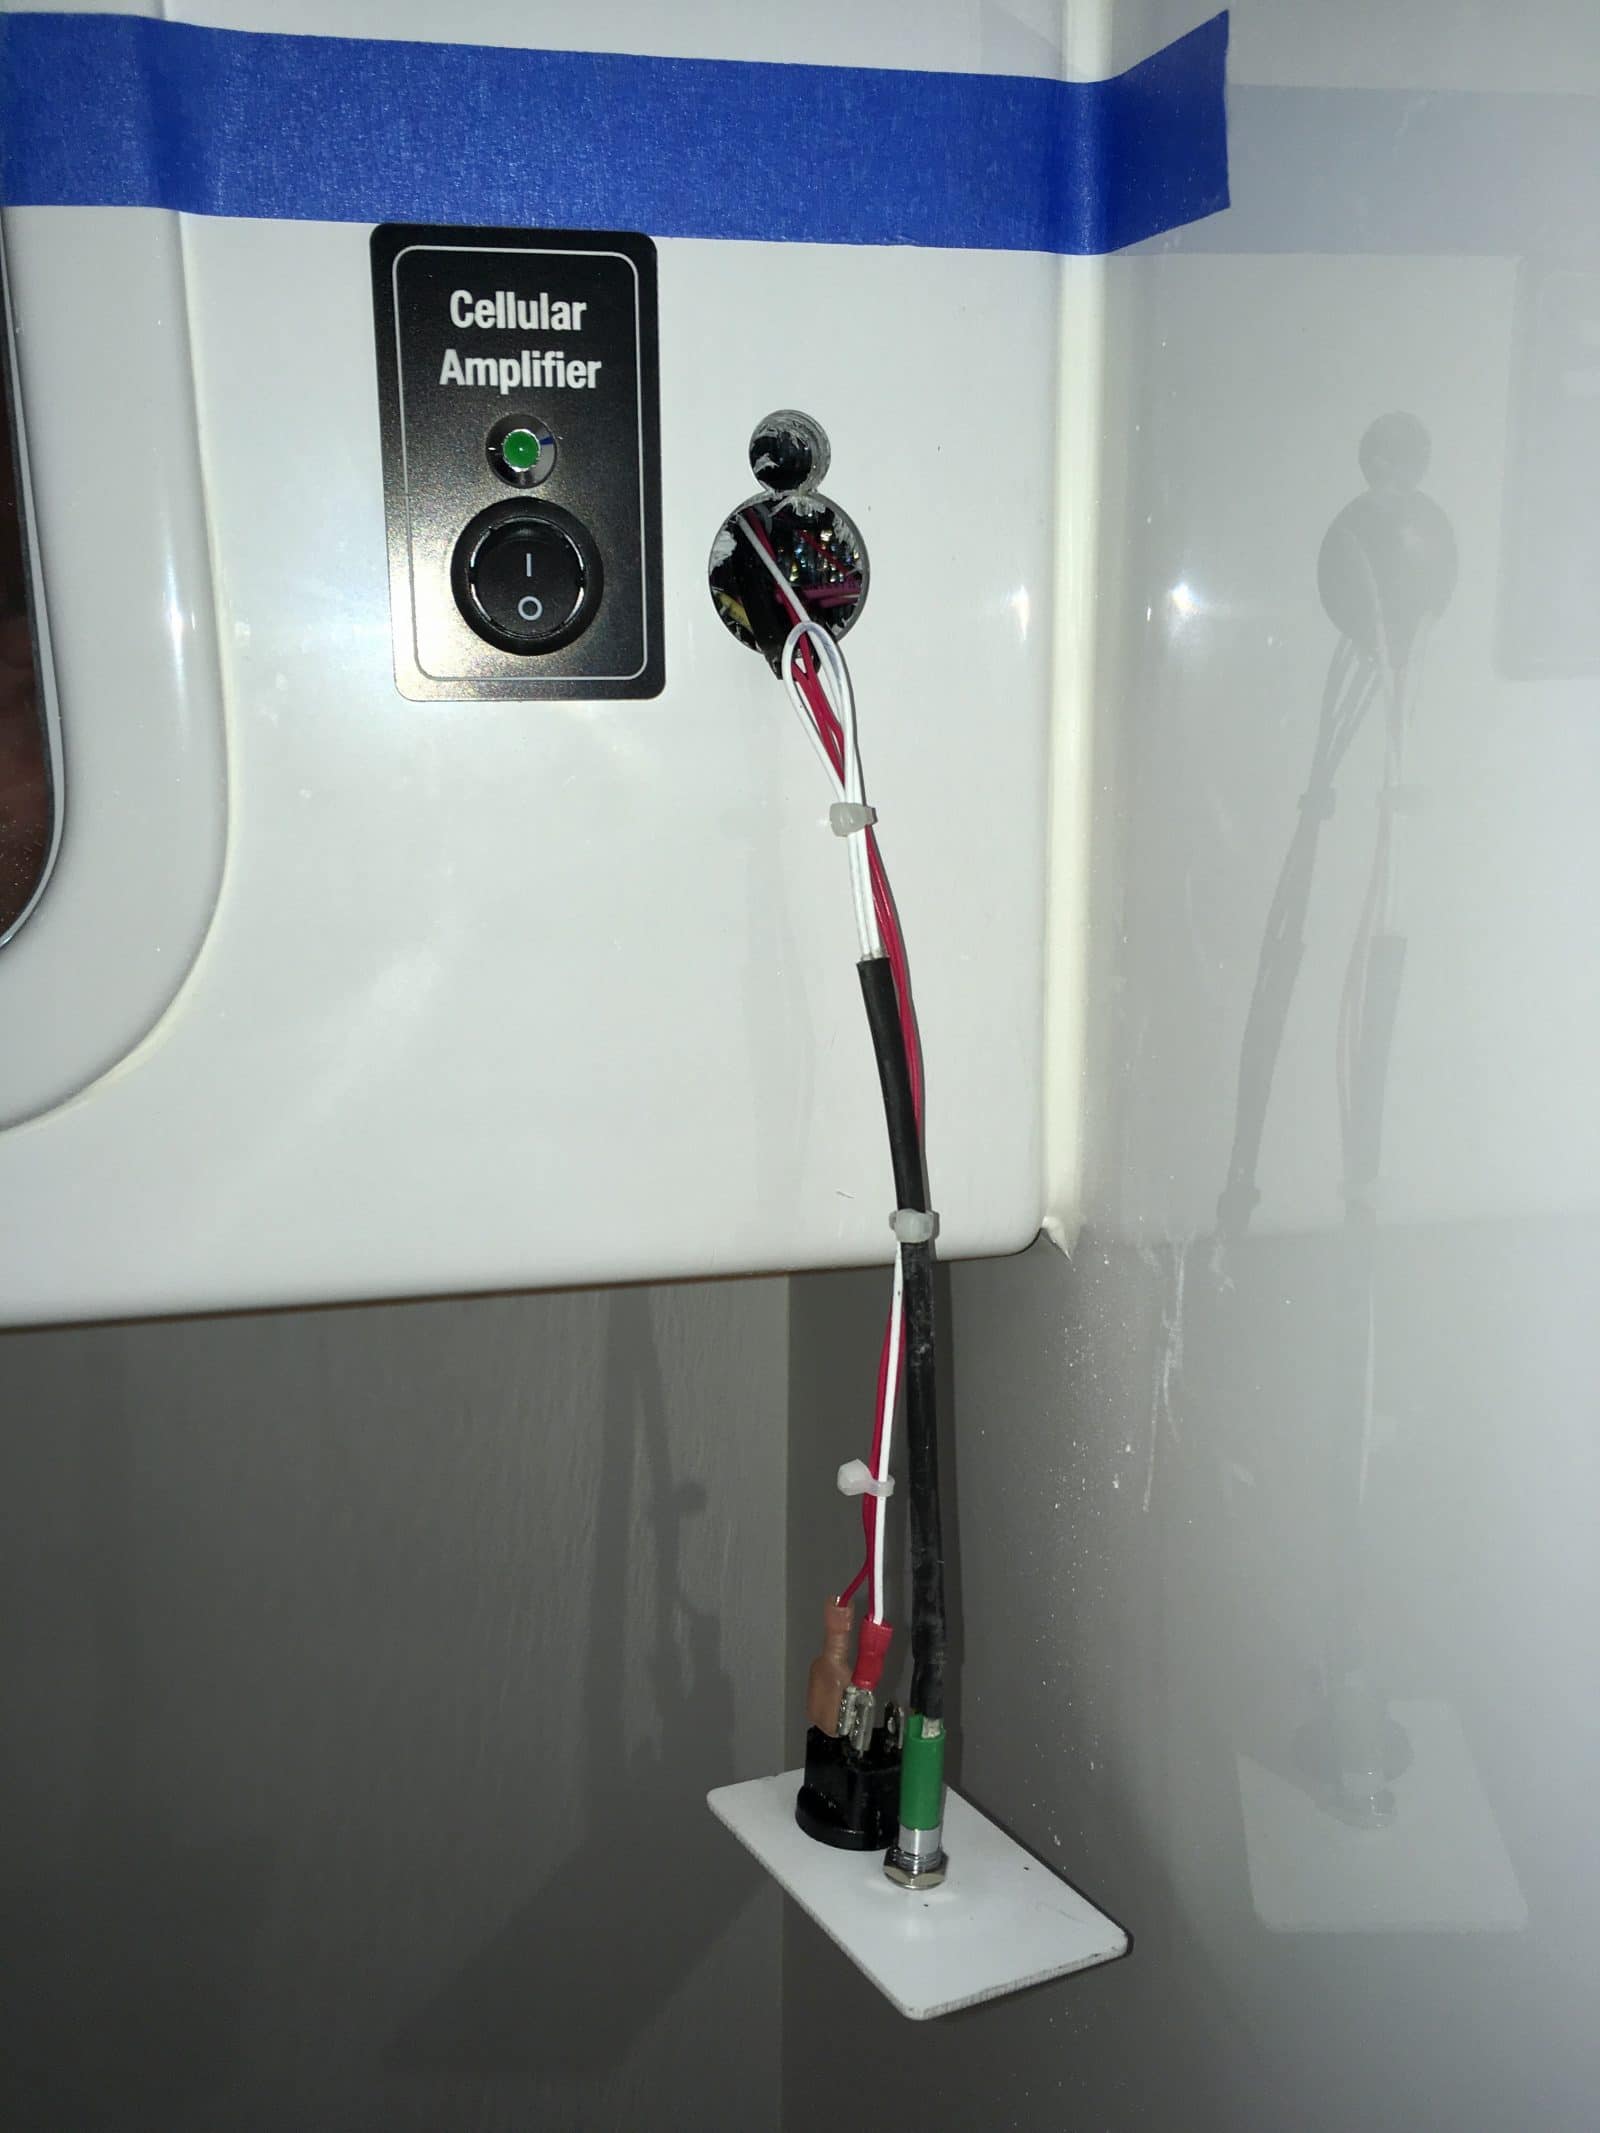
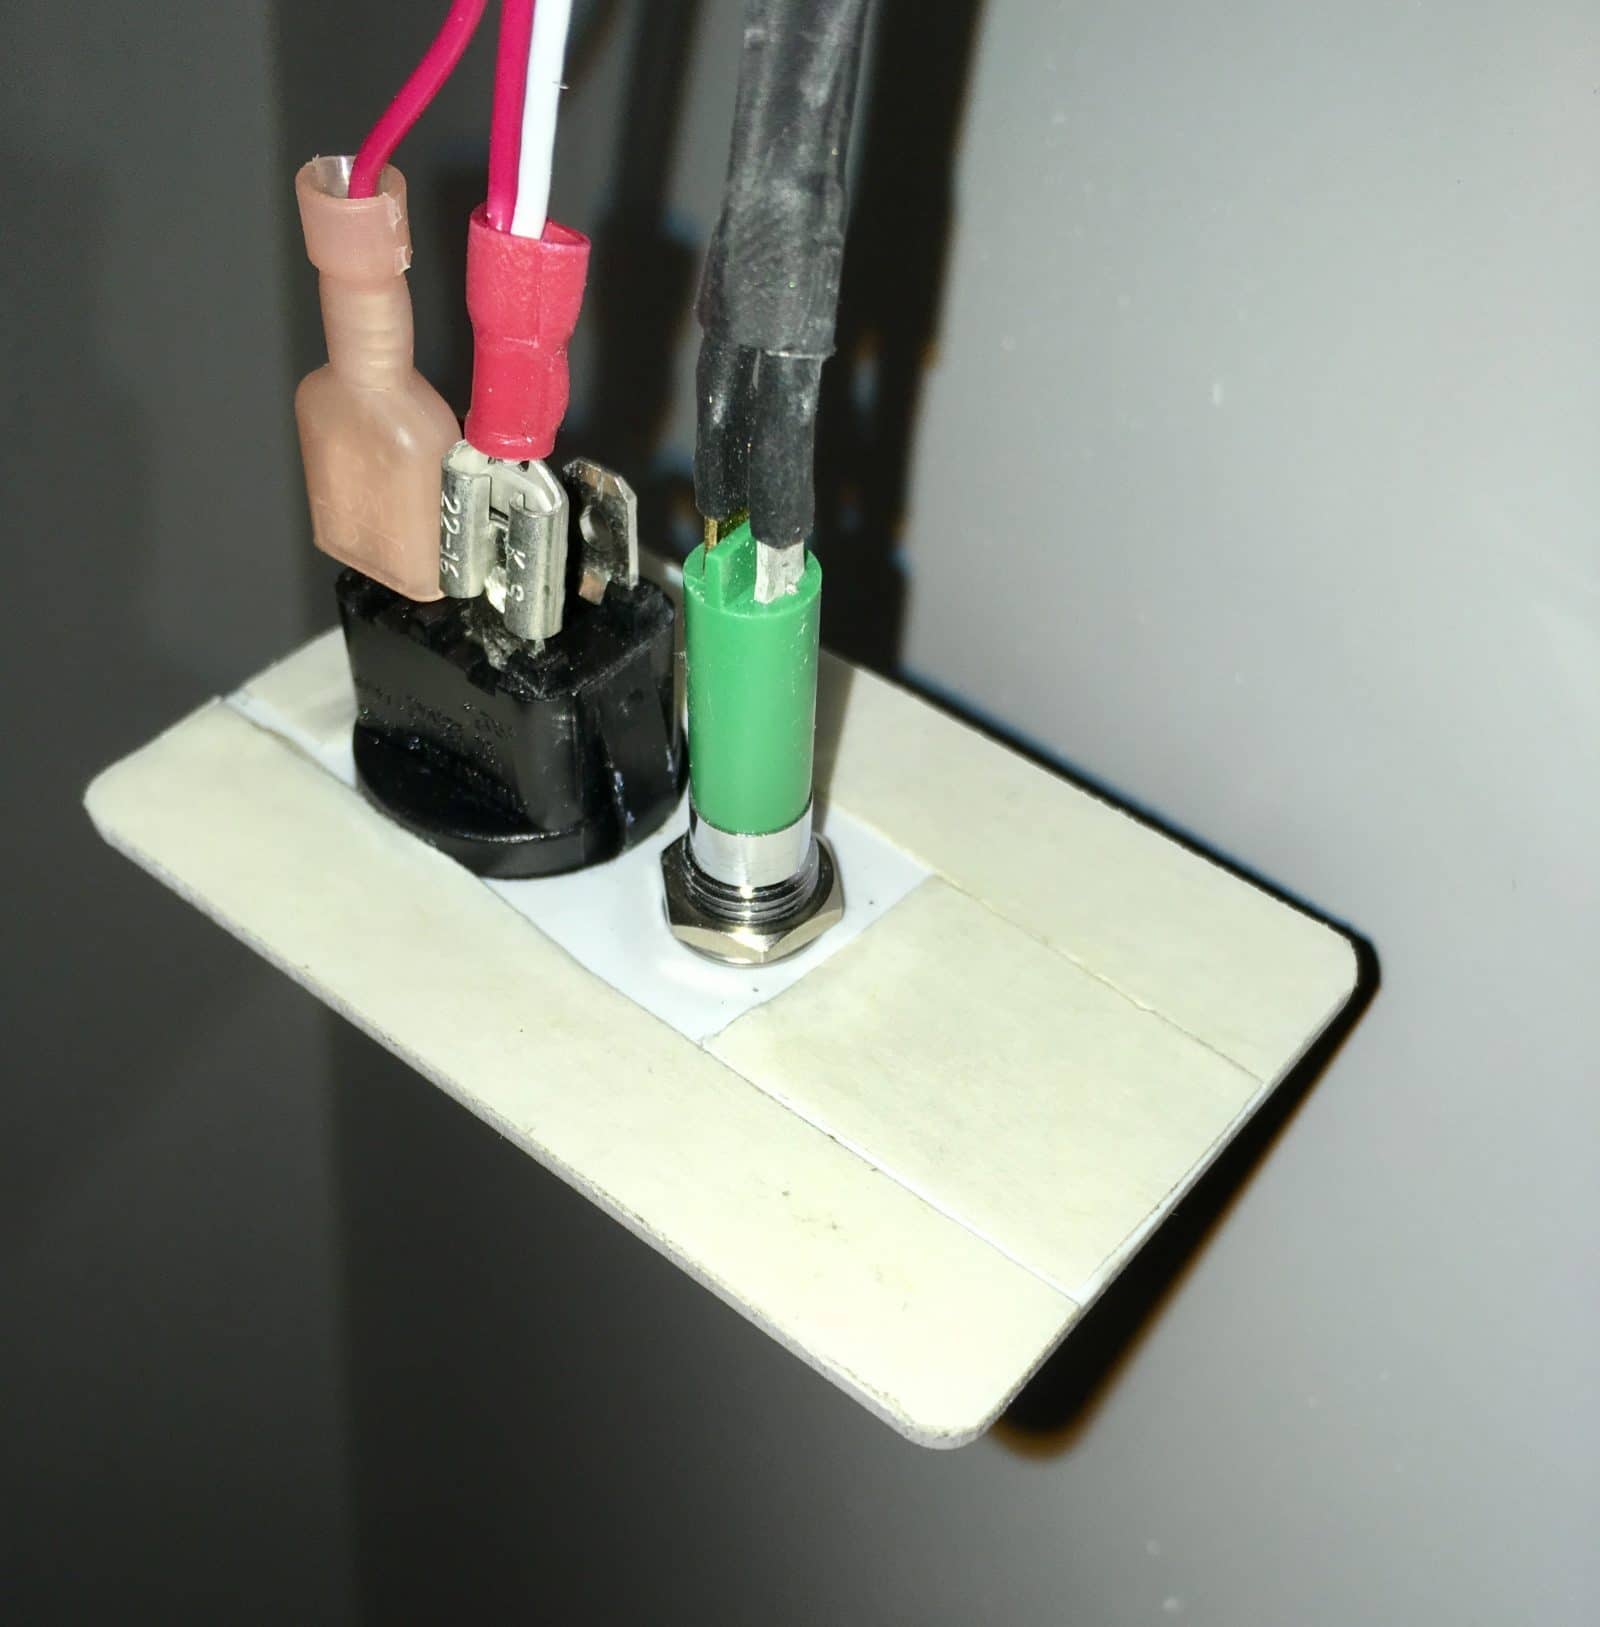
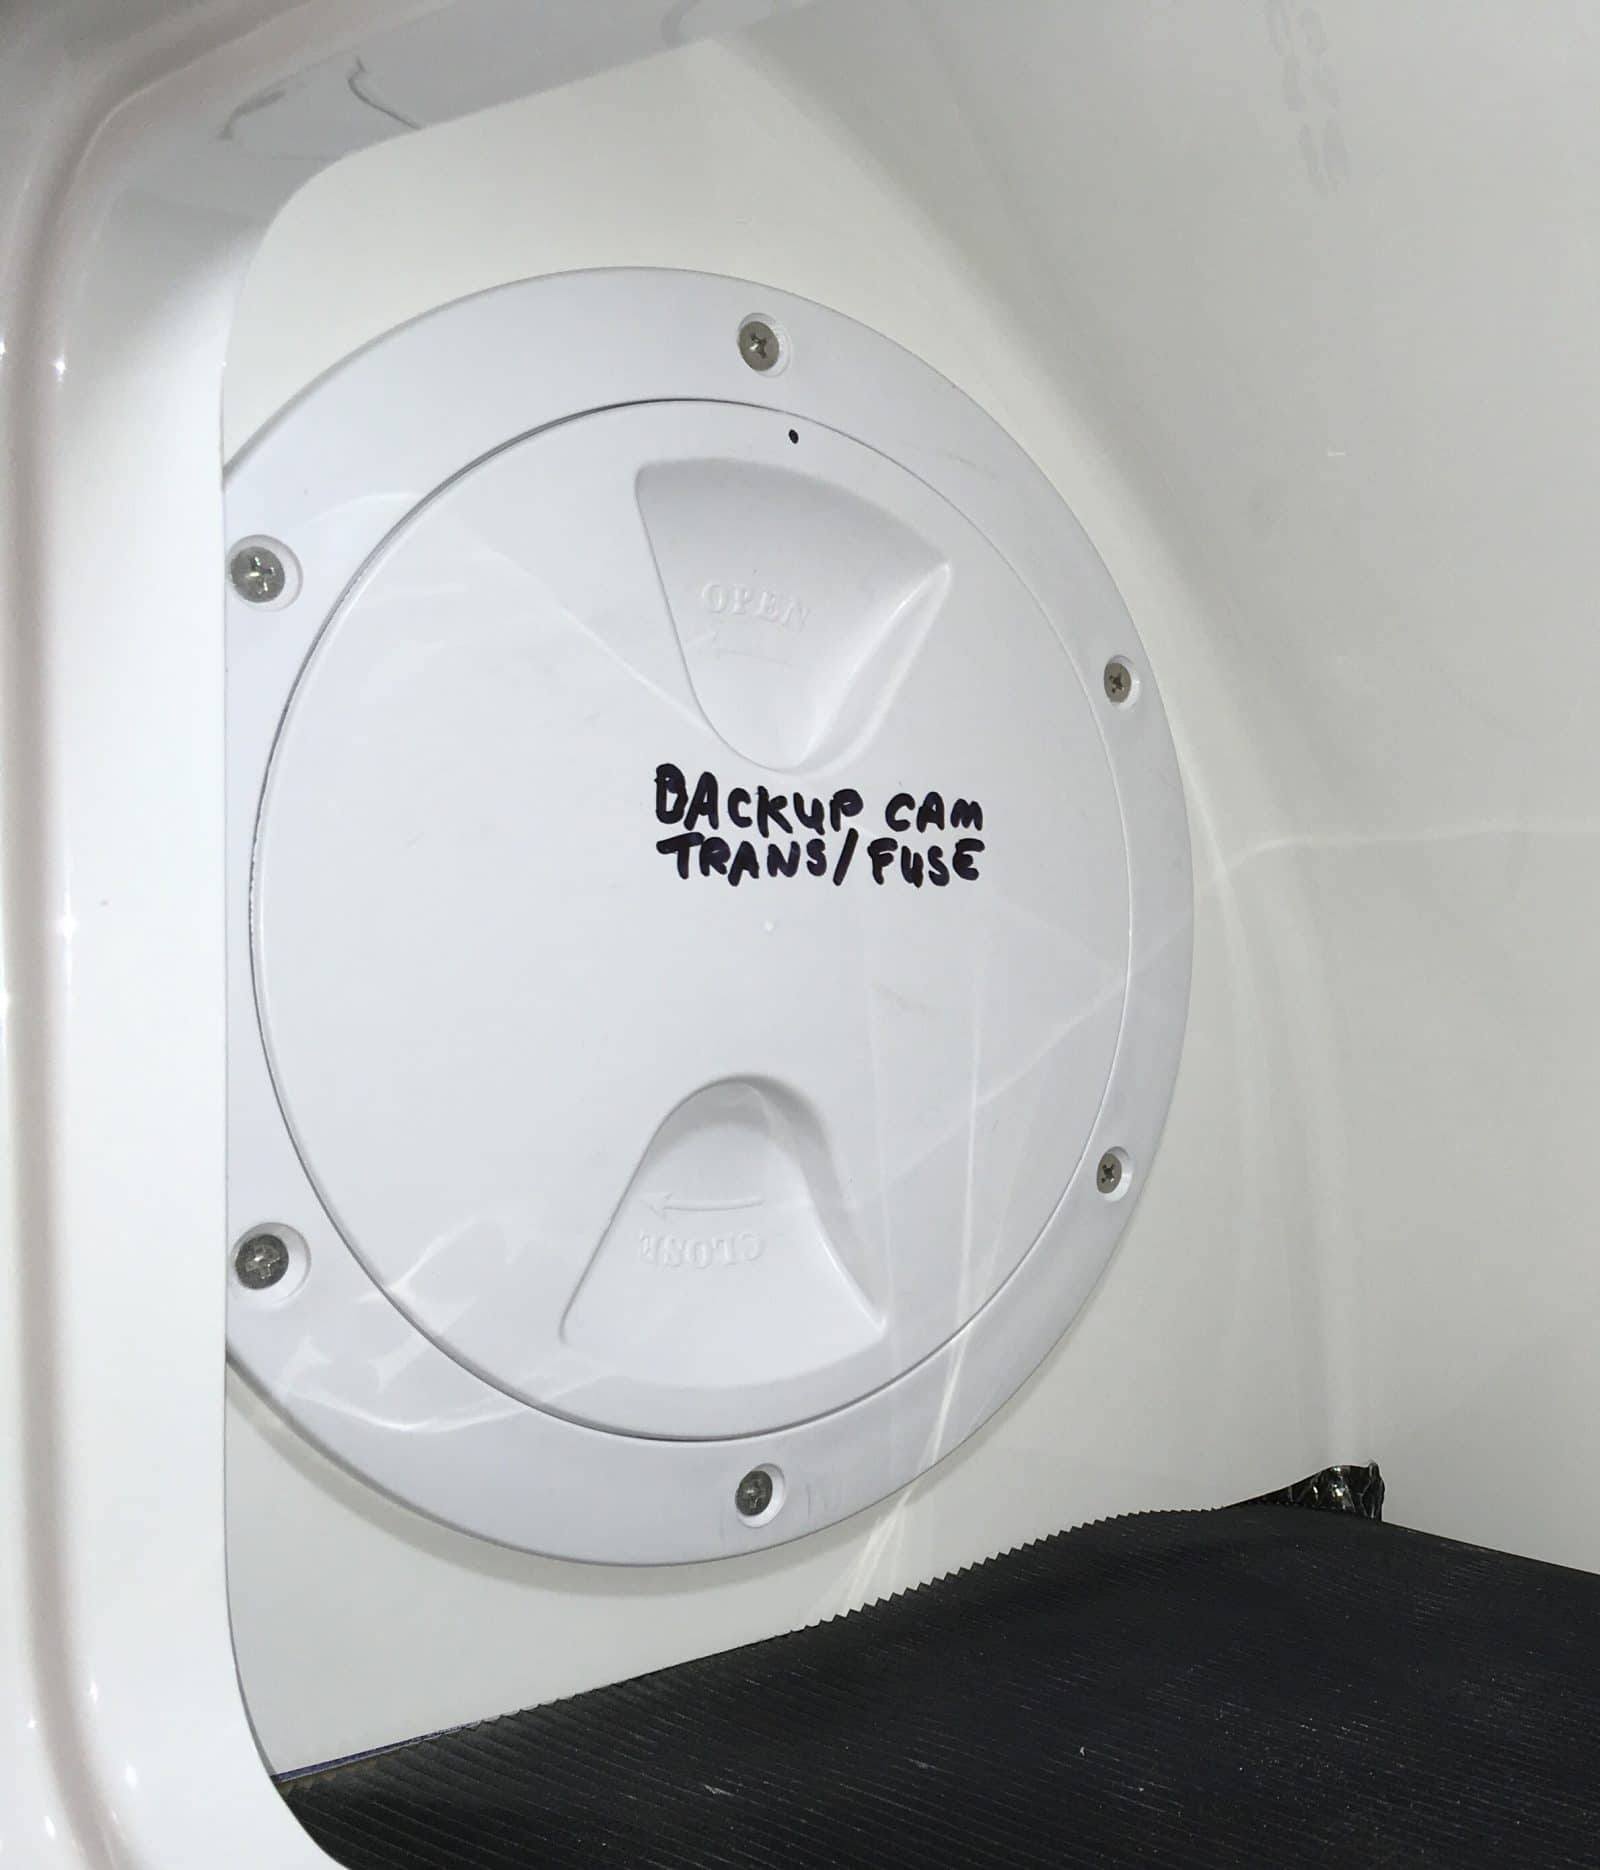
The Garmin transmitter is stuck with the supplied double stick tape to the inside of the cabin wall, above the factory mounted Cell Amplifier switch, in Mouse. This is the cubby immediately to the rear of the bathroom wall. One of the two flat sides should face to the front, as shown. You can't see this surface without a mirror - I stuck my phone inside the opening and fired off a dozen shots until I got a good one: I picked up power for the transmitter from the rats nest of cabinet lighting wires inside the cubby, accessible by removing the round hatch in the overhead cabinet in the bathroom. Oliver diagram - Yellow is Ground, Red (Pink actually) is 12 V DC: Here are the parts I got from Oliver: placard, switch and green LED. I supplied the standard spade connectors. Note that the brass colored terminal on the LED is positive, the silver one is grounded: I soldered 24AWG wire to the LED, and covered the connections with heat shrink tubing. The factory uses crimped mini spade connectors but I did not have any of those. This method allows you to slide the wires through the placard hole and install the nut and washer from the back side: I added a guide line using tape, and drilled the holes. They need to be bigger than the 3/4" switch and the LED, to clear the nut and prongs. I opened the holes to 1 inch and 1/2 inch using a step drill bit. Drilling fiberglass is always messy. I used a shop vac to collect dust as I drilled, to keep it from going everywhere: I made splices inside the cubby to Pink and Yellow, and fed my new wires out through the holes to the switch and light: Because the holes in the fiberglass are oversized, I used tape like the factory does. I used carpet tape, after cleaning the two areas with alcohol: Then I placed the new panel into position, being careful to get it square with the other one, It works! It's always nice when that happens: The light is bright enough to easily see from the cabin doorway: Finally, I added a note on the access panel: Almost done, More to come. John Davies Spokane WA
-
How to: Install a Garmin BC-30 backup camera
John E Davies replied to John E Davies's topic in Ollie Modifications
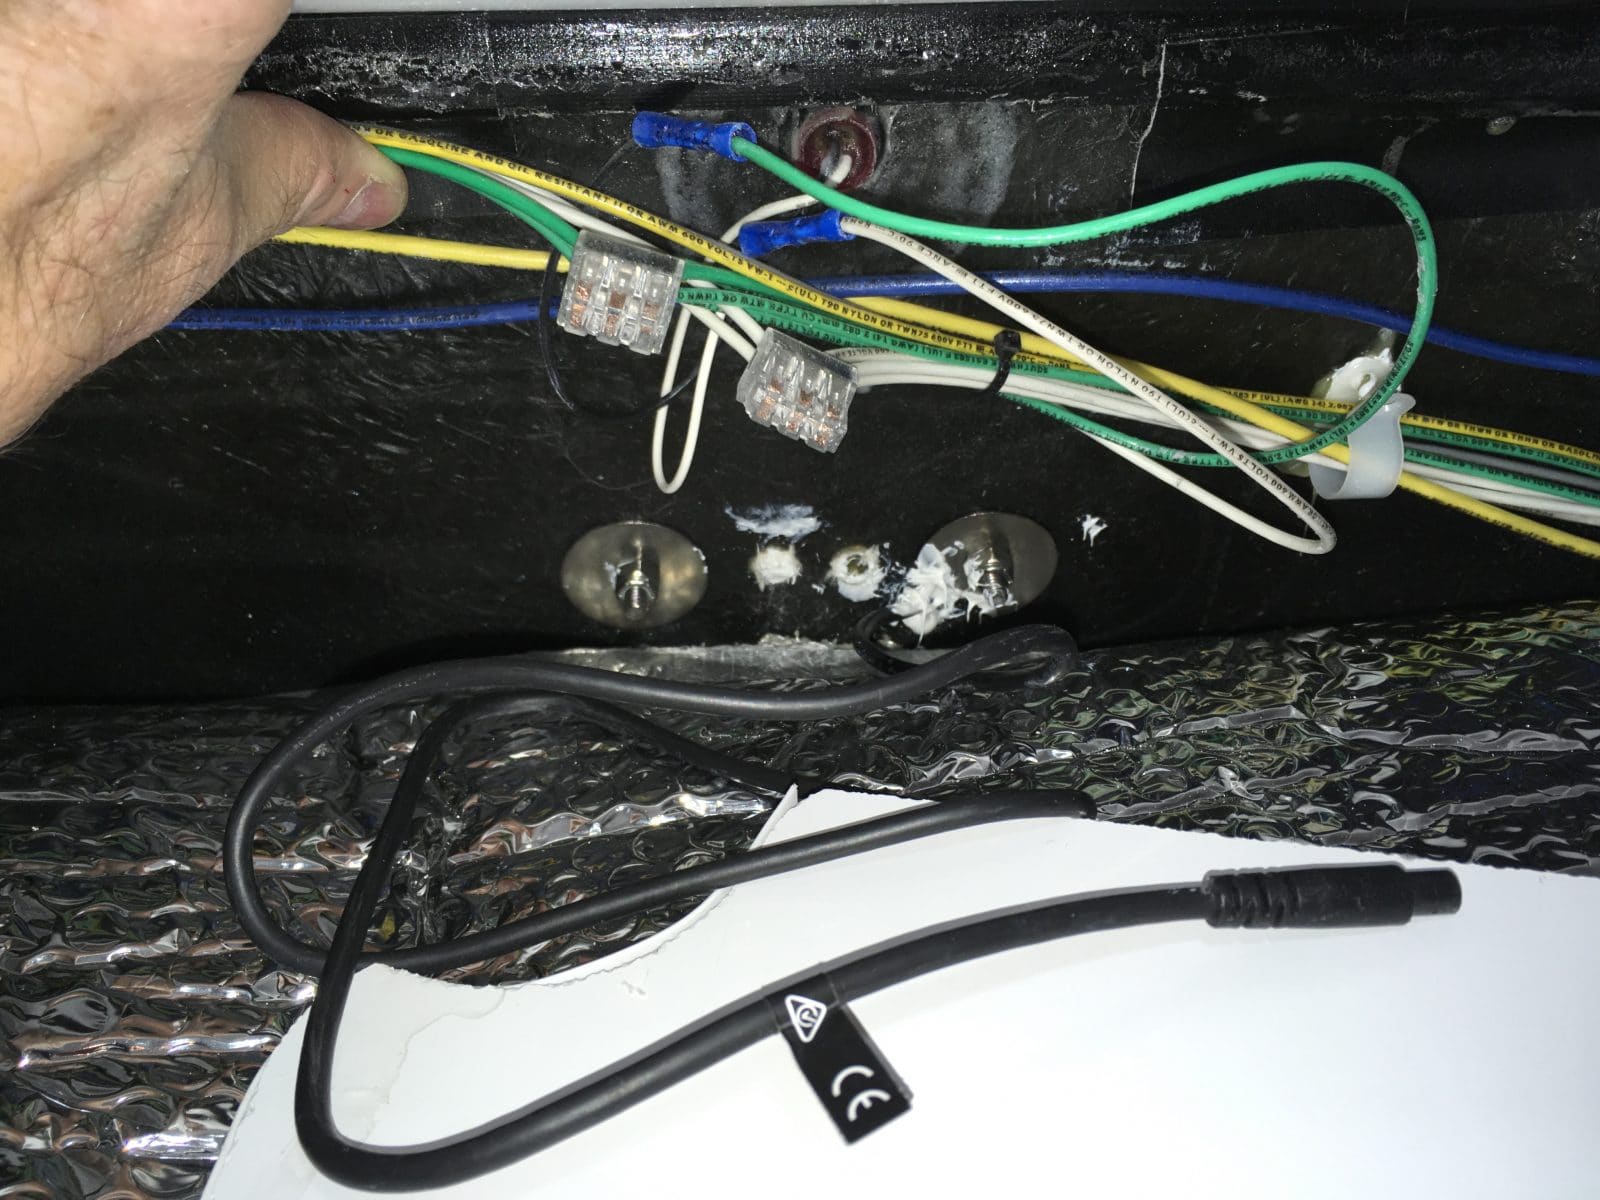
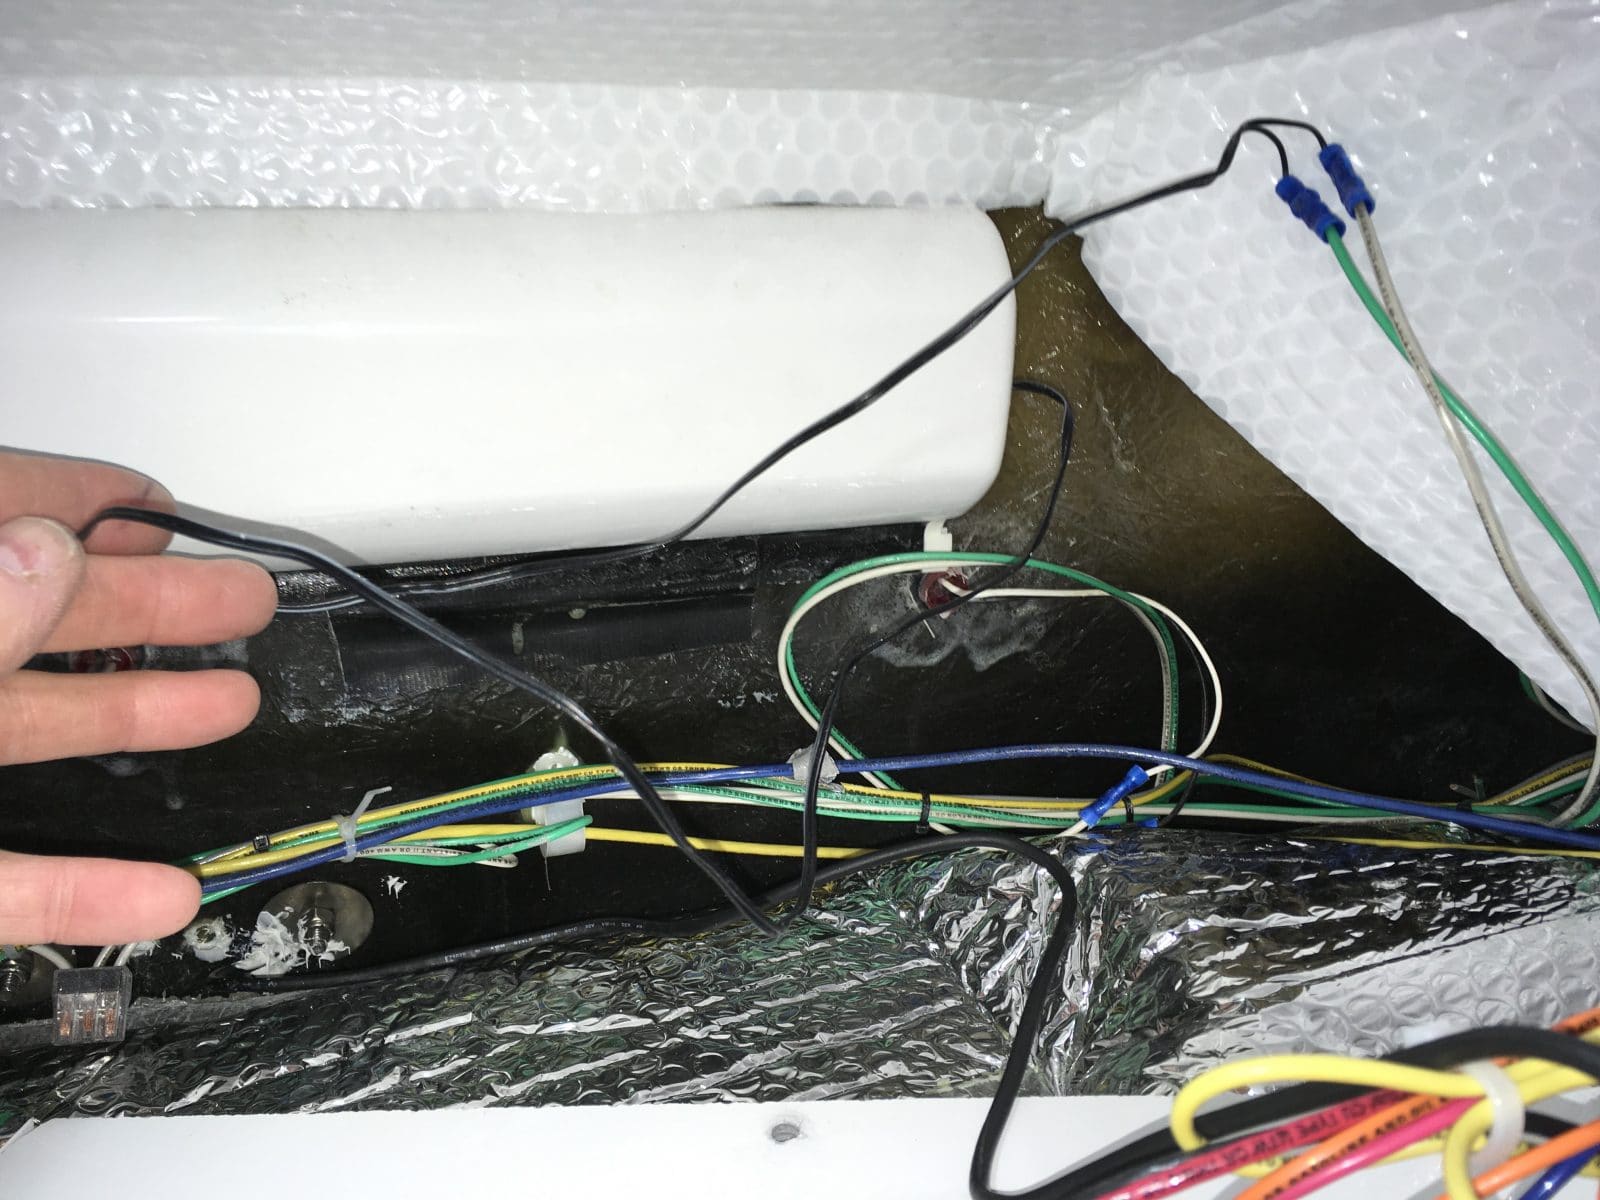
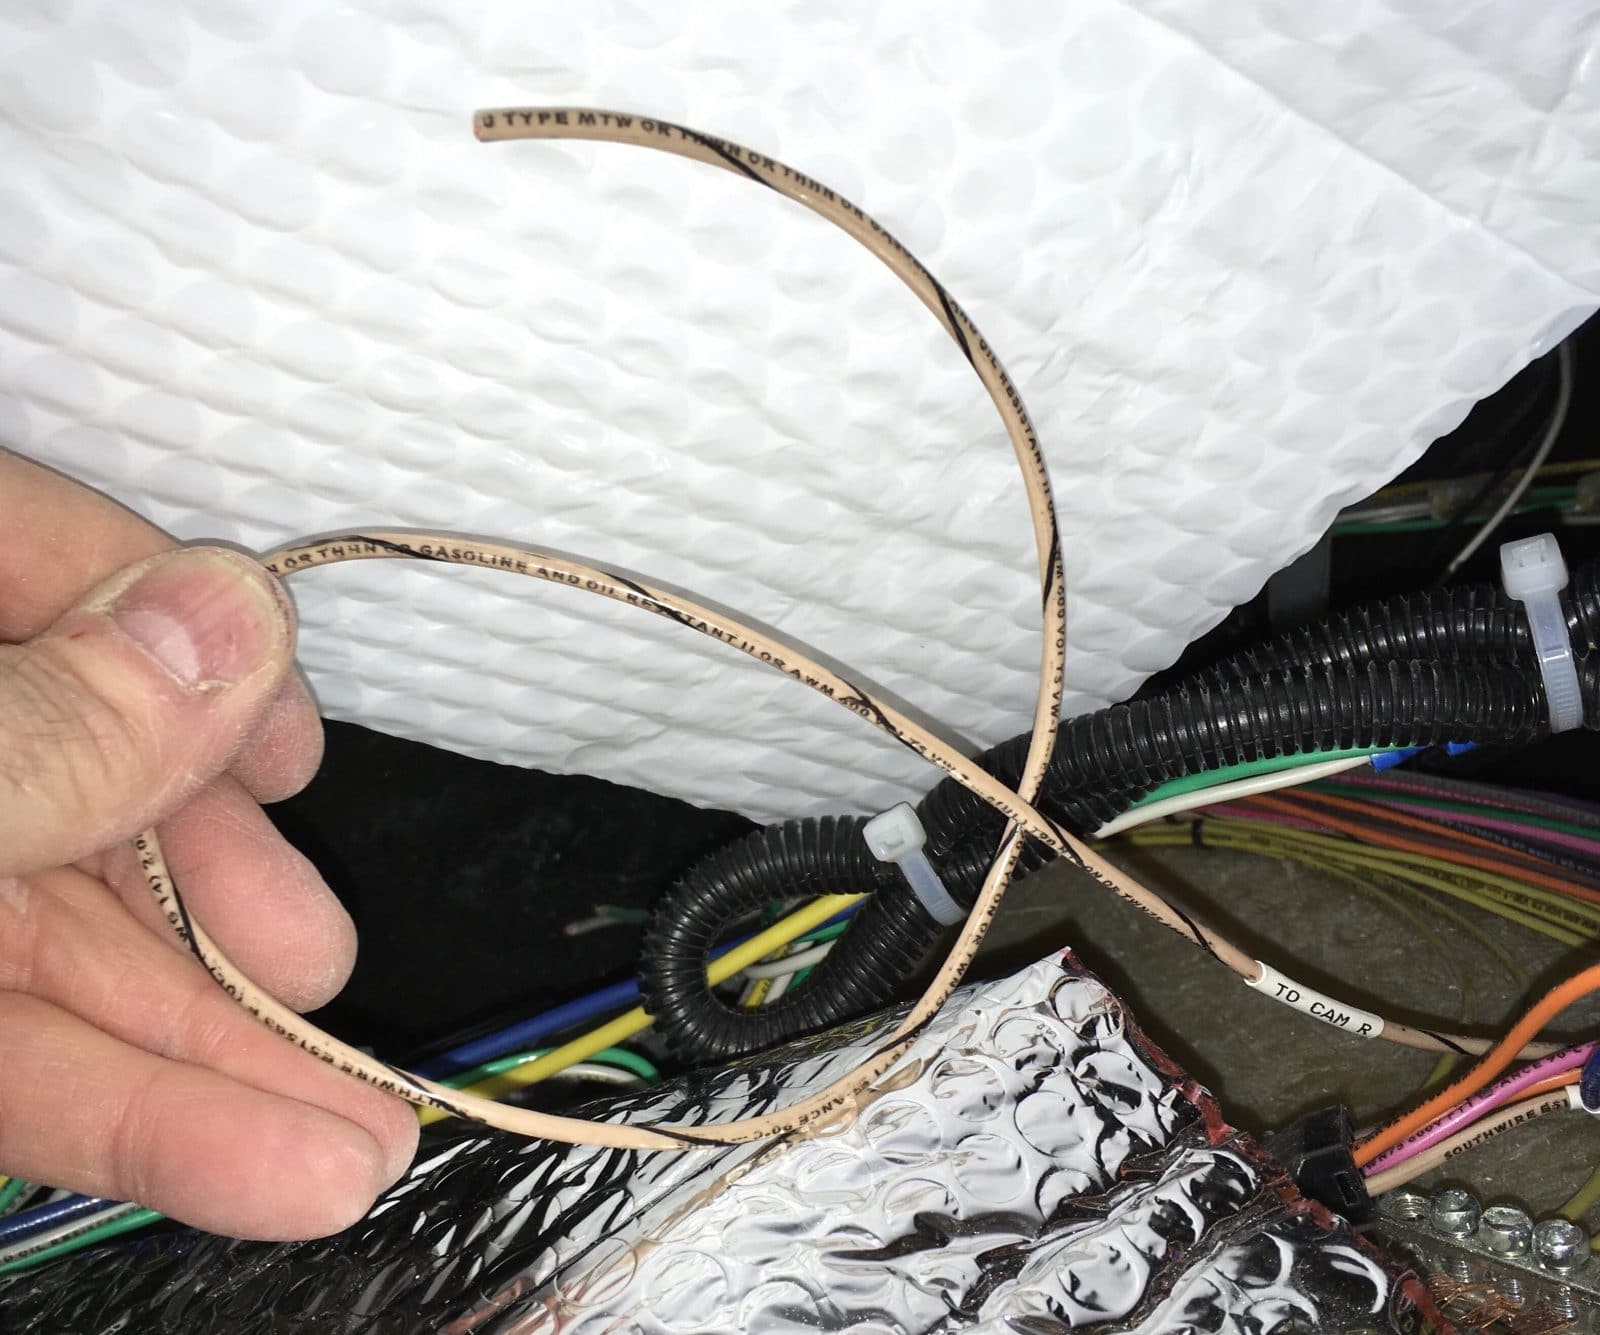
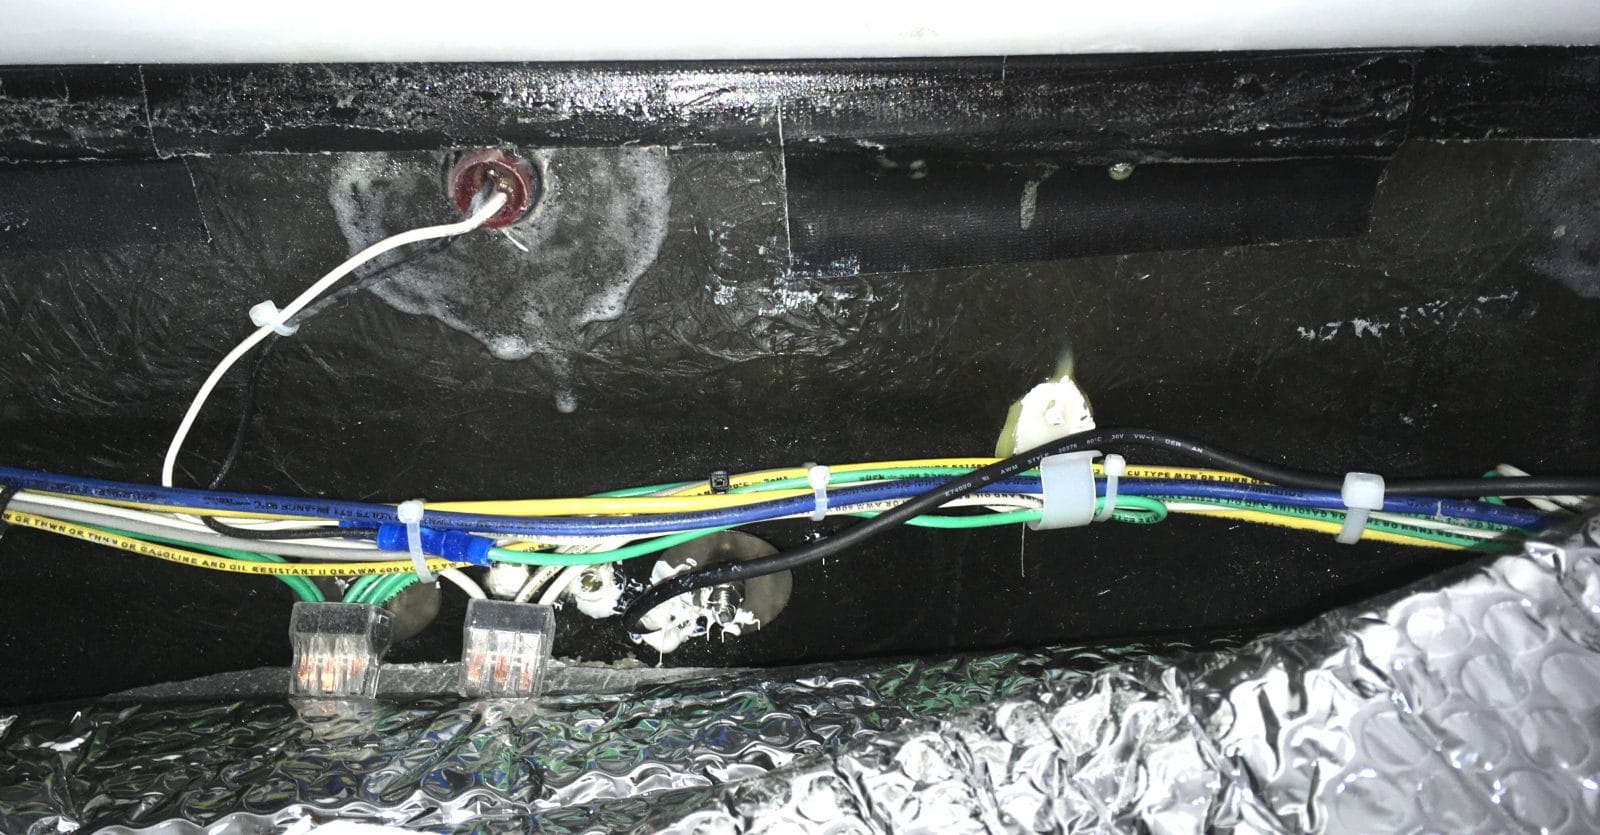
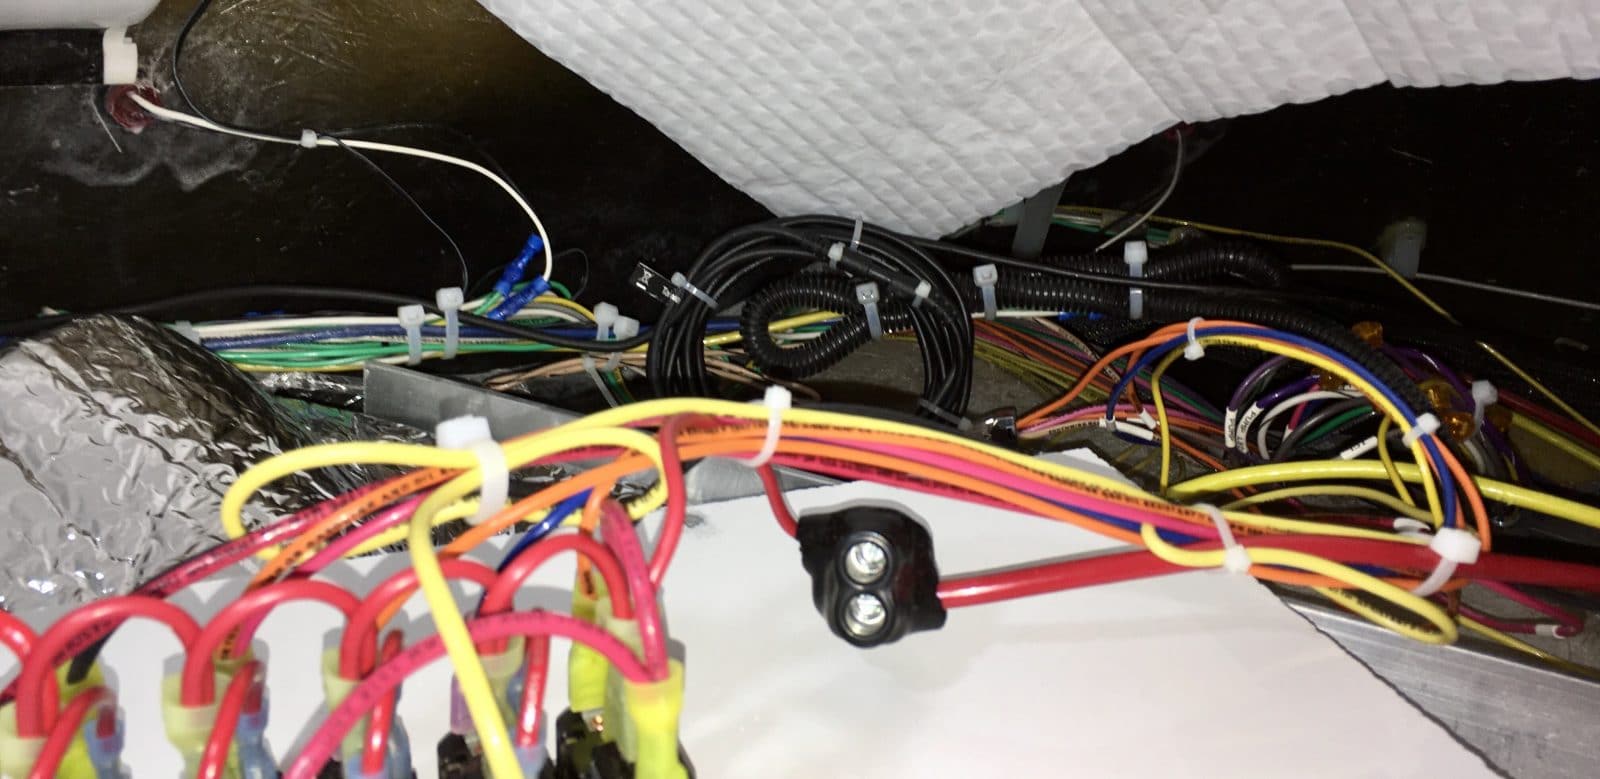
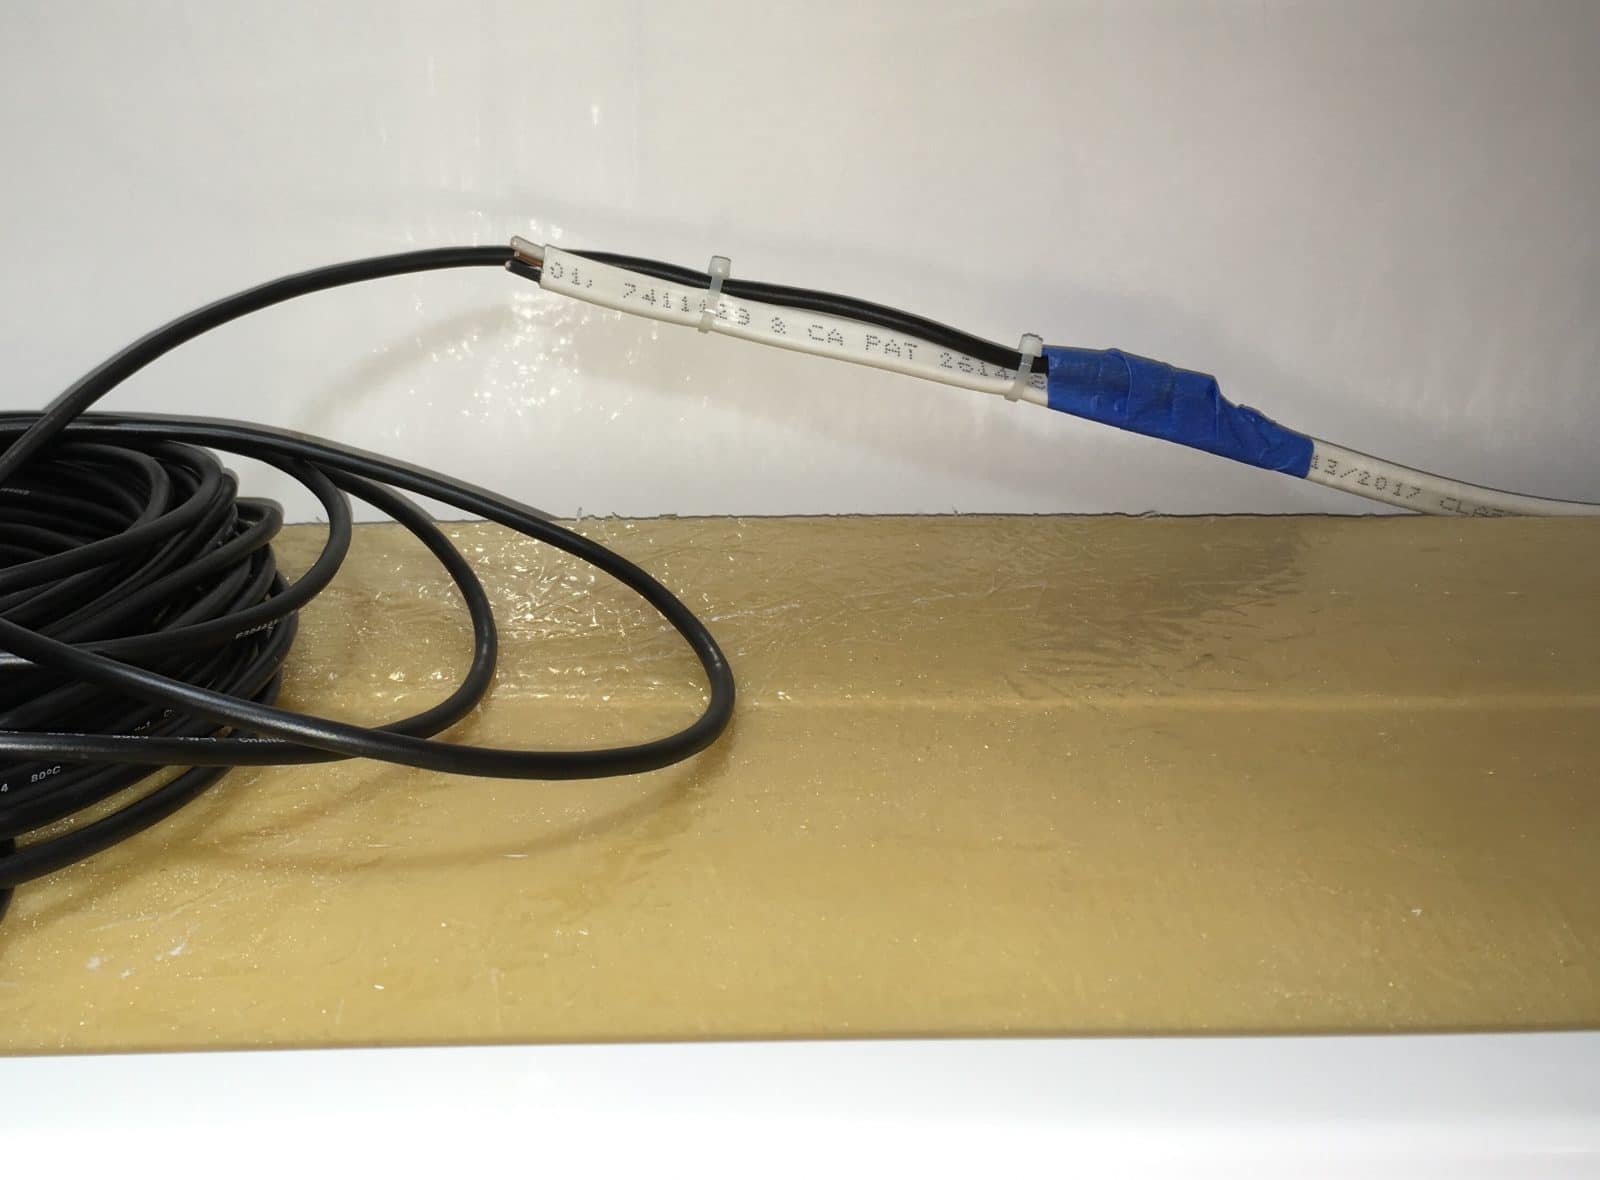
FINALLY, I finished this project. I have been using it by hot wiring the camera every time I tow, which is probably not a prudent long term solution. Heres most of the electrical stuff, reposted: The inside look at the camera wire coming through the rear outer wall. I reglued the two white plastic harness supports that fell off...: The wires for the Oliver Sign, about 5 feet (!) too long: The unsecured and un-capped wire for the factory Backup Camera: Wiring secured: The Garmin video extension cable is 50 feet long, about 30 feet too much, so the excess is coiled and secured in back. It is not good to secure coax in anything but a loop, you can damage the inside, so I have heard: I ran the cable along the outside of the street side overhead cabinets. Access is very easy when the rubber mats are removed. The only problem was the pantry, which blocks a few feet, so I used a piece of stiff 14/3 house wire to act as a snake. I fed it through from the cabinet over the dinette, and taped the Garmin cable to it to pull it back forward: More to come. John Davies Spokane WA
-
Here is a great big 10 page thread on Anderson hitches from the Caravaners Forum in Australia. It starts in 2012 when nobody had a clue what this new system was or how it could possibly work. It looked like voodoo, (my words). Some of the comments are hilarious. As the years go by, more and more actual users start commenting. Most have great things to say about it. One comment really made me laugh, on Page 2: by bricki » Sat Aug 04, 2012 7:40 pm some of you people really are sad and ignorant. no matter how good and inovative something may be if it isnt 23 foot long and towed with 200 land cruiser with a hr wdh then it cant possibly be any good [ light weight european vans, no way, american hitch no good ]long live meat pies kangaroos and ausi. cars what a load of sh*****t it may suprise you people but in most things we are 10 years behind the rest of the world Maybe it struck home because I tow a 23 ft trailer with a Land Cruiser 200.... It is a much more rowdy and undisciplined crowd there than at the Ollie Forum. Lots of good info though, later on when they have things figured out. LOL. http://caravanersforum.com/viewtopic.php?f=2&t=28948 Sorry if that quote offends anybody. No harm intended. I am a huge fan of Australia and especially its people, and would love to go back there again. BTW, when I was there in 2004 I didn't think they were ten years behind, more like thirty! But in a good way. John Davies Spokane WA
-
I hope it works well, I know Blutooth has improved in the last couple of years, but I still have really bad memories of past debacles. This system relies on both a BT connection to a booster, in back, and also a BT connection in front, in your TV. I did not want to deal with possible double BT connectivity and "forgetting" issues. Hopefully all that is history and the system is reliable, but that is the reason I went with a stand alone display. Plus I wanted to be able to use my phone for other stuff while visually monitoring the numbers.... not just relying on the phone app to wake up and send an alert. John Davies Spokane WA
-
I bought the TireTraker TT500 four tire system directly from the maker, due to very good reviews and their lifetime warranty. Originally I wanted to stay clear of serviceable batteries, but I began to see their value. You just install new button cells and orings once a year. They are cheap. You should try to not blast the sensors directly with a pressure washer. I did not need to install their signal booster, tho I bought it just in case. It was $20 extra. The system worked fine with my long Ram 3500 Quad Cab short bed with fiberglass cap, as well as my Land Cruiser. I really really really like seeing both pressures and temperatures, and it is easy to change settings and alarm thresholds. I did order one extra sensor, plus a service kit that includes O rings and batteries. This way if one fails on a trip I can replace it with no down time. The only thing I do not care for is the aluminum trim around the display. I found the reflection in my windshield to be very annoying, so I masked off the front and back and painted the top of the trim flat black. Problem solved. The holder itself is stout and dandy, and I use it sometimes to hold my phone. You can just see the TT display in this pic, in the bottom corner of the windshield. Also I removed the sensor covers and engraved numbers on top so that I could ID the units when removed and in storage, and to help me remember where to put them when I rotate the tires. https://tiretraker.com So far so good, I do recommend these and would buy again. I do suggest that you balance all wheels BEFORE installing them. The weight of the sensor is tiny, but you will be swapping them from wheel to wheel, when you rotate, and it is better if the tires are balanced independently of the sensor installation. The tires do not come balanced at delivery ;( John Davies Spokane WA
-
Reed, have you had issues with stuff sticking after a 409 wipe down? I have always uses a high flash point chemical like isopropyl alcohol or MEK. I would be a little concerned about a household cleanser for what is essentially paint prep. I do use the original 409 for lots of cleaning, I like to be able to buy the big refill jugs. Thanks. John Davies Spokane WA
-
I looked at horse stalls at North 40, a ranch supplier, and decided they were too expensive for my needs, way too heavy, and too darned big. I ended up buying a large truck mudflap, approximately 20 x 20 inches. Cost was $10 and I cut it into four parts using a razor knife to use as needed on the ground or to pad a jack foot. They are of minimal weight and they fit vertically in the odd sized gap behind my gas bottles (I have access hatches and a floor in there) so they essentially take up zero space. I'm using an assortment of wood blocks, plus two of the yellow cube Lego blocks under the jacks, mainly because they are light. I haven't bothered with stuff under the tires. Other than my one time use of the big Blaylock leveler, which I promptly sold to Reed ;) John Davies Spokane WA