John E Davies
-
Posts
5,759 -
Joined
-
Last visited
-
Days Won
243
Everything posted by John E Davies
-
I do not know 100% for sure, but my understanding is that all the cables and wires are in a common harness which is installed between the outer and inner hull parts, and they use only those that are specified on the build order. I don't think there is any problem adding an antenna later, but you might want to double check with an Oliver sales person. There is maybe an inch of air space between the parts, plenty to allow one to fish around and retrieve a wire harness or coax cable. Drilling the access hole might be a little tricky, to avoid damaging anything underneath..... But they have templates to locate everything correctly. John Davies Spokane WA
-
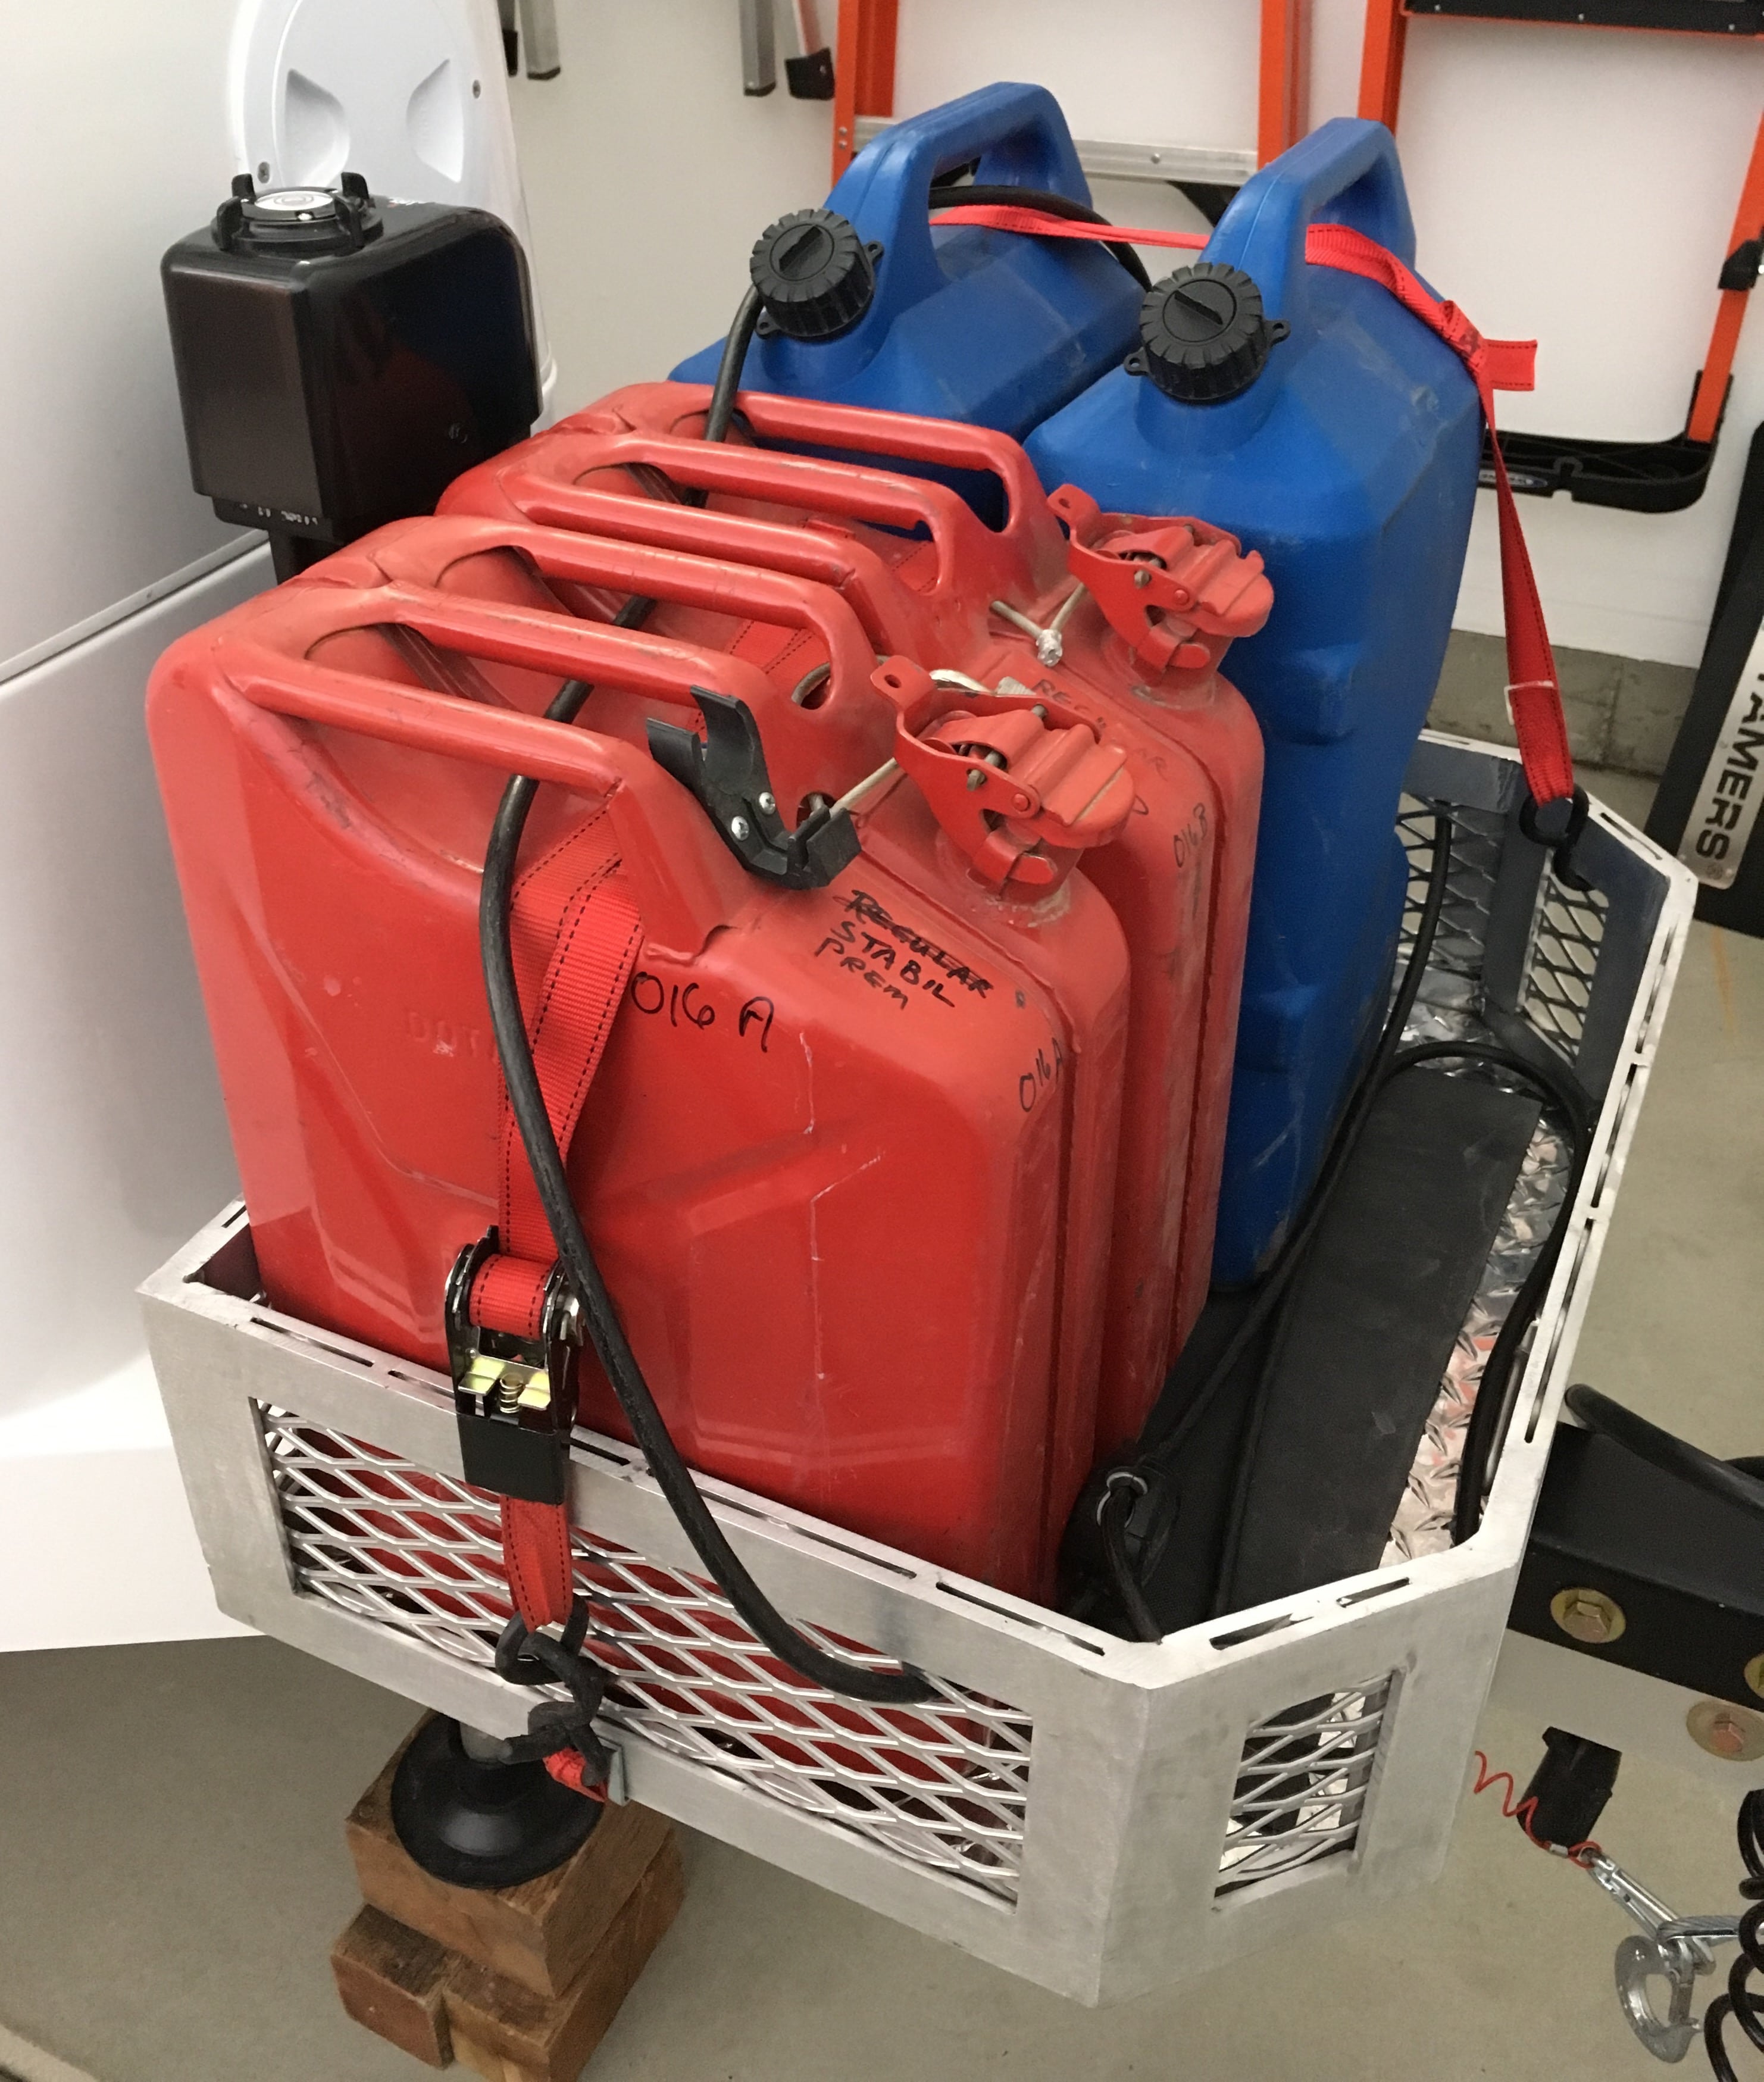
Has anybody added stout tie downs to the perimeter of the tray? The expanded aluminum sides are weak and will bend with any real force. The edges are knife sharp and need to be radiused. It needs a ventilated pad to protect the can bottoms .... Otherwise, I think it is a dandy accessory, VERY stout and good looking. I want to be able to tie down a variety of items, but primarily two steel gas cans and two plastic water cans: These fit _perfectly_ in this configuration with no extra room on the sides, and I can strap the gas cans and water cans down hard, and independently, so that either set can be removed without disturbing the other. I just need some better attach points. Maybe these around the top?: .... http://www.macscustomtiedowns.com/product/versatie-track-kit-4-foot/VersaTie-Track-Kits I would need a minimum of a 48 inch and a 36 inch piece to cover the entire perimeter, less the angled corners. Comments welcome. John Davies Spokane WA

-
It also depends on your mattress choice, I would not recommend the risers with any except the thinnest option. We have the 10 inch plush mattresses and no risers. I don't see how that size with risers could possibly be useable. I do like the great comfort but they are excessively tall IMHO. If I were going solo, I would get a six inch mattress for the curb side only, and put a riser on the street side, with conventional thin cushions for lounging. For hard core trips you could keep the cushions at home and utilize the top of that riser for lots of storage, like bottled water or bulky gear, or a dog bed. With an extra flip down access panel underneath, you could get to the electronics easily (which is not needed very often) and not have to disturb the stuff on the top two layers and then reach down though TWO access ports. An extra flip down panel would be good on the curb side, but not required if you have the thinner mattress, though it would save you from having to disturb the bedding, at the cost of having to squat or lie down to turn the valves... flipping back the ten inch mattress is more than a little awkward! Especially on the curb side with the darned fixed tv mount as it comes. With the tv gone, it is a non issue. John Davies Spokane WA
-

Rubber Gaskets Around Porch Lights
John E Davies replied to Mike and Carol's topic in Mechanical & Technical Tips
Bill, that is a fallacy. There is no problem using a good quality RTV silicone sealant on fiberglass. !!! HOWEVER !!! It should never ever be used on stainless steel fittings and hardware, because it does not bond to that material well. For stainless you should use a good marine sealant like 3M 4200 or one of the other variants. ... http://multimedia.3m.com/mws/media/891179O/3m-marine-fast-cure-general-purpose-adhesive-sealant-4200fc.pdf True story: Back when we were DINKs (Double Income No Kids) we bought a 1988 SeaRay 250 Sundancer power boat, brand new. I wanted a boat with a warranty, and I knew that SeaRay was a top quality manufacturer. LOL. We ran it on Puget Sound and lakes through the summer, stored it under cover on its trailer through fall and winter. In the spring I discovered that the fiberglass deck was bulging and mushy, and water oozed from multiple screw holes when you walked on it. The windshield frame, life rail stanchons, deck hatches and every single item were sealed with silicone sealant, and the water got past it and into the balsa core. The dealer farted around, the service rep attempted a repair by injecting resin from underneath, destroying the headliner, and finally they admitted that it had to go back to the factory in Arizona for a deck replacement. That blew the _entire_ summer, and I insisted that they use the 3M sealants for the rebuild. When I finally got it back, the water leaks were gone for good. The boat was a constant nightmare in other ways, but that is another story. My credo for the Oliver is: if the part penetrates the hull, it gets coated with 4200. You must clean the parts with MEK or similar, not alcohol (that will prevent it from curing). If it does not penetrate, then white silicone is fine and much more affordable, since you don't have to discard the unused contents of a tube 24 hrs after opening. I would have no hesitation whatsoever about using silicone to fair in the edge of a rain gutter or window, or to seal the rubber gasket on a light. Use the correct product, use as directed, and then don't worry about it. Water leaks on an Ollie are a nuisance but they won't hurt anything, unlike on a balsa core deck. John Davies Spokane WA -
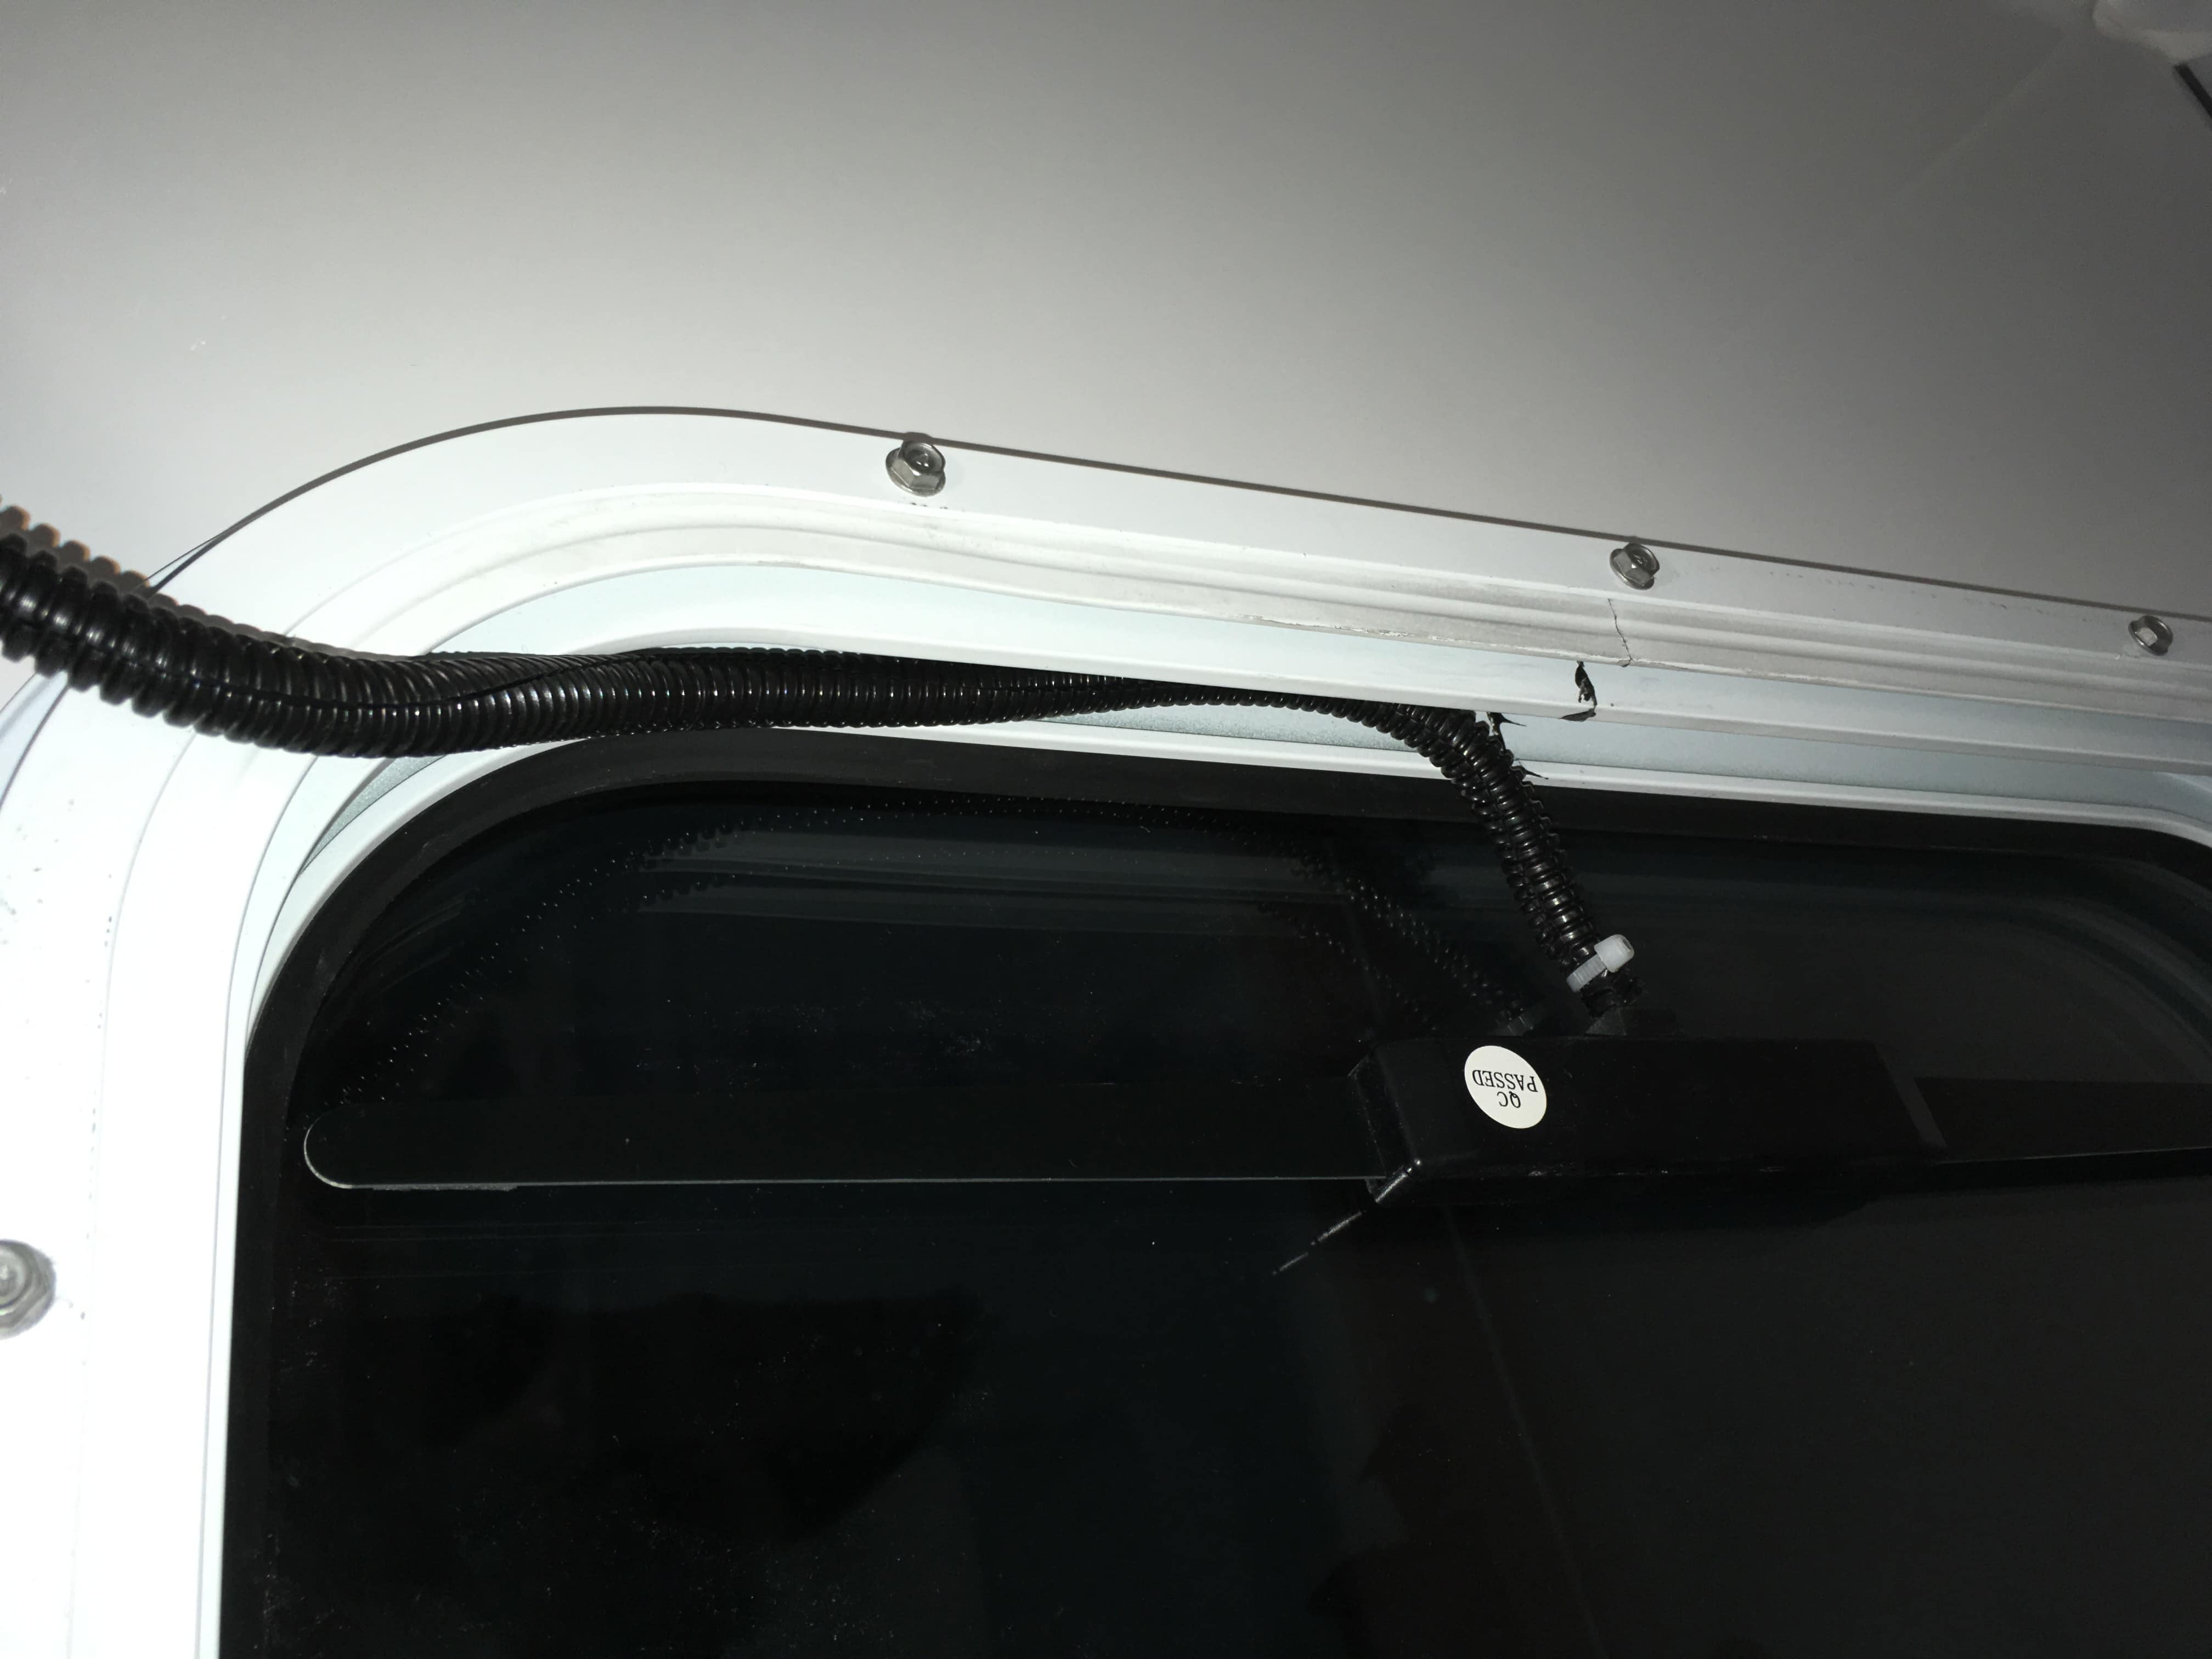
You get tv and fm radio through the Winegard. If you don't have one, you get the funky self adhesive bar antenna that came with the entertainment system, glued to the inside of the left rear window. Radio reception is adequate and tv reception is pretty much nil with the little one. Sorry for the dark, it is hard to show a black antenna on a tinted glass surface... We chose not to have the outside tv antenna since like you, we watch dvds or maybe downloaded Amazon Prime stuff on my iPad. We watch network tv for the news, but haven't watched any broadcast primetime show in way over a decade. Nor do we miss them. Unless you really need the capability of the outside antenna, skip it. The less things poking up out of the roof, the better. The wires are there inside the roof, if a future owner wanted to install one. John Davies Spokane WA
-
Hi Reed, yes this is it: ..... https://www.amazon.com/Blaylock-American-Metal-EZ-100-Wheel/dp/B000R5PMWE It's certainly big and sturdy. It is cast aluminum with a shiny chrome plating. For parking long term it will hold up, especially if there is an uneven surface or rocks. I used it one night and the rest of the time it has been stored awkwardly in the doghouse behind the propane bottles. It really is intended for bigger trailers, I think. Check your Private Messages. John Davies Spokane WA
-
This is quick and easy to use and I hate mine with a passion. I'm going to sell it. You just set it in front of the low front tire and drive forward. But it is huge and sharp and horrible to store. I would rather carry a bunch of 2x6x6 and/ or 4x6x6 wood blocks and stack them as needed under the jacks. They transport MUCH more efficiently and aren't heavy. The Anderson version of this is plastic and not as heavy, but it is still an extremely inefficient shape to carry around all the time. You can buy a single piece of lumber at Home Depot and cut it into everything you need. Cutting a 2 inch one is easy, cutting a 4 inch thick one takes more time and effort since a standard circular saw won't do it in a single cut. John Davies Spokane WA
-
I don't have a pic, but I have seen one trailer with frosted glass and I thought it looked cheap and tacky. Seeing ghostly shapes of your pots, pans, shampoo bottles and stacked clothes is not exactly uplifting. After a few false starts, you will quickly remember where you stored your stuff, if you go wth mirrored or dark. I like the mirrors, they really add a lot of reflected light and make the cabin feel bigger inside, day or night. You soon learn to open and close them using the latches, to avoid getting your fingerprints everywhere. Well ... one of us has learned that. There are lots of general pics of frosted glass cabinets, here is one: Keep in mind that your trailer shelves won't look anything like that after a long bumpy trip - your stuff will be a lot less tidy and photogenic. Nor will you be putting pretty and fragile glassware up there.... John Davies Spokane WA
-
This is a _wonderful_ summary of the differences, and I think every potential buyer should read and thoroughly absorb this information. http://www.twopluslu.com/oliver-versus-airstream-review/ Oliver factory tour: http://www.twopluslu.com/oliver-travel-trailers-review/ Bravo to the author! Well done! John Davies Spokane WA
-
- 1
-

-
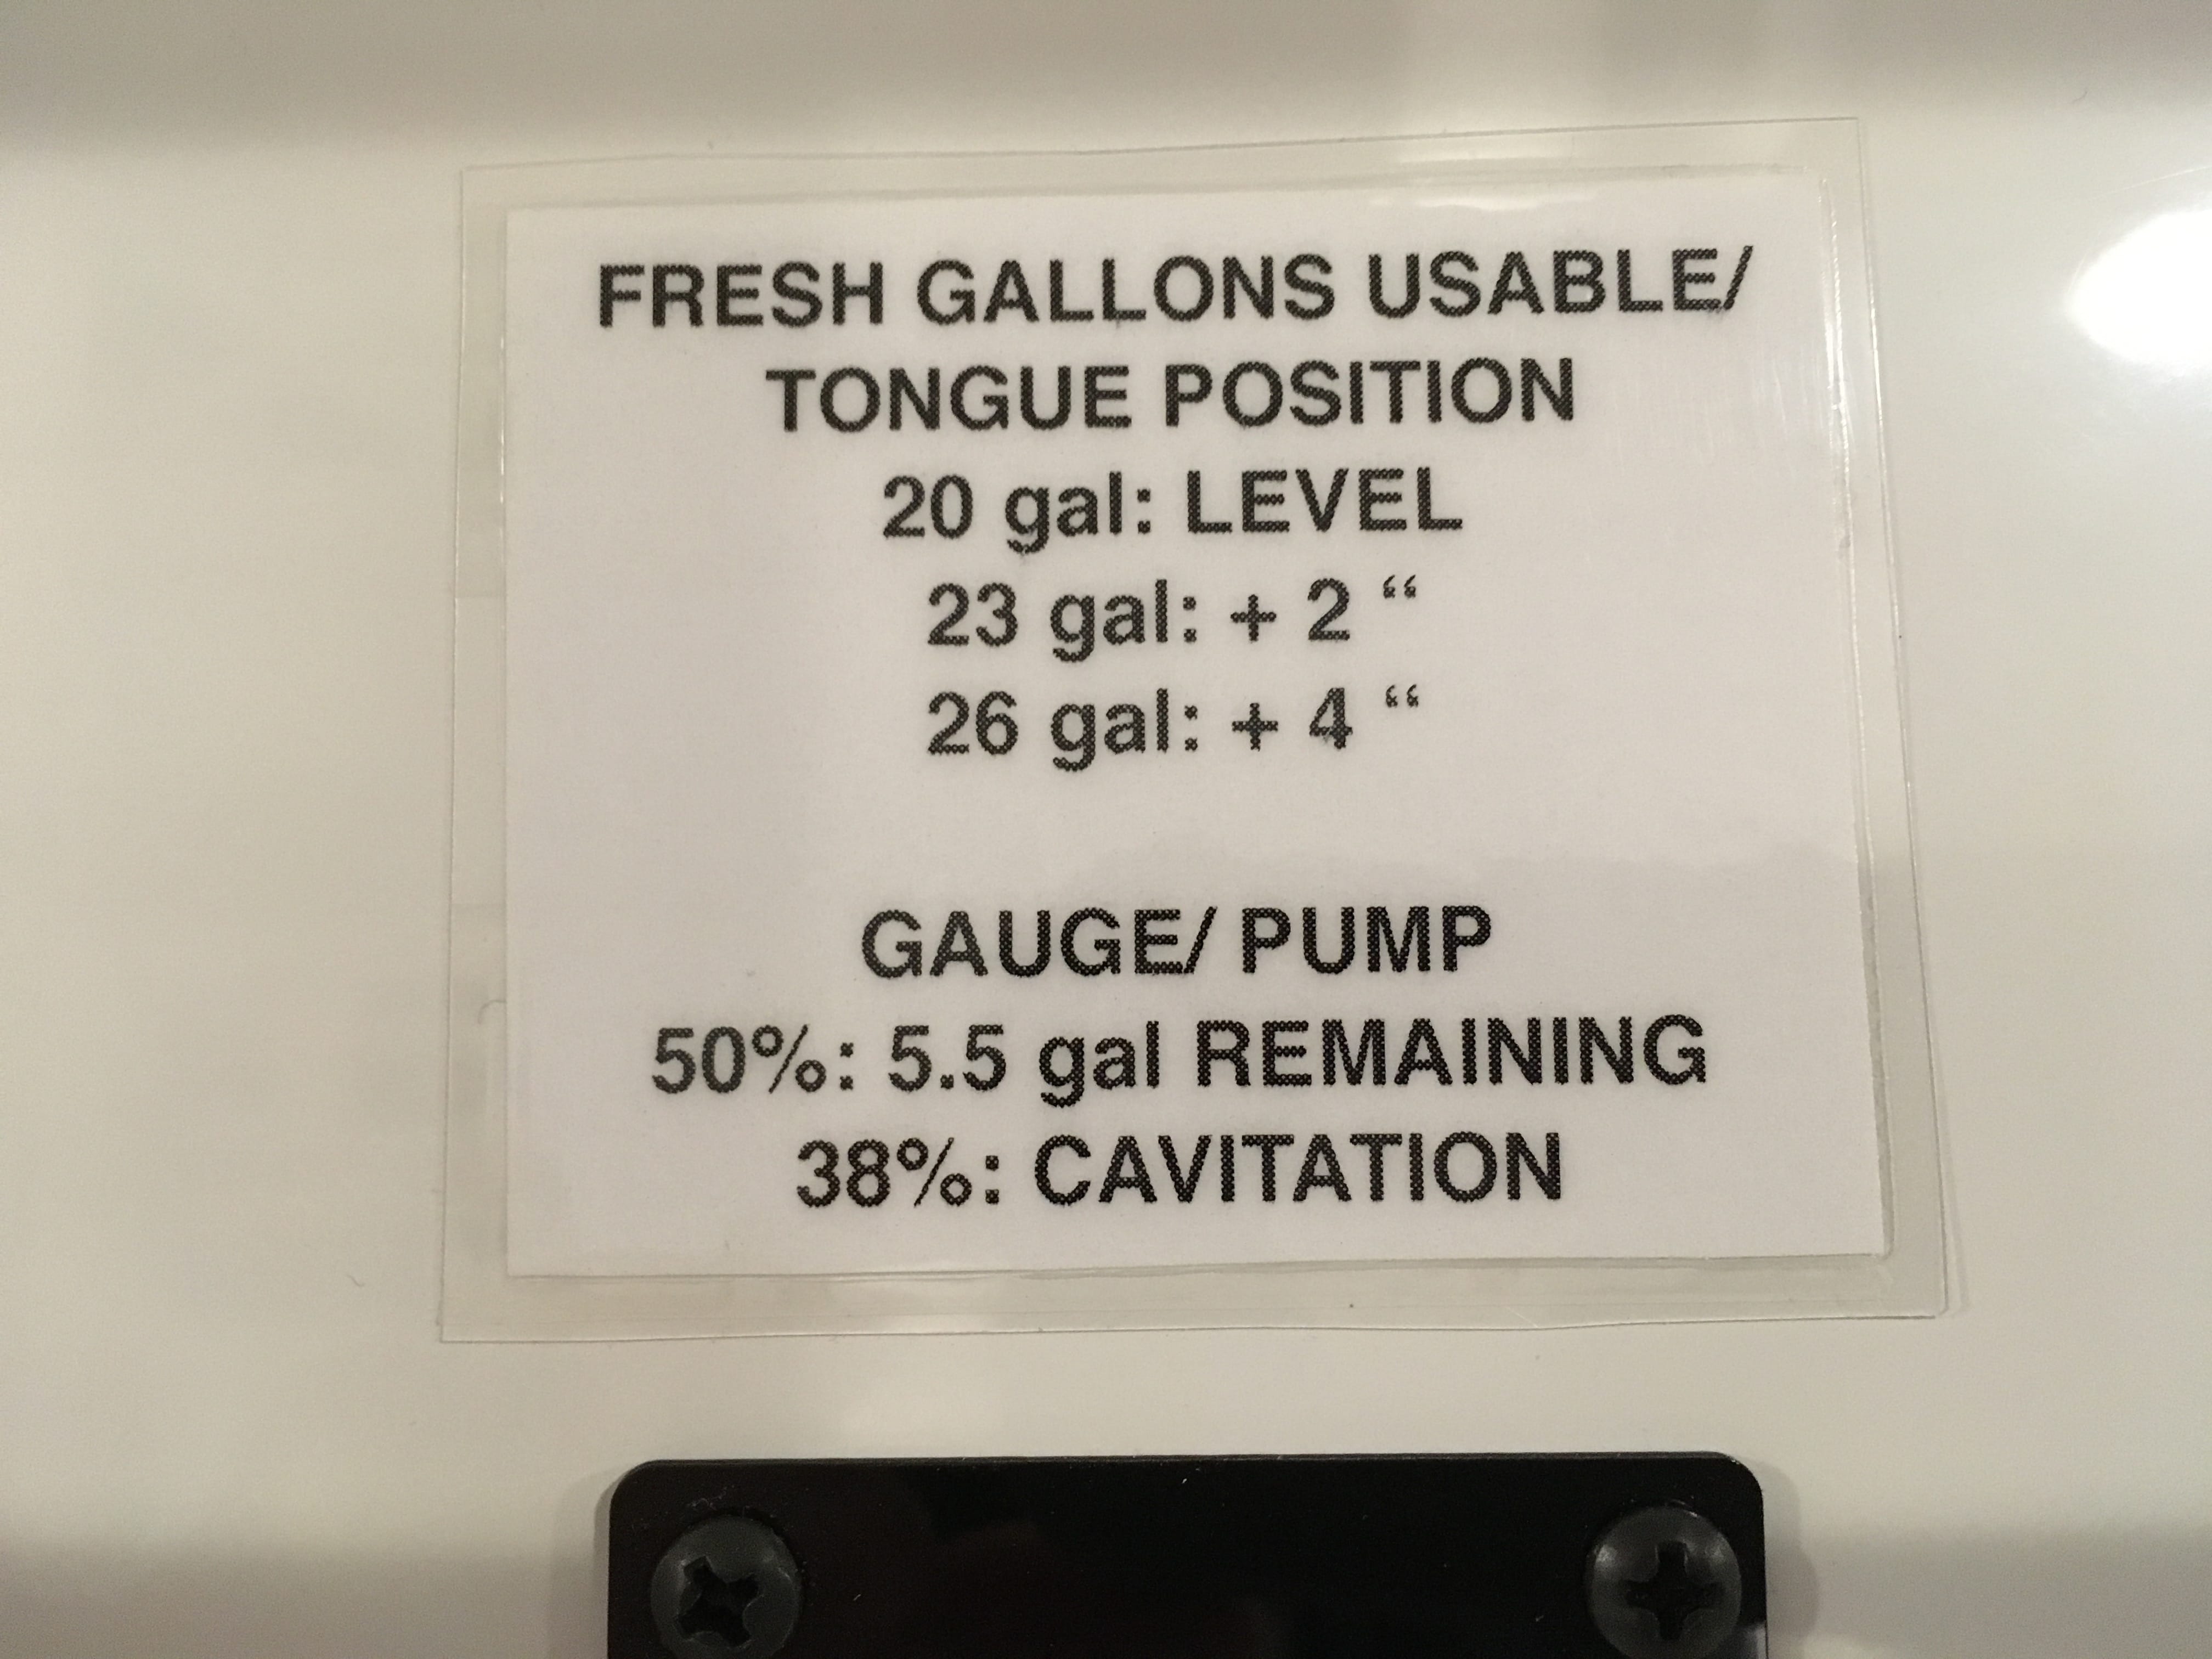
I am more than a little peeved that this design is a decade old and there has apparently been no attempt to correct that serious flaw until now. Do all older hulls stay hooked up constantly to city water ... ? When I looked at an XP Camper, I was very impressed by the water tank. It is tall, narrow front to back, and full width across the front wall. All 75 gallons (!) are usable without any fuss. I made a placard: LOL. John Davies Spokane WA
-
Questions about the twin bed settup in Elite II
John E Davies replied to carbon's topic in General Discussion
FYI, the Twin Beds are not Twins, they are 30 inches wide. Regular Twin linens are way too wide and you have trouble tucking everything in neatly. I am in the middle of cutting down all the stuff we ordered prior to delivery, so it will all fit. I'm cutting off a 16 inch wide strip on the long edge, resewing a hem there, and forming small pockets at the foot to keep stuff in place. To access the compartments underneath, you need to be able to turn the mattresses on their sides without messing up the covers too badly.... I do think that the description is misleading and they should publish the dimensions of the cushions/ mattresses. It should be the "Two Bed Option". LOL, I am changing my signature to that! John Davies Spokane WA -
Add me to the list of interested parties for an angled or vertical pickup tube. I tested my system today and the pump cavitated at 20 gallons used. Elevating the coupler 4 inches got me 6 more gallons, but that angle is not comfortable or particularly practical.... I notified Oliver and will see what they come up with. At this point, converting my unused 18 gal black tank to fresh looks even more tempting. John Davies Spokane WA
-
How to: Santa Cruz locking shotgun mount in the closet
John E Davies replied to John E Davies's topic in Ollie Modifications
You make some great comments. I do understand the "relying on electronics" issue. However, the lock can be opened in a few seconds with a security key that over rides everything with a single twist. The electronics of the lock and timer are proven over many decades of use in police cars, I do not worry about that part of the equation. I always carry a handgun during waking hours, even at home or sitting in the trailer. I have a big magnum revolver (Super Redhawk Alaskan .480R) for walking in the remote woods. This shotgun would be unlocked (the ratcheting arm swung out of the way) when the trailer is parked and occupied. The only reason it is there is to secure it while towing, or when there might be a nosy kid around. If somebody comes to visit, I can reach in, squeeze, and the gun is locked again in an instant. I didn't choose this approach lightly, I spent a lot of time discussing pros and cons at ShotgunWorld.com years ago. This just made the most sense to me. It has been 100% reliable in my home for over a decade. The HUGE issue with any long gun is that, unlike a handgun, in most places you can't keep it loaded while moving. So you have to either break that law, or load and unload it every time you stop for the night in a bad or remote place. Loading a conventional shotgun is darned slow, a magazine fed long gun in a big caliber, like an AR10, really makes more sense. But International border concerns pointed me toward a conventional shotgun. Many other guns are too scary for Canada, eh! John Davies Spokane WA -
How to: Santa Cruz locking shotgun mount in the closet
John E Davies replied to John E Davies's topic in Ollie Modifications
Thanks Mike. If you can stand Kel-Tecs, their SU16C carbine folds up _really_ small and fits into a tennis racquet carry backpack. That could ride in your closet for quick access and not attract any notice. I have had one for a long while. It is not a quality firearm but it is cheap, shoots fine, is very light, 30 rounds of 5.56 NATO will get anybody's attention, and if it gets stolen I will not weep bitter tears about it. In a Nike bag, it can rest against the outer wall behind the shotgun. I would not willingly face down up a 1000 pound animal with it, but it is way better than a stick and pepper spray.... if the animal doesn't retreat. John Davies Spokane WA -
If you mount panels directly onto the roof, you trap the heat absorbed by the dark material. Elevated panels allow the heat to escape instead of being transferred to the roof. The hotter the panel, the less efficient, plus there is the possibility of it harming the roof surface. A flex panel can't be tilted to face the sun, a minor issue unless you are parked long term and need to macimize their output. They are nowhere near as durable and are easily scratched... http://www.gonewiththewynns.com/flexible-rv-solar-issues-review I think flexible panels look SO much better than big flat panels, especially on a rounded roof, and they don't have the potential to get caught on branches, but I am unsure about tacking them down hard against the roof surface, long term.... Ice damage? They would be self cleaning on an Ollie, which the flat ones definitely are not. The flex panels at that link - they are listed as 12 volts, 17.8 volts open and 21.6 volts open. Which is correct and why publish so many different figures? Thanks, John Davies Spokane WA
-
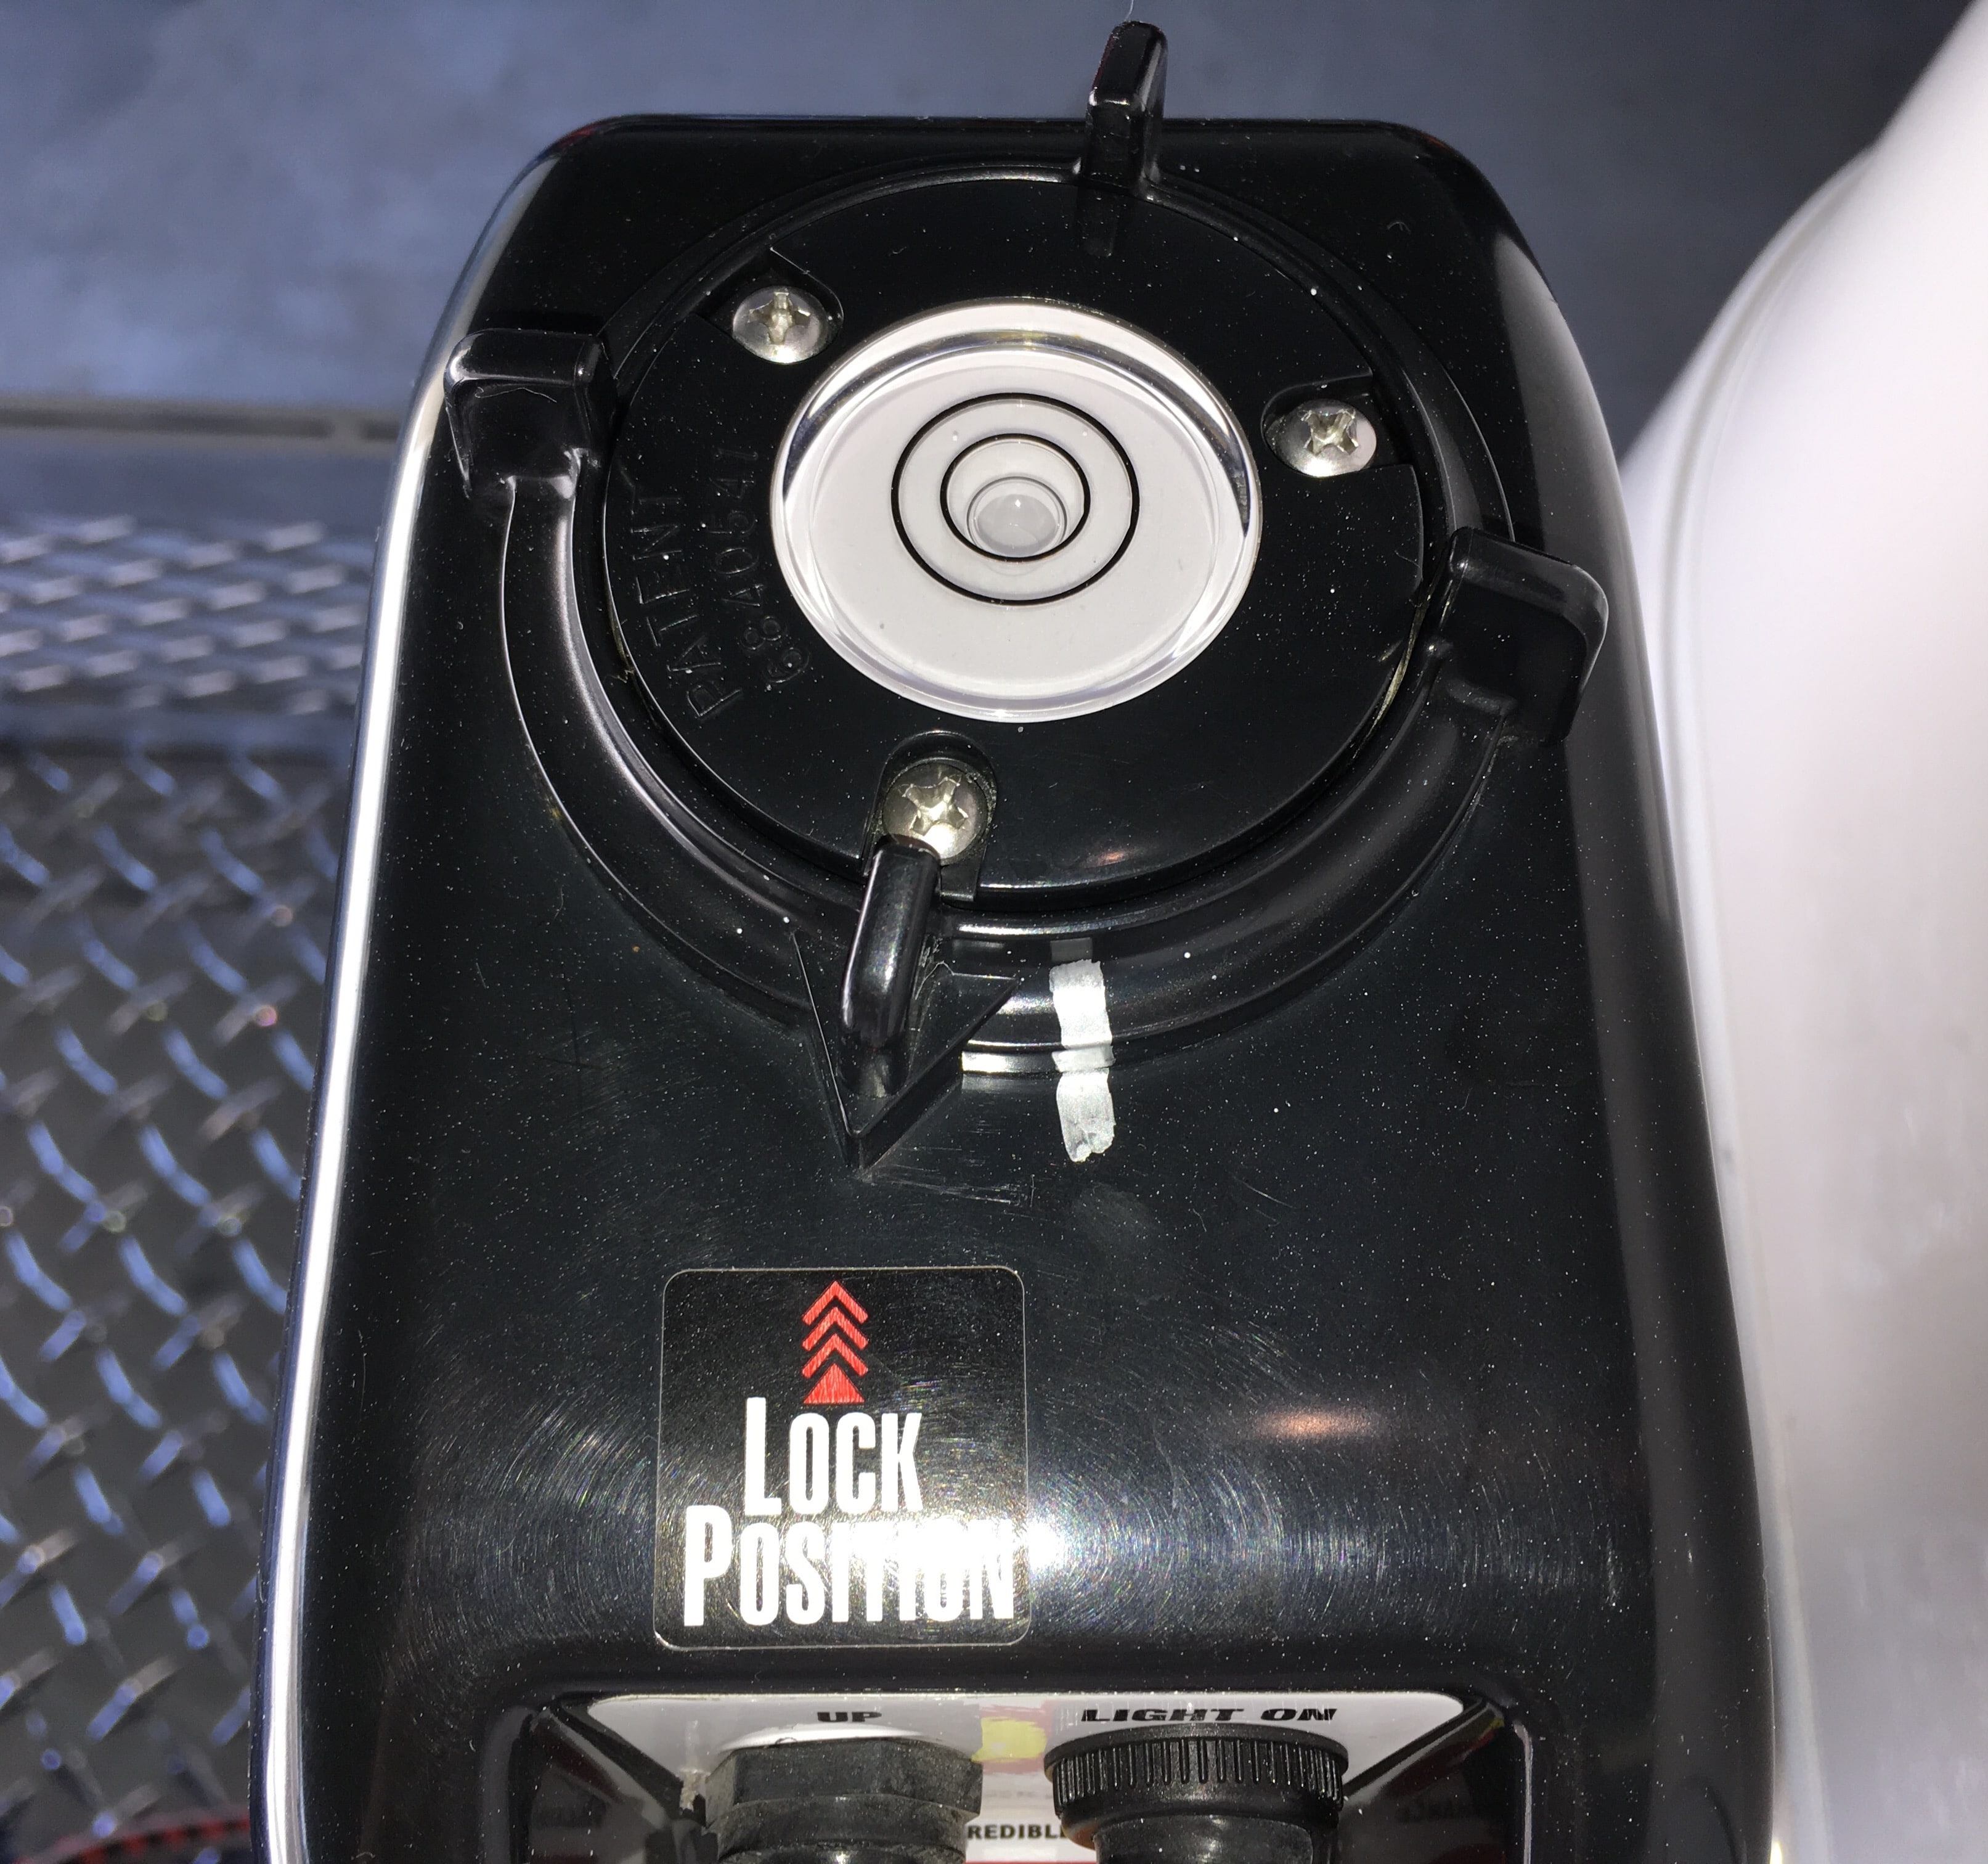
This is something you can do in a few minutes. Level the trailer using a good carpenters level placed on the floor. Level front to back and also sideways, until it is dead level in all directions. Using the three Philips screws on the bubble level, adjust until the bubble is right in the center of the smallest circle. Using a silver Sharpie or similar permanent marker, place an index line on the level housing and also on the adjacent motor cover. The reason for this is that the level can go on three different ways, and only one way will be correct: I wonder why they didn't just make the slots asymmetrical so this couldn't happen...? Related thread: https://olivertraveltrailers.com/forums/topic/2082-how-to-install-a-big-bubble-level-no-drilling/ John Davies Spokane WA
-
How to: Santa Cruz locking shotgun mount in the closet
John E Davies replied to John E Davies's topic in Ollie Modifications
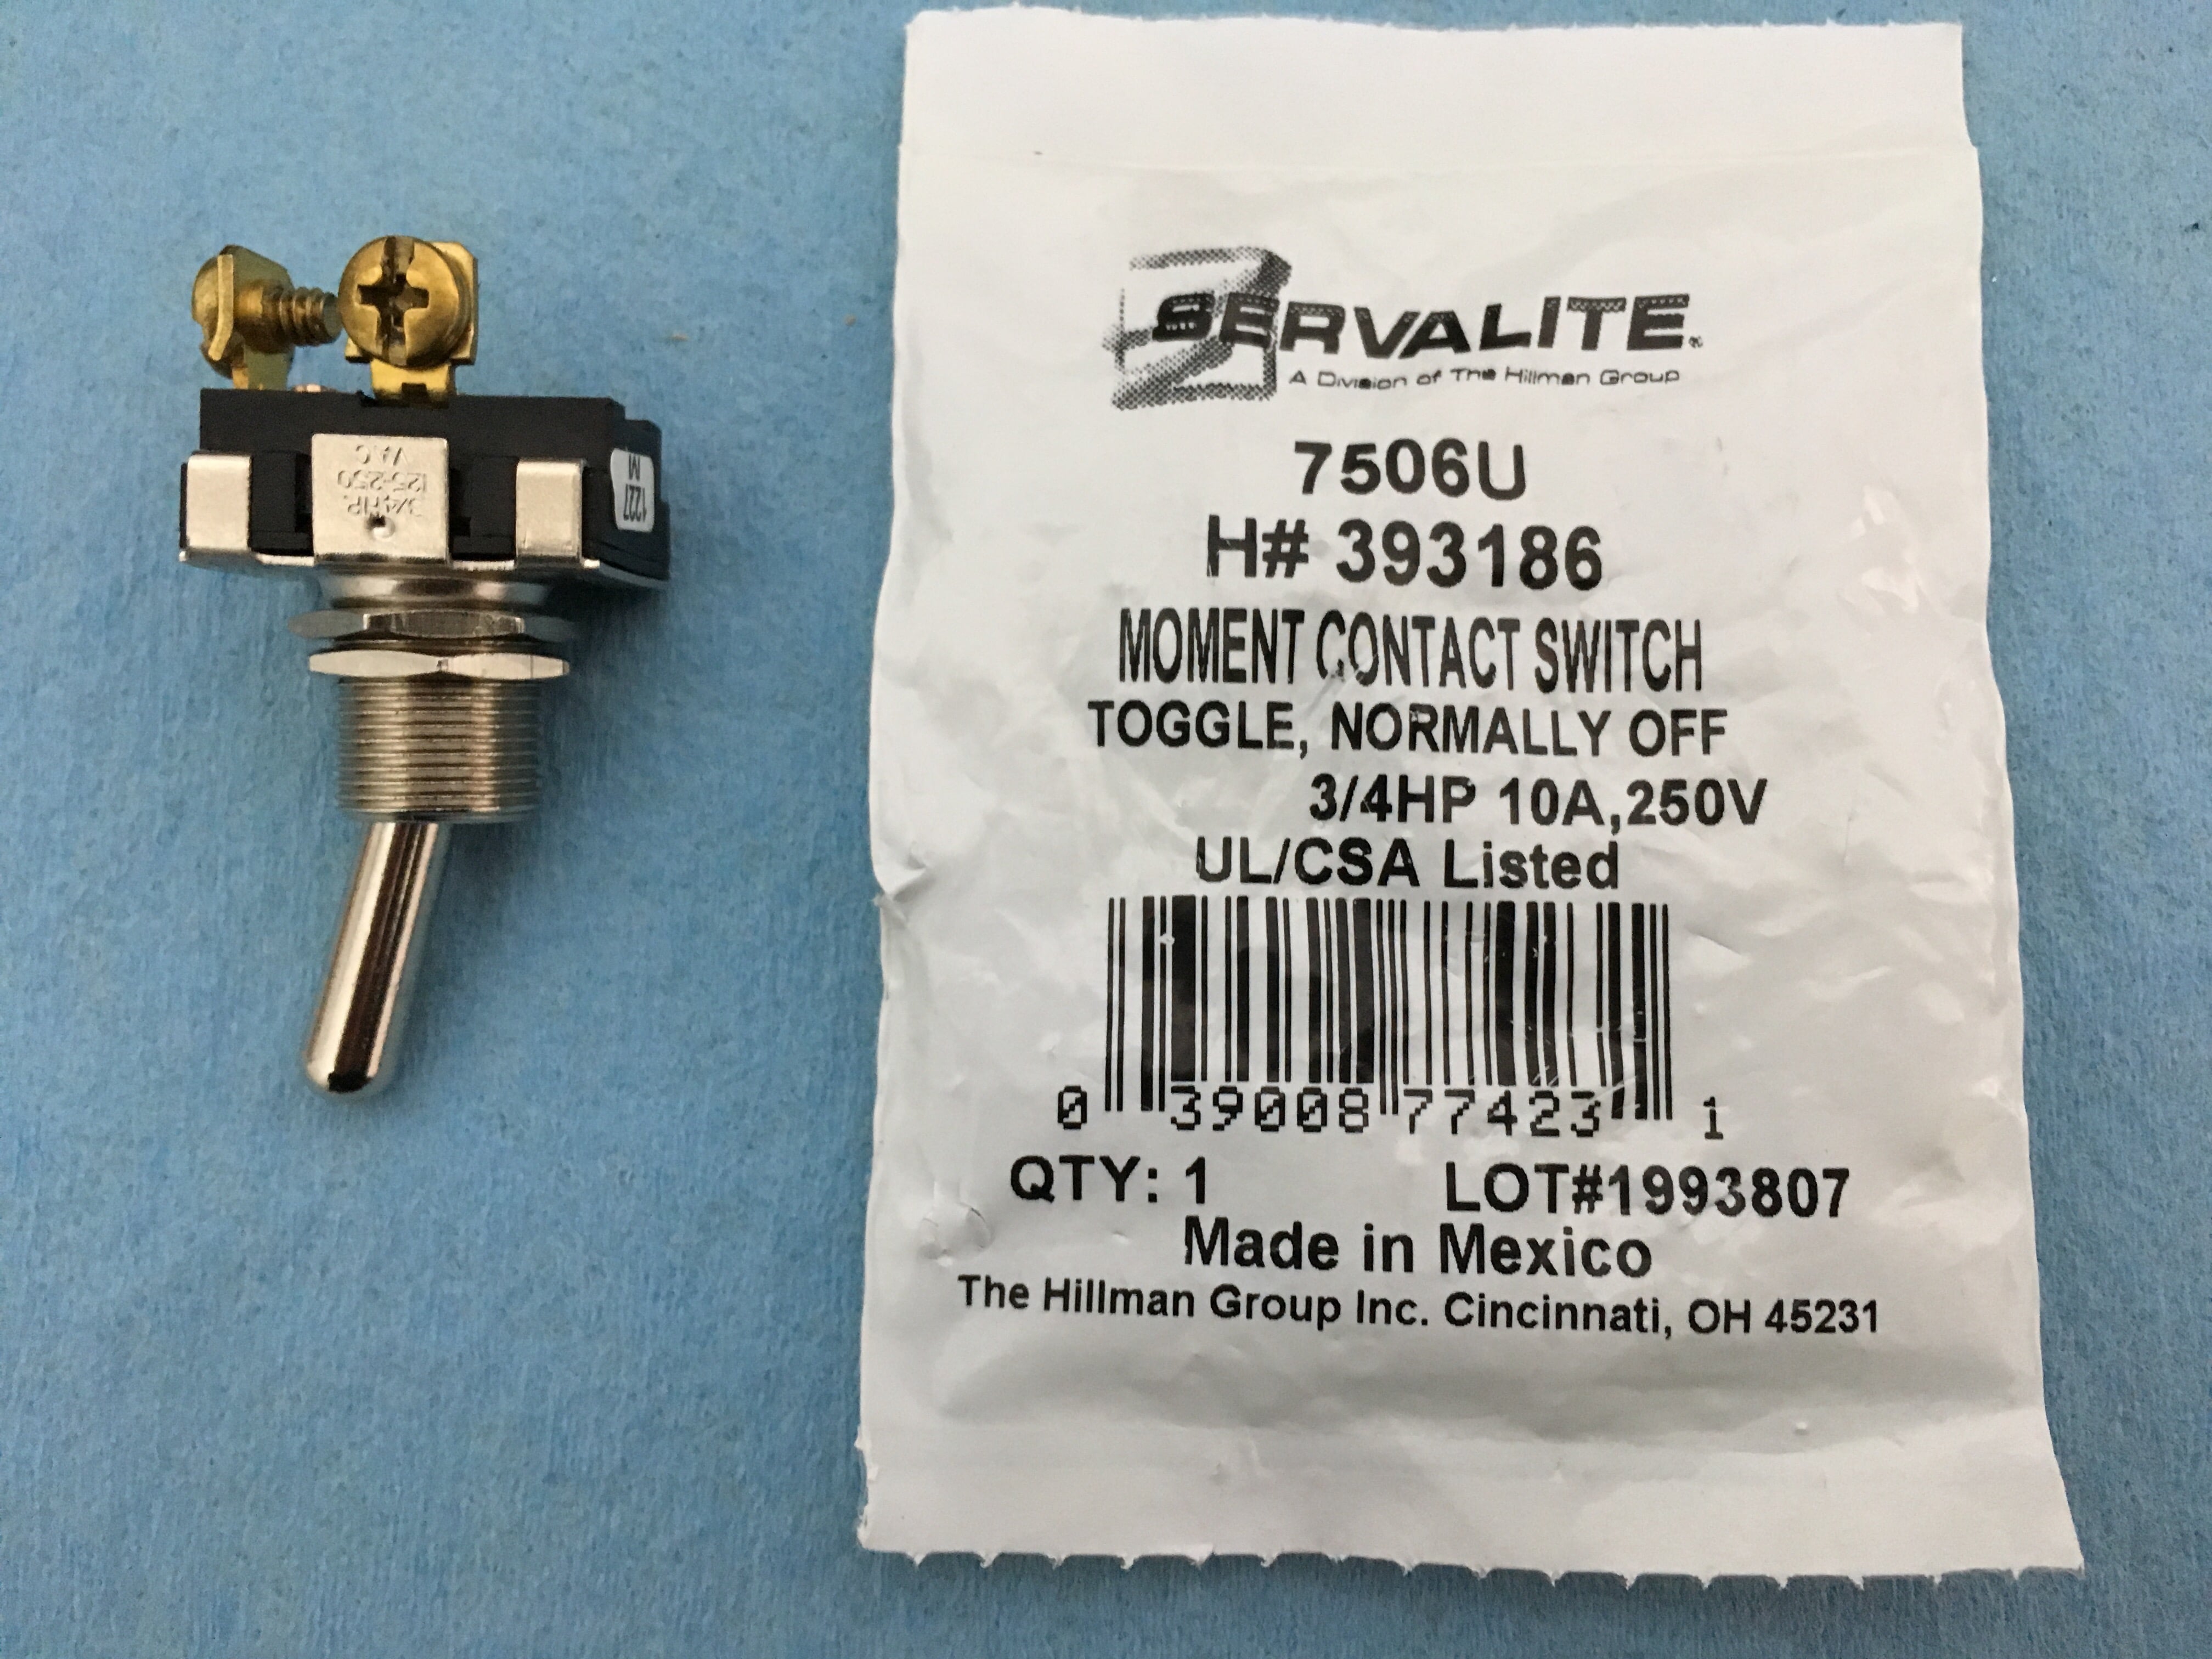
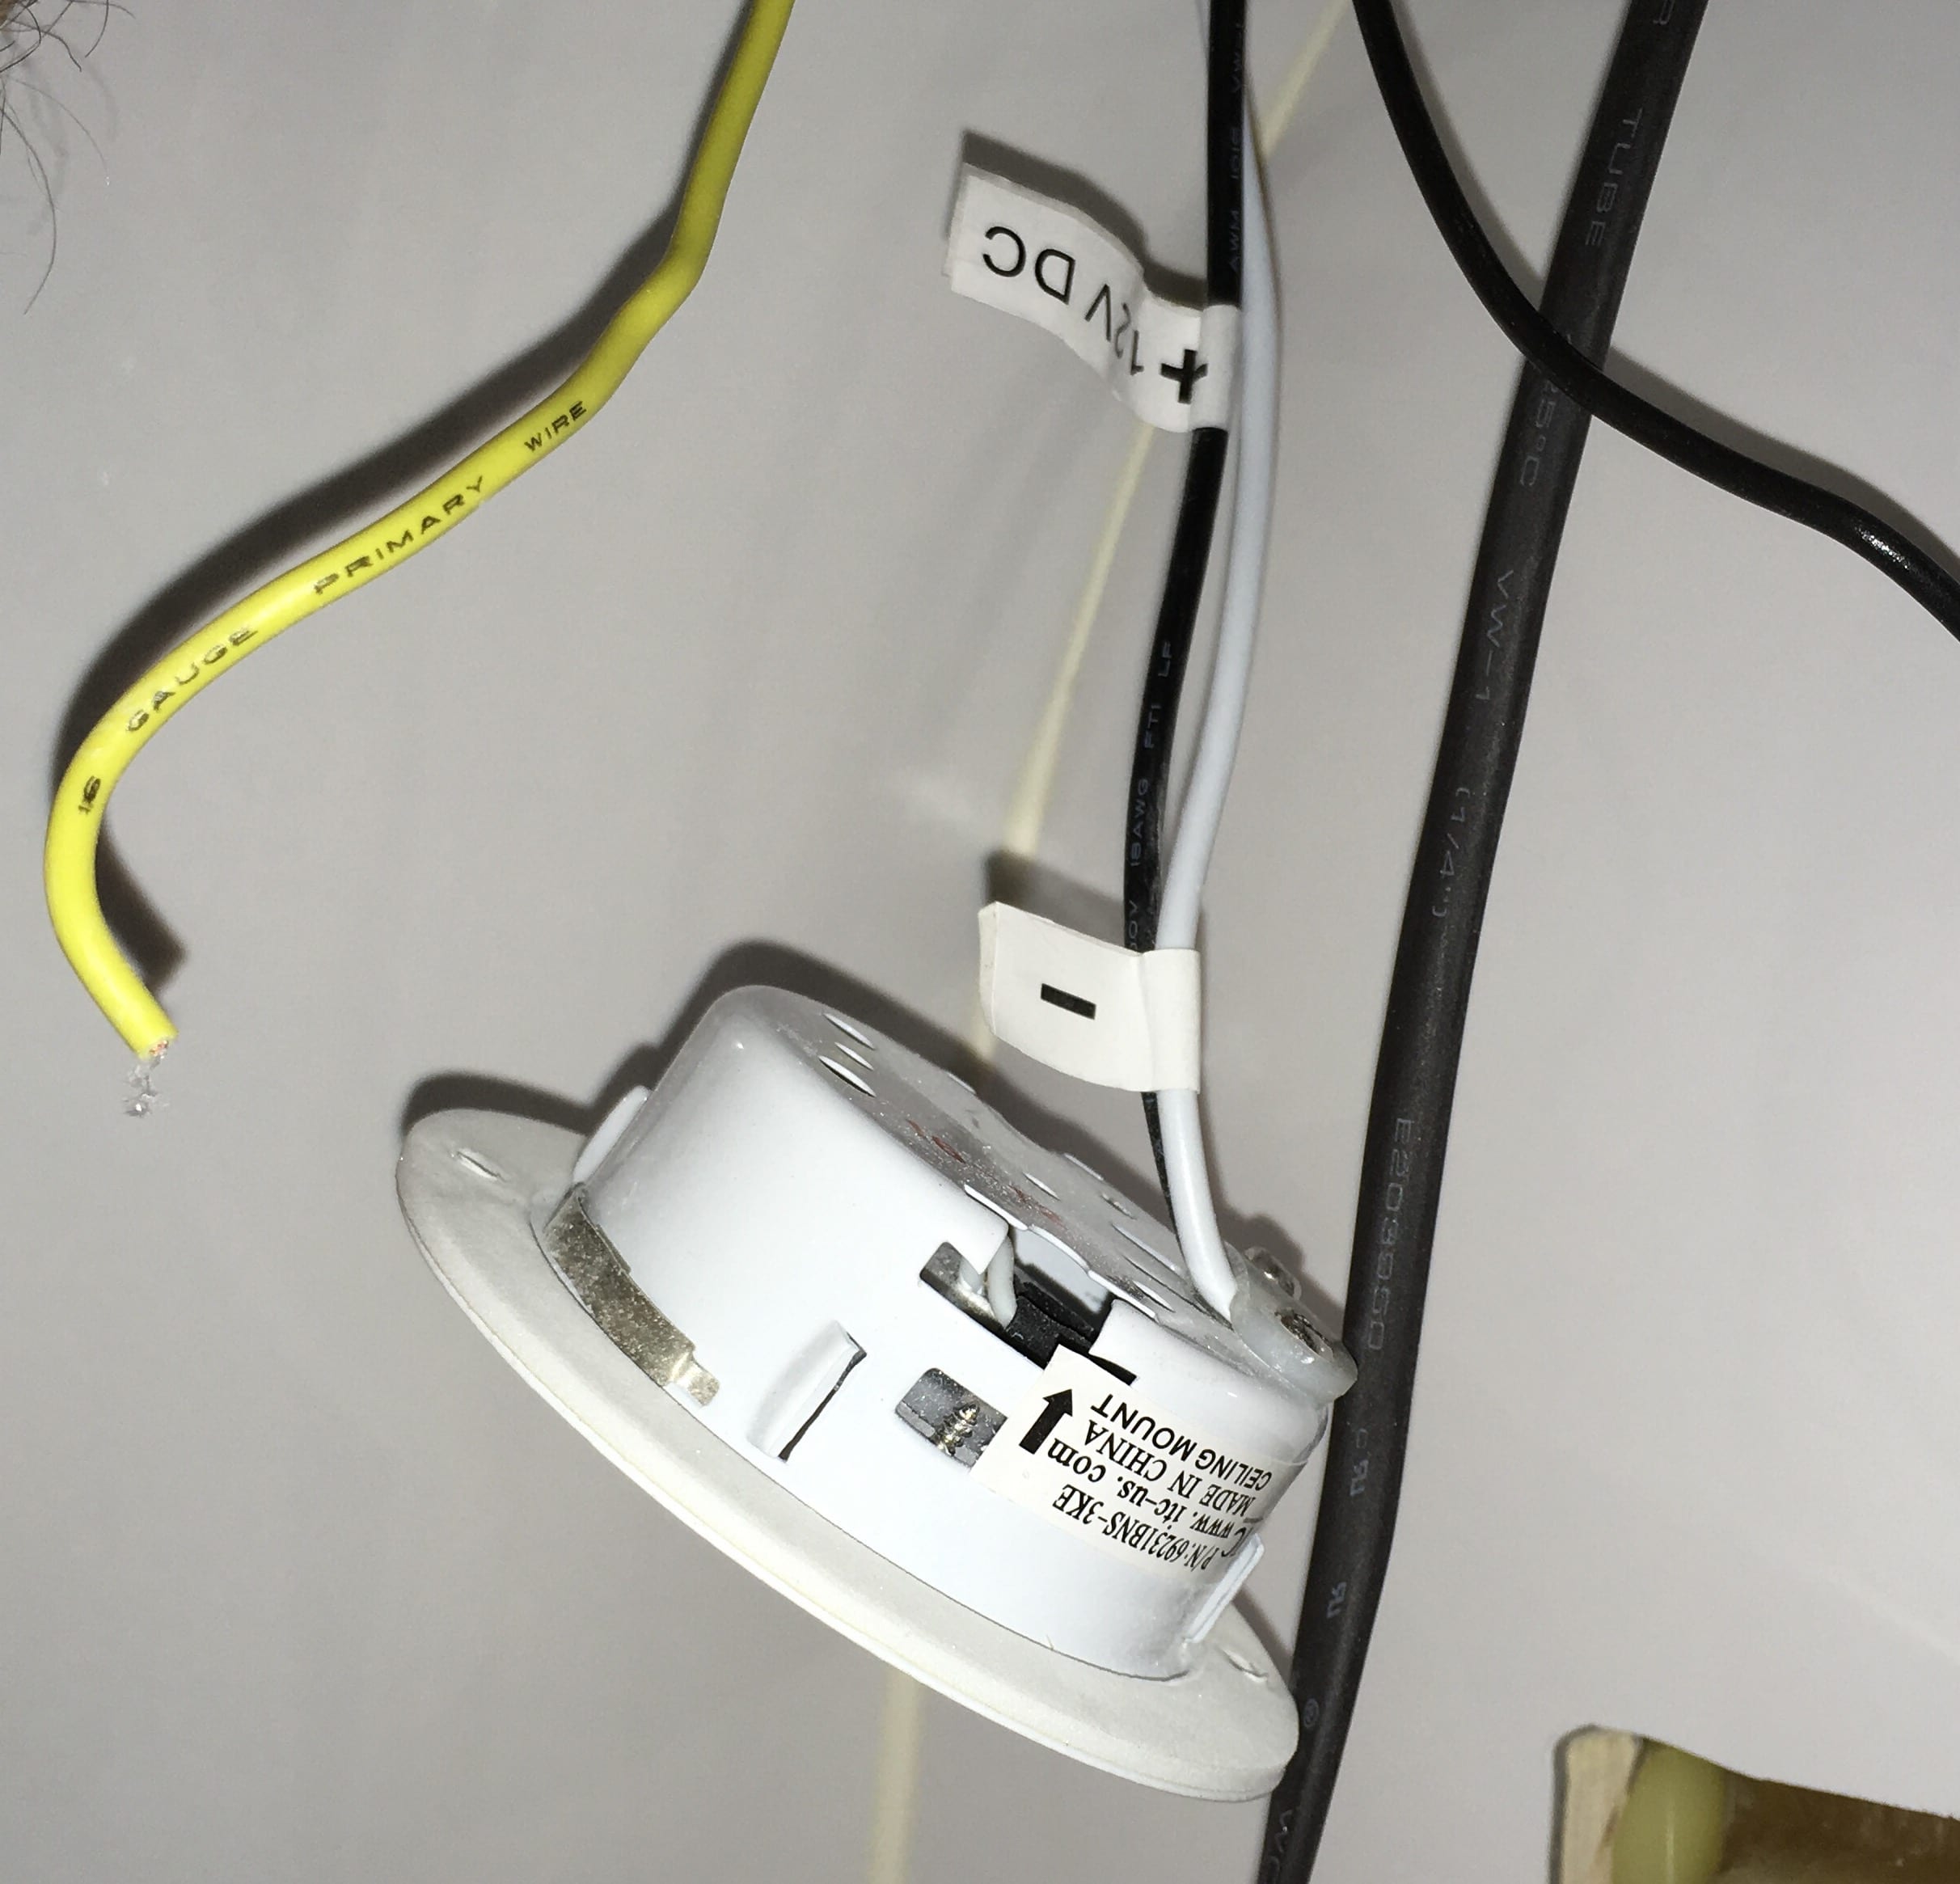
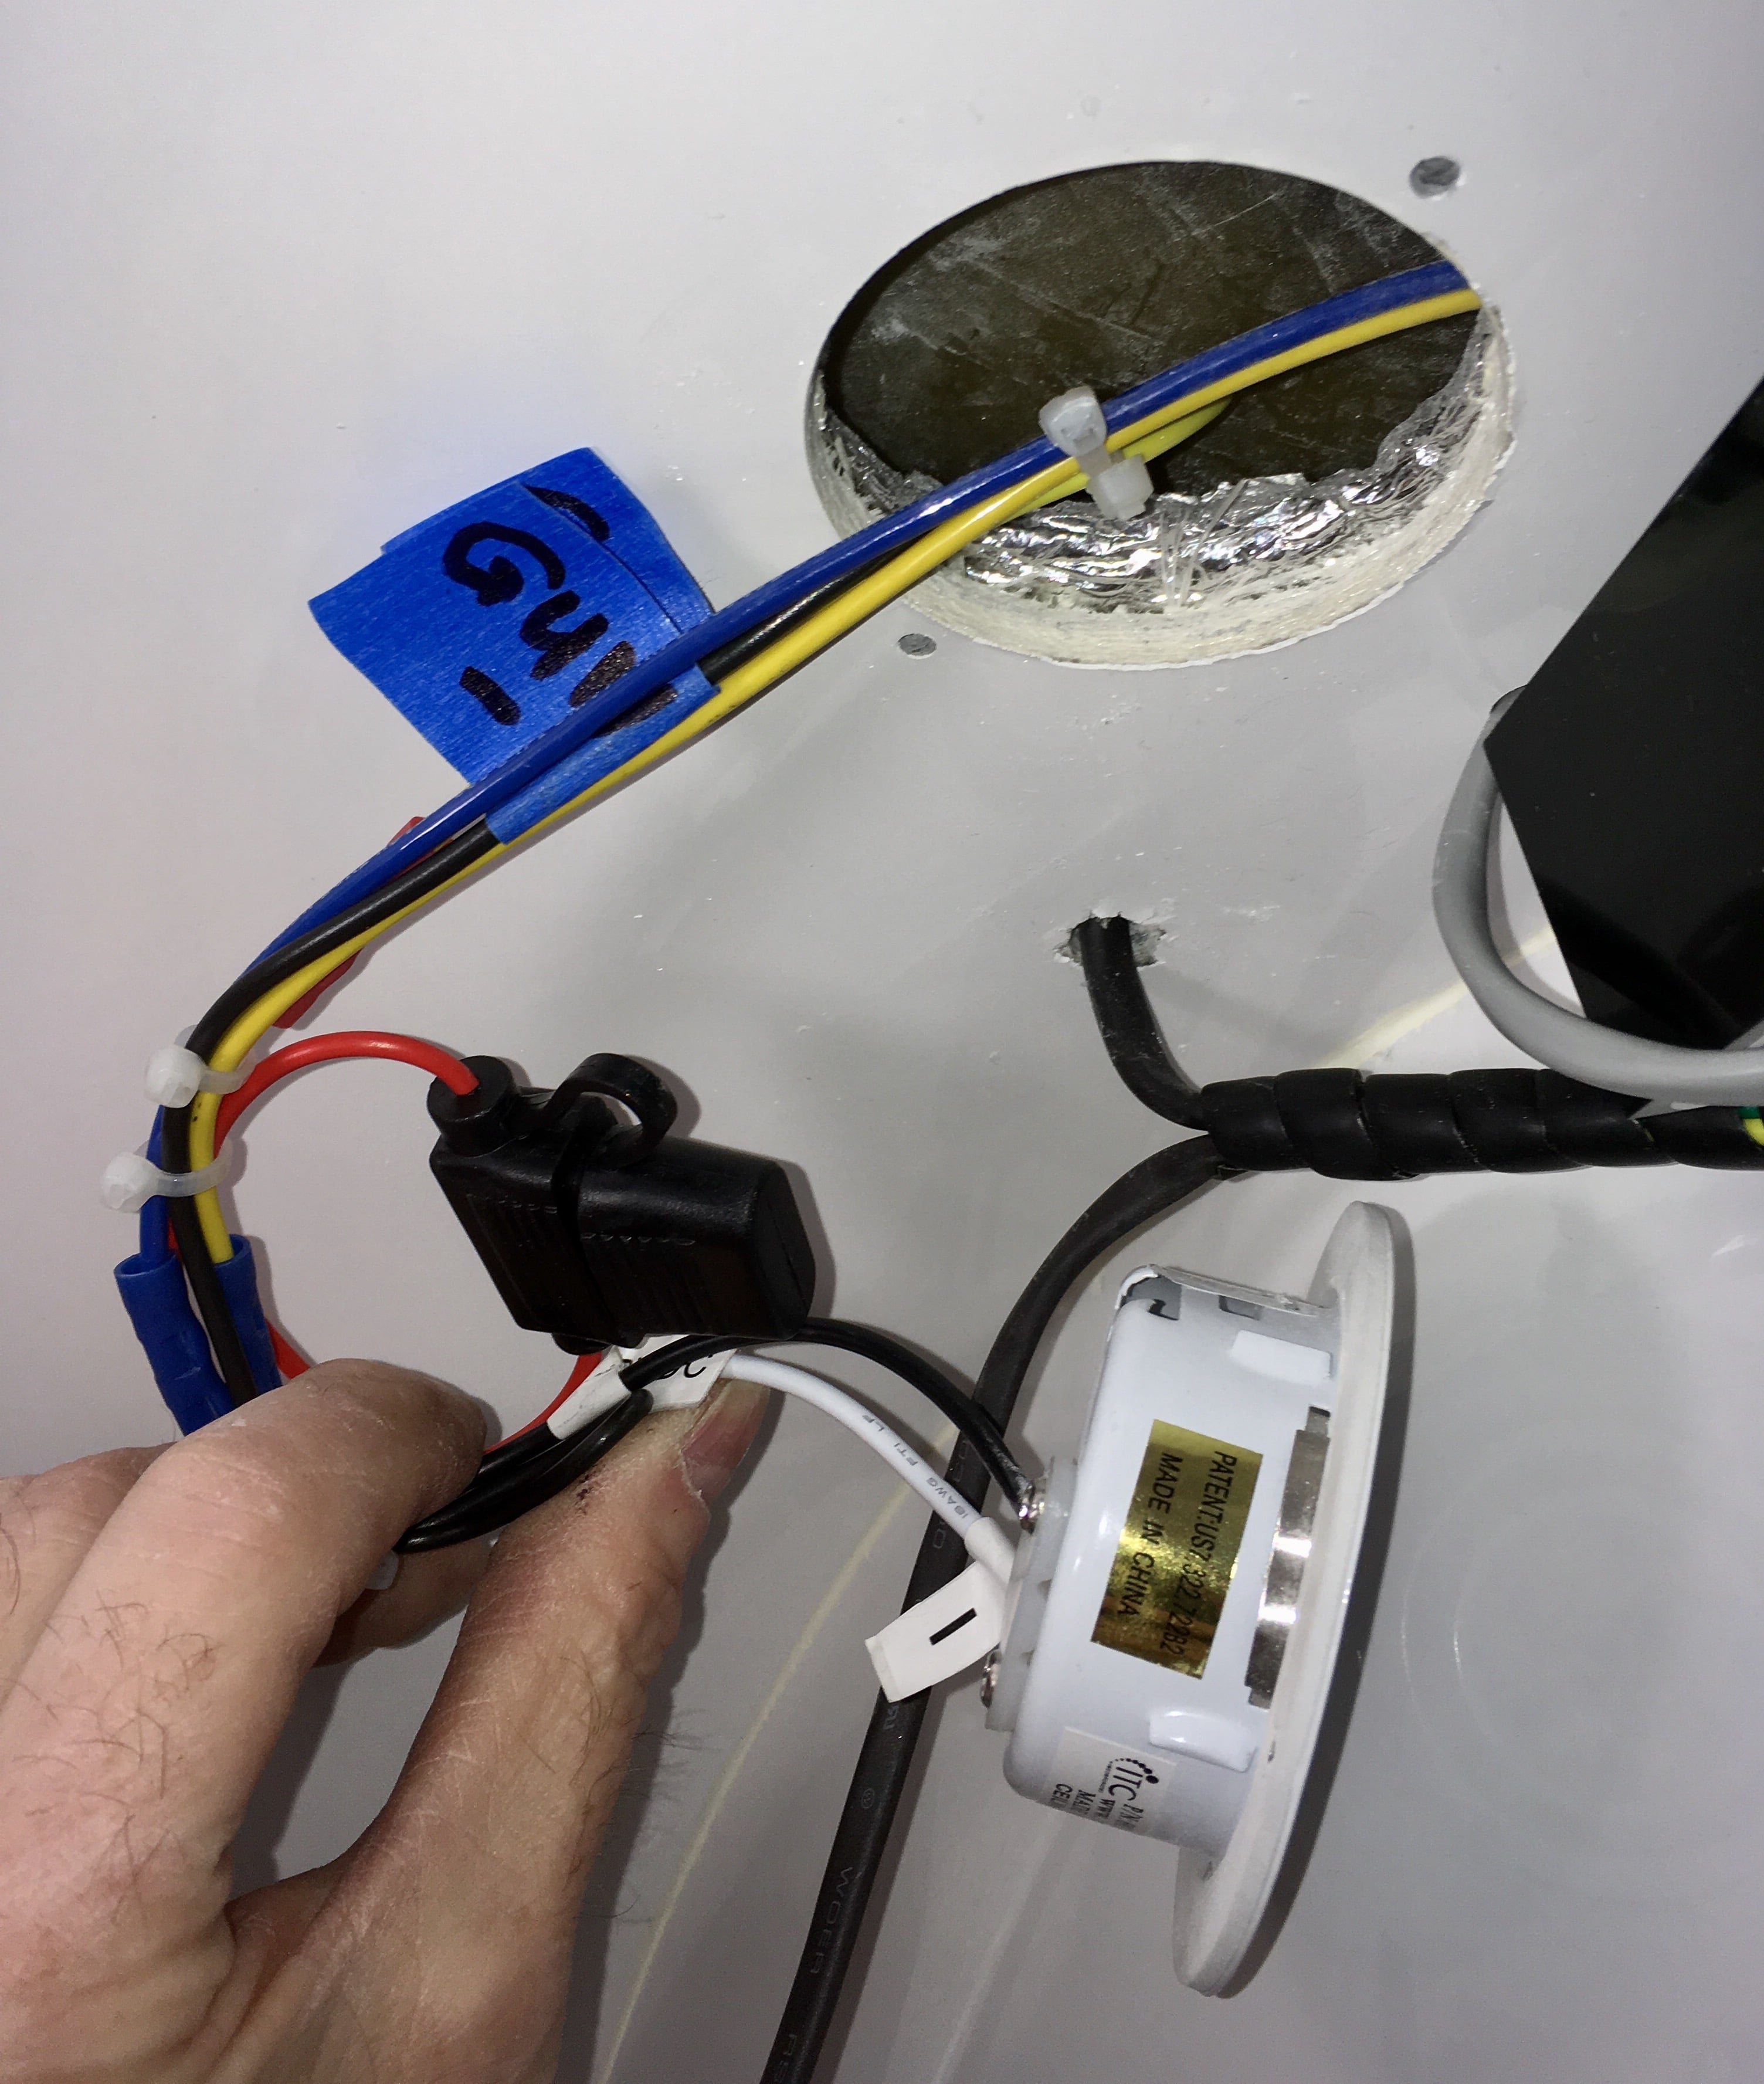
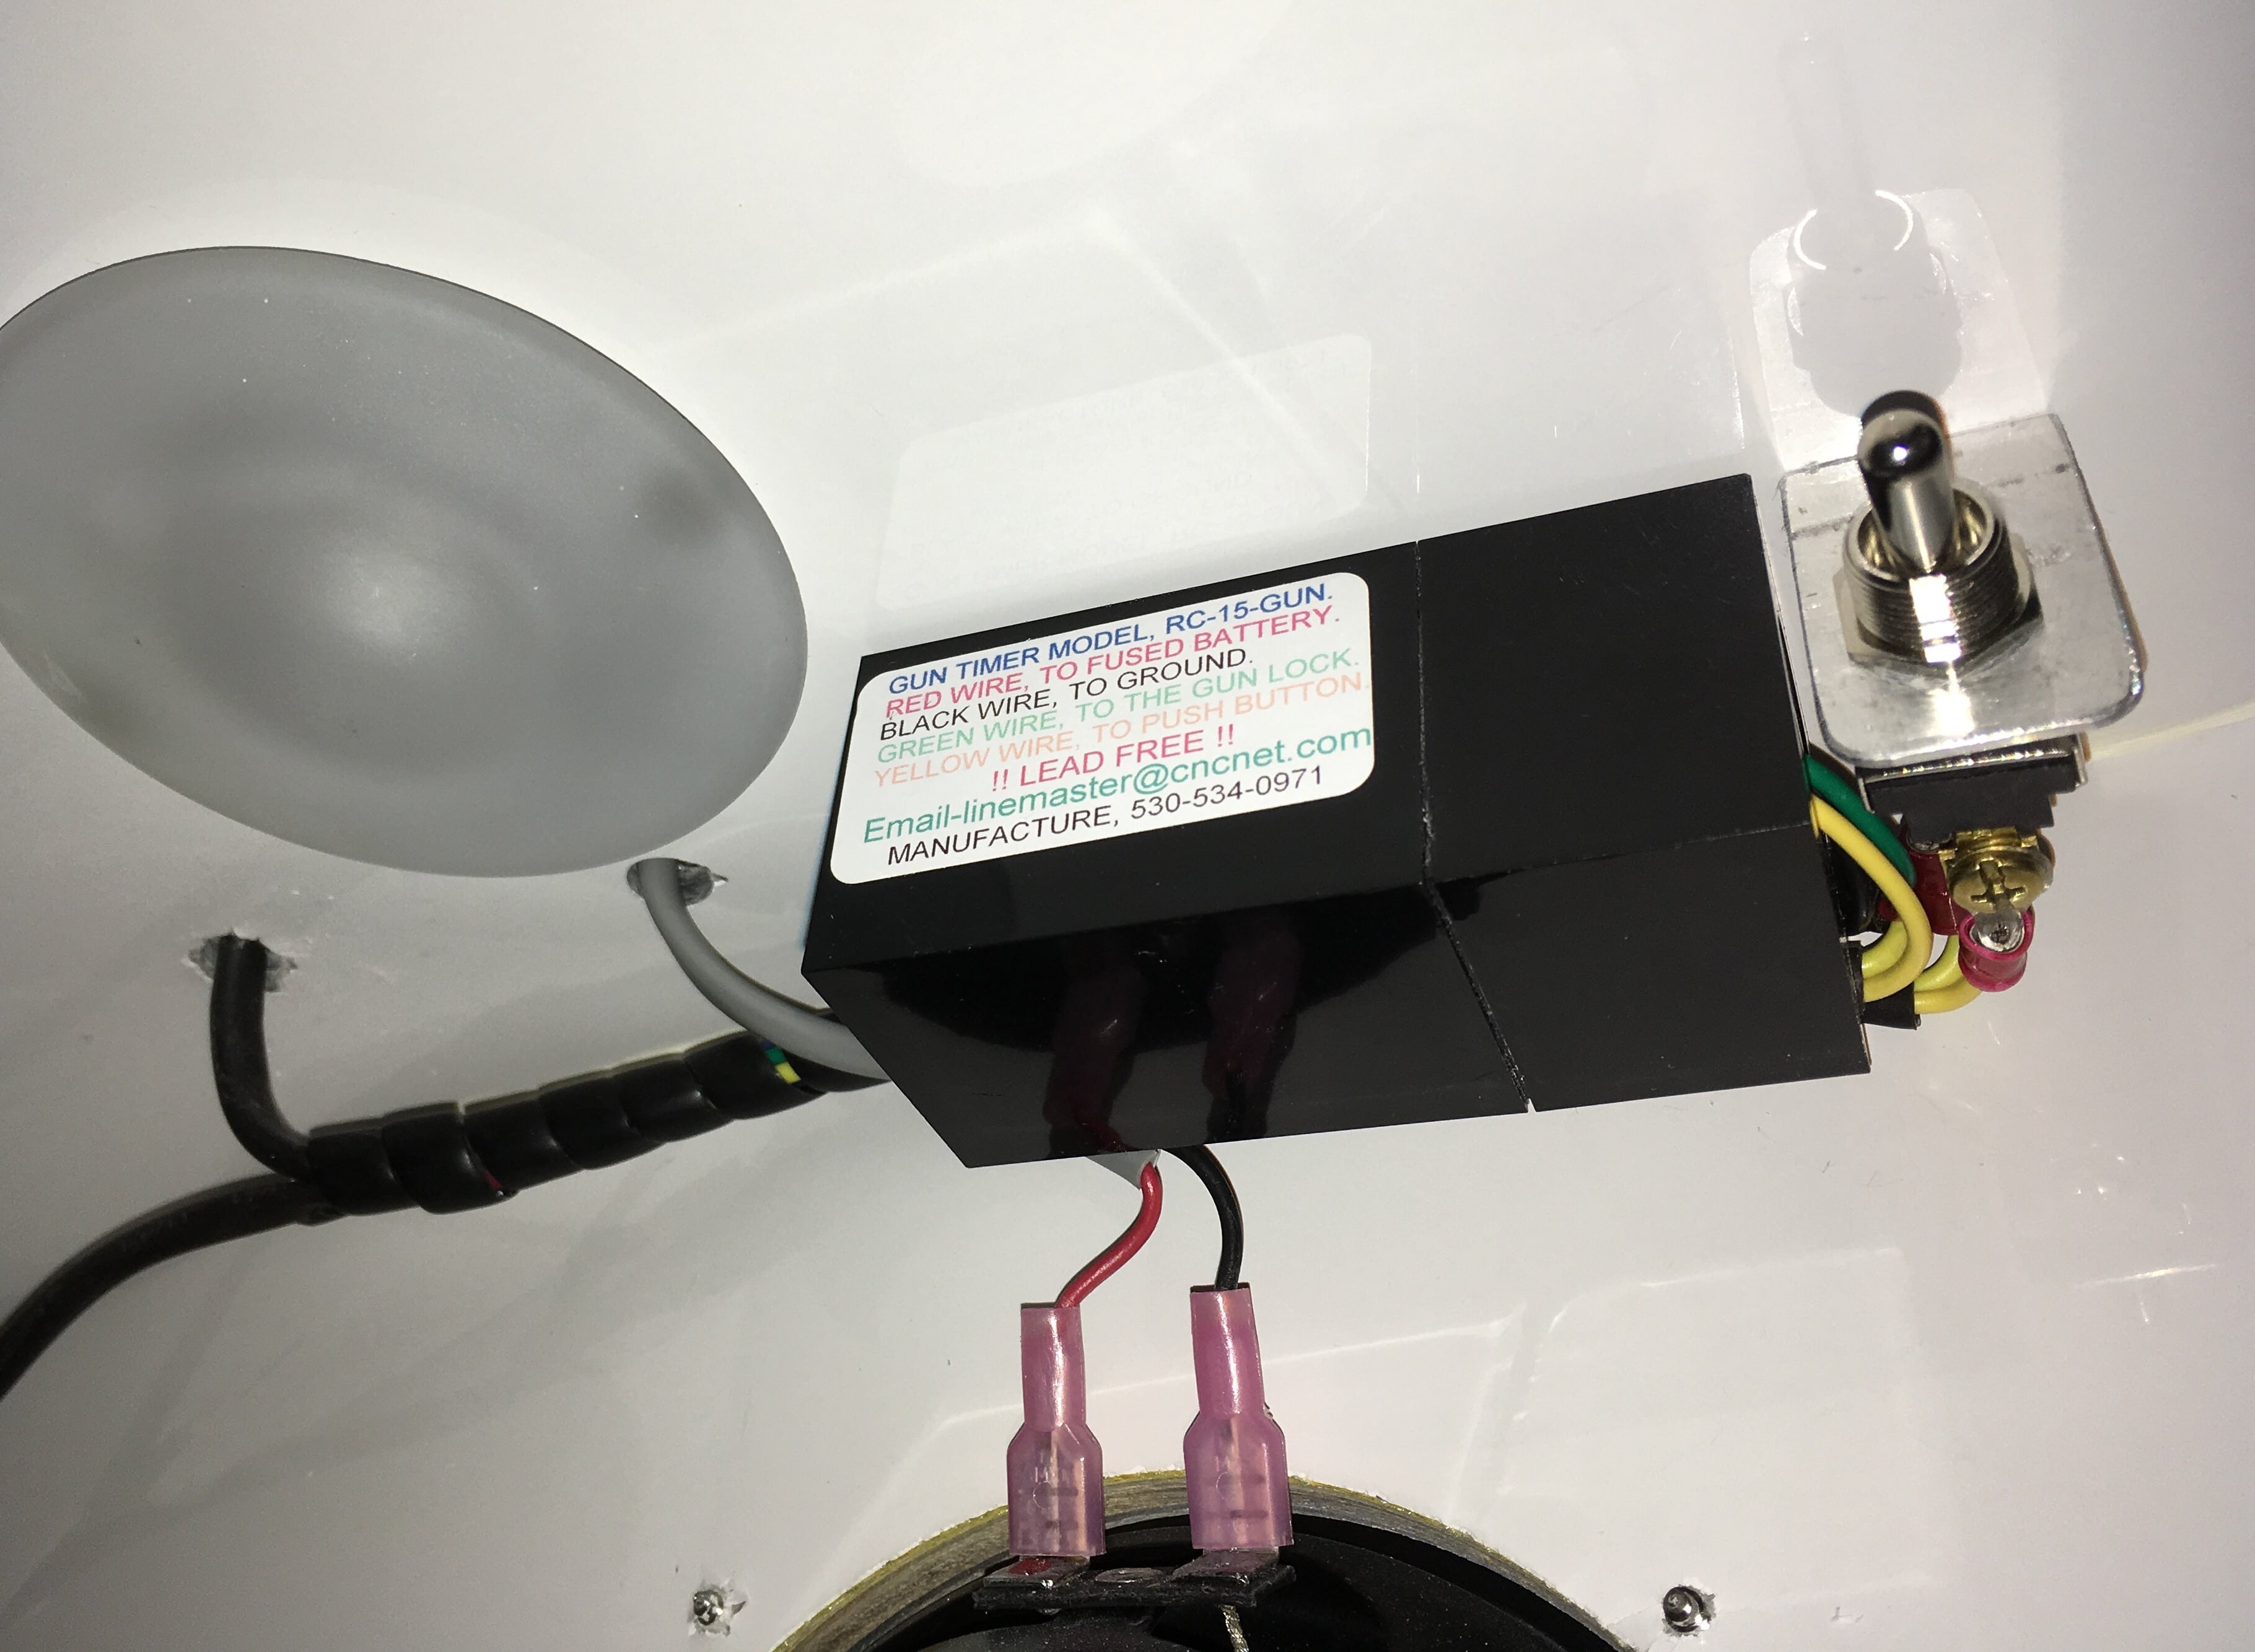
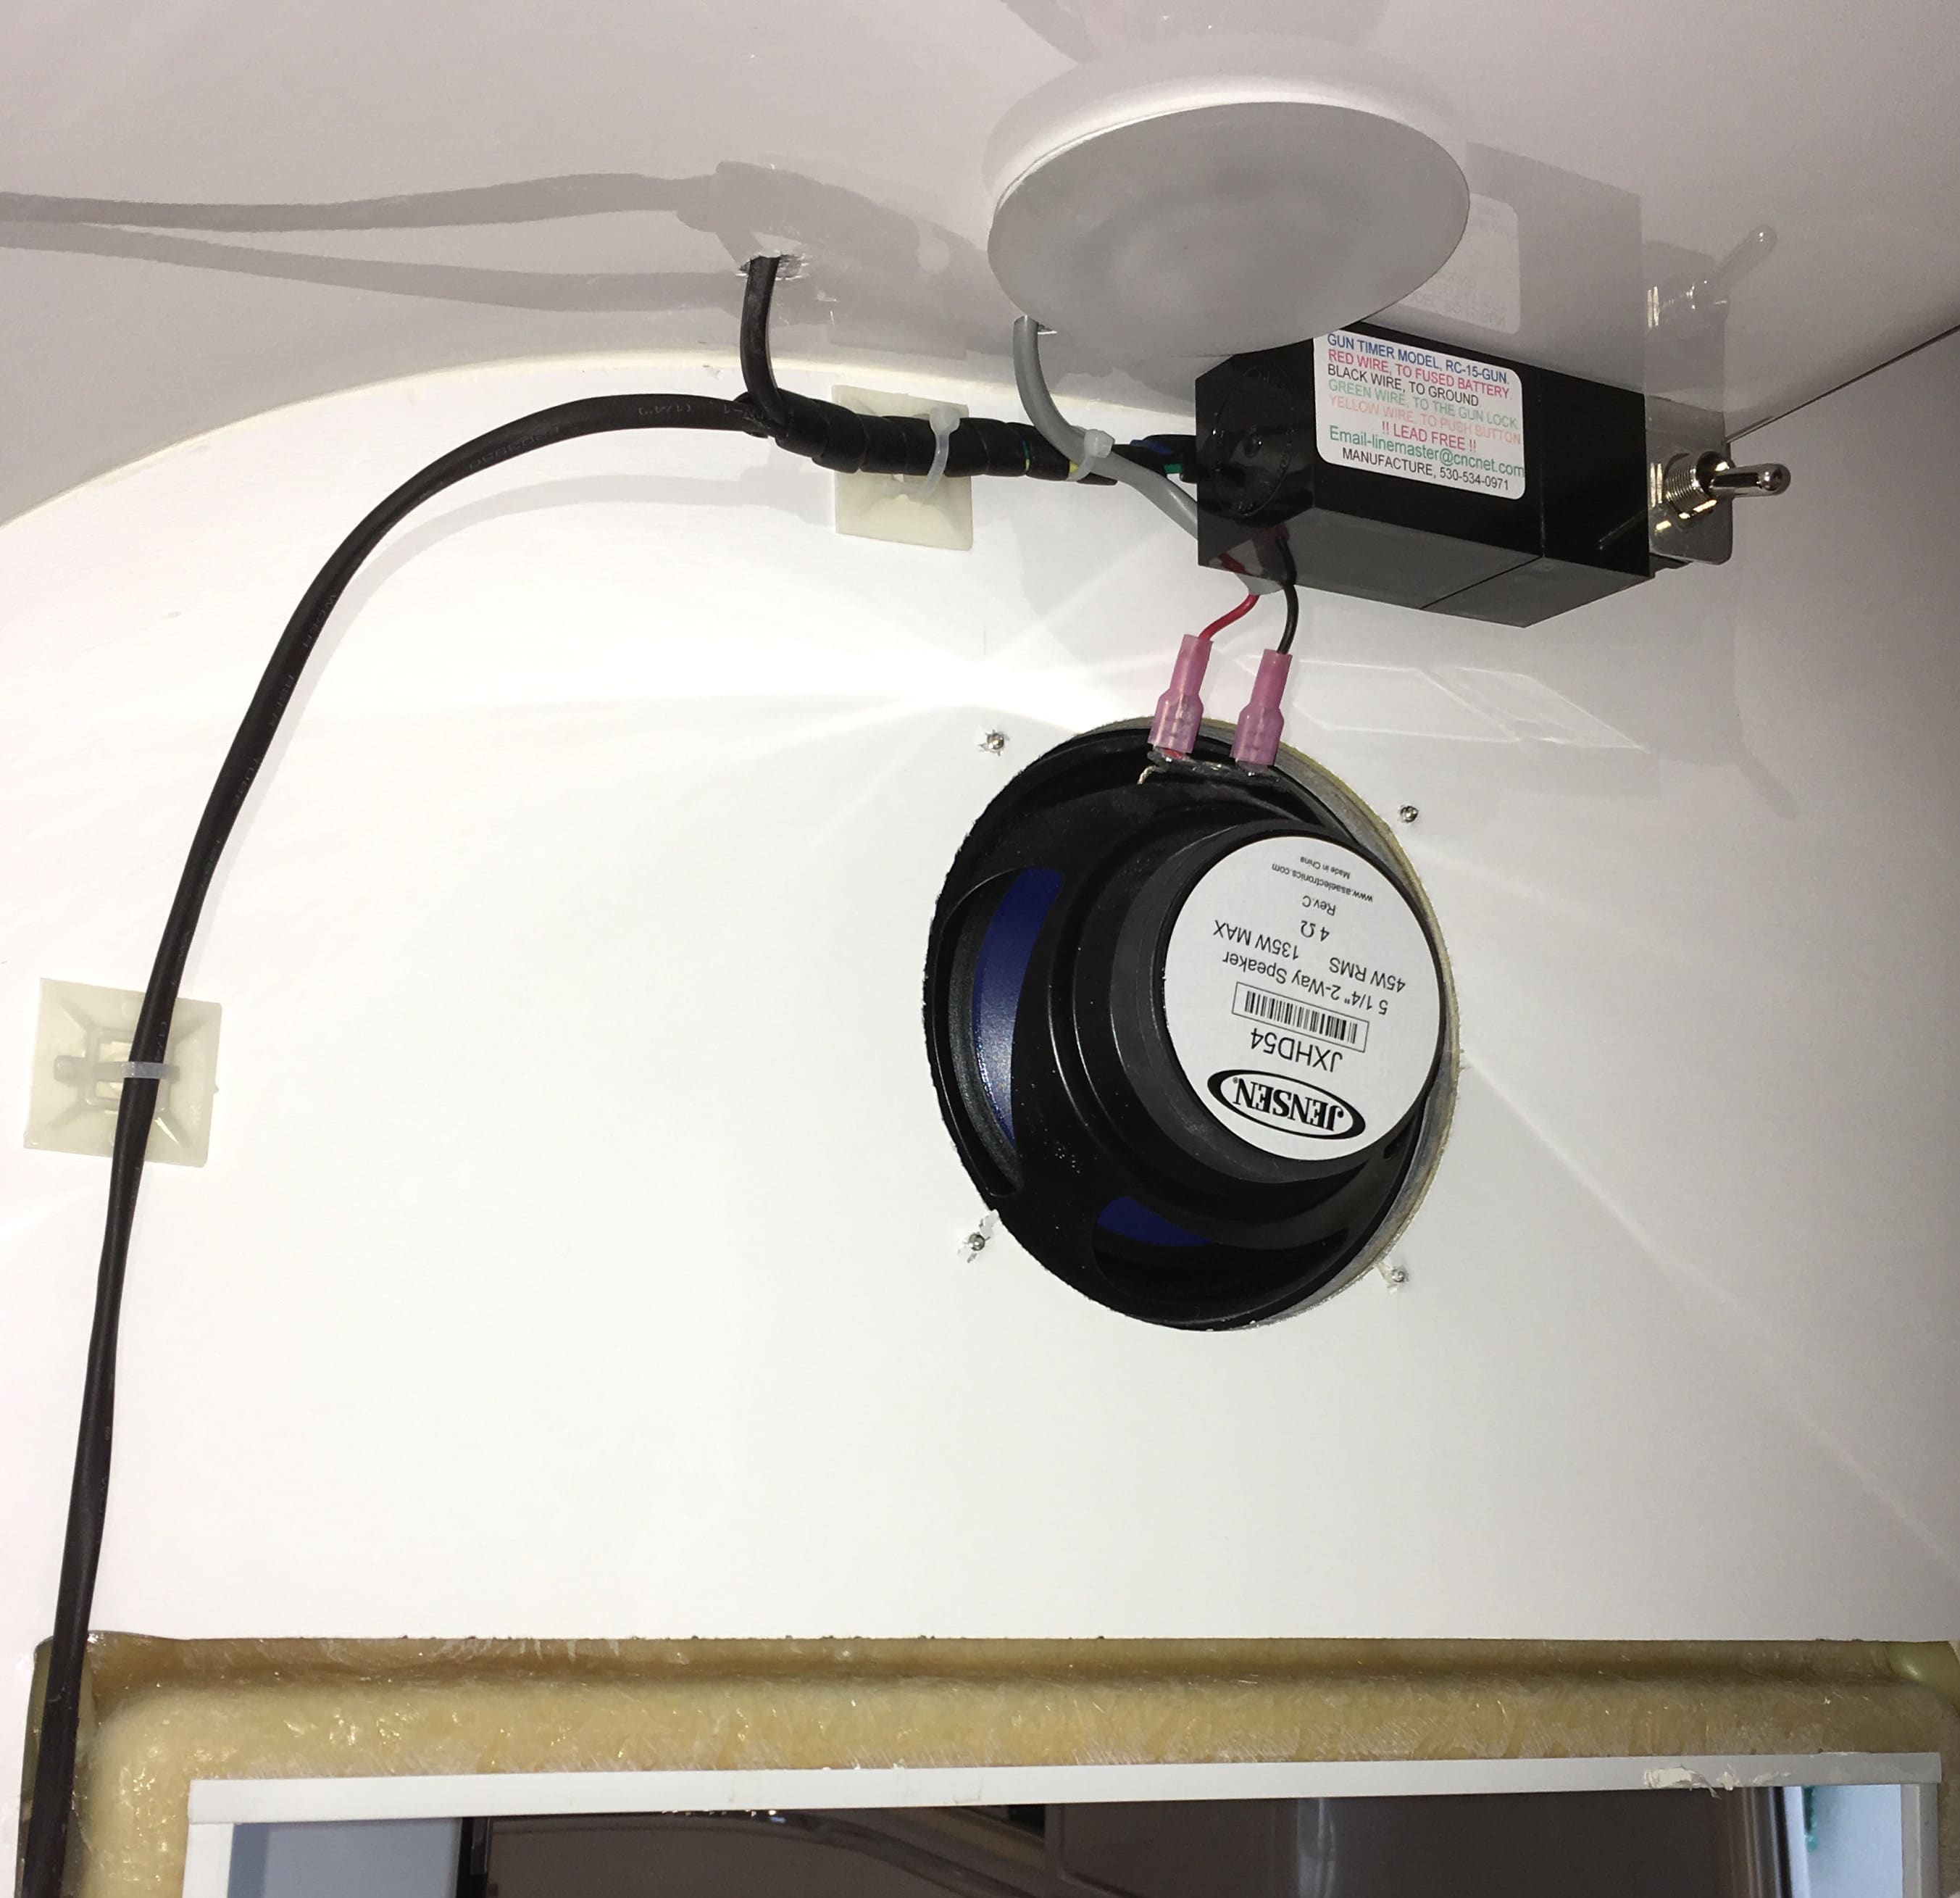
Electrical Installation: I needed 12 volts to run the circuit. I decided to use the closet LED light circuit since it was directly overhead. By switching on the closet light, using the switch near the microwave oven, the lock is "enabled" or armed. The lock is controlled by a momentary (spring loaded OFF) toggle switch. I found a sturdy and high quality switch at Ace Hardware - it is intended for cabinet door actuation (internal lighting). Cost was $10: Added to the circuit is a 10 second solid state timer. When the switch is toggled up, the timer powers the solenoid, releasing the arm. After ten seconds it automatically resets. It also has a failsafe design: if the switch fails (shorts) the timer will deactivate itself until the switch is replaced, protecting the solenoid. The timer also came from Santa Cruz. It was originally installed in my home closet. Here are all the bits hanging down from the closet light opening: The LED light, a very nice little unit! It was held on with two 1/8 inch aluminum pop rivets which I drilled out. I used small stainless screws for reassembly.: I used a 20 AWG inline fuse holder, which goes above the ceiling panel. I used a 3 amp fuse. Because the color coding was every which way, I labelled the gun wires + and - : All splices were done using regular crimp connectors, and the wires were covered either with heat shrink tubing or spiral wrap. I used 3M mounting tape to secure the timer to the ceiling. The finished installation: Closeup of the timer unit: Wiring schematic: ... http://ledguy.net/santa-cruz/pdf/Timer.pdf I ran the two shrink wrapped wires for the gun lock solenoid down inside the exposed channel of the door frame. I secured them there with dabs of silicone sealer every few inches. I added self stick nylon wire tie anchors at top, to finish it off professionally: Operation: The shotgun is a Mossberg 930 SPX (Special Purpose), with a 20 inch Cylinder bore barrel (no choke). It's very well built and reasonably affordable, and a great choice for a home or trailer defense weapon, agains humans, moose, bears or rabid coyotes. The semi-auto action reduces the brutal kick of a 12 gauge, a little ;) My bear load is Brenneke Black Magic 3 inch magnum slugs. They are hardened so that they will penetrate deeply without slowing down. There is even a picture of an angry brown bear on the box;) They are Big Medicine, but they hurt your shoulder, a lot. To secure the gun, place the butt into the saddle, maneuver the barrel and mag tube into the open arm of the lock. Squeeze the arm closed while wiggling the barrel to eliminate any play. It click click clicks and locks into place. To retrieve the gun, the closet light must be switched ON. Reach up past the stereo speaker and flip the toggle switch straight up. The timer activates the solenoid, the lock arm is freed and you can remove the gun. If you do nothing within 10 seconds, it will re-lock itself. Cool! The shotgun clears all the coat hangers by a good margin. There is enough clearance, toward the outside of the trailer, to mount a scoped rifle. There is about 8 inches of vertical adjustment in the lock, in both directions, to allow for different stock and barrel lengths. When locked, it is possible for someone to lift the butt up and out of the saddle, but it is impossible to get the barrel out of the lock assembly: the front sight prevents that. A shotgun with no front sight would require a different setup. The mount is not fully burglar proof, nor is it intended to be. It is intended to be handy and quick to access, and secure in terms of an unsupervised child or thief with minimal time to hammer and pry on the parts. With a towel or shirt draped over the muzzle and lock, it looks completely innocuous. Transport laws vary widely: some states allow you to transport a loaded, but secured, long gun, others require you to unload it and place the ammo in a separate container. Sometimes, it has to be a locked container, in a separate area. Always check local and state laws before transporting any firearm! This setup is fully legal to bring across the border into Canada, if declared ahead of time and the fee is paid, eh! This thread was a LOT of work, thanks very much for reading. John Davies Spokane WA
-
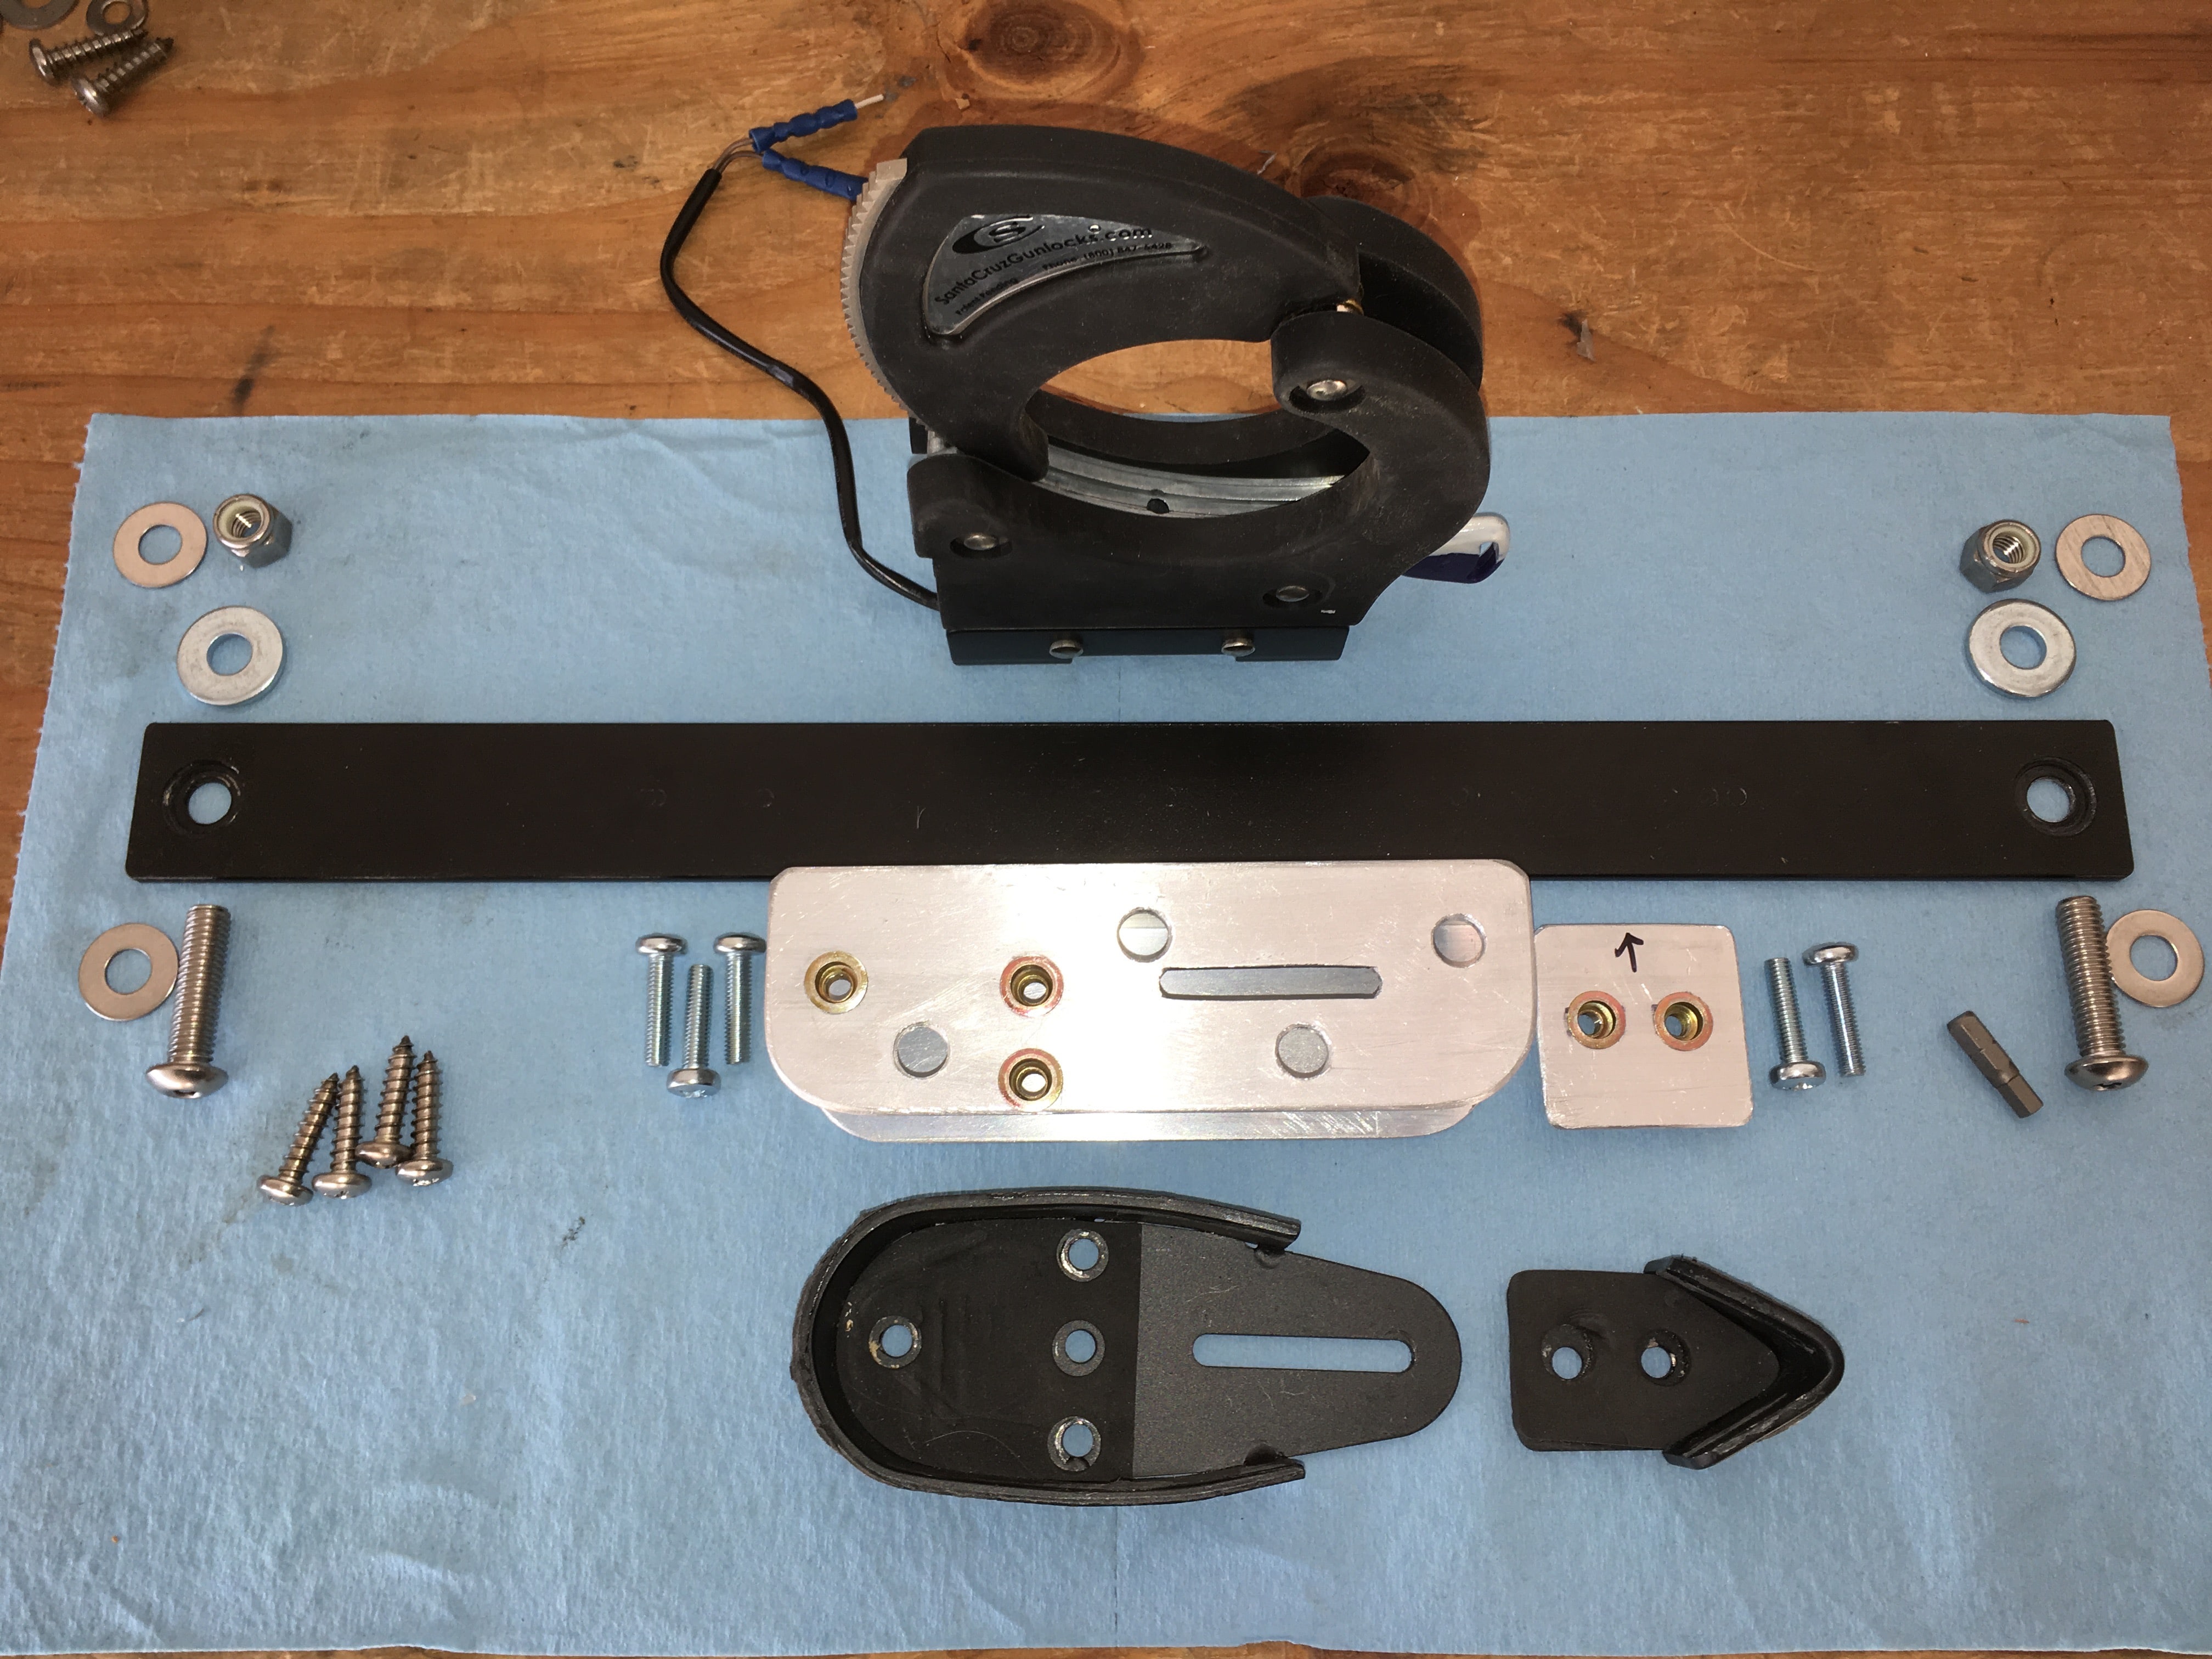
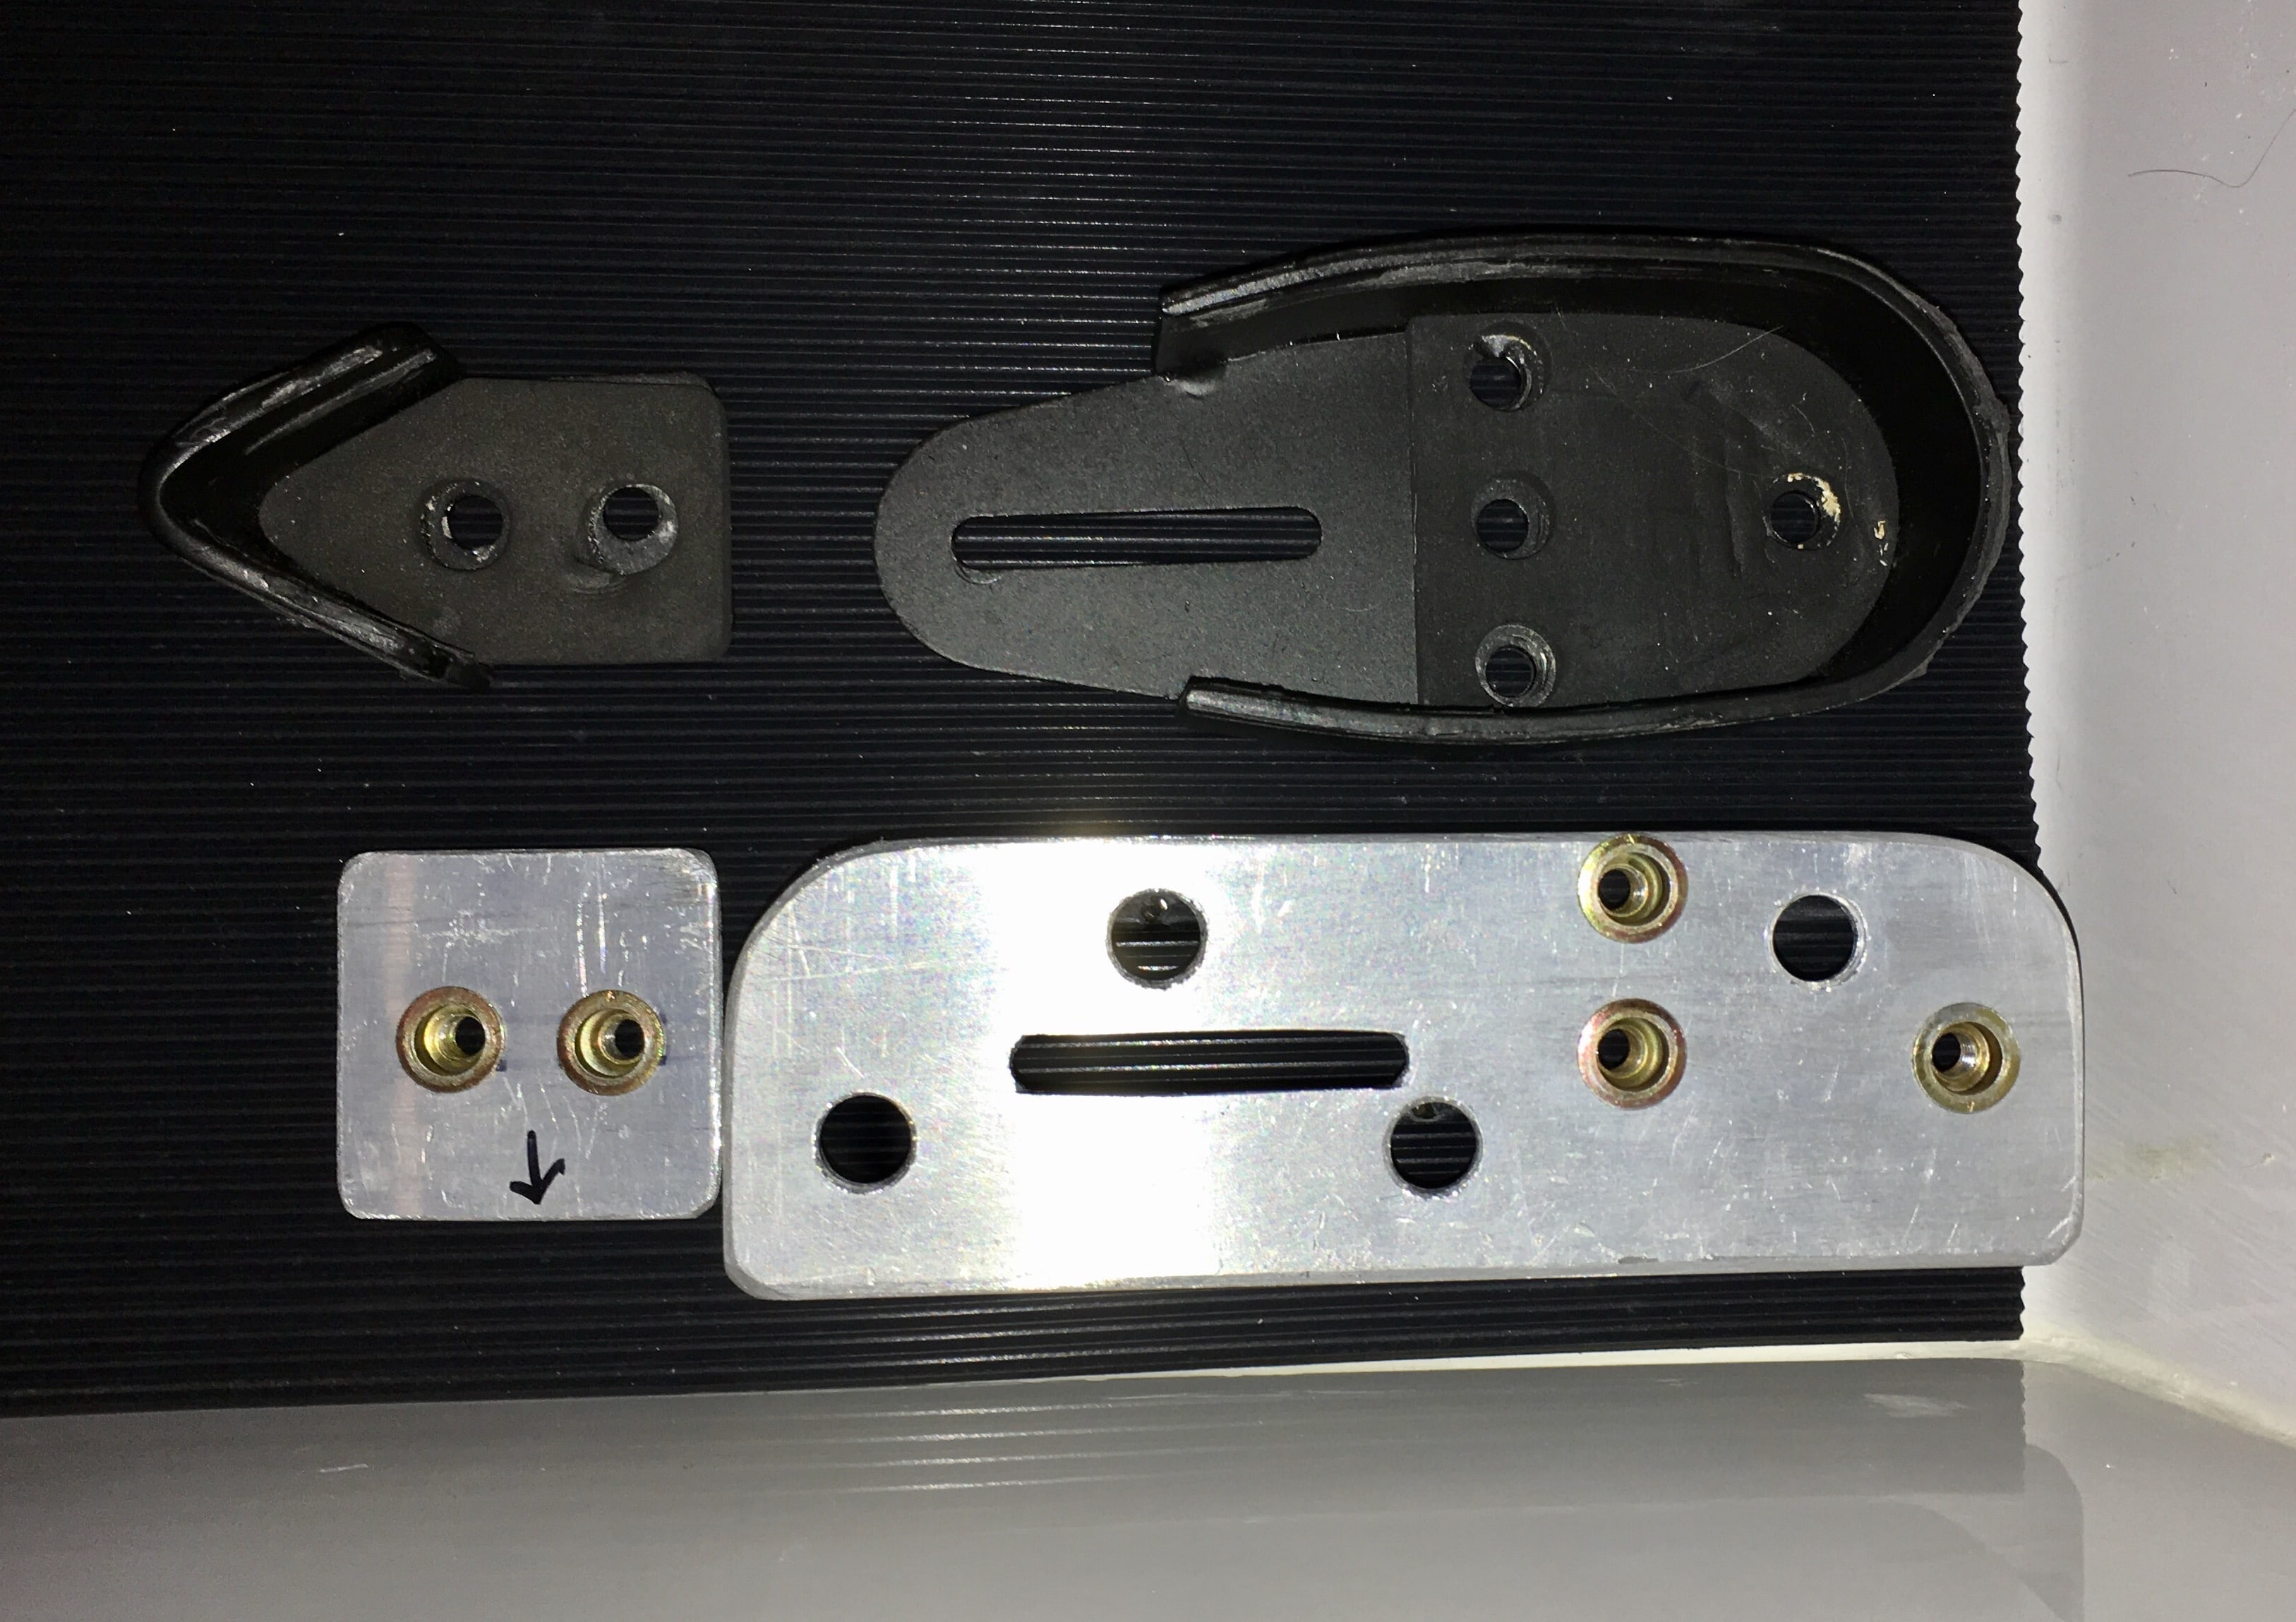
The forum is being really weird today and there were a couple of duplicate posts. Those of you that don't have any interest in firearms can read for enjoyment or skip the thread entirely. I want a 12 gauge shotgun stored securely yet close at hand for primitive camping and bears, and it is a weapon that is 100% legal to take into Canada. I had a Santa Cruz vertical locking mount installed in my master bedroom closet for 13 years. We moved and I decided to put it in Mouse. The mount is typical of what you see in police cars - the shotgun rides vertically with the butt resting in a floor saddle, and the barrel is clamped into a padded and ratcheting steel ring, that is released electrically by way of a 12 volt dc solenoid. In my house I had to install a power supply, but the Ollie has no need for that. http://santacruzgunlocks.com/products/ Here are all the bits, laid out and pretty: The hardened steel bar slides into the lock assembly, which gets positioned properly and is secured by an internal Allen screw, which is hidden when the lock arm is closed. [attachment file=IMG_1981.jpg] [attachment file=IMG_1982.jpg] Lower saddle: Because I wanted the bulky lock to clear the coat hangers, I raised the entire setup 2 inches off the floor. I fabricated a stand-off using a piece of 2 x 2 aircraft aluminum channel. Because the installation needs to be as secure as possible, I used steel nutserts where I could (regular nuts could be loosened). The bottom part attaches with #12 Philips sheet metal screws into the floor, but access to them is difficult due to the shape of the channel and the overlying rubber pad. For installation, I drilled 1/2 inch holes in the top of the channel: these are covered by the actual Santa Cruz saddle assembly. I sealed the screws and bedded the saddle with clear RTV sealant, to prevent water ingress. [attachment file=IMG_1977.jpg] [attachment file=IMG_1989.jpg] [attachment file=IMG_1994.jpg] [attachment file=IMG_1997.jpg] Main gun lock assembly: The bar is held on by two 3/8-16x 1.5 stainless "security bolts" and self locking nuts. The bolts have a tamper proof head design that you often see in public restrooms. It is an Allen head with a center post. You must have the special drilled bit to install or remove. Since the nuts are accessible, it is critical that the bolt heads be impervious to attempts to turn them. [attachment file=IMG_1979.jpg] The mount bar and lock fit neatly just outboard of the closet door frame. I had to move the clips for the awning center brace. (I put them on beside the entry door, rear side.) The wall is half an inch thick with fiberglass surfaces and apparently a wood core (???). I used sealer on the hardware, just in case. [attachment file=IMG_1993.jpg] [attachment file=IMG_1999.jpg] [attachment file=IMG_2001.jpg] [attachment file=IMG_2002.jpg] [attachment file=IMG_2016.jpg] Here are the security screws, viewed from the cabin side: [attachment file=IMG_2006.jpg] [attachment file=IMG_2007.jpg] I'll get this stuff posted and work on the last part. John Davies Spokane WA
-
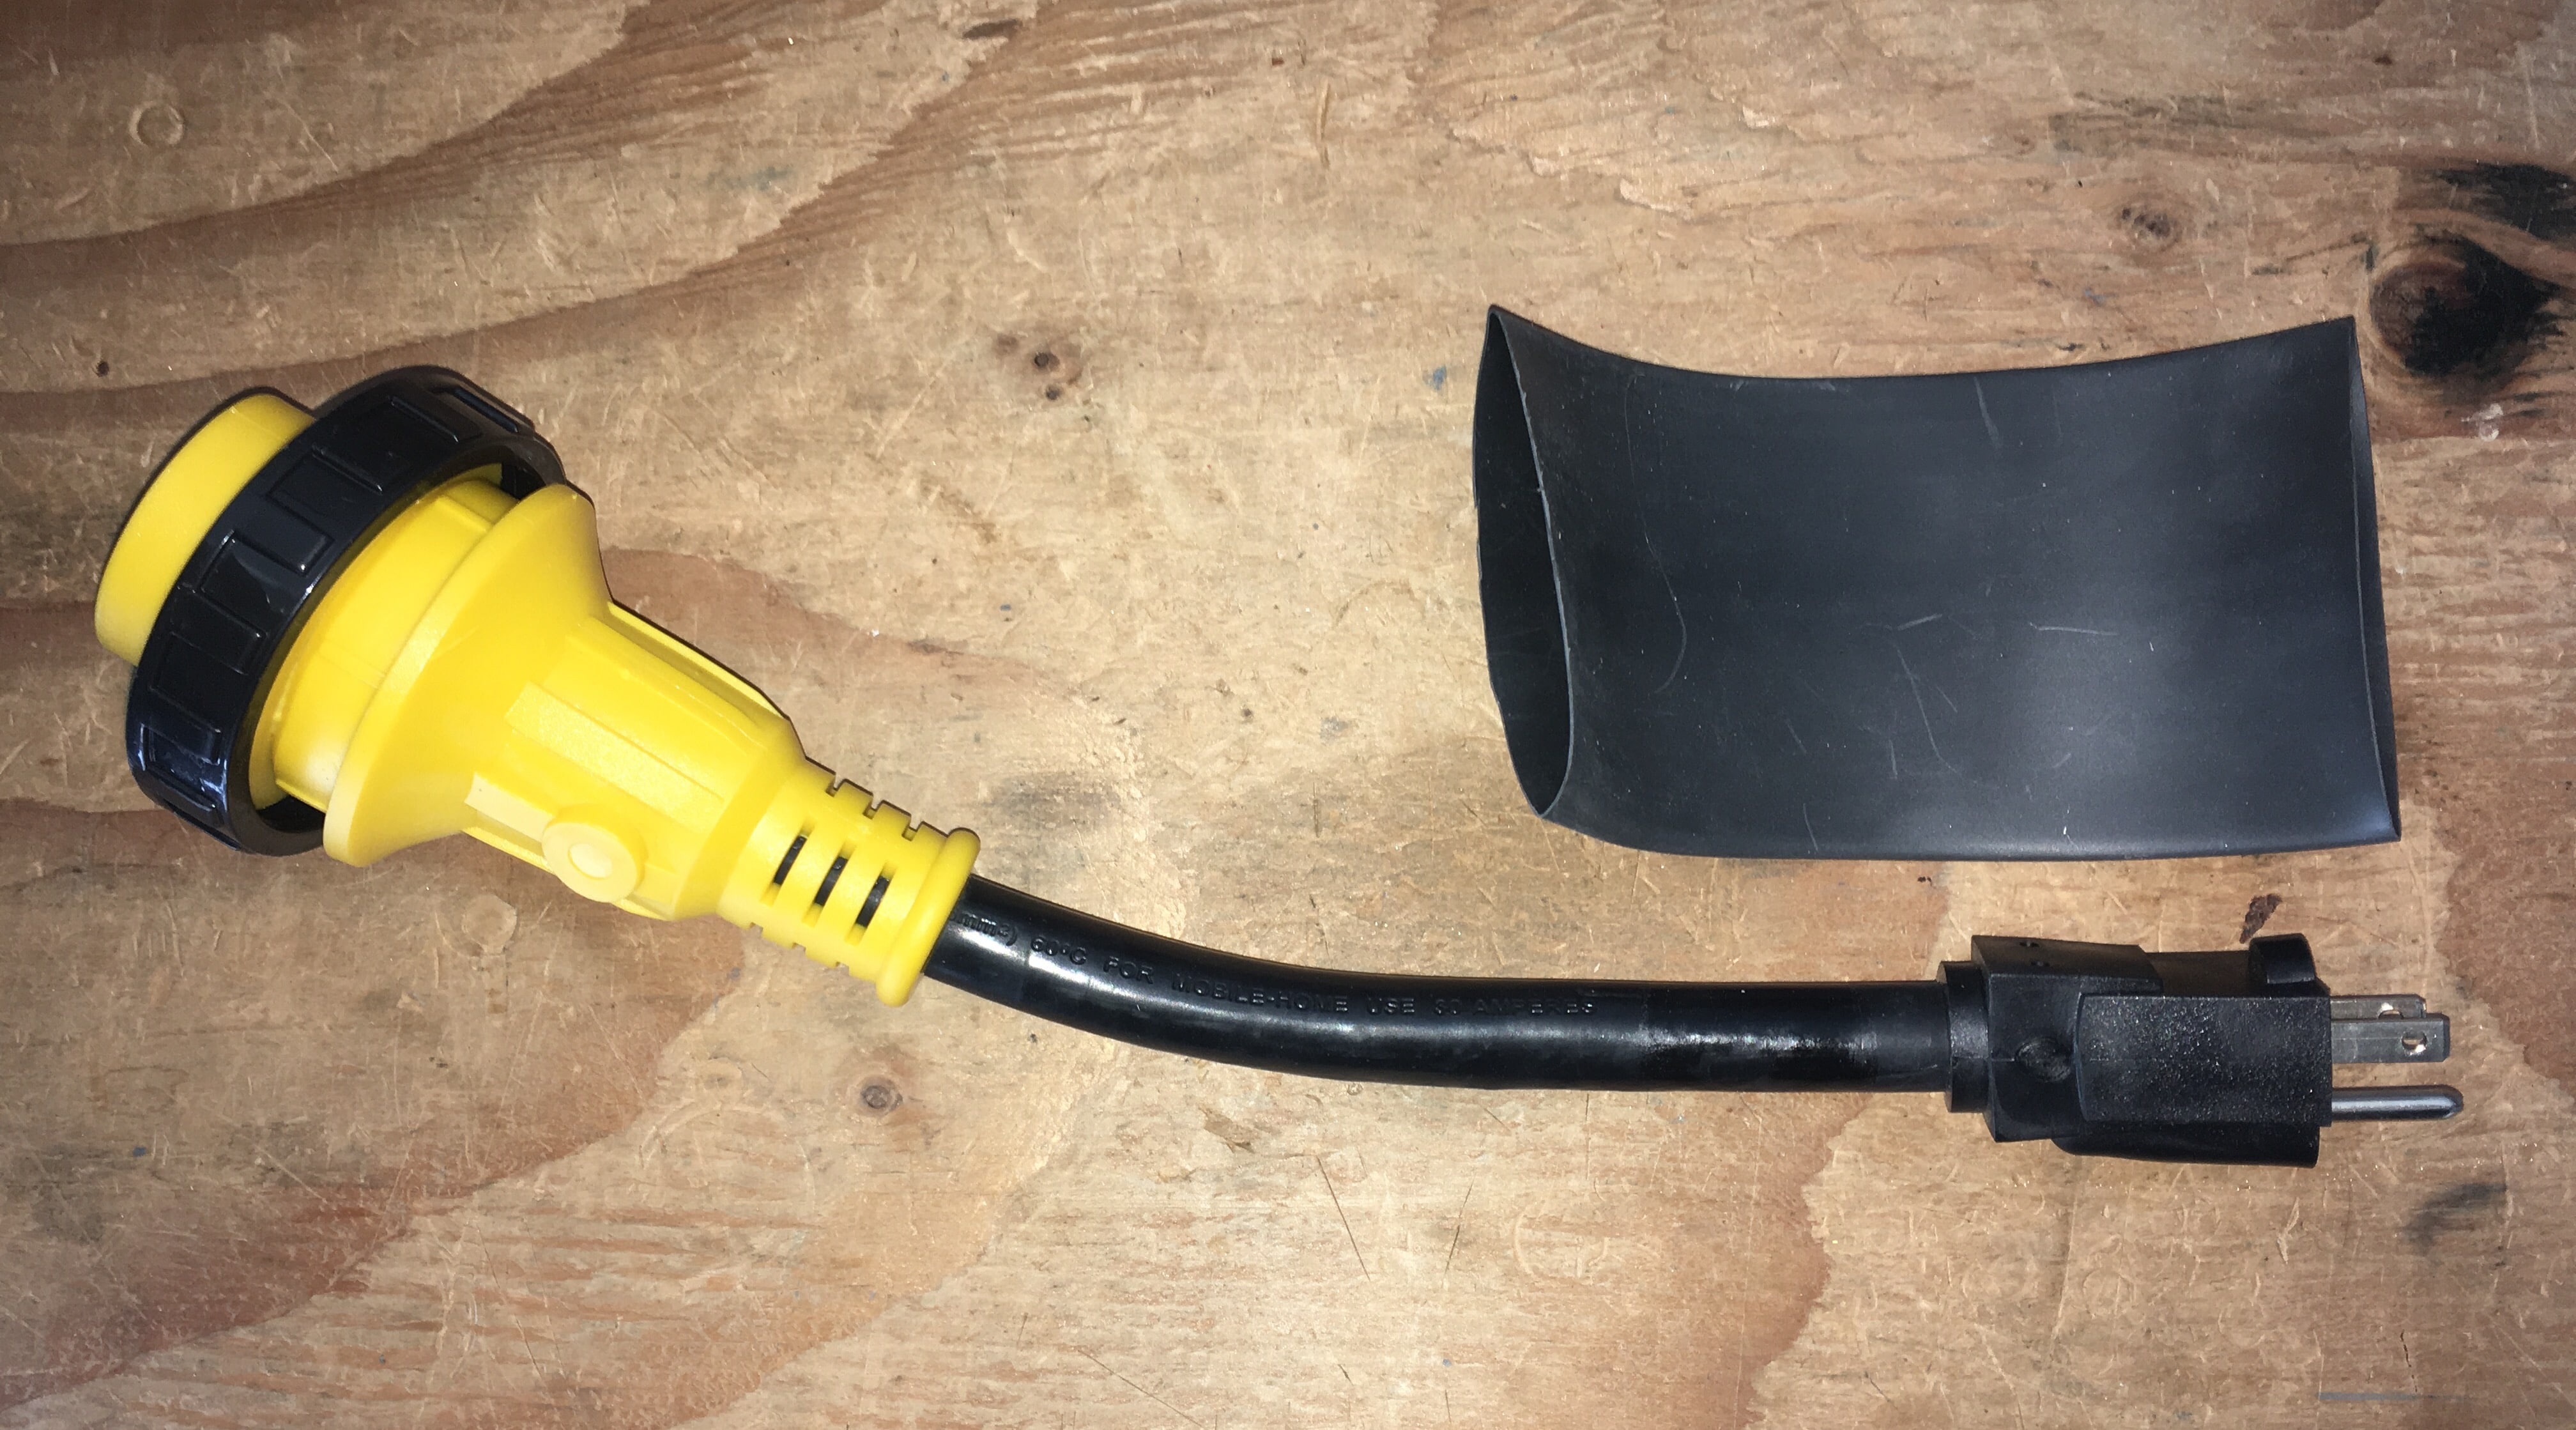
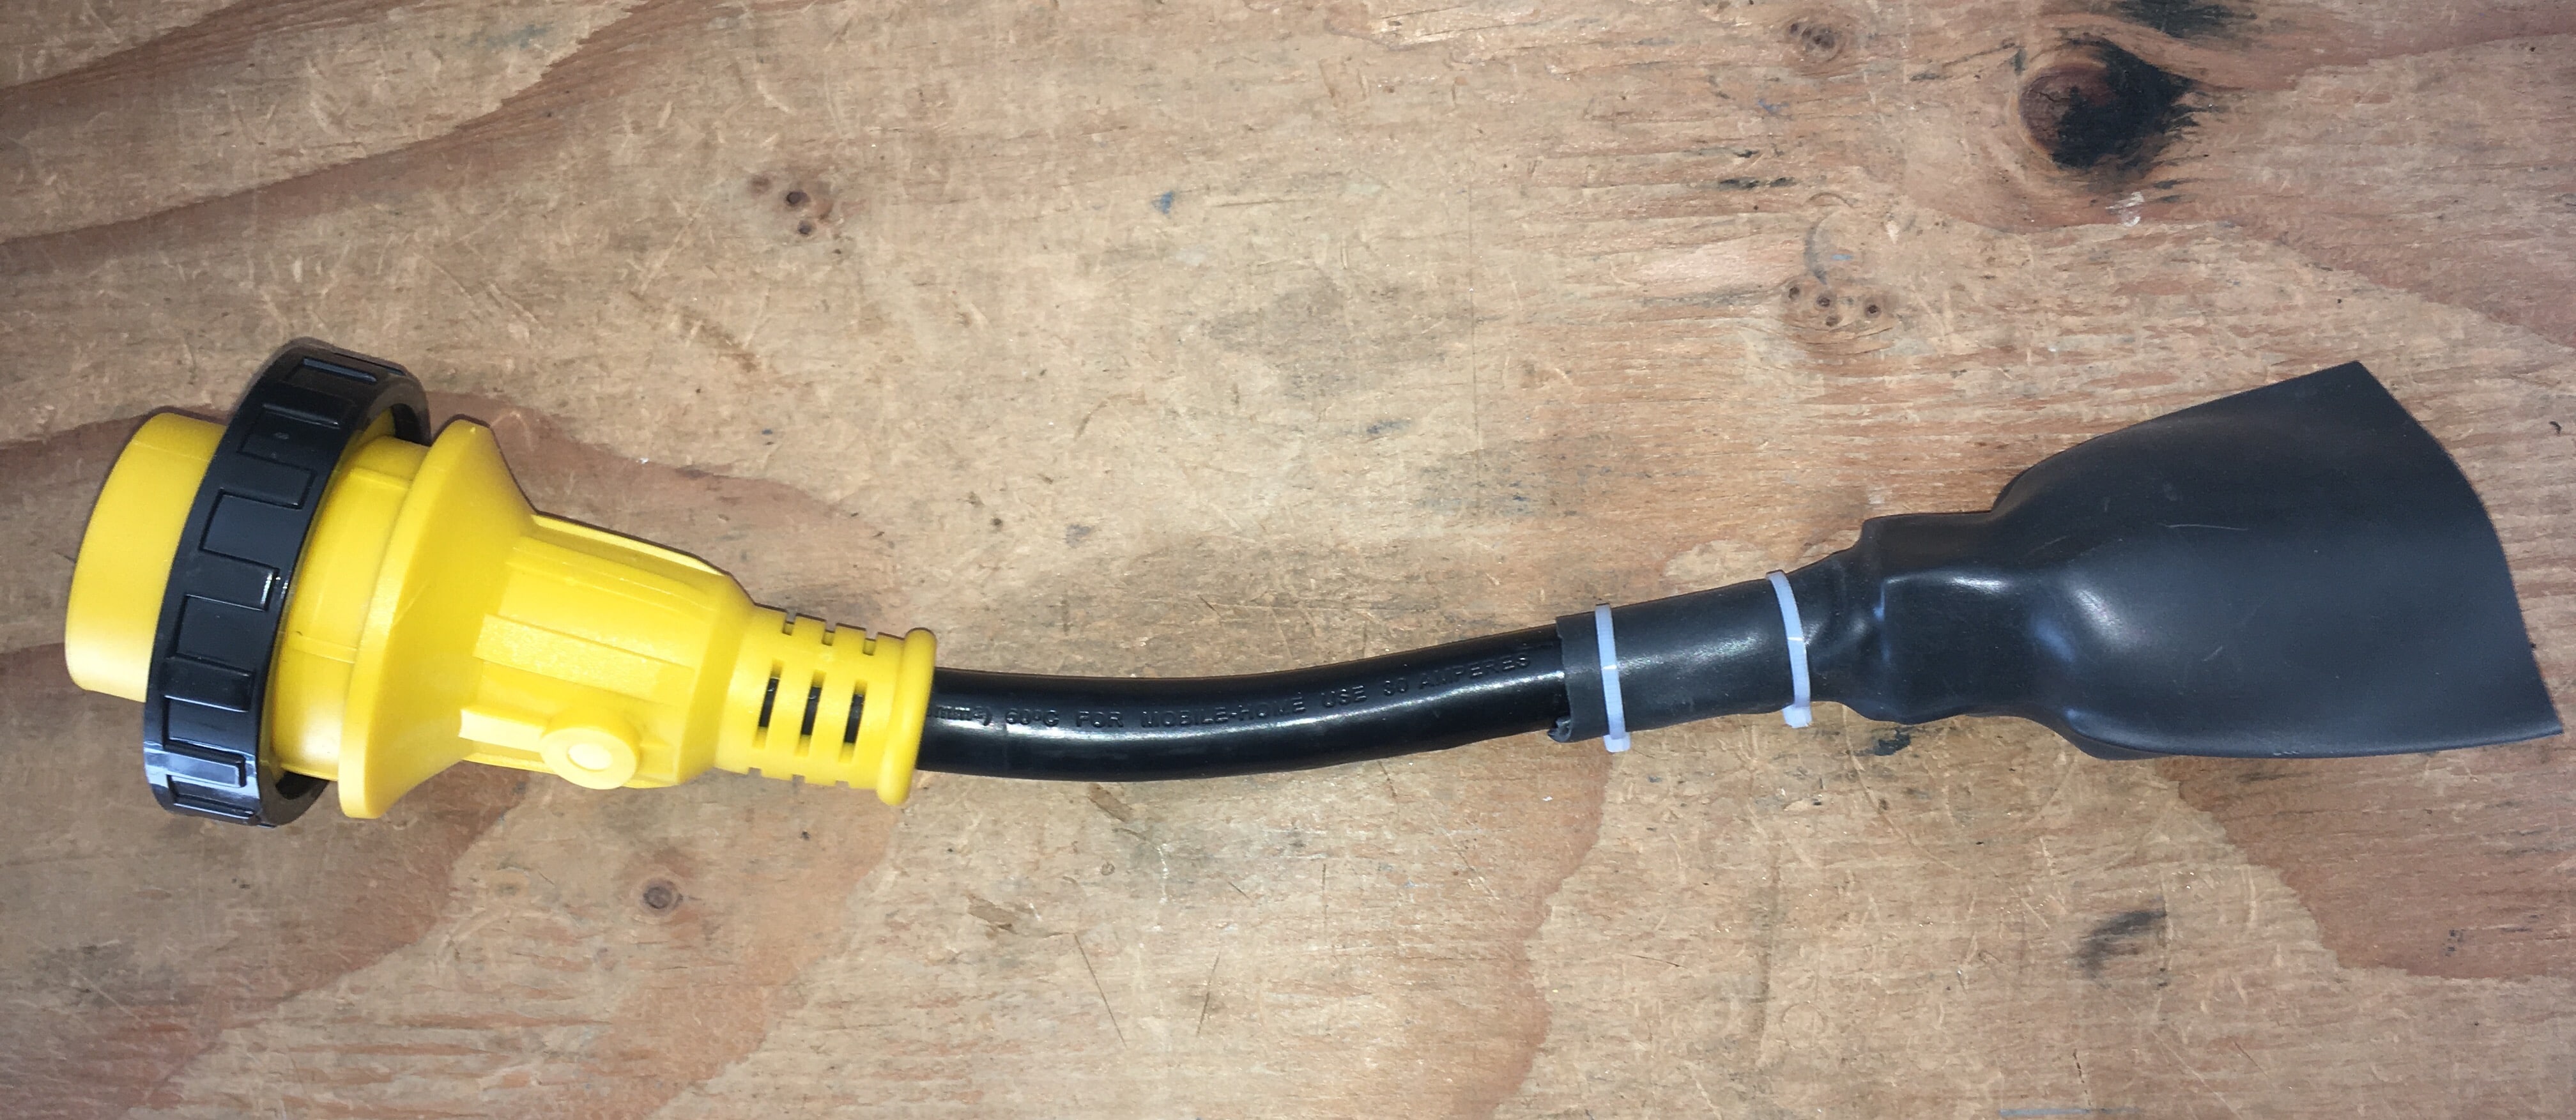
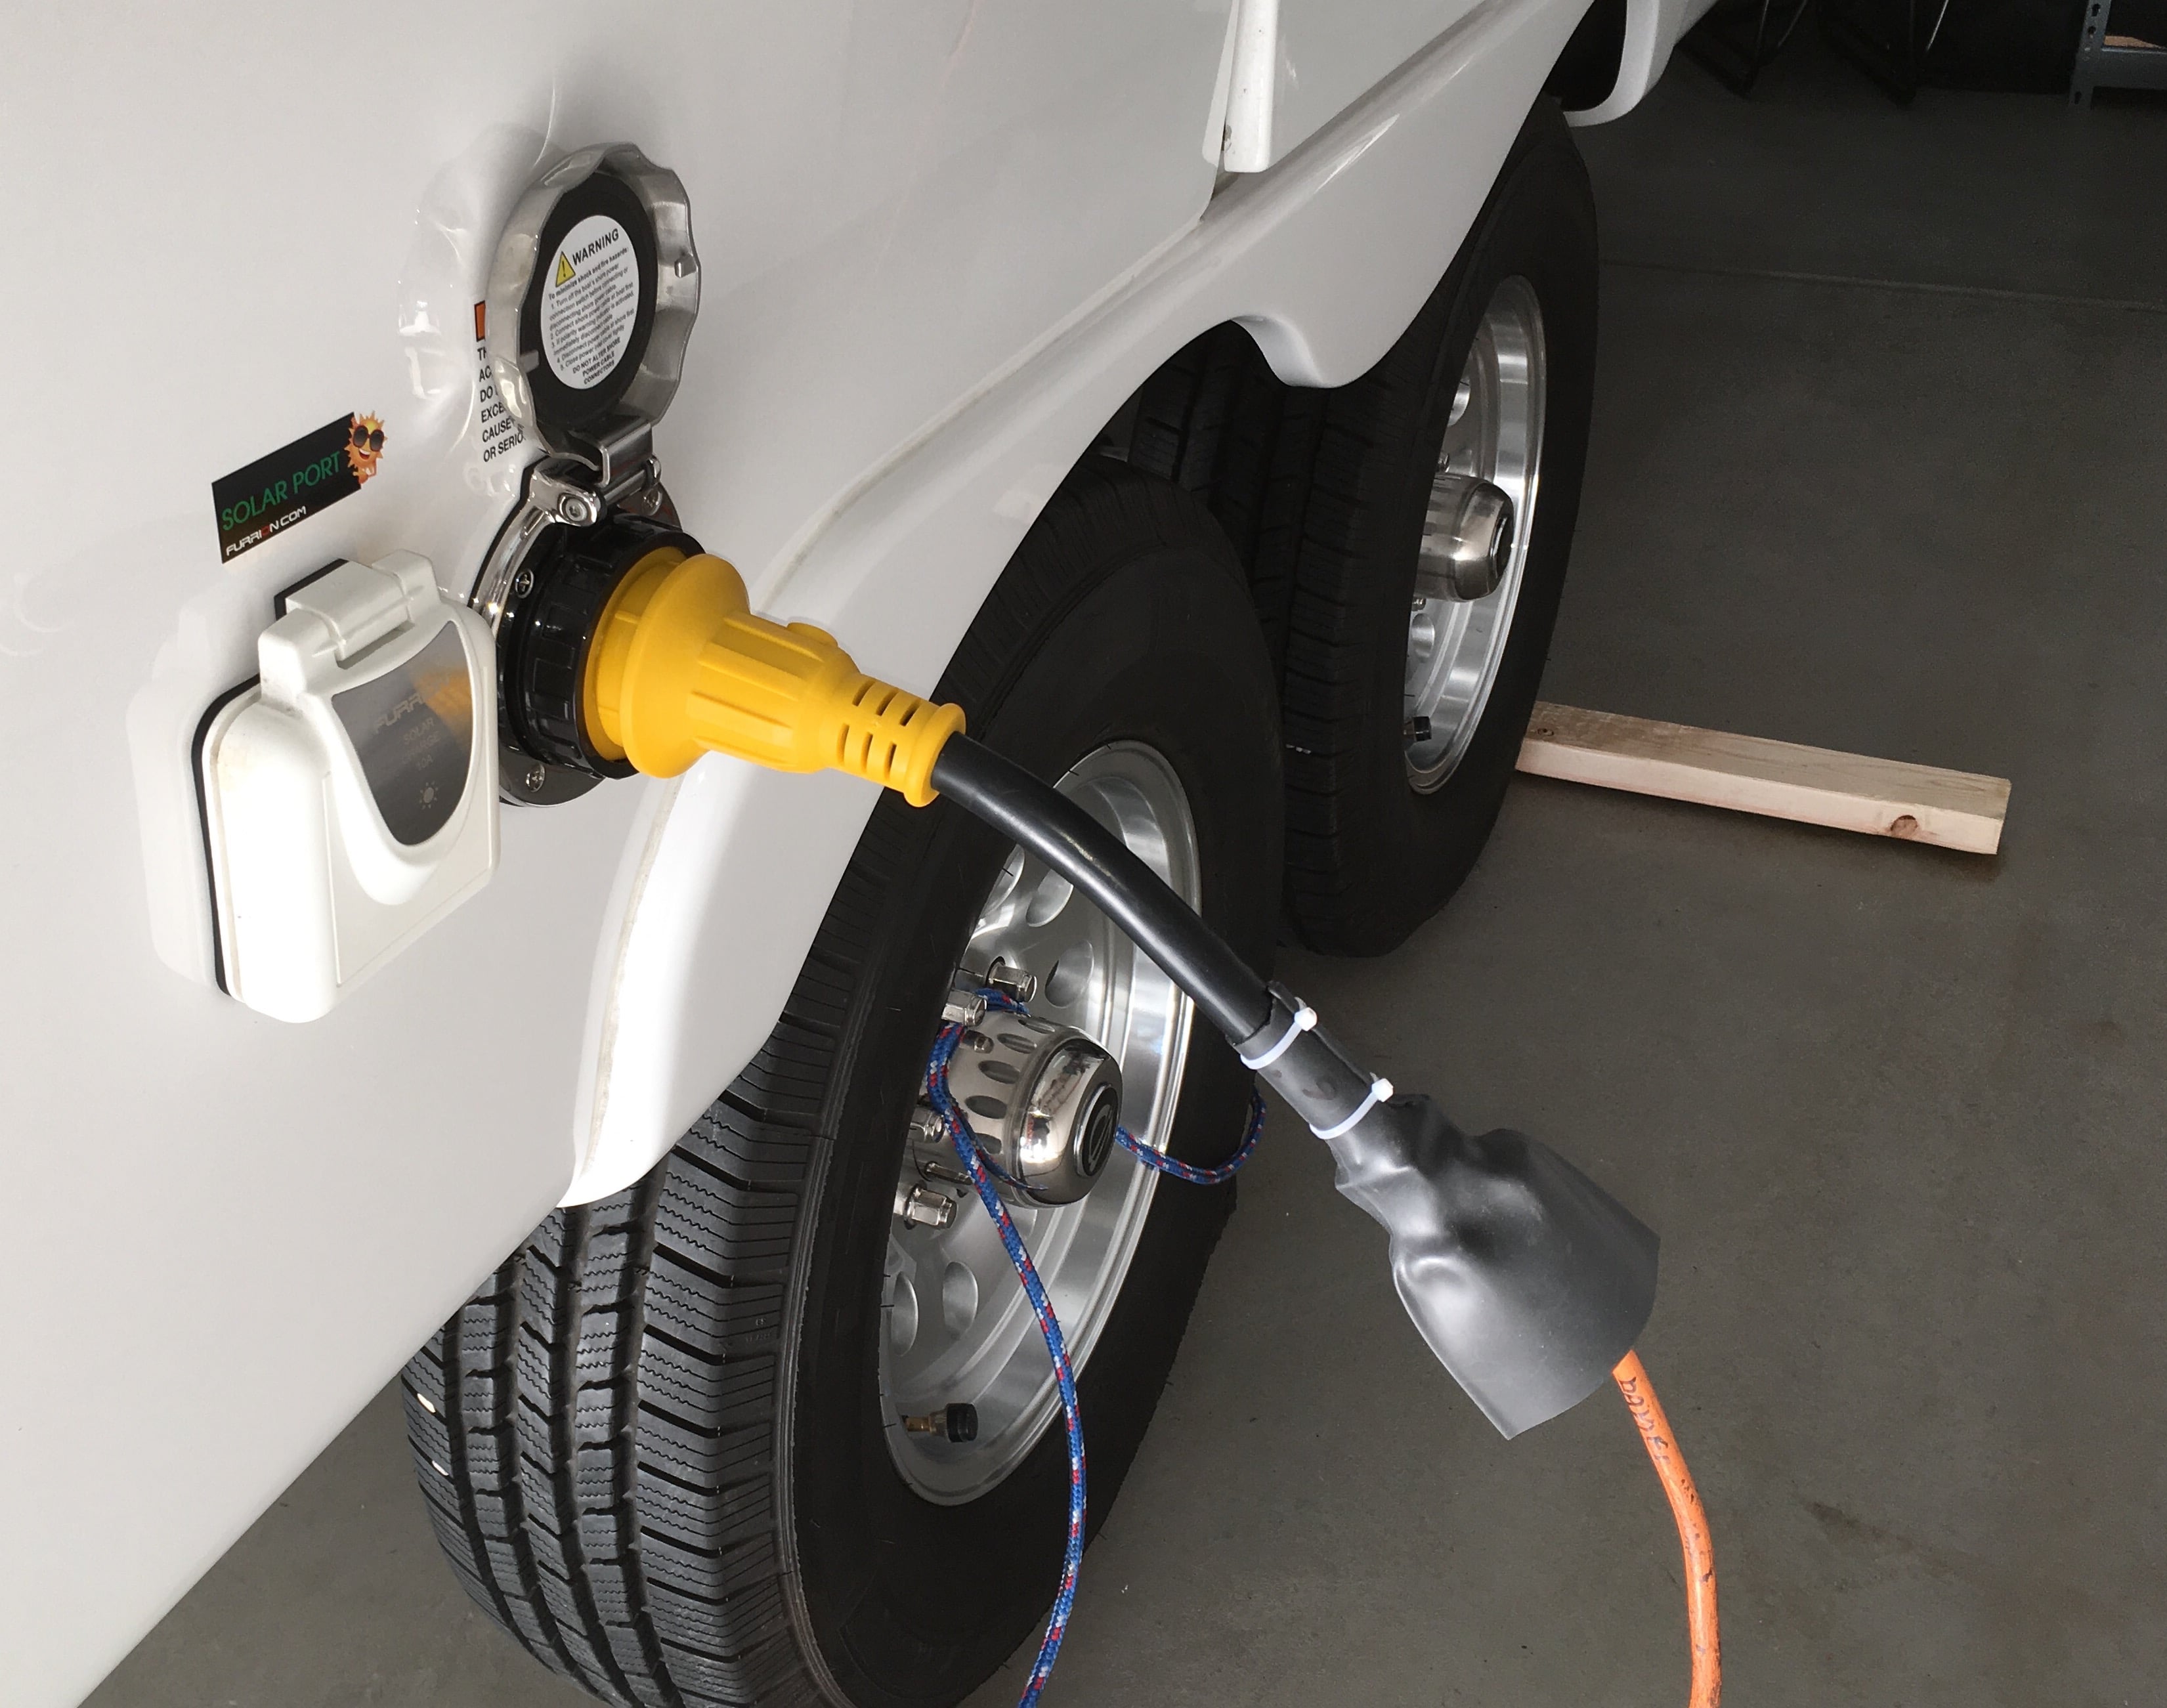
Shore power cord and receptacle
John E Davies replied to John E Davies's topic in Mechanical & Technical Tips
I made a rain boot for my 15 to 30 amp pigtail adapter, using 3 inch heat shrink tubing. John Davies Spokane WA
-
If you read those articles I linked to and talk to people who have these, it doesn't seem quite so alien. My wife had pretty major reservations, but she has come to accept it, if not exactly embrace the idea... ;) It truly is nastier dealing with raw sewage and the big stinky hose. If your husband is doing that job, then good for you. But if you have to do it yourself, you will soon understand that it is unpleasant at the best of times, and potentially VERY nasty if there is a spill, backed up drain, or ripped hose.... Dealing with soapy water from the grey tank is painless and odor free. Composting toilets have truly revolutionized toilets in cruising boats. They are starting to catch on in RVs. There is a steep learning curve, to get past the initial wierdness. John Davies Spokane WA
-
The lower step traps water when in the stowed position. When extended, that is not an issue. Both sections need a way for trapped water to drain away. Standing water is bad - it and dirt combine to form a crud that promotes corrosion, plus it just looks bad. And you don't want to dump that water onto your sneakers, correct? Drill a hole at each lower corner of each section (lower corner, when stowed!). That way water will drain regardless of the angle the Ollie is sitting. Clean up any burrs on the part that shows when the steps are down, using a countersink or larger bit. That was easy..... this is a very simple mod that anybody can do in a few minutes, and feel better afterwards. John Davies Spokane WA
- 1 reply
-
- 1
-
-
LOL, the plot thickens.... I have been informed that the ten hole wheel has been discontinued, and only the twelve hole wheels, with or without rivets, are available. To Be Continued.... Dedroll, I am glad you are getting some entertainment out of this. ;) There will be a short multiple choice quiz when this is settled. John Davies Spokane WA
-
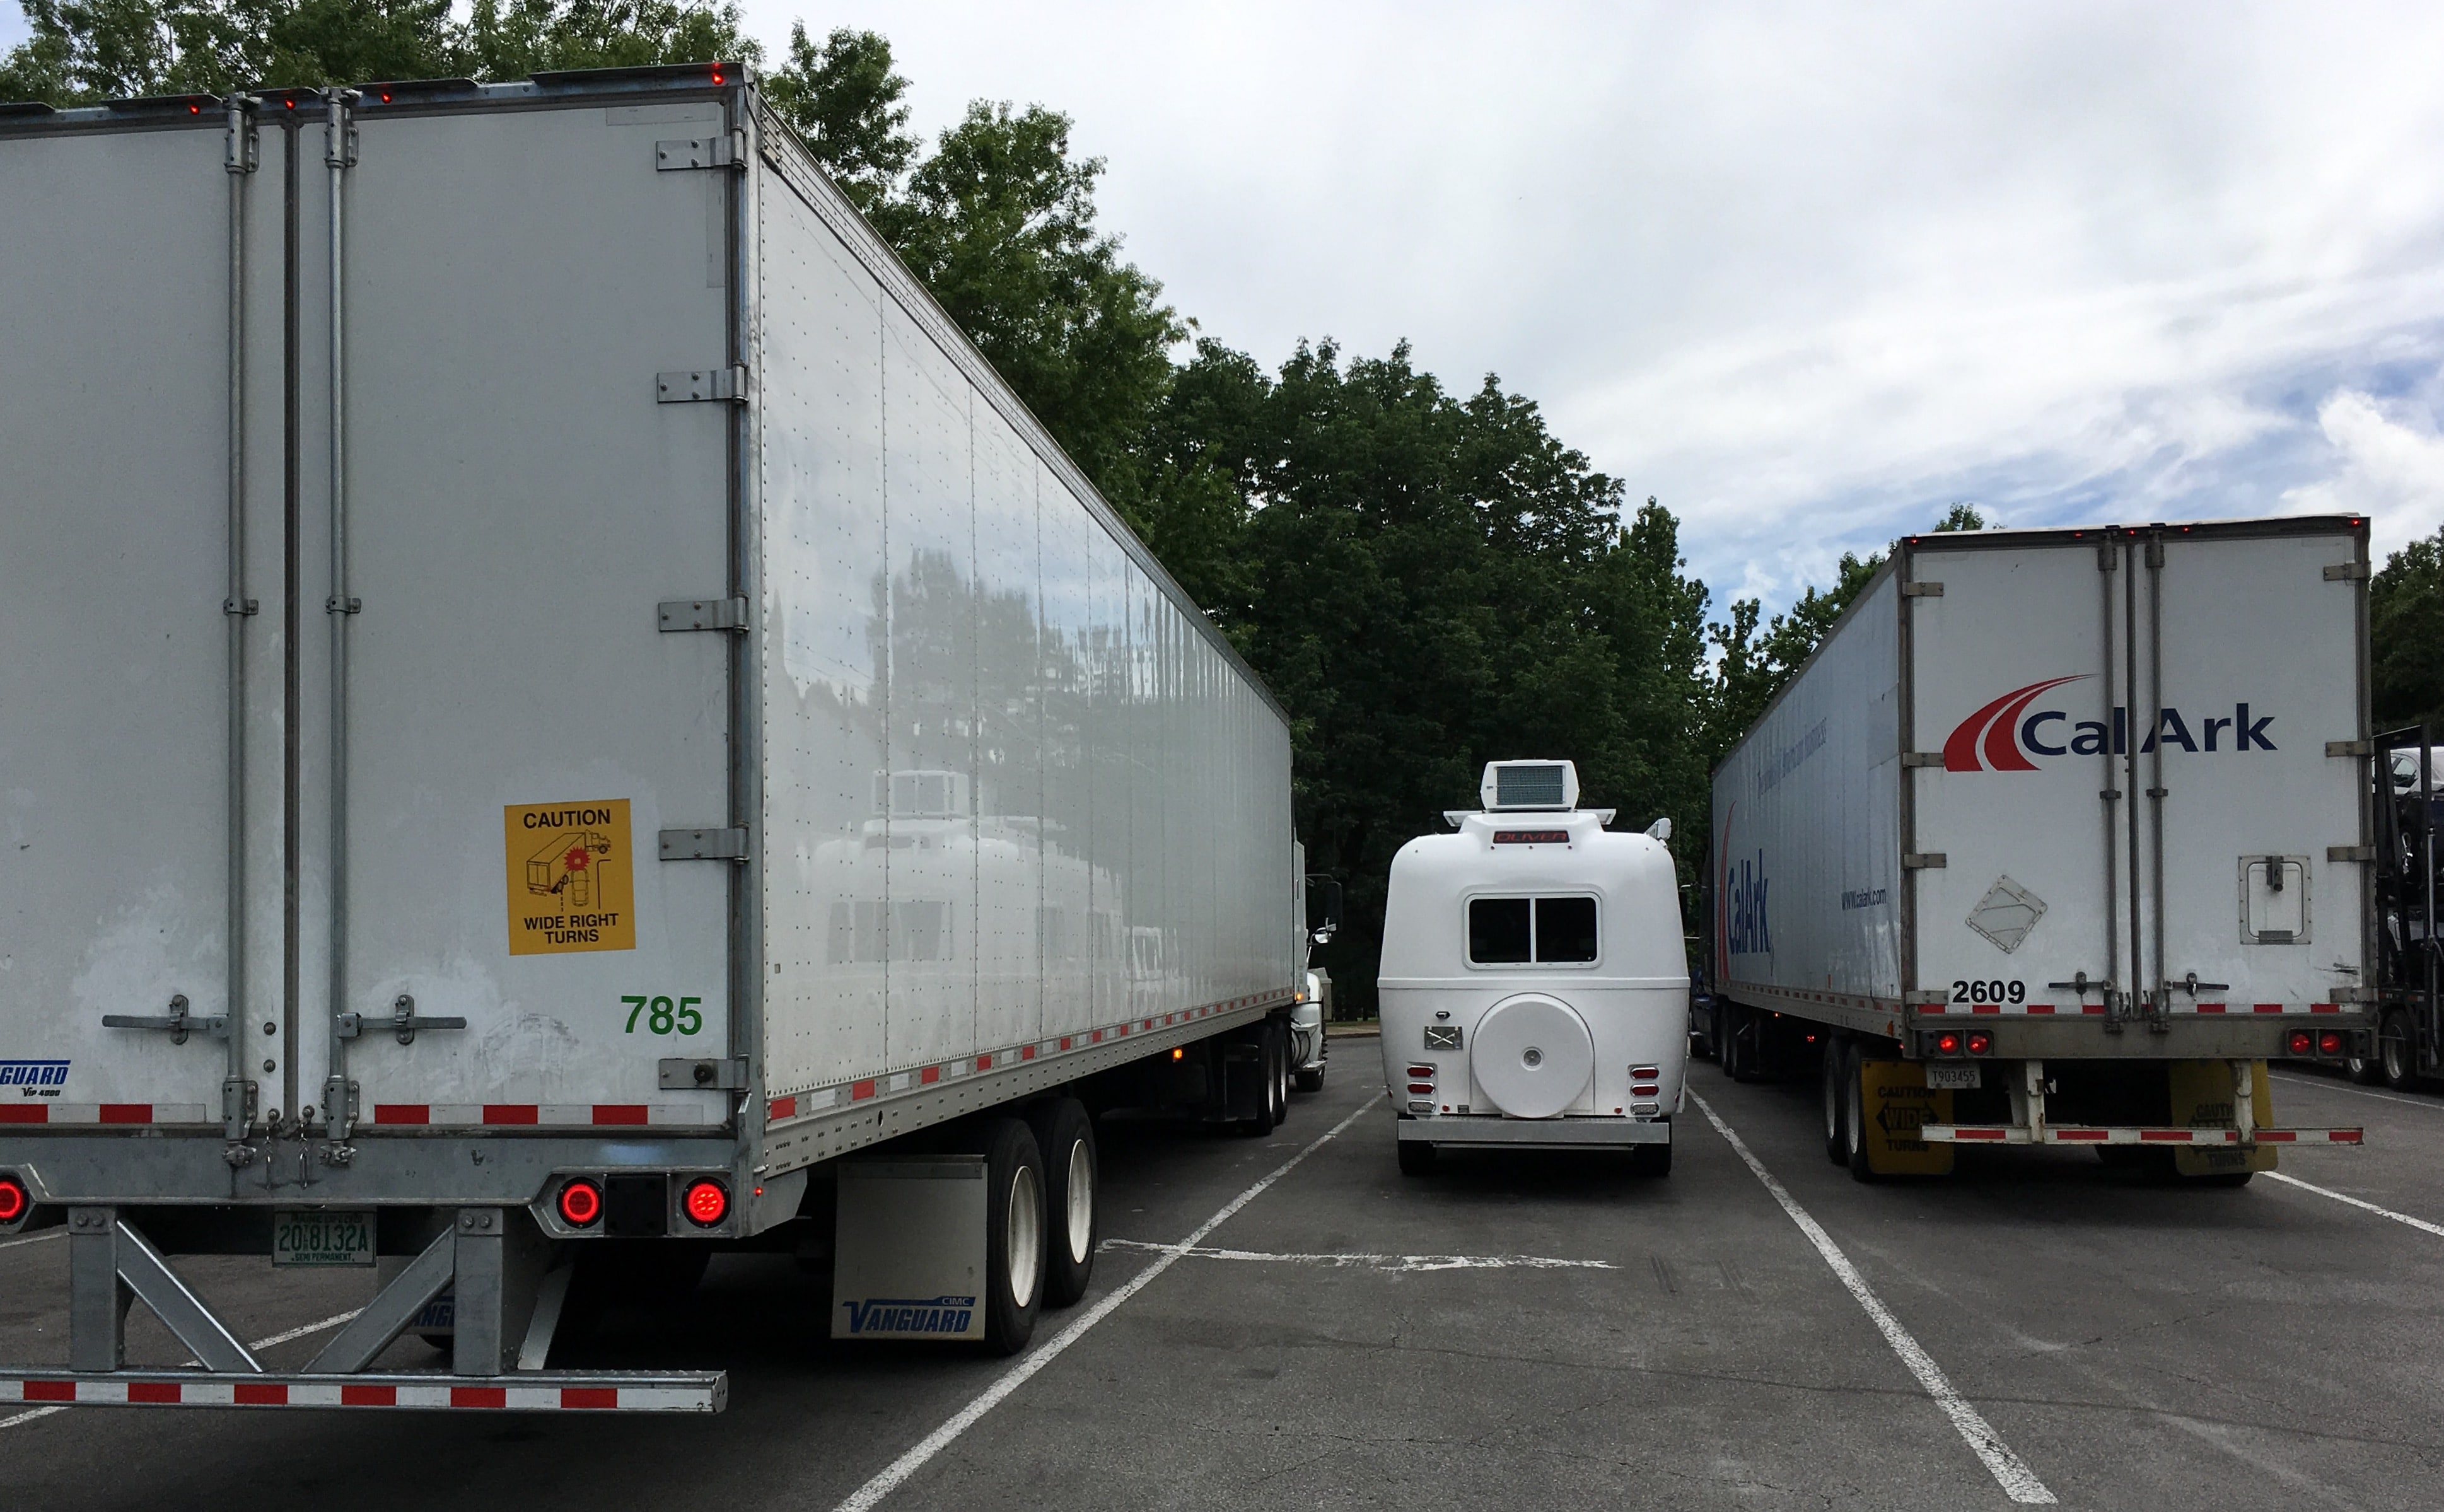
I hate truck stops, their diesel pumps are usually nasty and flow way too fast. I think a truck stop would be at the bottom of my list to overnight, but sometimes I guess you can't be choosy. I am always amused to see pictures of Olivers parked between semis. This is one reason (of several) that we came up with the name "Mouse" for ours. John Davies Spokane WA
-
That may be my final solution, thanks for the suggestion. I could always attach a looong hose to it and use it as a hand held bidet ;) John Davies Spokane WA
-
I wanted to add another pic and a comment. That is the unused water supply for the standard flush toilet. It sits directly behind the NH toilet, close to the streetside wall. It adds a complication for winterizing. You should blow it out and flush with antifreeze, but exactly how is problematic, without making a substantial mess. You could invert a cup over the top and let the fluids run out onto the floor. Maybe I will install a fitting and a 2 food flex service hose on top, so I can direct the flow into a gallon milk jug.... John Davies Spokane WA