John E Davies
-
Posts
5,759 -
Joined
-
Last visited
-
Days Won
243
Everything posted by John E Davies
-
 Does anyone know where I can get either a vinyl applique or a laser printed aluminum switch placard like this? Have added a Garmin backup camera and would like the switch to match the others in appearance. Jason in Service told me that they get all theirs from: .... http://www.seton.com ... but I emailed them and got a frustrating canned response telling me to buzz off. So now I need to figure out a local source or another online place. Any suggestions? I can make an aluminum plate, drill it and paint it black, I just need the label and the perimeter line. So it looks pretty and professional. Thanks. John Davies Spokane WA
-
They are close to the same, both are medium strength. I think the 4200 is a little stronger adhesive, the 4000 has added UV resistance, here is a chart. I would go with the 4200 simply because you have more time to work with it and remove excess. It's what I have always used. 5200 is a much better choice if you are gluing parts together that probably will never have to be disassembled, like a boat deck to a hull.... it is pretty much permanent. John Davies Spokane WA
-
Towing Elite II with a Land Cruiser 200 V8
John E Davies replied to John E Davies's topic in Towing an Oliver
What made you feel the LX 570 was not adequate? Was it the squooshy suspension? LXes are pretty darned soft so they will ride like a car. The Land Cruiser 200 is stiffer and it is easy enough to upgrade the springs, or just add airbags in back for the extra tongue weight. and they also do not have the darned self adjusting stuff to fail.... My Cummins 5.9 is a wonder going up a 12% pass at 10,000 feet while towing, that would be hard to give up. I sure wish we got the diesel Cruiser 200 here.... Thanks, John Davies Spikane WA -
Randy, I would definitely remove that gutter completely, there is no doubt in my mind that the sealant has failed, and the other sections are now suspect. The main concern is that the screws into the hull may not be water tight. Water ingress is likely, and possible freezing damage in winter. Take it off, redo it with 3M 4200 and you will not worry about it when you are lying in bed when the rain is coming down hard! Even if there were no other problems, you will then know that, instead of wondering: is it, or is it not, leaking down inside the hull? Read and follow the 3M sealant instructions exactly, do not use alcohol for initial or post cleanup! It will prevent the sealant from curing! BTW, I suggest that you keep a close eye on your other outside seals, if the same person installed them, or used the same batch of sealant, they too might have problems like the door gutter, which in my opinion should be a "red flag" of warning to you. John Davies Spokane WA
-
How To: Spare tire and wheel lock
John E Davies replied to John E Davies's topic in Ollie Modifications
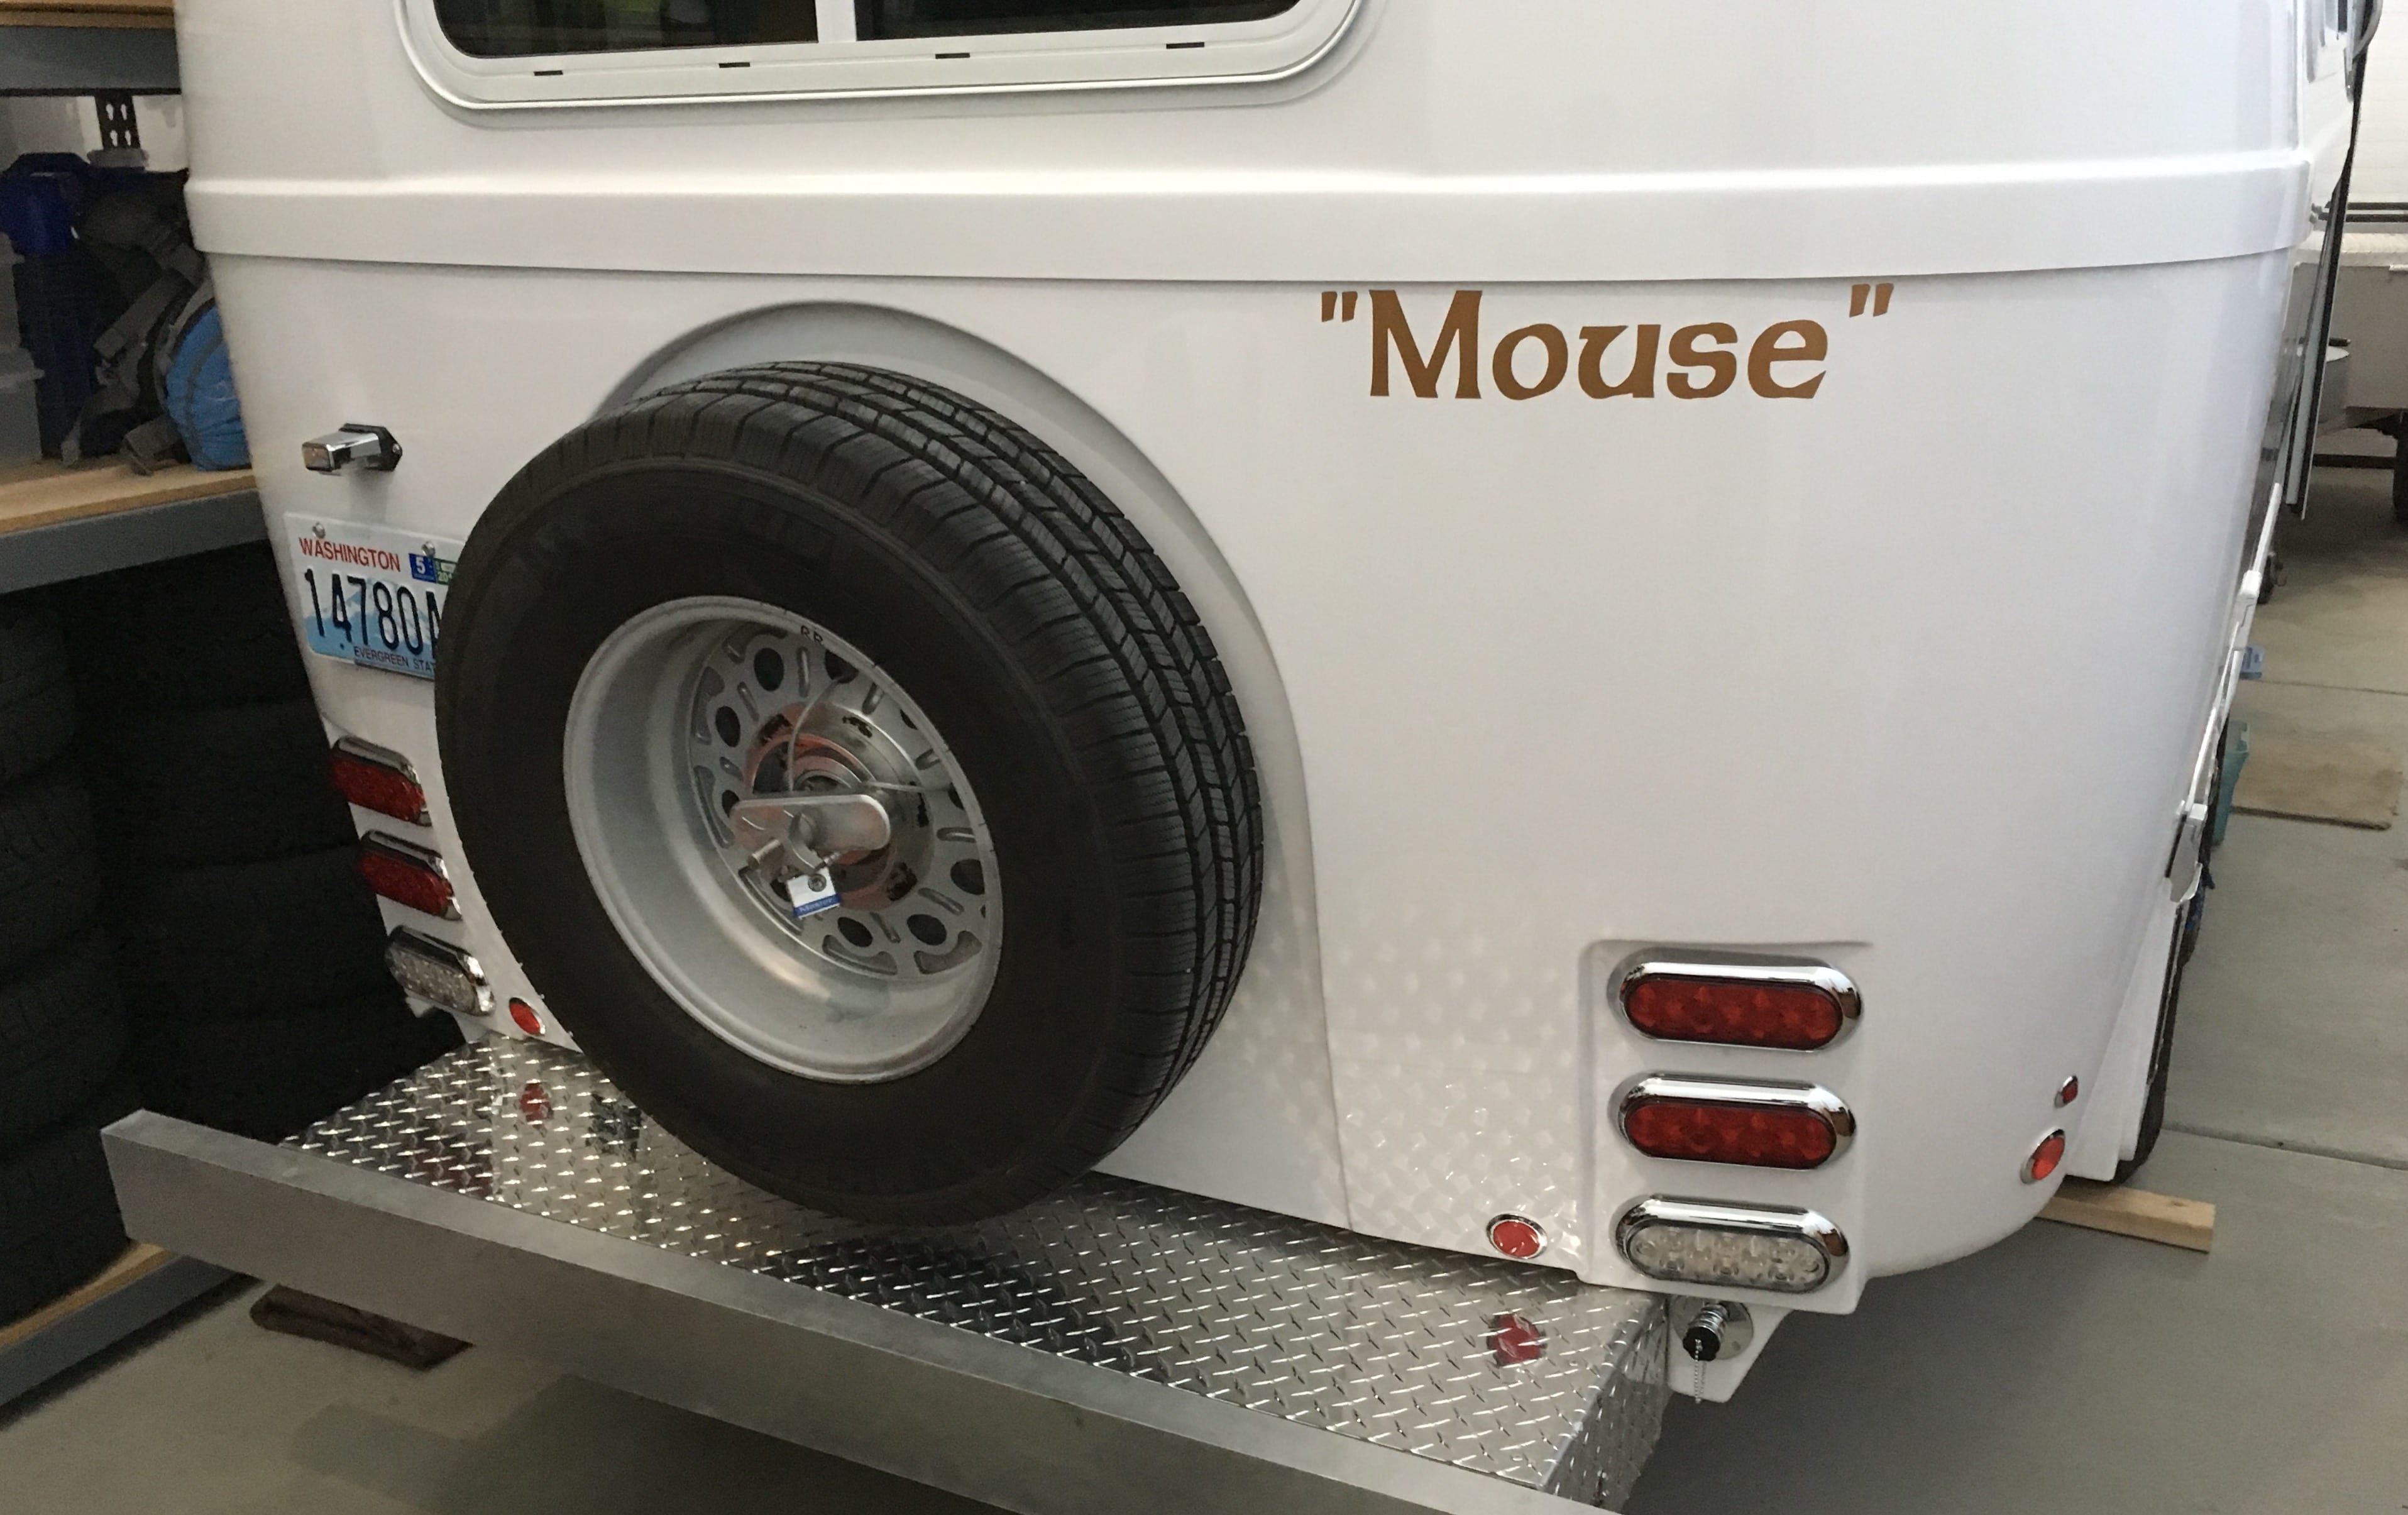
Great idea, I will try that. Thanks. The comment about possible fiberglass hull damage is a good one and something I had not considered. I think I will leave the wheel facing wrong side out, and consider it to be protecting the wheels good side, and also the hull, from crash damage, sort of a "soft auxiliary bumper", in case I back into a tree. At least, that is what I will tell anybody who asks ;) Do you have pics of your lock setup? John Davies Spokane WA -
How To: Spare tire and wheel lock
John E Davies replied to John E Davies's topic in Ollie Modifications
It won't fit that way due to the wheel offset - I tried - and also the pretty side of the wheel would get scarred up by the ring on the retainer. It would definitely look much better, especially as the wheels get aged and dirtier. The entire mount would have to be rebuilt, with the center part extended back half an inch, plus there would need to be some way to pad the good side of the wheel without scarring it or letting water sit there and corrode it. It would be best to just weld a great big thick flange on the cylinder, with steel studs sticking back for real lug nuts and a lock. To be honest, I don't know why they chose this design. It keeps the clean side of the wheel pretty, but the good side of the tire sidewall chafes hard on the hull and will mess it up it and the gelcoat after a long time..... Plus if the tire deflates, the wheel will get loose on the mount. Well built, but ...Perplexing engineering! Not at all how I would approach the problem. The one positive note is that with drum brakes almost all the dust gets blown away and very little accumulates like with disc brakes, so the back sides of the wheels can be kept reasonably clean. If kept heavily waxed, and cleaned routinely during rotations, they all will look good for a long time. If not, I guess the cover goes back on, or I build a new mount one winter.... Oh WAIT! Does anybody other than me rotate their spare? John Davies Spokane WA -
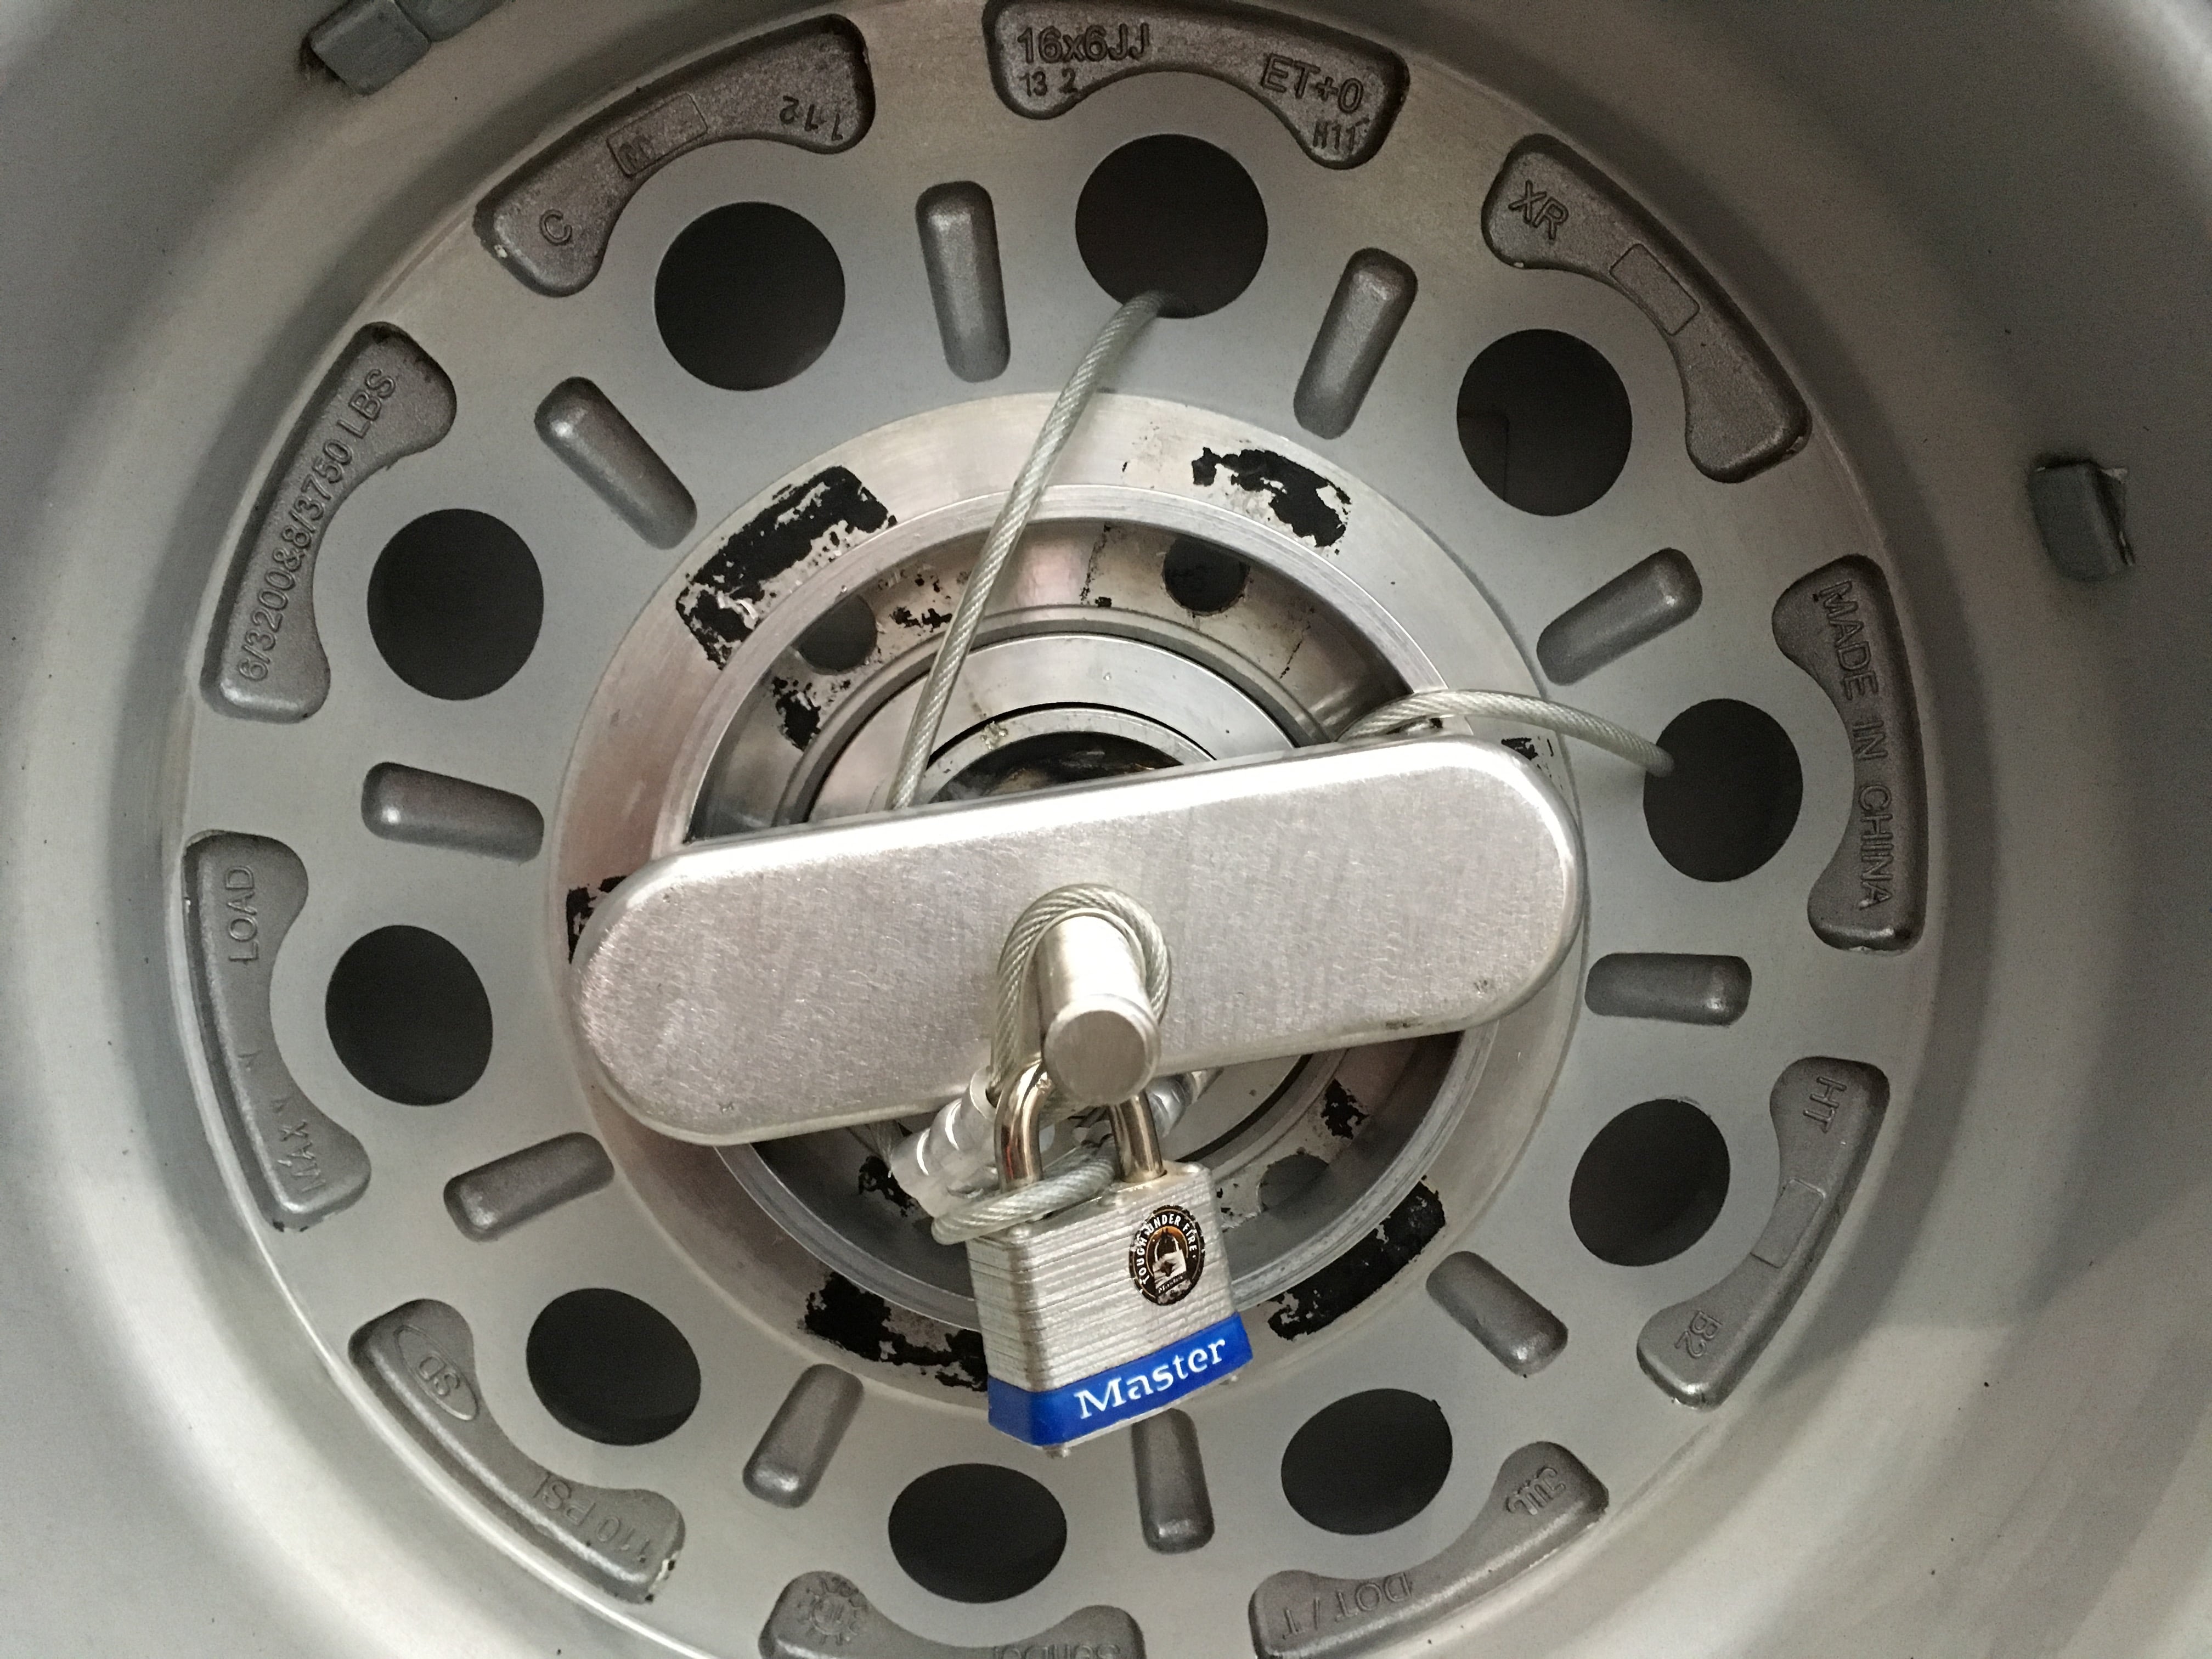
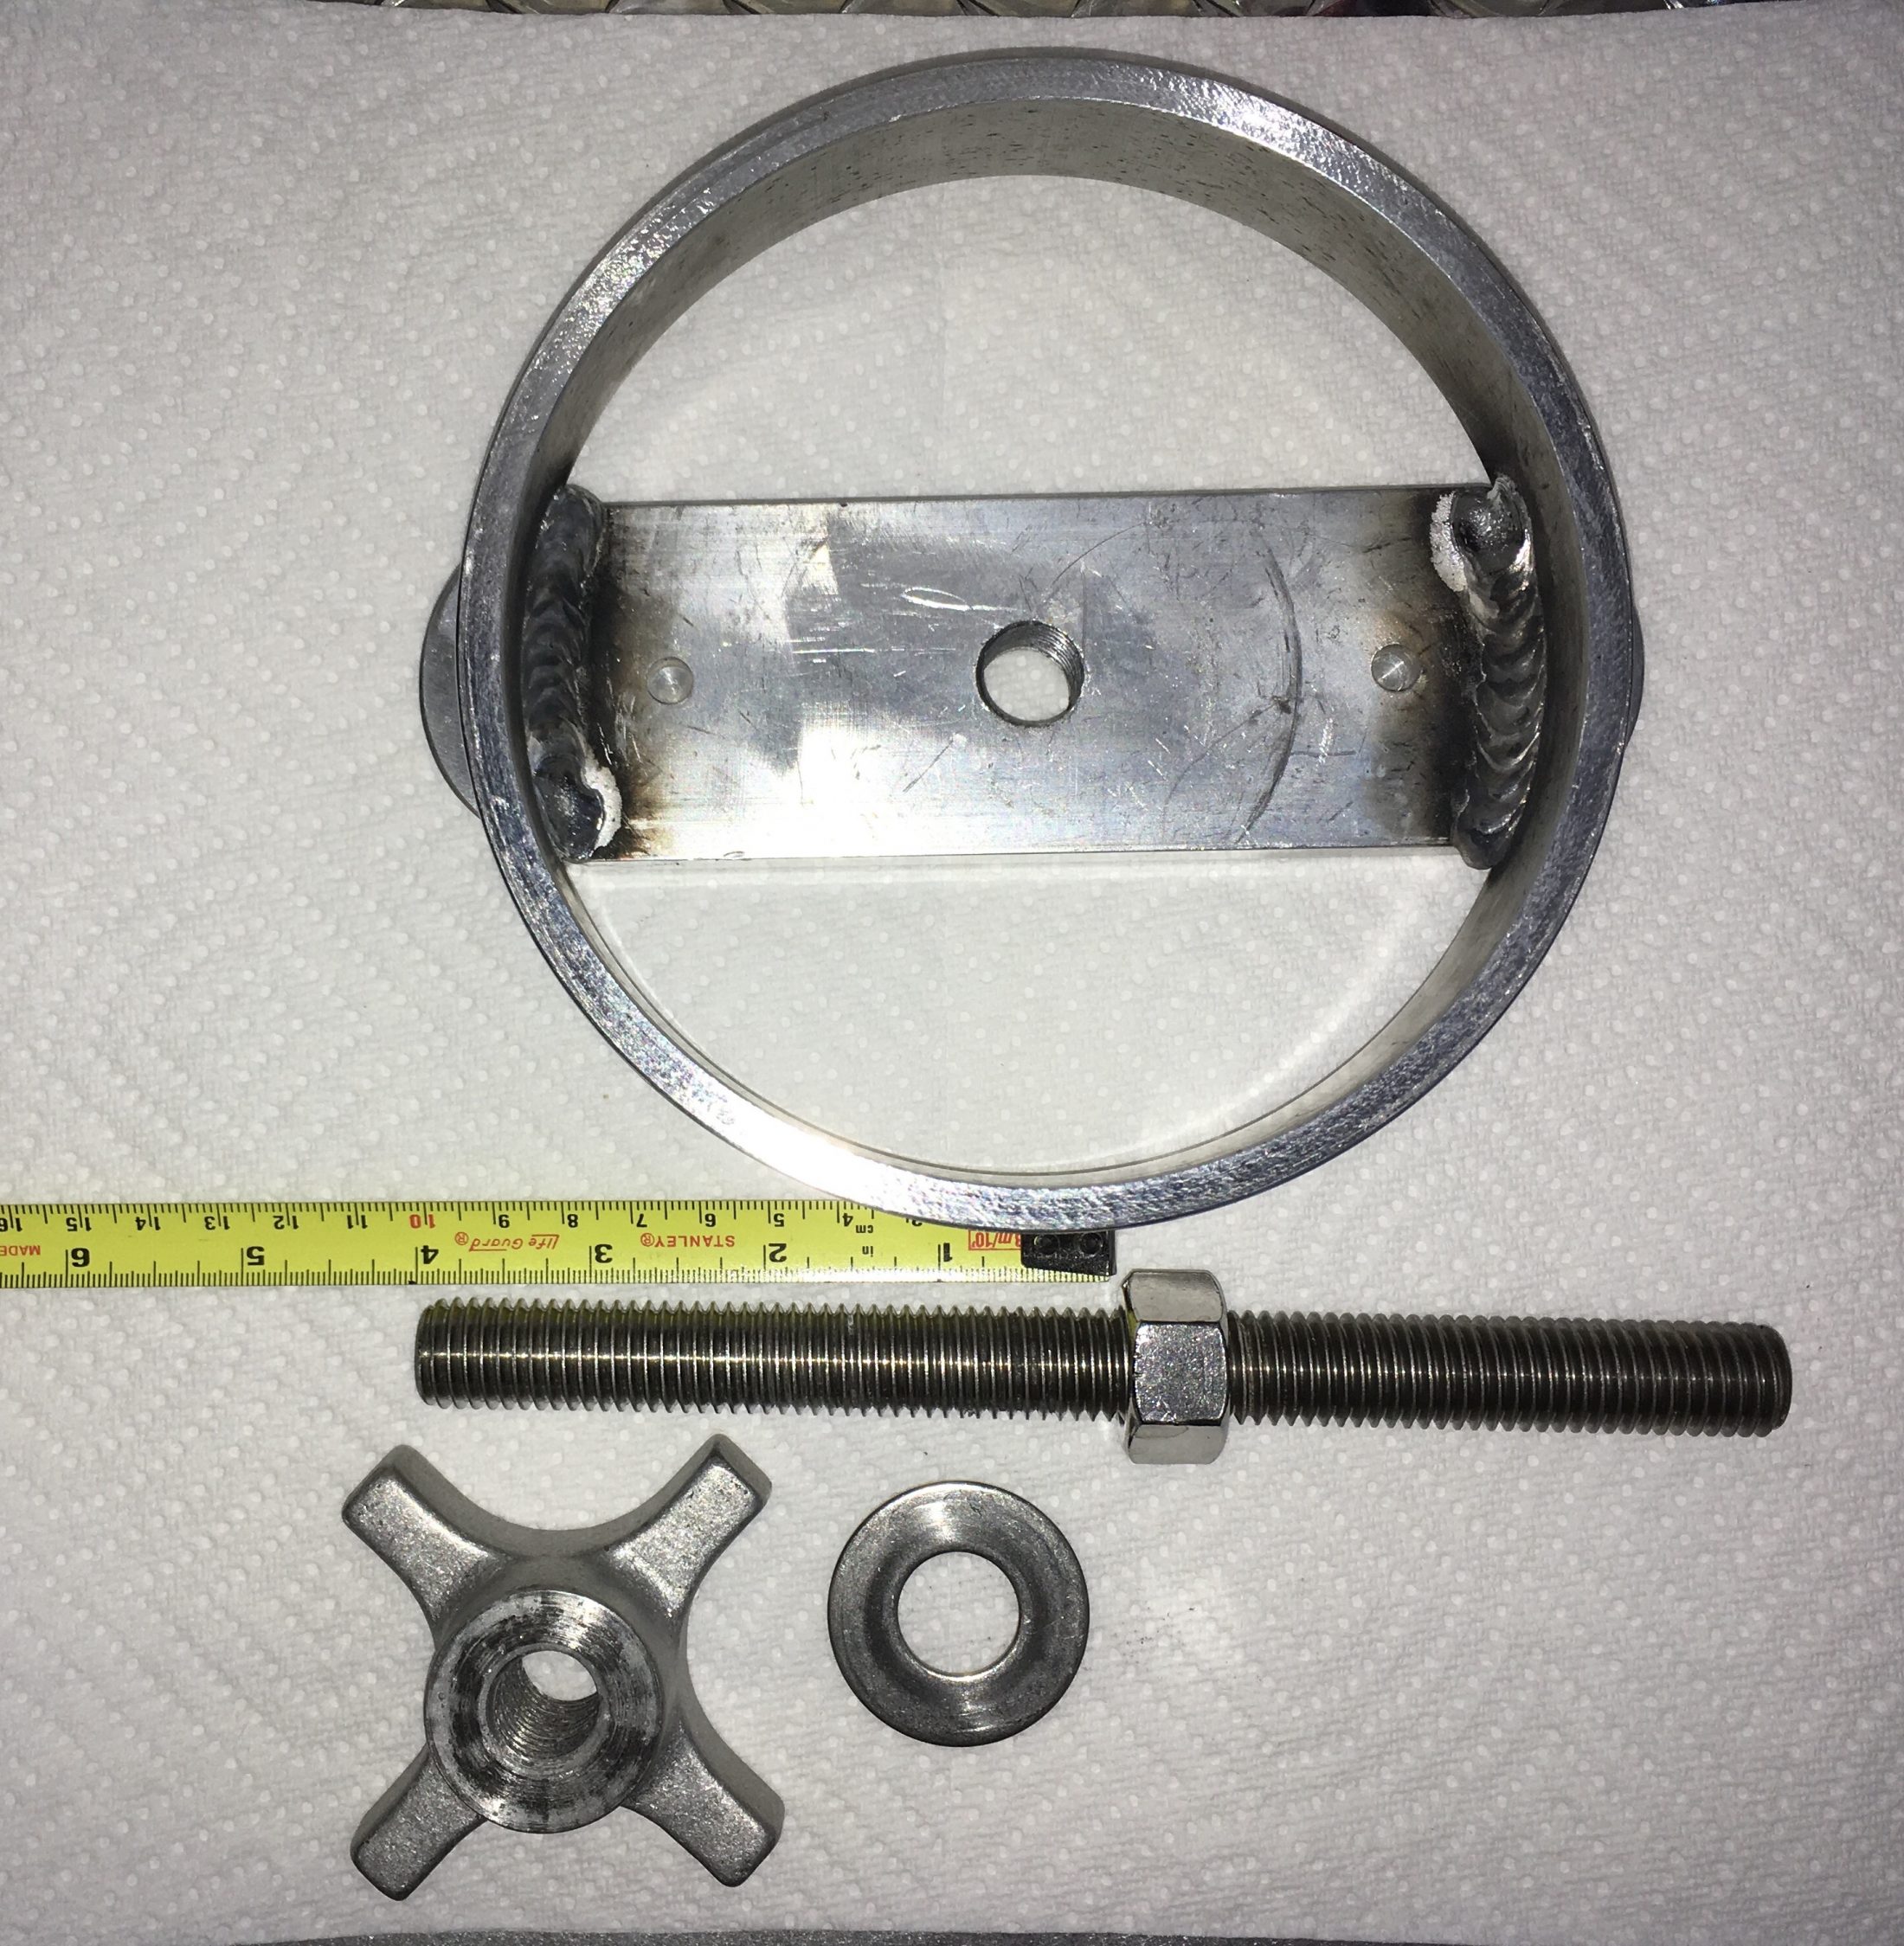
There is nothing securing the spare under the fiberglass cover, and because there are no studs like on the hubs, you can't use a conventional Gorilla or other threaded wheel lock. I considered drilling a 5/16" hole in the threaded rod for a padlock, but I decided instead to use a steel cable looped through the wheel itself. The cable is 1/8 plastic coated, 24 inches overall length, the "wire rope sleeves"are aluminum. I used a big old hand crimping tool to secure the loops. None of the parts will scratch the wheel or mount. Anything bigger would be hard to get through the openings between the mount and the wheel. I wanted to try going naked - no cover installed - so I used the star nut that secures the cover to run the flat washer down tight on the loops, to keep them and the lock from moving. If you wanted to install the cover, you would need to thread the cable in a different configuration, so that the lock and loops are hanging down and keeping the flat part of the wheel retainer free and clear. It is secure enough, IMHO. Anybody who was really determined to steal it could get through it pretty fast with a bolt cutter, but it is much better than nothing at all, and it is a very good visual deterrent. I had all the parts on hand in my garage, so it took only half an hour. It's an easy mod if you have the tools. EDIT: Thanks to Raspy for this tip. I screwed the threaded rod into the mount another 1.25 inches, so the exposed part was not a hazard or eyesore. More better! One thing I don't like about this design is that the ring scrapes badly on the inside of the wheel face as you tighten it hard, shedding aluminum particles. This is not good, but anything added there to act as a pad needs to not trap moisture. John Davies Spokane WA
-
My wife spent a ton on nice Twin sized linens before we picked up the trailer. Then we found that they are way too big because the beds are 30 inches x 75 inches, not 39 x 75 which is a Twin. They are really Bunk mattresses. NOT THIS: I really wish that ALL the advertising was not wrong, it means I need to get better fitting ones. I started to cut the existing ones down but there are ten pieces, and that is a whole lot of screwing around, and the results will not be pretty. I have decided to narrow the covers and blankets lengthwise, and replace the other six pieces. Here in the forums I saw mention of this place: ... http://www.ablifestyles.net/camper-rv-bedding/camper-rv-sheets/road-ready-rv-sheet-set/ Since we have ten inch tall mattresses, their off-the-shelf sheets (7 inch) will most likely be too small. They do offer custom sizing if you send them the dimensions. They also make Airstream specific linens with curves, so I am probably going to have them make me pads, bottom and top sheets that will fit the odd Oliver shape so there is not a lot of extra material bunched under and beside the mattresses. http://www.ablifestyles.net/special-order-camper-rv/ Here's some questions. Has anyone ordered custom linens from here, or another vendor, and were you happy with them? Do any of them have Oliver mattress dimensions on file, so that I would not need to measure the curve radius? Does anyone have that figure? I am not very happy about having to do this. Thanks for any help. And please ask Oliver Sales to change their literature so this does not happen to lotss more buyers. John Davies Spokane WA
-
https://camelcamelcamel.com You add the Amazon item you are interested in with your "target price" and it keeps track of price changes, which you can view on a chart. It will alert you by email if the price gets down to your target value. It's pretty useful if you can wait weeks or months before buying. If you need it right now, all it does is tell you whether or not the item was priced competitively. John Davies Spokane WA
-
Progressive Industries Surge Protector
John E Davies replied to Bborzell's topic in Mechanical & Technical Tips
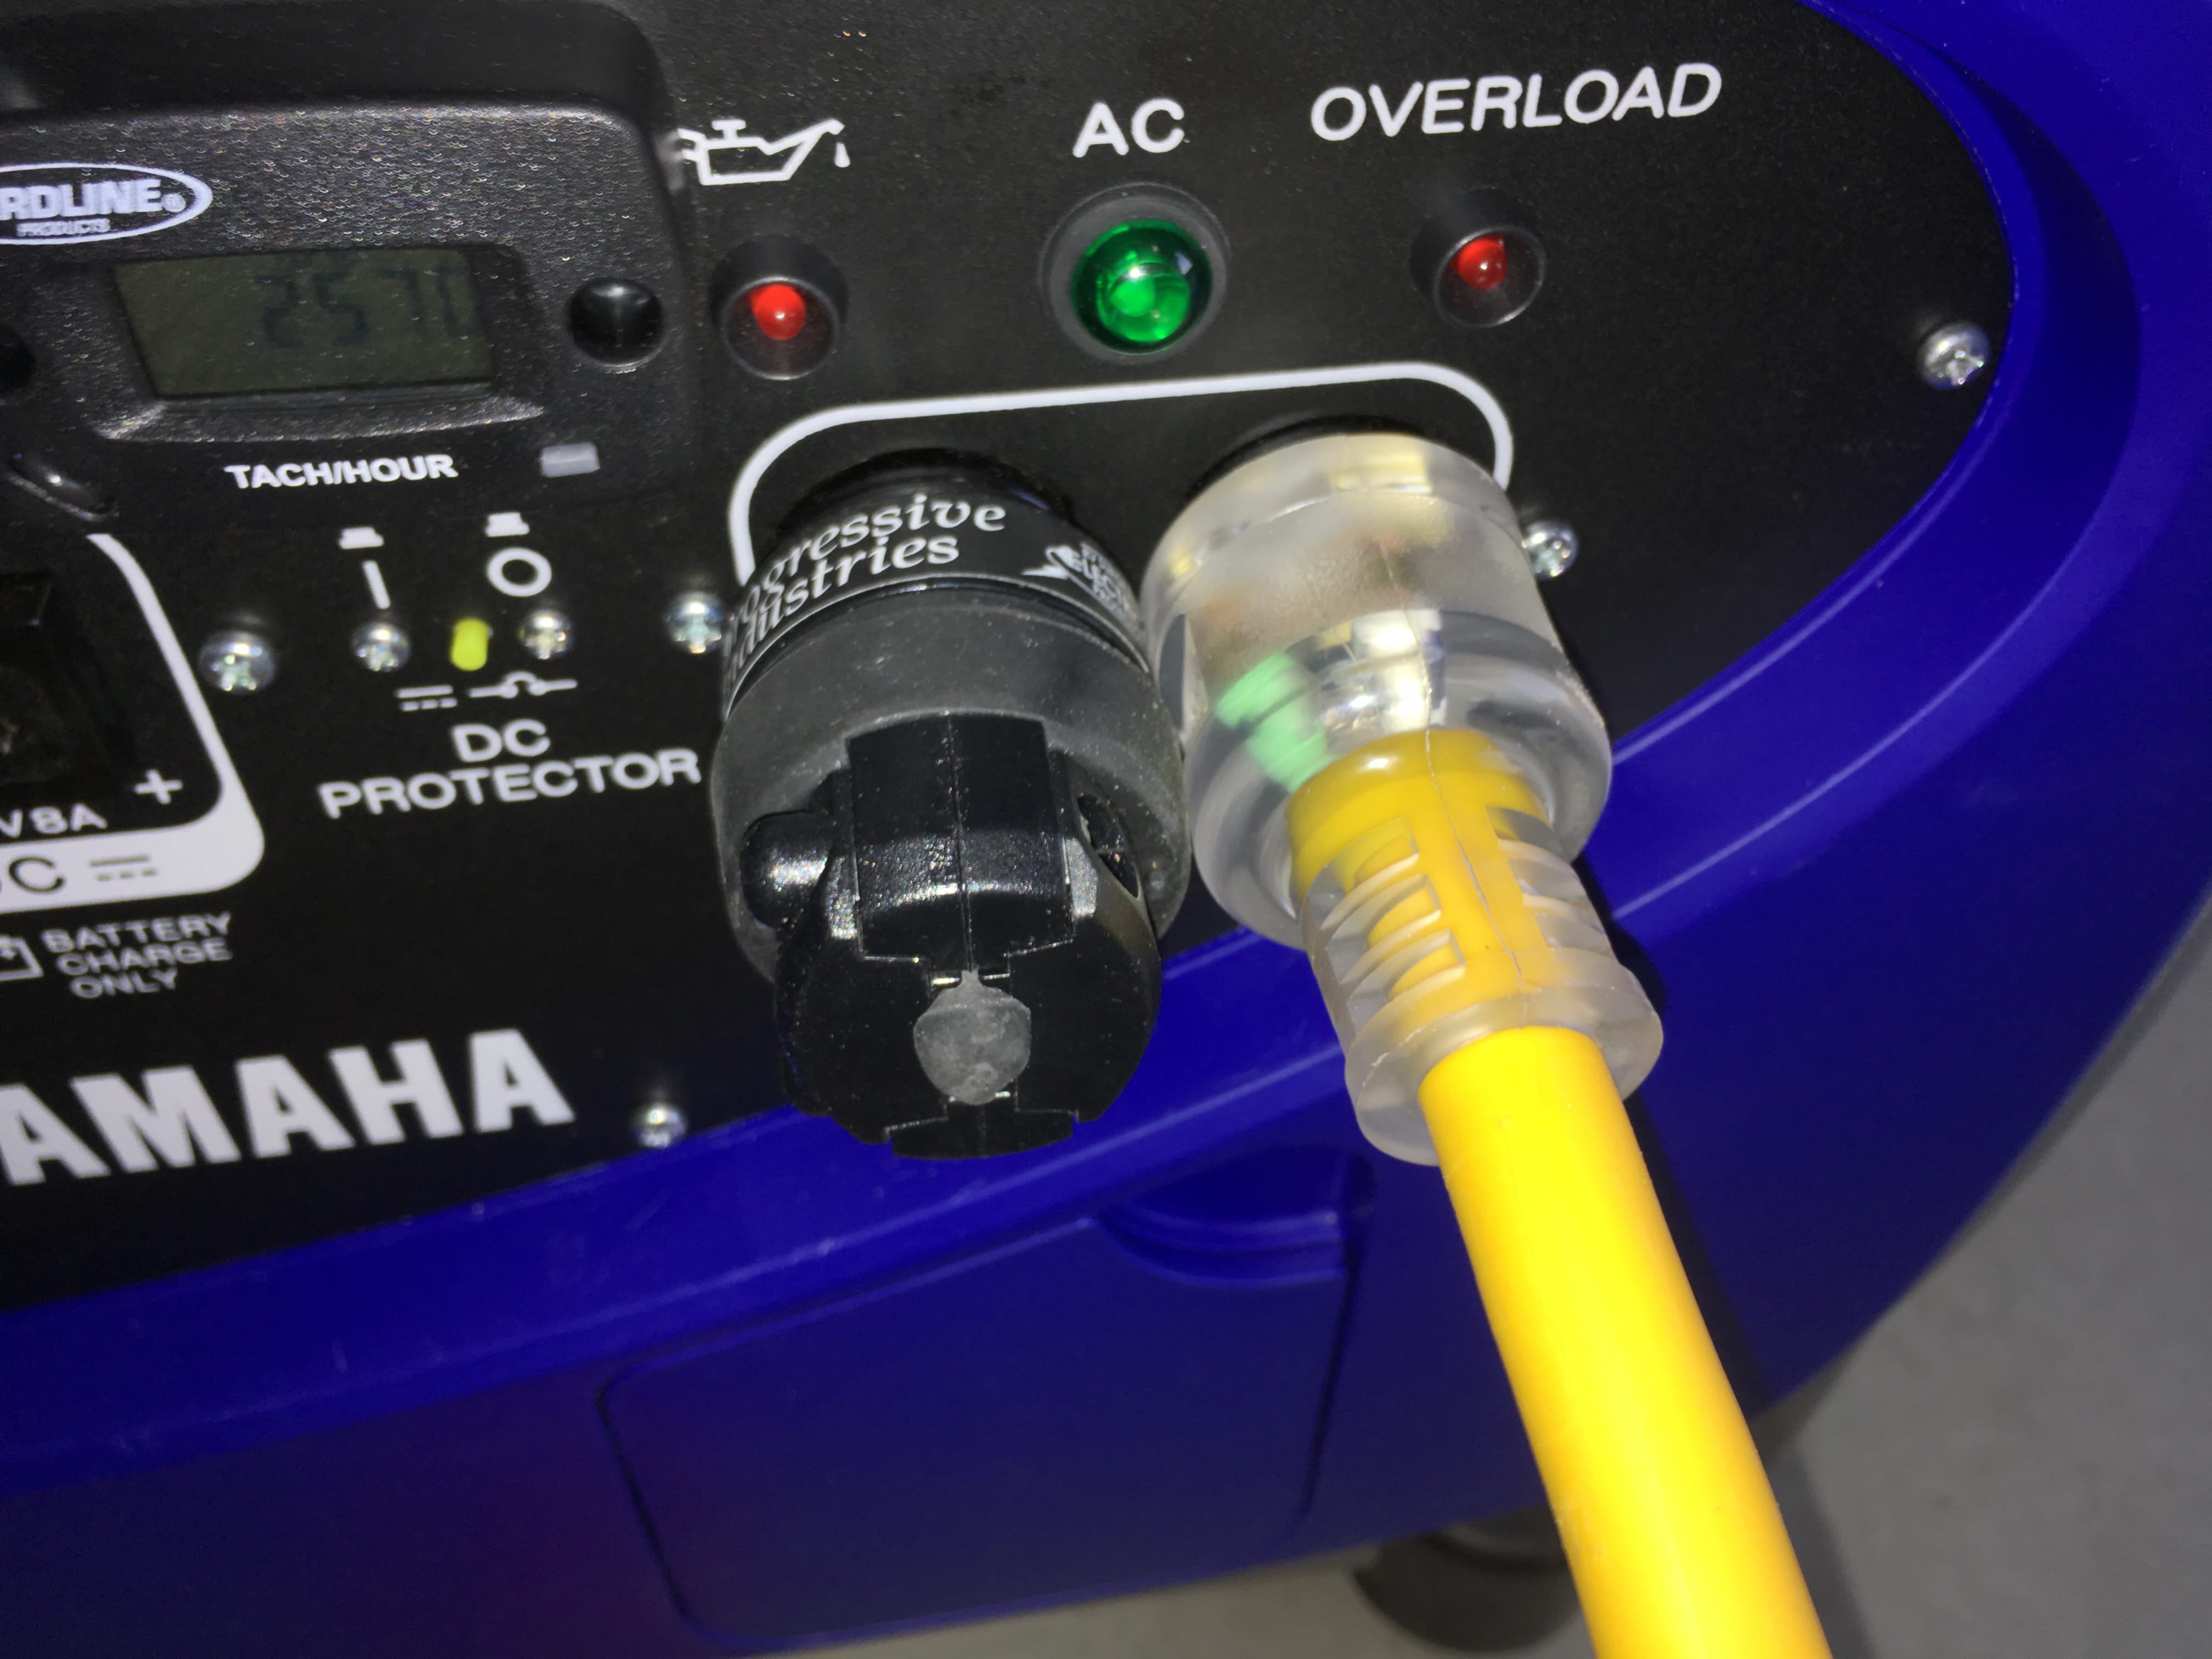
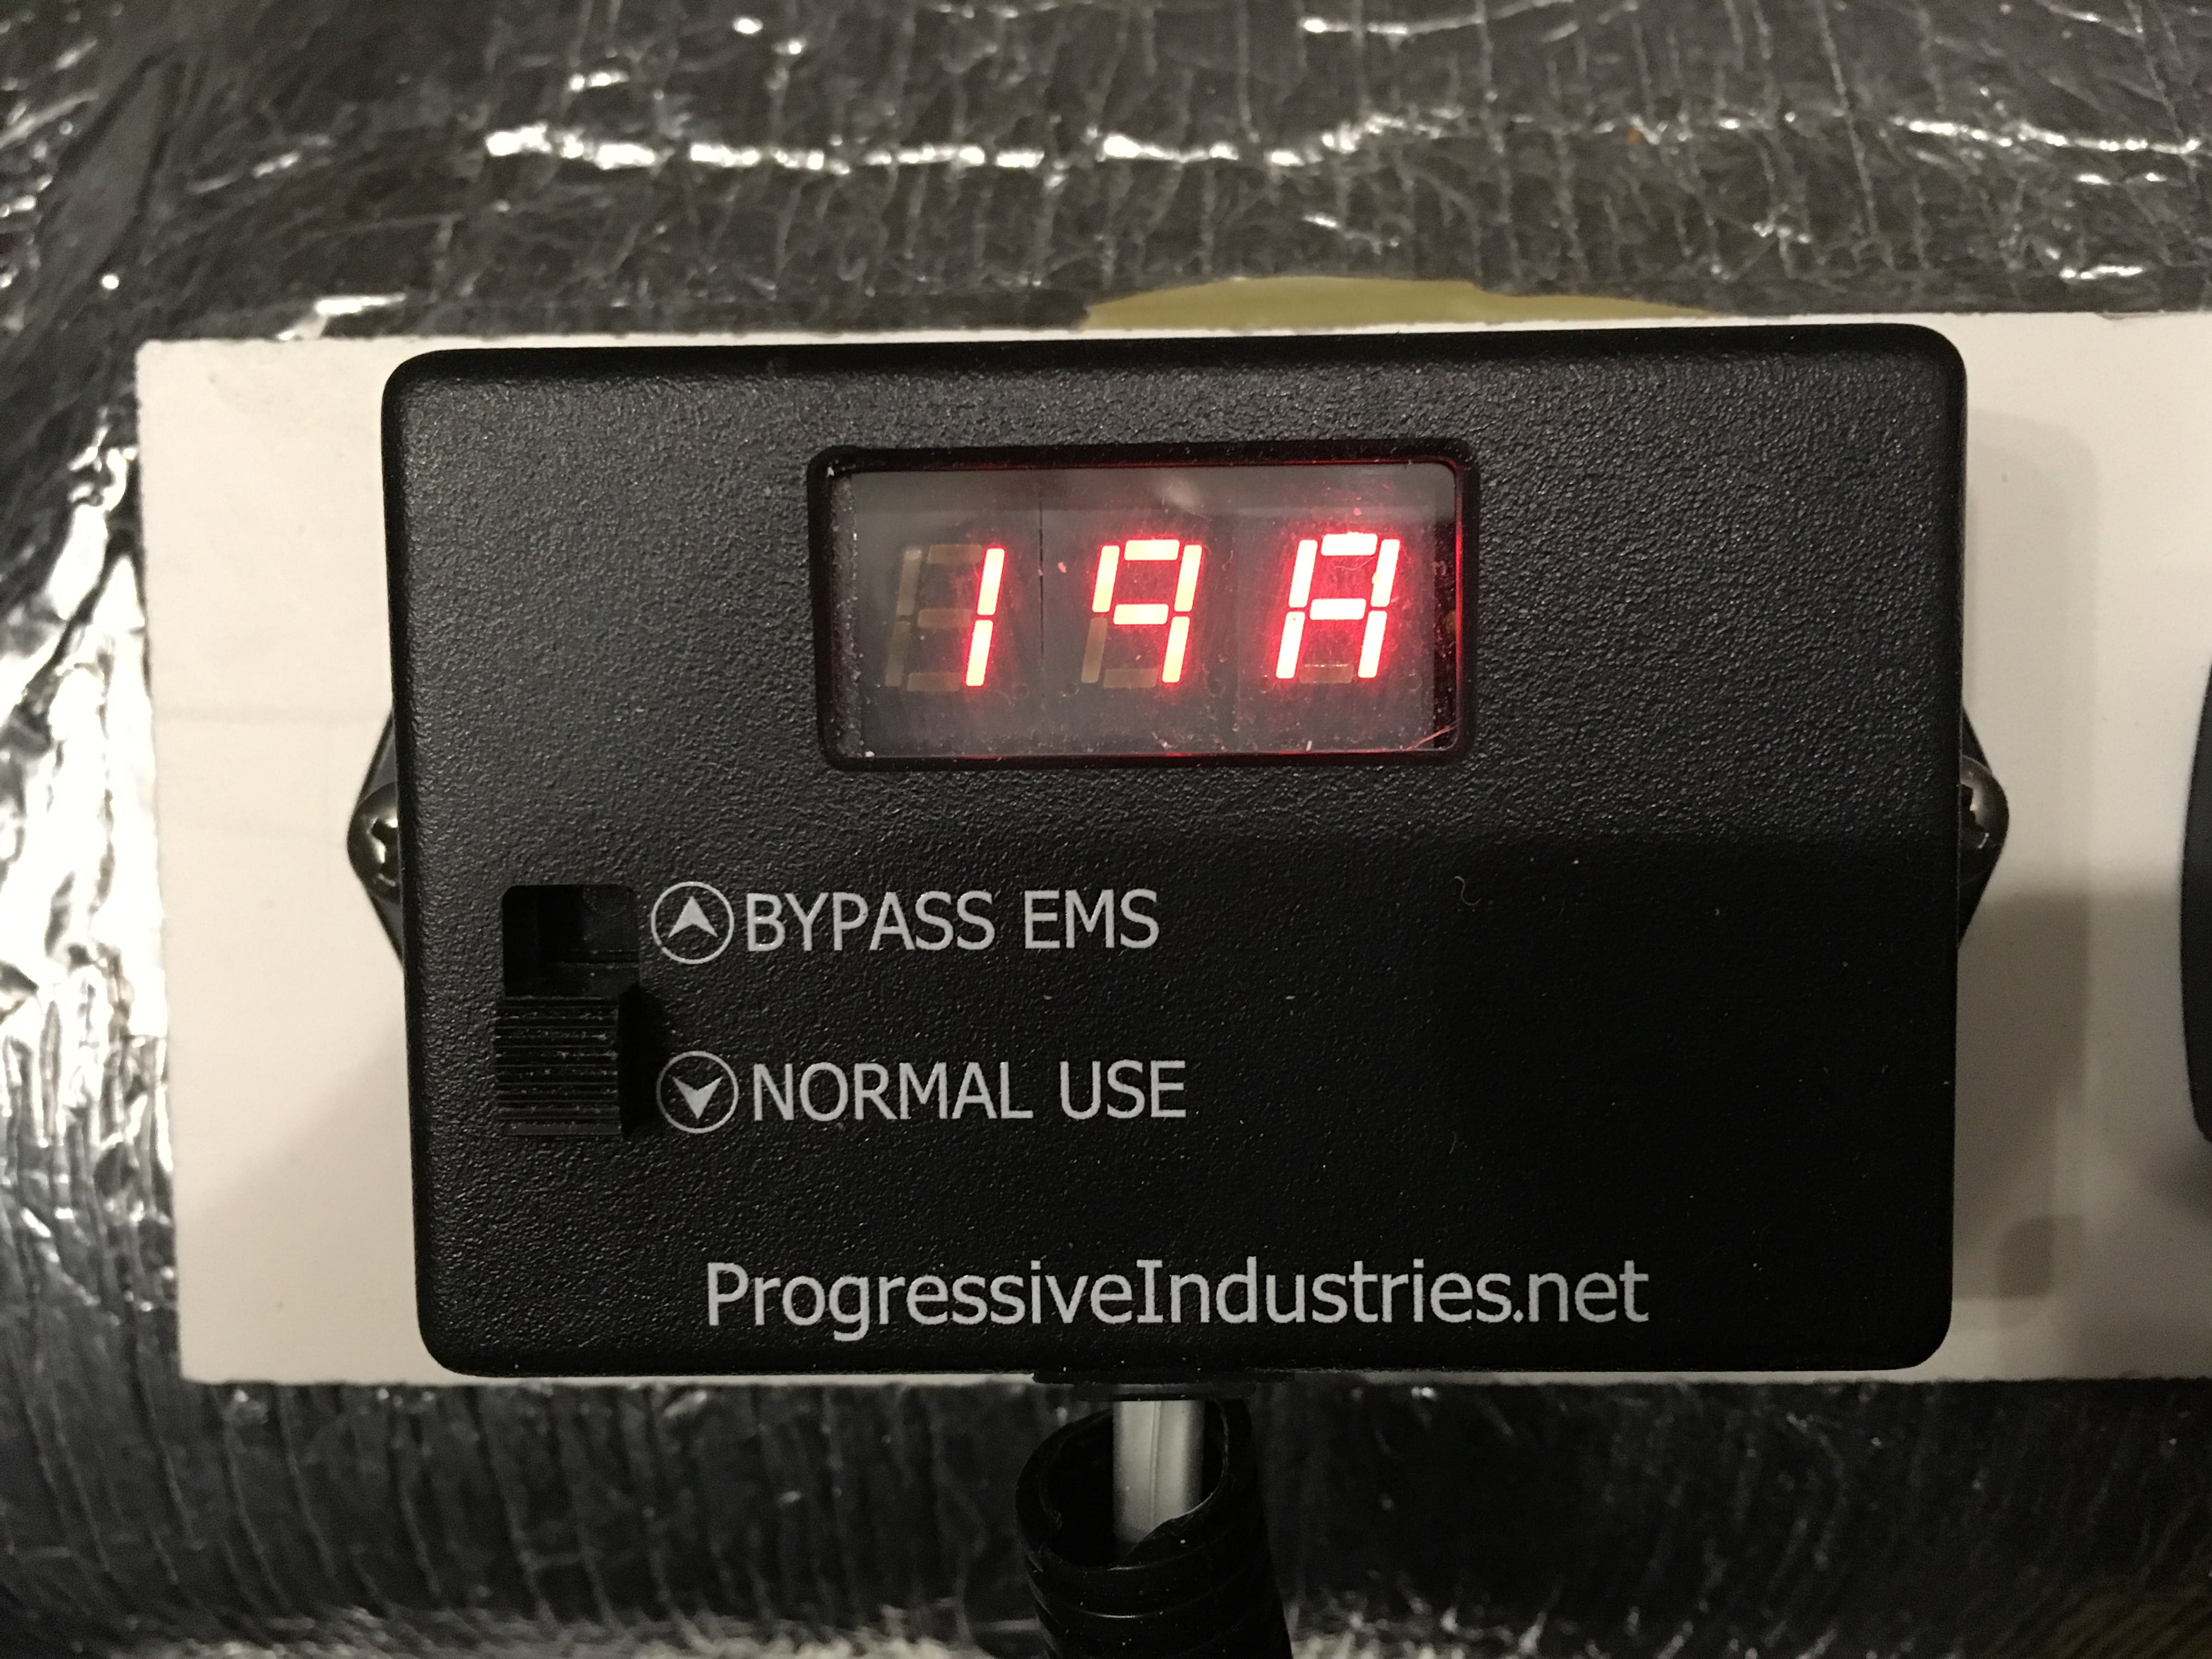
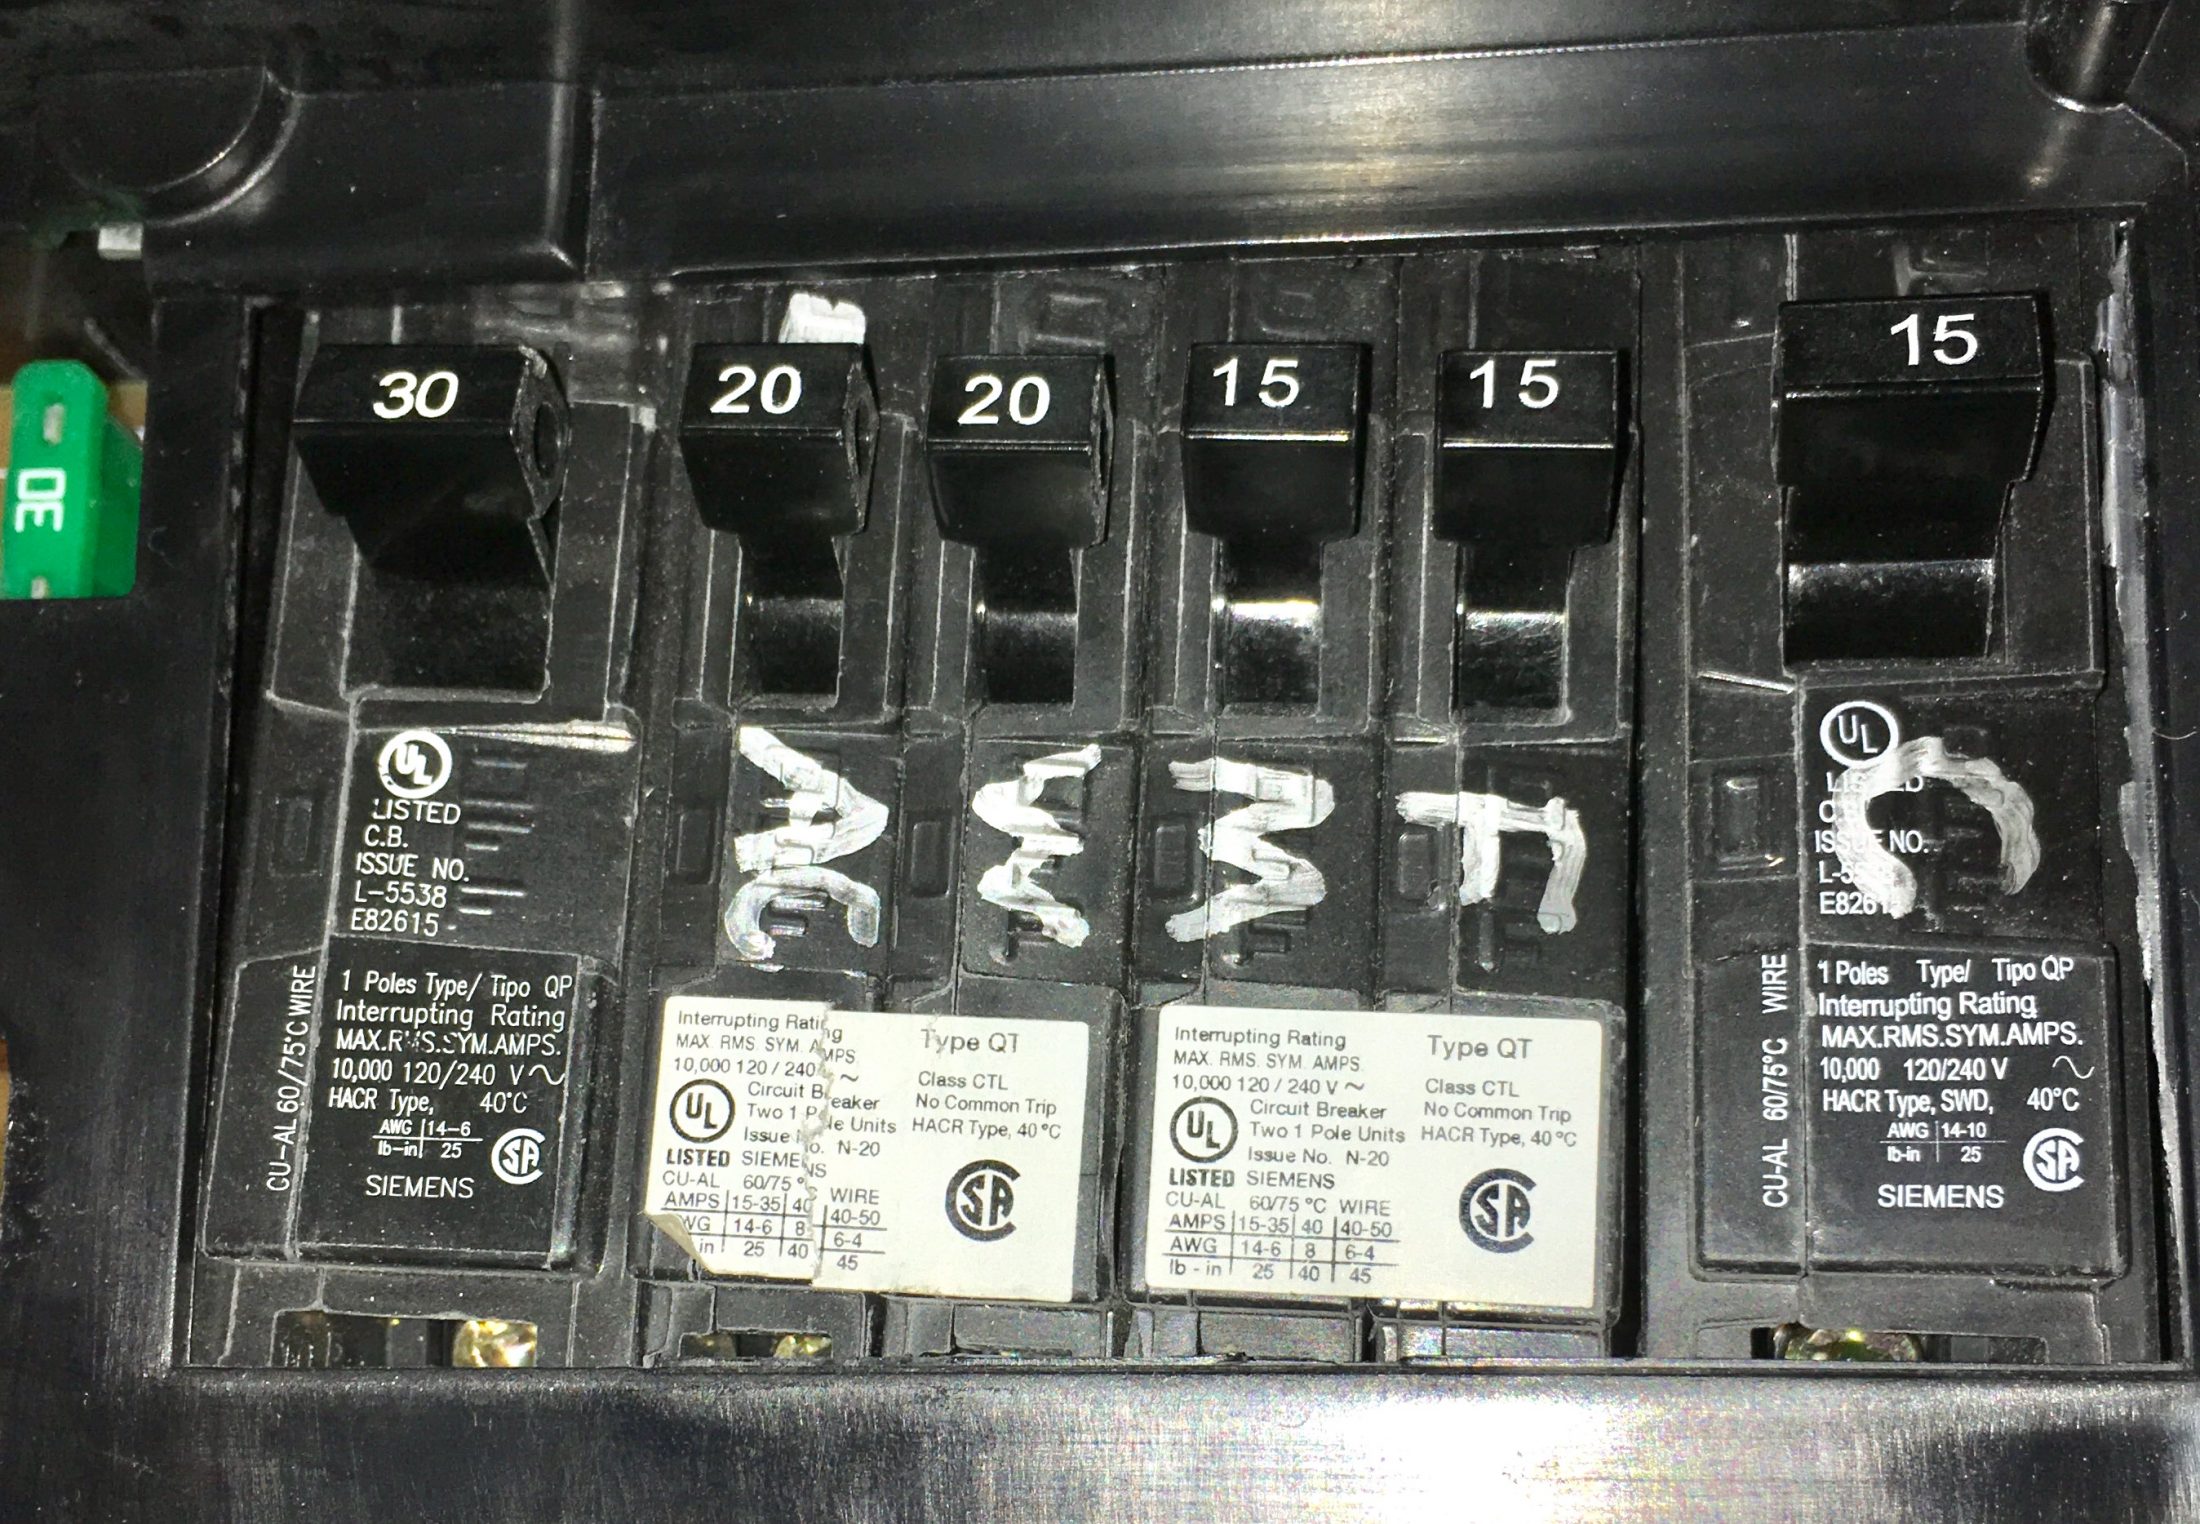
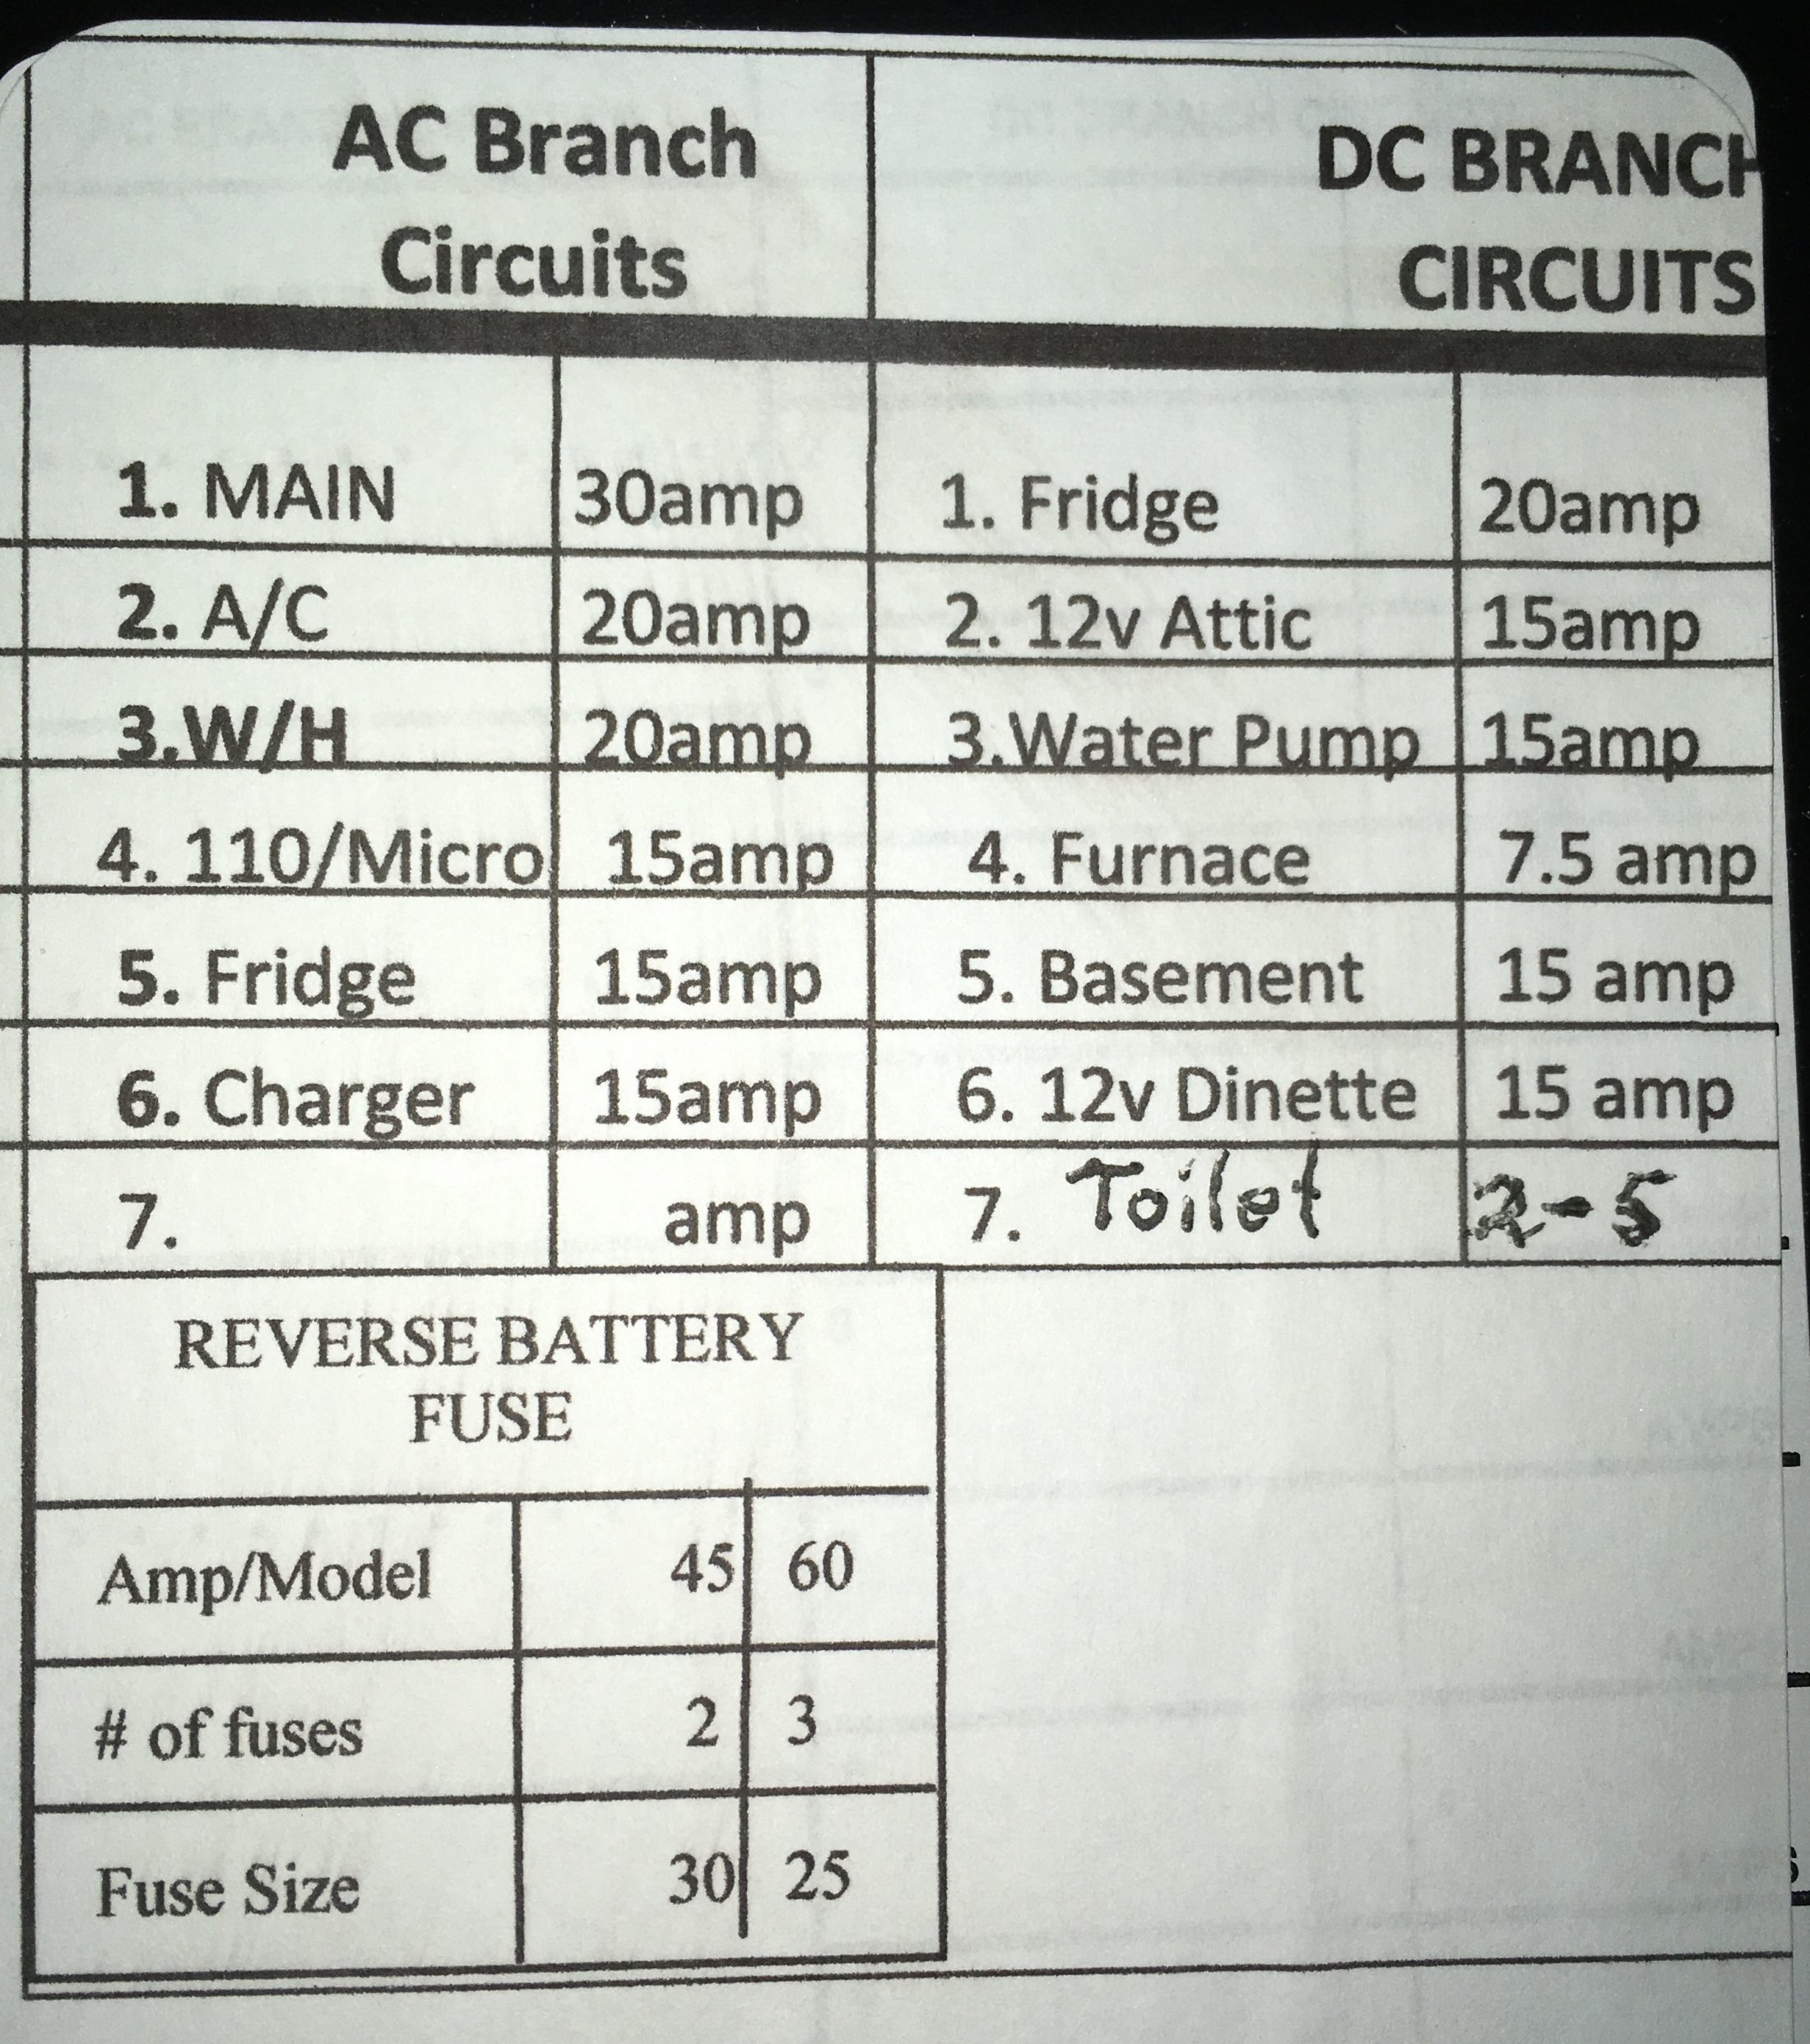
Reviving an old thread..... I got the Progressive Dynamics surge suppressor with my new Oliver and it came with a "generator plug" and no instructions. It is labeled "For Generator Use Only". When I tried running the trailer off my new (used) Yamaha EF2400ishc (thanks again Mike!) the surge suppressor would not let it connect. I googled the generator plug and came up with this: .... https://www.amazon.com/dp/B01BYSFQSW/_encoding=UTF8?coliid=I321CE0IR3BKDD&colid=1X5H11EH41351 As well as this discussion of why it is needed: .... http://www.jaycoowners.com/forums/f34/g-n-bonding-plug-28086.html I plugged it into the unused socket on the generator and all is well. That last pic is with the electric water heater (12 amps constant) and the converter (variable amps, lowering with time as the batteries get topped up) running together. It is nice to be able to see the amp load and adjust it as needed at the circuit breaker panel to keep the load reasonable. My Air Command 13.5k (the smaller unit) starts and runs fine at 9 to 10 amps with no other loads and I think I could get away with that and the converter also, as long as I made sure the converter was drawing less than 10 amps and the air conditioner thermostat was turned cold enough that it was not cycling on and off..... I am using a great big 10AWG super duty 15 amp, 25 ft cord and it shrugs off these loads with no sign of overheating. The generator receptacles are 20 amp, not 15. I could just switch the PD box off (bypass mode) and not use the generator plug, but I really like to see the amp draw on the display. I for one would rather it be in the open, with a light shield for night time. Finally, I labeled my breakers with a silver Sharpie so I could see at a glance what they are for, instead of trying to read the tiny printed lables on the door, facing the WRONG DIRECTION. Why doesn't this panel have the hinge on the right (correct) side? John Davies Spokane WA
-
Before we got Mouse we tent camped and used a sun shower hung from a tree, and ocassionally one of those nylon enclosures. I prefer au natural in the open, but if there are people around you can always wear a small swinsuit and get just as clean. The enclosures work OK but then you have to deal with cleaning them, drying them out and storing them away. Frankly it is a pain in the butt. I don't think they are worth the effort unless the person bathing is really shy. Then you can make them clean it. If it is warm and clear, and minimal wind, these work very well after a few hours of cooking under the sun. .... https://www.amazon.com/Stearns-Sun-Shower-Portable/dp/B000NVC1JY John Davies Spokane WA
-
No shower curtain, it is not needed, though it might stop water collecting in the pee receptacle. I would rather just have drain holes..... John Davies Spokane WA
-
Is that a LWB? It looks shorter. Only the LWB with the diesel are rated to tow over 7000 pounds. Most of the other configurations are much much lower. This really isn't a great choice for the tandem Ollie, unless you stay low and flat..... https://www.ford.com/resources/ford/general/pdf/towingguides/17RV&TT_Ford_Transit_Sep7.pdf John Davies Spokane WA
-
This would work, but IMHO it adds unnecessary complication. If you were full timing, it might be beneficial. but it isn't hard to empty the tank manually. There might be problems with hard crusty deposits forming in the drain line. I am not sure if you could chemically remove those periodically. The deposits that form in the tank require some hard scrubbing, using a handful of gravel, some water, and shaking vigorously is a common method. You can't do that with a small drain hose. A composting toilet is definitely a different kind of system compared to a regular RV toilet and tank... John Davies Spokane WA
-
Thanks for the kind words. See the second picture down from the top of Page 1. There is a significant lip around the seat part, under the lid, that keeps shower water out. You are correct, you want to keep the compost damp, but not drippy wet. Unfortunately, as I noted, there is nothing to keep shower water out of the hollow that the pee tank sits in. So when you are done washing, you can either leave that water sitting there, lift out the tank and dry the parts, or drill a couple of holes in the bottom of the receptacle .... NOT the pee tank itself, LOL. I plan to do the latter, but I keep forgetting. I suppose that you could fabricate a rubber seal around the top, but that might make removing and reinstalling the tank harder. John Davies Spokane WA
-
Can anybody bring me up to speed on these and their use in an Ollie? We have one at home and my wife has successfully baked really good bread in it, so she wants to be able to do stuff like this in the trailer. She is a fanatical baker, she has not done much with the convection microwave, and wants to learn. I have told her that using that much power for twenty minutes straight is likely not practical off batteries, but it should be fine when plugged in or when running the generator, off straight 120 VAC (not off the inverter). Any comments, warnings, recommendations, or guidelines? Would anything be needed in the way of heat insulation, inside the cabinet? I would prefer a unit that is a physical match for the installed microwave, with no need for trim kits or other extras. Thanks for your help, i am hoping for fresh baked bread, biscuits or whatever in the mornings.... John Davies Spokane WA
-
Seriously, is this common? I don't see how they could possibly have the time to do full end-to-end searches of all RVs entering the base. I thought your military ID would get you past all that sort of Homeland Security Theater. I have never been in the military - my sincere thanks go to those who are or were - so this is all alien to me. John Davies Spokane WA
-
Tie down points for the generator tray?
John E Davies replied to John E Davies's topic in Ollie Modifications
Thanks, Jason just verified that number by email. Mine has no sticker so I can ignore it ;) I think I will be OK with my planned max load. It will be rare, and for short distances. I might keep the gas cans full all the time, but the water cans would only be filled if I expected to be dry camping more than a couple of days. I will keep an eye on the tightness of the mounting hardware, just to be safe. John Davies Spokane WA -
Towing Elite II with a Land Cruiser 200 V8
John E Davies replied to John E Davies's topic in Towing an Oliver
Bump for an older thread. Any new comments, maybe from last generation Tundra 5.7 owners? Thanks John Davies Spokane WA -
Tie down points for the generator tray?
John E Davies replied to John E Davies's topic in Ollie Modifications
Thanks, that is useful info. What method do you use to tie it down, or do you use a locking rack? Do you have a pad for cushioning? John Davies Spokane WA -
Tie down points for the generator tray?
John E Davies replied to John E Davies's topic in Ollie Modifications
Chain links would work, but if run through the mesh they won't have the desired stregth. If I drilled holes through the top structure they would work. .... but if I am going to be drilling holes, I think I would rather have strong, elegant and expensive ($100+ for the Macs kit) rather than weaker, shade-tree and cheap. I wonder why the factory doesn't supply a few welded on eyes, or even holes or slots in the frame? There is no good way to strap things down that doesn't involve running a really long strap under the A-frame. John Davies Spokane WA -
Tie down points for the generator tray?
John E Davies replied to John E Davies's topic in Ollie Modifications
Does anyone know if there is a published safe load limit for this rack? I am guessing 100 pounds. I might load it down a little more, but it would be rarely, and not for long. Most of the time the cans would be empty, to reduce tongue weight. John Davies Spokane WA. -
Fresh water tank modification, new suction line.
John E Davies replied to Raspy's topic in Ollie Modifications
Is there room on top to install a 4 inch or 6 inch round deck plate with gaskets, for access to the inside of the tank.? Then you could use a flanged bulkhead water fitting with gaskets for the suction pipe, and also clean out the tank periodically through the port. It would not be likely to leak, being on top and not constantly submerged in water. Are you lending or renting your spin weld tool? What are you charging for the parts and tool? They are not cheap.... http://www.vintagetrailersupply.com/Spin-Weld-Driver-Tool-p/vts-624t.htm Thanks. John Davies Spokane WA -
Fresh water tank modification, new suction line.
John E Davies replied to Raspy's topic in Ollie Modifications
Jason told me two days ago that they are developing a retrofit kit that can be done there in Howenwald, or sent to a shop or skilled owner for installation. They have to finalize the design, make sure it meets the various codes and certification, and test fit it them into a couple of trailers on the production line, before making them available. They want to make sure they do not introduce any new issues while fixing this old one... A wise move IMHO. I can wait until they have a factory fix available, since my trailer is only a month old. But John "Raspy's" fix looks solid, well put together and easy to do for somebody out of warranty. Thanks for making the parts available. Can you comment on the spin welding, and how hard it is to get good results if you have never done it before? I have seen videos of the technique. Thanks, John Davies Spokane WA -
Tie down points for the generator tray?
John E Davies replied to John E Davies's topic in Ollie Modifications
Hi, I considered those but they are pretty light duty; I don't know if they even publish a safe working limit. I want a setup with a high load capacity for rough roads as well as holding things in place in the event of a crash or rollover... Plus footman loops require you to thread the webbing through the slot, that is time consuming and I would rather use a more open connections style, for a hook or carabiner to go through. The Mac's tie down with 1.5 inch welded ring is rated at 3000 pounds! That is probably overkill in this situation. John Davies Spokane WA