John E Davies
-
Posts
5,759 -
Joined
-
Last visited
-
Days Won
243
Everything posted by John E Davies
-
Use the supplied self adhesive strips, then mask neatly around the perimeter. Seal with a good quality white RTV silicone adhesive sealant, a marine UV stabilized one, not a cheap one. It won't fall off and gunk won't collect in the gaps. It is always smart to leave some little gaps where needed at the bottom for moisture to drain. My level is sitting in my Honey Do box, maybe I will go ahead and install it and post pics. I am going to mount mine _above_ the horizontal seam, so it will be visible above the nifty Raingler cargo barrier net that I installed in the back of my 200. I think many folks install them below the seam, it depends on your vehicle and if you carry tall stuff in back. BTW with gelcoat, drill your hole, then countersink the hole though the outer gel coat slightly using a bigger bit, or an actual countersink. That should prevent cracks and chips. Use sharp bits. Most gelcoat chips are pretty small and covered by whatever you install, so it isn't a big concern. Tho I don't like putting any hole in the hull unless I know the attached part will be there forever. Any hull hole gets 3M 4200 or 5300 for safety, not silicone.... John Davies Spokane WA
-
 My spring over axle project needs to wait since I acquired the 200 two weeks ago. I know I will be putting 33 inch LT tires (on smaller 17 inch wheels) on tbe Cruiser, but probably no lift, for a while at least. Once that is setup, I will think about changing the suspension on the Ollie. Any way, I would need to order a custom Anderson ball mount, with a longer extension for my receiver. If the trailer sat 4 inches higher at the coupler there would be no way I could open the tailgate all the way with the standard one. I've never even had Mouse on gravel yet.... ;( John Davies Spokane WA
 -
Yes to the latter, the location on the big main frame tube allows for a stronger and more direct anchor point. Sailorashore talks about this at length, he sounds as if he knows his stuff. I hope he will chime in here. The main tube is the same height as the others but 50% wider. It is very stout and one piece (no welds). Part of the problem with an _owner_ installed hitch is that access to the outer A arms of the frame sucks, big time, pardon my language. The fiberglass doghouse is in the way. You can remove it entirely, a huge job that involves going inside under the vanity, with possibly a second person in there, helping. You have to remove the generator tray, if you have one, cut the wire to the jack, remove the jack, disconnect all the switch wires for the jack, disconnect any hose or wire support clamps, pull the bottles, and remove the rear doghouse mount. Then reassemble everything later. That is a lot of _unnecessary_ work. An alternative is to get out your cutoff wheel and grinder and cut away sections of the fiberglass to expose the frame. Without damaging either part. No thank you.... Even if you cut access sections, you will still need to remove the jack so you can lift up the cover a few inches in front, for a little working room, to install the upper bolts. If you didn't trim the cover, then your bolt heads and grub screws are not accessible for later servicing. Not good. Speaking of grub screws, they are a very poor solution, especially with a soft aluminum frame. A solid anchor block, welded to the frame in front of the chain anchors would be best. I have not connected with Anderson, I know what they will say. They have lawyers to protect them from liability due to significant alterations of their product. The V shape is convenient but not needed in my (non-engineer) opinion. The sway control is done by the brake lining at the ball, not by the geometry of the chains. While there may be some extra sway dampening effect from a wide angle, as the bushings flex, I can't see it being significant. The main job for the poly bushings is jounce control and weight distrubution. The do that at any angle. The big plus for mounting on the outside of the frame is convenience for the operator. You do have to reach under, or lie down, to get to the nuts on the center frame. That may be a big factor for folks with poor mobility. With the supplied brackets mounted on the center member, alignment is nearly perfect and all the stresses go straight forward, no twisting. I can't say how much harder it is to hook up, since I have never used an Anderson hitch. It is harder to install the chains into the rear brackets, certainly. If you routinely take them off for theft protection, then that would be a bother. If you leave them connected all the time, less so. It isn't hard or in the least uncomfortable getting to them if you lie on a scrap of cardboard.... The chains are connected together near the jack, there is minimal load on the link since the angle is only a few degrees at most. It does not affect the ability of the two chains to move independently. The amount of motion is pretty small. I will know more after putting some miles on this setup. For now iit seems to be great, withminimal drawbacks. As mentioned before, if the factory embraces this variation, they could weld precisely positioned aluminum bars (slip braces) to the main tube during manufacture, so an owner could install the Anderson setup later with very minimal hassles. Anderson offers chain extensions, if Oliver used those to mock up the location, then the pre-made extensions would bolt right up, no grinding links! They are too short if you must also bolt up a steel brace, as I did. Plus at $40 a pair, they are darned expensive, compared to buying bulk chain at the local bolt store.... https://andersenhitches.com/Products/3366--wd-chain-extensions-with-threaded-links.aspx John Davies Spokane WA
-
Jeff, long wheelbase trucks may not need a WD setup, most half tons do, simply because they have soft suspension and tires. A heavy duty pickup definitely does not need one. In spite of your good experience with your long wheelbase (145 inch) Tundra, it is likely that your towing experience and safety would be improved with the addition of the Anderson. My 200 has a short 112 inch wheelbase and a relatively long rear overhang (center of axle to hitch ball) and also a soft cushy, long travel suspension. All this contributes to the need for a WD hitch. I didn't want to beef up the rear suspension, or the unladen ride and offroad articulation would suffer. I need to keep the truck comfy for exploring the back country, without Mouse in back. I do think I will add Timbren rubber bump stops in the future, for when I am forced to remove the hitch chains due to really uneven terrain (such as a washout or severe rise). Dragging a trailer with WD connected in these situations is not advised, for many reasons. The Timbrens should help here, without compromising the ride. My thread is not intended to deride the standard installation. It works fine for most owners. I just want to promote what I think is a more refined setup for Olivers with their unusual frame configuration. John Davies Spokane WA
-
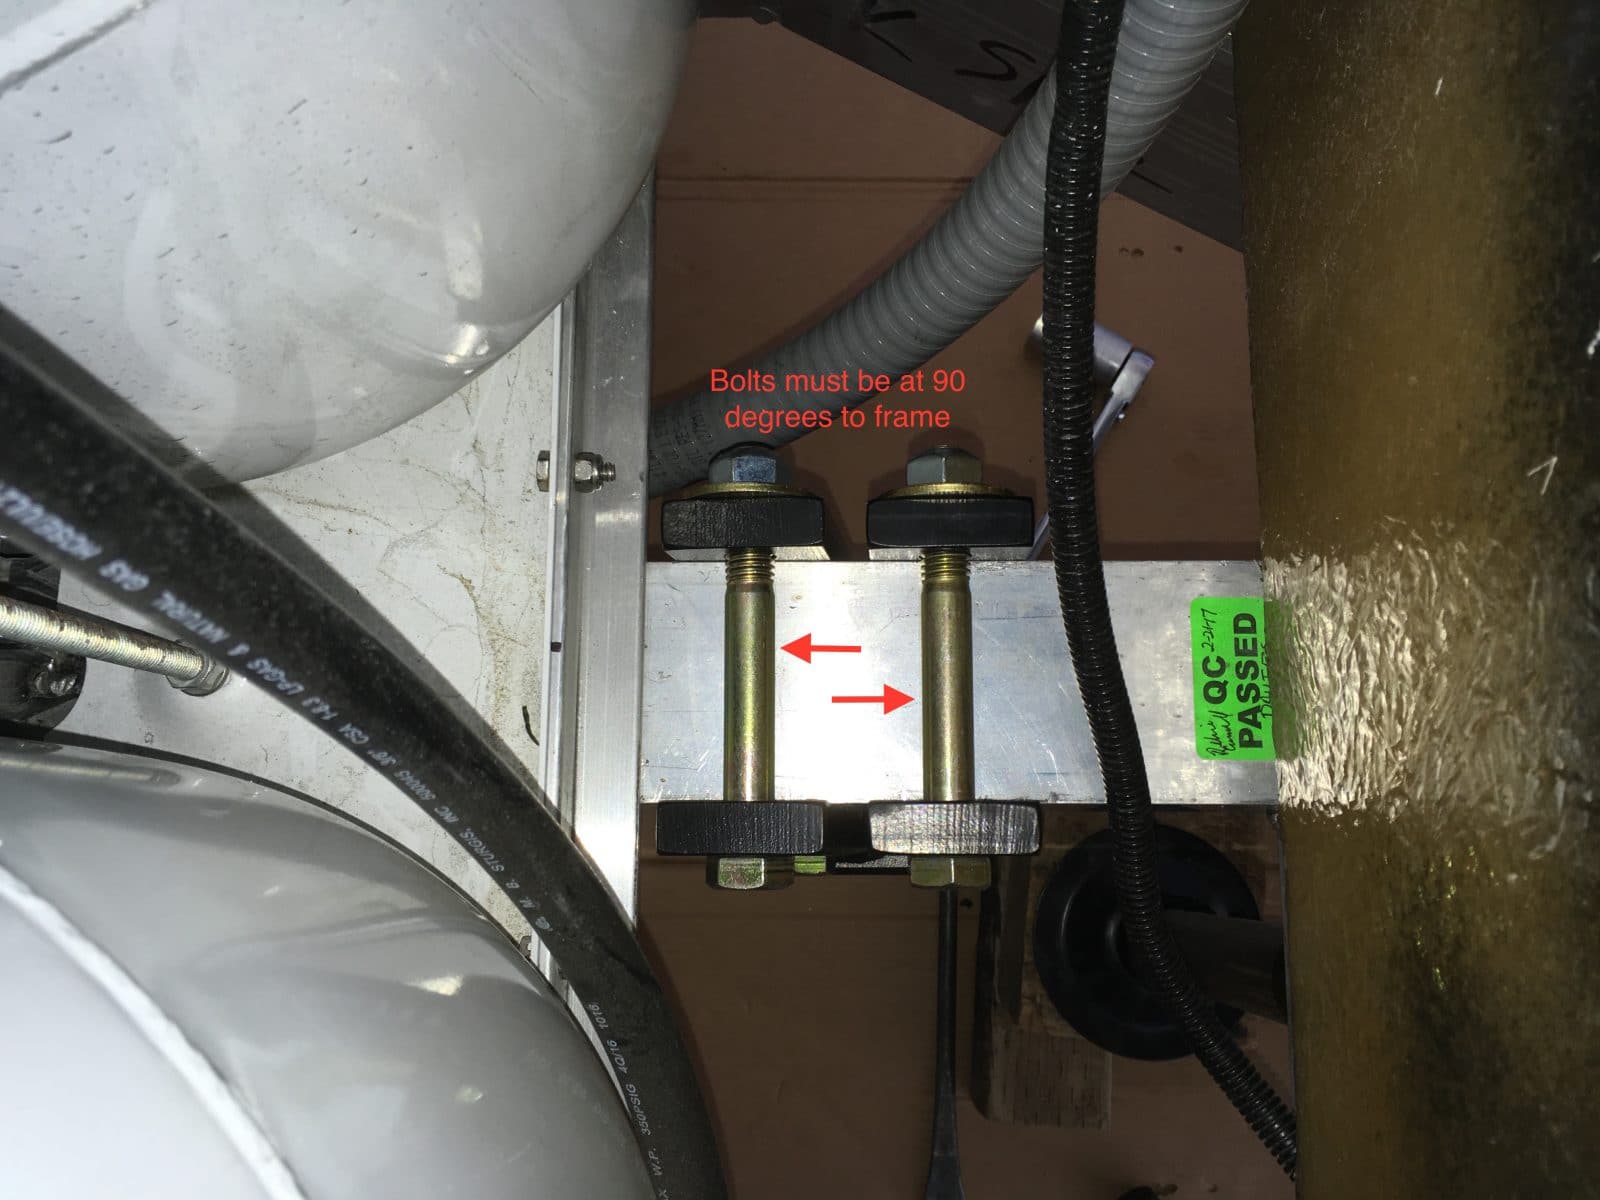
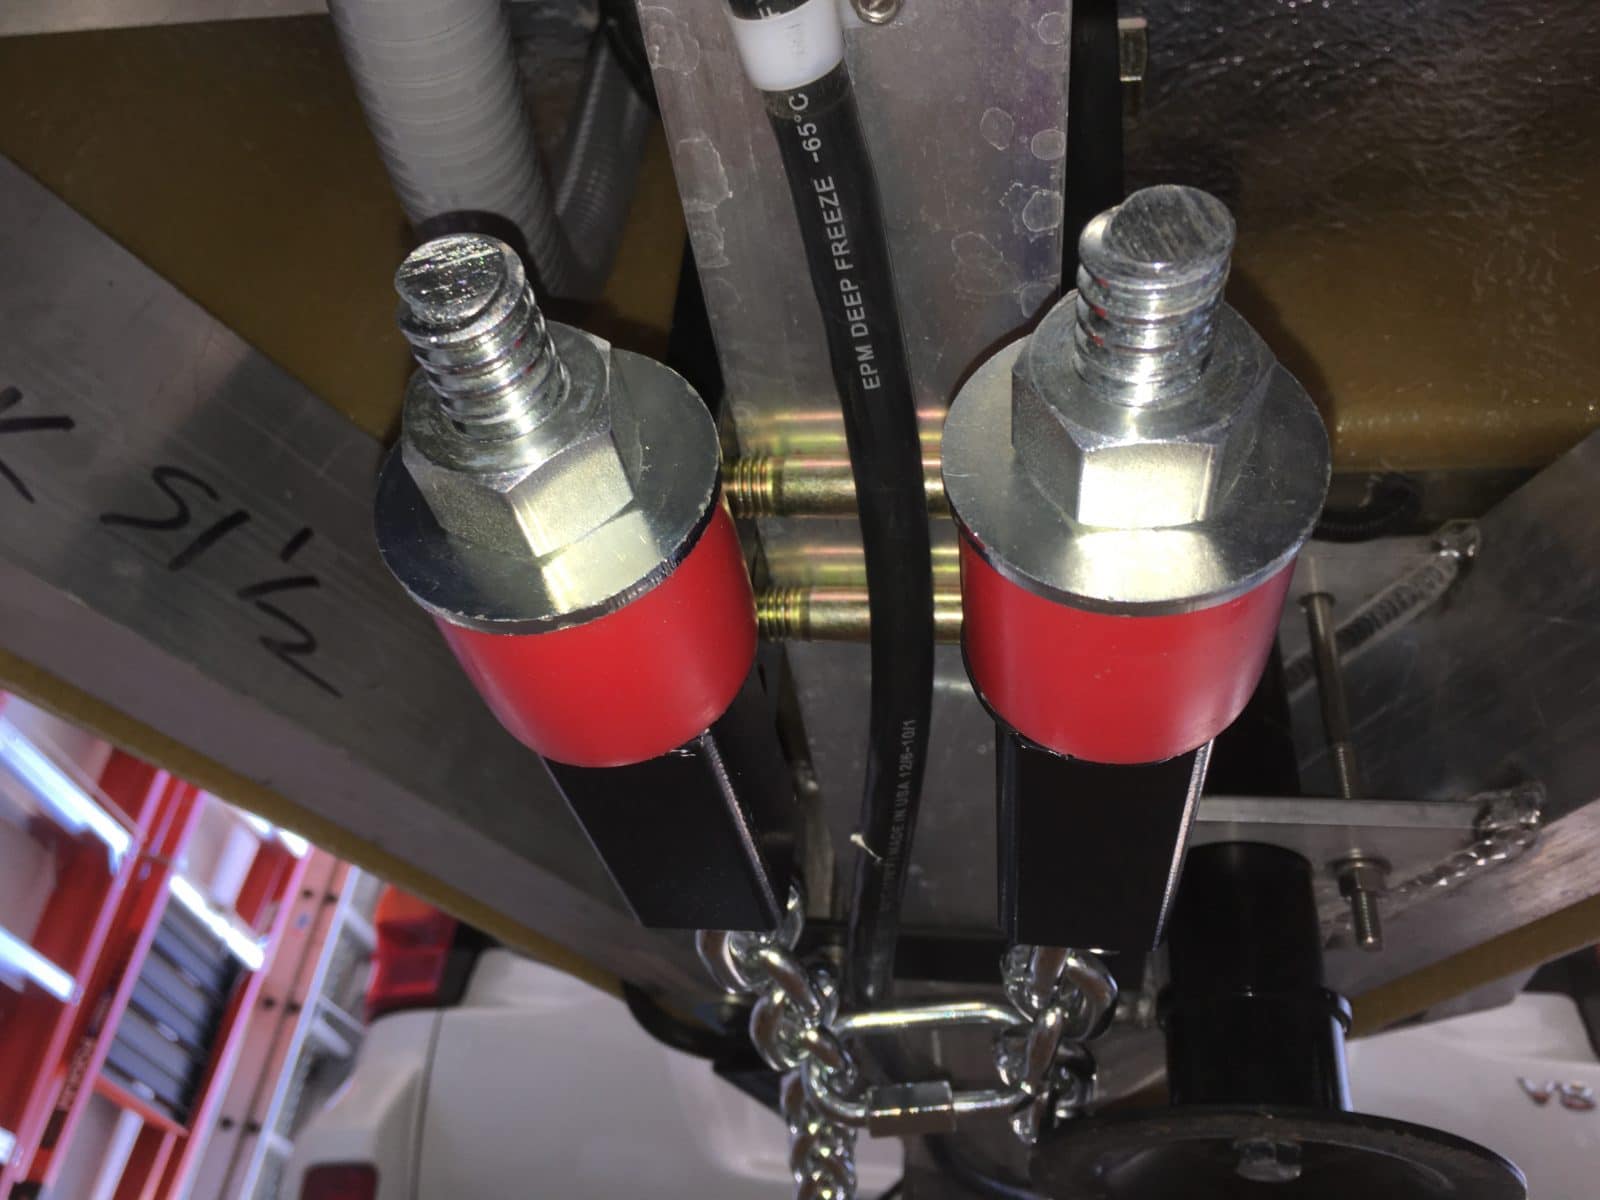
Randy, the 9/16 inch BOLTS must be at 90 degrees across the frame, and parallel to each other. The reason the bolts need to be at 90 degrees is that, if angled, there would be some extra slop or clearance that could result in loosening. Plus it would just look bad ;) The chain brackets themselves are angled forward fully, using the chain tension to pull them into place. Pictures can be misleading due to the angle and also the fisheye effect of the lens. Plus the front braces would not rotate fully back for 100% contact with the chain brackets, I never did figure out a reason for that. As long as they hit hard at the bottom of the chain brackets it should not matter. That is where movement would occur. John Davies Spokane WA
-
How do I use the back flow prevention handle??????
John E Davies replied to Bshaffer's topic in Mechanical & Technical Tips
I should have asked: do you have the manuals that are normally delivered to the owner? There are many! 95% of your questions will be answered there. Buried in an unlikely tab of the main Oliver header is the "Oliver University" which is their name for Support Documents. There is lots of stuff to to downlad and look at, and growing all the time. http://olivertraveltrailers.com/oliver-university/ But don't ever be reluctant to ask here.... John Davies Spokane WA -
How do I use the back flow prevention handle??????
John E Davies replied to Bshaffer's topic in Mechanical & Technical Tips
Well, the bath sink will drain, but after the 1.5 inch drain pipes fill with water, it will back up and the shower pan starts to fill through its drain opening. When your socks get soaked, you will remember to pull the handle. You probably won't forget after that., John Davies Spokane WA -
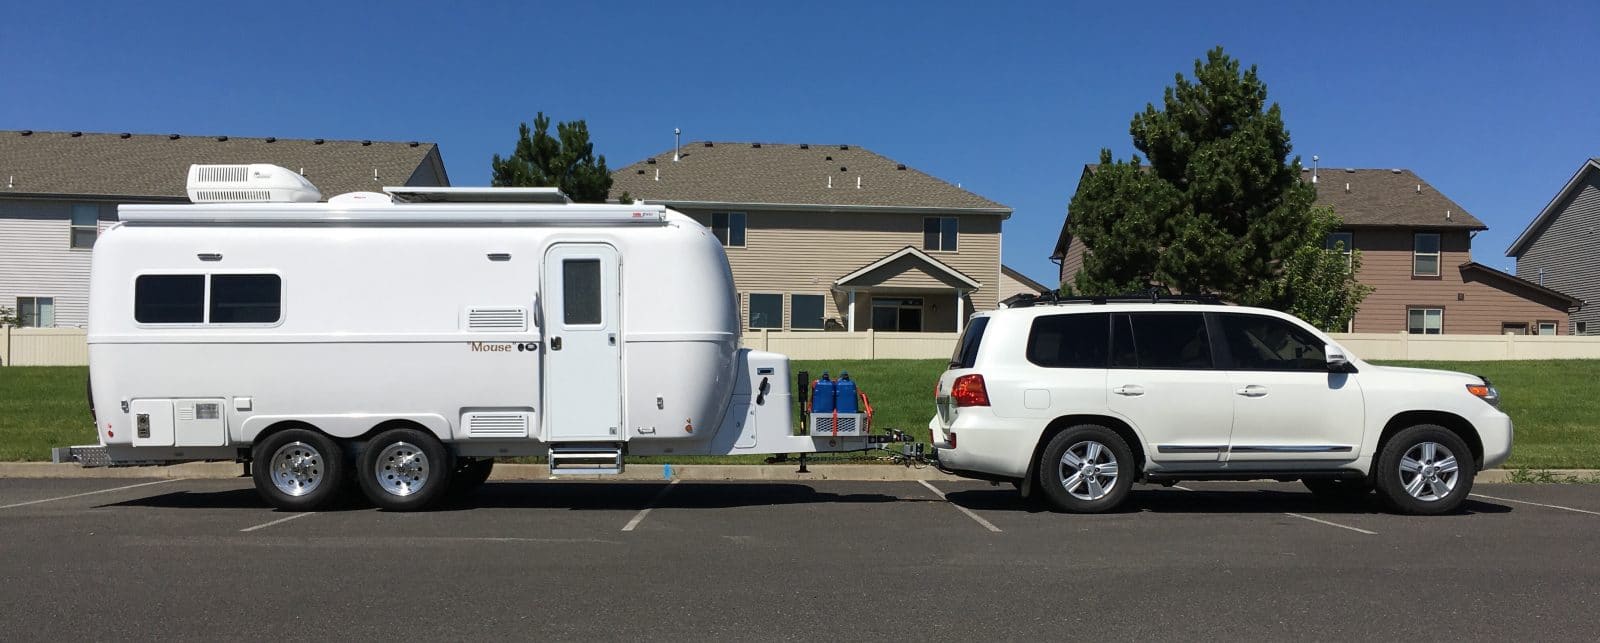
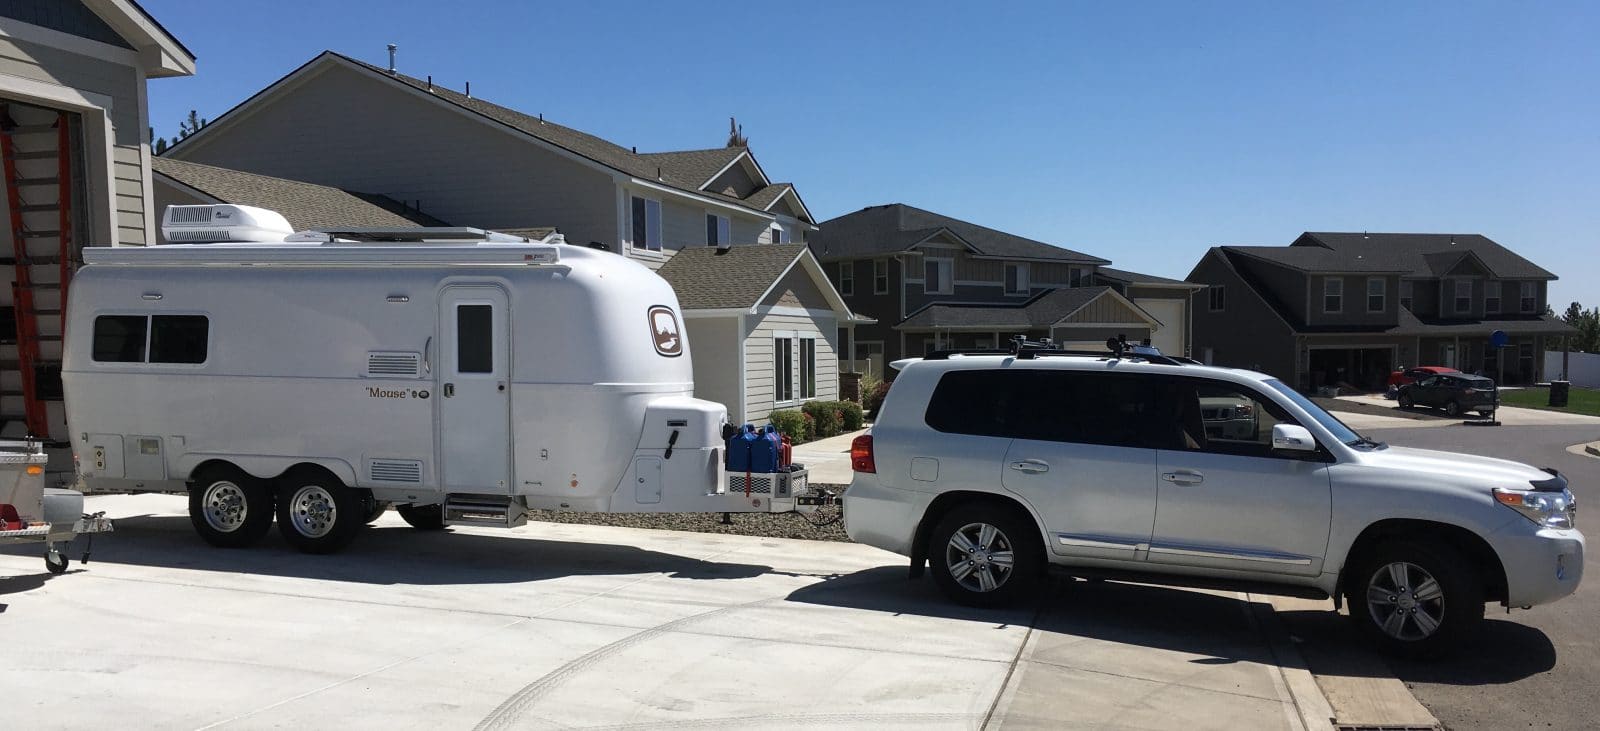
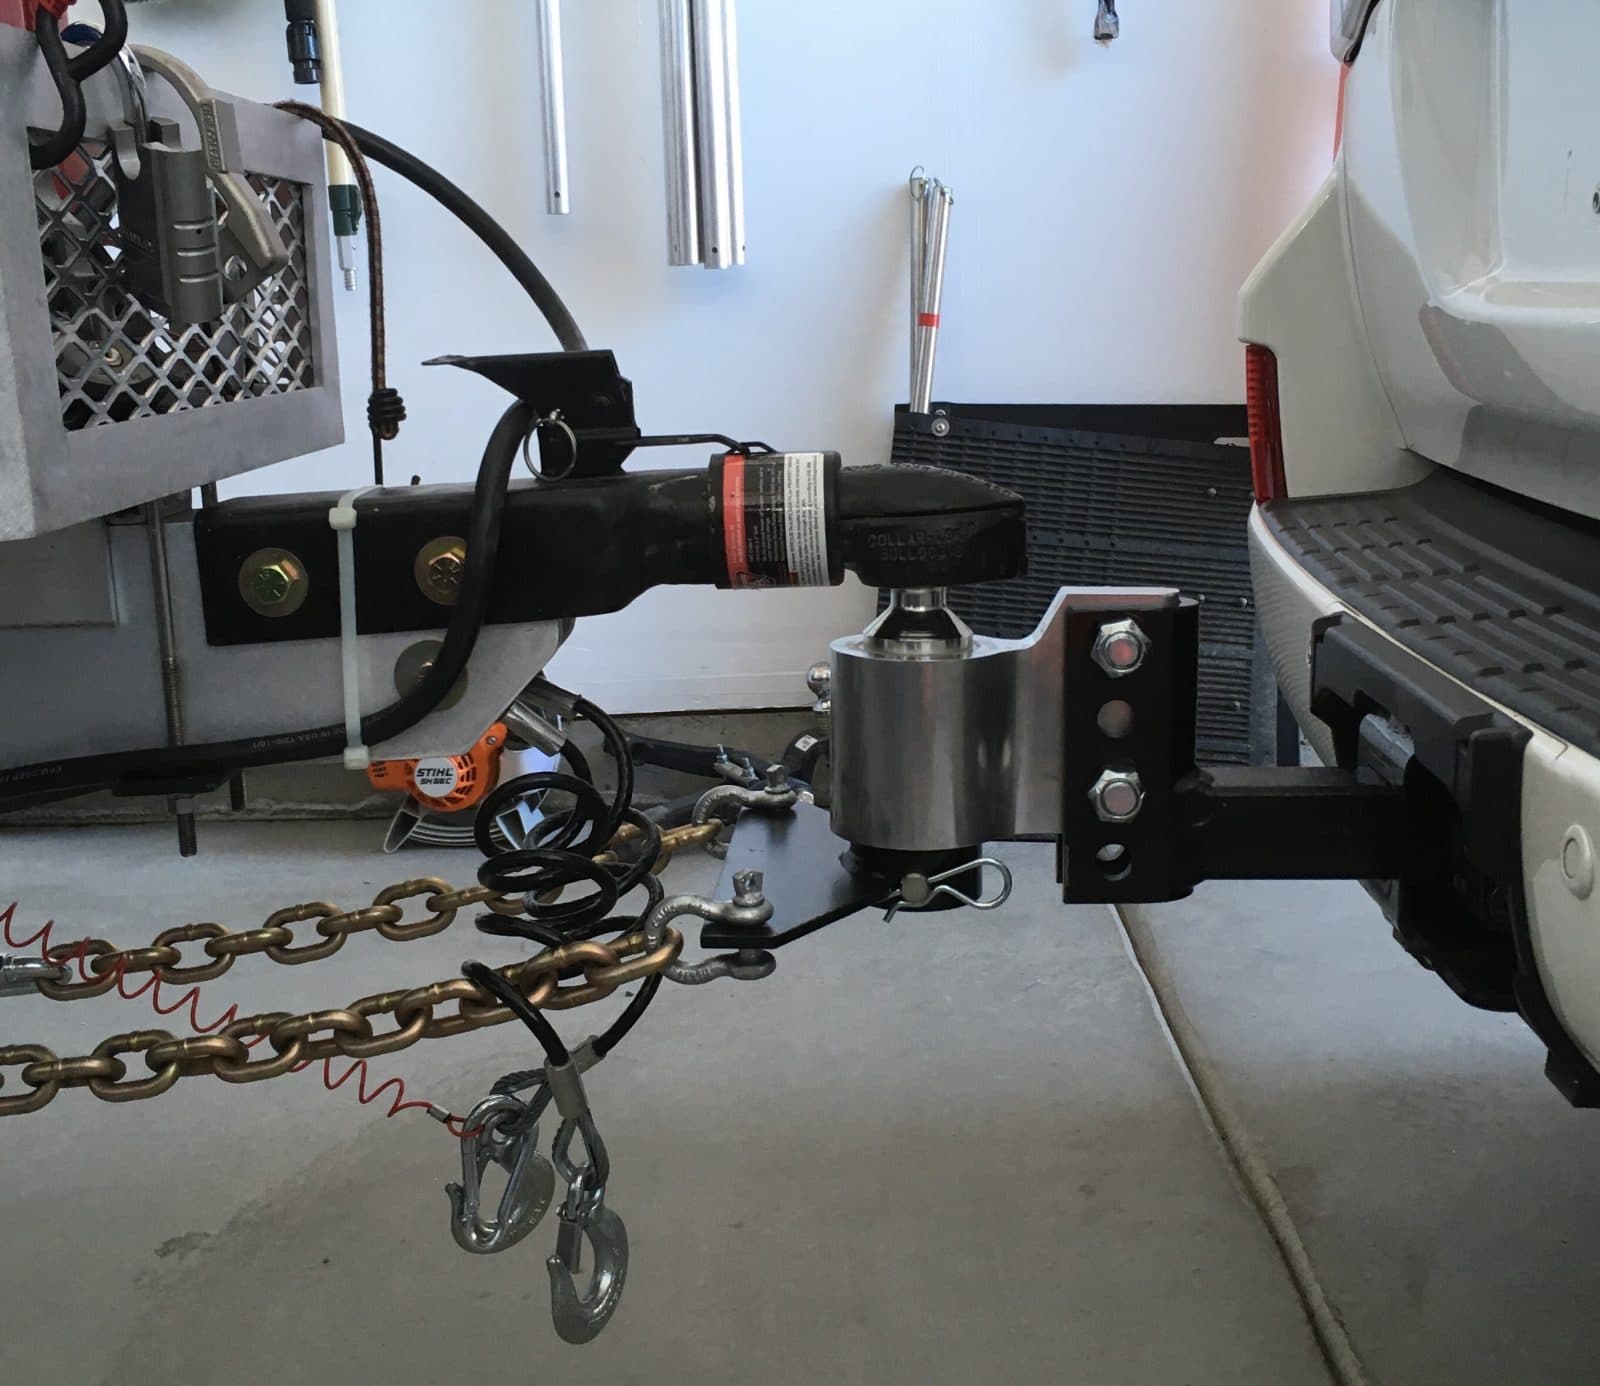
Here is Mouse connected as a dead weight to my 200, no Anderson hitch. The trailer is dead level, using big washers stacked under the extended shank ball. The truck is really butt low (2.5 inches) and it was not a good situation. It proposed badly over dips and you could tell the rear suspension was not in control. This was with a lighter tongue weight of 625 pounds (one can full of gas, the others empty). After driving and tweaking the Anderson hitch, this is the final setup after a 45 mile drive over various road surfaces and up to 70 mph. I noticed a little steering vagueness and wandering at first, but the wind was fierce and gusty on the highway. I tightened the nuts down a little, a couple of times until the truck settled down and felt "as one" with the trailer. It is an amazing feeling - very stable and comforting. The second pic is with a heavy tongue: gas and water similar in weight to a bigger generator. (130 pounds plus the weight of the cans and the storage platform). I will not normally carry that much weight there. The truck was unhappy without the WD hitch. . The truck is rated to tow 8500 pounds and 850 pounds hitch weight. I am happy with the way it tows now. The trailer is a little high in front, and the truck is a little low. If I were to drop the ball height one hole it would be worse (they are 1.5 inch increments). I plan to put bigger LT tires on the truck soon. That will raise the ride height, and I can lower the ball accordingly to get a better level for the trailer, and my tailgate latch will not hit. I hope. I have another thread devoted to the Land Cruiser 200 as a tow vehicle. Any other pics and tech info devoted to the 200 will be posted there. I hope to keep this thread dedicated to just the Anderson Center Frame topic. I think that this is a great alternative to the official installation. Please discuss. Thanks. John Davies Spokane WA

-
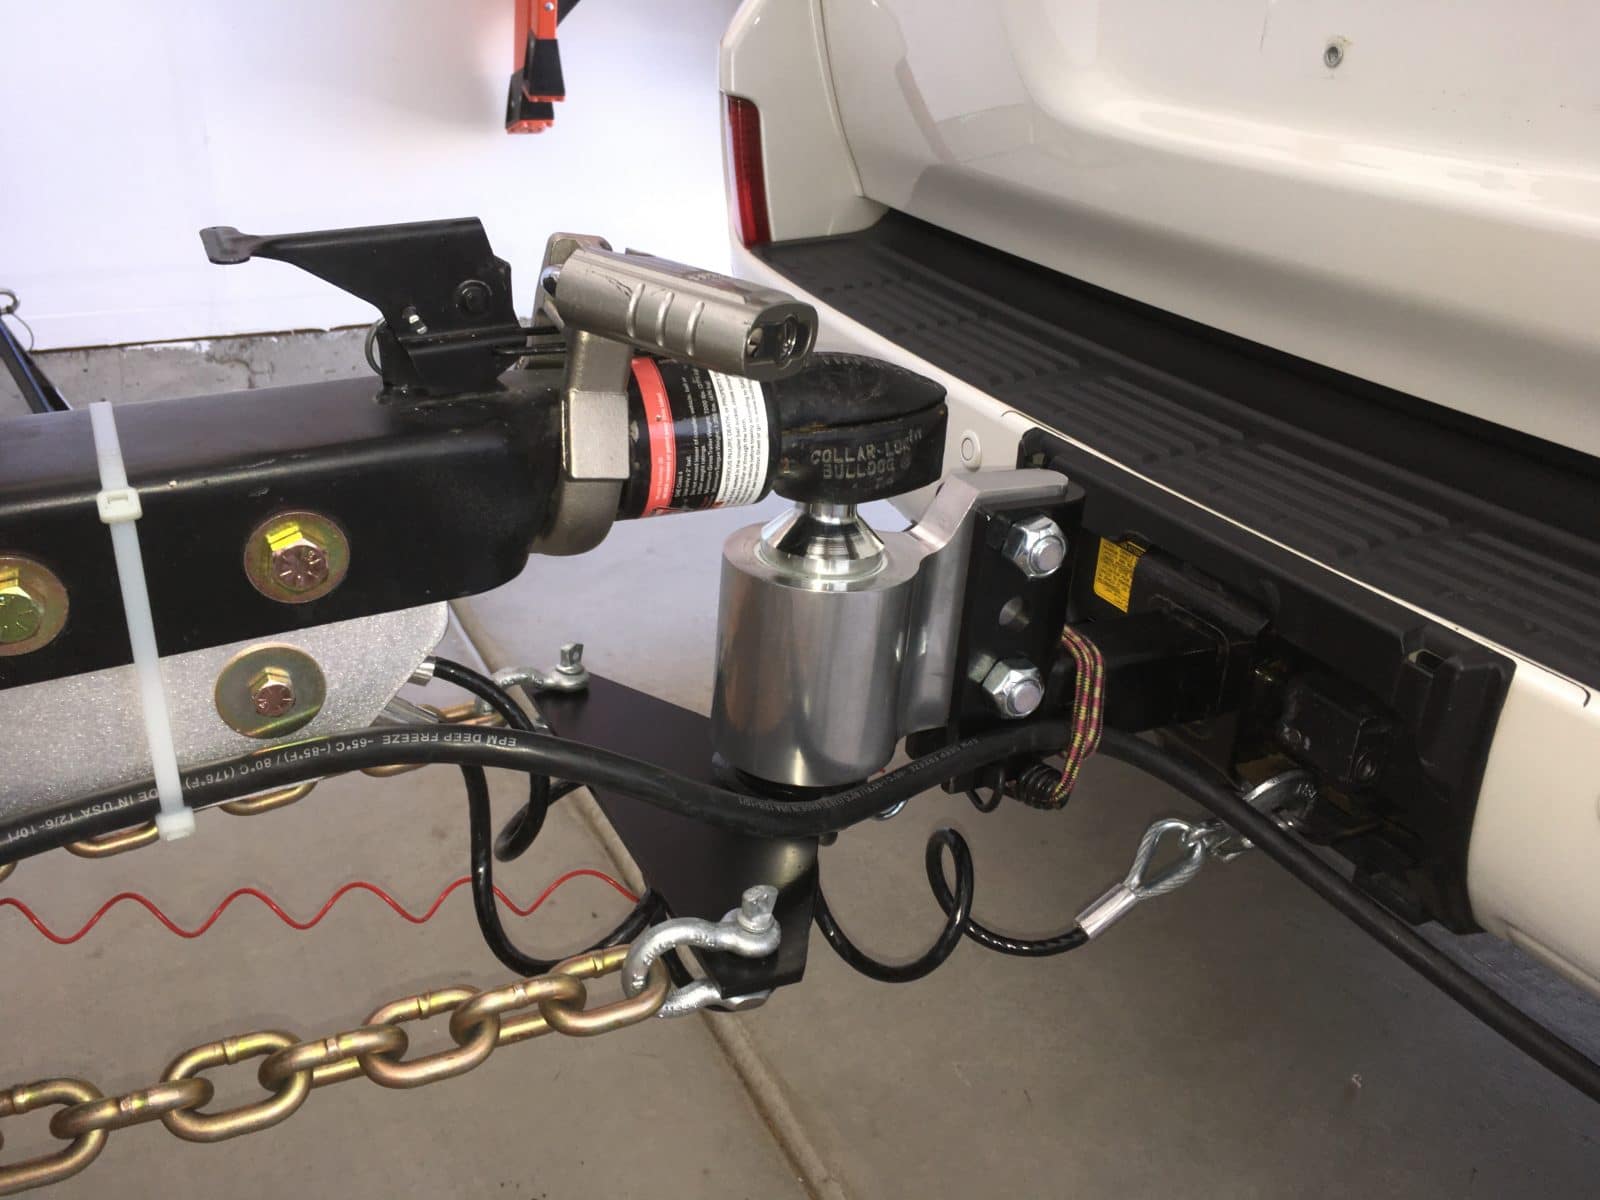
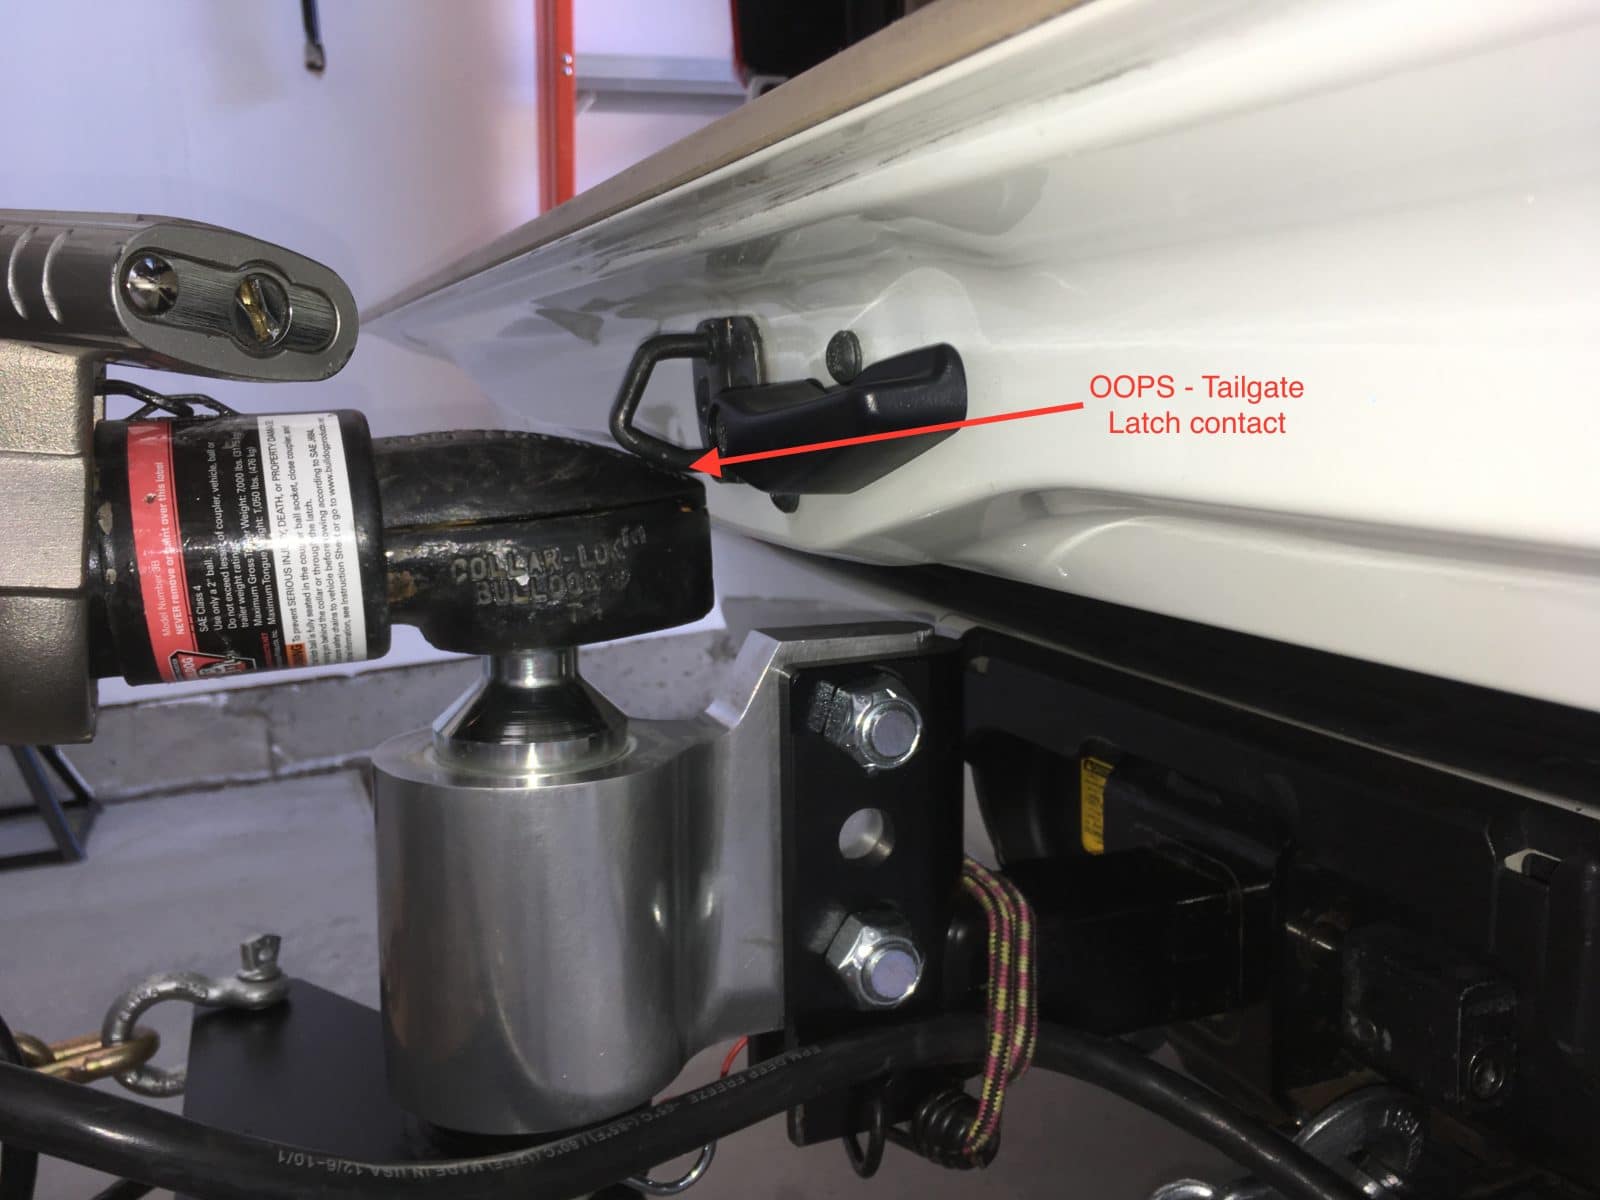
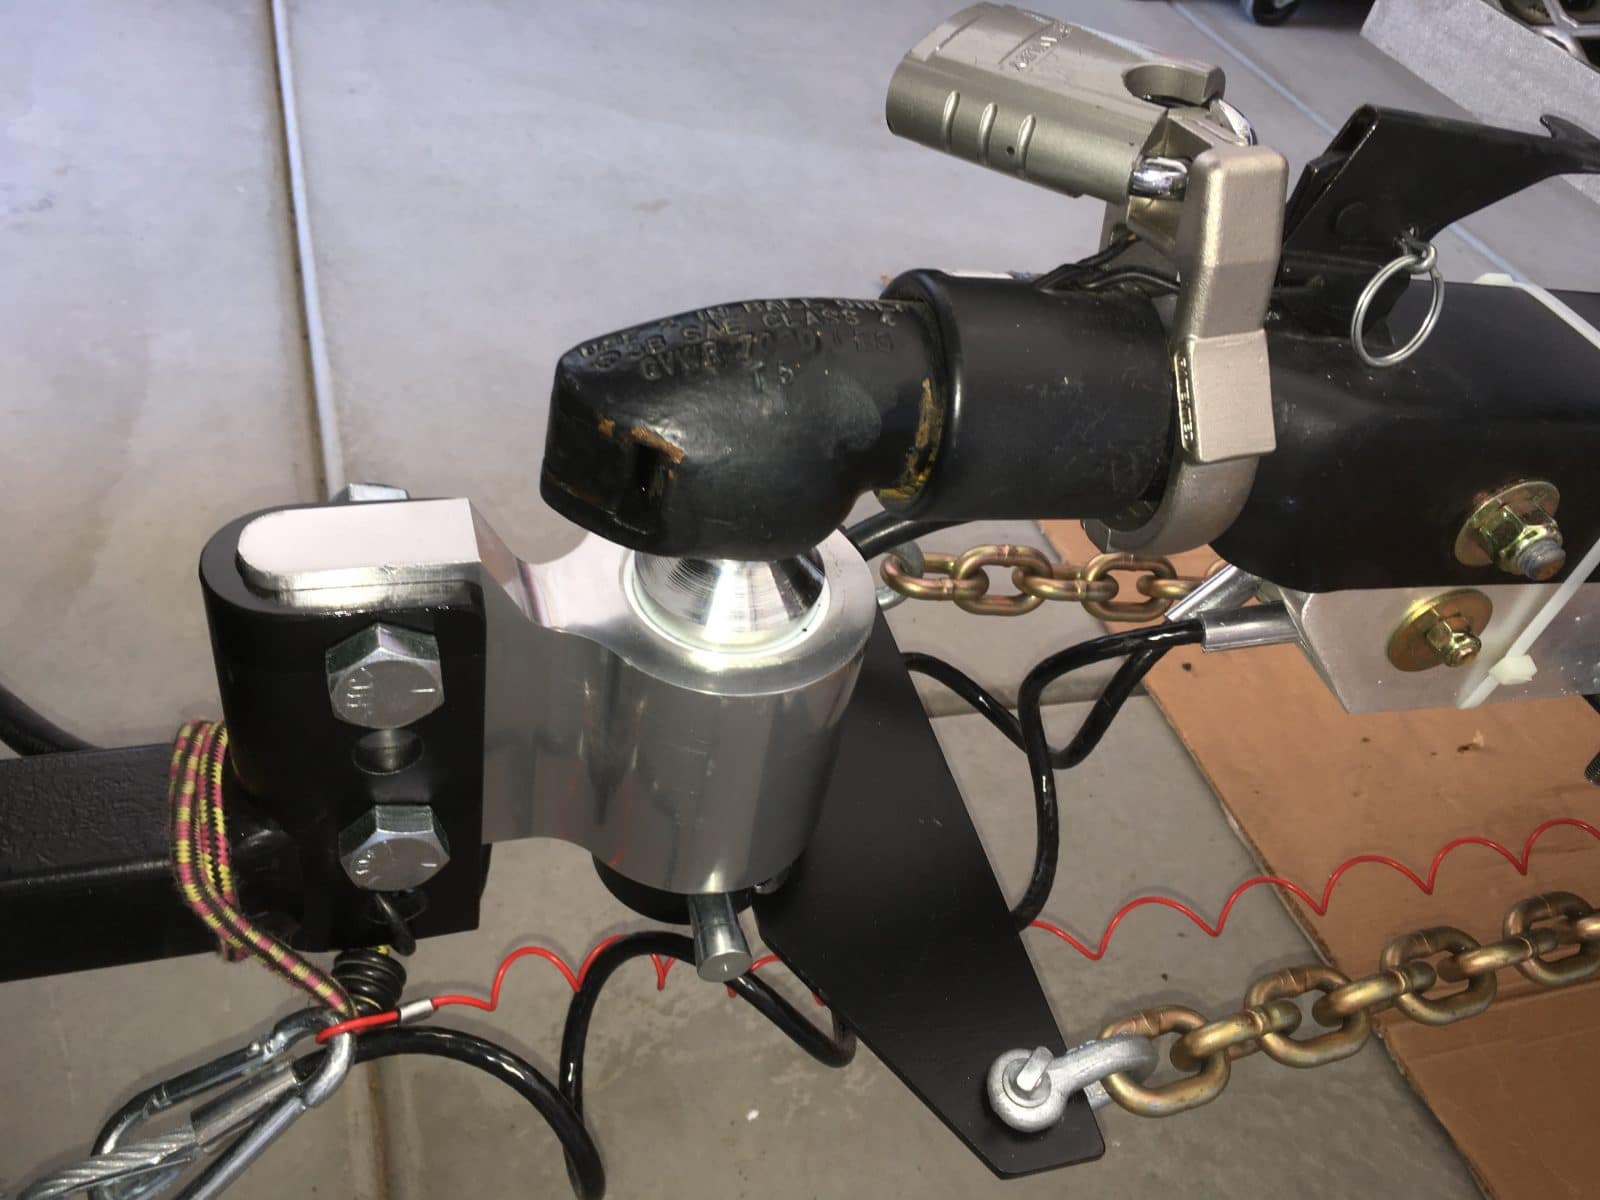
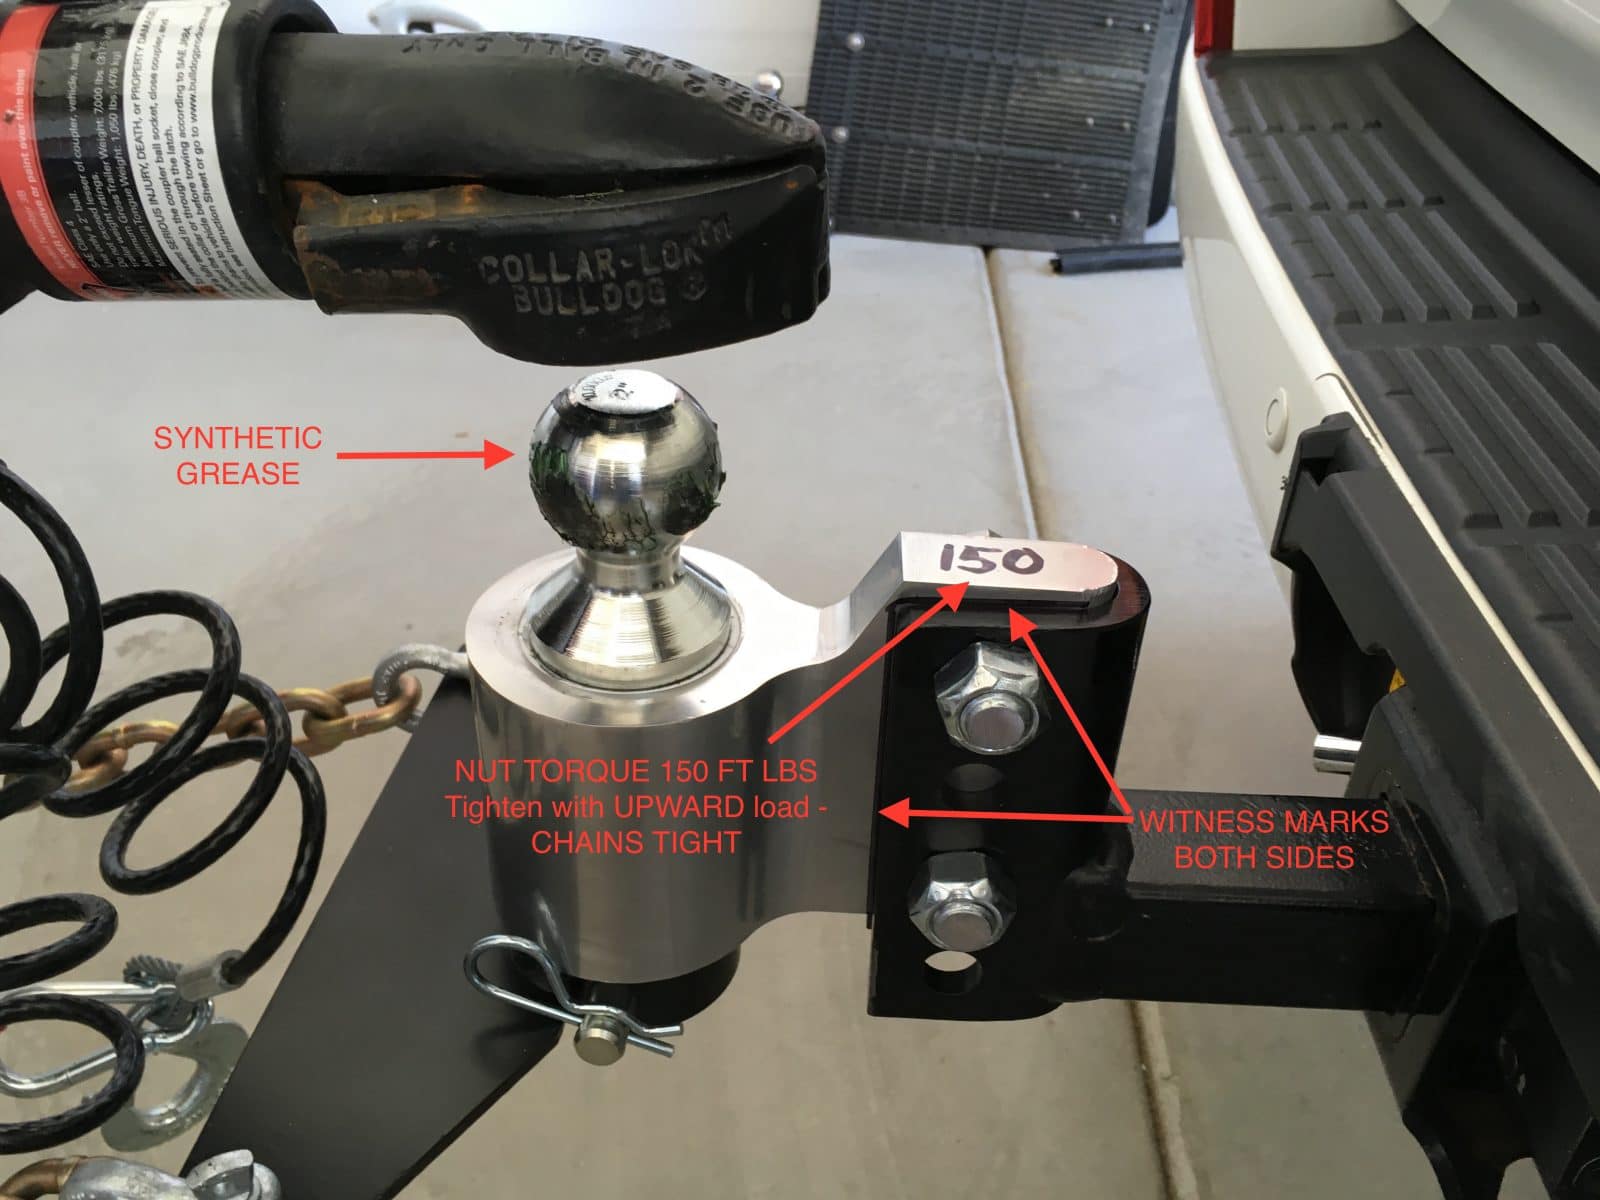
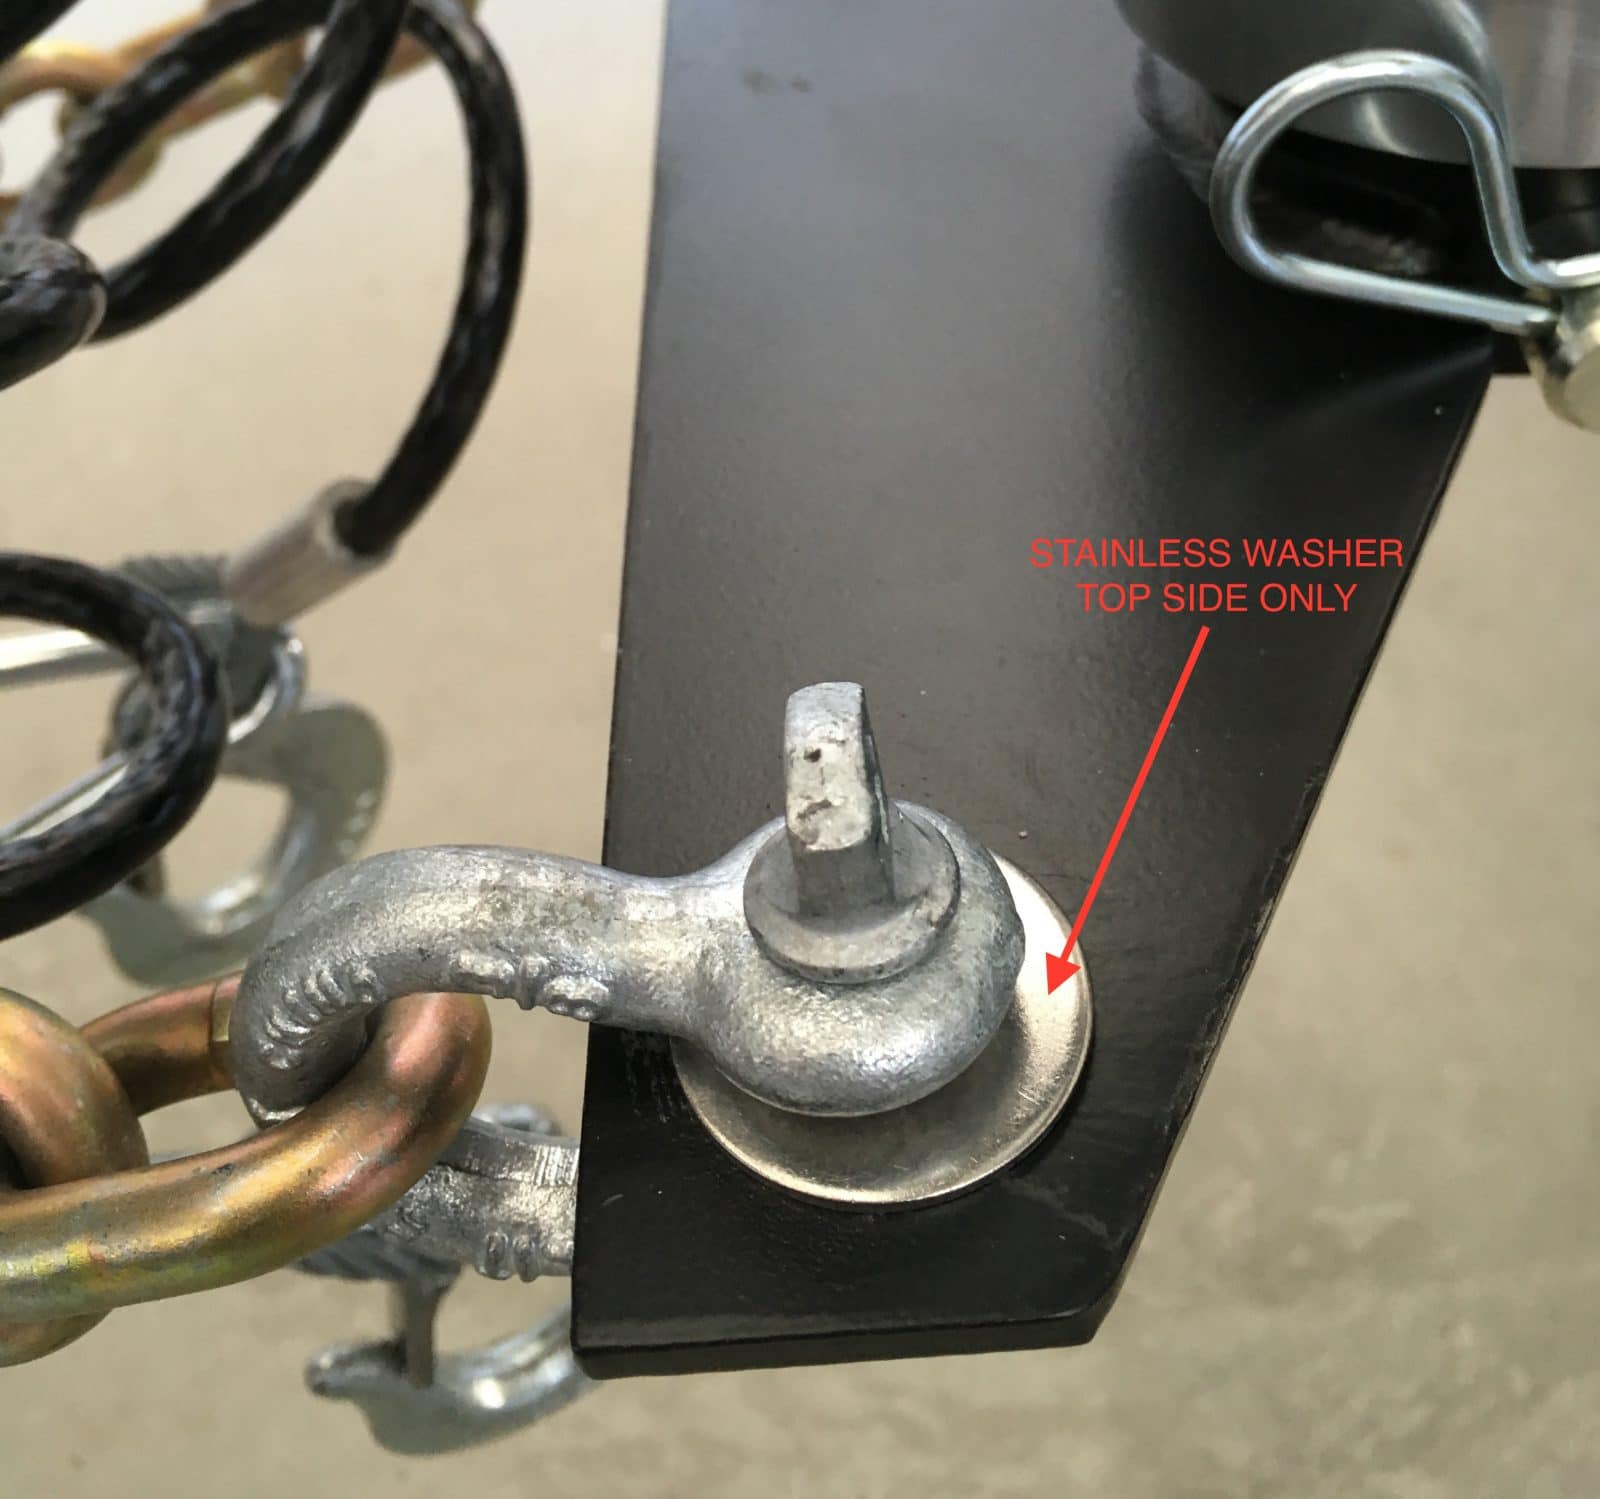
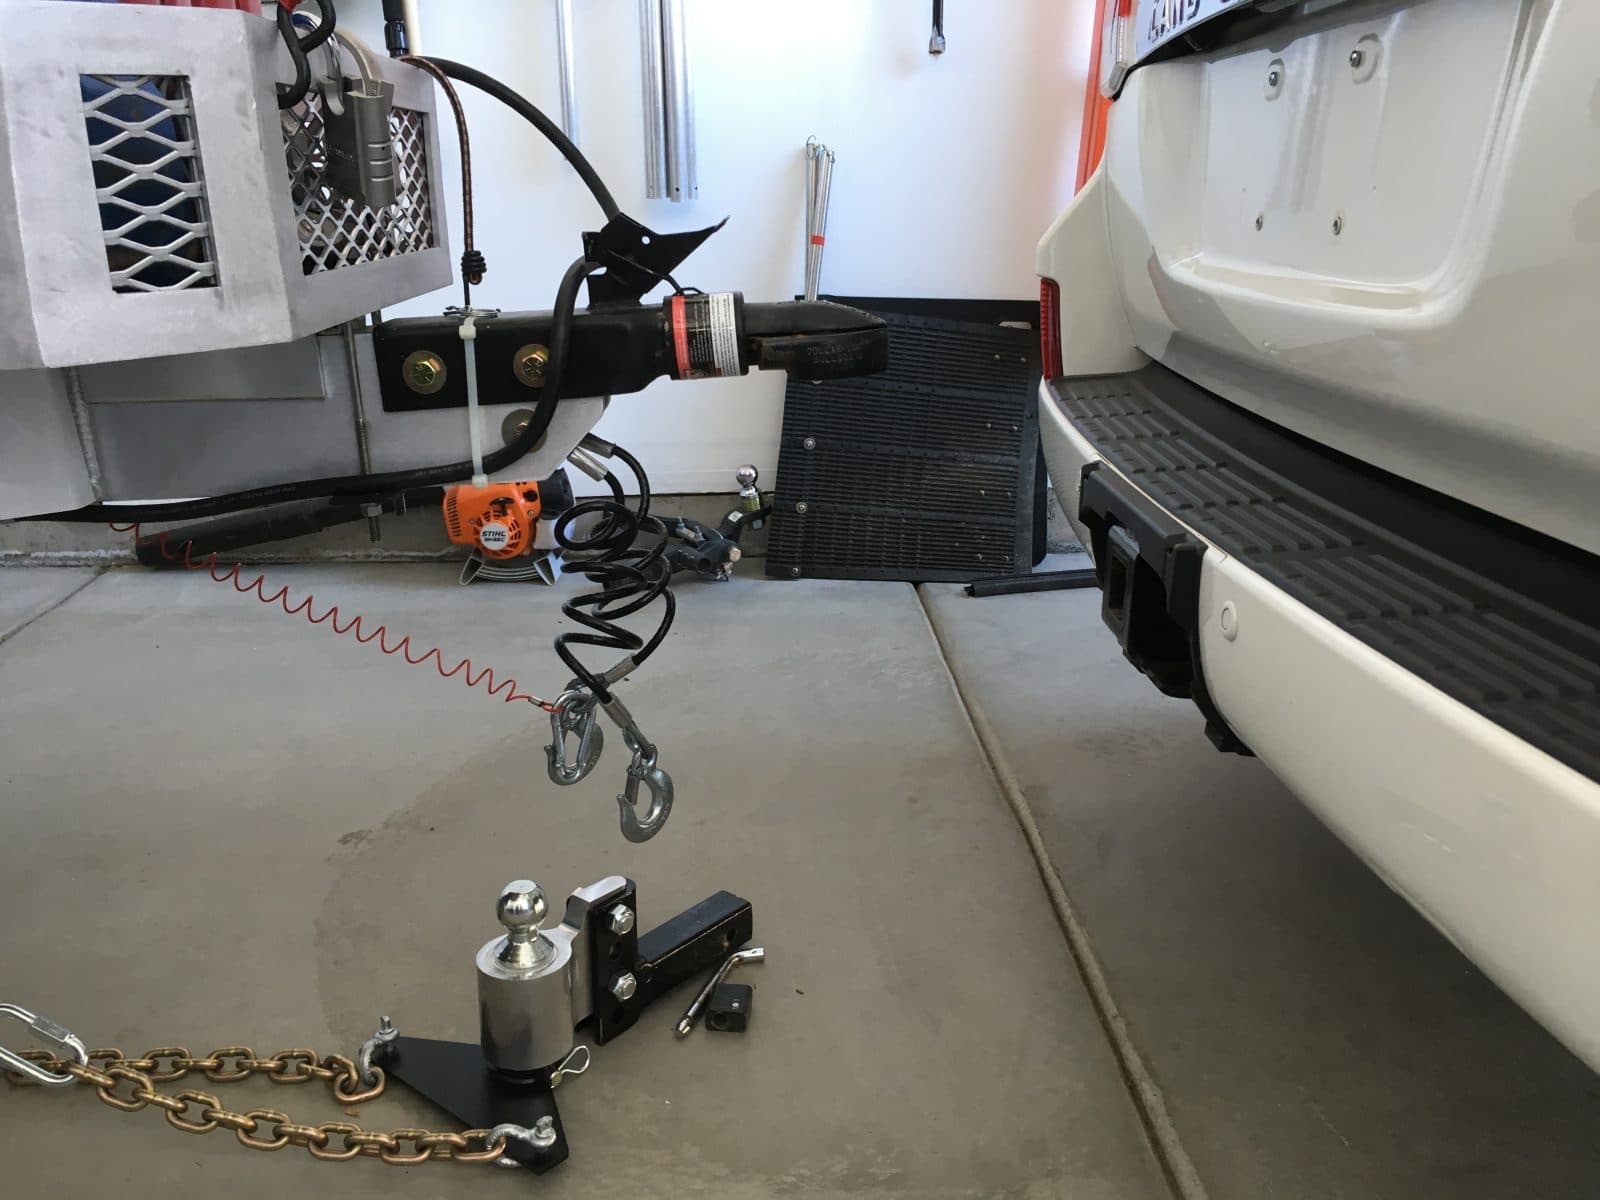
THE FRONT HITCH: Note the wire harness secured out of the way near the centerline of the hitch, so it can't bind or get damaged. I added another big nylon tie to secure the part near the coupler bolts. Oops - my tailgate latch contacts the coupler, though it clears the receiver bracket easily when the trailer is not attached. More witness marks - the instructions call for those bolts to be torqued to 150 ft lbs with no load on them. That did not seem right to me.... I did that, and the aluminum mount visibly shifted up and back in the bracket after towing. These bolts need to be tightened with a FULL CHAIN LOAD on the hitch. I greased the ball. Anderson says no grease is needed, but that is bogus. Although the ball and coupler rotate in sync, the parts still move up and down under tremendous load and they need a good synthetic lubricant. The shackles chafe the powder coating on the A Arm so I added a stainless flat washer under the top part only. These shackles need to be tightened, then loosened slightly or you will have trouble getting them disconnected later. Once there is tension on the chains, they are not going to loosen! Hook up: My truck was perfectly aligned with the trailer, so I wanted to see if I could connect the entire system without taking off the A Arm as Anderson recommends. The adjuster nuts were backed off to half engagement with the threaded rods. The truck was positioned close to ideal, in line with the coupler: Entire assembly was lifted up and slid into the truck receiver, and the retaining pin and lock installed, I pulled the truck forward a smidgen, lowered the coupler and we are connected: All that is left is to tighten the big adjuster nuts as per instructions, lower the tongue and check the trailer and truck for correct leveling. Adjust as needed to get the load shifted away from the tongue. More to come: John Davies Spokane WA
-
Duplicate post, sorry.
-
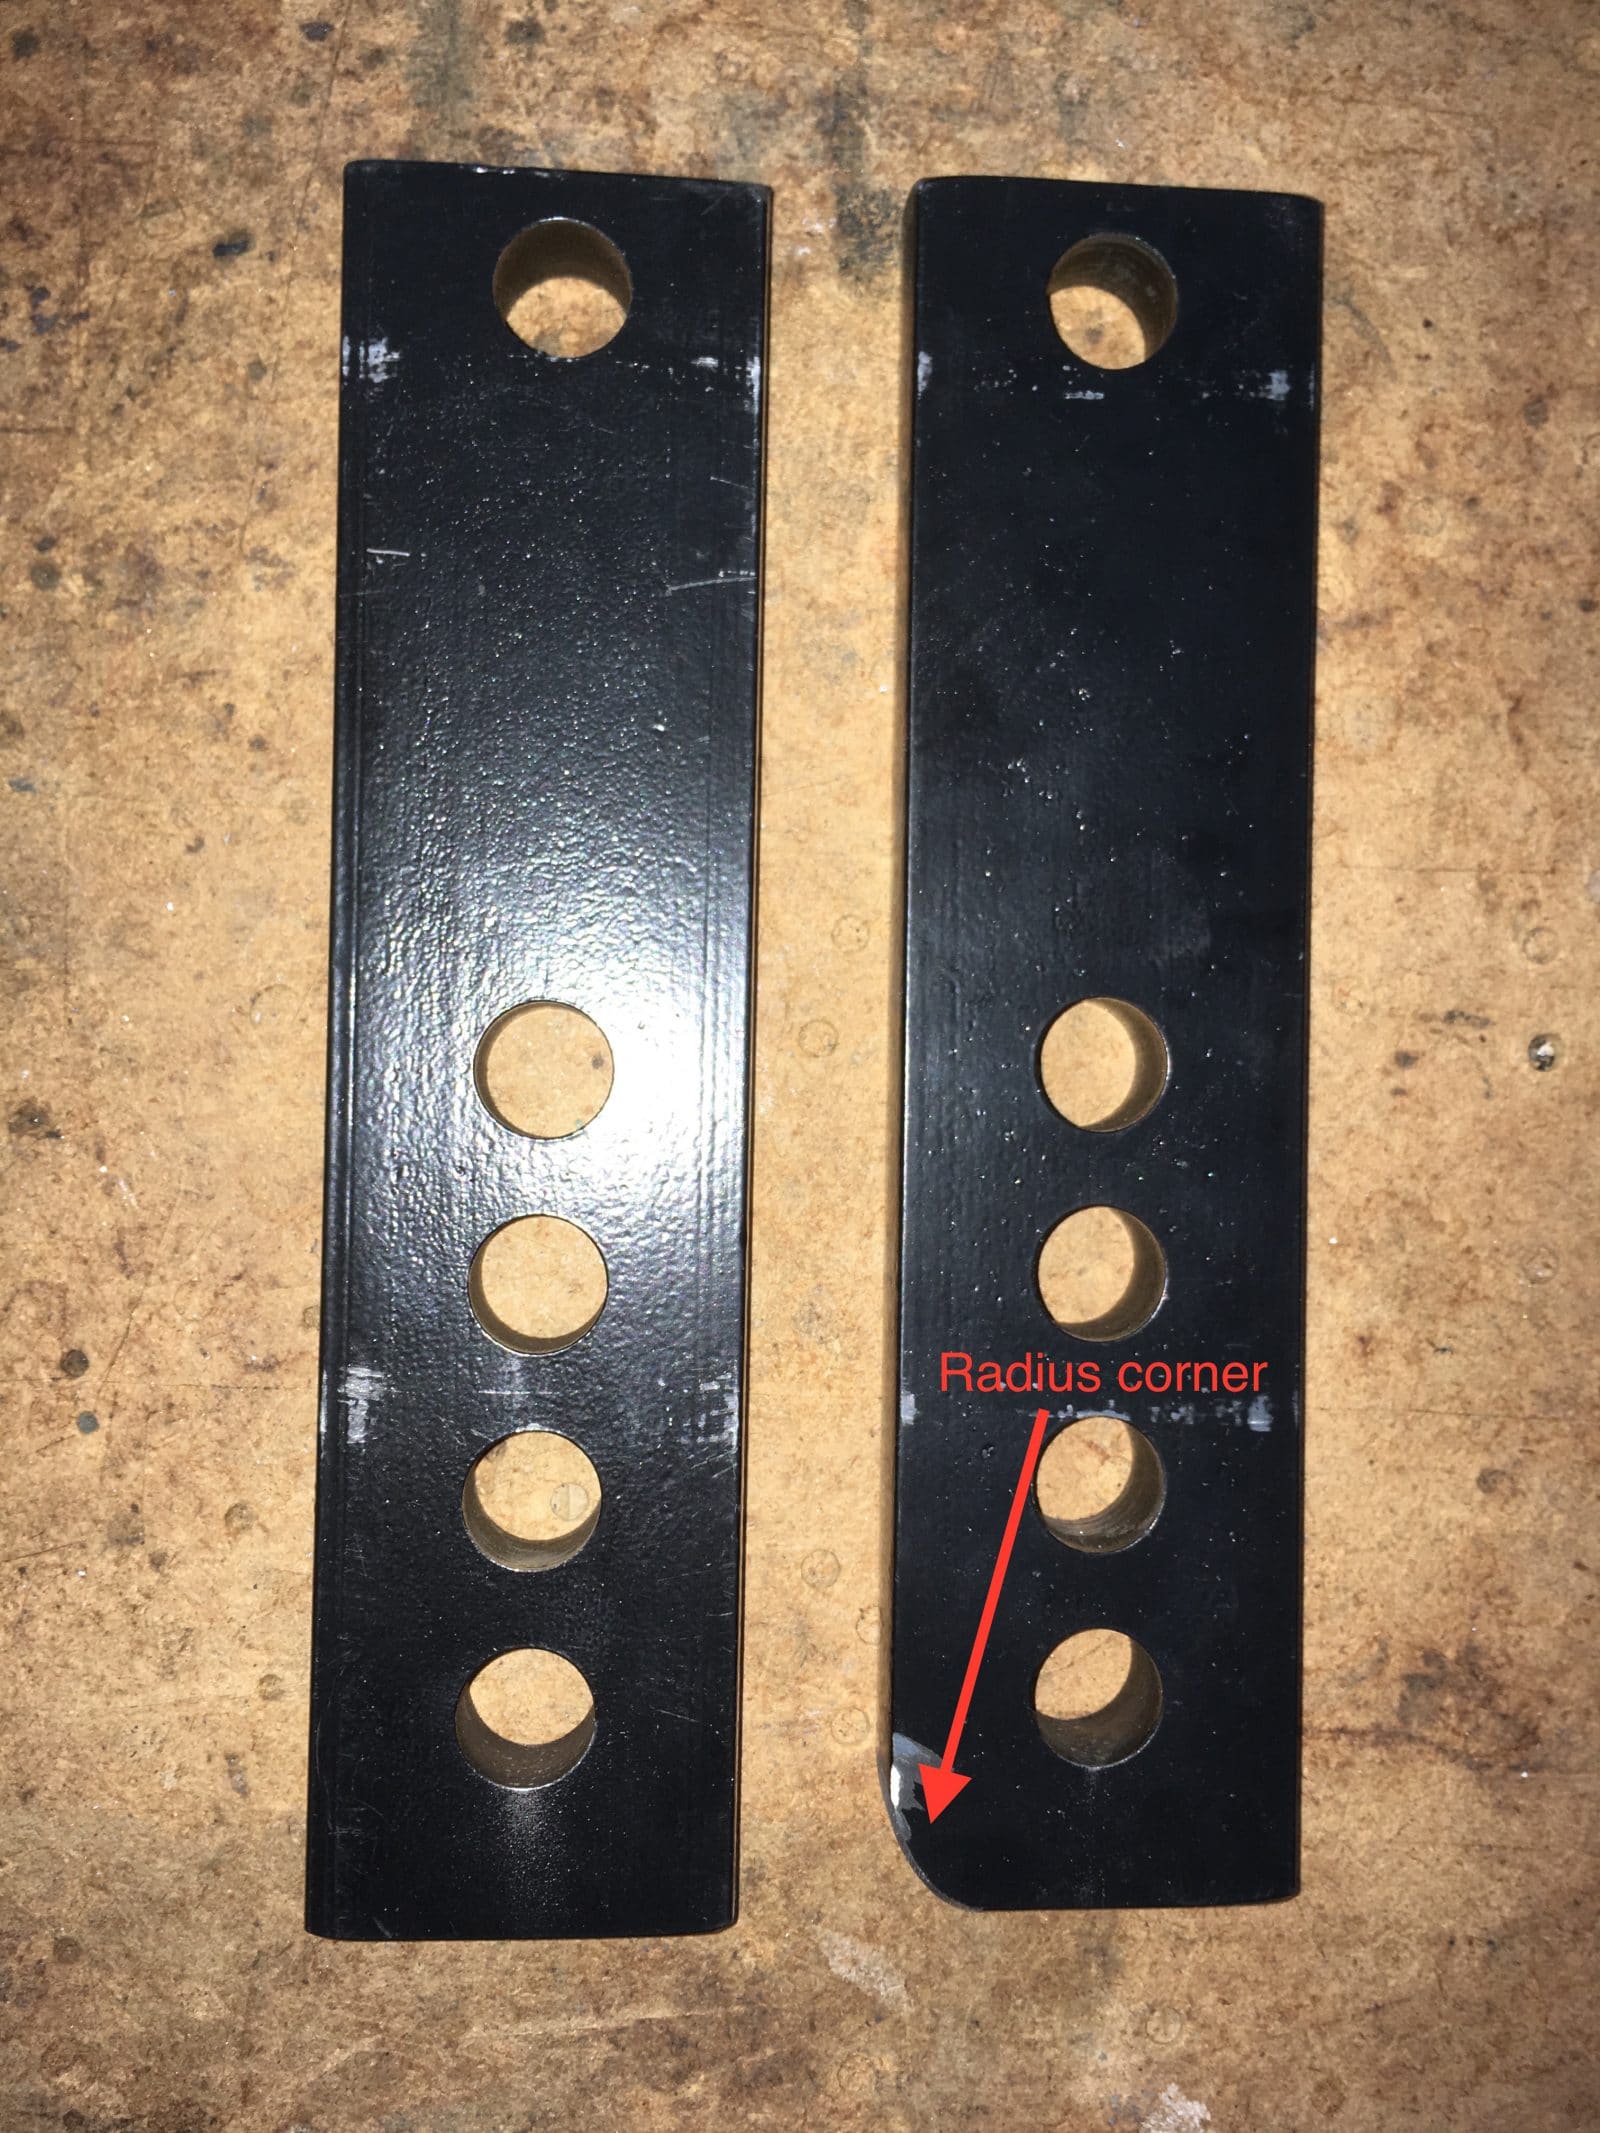
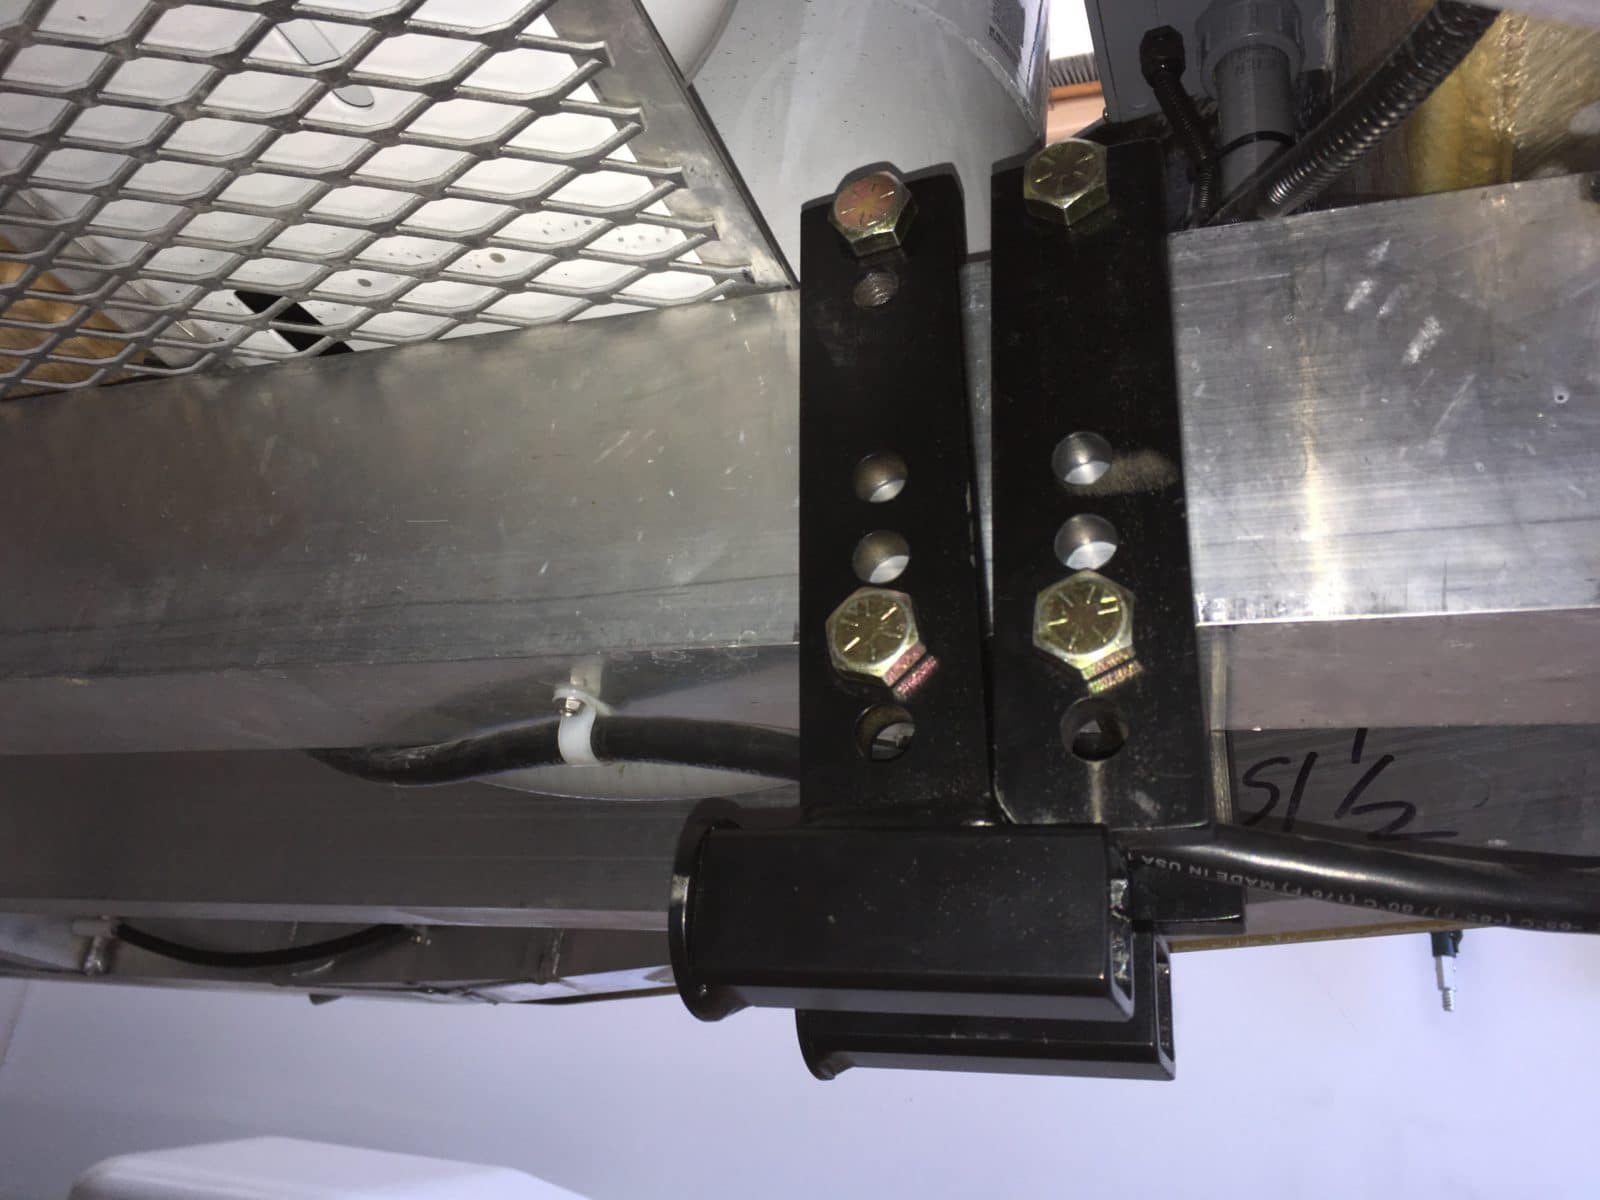
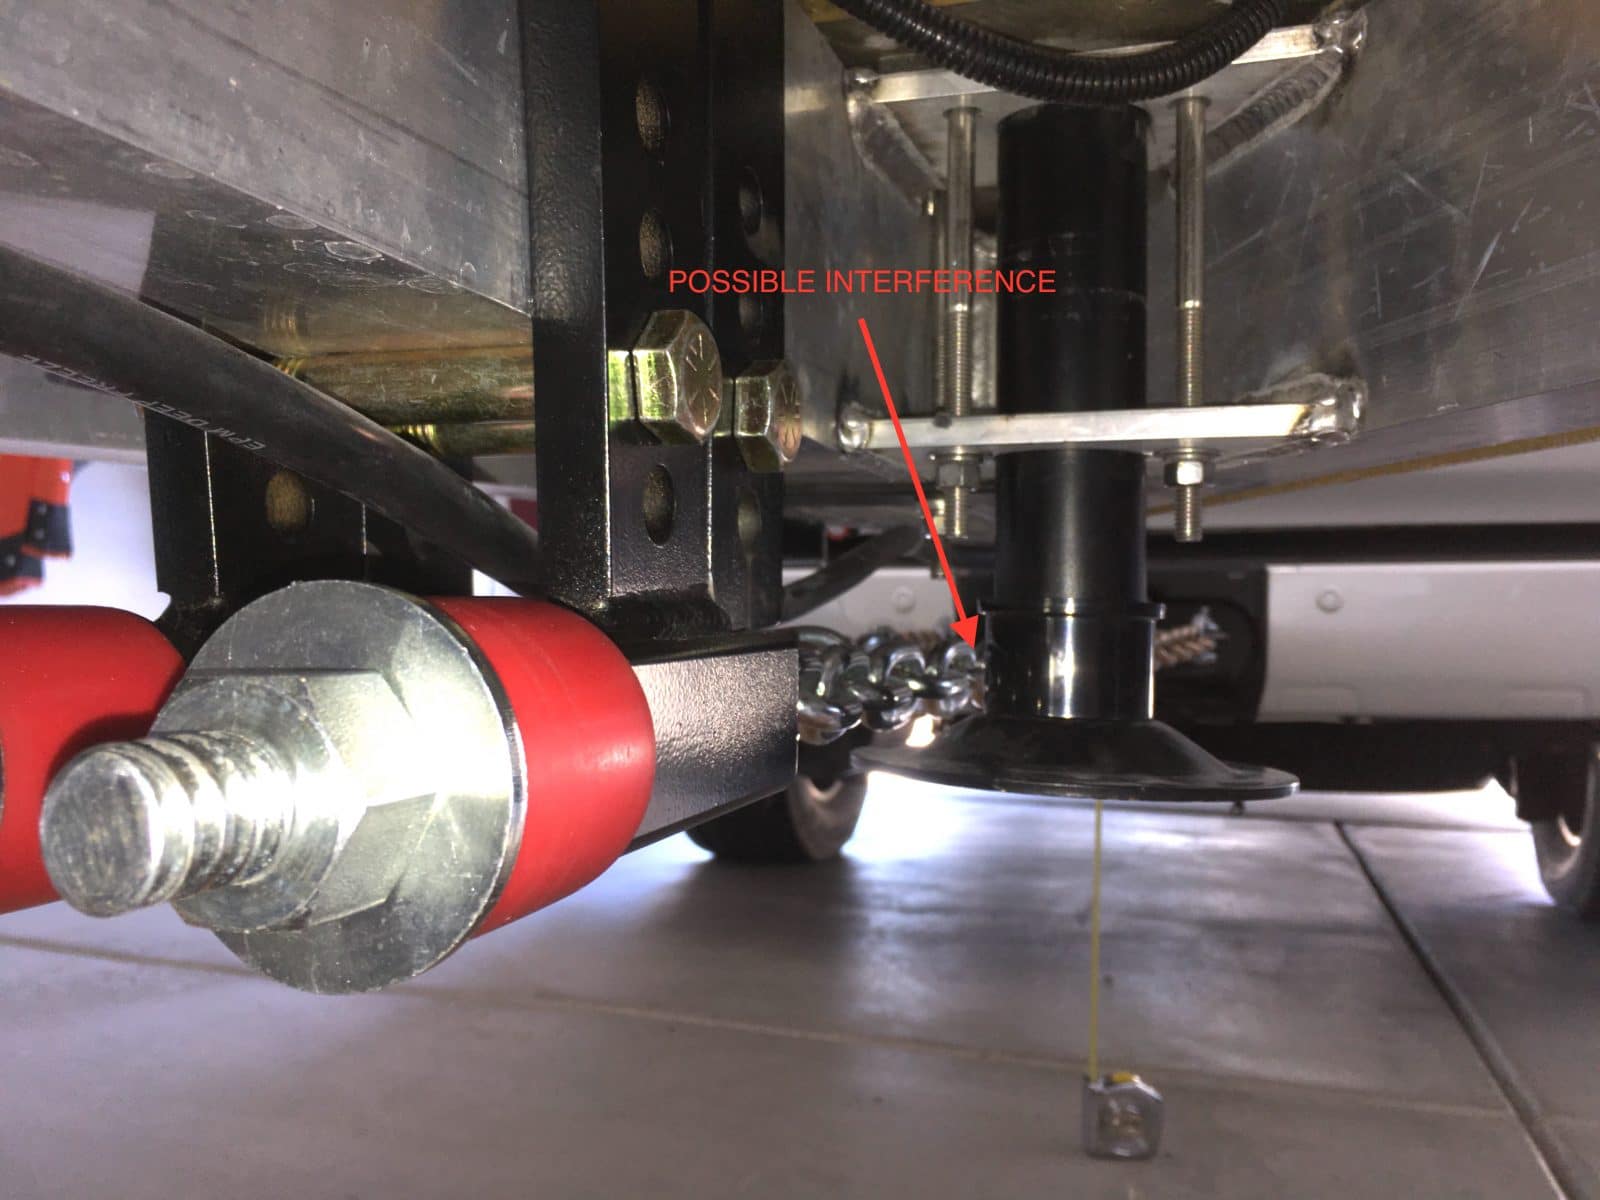
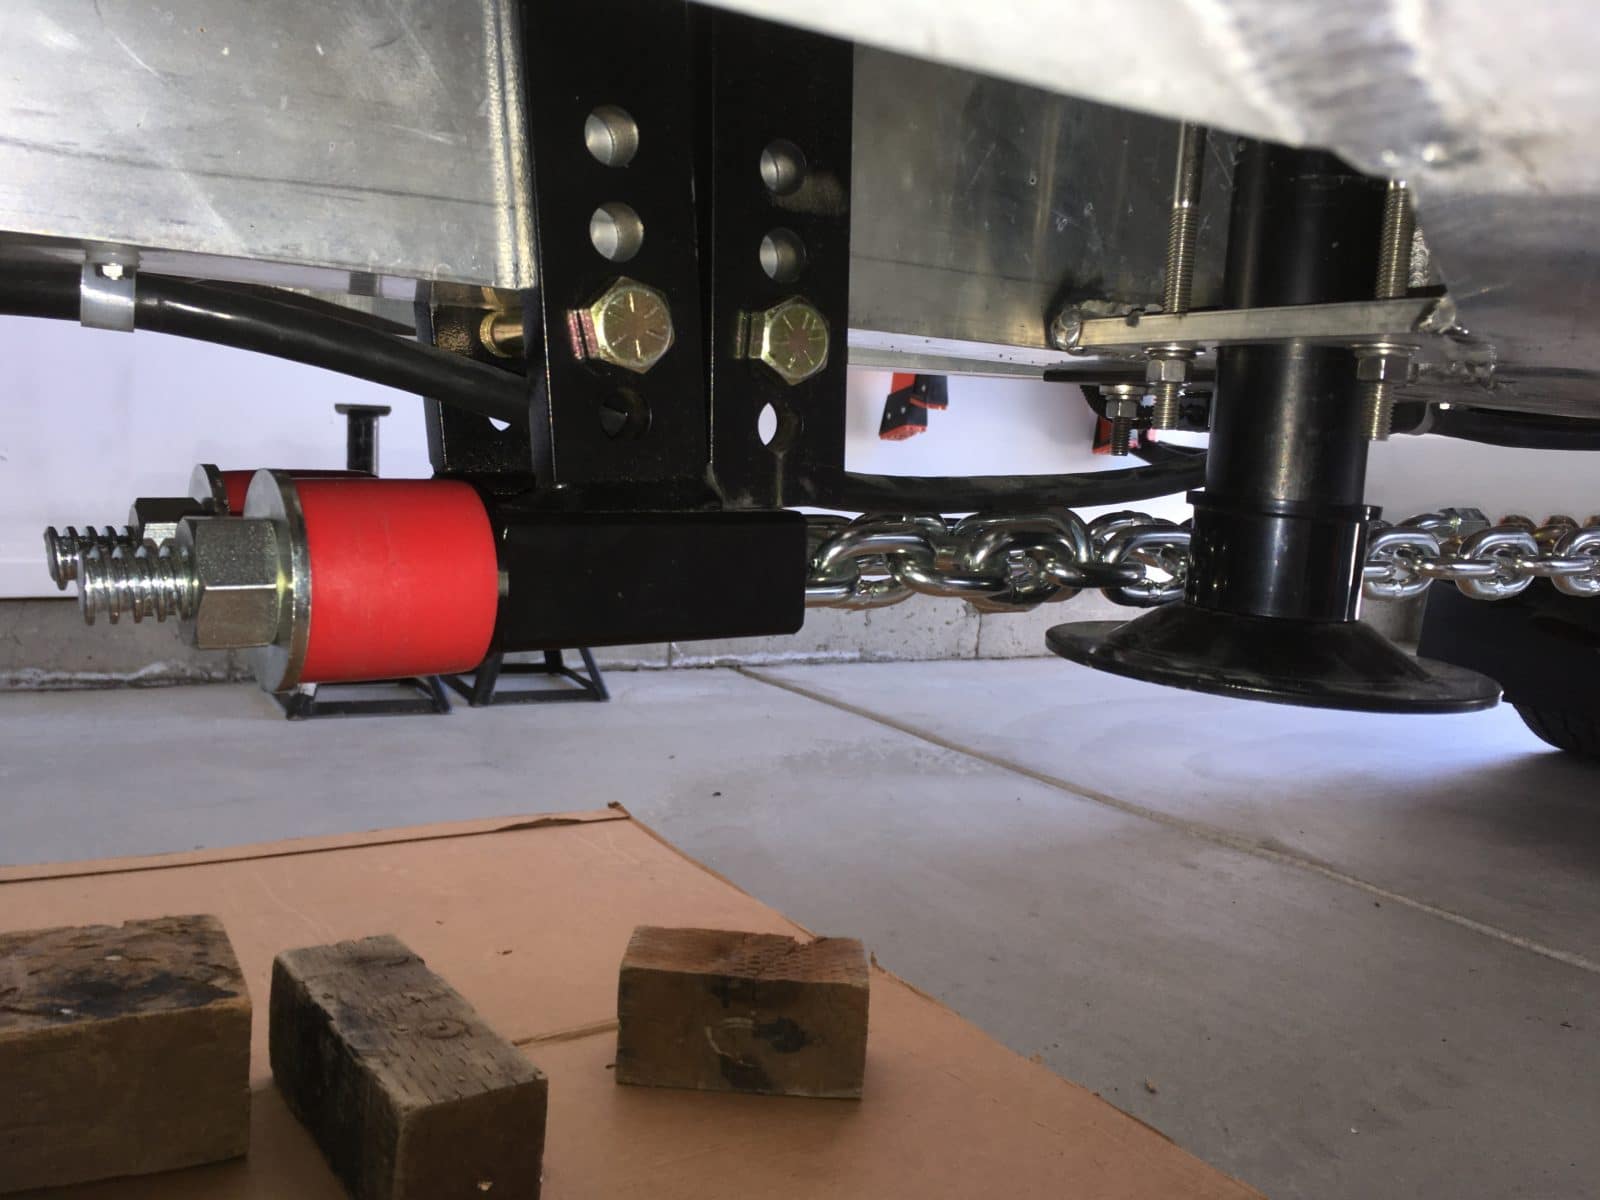
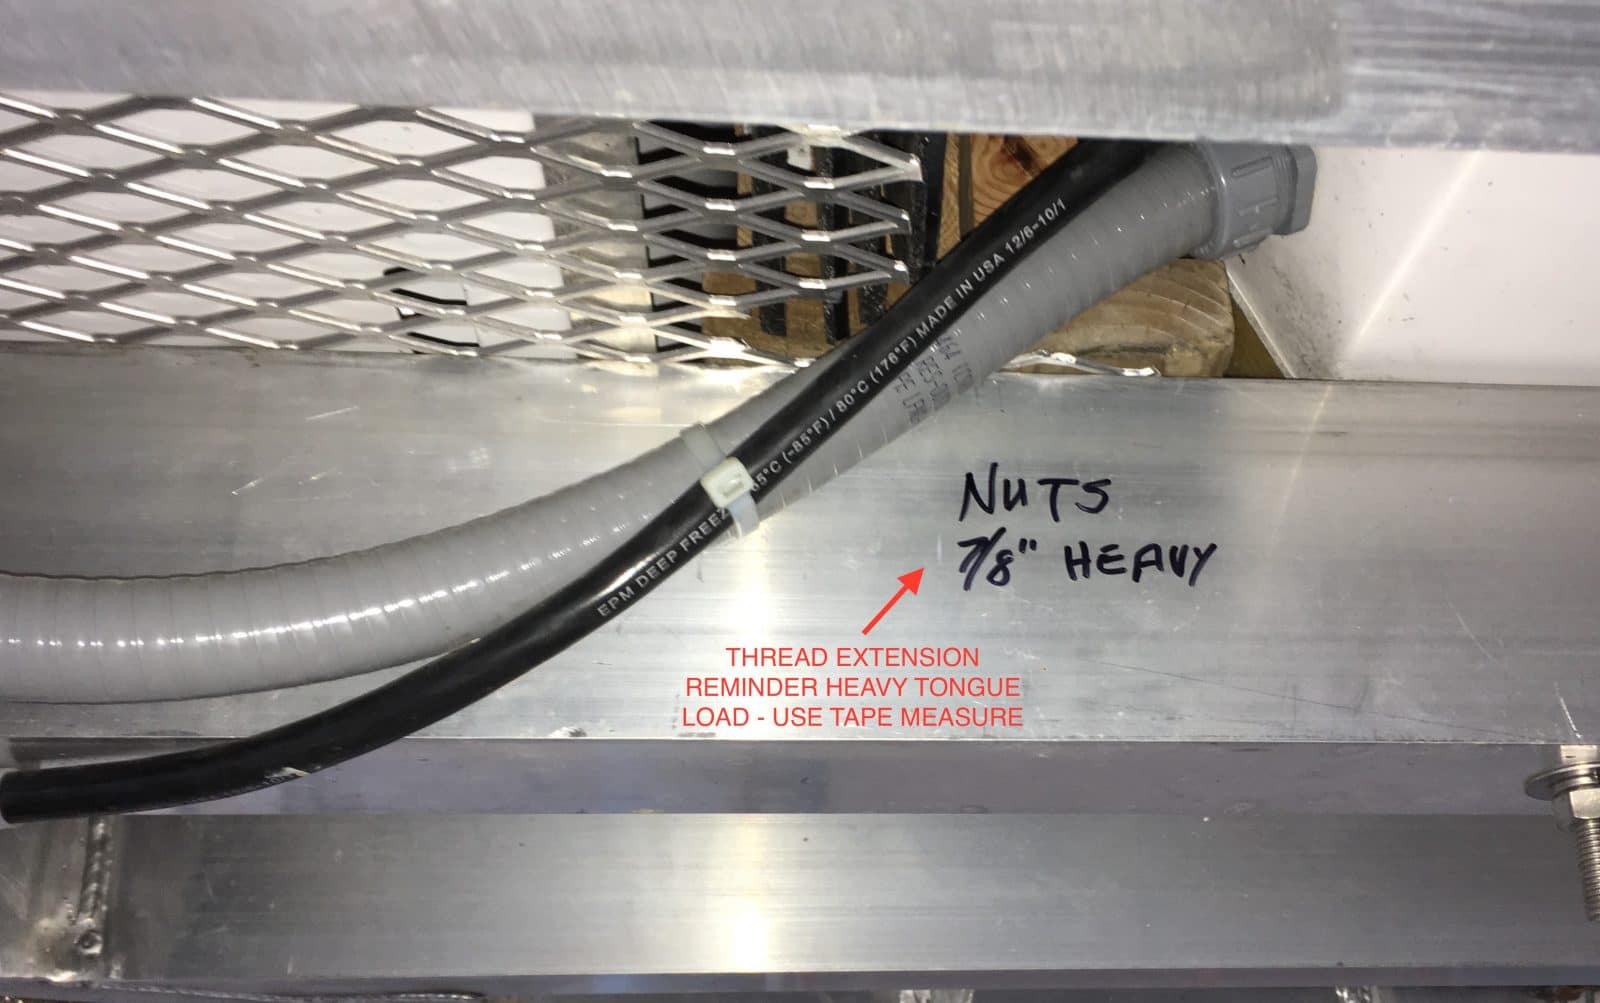
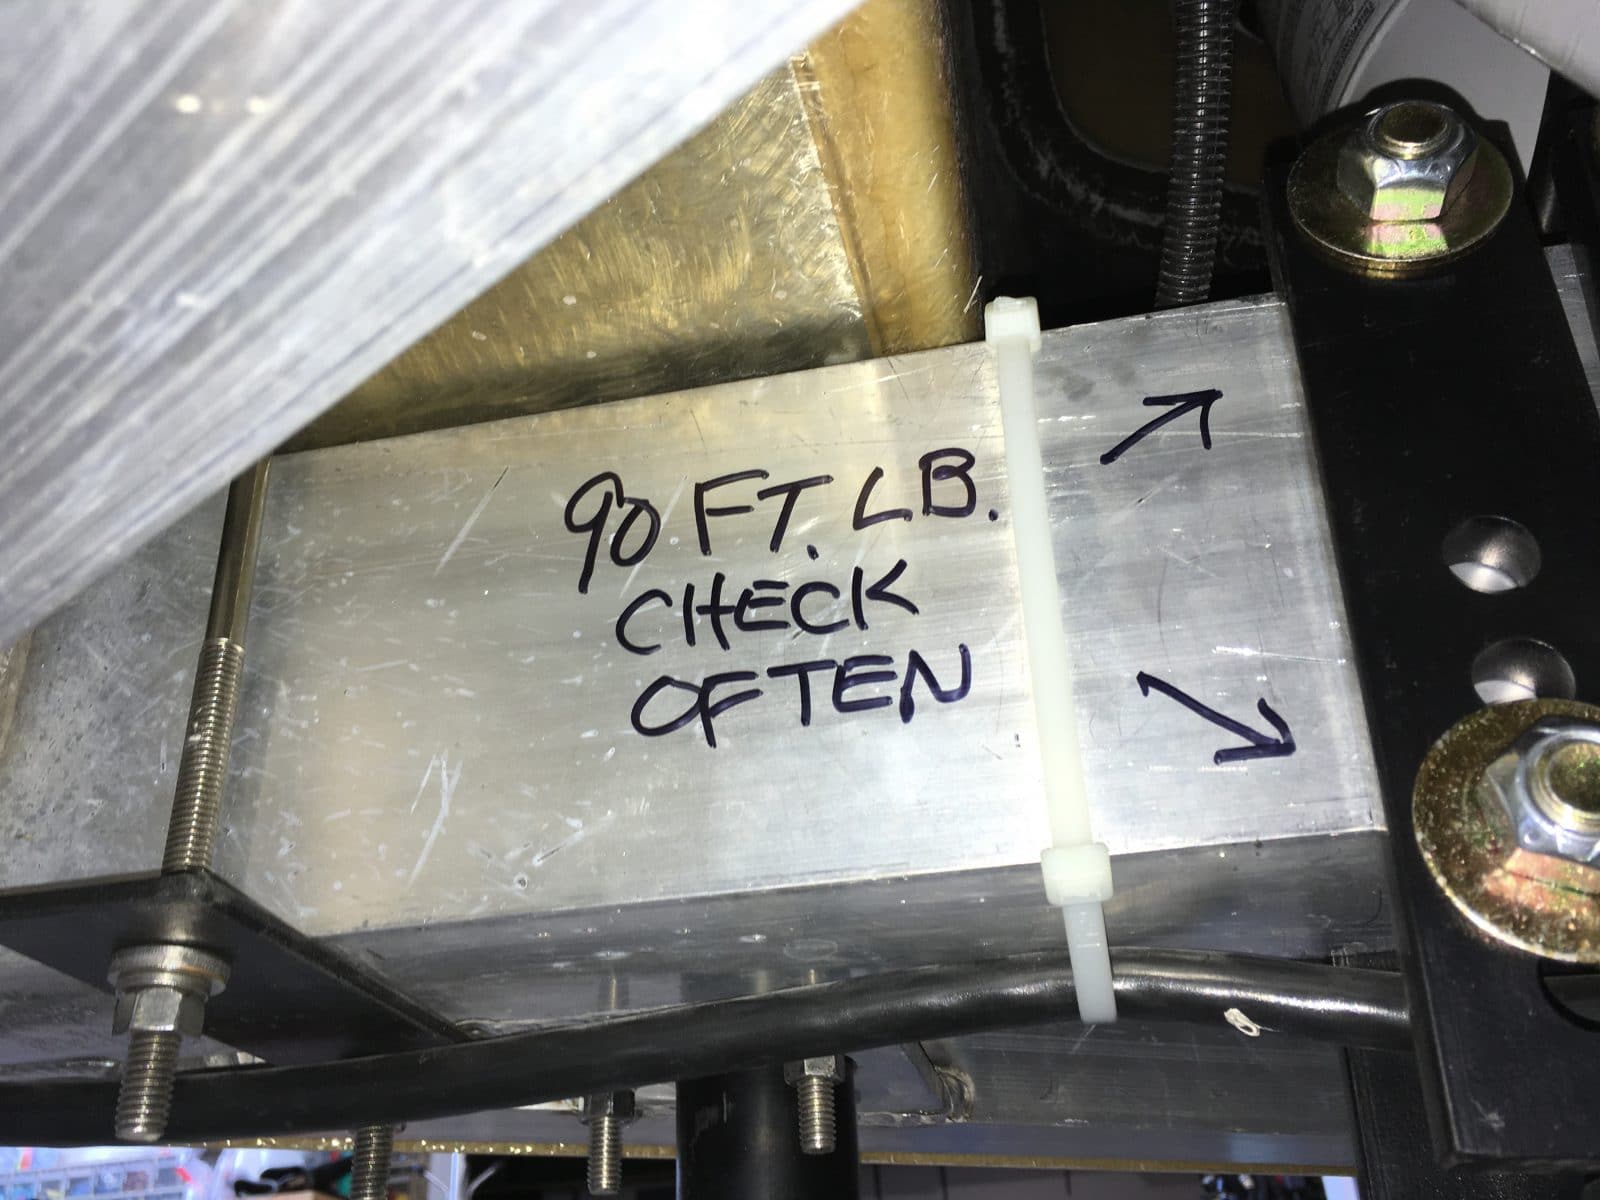
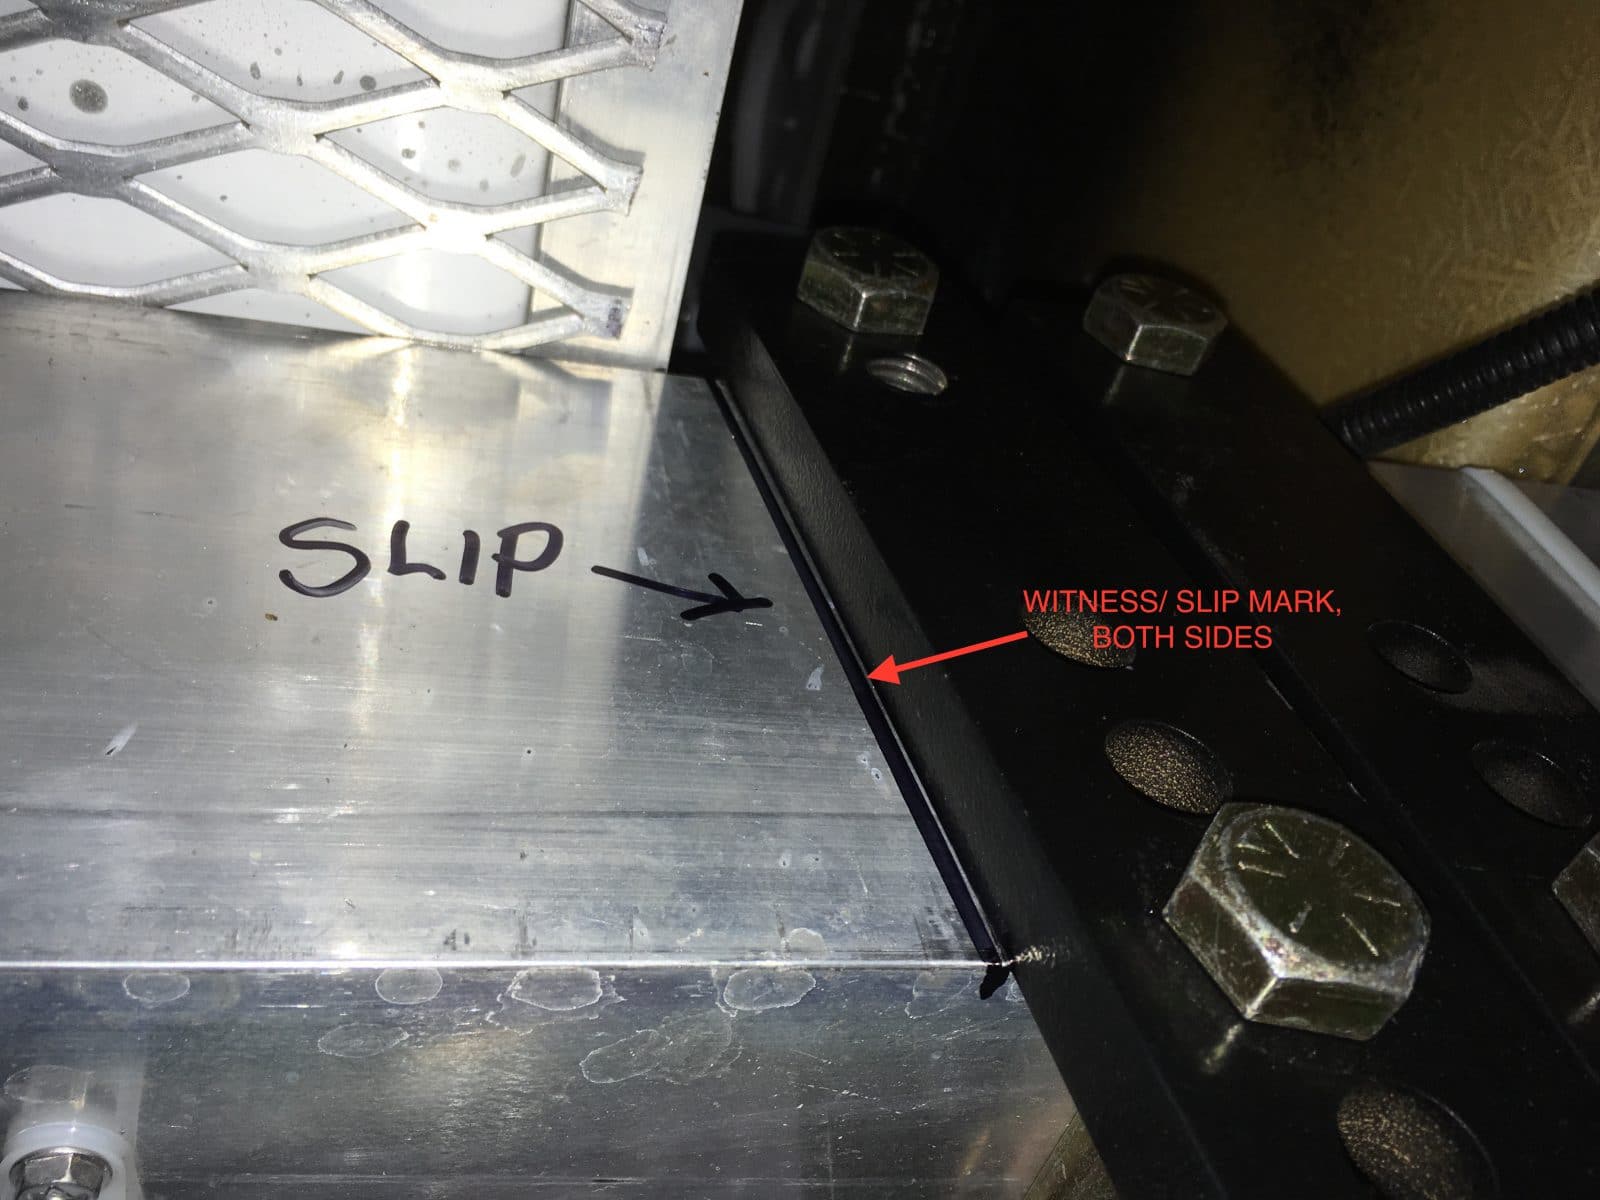
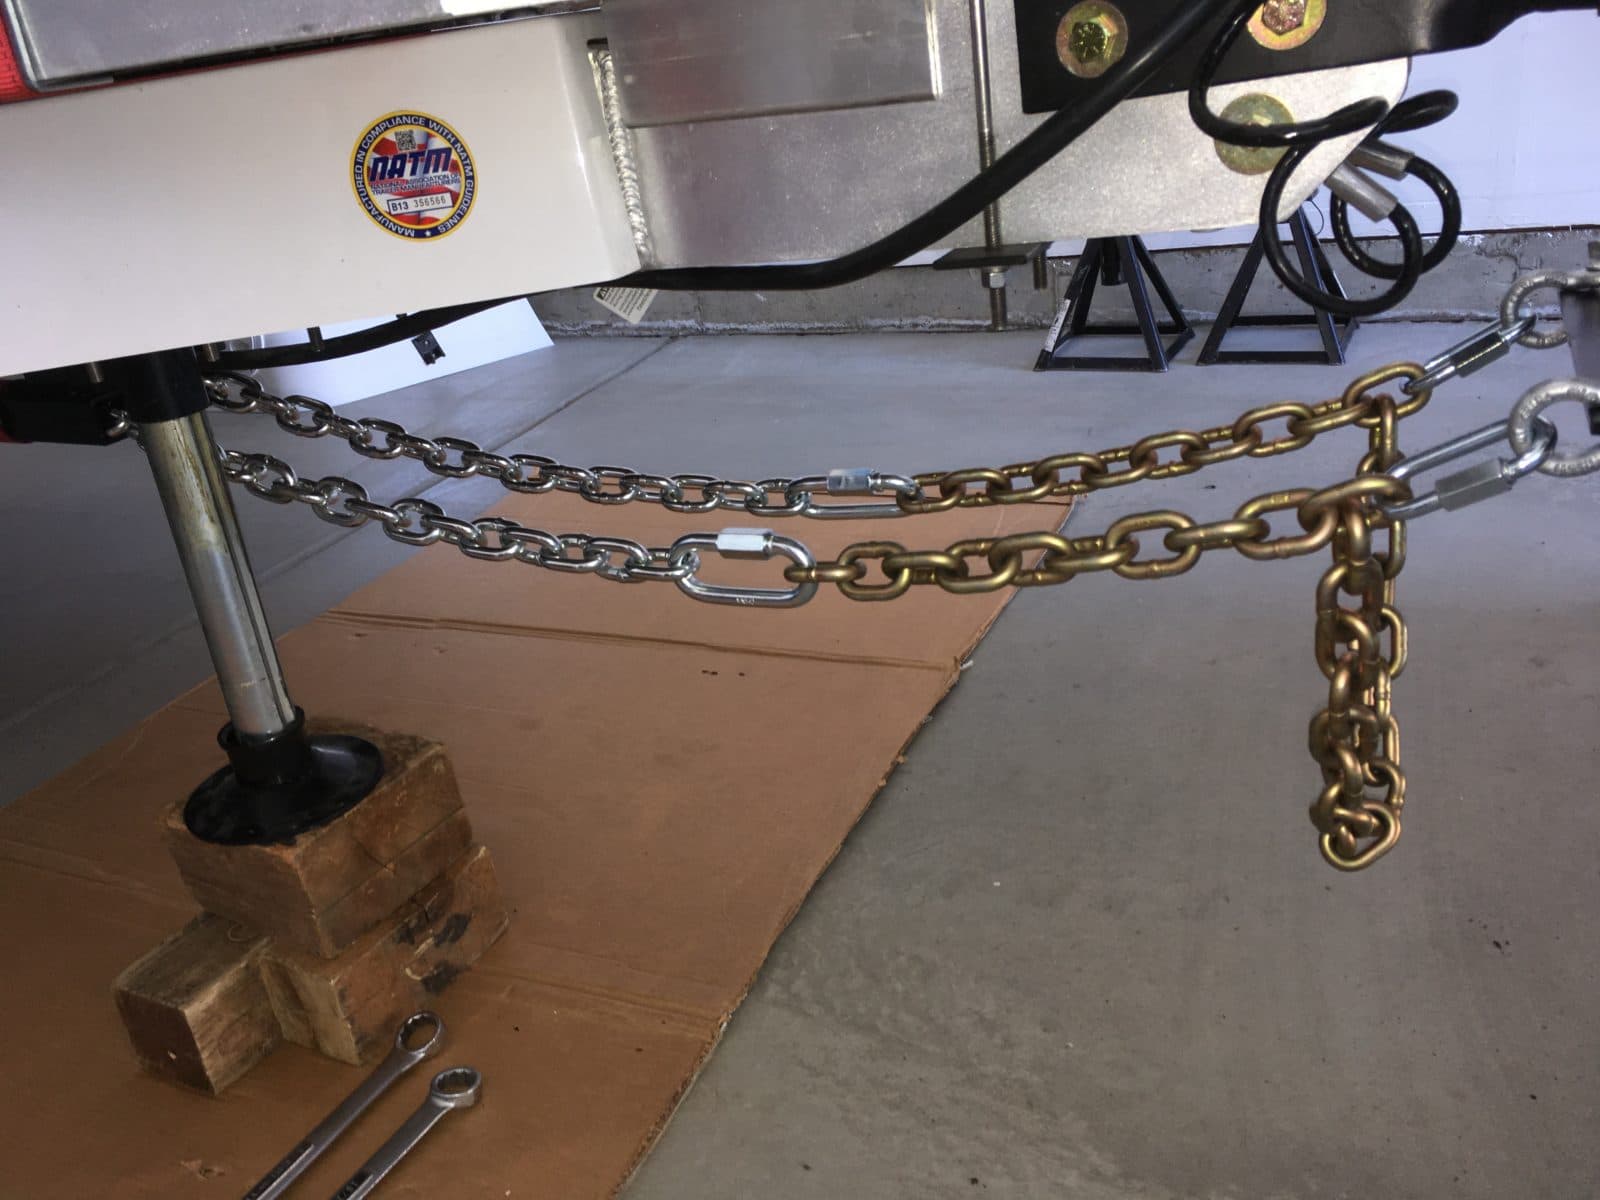
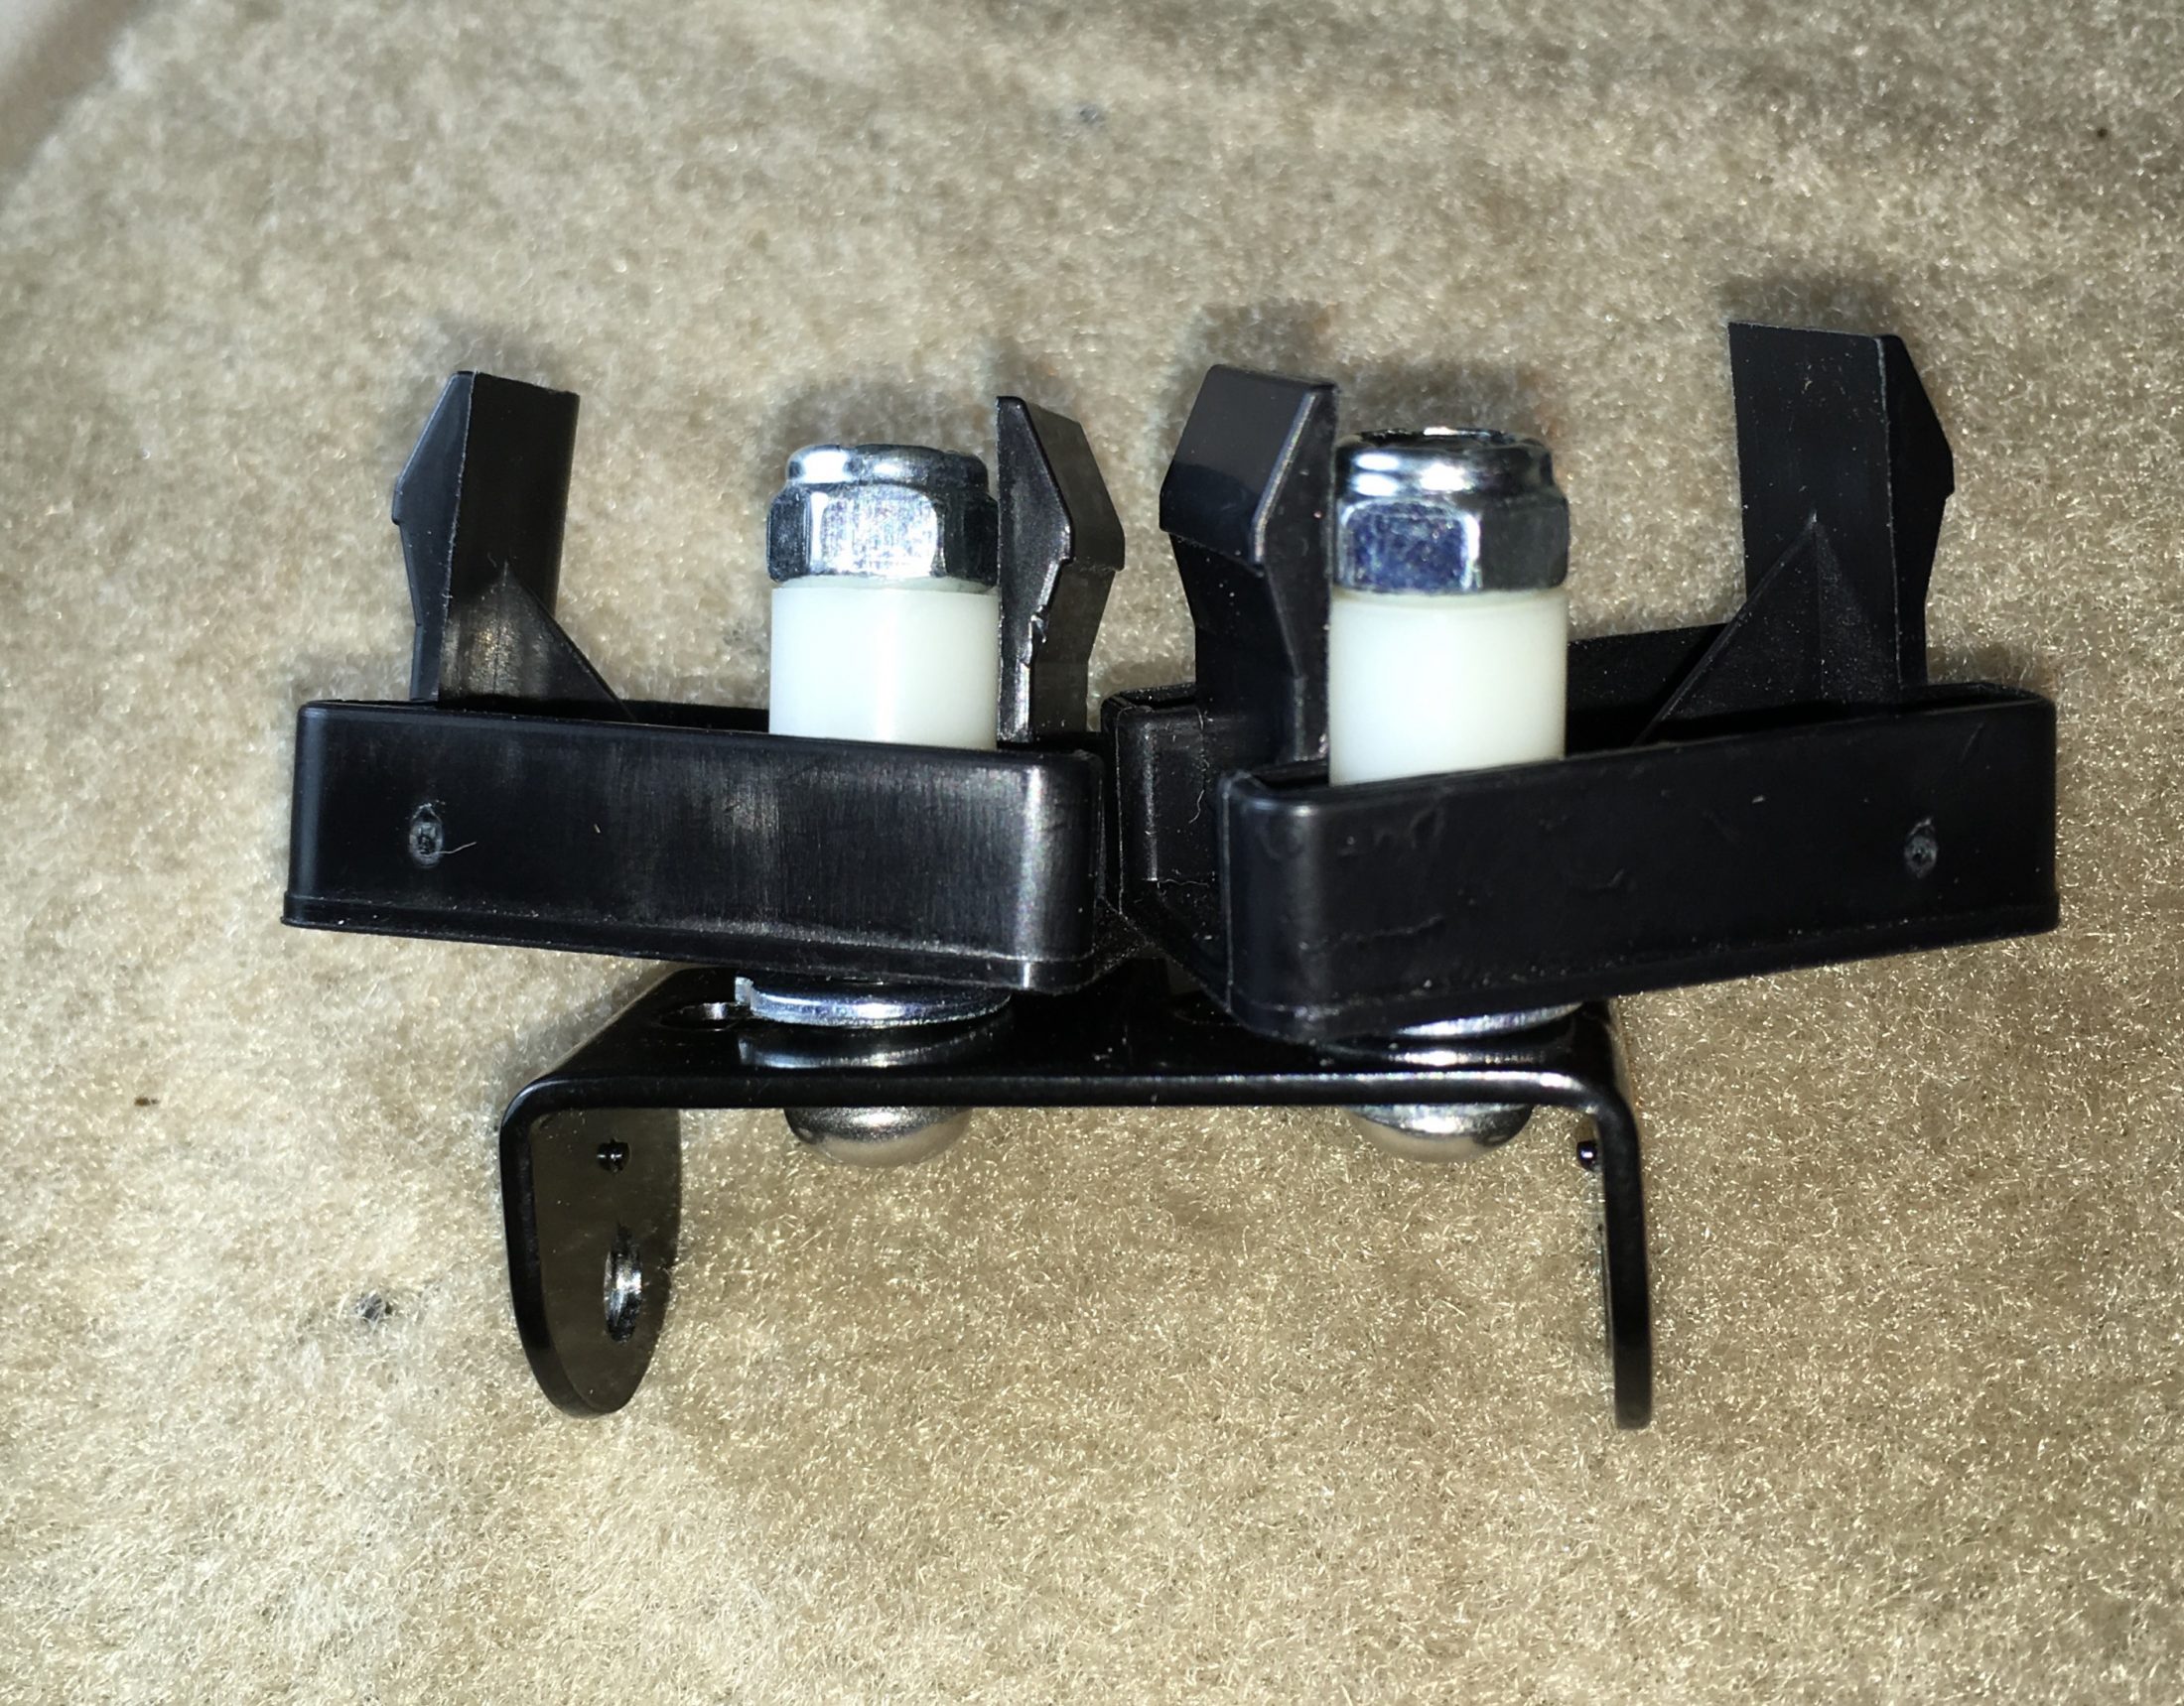
REAR BRACKET INSTALLATION: The front (Anderson calls them "inner" I think) plates are sandwiched together in front of the rear chain brackets. There is interference at the bottom at the weld as shown. The brackets can't be rotated back close to the main brackets without alteration. Grind a big radius on the bottom of each bracket as shown, to clear the welds on the other pieces. These are hardened steel parts and cannot easily be sawed. Here is the final installation. The rear brackets have to be rotated forward at the bottom to eliminate any clearances between bolts and frame that would let them slip under the very high chain tension. I used a big dead blow mallet, with the hardware snugged down a little. When I had everything positioned where I wanted it, I hooked up the chains, put them under some tension and torqued the four nuts to 90 ft lbs. It is very important that the bolts are at 90 degrees to the frame member and not cocked (angled). View looking down - note the great access: There is potential for the right chain to chafe or bind against the jack tube. Mine cleared OK, but I added a small Quick Link (sailorashore used two) to bring the chains together at that spot for extra clearance. The smaller Quick Link is used because the 1/2 inch ones won't go through the holes. There is minimal side load on it since the chain angle is almost 180 degrees. After towing 45 miles I re-torqued the four rear nuts -I noted no movement but they did take a little extra tightening. Rather than count turns which is not very precise, I chose to measure the length of the threads extended past the nut. For my heavy tongue load (710 pounds, of which 130 was water and gas) I needed 7/8". I plan to add the figure for a lighter tongue load later.... It is easy to set the nuts using a small pocket tape measure. I added extra 1/4 inch nylon ties to keep the light wire harness up tight and out of the way. Clearance is not an issue. I then added witness (slippage) marks so I could tell at a glance if they have moved. More to come... the front part. John Davies Spokane WA
-
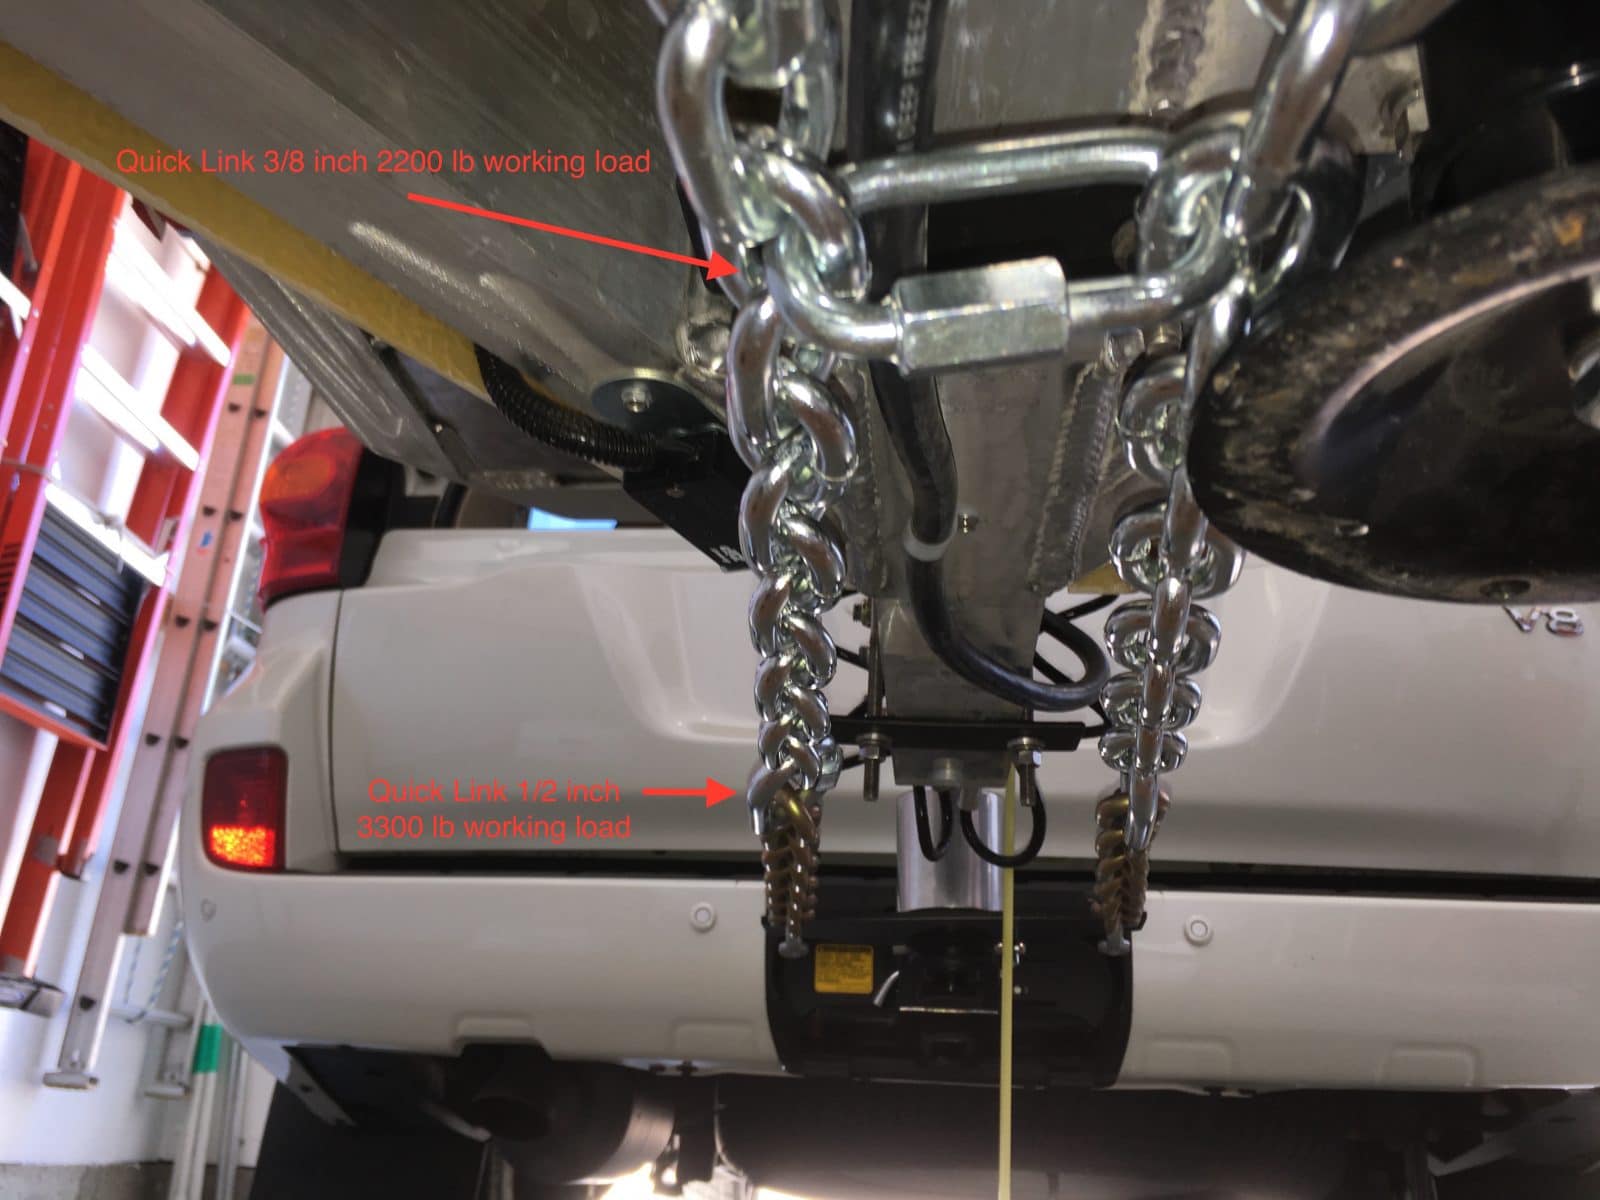
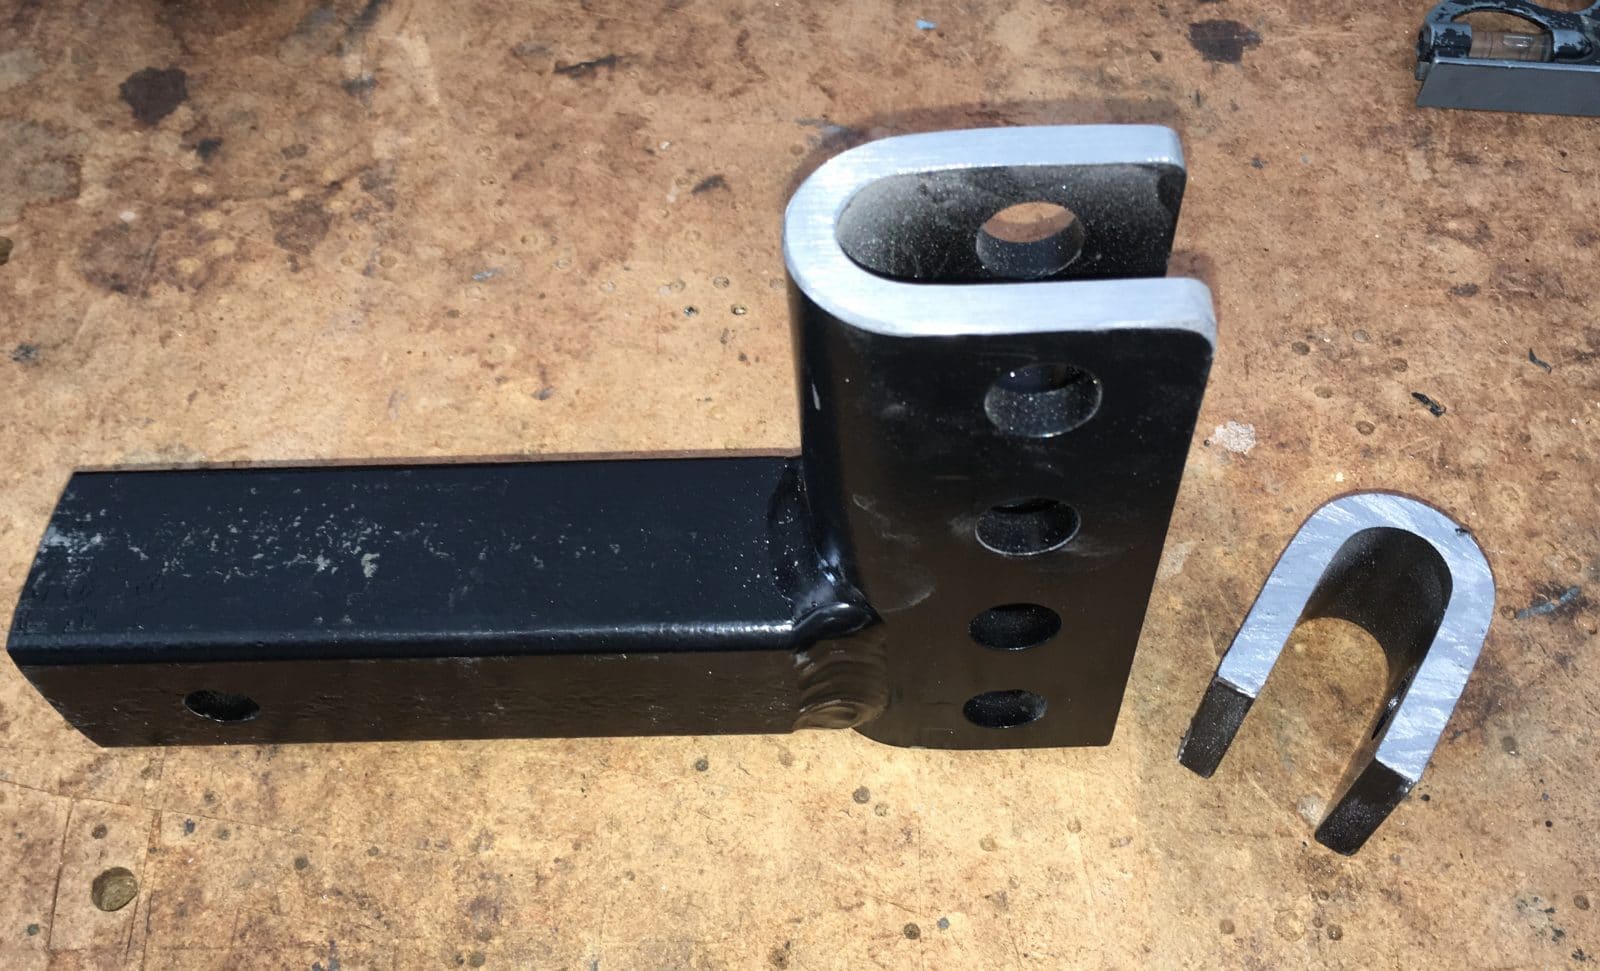
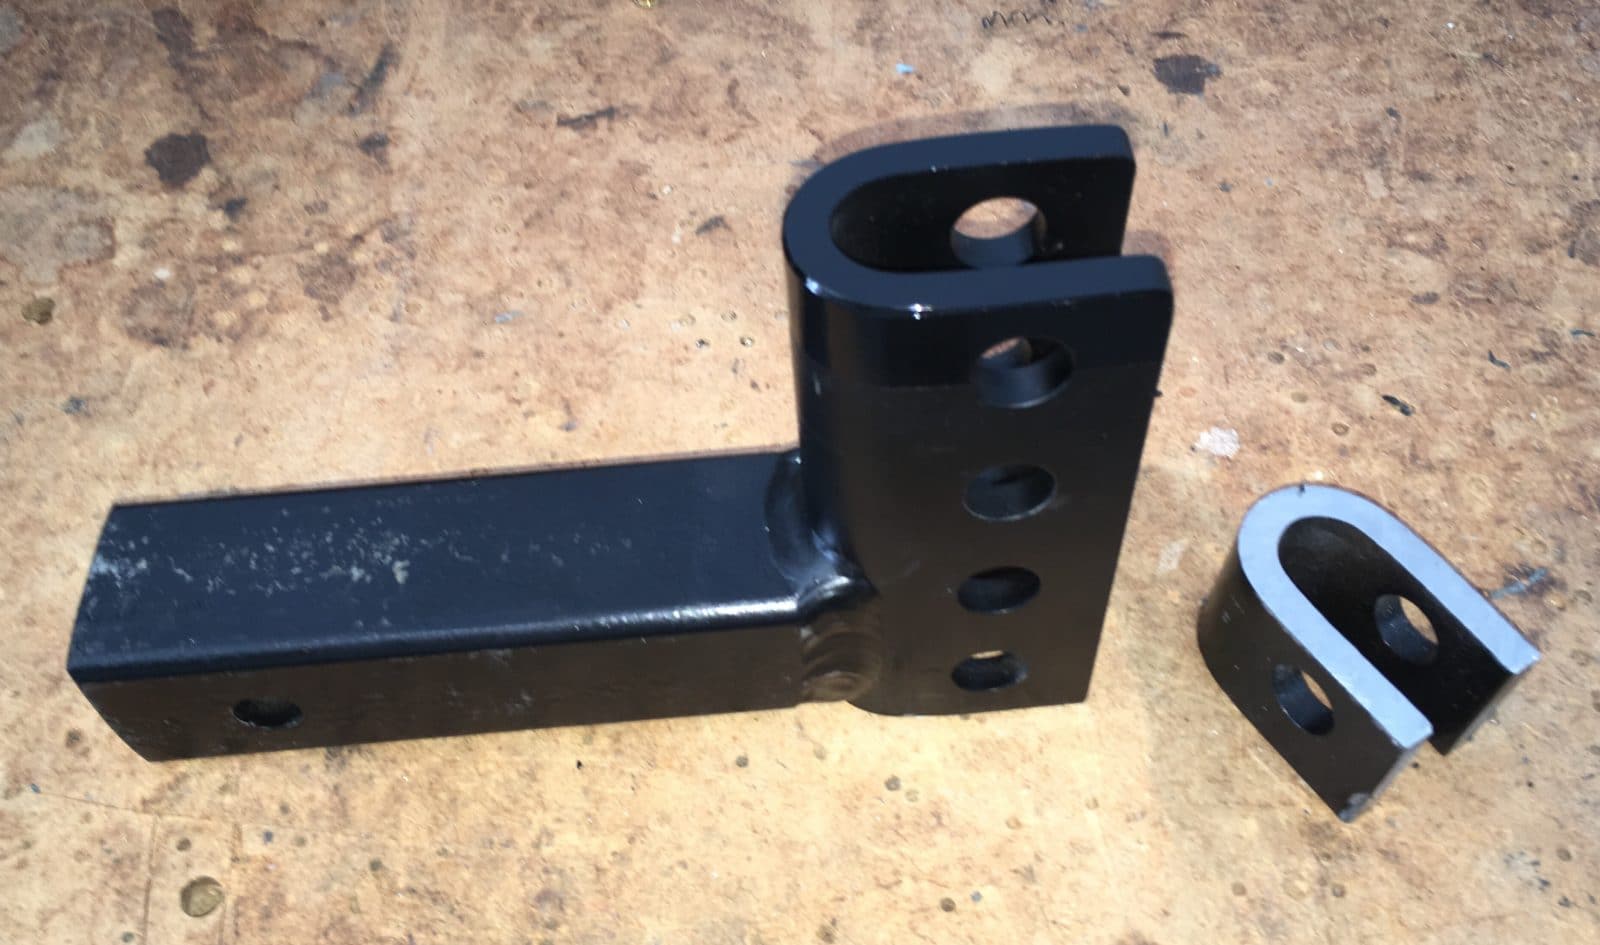
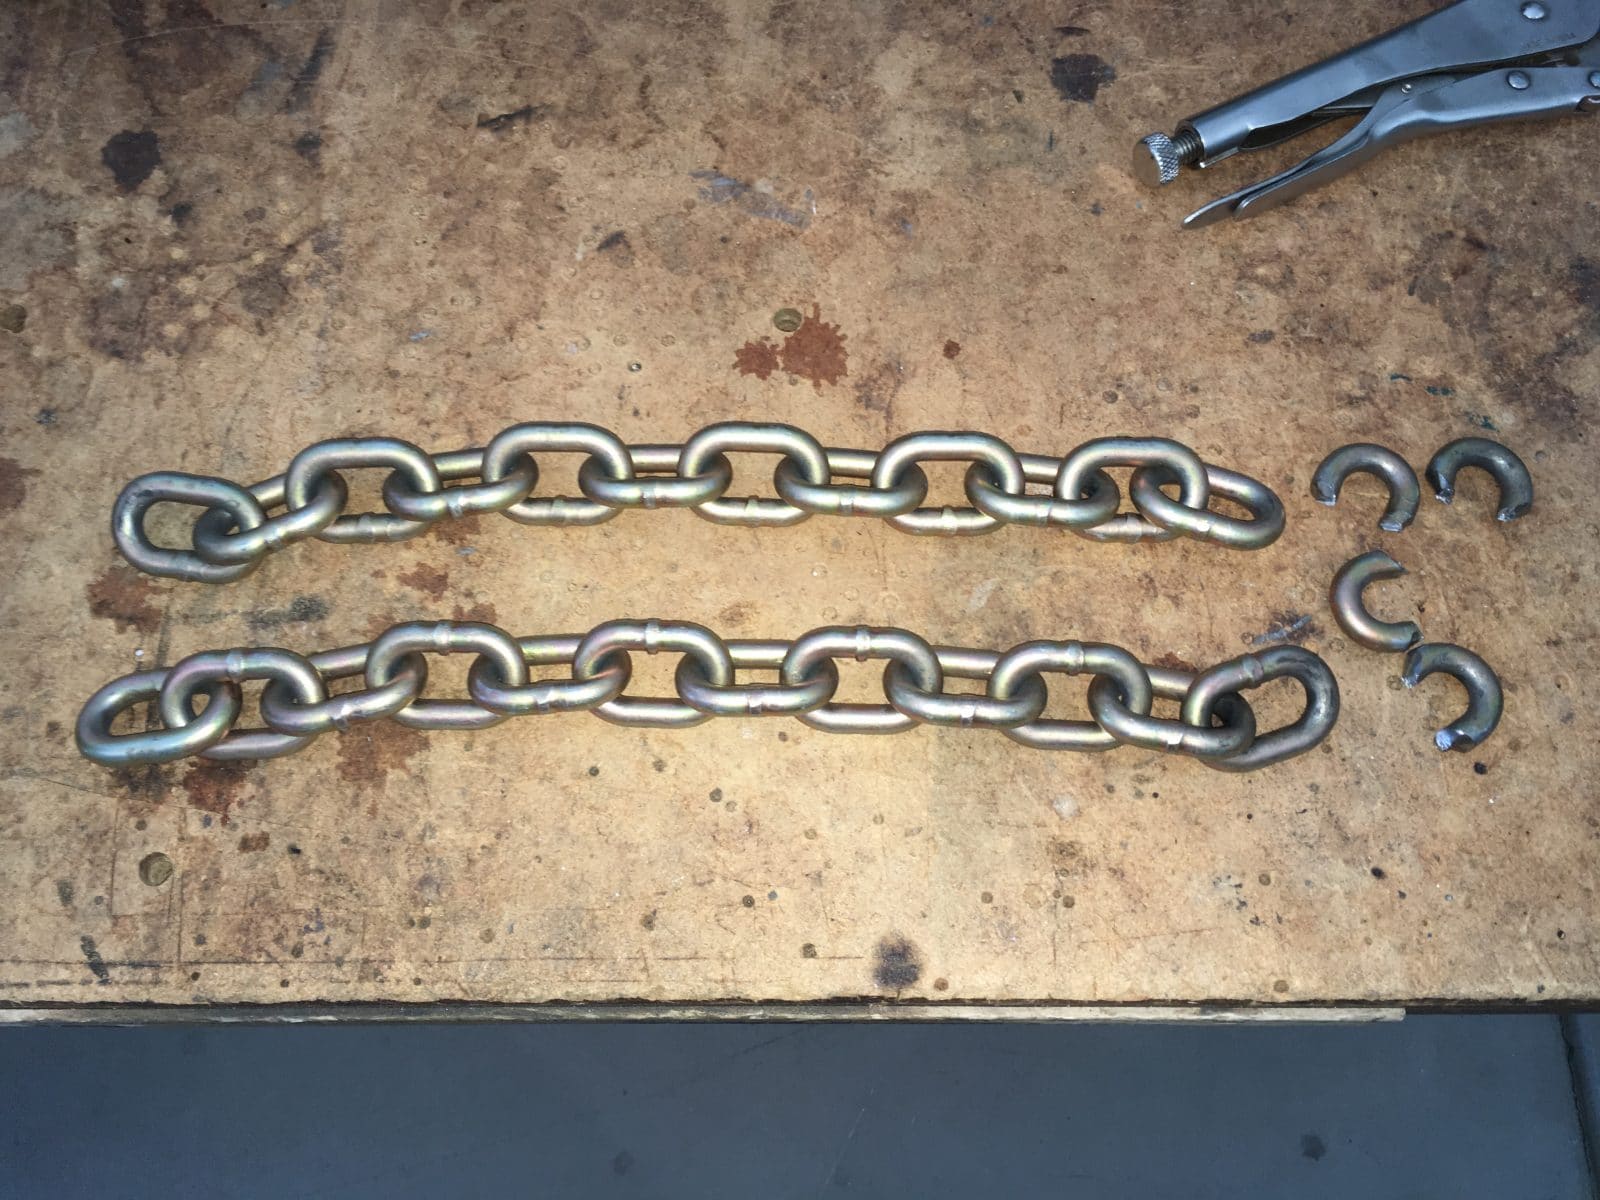
I would like to thank John Shkor "sailerashore" for this method. He talks about it in great detail with pictures of his installation starting on Page 3 of the Anderson FAQ: ... http://olivertraveltrailers.com/topic/andersen-wd-hitch-faq/page/3/ I won't go into every single detail of the actual work, but will post my pics and add comments where I feel they would be helpful. A word of warning, if you want to install this hitch yourself you need to be very comfortable working and grinding metal, and have the proper tools to do this right. Putting the Anderson parts under the middle tube is very easy with excellent access. The loads on the brackets are pretty much straight so there will not be any twisting or loosening due to very high off-center loads. MATERIALS LIST: 4 feet Chain 3/8 G70 Zinc plated 8800 pound working load (truckers chain) @ $3.50 per foot 2 Quick Link 3/8 inch plated, 2200 pound working load @ $2.68 each (used one, kept a spare) 2 Quick Link 1/2 inch plated, 3300 pound working load @ $2.08 ea 4 Bolts 5/8-11 x 5 inches Grade 8 (1 inch longer than the provided soft bolts) @ $3.01 ea 4 Nuts 5/8-11 Grade 8 self locking @ $1.16 ea 4 Washers Grade 8 ("Thru-hard") @ $0.96 ea I bought all this stuff at the Spokane Fastenal store. Any commercial bolt supply company will have it. You won't find bolts this big at the box stores! THE INSTALLATION: My tow vehicle is a stock 2013 Land Cruiser 200. I needed the 4 inch kit and I decided that I would have to cut off the very top of the steel bracket for tailgate clearance. Cutting the bracket, it is mild steel and cuts easily but you need either a vise or a metal cutting band saw. These are big thick pieces of steel we are working with. The piece removed and the bracket smoothed using a bench top belt sander. Painted with gloss black brake caliper paint - my favorite for this kind of touchup because it requires no primer and it is tough and pretty. So much for the easy part, the chain cutting is tough! You can't touch this hard chain with a bolt cutter. The store uses a huge hydraulic machine to slice through the links. I used a bench top grinder to cut most of the way through a link, then I used a bolt cutter to break the rest. It took about fifteen minutes per link, with dunking in water - the steel gets hot! Rear bracket location: these parts need to be positioned so that there is some fore and aft adjustment and also some room for the inner plates to be mounted in front, as reinforcements. I selected the very middle of the open area below and in front of the propane bottles. I installed them with the hardware loose so I could bash them into position if needed using a dead blow mallet. Here is the chain and hardware: I originally bought 8 washers but ended up using them only under the nuts. Here is the chain mocked up to see how much I would have to cut off. The reason for the extra long length is in case I screwed up, and also to give me a spare chain of the correct length. Here are the two pieces cut to the correct length - 12 links. IMPORTANT NOTE: chain comes in different configurations and the chain you buy might require a different number of links, so figure it out by mock-up before cutting. Note the grinding marks on the links, and the vice grips needed to hold them. More to come, I do not want to lose this work. John Davies Spokane WA
-
Does anybody know more about this rig? I saw it at this thread, which covers the recent 2017 Northwest Overland Rally in western WA. Which I did not attend, though I would have loved to inspect this closer..... https://expeditionportal.com/the-vehicles-of-nw-overland-rally-2017/ John Davies Spokane WA
-
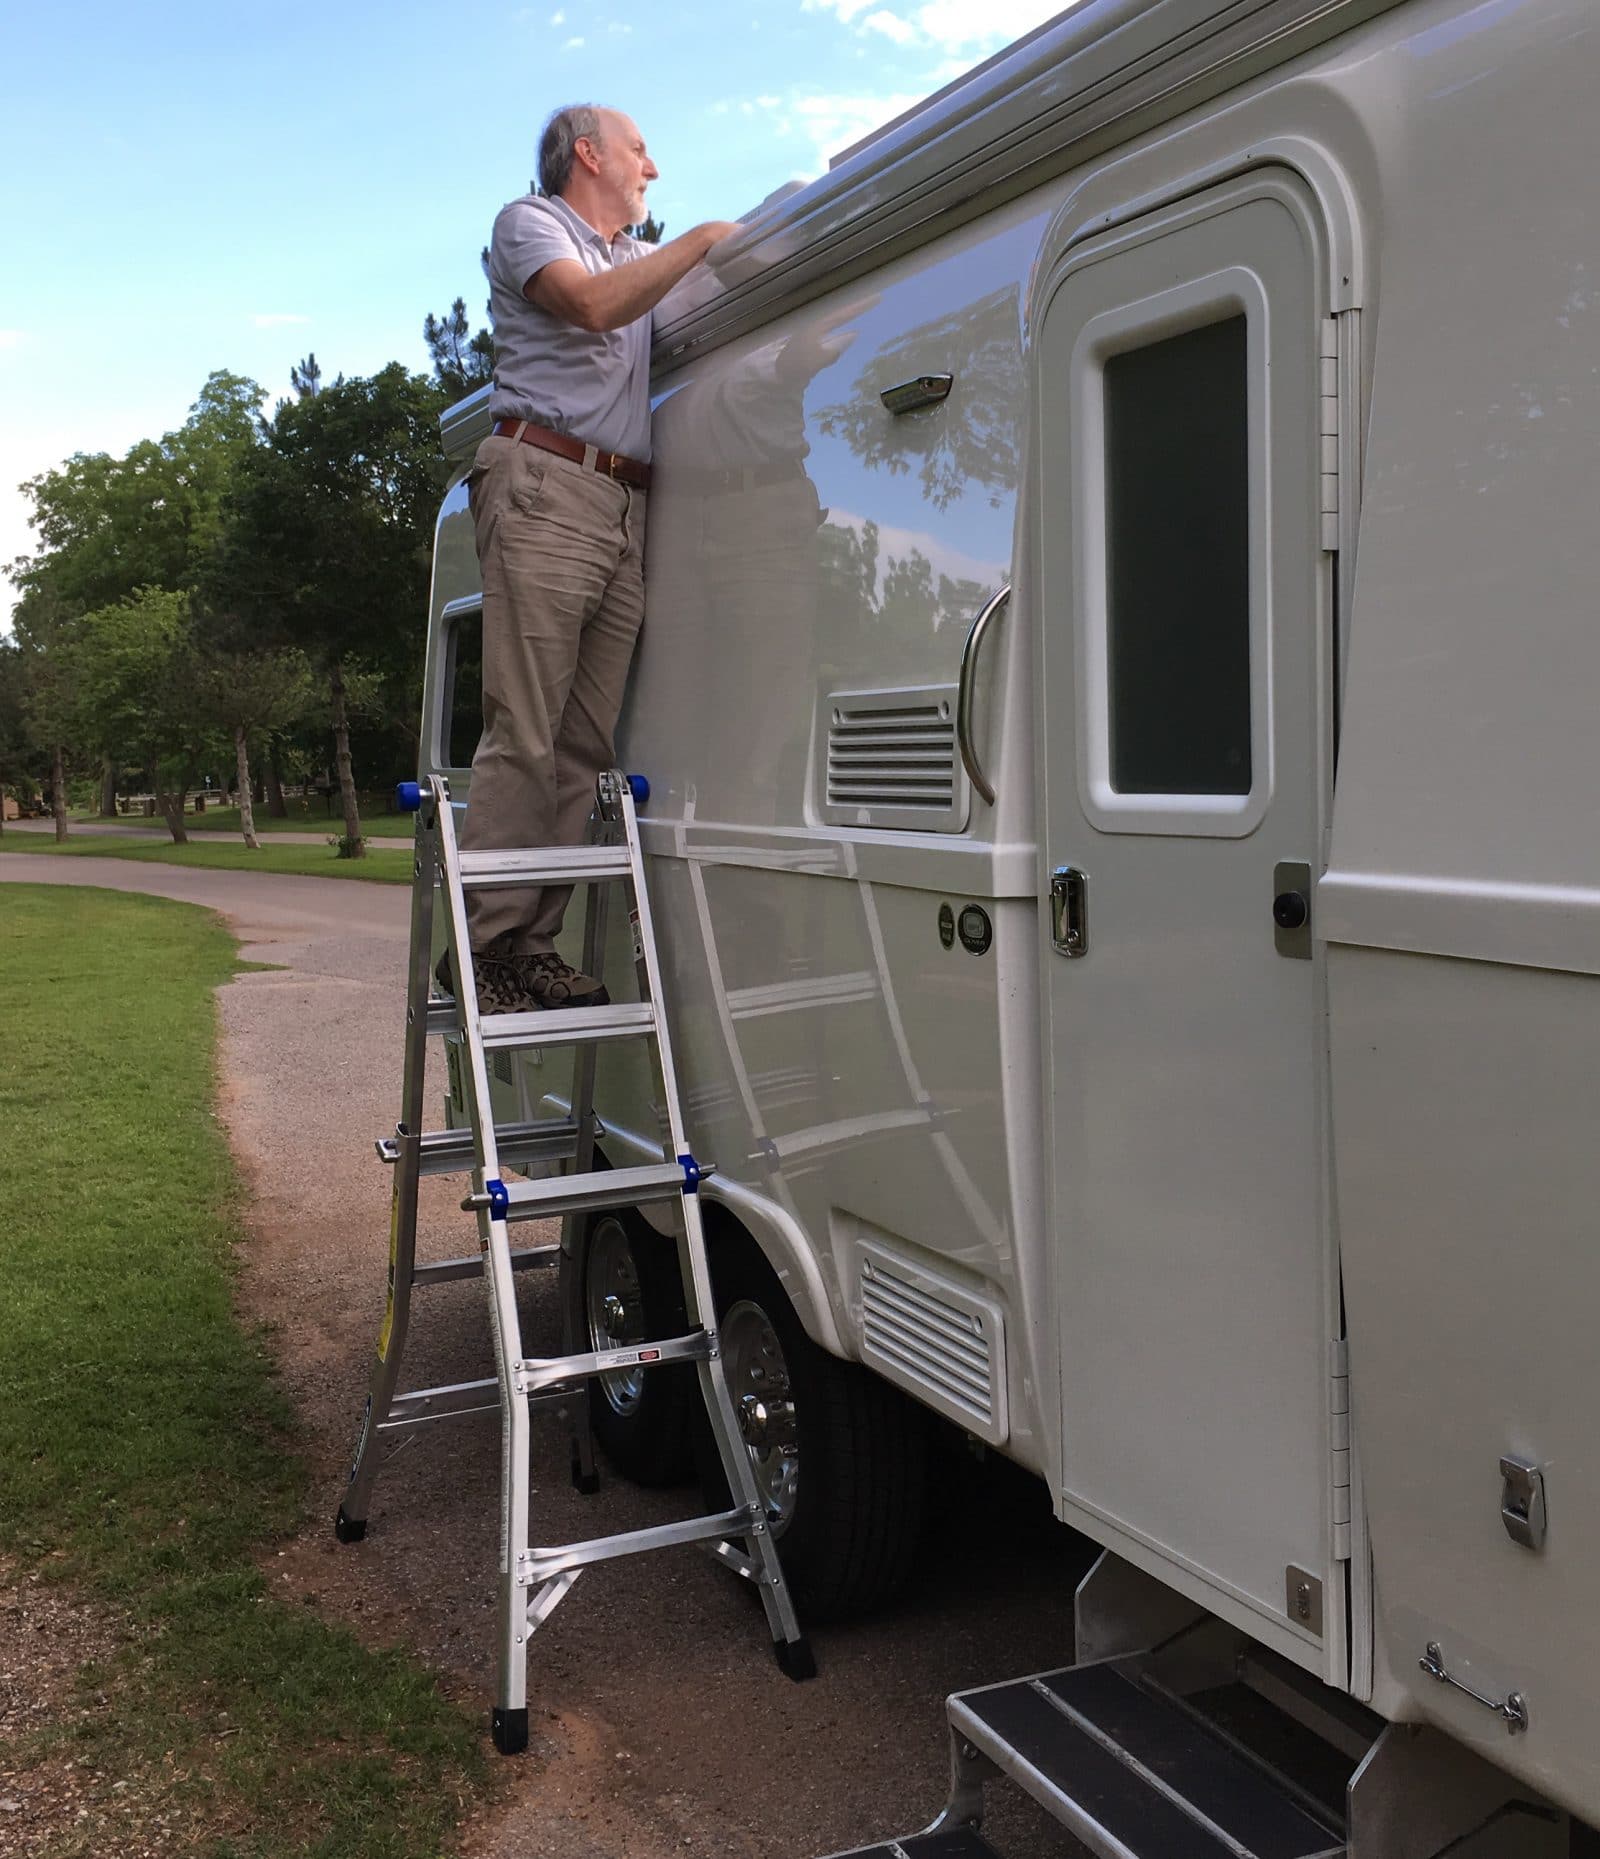
Yes, always ALWAYS bring at least a slim fold up RV ladder if you don't have room for something bigger and sturdier. Every trip. You never know when you might have to fix something or clear a stuck branch. It is not polite to go borrowing ladders..... IMHO. BTW, all the lock washers and flat washers were in place, the knobs just were not tight enough. John Davies Spokane WA
-
Your opinion on this storage option
John E Davies replied to Bshaffer's topic in Ollie Modifications
First of all, it is 8 feet wide and the Ollies are 7 feet wide, so..... this one won't work. A narrower one might possibly. Your stuff inside the drawers would get really trashed if you towed in inclement weather or on unpaved roads. The "sturdy steel frame" will rust quickly due to road debris and rock strikes, and it will be a seriously horrible PITA to keep it nice. If you want extra space consider the rear cargo platform that is an unlisted option. It is engineered for your trailer and is made of the same high quality aluminum. Or add a cargo pod of some sort on your tow vehicle's roof. Did that help? John Davies Spokane WA -
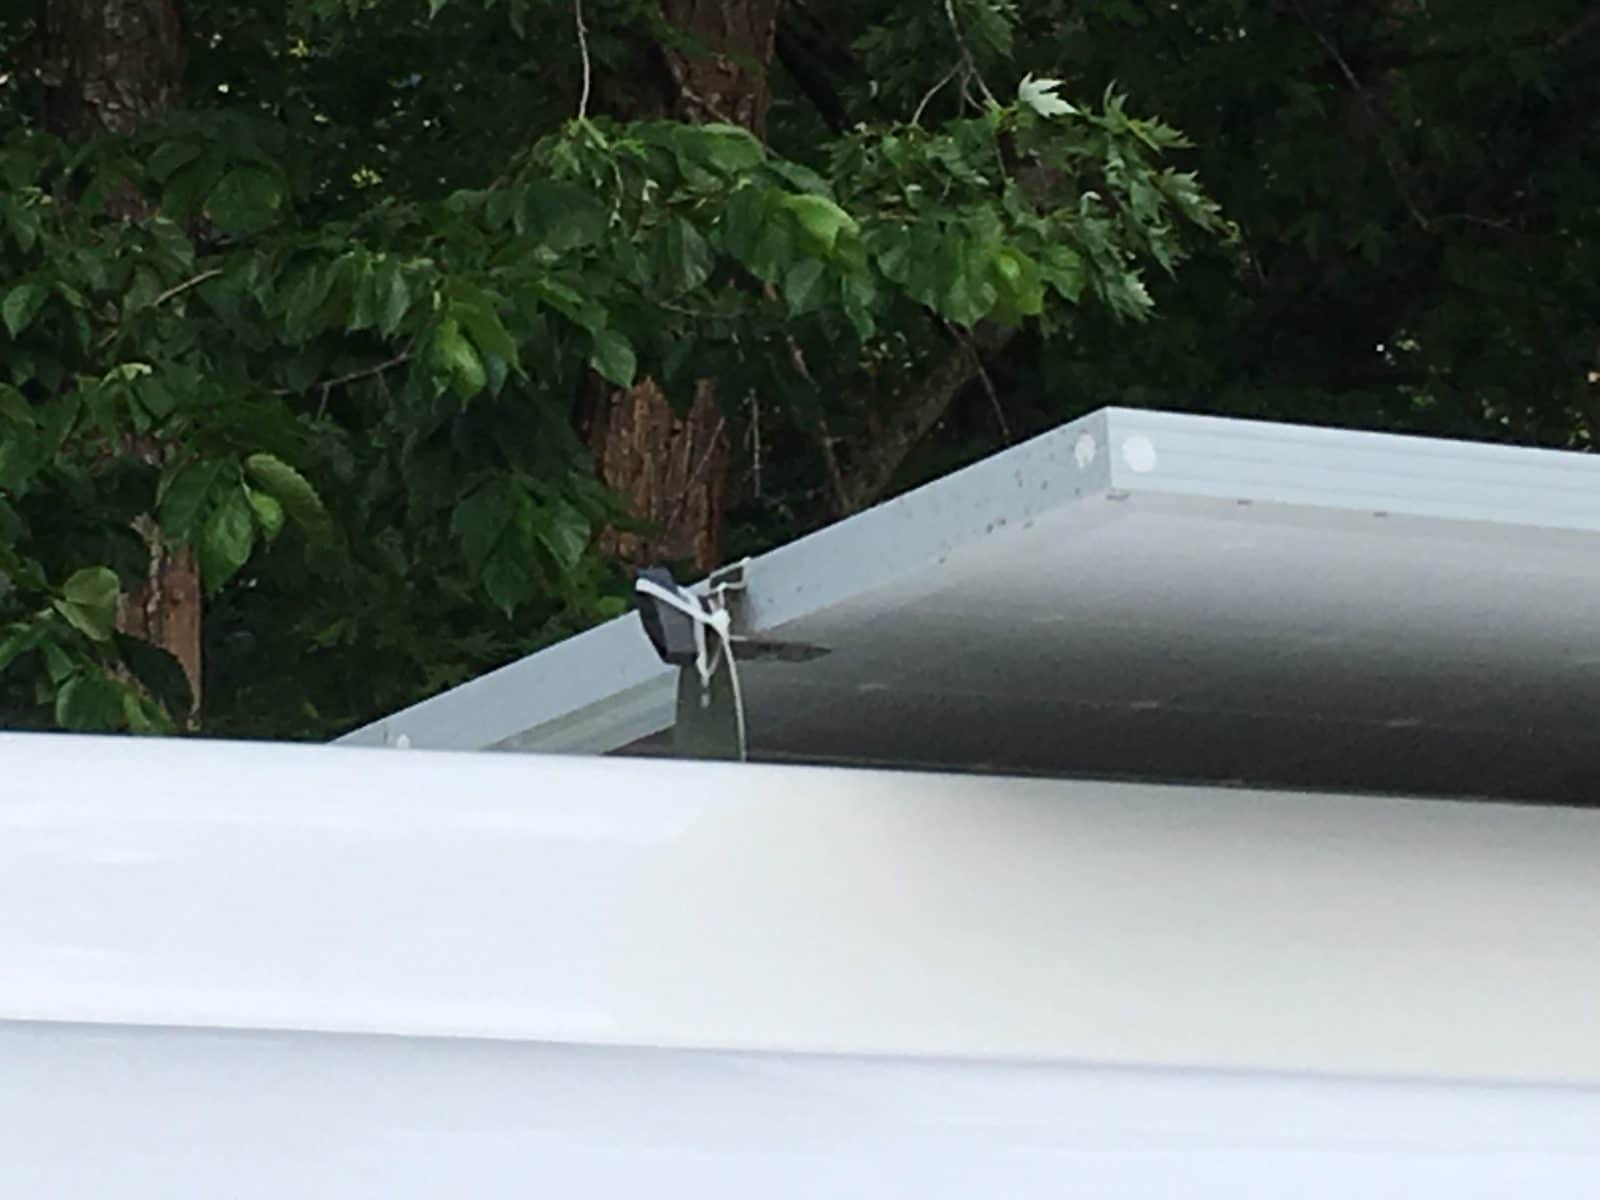
Here's a pic from the ground, showing a tie: John Davies Spokane WA
-
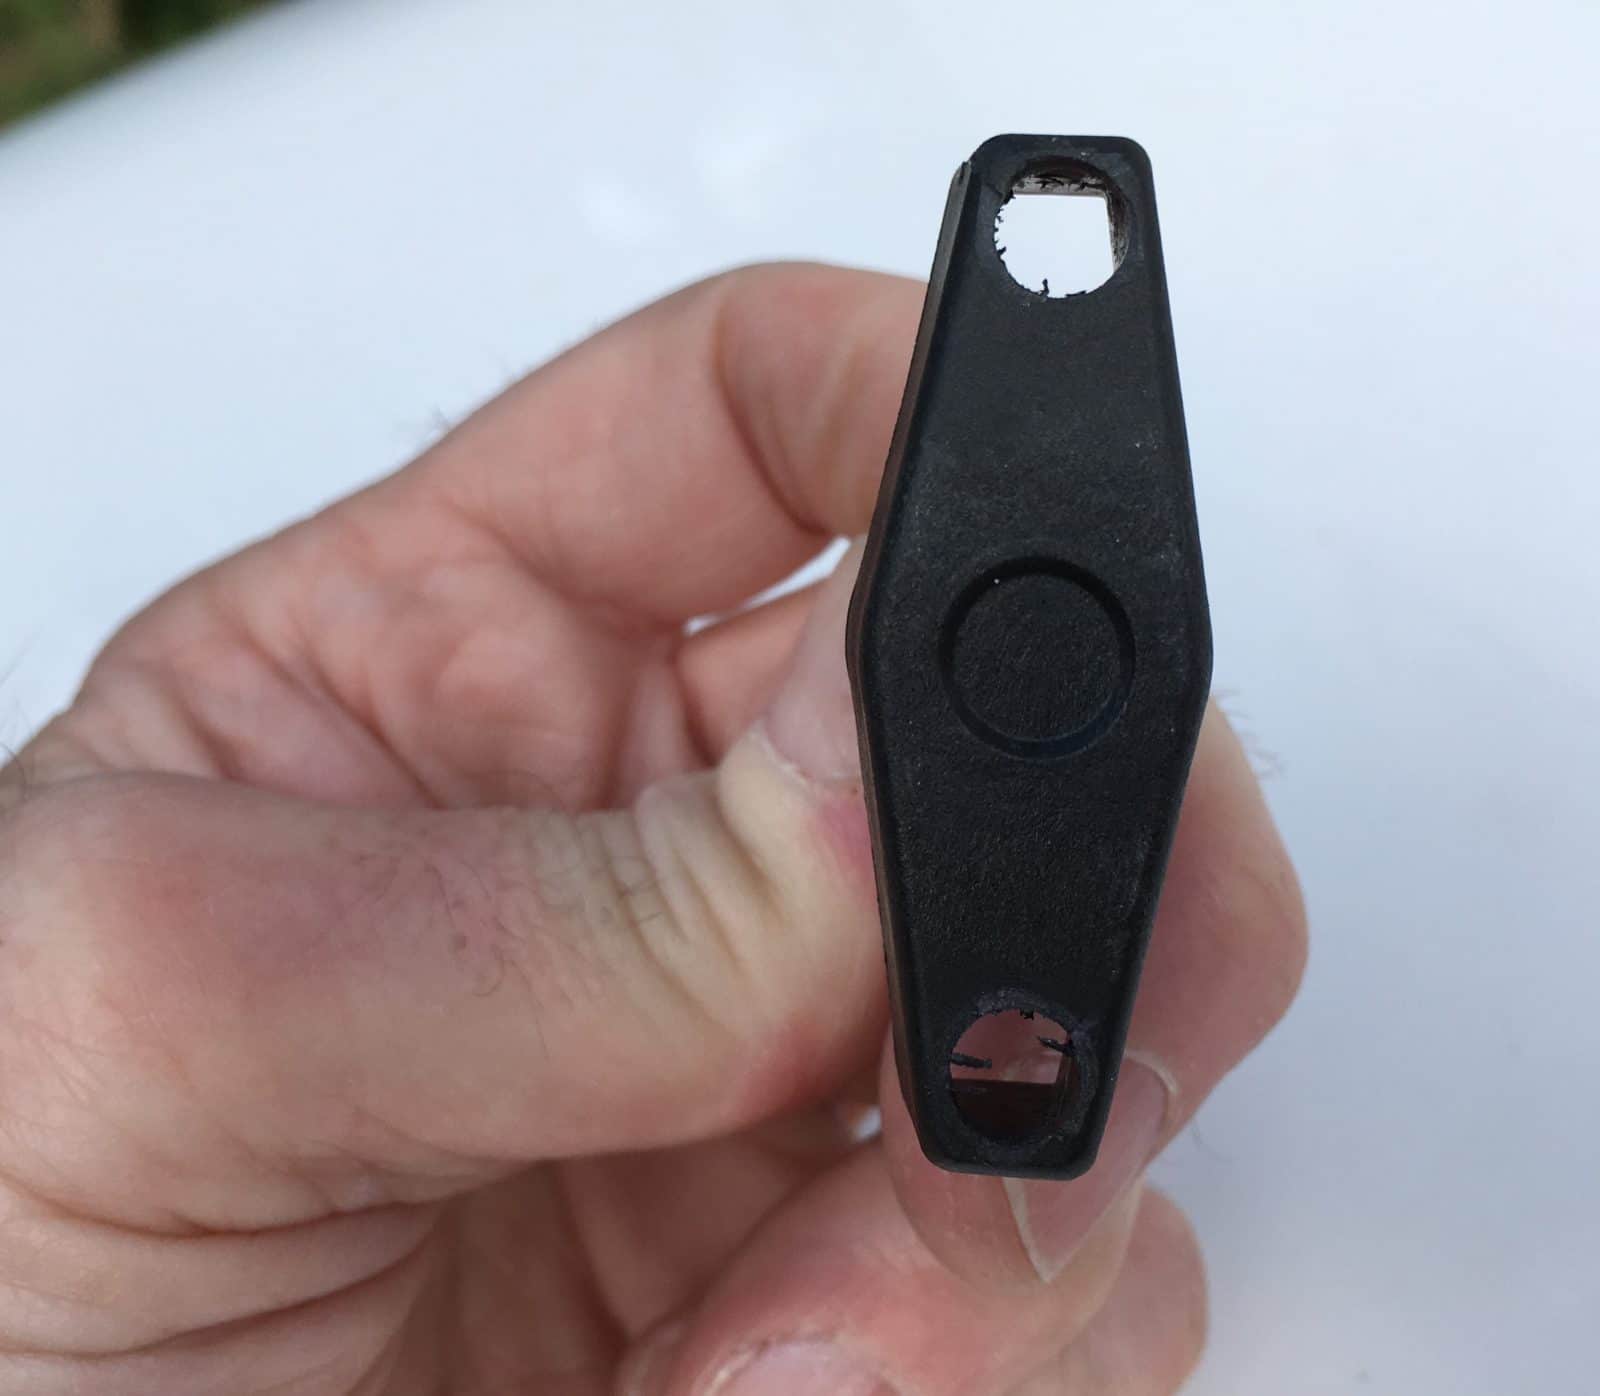
Three days after we took delivery of Mouse, I climbed up my ladder for a check of the roof. Everything looked fine, except for the solar panels. Three knobs were slightly loose, perhaps a 1/16th of a turn. One was a full half turn loose. This is dangerous since a loose or lost knob could wreck the panel and possibly the vent and AC unit behind it, especially if you are towing into a stiff and gusting headwind. I got out my Dewalt driver drill and modified the knobs so that I could secure them tight. I can't recall the hole size, probably 1/4 inch, big enough for a standard sized nylon wire tie. This is just like safety wiring a bolt using steel wire, but the advantage is that the big white ties are highly visible from the ground, so you can include a visual check of all four as you do your final walk around before leaving. You must route the tie so that all the forces are acting to tighten the knob. I think this should be done at the factory, but in the meantime I strongly recommend that everyone with panels on the roof secure the knobs. A better fix would be to drill out the threaded inserts and install through bolts with self locking nuts, but this would make it very hard to reposition the panels for cleaning the roof underneath.... Here is a question: have you ever checked them? If not, then please do so before your next trip. They may be loose.... Be safe. Here is my Werner convertible ladder in action. It is good to have access to your roof, always. John Davies Spokane WA
- 28 replies
-
- 15
-

-

-
Hey Karen, I for one am not mad at you, I agree 110%. Some folks at Oliver are obviously upset at the public responses here about QC, but they should knuckle down, hire capable workers, train them well, and just fix the darned issues without delaying too long. Not fixing the fresh water problem for a decade is crazy bad PR IMHO. I plan on keeping Mouse indefinitely since there is nothing out there that is better, but I don't like having to fix the factory mistakes and goofs. No way. John Davies Spokane WA
-
Do you mind telling us how you adjust the N2 pressure? Do you carry a small high pressure bottle, and do you think that is safe? Could you use regular 140 psi compressed air from your OBA system through a dryer, and an aviation strut pump? https://bogertaviation.com/products/15x-strut-pump I'm having a really hard time imagining how this adjustment could be done away from your shop..... Thanks. John Davies Spokane WA
-
I hope at the very least they add up-to-date pictures, not ones showing obsolete equipment, and also rename the Twin to Two Bed, since the beds are not actually Twins. They are Bunk sized, but calling it an Elite Bunk would really confuse people. Which I am still pissed off about, BTW. (Note my signature.) John Davies Spokane WA
-
Bill, what were the environmental conditions when you were painting? Hot and dry? Humid?h The fast drying problem may be related to the weather as much as the product itself ....? Thanks, John Davies Spokane WA
-
I'll post some inside pics and info in another thread, it will take a long time to pay back the investment in an RV bay. This was fully insulated, sheetrocked and is 16x43x16 tall .... but it cost $30K. But I got the garage insulated and sheet rocked free as part of the package, so that helps. OTH: Having the Ollie close by and completely out of the weather is priceless.... If you plan to live in the house a long time, not die too early, and continue to own an RV, then go for it! They are becoming extremely popular with older folks who are downsizing as the kids move away. John Davies Spokane WA
-
I will be interested to see your follow up reports. But I have to ask, why not just have it sprayed professionally with permanent white bed liner material? John Davies Spokane WA
-
I have no direct experience, but the Land Cruiser guys really like the SOFT Timbrens, read here. https://forum.ih8mud.com/threads/timbren-front-and-rear-bump-stops.478192/ Good luck. I am hoping I don't need airbags since I love the soft cushy OEM ride of my 2013 LC and don't want to mess it up (or the wonderful rear articulation) ... why are Timbrens so darned expensive? There is about $5 worth of material in a $300 kit! John Davies Spokane WA
-
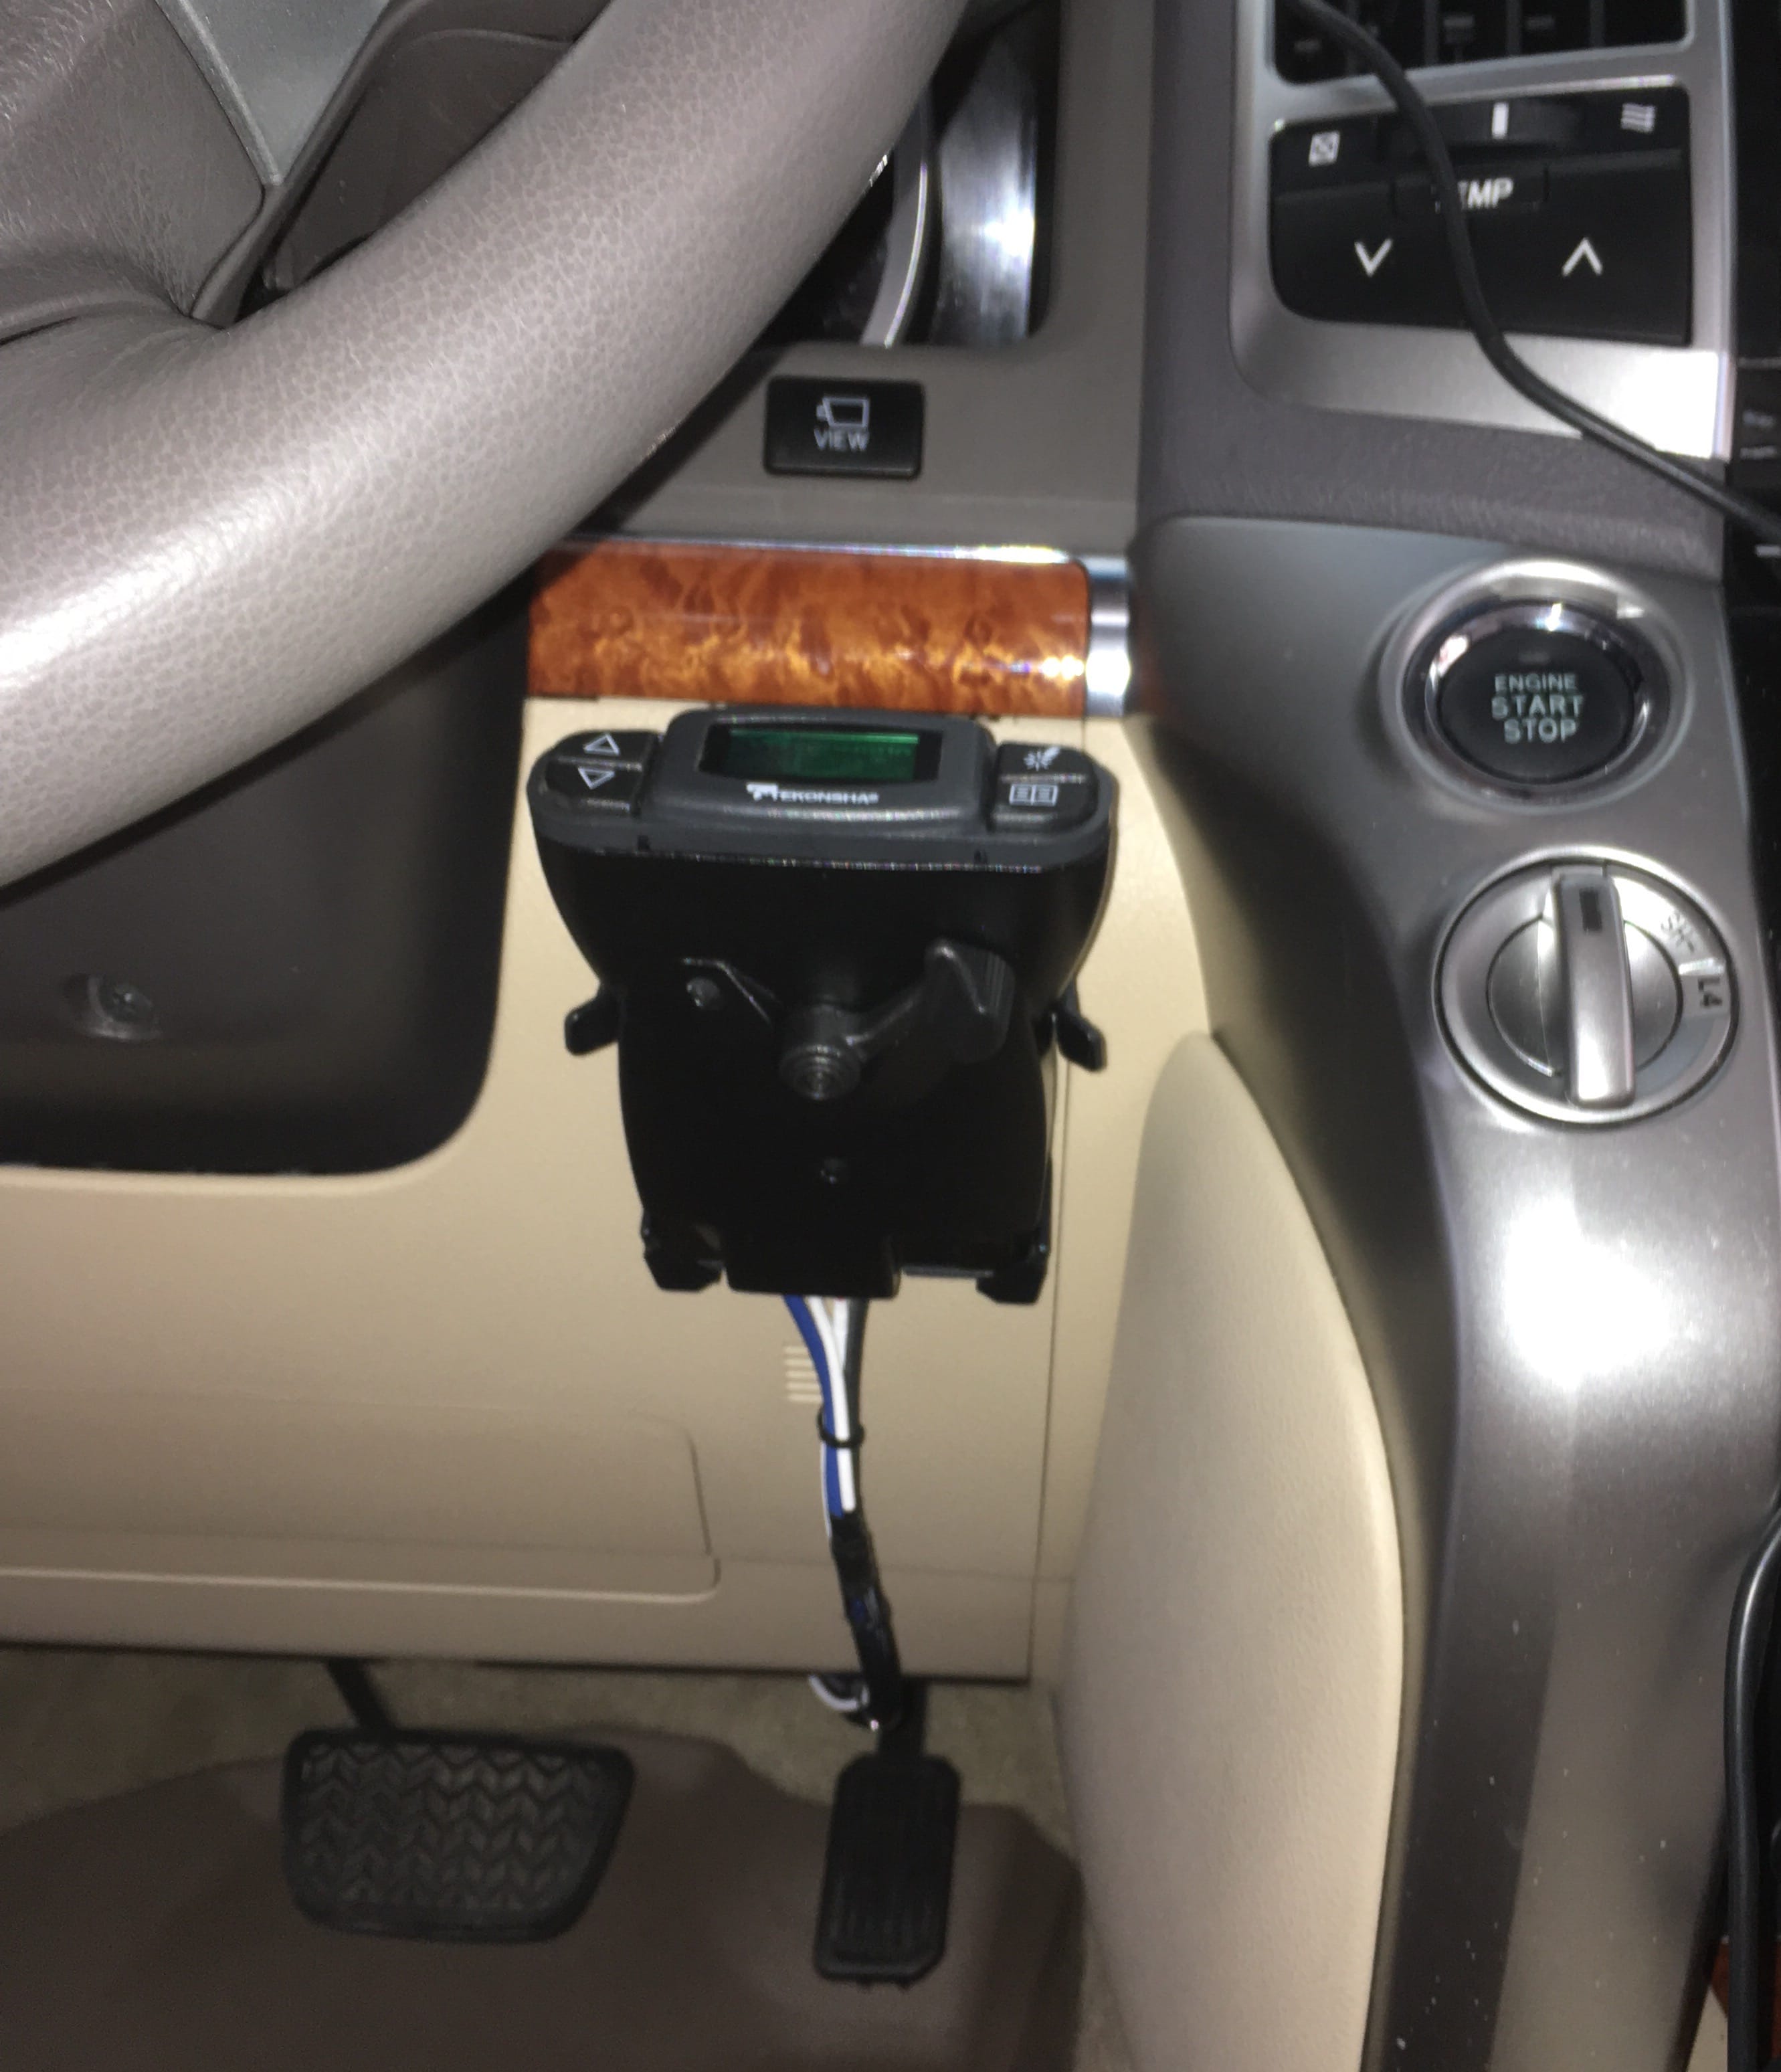
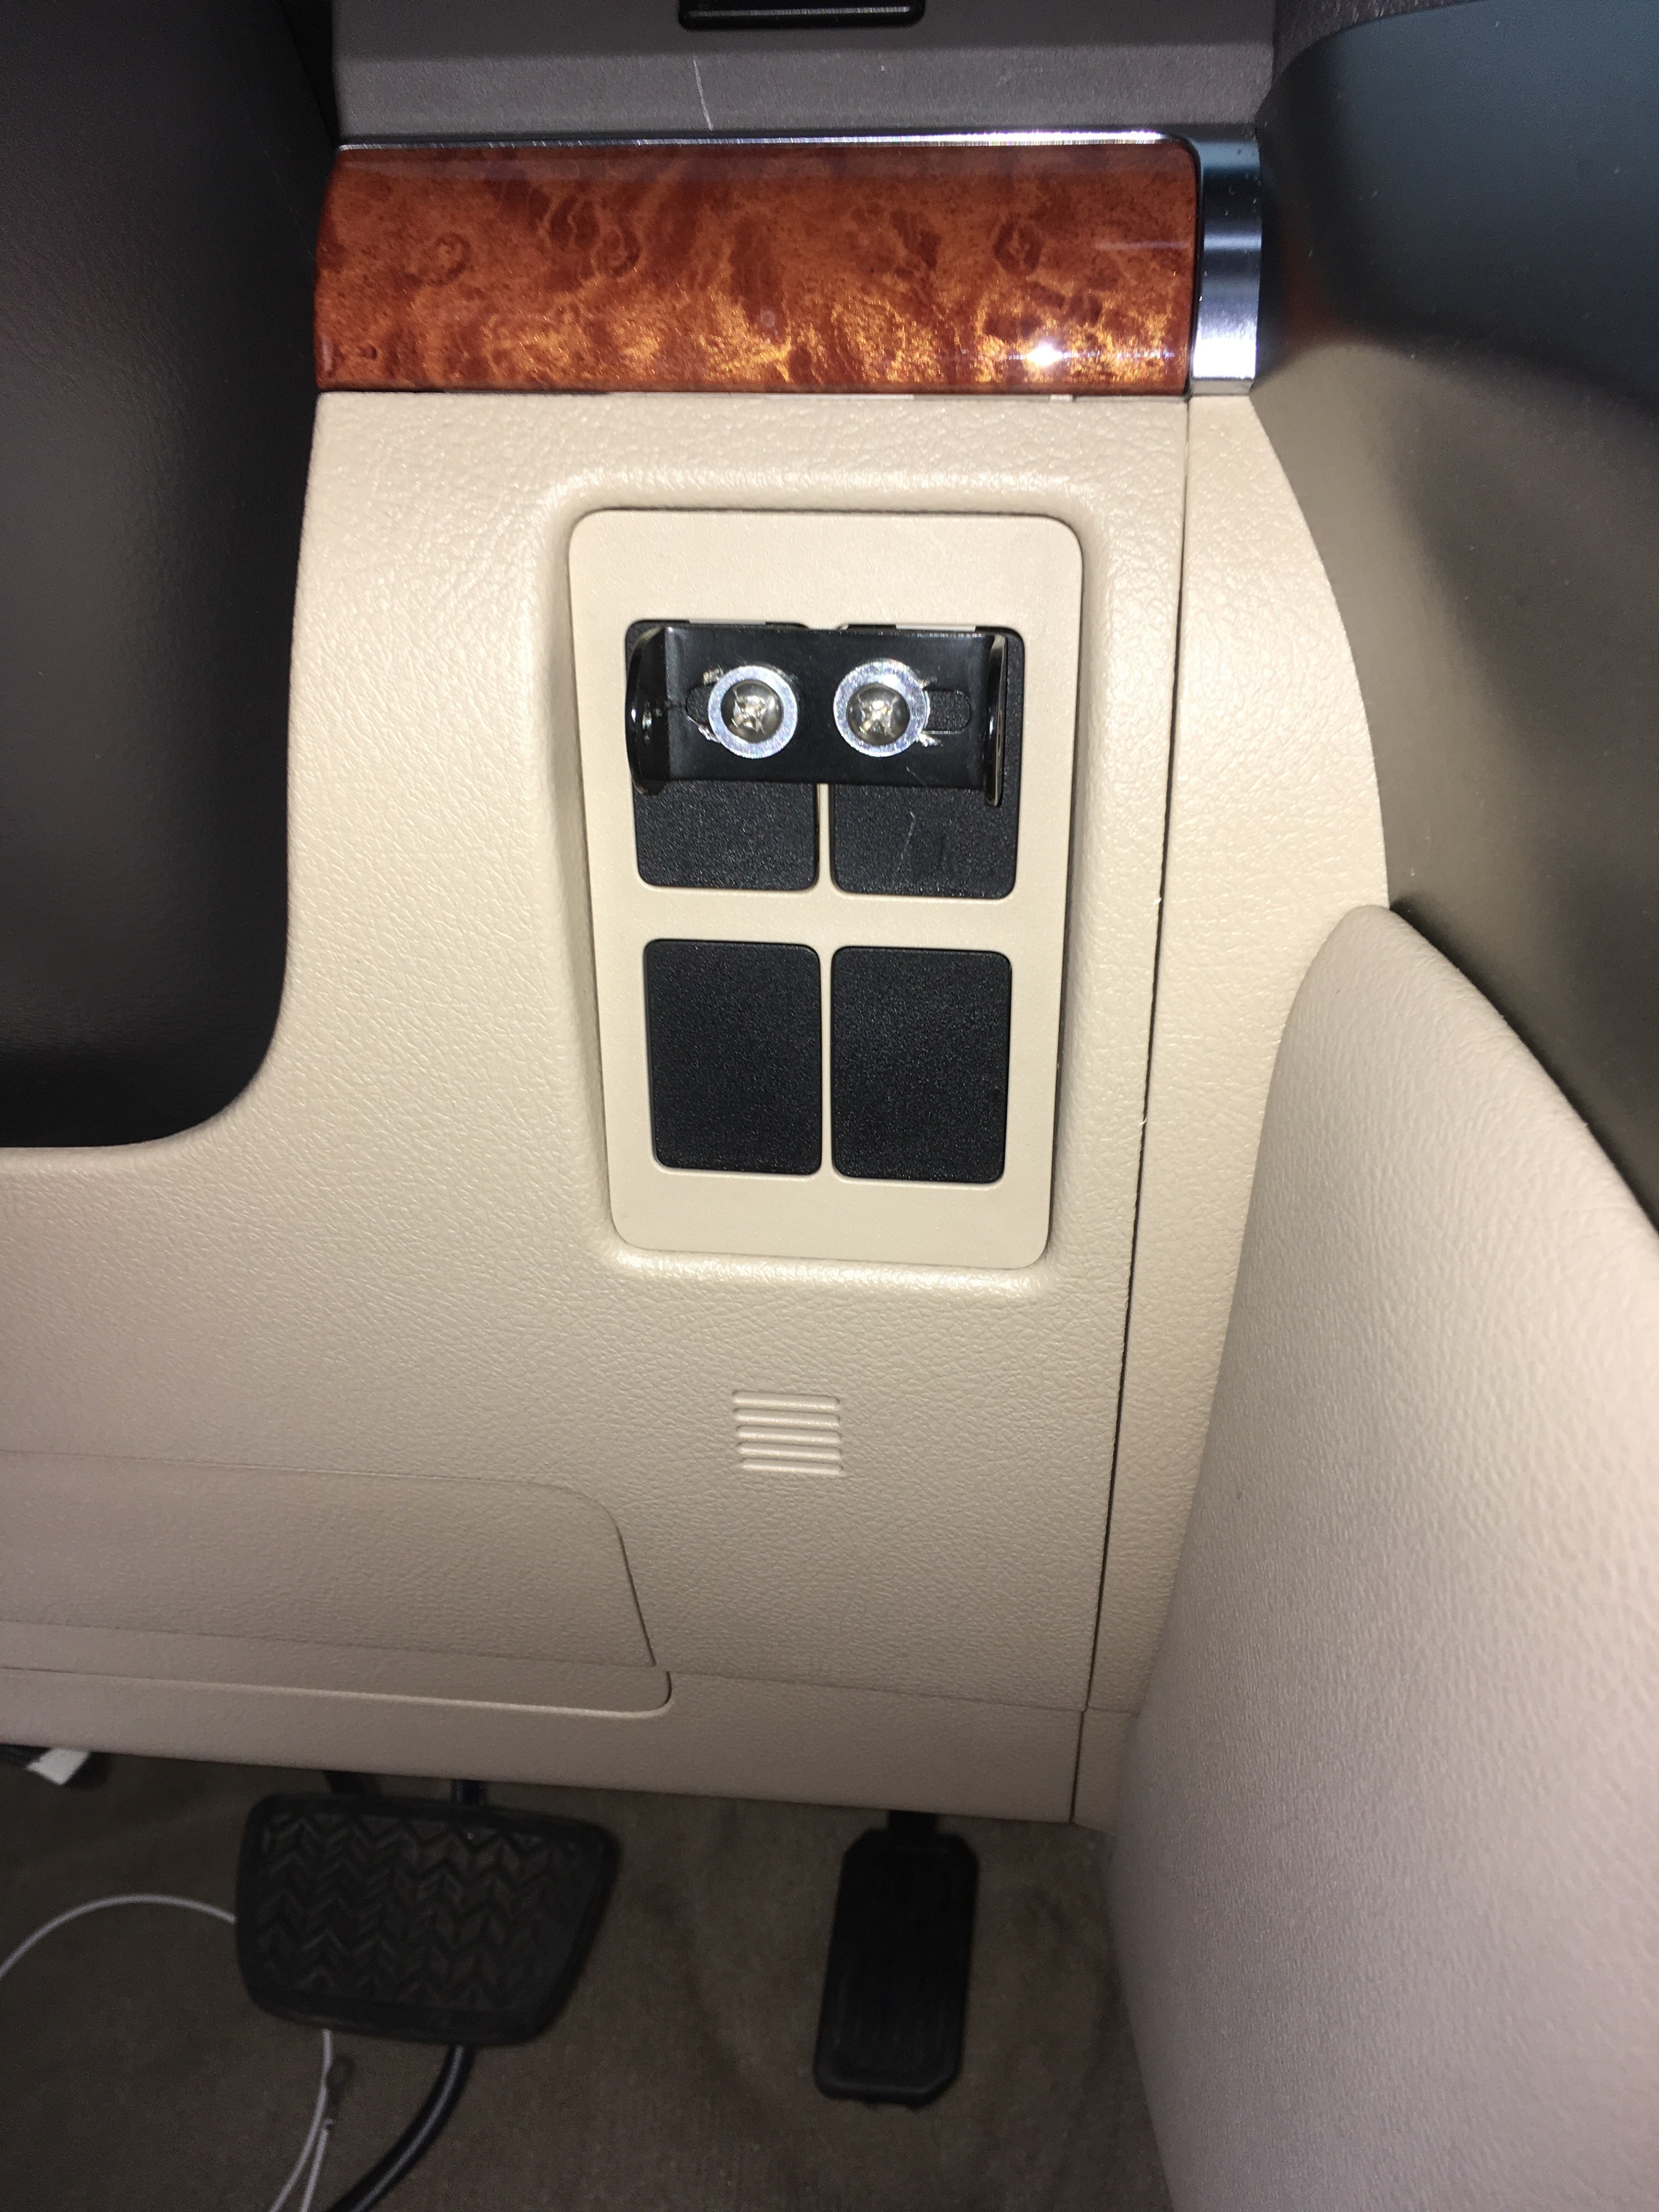
I will put any tow vehicle info and pictures here in this new thread as I get my new 2013 Land Cruiser 200 sorted and adjusted. Today I mounted the Tekonsha P3 from my old Ram onto the dash, below the wiper stalk. It is the best spot that I could find. I popped out the switch panel that has four dummy unused switch plates and mounted my P3 bracket through the top two plates, using 8-32 x 1 inch stainless machine screws with 1/2 inch long nylon spacers and nylock nuts on the back. If I decide to remove the controller, all I have to do is buy two new plates and pop them into place. I used a Tekonsha Toyota wiring adapter and ran the cable out from under the dash to the right of the OBD connector. The unit is blocked by the wheel when steering straight ahead but is easily seen if the wheel is turned a few degrees, and it is super easy to reach the buttons and, most importantly, the Emergency Lever. I tow tested the Ollie for about 30 minutes and it is definitely in need of an Anderson hitch, which I ordered today. It tows well on smooth roads but the butt end of the truck pogos badly over large undulations and dips. It never felt out of control, but the steering feels light and it definitely does not feel settled and comfortable. Here is Mouse hooked up the the Cruiser, butt low in my driveway, in front of the RV bay, AKA "The Hanger Deck". Tongue weighs 575 pounds with one gas can full and the other three empty, using my nifty new hydraulic tongue weight scale. The truck settled almost 2.5 inches under the dead weight. More to come, my hitch arrives in three days. John Davies Spokane WA