
Raspy
-
Posts
666 -
Joined
-
Last visited
-
Days Won
45
Everything posted by Raspy
-
The setting for filling the tank while boondocking means the pump will suck water from an outside container to fill the tank. Then, the same pump is used to suck water from the tank to pressurize the system. The city water fitting allows city pressure to come in and feed the faucets with no pump involved. Glad you got it fixed. Time to get back to having fun.
-
Ours had no logo when we got it. The previous owner said the original "came off". So I added our "howling at the moon" logo. It's about 12" in diameter. We also have it in about 5" on the back window of the camper shell and near the entry door.

-
If you open the kitchen faucet do you get water flow? Lots of air with it? Or just air? If so, run the faucet, both hot and cold until no air and just water. Do the same in the bath. Do the hot first, and than the cold. It can be very slow to come up to pressure if the water heater and lines are full of air. It's unlikely, but there may be debris in the filter at the pump. Some is OK, but clogged would stop the flow. It sounds like you mean the pump is pumping water out the overflow and I can't see how that can happen.
-
I'd say you are right at the limit with 15 amp and the air conditioner. That and the battery charger, plus a few small loads will push you over the top, but if that happens, the breaker in the house will trip. Just don't try to run the microwave too. Congrats on your new Ollie. We use ours at home sometimes too. Movie nights, etc.
-
It does stop water from sloshing back up into the shower. I've left ours open before while traveling and had a very dirty shower floor when we stopped. The water will slosh up into the shower, through the open drain fitting, when braking, and then drain back out when stopped, leaving junk behind. It's best to remember to close it before traveling. Our, just needs to be stepped on and it toggles from staying open, to staying closed.
-
Scuba, I know very well how the body sits on and is mounted to the frame. I've carefully looked at that joint on mine and at the factory. That's not what I'm talking about. There is a lot of flex in the body outside of the frame/body joint. This can be observed easily, as I described, by observing the frame/body relationship back by the tires, as someone steps into or out or the trailer, or rocks the trailer. Next time you are set up, look for this on your trailer. At the last rally, a group of us Ollie owners were in camp discussing this and wondering about it. This area seems to have a lot more movement than simple frame flexing. In fact, back by the tires, the jacks are so close, that there is no frame flexing. That's why I said I'd like to look further at this area at the factory. Not how the frame attaches, but how the structure is made outside the frame and how the inner shell is supported in that area. The inner shell has the floor and that load is transferred to the outer shell which transfers the load to the frame. There is no direct and short path from the frame to the floor. This path is where the flex is occurring.
-
I think you guys are missing where the movement is actually coming from. Additional jacks under the frame will not cure it. First thing to do is get set up at at camp with your jacks down and the trailer leveled, in the normal way, with the Oliver jacks. Now, sit down and look at the body and how it moves compared to one of the tires, while someone steps into and out of the trailer. Compare the movement you see to the frame in the same area, near the tire. You'll begin to see that the movement is in the body and not in the frame. That's right, the body is flexing outboard of the frame. So stabilizing the frame means nothing. Several of us have noticed this, and I have been planning to tour Oliver again to see how this area of the body is made, such that it can flex outboard of the frame and not fatigue over time. Bottom line: Stabilizing the frame will do next to nothing to correct this movement. Look more carefully at where the movement is and you'll see what I mean.
-
John, I do like the PW. And I'm uneasy about giving up the abilities of my 3500 as far as towing and cargo capacity are concerned. I also have a Rubicon for serious off road work and I'm planning on lots of trips towing Ollie, so mileage is important. If I'm understanding it right, the PW is only available in the crew cab and I want the quad. Not a huge difference, but they just get longer and longer, to the point of being useless in parking lots and off road. I've always been a standard cab guy, but now it's getting a bit crowded in there with all the stuff and the dog. I'm not as hard core as I once was either and having a nice truck to travel in seems appealing. It's also a stretch to give up on Cummins, but the complexity of the new ones is not for me. I had a water pump bearing go out on a trip last year and it threw off the belt too. I could not fix it because of the extremely crowded area in front of the engine. Normally a one hour job took a shop three days. And the belt has over 20 different routings with different options. It took a study on-line to figure it out. My '04 was simple. A belt and a 1/2" drive was all that was needed. And it could be reached easily. I consider the water pump and the belt to be routine maintenance and I might have to change a belt out in the desert somewhere. Not with this truck! One of the first things I did while looking at new trucks, was water pump access. The Hemi looks easy. The Ecodiesel is not for me either. I do not like overhead cam V6 engines and the complicated emissions stuff is out of the question. Too bad Ram missed out on the 5.0 Cummins Diesel, but that is water under the bridge. Decisions, decisions.
-
Bill, Good post and good testing. I agree. If a WDH is required by the manufacturer, or just to reduce sag, use one. And since the Anderson works well with the Oliver, that is the right one to use. I don't have a Ram 1500 (yet), so I can't check the manual, but I wonder if Ram requires one as Ford does with the F150? Trainman, Does your manual say anything about a WDH? And thanks for your report too! It makes me more confident about going from a 3500 to a 1500. Also, I don't remember if we discussed this, but Air-Ride makes some nice bags that go inside the rear coils. They come in two strengths.
-
John, Yes, that Power Wagon is an awesome truck. The main reason I don't want one is the 6.4 heavy duty gas engine. It's an extreme gas hog in my estimation and I think it would be hard to live with. The Rebel is bad enough in that regard. But the Power wagon is cool. I've been a fan of all of them since I was a kid and have had two of earlier generations. The new ones are great, except for the mileage. Do you have any experience with them that would give a real world sense of the gas mileage? I'd be expecting maybe 8 towing Ollie, maybe worse.
-
Yeah, I get that. What I mean specifically is the "sway" control. Not the "weight distributing hitch". If Ford says they require a WDH, I'm assuming that is what they mean and I would not advise otherwise. If they said they require a sway control, I would assume that was what they meant. Those two functions may come together, in varying degrees, with different hitches, but they are not the same thing. I was referring to sway control when I said it was being purchased out of fear, and not from actual experience. When Oliver offers, at an additional cost, a sway control device to someone who has no towing experience, and that part is implied to, or said to compensate for a known problem, or to be for safety, or to compensate for something else being wrong, the purchaser is put in an interesting position. Buy the extra part to compensate for an unknown problem, or take a chance. How often is Oliver asked what the problem really is? Do they know of stability problems they are not telling us about? I think Oliver is just selling a WDH hitch, for tow vehicles that need one, that works well with the Oliver tongue and front shroud design. And since it also offers some sway control, fine. But that doesn't mean everyone needs sway control. Eventually, so many people have WDHs that the conversation devolves into, "you need sway control!" and people start feeling they are unsafe without it, or that sway control is the same thing as weight distribution. It's simpler to buy it, than test to see if you need it. If everybody has it, it must be necessary, or so the logic goes. I can say with certainty it is not necessary in every case, and that it can interfere with the factory stability system, but I cannot say it's not ever needed, nor would I try to. On this forum, there has been talk about the Ford stability control system and how the sway control in the Anderson Hitch interferes with it. The question was asked what to do, how to deal with that, and Anderson's reply was: "shut off" the Ford Stability Control system! That is where I went off and scolded them for telling people to shut off a factory included safety system. If you want to talk about liability problems and potential personal injuries, that might be a good place to start. Just don't confuse sway control with weight distribution, or tell people they need to buy an Anderson Hitch just to get sway control.
-
I have a Ram 3500 Diesel that is an amazing towing beast. I already had it when we got the Oliver. But it really is more than needed and the ride is very stiff on all but smooth highways. The power is amazing and I routinely pass effortlessly on grades. The engine brake is another extremely nice feature. This significantly reduces brake use and there is never a time we don't have enough brakes. On long downgrades I never touch the brakes. This truck also gets better mileage than the Hemi. But having said all that, I'm considering a new truck, partly because mine is a standard cab and partly because we go off road a lot. For me, the new Ram Rebel is a wonderful choice. The 5.7 Hemi is a very well proven engine and it has an 8 speed auto. More and more transmission speeds, at some point, becomes a mere sales tool and has no meaning. Most modern engines are tuned with variable valve timing that widens out their power band and increases mileage. More gears doesn't mean better mileage. The new 2019 and 2020 Rams have and will have an amazing interior. I always seem to have a cab high shell on my trucks, which means I can't get the Rambox option. The air suspension seems like the perfect solution for towing, as it will self adjust to re-level the truck when hooked up, but they are having some reliability issues, especially in cold weather, so I've decided to not get that either. Simple airbags that fit inside the coil springs work well too. E-torque is another option that is expensive and is mainly useful for city, stop and go traffic. It's being hyped as more than that, and it has other small benefits, but I won't order it. We don't commute in traffic where it can help the most and all other benefits are too small to be worth the price for me. Finally, so many have said the Anderson hitch is "necessary", especially with a 1500 or smaller truck. I would like to see any actual test results or talk to someone who has had a problem while not using one. I have one and have never installed it. The Oliver is rock solid all the time. Remember, the Anderson is a weight distributing hitch that also has sway control. It is sold by Oliver and works well with the Oliver tongue design. It can help with tongue weight if needed, but I question if it's needed for sway. If not, and not needed for weight distributing either, I would definitely not buy it. And I certainly would not buy it out of fear that the trailer was unstable. It seems to be an expensive insurance plan purchased out of fear, rather than proven need, in many cases. If I get a new 1500, I will continue to not use it unless I begin to have a problem that I doubt will ever happen. And remember, I have one sitting in the garage waiting to go. It sounds like the F-150 Ecoboost trucks are very nice too. But there still seems to be some wariness with a small aluminum turbocharged engine pulling so hard all the time. Can't say that is a problem as long as everything is just right. The advertised mileage does not hold up when towing and seems to be closer to other trucks in that situation. I'm also not sure about the aluminum bodies. They are lighter, but much more expensive to fix. 100,000 miles comes up pretty fast when traveling a lot. I always like to think I can keep a good truck way beyond that. The last Cummins I had, I kept for nearly 300,000 miles and it still ran perfectly and used no oil. The transmission and other things were becoming annoying at that stage and so I sold it. All of those issues have been addressed in the new trucks, but even the Cummins is becoming harder to service. The new diesel emissions systems are over the top complicated on any of the new trucks and the diesel option is expensive. The price of diesel is also a bit higher than regular grade gas to, but close to mid grade that will probably be used in gas engines while towing. Gas engine emission systems have been pretty much perfected and simplified. My next truck will have a gas engine, even though I really like diesels and have had a number of them. As far as I'm concerned, their cost, maintenance hassle and potential for emission system failures has pushed them out of the "practical" range. My option list for a new Ram is sitting here and being refined almost daily. The deal I've already been offered is dealer cost minus the holdback, plus a couple of minor charges. Which translates to dealer invoice minus about $2,400, or about $6-7,000. off window sticker. There are some rebates that come and go too. When buying, NEVER just walk in and start talking to a salesman! That means you start at the highest price and work slowly down, and it means they get a commission. Eliminate all of that hassle up front. Big mistake. Go directly to the Fleet Manager or the owner FIRST. Ask them what the current pricing is on (the brand you want). Not the specific vehicle price of one in the showroom, the pricing strategy, such as dealer invoice minus X, for instance. Then start dealing with them if you wish.
-
Sherry, The microwave is screwed to the rear of the cabinet. The rear of the microwave is a single layer of thin steel, so I just drilled three holes back there and ran three screws into the wood wall from inside the oven box. The surround is a plywood box as built from Oliver, except it was rough cut and unfinished. Side to side I shimmed the microwave up to press into place between the pipes and the right side wall. So, it is pressed in and screwed in place. The (3) vertical stacked, wine rack tubes are 4" ABS and the (5) lower tubes are 3" ABS. They fit perfectly with zero play. A few #6 flathead stainless screws into the side wall and floor convinced them to stay there. I slightly modified the rear cord minder on the micro and set it on a 1/4" piece of plywood so the tubes supported its feet. It's set up high in the box so that it's door clears the drop down door with enough clearance to pass over a plate that is ready to go in. The rough cabinet, as it came from Oliver, was not designed to be seen, or support a piano hinge and latch, so it took some work to clean it up, tie the fiberglass to the plywood edges and cosmetically fix the rough cuts. The catch Oliver uses on the closet and pantry doors is a very nice piece and I was able to get them to send me one. But I had to make the strike plate and the arm that swings up to catch it, as well as make a few other little adjustments to it. Inside there is no extra room. The catch clears the micro by 1/8" and the micro door clears the strike plate by about a 1/16". The chains fall into spaces on each side of the drop down door that trap them to prevent swinging around underway. The latch mechanism is contained inside a hollow cavity in the door that allow it to be taken apart, but not seen. The door is stiffened up with strips of 3/4" X 4" oak and everything is varnished to prevent warping from moisture. Everything went in and fit around everything else, but it is tight. Also, the new microwave is a 700 watt model (vs about 1,000 for the original), to run easily on a small generator or small inverter. It's great not having the kitchen knives, spatulas, tongs and barbeque lighter in the kitchen drawers. Plus three wine bottles are handy and lying down, instead of trying to contain them in the closet, or something. Since they are in close fitting ABS tubes, they can never break. Even the extra keys have found a place where they can't escape.
-

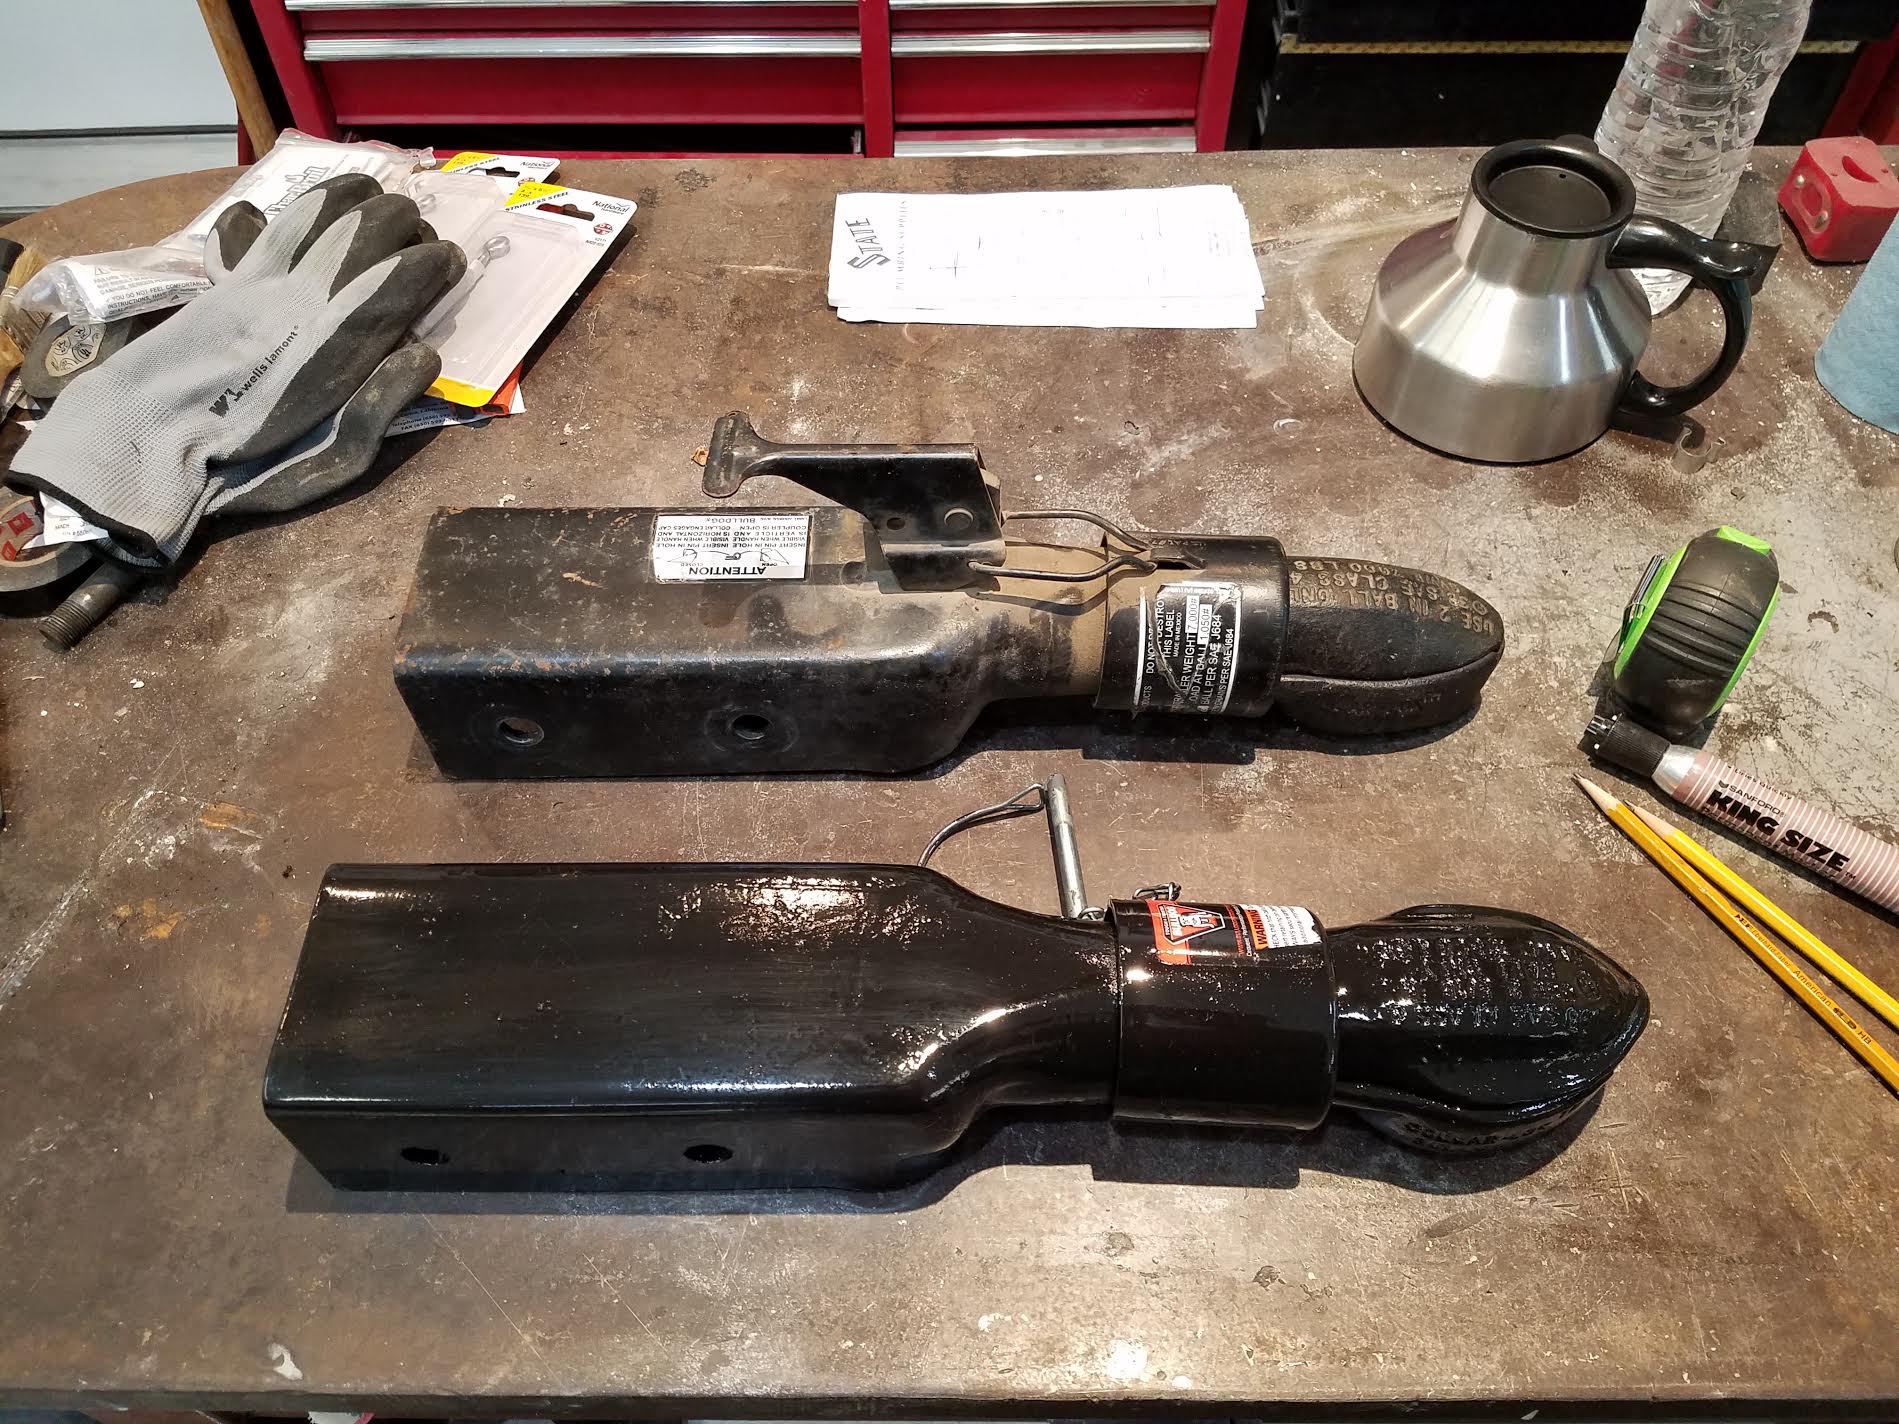
Changing Bulldog Coupler and Ball Size to 2-5/16"
Raspy replied to Spike's topic in Towing an Oliver
John, I switched mine early last year and it went fine. The new 2 5/16 coupler is not much stronger, but the ball certainly is. I just bought the part and transferred the hole locations over to it from the old one. Be careful that you use the right grage 8 bolts, you can use the old one, but I had to add a washer to each because the nuts had run out of threads before pinching the coupler onto the tongue. This meant the bolts were able to move around and it had started to elongate the holes a bit. The trick is to use bolts that support the load in their unthreaded area, but have enough thread to tighten correctly. This means you'll need ones that are about an inch too long and cut them off. A couple of washers allows you to get just the right length of unthreaded area in the coupler. There isn't enough room in the new piece to change it's overall length much and the farther out you go the weaker the design. The new piece uses a different catch and the lever is gone. Good! I kept tripping on that thing.
-
KWRJRPE, Pictures! We need pictures! (As if you had nothing better to do, it's all about me!)
-
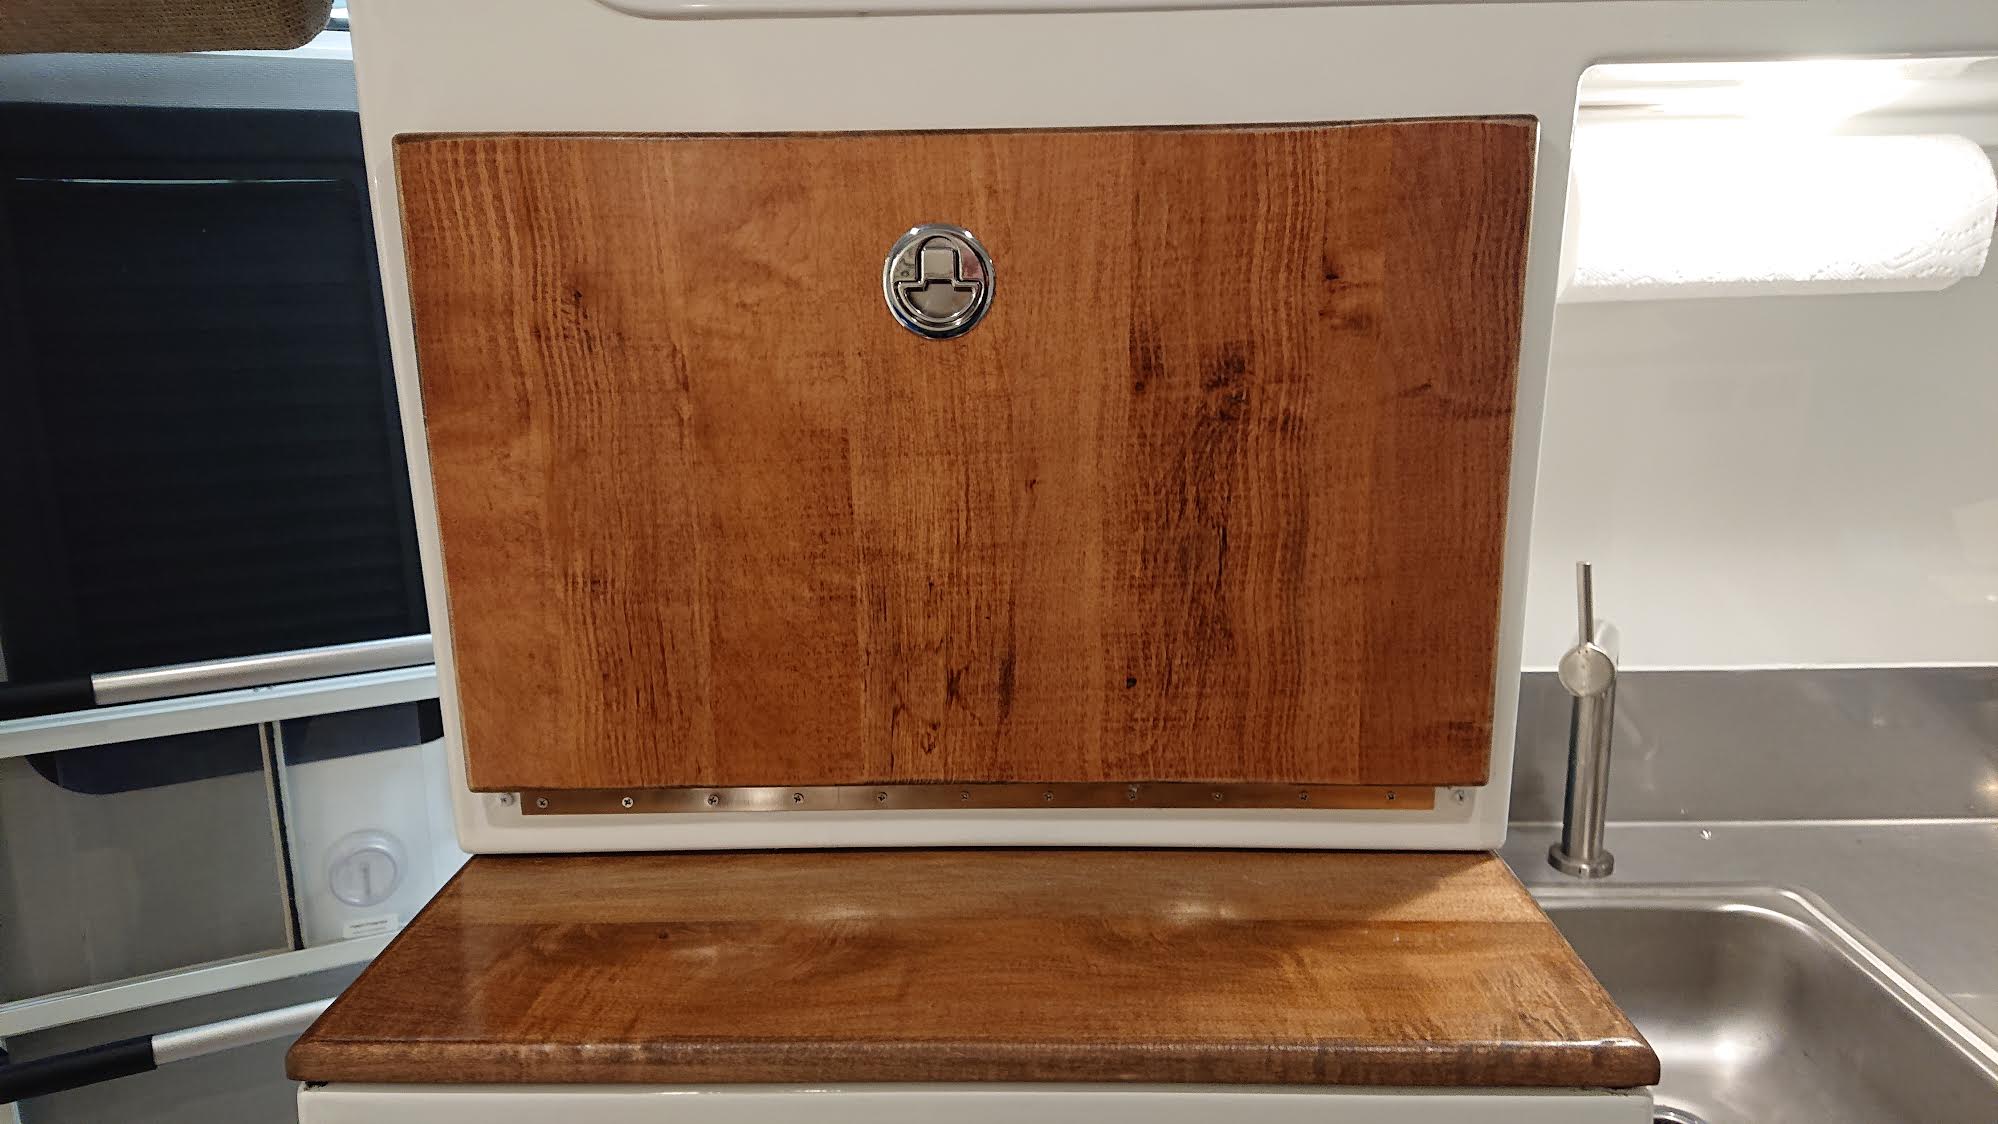
The latest modification is to the microwave cabinet. Our microwave tried to "escape" twice from it's cabinet and broke itself in the process. I decided I could do better and get more use from that area. So I installed a smaller one, that will still accept a full dinner plate, and I was able to fit in a wine rack, utensil storage tubes for the kitchen knives and things, and a couple of key hooks. We also gained a work surface which becomes extra counter space for preparing food or for a dish drainer. The latch was modified from a pantry latch and will not open while traveling. When closed we have a nice piece of furniture to look at that matches the rest of the tops we have, instead of looking at the old microwave. Since the microwave is now in the cabinet, it's door cannot open, so it is good for storing bread, towels, cereal boxes and things like that. It's very easy to pop open the cabinet, grab the bread, and build a sandwich on the new work surface/door with stuff from the fridge below. Or get things out of the fridge while someone is working at the sink and have a place to put them. Here are a few pix:
-
How to: Santa Cruz locking shotgun mount in the closet
Raspy replied to John E Davies's topic in Ollie Modifications
If you want instant deployment, easy manipulation in tight spaces, not having to rely on switches and electric catches to release something stuck in the back of a closet, that only you know the secret to, that then has to be unwrapped, in the dark, while in a hurry, look elsewhere. If you want 17 rounds of "go away", you need a strategically placed pistol that your hand can find in the dark. Or your partner or a friend can find without learning where the secret switch is and all the rest. There are at least four places that meet this criteria in an LE2. And none of them will accept a long gun. Further, if you get stranded in the mountains and have to walk out overnight, a smaller gun is much easier to carry. Or you might have two, so you can leave one with whoever stays behind. Not at all saying anybody needs to shoot someone or some animal, but a lot of noise and the presence of a gun can go a long way toward scaring off a bear or showing intention. Remember the recent story of the hiker that killed a mountain lion with his bare hands after being attacked? A shotgun packed away back at the trailer, would have been no help, but a pistol in his pocket, might have. Of course, while just sitting around camp in the evening with a few friends, a gun should be out of sight in the trailer, or locked up. A few years ago, a buddy of mine had some friends that were out camping together. One night, sitting around the fire, some weirdo walked into camp with a gun and started taking to them. The conversation deteriorated. Everyone was nervous and finally one guy ran to his car and started fumbling around for his gun. The stranger shot him and disappeared back into the forest. I never look for trouble. I would never go camping where I suspected there were dangerous people around. I don't hunt. And I would never shoot an animal unless necessary. But I can imagine a few scenarios where I would be very glad I was armed. We really enjoy going to rallies, where everything is safe, fun and friendly, and we also enjoy getting about as far off the beaten path as possible. -
That "rule", is of course true for the most part. But when out in the desert with a flat spare, it absolutely means nothing. If choosing between walking for miles in the hot sun, or plugging a sidewall, the sidewall plug wins every time. Sometimes blanket rules are invalid, or even downright dangerous, if strictly adhered too. It's better to remind someone that sidewall fixes are emergency repairs, and only good enough to get you to the tire shop at low speeds, while tread repairs can be permanent and safe. Any roadside repair, on a back road in the desert, is an emergency repair in my book. And different standards apply when it comes to getting stranded, vs simply getting local help with a quick phone call. A sidewall cut in a Walmart parking lot, for instance, would just mean a minor inconvenience while you get a new tire. In the desert, I intend to keep going, with what I have with me, if possible.
-
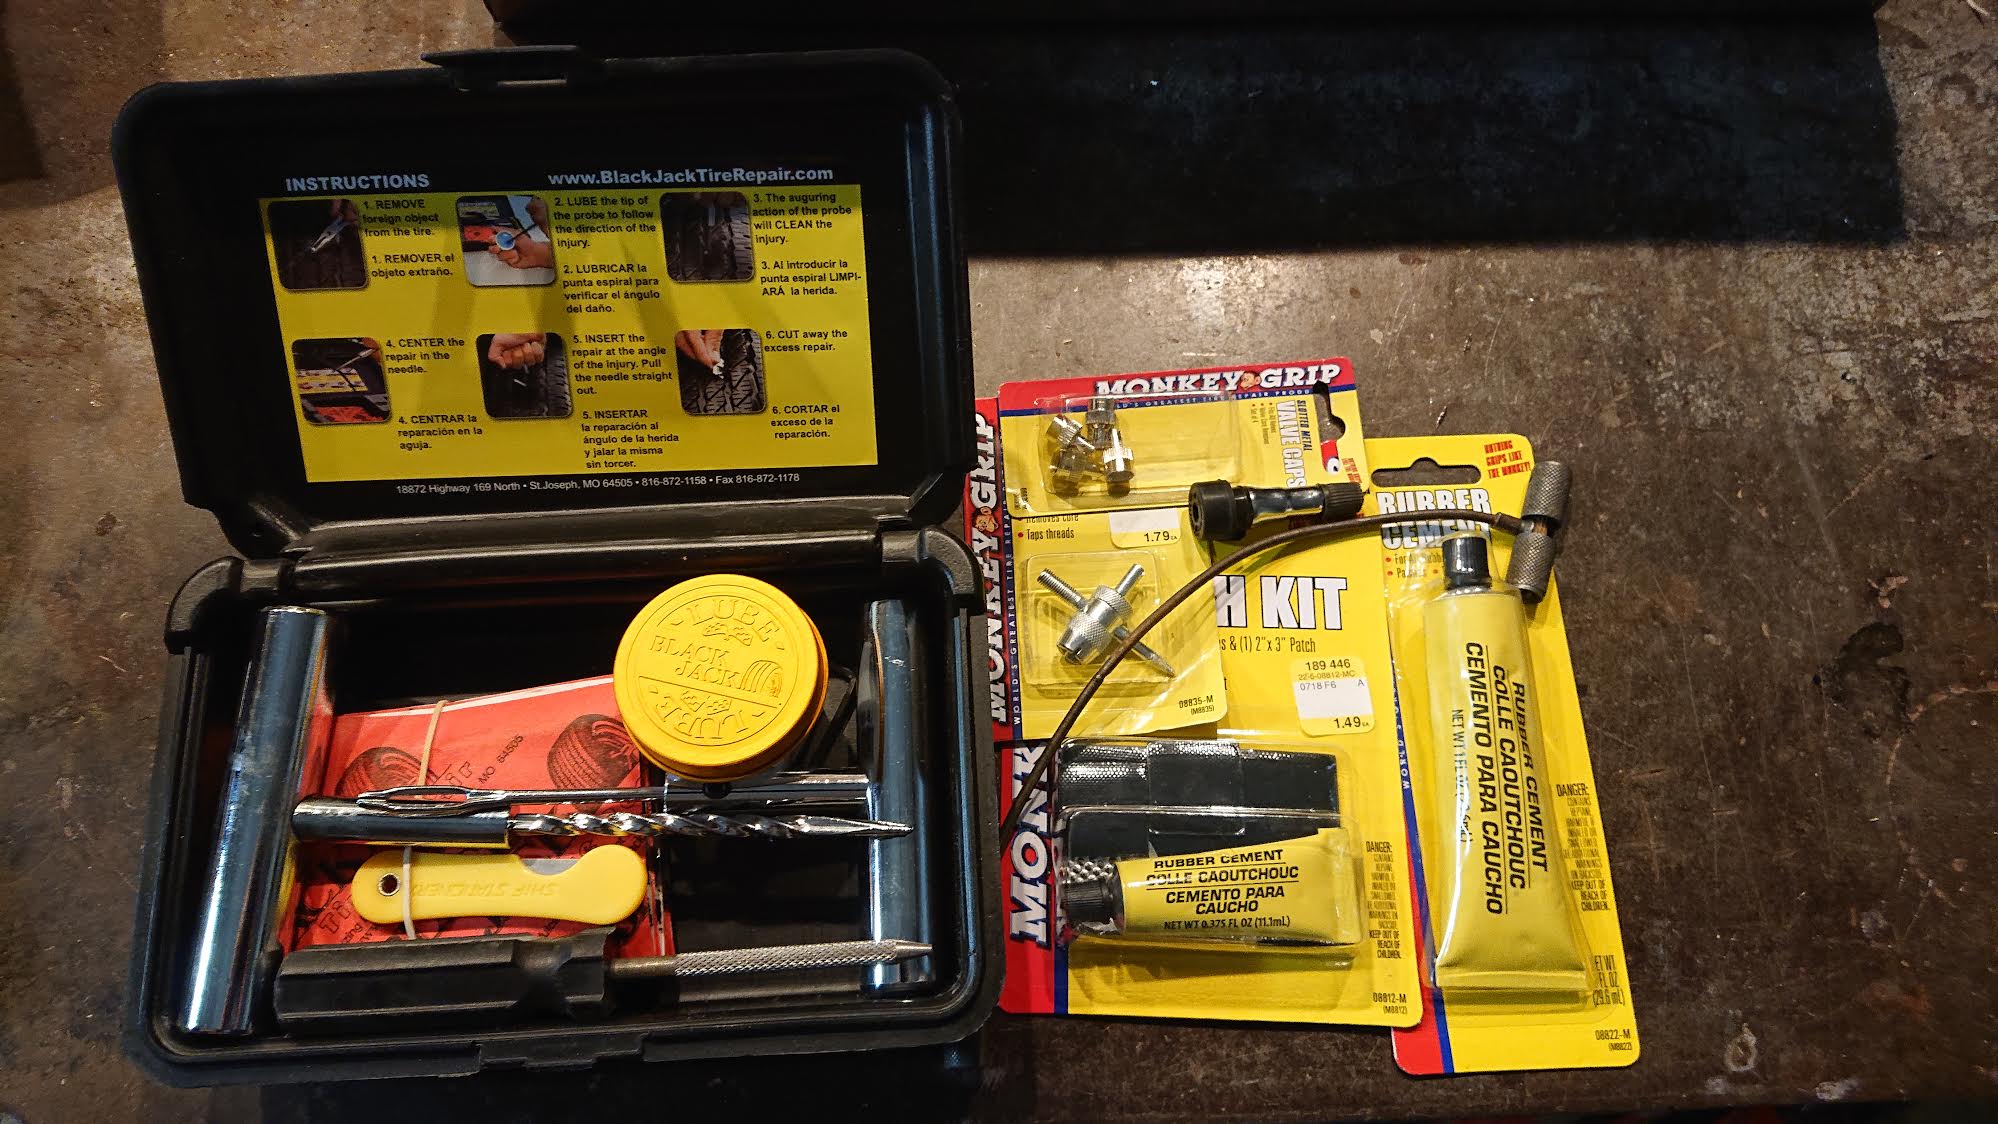
I recommend getting a kit with high quality tools. Sometimes you really have to push on them and sometimes the rasp has to go into a ragged hole and clean it up. If you buy an expensive kit in a nice box, you can add to it by buying some extra yarns, or whatever they are called, and an extra tube of rubber contact cement. The kits now mostly come with a grease type sealant and I don't think it is as good. The rubber cement can be squeezed into the hole and flooded all over the yarns before they are pushed in. It makes a good lubricant and then sets up to seal. Tubes of it are very cheap and sold next to the repair kits at auto parts stores. Also, add a few round inner tube patches to the kit so you can fix your bicycle tube while on a trip. This is done with the contact cement and the tube patches. The strings, or yarns can work better than the rubber plugs because often the hole is not round and can be larger than the rubber plugs might work in. Not all repairs are perfect, but most will get you home or to a tire shop. As mentioned, I recently fixed a hole in my tire that was from a 3/8" bolt. I drove it 150 miles to the Las Vegas to get a new tire and had no leak. If you are just fixing a hole from a nail in the tread, this fix can be considered permanent and road worthy. So, pick a high quality tool set that comes in a plastic closeable box. Add some extra yarns, some contact cement and some bike tire patches. You can also add a schrader valve tool, a couple of new schrader valves and a couple of air caps. You can even add a couple of tubeless tire valve stems and a tool to install them, but that be a bit much. I always have a bottle of windex handy in my truck for washing hands and cleaning stuff. This will work for checking for leaks. I also always have a 12 volt compressor, or an inverter and a 120 volt compressor, with me. These not only allow me to fix a tire, but allow me to air back up after a desert trip where I aired down. Here's the kit I put together that rides in my truck: It started out as a Black Jack tire repair kit and I added the rest.
-
My "lower limit" is 45 and I usually only do that to get from a dirt road in the desert to the nearest gas station with a compressor. I ran that pressure on the last leg of one trip on the highway just to check it out, and they definitely ran warmer than at 50 and again at 60 psi. Warmer means more stress on the tire and more rolling resistance. So, I'd say 45 is the lower limit for me and not a good choice. Plus it leaves no headroom if I pick up a nail and don't notice it until the next fuel stop. Also, the difference in ride smoothness between 45 and 60 may not make a real difference. A couple of my upper cabinets still open sometimes and my cushions will not stay in place unless jammed in sideways. On washboard roads, all bets are off and there is no tire pressure that will stop the chaos. Window coverings come off and my microwave refused to stay in place before I remodeled that cabinet. This while looking for the smoothest speed of about 10 mph and 30-35 PSI in the tires. My feeble compressor was used to raise them from 30-35 PSI up to 45 for some highway and a better place to top them off. Now, I have a new compressor and will be able to set them wherever I want. I also carry a tire plug kit and have used it. These can be had for cheap and they are a very good tool to have along. It's easier to plug and refill a leaking tire than to change it and it keeps your spare available in case you really need it. I got a 3/8" bolt through my truck tire in the middle of nowhere, while towing Ollie and we were out of there in 20 minutes with no further problems. I've also used it to fix other people's tires in Death Valley.
-
I run mine at 60 PSI and the tires stay cool while not being rock hard. I would never run them at 80. My Ollie weighed 5,700 lbs on the last trip and had a tongue weight of about 560. So, roughly 5,100 lbs divided by four tires, or 1,275 lbs on each tire. If you look at the tire charts, be sure you are not looking at the "minimum" allowable pressure and interpreting as the "recommended" pressure. On the last trip I varied the pressure from 45 - 50 and found everything was fine, but the tires ran warmer. Not hot, but definitely warmer. Off road, they can be let down to about 30 to smooth out the ride a bit. At slow speeds, they will not heat up.
-
If you want them too. You can have any spot that is open that provides you with the features that suit you. Hookups, size of space, etc.
-
Coy, Thanks for your thoughtful note. I really can't see how this relocation issue can cause anyone a problem. Things happen and it is no big deal. It certainly is not a problem for us. As you mentioned, this is a nice park. We planned to be next to some friends, but they were moved too. So we are still next to them. Either way, it's fine. Last year we had a good time and met a lot of great people. I'm looking forward to the same this time and have no concerns at all about being in a different spot. I found that having a bike was very convenient and allowed us to move all over the park. And to easily get back and forth to the Pavilion area. It's a great way to stop by other's camps and say hi or get acquainted. See you there! John
-
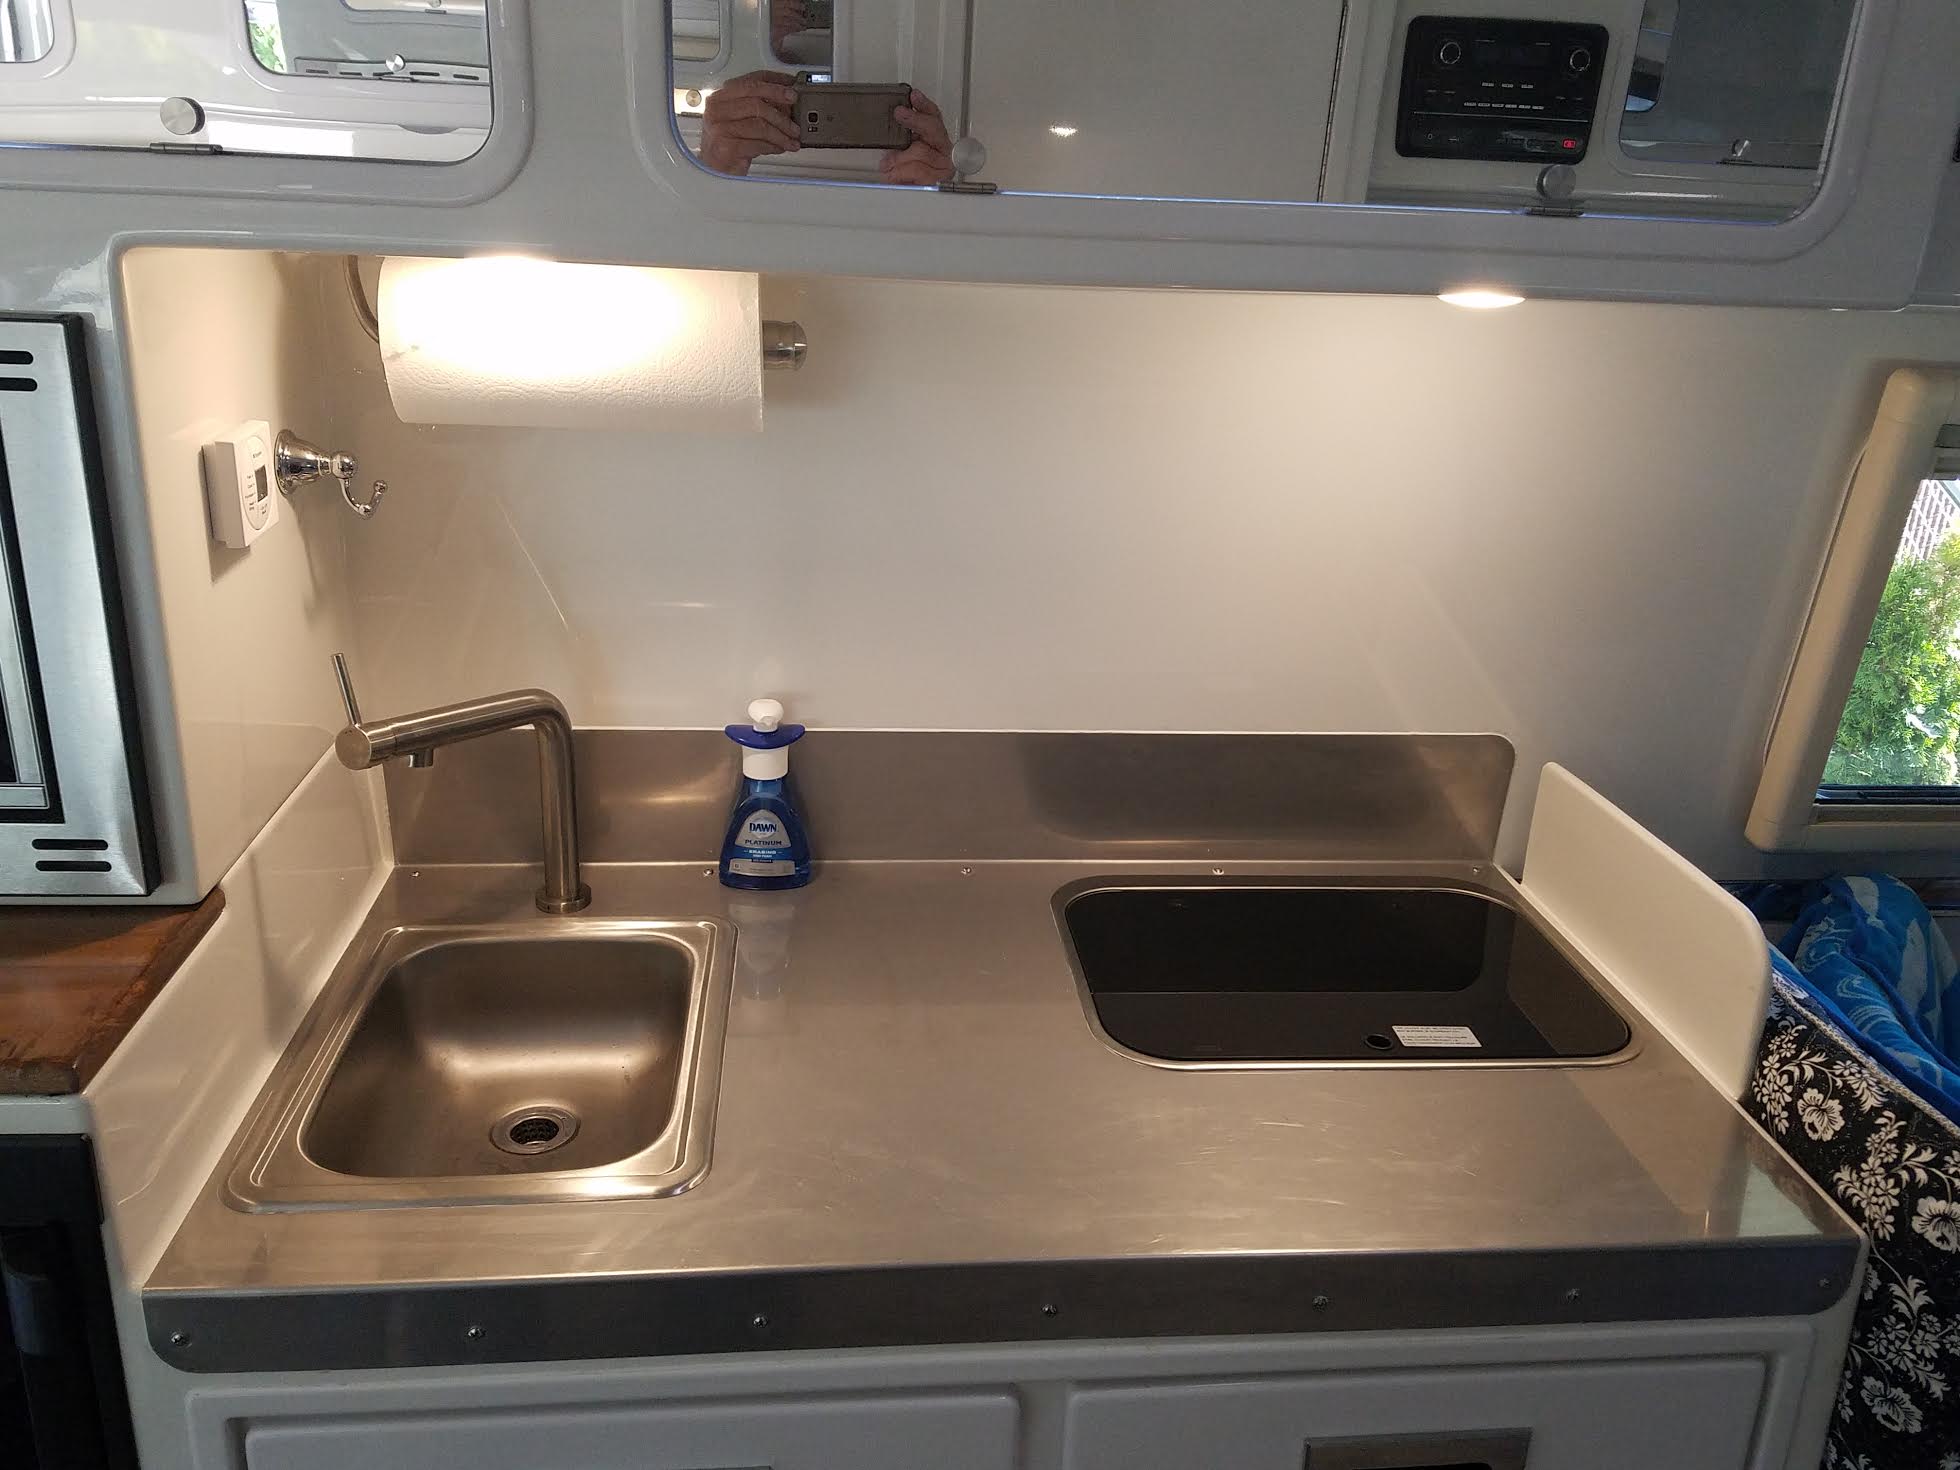
The dimensions of the stainless countertop are: 14 gauge, 304 stainless. Polished on one side. This usually comes with a plastic protective film on one side. It should be easy to find at a good scrap yard. Get a piece of about 48" X 36" or bigger to allow proper shearing and squaring up. Thicker would be fine, but not thinner. 18-8 stainless would probably be fine too, as thata is used in commercial kitchens, I think, and silverware. 316 stainless is also good and even more corrosion resistant, but not needed and more expensive. 44 3/4" wide 24 3/4" deep (over all) 6" backsplash 2 1/2" front flange (5) "10 screws in the front flange and (7) in the rear. I can give those exact positions too, later. Notes: The actual counter surface is quite square, so these measurements assume square corners with equal diagonal measurements. The dimensions qiven are slightly less overall than the depth of the surface. This so you can slide to stainless back to where the front flange is tight against the front of the counter. In the rear, the wall slopes inward as it goes up. This allows you to force the stainless into place and have the backsplash tight against the rear wall. In give you a tolerance that allows everything to fit perfectly when pushed int place. You can dry fit the top and install a few screws, then reach under to scribe the openings on the bottom of the stainless. Then cut those out from behind with the 4 1/2" grinder and a metal cutoff wheel. Use a hole saw to cut out the faucet hole. Dress up any raged edges with a fine flap wheel of about 120 grit. Carefully round the corners by rough cutting with the cutoff wheel and then smoothing with the flap disk. Be careful not to make the cutouts too big because the flange on the sink and stove are small. Use white silicone to glue it down. Install the screws, and use lots of blocks and clamps to hold it until set. It will be trying to slide forward because the backsplash is pushing against the rear wall. Use stripes of silcone about 2" apart so it can spread out and expel the air without forming bubbles. When dry fitting, install masking tape all around to limit how far the silicone will spread. Once clamped and screwed in place, wipe off the excess silicone and make the edges look nice. Then leave it alone for 24 hours. Then re-install the sink and stove. Before installing the sink, you have good access to make any changes needed under the counter. I installed shutoff valves on the pigtails feeding the faucet. Then I made a Corian side splash to prevent coffee or other spills onto anyone sitting next to the stove. If your stove it turned sideways, this is not needed. I also changed to a different style faucet If more details are needed, I'll provide them. On the front flange, I asked the metal shop to make a slightly larger bend radius of about 1/4" radius ot match the outer corner of the fiberglass surface. The thickness of the fiberglass is about 1/2". so this means screws of about 1 1/2 in length t allow for thicker areas underneath. The counter is cored construction, so overtightening of the screws. Prep the fiberglass surface by wiping thoroughly with alcohol to remove any mold release wax or oil. This project is not too hard. Just take your time and be mindfull of the details. It is a modification that I thank myself for doing everyday while out camping. Very very nice, durable and clean. We'll be at the Rally so come by and measure it up. Hope to see you there. John
-
Vector, Here is the solution to breaking zerk fittings. The Lock N Lube fitting. https://locknlube.com