jd1923
-
Posts
3,274 -
Joined
-
Last visited
-
Days Won
245
Everything posted by jd1923
-
Don't take me too seriously, just poured a cup myself! 🤣
-
You got me on this one. I did not fully consider this line, "I turned it to fan mode and the growl goes away." So yes, in this case I agree with @CRM that it must be compressor related. If this exclusive product, just one year old can "jump up off the mounts" Truma as a product line has way too many issues. Truma Water Heat Fire in the Hole - Mechanical & Technical Tips - Oliver Owner Forums (olivertraveltrailers.com) and there are more complaints. So never mind what I wrote about changing fan speeds, turning off-n-on, etc. That will not work. Perhaps you need to get that compressor back on its mounts, whatever that entails. Very sorry this is happening to you when you have immediate travel plans.
-
I'm with you, thank you. You can't get me to do anything but hookup the hose at the dump station! 🤣 Separate liquids from solids and more cr@p, NOT! (pun intended)
-
Yes 3600 LB payload is certainly HD! The 2003 Ram 2500 I drove for years had 9000 GVRW and it weighed 7200 LBS empty, so half the payload. Very nice truck. You should just throw the Ollie in back! Small world, we owned a 2014 Passat TDI. Never towed with it, but loaded full we got 47 MPG highway when we moved from TX to S FL. We were moving, so Chris was driving that, and I was pulling an 18' cargo trailer with our Ram. I had literally every SF of the car packed. Loved that car, drove it hard for 4 years. Got 35 MPG commuting and I drove it heavy-footed to make time. VW bought it back in the TDI settlement, writing us a check for the amount we paid for it, taxed and titled.
-
I use ours too. Mines an older 2500, not like the $100K super duty diesels some have. There is a difference. There is the 2500 and some are the 2500 HD which is really a 3500 in disguise! My owner's manual states to use a WDH when towing over 5K LBS. I tried it without after reading many comments here, and it is night and day in how it handles. Rich, I want your truck. 10-speed Allison OMG! I could coast up our mountains in that. Mine will have to do.
-
That makes good sense and we sure walked by many hiking on our recent trip to SW Utah. It would take a while looking to find the right kind, all close in size to collect a good batch. The ones I purchased for about $20, must have been run a rock tumbler and sorted for size. You can see in the ad choice of size. They're all rounded nicely, no cracks and hard as can be, the size and almost the shape of small eggs. Though I'll say, I certainly appreciate a thrifty idea! Thanks.
-
OK, the first mention was OK @MAX Burner, but you guys are turning my AGM in the TV thread into a dumb coffee thread!
-
Being home during this meet, I was hoping for more pictures. Your meetings, members getting together... Maybe those will be coming after y'all get home!
-
The Andersen model is made to fit the Oliver frame, truck model does not matter. The truck matters re whether you need a WDH or not, but they all have 2" hitch receivers. My suggestion is to ask members here if they want to sell theirs. I've noted some 10+ forum members that say they do not use theirs with their F-250 or other 2500 series trucks. Used and pulled from another Oliver, IMHO would be the best way to go! If you truly want to buy new, ask OTT for the part number or buy from them.
-
@HDRider I've never even seen a Truma A/C, but you have a bearing noise, in the fan or fan motor, that I'm certain. On our recent trip the blower motor in my truck was doing the same thing. Mine was more of a squeal that would change pitch with the fan speed. I pulled the blower motor the other day and it was making the same noise connected to 12V on my workbench. Good news is that if you can live with it on your trip, yes it will be annoying, but you should be OK for a while (unless going away for months). I see your Oliver is only a year old, so it should have some life in it. The way to get rid of the noise is to change fan speeds or turn off and on as you have done. I read Truma service is impossible, but plan on that in your near future. These are not serviceable bearings. The fan assembly and/or fan motor should be replaced. Yours should be under warranty. Bad time of year for it with summer coming and RV Service shops being booked months out. I would open a ticket on it asap for warranty repair. I hope to upgrade my AC this year or next. Reading too many posts on both Truma products on this forum. One member even changed out his on-demand HWH for the old fashioned 6-gal Suburban! I will upgrade to a unit where I can source replaceable parts and service the unit myself.
-
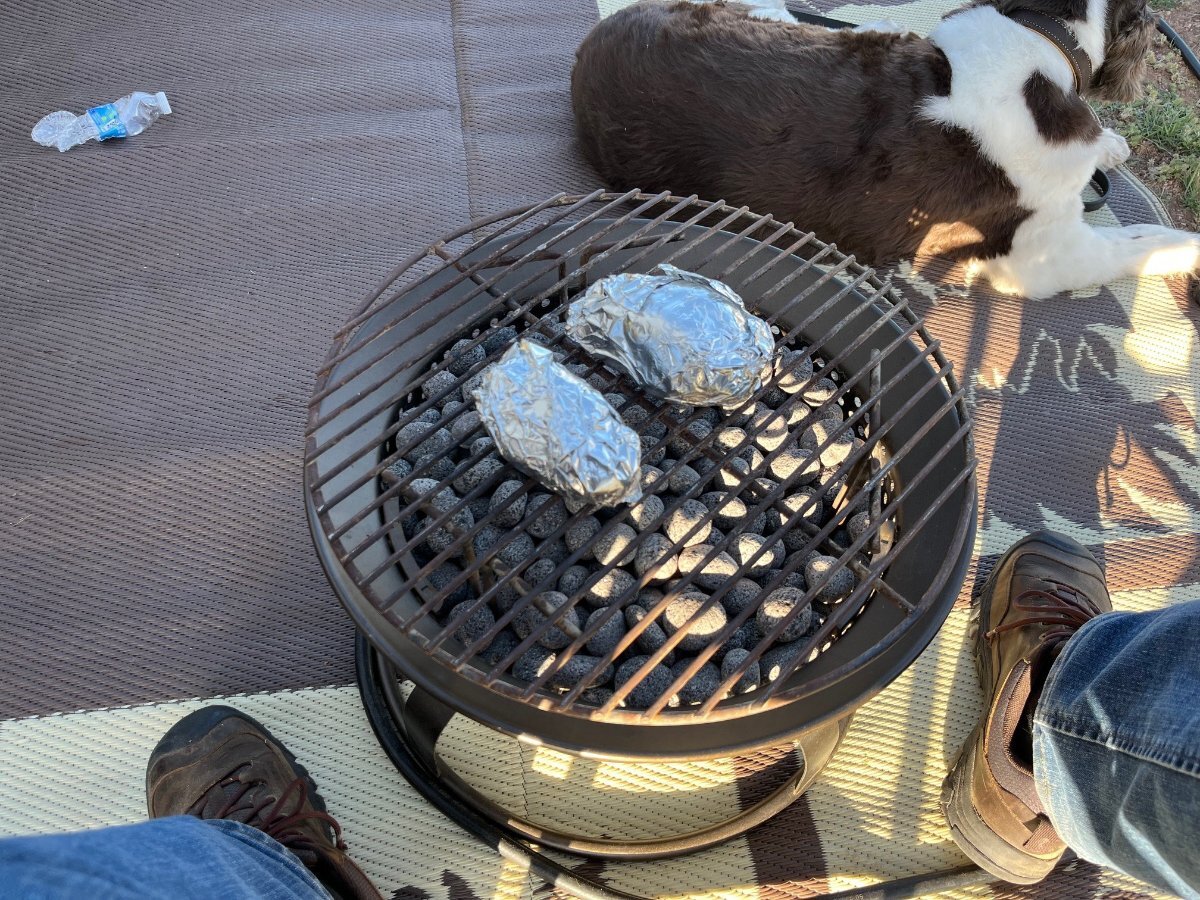
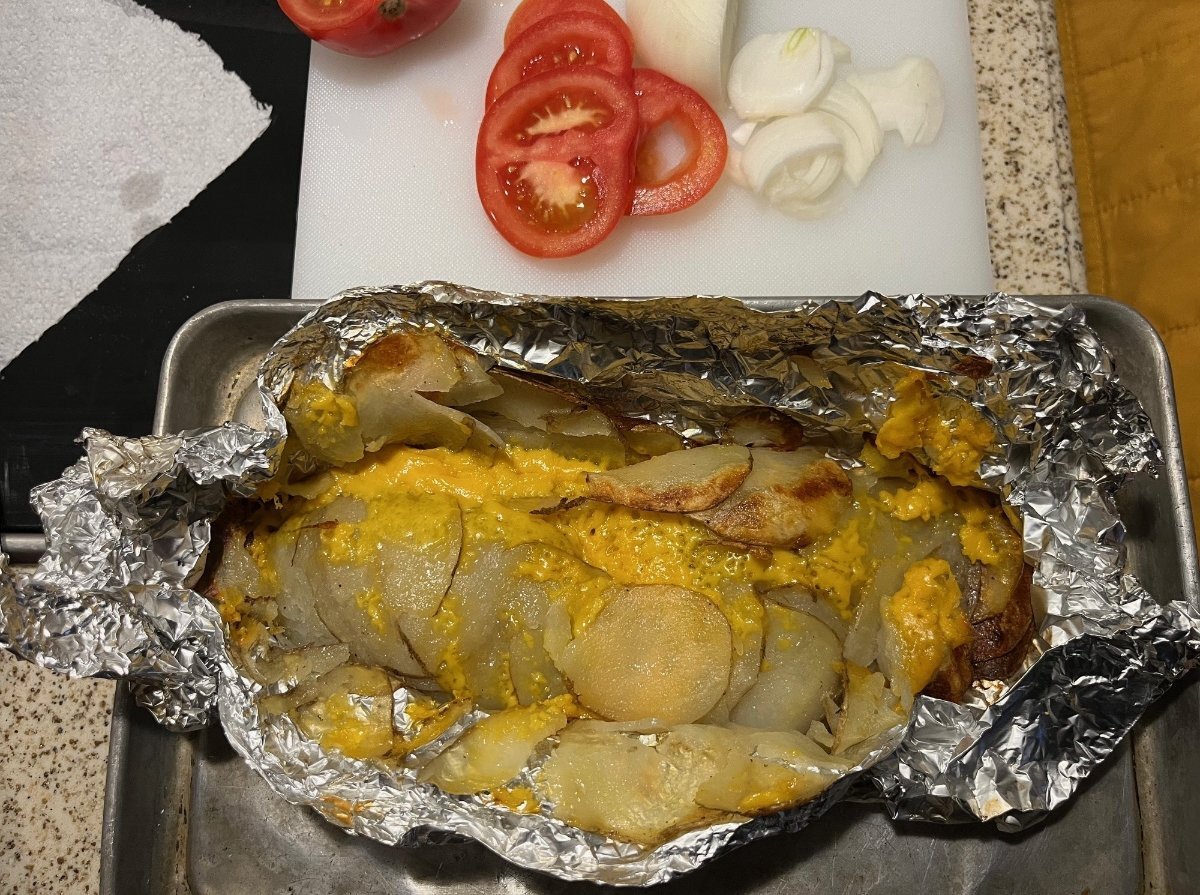
Yep, you can even mod a fire ring being creative. We love our fire ring! We prefer to camp in cooler weather, and in the evening we sit by the fire ring for drinks and conversation. I understand the purists want a real campfire, but more often than not in the SW open fires are restricted. Also, I'm a hardworking sort but I dislike spending effort on something that is later "dust in the wind" with no resulting value. No smoke, no fire danger, just warmth. Often when Chris is starting dinner, she'll call out, "start the grill please." I'm thinking it's early for dinner, but she wants to start a couple baked potatoes. I've learned Irish women got to have potatoes, at least mine does often. So, I was sitting there by the fire thinking, "why should I need two fires going?" Being conservative (in more ways than one), the waste bothered me. After dinner, we sit by the fire ring again. I acquired this grill grate a few years ago from a guy that was renting our outbuilding. When moving out, he threw it away, so I saved it. Now I have a great use for it. Love reusing old stuff I've saved! It's some kind of weird form of accomplishment within me. Actually, the first mod to our fire ring was to replace the rocks. They come standard with some cheap version of lava rock, lighter than air, useless. We purchased these HD lava rocks and although it does add a few LBs to the ring, the amount of heat is certainly doubled! Amazon.com: Stanbroil Lava Rock Granules for Gas Log Sets and Fireplaces - 10 lb.Bag (0.8"-1.2") : Patio, Lawn & Garden You put these two upgrades together and you can cook anything that does not release grease: baked potatoes, other veggies, boil water, etc. It gets hotter, cooks faster than our small Weber grill. And this way I can turn the potatoes, butt in chair, drink in hand! I bought this item too. Got the 100-pack since we use them as a drip catch for the Weber and you can use them for this purpose too. ttps://www.amazon.com/gp/product/B0BRGWLGDG/ref=ppx_yo_dt_b_search_asin_title?ie=UTF8&psc=1 These will also keep any juices from bleeding onto the rocks. A couple of pics to follow from our recent outing. I call the second one "campin' au gratins" and oh, they were sooooo good!

-
It's been two months now and I have a few thoughts. There is no way a truck alternator can supply the same charge curve as a dedicated charger can installed in an RV. I have an accurate voltmeter and while driving I get mostly 13.7V, then 13.2V and the highest was 14.1V (rarely). I may need to install a new HD alternator, especially if I install a DC-to-DC charger. Voltage an hour or so after driving is usually 12.6V, sometimes 12.7V which is a hair better than lead-acid batteries. It's not the 13.1V that I used to get in our Class-C AGM house batteries. I also have a Rid-Rat device and a Pepwave router setup in the TV, running 24x7. At home when the truck sits for a couple weeks the voltage can get down to 12.1V (lowest reading). I have a toggle switch for the router, but this is with it running. I bought this charger and the hardwire kit and it has an AGM setting. Seems like a very nice unit. I have collected 5-6 chargers through the years, but all old technology. This will get the two truck batteries up to 12.9V, again an hour or so after disconnected. They say you can leave maintenance charger on for extended periods, but I don't as many will fry the batteries at some point. I extended the hardwire kit, so that the terminal is sitting in the air intake in the front bumper. I can charge the TV now without popping the hood. That's nice. I plan to charge it overnight every few weeks to keep these AGMs in good shape. 😂 Amazon.com: NOCO GENIUS10, 10A Smart Car Battery Charger, 6V and 12V Automotive Charger, Battery Maintainer, Trickle Charger, Float Charger and Desulfator for Motorcycle, ATV, Lithium and Deep Cycle Batteries : Automotive Amazon.com: NOCO GC008 X-Connect M10 XL Eyelet Terminal Accessory Genius Smart Battery Chargers : Automotive
-
Reply worked
-
Hey @MAX Burner I'm trying to send you a PM and it says "@maxburner cannot receive messages. Do you have a full mailbox, or do one of the moderators know what's up?
-
@rideadeuce Hey Mike, you are really doing a great mod-job on your Oliver. So many great improvements, and excellent work too. I LOVE your ladder-scaffold setup! Can I borrow it? Oh, and can I borrow a lot of flat land to work on? I would need levelers for that setup, or perhaps ladders with adjustable legs. Hmmm, you have me thinking. It's certainly not easy working on top of the Oliver given its shape. Kidding aside, thanks for sharing so many great posts lately. 😂
-
We're used the Pine-Sol-Calgon solution 4-5 times over the last 6 months, and I did not smell a thing. My sense of smell is acute. Last time out, I smelled some in the toilet, since the toilet had been left without any water in the bowl. With a good seal and water in the bowl, and clean water meaning no Pine-Sol in the plumbing traps, you really should not smell it. Cause can be plumbing leaks or plumbing vents that do not seal. These vents are designed to allow air in and not out. But who knows, when the TT is bouncing down the road! That being said... In the future, I'm going with @Geronimo John's suggestion to use dishwasher soap pods. Do you really need 2-3? I would think 1 should suffice. I like this option because the pods are light, small and travel nicely. With Pine-Sol you really have to be careful, not only in transport but in application. If you do not very carefully put a cup of the liquid down one sink, no spills, flush the trap, then yep as @SeaDawg wrote, you're going to smell it.
-
I don't know whether you bought this new or used. I buy mostly used vehicles and there are often wires disconnect for various reasons. I have disconnected wires at a fuse box intentionally when I retire some device, but then I would also label and tape down the wire. You really want to know what it is that you are connecting. Given you bought this new, you would think all wires should be connected. However, the wire could be from a standard wire harness for an option you did not purchase. The only way these would get disconnected is from somebody working down there or perhaps placing something lose in the area. These spade terminals do not fall off by themselves from regular use of the trailer. If you want to connect this without knowing what the wire powers, it does not matter to which terminal it is connected. It's all a 12V bus bar. What matters is the amperage of the connected fuse. Without knowing what it powers, it would be impossible to know the correct fuse amperage. Are slots #14 or #15 labeled with fuses inserted? That would help to determine purpose. Perhaps somebody, not only with a 2022 model, but with the same 12V accessories you ordered, can help. I suggest opening a Service Ticket, providing this picture, asking first the purpose so the panel can be labeled properly and then where it should be inserted.
-
Welcome to our OTT Forum @Fernando Alicea! Hull #6 - WOW how cool.😂 She looks great! New windows would certainly improve the whole trailer. There are some experts here on the older Elite I Olivers. Everybody is quiet this week since so many are at the annual OTT Rally. I will mention @SeaDawg and @ScubaRx since they are a wealth of historic and general information and so they see this thread soon. If you want a quick answer, I would call OTT Service tomorrow before the weekend. They could look up your hull # and let you know the manufacturer or perhaps supply the windows you need. Best wishes and keep us posted on the maintenance of your classic Oliver.
-
Just reread your post and yep, that’s what you wrote. This was a thread about tires and shocks, so I assumed as such. Wow! This is crazy! Body mount bushings are NOT a service item! There are guys on the Cummins forum that replace these after 500K miles on commercial hauling rigs. Just had my bed off on my 2001, and all mounts are supple rubber on this 23 year old truck, that spent its life in the desert of the Phoenix Valley. Highly unusual is your experience.
-
Our pump will not cycle on at all even when left on for hours. The pump should pressurize the plumbing, but hot the tank given the overflow is always open. I noticed a minor drip on the far rear weep hole at a different time. What you experienced could have been your level a a bit off. We get the level spot-on with the LevelMatePRO and it was level at the time when the leak was pictured. I have never noticed any drip on the driver's side, all curbside, and this points to a plumbing leak vs. condensation. I want to thank everybody here who made suggestions, add pictures, etc. This is very helpful. I'm not getting right on this work very soon, but I will update this thread as I do. Our Oliver is parked now and until after Labor Day and I have much M&R planned for our off-season (home, TV and Oliver projects)!
-
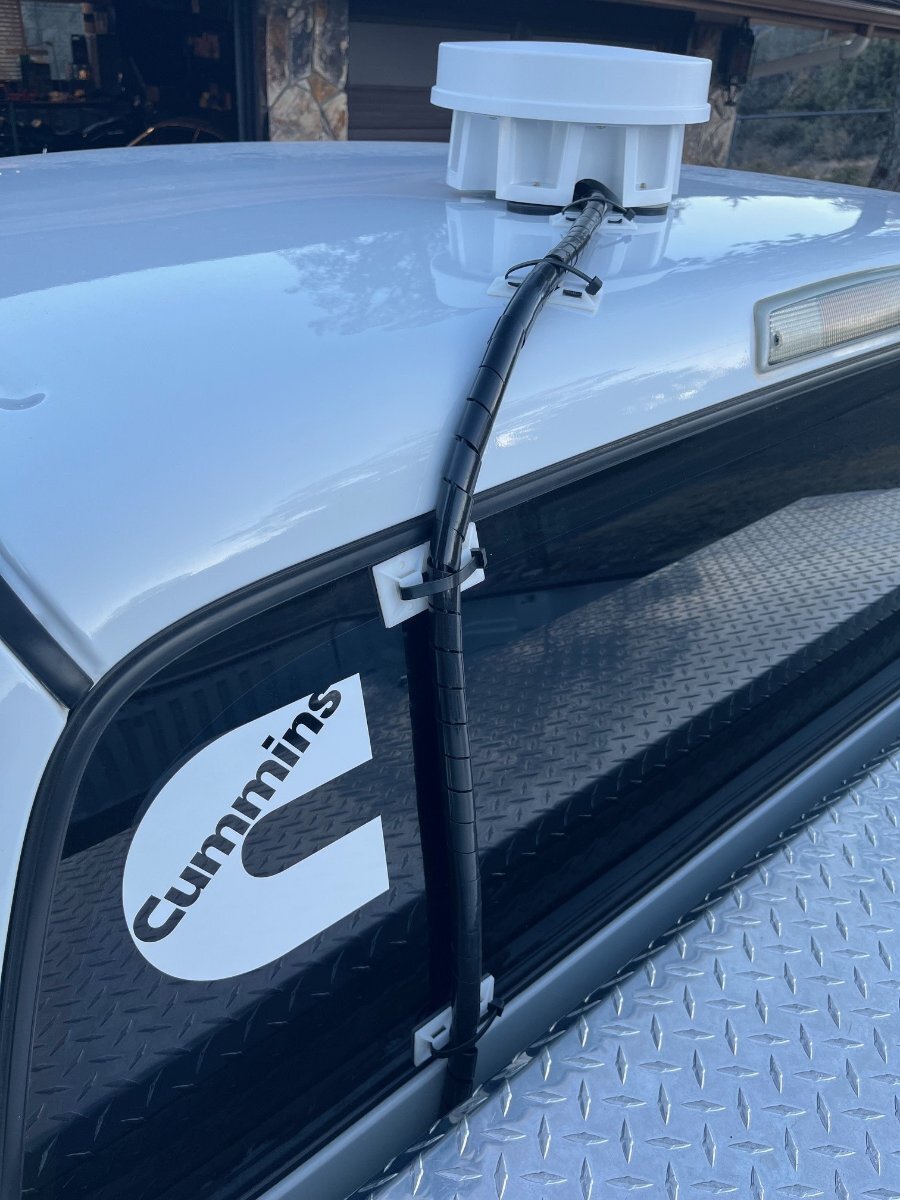
Sure Rich, thanks for asking! We have not yet added Starlink because of the $2500 cost. We are very much parttime (90% home), but I rationalized the Pepwave and a T-Mobile Business account as a backup to my business as an online instructor in Project Management. When have Internet issues at home, just connect to the TV in the driveway and Wi-Fi! T-Mobile is the only carrier that provides 5G all the way up here at 5400 FT in little Prescott, AZ! This is the bundle I purchased: Speed Demon Mobile Internet Bundle – MobileMustHave.com and they have an option to add Starlink. It should be plug-n-play as @rideadeuce mentioned. Just plug it in the WAN port. I purchased their $49 configuration fee (strongly suggested), since I did not want to learn and do that work. All I did was install the hardware and answer a questionnaire (select Wi-Fi names, etc.) and it's good. Starlink setup would be included if bundled. I STRONGLY recommend installing in the TV, unless a pretty truck is important to you, or you trade them in often. You're not always at the campsite, but you are always in the TV, or it's parked by your Oliver. Not much room on the Ollie roof and no drilling into the Oliver. The fiberglass shell of the Ollie allows for strong Wi-Fi (AS TTs have to run a Wi-Fi access point due to the metal shell). Get the best, the PARSEC PRO antenna too. We camp in many canyons in the Rockies, that have no service (radio, TV or cell). Just drive our truck up to a ridge and we can use our computers. If you add Starlink this is a moot point, but I drive this truck down to the valley often w/o the Oliver, teach a class in Las Vegas for the week and the router goes where we go. Chris uses her laptop often while I'm driving. We've gotten anywhere from a low 20 Mbps download speeds out in the boonies (slow but can stream TV) to 860 Mpbs high speed where 5G is available! Here is the mod post I made a few months back:
-
Like to get to this upgrade (I hear buy it in Mexico for <$) after new leafs and a quiet AC unit, and more... Spent $1600 for Christmas on our Peplink setup and that has served us well. I could just magnet mount mine nextdoor to your Parsec antenna on the TV! The Pepwave router has the WAN input too and has the SW logic to seamlessly switch between Internet sources.
-
@rideandfly are the diameters of the pistons and shafts the same?
-
Thank you @Townesw. I appreciate your pictures and will check that. Yes, we certainly had water in the FWT, filled 2 days before using the boondocking port, filling the FWT from the extra tank in our TV, at our previous camp. Our tank only fills to 20 +/- gallons due to the tank issue in the older hulls (not yet warranty repaired by OTT). Between camps, we drove 165 miles, parked and this was the next morning. You would think if water was going to come out of the overflow it would be while on the road, water in the tank sloshing back and forth. We used water for dinner, bathroom during our stay and Chris was doing breakfast dishes while this was leaking. I'm trying to figure out, how would the overflow tub have any water in it to leak through this fitting? Thanks again.
-
Thanks @rideandfly agree they are different builds. Hoping the internal seals and other components are superior. Time will tell. Those of you with these, going on long trips this season, please inspect your shocks afterwards to see if there are any leaks. They can only be better! 😂