jd1923
-
Posts
3,293 -
Joined
-
Last visited
-
Days Won
247
Everything posted by jd1923
-
Mike, you don't want 2 routers, because then you have two logins, need two antennas, splitters are not good, and more issues. What you need is a Wi-Fi access point. Then you would run ethernet cable from your CradlePoint router to some forward cabinet position. I have a Pepwave Access Point, included our bundle and did not use it. I thought I may need it distance to the trailer, but not so due to the power of the Parsec antenna. You could just get a better antenna. I can read Wi-Fi at 2.4GHz and 5GHz right now from my home office to my truck presently parked 100 FT away going through two walls. Parsec Husky Pro 7-in-1 Antenna – MobileMustHave.com I was about to list this item on Craigs for sale! PM me if you're interested at my Oliver family discount, part still NIB: AP One AC Mini - Peplink Wireless 2.4ghz/5ghz A/B/G/N/AC Wireless Acce – MobileMustHave.com As you can see a simple wired access point is a lot less $$$ than a high-end antenna. And both will have their own installation challenges to consider. Best wishes, JD
-

Bulldog coupler recall for some LE2s
jd1923 replied to Steph and Dud B's topic in Mechanical & Technical Tips
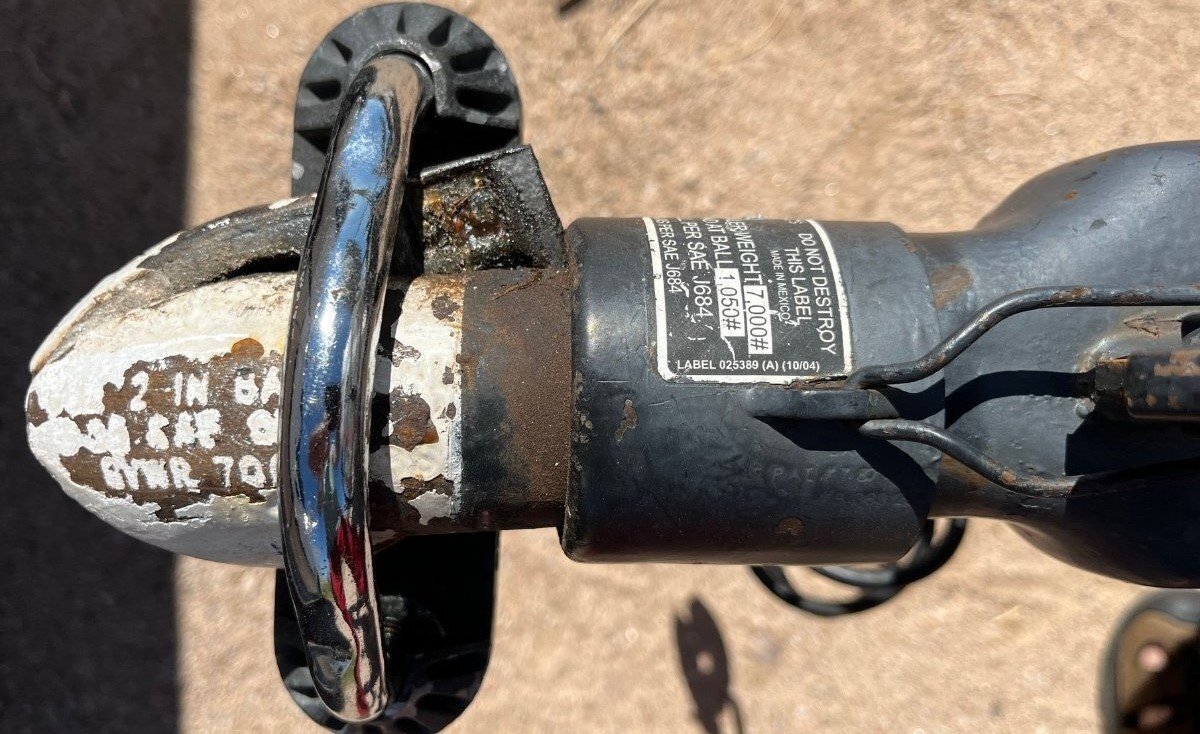
Oh and BTW, the NHTSA should have Bulldog Manufacturing run a recall too! They mislabeled a 5000 LB coupler with a 7000 LB label! Check page 4 of this thread. @Jason Foster asked for a better picture of the label, then I wrote a commentary re wrong labeling, Bulldog being at fault, not OTT. -
Bulldog coupler recall for some LE2s
jd1923 replied to Steph and Dud B's topic in Mechanical & Technical Tips
In the 5 pages of recall info OTT sent us, all it states is "Your unit must be inspected..." Everything else is about replacement and reimbursement. Manufactures are responsible to communicate recalls. Consumers are not legally bound to reply. I have received over 100 recalls through the year and everybody here has too. I have never replied to Dodge, Ford, Toyota or any other. I will call for a service appointment when service or replacement is required, but if not I merely file the paperwork in my file for that vehicle. I was about to do the same here, but since @Geronimo John found the NHTSA website and the "Customer Reply Card" I will reply as a courtesy to OTT. OTT will have hundreds that do not reply, for trailers sold, people thinking it's junk mail... The GOV will likely audit OTT later to see they have complied and their records of such responses. I plan to print the from, write "SELF" as the inspecting BUSINESS, attach the photo I took months ago when this subject came up on our forum, and mail it Attn: Regina OTT - task completed from my point of view.
-
@Imelda, yes @Geronimo John is certainly correct in running the microwave on a 2KW inverter. Our setup is similar to yours. I run our inverter day-and-night, for many needs. Use the microwave to reheat coffee in the morning, leftovers for lunch, etc. The TV is often running, laptop chargers, etc. Chris runs an electric tea kettle and a blow-dryer occasionally. Many of these are 1100-1500 watts each, so you can only run one at a time. We travel mainly in the sunny SW, so usually we're good on batteries. But if a cloudy day is in the forecast, I'll still run the microwave for 30 secs or more, but we will forgo the electric tea kettle for one on the LP stovetop. You could run two such appliances with a 3KW inverter at the same time. But the main reason to upgrade to a 3KW Inverter is to run your AC unit. Some cool in the afternoons when boondocking is what we truly want, eventually. But again, it comes down to available battery capacity. LI is not a straightforward battery swap, but not very difficult. There are charger settings to change and likely some new cabling. You'll want to add a shunt and perhaps a display or other options. GJ also mentioned Battleborn 100AH batteries. They run a little about $900 each, call it $3,000 +/- taxed and shipped, for three units totaling 300AH (I believe 4 will not fit). There are better options. Why replace relatively new batteries, ours are 450AH lead-acid, 225AH usable, for 300AH LiFePO4? Not a large enough bump for the money. I believe OTT uses Lithioncs brand in their Lithium Pro Package, which states 390AH. Though I could not find a 390AH Lithionics model shopping online. Many online sellers list their 320AH battery at a whopping $4,500, more like $5K OTD. Perhaps top-of-the-line but one of the most expensive LI batteries. There are better options out there today, unless $$$$ is not an issue. I learned of Epoch batteries last fall on this forum. They are priced to sell with good reports. In fact, this model is soooo HOT at $1,399 it is often out-of-stock: 12V 460Ah Heated & Bluetooth LiFePO4 Battery - Epoch Essentials (epochbatteries.com) That's 460AH which would double your capacity in one battery. Some do prefer redundancy if one fails, but I would take that risk. Mike @rideadeuce went with TWO 460AH Epoch batteries, amazing! A more expensive, but still competitively priced, model including "Victron Comms." I don't believe you need this feature as a Victron shunt would be enough for me. This model is $1,999 list and during last year Black Friday sale it was 15% off! I almost pulled the trigger. Maybe next year, LI prices have come down every year. He went this route to fit two batteries side-by-side for 920AH total. The first model I mentioned I believe fits in the battery tray (you know measure twice, ...) but you can only fit one in the bay since it is wider (one would be enough for most campers). The Victron Comms model is narrower, yet taller, so Mike removed the sliding battery tray to accommodate. A crazy amount of stored power for a small TT, a creative plan and sound installation. Check it out: Victron MP2 with (2) Epoch 460ah batteries. DAY #1 Removal, rewiring, mounts, routing wires - Ollie Modifications - Oliver Owner Forums (olivertraveltrailers.com) I suggest reading several more posts here, do other online research, give it a lot of thought, ask more questions and "patience grasshopper!" These batteries should last 10 years and if you add a 3KW inverter and perhaps other options (checkout the Victron product line) it becomes a large investment. You want to make the right choices, so that it works for your needs many years. Hope this helps! 🙂
-
Ya think! So this will my last sealant related comment here. Dave, thank you so much and I trust it on your recommendation. The label has all the right words. Re cost NP. What is it? About 30% of a shop-hour today for those who pay for repair work. Should saves us hours in labor. Do you think one can is enough to work the exterior of the Oliver, 4 windows, wheel flares, around the furnace, etc? Maybe I should get two anyway. Thanks again! 😂
-
Norcold Refrigerator Not Drawing off Solar?
jd1923 replied to Cort's topic in Mechanical & Technical Tips
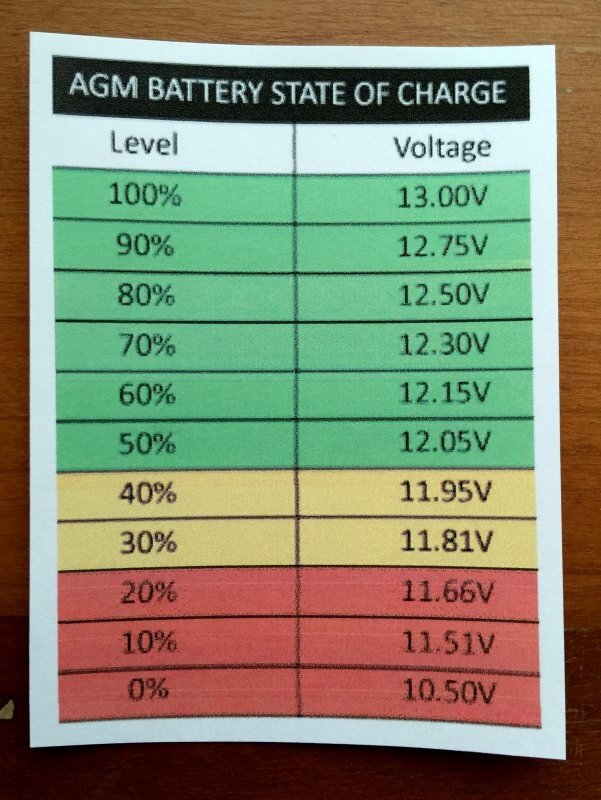
Basically, your fridge is reporting your batteries are DEAD! Lead acid/AGM should never be much under 12V though I have been in the yellow a few times, never in the RED!
-
Norcold Refrigerator Not Drawing off Solar?
jd1923 replied to Cort's topic in Mechanical & Technical Tips
We have 30-gal tanks. Our Mopeka had some up/down variation, and I received a sensor position warning on/off. I just installed them and will look when we refill. Don't think the magnets stick well to the rounded bottom. You'd think their surface would be curved as well. I may use a little 3m VHB around the edges next time. Now that it's parked level, it reads 15%. That's after 2 1/2 weeks out, fridge on LP all but about 20-24 hours while towing (say 180 hours ON at 60% boondocking), furnace on some 3 nights (not too cold), fire ring on for 2-3 hours on for ~10 nights, outdoor grill maybe 5 nights and daily use of indoor grill for coffee breakfast and 3-4 dinners. If it was just the fridge running, duration on LP should be in terms of weeks, certainly not a few days. Yes, check for leaks. -
I'm sorry! Though in rereading my post, I don't see that I made any technical comments, so not understanding how my personal likes/dislikes can be measured in terms of accuracy. Public forums are all about "IMHO." I just don't like the over-use of caulks of any kind. My hobbies have always been around restoration since the late 70s. Experiences with so many old cars, used trailers/RVs and old homes, etc. I do all my own M&R work, on auto, home and RV though will contract paint and detailing work, to which I have no strengths and experience. What I know, is I've spent/wasted way too much time removing sloppy caulk and paint. I have seen more bad jobs than good, and our Oliver windows (pic above) is just one example in a lifetime in the witness of shoddy work. Most DIYers admit they do not have the artistic hand to apply caulk nicely. Me too and many professional tradesmen are just careless. It may be inaccurate in the view of some, but I don't see purpose in caulking an RV window. If ours were to ever leak, to do it right (and caulking IMHO is not doing it right, merely applying a band-aid), I would remove the window and rigorously clean out all old caulk and butyl, and as a final step wiping rubbing alcohol on the contact surfaces for good adhesion. I would reapply butyl, just enough so that when fastening the screws evenly, it would squeeze out slightly around the perimeter. Scrape off the excess with a plastic blade and I'm done! Butyl seals fully, will last longer than our lifetimes (so it should never leak to begin with). I did this job on our Bigfoot, not that it was leaking rainwater to the interior, but to replace glass panels where the double-pane seals had failed within. Did not caulk when finished. It looked great would not leak a drop when pressure-washed from all angles! It's OK if you have a differing opinion. So I ask, but do not expect answers... Why are home windows caulked, when they sit nicely tucked under a 30" eave? And why does OTT caulk the wheel flares, when it does not matter if water passes through this seam to the wheel-wells? And why is the wet bath caulked where there is seamless fiberglass construction? The examples I see in our world are endless. I've asked the following Q, twice on this forum before and will give it just one more try before going it alone... What product can I source to remove silicone caulk, that can be applied to vertical surfaces? Perhaps it cannot be this easy, but if there was such a product that would cling overnight and penetrate or loosen the caulk it would be so helpful. I'd like to make our cleaning project a couple days verses a few weeks of hard labor. I also am concerned or damaging the fiberglass in applying the wrong product and I'm not concerned if there is silicone still in the pores of the fiberglass, as I will not re-apply caulk. I just want to get the dang stuff off! I ask @John Dorrer with your industry experience. I ask members who have commented here, like @ScubaRx, @SeaDawg and @DavePhelps with considerable RV and boating experiences and other OTT Forum members. I read so many suggestions on caulks and sealants. Don't y'all use something to remove the old, before applying the new? I thank you for your time and consideration.
-
@rideandfly I always use this app when upgrading wheels and tires. Play with it and it will answer all your tire/wheel size questions! Use the left frame to enter Original and New Setup specs and look to the graphic on the right to see diffs in the measurements, for diameter, width and offset (for wheel changes). Hope it helps! Wheel Offset Calculator (tiresize.com)
-
Norcold Refrigerator Not Drawing off Solar?
jd1923 replied to Cort's topic in Mechanical & Technical Tips
Another point to add is when you know you are pulling more current like using the DC fridge, keep your eye on the SOC of your batteries. Like many others here, I installed the Victron shunt so I can read SOC and +/- Amp draw from the Victron phone app. It was that morning when I woke at dawn and noticed 63% SOC even before getting out of bed. I thought "what the..." and then I noticed the DC light on the fridge. If I rolled over and back to sleep it would have been worse later. -
Norcold Refrigerator Not Drawing off Solar?
jd1923 replied to Cort's topic in Mechanical & Technical Tips
I have 450AH lead acid. Normally overnight, running the inverter, TV running 2-4 hours, furnace running some (fan takes a bit of amps), etc. we would be down to 84% lowest to 89%. The fridge on DC took at least 20% (90AH) left on by mistake. We run fridge on DC while towing, ever since I learned that from this forum. Never thought of it running past RVs. If you have the battery life, use it when you want to conserve LP. Run your fridge on DC when you want to. While towing, sometimes our fridge draws 6A or so. When sunny in AZ, which is like almost always and even in the winter, we can drive and get +A from the solar and -A from the fridge on DC and it can balance out to 100% SOC when we arrive. When cloudy we still have at least 92%. I have also disconnected the +12V form the 7-way trailer plug, so it's ALL solar. As far as your Bluetti and portables, I'll let someone else chime in on how. Many have a SAE connection terminal just behind the battery bay. I prefer to have everything permanently installed. When I upgrade to Lithium, I may mount another panel or two up top. Rarely, when we get extra low SOC after multiple nights boondocking, I just spend a night at some campsite, recharge, fill the FWT and my truck mounted tank, visit the dump station and were ready for another 4-7 days out. Ha, maybe we don't need Lithium or extra panels! -
Norcold Refrigerator Not Drawing off Solar?
jd1923 replied to Cort's topic in Mechanical & Technical Tips
@Ray Kimsey thanks for explaining the prioritization used in the AUTO mode, not enough patience while camping for me to figure that out. @Cort ours has run on DC while the LP is on. In fact, Chris is generally switching it to DC while I'm outside breaking camp and will turn off the LP, in no particular order. Also, ours switched to DC one dinnertime without knowing it and found our house batteries down to 63% at sunrise. We were running the furnace overnight too. Of course, no +A on solar overnight! We always have to fight the panel to get it to switch to DC. I believe we hit AUTO and then DC. And yes, as Ray wrote, in the case of a TT it is the house batteries, the "car battery" aka starter battery is not in play. -
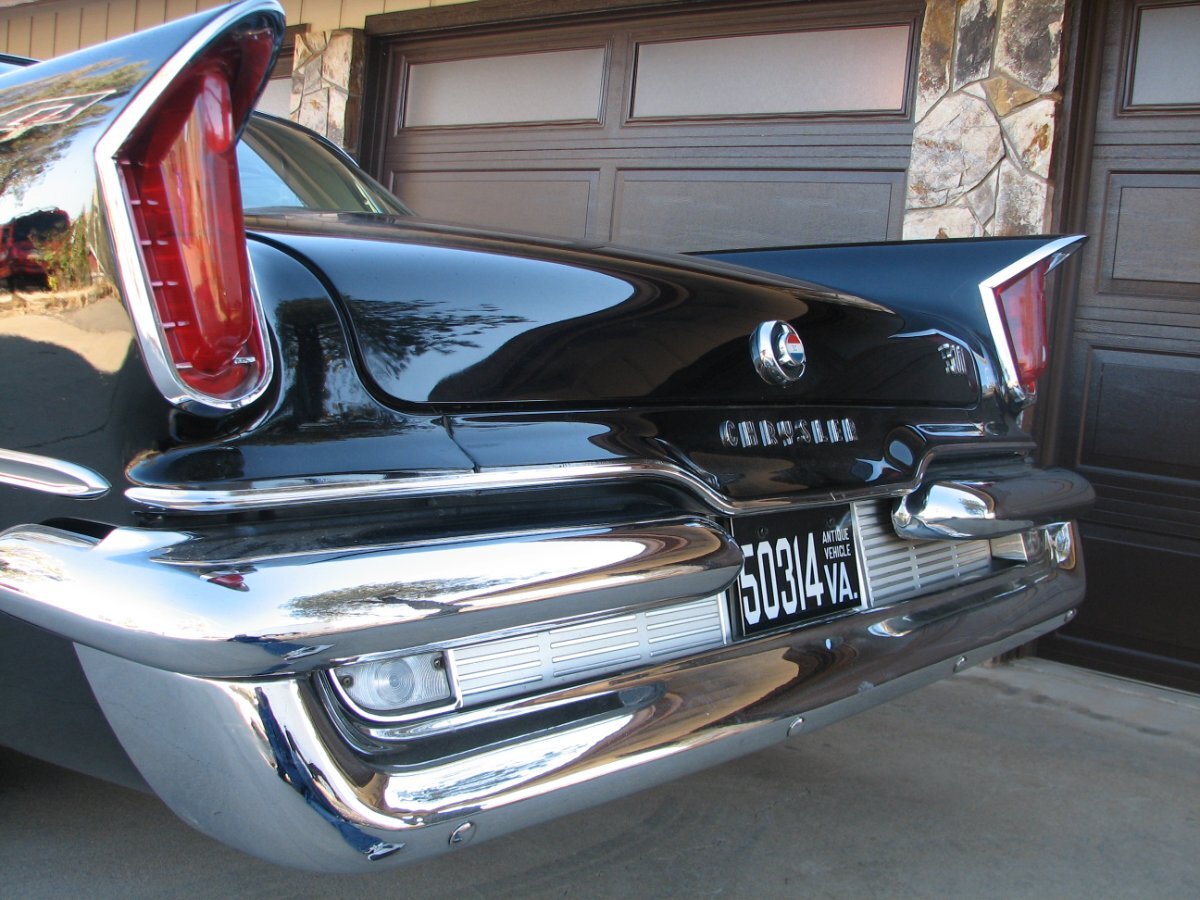
OMG Ken, wow! I see you are from the beautiful land of 10,000 lakes, frigid temps half the year and a whole lotta street salt! (This is one reason why I started the thread, re listing your location.) Good addition though. I would not think that part to be so easy to source. When I used to restore old cars, before working on the paint (which I jobbed out), I would remove EVERY piece of trim. Now it appears I am in the restoration hobby again with an old Oliver! The 2nd pic is the rear of my '59 300E (owned it 1992-2010). All trim, all stainless, all chrome, everything was removed. Then it only cost me $200 (1996 dollars) to get the paint buffed/detailed, on a 10-year-old lacquer repaint. It did cost 1000s more to rework the stainless, chrome the bumpers, purchase NOS lenses, etc. and likely 1000 hours of sweat equity (don't have that energy anymore, half-day labor now vs. a 10-hour day was normal back then). When I get around to paying $$$$ to get the exterior fiberglass redone professionally, I will remove many trim pieces like this, so they can hit the whole panel with a buffing wheel. Until that day, ours will get duller as I collect parts like these, prioritizing jobs like a new AC unit. Check out the doghouse handle on your hull a 2018 vs. ours a 2016 life in the southwest! I will remove these handles for the finish work, use a light polishing wax and remount them.
-
And if this is the correct cover, again it looks a little different, it's only $10 with tax. BUT, if I had the can of paint on hand, paid for, I would do the same and save the $10!
-
Agreed, but personally we are going to remove as much silicone on our Oliver as possible. IMHO, silicone caulk should only be applied to household bathtubs and showers. If I was to order a new Oliver, my first custom request would be DO NOT CAULK anything. I'll put some where needed myself and not silicone. What a mess. Considering our climate and perhaps an annual trip to points humid, I'll just go without. I see y'all had quite a rain-day at the Rally. For us that would be 1-2 days a year. And why do people caulk on top of old caulk. That's just lazy! I'm looking for a silicone remover, that's a gel or something that can sit overnight on the vertical seams. Hit it with my pressure washer the next day. I pressure-washed the Oliver when we got home last time. Blasting every seam and every angle against the windows. As a precaution, Chris was inside with a towel when I hit the windows. Keep in mind the pressure in my high-end tool is intense (near 3000 PSI), 100x a hard rainstorm. We only had a little water when I hit the window glass constantly very hard at all angles. I was glad to see all window weep holes, expelled a bit of dirt at first and then blew clean water. BTW, this is much easier that removing that surround for detailed cleaning. I replaced the rubber last year and I can tell everything is clean again, in working order. Anybody know why OTT caulks the fender flares? OMG, if water was to leak there it will get your tires wet!?! 🤣 How crazy is that? What is the thinking here? Why is our wet bath caulked everywhere? Is it not a formed fiberglass inner hull? Or is there truly a seam between the vanity and the walls? Or is it people think it looks better?
-
Brought up in Chicago and TG we left there 25 years ago! Also thank goodness when we get snow up here in the Bradshaw Mountains of the Prescott NF, Yavapai county uses a sand mixture without salt. And in the spring, they run the street sweepers right down our street. Nice! And thanks @KenB. I had seen these on Amazon for $6 and when I need another item on eTrailer I'll get a set of these to combine shipping. Ours are pretty good, but #113 is 8 years old now in the AZ sun. Not as shiny as once was When I get around to a professional de-oxidization (is that a word?) and gelcoat of the outer hull, it will be nice to first remove most trim items and do the job right. Other items I will replace at that time: Furrion RV Outdoor Receptacle Cover - 15 Amp - White Furrion Accessories and Parts F15RCSPSAM (etrailer.com) (not sure this is the correct part#) Amazon.com: Sea Dog 337150-1 Screw Out Deck Plate, 5-7/16" / White : Sports & Outdoors (could not find on eTrailer)
-
We owned a Class-A, then a C and now our Oliver, a progression of down-sizing. Never considered a 5th wheel. They just seem unnatural in some way. Think it's crazy every time I see the HUGE ones on the highway and more so on some narrow country road. The guy Art and D noticed @MAX Burner didn't learn from his first maneuver. Unfortunately, it will likely not be his last. About 10-12 years ago we were on a cross-country move with a cargo trailer. Pulled in for fuel and for a moment I forgot I was towing. Went around the pumps quickly and too closely, then all of a sudden my brain said STOP! If I did not regain my wits, I would have hit the bollard hard and destroyed the trailer. After my heart moved back down out of my throat, whew! I slowly backed up to correct. You know that thing we say about our Olivers? "You hardly know it's back there." This was the case with this trailer. Always remember it's back there. Chris and I say often, "Who is that guy? That's always on our bumper!"
-
Newbies taking the plunge - Are we missing anything
jd1923 replied to Dennis and Melissa's topic in General Discussion
Reads like a great time for all! Thanks for sharing your start-up adventure though all these pages. Love every bit of it, except maybe the line above! I'd be feeling every sport I've played, every maintenance job I worked and all related arthritis and injuries. In our family, our son is good on the floor! God bless. -
Alcan + D52 + Monroe Performance Report...
jd1923 replied to MAX Burner's topic in Ollie Modifications
Got to be, going from a 10" to a 12" drum. The spindle should be beefier too. There is more braking force in the larger drums & shoes, so everything must handle greater force. Sure @MAX Burner will confirm. Big investment, new axles, leaf springs, wet bolt/sleeves kit, shocks, am I missing anything? It doesn't make sense to me to do one w/o doing it all and at the same time. I may just have to start hoarding parts as I can and wait for the right time! GJ at least you already had a Houghton AC upgrade and I need to do that too! Hmmm, what will be first? I'm starting with plumbing fixes, rerouting furnace ducts, install the new bath fan already purchased and a half dozen other tasks, which need my labor and not a whole lot of up front $$$. It's going to be a fun Ollie summer and I have 3 weeks off starting June 15th to get started! -
I know Wildpeak tires are a favorite brand of the 4Runner/GX offroad crowd. Would not have thought of them for LT trailer tires on the Oliver. The tread has a solid rib pattern for towing though - Nice!
-
Member Profile & Signatures - Where are you located?
jd1923 replied to jd1923's topic in Introduce Yourself
Thanks Bill, for leading by example! 😂 -
Does it not turn at all? The blower motor has a dedicated fuse. A blower can go completely dead yet uncommon. If you have only one speed, then it's the external resistor and not the blower motor. The fan on our TV was making squealing noises on our last outing that would change pitch with the 3-speed fan switch selection. I pulled it and it made the same sound when bench testing. The Dodge OEM is a $280 part retail, so I tried 2 Amazon aftermarket motor/fan assemblies, and both had issues. Tried Amazon since returns are easy. Today I thought to clean the OEM fan and motor, manufactured by Denso (A+ quality). A cloud of black dust blew out of the motor housing through to cooling port (23 years in the desert and 162K miles). Cleaned the fan. It turns with so much more power than the brand-new aftermarket item. No more squeals at any speed and it's reinstalled (under dash on passenger side, rear screw is a PITA, Ford likely the same location). Hopefully you tested the blower fuse with your buddies at the Rally. Your truck is long out of warranty, so be ready to pay $400-$600 at the dealer for a new blower installed. Car guys on the forums use the term "stealerships!" I only go there when under warranty or to pick up parts ordered online at a discount. Ford has a good system to buy online by VIN# and pickup at your choice of dealer location with no S&H costs. And always have a good local independent service shop for better price and service.
- 1 reply
-
- 1
-

-
Every time I read a post, new members introducing themselves, or someone with an issue or question, my first thought is, "where are they located?" We all have interest in location, or we would not be interested in RVing! Those of you with the colored maps in your signature are certainly into this. My semi-retirement job is online learning for PMP certification. During class introductions, I always ask, where are you located? City/state in the US, Canada or where else in the world? Being a member of many forums, I always have Prescott AZ in our signature. For us, Chris & John, it means if you're traveling through the SW, PM me come visit for a few days and stay a while in the greatest small city in Arizona. We would love to meet you! For example, for over 15 years we were members of the Chrysler 300 Club International (I had restored our '59 300E during that time). The club published a member book, with complete contact info. Members could opt out, but rarely did. Members cruising these old cars cross-country could contact others for a visit. We counted on each other when needing help in a breakdown situation. I once delivered a spare part I had on hand to a member in distress, stuck on the shoulder of a nearby highway. Without my help, they would have needed an expensive tow and be stranded for a week or so to acquire such an extremely rare part. We became good friends. Location also matters in our repair topics, sometimes as much as hull #, really. Location determines climate (hot & humid to cold or dry), altitude considerations, east/west or north/south, coastal or inland all has different considerations as much as camping style. We just parked our Oliver for the summer as many of you just pulled yours out of winter storage! All members on our Oliver Forum have a profile page and a signature. Location is a field on the profile but if I was to guess only 10% of you have entered your location. I understand we must be careful in this day, but City/State is not asking your SS# or even your street address. For example, @MAX Burner's signature states, "the Great Southwest." In communication we realized we're just 6-7 hours away, northern NM to Central AZ, a relatively short distance in the west. We now have mutual open invitations. I learn to trust the members here, who put their gut emotions into helping others on our forum. Just a suggestion, but I for one would love to see your location posted on your profile page and signature line! And again, please PM me when traveling across our great state.
-
Trailer batteries not being charged by TV while under way
jd1923 replied to DavePhelps's topic in General Discussion
Just remembered how I tested the black 12V wire. No TV connected, just check at the plug. Use a voltmeter or 12V test light and connect the black 12V to the ground at the plug. It should show the voltage of your house batteries (light ON). Disconnect the black wire on the busbar, as shown in the picture, to produce an open circuit and it should read 0V (light OFF). Remember whenever the 7-way plug is inserted into the TV, you always have this connection. Current will move either direction, from high potential (voltage) to low. OTT recommends removing the 7-way plug whenever parked for a period of time, certainly when camping overnight. I do not want to do that, as we often stay hitched and what if you forget? Less setup/tear-down checklist items the better! One evening prepping dinner, our fridge somehow got switched to DC. Operating that panel is NOT straightforward! I woke at sunrise to find our 450AH LA house batteries down to 63%! Sure glad the TV starter batteries were not affected, or we would not have been able to break camp and drive off that morning! We also want to switch to DC when towing. This time we had to pull away with LP on. I have our black wire always disconnected, labeled and taped below to the insulation of another wire so not to hit ground. Our solar generally produces enough +Amps to cover the need, or when cloudy we arrive at 94% +/-. -
Congrats! and please stop being shy. Hope to meet you at a rally. We're one year in on a pre-owned and looking forward to meeting many members soon. Just an idea...