jd1923
-
Posts
3,368 -
Joined
-
Last visited
-
Days Won
255
Everything posted by jd1923
-

EPOCH LIFEPO4 batteries on sale right now
jd1923 replied to Jps190's topic in Mechanical & Technical Tips
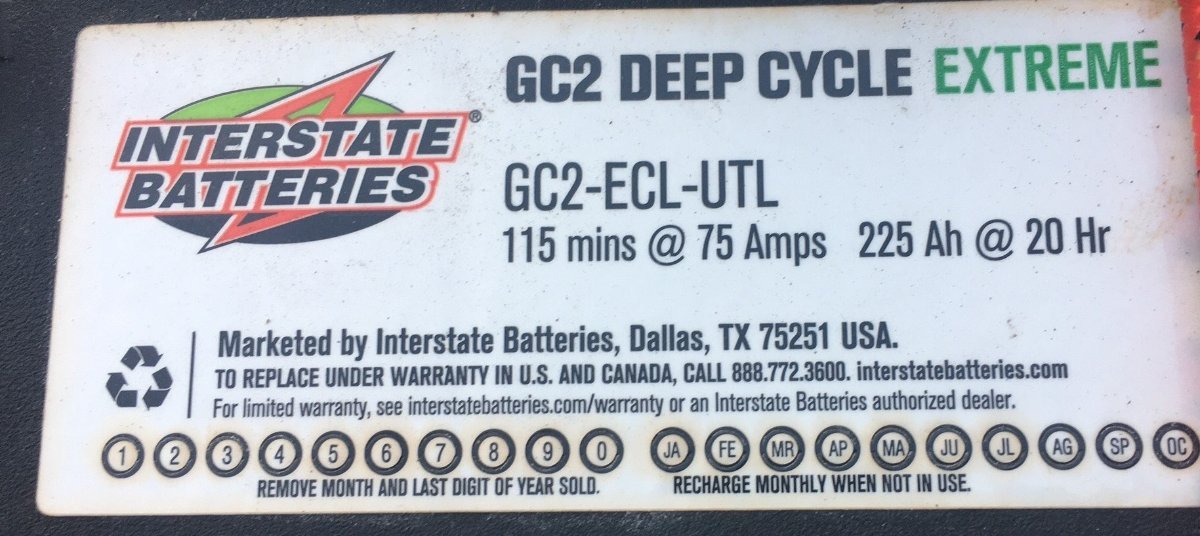
Prior owner put a in a set of Interstate 6V batteries, from the label is where I added up 450AH at 12V (on the set of 4). The installer did not mark the labels with date codes, but I have the original receipt. Yep, 50% down is suggested. You can actually run them lower when needed (I made this mistake a few times on a prior set) which reduces the number of duty cycles. Just giving you a reason to upgrade. You know @SeaDawg if you keep taking such good care of your AGMs, you're never going to get lithium for your Ollie!
-
So then, the BM-712 signal is not any stronger than the SmartShunt Bluetooth signal. I haven't tried mine while towing yet. I was connected yesterday to drain the tanks and too bad I did not think of it. Soon, I'll back my truck up the Oliver to see. I wanted signal strength to my living room! You would think at a minimum to the driver's seat! On other forums I read the Smart Dongle has a stronger Bluetooth signal: Amazon.com: Victron Energy VE.Direct Smart Dongle (Bluetooth) : Electronics There were many forum members complaining about buying the SmartShunt and having to spend more $ on this. Also, you may need one of these to connect: Amazon.com: Victron Energy VE.Direct Cable, 5.90 ft : Automotive which comes in various lengths. We could get the Bluetooth signal out of the battery bay, higher up and run it closer to the TV. I don't have the time to worry about it now, but perhaps another $60 would allow the app to read the signal from your driver's seat. I'm not betting on a 60' broadcast to my living room, but perhaps it could if I mounted the dongle rear left of the Oliver where I have line-of-sight. Closer to my living room, would be farther from the TV driver's seat!
-
EPOCH LIFEPO4 batteries on sale right now
jd1923 replied to Jps190's topic in Mechanical & Technical Tips
Wow John, and I liked the 460AH when you first posted it. 600AH in the Oliver battery bay, priceless! I'd add that before adding more solar wattage. Recent purchase of our older Oliver came with 450AH 6v lead-acid batteries, now 2 years old. We gotta get at least a season or two of camping in before anymore major upgrades, but (2) Epoch 300s is now on the Wishlist for sure! -
To me it's like paying two insurance companies to cover liability on your truck! Borderline paranoic, no need from any engineering or electrician point of view. The PD EMS-HW30C is quite a capable device, which over 99.9% of the time can be reset by unplugging shore power. You'd likely have plug this into a 240V circuit to get the E10 error "Replace Surge." I just installed one in our older hull, since back then OTT did not include one. If you have to replace it, a small Phillips to open the cover and a flat-blade screwdriver to do the rest. The AC wires coming in (black, white and green) and the same 3 in the same orientation going out. The hot on the output side goes through sensing coil, and that's that. What if a lesser outdoor unit failed, caused a dead short and in turn killed your EMS-HW30C? Sure glad I will not have to work one more camp setup/tear-down task and stow another device! But that's me and I never wear suspenders! As they would just give me a kink in neck or sore shoulders.
-
Not "wide bands" and you do not need much. The installation above, each panel had eight 1x3" 3M VHB 4950. BTW, I like this model for many things, but there may be better versions over 4950, they have so many. I have removed some on several kinds of surfaces. I start with an old soft putty knife with rounded corners, to break the seal and get the bulk off (you don't get too far with plastic scrapers). Then let a little Goo-b-gone soak in. Real damage would come from 8 min or 12-16 screw holes per panel and all the Dicor crud to remove. I've seen YouTube videos where the use VHB tape and then put "Dicor over the brackets to be safe." There is a difference between being safe and just being stupid.
-
And 20K vs. 60K miles is a big difference. You certainly have ample time at near 5 years with relatively low miles. My advice is the same advice Mike already gave, but I'll say it another way. Don't buy tires from OTT, as they are a long way from a Rocky Mountain trip, down to Key West, up to Maine, or wherever you will travel. Discount Tires is likely the largest national tire chain in business today. Buy from them when the time is right (I stick to 7 years max) and whenever you need to check pressure or add air, fix a flat, replace a tire or leaky valve stem, or just to rotate and balance, they will be nearby at no charge for many of these service needs. You may pay a little extra up front for this national service coverage, but it could save you later. They are everywhere and generally have very large parking lots and driveways, easy to pull into with a trailer (except for their store up here in Prescott, AZ!) The fact that they have a store up here, in a small town in the mountains says a lot too.
-
So you got 80", fore to aft, longer and narrower than what we have (yes OTT could offer this). Keep us posted after you thaw out up there! Re VHB tape, I use it on bracketed models, anything and everything. It does not work well with textured surfaces but will bond to anything clean and flat. The picture below is the solar install I added on our Bigfoot Class-C. (BTW, every white-colored accessory in this picture was installed by me. I was not up on VHB when I install the Dish, so that item is screwed and Dicor'd.) I used two sets of solar mounts per panel to be safe (2 sets, 8 standard Renogy brackets) to install these extremely heavy panels: Pro 200W 12V Monocrystalline Solar Panels w/ 9BusBar Technology -Newpowa Zoom in on the mounting brackets in the pics, no screws, the brackets just sit on VHB tape! You could not budge them. The Bigfoot also has a fiberglass roof. Screws in fiberglass are an issue long-term, 3m VHB will outlast a screw mount.
-
Water System upgrade for better water flow & pressure
jd1923 replied to jd1923's topic in Ollie Modifications
Not sure how accurate sound noise (dB) measurement apps are? I just downloaded one. However, when using any tool, carefully in the same manner, it should show a reasonable relative comparison. The new water pump was at 50 dB (pretty quiet!). I closed the basement door to the water pump, placed a 4" dinette seat to cover the opening and placed the phone on the seat cushion, showed 50 dB. I went into the bathroom, ran the water holding the phone down below the sink to measure the noise within vs. the water pouring, it was 73 dB. Lastly, I started our older Dodge Ram Cummins, on a colder day and ran the app while idling. The 2nd Gen Dodge Cummins are noisy, not like the older Ford PowerStroke, but certainly noisy! It came in at 64 dB. Conclusion, the plumbing under the bathroom sink in our older Oliver is louder than an old Dodge Cummins diesel on a cold start! That's really bad.
-
@Geronimo John, I was writing as you were! See my previous post. JD
-
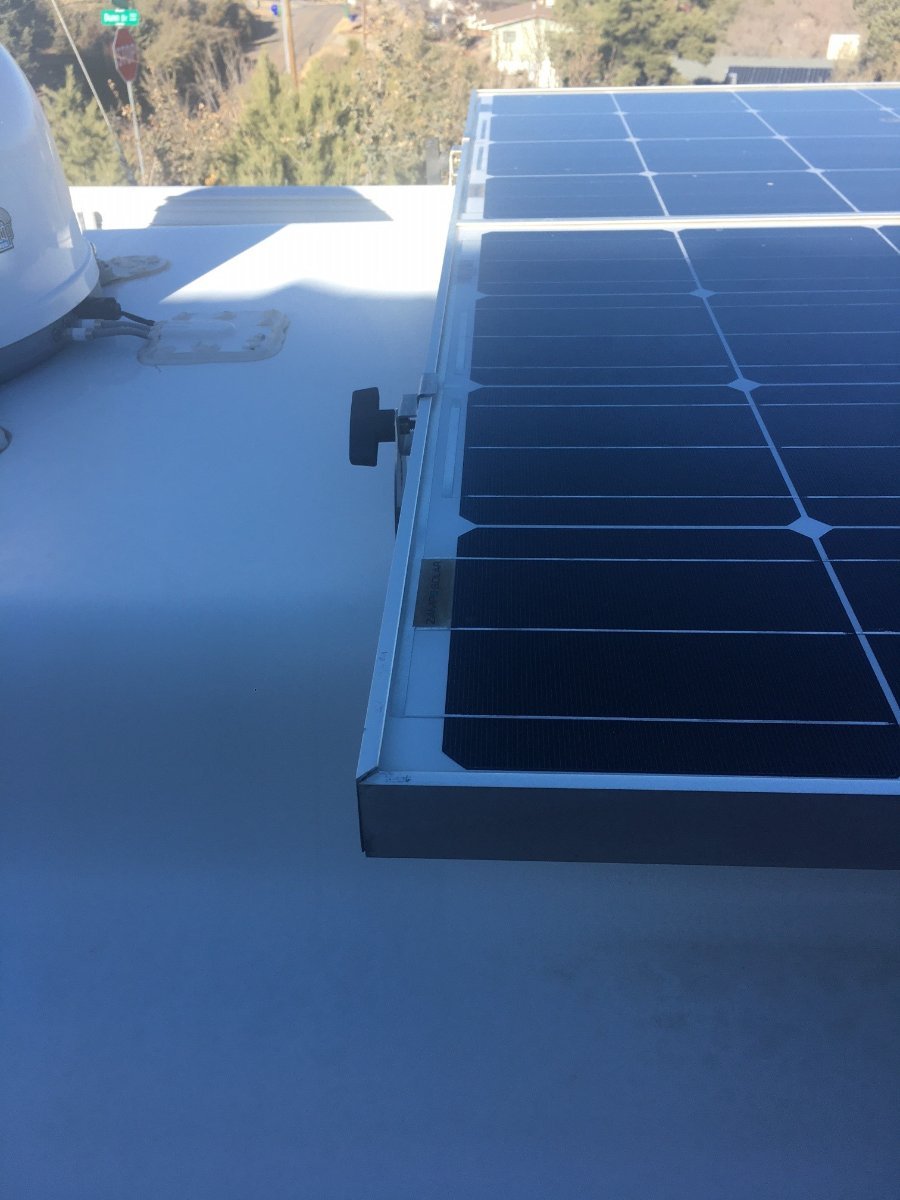
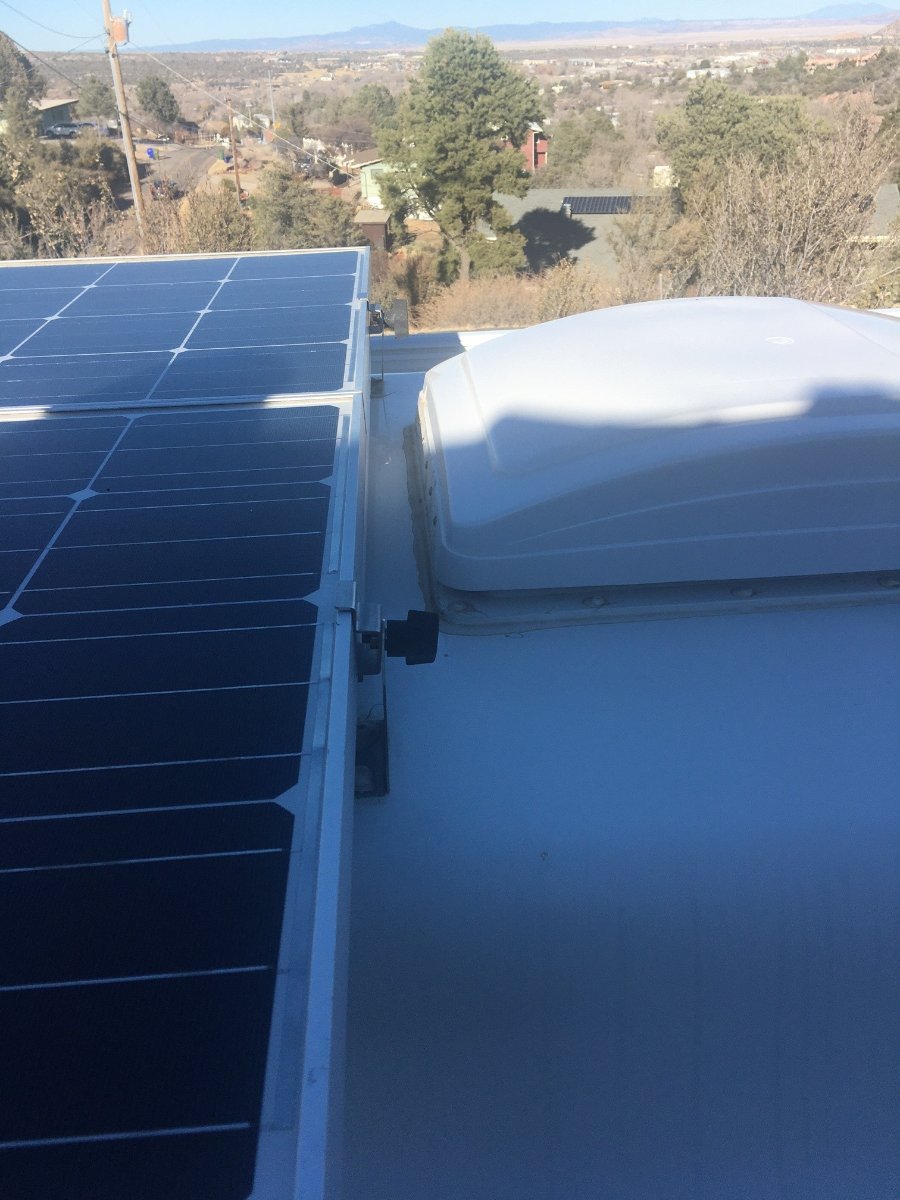
@SeaDawg and @Geronimo John, Got back up there today, took more pics and measurements... End-to-end there is 84" between two hard constraints, the bathroom plumbing vent and the MaxxFAN. The picture showing the tape measure starts at the rear solar panel mount. You can see from the picture I posted yesterday that there is another 2-3" behind that rear mount to the MaxxFAN. So approx. 84" total front-to-back, where an 80" panel can fit nicely. And two of these, running front to back, could hardly be seen from below! That would be nice, clean and mount nicely. I would mount mine with 3M VHB tape ONLY, no need to screw into the fiberglass (you would only need to drill two 1/4" holes for the solar charge leads. I read here where some members would not put solar up top to detract from the beauty of the Oliver. Two of these lengthwise could hardly be seen, but if you mount 3 panels, wow we're seeing it, just sell the generator! Personally, I would move the TV antenna, and in my previous post I suggested one method. I'm adding a TV antenna soon, and I plan to mount mine at the rear, drill ONLY a 1/4" hole into the roof, straight down to the attic (with only a little dab of Dicor self-leveling sealant you're good). You're there with a straight short cable, not 30+ FT of multiple coax cables and connectors that OTT uses. From what I could see, while up there on the ladder, at 80" wide your panels would hang over the awning(s) and be as wide as my awning, left and right (sorry, not good with the starboard stuff!). Think another 11" each side when looking at mine. Hopefully my measurements and pics will help your plan. Best to you and stay warm somehow! Sheesh I cannot fathom how people install stuff today! Look at my Winegard below. I would have used NO screws, no bracket wings and NO Dicor! The coax only needs a 1/4" hole and VHB to housing to clean fiberglass. It ain't going nowhere, I promise!
-
Really, you're thinking 80" wide? It seems like mine stick out enough sideways at 52" wide. And BTW, if you're thinking 3 panels, it almost doesn't matter at 78x80" total, but 3 panels would install easier sideways. Yeah, the OE2 is 7 FT wide, but not at the roof and then the very top it is much narrower. I would go with 2 mounted lengthwise, if it were me. The antenna is an easy move, though you would likely have to run the coax on the roof for a foot +/-. You would seal that opening and the newly installed panels would then cover the current opening. I'm working and more day out there today (just finished the sanitize process). I'm going to take some more measurements for you, like how much length between the bathroom fan and the MaxFAN. More later...
-
Water System upgrade for better water flow & pressure
jd1923 replied to jd1923's topic in Ollie Modifications
After working this project, I feel like I spent so many hours and considerable money, as they say, "putting lipstick on a pig!" Others may prefer a limp water system, great if that's your preference, and keep lifting those mattresses! I like mechanical systems to perform, allowing the user freedom to choose how it's used. At home, I widen or remove all the government-imposed restrictors in faucets. We conserve in our own way, eliminating slow drips, minimal water for dishes, not rinsing recyclables, using the diverter to stop water flow when not needed, and in other ways. But when I'm going to spend 3-4 minutes in the shower, I want a true shower and not dribble! The new pump is extremely quiet, while the OTT plumbing system is not, at least in our hull. There is more noise under the kitchen and bath sink cabinets, by far, than the pump itself. All that rigid PEX is likely part of the cause as well as other restrictions. The bathroom vanity is really bad. I was able to increase flow at the kitchen sink by 33%, but only 5% at the bathroom sink which means the shower! Any ideas on where the restrictions lie in both hot & cold-water lines the bath sink? I will say the toilet bowl fills a good twice as fast with these improvements. The plumbing is so LOUD when running water. Loud inside the bath vanity, where there is no access panel! I'm not really wanting to tear that apart now has many here have done. Perhaps some do not notice, but after years of auto mechanic work and troubleshooting, I hear every little sound anywhere. I'm going through the sanitize procedure today and will then pull the trailer to my driveway where I can get the rear downhill slant necessary to drain the fresh tank. Then blow out the lines again, since it's getting colder the next few nights. We might even get a little snow tonight. No antifreeze in ours, since next week we're camping at Burro Creek and Vulture Mountain at Wickenburg! (We were going to go before Christmas, but this and other projects went long.) 😌 -
Water System upgrade for better water flow & pressure
jd1923 replied to jd1923's topic in Ollie Modifications
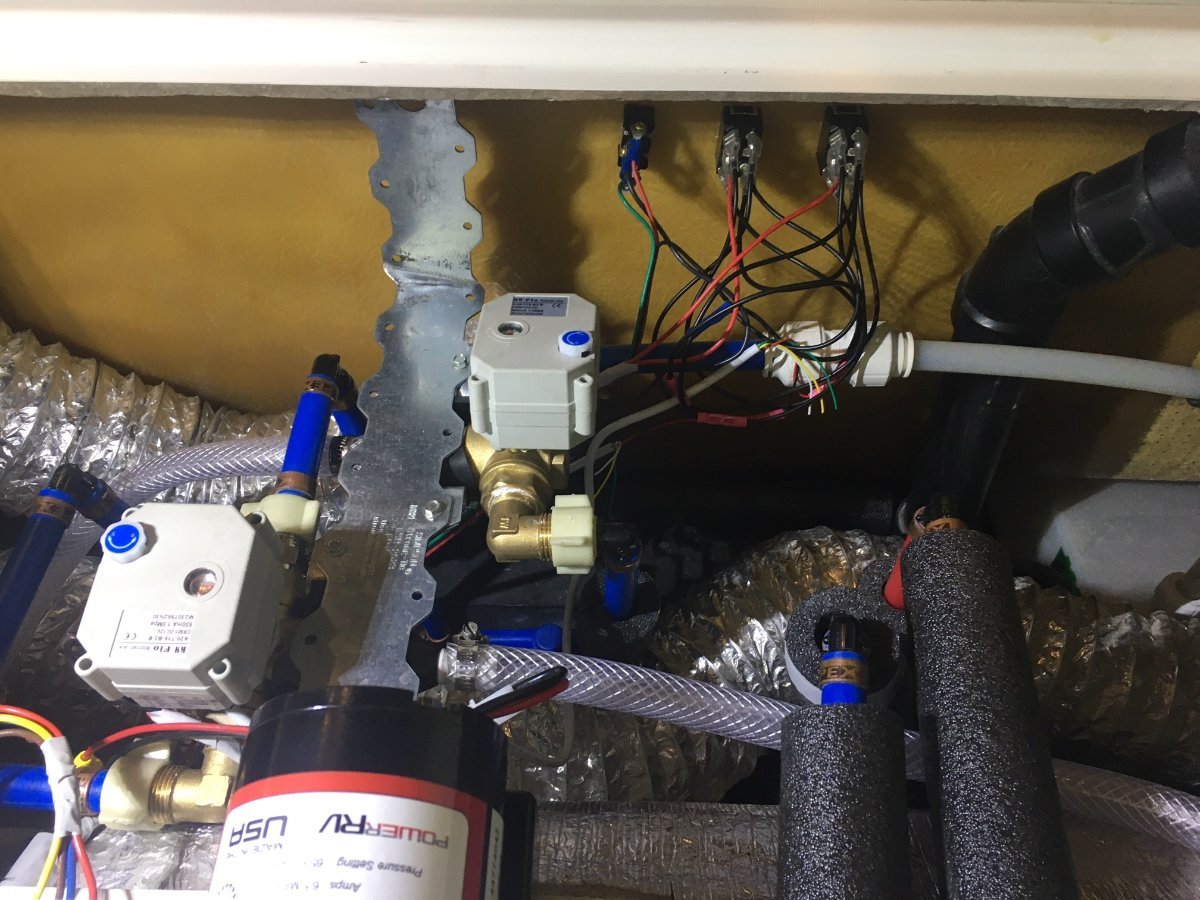
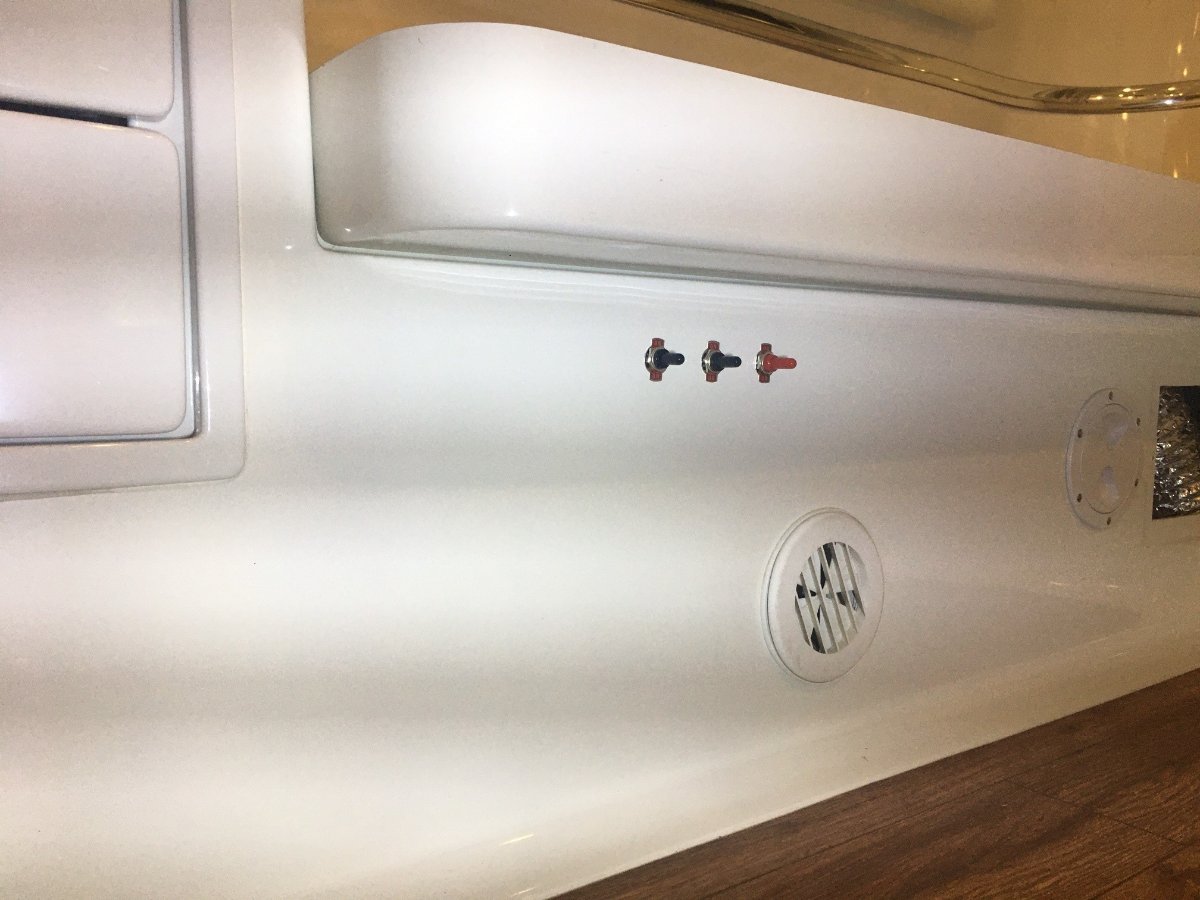
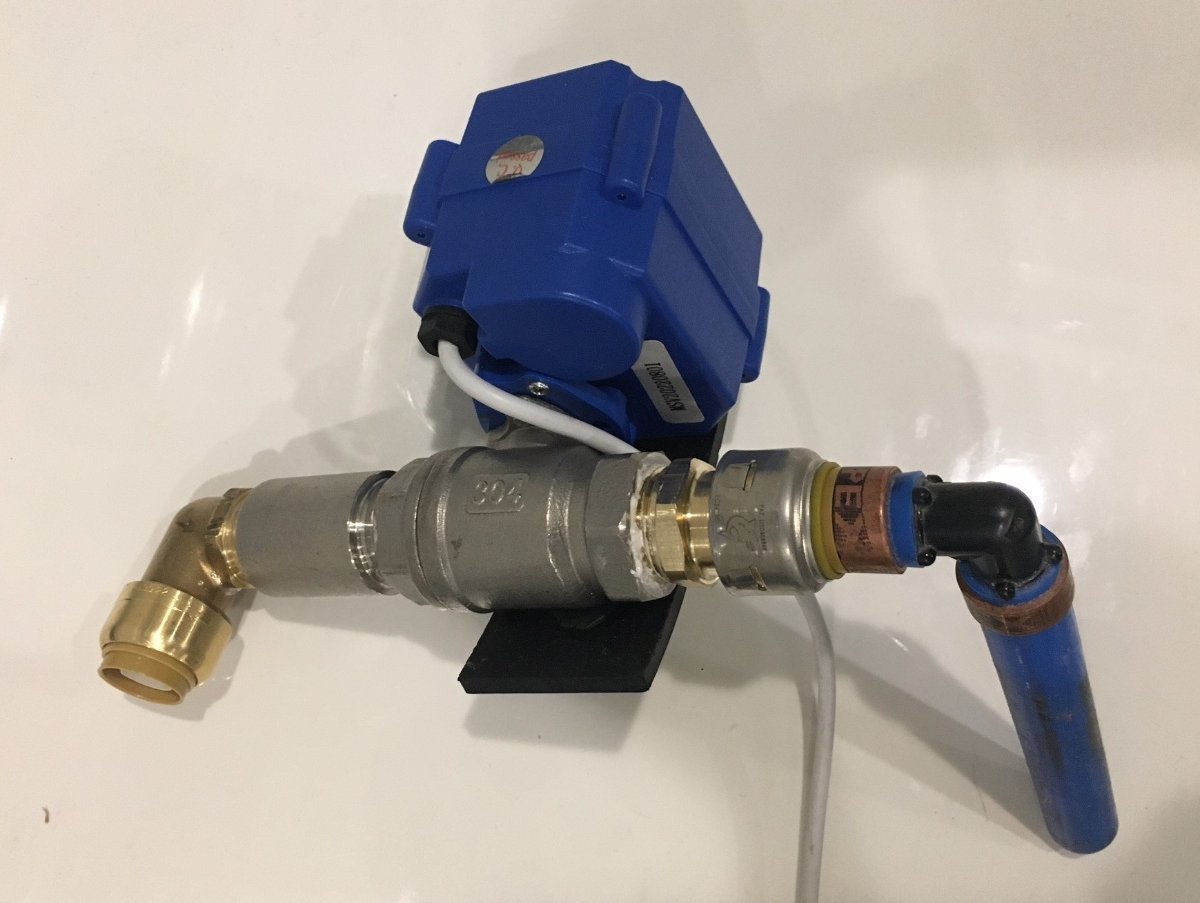
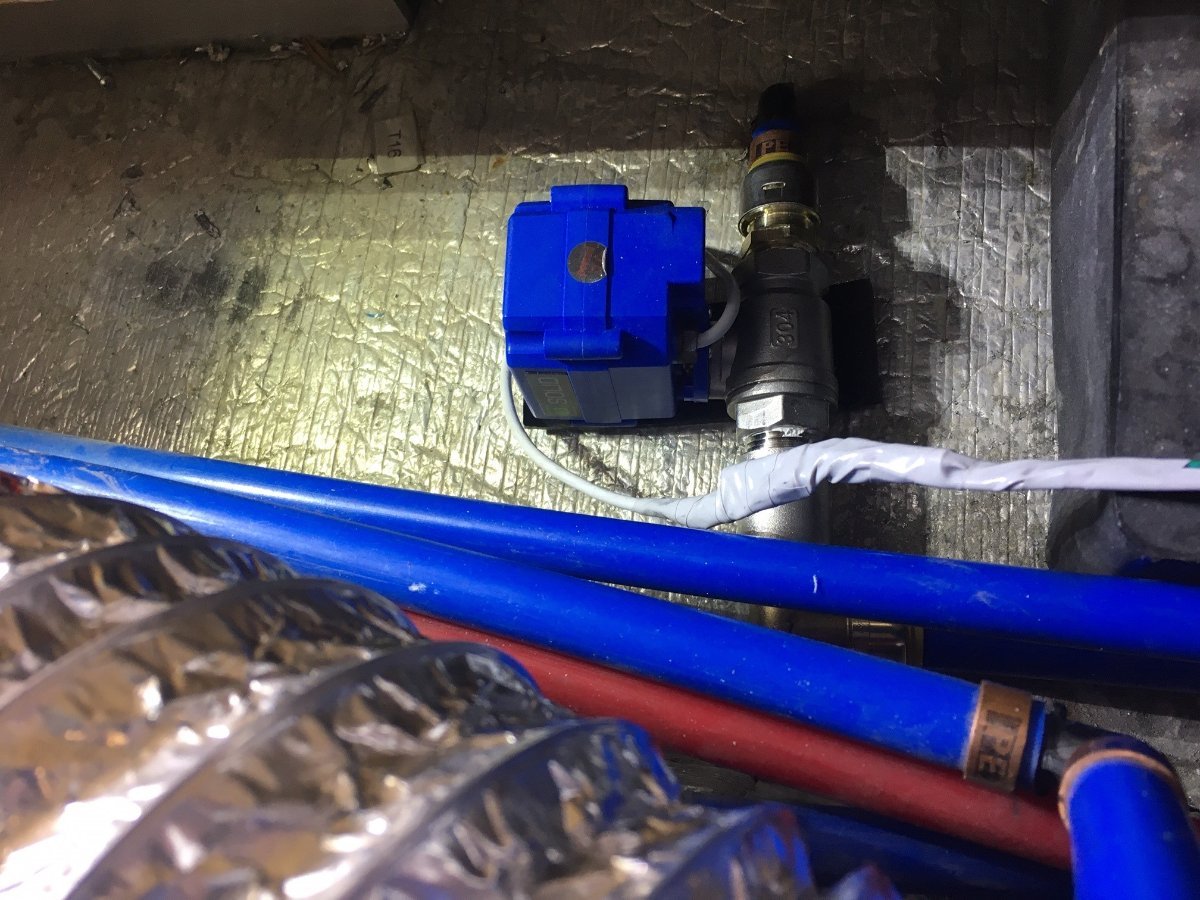
More detail to follow. In the next pic you can see the electrical switches and wiring. Yes, it's a bit complex to keep them all straight. A shout-out and thank-you to @ScubaRx for suggesting motorized valves wired to DPDT switches. Once you get the X-pattern of the wiring they're not complicated. After taking the picture, I wrapped each switch with electrical tape to keep the terminals in place. Each motorized valve has a rubber-lined steel U-bracket underneath the main bracket for support. It was the only way to do it considering the height of the plumbing and the installed bracket height. The structure is rather solid once it was all tied together. Lastly the toggle switches to the exterior. I drilled three 12 mm holes about 2" apart, in a straight line just 3" below the bed frame. The default setting is ALL switches up, for what OTT calls "Normal Camping Position." I wrote up an instruction sheet (PDF below, with a borrowed OTT graphic), but believe me, after all this work I have the settings down! Water Valve Switches.pdf
-
Water System upgrade for better water flow & pressure
jd1923 replied to jd1923's topic in Ollie Modifications
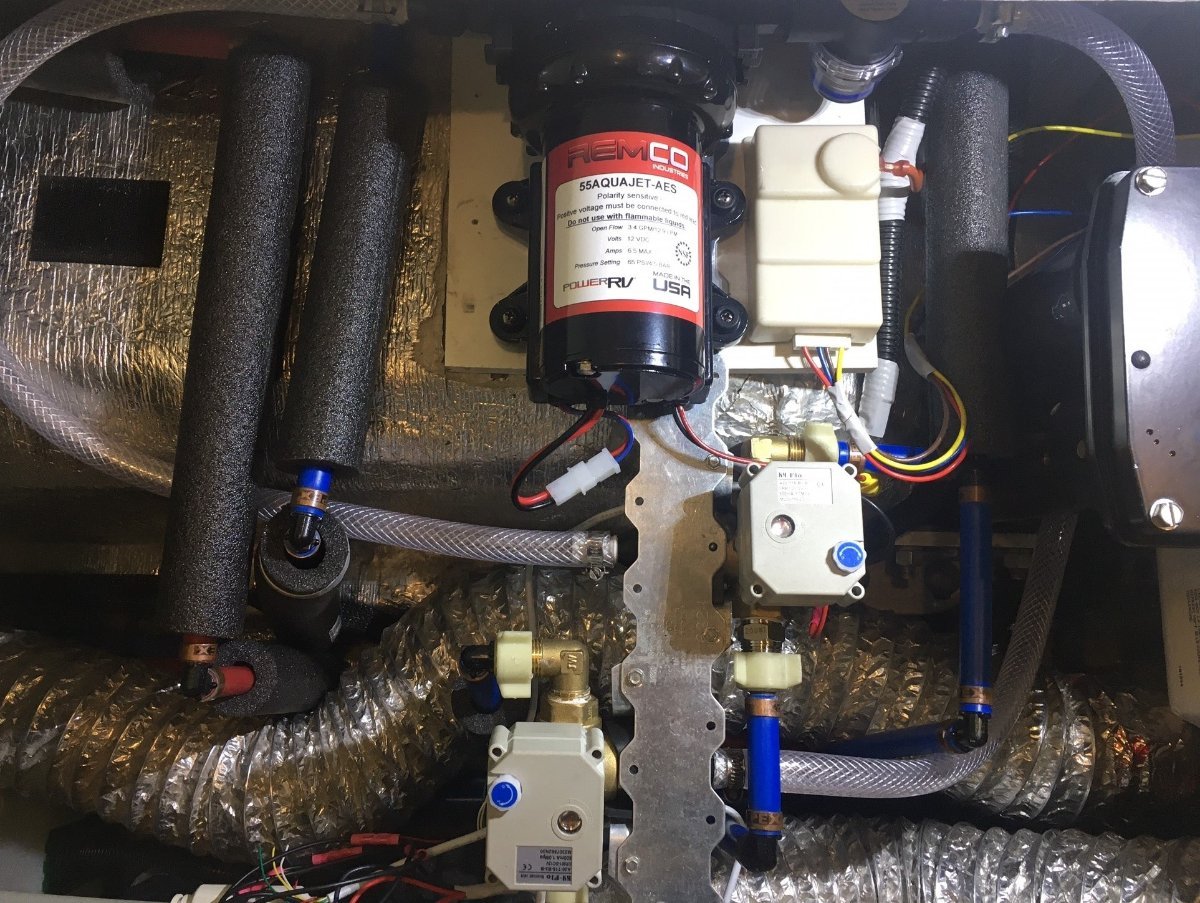
Here is our upgraded water system now completed. New water pump, Remco Made in USA, 3.4 GPM variable speed advanced RV water pump: AquaJet PUMP – Remco (remcoindustries.dreamhosters.com) Remco suggests that accumulators are not necessary for variable speed water pumps. This pump works better and is quieter than the OEM installed Shurflo, and they do cost more. Motorized water valves were installed for 1) fresh water source (Fresh Tank or Boondocking port), 2) pumped water direction (faucets or Fresh Tank), and 3) Fresh Water tank drain. I had to build a bracket to hold these valves as OTT had not mounted the manual brass valves (one leaned on the wheel-well and the other was suspended in air held only by the attached PEX plumbing). I was able to shape a bracket hung by two screws drilled into the internal fiberglass of the bed support (just off pic to the bottom). As you can see, the other end is held by the water pump mount. I cleaned up and taped the pump wiring and spliced 12V to the ball valve switches.
-
Hey @Geronimo John, I measured today as promised. The double panel on our hull measures 58 1/4" long (front to back) and 52 7/16" wide (width of 2 panels). Our roof layout looks quite different vs. your picture. I know you have an OE2, but your picture looks like maybe it's an OE1. I have the Winegard Sat up front, then about a foot of length, then the panels and 2-3" to the MaxxFAN. The pic above goes from bathroom vent to MaxxFAN all the length of the panel. I noticed a serial # Z2015071020403 on mine today, so thinking it's a Zamp panel. The measurements of the panels are within an 1/8" of these, two 170W panels, 340W total: Amazon.com: Zamp Solar Legacy Series 170-Watt Roof Mount Solar Panel Expansion Kit. Additional Solar Power for Off-Grid RV Battery Charging - KIT1009 : Patio, Lawn & Garden
-
Water System upgrade for better water flow & pressure
jd1923 replied to jd1923's topic in Ollie Modifications
Thanks @SeaDawg and @Rivernerd but as of today this job is finally done! Ha, I ended up with a 65 PSI pump and if one day the Fresh Tank drain leaks, I will need to cut the PEZ back further, add a coupler, but so far so good. RV pumps are spec'd anywhere from 45 to 65 PSI. I even noticed one model at 70 PSI. PEX is rated at 100 PSI. Not sure about any "plastic push-to-connect fittings." At least not on this old hull from 2016. They used only the copper looking crimp rings (see pic). I've had the Oliver plumbing pressurized at 65 PSI, for two full days now, no leaks and I was inside for hours, and the water pump did not cycle once, without turning a faucet on, so no leaks. Yes, the screens, faucet flow restrictors, etc. will constrain the flow (actual GPM). However, I am not impressed with the PEX fittings and valves used by OTT on our Oliver. The valves are 1/4" ID and the PEX plastic elbows have barely a 5/16" snug opening (see the drill bits in the picture). I find drill bits easier than using a caliper for ID measurements. This is NOT a 1/2" plumbing system! Flow rate at the kitchen sink, faucet restrictor removed was 1.25 GPM (filled a gallon bottle in 48 sec) with the OEM 3 GPM pump (Shurflo made in Mexico), and Now I have 1.67 GPM (36 seconds) with a 3.4 GPM variable-speed pump. More on the installation in a post coming soon!
-
Water System upgrade for better water flow & pressure
jd1923 replied to jd1923's topic in Ollie Modifications
Replacing the Fresh Tank drain was not a fun task, being very difficult to reach down at the bottom to work PEX! Also, my first time with PEX. I wanted to just cut out the drain valve, but after doing so there was not enough length to make a PEX connection, so I had to go upstream and cutoff the elbow. This is my valve assembly that just barely fit and then a picture of it installed. Hoping the SharkBite fitting connected fully (if not, our Fresh Tank could just empty while traveling). I should have marked the PEX tubing with a Sharpie, so that I could see how much is recessed (this thought came too late). To be sure, I lubricated the tubing exterior and hit the valve assembly with a short hammer! I can't pull them apart, so the SharkBite must have engaged. No leaks!
-
Water System upgrade for better water flow & pressure
jd1923 replied to jd1923's topic in Ollie Modifications
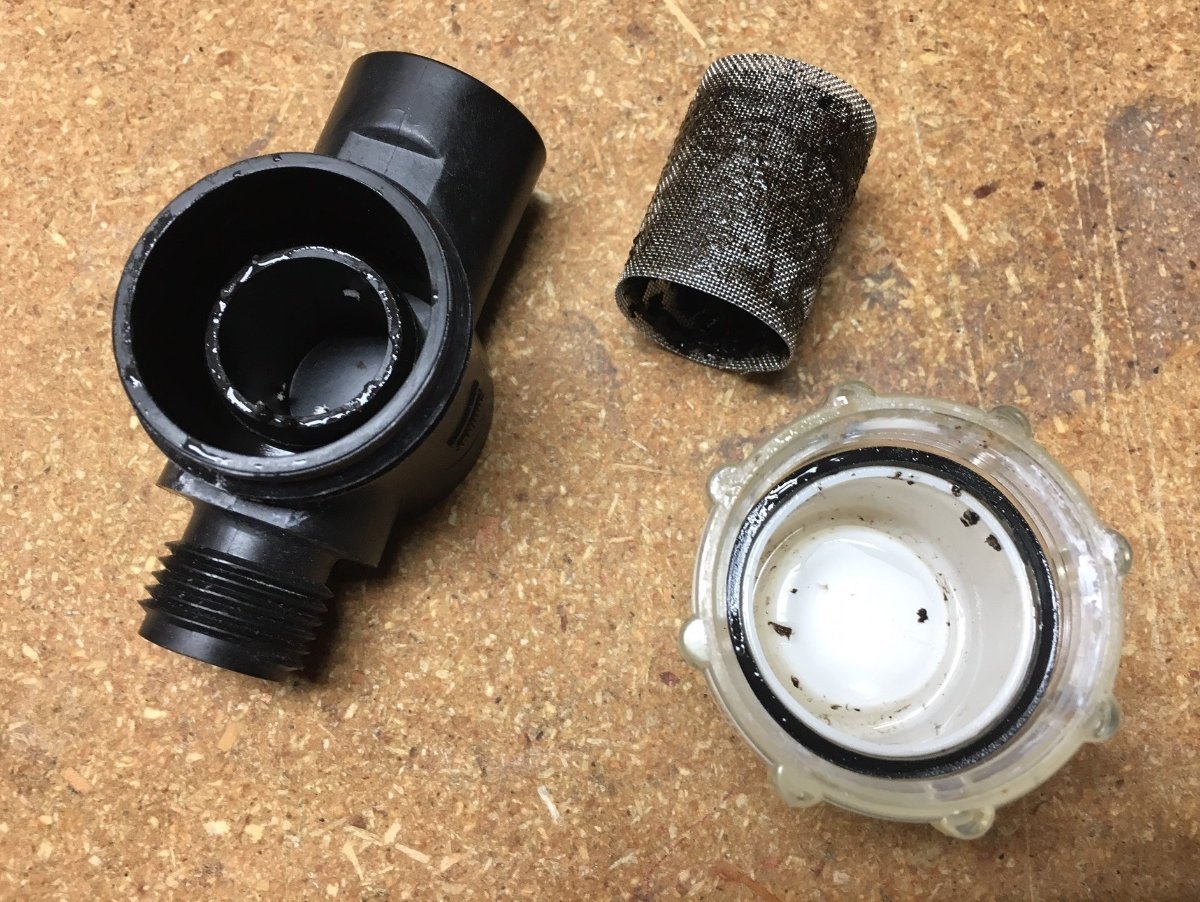
Well, this project has not gone as smoothly as I thought at first. The Seaflo water pump had a bad shut-off sensor, would not stop running after being bled. I bypassed my dual accumulator setup (pic above) thinking they might be keeping the pump from achieving cut-off pressure, but same thing. Found out on iRV2 Forum that this is perhaps common to the brand. They make their colors look made in USA, but CHINA is in fine print in the corner of the box. Many on that forum like the Remco, Made-in-USA brand, more on this later. Turns out my fresh tank drain was pushed up so that the plumbing was as high as the top of the tank. OTT does not strap this down. The weight of my new motorized ball-valve should keep it down. I did blow compressed air too. Honestly, our fresh tank only drains well when the nose of the trailer is steeply uphill. There are many reasons for slow water pressure at the faucets. Check out what the incoming water pump filter/screen looked like on the original pump! Should be cleaned annually.
-
GJ, I can measure mine tomorrow afternoon. Will update asap.
-
@mossemi, you gave me a good idea! The EMS only monitors the incoming 30A 120V shore power. The Inverter (any model) pulls from the batteries, inverting 12VDC into 120V AC at 60 Hz, and in doing so is truly independent of the EMS. @mccc99 do you have an Inverter 1800W or greater? Then disconnect shore power. Does your microwave run off the Inverter with or without the same error? Mine pulls over 125A (1500W) and runs fine on the Xantrex 2000W Inverter. Our last RV, the numbers were the same. This would be a good troubleshooting step. Let us know what you find!
-
One addition, I do not know what the number '7' means in your post. Mine shows 1) Error Code 2) Volts, 3) Hz and 4) Amps, if I remember the order, displaying each state for 2 seconds. However, mine is newly installed and it's never shown an error code. If the '7' is for previous error code (reading my manual now, but it is not exacting, has no display list), E7 means "Line Frequency High (above 69 Hz)." I would find it hard to believe the pedestal would be 70+ Hz and then back to normal 60 Hz when the data was read, but 70+ Hz could certainly freakout a microwave!
-
Flashing from one to the other is the standard interface and I read these numbers as being fine. Others said that already, but if the numbers are fine, it shows the campground pedestal is also FINE. You are getting 125V at 60 HZ and at the time of your reading, your Oliver was pulling 8 amps. Nothing wrong here! E0 means NO Error Code. You do not have an "EMS ISSUE" nor do you have a Shore Power issue! You have an internal issue with the microwave or its electrical circuit. Meaning issue is in your latter statement, "When I try to use my microwave it cuts off after a few seconds." When this occurs, does the AC breaker for the microwave trip? (Although our old hull does not have a separate AC breaker for the microwave. What!?) Does any AC breaker trip? If so, the microwave is pulling more amperage than the circuit design. Does the microwave "cut off" without tripping the breaker? Then your issue is within the microwave internal circuits (which means replace the microwave). Your PD EMS-HW30C is working as designed and the numbers reported by the display show a satisfactory shore power connection.
-
The Smart Plug looks to be perhaps a quicker connection? Water tight? What is the criteria? Is the OEM outlet/plug inferior? I like the screw ring on the OEM plug, it's in there, a SOLID connection. I'm with some others here, not my time and money. Sheesh, I've made a dozen upgrades in just 6 months, didn't think of this one. With solar we rarely connect, and the cord mostly sits in the Oliver trunk!
-
This is why @John E Davies in another thread replaced his single monitor with two special purpose monitors. Turns out this may be a bit overboard, a concern for those who are risk adverse! Not me, more of the risk-taking sort, being extremely lucky to have survived the 70s! 🤪 According to this org, Carbon Monoxide Facts - Healthy Building Science, "CO is slightly lighter than air. However, studies have shown no significant difference in measurements based on what height CO detectors are mounted." Thank you @Patriot for bringing this to our attention. Previous owner installed this same unit on mine. Hey, if this thing rings loud in the middle of the night, I don't need a switch. Just open the rear seat of the dinette and pull either wire away from the 3M Scotchlok used by OTT to connect it or use a wire cutter! To install a new one, yes pull the fuse, or if you're careful you can cut the wires, one at a time and wire it hot. That would be me, a low amp 12VDC circuit, just a minor jolt if you ground yourself! Just don't splice the hot (red) until you are ready to crimp it into a new butt connector. I would not have known these sensors have date codes, likely for legal vs. technical reasons, though I may be wrong on this one (does the sensor age or wear out in some way?). Looks like mine is good for another 2 1/2 years. BTW, the build date is not important, just as long as you are within the expiration date. Hey, who installed the USB receptacle? OTT did. It sure looks crooked (the pet peeve of the perennial installer)! I cut the flap off the USB ports since the cover just gets in the way (we don't use cigarette lighter outlets).
-
I installed the Victron SmartShunt: Amazon.com: Victron Energy SmartShunt IP65 500 amp Battery Monitor (Bluetooth) : Automotive I went with the IP65 model and @Ronbrink installed the other version (see his pic above), same $130 price on Amazon for either. Not that waterproof is a true requirement, but not a bad feature for the battery bay, and I like that it came with the wiring at the same price. Love having this, not having to look down at knee height for our Blue Sky display (as it was installed in our older hull). Those of you with the Victron SmartShunt, what kind of Bluetooth range are you getting? Mine is terrible! I recently installed two Bluetooth devices, this shunt and the LevelMatePRO. The shunt is installed on top of the outer battery. The LevelMatePRO is mounted to the PD5100 ATS under the rear dinette seat, so they are about 3 feet from each other. I have to be within 20' of the Oliver for the VictronConnect App to find the SmartShunt. Unsatisfied to know I cannot connect from our living room just 60' away, to monitor over the winter w/o going outside. The Bluetooth on the LevelMatePRO is SOOOO much stronger. From the living room, yes and it can even connect from inside of my garage over 120 feet away. In either case, our RV parking is behind a 10x20' Tuff Shed blocking line-of-sight. Does the Victron SmartShunt merely have a weak transmitter? Read some Victron forum comments and there is a trend re weak Bluetooth. Maybe the IP65 version weaker? Anybody with the Victron BMV-712 Smart Battery Monitor, is it stronger? Looks like the same shunt, but I do not see negative Victron Forum comments re the BMV-712. Let us know your feedback. Thanks