
Snackchaser
-
Posts
303 -
Joined
-
Last visited
-
Days Won
20
Everything posted by Snackchaser
-
A different refrigerator fan option
Snackchaser replied to Snackchaser's topic in Ollie Modifications
@Ronbrink Yes! That's exactly what I said! However, the Beech Lane fans blow inward the with label on the outside (at least the ones I bought). This would be the right direction if mounted in the bottom vent as intended by design, but the wrong direction if mounted in the top vent. Cheers! Geoff -
A different refrigerator fan option
Snackchaser replied to Snackchaser's topic in Ollie Modifications
@jd1923 and @Ronbrink you guys did a good job too! I will check out that evaporator fan, I could run it from the same switch perhaps. It's hard to tell from your photos, and forgive me if I'm mistaken, but it looks like your Beech Lane fans are blowing air in the wrong direction! They are designed to be mounted in the lower vent to push air out of the top vent. When installed in the top vent, they push air out of the bottom vent, which is working against the Norcold fan and natural convection. Try flipping the fans around in their mounting brackets so the label is in the back, and they will work much better! Cheers! Geoff -
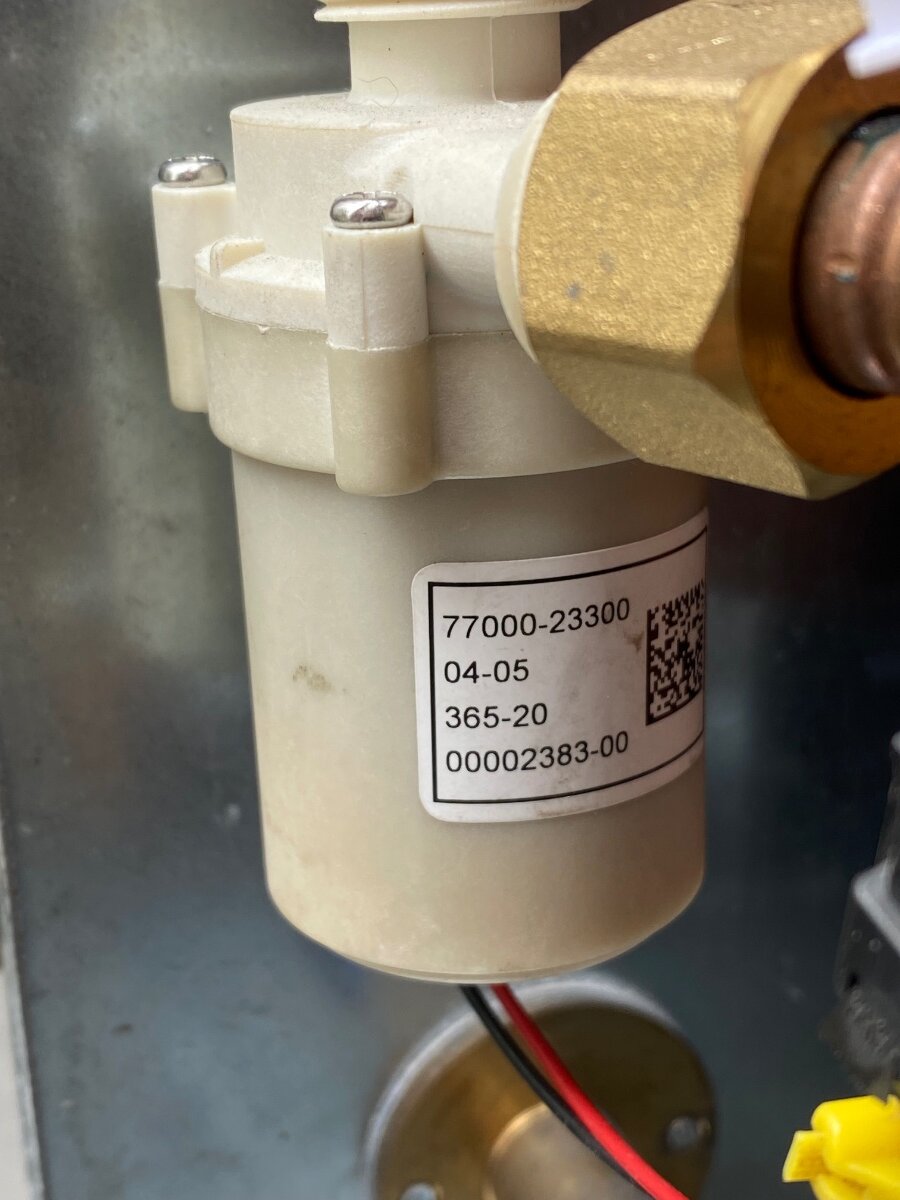
During the hot weather this summer, our Norcold refrigerator was also struggling to keep cold while on propane. The fridge fan could not remove enough heat for it to work properly, so it was time to install more cooling fans! I ordered the $75 Beech Lane fans based on the positive reviews, but there was no way they would fit in my Norcold’s lower vent area as intended. They could fit in the upper vent with modified mounting brackets and reversed air flow, but why pay for something that didn’t fit as designed. In addition to fitment issues, I didn’t like the control box being mounted outside behind the vent cover where the blue LEDs can be seen glowing. I wanted the ability to turn the fans off, but the control box didn’t remember the last setting when the power is switched off, and I didn’t want to be opening the vent cover to reset it. These are multi speed fans with 3 wires so switching the fan wire wasn’t a good option either. I returned the Beech Lane fans and bought 2 similar (water resistant) fans and a Normally Open 500c (1220f) thermo switch for lots cheaper. I made a rectangular frame of 1/2” aluminum angle bar for the fans, and installed them in the upper vent. Because the upper vent has an angled back, I used long deck screws with short PEX pipe standoffs on the bottom screws to keep the fans mounted vertically. The Beech Lane fans would have to be mounted the same way if I had kept them. The fans are powered from a new switch in the master panel and it’s in series with the thermo switch so they will only work when the switch is on, and the temperature is above 1220. I used a laser thermometer on the condenser fins when the refrigerator was operating on propane. The temperatures were significantly higher on the right side above the flame chamber, and they got progressively cooler towards the left side. So I hung the temperature switch between the condenser fins just right of center. It can easily be moved left to cooler fins if the fans are running too often. I installed a terminal block as a centralized connection point for all the wires, but they could be spliced together in any manner of ways. “Y” spade adapters worked well to connect to the refrigerators existing dc power terminal via a 5 amp fuse. The fans use less than 1 amp combined. The microwave was removed (six screws) to get wires up to the new switch on the switch panel. The tension jack to hold the microwave in place has to be loosened too, it’s accessed through the round marine hatch behind the switches. Just takes a couple of minutes to take it out. We have been testing the fans in 100 degree weather for the past week, and they've been working great! I hope someone finds this useful! Cheers! Geoff

- 27 replies
-
- 12
-

-

-

-
Norcold Refrigerator Power Mystery
Snackchaser replied to TimD's topic in Mechanical & Technical Tips
Tim, The "blown fuse" LED indicators in the Oliver's dc panel will create a voltage even with the fuse pulled. This is mere milliamps, not a hazard, but a multi meter will pick it up. Cheers! Geoff -
NO BRAKES ; 2019 Oliver Elite II-Hull #448
Snackchaser replied to BoondockingAirstream's topic in Mechanical & Technical Tips
Wiring used by manufactures for trailer brakes may seem ugly or brittle, but it has properties and insulation appropriate for the application and harsh environment where it can exposed to water, oil, chemicals, constant vibration, and abrasion. Please use caution using extension cords for brake wiring because they could have inferior wire that looks good, but with insulation that could deteriorate and fail over time. Trailer brake wire is readily available for this purpose, and it's a better and proven choice. Cheers! Geoff -
Hey Bob, If you’re pressed for time and it doesn’t re-set, then you might be better off trying to fix it yourself because Truma service could be inconvienient, untimely and expensive. I’d check for a degraded pump, or a debris jam thats causing excessive current draw as the error code indicates. The year warranty is probably expired so it could be worth a try. If the WH operates at all before the error code shuts it down, then listen for unusual pump noise and/or measure the current draw. It normally runs just long enough to fill the reserve tank with hot water, and a DC clamp-on amp probe can be used to measure the current from the front panel. AC/DC amp probes are readily available and you can use the wiring schematic in the Truma Manuel to identify the pump’s wires where they enter the control board in front. Just separate one of the pump wires from the bundle, and clamp the probe over it. The pump is rated to draw less than 2.5 amps when pumping. If the error code is preventing it from running, then you'll have to remove the WH and take the pump out for testing. It takes a little time but it’s not difficult. Drain it through the front flip down drain before disconnecting the plumbing. Disconnect the propane line and unplug the control wire from inside the unit, cut the DC power at the splice in the back by the water connections. Carefully use a heat gun, spray solvent such as Goo Be Gone, and plastic putty knife to break the outside seal, and have some butyl tape and outdoor caulking on hand to reinstall it. Once out, connect a standard 1/2" NPT residential faucet hose to the pump's intake, prime it, and put the other end in a bucket of water. Connect it to a 12V battery with jumper cables and use stiff wire or paper clips to connect to the pumps plug. It should pump with good pressure and <2.5 amps. If the pump is okay, then unfortunately you're back to control board issues and probably going to the Truma dealer for diagnostics. But you will only be out of your own time for trying. The pumps are pricey at around $250 when I last checked. Only buy one from a reputable dealer because I saw a fake site advertising them for $55. I hope this helps! Good luck! Geoff
-
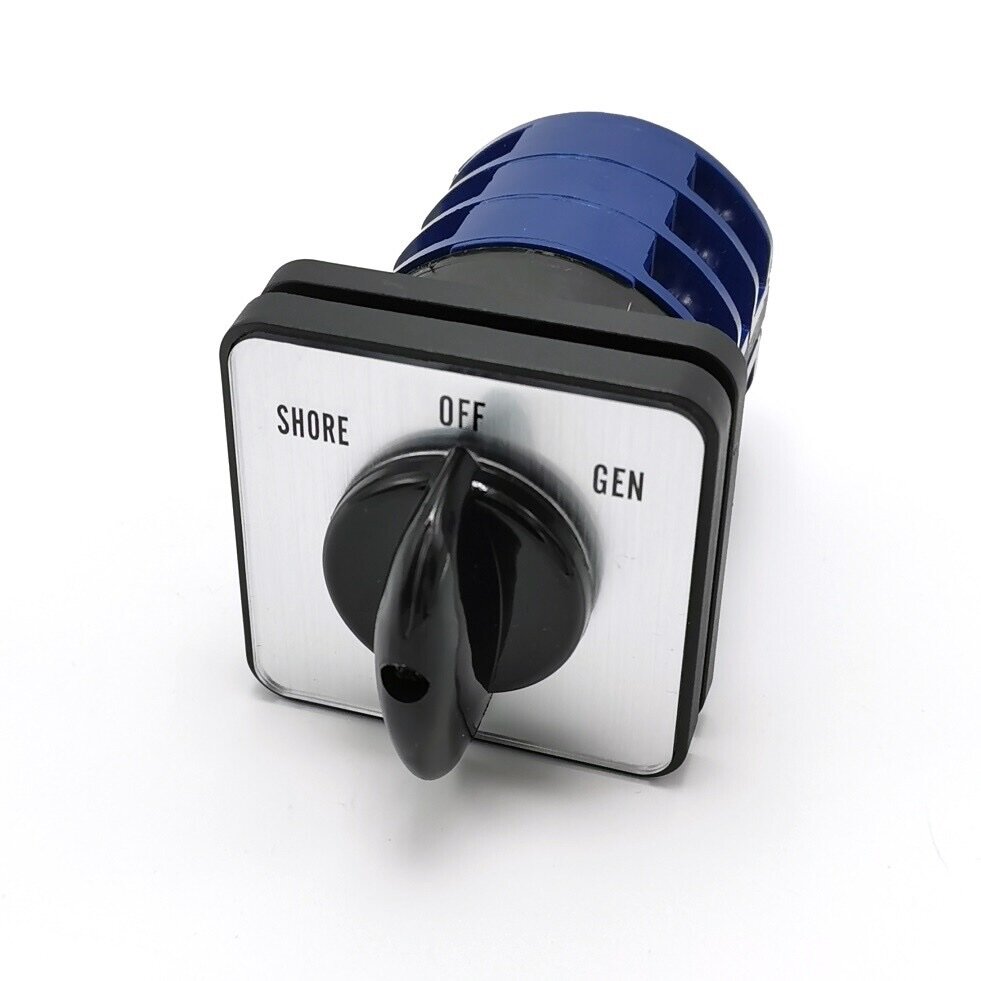
JD, This is unfortunately one of the drawbacks to the Victron inverters, but supposedly you can switch it to charger only mode to allow shore-power pass-through with the inverter off, with less standby power used. Bit of a pain though! However, a clever and handy guy such as yourself could install an external by-pass switch that would be easier than the App. Victron makes an inexpensive 30 amp beauty for switching between a generator and shore-power. I've seen them for $45. This can be wired so that you can switch the inverter off and still have shore-power. It's a great solution that might get you some extra sleep! 🥱 Cheers! Geoff
-
Bob, I was using the specs of my Xantrex Freedom 2000 model to make a point about power consumption in standby mode, without any AC load. Different models will vary. The newer Xantrex models have a "No-load detection" feature that reduces the standby current by 25%, or to about 60 AH. This is similar to the Victron's power saving modes. Be sure to check your settings, because this feature is usually turned off in the default settings. However, I don't know the minimum current for the No-load detection off-hand, so it's possible that ghost loads like the microwave LED clock could defeat its value. And your assumption is right, this applies to any type of batteries. Hope that helps! Cheers! Geoff
-
David that's very cool and clever! Sounds like you know the maker! Do you think you could get the slicer file from him, or have him put it on Thingiverse? Is it made from PLA filament? BTW, I never mentioned it, but the rubber weather cap that comes with the Rj45 socket can be used under Furrion cap. Mine has disappeared though! Thanks, Geoff
-
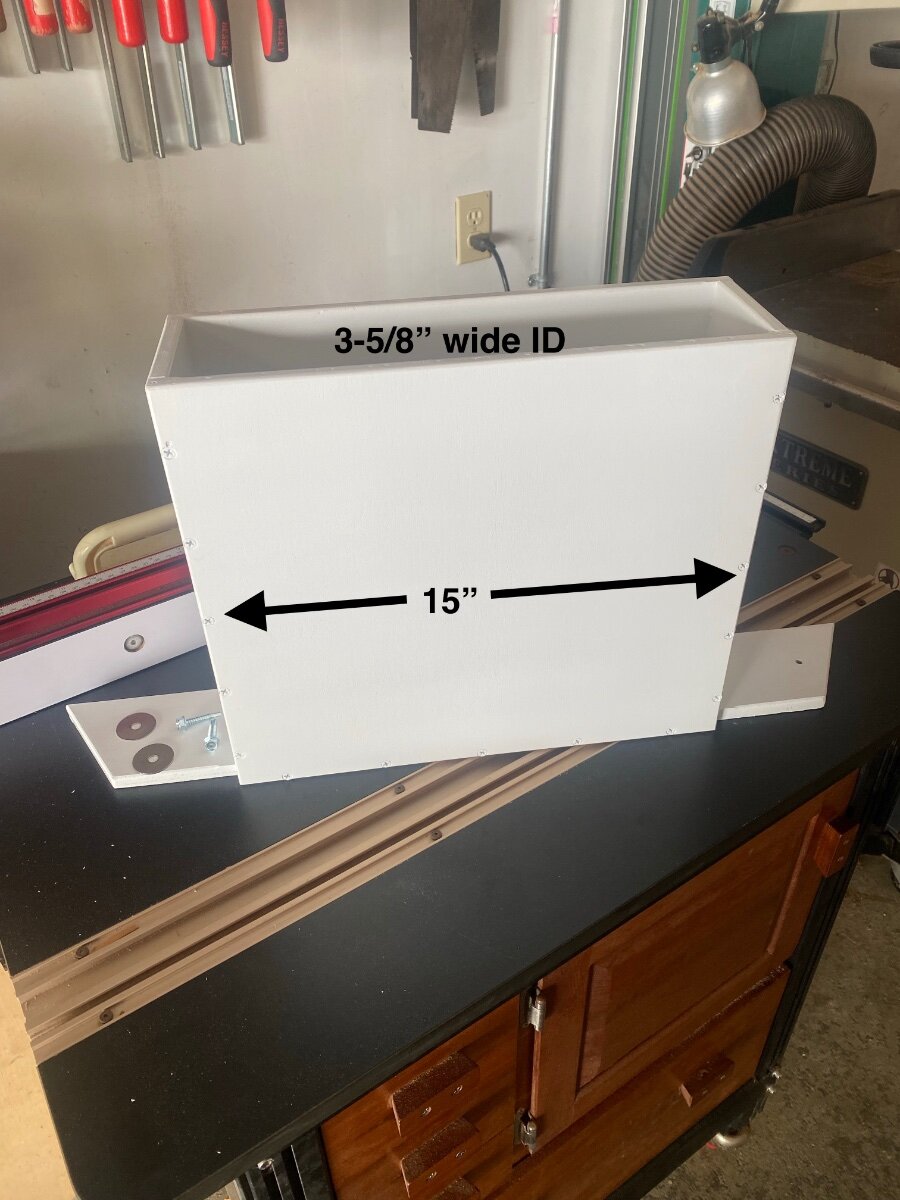
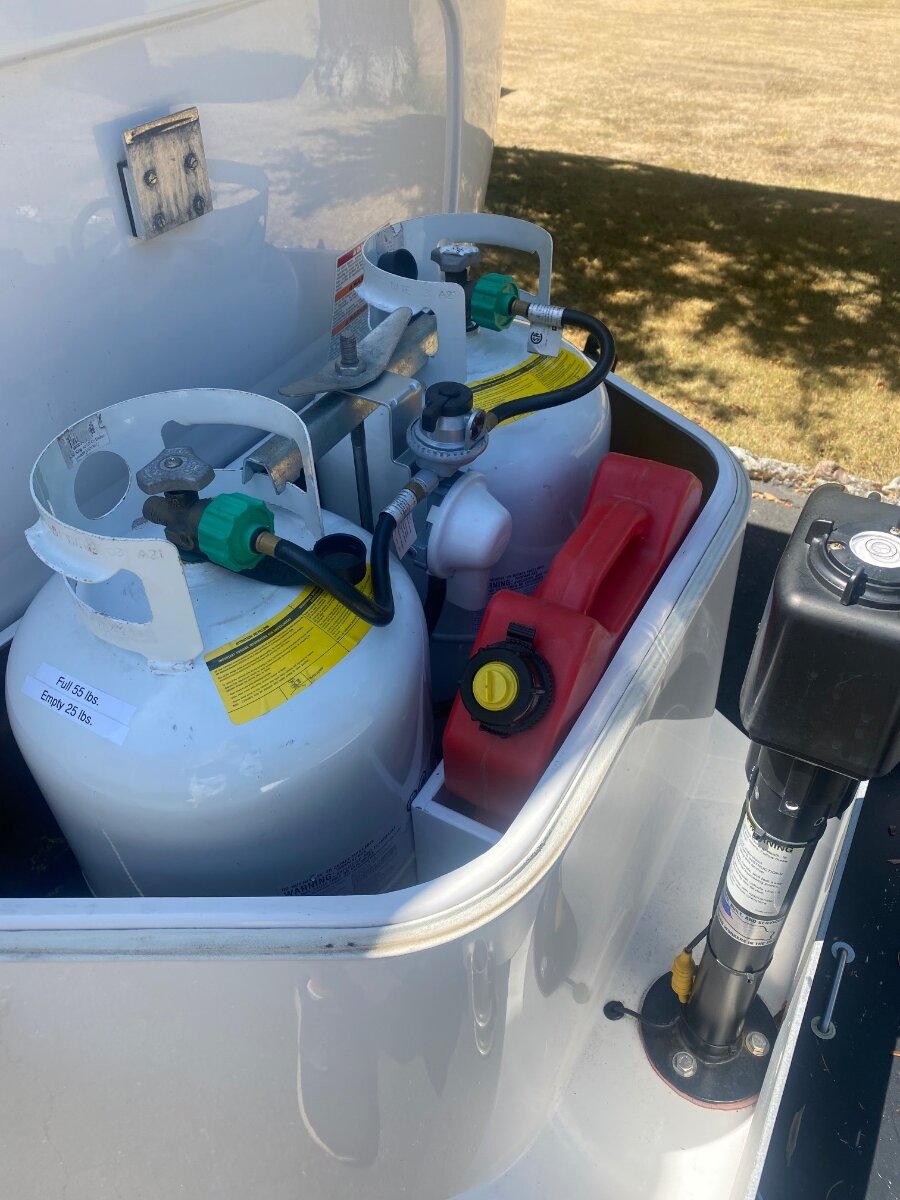
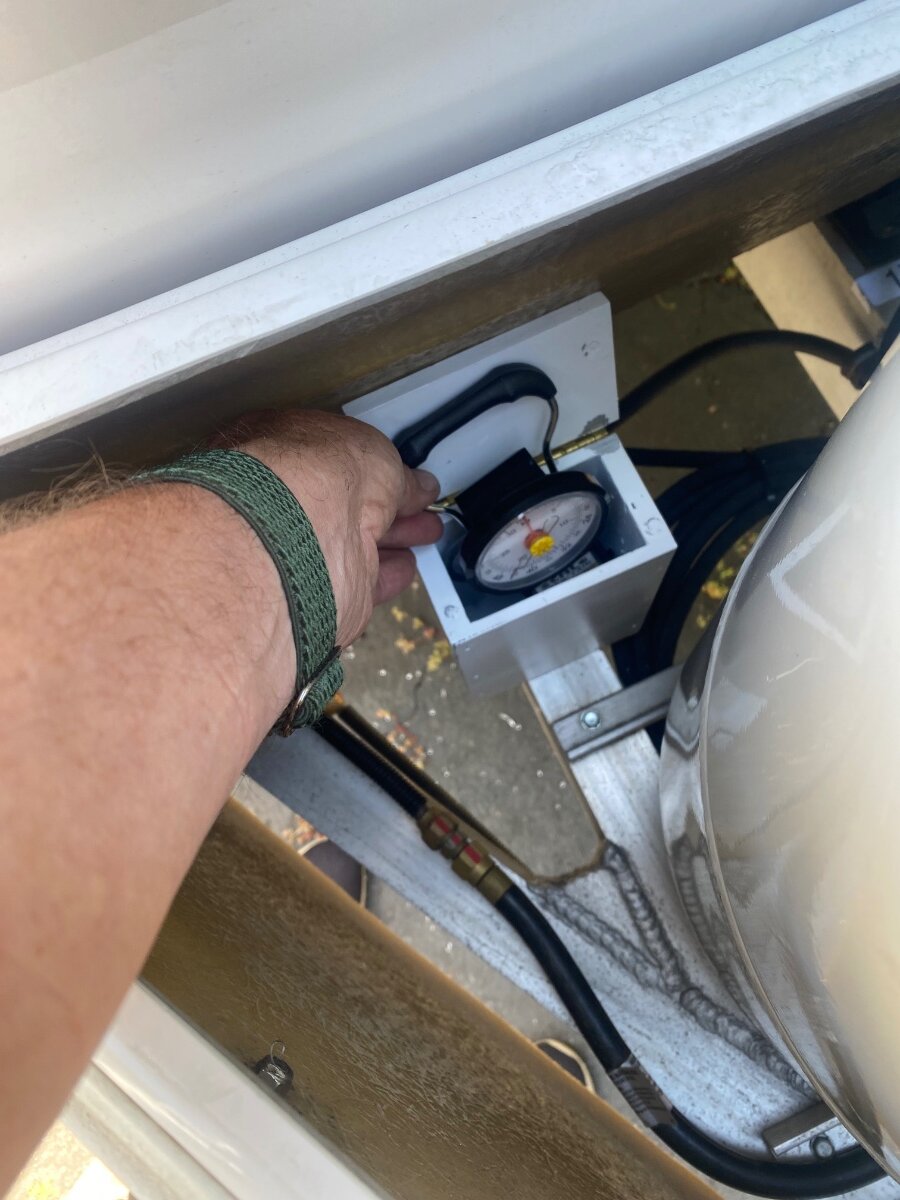
While preparing for an upcoming trip, where I’ll probably need to run a generator for AC, I decided to utilize some unused space in the dog house to store my RotoPax 2 gallon gas can. I used to carry it in the tongue tray with the generator, but now I’ll always carry it for emergency fuel. I made a rectangular box that's sized so there is just enough friction to hold the gas can snugly in place without needing a strap, and narrow enough to fit between the propane tanks and the front of the doghouse. The tank can’t come out anyway because of the doghouse cover. I measured the can after leaving it in the sun for a while to account for any expansion. The fuel can holder is made from 1/2” void free plywood (baltic birch), and it’s put together with glue and screws. It was rattle can painted with primer and plenty of white gloss, then attached to the frame with self drilling 1/4” screws, like the ones holding the propane tank tray. It can be locked through the handle if desired. The RotoPax gas cans were originally made for off-roaders, and they are pricey at around $85 each. But they are practically indestructible, and they come in different colors for diesel or water. I’ve had mine for around 7 years and it’s never leaked a drop. There are knock-offs available on AZ for about half the price, but I can't vouch for their quality. From the plywood scraps, I also made a little box for the luggage scale that I use for weighing the propane tanks. It was made in the same way with magnets to hold the hinged lid closed. It was mounted in the doghouse in front of the propane tanks. Hope someone finds this useful. Cheers! Geoff
- 2 replies
-
- 10
-
-
Haloview BT7 Touch Rear Camera installation on 2022 LEII
Snackchaser replied to dhaig's topic in Ollie Modifications
Nice work Don, very creative and well documented! Being such a handy guy, you might also like my post "Turning on the rear camera automatically." It sure beats always having to remember to flip the camera switch on and off every time. Cheers! Geoff -
Late-Model RAM Owners - how do you like your “tech”?
Snackchaser replied to Galileo's topic in Towing an Oliver
Just an FYI. If the digital rear view fails, it still acts like a normal mirror. It has to, because the camera doesn't work well in the dark. -
Weigh Safe 180 Aluminum hitch with 3” shank, 10” drop
Snackchaser replied to Patriot's topic in Towing an Oliver
A friend of ours rented a private trailer this summer, but he had not slid his receiver hitch fully in, and the retainer pin missed the hole in the shank. A dip in the road caused the receiver to slide out, and both safety chains broke. The violent snap caused the propane to break free and hit the windshield of a following car, causing a minor eye injury from glass particles. He said the chains were "hefty." It would be hard to determine the force put on those safety chains, but it must have been considerable! Just sayin, a chain is only as strong as the weakest link! -
I need help with my Norcold 412.3 refrigerator please.
Snackchaser replied to Copycat Carlton's topic in General Discussion
Good on you for your perseverance and skill at getting the Norcold fixed! Thanks for providing part numbers and giving hope that problems with these, now obsolete, refrigerators can still be repaired. I think it would be great if you explained how to remove the front panel right here on the forum. I'm sure others would benefit . . if not now, then later. Congrats! Geoff -
Late-Model RAM Owners - how do you like your “tech”?
Snackchaser replied to Galileo's topic in Towing an Oliver
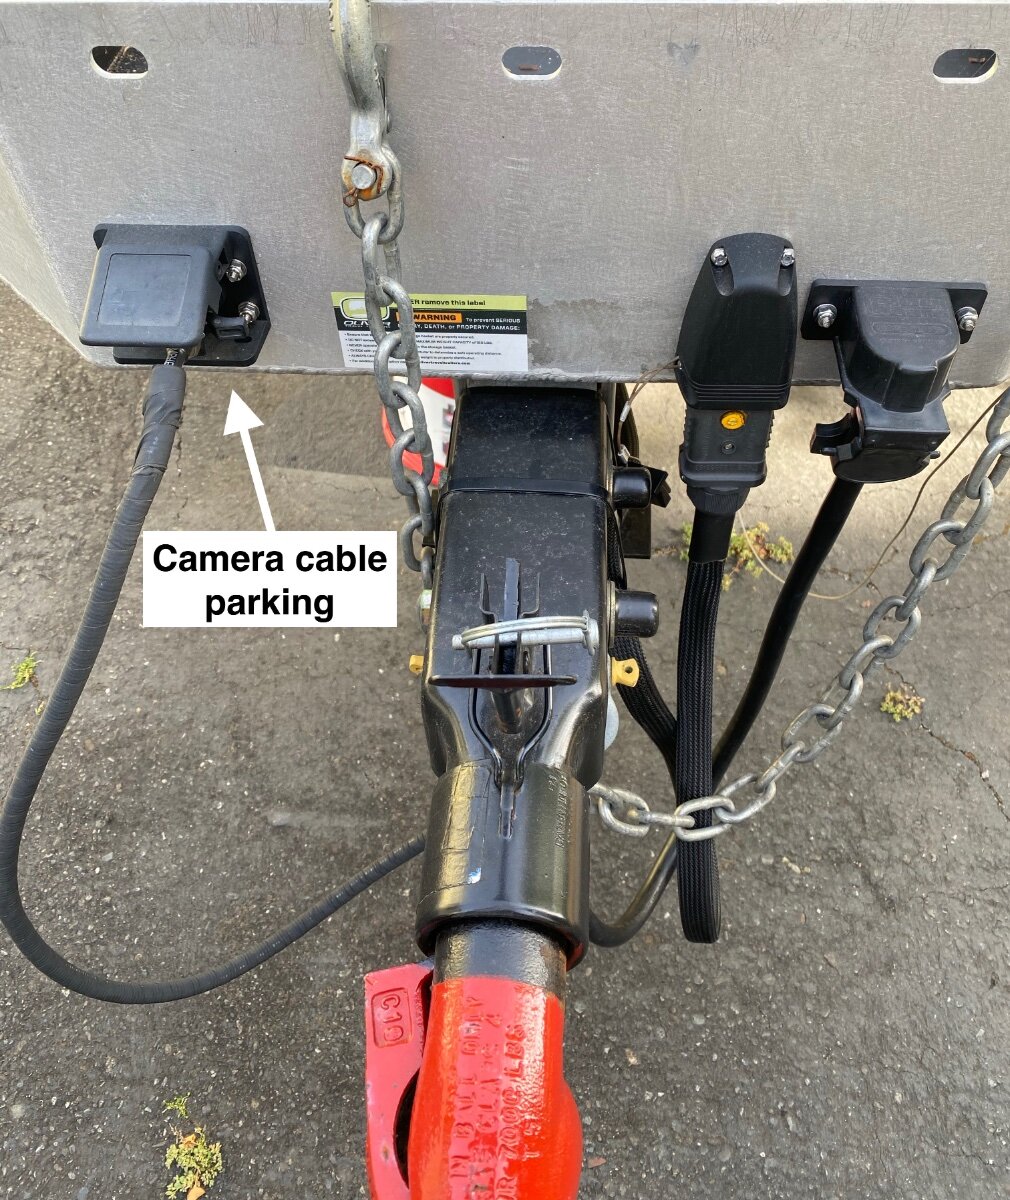
Those are parking places to keep dirt and water out of the cables. One is for the DC to DC charger cable made by Trailer Vision. They also make the plug covers and receptacles for Anderson connectors. The other one is for the 7-pin cable (AP Products Plug Guard.) Cheers! Geoff -
Late-Model RAM Owners - how do you like your “tech”?
Snackchaser replied to Galileo's topic in Towing an Oliver
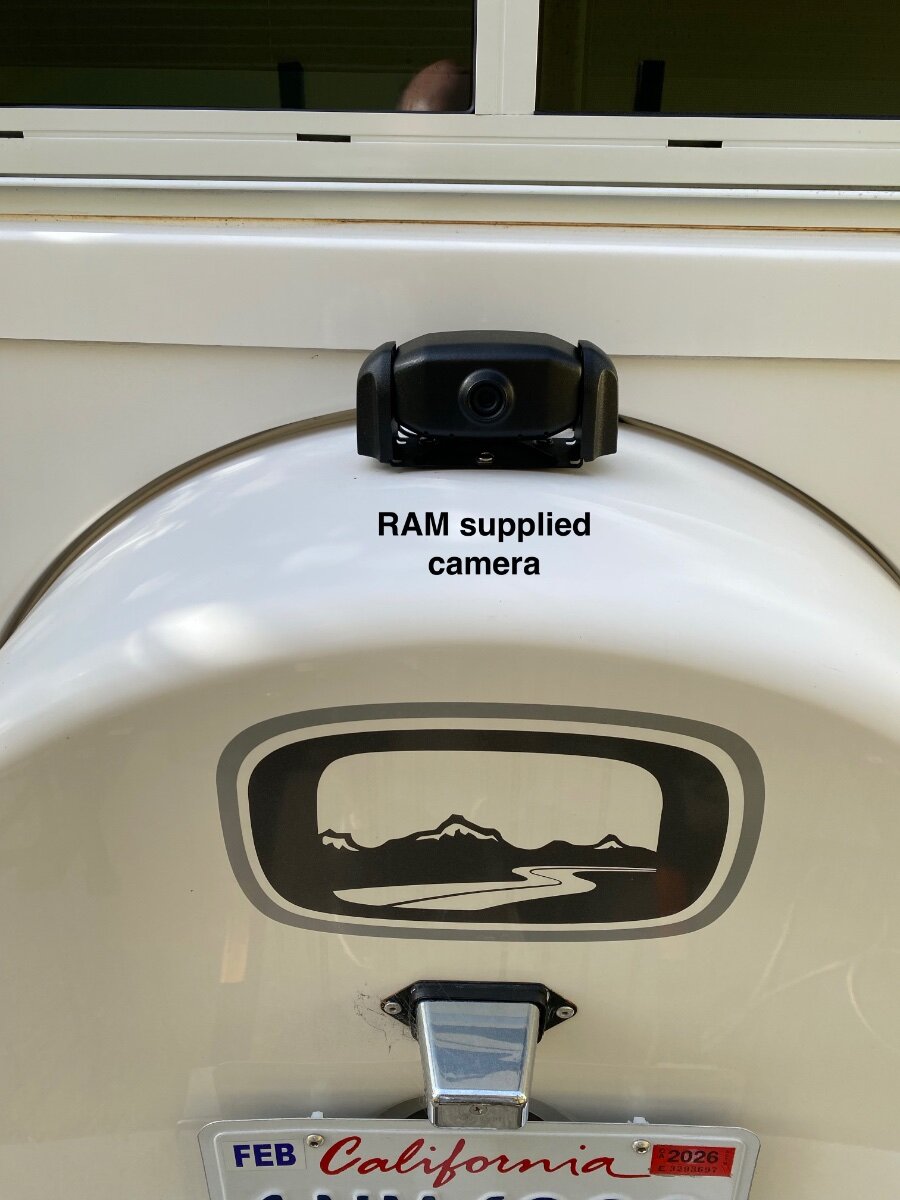
Camera is through bolted with nylock nuts as to not to chip the fiberglass, like happens with sheet metal screws. The very tip of a step drill works well for making holes in the fiberglass because it doesn't grab and chip like a twist drill. Cheers! Geoff
-
I was awakened by flashing blue lights!
Snackchaser replied to Snackchaser's topic in Ollie Modifications
Thanks JD. Yes, if you disconnect the grounds the LEDs won’t work, but switches will still work. Also, if you want the blue lights, then you can replace your switches with LED types available at AZ. i like the blue lights, just not so bright! Geoff -
Late-Model RAM Owners - how do you like your “tech”?
Snackchaser replied to Galileo's topic in Towing an Oliver
I like our 2022 RAM 2500 gasser a lot! Some of the many notable features that we like include Apple Car Play. It always synchronizes seamlessly, without the frustration we've had with other cars including our old 2016 Ram. We frequently use it to display full screen Google maps from the phone, and we can toggle back and forth to the RAM GPS which offers nice features too, like a side bar that shows upcoming rest stops, gas stations, etc.. My absolute favorite feature is the digital rear view mirror camera option. It's a high resolution and wide angle view that is way better than the standard mirror. Best of all, it has an auxiliary camera for mounting on a trailer, and the resolution is just as good. I think it's a fantastic towing safety feature, where you have an excellent wide angle view of directly behind and side lanes where there is normally blind spots. There is an outlet in the rear bumper for the trailer camera, and a cord garage for the trailer during storage. My camera is mounted on the spare tire cover. It also has a 5-camera outlet for a trailer surround and interior views, but we don't use those. Other features I like, are the side mirror sensors that warn of vehicles in side lanes. This can be adjusted for your trailer length. The self adjusting steering aggressiveness for highway and town is just right, and the lane departure steering correction is very suttle, even better than our Tesla that can startle you with aggressive corrections. I'm sure that other trucks have similar features, but I also have a personal preference for the RAM dashboard layout and controls. That my two cents worth! Cheers, Geoff -
Sounds like click bait, but it’s true! During a recent trip, the master switch on the main panel started flickering on and off, and that caused the blue LED indicator lights for other switches to flash. It turns out that one of the spade terminals for the switch had loosened from the strain of the tangled mass of wires that were tightly stuffed in behind the switches. Many of the wires were individual grounds for the LED switch indicators, and there just isn’t enough room for all of them. The wires are oversized and stiff, and they used bulky splices to connect them all together. So I cut the mass of yellow wires out and replaced them with a single smaller wire that was daisy chained to each switch. That space is much less tangled now, and there is more room and less strain on the switches. Now I have room for a new switch for a future project. While I was in there, I decided to address another peeve. I’ve always thought that those blue LED’s were too bright, so I soldered a 47K ohm resistor on the termination end of the new LED ground jumper. This dimmed the LEDs by about 50%. . . so much better! If anyone’s interested in doing this, Amazon carries a 525 piece resistor assortment for $8 so you can experiment with various levels of dimness. Only one resistor is needed for all the switches, so you could do a little twisted resistor art with the leftovers. I hope that someone finds this useful. Cheers! Geoff
-
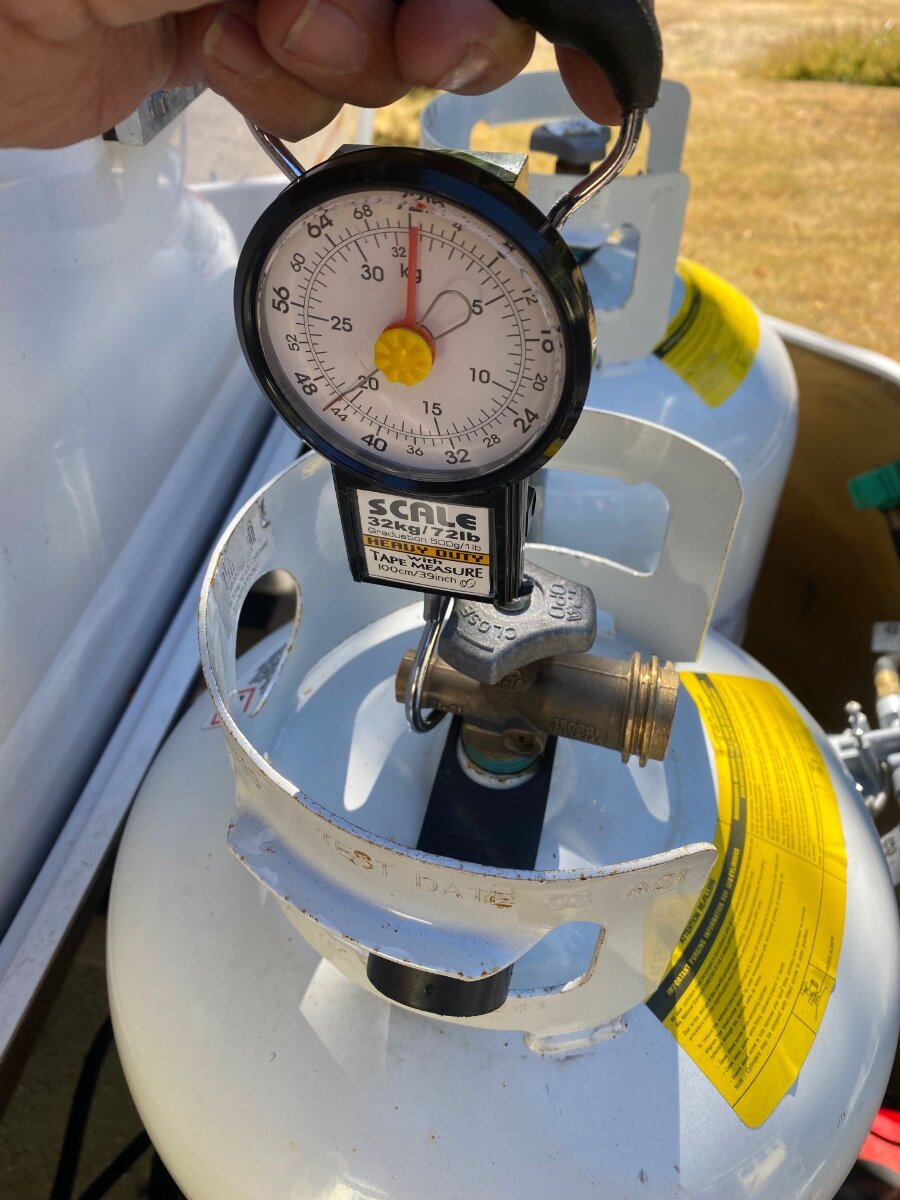
Although there are several ways to check propane tank levels, I’ve found the easiest way for me is a luggage scale. They have large hooks that balance nicely when hooked on to the fill valve, and they remember the weight so you don’t have to contort yourself to see the scale. Mine has an analog dial with a memory needle, and thankfully no batteries. I’d recommend these over ones with batteries that always seem to be dead when you need them. Flame King sells a more expensive scale made for this purpose. It conveniently reads in percentage, but it’s battery operated too. A 30 pound tank weighs around 55 lbs when full, and about 25 lbs when empty. A 20 pound tank is around 37 lbs full and 17 lbs. empty. I’ve labeled my tanks with their weights and I can determine exactly how many pounds are left with the scale. The tanks can be weighed in place with the spin-off clamp loosened, and it helps to put a stick or bar through the scale handle to lift with both hands. I know some people swear by the Mopeka ultrasonic level detectors, and I heard the newer ones work pretty good. But I’m still not over the problems and uncertainty of my old ones, so I’ll stick with my trusty scale for now. Cheers! Geoff
-
Hey John, Chat GPT is often wrong because it relies on opinions like mine🫢 My opinion is that Gen-3 has slightly better reception because of the larger surface area and its motor driven alignment. However, I don't think it is a significant difference, certainly not enough to offset the benefits of the Mini. When there are too many obstructions, neither one is going to work well. But I agree that the Gen-3 is faster, I think probably because of a better Wifi signal, hence I recommend using the Mini Mesh Node Router with the Mini Dishy. See my post: "The new Starlink Mini router, for what ails you." We used to turn-off the power hungry Gen-3 at night to save our battery, the Mini stays on 24/7, a big benefit. Also, the dishy spends most of its time on a mast, and the heavier Gen-3 on the same mast used to rock the trailer in breeze. The mini is small and light as a feather in comparison. See my post "Tacky Starlink mast." BTW, I see folks buying padded cases and protectors for the Mini, but they're pretty rugged and mine just lives in the hidden drawer below the pantry when traveling. It's more challenging to route the Gen-3 cable into the trailer, I've posted some designs on this too, see: "Great news! Starlink Gen-3 is here and it has Rj45 connectors." Other folks have posted ways to power it from DC, but I've never looked into that. The Mini is easy to power, and there are portable power supplies available that can be taken on hiking trips. I make a 3d printed version with built in battery charger, hit me up if interested. I also have a post on powering the Mini from 12 volts with a 12-48 volt Victron converter, this was for one of the early Mini's and before any commercial solutions were available. See my post: "Starlink Mini installation, cracking the 12 volt barrier... or not." That post also includes a clean method to get the power cord into the trailer. I still use that power supply today, but there are cheaper power supplies now available. Albeit, not as good or energy efficient😆 Hope that helps with your decision process! Cheers, Geoff
-
Hi John, We cut the cable years ago, and I’ve used the larger units, Gen-1 and Gen-3 for the Oliver. Now I use the Mini exclusively with no complaints and we still keep the Gen-3 active at home for security devices and guests while we're away. The Mini, with it’s built in Routrer, looses speed the farther away it is. This is due to the WiFi signal dropping off. So if you go with the Mini Dishy, then I recommend getting a Mini Mesh Node Router for $40 because there are times when you will need to move it farther away to find clear sky. See my post: The new Starlink Mini Router, for what ails you. Starlink Beam Switching keeps improving and there are increasing numbers satellites so reception keeps improving and the Mini seems to work as well as the Gen-3 in that regard. My Mini isn’t quite as fast as the Gen-3, but it’s still blistering fast, and way faster than most cable connections. There are a number of options to run the Mini from the trailers 12 volt system. You just can’t use the included 50’ cable because of voltage drop without boosting the voltage. You can do that with a voltage converter to increase voltage, or one of the available power supplies, or use a shorter cable. Hope that answers your questions! Cheers! Geoff
-
Typically it's a GFIC receptacle (outlet) with a reset and test button, not a breaker. It will be the first receptacle closest to the breaker panel that daisy chains to feed the others, mine is the one under the dinette.
-
All the comments are right on the money. But for a little more perspective of why you fell short of power, consider this: My guess is that you have about 400 Amp Hours with your 4 AGM batteries, which gives you about 200 AH usable power without going below 50%. You stated that your inverter stays on. A Xantrex Freedom inverter uses 72 AH per 24 hours of standby power (turned on without a load.) The Victron Multiplus is better at 40 AH a day with standard factory settings, and as low as 16 amp hours a day with power saving settings. These are both zero AH when turned off. The batteries are being supplemented with an assumed 320 watt solar system, which is under 30 AH a day in sunny conditions. You mentioned a coffee maker which burns a lot of power, typically about 20 AH to brew coffee, and more if your keeping it warm. That could cancel out the solar contribution. Now add in the AH values for whatever else you're using, and you can figure out how long you can last when boondocking. Hope that helps! Cheers, Geoff
-
The Oliver’s fiberglass body is the majority of the 4900 lb dry weight. I’d conservatively guess the aluminum frame is around 2000 lbs, not including the running gear and hardware. So given their claim of 30% weight savings, it would save about 600 lbs. However, I’d question whether that 30% weight savings is compared to a conventional steel frame. If so, then you're looking at closer to 20% weight savings compared to aluminum, or 400 lbs . . . which is not significant IMO. If the frame costs more to make, and it’s a selling point, then just make sure that corners are not being cut elsewhere. Food for thought! Cheers, Geoff