All Activity
- Past hour
-
thank you Bill, I always check for updates before doing anything new on the RV890. One of the Checklist items before we leave is to check for updates. B~Out,
-
Have you done any mods to the duct work based upon "Snackchasers" post, if so i would look for a disconnect of ductwork from that port. Your Oliver is #1238 what year s/b on your signature? it would be interesting to see if the factory has changed the heater duct runs based upon Snackchasers changes... it appears as though Oliver has changed the open heater ports, so this one appears to be facing the galley, as you can see it from the galley access port. Back in 2020 (our model year) there was one open towards the rear, which must do a 180 to head towards the front of the trailer and one facing the front of the trailer. Our galley-side port still has its knock-out port intact. For me it was like a "Fun House" optical illusion for a minute until realized what i was seeing based upon my 2020 experience.... B~Out
-
Congrats! Alaska next.....
- Today
-
Congratulations -- that is exciting! Are you heading to Alaska next?
- Yesterday
-
This must mean your ducting is detached from the furnace somewhere, or you have a large hole in the ducting. It's a pain when traveling, but you'll need to get under the curbside bed again to fully diagnose and correct. Most of these furnaces have forced air coming out fore and aft of the furnace. Check there first and then follow the ducting forward. If you can't see it quickly, run the furnace while you have the basement open and you should feel a lot of hot air blowing somewhere! We'll be thinking of you, as you head north and it gets hotter and hotter in Arizona. Have a great trip! 😎
-
routlaw, thanks for checking with us 😀We did look under the bed that’s how we found the opening and the rest of the duct looks secure. I’ll let everyone know what I find once we get parked for the night.
-
How long did this milestone take you to achieve? Any idea of the total miles? Congrats! Bill
-
Thanks, that’s what I was thinking but didn’t see the knockout in plane site. I’m going to take a mirror to see if it slid under the floor. 😀 We are slowly making our way to Alaska from Arizona. Currently in Idaho and we are definitely using the heater. 🥶⛄️.
-
Difficult to tell from the existing picture but it's also possible the duct work has dropped out of the knockout panel. If you haven't already I would move your bed aside, open the hatch from above to make sure the duct has not vibrated loose and onto the floor.
-
Thanks, that’s what I was thinking but didn’t see the knockout in plane site. I’m going to take a mirror to see if it slid under the floor. 😀 We are slowly making our way to Alaska from Arizona. Currently in Idaho and we are definitely using the heater. 🥶⛄️.
-

Furrion Stereo Upgrade: A Sound Choice
Snackchaser replied to Snackchaser's topic in Ollie Modifications
Jd, my Oliver came with Furrion fs65w speakers. They have white grills and at $20 each on Amazon they are a bargain. You might spend as much just changing the grills. I actually looked into replacing the Furrion speakers with Polk Audio DB652 to improve the sound. They have a broader frequency range and the sensitivity is improved from Furrion’s 86dB to 92dB. However, they have black grills, would need a 5.5” to 6” adapter, and they are about $50 each. The return didn’t justify the cost. I took another route and painstakingly measured the Furrion’s speakers Fs (free-air resonance frequency) to determine if a 3-D printed sealed enclosure or baffling would improve their sound. This involved injecting a range of frequencies through the stereo, then measuring the voltage at the speaker terminals through a 10 ohm resistor. The highest voltage was at 188 Hz, which is the point where the speaker resonates most freely. This indicated that the speaker suspension was on the stiff side and improvement was unlikely After all that, just the new IVR stereo was enough improvement that I completely forgot about replacing the speakers. Cheers! Geoff -
The 48th state was Rhode Island. We completed the last fifteen (15) states over the past 12 Months. Newport, RI was a fun town to complete the job.

-

Stove Burner Grommets PI 8022
Mike and Carol replied to Galway Girl's topic in Mechanical & Technical Tips
I had a similar experience when I needed one of the four screws that hold the Dometic AC cover on. I called and was told they would “take care of me”. In a few days I had a bag of 6 screws. No charge. Mike -
There are both map and system updates available from Garmin. The maps update only take a couple of minutes while the system update takes 10 to 15 minutes. Bill p.s. these updates are for (at least) the 890.
- 1 reply
-
- 1
-

-
Bathroom Heat - a more direct approach!
Snackchaser replied to Snackchaser's topic in Ollie Modifications
You can drill with the collar in place, either a 1/4" self-drilling screw, or drill a hole for a #8 sheet metal screw. Best to tape it on before screwing, otherwise the holes can be hard to re-align. Those collars are a pain to install, and you were right to tape it in place. There was another post today where it looked like the blank hole seal might have fallen off someone's furnace. The PEX lines are definatly in the way, my duct was squashed to fit through, and the water heater by-pass valve handle had worn a hole in the duct. While you're in there, take a look at the water heater plumbing. There is a by-pass loop and valve to isolate/by-pass the water heater. This was one of the lines interfering with my duct. I removed it, mostly because I put in a hot water recirculating system, but it opened up space too. I don't anticipate ever needing to by-pass the water heater like that, and most folks probably don't even know it's an option because the valve is hidden under the duct. If there is ever a problem during travels, I'm just shutting the water off or bypassing the water heater by other means. -
Wow! That's even better than a trip to the local hardware store, except you probably didn’t get popcorn like I do! Mossey
-

Bathroom Heat - a more direct approach!
SNY SD UP replied to Snackchaser's topic in Ollie Modifications
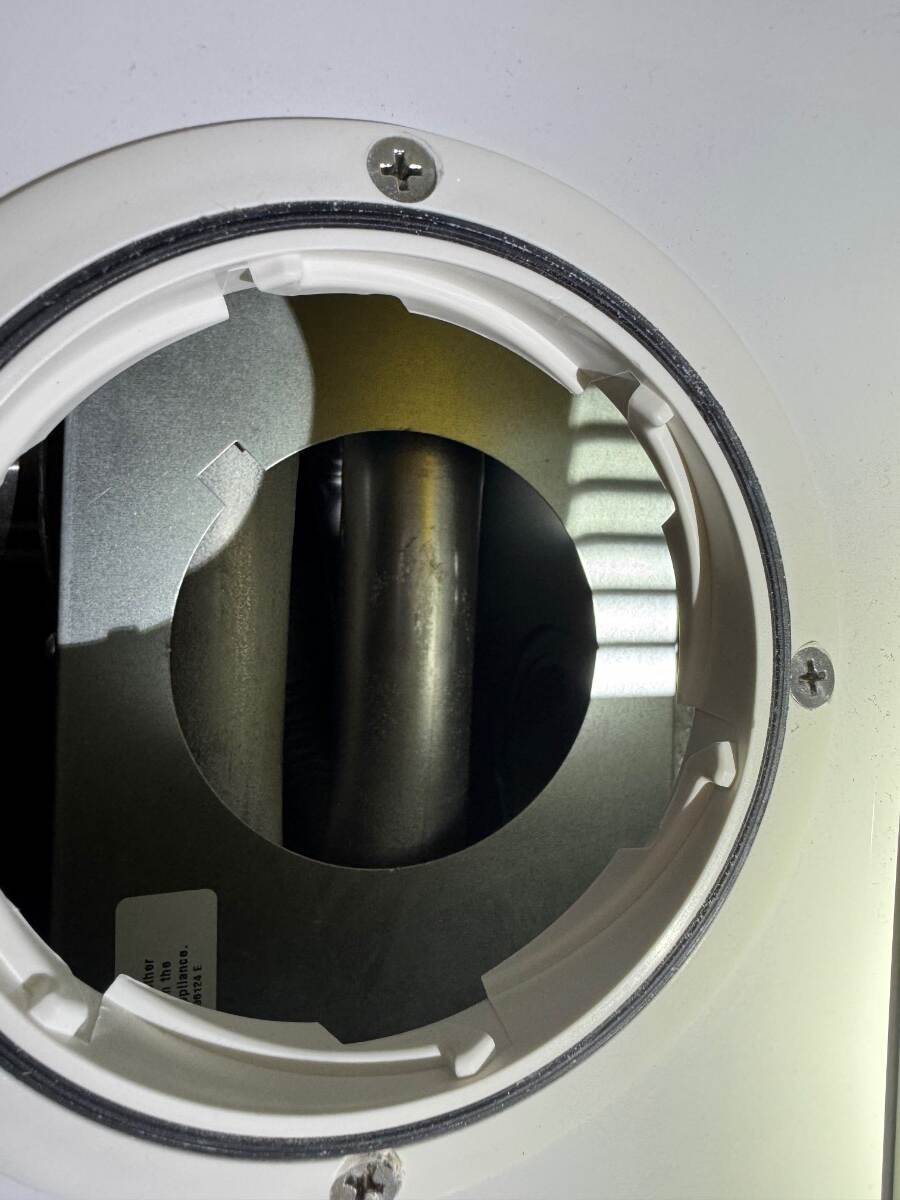
i was wondering about that. i did not see any screws, glad I asked. here is a picture of my beveled connector collar. Did you twist & remove the connector collar to drill that hole? I accidently removed mine when working the elbow on to it. Took me 10 mins to get it inserted & locked in just right. that is why my foil tape is there to stabilize it, in case i go the "Screw the 180" route. Now i might bring my 180 with me and try to do that mod on the road if things are a bit chilly inside. Maggie said that she felt a lot of heat coming out of the shower exhaust next to the TP caddie. i was reading but did not catch if you mentioned, Did you replace any pex to move the line that is "Right in the WAY!!!" to connect the under the bed exhaust vent? Boy-h-boy, they sure did want us to have a nice 45 elbow in there. The way i see it is, if i can move the water line, then i can have a Rigid Tee in there on the way to the Kitchen Exhaust.
-
Stove Burner Grommets PI 8022
Snackchaser replied to Galway Girl's topic in Mechanical & Technical Tips
When I called Dometic for a part number last year, the lady couldn't figure out the part number for the little grommets. So she sent a bunch of parts including all the grommets, new knobs, new decal. For free! She was also very fun and cheerful to talk to. -
Bathroom Heat - a more direct approach!
Snackchaser replied to Snackchaser's topic in Ollie Modifications
Yes screws are necessary on all the fittings, clamps will not compress rigid fittings onto the furnace flange. But screws are not enough, also use foil tape on all the joints it holds very well and seals too! I see some remnants of the old foil tape in your picture, and it's readily available at most hardware stores. Geoff -
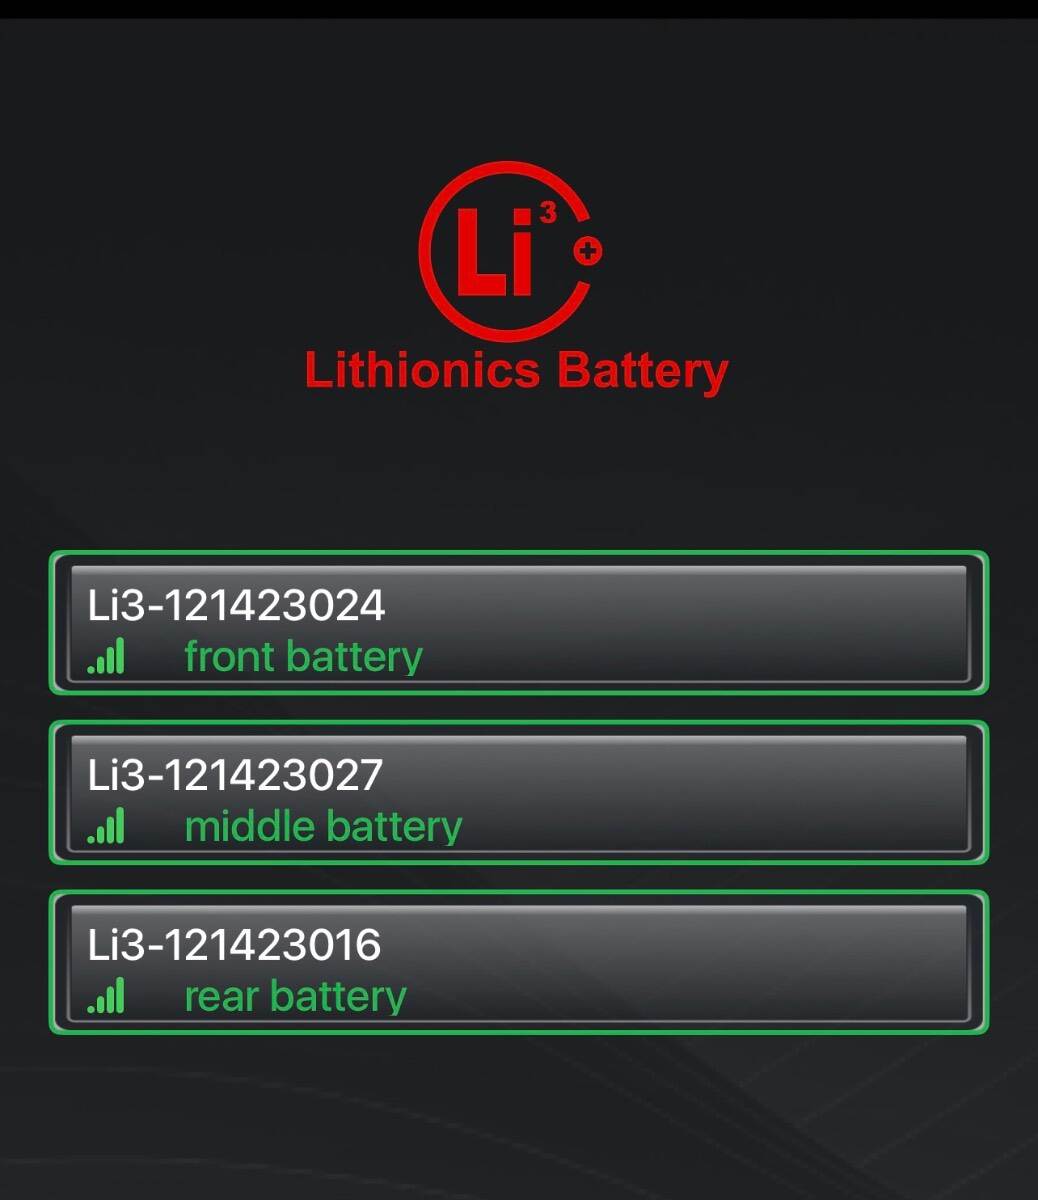
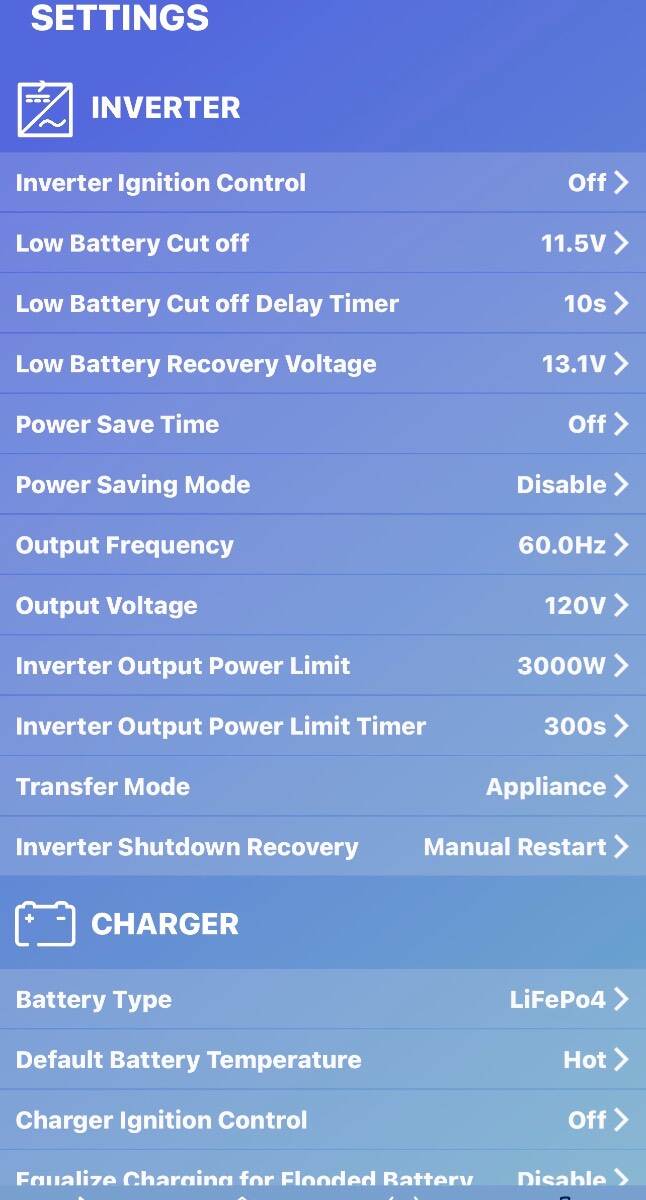
390 ah is three batteries, 640 ah is two. You have three batteries, 390 ah. Also if you select one of the three batteries on your app, then go to page two, it will show capacity... 130 ah each
-
It's pretty easy to stub your toe like this when buying on Amazon. It's not the same as a trip to local hardware store if you still have one! Mossey
-
How can I figure out if my system is the 390ah or the 650ah? I’m looking at my settings and the LBCO is 11.5 v I’m not having any issues, but I have updated the firmware a few times so I want to make sure I have the settings correct. I am pretty confident I have a 390 ah system.. should I leave the settings alone or change them? sorry to hijack your thread. Marc
-

Stove Burner Grommets PI 8022
Galway Girl replied to Galway Girl's topic in Mechanical & Technical Tips
At the Oliver Rally I plan to put out various parts for free that may fit other Oliver setups as I’ve bought many replacement parts (like stove grommets) that aren’t for our version by mistake. -
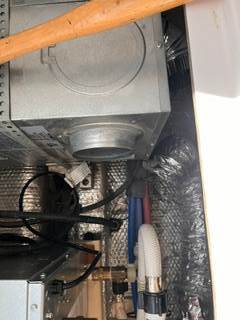
That looks like the knockout panel on the furnace is missing . You can seal it with silver furnace tape or find a sheet metal piece to put in place. Please post the pix to oliver as a service ticket!
-
Is it normal to have this large furnace opening blowing under the curbside bed? We seem to be getting excessive hot air blowing out our kitchen drawers and under the bed. The rest of the flex duct looks fine. (The photo shows the large furnace opening directly behind the under bed access port.) Thanks!