Leaderboard


Popular Content
Showing content with the highest reputation on 03/28/2022 in Posts
-
Note: This information is specifically related to the Xantrex Freedom 2000w or 3000w Inverter/Chargers. Inverter - What is it and how does it work? An inverter produces 120V AC power from a 12V DC power source. The easiest way to think about this is 12v power x 10 = 120v. This is not exactly accurate as it takes slightly more power but this is the easiest way to do a quick conversion. For instance, a laptop might be rated to use 3 amps when plugged into 120VAC but when used through the inverter it would equate to 3a x 10 = 30 amps. The importance of this is because while on shore power your energy is endless. When using the inverter, you are limited to the battery’s capacity. Battery capacity varies from battery to battery. Charger - What is it and how does it work? The charger uses incoming 120VAC power and steps it down to 12VDC power. The charger is setup with a specific charge profile based on the type of batteries and the number of batteries that you have. Each and every battery has a charge profile set by the battery manufacturer. The charger has 3 stages of charging: Bulk Charge, Absorption Charge & Float. In Bulk charge it will supply a set amount of voltage, typically 14.0 - 14.6 volts and a large amount of amperage to replenish your battery charge quickly. The length of this stage depends on the battery type, number of batteries, charge profile and *incoming power. Absorption charge is a timed charge cycle. It keeps the voltage high but lowers the amperage going into the batteries. Once in Float charge mode it drops the voltage right above the batteries resting voltage to top them off & maintain them. Note: When in Bulk Charge rate it is passing the max amount of energy allowed to the batteries. With Lithium batteries this is a large amount of amperage which generates a tremendous amount of heat. During this stage it is normal for the fan to run at a high speed which causes it to produce a lot of noise. *Amps setting based on battery type & number of batteries. Shore Power *Incoming Power The camper is designed for 30 amps however smaller power sources can be connected using adapters. It is important to understand that the camper and the inverter/charger are setup for 30 amps and when using a power source smaller than 30, it may result in poor performance or failure. House: When you are connected to a regular home receptacle, you are connected to a 20a or 15a circuit, unless you had a dedicated 30a receptacle installed. You also have to consider that the circuit most likely is not dedicated to the camper which means other appliances inside your house are running on that same circuit. When connected to a house circuit you may also experience failure at the circuit breaker in your hose. If this occurs, you have overloaded your house circuit meaning you are requesting more power than what it is rated to provide. You would need to locate a dedicated circuit, a circuit that is not being used, or turn off some of the appliances to lighten the load. Generator: When you are connected to a generator the incoming power depends on the size of the generator. We recommend at least a 3000w generator which will provide about 25 amps of power. You can use a smaller generator however you will again be limited to how much power it can provide. Note: When using a generator, because it is not grounded, it is recommended to use a Neutral Ground Plug. Without the plug you would be required to turn off the surge protector, which we DO NOT recommend. WARNING: Using an undersized or long extension cord may result in poor performance and failure. When using an extension cord it is important that you use the appropriate size & length. A 100ft extension cord will have voltage loss resulting in heat buildup at the power inlet which can cause the inlet & cord to melt. We recommend using a 10ga/25ft max extension cord. Flow of Power Solar & Shore power have their own path to the batteries for charging and they work independently of each other. The battery is just the storage device for the energy whether that energy comes from Solar or the Charger via shore connection. See pic below for path of power The red arrows indicate the direction of power with both stopping at the battery bank. NOTE: The Inverter/Charger has two connections to the AC Panel as shown above. One connection comes from the Main power supply to the input side of the inverter. The Input side is what supplies 120vac power to the inverter/charger. Once the inverter/charger has the incoming power it passes it through the output side back to the AC Panel on a split bar to allow AC power to any breaker located on that side of the panel. The inverter/charger also uses this same power to charge the batteries. When not connected to 120vac power and the inverter is turned on it pulls 12vdc power from the battery bank and converts it to 120vac power, sending it down the same output connection in order to supply power to the AC panel on the split bar. Caution: We do not recommend leaving the inverter on. The inverter will pick up the AC load within seconds if something happens to the incoming 120vac power but this will start to pull from your batteries which will cause the batteries to drain without your knowledge. Solar vs Charger Solar collects and charges at 12vdc whereas the Charger uses 120vac incoming power to charge at 12vdc. The difference is in the amount of amps supplied to the battery. The max amp output that the solar panels can provide is 18.8a per hour however this is dependent on the sun, while the charger can put out up to 150a per hour depending on the charge rate setting in the charger. Bottom line is that a shore power connection whether it be at a camp ground, your house or a generator will always charge faster than the solar. Areas highlighted in light blue below are the primary settings to review. Please make sure you locate the appropriate battery column for your camper build. Below are some links to the Service Knowledge Base articles. *These links may require login credentials as some of the articles are posted for Oliver owners only and cannot be viewed without an account. Xantrex Inverter Settings Inverter/Charger - Battery Charge Profiles Xantrex Inverter - Error 20
 3 points
 -
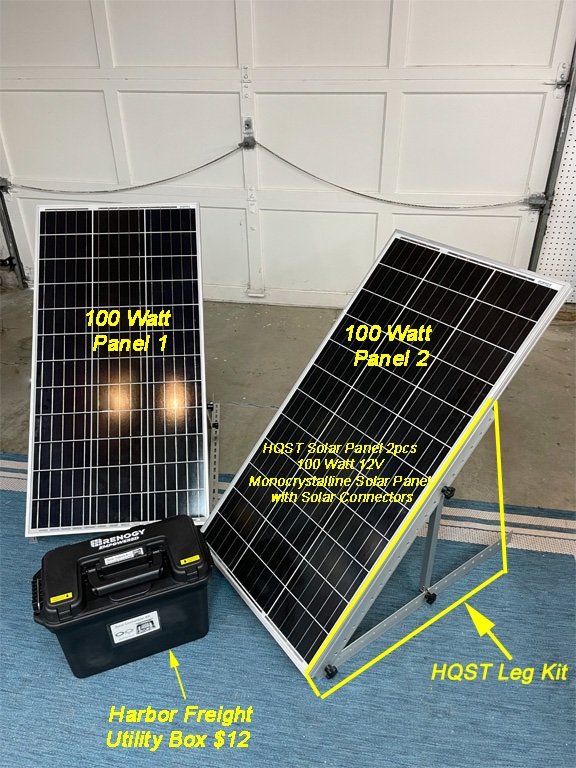
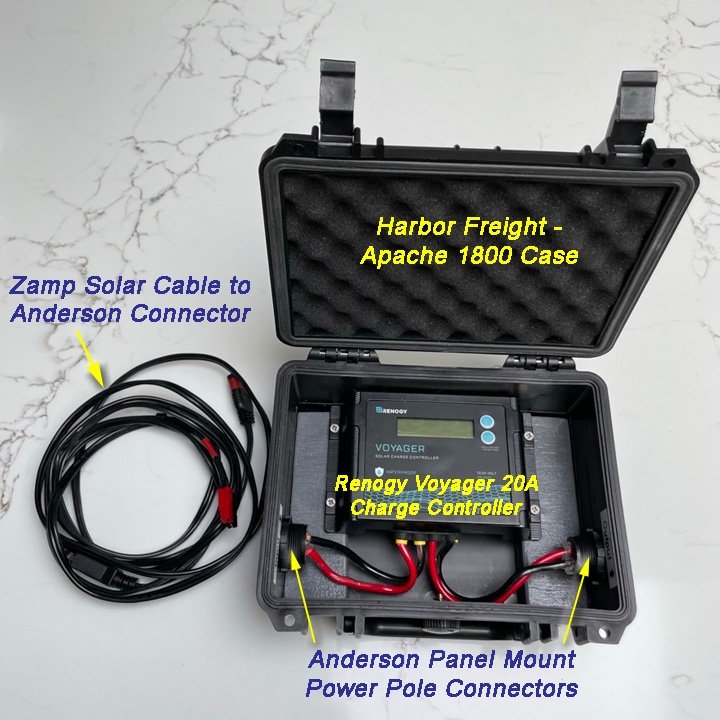
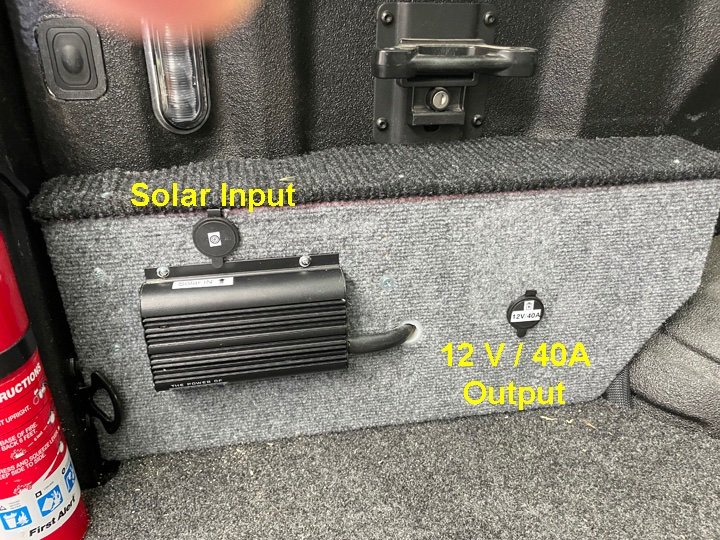
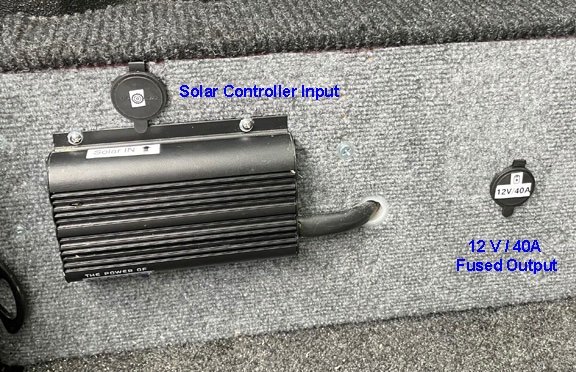
Portable Solar Upgrade: We are preparing for more trips where we will be camping in more primitive settings. In some cases we'll be in developed USFS campsites that have a fire pit but no water or electricity. To extend our stay and recharge our batteries without starting the truck or generator we've decided to pull together a simple external solar kit. We also want to be able to loan this kit to our family members who have other trailers with Zamp Solar input ports. Here's what's in our Kit: 2 - HQST Solar Panels - 100 Watt 12V Monocrystalline with MC4 Solar Connectors 1 - Renogy Voyager 20A PWM Solar Controller 1 - Harbor Freight Utility Case (For cables, adapters, and the Solar Controller) 1 - Harbor Freight Apache 1800 Waterproof Case (So I can leave the controller out in the rain if necessary) 1 - Pair - Solar Extension Cables with MC4 on one end (RICH SOLAR 20 Feet 10 Gauge ) 1 - Zamp Solar Cable (Modified to have Anderson Power Pole connectors on the end.) Misc - MC4 Y Cables, adapters and Fuses Cost: The total cost of this kit was < $300 ....a similar 200 Watt Solar Suitcase with controller is about $425.00. Our USE Model: Our kit is designed plug in to charge both the Aux Batteries in our truck bed and for our the main batteries for the Trailer. We also have made it portable so it can be loaned out to our kids and friends who also have a need for charging. Our F350 truck is setup with dual AGM batteries and has a Redarc BCDC1225D Dc/Dc Charter with Solar Inputs connected via 45A Anderson Power Pole Connectors. (Another whole writeup on that project is here: Link to Truck Power Port Project The Elite II units with Solar Options have an external Zamp Connector on the side of the trailer which is connected through a 20A fuse to the trailer batteries. That Zamp Port doesn't connect to the onboard Zamp Controller, so you need a second controller for external panels. In operation there are two way's we connect up the Solar Panels: 1) To charge the truck batteries, the panels connect directly to the Power Pole connector in the truck as it's connected into the Redarc Charge Controller. 2) To charge the trailer batteries, the panels connect through a Renogy 20A PWM controller to the Zamp Port on the side of the Oliver. System Overview Photo Repeated Below: All the components will fit into two cases, one for the solar panels & legs, and another in a utility box for the cables, controller and adapters. Solar Controller in a transit case: For Mobile and Loaner Use We want to be able to move the solar controller between various trailers in our family, so I decided to mount it inside a small waterproof transit case. The case has Anderson Powerpole connectors on both the solar input and controller output side of the case. These are nice connectors that are flush mounted into the box and include a dust cap for travel. Harbor Freight - Apache 1800 Transit Case $12 on sale Mounting the Controller: The Renogy Controller is mounted to a piece of 3/4" plywood cut in a U shape to fit inside the bottom of the transit case. This U shaped cutout helps hold the wire connectors up off the bottom of the case and gives room for the wires. I wired the Anderson Connectors using the 45 AMP pins to 10 AWG stranded wire. These wires are connected to the controller mounting screws via spade connectors. Case open to show the Renege Charge Controller and connections to Anderson Plugs Both the Input (Solar In) and Output (From the Charge Controller) use Anderson Power Pole Connectors Capable of 45A) The Carrying Case: All the cables, Y connectors, adapters, fuses and the whole waterproof case fit neatly into a Harbor Freight Utility Box. The Solar Panels and leg system along with tie down stakes will fit into a separate case to protect them during transit. There's even room left over for a voltmeter or other accessories like Crimpers or Cutters for solar troubleshooting. Harbor Freight Utility Box has storage in both the base and the LID area. Main Body of Box holds Cables and Controller in a waterproof transit case. The lid of the box also opens and has room for MC4 - Y adapters, Couplers and Fuses. In any case, hope sharing this give's some of you an idea for your own mobile solar upgrade. Craig Short Hull 505 - Galway Girl
3 points
-
Yeah, the picture isn’t quite accurate since they were probably photoshopped. There are two pieces to each leveler. The curved ramp piece that you drive on to, and then the separate wedge piece that locks into place to keep things from shifting, but yeah, I would think that normally the center of the tire would be located more directly above the point where the curved ramp touches the ground, like the photo below of the Andersen levelers, although they could have also rolled the trailer forward a little bit after putting the wedge in place.
2 points
-
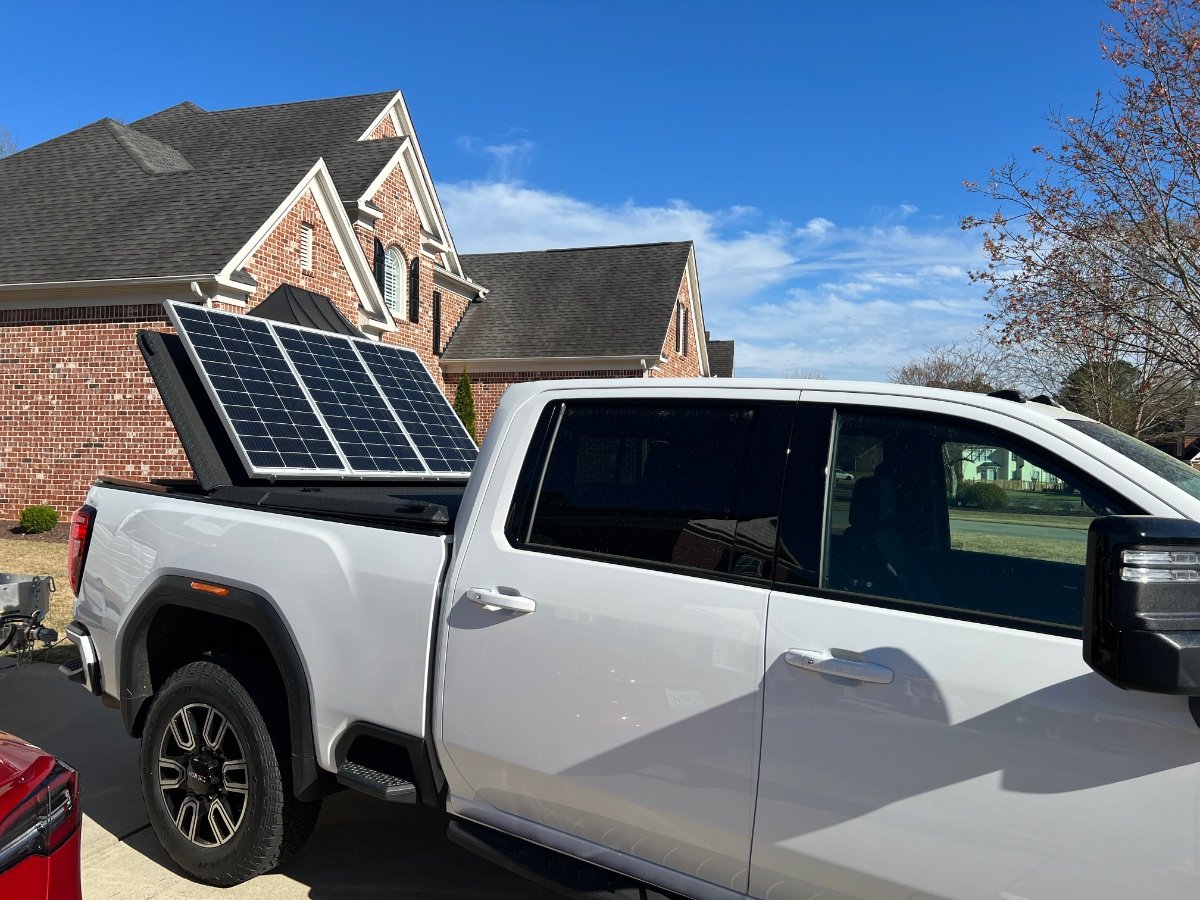
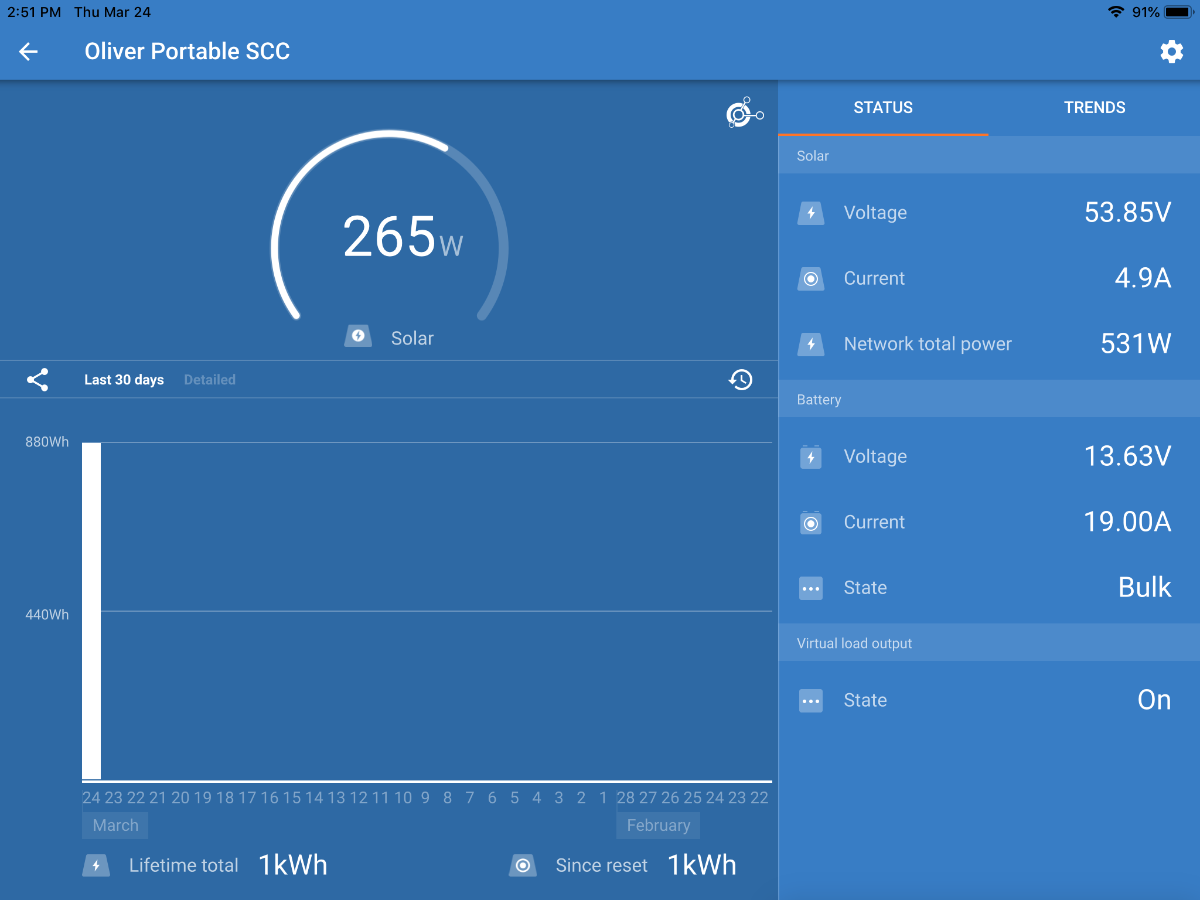
I installed a Victron 100/30 solar charge controller in the Oliver and connected it to the zamp outlet to test the truck bed solar. The panels on the truck bed are wired in series so it is only around 5 amps which allows for using cheap 12 gauge landscape wire. Panels were flat until around 2 pm when I raised them up. The truck was facing southwest and I am located just south of Atlanta. Total yield for the day from just the truck panels was 1.77 KWH. This will be plenty to run the iceco fridge and add additional power to the Oliver batteries.
2 points
-
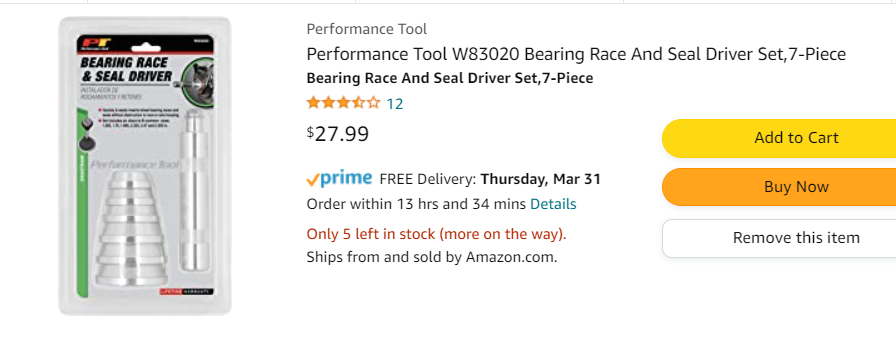
I picked up this bearing driver set from McMaster Carr. Lists country of origin as United States. A little more expensive than the comparable set at Harbor Freight but I try to buy Made in USA when possible, even if it costs a little more.
1 point
-
That's a nice set for having at a shop. However, I prefer a smaller less comprehensive set for carrying around in Ollie. Even with this set, you don't need 80% of it just for Ollie. I recommend servicing your bearing set and set aside only that you need. Saves weight and space. GJ
1 point
-
We picked up in March…Girard with led lighting across the front and a remote and wind sensor. Very nice.1 point
-
June will mark 38 for us 🙂 We're full-timers and in Texas waiting for Bluebonnet to happen next month. Then, who knows? Happy trails!!!1 point
-
Yeah, I would expect that Summit would be legitimate as a Timken source since Summit is a big reputable auto parts distributor. Maybe just a fluke with the WBA database not being updated recently with the latest Timken data.1 point
-
GJ - Thanks for the encouragement to improve. Today I also added an input port for solar charging (feeds into the redarc) and an output port for running a compressor. Used 45amp Anderson Connectors and fused the circuits. Craig
1 point
-
FYI, i just completed changing out the bearings and seals on my 2015 Oliver LE2. These are the bearings used. Timken Set 17. L68111 and L68149 for the inner race and bearing Timken Set 4, L44649 and L44610 for the outer race and bearing Timken seal, 473336……or you can use a National seal. They are the same I elected to use the Timken wheel bearing grease. Looks to be great quality and who knows better about the required grease for their bearings than the maker of the bearings. I would strongly suggest you also purchase a bearing arbor/bearing driver. Using a punch to install the race is not a good way to go. The bearing driver kit makes the job so much easier and gives you the assurance the race is completely seated to the drum. These kits are inexpensive…..only $35 to $40 and they will fit a number of different common bearing sizes. Drive the seal to be perfectly flush with the outer diameter of the drum……..do not drive this seal all the way to the bottom of the machined recess in the hub. i use a large flat block of metal to drive on…….a flat piece of wood can also work. Do not hammer directly on the seal itself as you can distort the seal. Since I am not familiar with your comfort level in working on drum brakes it is difficult to suggest doing a little maintenance on your Nev R Adjust brakes. This is not a very robust design or execution of self adjust brake mechanisms, and it is my personal opinion that they do require some maintenance in order to perform as intended. Once you remove the brake drums and attempt to move the brake shoe assembly back and forth to see how free they move/adjust, you may be very surprised to find that they bind and are not free to move. There are points in that brake systems that require some cleaning and lubricating and doing that when you repack the wheel bearings would be a good idea. To get to all the parts for cleaning and lubrication, you almost need to completely disassemble the brakes. But if you feel uncomfortable with that, at the very least apply a good brake grease to the raised pads on the backing plate where the brake shoes ride. There should be six raised areas that should have a small amount of brake grease applied. You can lift away the brake show from the raised pad with a screwdriver, and then apply just a small dab of brake grease. The other areas that need a dab of brake grease will require you to disassemble the brakes. Not an extremely difficult task, but a couple of special tools are suggested to remove and install the springs that hold the shoes together and to the backing plate. I used CRC 05361 Silarmic brake grease and am quite impressed with it. Follow the suggestion listed earlier for torquing down the wheel bearings to “set” them before inserting the cotter pin. Tightening that axle nut good and tight while rotating the hub is important to get the “bearing set” properly. Then back off the nut as described in the earlier post. Very critical to get just the correct amount of play in the new bearing and race. Not certain if “play” is the correct term as you really do not want play in the bearings……but you do not want them set to tight either. The replacement of the wheel bearings, races, and seals is not that complicated of a job…..but it can be time consuming to do it correctly and especially to insure all parts are absolutely clean before applying the grease……you sure do not want any contamination or bits of dirt in your new set of bearings. Good luck on your project. Steve R.1 point
-
It doesn't have to be a small town, especially these days. Everyone seems to have supply chain issues. We don't carry much in the way of spare parts, but there's a bearing set under the seat. One of the few things that can really keep you "stuck" in one place. Fortunately, we've never needed it.1 point
-
Thank you @Geronimo John. Unfortunately it was not guaranteed to get to me before I had to hit the road again. But that's okay. I'm not too happy with the old break assemblies/kits on #110. One is manual and three are auto-adjusting, which, one does not seem to auto-adjust at all. I had to use @John E Davies trick to get the automatic arm out of the way of the adjuster. There are no teeth left on the adjuster, so the automatic arm has nothing to grab onto. Understandable. Next will be to decide which Break assembly kits I go with. But, that's for another day. I think good old-fashioned manually adjusted assemblies is the way to go. I'm almost temped to take it to Tennessee and have Oliver do a bunch of suspension and break upgrades. But, they'll likely charge WAY more than me doing it myself. They're too busy for that anyways, I'm sure. You guys are great. Sorry for repeated questions. These forums are not nearly as good as Google search algorithms, so tougher to find the correct info for each unique situation. Cheers, Chris1 point
-
I just had my hubs off and can confirm for our 2020 model Elite I the parts are as follows: Outer bearing: 15123, Inner bearing: 25580, Seal 10-36 In addition, I contacted Dexter and they sent me the build sheet for my axle that confirms the numbers I got for the outer bearing and other parts. I had asked Jason (Oliver Service) prior to taking off the hubs to clean the brakes what the spare parts are so I can have on-hand in the future is ever needed on our travels. His list was Bearing Kit is #BK3-200 Includes: 14125A Bearing & Race 25580 Bearing & Race 10-36 Seal So I am assuming Jason was referencing a prior year model perhaps as the outer bearing he stated was different than the one install in our trailer. Would recommend you check the outer bearing number installed in your trailer prior to purchasing a spare set or better yet get with Dexter and provide them your axle serial number so they can provide it to you. If requested, I can upload the data sheet Dexter sent me as an example of you would get. On a side note, the bearing installed by Dexter were stamped "China" so they are not the Timken "made in USA" bearings everyone whats to have. I purchased timken bearings to have on-hand if I decide to upgrade during my next repack of the bearings. Also does not hurt to have several seals so you can repack bearing whenever the miles, time or when you feel like it hits.1 point
-
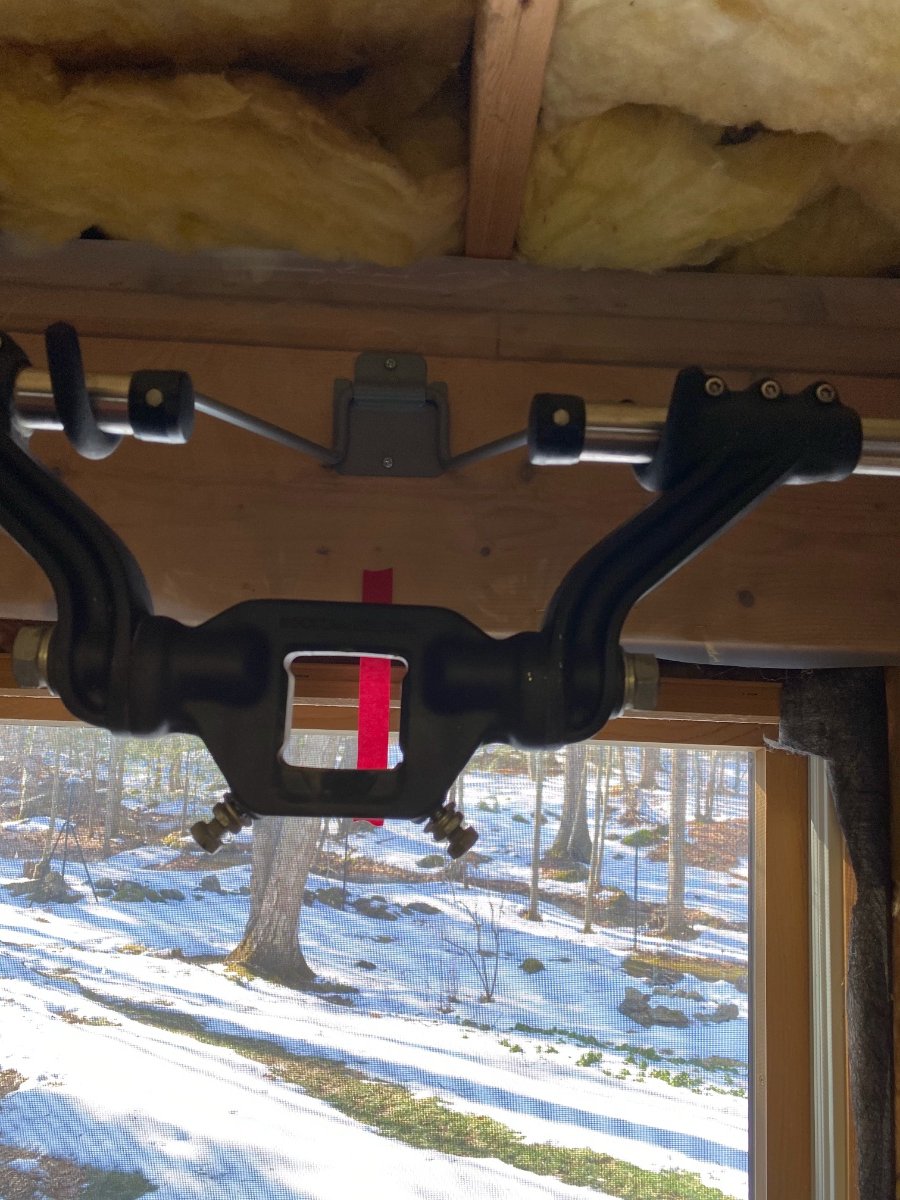
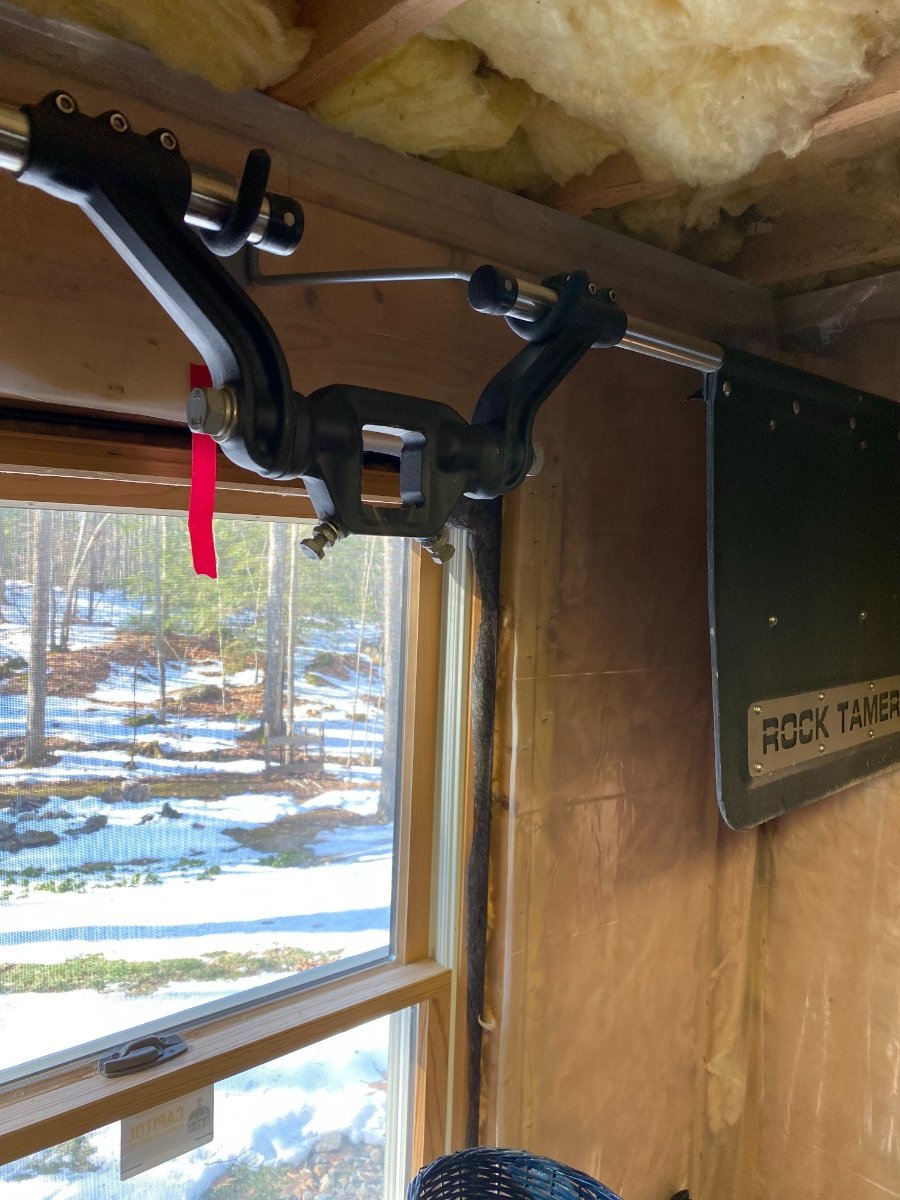
See attached picture of how I store our Rock Tamer Mud Flaps when we don’t have them installed on our TV. I bought a very inexpensive bike rack mount that is sold at Home Depot or Lowe’s. I mounted on the header above our basement window. I removed the Andersen components to lessen the weight.
1 point


-
Recent Achievements
-


")


")


