Leaderboard


Popular Content
Showing content with the highest reputation on 02/20/2025 in Posts
-
We lived in the Seattle area for 35 years. It is much cooler than Texas during August and September! It is also one of the driest places in the USA during July and August, believe it or not. The Northwest does not get the Southwest monsoons that time of year. But, by mid-September, the cloudy/drizzly weather moves back in. I concur with EurekaJ's recommendations above. While you are north of Seattle, I also recommend a night or two at Deception Pass State Park near Anacortes, Washington. And, if you are history buffs, a visit to Lewis and Clark's Fort Clatsop south of Astoria in Oregon is worth a stop. Plus, I recommend a few days exploring the Oregon Coast. I would book an RV site at Beverly Beach State Park (one of the nicer state parks we have been to) and do day trips from there, both north and south, to explore the many spectacular beaches and coastal rock formations.5 points
-
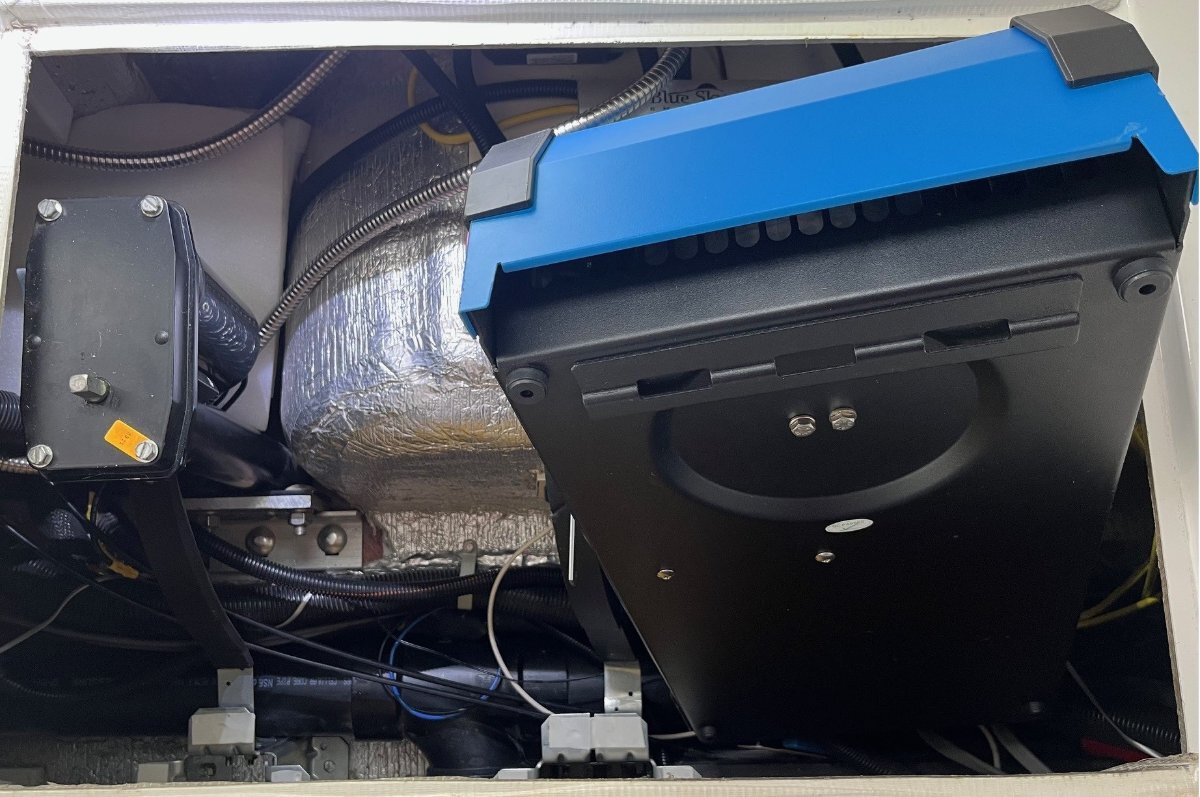
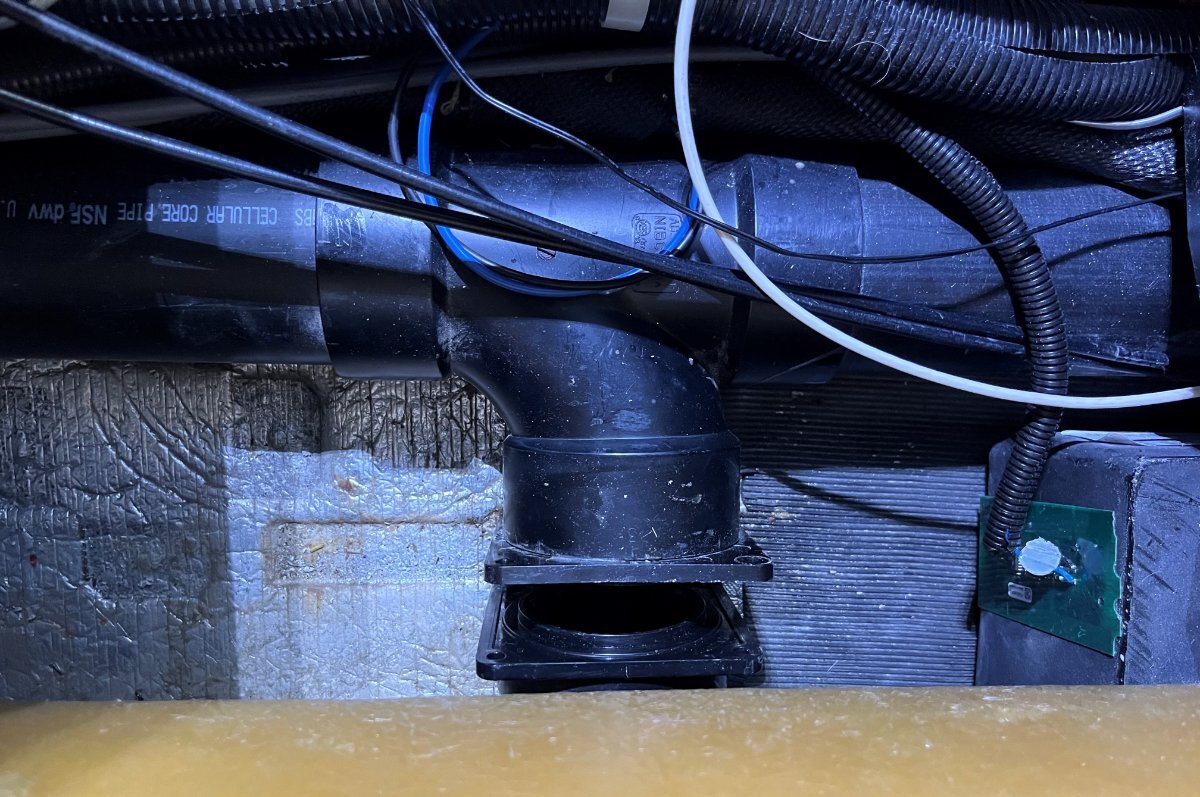
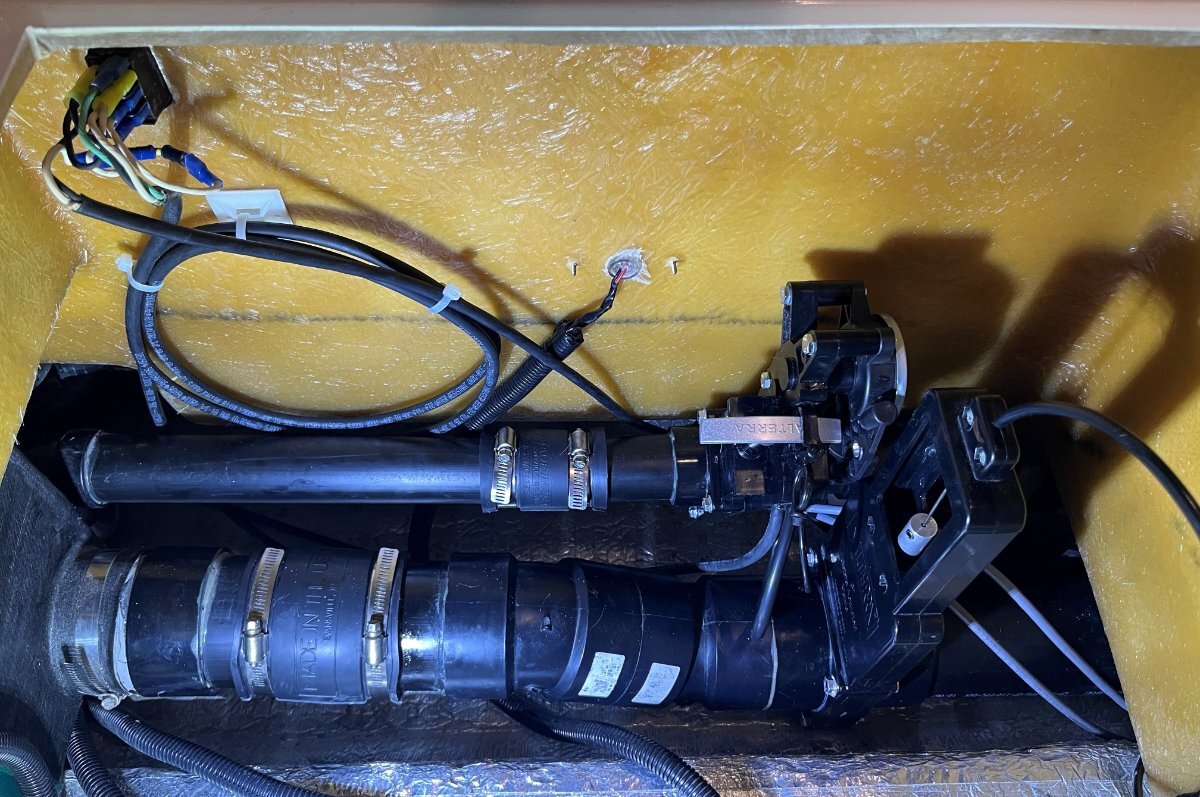
A bench inspection of all 3 valves showed something quite interesting. With cables detached, the black waste valve opened and closed easily yet the seals were crusty and looked more worn. The seals on the gray valves looked to be in better condition yet the valve mechanisms on both gray valves were stuck, all gunk-ed up! My thinking is soap and/or tank additives in the gray plumbing caused this and the black tank is certainly a different chemistry. I cannot be sure with 3 prior owners of our hull what was used through the years. I remember our good friend Steve @ScubaRx writing that he does not use additives, has not for years, and I believe we’re going with that plan going forward. I was so hoping not to have to replace the gray waste valve since I had installed our Victron MP2 directly over it. Last week I reached down and around the inverter and with much pain and patience. I loosed the Allen key on the cable and the two Phillips screws to remove the sheath. With the cable detached I found the valve was near impossible to move by hand. What I feared came true, and today with much pain I removed this valve. Was very happy to get the valve out and in only 2 hours, considering all. First of course, I removed the ground to the batteries and switched off the solar. I had to unstrap the inverter and pull the 42 LB beast up far enough out of the way to work below it. I used a steel bracket to hold it up. I feared I had taped the shelf down strong with the VHB tape, but it popped off with a strong pull due to the slick shelving material. The waste valve was jammed so hard into the floor that the two bottom bolts were extremely difficult to remove (see impression of the waste valve in the floor insulation in 2nd picture). They were also rusty given their bottom location. You needed two open-ended 7/16” wrenches and the back bolt is extremely hard to reach being under the aisle floor. I spent 30 min on these two bolts alone! I’m really good at wrenching in tight spots from considerable experience. Most of you reading this, I strongly suggest getting OTT to replace this valve when you feel "it’s time." If they charge more than a hour labor, a good retort would be, “Well you put it there!” There was a rubber mat installed under the gray tank which was halfway under the waste valve. I cut this rubber out in the area where the valve is bolted to make the reinstall a little easier. The gray valve was much worse than the picture reveals and the fact that this valve was installed horizontally makes all the residue collect on the lower side causing friction on one side adding to overall pull & push resistance. I replaced entire valve assembly for the gray and just the seals on the black. The gray pull cable is about 4' short and looks fine with a slight curve. I will replace the 144” black cable when it arrives. Before we travel next week, I’ll get the garden hose in the Oliver, fill the black and gray tanks some, run water into the shower drain to test all 3 valves. Tomorrow I should install the new gray valve. It will not be easy as the two flanges do not sit parallel. The two bottom bolts will be fun again! Then I need a plug and some fiberglass repair for the hole in the bathroom wall, and I'm sure I'll see other needs. Sure hope to be good very soon... and for another 10+ years!
 5 points
 -
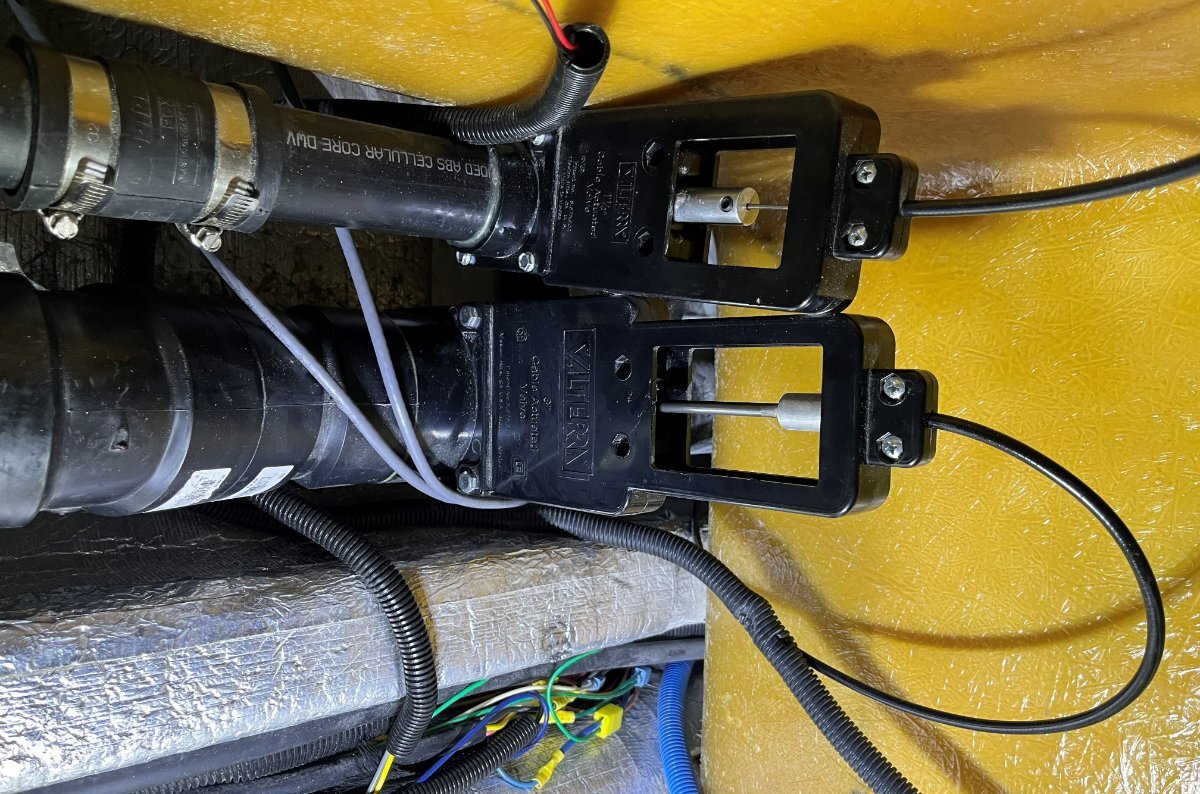
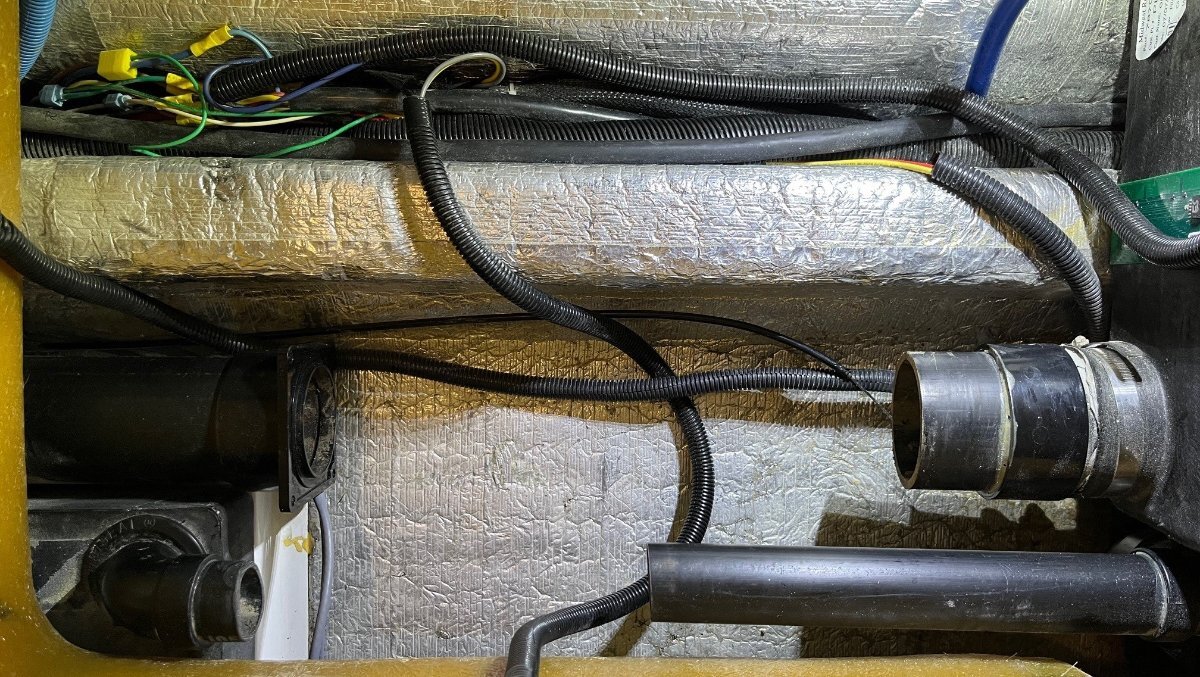
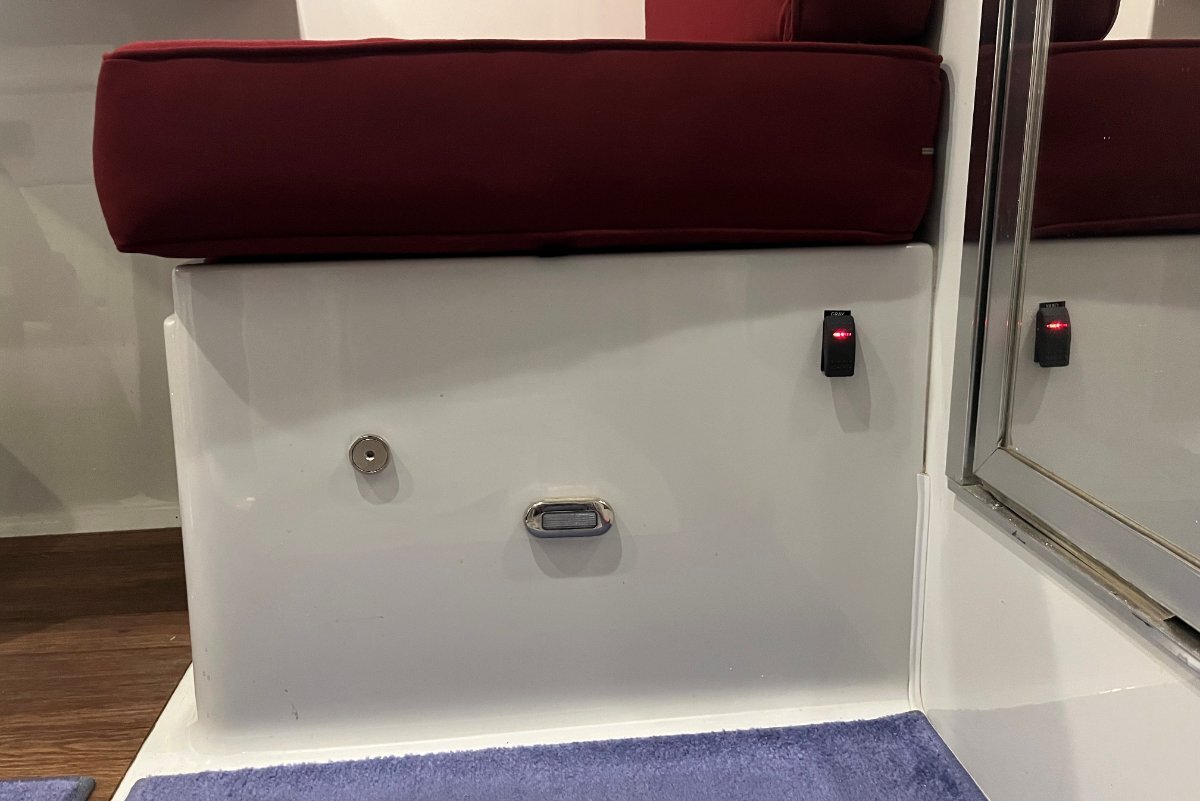
There was a recent thread started by @Galileo where Val had a black tank waste valve beyond repair. OTT Service suggested replacing the valve with the Valterra motorized valve which would eliminate the need for the 12 ft pull cable replaced by an electric switch. This got me thinking as we have a 10-year-old hull and ALL three (3) waste valves, including the 1 1/2" gray valve for the bathroom, are very difficult to pull the valves open and to push back to close. It's always better to work preventive maintenance than to get caught on the road with a stuck waste valve! I wanted to install electric motorized valves in all 3 locations but we were made aware by OTT (through Val's service call) that replacing the gray valve would be difficult. From a picture I had taken of that area, I noted it was installed laying flat on the hull floor which would not allow for the considerably wider motorized valve. I couldn't see a design with one manual valve with t-pull handle in the rear next to an electric switch for the other. So my plan morphed into restoring the main waste valves replacing OEM parts as needed. I kept the idea of a motorized 1 1/2" valve for the bathroom because this valve must be opened/closed often, every travel day. What a chronic pain it is getting into the bathroom, reaching down ankle height and pulling the valve open before pulling a muscle! Yep, we're getting older... To start, I removed both valves under the front dinette seat. The 3" black and the 1 1/2" gray valves were originally installed angled towards and touching each other, with the gray valve jammed against the fiberglass wall. I sawed off the 1 1/2" ABS at the waste valve flange so that larger motorized valve could be installed. Purchase of a new flange and two couplings was all that was needed, as I was happy we had some ABS glue. With the plumbing out it was so easy to run wiring for our DC-DC charger from the hitch to rear dinette seat, an added bonus. At first, I wanted to install the power switch near the entrance door so that it could be reached while standing outside. Thinking through the extra work and that it could be easily damaged or switched accidently, I installed it right there under the dinette seat. Here the provided wiring harness reached the buses under the rear dinette seat w/o modification. I cut a tight-fit rectangle opening for the switch alone, tossed the large faceplate and by-passed the odd fuse/reset button, adding a 5A fuse at the +bus. When the valve is open a thin red LED shows which can be seen from outside the entrance door. It is soooo great to merely press a button to work this valve!
4 points
-
I recommend you look into the US101 loop of Olympic National Park. While most of the scenic opportunities (Hurricane Ridge and the Hoh Rainforest) require day trips to get up into the national park itself, they are both worth it. If you can stay near Port Angeles (north of Hurricane Ridge) you would also have a day trip opportunity to ferry to Victoria BC and the beautiful Butchart Gardens. Additionally, while this may not coincide closely with your National Park strategy, perhaps you might visit the area near the mouth of the Columbia River - Cape Disappointment, WA and the Columbia River Maritime Museum in Astoria, OR across the river. You will get a sense of why the call the mouth of the Columbia the “graveyard of the Pacific”. It’s usually quite nice in the summer (not Texas hot), it’s just plain nasty in the winter.4 points
-
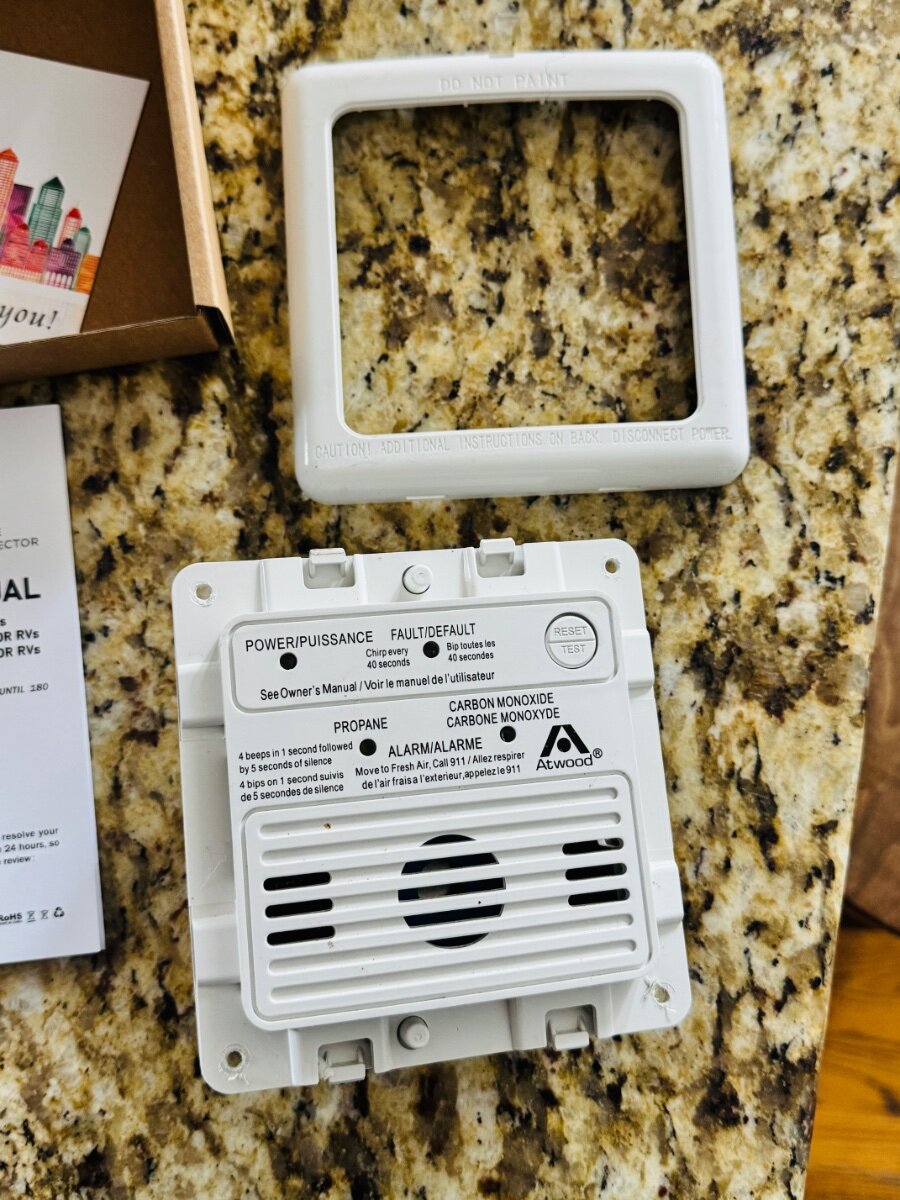
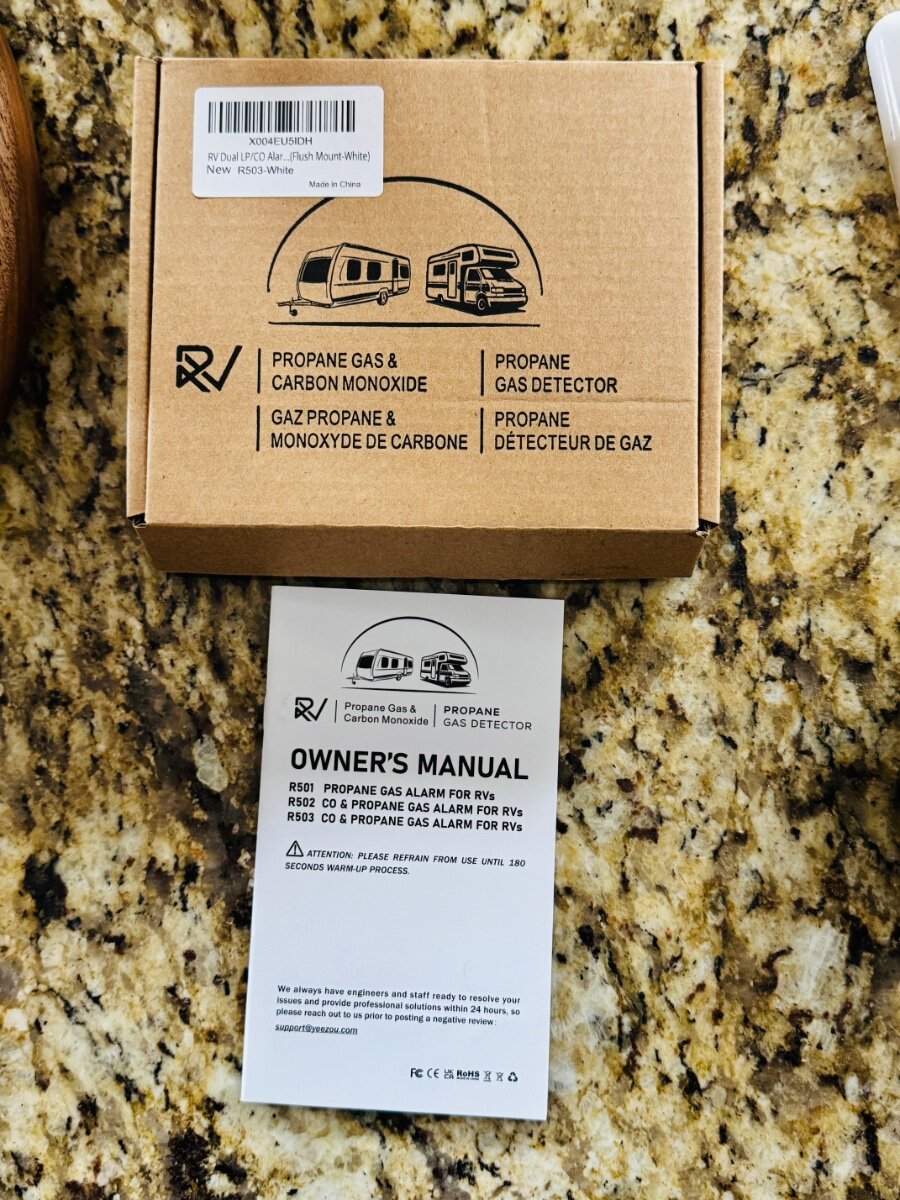
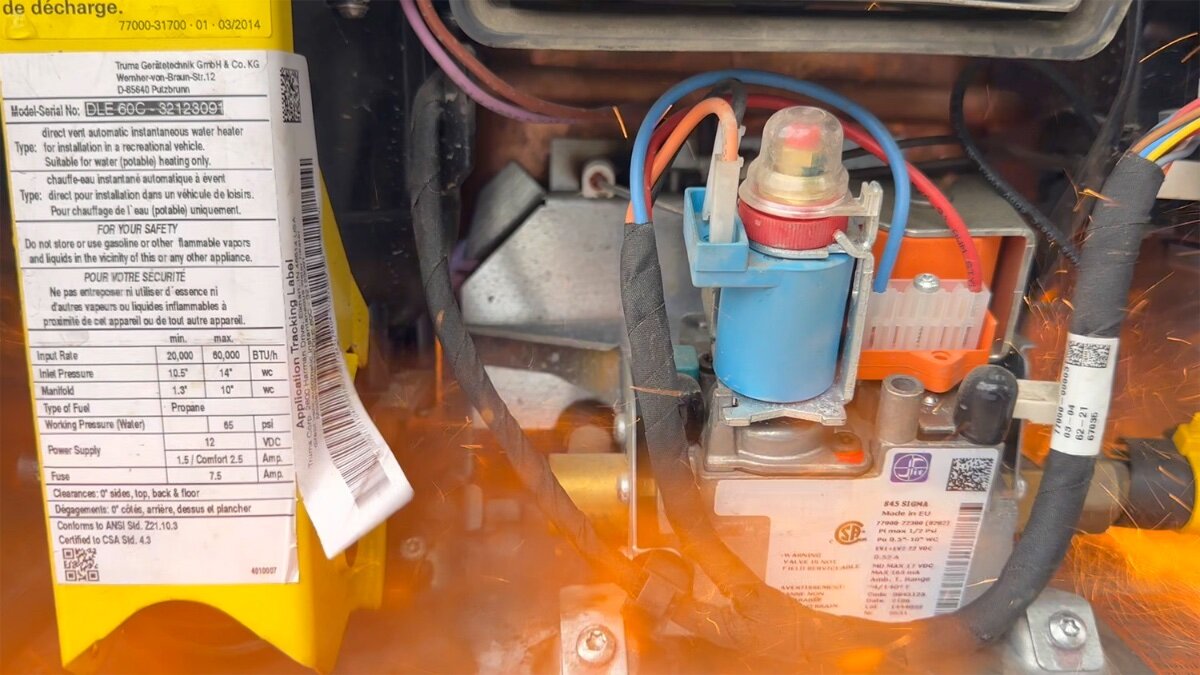
After 7 years, the CO/propane detector needed replacement. The alarm stayed on and wouldn’t reset. Got on Amazon and ordered the one linked below, perfect fit. Says to replace every 5 years. 2 min. Job. Even came with its own quick connects. I know there are previous posts about this, just thought I would update with a new one since this topic will be coming up for others soon. Amazon link: https://a.co/d/eDhKYr5 NEW ONE OLD ONE
3 points
-
I’m starting the planning for a trip to visit some National Parks and states we haven’t been to. This will be a late summer trip, August/September. Planning to visit Lassen, Redwood, Crater Lake, Mt. Ranier, Olympic and North Cascades National Parks. Would also like to work in some coast driving (101) and camping. We’ve never been to either state so if anybody has any recommendations or advice it would be appreciated. I’m sure the weather is somewhat cooler there in late summer than it is here in south Texas! Mike2 points
-
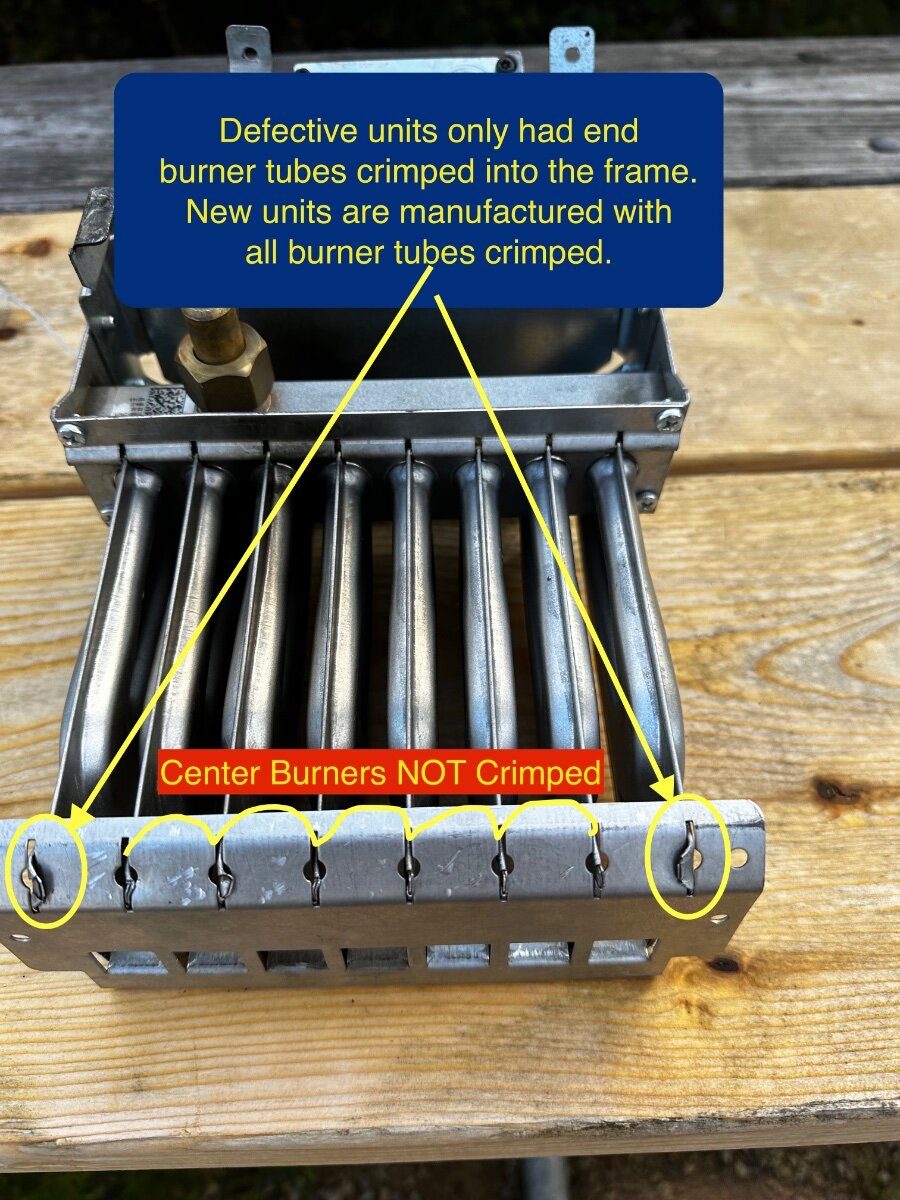
I'll repost this picture to illustrate the purpose of the recall. The recall is for water heater burner assemblies manufactured in the date range of the recall. Those burner assemblies only had the two END burners crimped to the frame. (See below pix.) The result is after many miles of vibration or less on rough roads, the burner tubes are susceptible to falling out out of the frame. When that happens, gas from the feed orfice that is no longer aligned with a burner tube pumps gas directly into the burner chamber. On ignition you'll hear an explosive (whoosh/pop) type of ignition. Most commonly that ignition also blows out the burner...and then the unit recycles as it try's again to light the heater. Owners of units in the recall range should carefully listen and watch for unusual ignition events...which is a sign that a burner tube has fallen off the frame. All new units being manufactured have ALL the burner tubes crimped in place. The recalled units are replaced with newer burners with all the burners crimped to the frame. Oliver is getting units from Truma but at a rate of 10-15/month...so patience is required for repairs. Follow instructions in the Oliver Recall to get your unit repaired. They can only send replacement burners to qualified repair centers. For the curious, here's a pix of an actual "ignition event" when a burner tube has fallen off: As you see the flame is rather large and extends outside the burn chamber.
2 points
-
We had our Truma burner unit replaced yesterday. Oliver is only getting 15-20+/- burner replacements every 3-4+ weeks. It is going to be a long process. As their letter stated you can get it done by an approved Truma repair company and Oliver will reimburse you. Oliver was very proactive on this and unfortunately a number of Owners have been disrespectful to Oliver Service. Just hook up and go camping. Things will get done.2 points
-
The Texas Oliver Rally 2025, for Oliver Owners only, will be held October 20, 21, 22. Checking in Oct 20 and checking out Oct 23 at Lake Mineral Wells State Park. For those interested in attending starting May 20 you can reserve a campsite. A potluck dinner is scheduled for Oct 21 and. BBQ dinner us scheduled for Oct 22. A hall at the campground has been reserved for these dates. Paula Ratcliff has arranged for live music for the potluck dinner. I have contacted Truma and they will have a service rep on site. If you need service, you are to contact Shelley Deisinger at s.deisinger@trumacorp.com be sure and let her know you are at a campsite during our rally. I did reach out to Girard but they let me know they will not be at our rally. A representative of the Oliver approved dealer in Ft Worth, United RV will be providing the BBQ dinner. However I had to reserve the group dining hall at $180 per day, so I hope everyone will contribute to this cost. Hopefully someone from Oliver will also be there. Jason E. Attended our last one.1 point
-
Wow, thanks Rich for this video! If I had seen this a couple weeks ago, I might have purchased Drain Master RV waste valves, expensive though at $635 for a 2-valve set. https://drainmaster.com/rv/product/pro-series-s3vt-kit-2-valves-6002 The design of these would allow installation at the gray valve which is flush to the floor. I did just buy a tub of Molykote on Amazon which will be delivered tomorrow. It seems better than the lube I've been using designed for swimming pool plumbing. I'll wait on reinstalling my last, most difficult to reach gray valve, until I can apply this product. https://www.amazon.com/dp/B07VV6QZ7N?ref=fed_asin_title1 point
-
Did you try to reserve via the Oregon State Parks page at reserveamerica.com? https://oregonstateparks.reserveamerica.com/camping/beverly-beach-state-park/r/campgroundDetails.do?contractCode=OR&parkId=402126#sr_a I just checked for a 2- night stay on a random August 12 2025 date and found a number of RV sites available. I recommend you try again, maybe trying different dates and stay lengths. Good luck!1 point
-
Just checked Beverly Beach SP for availability in August. All reservable sites are reserved. It looks like a 6 month reservation window and a number of sites are not reservable, I’m assuming they are probably first come first served. Big park! Will continue to check.1 point
-
I just thought of another…. If you are transiting Central Oregon (near Bend) along your route, I suggest you look into the Newberry National Volcanic Monument. The campgrounds near Paulina Lake are beautiful. It is a remarkably diverse geologic region - the monument is quite large, it is just not substantial enough to be a NP. This has the added advantage of being slightly off the beaten path away from the many other popular Pacific Northwest destinations.1 point
-
I haven't seen or heard of this before. The ECO mode does fire up periodically as needed to keep the water warm. When you mention 'control panel', are you referring to the inside panel? My inside control panel is above the curbside bed and the wiring is accessible from the porthole in the cabinet above the cooktop. Mossey1 point
-
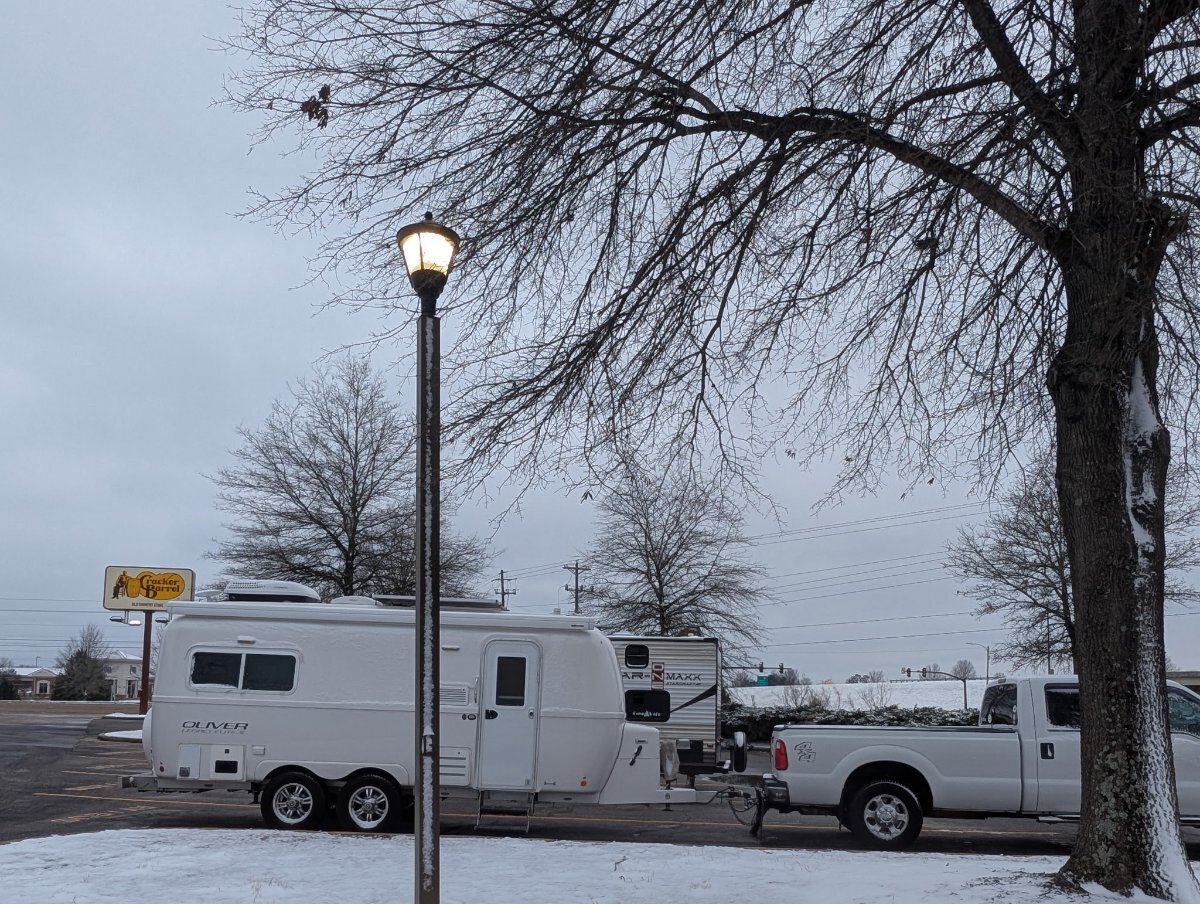
Jolli Olli is parked at the Cracker Barrel in Saltillo, MS. Had dinner last night and breakfast this morning. Waiting for the roads to dry out before a 2 hour drive to North Abutment COE in Grenada, MS, on the way to Waco, TX.
1 point
-
@MAX Burner, Maybe it’s time to try making espresso shots with your favorite Black Rifle coffee and really make that half-cup of Joe work a little harder. Mossey1 point
-
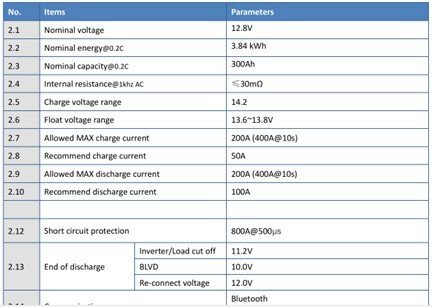
You need to reconfigure your Xantrex, both solar chargers, and your new Orion to the same Epoch suggested charge rates. These specs are from the Epoch Essential 300AH battery manual. Bring Bulk and Absorption charge rates down to 14.2V. It will not matter that you ran higher for a couple weeks, but lower charge voltage over time will extend battery life. There is also no prescribed charge process like having to bring the batteries down to XX% SOC. Though if your only getting down to a min of 82% just use more 12VDC and 120AC power! Don't worry about leaving lights on (old camping habits), the TV or radio, use your microwave or oven, boil water in an electric kettle, or run your fridge on DC or AC, it doesn't matter. During our last trip to Q, the first morning we ran the HWH on inverted 120VAC and our 600AH dropped about 6%. But don't forget, leaving a high amperage appliance on. I'm sure you're checking the Victron Connect app often We stay at campgrounds with hookups and most of the time I do not bother hooking up. Like you mentioned, it is good every so often knowing you're up to the full 100%. I hooked up when we got home after a week to bring them up to 100%. The next morning I put the cord away and this week while working in it, running lights, radio and furnace, our 600AH has always been over 90%. And now you have DC-DC charging. Your system is in a great shape! 😂
1 point
-
From what I've seen so far: Oliver has reported this to NHTSA and is self recalling for their own units as an extra precaution. The NHTSA and Truma appear to still be in negotiations about a larger industry wide recall. CS1 point
-
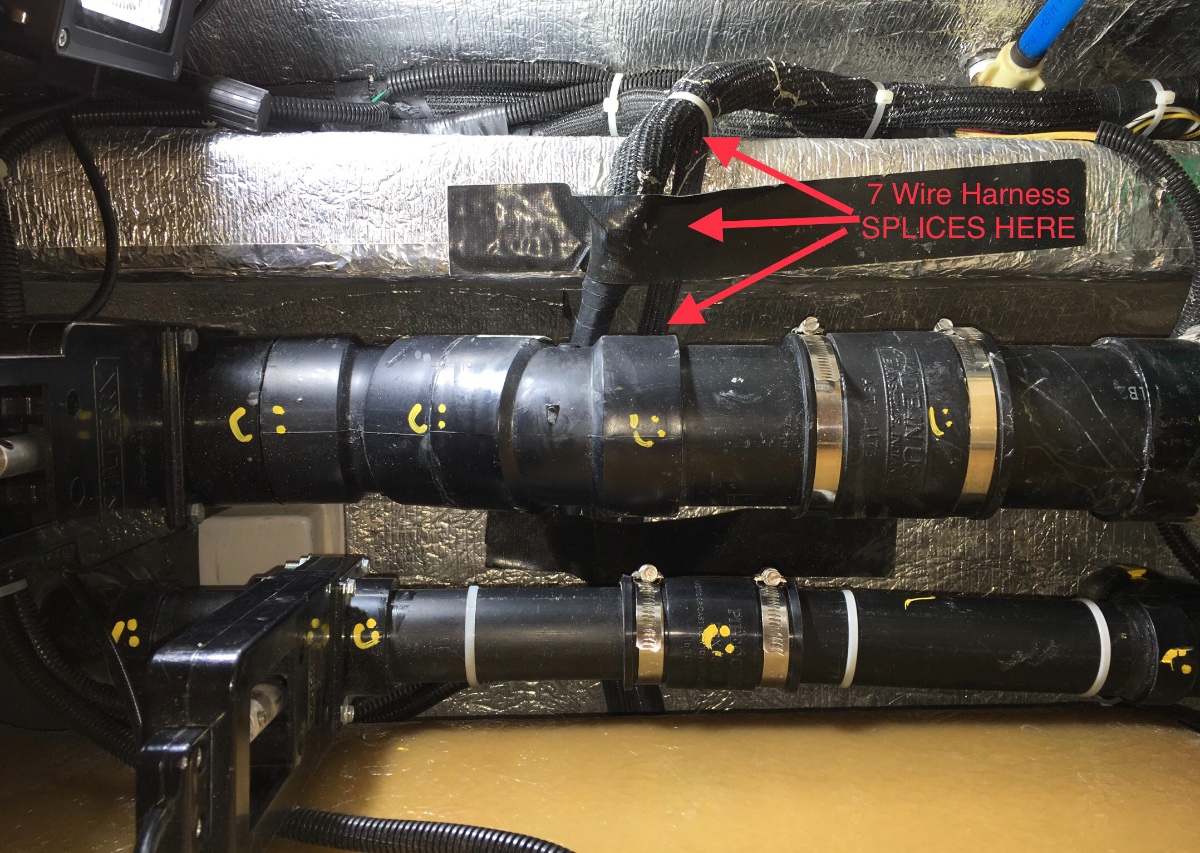
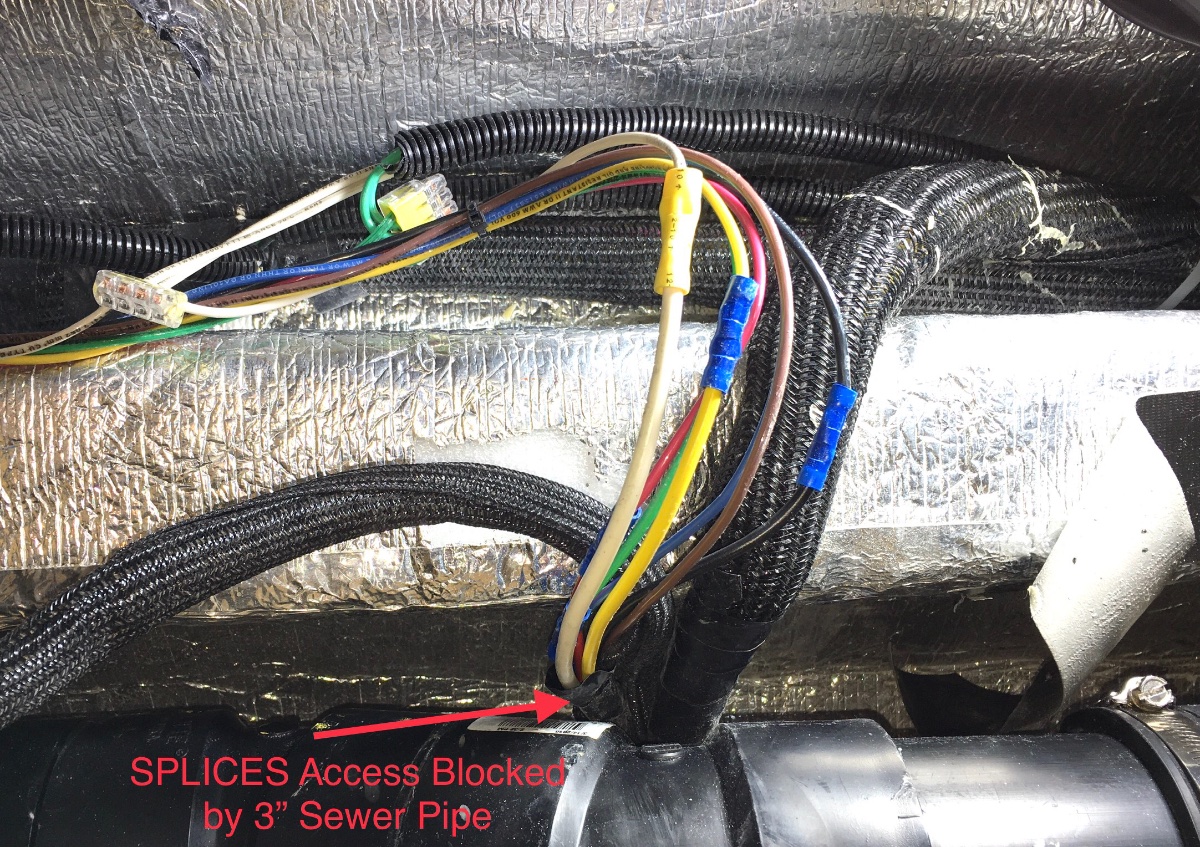
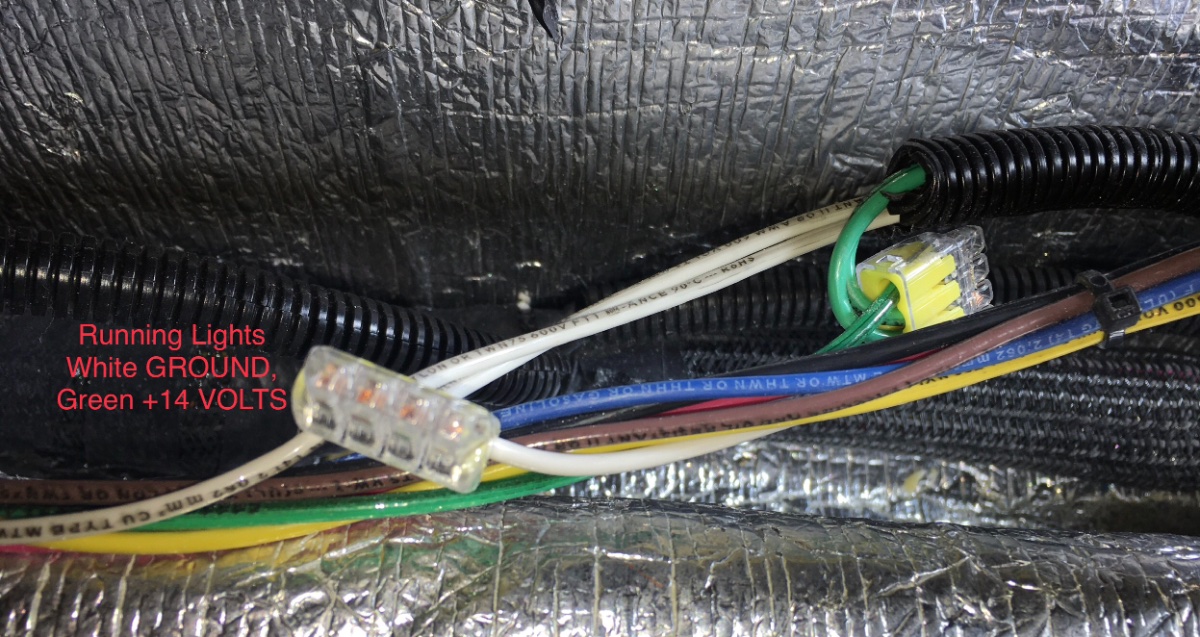
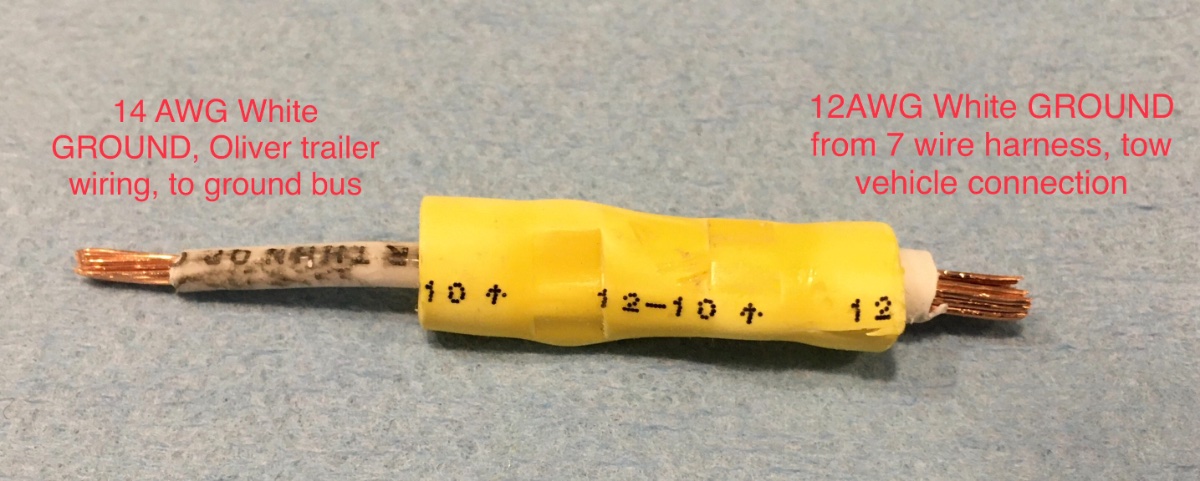
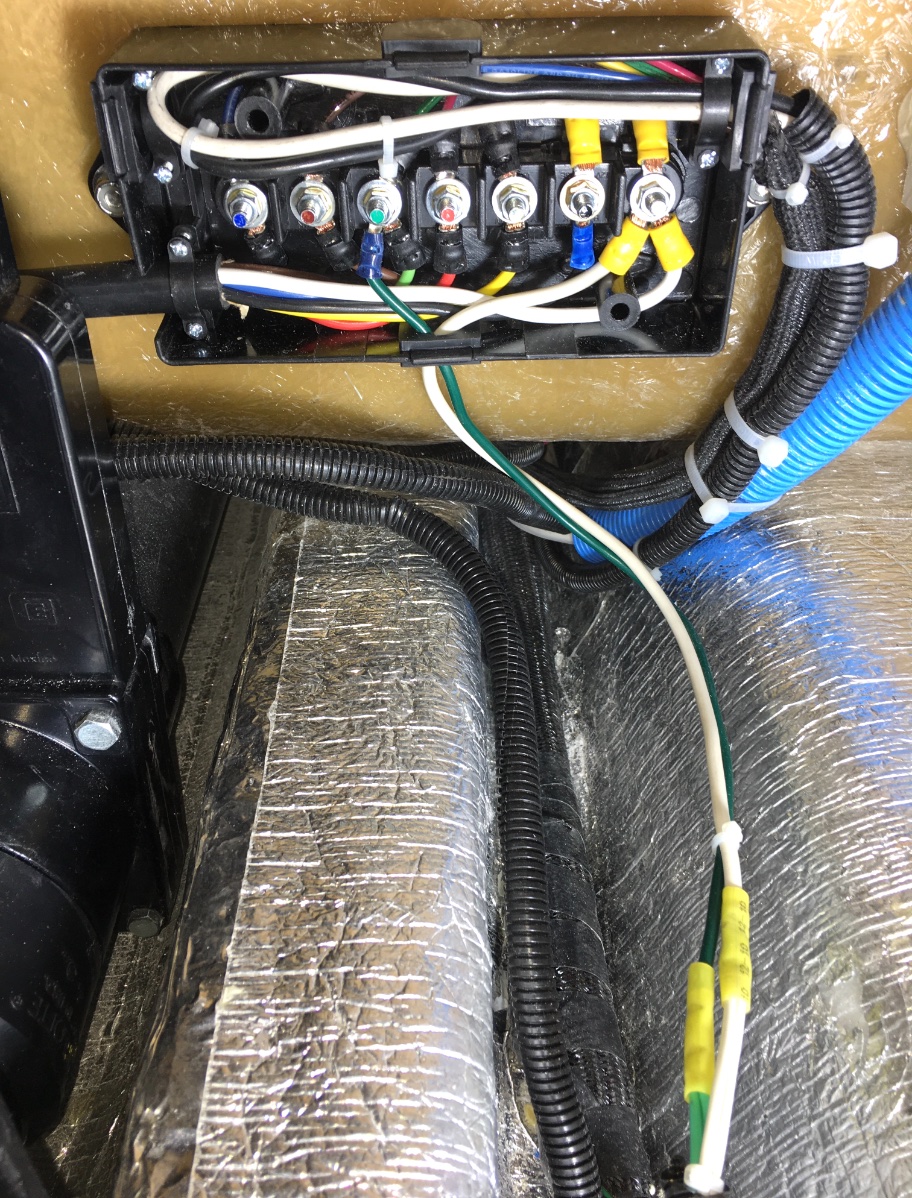
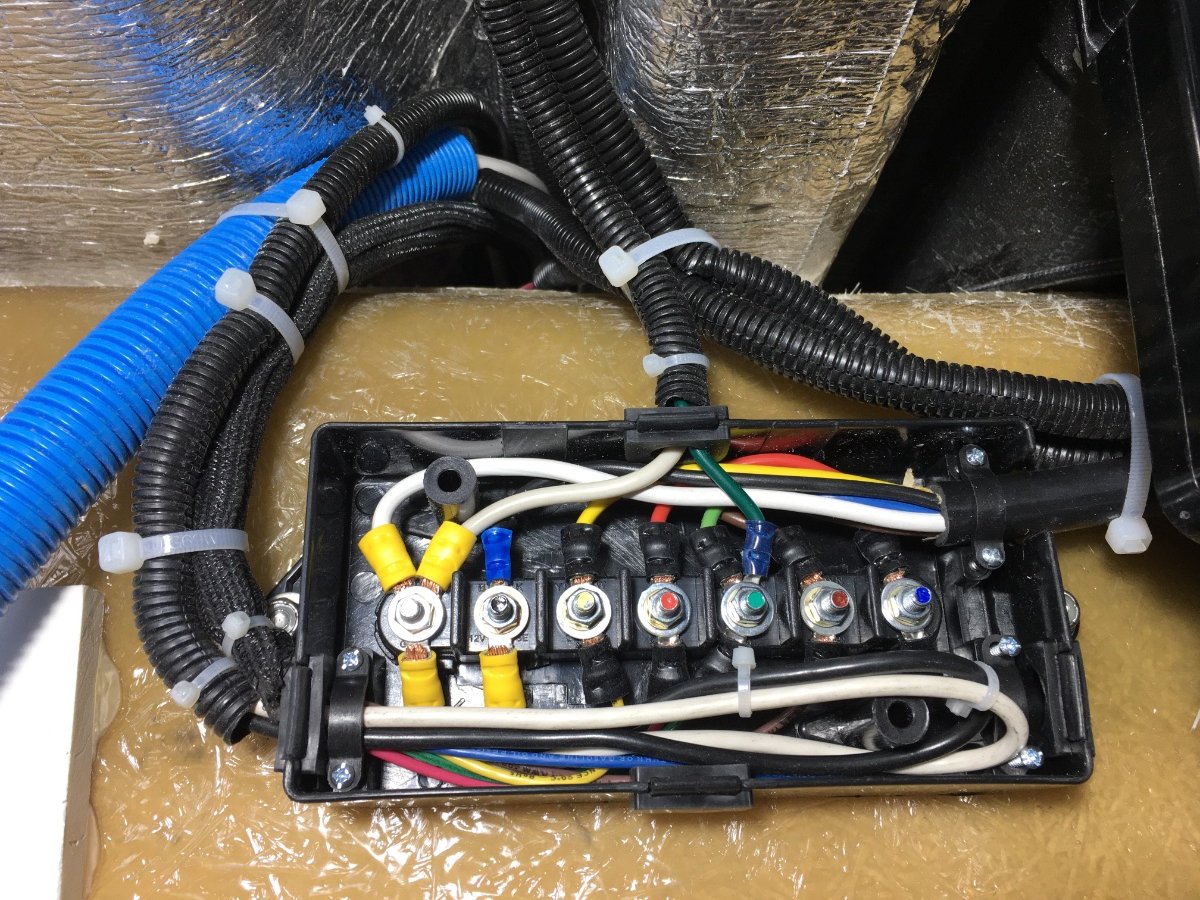
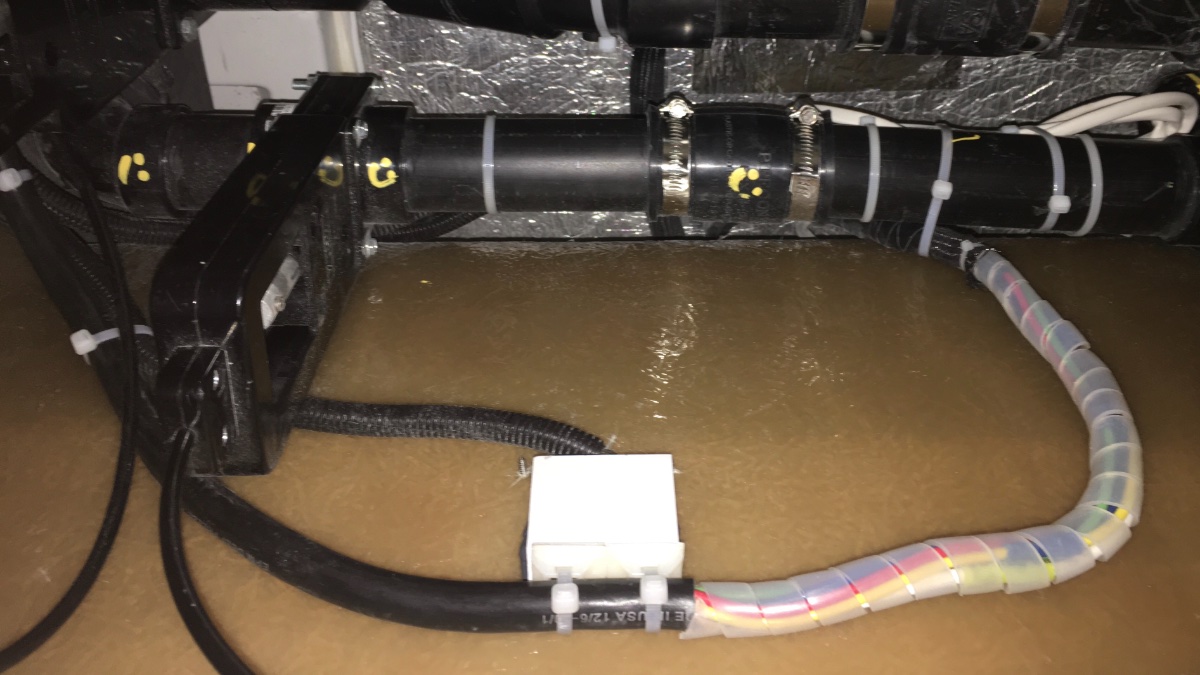
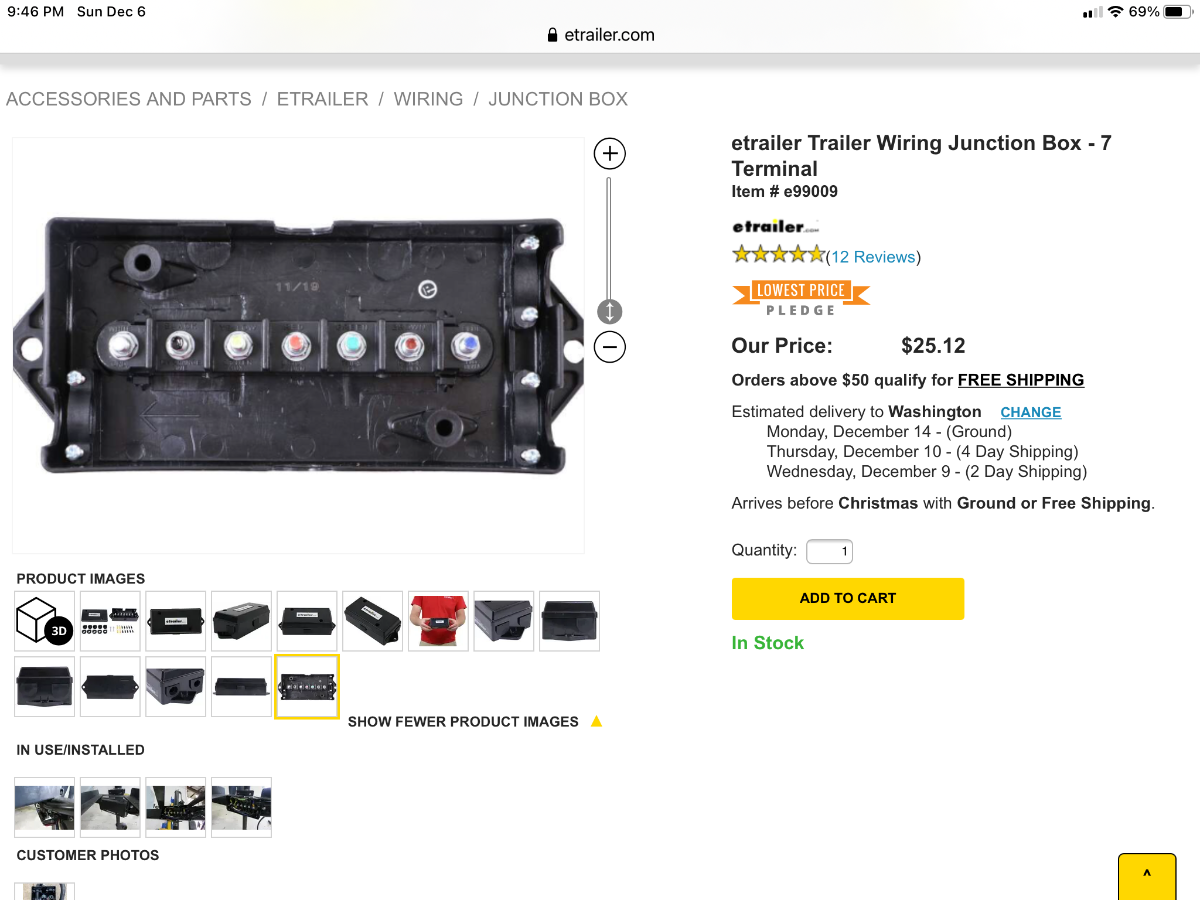
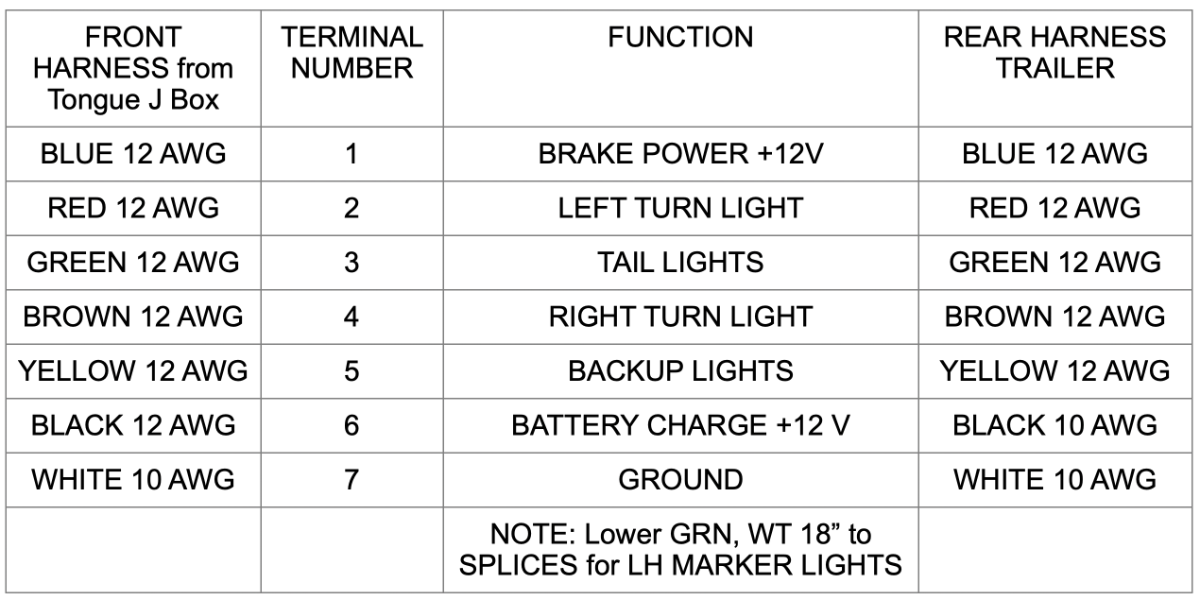
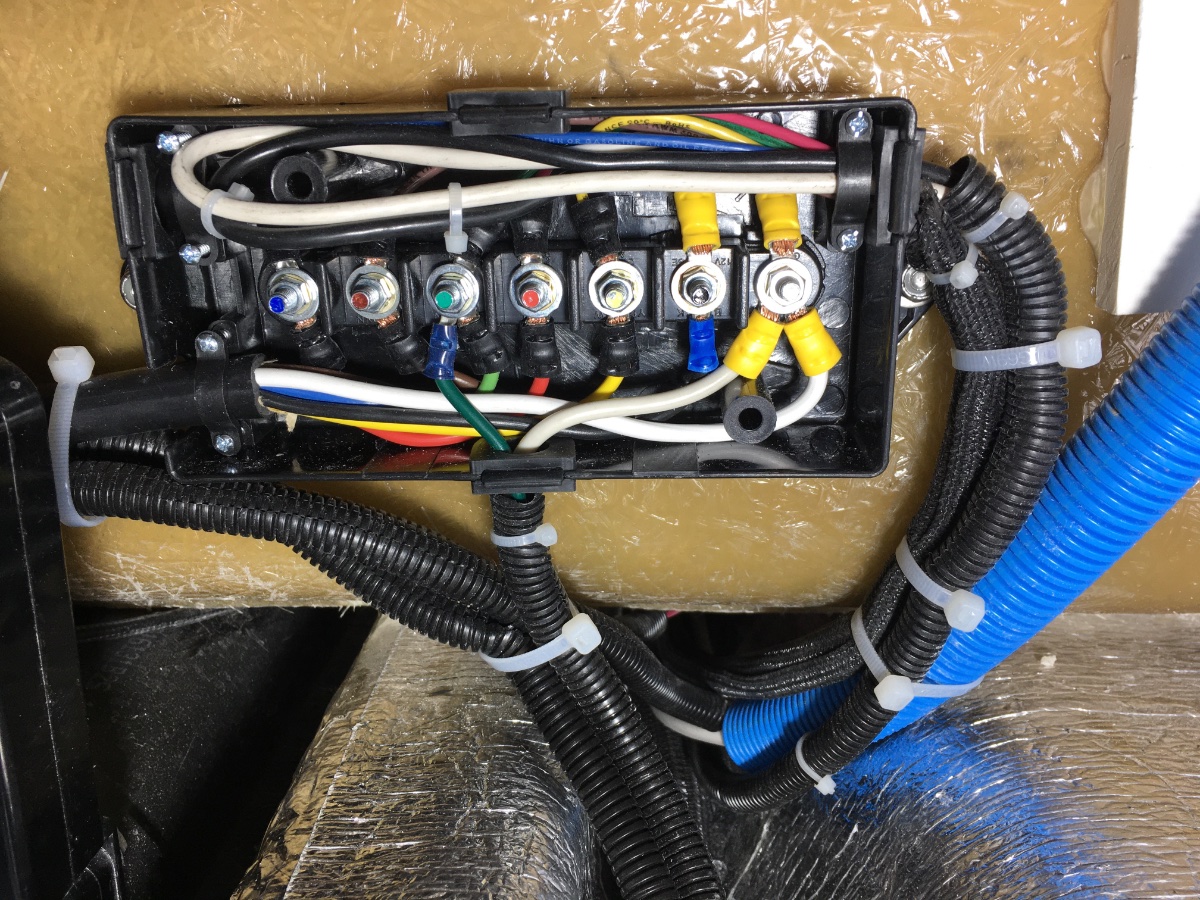
Here is a related thread, I installed a similar box up front under the jack: ... https://olivertraveltrailers.com/forums/topic/2688-how-to-junction-box-for-trailer-harness-repair-or-extend-the-harness/ This all came about because I wanted to install a ... Redarc DC to DC Battery Charger .... and I needed to know FOR SURE that the wires were big enough. 12 AWG is the absolute minimum according to Redarc, and bigger is always better, especially in an Ollie with a very long run back to the batteries. Here are the existing butt splices, half of them are absolutely buried under the sewer pipes. Time for a J-Box! So I cut all the splices, and dragged the ends up to where I could inspect the wires. Most were OK, but the white Ground wire was not. Somebody extended the front wire with a smaller sized one. Darn it! I bolted down the box next to the 120 VAC outlet. I spliced into the green and white running light wires and brought them up to the box via the bottom hole. The other wires come in from the left and right sides. I ran heavier 10 AWG black and white wires (power and ground) from the box back to the appropriate posts. So now the Redarc charger will not suffer from excessive voltage drop, and with the easy access, it will be very simple to troubleshoot any future 7 Wire Harness problems. The new splices are easy to ID because they have clear spiral wrap plastic, and they are secured to the inside wall using a 1" thick block of HDPE plastic, bonded with JB Weld directly over the small LED light. The placard goes inside the J Box using 3M double stick tape. Here is the placard, in Apple Pages format: Oliver Junction Box wiring placard Rear 7 pin.pages Note that I indicated where those marker light splices are - I hate not knowing! John Davies Spokane WA
1 point
-
Our 2008 was originally grounded to the ball. Gave us issues at times. Brakes would flash nc, c (not connected/connected) at times (going over a bump, going downhill, especially.) Wouldn't charge without being hitched to the truck, from the connected pigtail. Solved that with a new ground to the frame. I'd forgotten that, until now. Sorry, it's so very long ago. Yes, I should have reported this to Oliver, but I think we discovered the issue during the production hiatus, and didn't think about it. Any good local horse trailer or utility trailer repair company could probably help you with that issue, if that's truly your issue. (May be easier to get an appointment with a horse trailer repair, than rv repair shop. Just a thought.)1 point
-
This is a bad situation for a number of reasons, and I am really surprised that Oliver ever did it this way. People have been talking about this “ ground through the ball” issue for literally decades, usually it is about cheap boat or utility trailers, where each outside light has a little ground wire that is clamped under a mount screw. There is no central frame to light harness connection. It is a recipe for really unreliable long term operation, especially when you try to charge a battery through that type of floating connection. Plus running electricity through steel or aluminum parts causes corrosion. And dunking a boat trailer in salt water REALLY screws this up. The Andersen hitch uses a plastic non-conducting friction sleeve between the ball “stud” and the ball mount, so the ball AND the whaletail are electrically isolated from the stinger part. Does that seem like a good ground path for 10 or 15 amps of electricity? And for your brake controller current? You should definitely modify your white 7 pin harness ground wire by connecting it to a frame ground, preferably the big stud under the rear dinette seat. This should be a Technical Bulletin for the older trailers! How many hours have you wasted looking for the solution? Have your brakes ever worked correctly? John Davies Spokane WA
1 point
-
Small world. I was a voltmeter product manager at Fluke in 1978-82 for that handheld DVM (and other products) that Frank C showed. It was designed with tests including driving over it with a fork lift to see if we could squish the case. The person who was our mechanical designer iterated several times until it stood up to our abuse goals. I still have (and operate) Prototype 004 at home. CS1 point
-
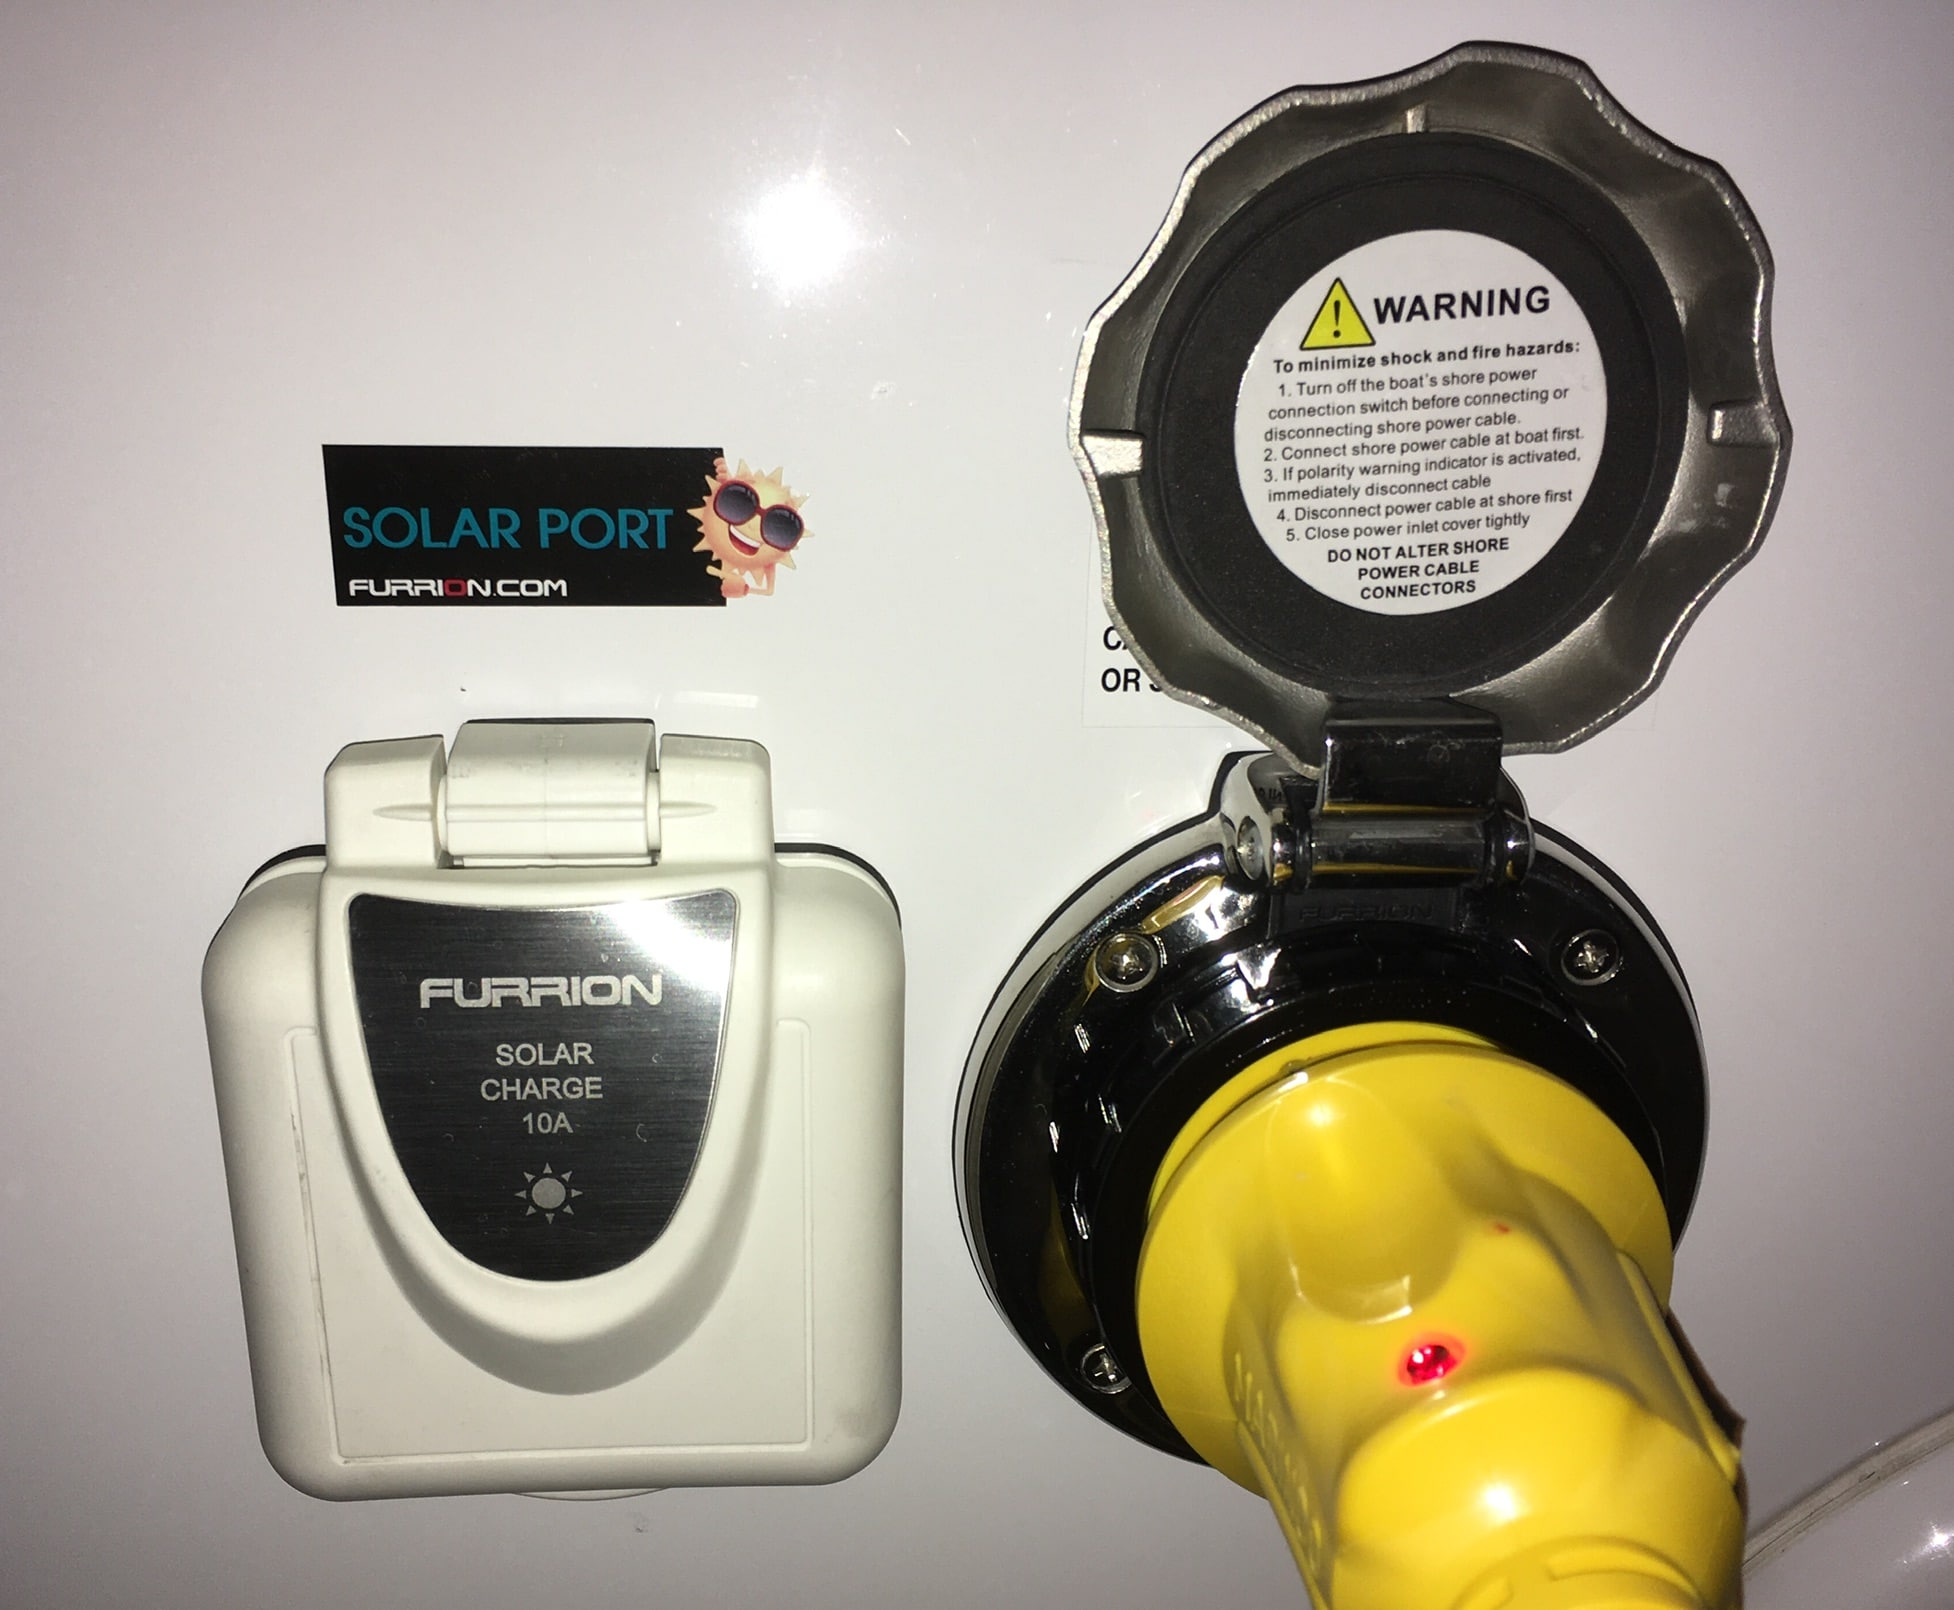
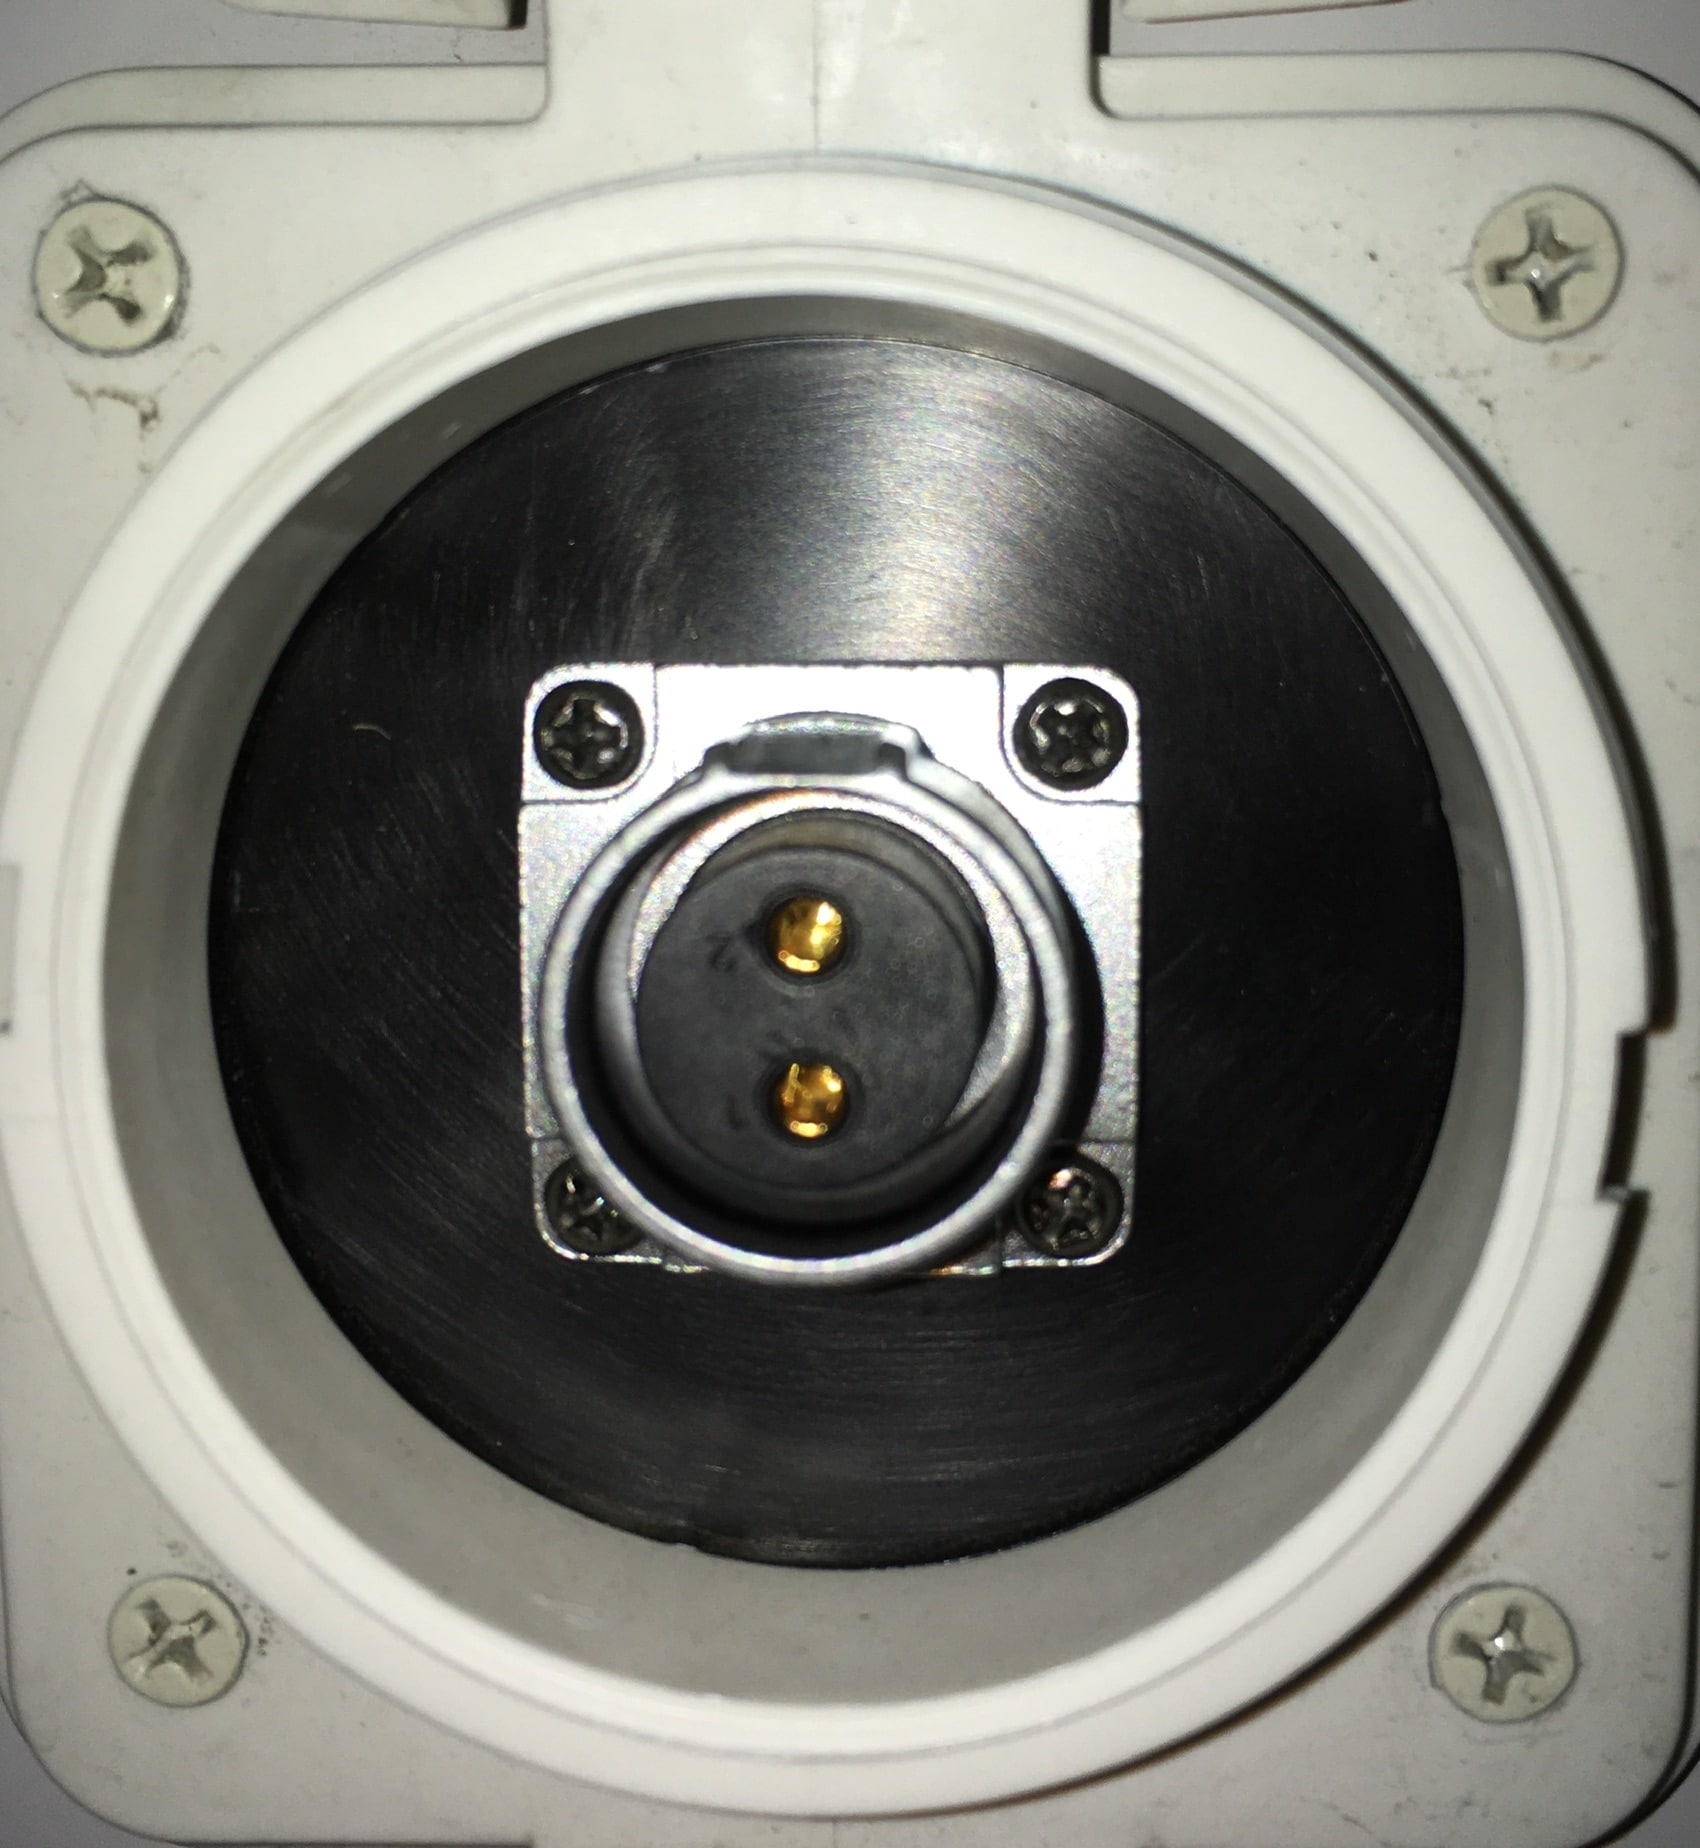
I haven’t looked at a current production trailer, but this is what they installed in mine (218). The installation instructions call for an inline 10 amp fuse to protect the wiring inside the trailer. Mine did not have one... make sure yours does. The positive and negative wires run directly to the battery, so you need a panel with an onboard charge controller and an output of no more than about 8 amps. A 100 or 120 watt would be perfect. I sourced a compatible 20 amp male plug and high quality Anderson Powerpole connectors to make a heavy gauge power cable to run my ARB fridge (inside my truck) off the trailer when parked. It works dandy. And I can use the cable as an extension for a solar panel in the future. I can post more info if anyone is interested. Here is the plug...https://www.amazon.com/CNLINKO-Industrial-Circular-Connector-Waterproof/dp/B01M4RQ3X1/ref=pd_cp_263_1?pd_rd_w=W9luB&pf_rd_p=ef4dc990-a9ca-4945-ae0b-f8d549198ed6&pf_rd_r=Z19YVZZ7KAH8KQMVWZS6&pd_rd_r=993fda2b-55b9-11e9-bfd2-9b05f136c4af&pd_rd_wg=EJPXx&pd_rd_i=B01M4RQ3X1&psc=1&refRID=Z19YVZZ7KAH8KQMVWZS6 It would be nice if they added a picture on the standard features page. I am not at all liking the tacky happy face sun sticker, it needs to come off. It says Solar Charge right on the cover. It’s not even straight ? John Davies Spokane WA
1 point


-
Recent Achievements
-


")


")


")

