-
Posts
490 -
Joined
-
Last visited
-
Days Won
6
Everything posted by Wayfinder
-
Well, I'm not sure who posted their video link to a heavy duty jack stand made from wood, but I made my own as soon as I got back from camping today. This looks rough, and it is, but I'm letting the Gorilla Glue setup with the weight of the trailer on it as it will normally sit. This is made from old reclaimed pressure-treated 2x6s, long deck screws, wood and Gorilla glue. Once the glue is completely dry, I'll finish sanding it down to get ride of any splinters or chips and then give it a quick stain. Why not, right? My neighbor does have some extra spray paint he can give me. I'm thinking of painting it safety ORANGE. So from a distance it might look like a cheap piece of plastic. But I don't think so really. Would be too much of an attention getter. This is approximately 9 inches high and around 8.5" x 11" (ish) wide/long. I think it will last as long as me. Well, longer! I made it so it's easy to pick up with two hands, grips/handles on both sides. With the height, it should give more stability to the front jack as it will not need to be extended nearly as much. I usually just used a small set of blocks as a front jack stand. Not nearly as stable (also Pictured next to rear tire).
-
Well, I'm glad I checked my spare tire. I now know that it is smaller than the other four primary tires. It's P215/70R16 from BF Goodrich only good for 1708 lbs @ 44 PSI. There's really no way for any of the primary tires to fit inside the spare tire cover. If one did, it would be VERY tight indeed. But, added 8 lbs of air to the spare and it looks good, new even. I even cleaned inside, under, and around the spare cover. Just in case the Oliver Police come knocking for a white glove inspection. 😝
-

Extending the Cell Booster Interior Antenna
Wayfinder replied to Wayfinder's topic in General Discussion
If I understand you correctly, yes. Both my cell phone AND a dedicated cellular hot spot, both from Verizon, see improvements, albeit not drastic or magically drastic. Again, if there's already a signal worth boosting. Now I cannot speak for the improvement for all carriers, mileage may vary. My WeBoost might only help LTE & 3G. Newer WeBoost models, like the Drive+X "says" that all WeBoost products support 5G, but I'm not sure. 5G technology has a relatively short distance and is only line-of-site as I understand it. Also, 5G, if very close to a large antenna is quite dangerous. That's why it's so important for these companies to position the transmitters correctly, where humans are in the way of the signals. So not sure if we'll see an internal antenna boost a 5G signal. 🤷♂️ This weekend, here at Petersburg Campground in Appling, Georgia, I would have nearly zero Internet activity if not for the WeBoost. I would have had to read a real book or something. "I shutter the thought". The only book I have with me is my Security+ certification book, which I need to study for once again. I swear I retire before I another Security+ certification... after this one. LOL -

Wishing to learn wisdom and experience from experienced folks
Wayfinder replied to Nightfog's topic in Introduce Yourself
There's also van life that has my eye too. -

Extending the Cell Booster Interior Antenna
Wayfinder replied to Wayfinder's topic in General Discussion
Yeah, from my experience, I get one, maybe two bars of improvement, BUT, ONLY if there is a decent enough signal to start with, say a half to one bar. Can't boost zero signal. Zero * anything is still zero. LOL I pretty much have to put the phone on top of touch the internal antenna. I like the idea of Star Link, but I don't camp enough for that yet. -
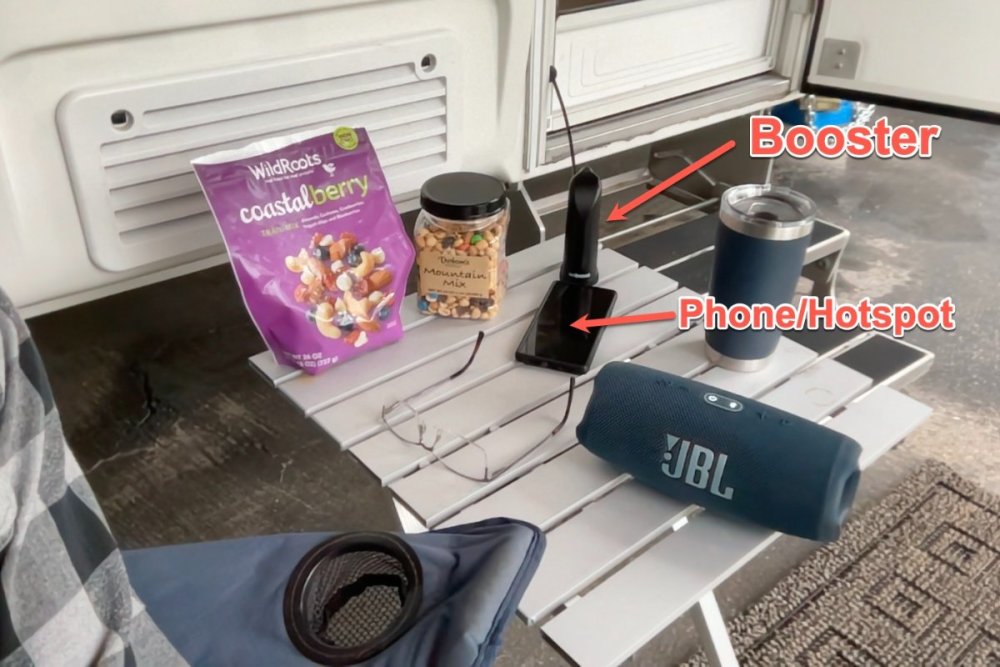
One of the first things I had to replace when getting Hull 110 was the cell booster. I picked up a WeeBoost and left the interior antenna cable extended over the dinette table. I've not yet made it super "pretty", but the long cable allows me to sit outside with my phone right next to the antenna. Basically, if you've used a booster before, the phone pretty much needs to literally be on top of the antenna to get any significant boost. At least with this POS WeeBoost. I want to shop for another extended cable to make it even longer. As it is now I can barely get then antenna outside the door. It's a stretch.
-
Yup, a TMPS is great.
-

Bulb Seal (for under the awning) has been Ordered
Wayfinder replied to Wayfinder's topic in Mechanical & Technical Tips
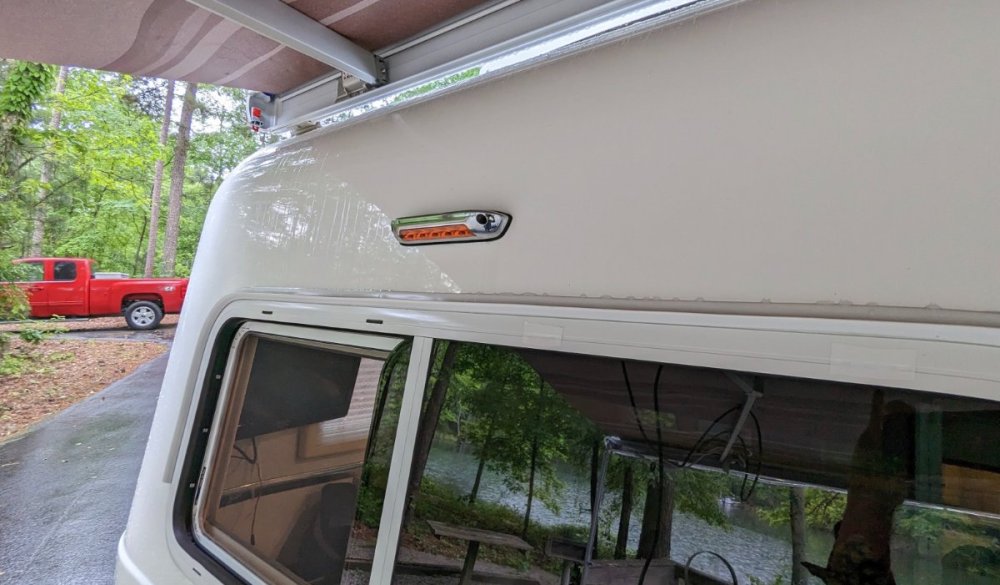
Well, I am currently camping for the 3rd time in two years, (and twice in two weeks) and now testing weather or not I will like NOT having a bulb seal on the trailer. So far with a light drizzle it's no issue. But I also have gutter guards all around. I am wondering if I'd like gutter guard under the awning mount, leaving a sizable opening between the gutter and the bottom of the awning mount. It might be a nice compromise. But, no rush. Critical thinking and testing to do in the mean time. Still adding pics to Album, but again, it's raining. Doesn't look like any astrophotography practice tonight. LOL Album so far: https://photos.app.goo.gl/nkozxUcsgrfPp9YeA The attach pic is showing the rain tripping down over window gutter and showing there's no bulb seal over head. -
I'm no tire expert, but I think you're right in setting the truck and TT to what you did. I'm running 60 PSI on this short camping trip, and I will be airing down to 45 to 50 PSI to see if I can tell a difference on ride home. Watching in the mirror closely for rocking of trailer. But next week the new ones go on. I'm thinking upper 40s so when they heat up they'll go to around 53-55 PSI. Thoughts? Likely the pressure I'll use for the trip out to the rally from Georgia.
-

getting ready to camp after 2 yrs in storage
Wayfinder replied to LindaShields's topic in Introduce Yourself
@LindaShields Mine is black, but my TT is a 2016. It's under my dinette seat next to the pantry. Please be careful around this gear. It's can be dangerous. I just happen to have my EMS code display on top of the box because it was never mounted outside of that area. matter of fact, whoever had it before me crushed the grey "telephone-like" cable with the bottom of the hatch. I have no ideas why it was never mount for easy viewing. -
Well wouldn't you know! I get my new tires put on next Wednesday, but my local tire shop initially quoted me $261 for each Michelin Agilis, but nearly everyone online was charging $245 to $255. My local Discount Tire wanted $245. I went up to my local family shop and asked if they would at least meet me half way on the difference. Well, dang, the not only meet it, they beat it. Now only $240 per tire. Woohoo! It's good to be nice and just ask. "Winning!"
-
Also after 8 years, Wayfinder gets new shoes next Wednesday. Shiny new Michelins. Party to follow. My current tires would be good for a farm truck or something. They still took new, all surfaces.
-

What does happen when pulling brake cable
Wayfinder replied to Wayfinder's topic in Mechanical & Technical Tips
Thanks @John E Davies , without ever touching them before, I love the Battleborn solution. I almost missed your suggestion, but just now saw it as I updated this thread. I've been trying to be more active here as I'm finally able to get out and camp this year. Hope to meet many of you at the rally. -
Well, taking some advice from @Geronimo John and/or @SeaDawg and making some extra leveling & clocking pieces along with non-slip material as a ground base. Now that I'm more prepared with 2x6s and X-chocks, I'll never be on a sloping campsite again. 😂 They might be able to help someone else out, someday. Heading out to Petersburg Campground this weekend. What an awesome campground. I'm lucky I got in on a weekend. This is another reason to keep a small 24" camper. Americans are going crazy with all the big rigs so they can't get in the all the sites.
-
Ten years for PERFECT looking tires seem very reasonable, but, like so many have said here and else where, we just can't see what's going on under the tread. Dang it! I better not hit something on the road to the OTT rally with my new tires. I could have done that with my old ones and felt okay about it. LOL In regards to rim sizes going away, nothing will happen over night, and I suspect we'll be able to get 15" and 16" in decades to come. I have NO doubt.
-

Wishing to learn wisdom and experience from experienced folks
Wayfinder replied to Nightfog's topic in Introduce Yourself
Welcome @Nightfog. True about YouTube watching. It took me 8 to 10 years to pull the trigger. LOTs of "research" for sure. This group is fantastic and TONS of experience. I learn from them every time I log in. CORRECTION: Oliver is my first camper, and maybe my last. LOL Cheers, -
Welcome back to the road. Have fun and share cool pictures.
-
Well, I'm a bit ashamed to admit that I did not know, or at least remember, any of this, in regards to the multiple Oliver companies. I'm just now getting back into all of this great Oliver life style, so I guess I'm pulling my head out of my.... um, out from under a rock. 😉 Thanks for sharing this info!
-

Tire pressure confusion - Legacy Elite 2 POLL
Wayfinder replied to John E Davies's topic in Towing an Oliver
Once again I would like to thank @Hokieman for putting me onto this thread and everyone who participated on this thread. I had missed it when you guys are actively creating it. With my new Michelin Agilis Crossclimates going on the trailer next week, they will still be brand spanking new by the time I make it to the rally, let the inspection begin. 😉 I have doubts that I will be able to tell any difference from my original 2015 Michelin LTs, while driving. It sounds like I will be just fine staying within 45 to 55 PSI, no matter how heavy I load the trailer and maintaining 7000 lbs, unless I load up with too much good Lagar. 🙂 Many of us continue to learn from these forums. Thank you all! It's really appreciated by me.


