MAX Burner
-
Posts
1,681 -
Joined
-
Last visited
-
Days Won
68
Everything posted by MAX Burner
-
 SITREP: First "official" weekend shakedown road trip with H-226 Easter Weekend 2023: OK - you've just backed into a scenic campsite at a nice state park, walking back to your Ollie, unlock the main hatch, take a deep breath and look inside. Holy Cr*p! Know what I mean? After discovering that (1) our middle right galley drawer landed on the deck with pots and pans adrift everywhere, and (2) our street side dinette shade assembly did a touch-and-go on the table, I started searching the forums for a couple "fixes." 1. Galley Drawers: Full credit is going out to @John E Davies for his engineered galley drawer fix that calls for using a couple pairs of Raingler https://raingler.com/products/footman-mount-set stainless steel footman mounts and nylon straps with flat PVC-coated hooks. Just ordered the set up and should receive it next week. Very clean... We repaired and reinstalled the soft-close hardware on the drawer front at the campsite. Cause may have been too many heavy cooking items in the drawer, faulty shocks, and/or me driving too fast along the curvy roads enroute to the campsite. In either case, I'm sure John's fix will eliminate the drawers from taking off whilst being towed - provided, like John said, "I remember to use the straps!" 2. Shade Assembly: There's a few posts regarding shades falling off - but we're still looking for a solid fix... Some owners are using additional clips from Oliver. Suggestions welcomed on this portion of the thread. Any ideas out there? Thanks in advance! Cheers...
 -
Concur, 100%! There's a saying: "There's no such thing as too much ammo, too much power, or too much truck!"
-
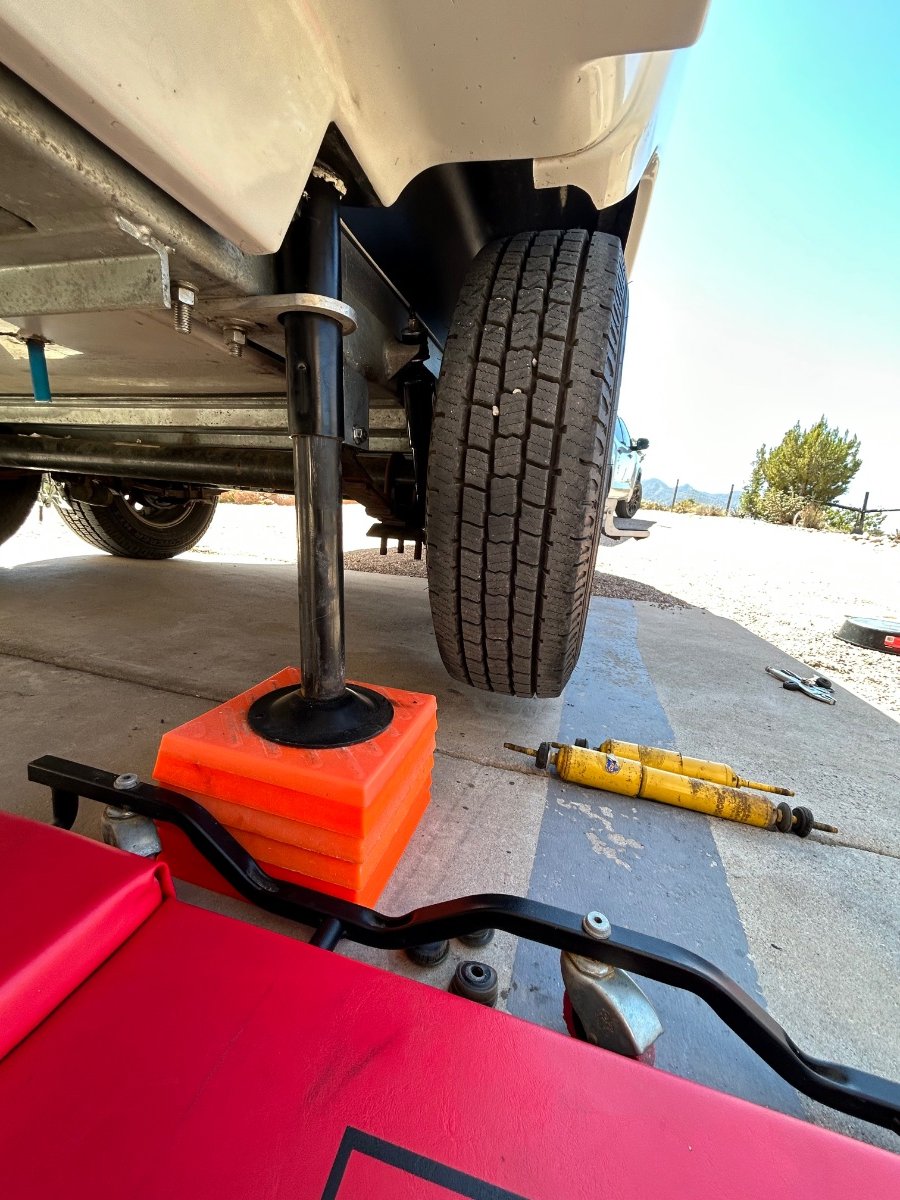
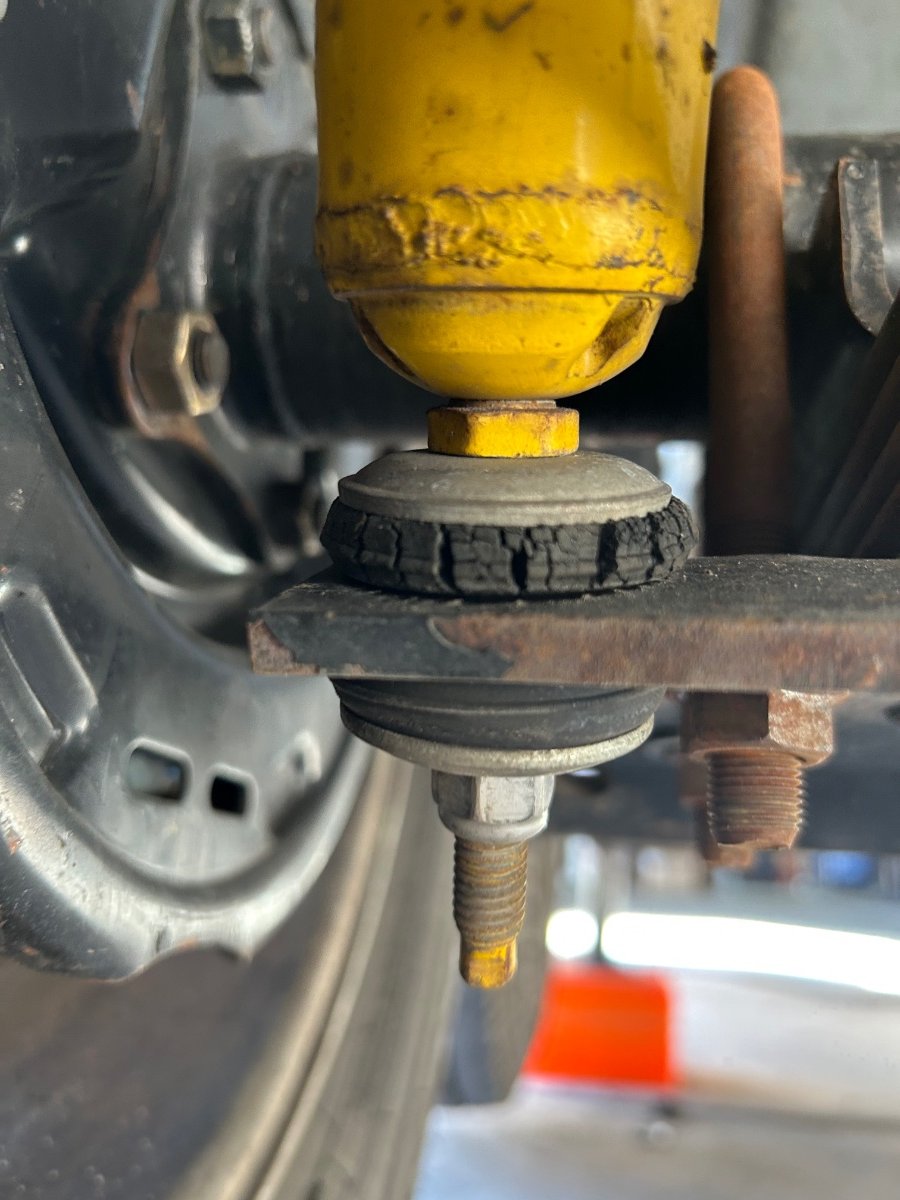
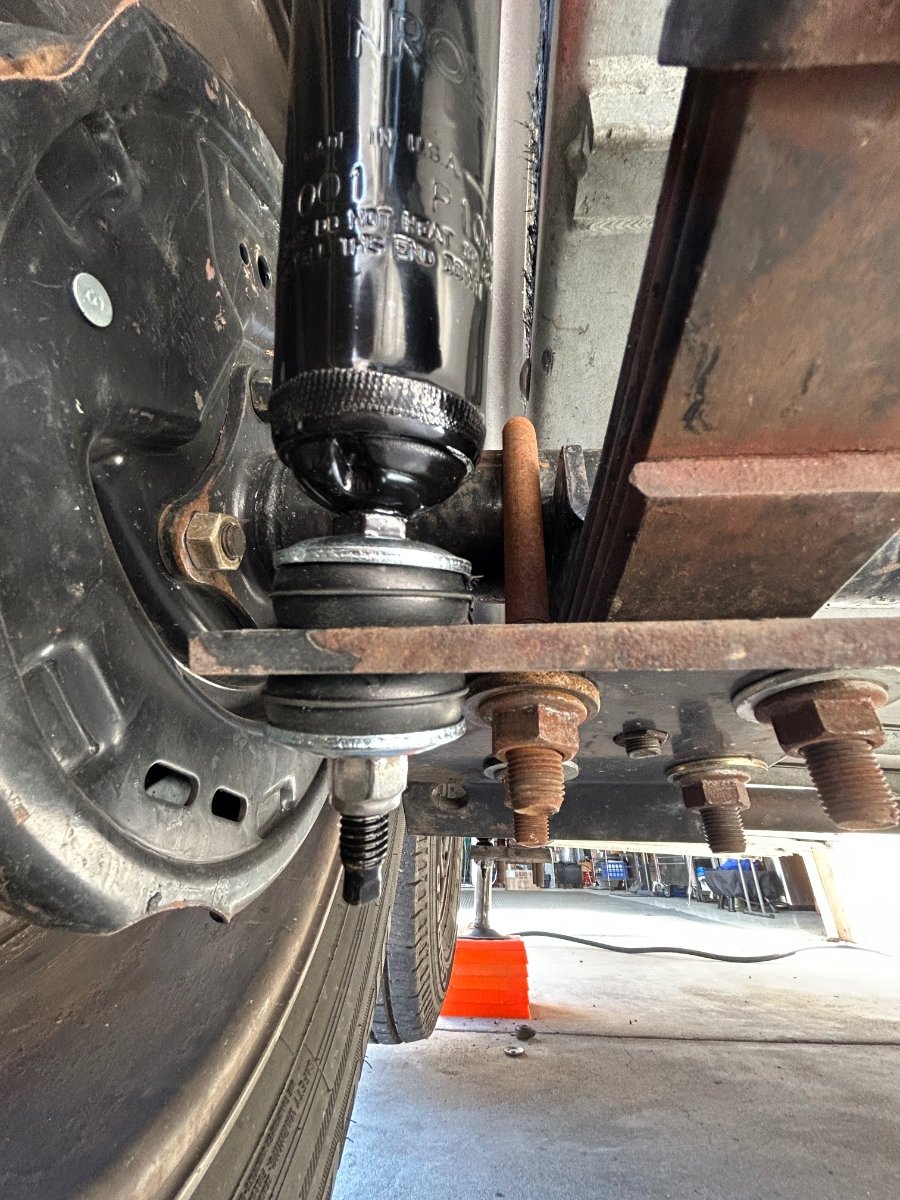
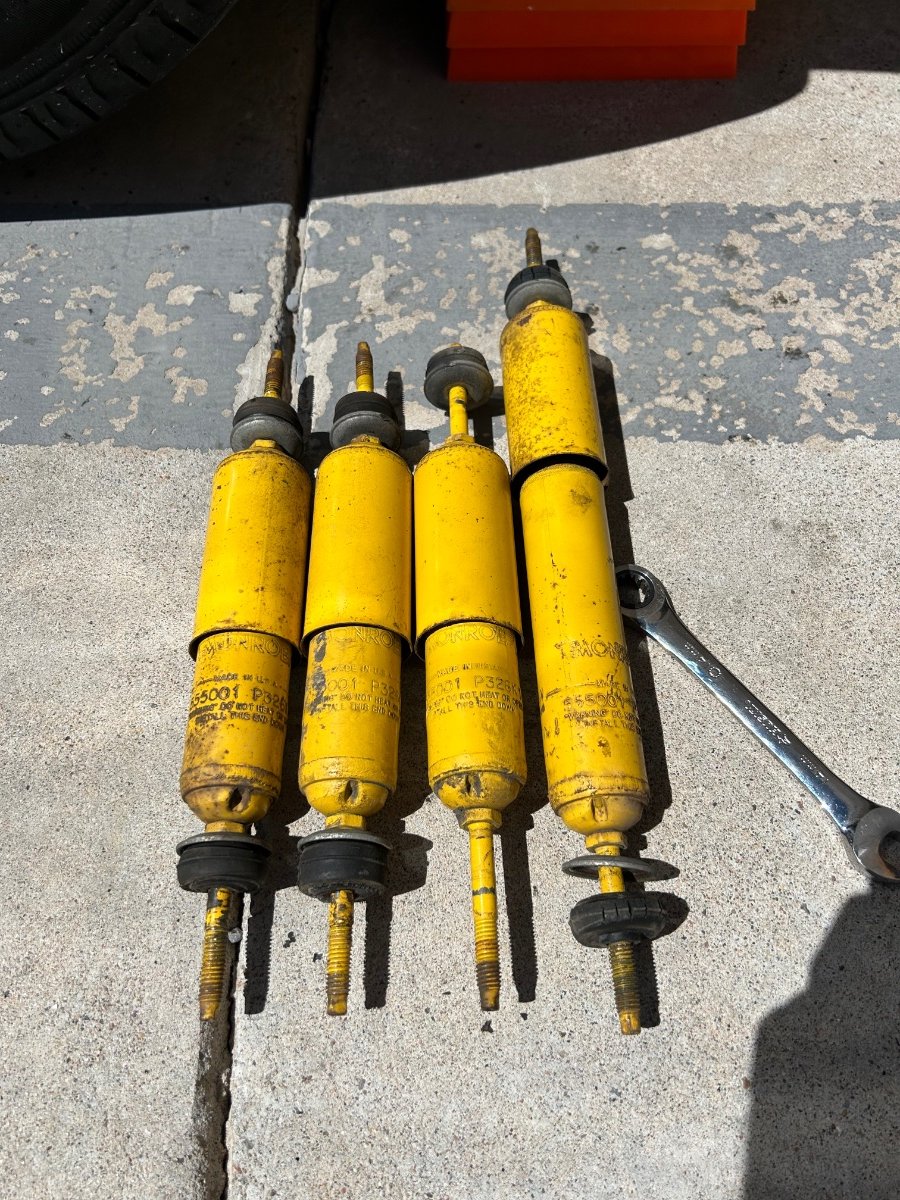
OK... SHOCKS. Back story: I noticed last week that we may have a couple of leaky Monroe shocks after doing a fairly major undercarriage power wash of our Ollie's running gear. That said, I ordered 4 Monroe replacements last Thursday and we wandered off for an extended Easter weekend at a lakeside state park in southern NM to get into some warmer climes. Anyhow, that was a 380+ round trip drill, right? So, as I was cleaning the rig this morning, FedEx arrives with the replacements - perfect frigg'n timing. I jacked-up and jack-standed the Ollie and commenced the shock R&R drill many of you have done over the years. Here's the deal... I'm fairly certain the shocks I removed on this drill were originals from the Oliver factory. The R&R went smooth as it could have. The only modification was adding fender washers on the upper and lower brackets and fresh nyloc nuts. At the end of the day - uplifted peace of mind regarding the running gear package. As it turned out (see pix) 3 of the four Monroes were Tango Uniform - they were just along for the ride and not providing any stability to the overall suspension system. A functional shock when compressed will expand to its fully extended length. The pic shows 3 of the removed Monroes compressed and not extending. Only one was marginally operational. Not good, IMHO. RECOMMENDATION: I believe these units were at least 5+ years old. So, if any of y'all out there are kinda like me and can't sleep at night when you know something's "not quite right" - and you may have 5+ year old vintage shocks, take a couple hours and check 'em out before your next road trip. Granted the Ollie suspension isn't "bomb proof" but it is somewhat robust as compared to other SOBs. With dual leafs and the Dexter coupler, the shocks contribute to stabilizing g-forces and actually aid in reduceing tire wear while being towed. That is... if the shocks are working as designed and not blown out. I'm planning to check them annually when I do my wheel bearings... Just say'n. Safe travels --- looking forward to seeing y'all down the road, until then; Cheers!

- 49 replies
-
- 11
-

-

-
Ditto @topgun2's comments - 100%. FYI: We used a 2015 RAM 3500 turbo diesel crew cab, 8' bed for 6 years as our TV, but.... it lived outside, wouldn't fit in the garage, and nowadays diesel fuel is fairly "spendy." We never had an issue with maxing out payload, tongue weight - ever. The TV basically never even "knew" the Airstream was back there. Overkill? Not in my world. I came from a field where there was no such thing as, "too much power" (or too many missiles...) That said, we did a TV downsize last year when making the Oliver transition. Now we're easily pulling our rig with a gasser and must be mindful of payload, tongue weight, and overall GVW. Oh, and the TV fits in the garage - YES! Regarding whether or not an OEM tow package is worth it? Seems to me to be a "must have" feature, if only for the factory brake controller and 7-pin receptacle, IMHO. Best of luck in your searching efforts, brother! Art
-
Just realized.... My "States Visited with our Ollie Map" is WAY TOO BIG! No clue how to shrink it down...(?)
-
No intent on hijacking John's original thread topic - but we ran Michelin Defenders on our previous trailer and got about the same age and mileage from them. We live in a high UV area of the Rockies and used dual axle white wheel covers (secured on backsides with bungees) whenever the rig was not in its protective "Hangar." I'm thinking the covers helped a bit but don't have any empirical/quantitative data to support the observation. But after 7 years and 40k+ miles, the tread wear was incredible, however the sidewalls (inside and out) started showing signs of UV cracking - we bought another set at that point, FYI. May have waited 12-18 months too long to make that new tire set investment... IMHO
-
@topgun2: Replaced the frosted door window with a clear glazed Louvre mechanism - don't have to open the door to see who's a-knock'n! Short gas line - exactly right on! I've got the 10-footer, but not compatible (yet) with the QD forward propane outlet because of the grill's gas regulator... Need a hack! HA! @Patriot: Temps are awesome - FINALLY! We've had a long cold winter. Temps here are low 50's to high 70's - spring has sprung in the Rockies. Just have to wait for the wind to stop... we don't like the wind. I'll take cold, rain, snow - you can have the wind!
-
I'm new here --My name is Mark and I'm having my LEII built
MAX Burner replied to Mark Meadows's topic in Introduce Yourself
Congrats, Mark! Welcome to the forum - it is (as other's noted) an absolute wealth of knowledge, experience, and lessons-learned that will make owning your new Ollie a very pleasant and pleasurable chapter in your RV lifestyle! FYI: we just logged our 1st extended Easter weekend "shakedown trip" in our Ollie - only a few small/manageable issues; and we had a blast! -
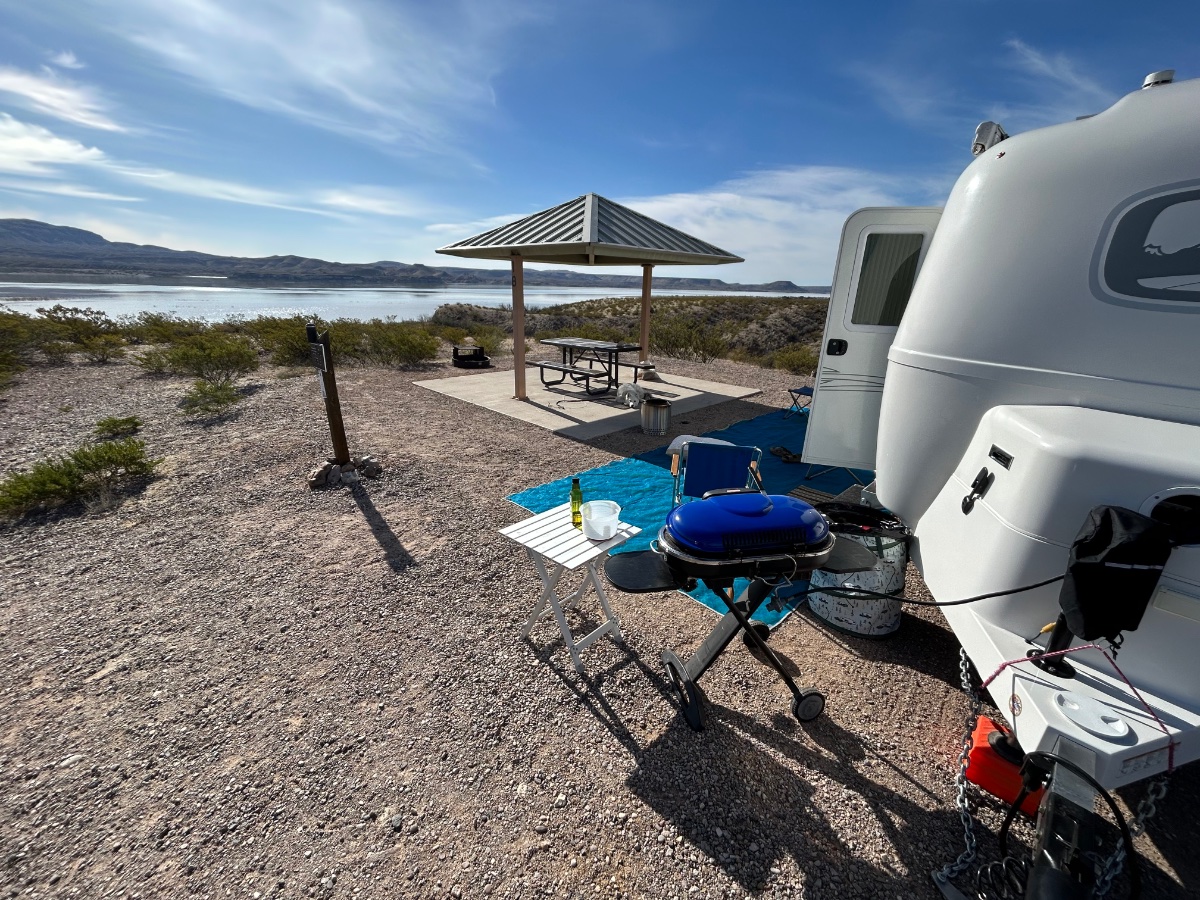
Happy "late" Easter Sunday from Elephant Butte Lake State Park - New Mexico.... 1st "official" camping trip with our new-to-us Hull #226...
-
Brake drum temps mystery
MAX Burner replied to Steph and Dud B's topic in Mechanical & Technical Tips
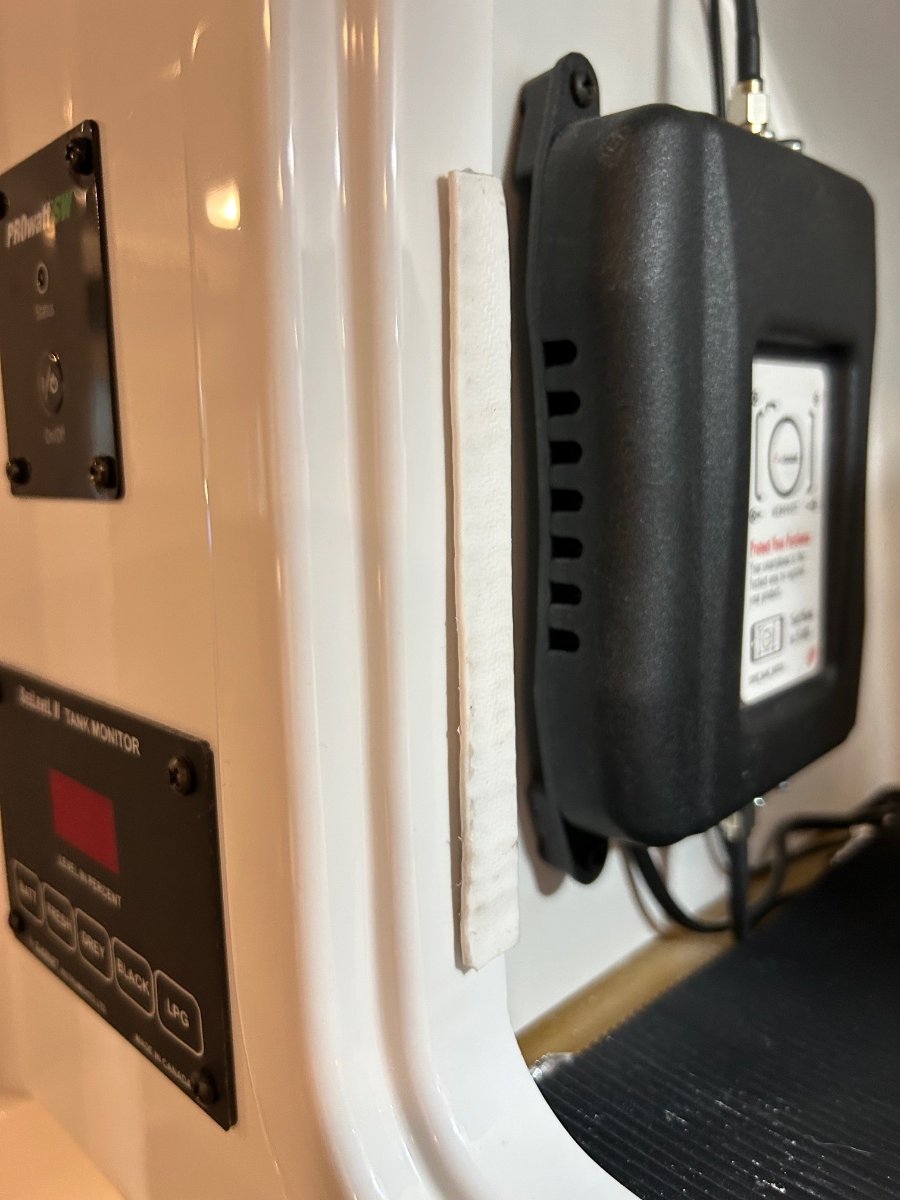
Awesome thread,y'all - informative. I inspected my wheel bearings, brakes/wiring, drums, shocks, rear jacks, and torque settings on the Dexter running gear yesterday in preparations for our 2nd "shake-down" cruise with our "new-to-us" Ollie - leaving later today. No major issues discovered other than running gear had not been kept clean enough to provide accurate visual inspection of linkages and general running gear, so I broke out the pressure washer to remove old grease build-up and generally clean up a 5+ year old mess. ABOVE: Before... Pic #2: After... I found 2 leaky shocks and mounting bracket nuts for rear jacks were about a half-turn less than properly torqued. Although the wheel bearing grease appeared serviceable all the way around repacked with fresh, since I was there anyway. - I Getting ready to button up curbside after cleaning, inspection, and repack operations. Headed to El Caballo Lake around noon for a long weekend of fishing, good company, and maybe a beer or 3.... HA!
-
Well done, TRIPMUSHRV, for sure! I'm definitely a "Checklist-Guy", too. FYI: I use the concept of "BOLD FACE" procedures or steps with our checklists. Bold Faced steps are those that can be memorized - it may be those that are the first few steps in a procedure, such as "walking-down" the campsite prior to committing, or maybe the first several steps in "hitching/un-hitching" Ollie from the TV. In any case, It works for me and how my brain is wired - the "bold face-only" list is much shorter, comprised of all the "don't forget" steps to keep one from breaking or hurting something/someone along the way! HA!
-
NOPE. The ledge the tray rests on if fixed - I may. need to "un-fix" it! HA!
-
ROGER, THAT!
-
Absolutely brilliant, Patriot! Already added it to our checklist, brother!
-
Our model (Hull #226) has a "wooden tray" underneath the velcroed nightstand top - it doesn't access the contents of the drawer.... But is a nifty storage area nonetheless...
-
Correct! Our 2017 has the cutout/storage tray underneath the nightstand top. Funny story: Just yesterday, we discovered a cutout/storage area underneath the countertop just below the pantry locker. So guess what was stored inside of it? A (what appears to be) brand new Foy kitchen sink mahogany cutting board! SCORE!!! The sad part of the funny story is that I made a bamboo cutting board custom fit to the sink - now we have two! HA!
-
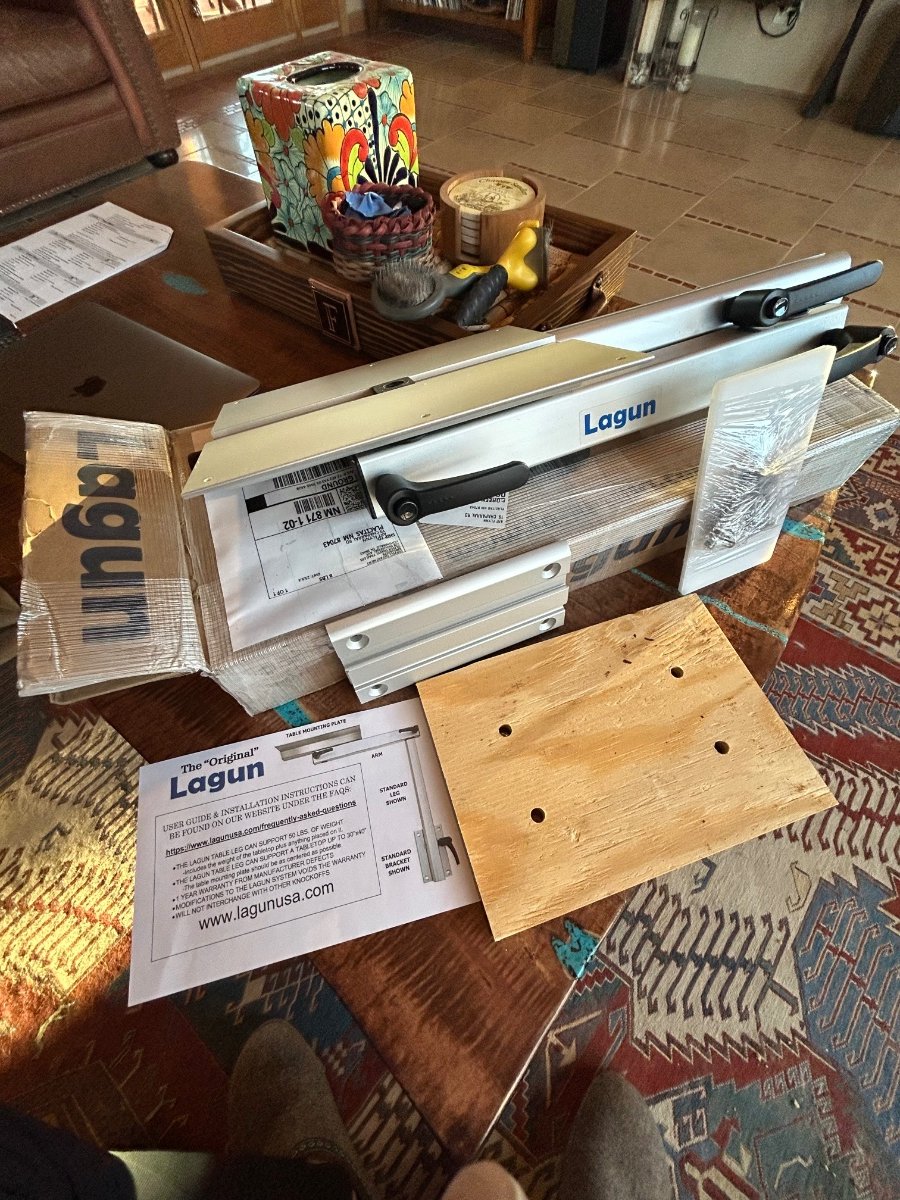
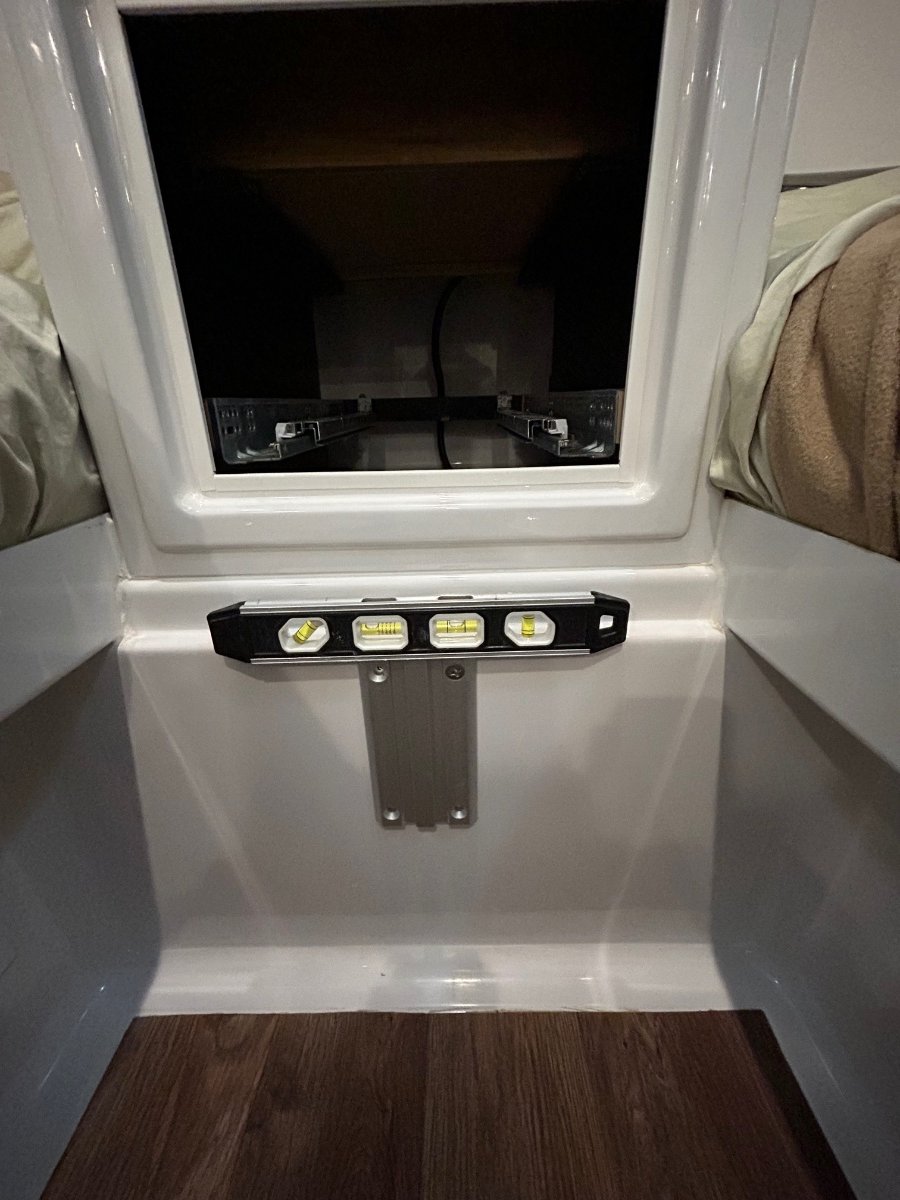
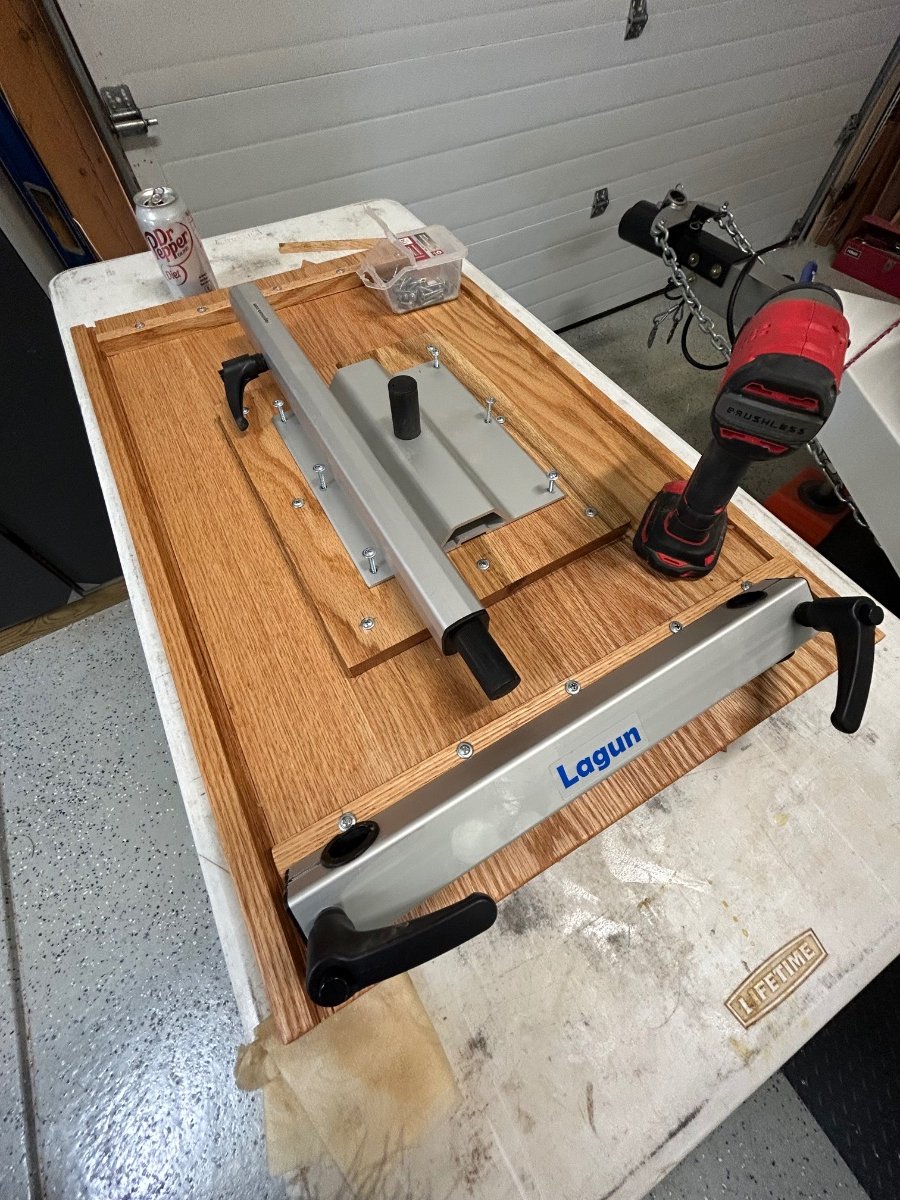
The Lagun hardware packet came with a 3/8" thick piece of plywood for the backing bracket. I chose to use a piece of 3/16" aluminum plate (same width/length dimensions as the plywood piece) as the backing bracket. It's a bit bigger than the backing plate used for the TV mounting hardware, FYI.
-
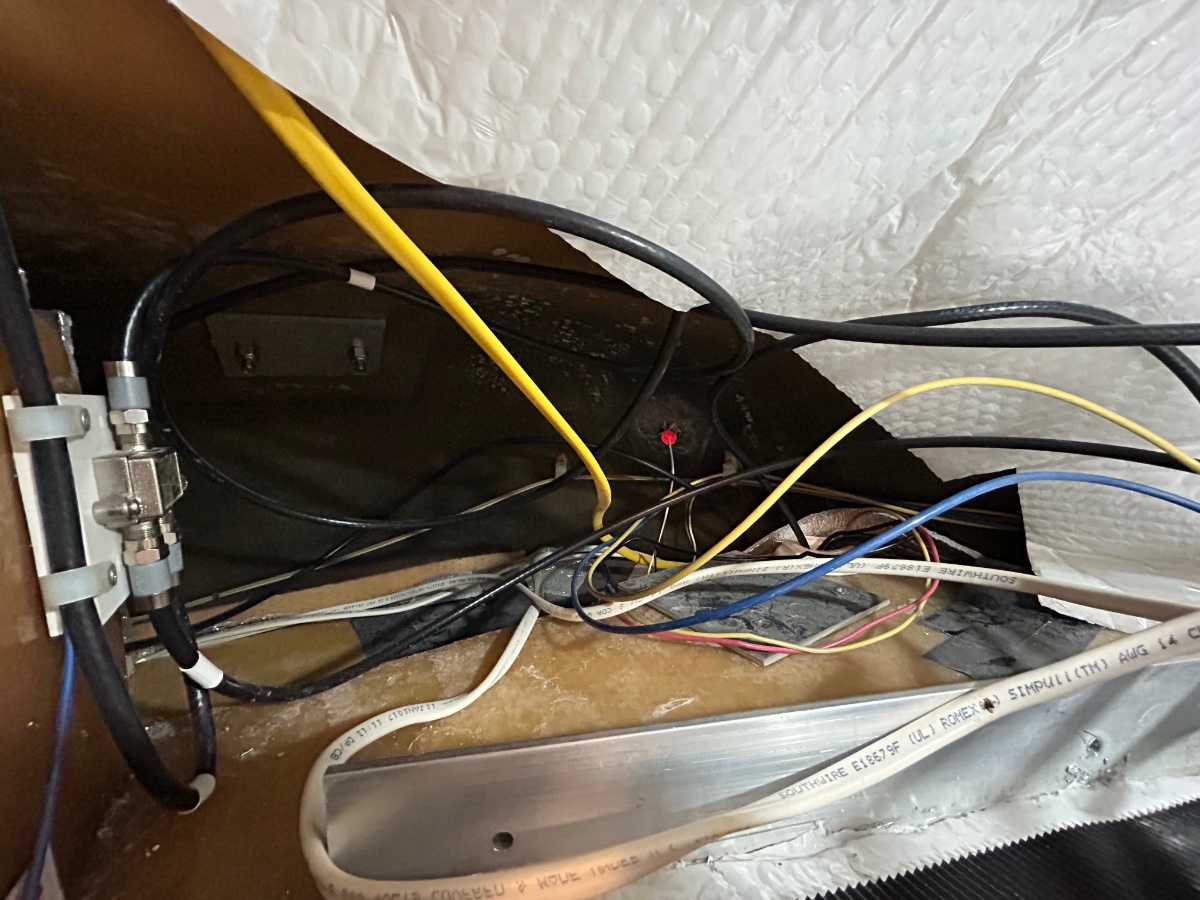
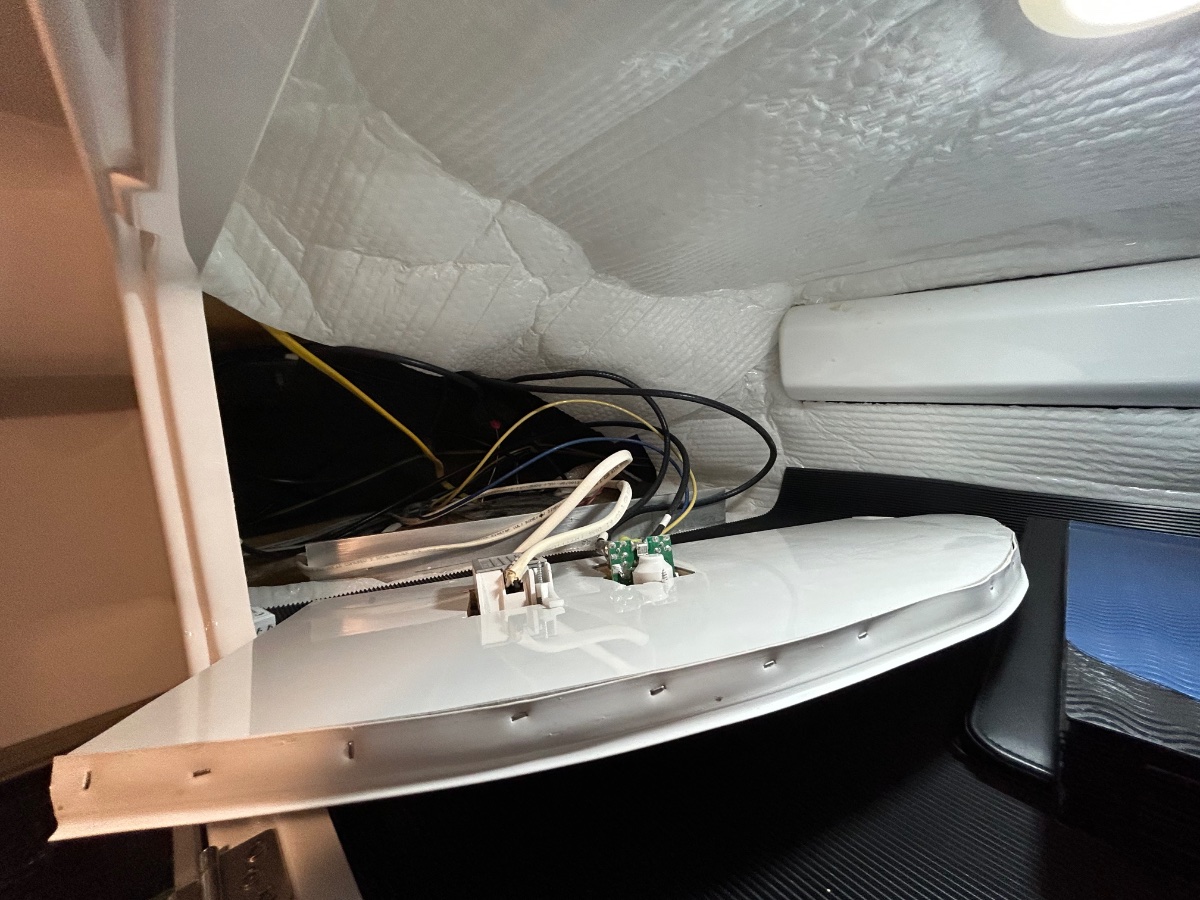
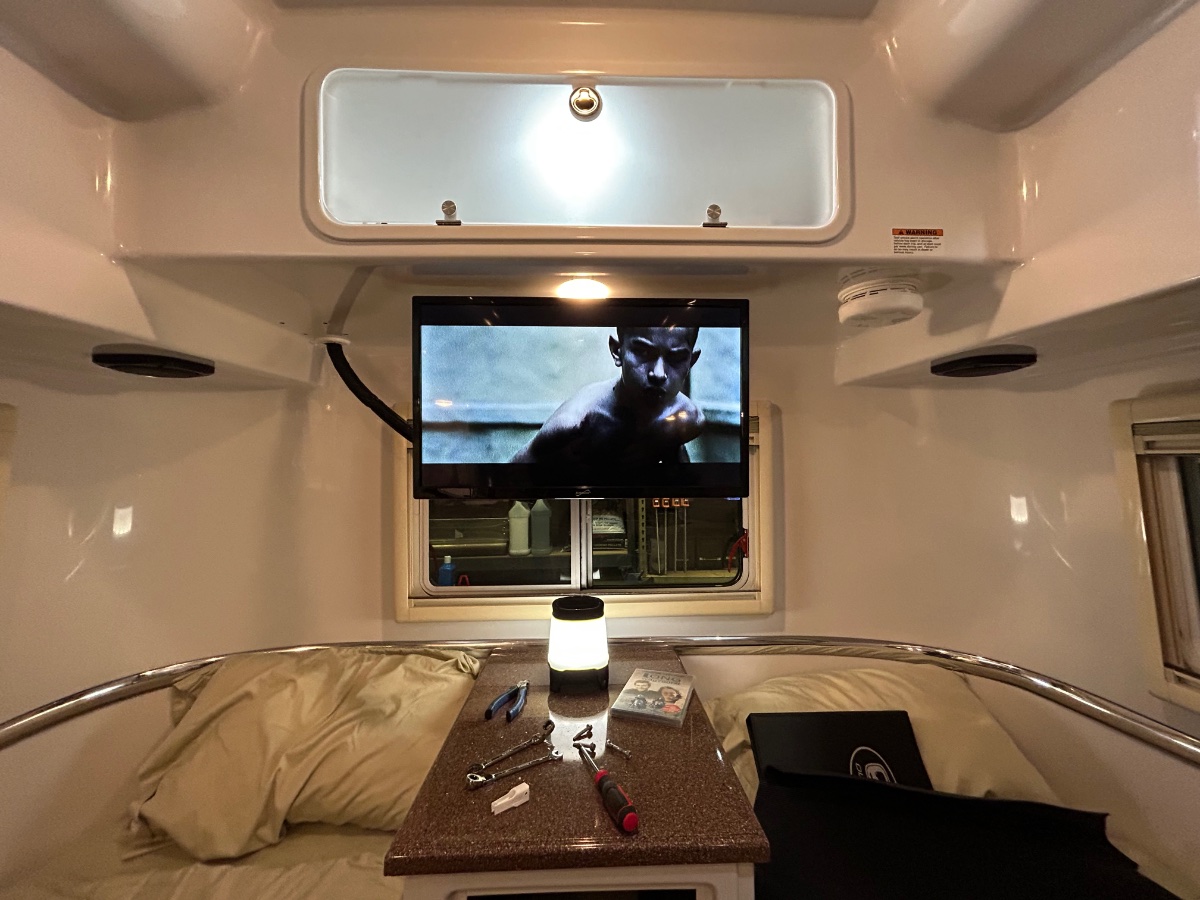
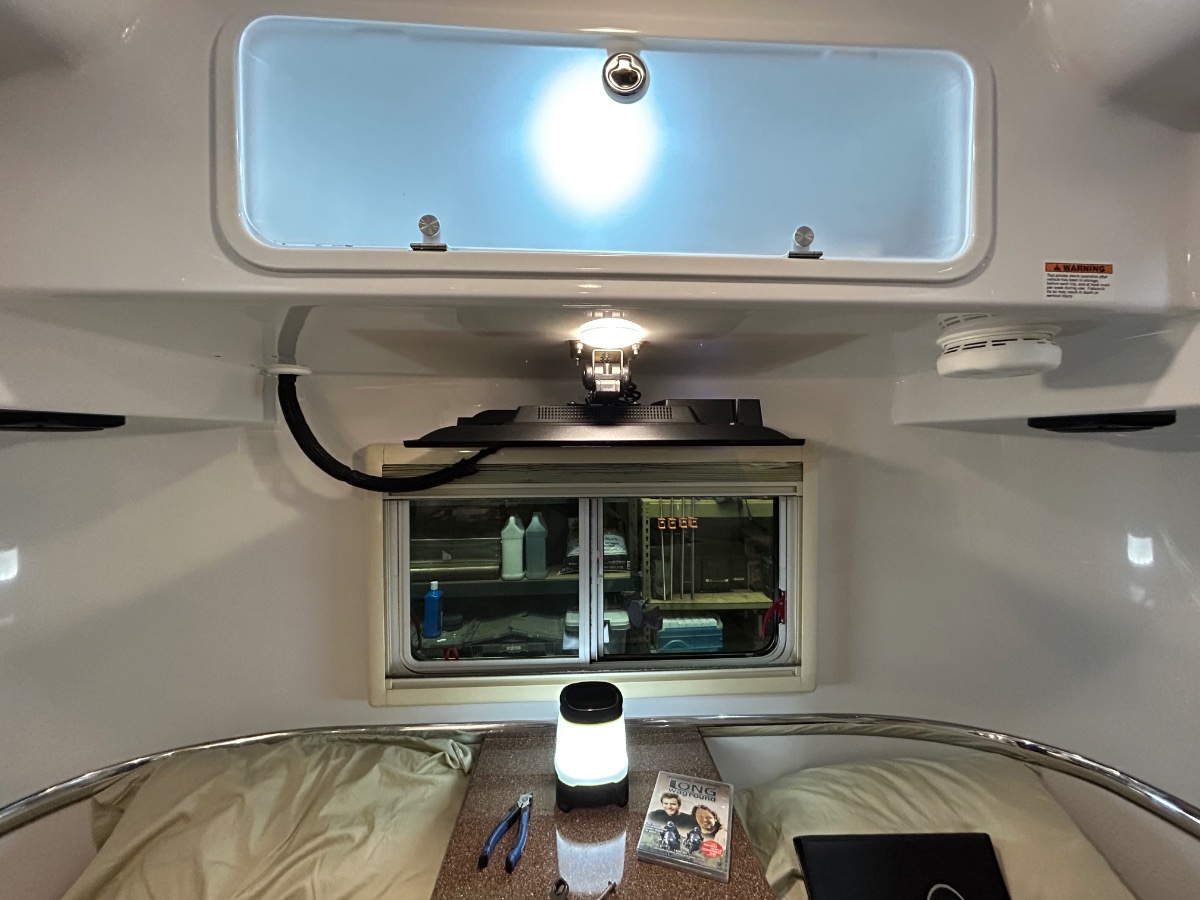
The "center mount" TV hardware arrived from Oliver (thanks to Ryder!) last week. So, we removed the curbside/aft corner vertical TV mount on our rig a couple days ago. We mounted the new hardware just aft of the LED light over the nightstand. I've still got the power & HDMI cables routed through the original hole, but thanks to mossimi, I'll cut a new hole aft of the TV mount (less conspicuous) and use moss' 2" plug that he sent me to cover the original cable hole. I was amazed how random the wiring was behind the bulkhead in the aft storage compartment. Cleaned a lot of that up. Also, the wiring set up had 2 massive (L, R, Video) cables from the TV through the original hole - one of which ran back to the Furrion controller - we removed them both, not needed. Quite a mess back there. We ordered a new 27" viewing size "Smart TV" to replace the original Furrion model (which the DVD player was INOP). Tucked up nice and neatly. I've got some white wire/cable loom ordered to replace the black mesh that Oliver uses. I think the white loom will look more appealing than the black stuff... IMHO. We've also ordered a 12VDC Furrion subwoofer which can connect to the Furrion AV/Radio Controller which should liven up the tunes a bit whilst sipping on a nice chilled margarita...
-
Protective Edge Strip for Spare Tire Cover
MAX Burner replied to MAX Burner's topic in Ollie Modifications
KATJO: See pic below. The edge guard would totally work for your application. The cabinet door closes without obstruction. You may need to heat up the edge guard material with a heathen to make it easier to go around the corners. Good luck - post pix of your upgrade! Cheers,
-
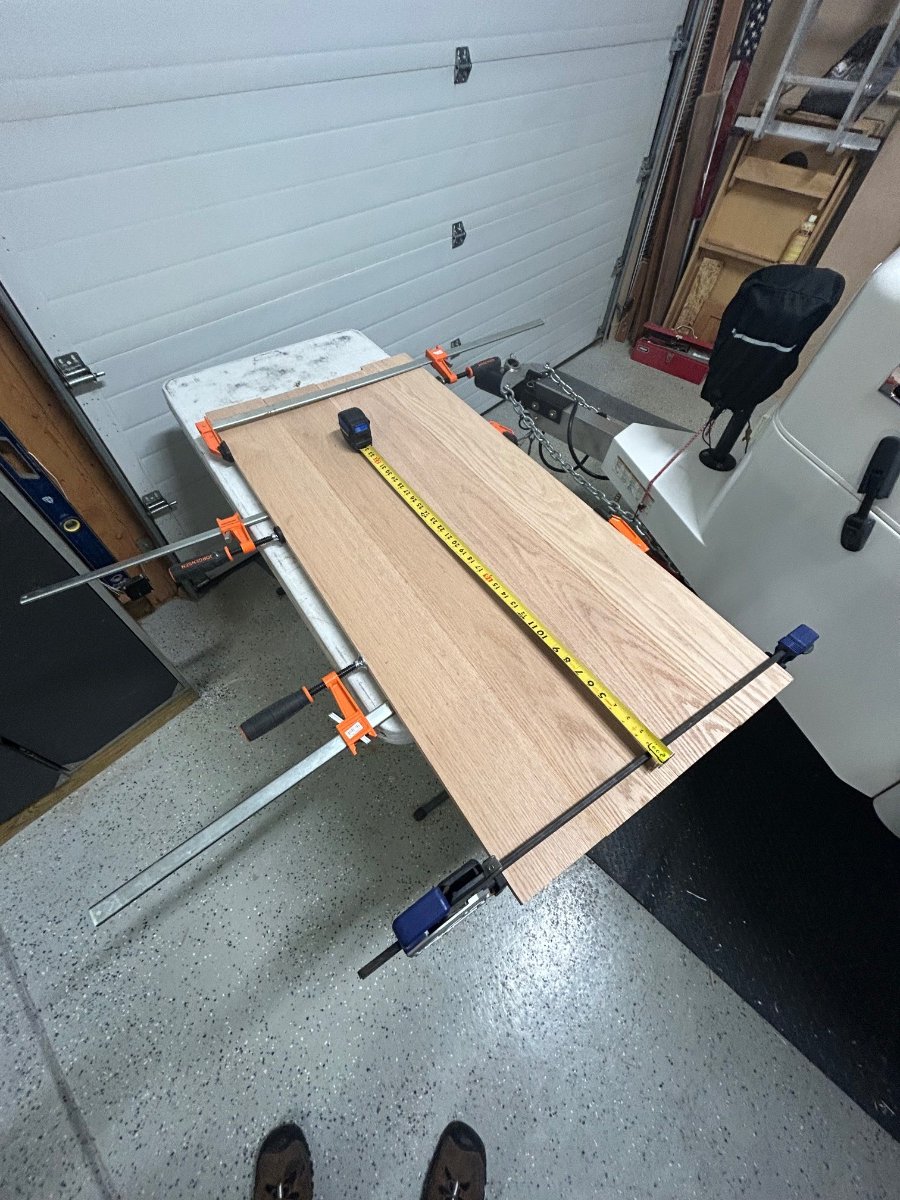
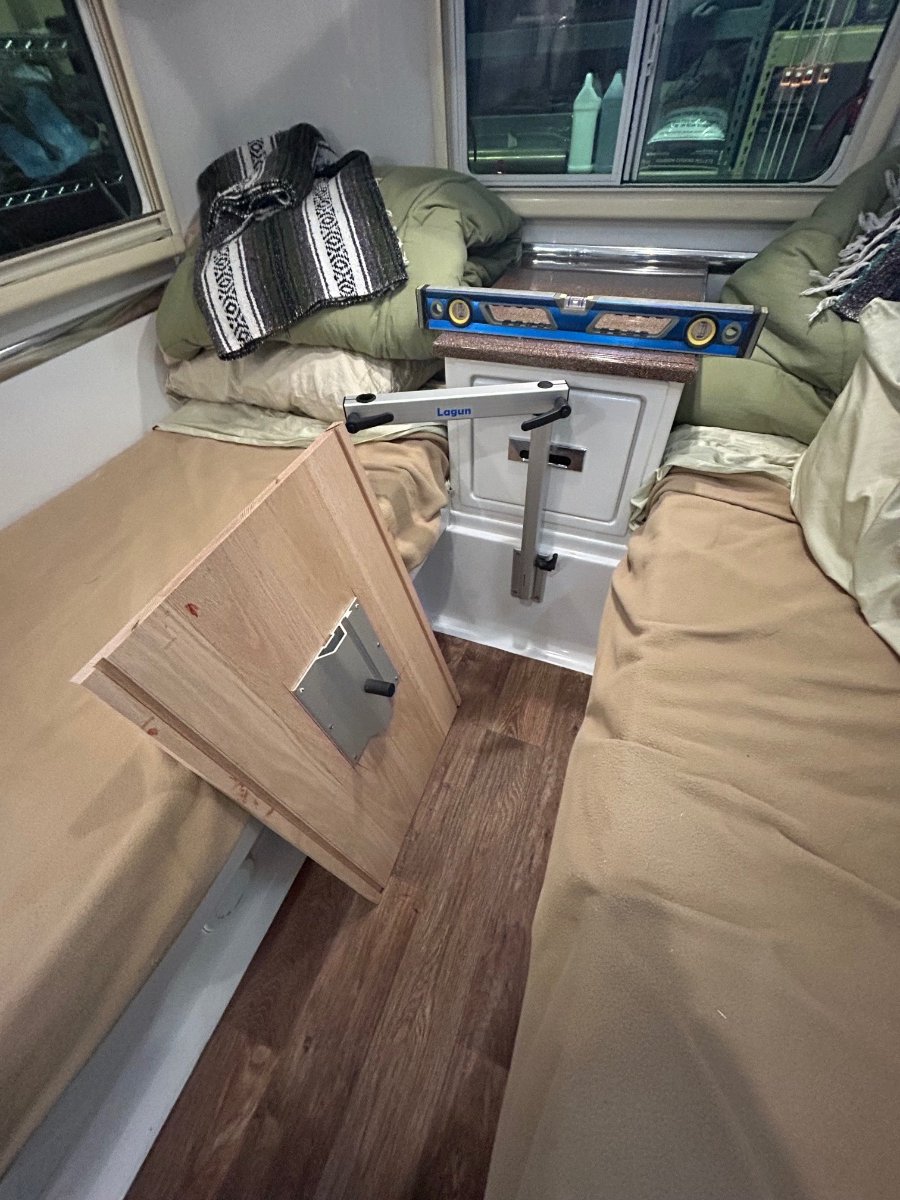
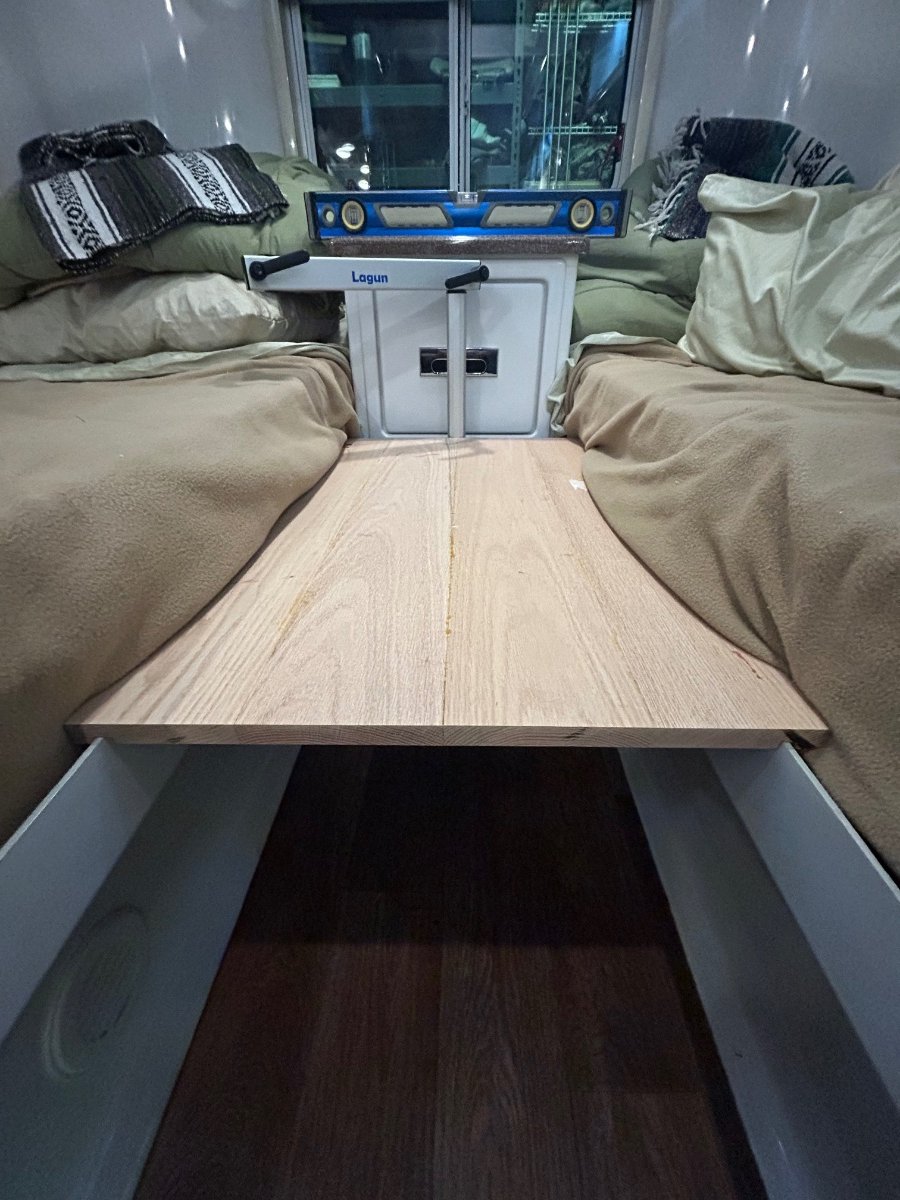
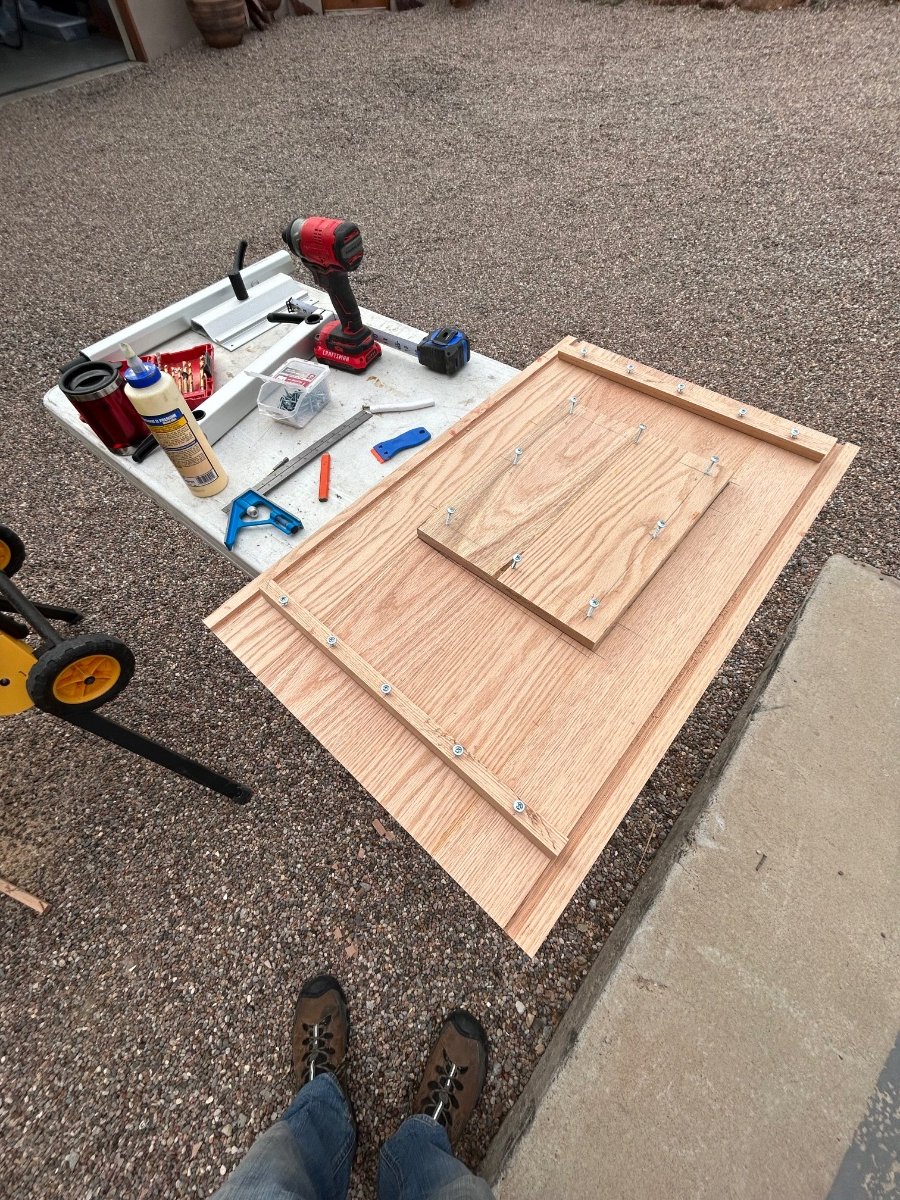
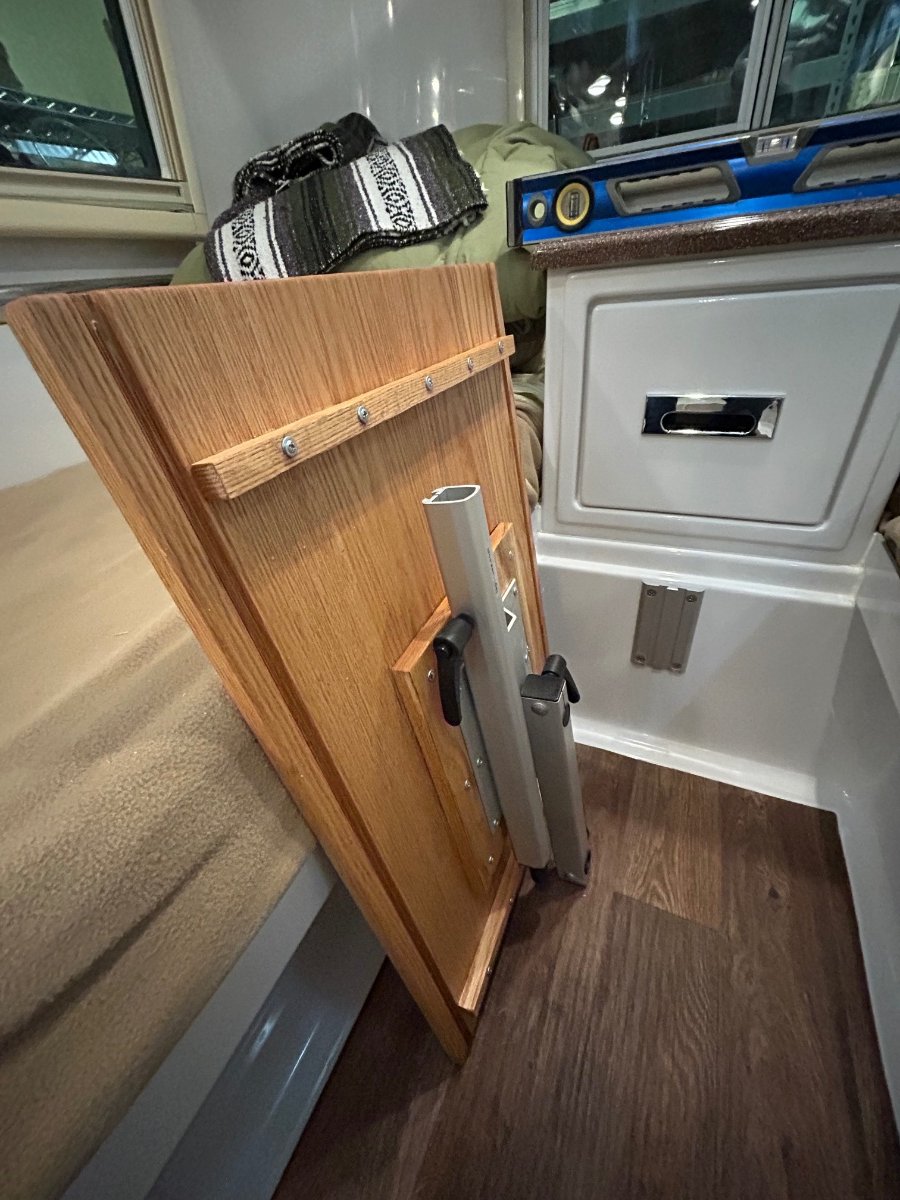
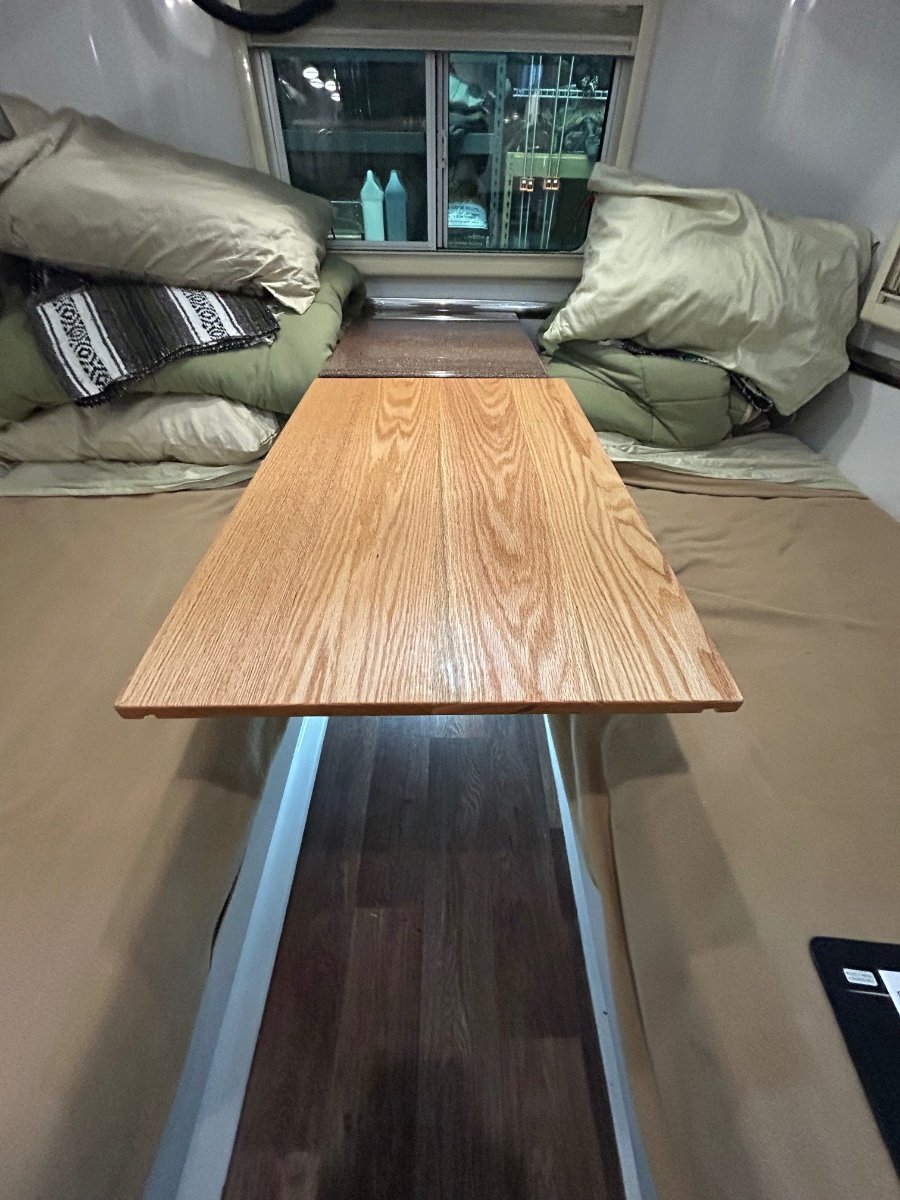
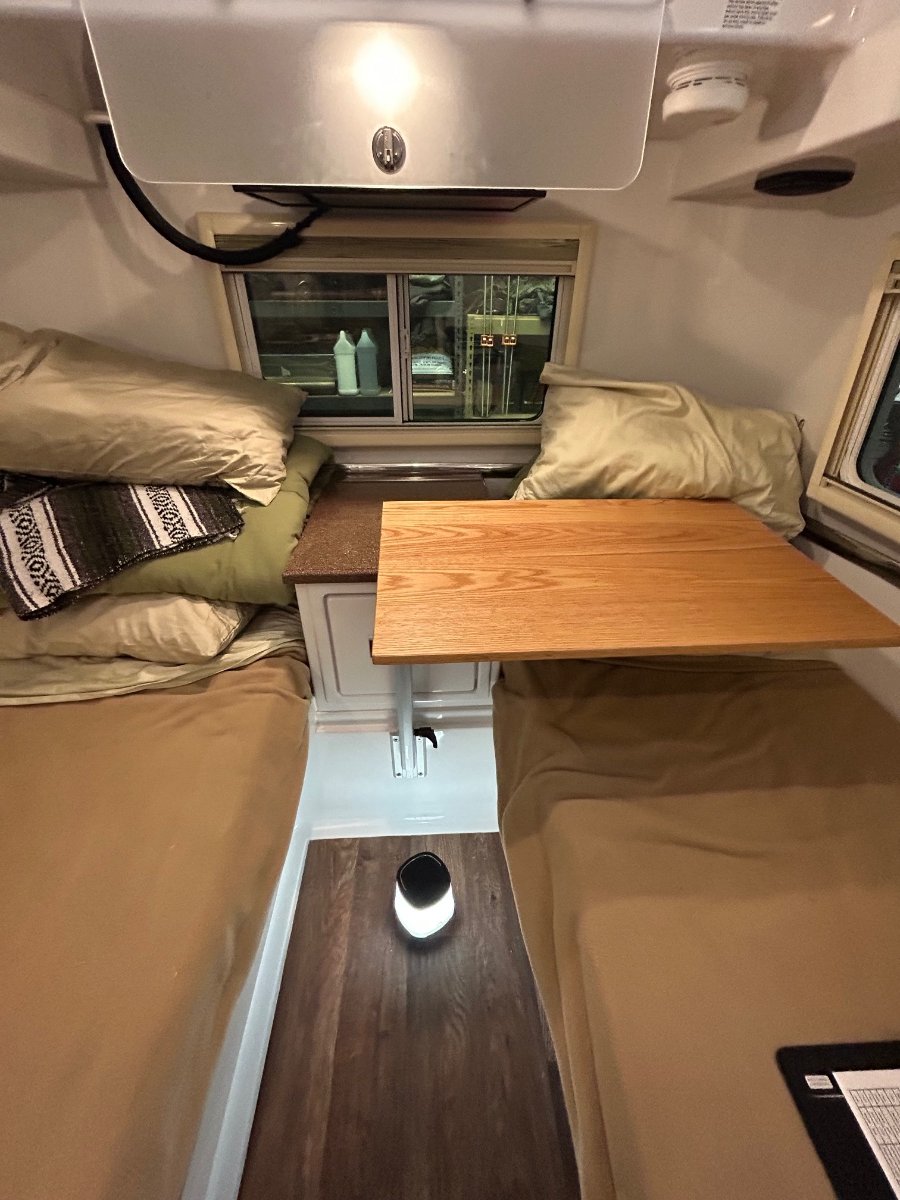
I'm hoping the order of the pix stays intact after posting. If so, each pic has a description below it, FYI. The Lagun hardware arrived here when I was on travel last week. We ordered it from Lagunusa.com directly. OK, so I started the Lagun Table installation a couple days ago. I installed the main leg mounting bracket first. Leveled rig fore/aft and port/starboard to get a good level on the bracket. My hardwood lumber supplier here was totally out of mahogany, so I decided to go with American red oak instead, I know - heavier and not as interesting as mahogany, but we've scheduled a long weekend camping trip this Friday and I wanted to get this table knocked out. We'll call the oak version a temporary bookmark for the time being. I glued/dowelled 4 pieces of 1/2" x 5.5" x 48" oak to get a tabletop dimension of 20" x 32", FYI. I used the extra wood for the table mount plate and cross spars (shown in later pix). The second pic above, shows the grooves on either side of the underneath portion of the table - the grooves are for when the table is in the "Puppy Mode." They fit over the twin bed lips to hold it in position when either towing or when Magnus is sleeping on it. This stage was for fitting purposes. This one illustrates how the grooves fit over the twin bed lip. Above shows fitting cross spars and mounting plate on underneath side of tabletop. Spars and plate are glued and screwed to keep table flat and reduce cupping as humidity cycles up and down. After a few coats of Watco natural oil/sealer, this shows the fitment of the Lagun hardware (in storage/Puppy mode). Ready to set up... In tabletop dining mode - height is adjustable to well above nightstand so tabletop can be swiveled either direction... If it turns out that we need more access to the nightstand drawer, we'll re-mount to the street side twin bed rail as described in earlier posts in this thread. The drawer is accessible in the Puppy Mode - so it can be opened at night for whatever is needed inside. I initially wanted to construct the tabletop with folding sides as described in another earlier post, but that wouldn't have allowed for the Puppy Mode. For now, the table configuration will get us thru this coming weekend trip! HA!
-
Lagun Table Package.pdfLagun Table Package.pdfFYI: We've received our Lagun hardware this week and I'm looking forward to installing it onto the nightstand base below the drawer (because we don't have the storage hatch option). Should we decide in the future that we "need/want" the hatch I'll build the side mount designed by Overland that moves the table/assembly to the street side by attaching to the underneath surface of the bed lip and the vertical bulkhead just below it. So, to answer your question: NO. You don't have access to the nightstand drawer (or the storage hatch, if so configured), but this is only when the vertical Lagun table is positioned in the mounting bracket. The side mount option allows the entire assembly to swing around to the street side giving access to the drawer (and the hatch). I know it's obvious but, if the table/assembly is stowed your drawer/hatch is accessible (DUH). The plus side to either table mount position, at least for us, is that should you have another person or couple over for entertainment, it allows for up to a 4-person seating arrangement. The side mount is definitely a DYI project. I'm planning to post a thread of my step-by-step Lagun retrofit project milestones later this week. I'll be making a mahogany folding tabletop that will function in either a narrow or "unfolded" wider mode as an earlier member posted, FYI. It will also serve as a gap filler between the twin mattresses with a puppy pad for Magnus' bed at night (WOOF!). Ha! Anyhow, hope this helps out some... Cheers!
-
Brilliant, Chris! This should be SOP prior to a trip after a long storage period. Thanks for the heads-up, brother!
-
Correction - meant to say, "whoever is using the starboard (CURB) side rack." My bad.
-
Slight deviation from the original intent of the thread... But, Has anyone experience in adding a manual street side awning? I installed a Fiamma on my Casita - not tough at all, but the OTT awning is 4 feet longer. Could be challenging, I'm thinking.
-
FYI: I used the exact technique Trainman is describing above to remove a 6 year old awning seal after the seal had been badly oxidized. The 2-way adhesive on the seal is likely not as robust as the decal. It took very little heat, which was helpful for the plastic "razor blade" scraper (bought from Amazon - $15 or so with a couple dozen replaceable plastic blades) to remove from the gelcoat. There were a few small areas needed for touch up with GoofOff, the result was a perfectly clean surface. I'm planning to install the new seal this weekend. I'm also interested in your project's result as we're interested in removing our front decal and side stripes.