Overland
-
Posts
3,835 -
Joined
-
Last visited
-
Days Won
212
Everything posted by Overland
-
 Mine is stretched pretty much to the limit when attached, but has never pulled loose in a turn or anything.
 -
Interesting - mine came with a coiled cable similar to the one you linked to. What is Oliver using now?
-
Smart tiles is the brand, but there are others. I got mine from Home Depot, and they're available at Amazon and other places. The color is Murano Metallic. I thought this one was a little more subtle, but I was outvoted. I added it to the kitchen as well, as you can see in the last photo. Getting it to work on the curved bath wall is a bit tricky. You can't really tell from the photo, but it's fudged to get it to look as straight as possible. The top is straight, but not the bottom, but that's mostly covered by the sink and faucet so it isn't so noticeable.
-
Upgraded Shower and Bathroom Access Hatch
Overland replied to NCeagle's topic in Ollie Modifications
We've found that a quick squirt of water from the shower works fine if you don't want to bother with the vinegar. -
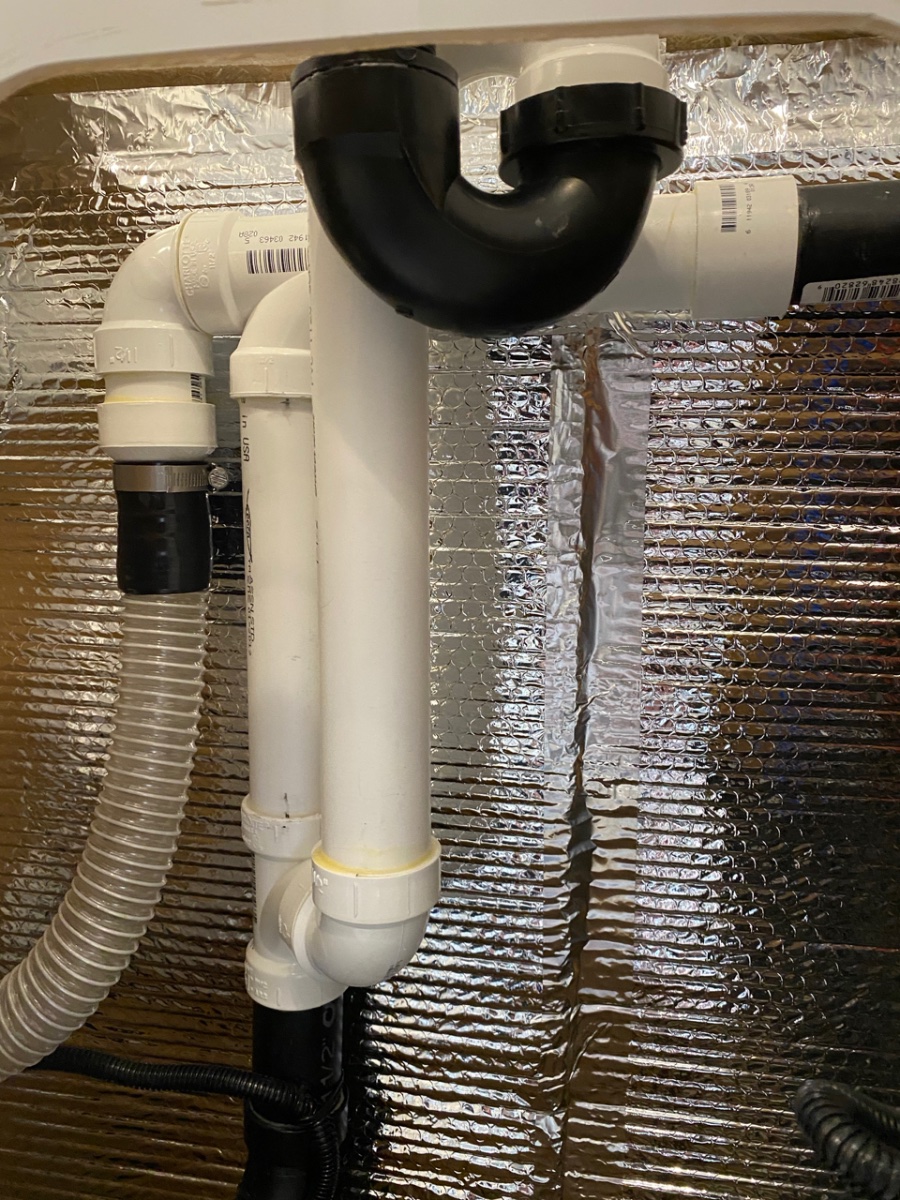
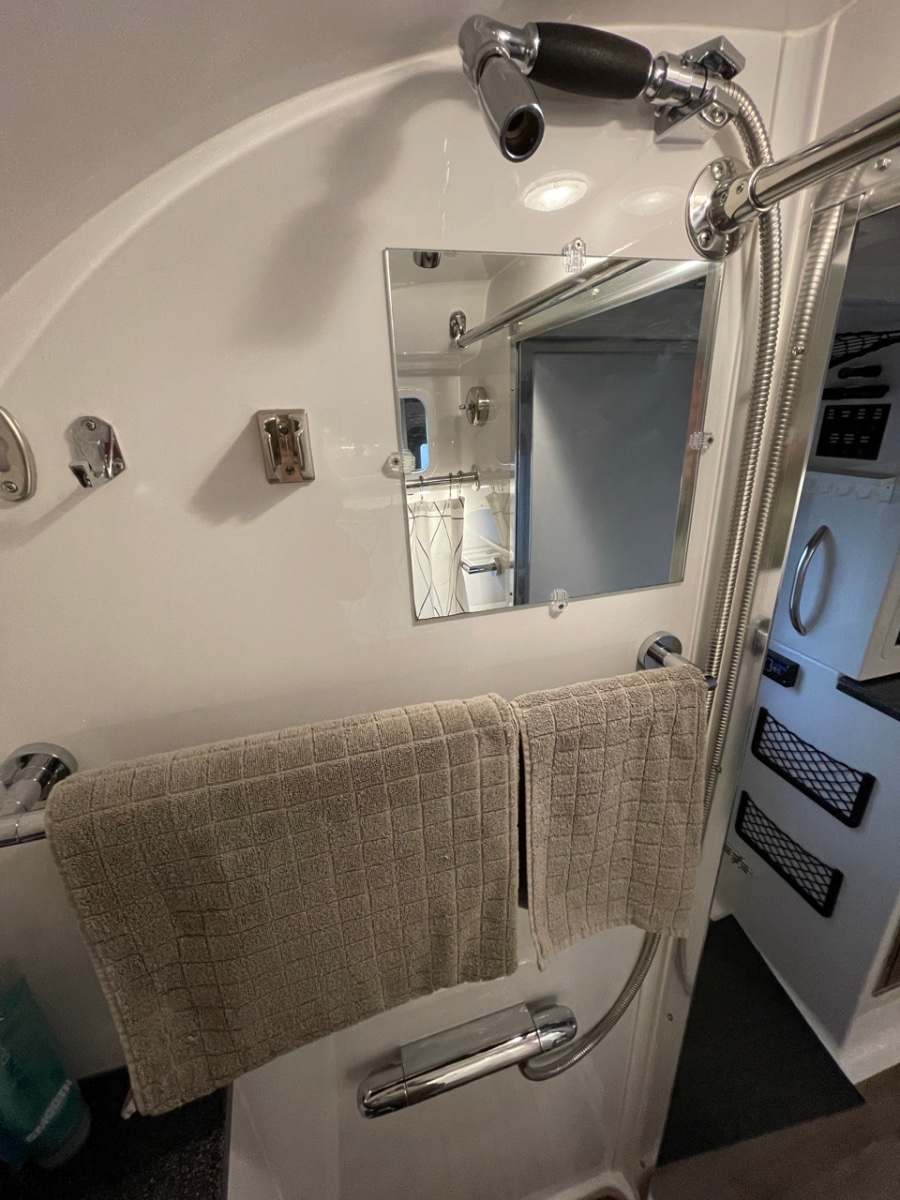
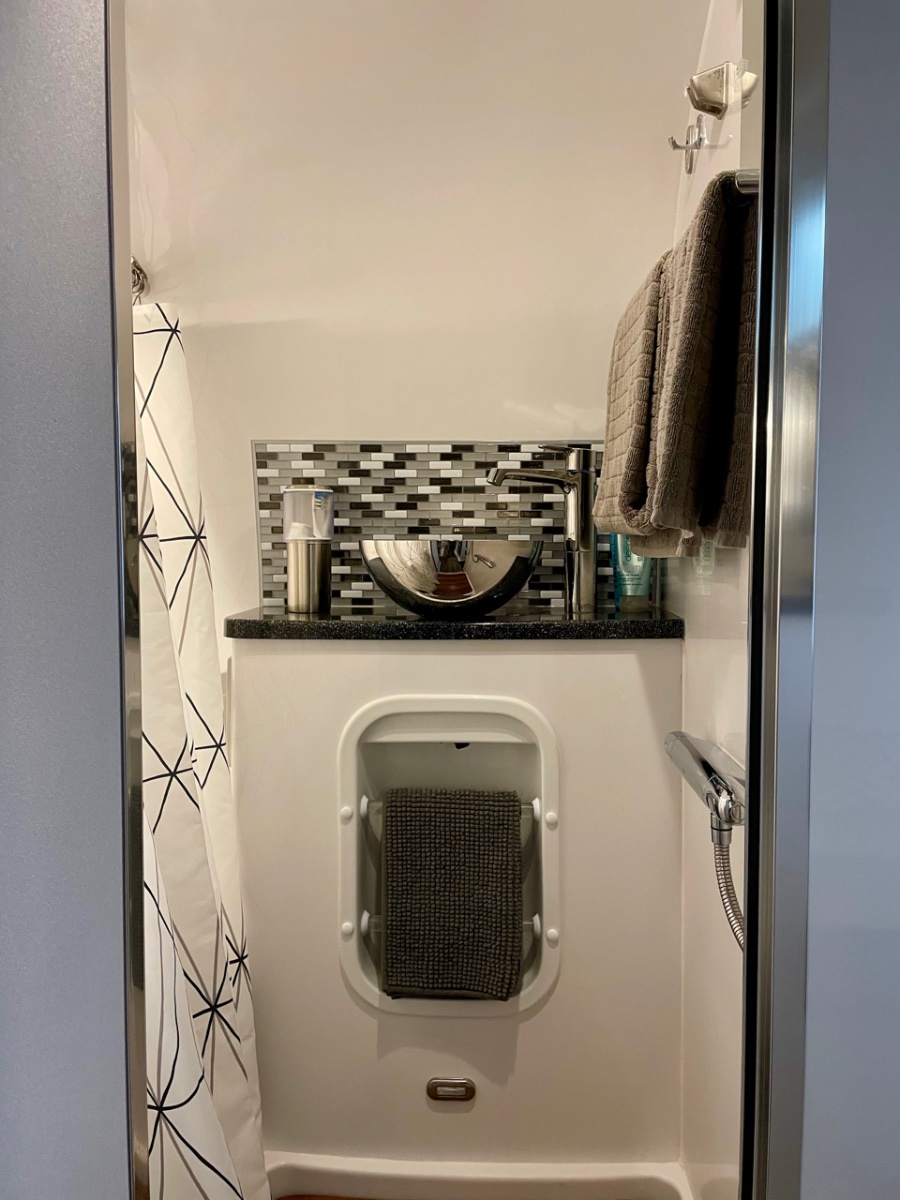
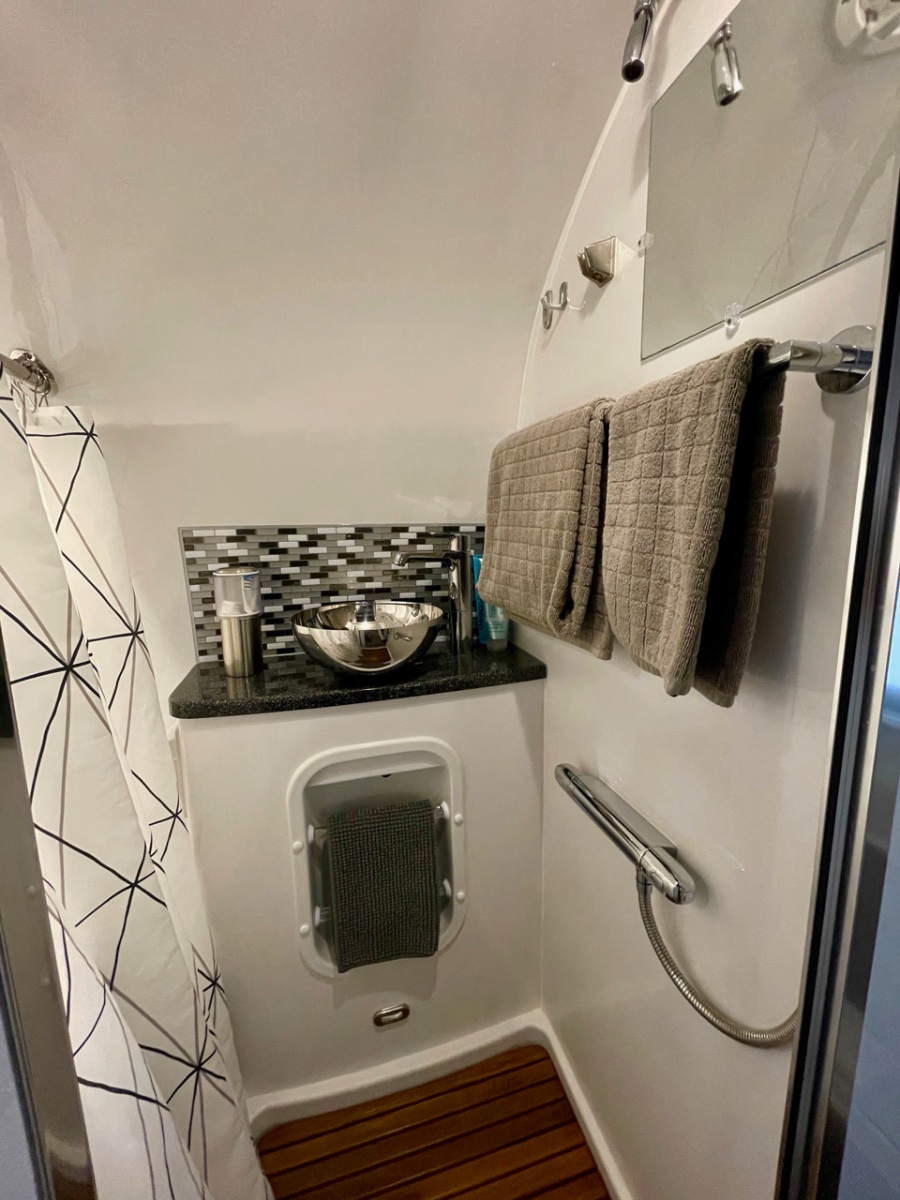
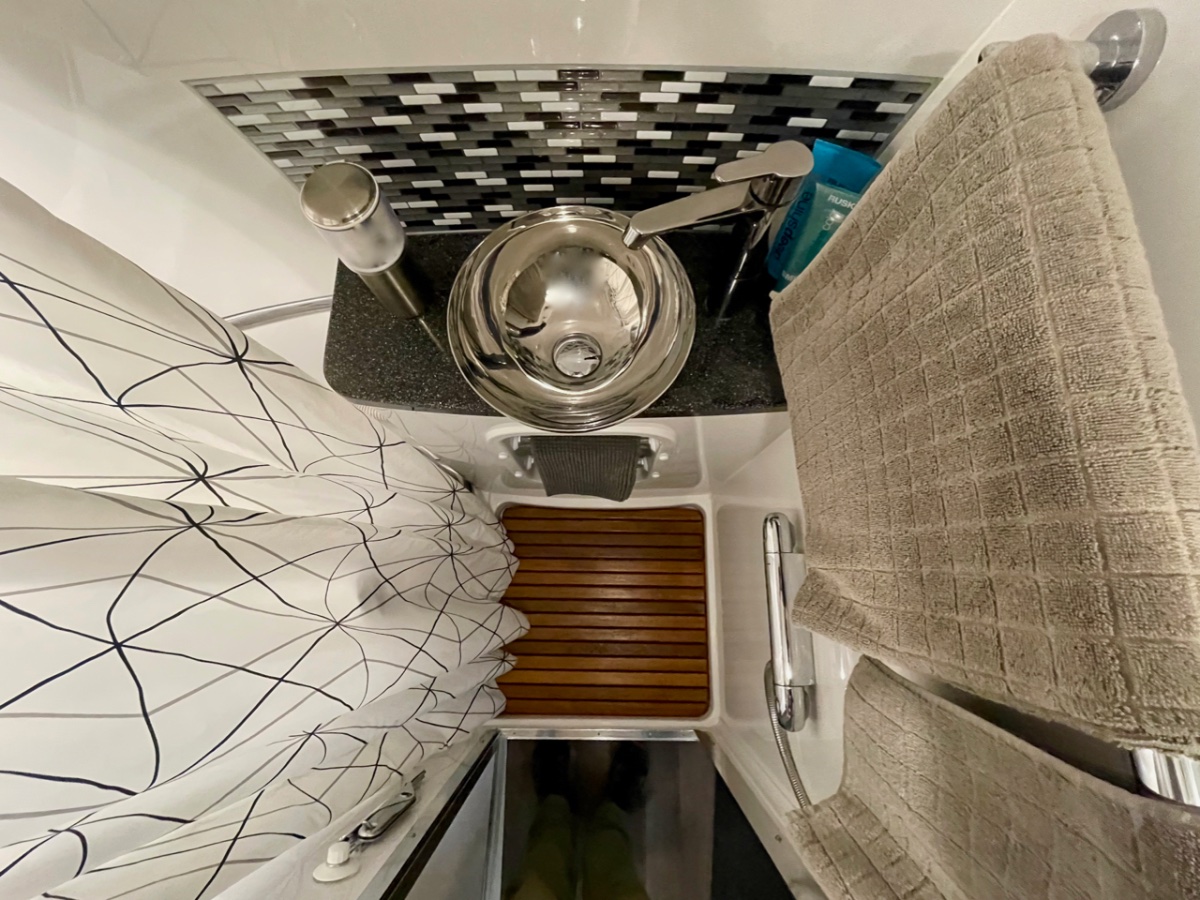
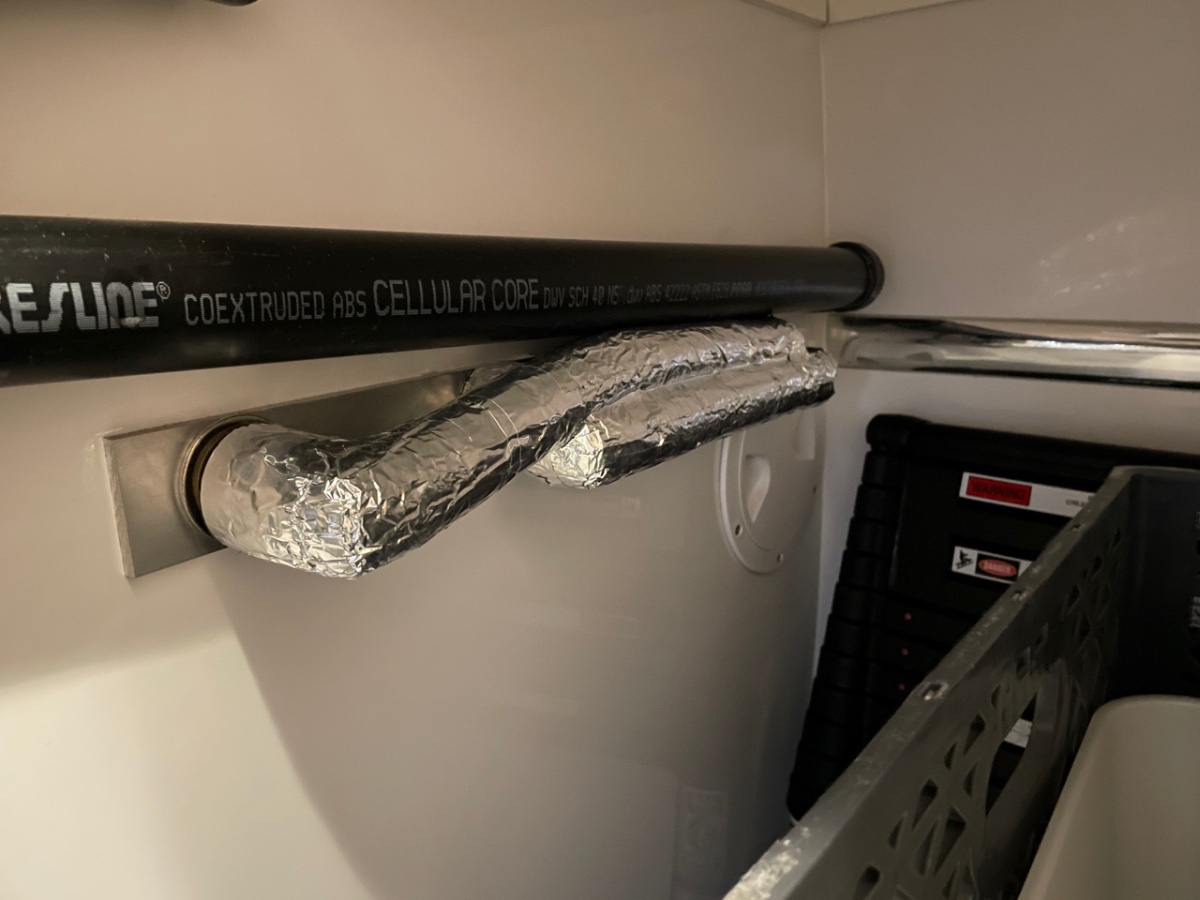
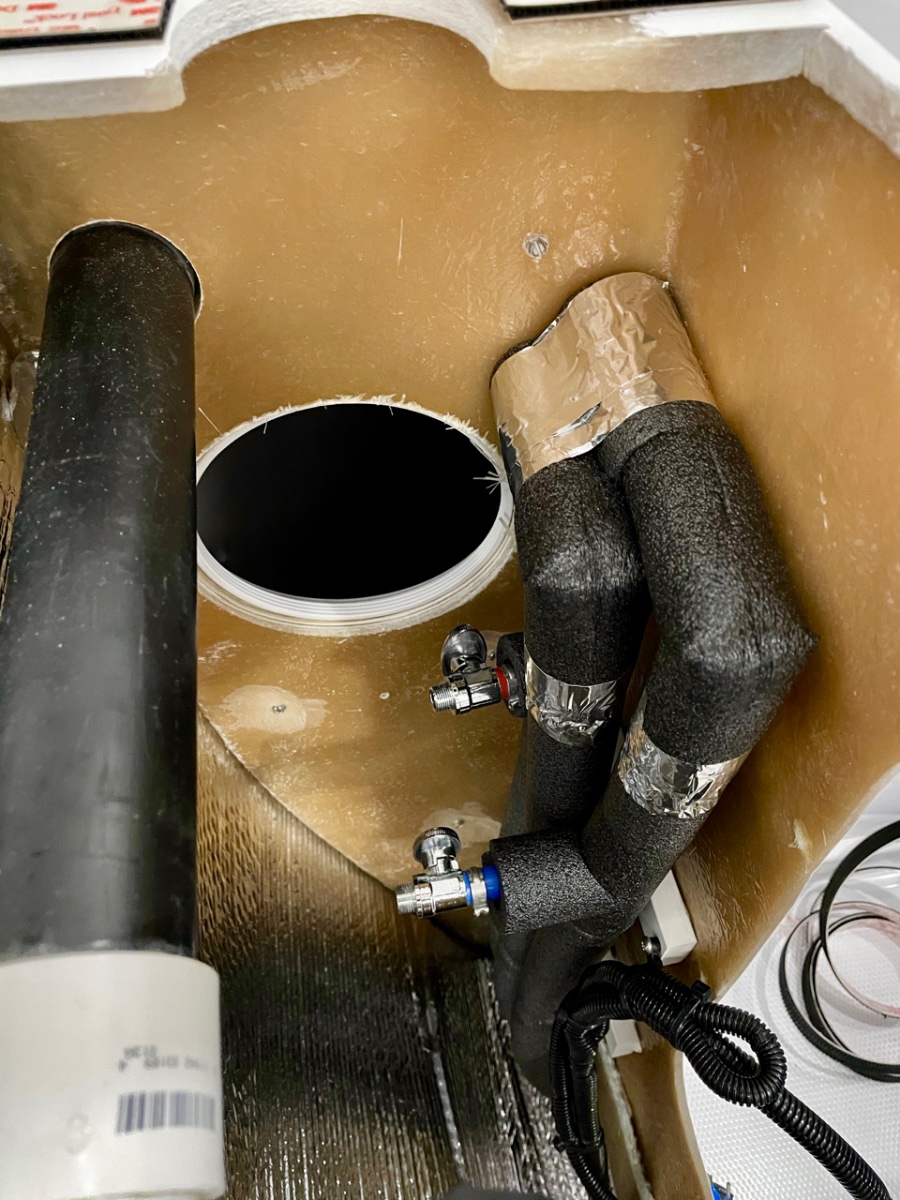
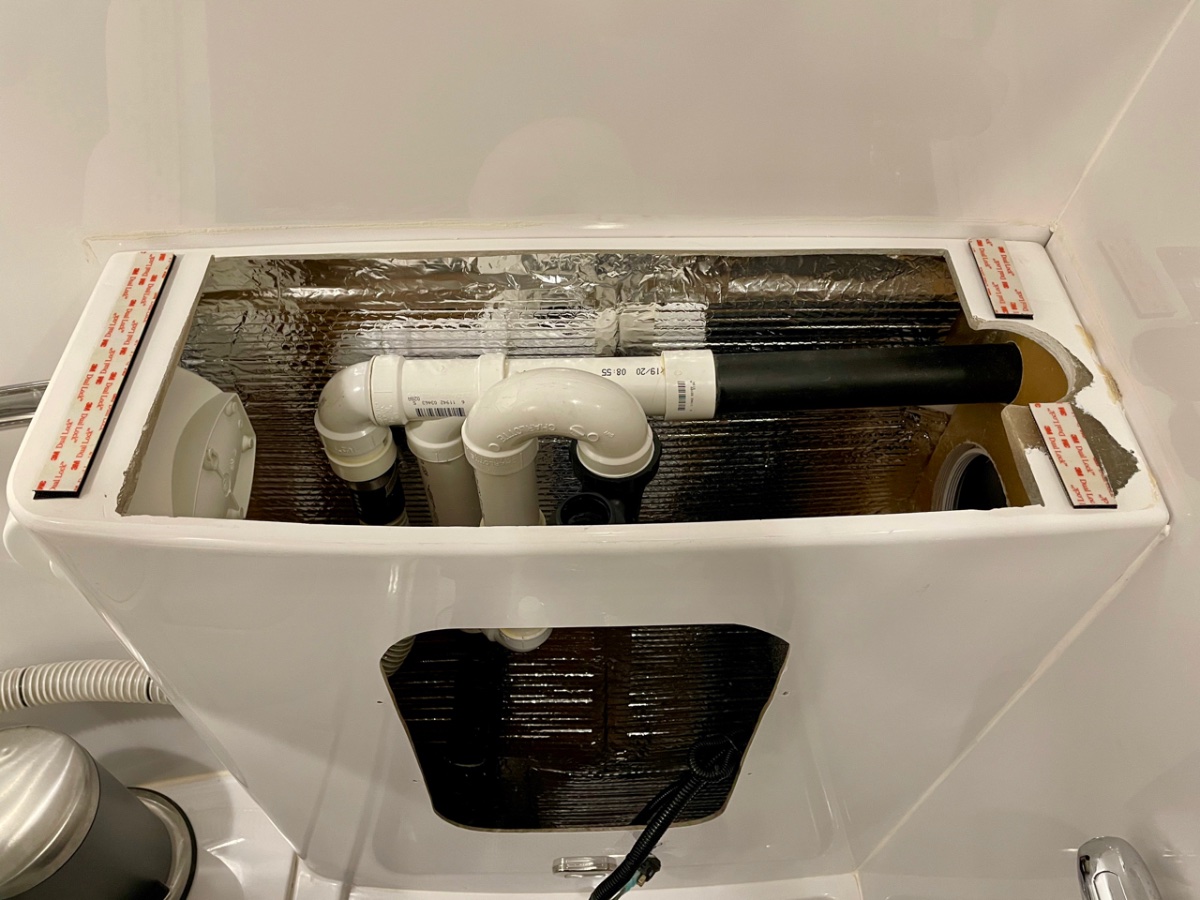
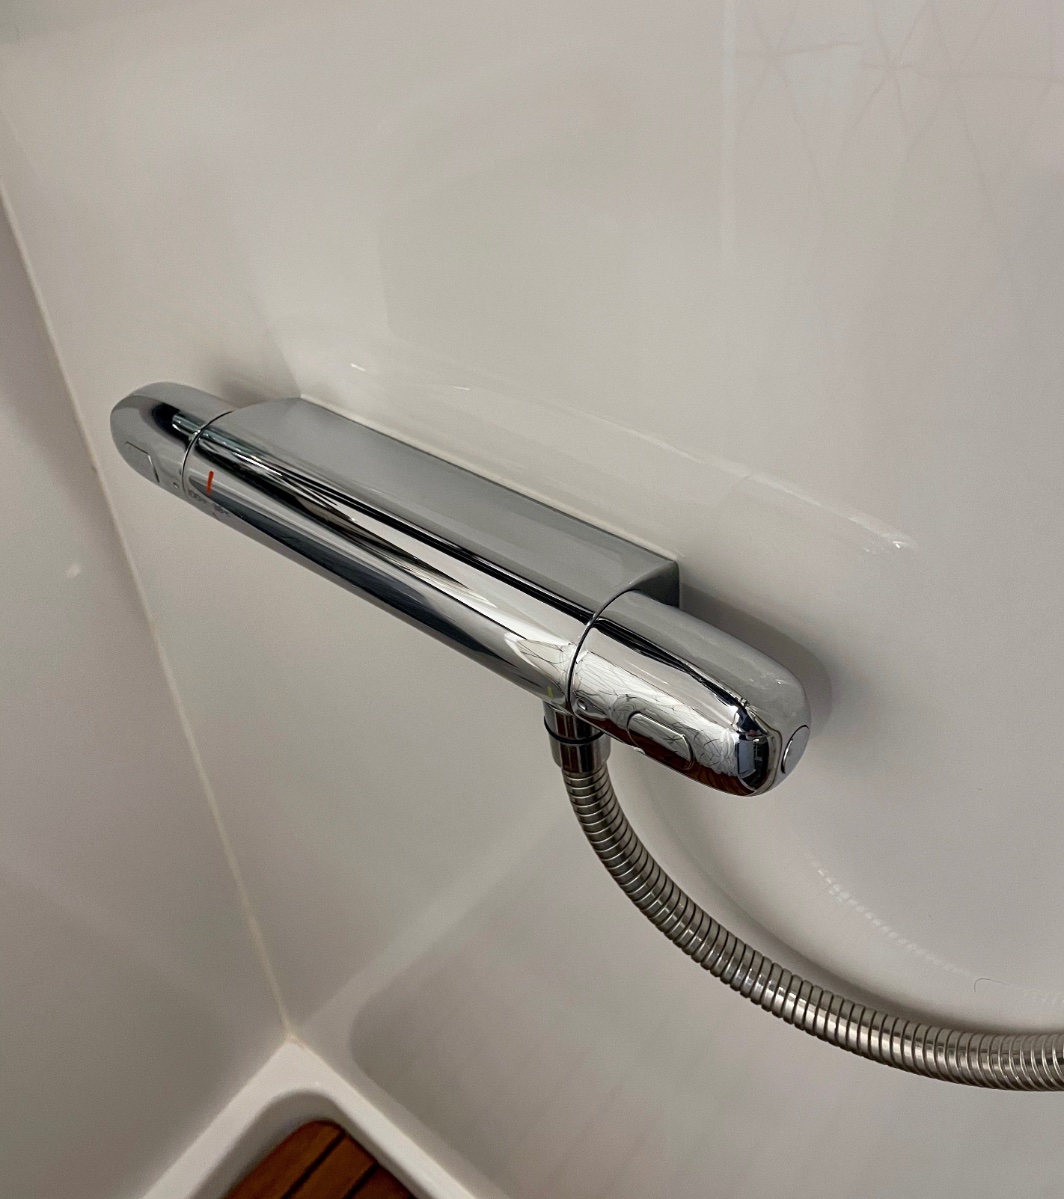
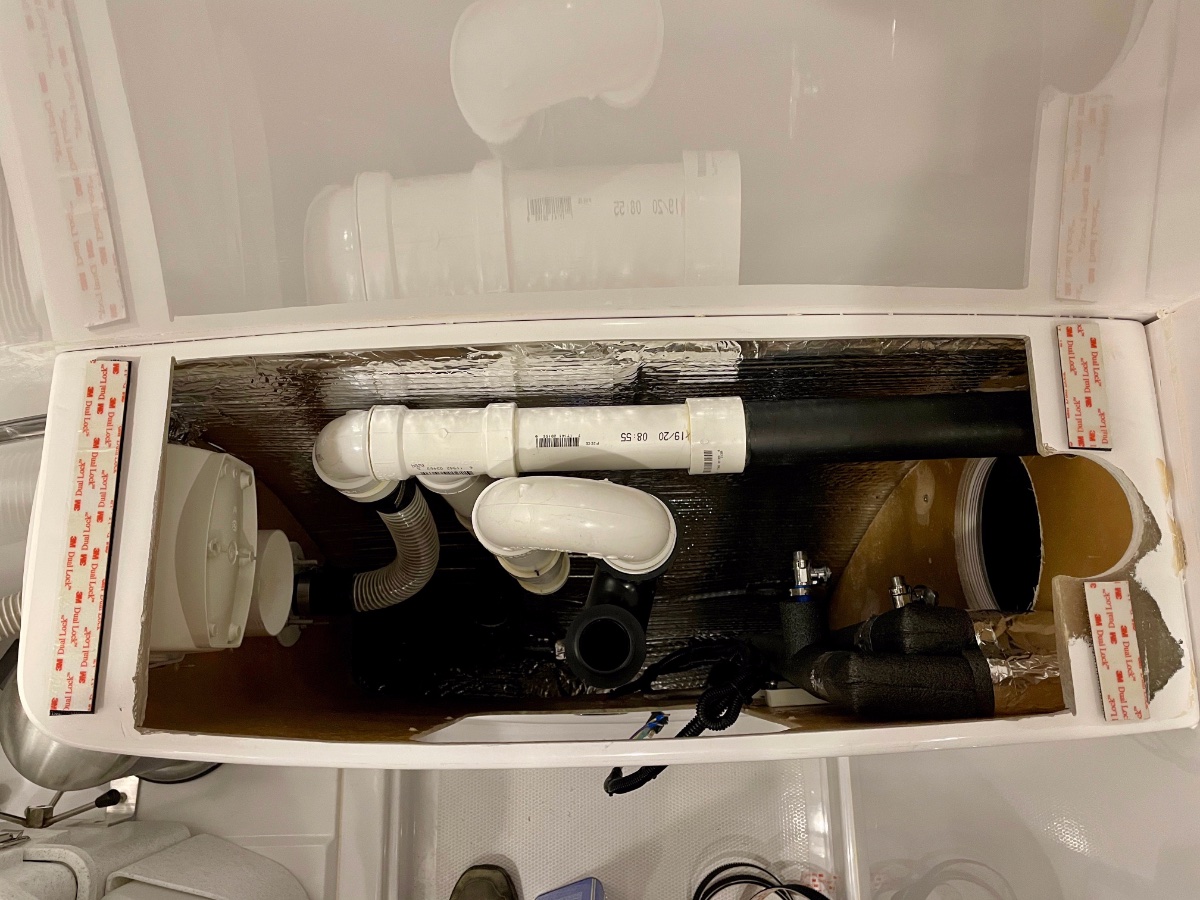
Many of you know that this has been a long, drawn out project. I think I started talking about it to a few people at the 2019 rally - so it's been well over a year in the making, almost two. Not that it was particularly difficult (though certainly a more major mod), but because of laziness and indecision on all the components it ended up being a start and stop project, with months sometimes between fits of activity. And then it snowballed into a complete plumbing overhaul, which was unnecessary - but then that's how the trailer got its name, after all. I'll post about all the plumbing stuff later, but since there have been a few recent posts about shower and bath mods, I figured I'd go ahead and toss this one into the mix. This project started for a few reasons. One, I've always found the bath sink to be mostly useless. It's fine for washing hands, but for most anything else, you've got to crane your neck around with the front wall curving in to hit your head. And trying to use a tiny little sink for washing your face just leaves water everywhere. So we found that were using the kitchen sink almost exclusively. That was fine - no big deal - but with the bigger sink, I was getting tired of wasting water cleaning toothpaste residue out of the sink, and it seemed silly to have a bath sink that got little to no use. The second reason for the upgrade is that after we redid the kitchen sink, the bath sink just looked sad. In addition to functionality, the bath needed some sexy. So the obvious solution was a vessel sink of some sort. Since a vessel sink sits on top of the counter, I'd have much more leeway in size and placement. I could pull it forward as much as I wanted, plus it had the added benefit of raising the sink to a more comfortable height for us. Some experimentation with kitchen bowls of different sized showed that I could get a fairly generous sink that didn't take up too much shower space. I settled on something in the 11" to 12" range; which proved to be a little difficult to source, especially after deciding on the material. I had bookmarks for dozens of sinks of different materials, but I couldn't find one that I really liked. I almost picked a glass one off Amazon, but in the end I thought that was going to be too heavy. What I really wanted - since I had already swapped out almost all of the brushed chrome fixtures in the bath for polished - was a simple polished stainless sink. There were a few out there, but nothing in the right size, nor at a reasonable price. So the project bogged down a bit at that point; but I was confident that I'd find something eventually, and so I went ahead and ordered a new vanity top from Oliver, without any cutouts for the sink or faucet. I’m glad I did, since Oliver has apparently now stopped offering our countertop color And sure enough, a few months later I came across a discontinued sink on Overstock.com that was exactly right. 11.25", polished inside and out. It's the Acquaio sink from WS Bath, if you can find one. I know that other sizes are still available. It was still pricy even on discount, but by that point I didn't care. To make up for the splurge, I got a faucet from Ikea, which is actually pretty nice. The colors from chrome to stainless don't exactly match, but they're close enough and it doesn't bother me. Since I was swapping out the faucet, I needed to find a separate shower valve, which was another lengthy quest. I thought at first that I'd put one to the right of the bath caddy, like @mountainoliver has in his trailer. But most everything I found was just a bit too big to fit (I didn't know about mountainoliver's mod and the mixer valve he used until later). Then I found the Grohe Grohtherm valve, which was interesting in a couple of respects - it didn't recess into the vanity at all (which eliminated a potential issue with the plumbing), it matched the Grohe faucet that I had already installed in the kitchen, and since it was linear, I thought that it might actually fit in the space above the caddy, between it and the vanity top. And it did fit, but looked squished in place, plus I didn't think until trying to place both it and the sink that the the sink drain and trap was going to be difficult to work the plumbing around. Plus putting it there meant that the shower hose was going to be strung across the vanity and generally look bad and be in the way. The problem with this realization was that I'd ordered the valve and the sink before one of my 3-month breaks in the project and now neither was returnable - so I had to make it work. This meant that the shower valve was going on the closet wall. I also realized during the test fitting that when I pulled the sink forward, the drain trap was going to hit the top of the bath caddy, meaning that I couldn't get it far enough forward to work. Small disaster. But I realized though that the bath caddy wasn't symmetrical, and if I turned it upside down, everything fit. I'd lose the flat shelf on the bottom, but we only use the caddy to hold the bath mat, so not a problem. Small problem with the water pump switch placement, though, since it would be on the bottom - but a quick email to Oliver had a new caddy that hadn’t been drilled for the switch on the way. At that point, all the pieces were here, all the logistics worked out, and I was ready to go. Time for another couple months off while I built up the courage to drill through the closet wall. Then finally... First step was to remove the existing vanity top, which is possibly one of the most firmly attached things in the trailer. It's glued in place, so the only way I could find to get it off without completely destroying the vanity was to cut through the joint with an oscillating saw. That's a slow, tiring, dusty endeavor; and it generates a great deal of heat, so you've got to work in spurts to keep the fiberglass resin from burning - which is fine really, since working through the caddy access, your shoulders will welcome the rest. I had to do a tiny bit of trimming on the new top to get it to fit as snuggly as the old one; and once in place, I sealed it with silicone like the original. Top off, new drain lines in place, and I decided to attach the new top with industrial velcro to make it easier to remove in the future (works well). Next, shower lines teed off the existing plumbing, line to the nonexistent toilet removed, and some insulation added to both the plumbing lines and the outside wall behind the vanity. (I have a circulating pump on the hot water, hence the extra line.) I also glued a small PVC block to the back side of the vanity wall to tie down the water lines and prevent them from vibrating too much. And as always, cleaned out as much fiberglass dust as possible, cleaned up and wrapped wiring, etc. The access port on the closet side is something that Oliver gave me in the original build. The sink valves and drain trap are accessible from that port, and since I used velcro for the top, I have the option now of cutting the silicone on the top and pulling that off for access, in addition to taking out the caddy. New plumbing in the closet for the shower. I drilled out a short piece of aluminum as a backing plate for the shower valve. The plumbing is protected somewhat in the closet by the ABS vent, and we really don't keep much in there that could bump around and damage the plumbing. But a few layers of aluminum tape should help protect the insulation from getting beat up and gives a bit of a spaceship vibe. The valve is supposed to stand out from the wall about an inch or so, but I decided to recess it so that it attaches flush and as out of the way as possible. I caulked around the valve and it ended up making a nice little shelf for a razor, and I placed it low enough that my wife can use it to prop a foot while shaving her legs. You can also hang a bar of soap on one of the handles to drip dry. The faucet has a neat feature with stops on both valves, which can be custom set to whatever temperature and flow you prefer. The little buttons on the handles allow you to go past the stops when you want. And that's really it. Installing the sink and faucet is just drilling two holes and following the directions. The only change I made is that the sink came with a short stainless ring to mount between the sink and counter, but I didn't like the look and so just used one of the black rubber gaskets that was inside the ring. That way the sink looks like it’s sitting right on the counter instead of a pedestal. We tested everything out on our last trip and functionally, it all works as expected. The sink isn't in the way at all while showering, and really is so much more usable. Plus I think it looks great. The shower functions just as nicely, with the valve not being obtrusive. I added a second holder for the shower head up high, which works better for me, though my wife prefers the original one. I still need to swap that one out, since I think it's the only bit of brushed chrome left in the trailer. I added the same backsplash material that a few other owners have recommended. I wanted to order a new, wider mirror; but the original one is glued on and so I didn’t want to go through the trouble of trying to get it off. I suppose I could just place one on top of the other, so maybe that’ll be a future project. Glamor shots -

- 31 replies
-
- 20
-

-

-

-
Upgraded Shower and Bathroom Access Hatch
Overland replied to NCeagle's topic in Ollie Modifications
That's very nice. Mine is similar now, but with the shower mixer on the closet wall. It's a much better arrangement than the pull-out faucet, for both the shower and sink. -
Upgraded Shower and Bathroom Access Hatch
Overland replied to NCeagle's topic in Ollie Modifications
With that access hatch, you can plumb in a separate mixer and shower line. 😉 -
Upgraded Shower and Bathroom Access Hatch
Overland replied to NCeagle's topic in Ollie Modifications
That's a great hatch. I had wanted one for ours, but it was one of those wish list options that got lost in the shuffle during the build. Instead, they gave me a round port on the closet side, which wasn't as nice, but it's enough to get an arm in and undo the trap if necessary, and more extensive work if you're super patient (I'm not). Did you have trouble getting it to fit with the curved vanity front? When I replaced my caddy, I was able to scribe the top and bottom and cut it to fit, more or less, to keep the caulk joint to a minimum. When I redid my sink, part of it was installing a new vanity top, and so when I put the new one on, I used VHB velcro strips. So now, I can undo the trap from the closet port, then lift up the counter for access. I still have to cut the seal on the counter, just like with the caddy, but it gives me another option to make repairs if needed. Getting that top off was some work, though. I had to cut through the glue working from below with an oscillating saw for about two hours - did I mention that I'm not a patient person?
-
I require a background check to peek inside.
-
I cut off the tabs for the straps on one side so that they’d lie flat. That worked well, but when I install the new ones, I think I’ll follow Bill’s lead with the plastic liner, but with cutouts for the tabs.
-
Interesting thought. I can’t think why this wouldn’t work.
-
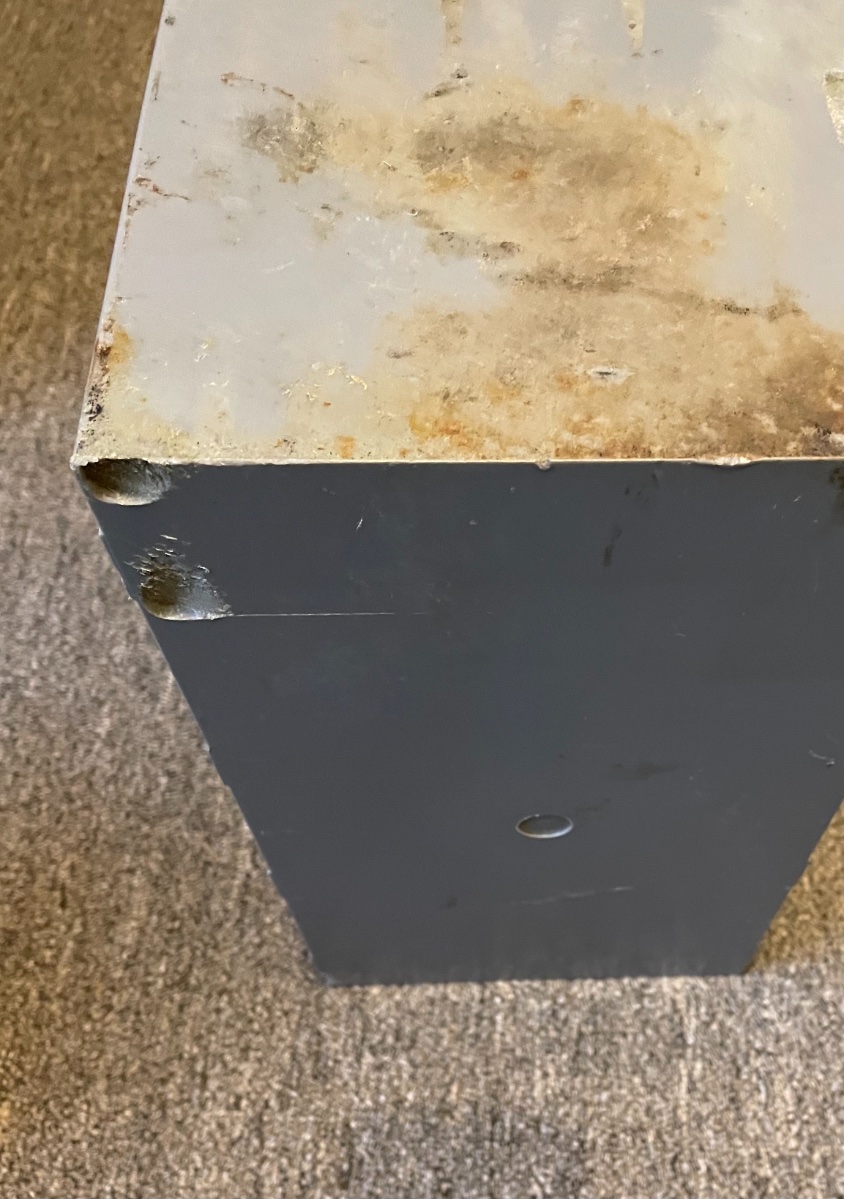
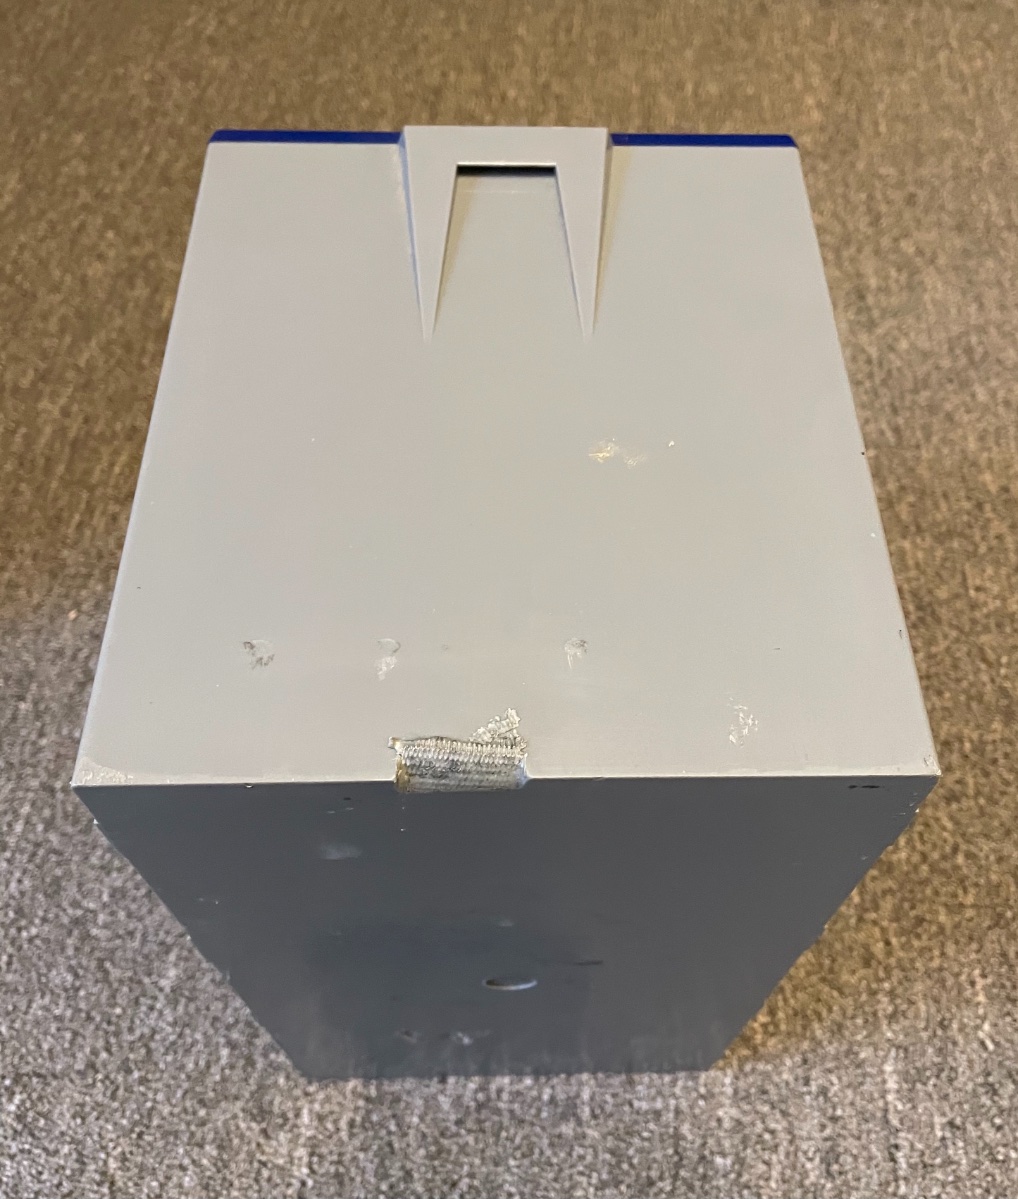
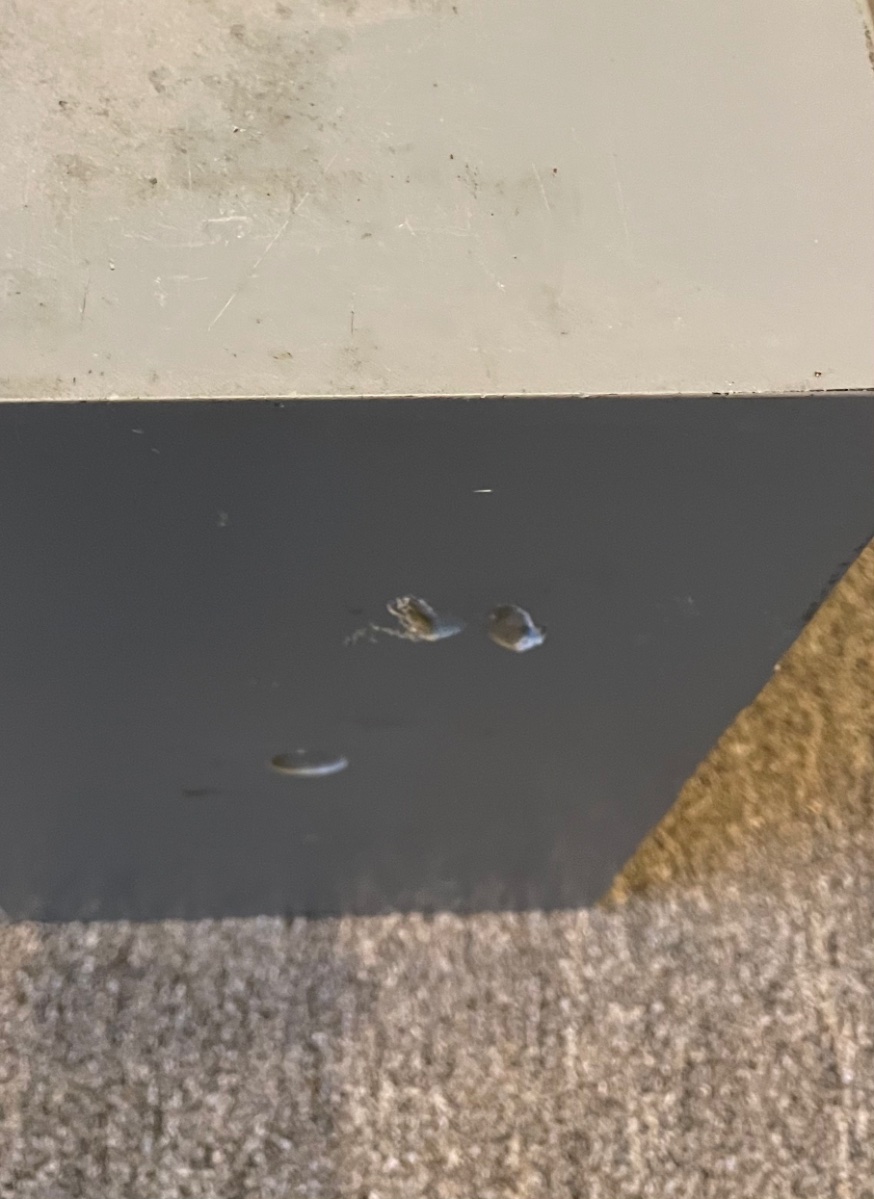
Funny, I was just cleaning up the two batteries that I’m sending back to Battleborn and was dismayed at the abuse they seem to be taking in the battery tray. The first pic is the bottom corner of one, where apparently some rivets in the tray dug into the case. The second is two gouges in the other battery from I don’t know what - I’m guessing a ratchet strap. And the third is the weirdest of all - it looks like the strap itself dug into the case, almost like it melted it.
-
Xantrex 3000 Inverter dead upon arrival home from a trip
Overland replied to NCeagle's topic in Mechanical & Technical Tips
Well my Multi feeds power back through that breaker. Without the charger module, my PD still acts as the distribution panel. I think I would need to simultaneously switch both the power feed to the Multi/PD and also the feed from the Multi/PD to the breakers. There’s surely some damage potential there if power were to get back fed into the Multi, even briefly. I’d definitely want to consult Victron before doing it. -
Tank monitor question.. ever seen one of these?
Overland replied to Mcb's topic in General Discussion
I wonder if that symbol wasn’t an “E” with one light out. -
Xantrex 3000 Inverter dead upon arrival home from a trip
Overland replied to NCeagle's topic in Mechanical & Technical Tips
I spoke with Victron some time ago about the potential problem if my MultiPlus died that I would have no options for 120v, since the Multi is essentially the gatekeeper and if broken wouldn’t allow shore power to the outlets. They told me on yacht installations that they often recommend a manual transfer switch to bypass the Multi and send shore power directly to the outlets. That doesn’t solve battery charging, but then any charger can break, not just complex ones. But I have considered reinstalling the original PD charger back in my trailer, but hooked up to a manual transfer switch. I haven’t put enough thought into it to figure out exactly how that would work, but I assume it’s possible. Or I could always just keep the charger module as a spare and reconnect everything in an emergency. That would be a really manual transfer switch. -
Do they mean to say absorption rather than float? Battleborn's recommended float charge is 13.6 volts.
-
Neapolitan shotguns? I’m so behind the hipster crowd.
-
You might try disconnecting the solar for a bit just to see what the batteries settle in at. Otherwise, I'm glad to see that the Zamp controller is indeed providing a decent voltage. Back to the previous discussion, I found this video today that gives a nice primer on battery to battery chargers, and also a good look at the Victron Orion B2B unit. You guys know that I'm a sucker for Victron gear. $220 is the best price I can find for the 30 amp version. They also make an 18 amp model for $165.
-
The lack of documentation in the current owners manual is a significant downgrade for the trailers themselves. It's a shame that Oliver doesn't see it that way.
-
Thanks for posting that chart. I've seen another that had identical figures, but I was actually going to ask Battleborn next time I spoke with them if they had one of their own. When I've spoken with them on the phone they've always said "13.4 or so" as what their batteries should settle into when full. That's the voltage I see now, but when they were brand new I'm pretty sure it was 13.6.
-
I think the question is how much of a charge do you really need? It seems to me that 15-20 amps from your vehicle would be plenty for even those of us who want to optimize everything, for which 6 awg would probably suffice, 4 to be safe. Then add a B2B charger and you don't have to worry at all what voltage your vehicle is providing. I say 15-20 because if your vehicle is producing 12.8 v minimum, say you see 12.5 v at the trailer, 12.5 x 15 amps ÷ 14.4 v charge x 6 hour drive = 78 Ah, which is about a day's usage. Plus what you get from your solar. Sure there's always the possibility of snow for four days and you desperately need 300Ah of charge in a 2 hour drive, but I don't know if that's a practical thing to plan around. But then sure, more is more - 50 amps would be awesome.
-
Ask for Chantal Hershberger. She's the person I spoke to, and she knew immediately what I was asking about. My errors would clear just by turning the unit off and on. I never had to disconnect power or anything.
-
So if you think that a 2 awg cable is undersized for a 10' run, then what size cable do you recommend for the 25' to the trailer battery? My calculator says you'd need 4/0 to give a 0.2 amp drop at 100 amps. That's a very safe recommendation, since no one would do it. Just like adding a constant 100 amp load to my battery is a safe suggestion, since I'm not going to do that either.
-
I only found out about it because the Truma rep told me at the last rally after I told him about the problem. I can't find anything online either, and I don't know if it's something exclusive to the Comfort Plus model that I have. But when I finally got around to calling them about it, they knew immediately what I was talking about and didn't hesitate to tell me that they'd send out a replacement. I'd definitely ask them, but since your unit won't clear the error, I'd have to guess that you actually have something wrong with the pump - a short or it's jammed or something.
-
2 gauge cable, less than 10' long? How many amps do you think I'm pushing through this?