John E Davies
-
Posts
5,759 -
Joined
-
Last visited
-
Days Won
243
Everything posted by John E Davies
-

Off Road Jack and Multi-Axis Hitch on an Ollie
John E Davies replied to Overland's topic in Ollie Modifications
John, when I commented about the repair cost it was for complete brake assemblies. Replacing shoes or magnets is not often done by shops, the labor cost is so high, so they just swap them for brand new assemblies. Off and on in a few minutes. Thus most shops do not stock the individual parts you need for a rebuild, and they are co$tly. Like a return spring for $15.... You can certainly repair or rebuild your p brakes yourself but it is not cheap. The self adjusting brakes on Ollies are a real nightmare to reassemble and have their own special set of design flaws, and I have been changing mine for Dexter manual adjust ones as they fail, they are around $90 a pair. If I chose Chines clones they would be half that.... Electric over hydraulic disc brakes are in my trailer’s future. They will park short term using the emergency lanyard. No worries, unlike the drum brakes which need wheel rotation to allow the magnets to activate the shoes. Drum brakes suck, pardon my language. John Davies Spokane WA -
Off Road Jack and Multi-Axis Hitch on an Ollie
John E Davies replied to Overland's topic in Ollie Modifications
Excellent! Thanks so much for the info. Some questions.... Do you have concerns about either unit in terms of customer support or replacement parts? Some jack owners at Expedition Portal have had trouble communicating with the importer. It sounds as if the jack should be considered an extra jack, not a substitute for the OEM one. I was hoping to ditch the electric one entirely, but from your description some situations are better for the rigid one. Would the trailer feel squirrelly if you were camping with only the XO jack down? How much does the jack and its mount weigh? I would like to find out more about the equalizing accessory, can you point me to the right source? Does it have bars and how do they attach at both ends? As far as parking brakes go, they are very neat but do require a special backing plate that has an extra lever and cam at the top of the shoes. It is a special order item and way more expensive than the standard brakes. No generics are available. It would make swapping out brakes, in the event of a failure or grease leak, more costly and parts won’t be in every RV shop..., https://www.etrailer.com/Accessories-and-Parts/Dexter-Axle/23-112.html To reduce cost and simply the cable rigging you could install the parking brakes on just the front axles, that would be plenty adequate. John Davies Spokane WA -
It would be nice if the drawers had those cool off-roady/ marine push button latches. I strap mine closed and I normally remember to do so before departure. I can sometimes tell when I open the cabin door if I forgot ... there might be a stray spatula or grill lighter lying on the floor that was ejected over a bump when the drawer was open.... it is more than a little spooky to have your utensils jumping out by themselves. I hope by now that the latches have been altered so this can’t happen. It is very hard on the drawer hardware and also on the owners’ nerves. But that is less disturbing than discovering a busted drawer and its contents wedged against the bathroom door... John Davies Spokane WA
-
Please post pictures, where did you attach them at the rear? Thanks. John Davies Spokane WA
-
A little advance warning was all I expected, the forum looked perfectly normal until Submit took my long post into a black hole. My avatar pic vanished and my Profile page is way different. The character limit for the Signature is now shorter, so much of mine got truncated. But it does seem as if pictures upload way quicker now, which has always been a bother. But OTH I am getting way more 404 Page Not Found messages. My private Messages page is not available. So I am not yet sure what to think. Patience runs thin.... I would love to just go camping if I could, but some members’ spouses live a normal working life and we can’t just hit the road. John Davies Spokane WA
-
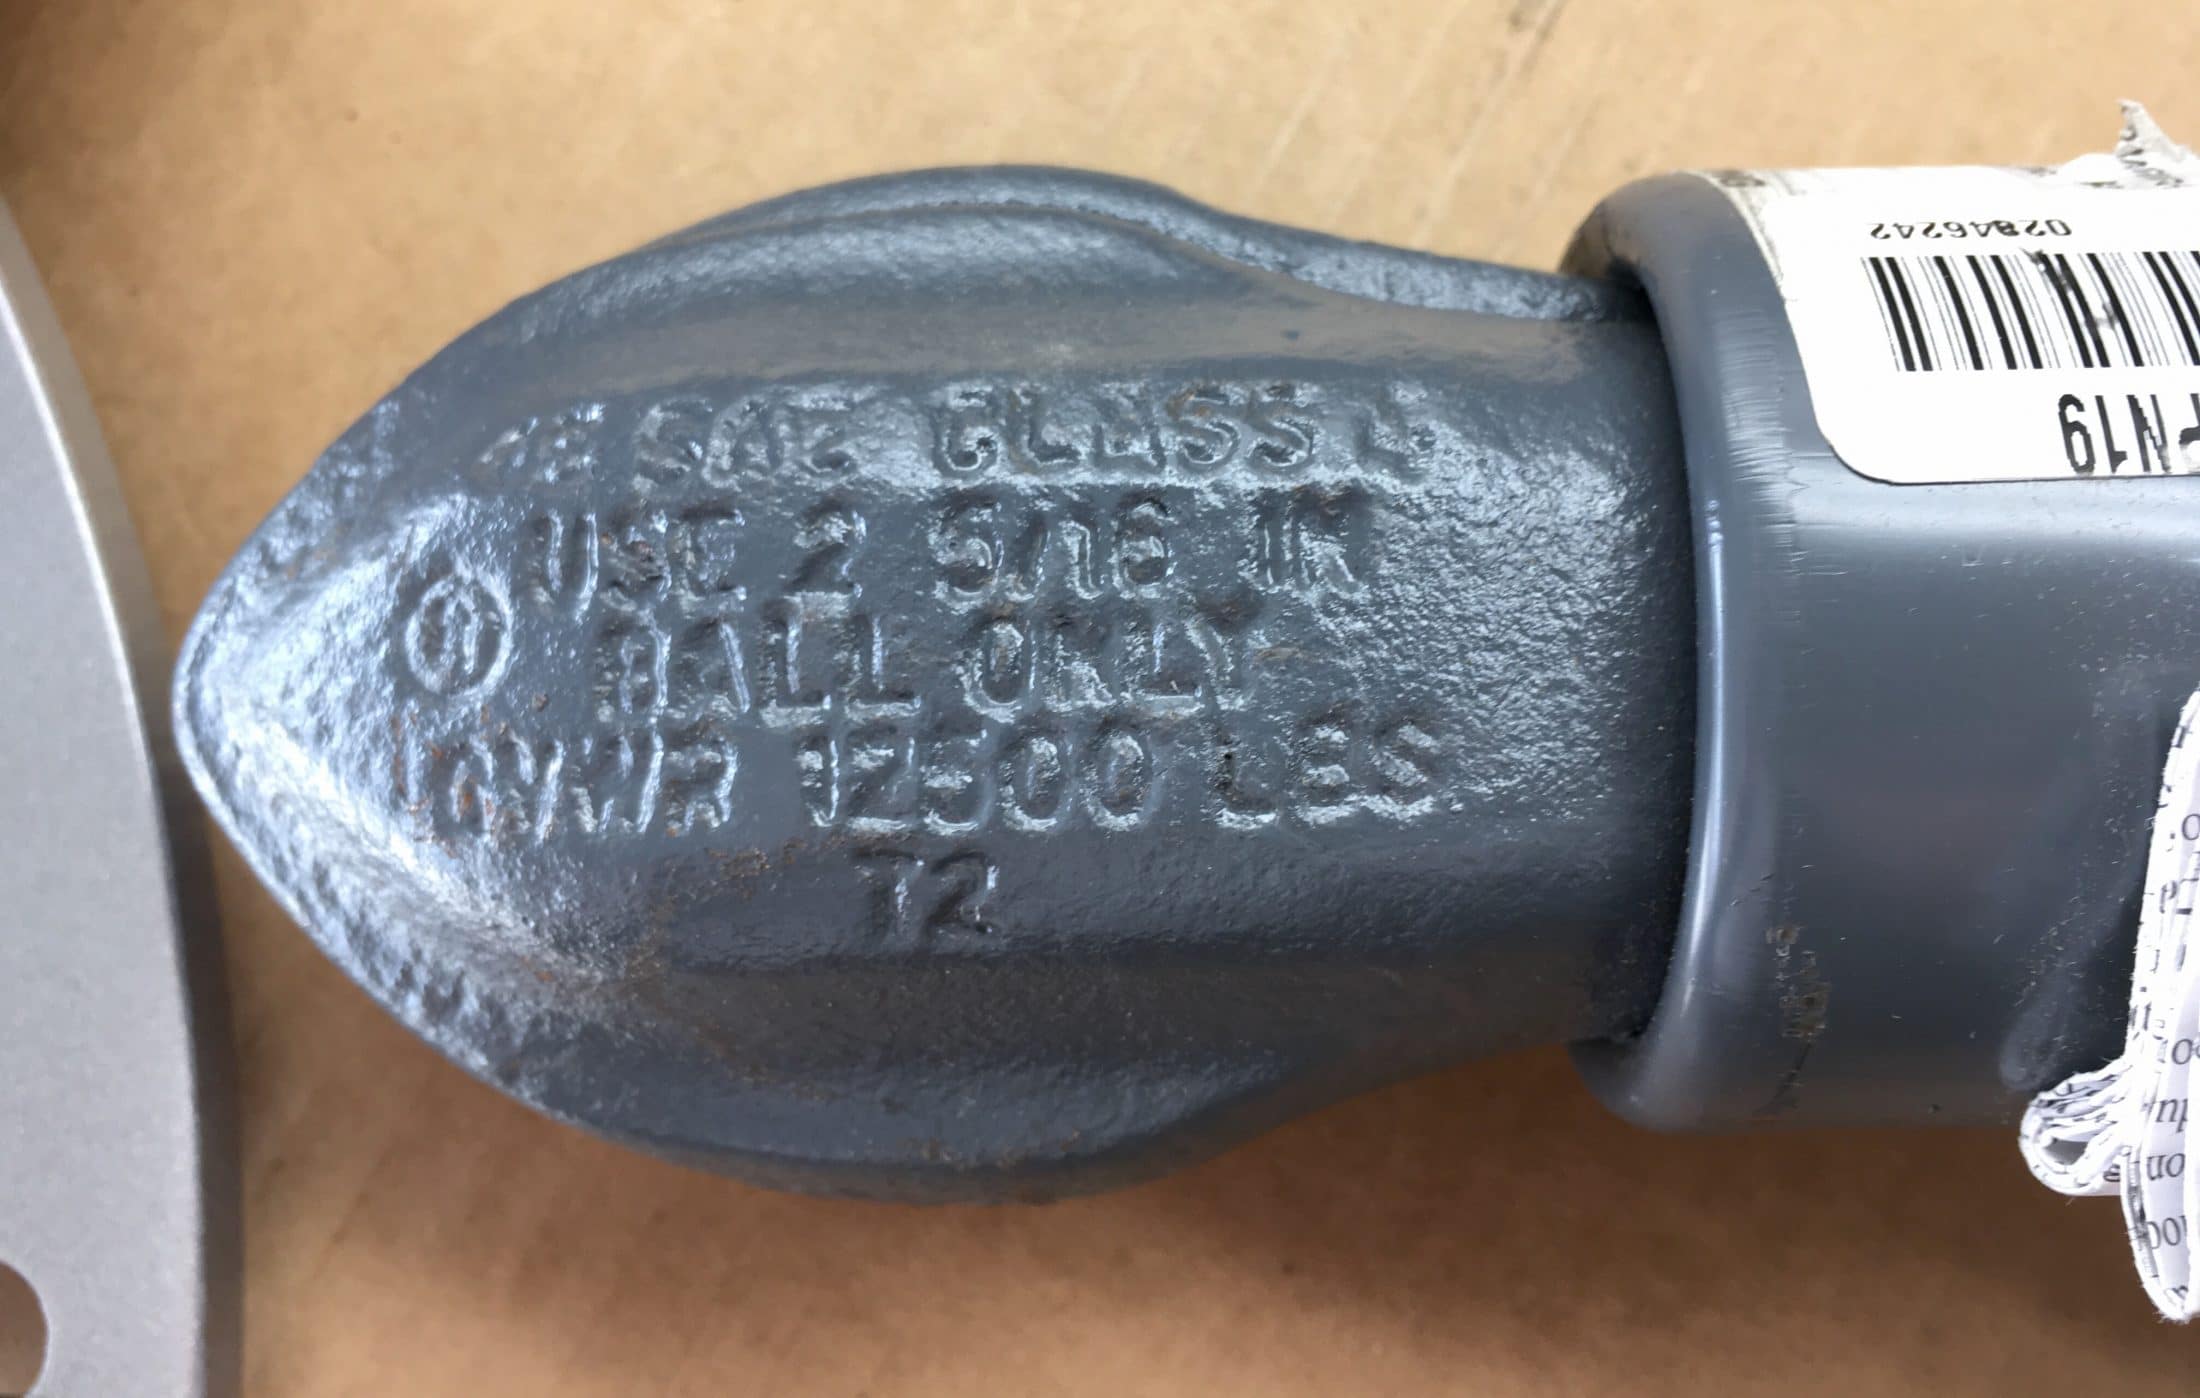
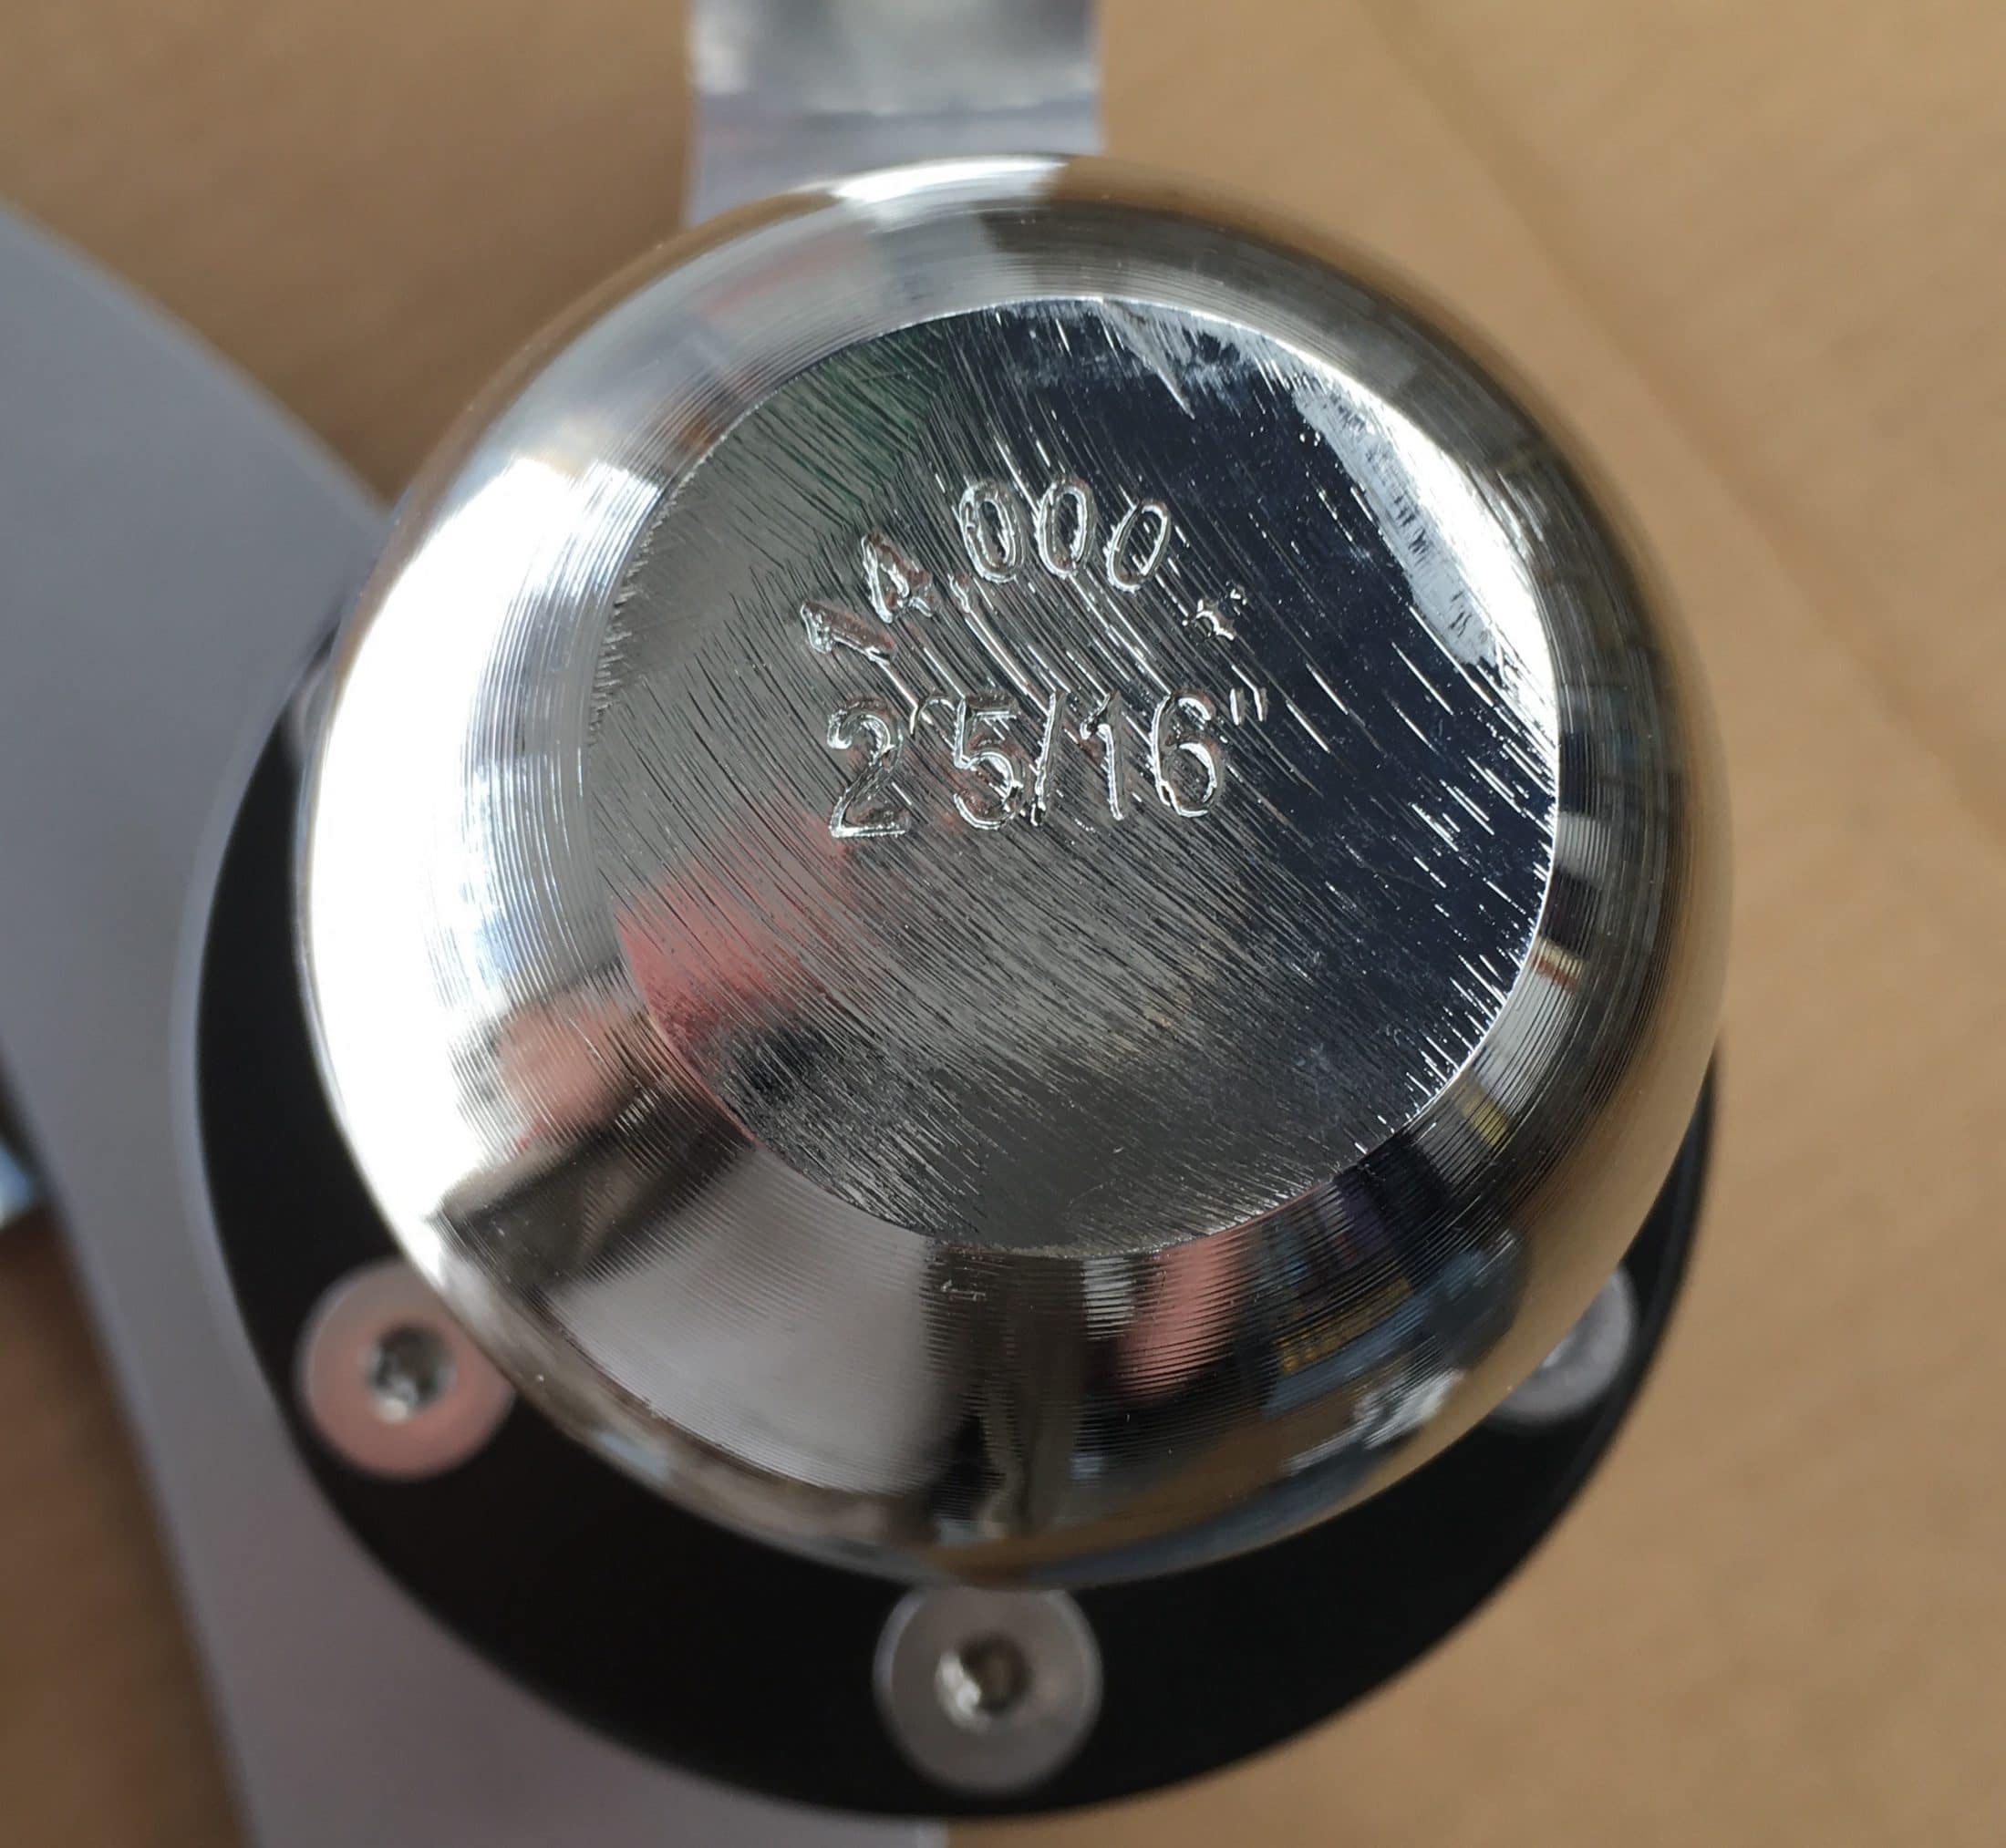
Old thread, Andersen says this is all normal.... https://olivertraveltrailers.com/topic/bulldog-coupler-destroys-anderson-ball/ A little off topic...does anyone have any idea what percentage of trailers ship out with an Andersen? Half? John Davies Spokane WA
-
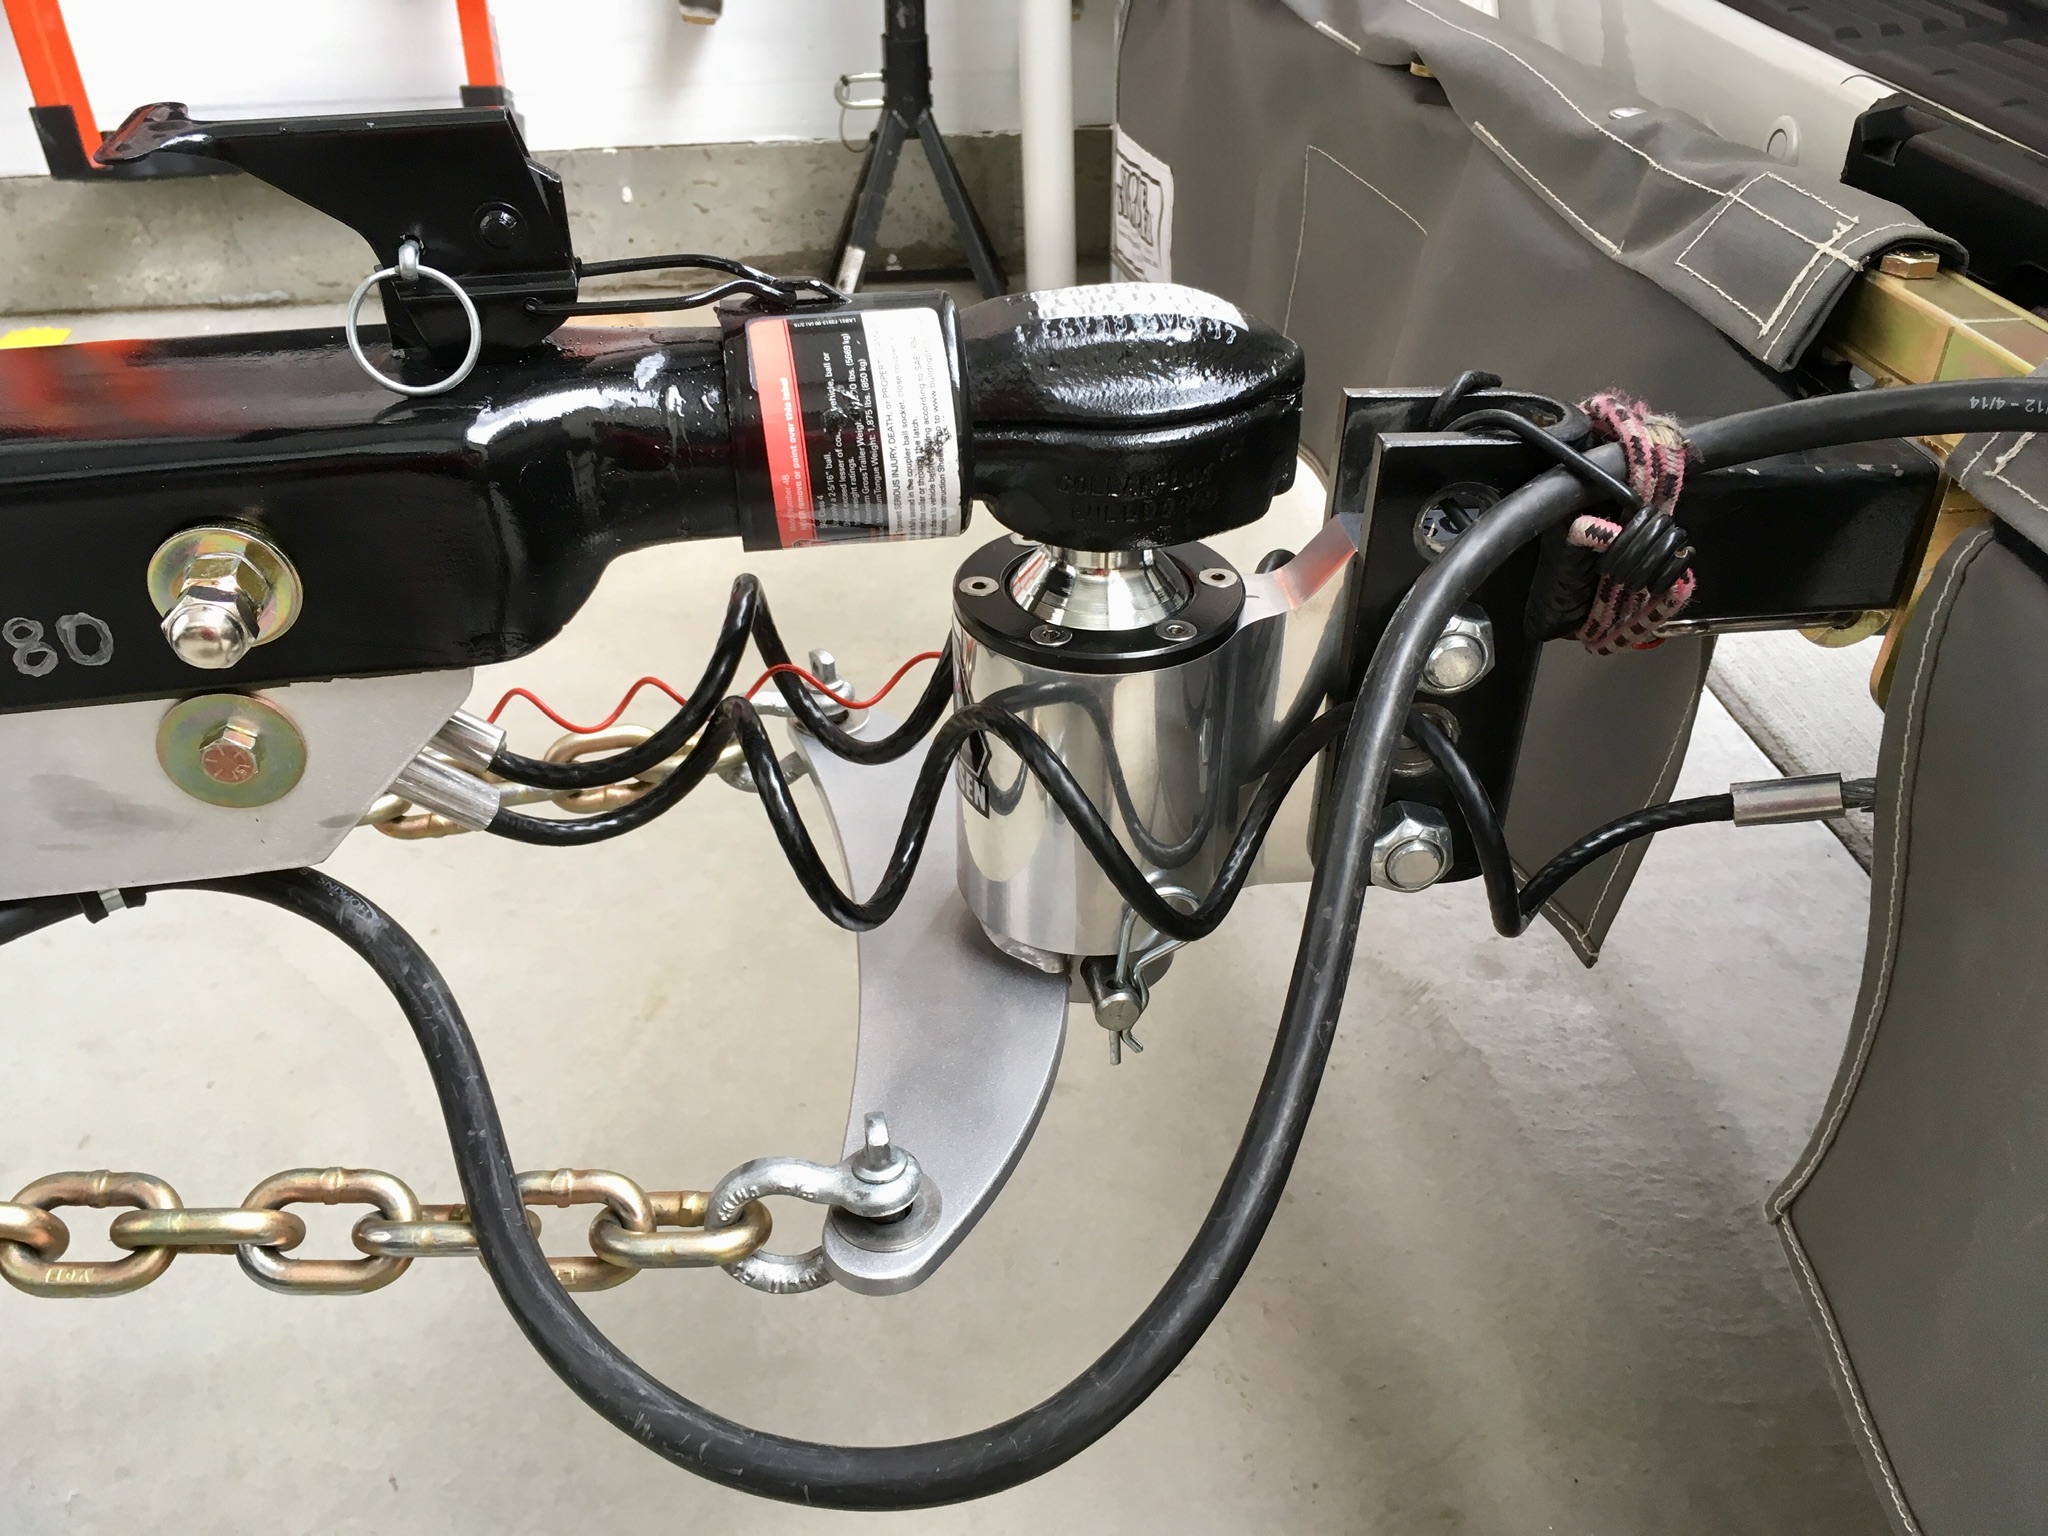
If you are NOT using the Andersen hitch, the 2” ball is fine for both trailers. But there is not enough surface area for the unusual and rapid wear that the chains apply ... they jam the back of the Bulldog hard into the back of the ball. It is made worse in dirty conditions. The Bulldog is designed for a strictly vertical load. Just look inside the opening to see why. It is the combination that is not good. The small ball just makes it worse. It is the Achilles heel of the hitch. The appalling Wake the Dead Spawn of Satan noises it makes sometimes is hopefully cured, time will tell with this redesign... Thanks for the kind comments. John Davies Spokane WA
-
It had about 5000 miles, and I had flipped it around at about 4500 so that the fresh side would be taking the thrust load from the coupler. It still had a lot of life left, I just could not deal with the squealing and popping when it got wet. I had used four inserts in that time, attempting to keep it quiet.... John Davies Spokane WA
-
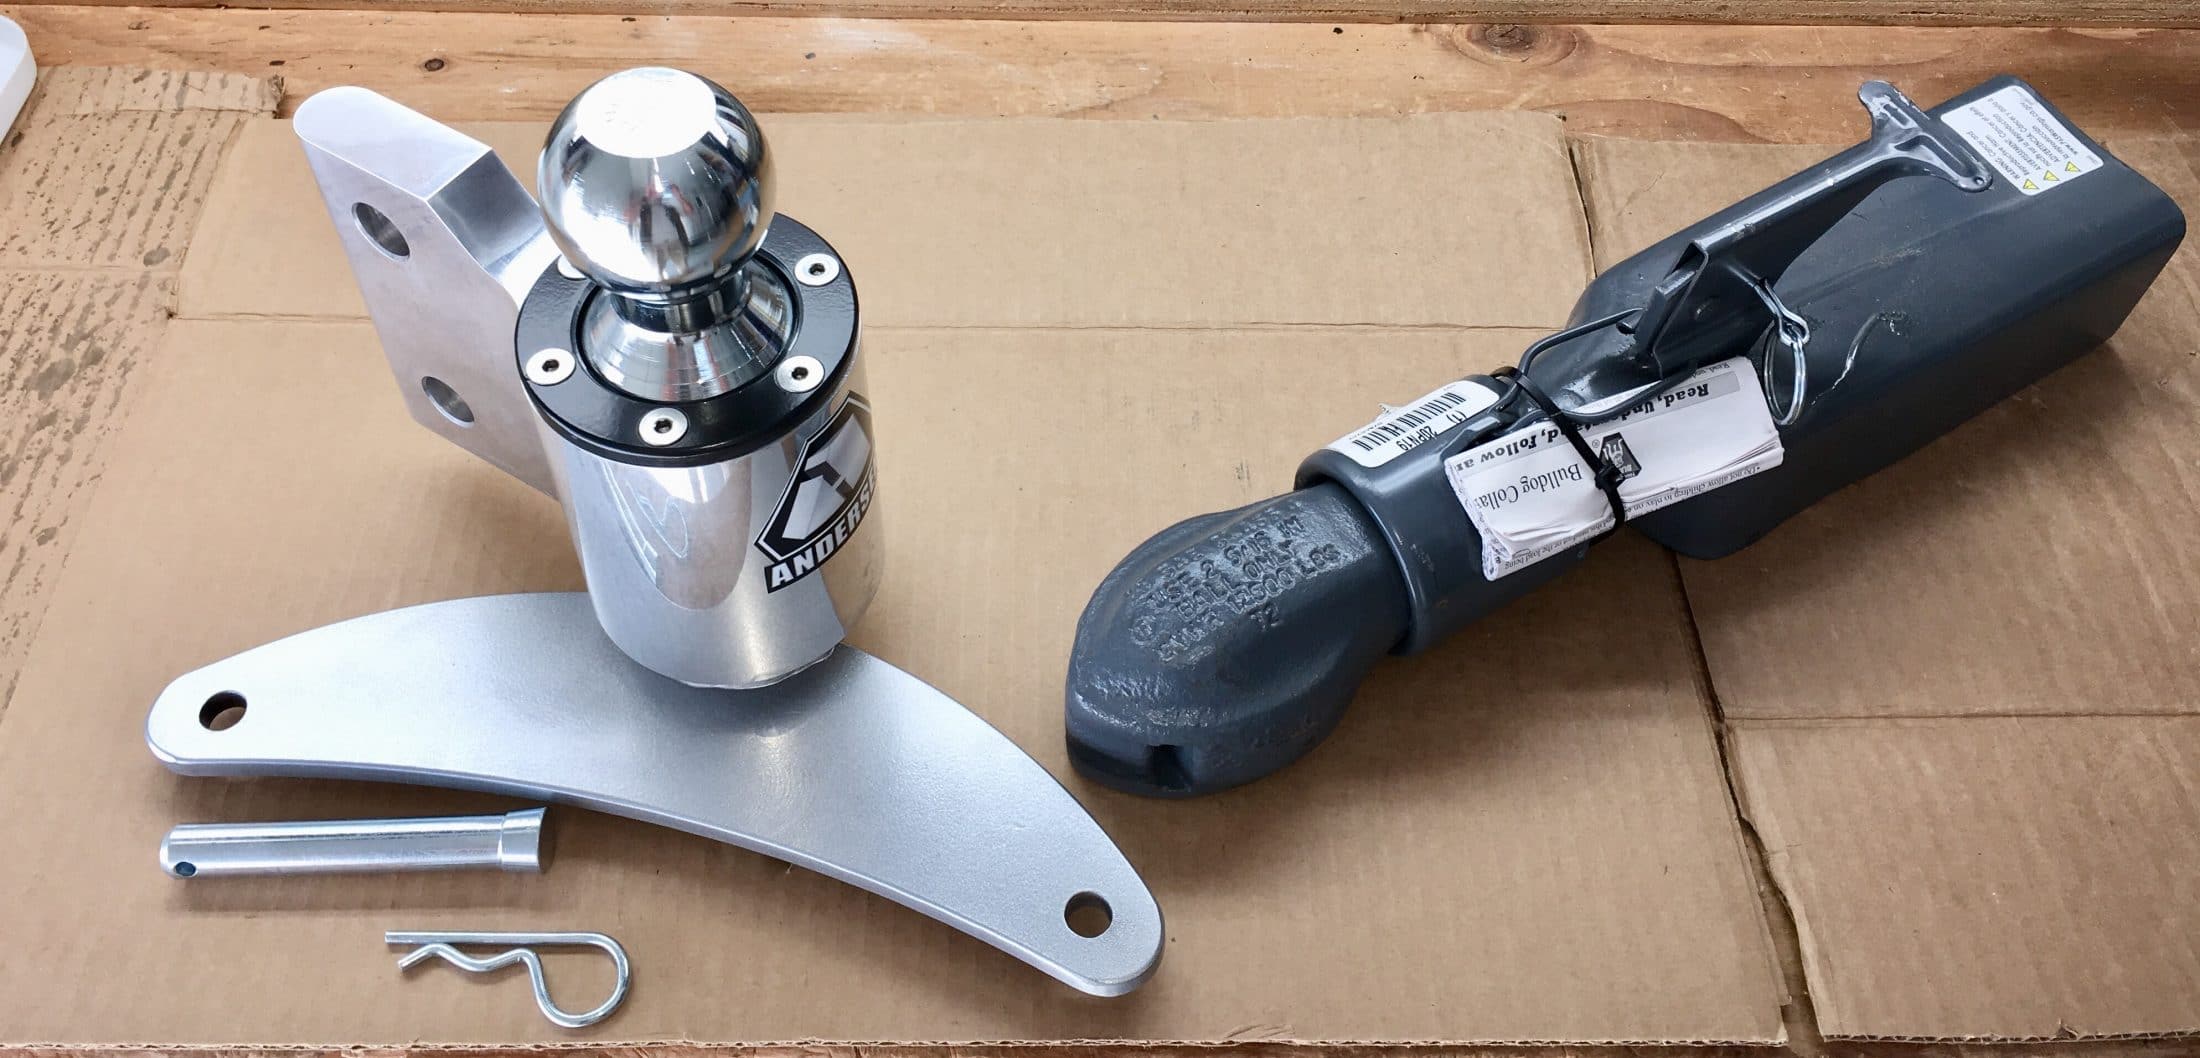
INSTALLING THE ANDERSEN BALL MOUNT: Follow the Andersen instructions, apply an upward load (to remove slack) if you plan to keep the chains tight. If you are running them loose like me, as a dead weight hitch, you can let gravity pull the mount down. Torque both big bolts to 150 ft lbs. **** RECHECK THE BIG BOLTS FOR CORRECT TORQUE AFTER TOWING ***** Since the new ball is taller, and the new coupler cavity is at about the same horizontal position as the old one, the tongue will sit a little higher. My tongue was already a little high. so I was able to drop down one set of holes and ended up with a very nice alignment. Trailer level, truck level with 10 psi in the airbags, chains just snug. I REALLY think that these trailers should be delivered with the larger couplers installed, the cost is the same and it is a much better setup for the Elite II. For the baby Ollie, the smaller coupler is fine.. John Davies Spokane WA

-
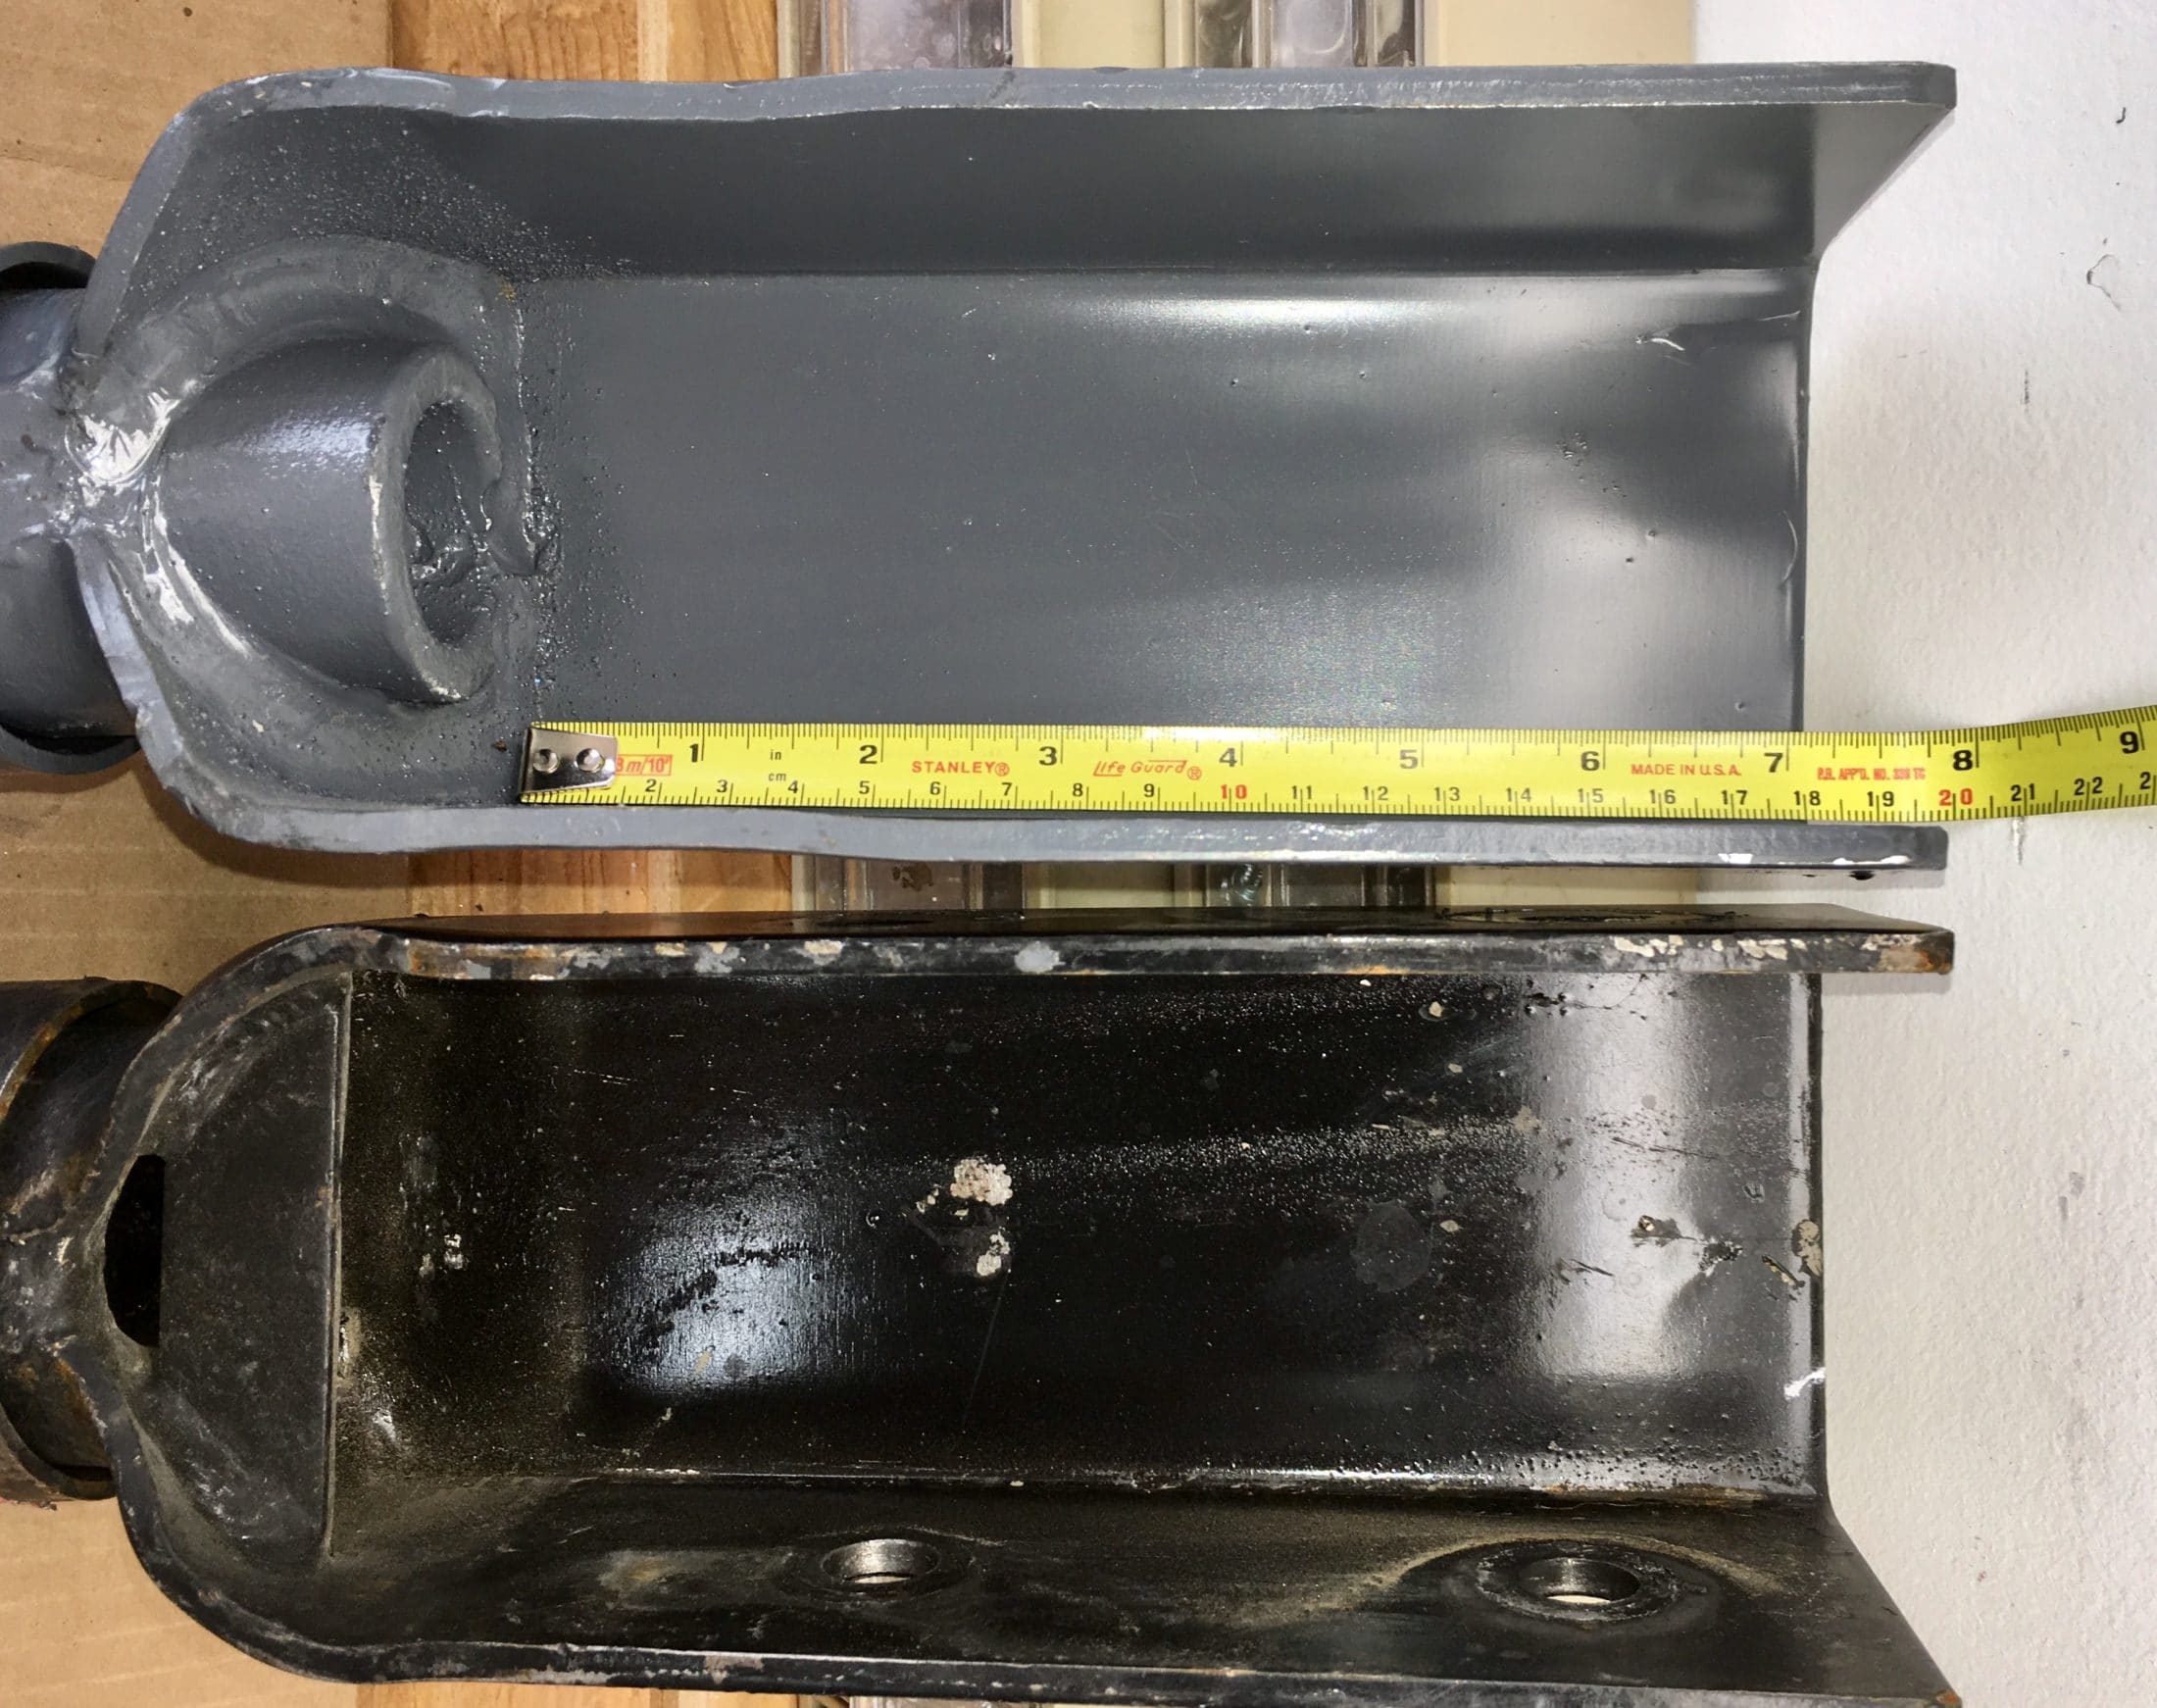
Measuring the location for the coupler holes is tricky since the shape isn't precise - the bends are a little random. Add the top thickness plus a little extra, then drill. If you have to drill (or file) some more when it is on the frame rail, that is OK. You just want to make sure you don't have GINORMOUS holes, so that there is some precision to the fit. John Davies Spokane WA
-
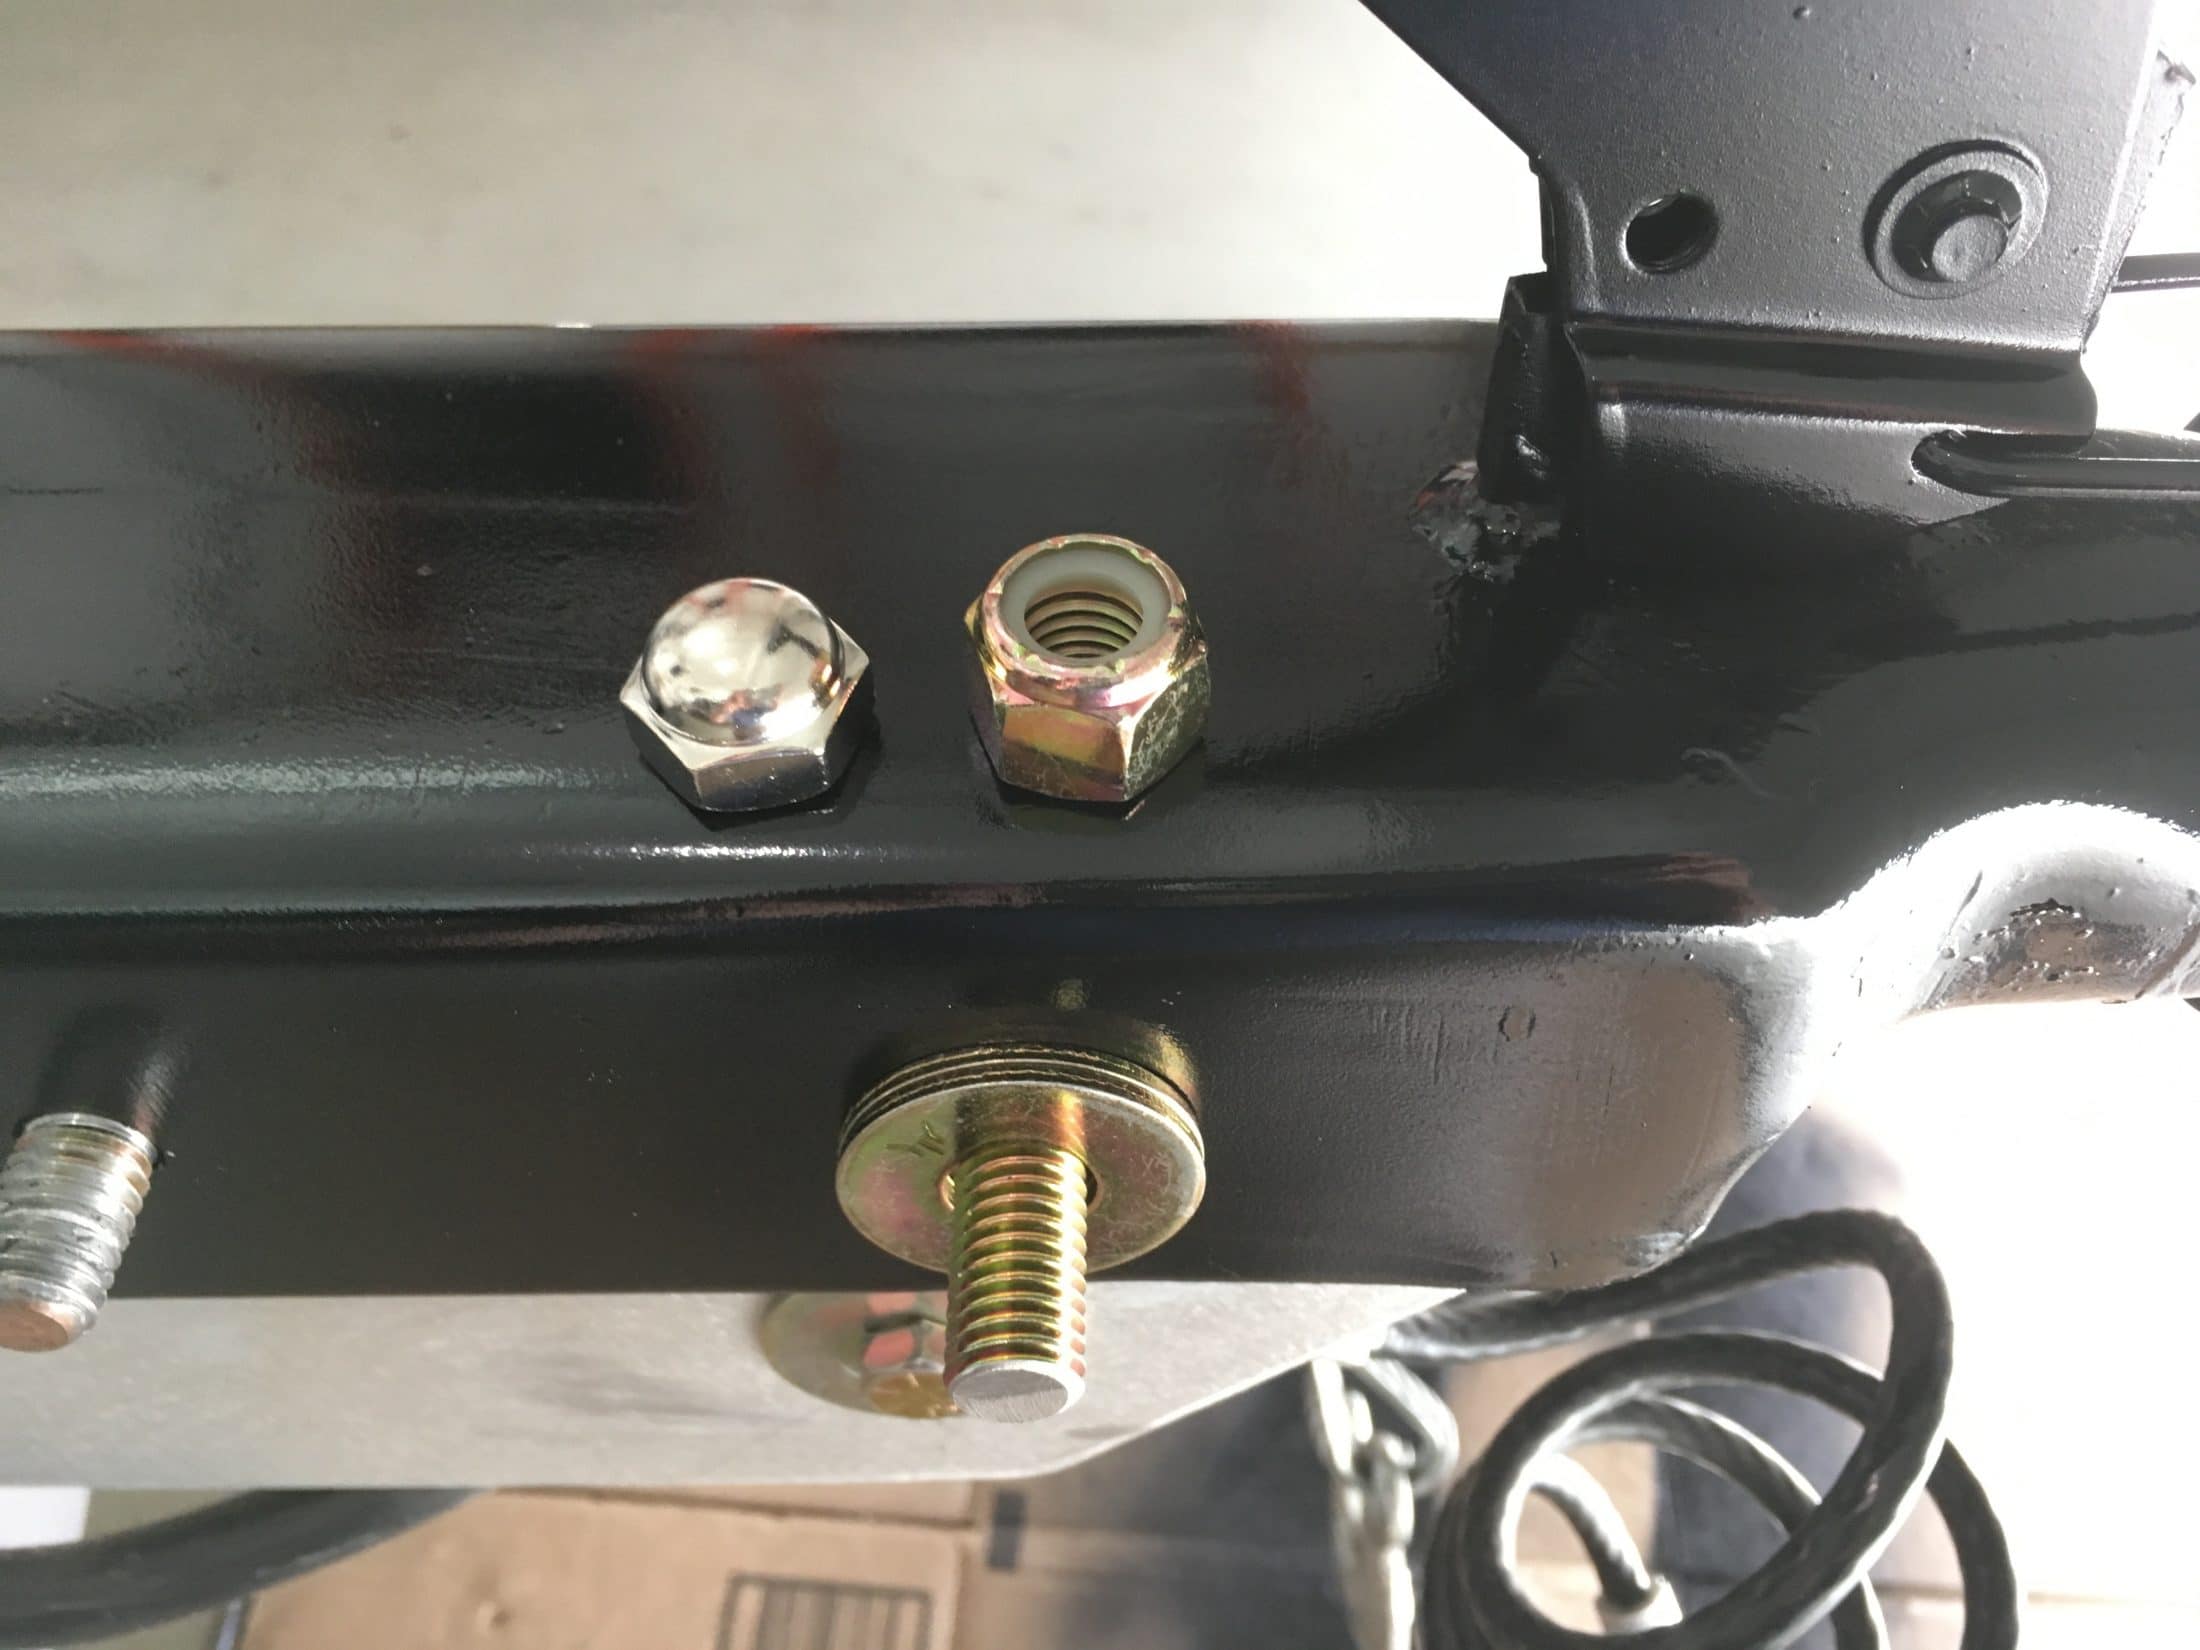
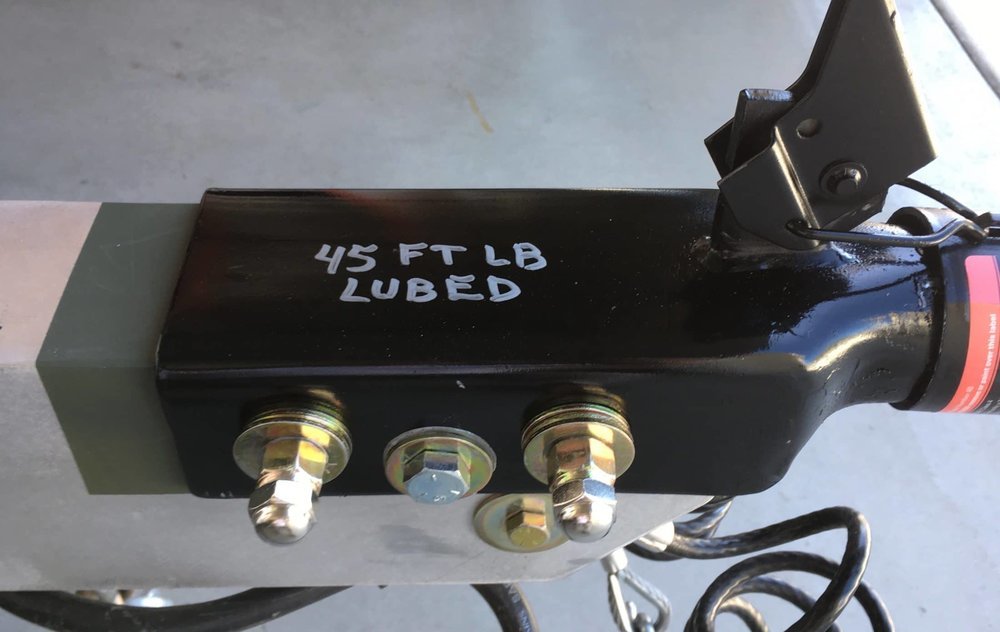
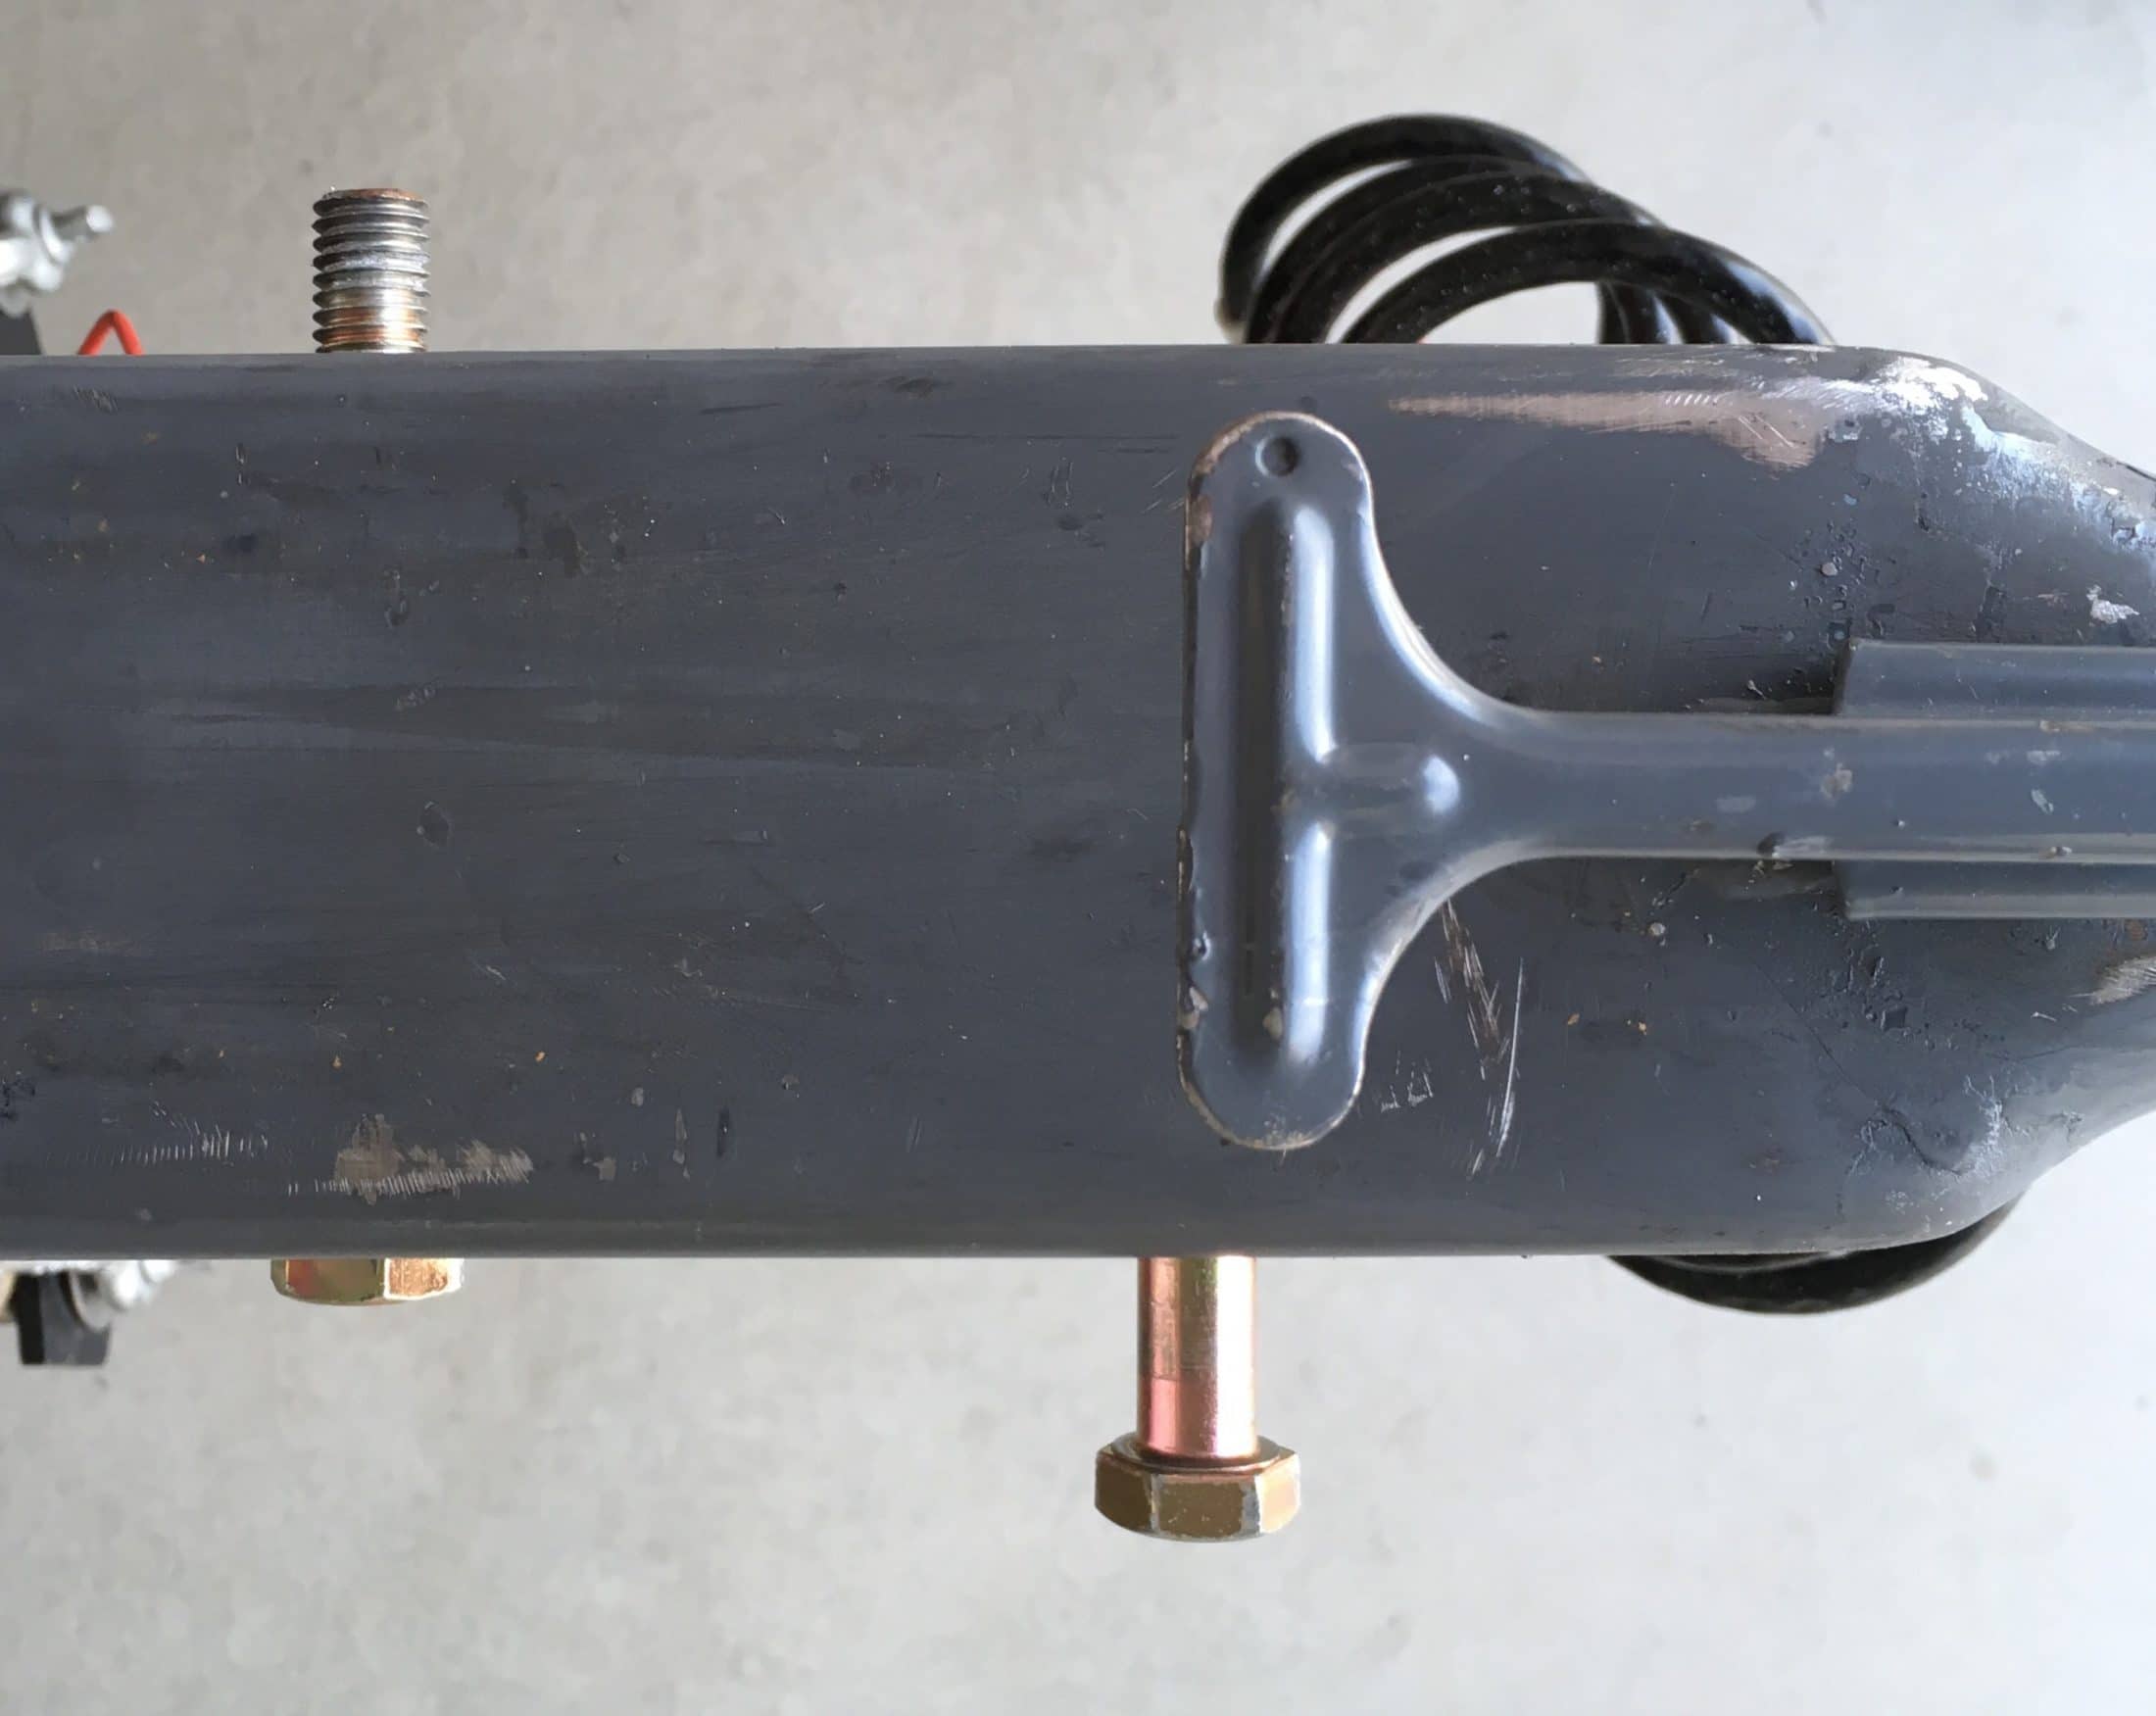
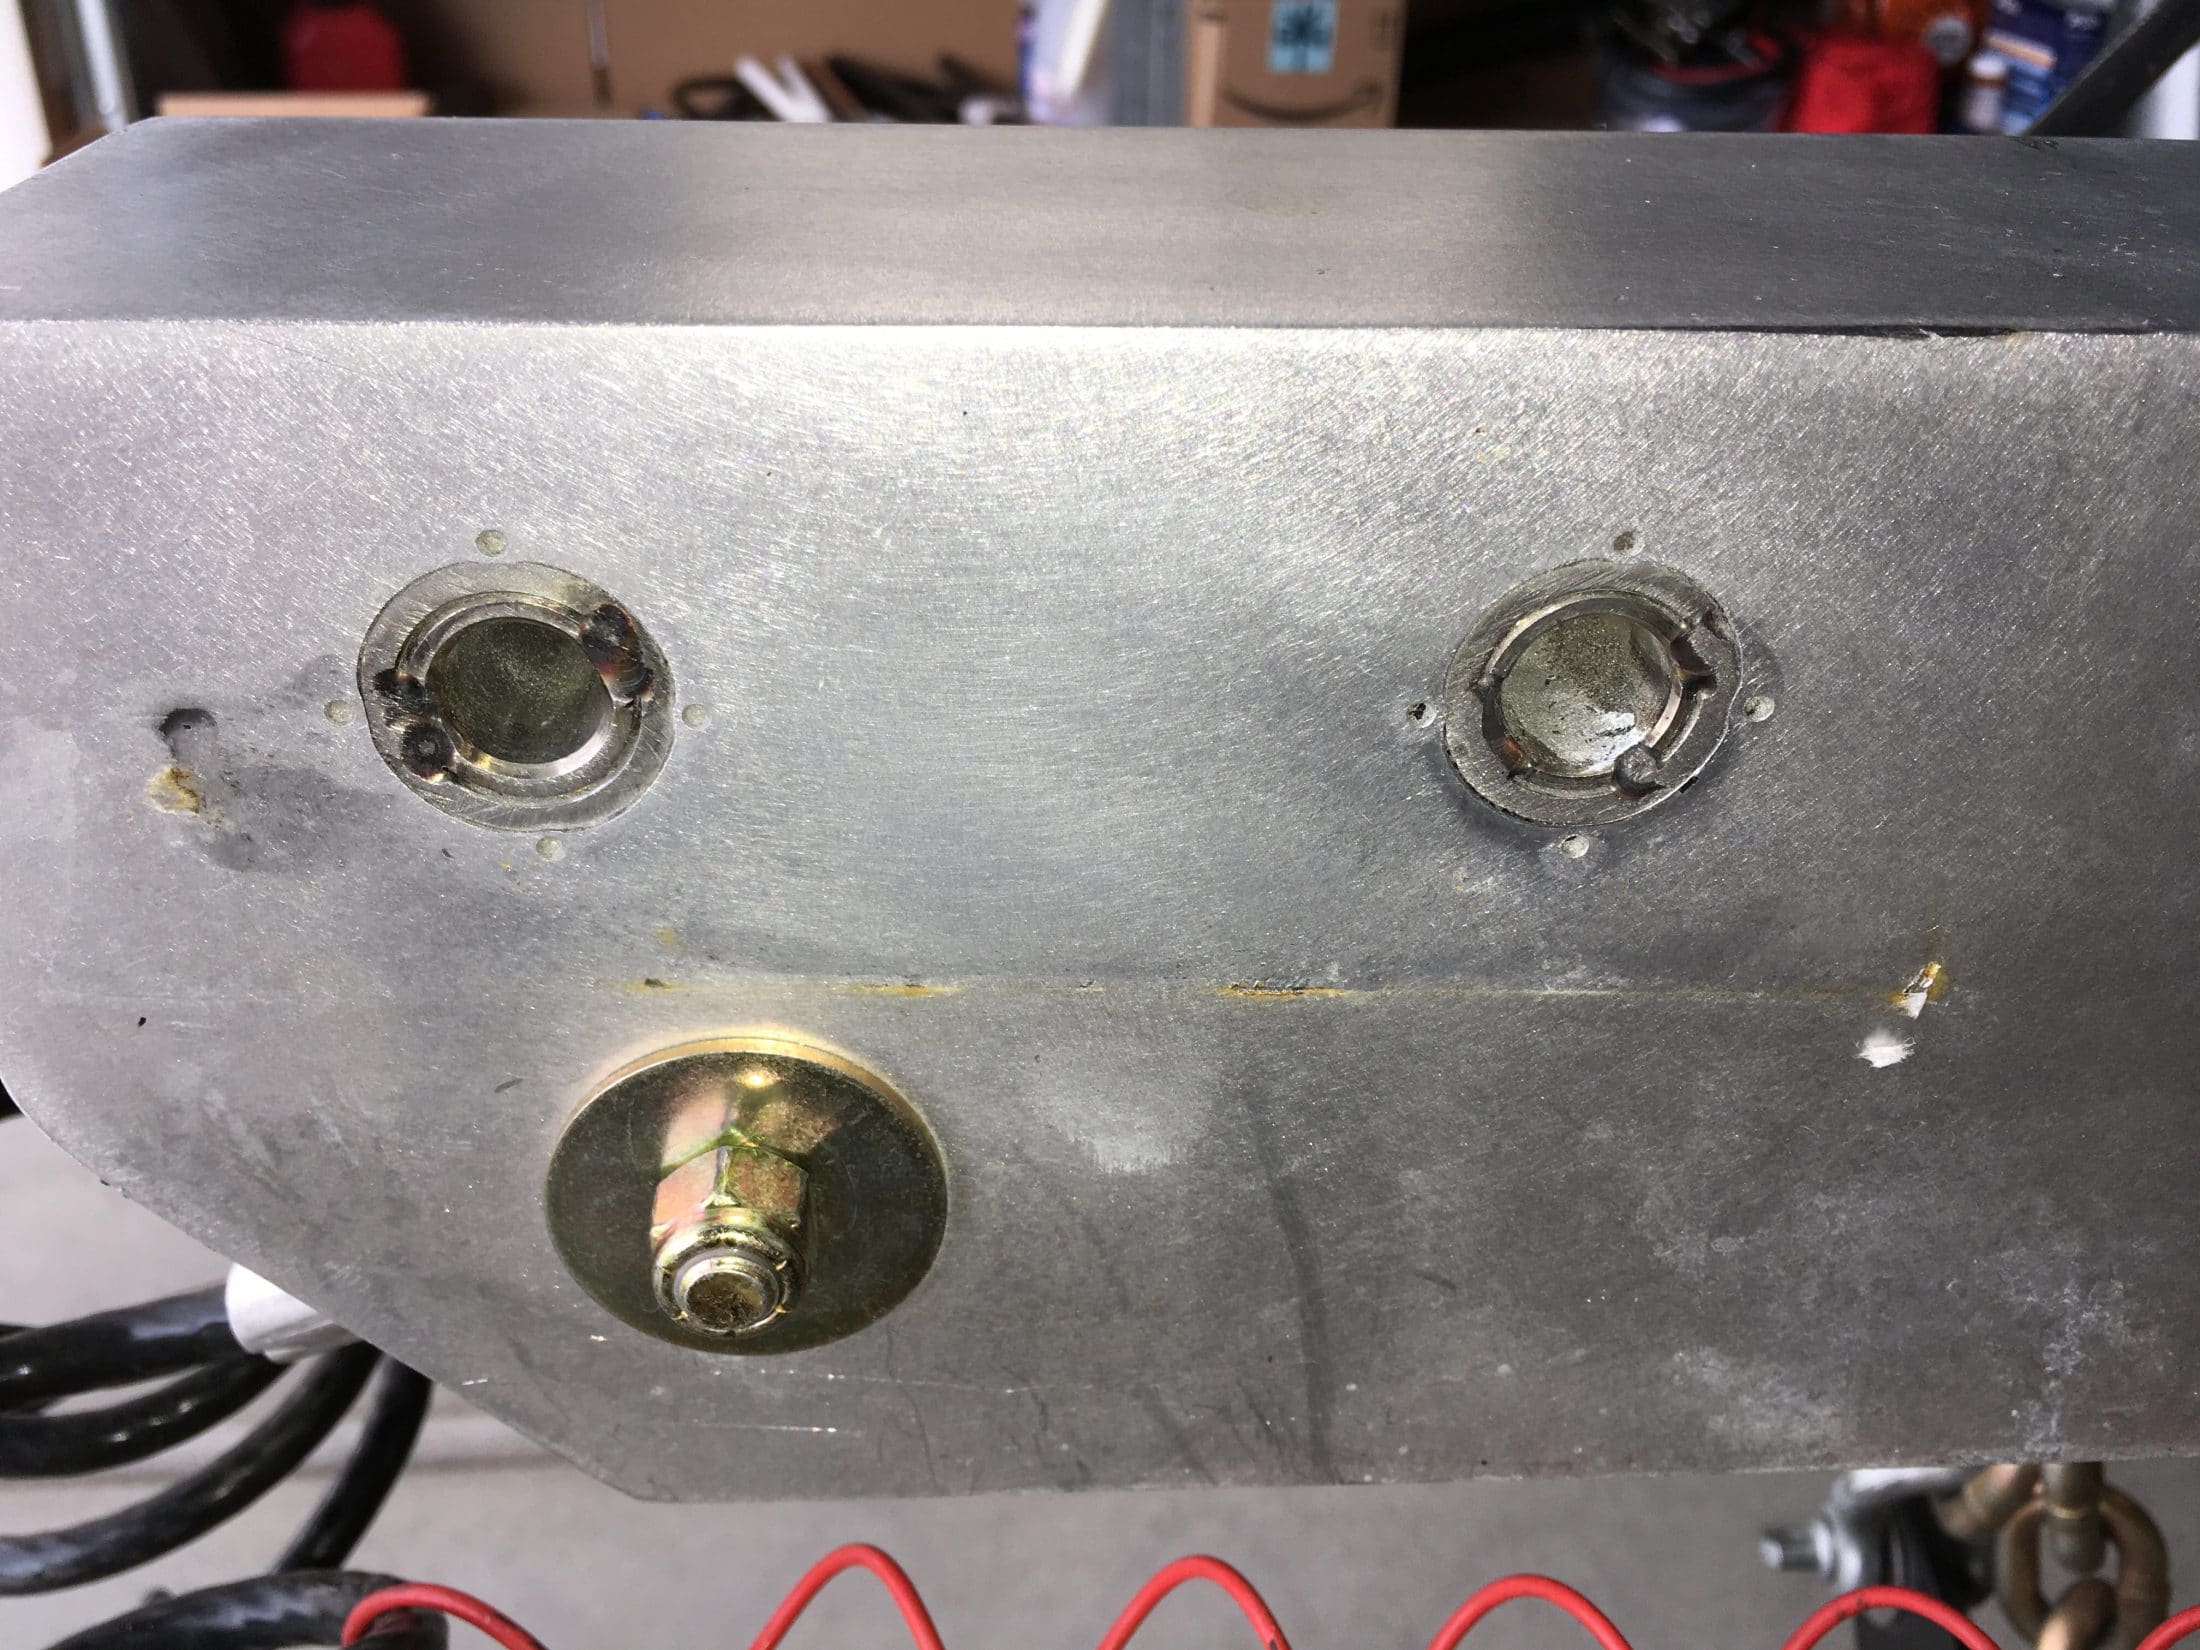
Clean up the coupler and paint it inside and out, at least two coats. I used Duplicolor Brake Caliper Paint gloss black. It requires no primer, is super easy to apply and it is extremely durable. Clean up the tongue, sand down the rough bits and prime with several coats. I used Duplicolor Self Etching Primer, which is specifically OK for aluminum. (Many primers do not work well on AL.) ... https://www.amazon.com/Dupli-Color-EDAP16907-General-Purpose-Self-Etching/dp/B002984MU0 .... I primed a little beyond the new coupler since there is wear there from the bungee cord I use to hold up the Andersen chains. Here is the new hardware, make sure the bolt is GRADE 8, GRADE 5 and has at least a 3.5" unthreaded shank. NO threads should be inside the coupler or frame rail.Cut off the excess so you can install a cap nut. I added an extra washer under each nut, since the factory nuts were cutting into the shank. EDiT 08/23/20. Replaced Grade 8 bolts with Grade 5 - IMPORTANT, PLEASE READ THIS: .... Coat the bolts and threads with anti-seize compound and insert: Apply an upward load on the coupler. I used a jack stand and retracted the electric jack. Torque gradually to 80 ft lbs 45 ft lbs if lubricated. Alternate back and forth, keep tightening until there is no further nut turning. The sides of the coupler will draw in tight against the frame. When done, add the stainless cap nuts to make it pretty and keep from scraping your shin. ***RECHECK THE TORQUE OFTEN WHEN TOWING UNTIL THE NUTS NO LONGER MOVE.*** Optional: paint a bright stripe on top of the coupler, it highlights the ratings label and makes it easier to see in your tow vehicle camera when hitching up. I used silver caliper paint. Done! John Davies Spokane WA
-
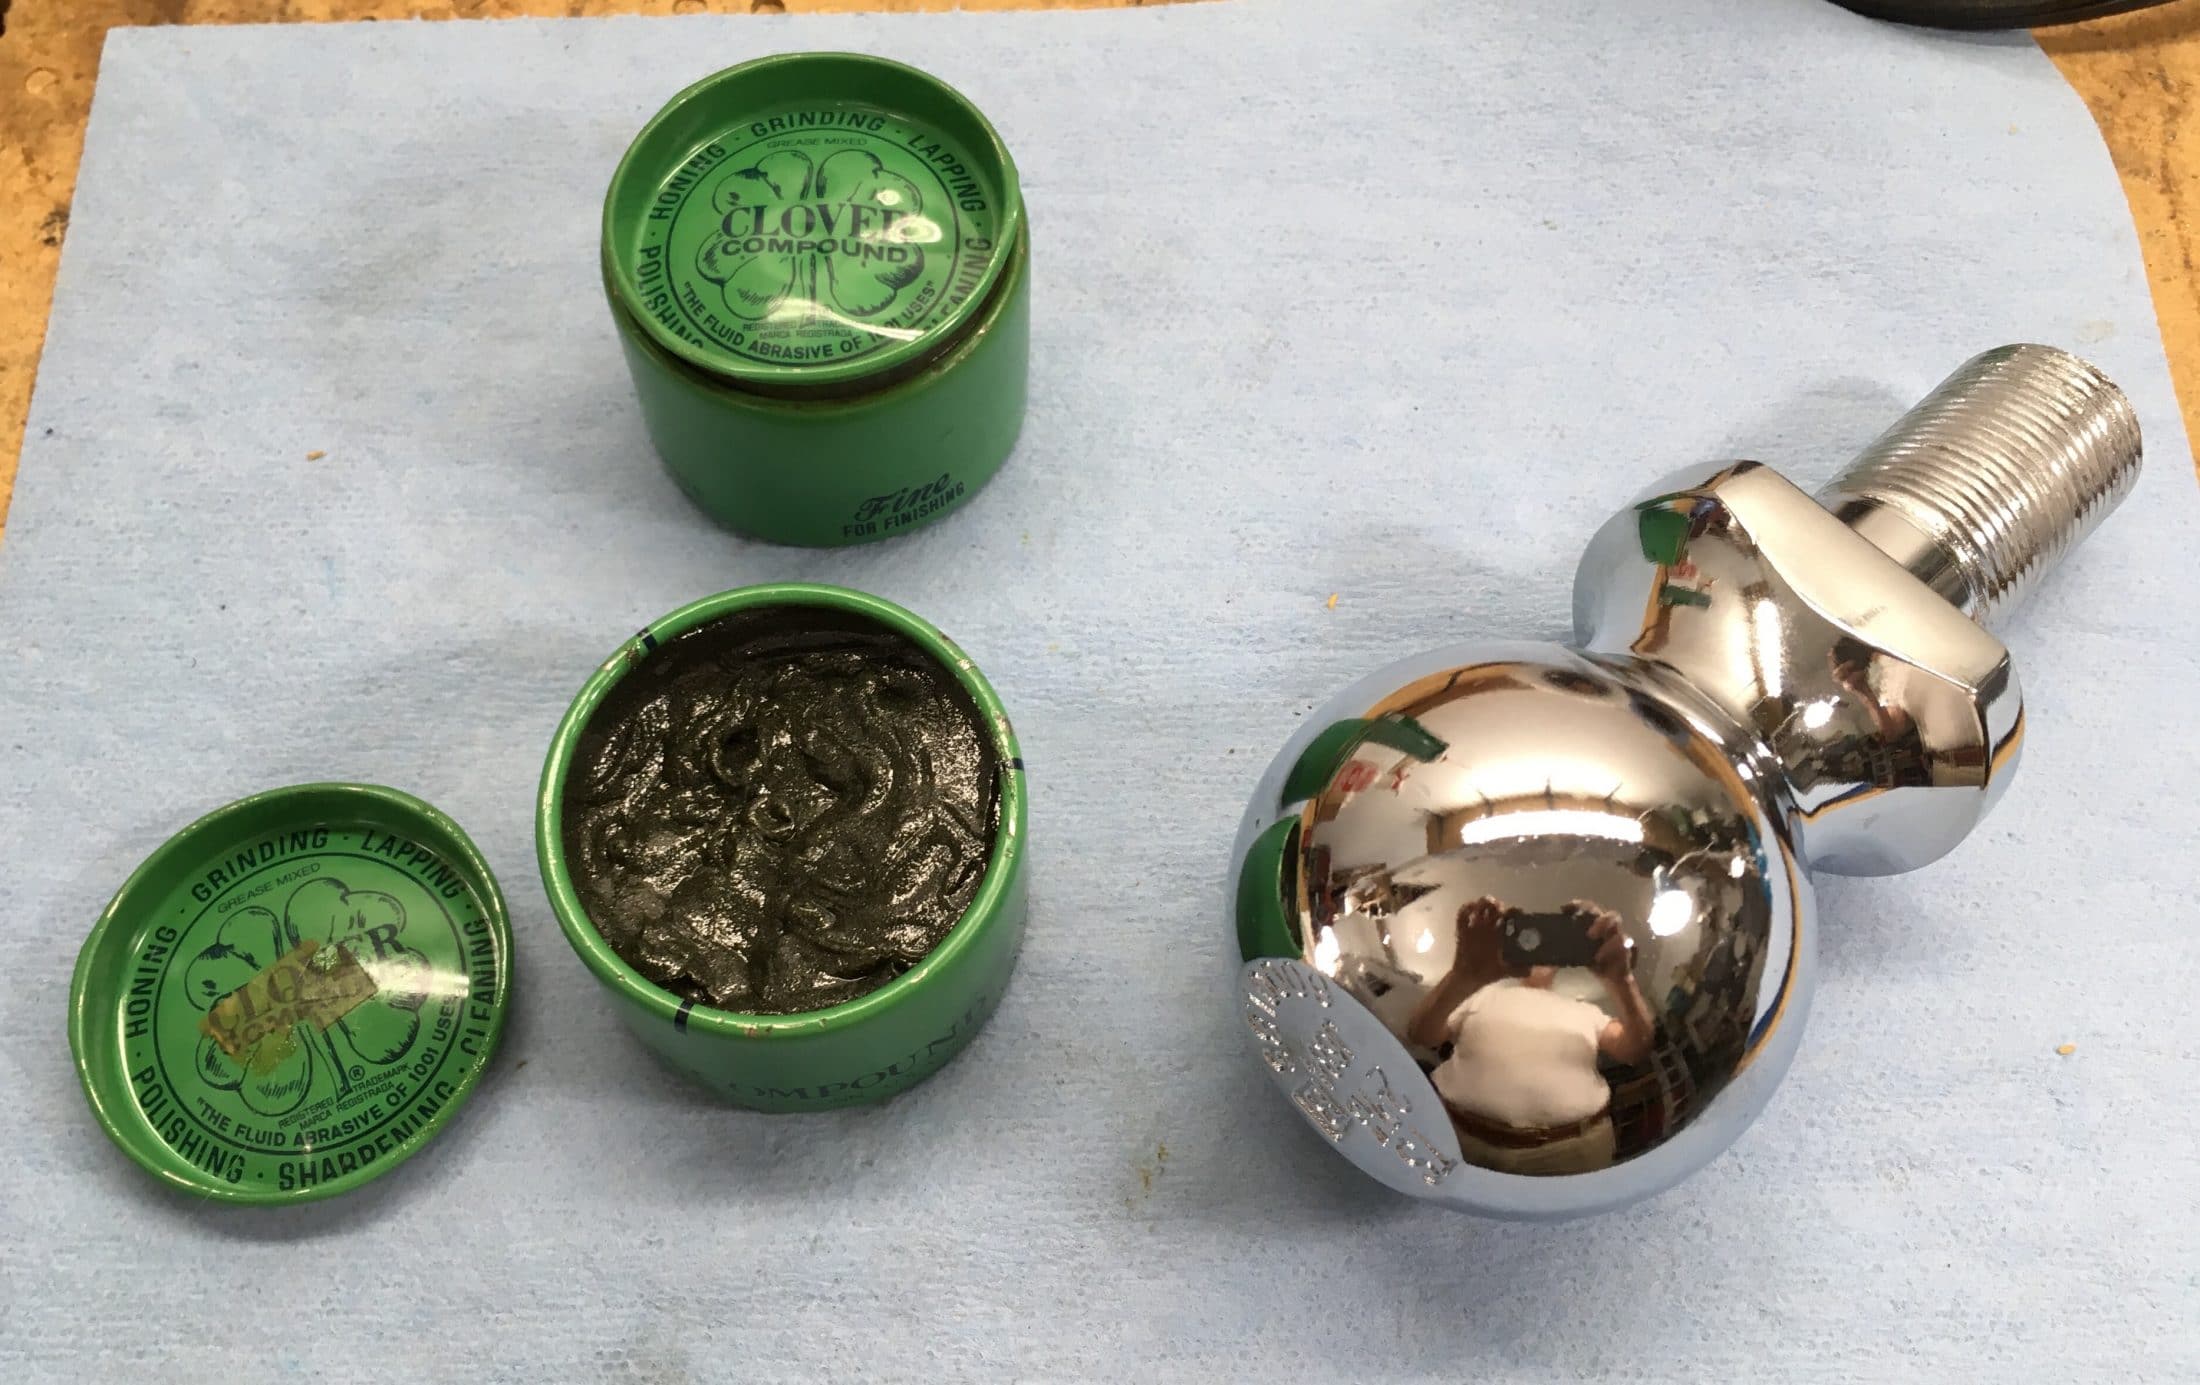
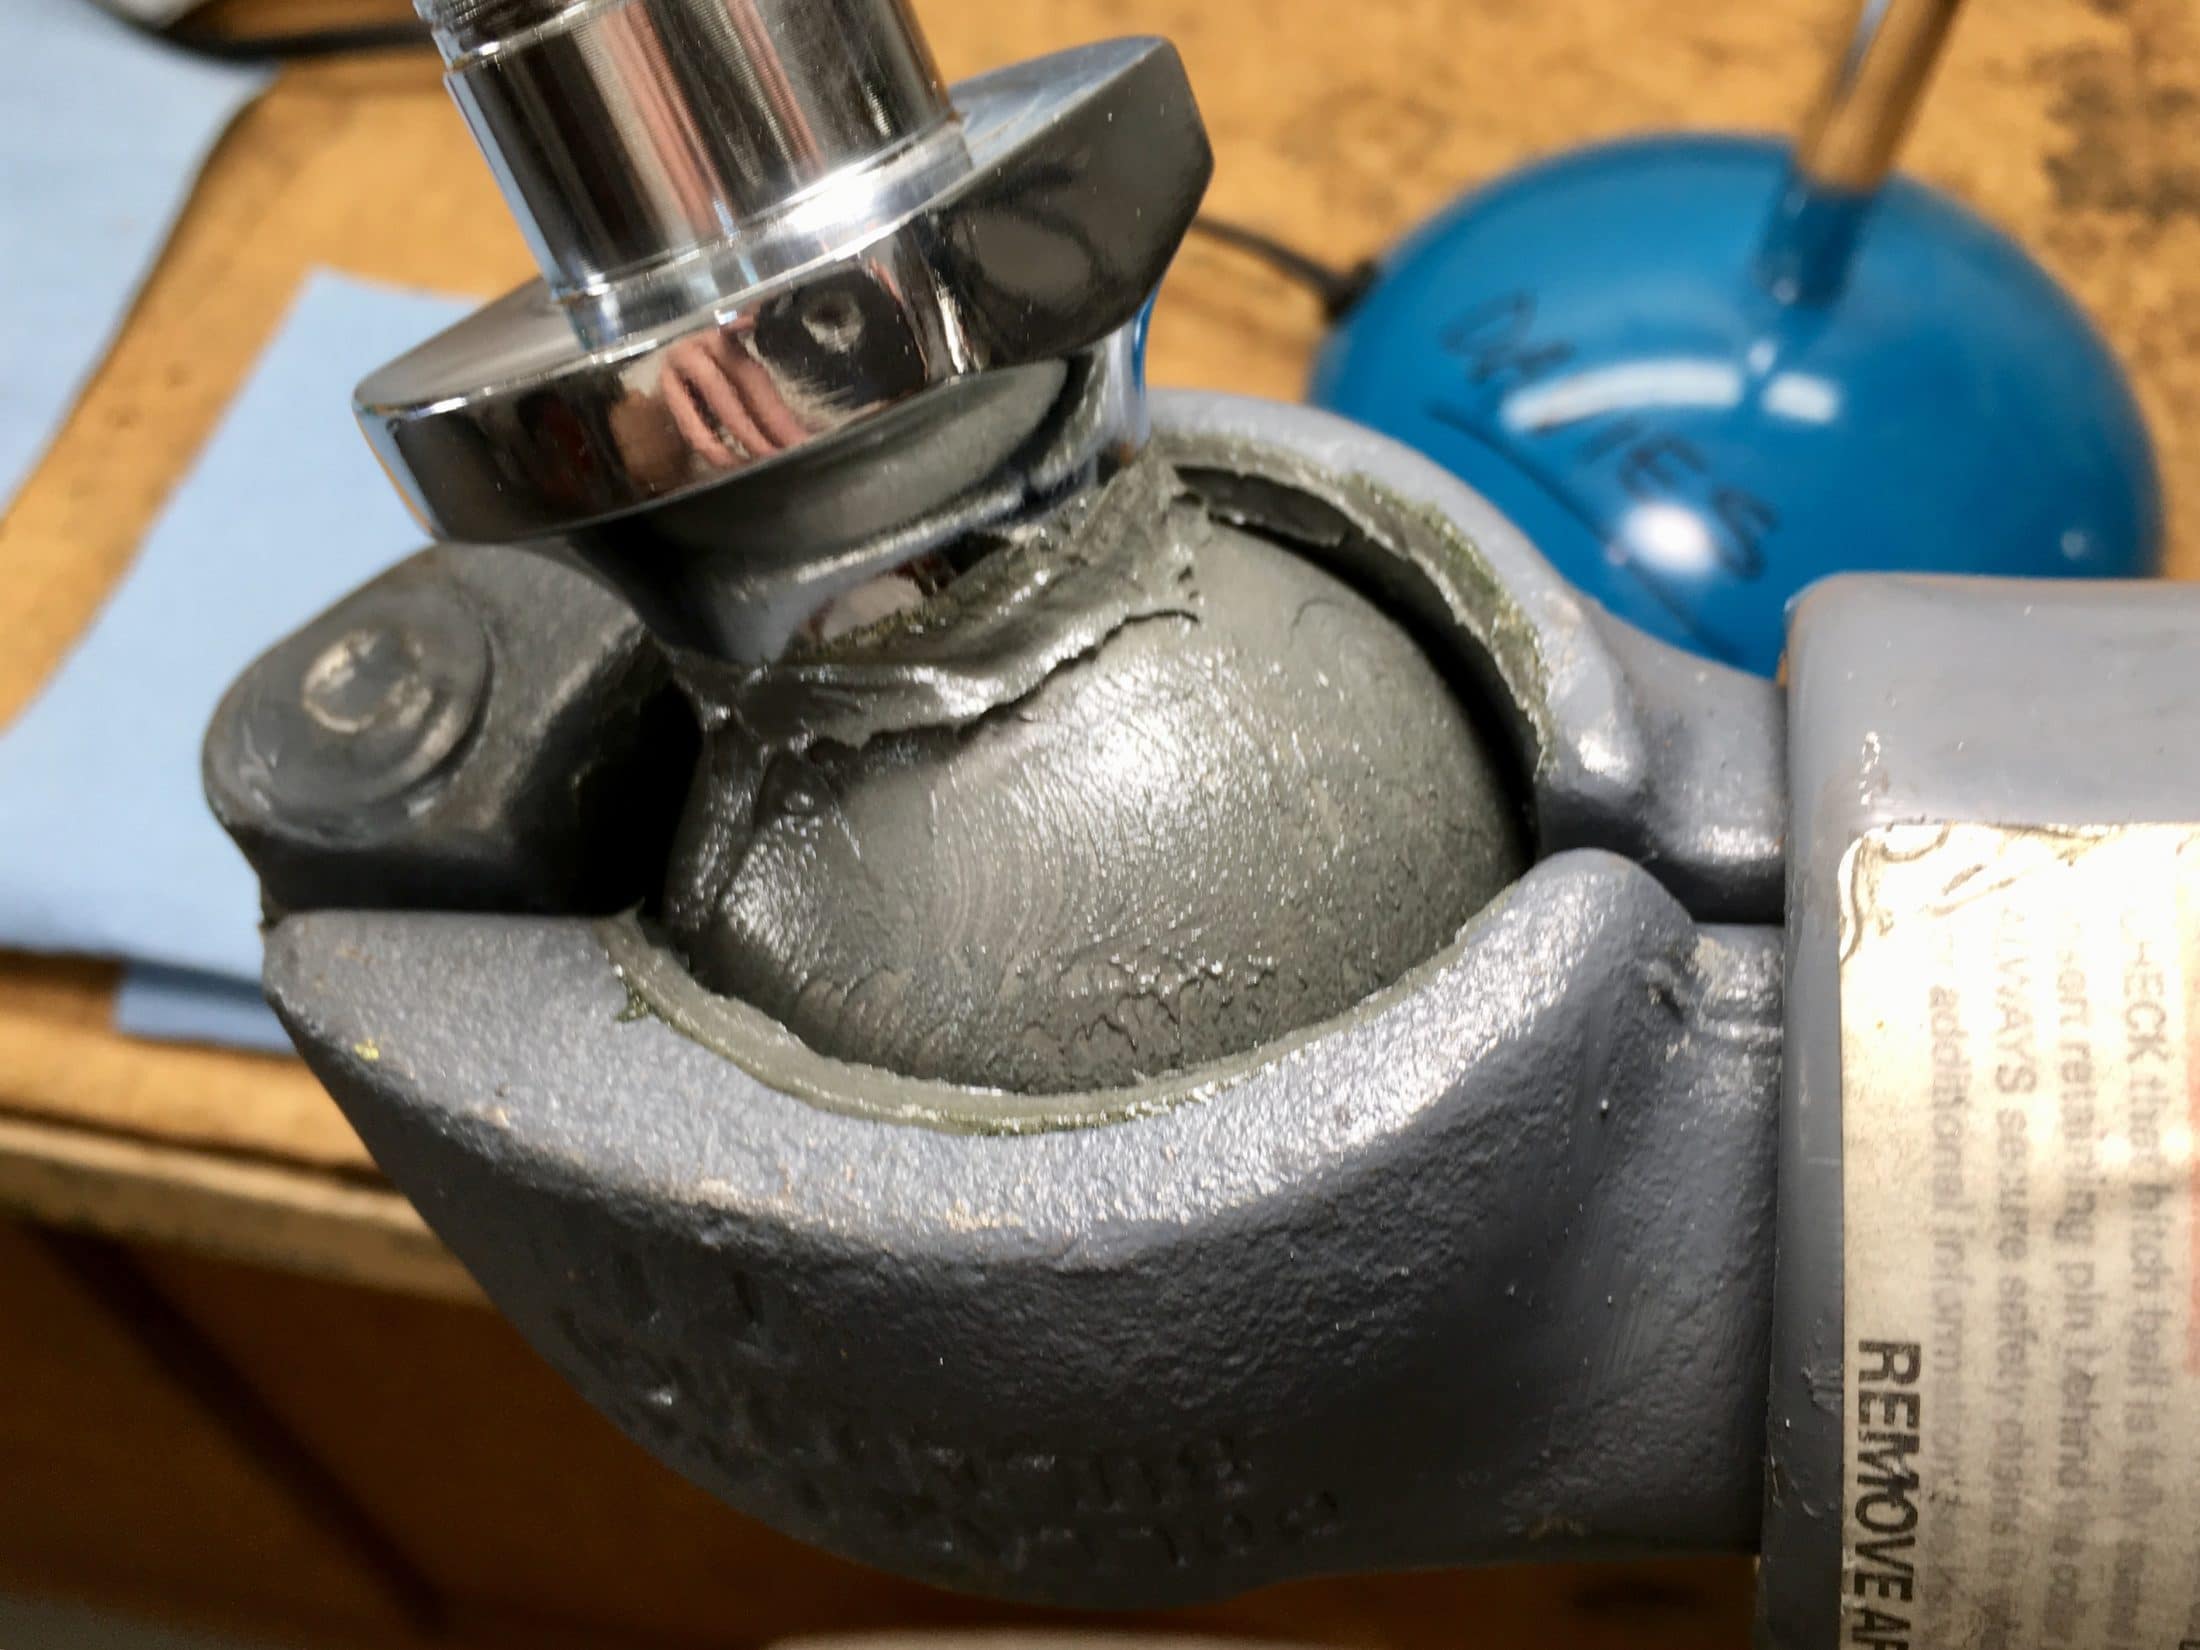
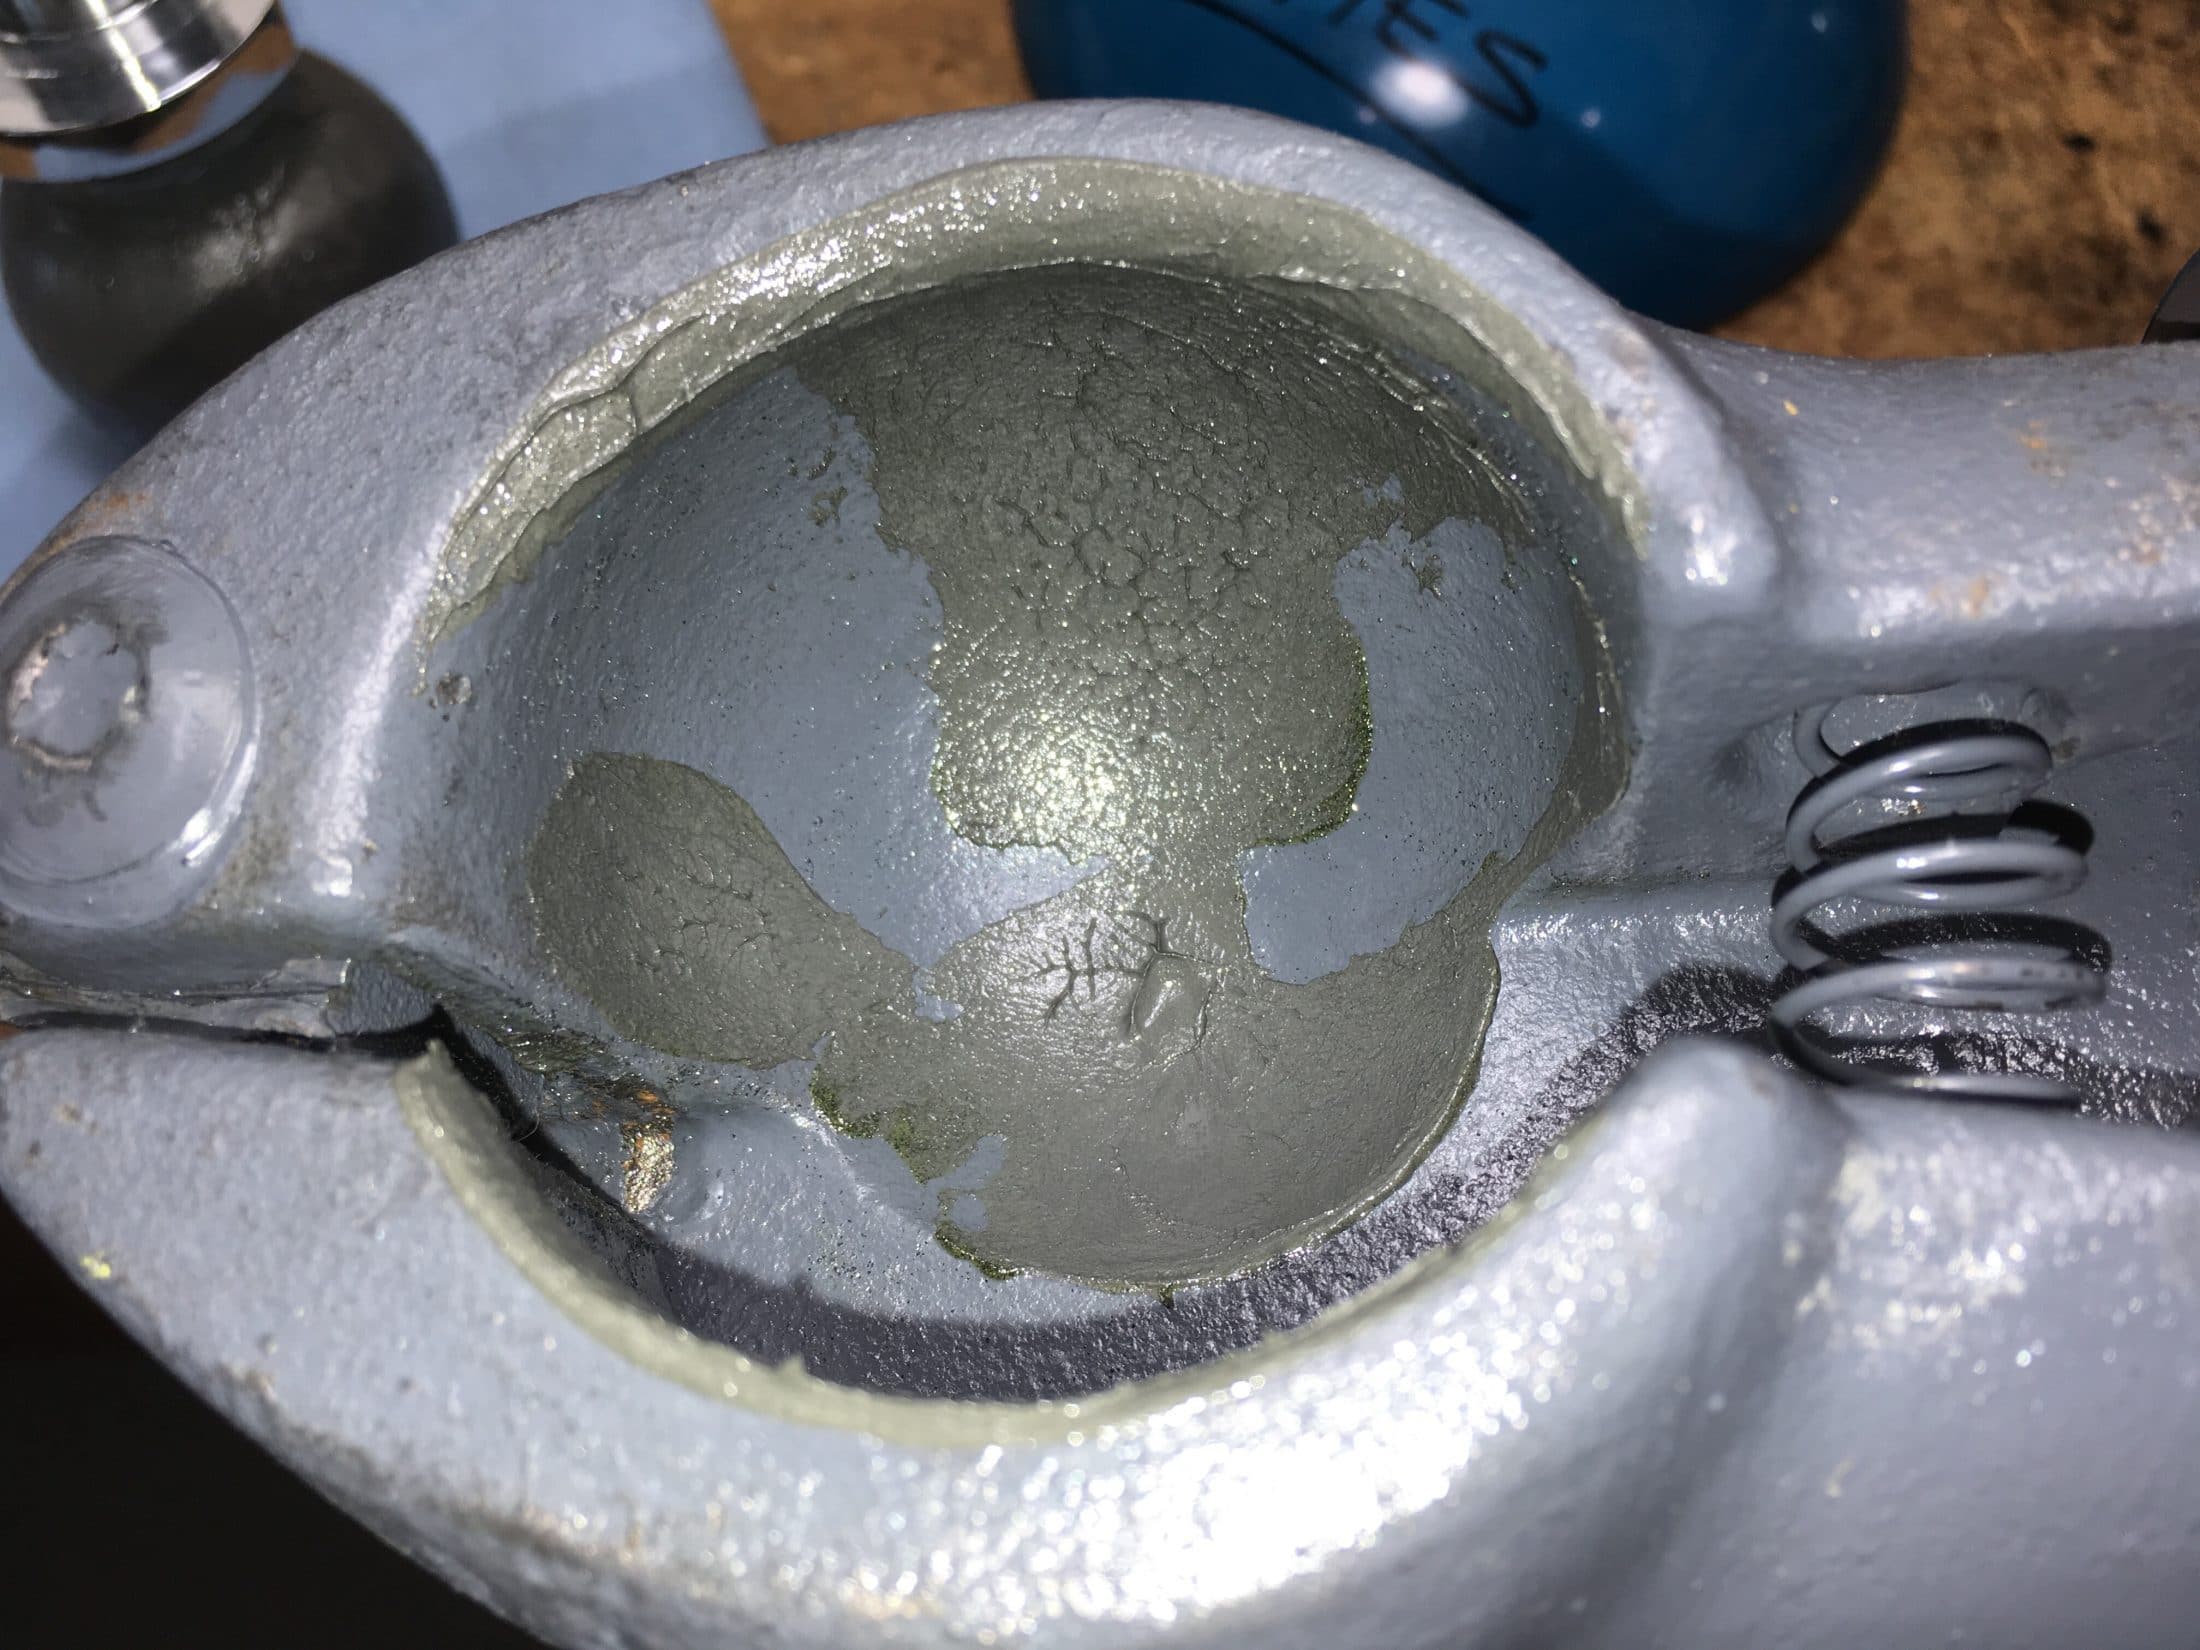
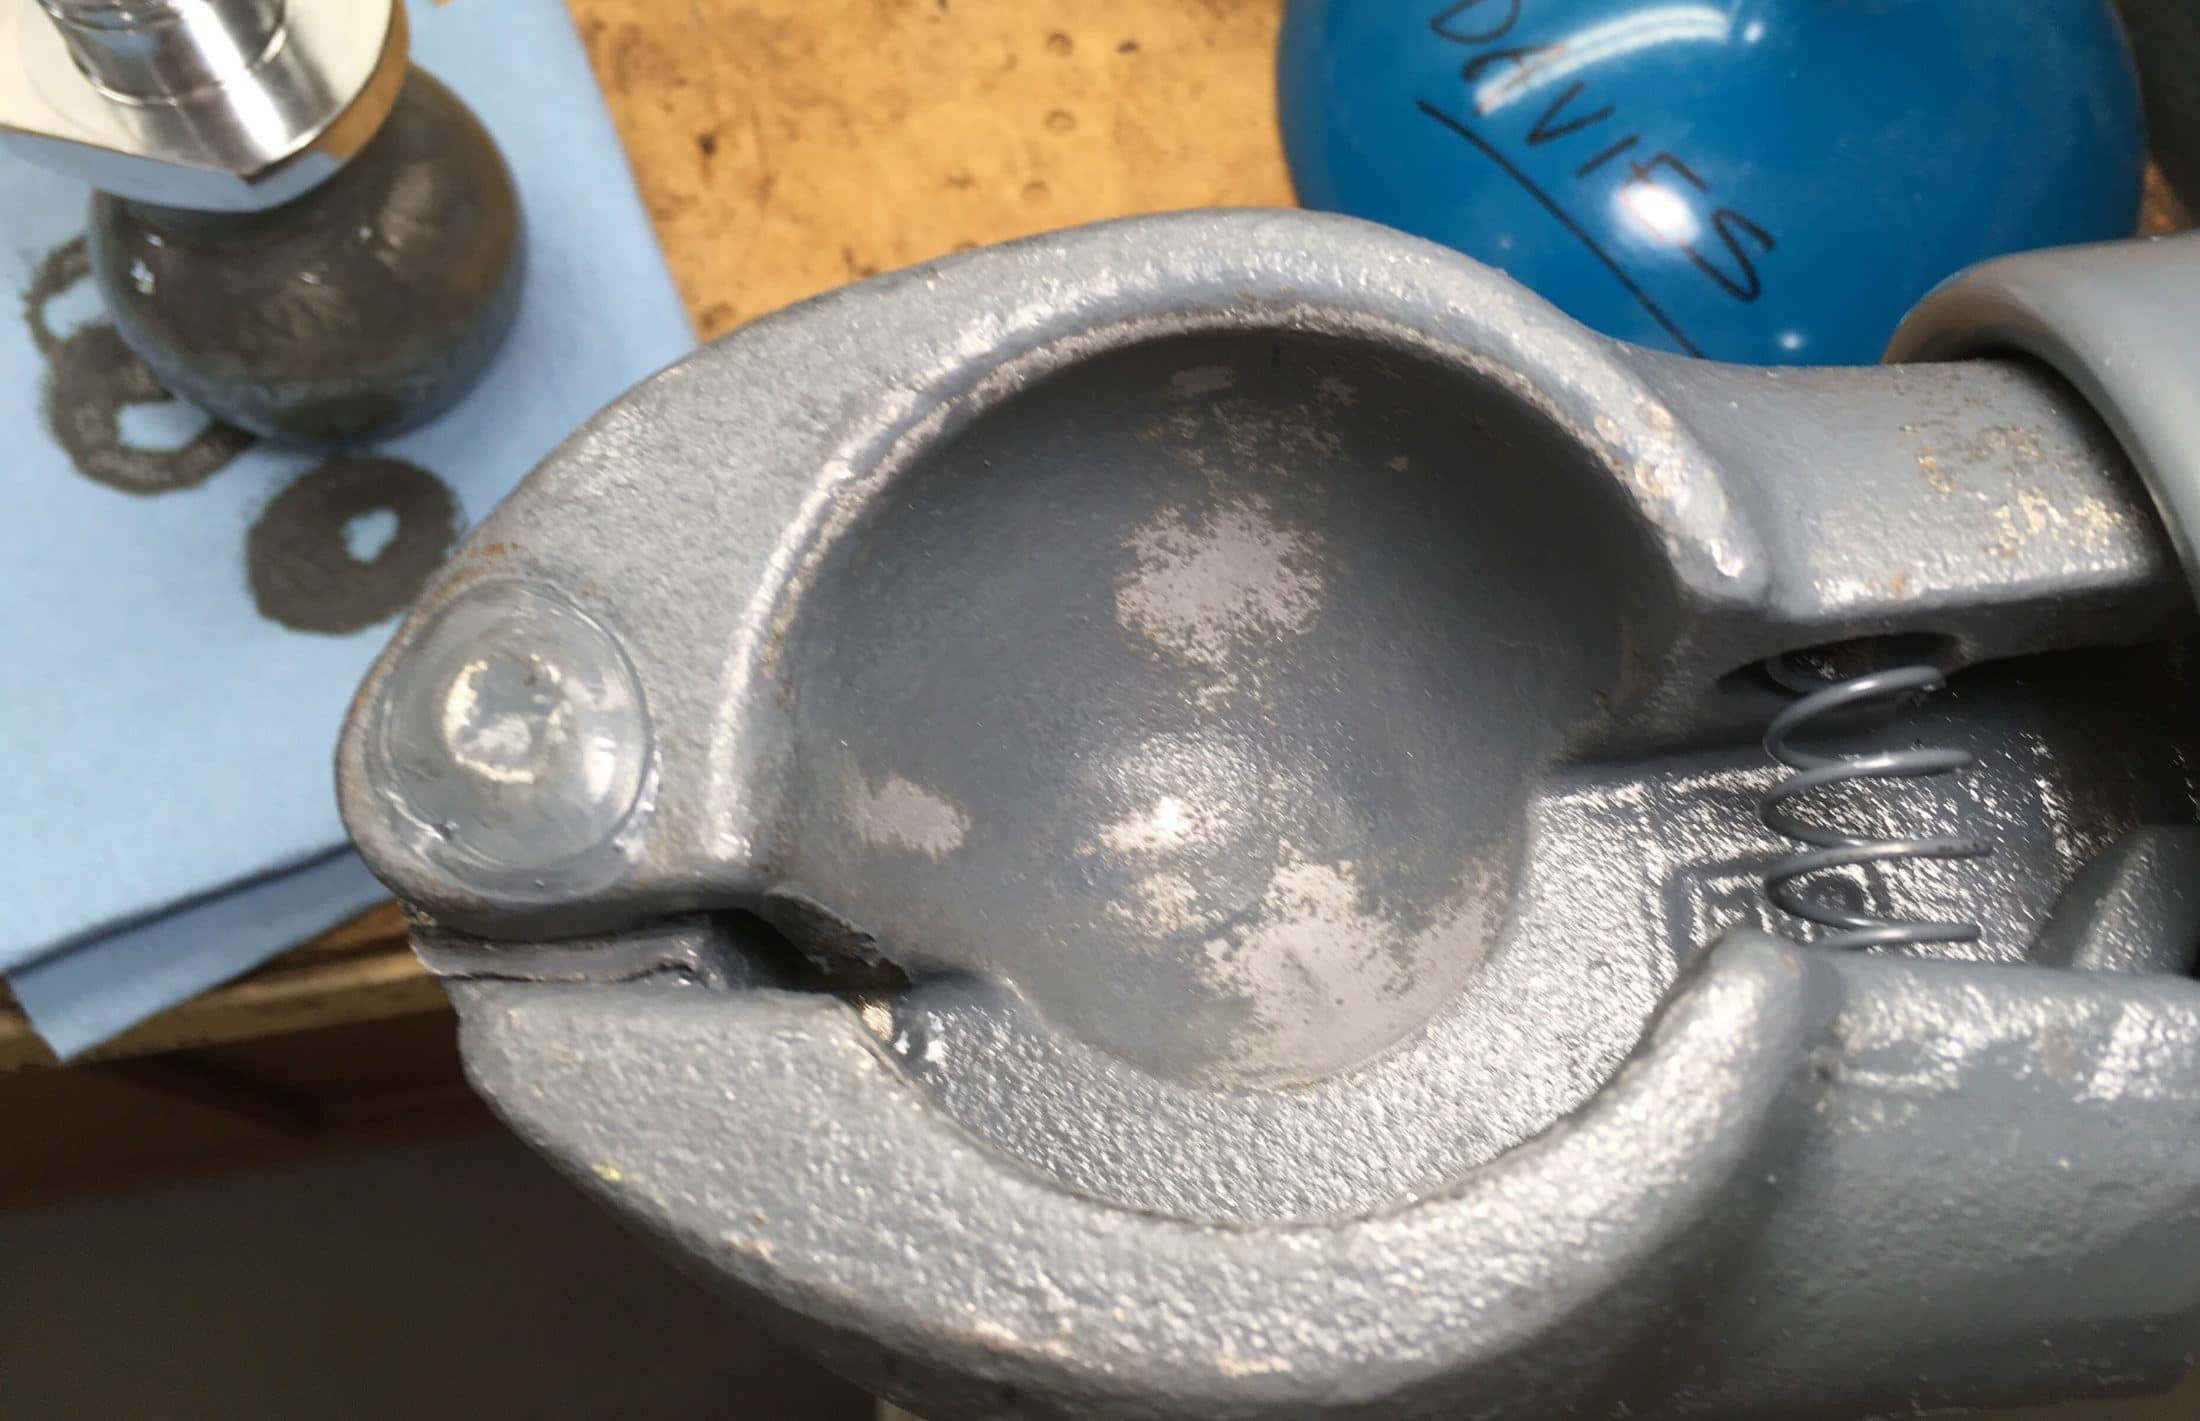
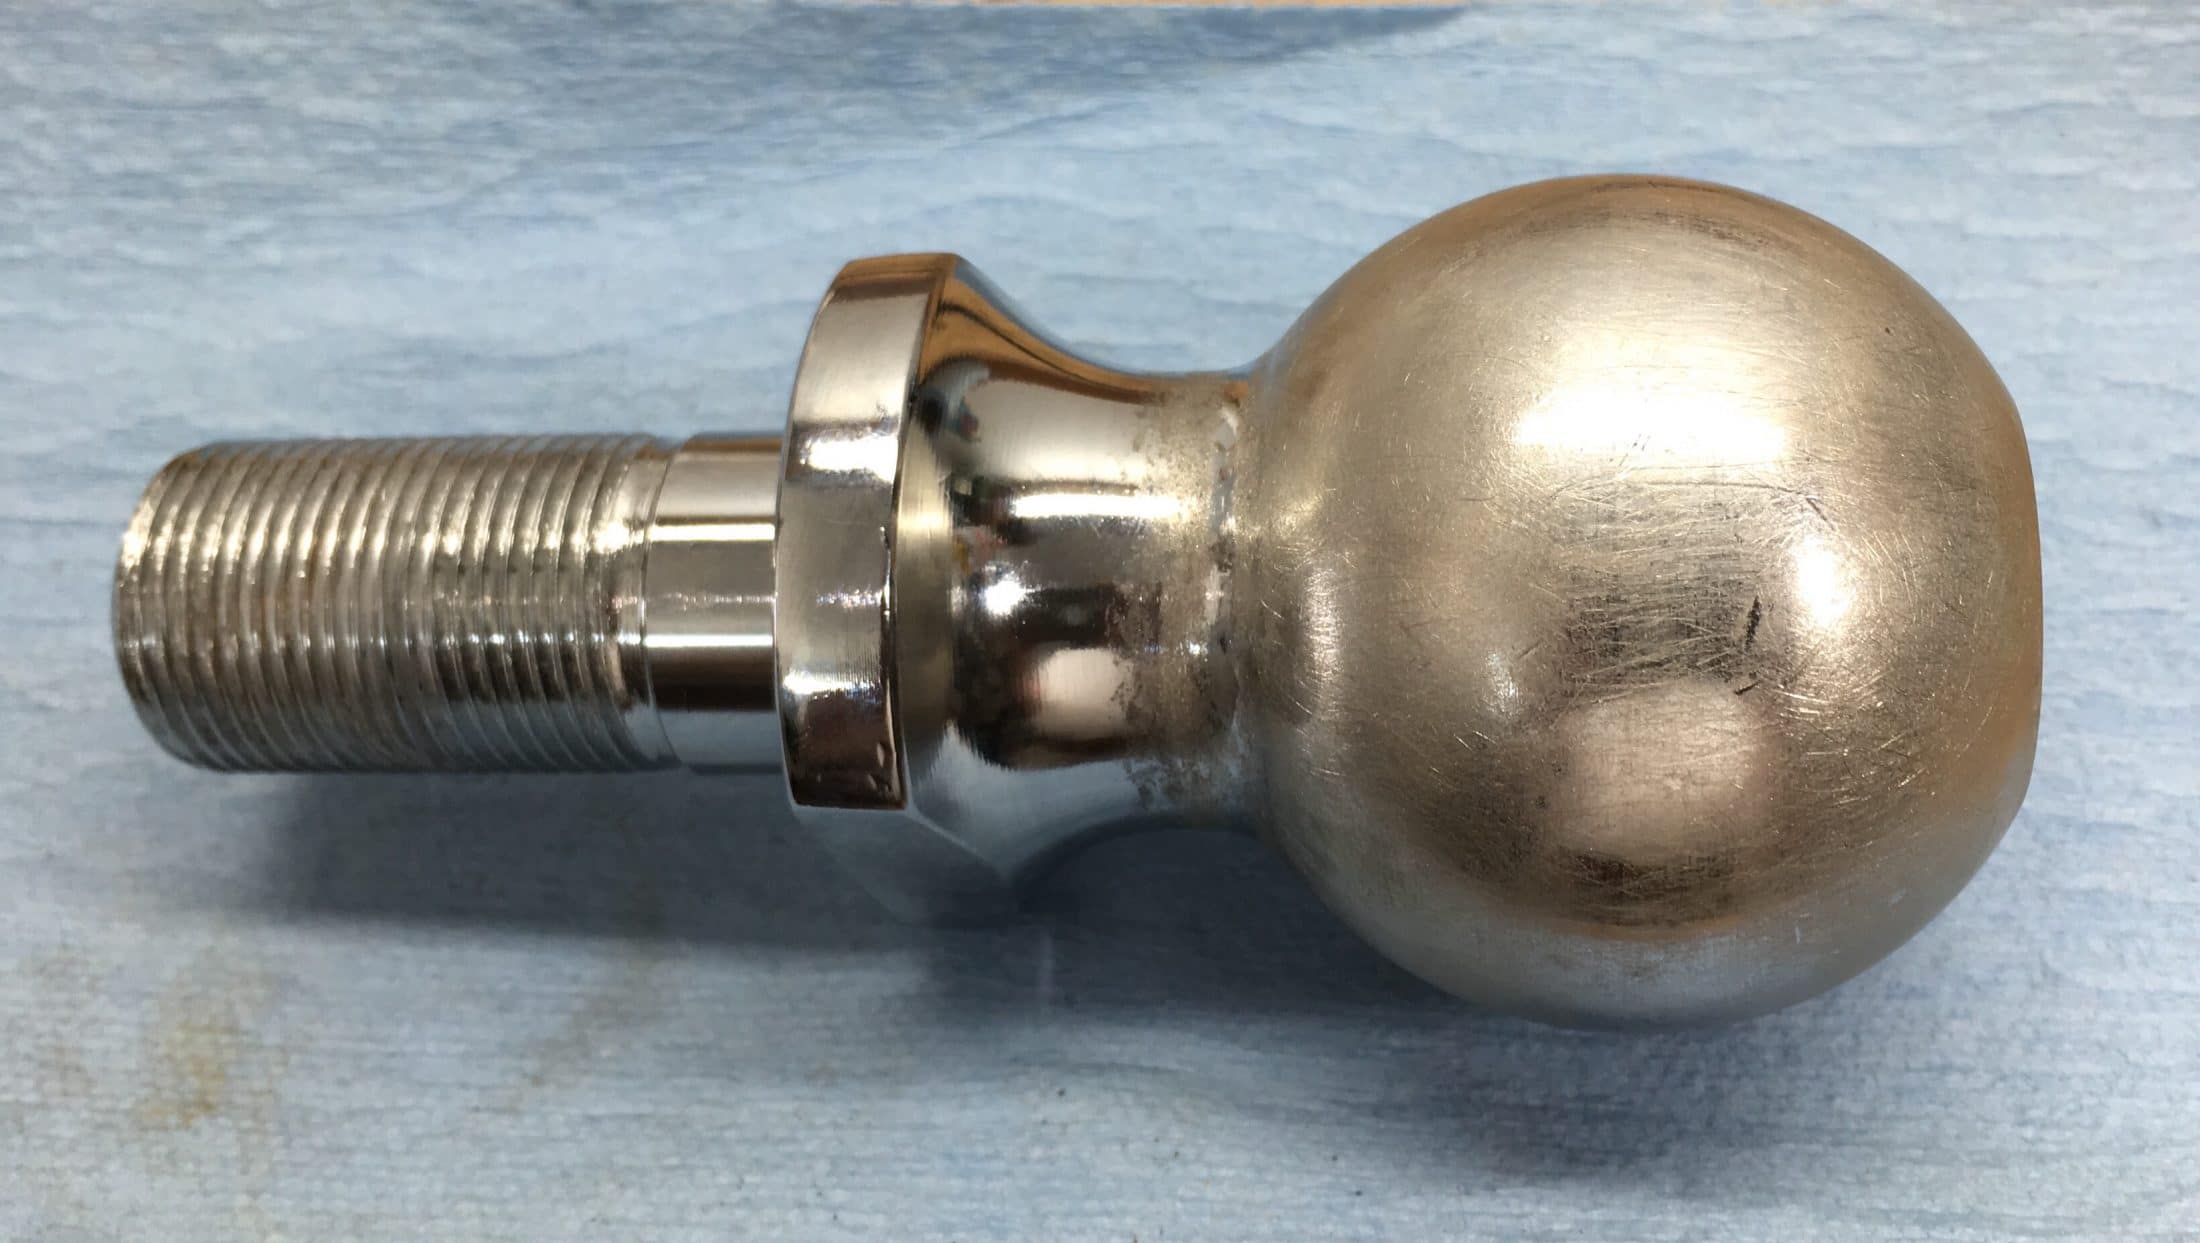
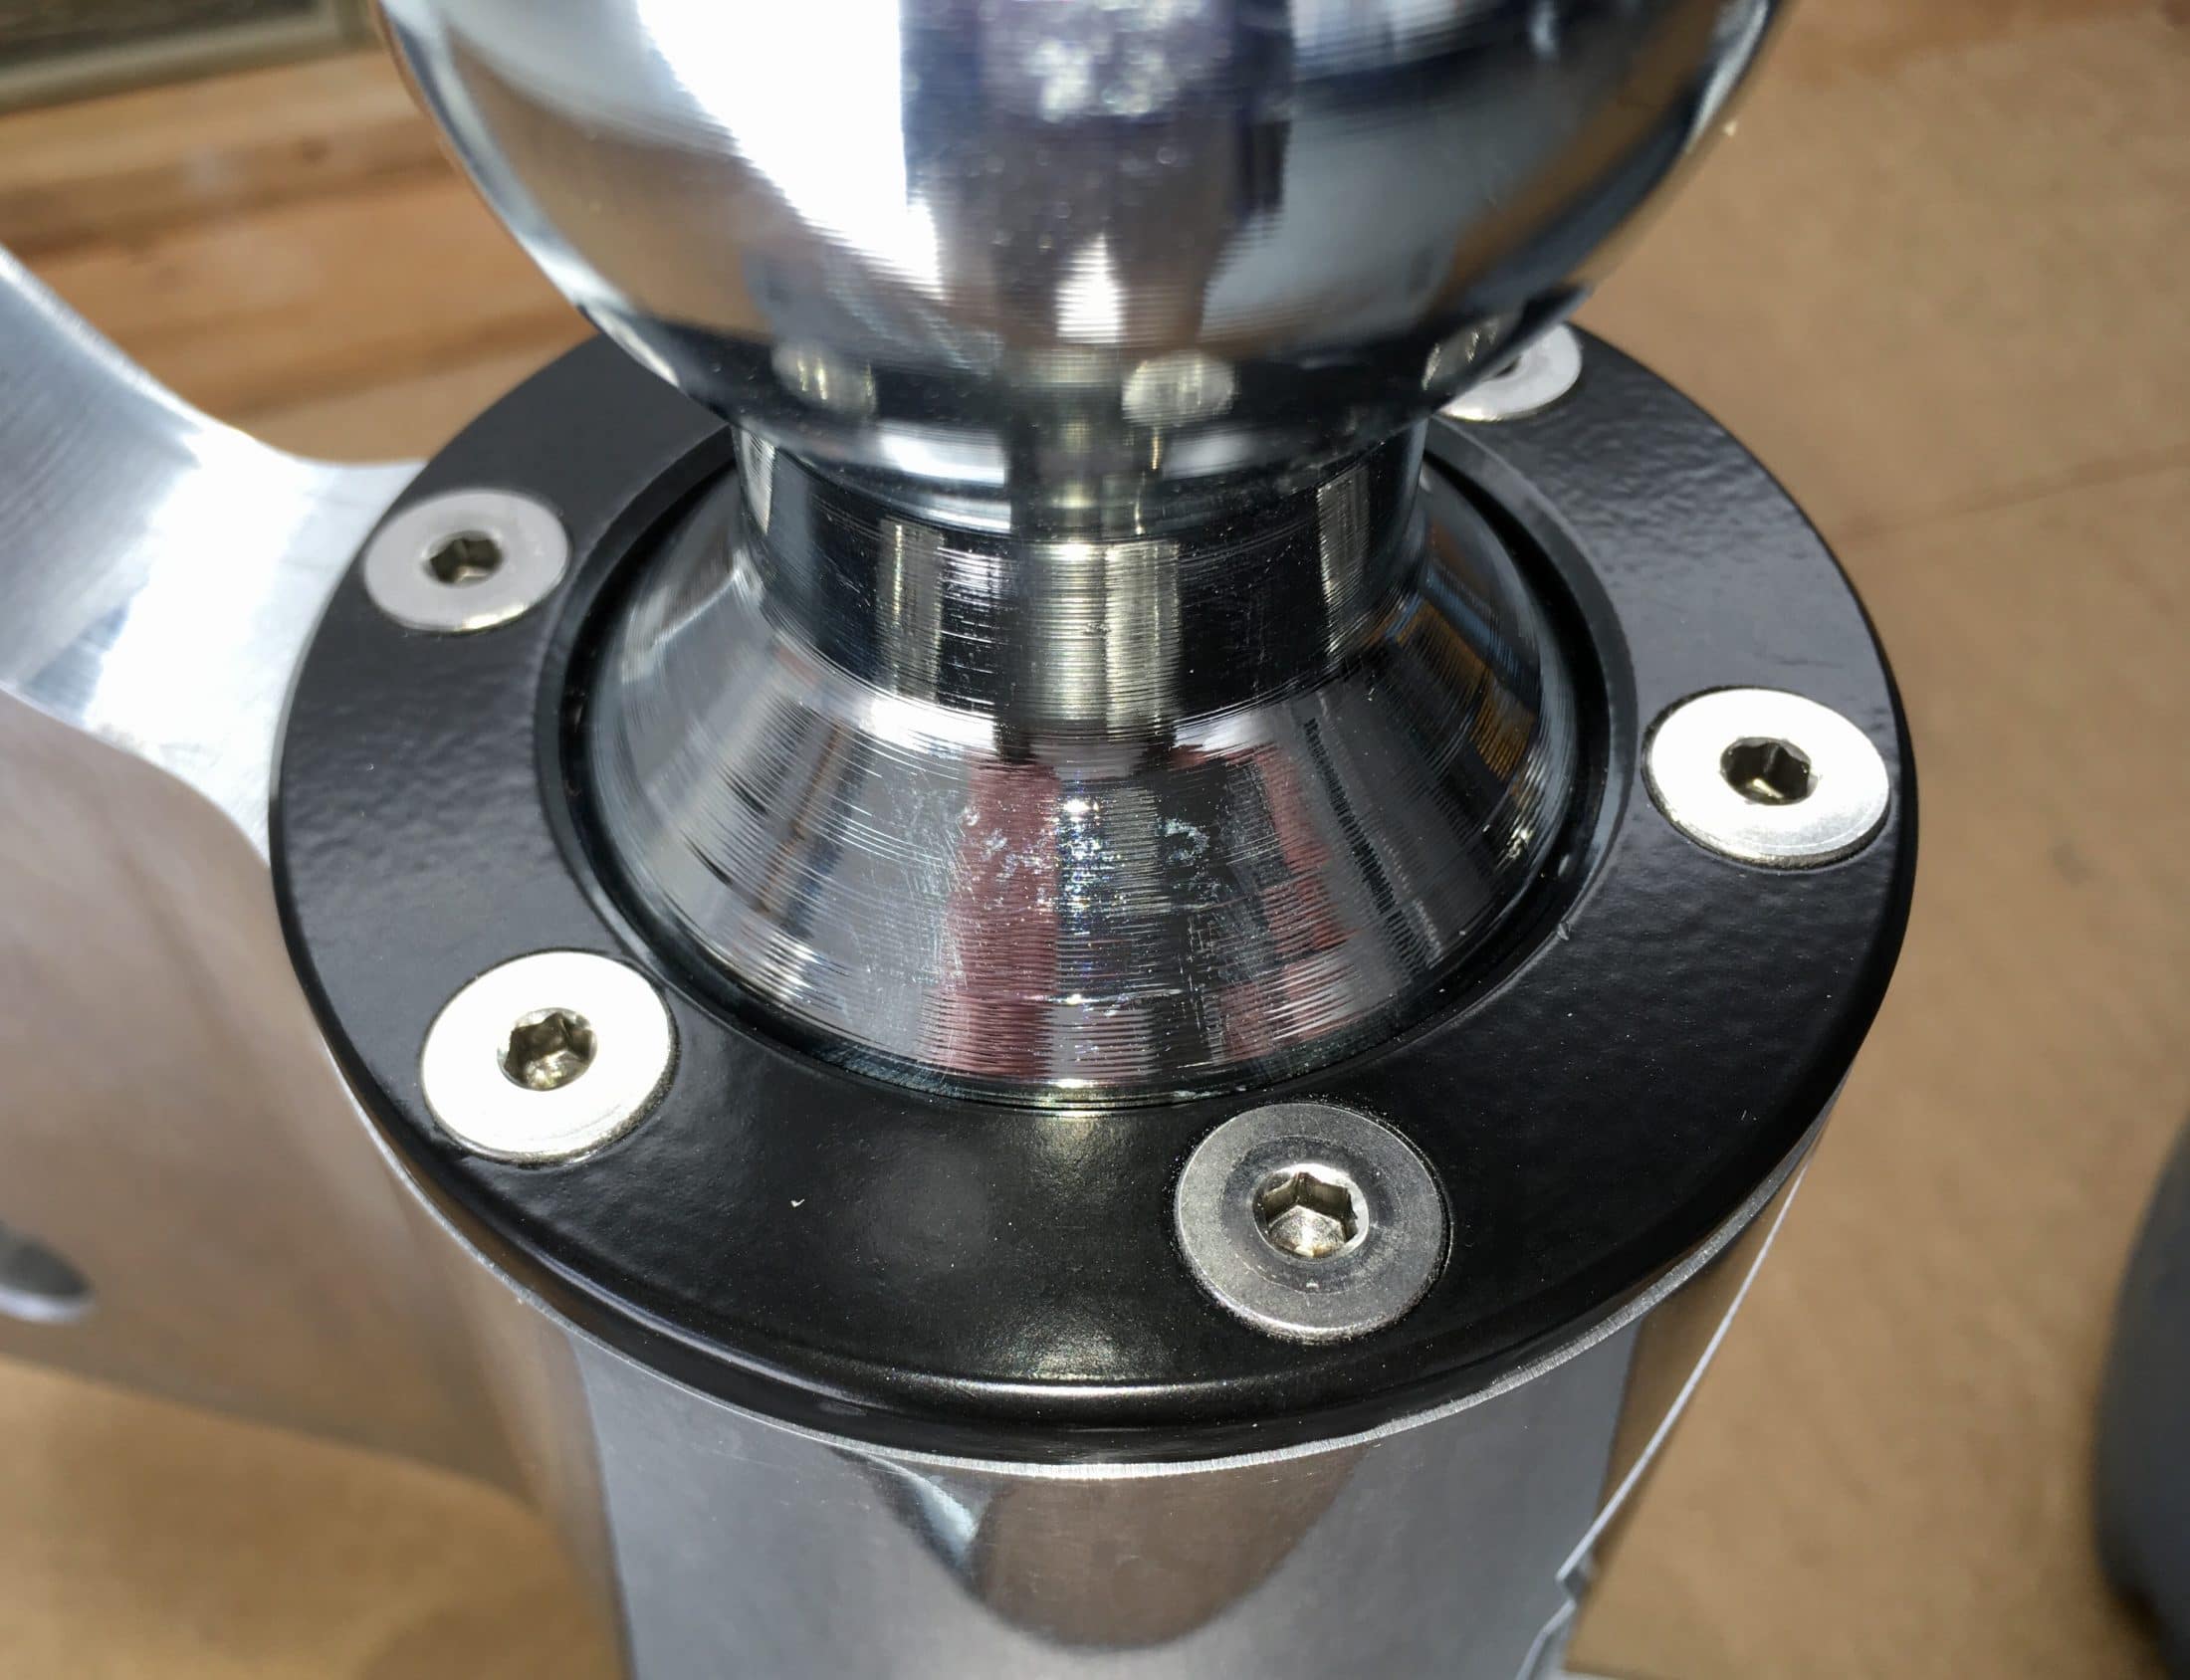
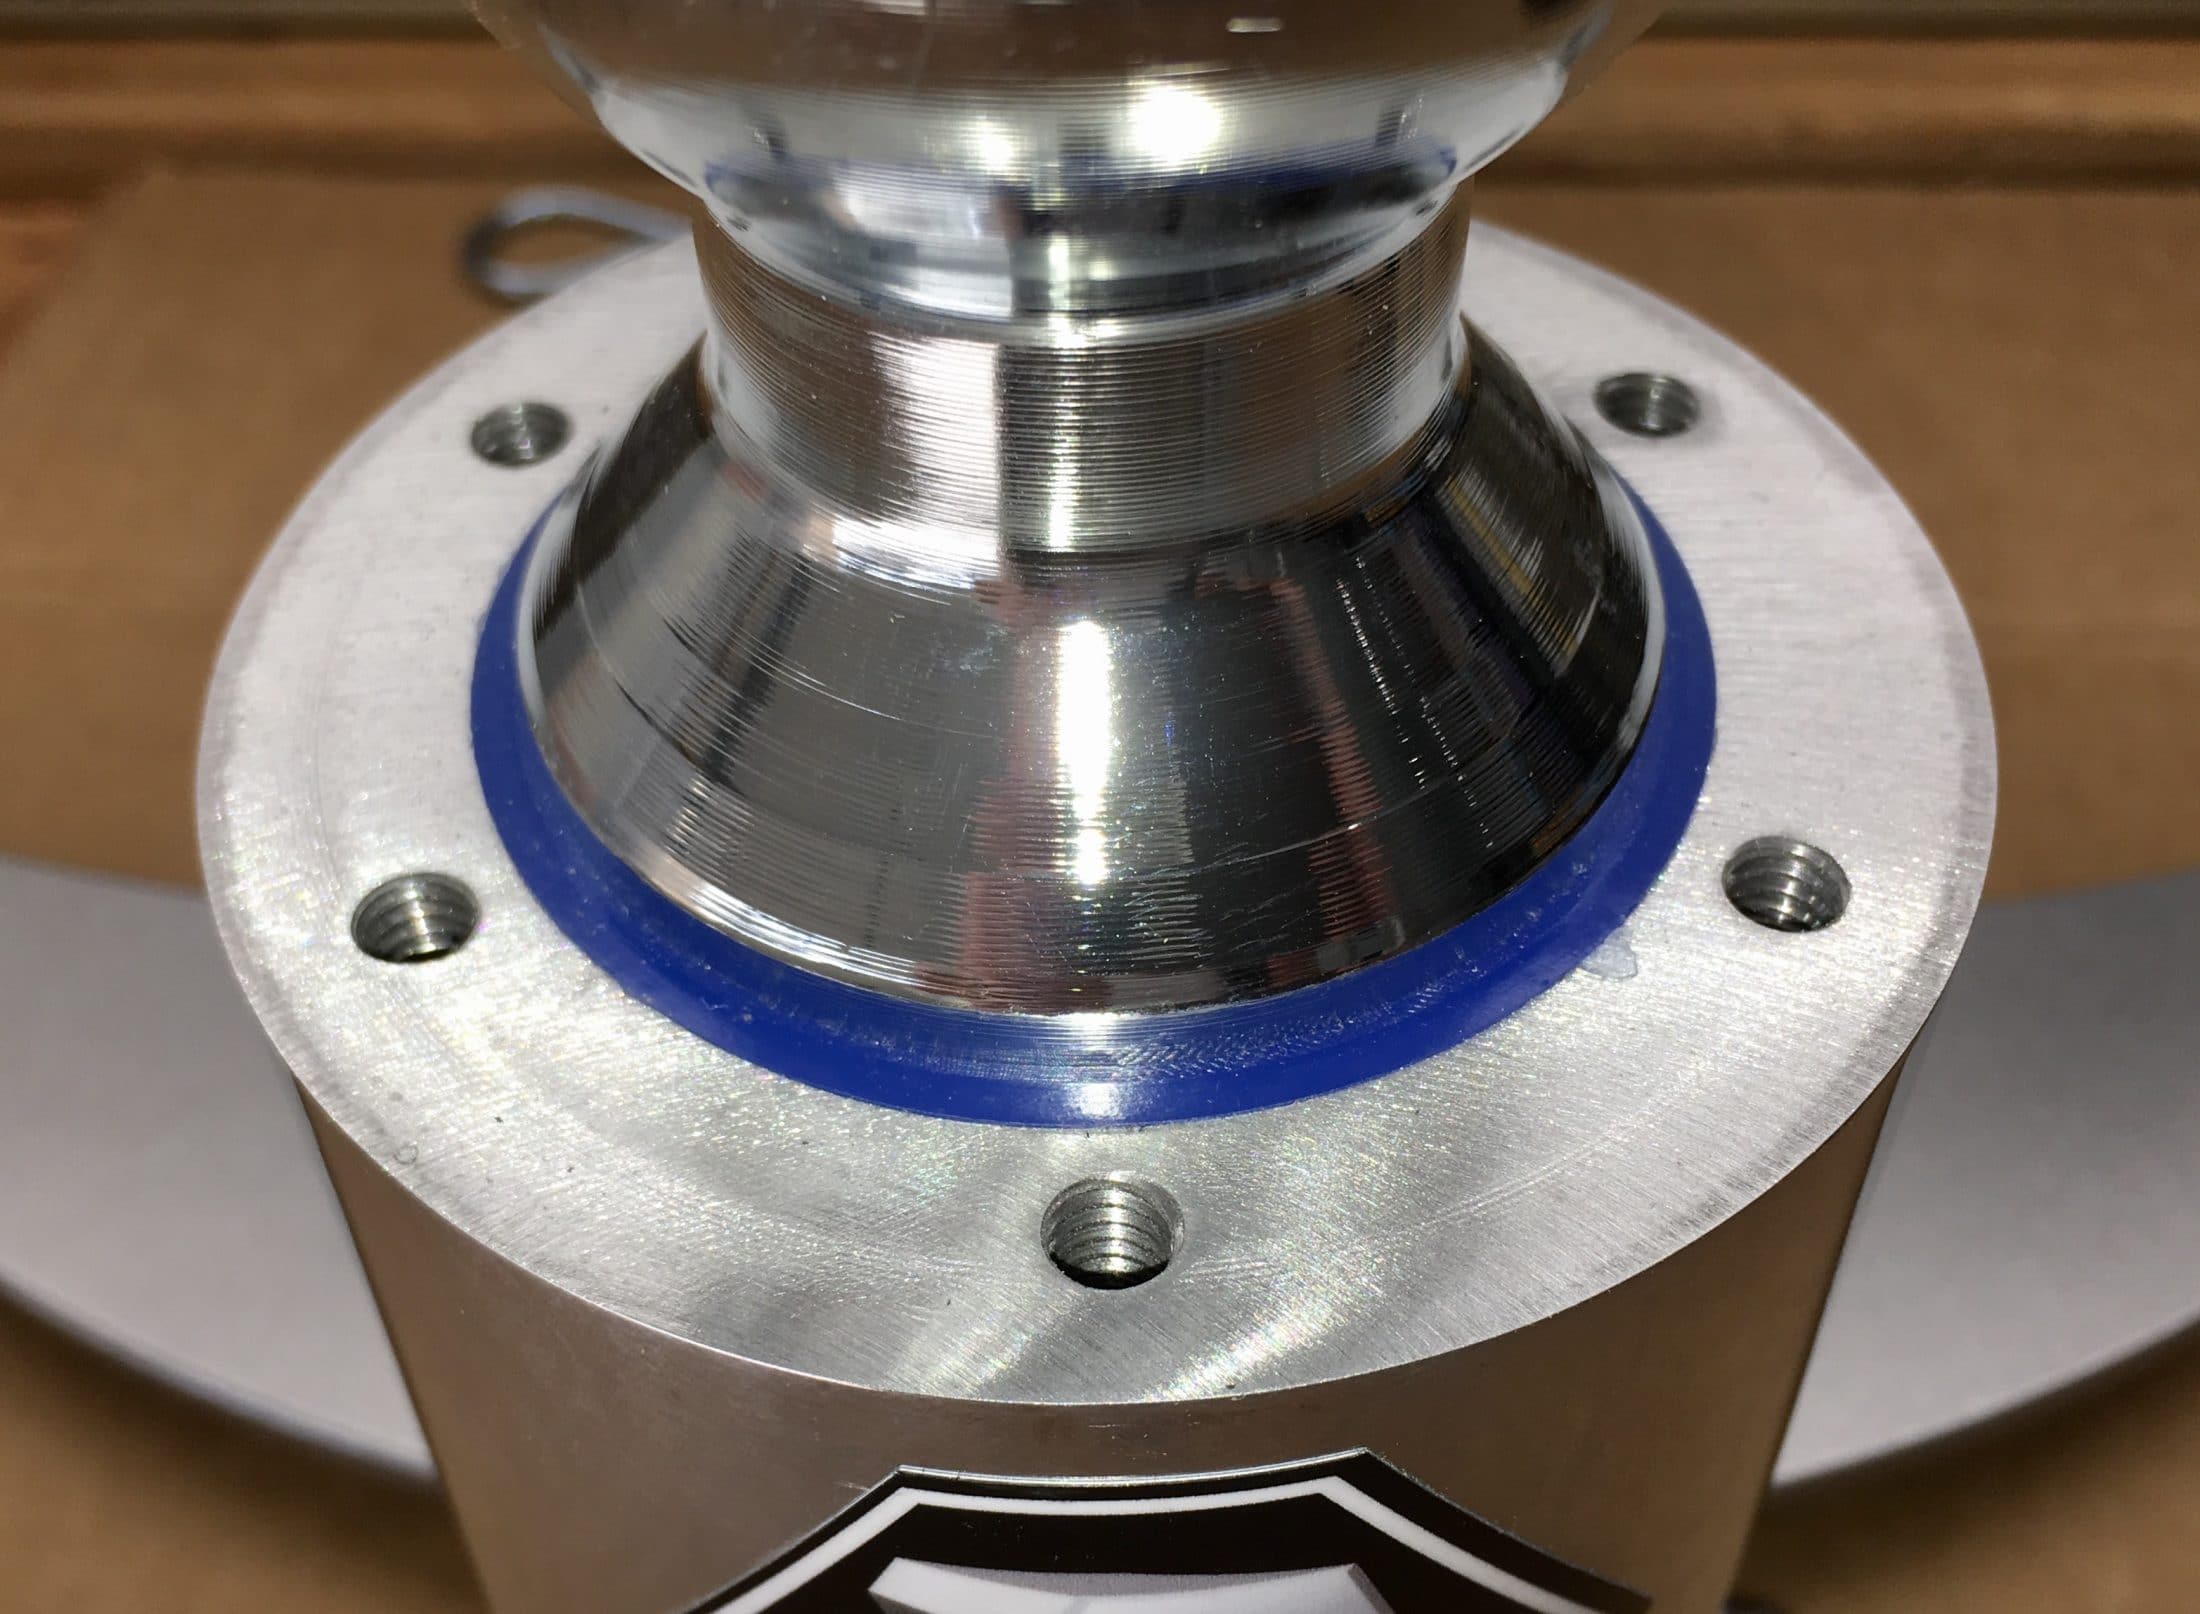
LAPPING THE COUPLER: This is SO very optional, I thought about not even posting it. But maybe there is somebody as anal as me who wants to do this. The inside of the coupler is crudely forged. It would be nice if Bulldog would run a power hone up inside afterwards to remove all the rough bits. Those sharp pointy bits are hard on the Andersen ball, which is intentionally made of a softer steel. I bought a cheap Walmart 2 5/16" ball to use as a lapping tool. I used the fine valve lapping compound only. Apply downward pressure, into the top part of the cup, rotate frequently, spin and rock back and forth; whack the collar every now and then with a mallet to ensure the pivoting part is moved fully in. This shows the contact areas, the high spots that need smoothing: After a couple of minutes, you will feel the ball start to move more easily, without hanging up. I quit after twenty minutes. The ball moved very easily. Here is the inside, cleaned up with brake cleaner: Here is the ball, showing where the contact occurs: It's still usable, just scuffed. More to come. John Davies Spokane WA
-
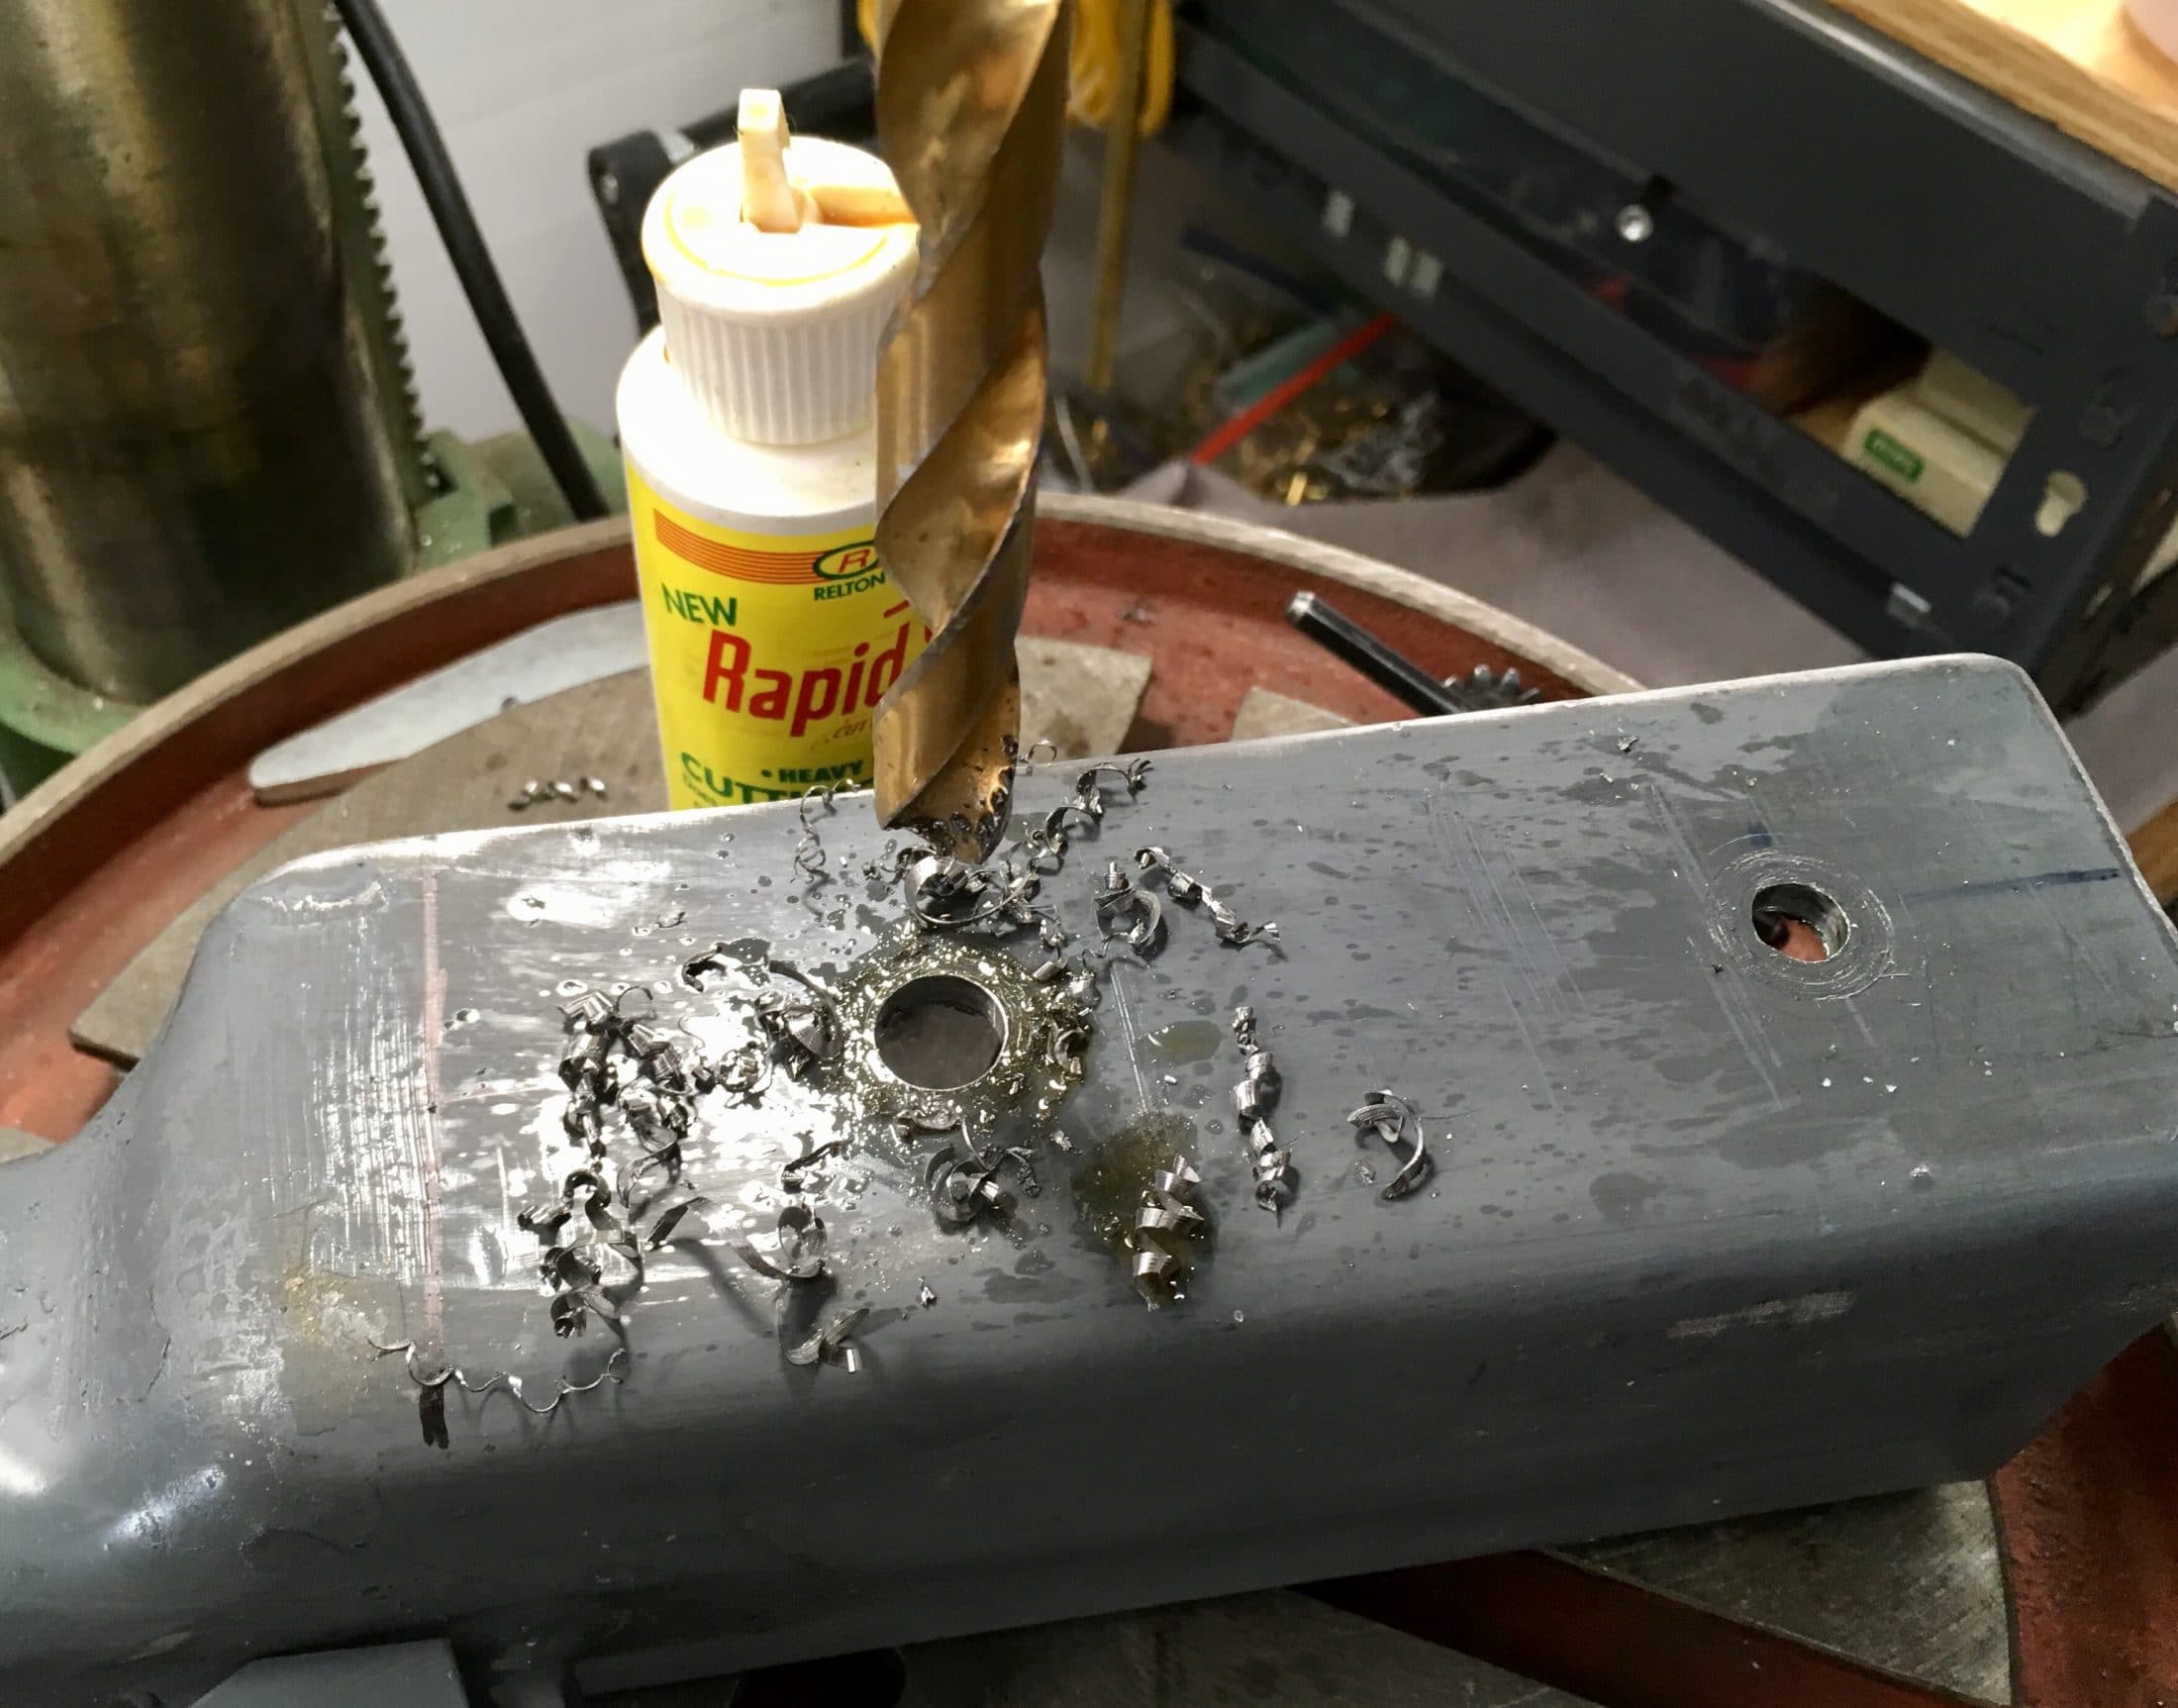
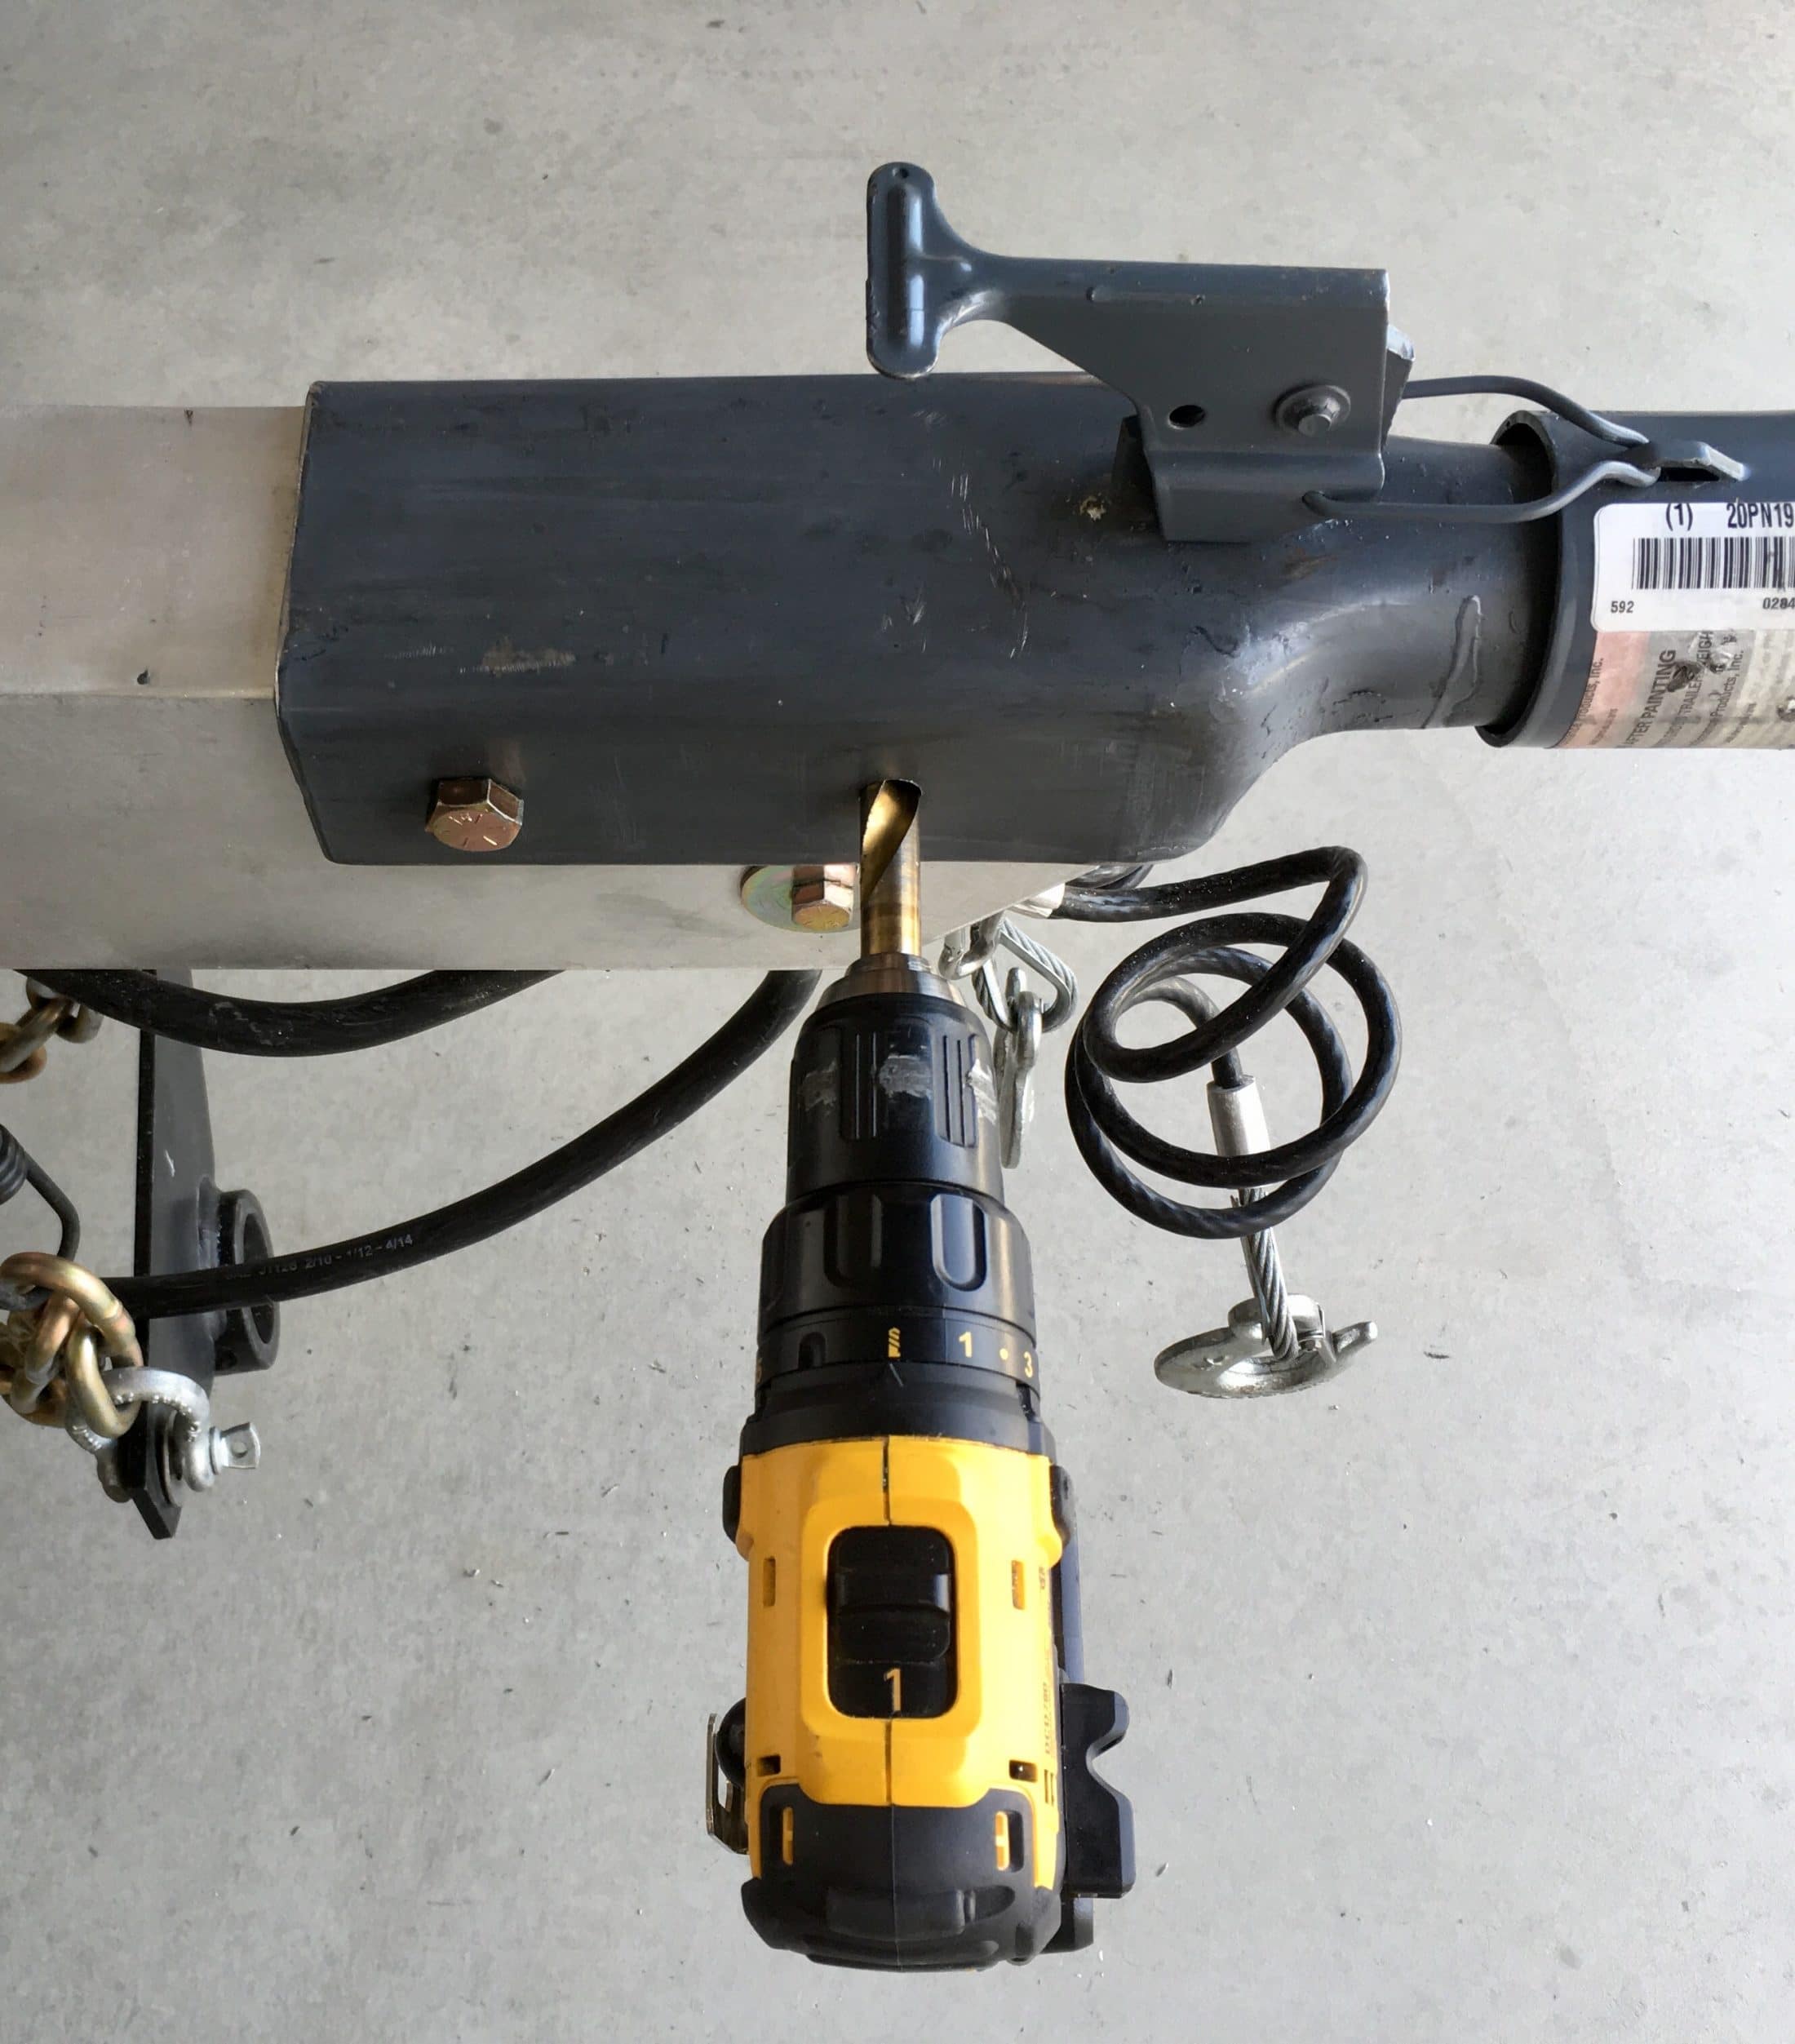
I used a drill press. It is accurate and safe, a hand drill could be used but the results may not be as good. Use a good cutting oil, the Bulldog is tough steel. After locating the holes on each side, center punch them and drill pilot holes. Then the 1/2" holes, one from each side. After the holes are drilled, use a hand drill to run the bit all the way through, this corrects any small misalignments. Try the coupler on the frame. I lucked out. The rear bolt would go all the way through, the front one was a little wonky: Run the drill bit through the tight one: Here is the fit with the old bolts inserted, way better than the factory fit: I did not expect them to fit as precisely as they did, that is a result of careful measuring, and a lot of luck. More to come. John Davies Spokane WA
-
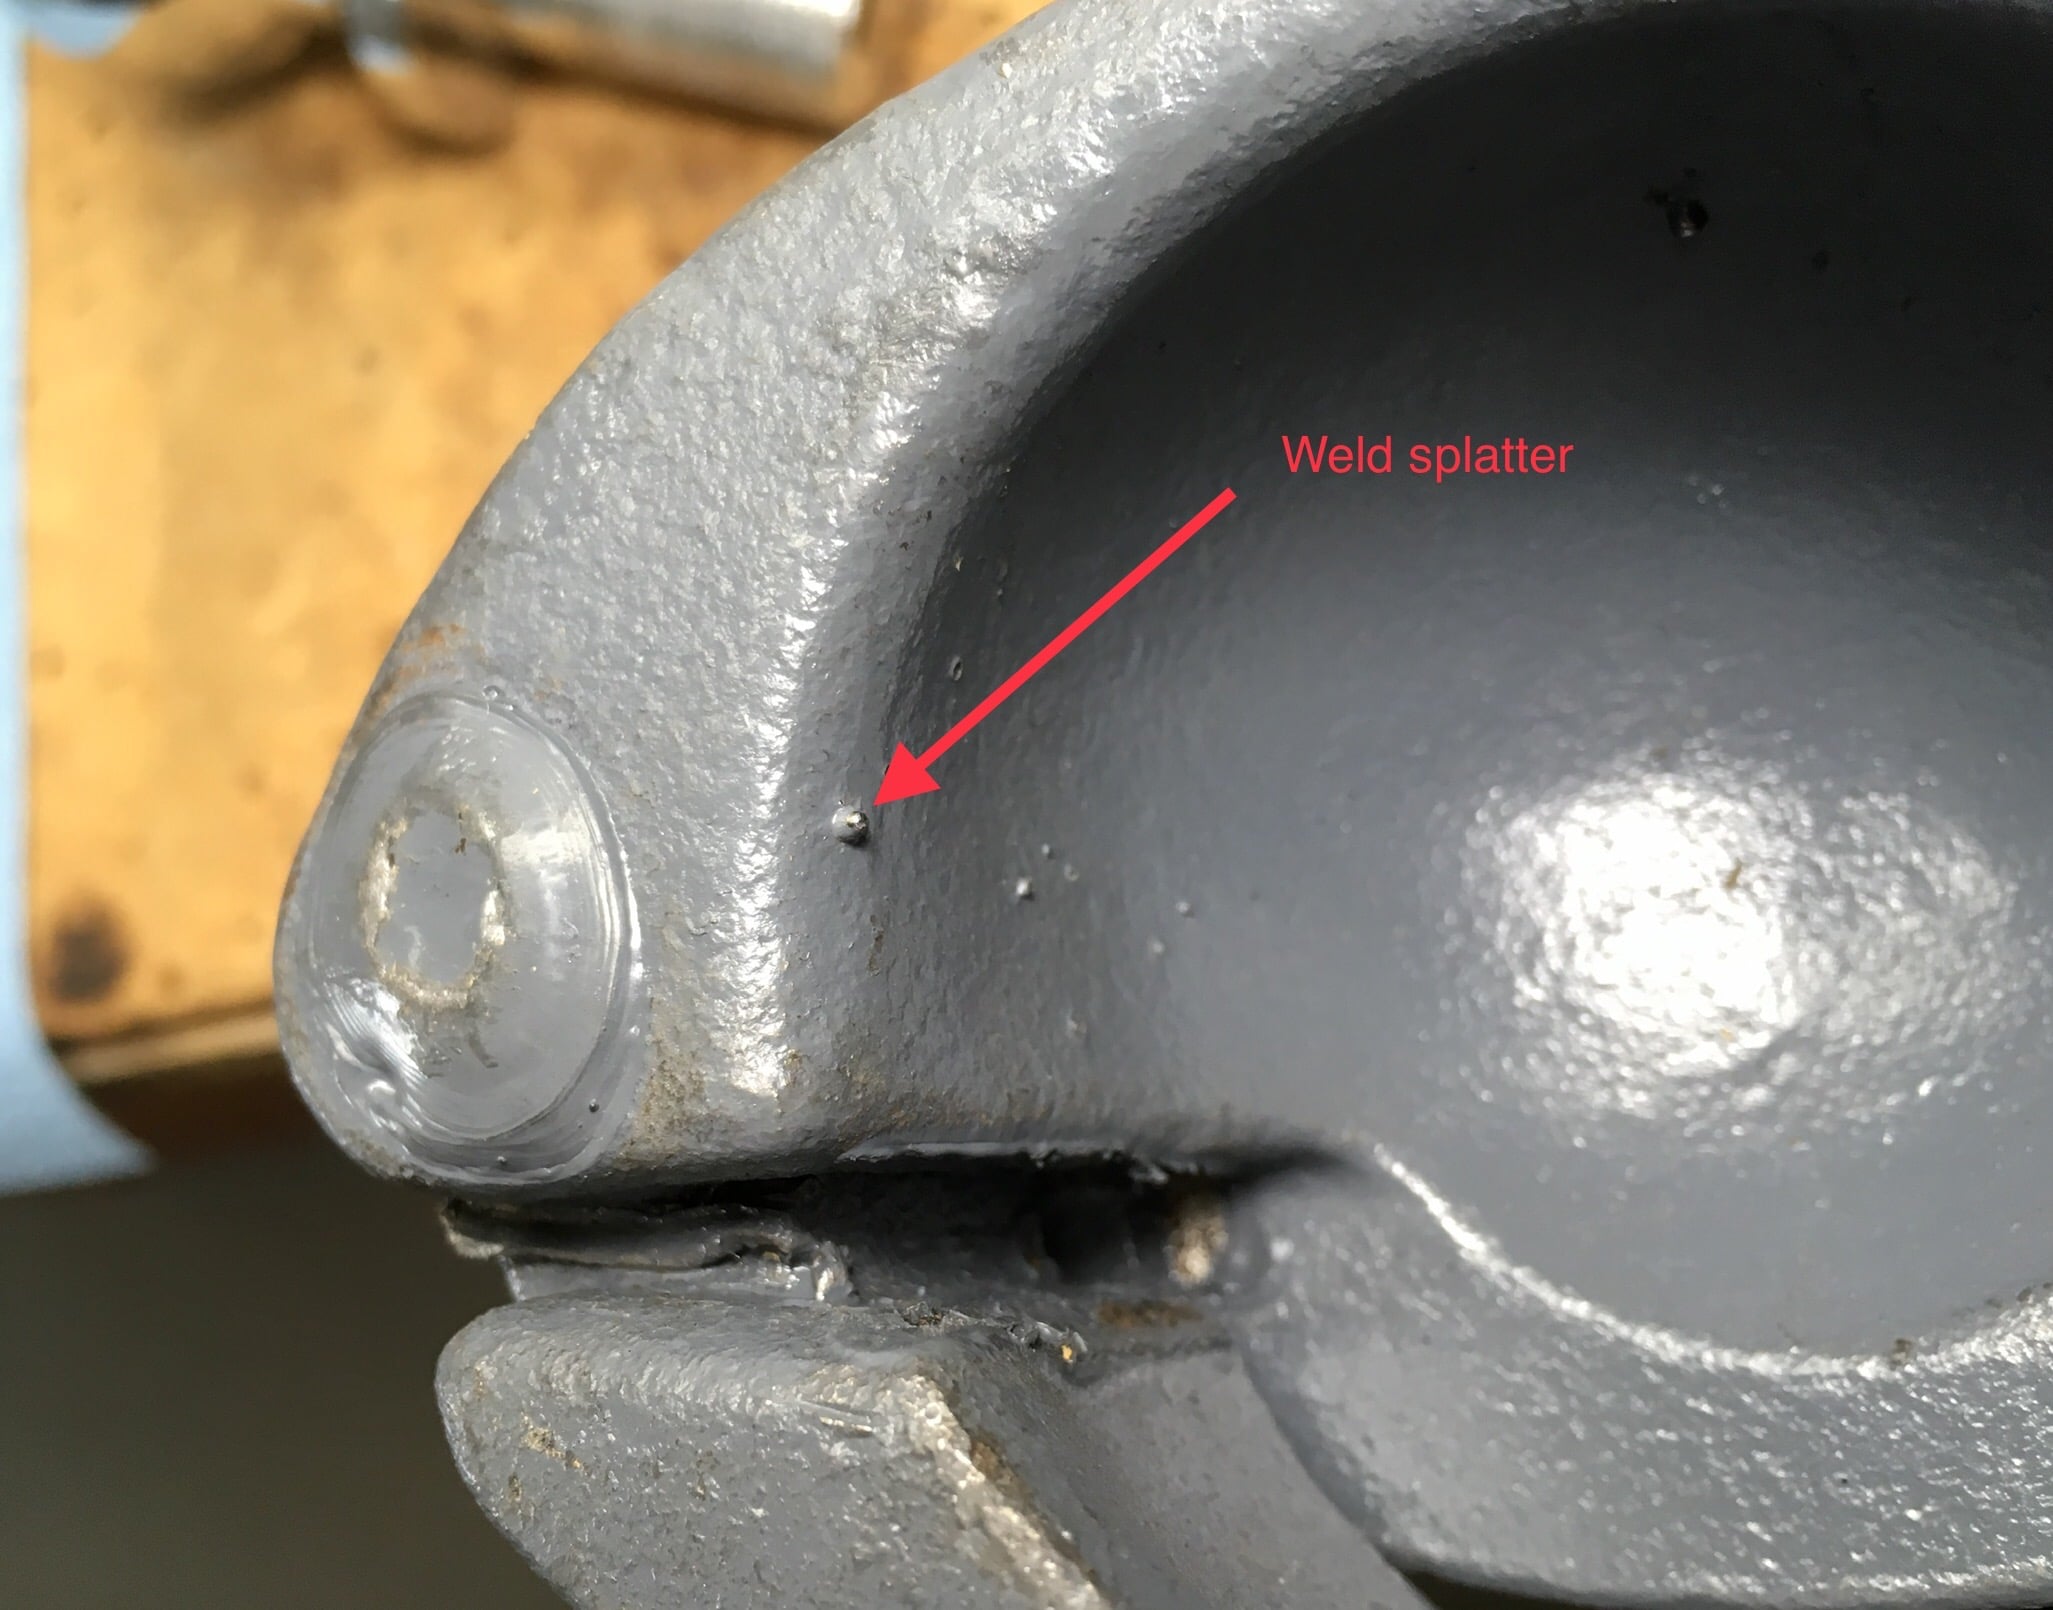
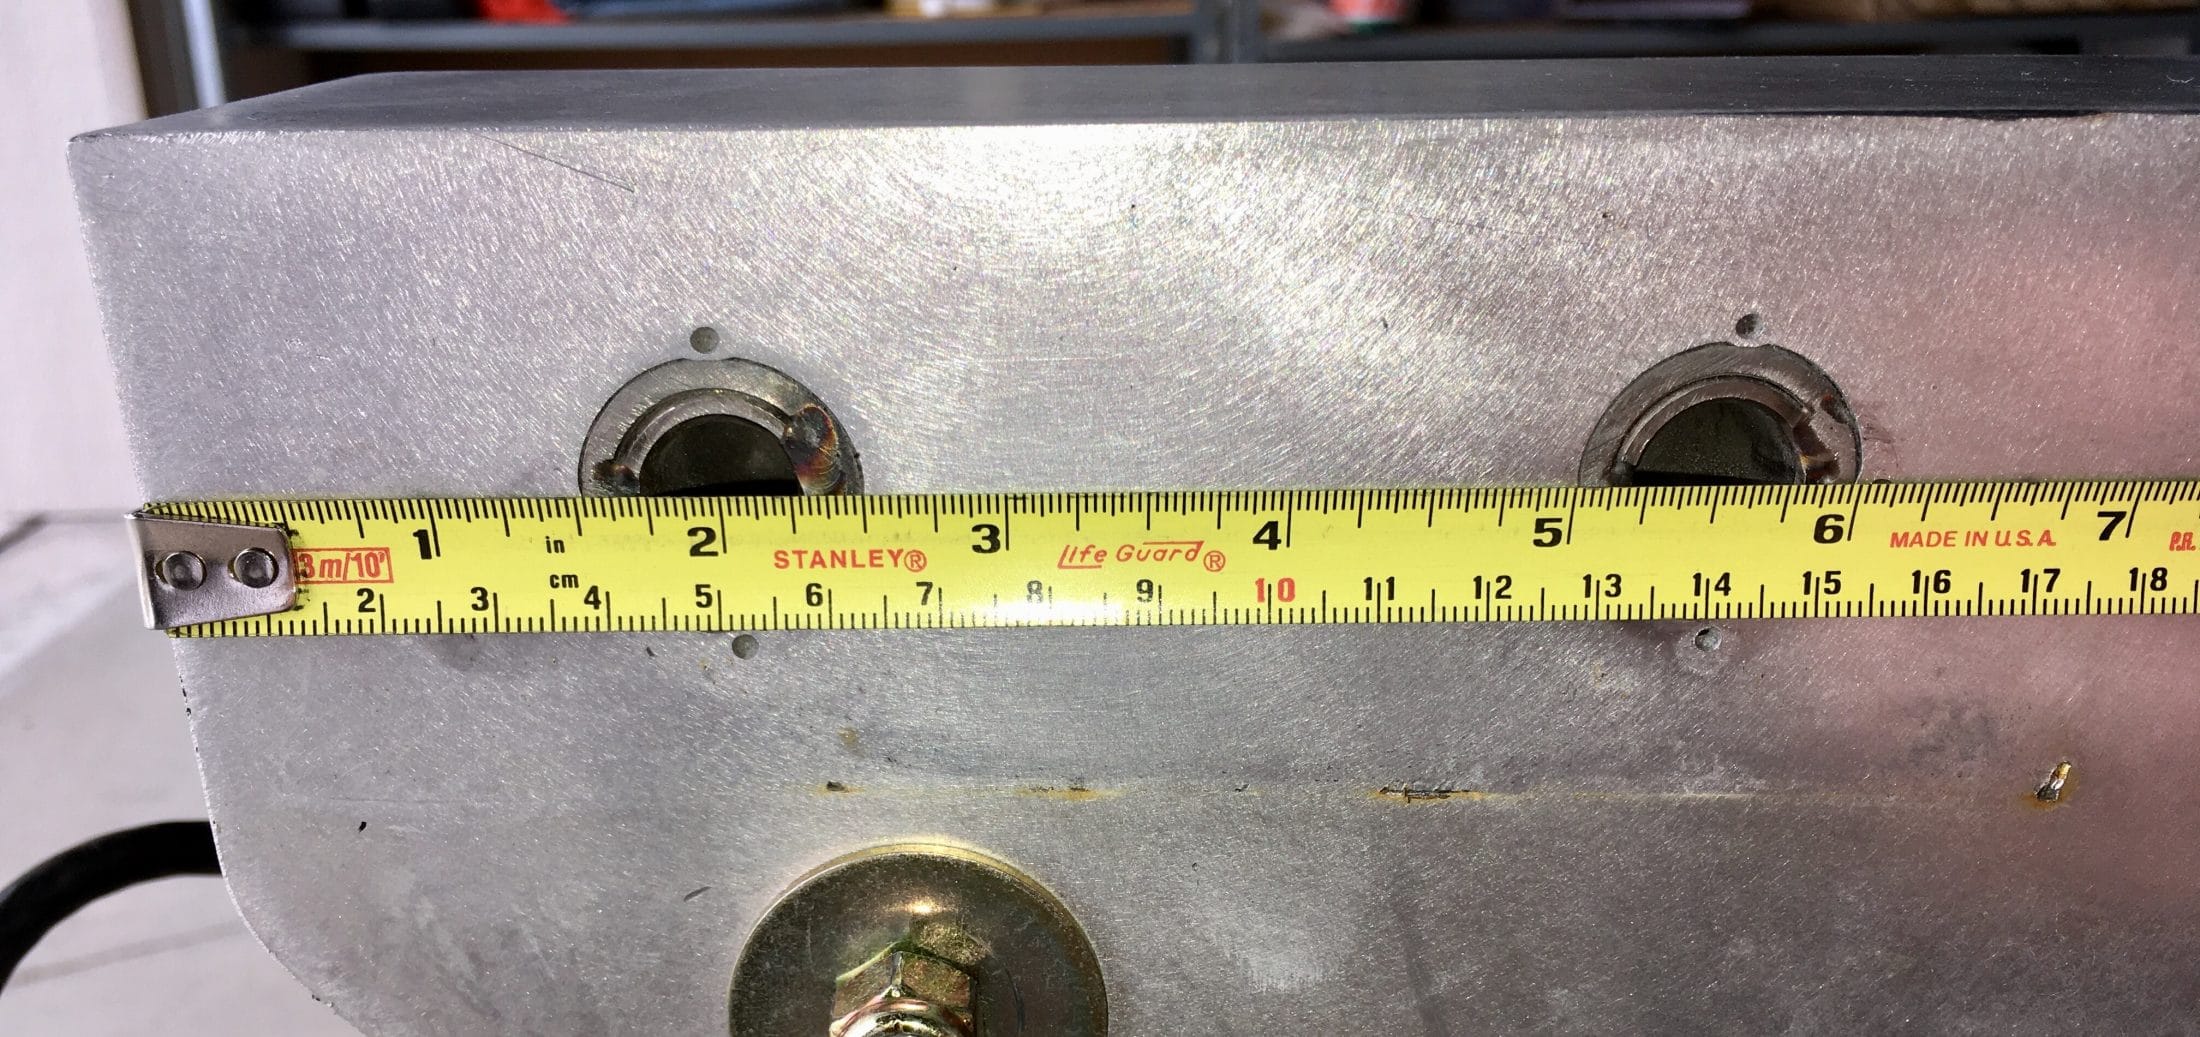
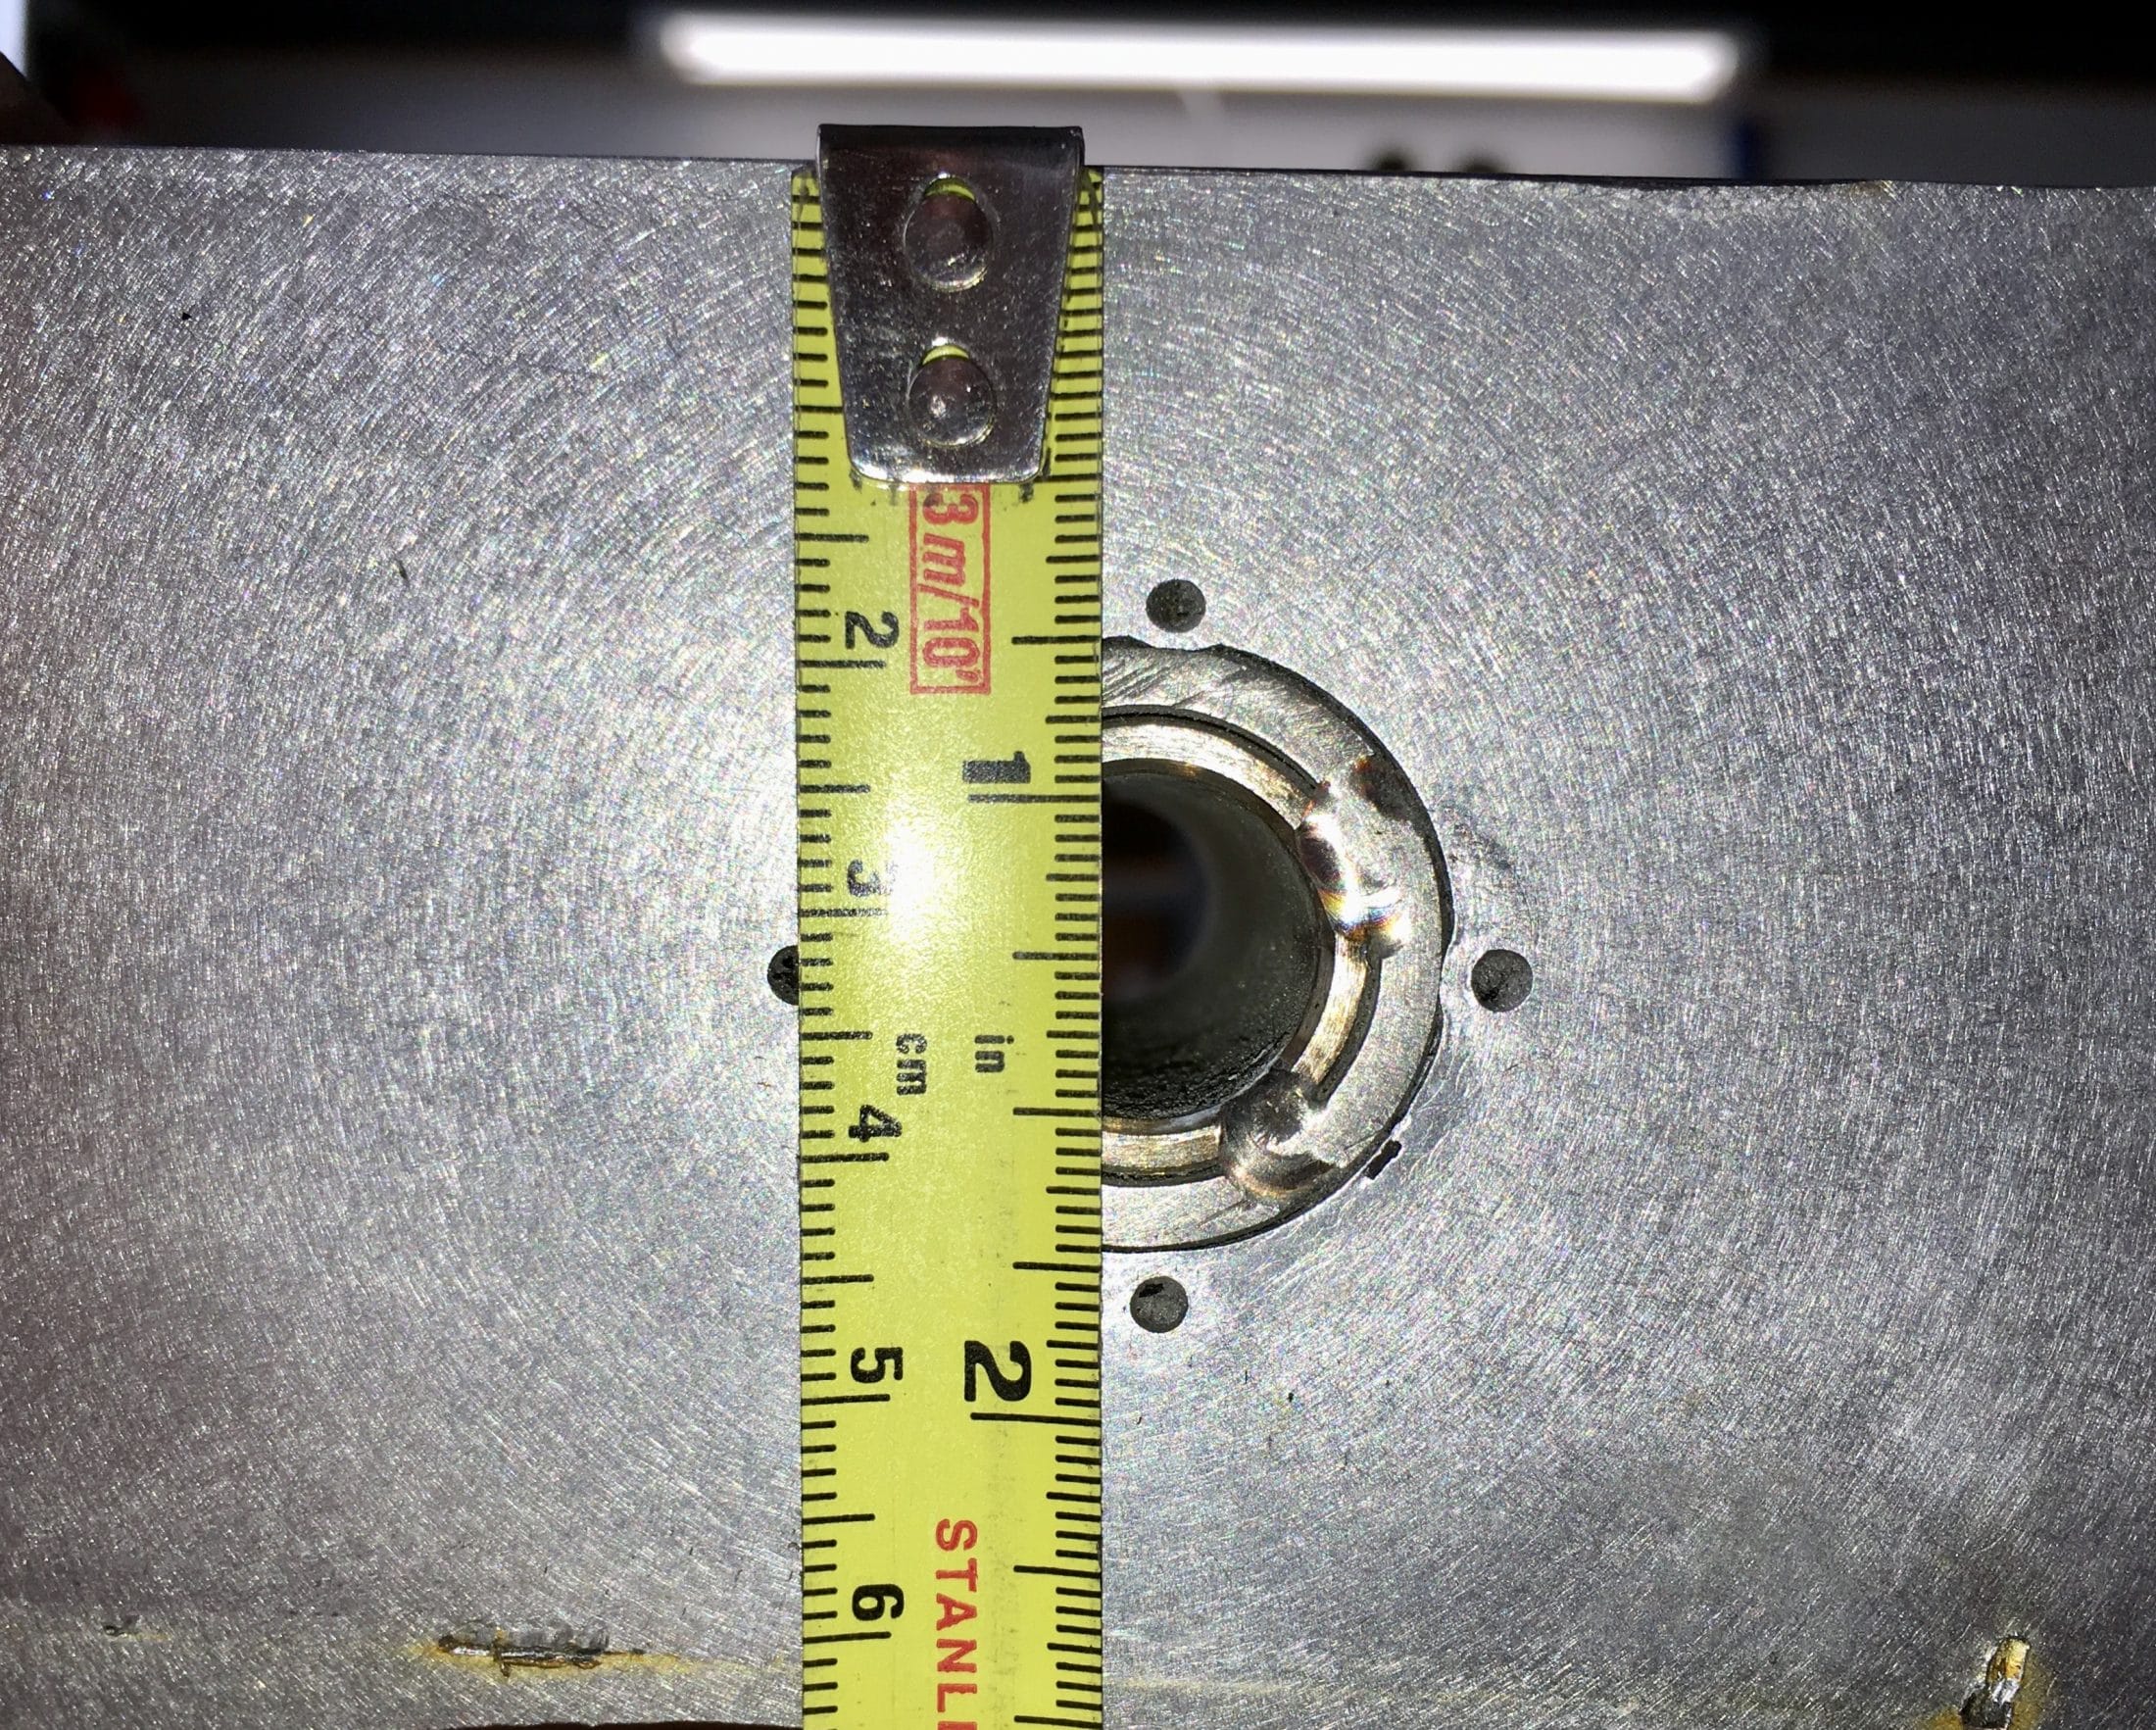
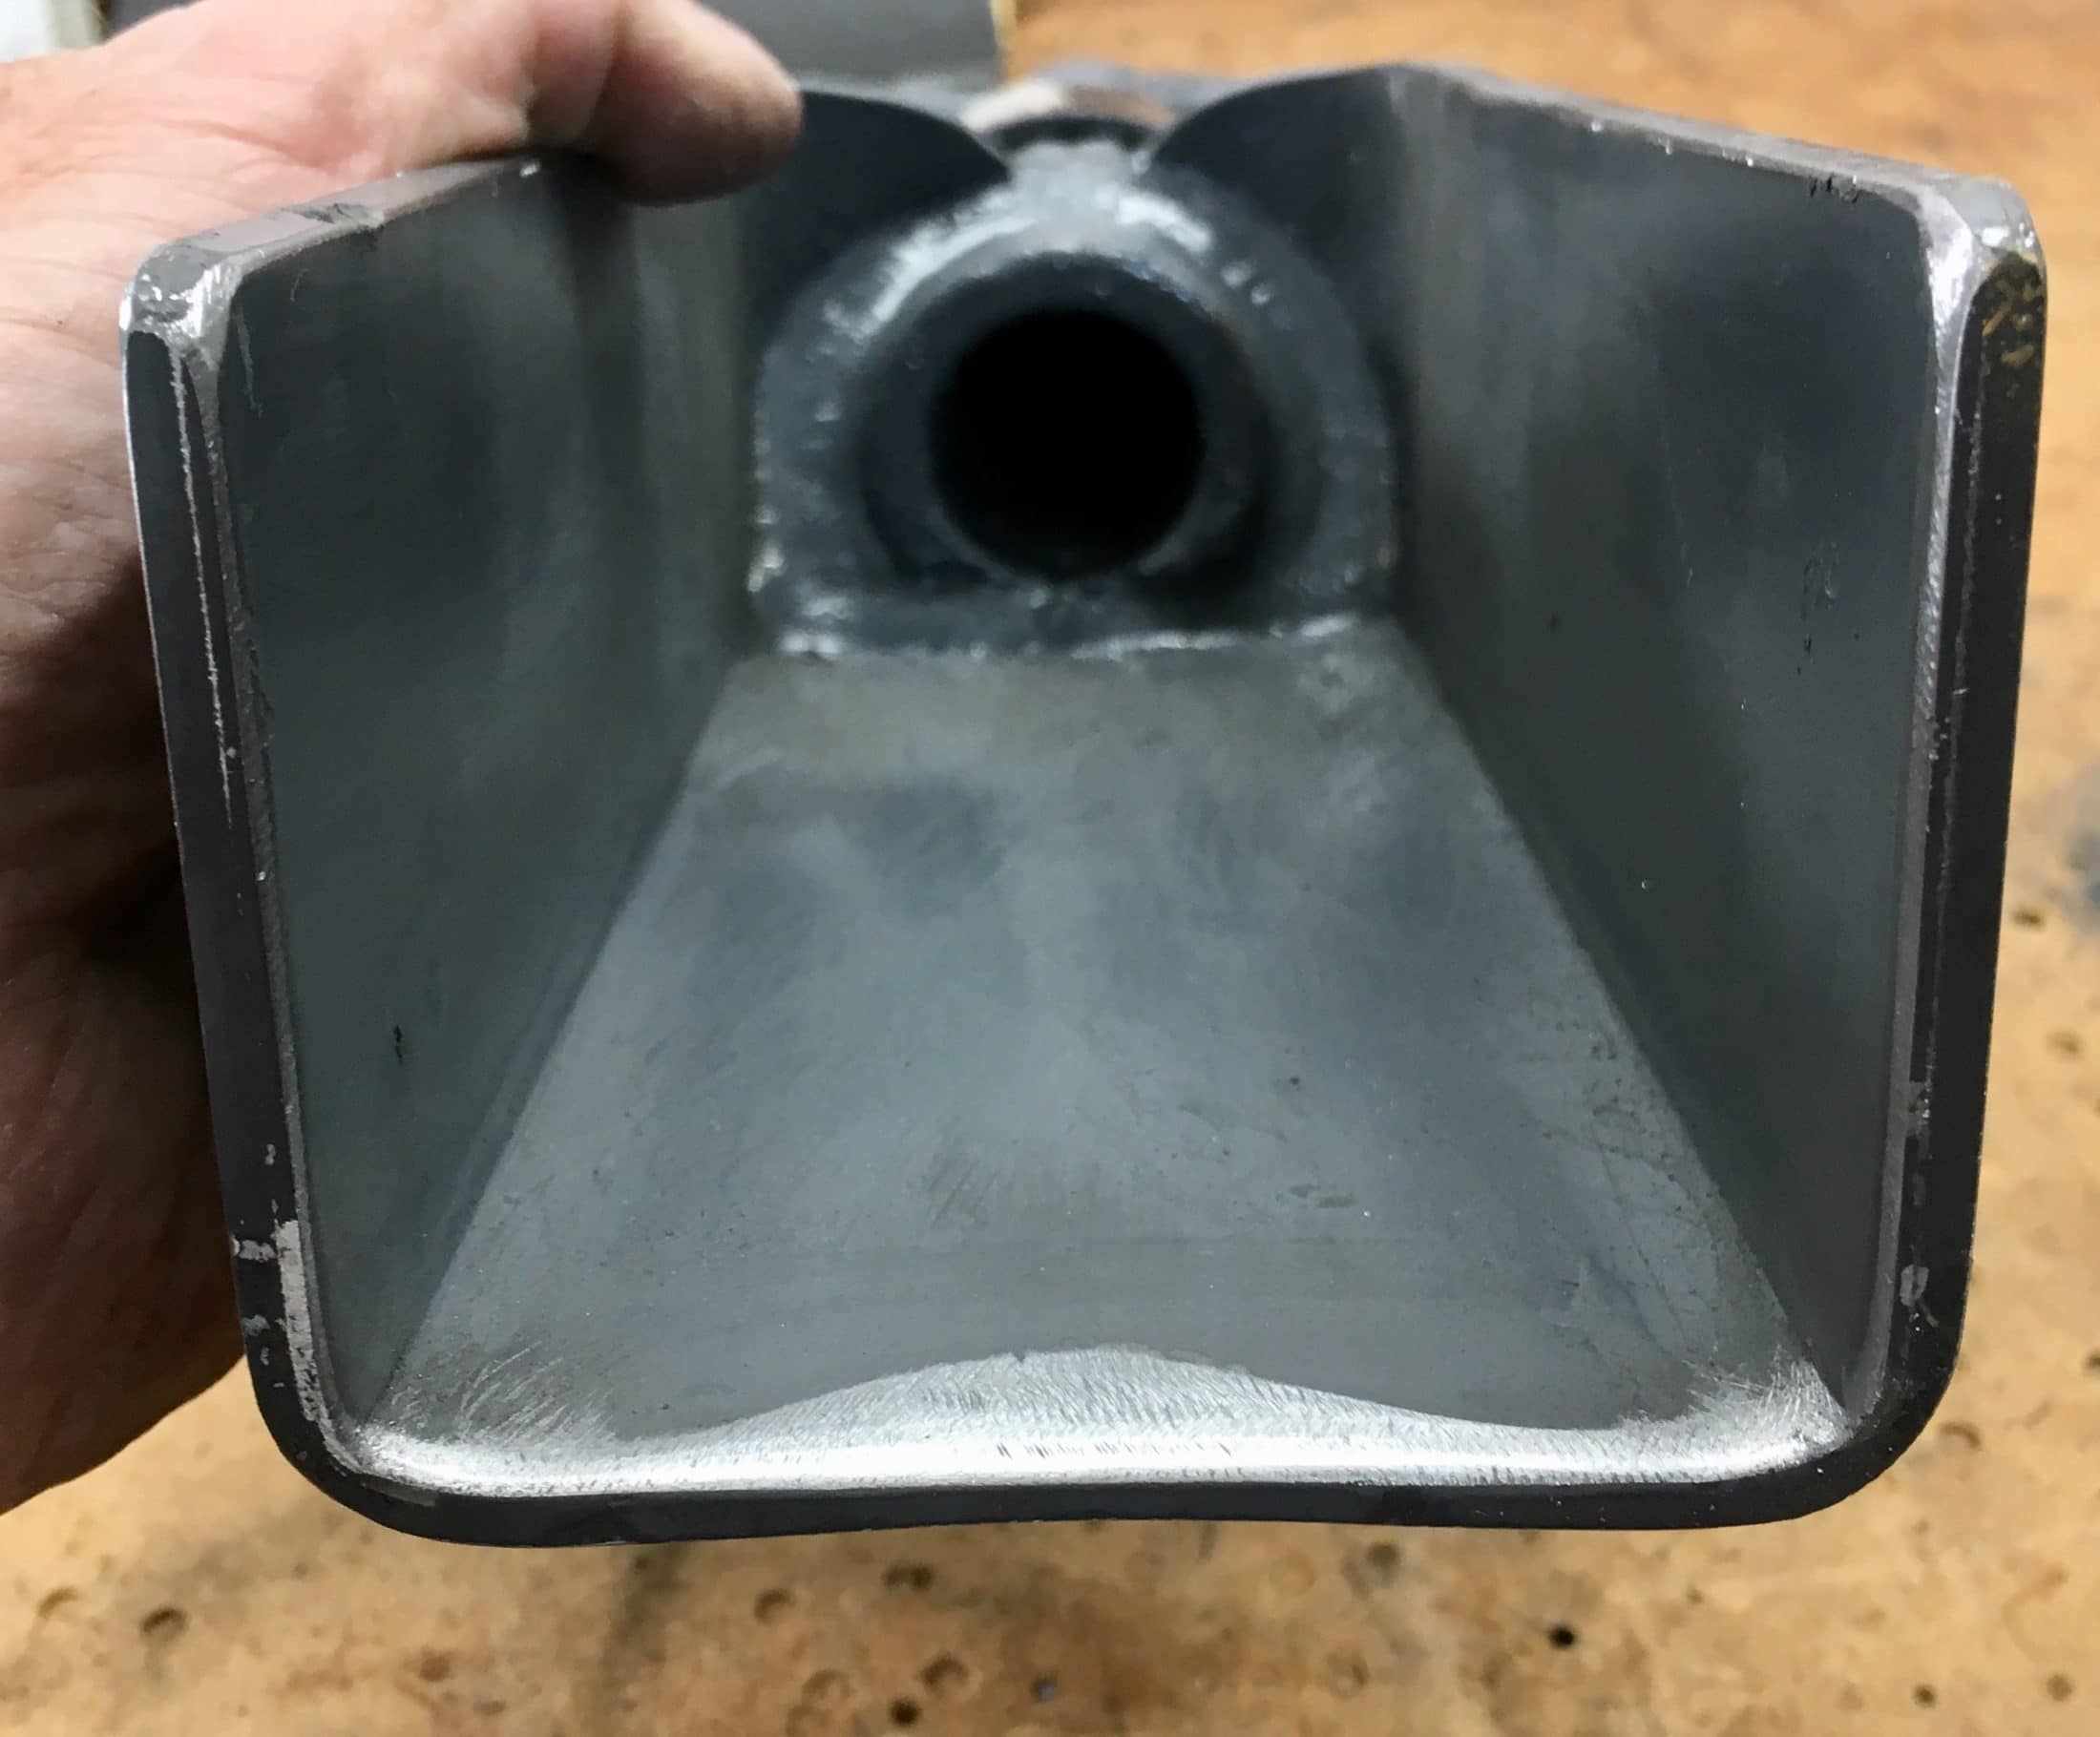
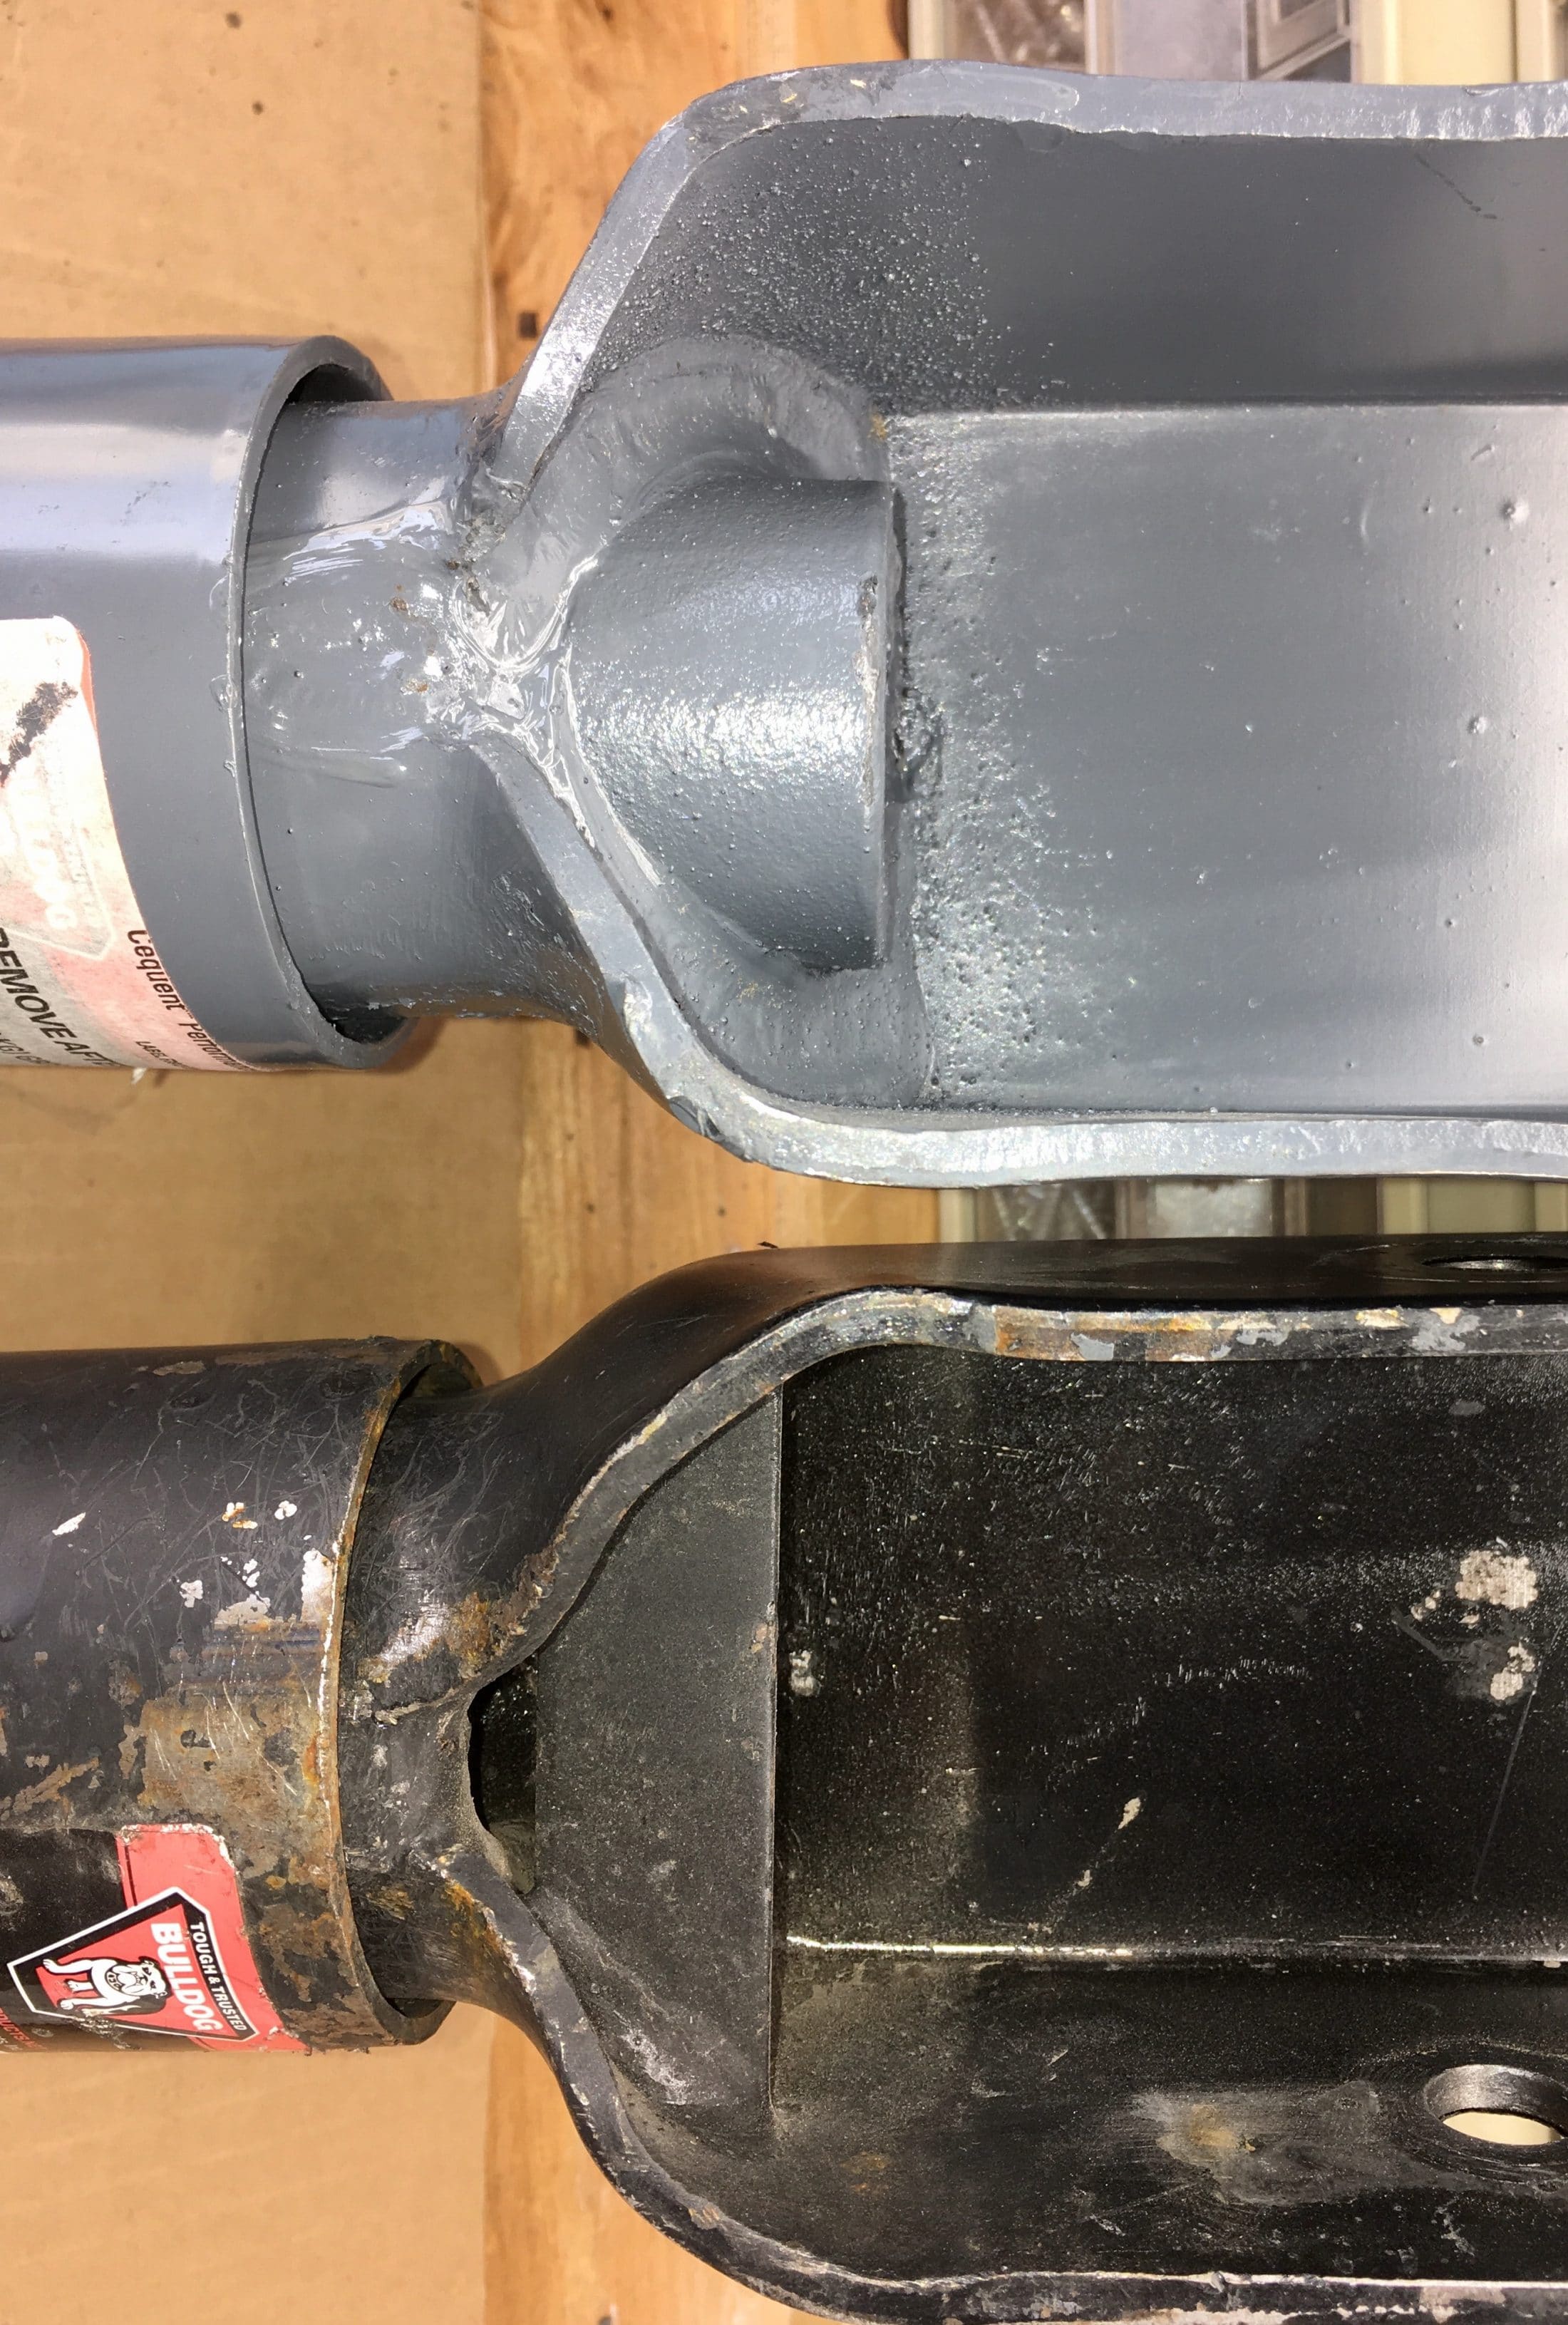
Here is the reason for the frame damage- sharp corners and edges: The new one will need some dressing out, to remove sharp bits, and to remove the excessive weld splatter: The back bend is curved instead of straight. That sharp edge could dig into the frame, so it needs some work: Frame hole location: 2" back from the front edge, 3.5" center to center, 1.5" down from the top edge: The top of the frame needs to have the corners rounded a little: Here is the inside of the coupler after smoothing and shaping a little: More to come. John Davies Spokane WA
-
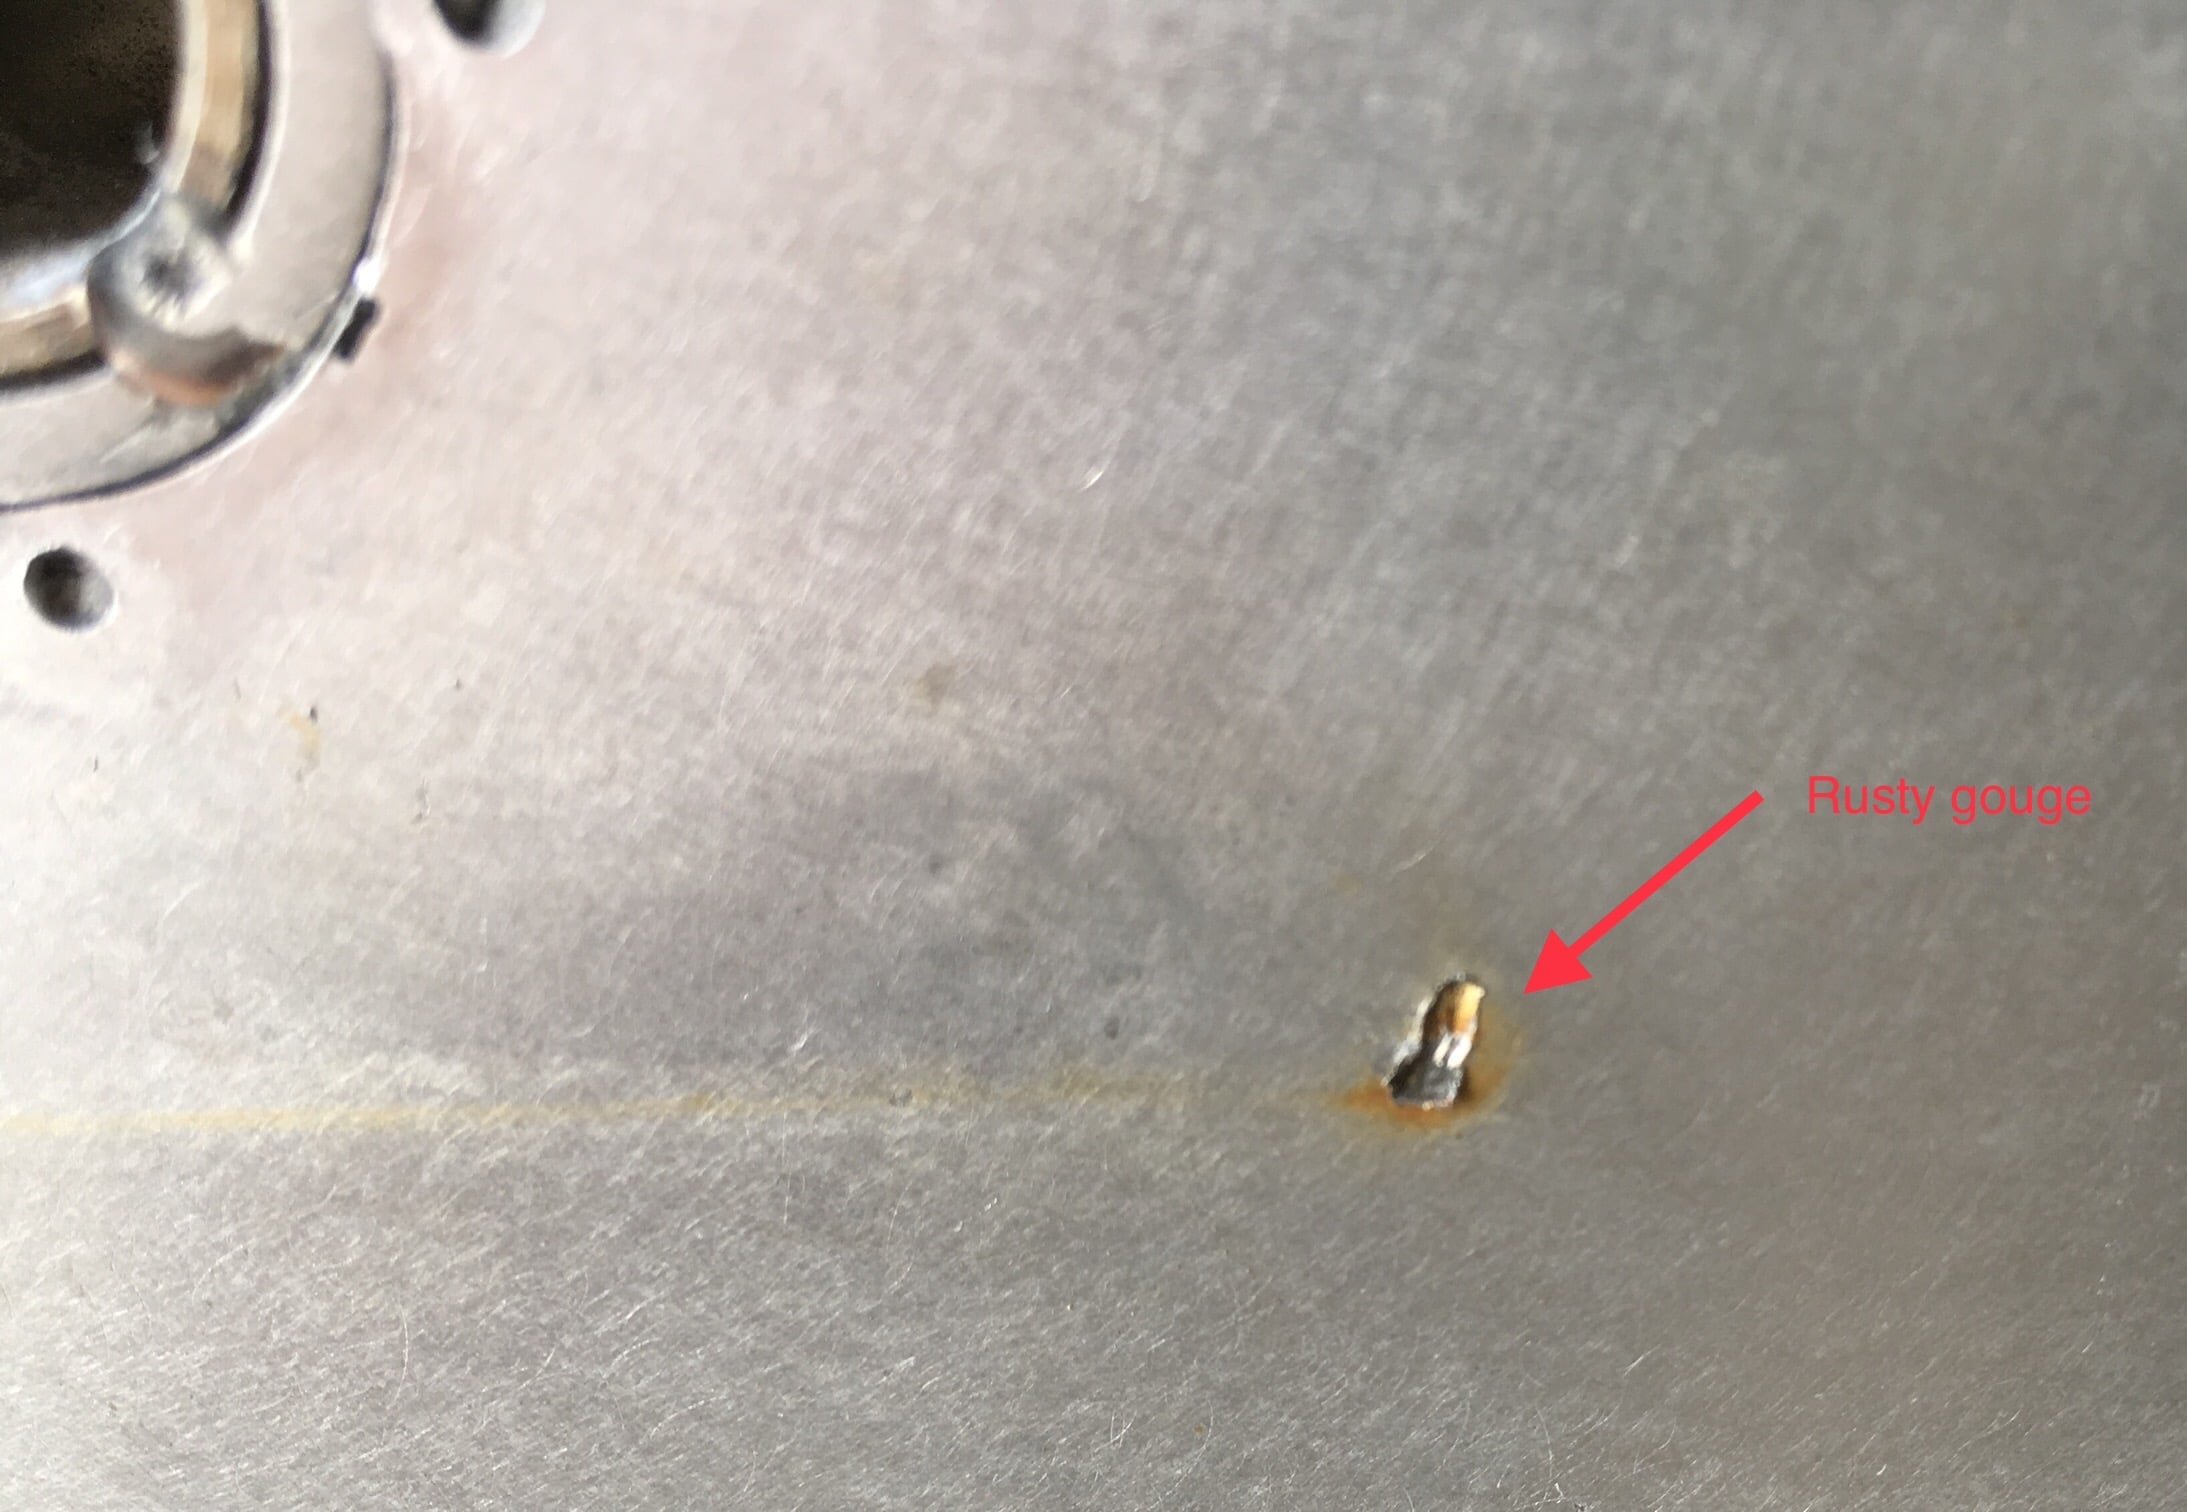
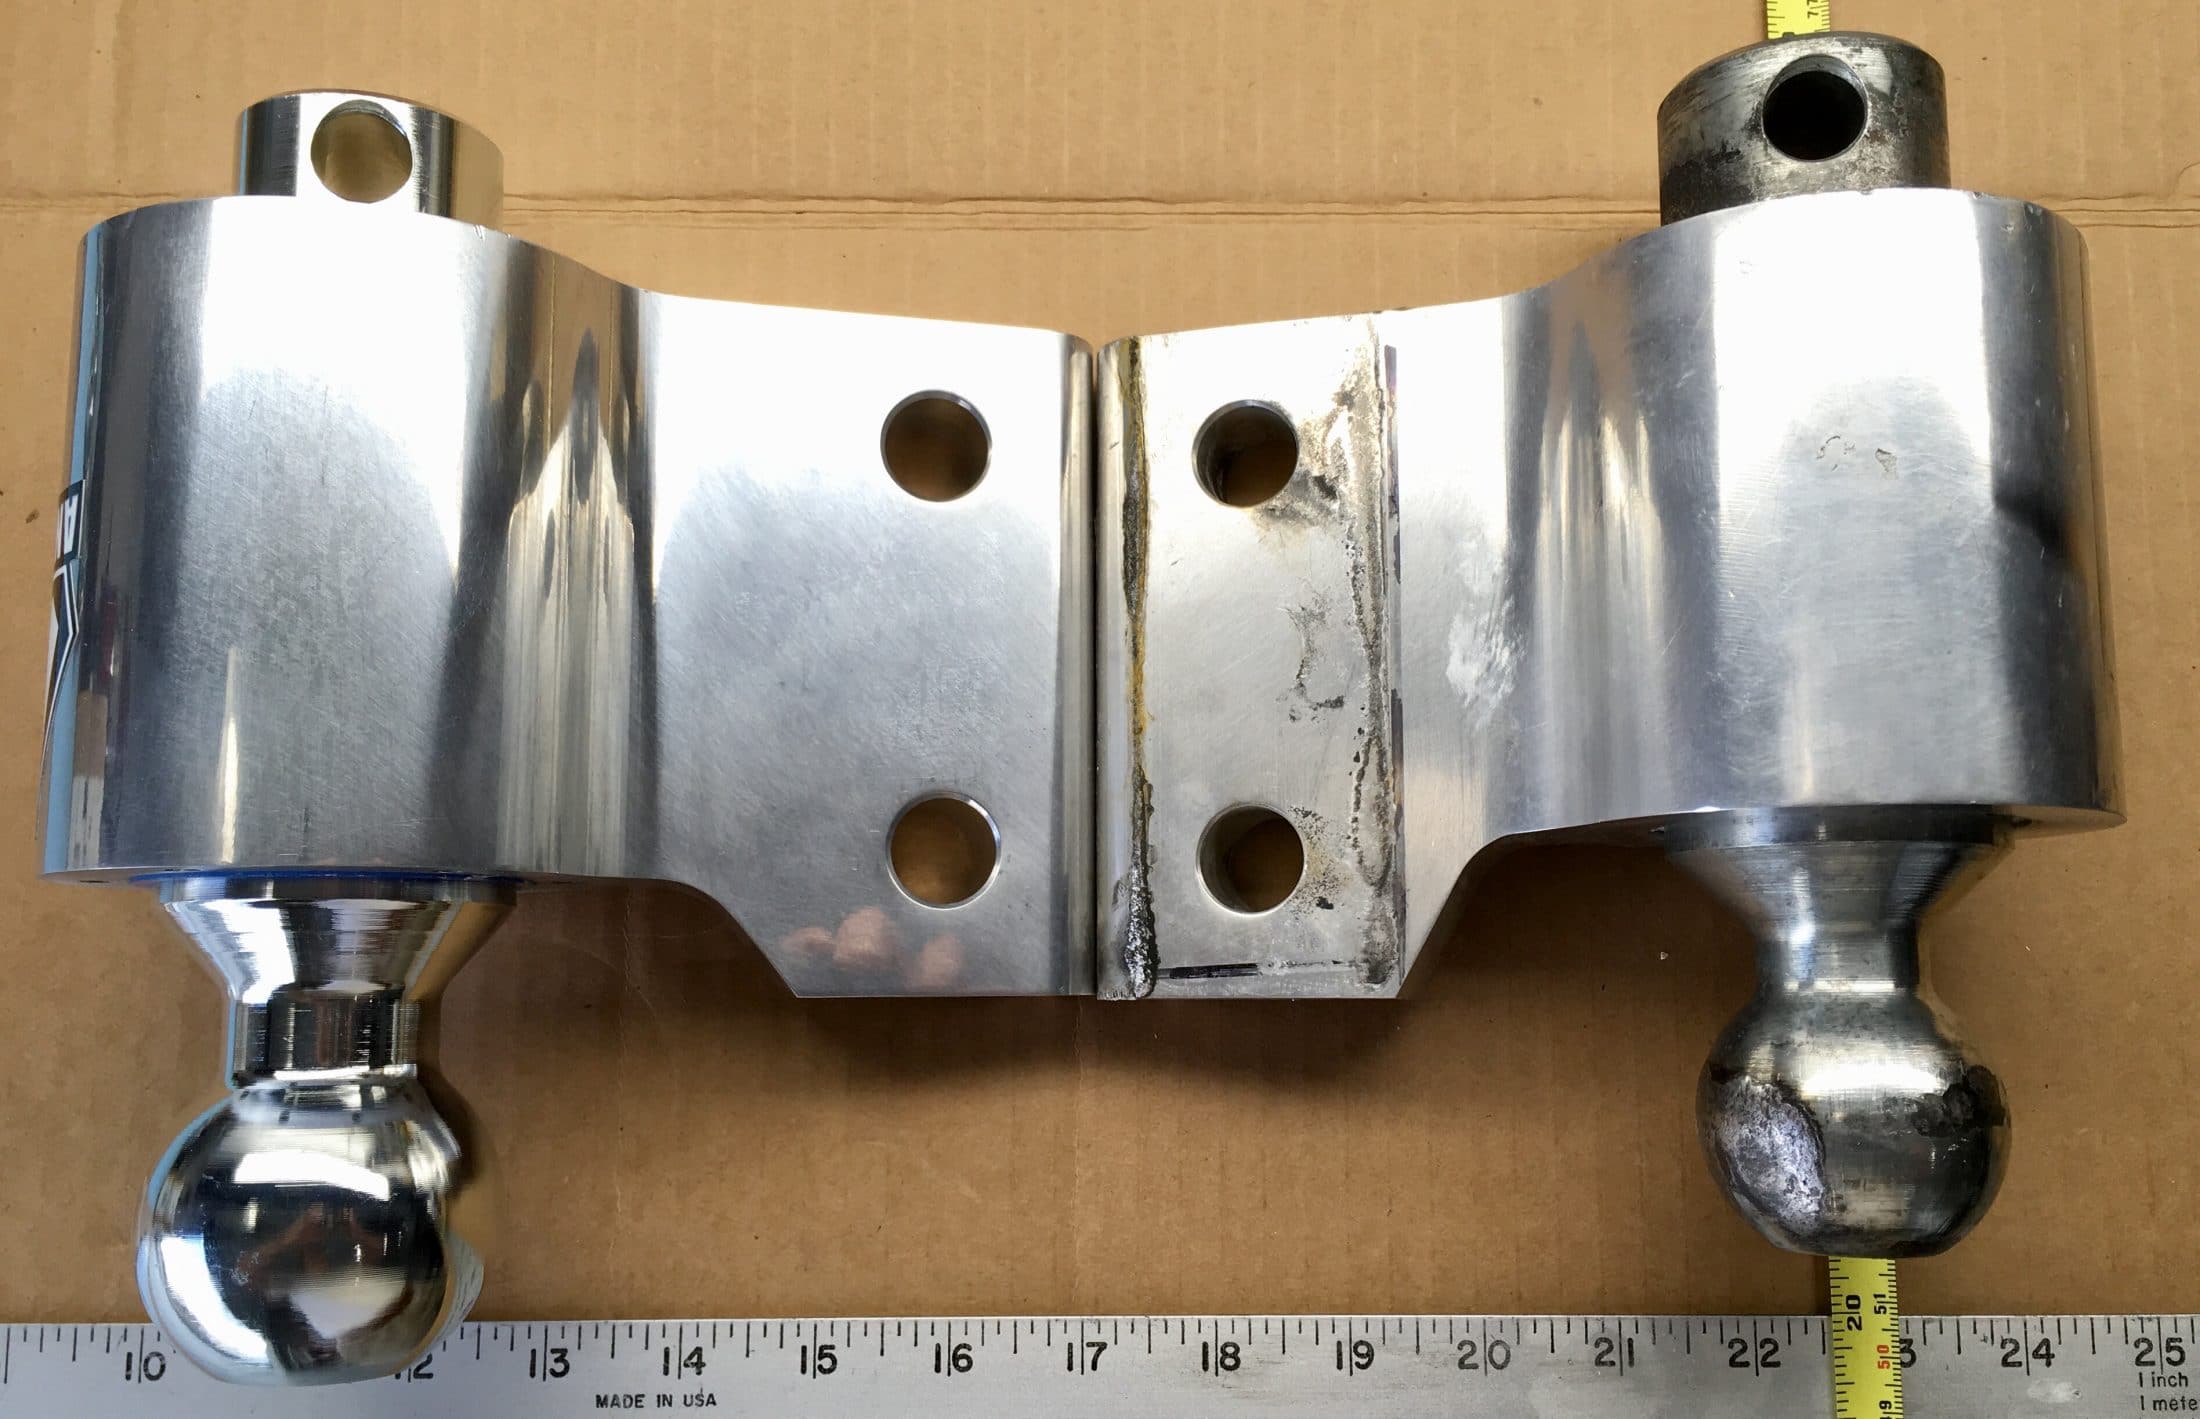
INSTALLING THE BULLDOG COUPLER: Remove the old one. The bolts are tight. Uh oh.... Not good - a 1/2" bolt inside a 5/8" hole: The only thing holding the coupler tight is the pinch effect against the side of the frame rail. The loose fit at the holes is a poor design. New vs old: The new one has a heavy sleeve welded inside the front part. The smaller one just has a thin reinforcement gusset: The new one has less "free length" since there is more stuff at the front. There is enough for the Ollie frame however: Here is the oversized hole in the old coupler: here is the frame, showing the staked in place steel inserts, to keep the sides from collapsing under the load of the bolts: There was some damage due to sharp edges inside the old coupler: John Davies Spokane WA
-
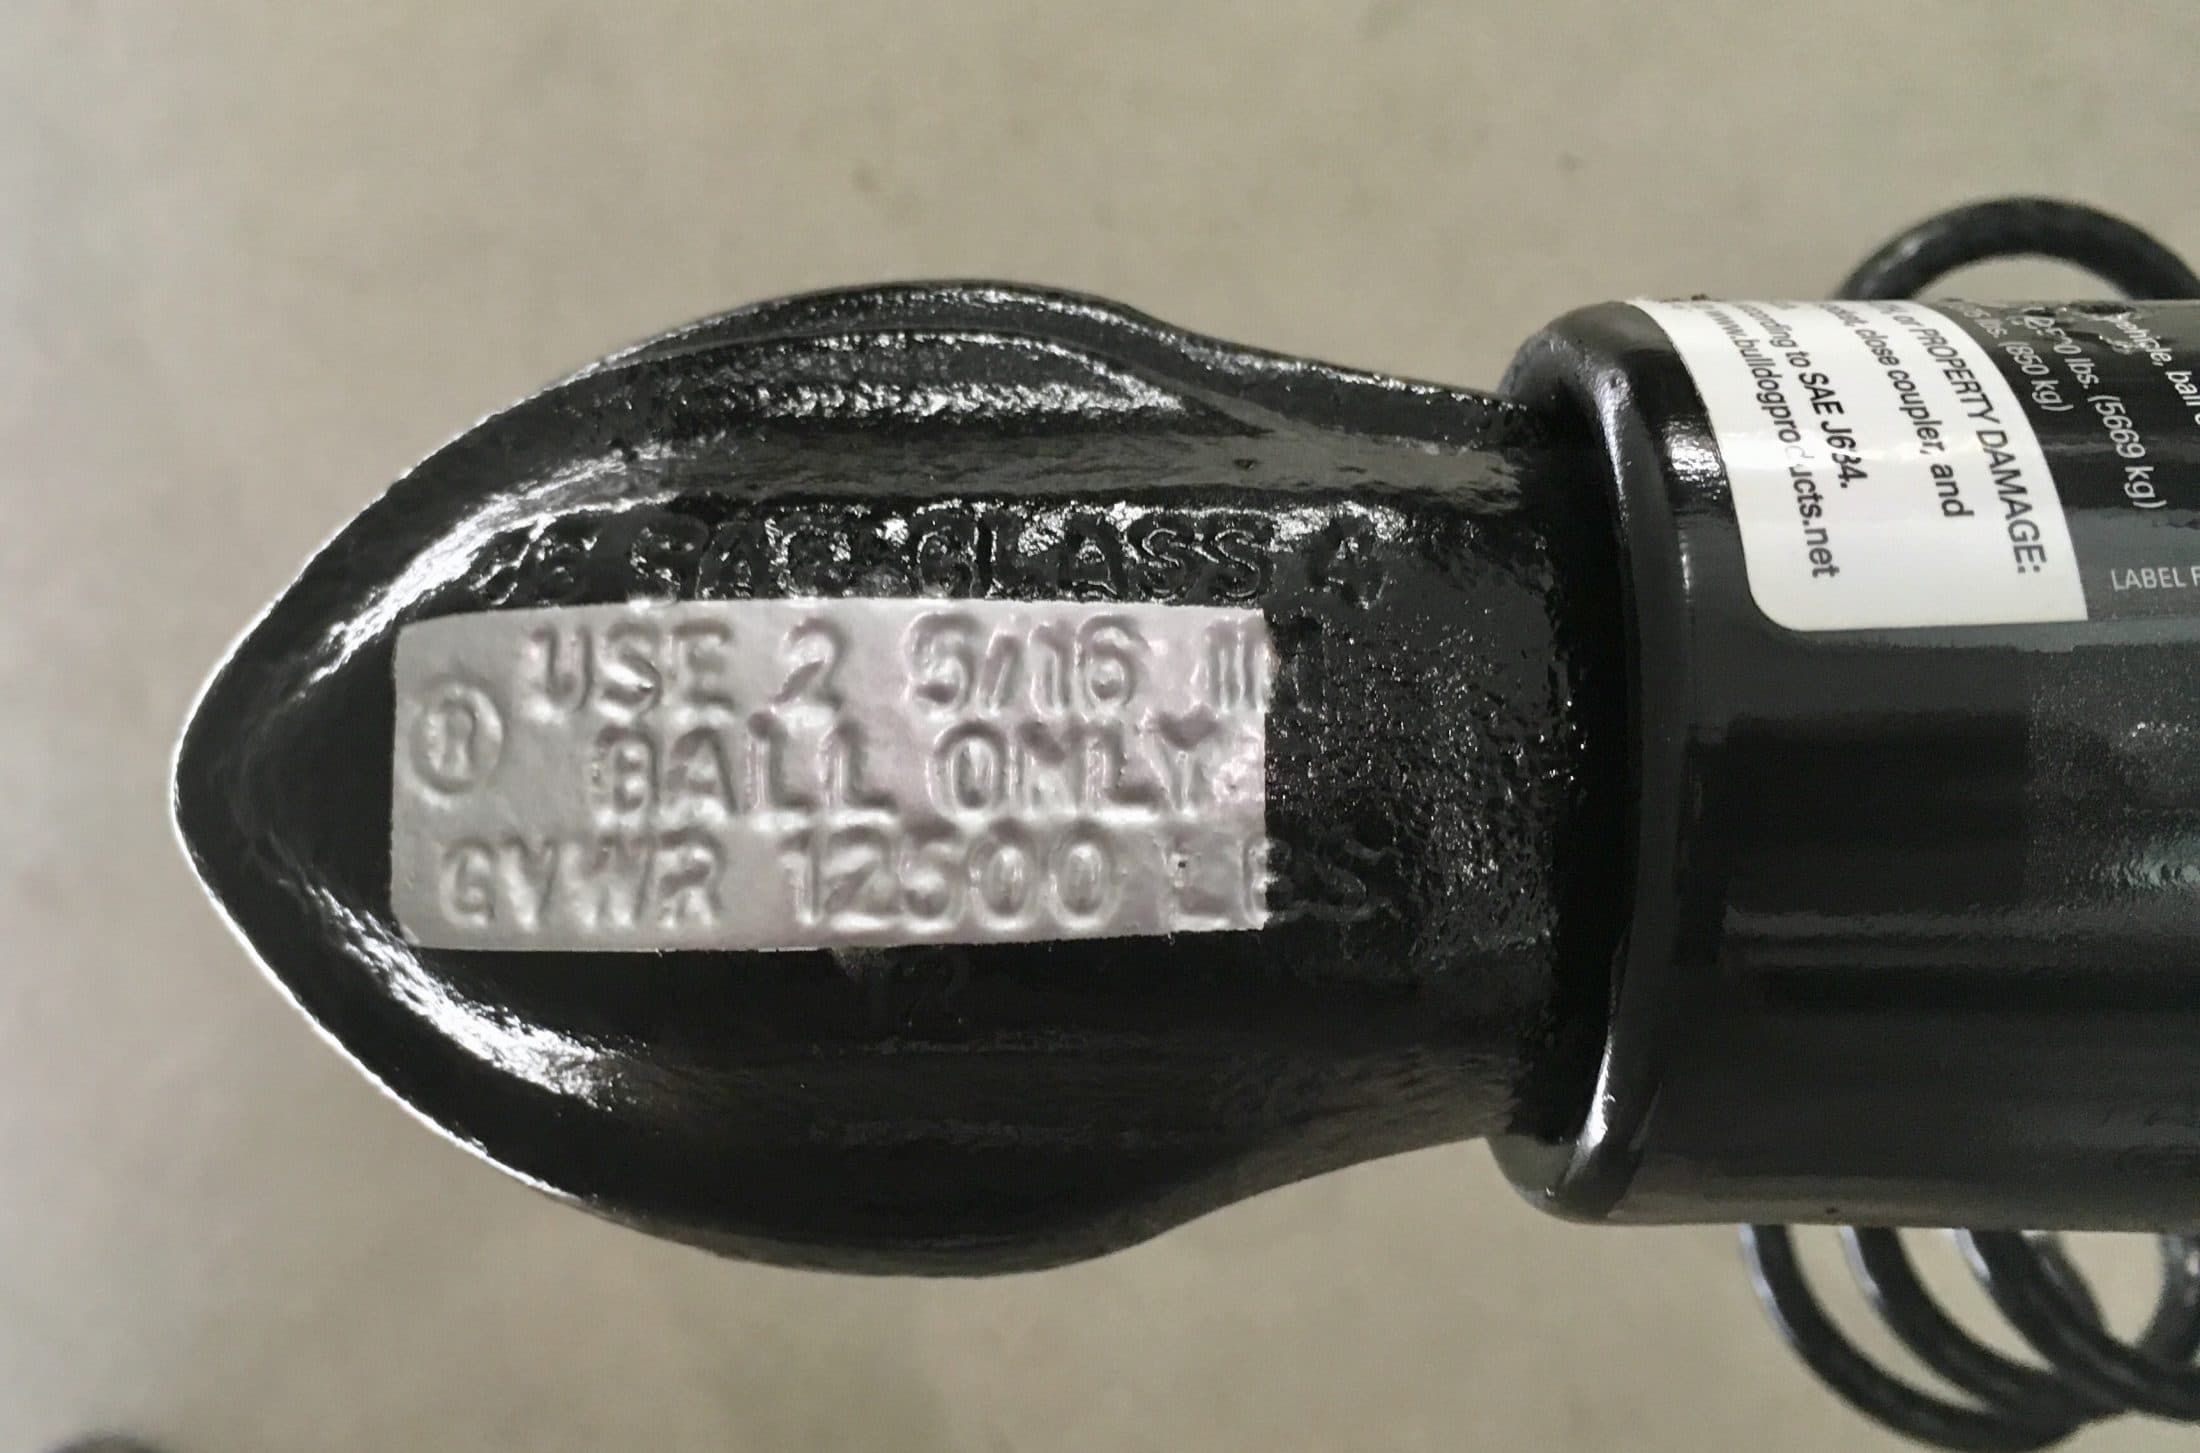
EDIT 08/29/19. Added extra bolts here: ... https://olivertraveltrailers.com/topic/how-to-reinforce-your-bulldog-coupler-by-adding-extra-bolts/ EDiT 08/23/20. Replaced Grade 8 bolts with Grade 5 - IMPORTANT, PLEASE READ THIS: .... https://olivertraveltrailers.com/forums/topic/3564-bulldog-coupler-complete-bolt-failure/ EDIT 06/07/21. Link to coupler: https://www.amazon.com/Bulldog-028462-Trailer-Rectangular-Straight/dp/B00ZRVQPVK The supplied 2" coupler and hitch is marginal. It has a 7000 pound GVWR and the chain thrust wears the ball badly because of the small contact area. Here's info on the newest Andersen coupler and steps to swap the parts. Andersen is really bad about not showing the latest images. The newest ball mount is WAY different than the one pictured on their website. I think it is so they can dispose of obsolete parts rather than discounting them heavily, or scrapping them. EDIT 08/23/20. Andersen shows the latest style ball unit, I don’t know when they updated the pictures. Here is the new ball mount, which I received for $100. Included was a return shipping label for the old parts. It is next to the new larger Bulldog coupler. See this thread for upgrade info: .... https://olivertraveltrailers.com/topic/fyi-andersen-wd-hitch-ball-locking-up-or-load-noise-11/ EDIT 06/07/21: Andersen is still offering their special $100 upgrade deal as of this date, according to member “rleog”. The new design uses an aluminum collar to retain the seal, and to hopefully keep out moisture. The insert will extrude upwards and make a more intimate contact with the ring. I reinstalled the screws with anti-seize compound to prevent future problems. The new ball mount sits about 5/8" above my old one, with a fresh insert (500 miles towing). John Davies Spokane WA
-
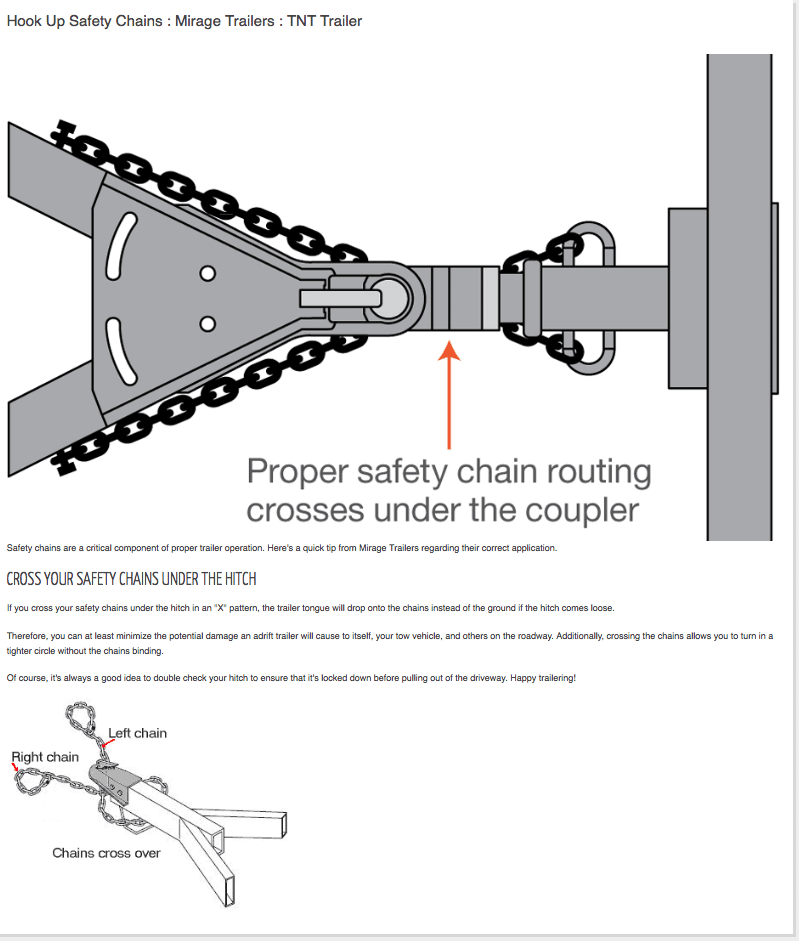
My only concern with the cables is that they hook to the tongue in one spot, along the centerline. Chains should attach further back with some left/ right separation, so that you can cross them under the coupler. That way the coupler will be cradled and held off the pavement if it becomes disconnected. With the central attach point, the coupler will hit the ground. Not good, but I am not going to change the design,... this is how it SHOULD be: BTW I am unsure how Oliver gets away with their setup. I thought certification required criss-cross chains or cables.... I actually like how the cables stay up and out of the way. I feed the breakaway lanyard through the center of the loops of the left cable, very neat and tidy. With my Stone Stomper, dangling chains would just be in the way. John Davies Spokane WA
-
Hi Bill, I love that part of the state, be sure to check out Bannock State Park (a stellar ghost town, but no camping) and the Big Sheep Creek Backcountry Byway. “Passing beneath the high rock cliffs of Big Sheep Canyon, one can look down into clear, deep pools of spring-fed Big Sheep Creek. Perhaps nowhere else in America can one see so many trout without leaving the car.” . https://www.visitmt.com/listings/general/scenic-highway/big-sheep-creek-backcountry-byway.html A word of caution to those who have never been in that area, there is zero cell service away from the major highways and the towns and services are VERY far apart. As always, a satellite communicator and emergency gear is advised when traveling the back country, and top up the tank often if you aren’t driving a diesel. John Davies Spokane WA
-
Looking at LE2 for Fulltime - which of my concerns are valid?
John E Davies replied to WhatDa's topic in General Discussion
If you don’t need to carry people in back, remove the rear seats entirely, and fabricate a vast flat load floor from Baltic Birch plywood to carry your stuff. Be sure to add cargo tie down tracks and loops. The seats are heavy so you end up with more cargo capacity, but more importantly, you gain lots of volume, and you can build hinges to access OEM underfloor storage areas for high security stuff like personal effects, firearms or contraband ;) The new 8 speed in the Ram HD trucks should be great, it offers a really low first gear to launch the trailer from a stop, and you should get better mpgs overall. The Fast Lane guys got a 25% improvement on their 100 mile test loop with the new 2019 Power Wagon vs the older model. That is pretty amazing, I hope that was not a measuring error..... I would get the lowest ratio axle gears offered, the Elite II is a heavy little tank when fully specced out and loaded down. More torque at the wheels is always a good thing out West, especially if you put bigger tires on the TV. I agree about the toilet, for boondocking a regular one is a big mistake for a number of reasons. Being able to skip RV dump stations, many of which are CLOSED off season, is huge. Your wife will adjust. Servicing the composting toilet is not a big deal at all. John Davies Spokane WA -
Very nice attention to detail on the electrical mods, I like it. I love the black nylon ties which match the wire looms. Will you please post detailed pics and info for your pointy end, the hitch and jack? I have pretty much decided that I won’t immediately abandon the Andersen (having just upgraded the size) but I definitely want to know about the jack with castering wheels. How has it held up, have you used it to retrieve a stuck trailer, do you trust it enough to remove the OEM electric one? Do you worry about your Ollie rolling away? Owners love the jack, but there are concerns about customer service and replacement parts.... https://expeditionportal.com/forum/threads/new-xo-trailer-jack-from-ark.160905/ If I had a bigger TV I would probably be using a cool offroad coupler, but my Land Cruiser needs the Anderson jounce control. Thanks. John Davies Spokane WA
-
Landrover, I think you misunderstand the term. I think you are thinking of the Torflez rubber axle..... An EZ Lube axle has zerk fitting on the end of the spindle, under a cover. You inject grease onto the hollow spindle and it flows out into the bearings. I am not aware of it being used on Ollies. It is certainly useful on a boat trailer without brakes that gets submerged often. It isn't a great choice for a trailer with drum brakes since you can blow out the rear seal and contaminate the brakes with grease. It's OK for disk brakes since any rear seal leakage will be obvious and won't - hopefully - get all over the brake pads. I think an Oliver disk brake upgrade with EZ-Lube axles would be a good thing.... John Davies Spokane WA
-
Anyone Know of RV Instructors In NC or TN (near Hohenwald)
John E Davies replied to DGLWFun's topic in General Discussion
Nan, I mean no offense, but you have been advised several times in the past to rent (or borrow) a pickup truck and take it for a long weekend drive, and also to take some new ones for test drives to see how the various brands differ. If you won’t act on our well intentioned advice, why keep repeating your concerns? I thought you had gotten to the point of buying a truck, what has happened? John Davies Spokane WA -
Anyone Know of RV Instructors In NC or TN (near Hohenwald)
John E Davies replied to DGLWFun's topic in General Discussion
Rent a large U-Haul box tandem axle trailer for a weekend and tow it all over - first on secondary highways and country roads until you get used to it, then on city streets. Find an empty parking lot on a Sunday, set up markers (paper cups filled with water) and practice maneuvers and backing. Buy the full U-Haul towing insurance! Use cell phones and hand signals to communicate with your helper. Buy a cheap set of walkie talkies for when you are out of coverage.,... This will be easier than finding somebody to teach you, and if you have issues you can ask here. Did you buy the backup camera for your Ollie? That is a huge help. John Davies Spokane WA -
3M VHB Tape & Breakaway Switch
John E Davies replied to CedarForks's topic in Mechanical & Technical Tips
I would install a larger self tapping screw AND the 3M tape, aligning the switch with the lanyard attach point on the trailer hitch. I don’t think that in normal operation it has to rotate, as long as it is positioned correctly when secured. Even an off-angle pull easily withdraws the plunger. One thing you do not want to happen in an accident is for the switch assembly to pull off the frame instead of the plunger coming out. That would be very bad .... John Davies Spokane WA -
Look for a local “hand wash” or detail shop that will do small RVs. Or ask a friend with a home where you could borrow their driveway and hose connection.... I sometimes use the water rinse at a commercial quarter car wash when traveling but never use the soap, which is very harsh, and never ever ever use the brush since it is caked with grit from the thousands of previous users..... if you can properly clean the Ollie and apply Rejex, the dirt and bugs come off much more easily than with regular car waxes. I would rather have a trailer filthy with road crud than use a commercial wash bay. John Davies Spokane WA